sap accounts-payable
TRANSCRIPT

Beginner Accounts Payable
Table of Contents 1 (May 2008)
Table of Contents
Managing Your Favorites ............................................................................................................ 3 Adding Favorites ...................................................................................................................... 3 Inserting Folders....................................................................................................................... 7 Change Favorite Text ............................................................................................................... 9 Inserting Web pages............................................................................................................... 11 Adding Files ........................................................................................................................... 13
Editing Options ........................................................................................................................... 16
The Business Workplace ............................................................................................................ 18 Purpose................................................................................................................................... 18
Accounts Payable Overview....................................................................................................... 25
Direct Invoices – Vendors .......................................................................................................... 26
Credit Memos.............................................................................................................................. 36
Display Documents...................................................................................................................... 45
Change Documents ..................................................................................................................... 47
Display Document Changes ....................................................................................................... 49
Park Documents .......................................................................................................................... 51
Change Parked Documents........................................................................................................ 52
Change Parked Documents Header .......................................................................................... 57
Display Parked Documents ........................................................................................................ 61
Display Changes to Parked Documents .................................................................................... 62
Delete Parked Documents .......................................................................................................... 63
Post Parked Documents.............................................................................................................. 64
Reversal of Individual Documents ............................................................................................ 66
Three-way Match Overview....................................................................................................... 68
STEP 2 - Three Way Match Process: Goods Receipt.............................................................. 71

Beginner Accounts Payable
(May 2008) 2 Table of Contents
Partial Receipts....................................................................................................................... 75 Change Goods Receipt ........................................................................................................... 79 Display Goods Receipt........................................................................................................... 84 Reverse (Cancel) Goods Receipt ........................................................................................... 89 Goods Return ......................................................................................................................... 92
STEP 3 - Three Way Match Process: Logistics Invoice Verification..................................... 95 Invoices where prices vary from that of PO price................................................................ 106 Unplanned Delivery Costs (Freight) .................................................................................... 107 Planned Freight Billed in Separate Invoice.......................................................................... 108 Planned Freight Billed by Third Party Vendor .................................................................... 112 Credit Memo after MIRO invoice........................................................................................ 115 Subsequent Credit Posting to MIRO.................................................................................... 119 Subsequent Debit Posting to MIRO..................................................................................... 123 Other Features to Posting MIRO Invoices ........................................................................... 127 Display Invoice Verification Documents............................................................................. 131 Reversal of Individual Logistics Invoice Documents .......................................................... 134
Analysis of GR/IR & Freight Clearing Accounts .................................................................. 139 Correct the GR/IR & Freight Clearing Accounts................................................................. 145
Manually Clear Vendor Line Items ........................................................................................ 149
Reset Vendor Cleared Items .................................................................................................... 153

Beginner Accounts Payable
Managing Favorites 3 (May 2008)
Managing Your Favorites Adding Favorites One of the more productive ways of working within SAP is to use the Favorites procedure. Generally a user processes the same T-codes over and over. SAP has a built-in method of gathering all of these procedures into one area labeled Favorites. This allows the user to find their T-code easily without looking for it in the menus or memorizing it. There are different methods on adding favorites to the user ID. The user can choose which method they feel comfortable using. 1) Insert Transaction On the main menu in SAP click on Favorites>Insert Transaction

Beginner Accounts Payable
(May 2008) 4 Managing Favorites
Enter the T-code and then click on the green check mark. Continue with this process to add more T-codes. For Accounts Payable technicians, the following T-codes are recommended: F-43 Enter Vendor Invoice F-41 Enter Vendor Credit Memo FB08 Reverse Document MB01 Enter Goods Receipt (part of 3 Way Match Process) MB03 Display Goods Receipt MIRO Enter Vendor Invoice (part of 3 Way Match Process) FBL1N Display Vendor Line Items F.98 Accounts Payable Reports F110 Check Run – Multiple checks F-58 Hot Check FCHN Display Check Register
Enter the T-code
Click the green check mark
Beginner Accounts Payable
Managing Favorites 5 (May 2008)
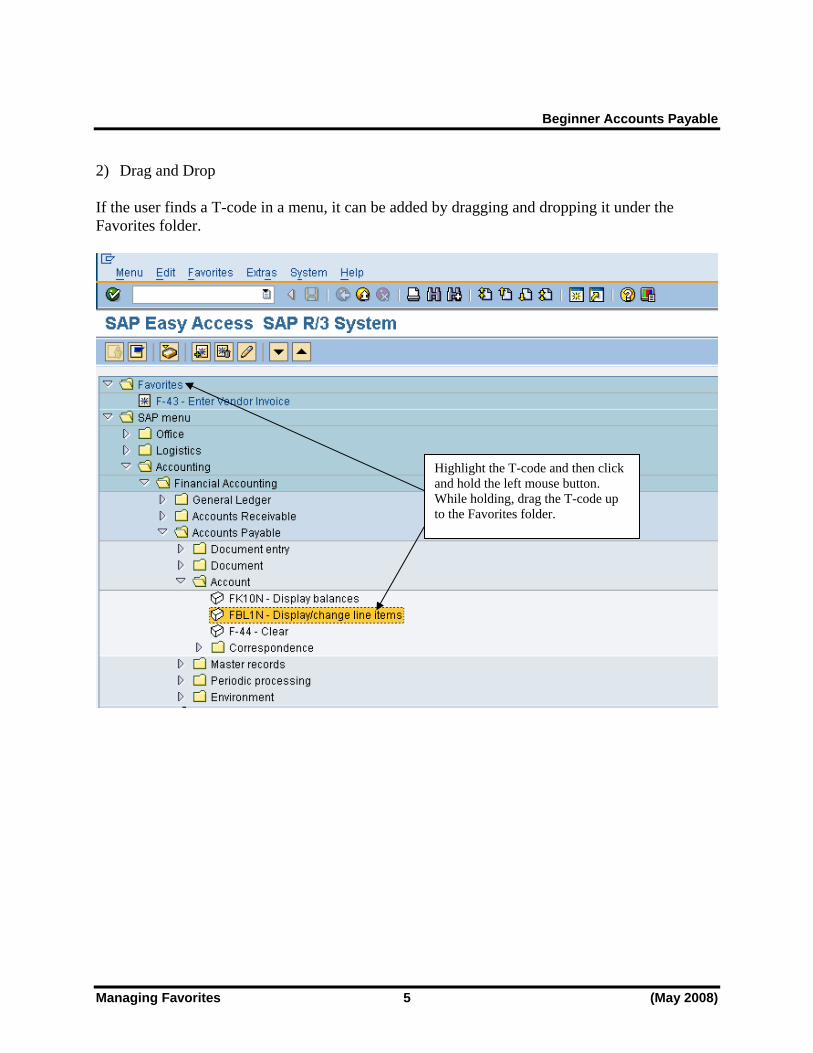
2) Drag and Drop If the user finds a T-code in a menu, it can be added by dragging and dropping it under the Favorites folder.
Highlight the T-code and then click and hold the left mouse button. While holding, drag the T-code up to the Favorites folder.

Beginner Accounts Payable
(May 2008) 6 Managing Favorites
3) Add Manually If the user finds a T-code in a menu, it can be added by highlighting and clicking on the right mouse button. Then click ‘Add to favorites’. Once the favorites have been added, the user will be able to access the T-codes easily. The favorites can be saved as a raw list like below, or folders can be added to organize the favorites.
Highlight the favorite and right mouse click. Choose ‘Add to Favorites’.

Beginner Accounts Payable
Managing Favorites 7 (May 2008)
Inserting Folders If a user has several T-codes, folders can be added to organize. This is up to the user. Folders do not have to be created. To add a folder, click on Favorites>Insert folder. The user can then drag and drop the T-codes into the appropriate folders.
Make sure the cursor highlights where the folder should be placed.
Make sure the cursor highlights where the folder should be placed.

Beginner Accounts Payable
(May 2008) 8 Managing Favorites
After adding folders, the T-codes are organized by a way the user feels comfortable looking for transactions.

Beginner Accounts Payable
Managing Favorites 9 (May 2008)
Change Favorite Text The description for the T-code may or may not make sense to the user. This description can be changed to make more sense. For example, F-58 T-code says Payment with Printout. To most users, the title ‘Hot Checks’ might make more sense. To change a favorites description, single click on the favorite to highlight it. Right mouse click and change the description.

Beginner Accounts Payable
(May 2008) 10 Managing Favorites
Enter a text that is more meaningful.
The text will change.
Enter a description and then click on the green check mark.

Beginner Accounts Payable
Managing Favorites 11 (May 2008)
Inserting Web pages There are several web pages that users have to refer to while conducting their job. SAP allows URL addresses to be added as favorites. Highlight the folder that the URL address should go under and click on Favorites>Add other objects. Double click on Web address or file.
Click on ‘Web address or file’

Beginner Accounts Payable
(May 2008) 12 Managing Favorites
Enter the text and web address. The web address will appear in the favorites and can be executed without exiting SAP.
Enter a text and then the web page address. Then click on the green check mark.
Double click to go to the web page

Beginner Accounts Payable
Managing Favorites 13 (May 2008)
Adding Files Files can also be added to the favorites. Any Microsoft product (Excel, Word or Powerpoint) can be added. The file can only be accessed when the drive associated to it is available. For example, if a file from the local C drive is added, it will only be available when logged on to that machine. If a file has been added from a shared drive, the file will be available as long as the computer has access to the shared drive. Highlight the folder that the document should go under and click on Favorites>Add other objects.

Beginner Accounts Payable
(May 2008) 14 Managing Favorites
Double click on Web address or file.
Click on ‘Web address or file’

Beginner Accounts Payable
Managing Favorites 15 (May 2008)
Enter the text and then browse for the document. The document is now available under the Favorites folder.
Enter a text and then use the browse functionality to search for the document. Click on the green check mark.
Double click on the document to launch it.

Beginner Accounts Payable
(May 2008) 16 Editing Options
Editing Options Editing Options allows the user to determine the format of screens they use. An option that can be set is currency (USD or foreign currency), while there are standard formats for other settings. The next few pages showcase the recommended settings and variants. Menu path: ACCOUNTING > FINANCIAL ACCOUNTING > GENERAL LEDGER >
ENVIRONMENT > USER PARAMETERS > EDITING OPTIONS Transaction Code: FB00 The initial screen that appears is Document Entry. Below are the standard settings for this tab. CONUS bases should have the box to the left of “Documents only in local currency” flagged so that all transactions will be displayed in USD.

Beginner Accounts Payable
Editing Options 17 (May 2008)
The variants in the section “Screen templates and line layout variant for document entry” can be changed to personal preferences. For Accounts Payable technicians, there is a choice for invoice and credit memo fast entry screen. The variant “Z0001 AIMS one-line fastentry screen” is the default and is usually the best choice. However, one of the others can be used, if it is preferred. The rest of the tabs in this transaction can be left to the default settings.

Beginner Accounts Payable
(May 2008) 18 Business Workplace
The Business Workplace Purpose One of the many features of the SAP environment is The Business Workplace in which every user can carry out their share of the business and communication processes in the enterprise. It is here where the user is able to create, edit and send and receive messages and documents. This process is enabled from entirely within the SAP environment without the necessity of going outside the system. This part of The Business Workplace is called SAP Mail and is, in fact, an internal e-mail system. The Business Workplace has six working environments for processing documents and messages. The working environments are as follows and are flagged with symbols. Working Environment Description
Inbox Under Documents, you find all the documents sent
to you and their resubmissions. Under Unread Documents, you will find only those documents which you have not yet read. (they are, however, displayed in the lower right preview window.
Outbox Under Documents, you will find an overview and
other information about the documents sent by you. Resubmissions Under Documents, you will find the documents that
are to be resubmitted to the user’s inbox at a later date.
Private Folders Folder structure that you create yourself to manage
documents, lists, messages, etc. Shared Folders Folder structure for publishing and/or managing
information on an enterprise or group-specific basis. Subscribed Folders The folders that you subscribe to are listed here.
We are not using this function at the present time. Trash Folder Deleted folders, documents, lists and messages are
stored here temporarily and you have the option of reversing the deletion.

Beginner Accounts Payable
Business Workplace 19 (May 2008)
The entry into your personal workplace is through opening SAP Easy Access Menu Tree as shown below: SAP Menu>Office>SBWPWorkplace
The individual working environments are shown as we have expanded the Workplace tree. You may further expand the tree to show the individual factors that make up the Inbox, for example.
Beginner Accounts Payable
(May 2008) 20 Business Workplace
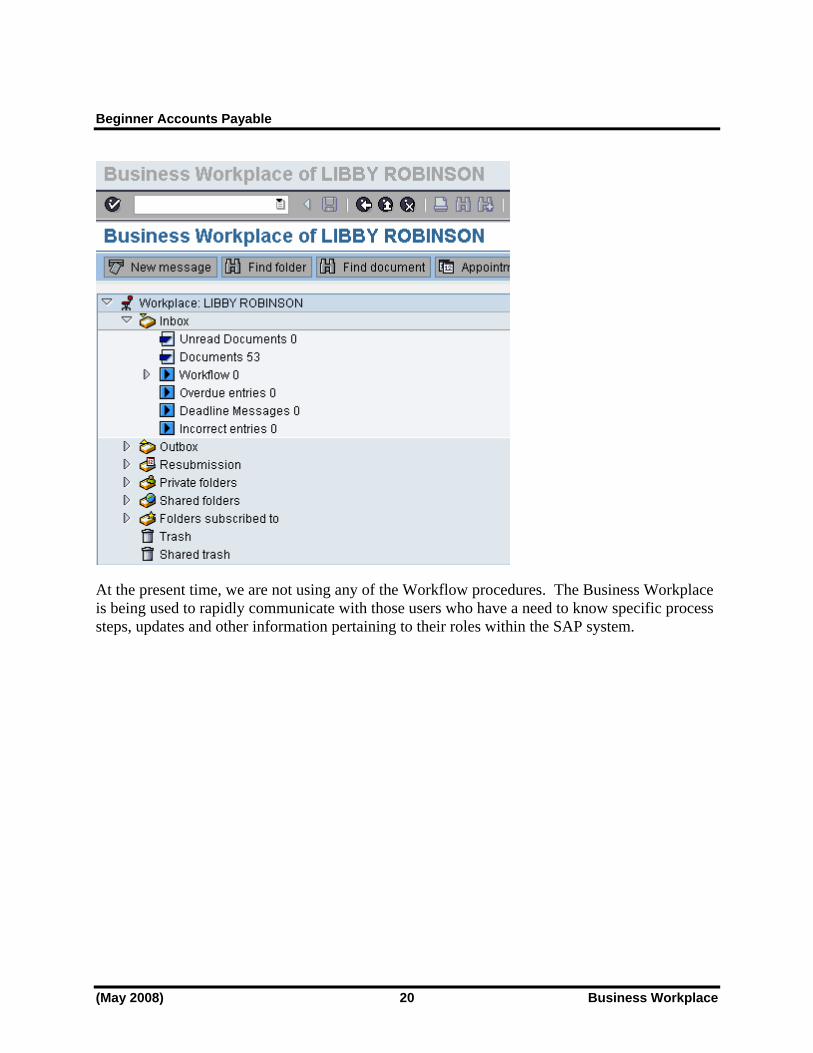
At the present time, we are not using any of the Workflow procedures. The Business Workplace is being used to rapidly communicate with those users who have a need to know specific process steps, updates and other information pertaining to their roles within the SAP system.
Beginner Accounts Payable
Business Workplace 21 (May 2008)
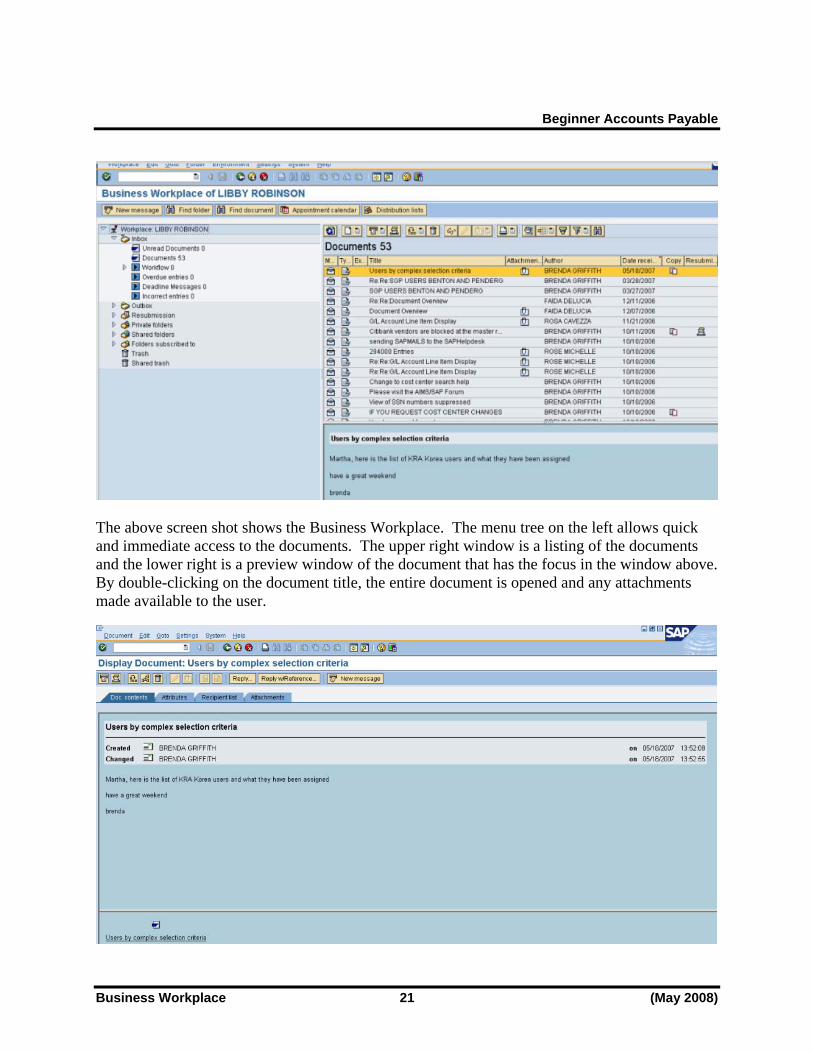
The above screen shot shows the Business Workplace. The menu tree on the left allows quick and immediate access to the documents. The upper right window is a listing of the documents and the lower right is a preview window of the document that has the focus in the window above. By double-clicking on the document title, the entire document is opened and any attachments made available to the user.

Beginner Accounts Payable
(May 2008) 22 Business Workplace
To create a document to be sent through the SAP mail system, click on the new message icon on the application toolbar.
By clicking on this icon, you will open a window that allows the user to create, edit and combine attachments to the message they wish to send with the SAP mail system. You may title the document, add the pertinent text and combine an attachment with it.
Click on the New Message icon.

Beginner Accounts Payable
Business Workplace 23 (May 2008)
To send the communication to a particular recipient, merely type a partial last name combined with a wild card * to search for the user (example Libby*robin*). It is NOT necessary to enter a Recipient type. You will note the three checkboxes to the right of the Recip. Type. The “Lightning Bolt” checkbox allows Express mail. The SAP definition of Express mail means that as long as the recipient is in the SAP system, they will be notified that mail awaits them. This notification will show on their screens as illustrated below.

Beginner Accounts Payable
(May 2008) 24 Business Workplace
By clicking on the Execute button , the user may instantly see the document. If speed is not a priority, they may choose the Inbox button and read the document at their leisure.

Beginner Accounts Payable
Accounts Payable Overview 25 (May 2008)
Accounts Payable Overview The Accounts Payable department is responsible for entering invoices received from vendors and then paying those vendors. In SAP, there are two methods for entering invoices and two methods for paying vendors. First, there are direct invoices. This method is used for invoices such as BPA purchases, credit card invoices, petty cash and change fund reimbursements, employee travel expenses. The other method is called the Three Way Match method. It starts in Procurement with a purchase order being created. Next, a goods receipt is posted once the goods are received. The final step is the invoice verification (also called MIRO in SAP). Vendors are paid by two different methods in SAP. The first is by check. This process is done at the individual regions. The other method is by electronic fund transfer (EFT). This process is done centrally by CNIC Millington with the approval of the regions.

Beginner Accounts Payable
(May 2008) 26 Direct Invoices – Vendors
Direct Invoices – Vendors This type of invoice entry posts directly into FI - Accounts Payable. This procedure is used for entering non-purchase order (PO) related invoices (i.e., utilities, telephone, magazine subscriptions, etc.), BPA-related invoices, NAF purchase card invoices, custodian fund replenishments (i.e., petty cash, change funds, unit funds), prize winnings (e.g., bingo events), or employee expense reimbursements (e.g., travel expenses). Menu Path: ACCOUNTING > FINANCIAL ACCOUNTING > ACCOUNTS PAYABLE
> DOCUMENT ENTRY > INVOICE Transaction Code: F-43
Enter the vendor invoice number exactly as it is on the invoice.
Enter the invoice date on the vendor invoice (not the day it was received).

Beginner Accounts Payable
Direct Invoices – Vendors 27 (May 2008)
Field Description/Usage
Enter Vendor Invoice: Header Data
Document date Enter the date of the originating document. For example, this date may be the date of a non-PO related vendor invoice, date of a BPA-related vendor invoice, date of an employee expense claim, date prize was won, or date of a custodian’s petty cash/change fund replenishment form.
Type KR (default entry).
Company code Enter the company code for the base/fund.
Posting date This field defaults to the current date. Change this date if the document should be posted in a different fiscal period.
Period Leave blank.
Currency Enter appropriate currency. For CONUS bases, this field might be hidden.
Translatn Date Leave blank.
Reference Enter the reference number of the originating document. For example, this may be the vendor’s invoice number, form number of an employee expense claim, prize control number, or form number of a fund custodian’s replenishment form. DO NOT PREFIX the vendor invoice number with # or INV#. Remember in order for the duplicate invoice feature to work properly, the system will check for exact matches of invoice numbers on exact same dates! EXACT MATCHES…please carefully key in invoice number to avoid duplicate payments - do NOT change invoice date from that on the invoice or receiving document!
Doc. header text The document header text contains explanations or notes that apply to the document as a whole, that is, not only for certain line items. A general description of the business transaction can be entered here. For certain transactions special data must be entered in this field. For example, for BPA-related invoices, enter the BPA number and the call number. Users should be careful to use the format of their locally generated call number.
PstKy Enter posting key 31 for a credit entry to a vendor account number.
Account Enter the vendor account number. This should not be confused with the accounts payable reconciliation G/L account. If it is an invalid vendor account, the system will give an error message.
Sp.G/L Leave blank.
Trans.type Leave blank
Press [Enter] or the green check mark icon.
Beginner Accounts Payable
(May 2008) 28 Direct Invoices – Vendors
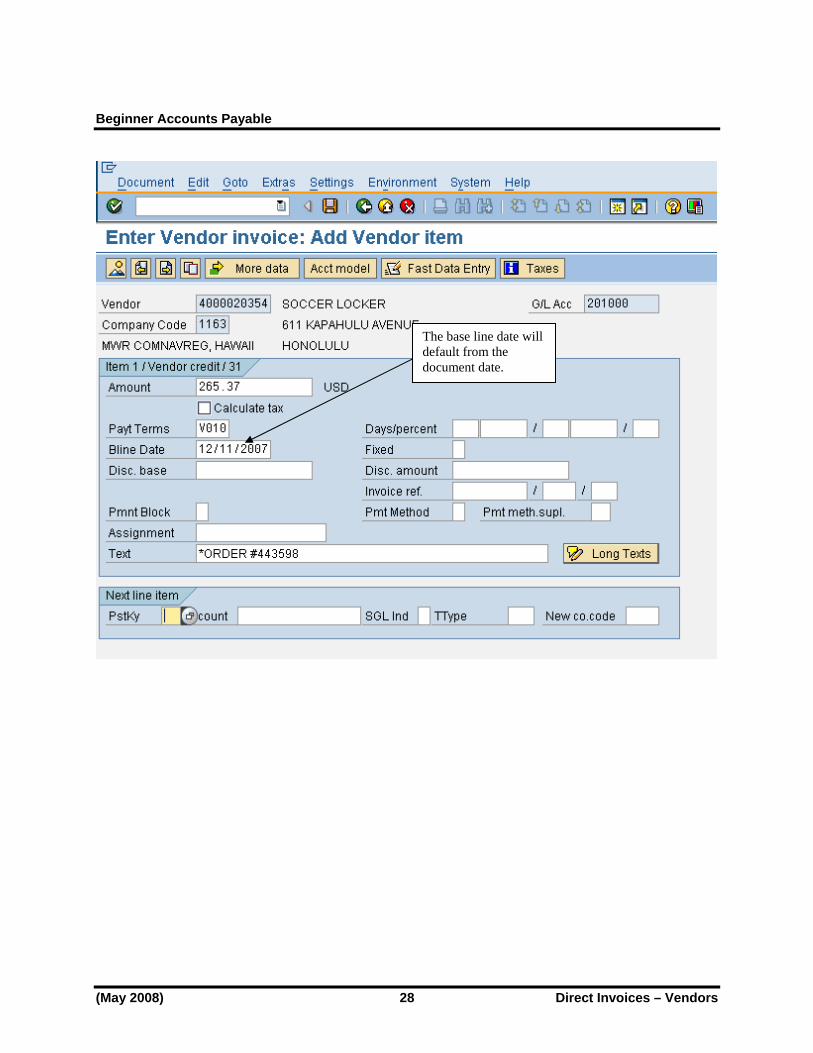
The base line date will default from the document date.

Beginner Accounts Payable
Direct Invoices – Vendors 29 (May 2008)
Field Description/Usage
Enter Vendor Invoice: Add Vendor item
Amount Enter the dollar amount indicated on the originating document (non-purchase order- related invoice, expense claim form, prize form, replenishment form, etc.)
Calculate tax Leave blank.
Payt terms Leave the default value unless it differs from the invoice. The default value is stored in the vendor’s master record. Use the matchcode to select different payment terms for this invoice, if necessary.
Days/percent Leave blank for default or enter special discount terms from vendor invoice. For example, the vendor will give a 5 percent discount if paid in 3 days. Enter “3” days, and “5” percent.
Bline date The default value is populated by the entry made in the document date field. The default value is generally correct but the baseline date can be changed. This date is the date from which the terms of payment are calculated. There can be instances where the document date is different from the Bline date.
Fixed Leave blank.
Disc. base Leave blank.
Disc. amount Leave the default value or if the vendor has offered a special “lump sum” discount for payment within a specified time or a “good customer discount”, enter the amount in this field.
Invoice ref. Used for linking credit memos with invoice. Leave blank for invoice.
Pmnt block Blocking payments restricts the payment from being made whether due or not. This function may be used if there is a dispute or problem with a vendor. If the invoice item should be blocked from payment, enter payment block “A” in this field. Normally, this field will be left blank.
Pmnt method Normally, this field should be left blank, so that the default payment method in the vendor master record will be used by the automatic payment program.
Pmnt meth.supl. Leave blank.
Assignment Can leave blank or enter information that you would sort in the line item display report.
Text Free entry description of transaction - useful for display and reporting purposes. If this field is prefixed with an “*” character, this text will print on the check stub and EFT remittance advice.
Long text Click this button to add notes. You can document many lines of text for notation purposes here. This will not print on the check or remittance advice.
Beginner Accounts Payable
(May 2008) 30 Direct Invoices – Vendors
Fast Data Entry: The Fast Data Entry template can be selected at the outset of the transaction especially where multiple expense accounts will be entered against a single vendor (e.g., petty cash replenishment). You do not want to use this type of entry if you have to change terms or discount amounts. Simply press the Fast Data Entry push-button after the amount of the invoice is entered for the vendor line item (prior to entering the offsetting posting key/accounts).

Beginner Accounts Payable
Direct Invoices – Vendors 31 (May 2008)
Field Description/Usage
Enter Vendor Invoice: Add G/L Account Items
PK Enter posting key 40 for a debit to GL account.
CoCd Leave blank.
Account Enter the GL account for the first offsetting expense item.
Amount Enter the dollar amount of the first offsetting expense item.
Site Leave blank
Cost c Enter the cost center (if account is a cost element) to which the expense item should be coded.
Order Enter the internal order to which the expense item should be coded. This field must be used in conjunction with the cost center since only a statistical posting is made to the internal order. Internal orders usually represent a special event (e.g. air show, concerts, festivals).
Assignment Can be used to sort items in the G/L line item display. An example would be to identify UFM items at the item level or other notation.
Text Optional field, enter a description for this expense line item. This text will never print on the check stub or EFT remittance advice.
If the Fast Data Entry option is not selected, then proceed with the following instructions: After entering the amount for the first line item for the credit, posting key 31(instructions are listed above for Screen: Enter Vendor Invoice: Add Vendor Item), follow the instructions listed below to enter the debit, posting key 40, for this transaction. Field Description/Usage
Enter Vendor Invoice: Add Vendor item
PstKy Enter posting key 40 for a debit to GL account. This is the standard form for entering a journal.
Account Enter the GL account for the first offsetting expense item.
Sp.G/L Leave blank.
Trans.type Leave blank.
New co.code Do not enter a value in this field.
Press [Enter] or the green check mark icon.

Beginner Accounts Payable
(May 2008) 32 Direct Invoices – Vendors
Field Description/Usage
Create Vendor Invoice: Add G/L Account Item Amount Enter the dollar amount of the first offsetting expense item. Tax code Leave default. Calculate tax Leave blank. Cost center Enter the cost center code (if account is a cost element) to which the expense
item should be coded. Order Enter the internal order to which the expense item should be coded. This field
must be used in conjunction with the cost center since only a statistical posting is made to the internal order. Internal orders usually represent a special event (e.g. air show, concerts, festivals)
Material Leave blank. Article Leave blank. Site Leave blank.

Beginner Accounts Payable
Direct Invoices – Vendors 33 (May 2008)
Quantity Leave blank. Assignment Can be used to sort items in the G/L line item display. An example would be to
identify UFM items at the item level or other notation. Text Option field, enter a description for this expense line item. This text will never
print on the check stub or EFT remittance advice. Long Text Click this button to add notes. You can document many lines of text for notation
purposes here. This will not print on the check or remittance advice.
Press [Enter] or the green check mark icon if there are more entries. If not, proceed to the next section, Reviewing Entries.

Beginner Accounts Payable
(May 2008) 34 Direct Invoices – Vendors
Reviewing Entries: Click to review the entry before posting.

Beginner Accounts Payable
Direct Invoices – Vendors 35 (May 2008)
If everything balances, you can post the document. Click on the icon to save. If it does not balance, double click on the line to make changes. To add additional line items, go to the bottom of this screen (Display overview) to Other line item and enter the information there. Message: “Document 35xxxxxxxxx is posted”. This number should be written on the originating document or invoice along with a posting date. Several regions have developed a stamp.
GOODS RECEIPT DOC NUMBER: ______________Date________________ INVOICE DOC NUMBER: _____________________Date________________ PAYMENT DOC NUMBER: ____________________Date________________

Beginner Accounts Payable
(May 2008) 36 Credit Memos
Credit Memos Menu path: ACCOUNTING > FINANCIAL ACCOUNTING > ACCOUNTS PAYABLE
> DOCUMENT ENTRY > CREDIT MEMO Transaction Code: F-41

Beginner Accounts Payable
Credit Memos 37 (May 2008)
Field Description/Usage
Enter Vendor Credit Memo: Header Data
Document date Enter the date of the originating document or the vendor’s credit memo.
Type KG (default entry).
Company code Enter the company code for the base/fund in which the vendor item should be posted.
Posting date This field defaults to current date. Change the posting date if the document should be posted in a different fiscal period.
Period Leave blank.
Currency Enter appropriate currency. For CONUS bases, this field might be hidden.
Translatn Date Leave blank.
Reference Enter the reference number of the originating document. For example, this may be the vendor’s credit memo number.
Doc. header text Free entry document header text contains explanations or notes that apply to the document as a whole, that is, not only for certain line items. A general description of the business transaction can be entered here.
PstKy Enter posting key 21 for a debit entry to a vendor account number.
Account Enter the vendor account number. This should not be confused with the payables reconciliation g/l account. If it is an invalid vendor account, the system will give an error message.
Sp.G/L Leave blank.
Trans.type Leave blank.
Press [Enter] or the green check mark icon.

Beginner Accounts Payable
(May 2008) 38 Credit Memos
To ensure a credit memo is applied to an o/s invoice, enter the original invoice reference number.

Beginner Accounts Payable
Credit Memos 39 (May 2008)
Field Description/Usage
Enter Vendor Credit Memo: Add Vendor Item
Amount Enter the dollar amount indicated on the credit memo.
Calculate tax Leave blank.
Payt terms Leave the default value if one appears. If the credit memo is NOT associated with an existing invoice you can enter an ‘*’ to adopt the payment terms on the vendor master record.
Days/percent Leave blank.
Bline date Leave the default value.
Fixed Leave blank.
Disc. base Leave blank.
Disc. amount Leave blank.
Invoice ref Enter the SAP invoice document number and fiscal year to which the vendor credit memo relates. This will cause the original invoice’s payment terms to be adopted automatically for the credit memo!
Pmnt block Normally, this field will be left blank.
Pmnt method Leave blank.
Pmnt meth.supl. Leave blank.
Assignment Can leave blank or enter information that you would sort in the line item display report.
Text Free entry description of transaction - useful for display and reporting purposes. If this field is prefixed with an “*” character, this text will print on the check stub and EFT remittance advice.
Long text Click this button to add notes. You can document many lines of text for notation purposes here. This will not print on the check or remittance advice.

Beginner Accounts Payable
(May 2008) 40 Credit Memos
For multiple line items: You can enter multiple line items on one screen (Fast Data Entry) or you can enter one item per screen. You still need to go to the screen titled Screen: Enter Vendor Credit Memo: Add Vendor Item (see above), to enter the amount of the 1st line item. Fast entry screen cannot be used to enter debit entries. To use the fast entry screen see the instructions on G/L Item Fast Entry. Fast Data Entry: The Fast Data Entry template can be selected at the outset of the transaction especially where multiple expense accounts will be entered against a single vendor (e.g., petty cash replenishment). You don’t want to use this type of entry if you have to change terms or discount amounts. Simply press the Fast Data Entry push-button after the amount of the credit memo is entered for the 1st line item (prior to entering the offsetting posting key/accounts).

Beginner Accounts Payable
Credit Memos 41 (May 2008)
Field Description/Usage
Enter Vendor Invoice: Add G/L Account Items
PK Enter posting key 50 for a credit to GL account.
CoCd Leave blank.
Account Enter the GL account for the first offsetting expense item.
Amount Enter the dollar amount of the first offsetting expense item.
Site Leave blank.
Cost c Enter the cost center to which the expense item should be coded.
Order Enter the internal order to which the expense item should be coded. This field must be used in conjunction with the cost center since only a statistical posting is made to the internal order. Internal orders usually represent a special event (e.g. air show, concerts, festivals).
Assignment Can be used to sort items in the G/L line item display, an example would be to identify UFM items at the item level or other notation.
Text Optional field, enter a description for this expense line item. This text will never print on the check stub or EFT remittance advice.
If the Fast Data Entry option is not selected, then proceed with the following instructions: After entering the amount for the first line item for the debit, posting key 21 (instructions are listed above, Screen: Enter Vendor Credit Memo: Add Vendor Item), follow the instructions listed below to enter the credit, posting key 50, for this transaction. Field Description/Usage
Enter Vendor Credit Memo: Add Vendor Item
PstKy Enter posting key 50 for a debit to GL account. This is the standard form for entering a journal.
Account Enter the GL account for the first offsetting expense item.
Sp.G/L Leave blank.
Trans.type Leave blank.
New co.code Do not enter a value in this field.
Press [Enter] or the green check mark icon.
Beginner Accounts Payable
(May 2008) 42 Credit Memos

Beginner Accounts Payable
Credit Memos 43 (May 2008)
Field Description/Usage
Enter Vendor Credit Memo: Add G/L Account Item
Amount Enter the dollar amount of the first offsetting expense item.
Tax code Leave default.
Calculate tax Leave blank.
Cost center Enter the cost center (if account is a cost element) to which the expense item should be coded.
Order Enter the internal order to which the expense item should be coded. This field must be used in conjunction with the cost center since only a statistical posting is made to the internal order. Internal orders usually represent a special event (i.e., air shows, concerts, festivals, other base-wide events)
Material Leave blank.
Site Leave blank.
Quantity Leave blank.
Assignment Leave blank.
Text Enter a description for this expense line item. This text will never print on the check stub or EFT remittance advice.
Press [Enter] or the green check mark icon if there are more entries, if not proceed on to the next section, Reviewing Entries.

Beginner Accounts Payable
(May 2008) 44 Credit Memos
Reviewing Entries: Click to review the entry before posting.
If everything balances, you can post the document. Click on the icon to save. If not, double click on the line to make changes. To add additional line items, go to the bottom of the screen (Display overview) to Other line item and enter the information there. Message: “Document 31xxxxxxxxx is posted”. This number should be written on the credit memo along with the posting date.

Beginner Accounts Payable
Display Document 45 (May 2008)
Display Documents Menu Path: ACCOUNTING > FINANCIAL ACCOUNTING > ACCOUNTS PAYABLE
> DOCUMENT > DISPLAY Transaction code: FB03
Field Description/Usage
Display Document: Initial Screen
Document number
Enter the document number to be displayed.
Company code Enter the company code for the base/fund in which the document to be displayed was posted.
Fiscal year Enter the fiscal year in which the document to be displayed was posted.
Press [Enter] or the green check mark icon.

Beginner Accounts Payable
(May 2008) 46 Display Document
Double-click on a line item to view the details for each line. To exit this transaction, click on the backward green arrow.

Beginner Accounts Payable
Change A Document 47 (May 2008)
Change Documents It might be necessary to change some details in the document. However, the amount, GL account, cost center and internal order can never be changed if the document has been posted. If these values were posted in error, the document should be reversed (See Reversing Documents). A new document with the correct values should then be entered. Menu path: ACCOUNTING > FINANCIAL ACCOUNTING > ACCOUNTS PAYABLE
> DOCUMENT > CHANGE Transaction code: FB02
Field Description/Usage
Change Document: Initial Screen
Document number
Enter the document number to be changed.
Company code Enter the company code for the base/fund in which the document to be displayed was posted.
Fiscal year Enter the fiscal year in which the document to be changed was posted.
Press [Enter] or the green check mark icon.

Beginner Accounts Payable
(May 2008) 48 Change A Document
Double click on the line item that you want to change. The fields that appear with light colored backgrounds can be changed. These fields include: • Document Header fields (press the Header icon ): - Document Header Text
- Reference Doc • Line Item fields: - Payment terms (vendor line item only)
- Payment block (vendor line item only)
- Payment method (vendor line item only)
- Assignment
- Line item text To save the changes, click on the Save icon.

Beginner Accounts Payable
Display Document Changes 49 (May 2008)
Display Document Changes Use this transaction to view all the changes that have been made to a single document. Menu Path: ACCOUNTING > FINANCIAL ACCOUNTING > ACCOUNTS PAYABLE
> DOCUMENT > DISPLAY CHANGES Transaction code: FB04
Field Description/Usage
Display Document Change: Initial Screen
Company code Enter the company code for the base/fund in which the document was posted.
Document number
Enter the document that you wish to view for all the changes made to this document.
Fiscal year Enter the fiscal year in which the document is posted.

Beginner Accounts Payable
(May 2008) 50 Display Document Changes
Period of change
From change date
The system only displays changes which were made after this date.
Time The system only displays changes which were made after this time.
Changed by User ID of the user who made the change.
Press [Enter] or the green check mark icon.
Click on the icon.
Double click on each line if you wish to view the details of the changes.

Beginner Accounts Payable
Parking Documents 51 (May 2008)
Park Documents Sometimes you do not have all of the information to finish posting a document. However, you do not want to lose the data that you have already entered. In order to save the document, but not post it to the General Ledger, go to the Overview of the document. Then select Document > Park. This will generate a 10 digit document number. The Park Document icon can also be used.
NOTE: When a document is parked, it is NOT posted to the General Ledger.
You cannot close an accounting period if there are any parked documents. Review the status of all documents and if there are any that are parked, either post or delete them.

Beginner Accounts Payable
(May 2008) 52 Change Parked Documents
Change Parked Documents Menu Path: ACCOUNTING > FINANCIAL ACCOUNTING > ACCOUNTS PAYABLE
> DOCUMENT > PARKED DOCUMENT > CHANGE Transaction code: FBV2
Field Description/Usage
Parked Document: Change
Company code Enter the company code for the base/fund in which the document to be changed was parked.
Document number
Enter the document number of the parked document to be changed.
Fiscal year Enter the fiscal year in which the document to be changed was parked.
Press [Enter] or the green check mark icon.

Beginner Accounts Payable
Change Parked Documents 53 (May 2008)
If the document number is unknown, a list of parked documents is available by clicking on the Document list icon.
Field Description/Usage
Parked Document: Change
Company code Enter the company code for the base/fund in which the document to be changed was parked.
Fiscal year Enter the fiscal year in which the document to be changed was parked.
Posting date Enter the posting date used, if known.
Document Type Enter the document type, if known.
Entered by Enter the User ID of the user who entered the parked document, if known.
Click the Execute icon.

Beginner Accounts Payable
(May 2008) 54 Change Parked Documents
A list of parked documents meeting the previous criteria will be displayed. Double-click on the document that needs to be changed.

Beginner Accounts Payable
Change Parked Documents 55 (May 2008)
The document appears in the Overview section. Changes can be made to the following: • Reference
• Doc head text
• Add more lines If a line item that has already been entered needs to be changed, double click on it.

Beginner Accounts Payable
(May 2008) 56 Change Parked Documents
New line items can also be added at the bottom of the screen: • Pst key
• Indicate GL account OR Click on ‘Fast Data Entry’. Once all changes have been made, be sure to save them by clicking the Save icon (called Park document here). To exit this transaction without saving changes, click on .
IMPORTANT Saving the changed document does not post the document to the GL! NOTE: After the document is saved you will get a message saying, “Preliminarily
posted document 3XXXXXXXXX was changed”. To post the document, see section on POST PARKED DOCUMENTS.

Beginner Accounts Payable
Change Parked Document Header 57 (May 2008)
Change Parked Documents Header Menu Path: ACCOUNTING > FINANCIAL ACCOUNTING > ACCOUNTS PAYABLE
> DOCUMENT > PARKED DOCUMENT > CHANGE HEADER Transaction code: FBV4
Field Description/Usage
Change Parked Document: Initial Screen
Document number
Enter the document number of the parked document to be changed.
Company code Enter the company code for the base/fund in which the document to be changed was parked.
Fiscal year Enter the fiscal year in which the document to be changed was parked.
Press [Enter] or the green check mark.

Beginner Accounts Payable
(May 2008) 58 Change Parked Document Header
If the document number is unknown, a list of parked documents is available by clicking on the Document list icon.
Field Description/Usage
Parked Document: Change
Company code Enter the company code for the base/fund in which the document to be changed was parked.
Fiscal year Enter the fiscal year in which the document to be changed was parked.
Posting date Enter the posting date used, if known.
Document Type Enter the document type, if known.
Entered by Enter the User ID of the user who entered the parked document, if known.
Click the Execute icon.

Beginner Accounts Payable
Change Parked Document Header 59 (May 2008)
A list of parked documents meeting the previous criteria will be displayed. Double-click on the document that needs to be changed.

Beginner Accounts Payable
(May 2008) 60 Change Parked Document Header
The document header portion will appear. The fields that appear with white backgrounds can be changed. These fields include: • Document Header Text
• Reference Doc Once all changes have been made, be sure to save them by clicking the Save icon (called Park document here). To exit this transaction without saving changes, click on .
IMPORTANT Saving the changed document does not post the document to the GL! NOTE: After the document is saved you will get a message saying, “Preliminarily
posted document 3XXXXXXXXX was changed”. To post the document, see section on POST PARKED DOCUMENTS.

Beginner Accounts Payable
Display a Parked Document 61 (May 2008)
Display Parked Documents Menu Path: ACCOUNTING > FINANCIAL ACCOUNTING > ACCOUNTS PAYABLE
> DOCUMENT > PARKED DOCUMENTS > DISPLAY Transaction code: FBV3
Field Description/Usage
Display Parked Document: Initial Screen
Company code Enter the document number of the parked document to be displayed.
Document number
Enter the company code for the base/fund in which the document to be displayed was parked.
Fiscal year Enter the fiscal year in which the document to be displayed was parked.
Press [Enter] or the green check mark icon. To view the list of parked documents, click on the icon.
Field Description/Usage
Display Parked Document: Initial Screen
Company code Enter the company code for the base/fund in which the vendor item was posted.
Fiscal year Enter the financial year in which the documents are posted to.
Posting date Enter a range of posting dates.
Entered by User Id of the user who has entered the parked document.
Press the Execute icon. Double click on the document to display it. Double click on the line items to view the details of each line item. To exit this transaction, click on or .

Beginner Accounts Payable
(May 2008) 62 Display Changes to a Parked Document
Display Changes to Parked Documents Menu Path: ACCOUNTING > FINANCIAL ACCOUNTING > ACCOUNTS PAYABLE
> DOCUMENT > PARKED DOCUMENTS > DISPLAY CHANGES Transaction code: FBV5
Field Description/Usage
Display Parked Document Changes: Initial Screen
Company code Enter the document number of the parked document to be displayed.
Document number
Enter the company code for the base/fund in which the document to be displayed was parked.
Fiscal year Enter the fiscal year in which the document to be displayed was parked.
Period of change
From change date
The system only displays changes which were made as of this date. A range of dates is sometimes useful.
Time The system only displays changes which were made as of this time, if known. A range is best if using this field.
Changed by Enter the user ID of the user who made the change, if known.
Press [Enter] or the green check mark icon. Click on the icon. Double click on each line if you wish to view the details for the changes.

Beginner Accounts Payable
Delete Parked Document 63 (May 2008)
Delete Parked Documents Parked documents are deleted when: 1. The concerned cost center manager and/or division manager, for valid reasons, does not
approve an invoice. 2. An erroneous bill forwarded F&FR is discovered after routing. Menu Path: ACCOUNTING > FINANCIAL ACCOUNTING > ACCOUNTS PAYABLE,
DOCUMENT > PARKED DOCUMENTS > POST/DELETE Transaction code: FBV0
Field Description/Usage
Display Parked Document: Post/Delete
Document number
Enter the document number of the parked document to be deleted.
Company code Enter the company code for the base/fund in which the document to be deleted was parked.
Fiscal year Enter the fiscal year in which the document to be deleted was parked.
Press [Enter] or the green check mark icon. Go to: “Document > Delete Parked Document”. There will be a system message “Data will be lost. Delete parked document?” Click on the [Yes] icon to delete the parked document. A System message appears: “Parked document deleted”.

Beginner Accounts Payable
(May 2008) 64 Post Parked Documents
Post Parked Documents Once a parked document is ready for posting, a special procedure must be followed. When editing or making changes to a parked document, the Save icon only serves to save changes to the parked document, it does not post it to the general ledger! You must POST a parked document with the following transaction. Menu Path: ACCOUNTING > FINANCIAL ACCOUNTING > ACCOUNTS PAYABLE,
DOCUMENT > PARKED DOCUMENTS > POST/DELETE Transaction code: FBV0 Press [Enter] or the green check mark icon.
Field Description/Usage
Display Parked Document: Post/Delete
Document number
Enter the document number of the parked document to be posted.
Company code Enter the company code for the base/fund in which the document to be posted was parked.
Fiscal year Enter the fiscal year in which the document to be posted was parked.
Press [Enter] or the green check mark icon To post the changes made, click on .

Beginner Accounts Payable
Post Parked Documents 65 (May 2008)
To view the list of parked documents, click on the icon.
Field Description/Usage
Display Parked Document: Post/Delete
Company code Enter the company code for the base/fund in which the document to be posted was parked.
Fiscal year Enter the fiscal year in which the document to be posted was parked.
Posting date Leave blank.
Entered by Enter the User ID of the user who entered the parked document, if known.
Select the Execute icon. Double click on the document that is to be posted. Double click on the line items that are to be changed. Post document by clicking on. System message received: “Parked document is posted”.

Beginner Accounts Payable
(May 2008) 66 Reversal of Individual Documents
Reversal of Individual Documents Documents that have been posted in error or contain amounts, accounts or account assignments (cost centers, internal orders) that are incorrect can easily be reversed. SAP provides functionality to automatically generate a reversal document when the user specifies the original document. Remember that reversal documents cannot be posted to a period that is already closed and the financial statements have already been generated. Generally, SAP will use the posting date of the original document as the reversal posting date if it is within the current period. A different posting date may be specified by the user. It should be in the same accounting period as the original document. If it is determined that an invoice from a previous (closed) period needs to be reversed, you must specify an alternate posting date because the system cannot post to the original. Menu Path: ACCOUNTING > FINANCIAL ACCOUNTING > ACCOUNTS PAYABLE
> DOCUMENT > REVERSE > INDIVIDUAL REVERSAL Transaction code: FB08 Screen: Reverse Document: Header Data

Beginner Accounts Payable
Reversal of Individual Documents 67 (May 2008)
Field Description/Usage
Reverse Document: Header Data
Document no. Enter the document number to be reversed.
Company code Enter the company code for the base/region in which the document to be reversed was originally posted.
Fiscal year Enter the fiscal year in which the document was originally posted. Remember that F&FR uses document numbers that are company code dependant and that reset themselves after they reach the end of the respective number ranges. Therefore a unique document can only be found when the document number, company code and fiscal year are specified in combination. This combination is a unique key in the database that identifies a particular document.
Reverse posting details
Reversal reason Currently, there are three reversal reason codes that can be used. This code is only used for reporting purposes (i.e. document reports can be executed with reversal reason code as a selection criteria). The valid reason codes are: 01 Reversal in current period 02 Reversal in closed period (alt posting date) 03 Accrual reversal
Reason code # 03 should only be used for self-reversing journals (AJVs). Reason code # 01 should be used when the original document to be reversed was posted in the current period. Reason code # 02 should be used when the original document to be reversed was posted in a closed period.
Posting date This field could be left blank if the posting date for the reversed document is similar to that of the original document. This field must be filled when using reversal reason code # 02 - you must indicate the date you want the reversal posted (it CANNOT be in a closed period…it must be a date in the current period you are using). This field should be left blank when using reversal reason code # 01.
Posting period Leave this field blank unless the reversal document is to be posted into special period 13.
Check management specifications
Void reason code Leave blank. Do not use this transaction to reverse check payments.
Click on the icon to see the document for cancellation. Click on to go back to the previous screen. To reverse the document, click on the Save icon. Document number range is 1900000000 to 1999999999. Write the reversing document number on the invoice.

Beginner Accounts Payable
(May 2008) 68 Three Way Match Overview
Three-way Match Overview Procuring items on a SAP purchase order is part of the three-way match process. In order for a purchase order to be paid, three things must occur: Step 1: The Procurement Technician must create the purchase order in SAP. In this step there is no accounting impact, although PO items are coded to the appropriate general ledger account and cost center, or asset. For more information, please see the Procurement Beginner manual. Step 2: The Accounts Payable Clerk/Receiving Agent must enter a goods receipt (GR) into SAP. In this step, the goods receipt will match up the information that was entered on the purchase order. If this is a partial shipment, the clerk may modify the quantity, which will leave the GR open until the rest of the shipment is entered. The General Ledger is automatically updated with the general ledger account (i.e. expense or prepaid account), cost center, or asset that was coded on the SAP Purchase Order. The offsetting posting is made to an account called the Goods Receipt/ Invoice Receipt (GR/IR) clearing account (201010). This is known as an accrued liability account. If a freight charge was included on the PO, it will be posted to the Freight clearing account (201012), also an accrued liability account. Credit GR/IR 201010
Debit Expense Account [(701000 (Supplies), 151000 (Inventory), 1710000012 (Asset) Vehicle]
Step 3: The Accounts Payable Clerk receives the invoice. Invoice Verification is the last step of the three-way match process. Transaction code MIRO is used to enter the purchase order number and verify that the amount of the PO that appears on the screen is the amount being invoiced. MIRO must match what was entered at the purchase order level and goods receipt. You are only authorized within AIMS/SAP to accept a +/- 3% variance between the purchase order line item price and the invoice (maximum of $25 per line item) for a prime vendor, except for assets. A 3% variance is ONLY tolerated on prime vendors. All other vendor invoices are required to match the purchase order. A price difference greater than 3% requires a purchase order modification (this necessitates a return to the Procurement Department). The only exception is a variance due to freight. The following entry is posted, once the invoice is saved. Credit Vendor “4/XXX” which in turn credits the correct GL account (201000)
Debit 201010 - GR/IR Clearing Account

Beginner Accounts Payable
Three Way Match Overview 69 (May 2008)
Goods Receipt The goods receipt should be verified against the corresponding purchase order to ensure the correct goods and quantity are received. For all system generated purchase orders, the Accounts Payable Technician will directly enter the goods receipt into the system. Based on local connectivity and staffing requirements, it is possible for persons other than the Accounting staff to enter the goods receipt into the system. The Receiving Agent (or warehouse person) may be given authorization to enter the goods receipt in the AIMS system - this is a local decision. F&FR: Until such time that the warehouse and facility staffs have access to AIMS and the goods receipt function, the following procedure should be used:
Purchasing/Receiving Agent
1. Upon receipt of all goods, the goods receipt copy of the purchase order is signed/dated by the receiving agent and forwarded to the Accounting Office.
2. In cases of partial receipts, the receiving copy should be flagged as “partial” and forwarded
to the Accounting Office. When all goods are received, a final goods receipt can be signed and forwarded to the accounting office with a notation of “complete” or “complete delivery”.
Accounting Office
3. Goods Receipt is checked to ensure the Goods Receipt has been signed and dated.
4. Goods Receipts are entered into the SAP system.
5. Goods Receipts document number should be noted on the Purchase order copy.

Beginner Accounts Payable
(May 2008) 70 Three Way Match Overview
NOTE: Goods receipts may also be entered into the system where there is no receiving copy in the following instances: Vendor’s invoice has been signed by an authorizing departmental person acknowledging receipt of the goods. Verbal assurance has been given by the receiving officer that the goods are received (In this case a memorandum would be signed attesting to the fact that the goods are received).

Beginner Accounts Payable
Step 2 – Three Way Match Process: Goods Receipt 71 (May 2008)
STEP 2 - Three Way Match Process: Goods Receipt Menu path: LOGISTICS > RETAILING > PURCHASING > PURCHASE ORDERS >
PURCHASE ORDER > FOLLOW-0N FUNCTIONS > GOODS RECEIPT Transaction code: MB01

Beginner Accounts Payable
(May 2008) 72 Step 2 – Three Way Match Process: Goods Receipt
Field Description/Usage
Goods Receipt for Purchase Order: Initial screen
Document date The document date is the date on which the original document was issued.
Posting date Enter the Delivery Date.
Delivery note Leave blank.
Bill of lading Number identifying the bill of lading of the goods that have been received. The bill of lading is the document issued by the sender that accompanies the goods. Normally left blank.
Doc. header text The document header text contains explanations or notes that apply to the document as a whole, not just for certain line items.
GR/GI slip no. Leave blank
Defaults for document items
Movement type Enter ‘101’ for a goods receipt.
Purchase order Enter the relevant purchase order number to which the goods receipt or goods return relates. The purchase order number should to be quoted by the vendor on the shipping documents or packing slip. The purchase order number can also be found on the goods receipt copy of the purchase order (which is sent to the warehouse).
Site Enter the site to which the goods are being received or from which they are being returned.
Reason for movement
Leave this field blank while processing a Goods Receipt.
Storage location Leave this field blank.
Suggest zero lines
Leave this field blank.
GR/GI slip
Print Check this box if you want to print the goods receipt.
Collective slip Leave the default value.
Press [Enter] or the green check mark to continue.

Beginner Accounts Payable
Step 2 – Three Way Match Process: Goods Receipt 73 (May 2008)
Field Description/Usage
Goods Receipt for PO: Selection screen 0001/XXXX
Item Make sure that the checkbox beside the item is flagged. The system defaults a value from the purchase order. In cases of partial shipments where one of the line items order was NOT received, remember to “unflag” the checkbox beside the line item. In other words, if you did NOT receive the item, unflag this box.
Quantity Enter the quantity to be receipted, in the unit of entry. The quantity is automatically converted to the stockkeeping unit of measure. The system defaults a value from the purchase order. In cases of partial shipments, remember to change the default quantity to the amount actually received.
EUn Unit of measure in which the goods movement or inventory count is entered. The system defaults a value from the purchase order. Be sure the value from the PO is correct before continuing.
Delivery completed
Flag this indicator if the goods receipt is expected to be the final delivery (i.e. the purchase order quantity has been fully received or when no further shipments are expected).
Stock type Leave this field blank.

Beginner Accounts Payable
(May 2008) 74 Step 2 – Three Way Match Process: Goods Receipt
To display the goods receipt document in detail, press the [Adopt + Details] push-button. Reviewing G/L Accounts & Cost Center Before Posting: To display the G/L accounts and the cost centers that were selected when creating the purchase order, before posting occurs, select Environment, Purchase order. To get back, press the green arrow. Click the SAVE icon to post the Goods Receipt. The following message will appear: “Document 50XXXXXXXX posted”.
NOTE: Posting of the goods receipt document results in an entry being recorded to
the general ledger. This entry records the liability of the F&FR activity (to pay the vendor for the goods/service) on the balance sheet. The following entry is made:
Debit: XXXXXX (Expense, Inventory or Asset Account)
Credit: 201010 (GR/IR Clearing)

Beginner Accounts Payable
Step 2 – Three Way Match Process: Goods Receipt 75 (May 2008)
Partial Receipts Sometimes a vendor does not ship all of the goods ordered on a purchase order. However, the goods that do arrive need to be receipted in SAP. This can be done by a partial receipt. This is the reason that it is VERY IMPORTANT to list everything ordered on the PO. Do NOT enter one line item as “See Attached” and one LOT (or EACH, CASE, etc). You will not be able to process a partial receipt. Menu path: LOGISTICS > RETAILING > PURCHASING > PURCHASE ORDERS >
PURCHASE ORDER > FOLLOW-0N FUNCTIONS > GOODS RECEIPT Transaction code: MB01

Beginner Accounts Payable
(May 2008) 76 Step 2 – Three Way Match Process: Goods Receipt
Field Description/Usage
Goods Receipt for Purchase Order: Initial screen
Document date The document date is the date on which the original document was issued.
Posting date Enter the Delivery Date.
Delivery note Leave blank.
Bill of lading Number identifying the bill of lading of the goods that have been received. The bill of lading is the document issued by the sender that accompanies the goods. Normally left blank.
Doc. header text The document header text contains explanations or notes that apply to the document as a whole, not just for certain line items.
GR/GI slip no. Leave blank
Defaults for document items
Movement type Enter ‘101’ for a goods receipt.
Purchase order Enter the relevant purchase order number to which the goods receipt or goods return relates. The purchase order number should to be quoted by the vendor on the shipping documents or packing slip. The purchase order number can also be found on the goods receipt copy of the purchase order (which is sent to the warehouse).
Site Enter the site to which the goods are being received or from which they are being returned.
Reason for movement
Leave this field blank while processing a Goods Receipt.
Storage location Leave this field blank.
Suggest zero lines
Leave this field blank.
GR/GI slip
Print Check this box if you want to print the goods receipt.
Collective slip Leave the default value.
Press [Enter] or the green check mark to continue.
Beginner Accounts Payable
Step 2 – Three Way Match Process: Goods Receipt 77 (May 2008)
Each line item of the PO is listed with the order quantity. If the goods from the line item were not delivered at all, uncheck the box to the left of the item number.

Beginner Accounts Payable
(May 2008) 78 Step 2 – Three Way Match Process: Goods Receipt
If part of the goods from the line item were delivered, change the quantity to reflect the amount that was delivered. For example, if line item 4 had 700 pencils delivered, change the quantity from 1,000 to 700. Once goods have been receipted, SAP will NOT allow you to re-receive them. In the above example, where 700 out of 1,000 pencils were delivered, SAP will only allow you to receive 300 the next time you do a Goods Receipt. Once you are satisfied that all goods are marked properly, click to save the document. Be sure to write down the document number.
Beginner Accounts Payable
Step 2 – Three Way Match Process: Goods Receipt 79 (May 2008)
Change Goods Receipt Very few fields on a goods receipt can be changed. The fields that may be changed include the document header text and the item text. All other fields such as quantity and date cannot be changed. If these other fields require changing, the goods receipt should be reversed using Movement Type 102 (see the following section). In cases where merchandise is returned to the vendor, enter a new goods receipt using Movement Type 122. You will note when using movement type 122, the quantity for each line item returned is marked with a “-” or minus sign signifying its return to the vendor. Menu path: LOGISTICS > RETAILING > MERCHANDISE LOGISTICS >
INVENTORY MANAGEMENT > ARTICLE DOCUMENT > CHANGE Transaction code: MB02
Field Description/Usage
Change Article Document: Initial screen
Article doc. Enter the document number of the goods receipt that is to be changed.
Art. doc. year Enter the calendar (not fiscal) year in which the goods receipt was posted.
Press [Enter] or the green checkmark to continue.

Beginner Accounts Payable
(May 2008) 80 Step 2 – Three Way Match Process: Goods Receipt
Field Description/Usage
Change Article Document XXXXXXXXXX: Overview
All fields Display only

Beginner Accounts Payable
Step 2 – Three Way Match Process: Goods Receipt 81 (May 2008)
Menu Path: Go to > Additional functions > Header
Field Description/Usage
Change Article Document XXXXXXXXXX: Header
Doc header text The document header text contains explanations or notes that apply to the document as a whole, not just certain line items.
Click the green arrow back to return to the previous screen.

Beginner Accounts Payable
(May 2008) 82 Step 2 – Three Way Match Process: Goods Receipt
Menu Path: Go to > Details from item Enter the line item to be changed and press [Enter] or the green check mark.

Beginner Accounts Payable
Step 2 – Three Way Match Process: Goods Receipt 83 (May 2008)
Field Description/Usage
Change Article document XXXXXXXXXX: Details 0001 / 0002
Text The text may contain explanations or notes that apply to certain line items.
Click to save the changed Goods Receipt The following message will appear: “Document 50XXXXXXXX changed”.

Beginner Accounts Payable
(May 2008) 84 Step 2 – Three Way Match Process: Goods Receipt
Display Goods Receipt Menu path: LOGISTICS > RETAILING > MERCHANDISE LOGISTICS >
INVENTORY MANAGEMENT > ARTICLE DOCUMENT > DISPLAY Transaction code: MB03
Field Description/Usage
Display Article Document: Initial Screen
Article doc Enter the document number.
Art. doc. year Enter the calendar (not fiscal) year in which the goods receipt was posted.
Press [Enter] or the green checkmark to continue.

Beginner Accounts Payable
Step 2 – Three Way Match Process: Goods Receipt 85 (May 2008)
Field Description/Usage
Display Article Document XXXXXXXXXX: Overview
Item Display only.
Quantity Display only.
EUn Display only.
Beginner Accounts Payable
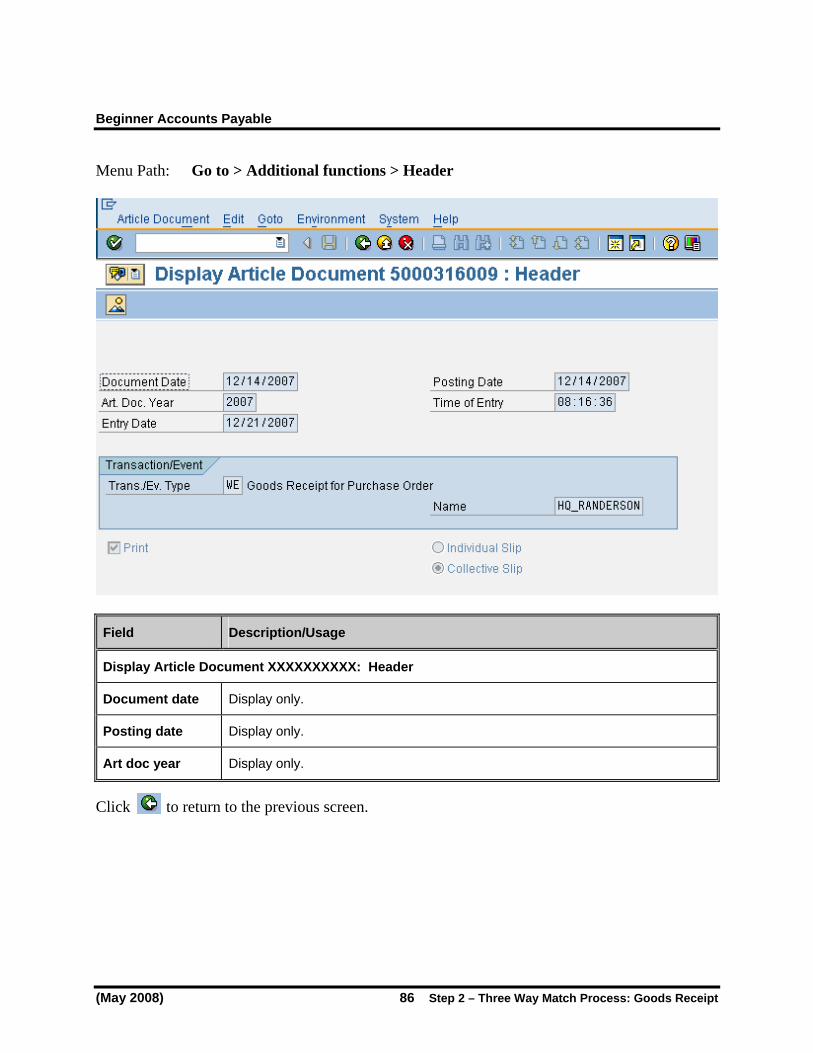
(May 2008) 86 Step 2 – Three Way Match Process: Goods Receipt
Menu Path: Go to > Additional functions > Header
Field Description/Usage
Display Article Document XXXXXXXXXX: Header
Document date Display only.
Posting date Display only.
Art doc year Display only.
Click to return to the previous screen.

Beginner Accounts Payable
Step 2 – Three Way Match Process: Goods Receipt 87 (May 2008)
Menu Path: Go to > Details from item Choose the line item to be displayed and click the green checkmark.

Beginner Accounts Payable
(May 2008) 88 Step 2 – Three Way Match Process: Goods Receipt
Field Description/Usage M/O/D/S
Display Article Document XXXXXXXXXX: Details 0001 / 0002
Purchase order Display only. D
Movement type Display only. D
Reference doc Display only. D
Site Display only. D
Vendor Display only. D
Article Display only. D
Unit of entry Display only. D
Acct assgt cat Display only. D
No. of GR slips Display only. D
Company code Display only. D
Fiscal year Display only. D
Text Display only. D
Click to return to the previous screen.

Beginner Accounts Payable
Step 2 – Three Way Match Process: Goods Receipt 89 (May 2008)
Reverse (Cancel) Goods Receipt This transaction should be used when it is determined that an incorrect Goods Receipt was entered or an error was made during posting. Menu path: LOGISTICS > RETAILING > MERCHANDISE LOGISTICS >
INVENTORY MANAGEMENT > ARTICLE DOCUMENT > CANCEL/REVERSE
Transaction code: MBST If you want all items selected automatically, click to adopt.

Beginner Accounts Payable
(May 2008) 90 Step 2 – Three Way Match Process: Goods Receipt
(You will notice that you cannot select or deselect items to be reversed.) Otherwise, if you only want to cancel some of the items on the GR from the initial screen press [ENTER] or choose the .

Beginner Accounts Payable
Step 2 – Three Way Match Process: Goods Receipt 91 (May 2008)
(To deselect, click in the box that corresponds to the line item that you do not want to reverse.) Click to post the reversal.

Beginner Accounts Payable
(May 2008) 92 Step 2 – Three Way Match Process: Goods Receipt
Goods Return Menu path: LOGISTICS > RETAILING > PURCHASING > PURCHASE ORDERS >
PURCHASE ORDER > FOLLOW-ON FUNCTIONS > GOODS RECEIPT Transaction code: MB01
Beginner Accounts Payable
Step 2 – Three Way Match Process: Goods Receipt 93 (May 2008)
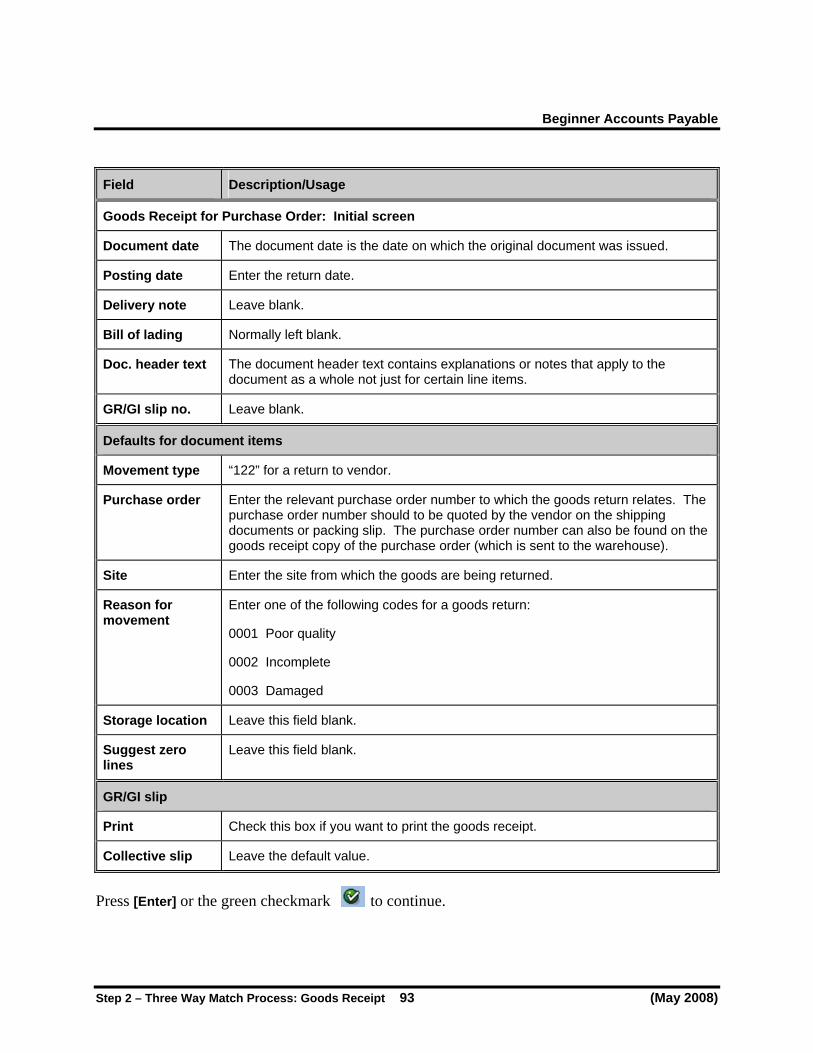
Field Description/Usage
Goods Receipt for Purchase Order: Initial screen
Document date The document date is the date on which the original document was issued.
Posting date Enter the return date.
Delivery note Leave blank.
Bill of lading Normally left blank.
Doc. header text The document header text contains explanations or notes that apply to the document as a whole not just for certain line items.
GR/GI slip no. Leave blank.
Defaults for document items
Movement type “122” for a return to vendor.
Purchase order Enter the relevant purchase order number to which the goods return relates. The purchase order number should to be quoted by the vendor on the shipping documents or packing slip. The purchase order number can also be found on the goods receipt copy of the purchase order (which is sent to the warehouse).
Site Enter the site from which the goods are being returned.
Reason for movement
Enter one of the following codes for a goods return:
0001 Poor quality
0002 Incomplete
0003 Damaged
Storage location Leave this field blank.
Suggest zero lines
Leave this field blank.
GR/GI slip
Print Check this box if you want to print the goods receipt.
Collective slip Leave the default value.
Press [Enter] or the green checkmark to continue.

Beginner Accounts Payable
(May 2008) 94 Step 2 – Three Way Match Process: Goods Receipt
Field Description/Usage
Goods Receipt for Purchase Order: Selection screen 0001 / XXXX
Item Make sure that the checkbox beside the item is flagged. The system defaults a value from the purchase order.
Quantity Enter the quantity to be returned, in the unit of entry.
EUn Unit of measure in which the goods movement or inventory count is entered.
Delivery completed
Leave blank.
Stock type Leave blank.
Click the SAVE icon to post the Goods Return. The following message will appear: “Document 50XXXXXXXX posted”.

Beginner Accounts Payable
Step 3 – Three Way Match: Logistics Invoice Verification 95 (May 2008)
STEP 3 - Three Way Match Process: Logistics Invoice Verification This method of invoice verification must be used for all purchase orders.
NOTE: Posting of the invoice results in an entry being recorded to the general ledger.
This entry now moves the liability of the F&FR activity (to pay the vendor for the goods/service) to the actual vendor account, creating an “open item” due for payment. The GR/IR account is “cleared”. The following entry is made:
Debit: 201010 (GR/IR Clearing).
Credit: Vendor Number (or balance sheet account - 201000 - the reconciliation account for most vendors).
Menu Path: LOGISTICS > RETAILING > PURCHASING > LOGISTICS INVOICE
VERIFICATION > DOCUMENT ENTRY > ENTER INVOICE Transaction code: MIRO The first time you enter the MIRO t-code after you sign in, SAP will prompt you for a company code. Enter the appropriate company code and press [Enter] or the green check mark.

Beginner Accounts Payable
(May 2008) 96 Step 3 – Three Way Match: Logistics Invoice Verification
To pay invoices for a different company code after the first invoice is entered, use the menu path and go to EDIT > SWITCH COMPANY CODE. This is also helpful if you make a mistake at the beginning.

Beginner Accounts Payable
Step 3 – Three Way Match: Logistics Invoice Verification 97 (May 2008)
Enter the new company code on the pop-up screen and press [Enter] or the green check mark.
Note that the company code has now changed.

Beginner Accounts Payable
(May 2008) 98 Step 3 – Three Way Match: Logistics Invoice Verification
Information on the invoice is entered via a series of tabs. The first tab is shown below. Enter information in the following fields as specified in the table below:
Field Description/Usage
Enter Invoice: Company Code 1139
Transaction You can choose between the following transactions: Invoice, Credit memo, Subsequent debit, or Subsequent credit. System will default to Invoice – change if necessary.
Tab One: Invoice Verification
Invoice date Enter vendor’s invoice date.
Reference Enter vendor’s invoice number.
Posting date Enter posting date, defaults to today’s date.
Invoice amount Enter the gross amount on the invoice.
Calculate tax DO NOT SELECT. Leave blank.

Beginner Accounts Payable
Step 3 – Three Way Match: Logistics Invoice Verification 99 (May 2008)
Tax amount Leave blank.
Tax code Defaults to I0 (Do not change).
Purchase Order Information
Defaults to Purchase order/scheduling agreement.
Purchase order number
Enter Purchase Order number.
Indicator for Delivery Cost
Defaults to “Goods/Service items + planned delivery costs”. By selecting this indicator, the freight/delivery cost will automatically be displayed if the PO has planned freight.
Once this information has been entered, press [ENTER]. You will note that the purchase order line items now appear at the bottom of your screen. All line items come in “selected” or highlighted in YELLOW. If one or more of the line items are NOT to be included in this payment, “unselect/deselect” them by clicking on the grey box to the left of the line item (they will no longer be YELLOW).
NOTE: If no line items appear, this usually means that the MIRO invoice was already entered. Open another session of SAP to investigate (look at the vendor’s line items, both open and cleared).

Beginner Accounts Payable
(May 2008) 100 Step 3 – Three Way Match: Logistics Invoice Verification
Moving on through the rest of the tabs, select the second tab “Payment.”

Beginner Accounts Payable
Step 3 – Three Way Match: Logistics Invoice Verification 101 (May 2008)
Field Description/Usage
Enter Invoice: Company Code 1139
Tab Two: Payment
BaselineDt The default value is populated by the entry made in the document date field. The default value is generally correct but the baseline date can be changed. This date is the date from which the terms of payment are calculated. There can be instances where the document date is different from the Bline date.
Payt terms This will default from the purchase order. Select via pull down menu. It can be changed if necessary.
Days Defaults from PO, however changes can be made here. If an invoice has multiple days with multiple discounts, enter the 1st number of days for 1st discount to be taken.
Discount Enter cash discount if discount is a ‘lump sum’ vs. a percentage.
Days Net System will default from master record, change if necessary.

Beginner Accounts Payable
(May 2008) 102 Step 3 – Three Way Match: Logistics Invoice Verification
Pmt meth. System will default from master record, change if necessary.
Pmnt meth.sup. Characteristic in an open item for the grouping of payments.
Pmnt block Enter block if necessary.
Inv. ref. Used for credit memos. Enter SAP/AIMS invoice number if credit memo should be linked/referenced to invoice.
Click on the “Details” tab.

Beginner Accounts Payable
Step 3 – Three Way Match: Logistics Invoice Verification 103 (May 2008)
Field Description/Usage
Enter Invoice: Company Code 1139
Tab Three: Details Unpl. del. csts Enter unplanned delivery costs without taxes. Note that the system will allocate
delivery costs entered among the individual items. If you have planned delivery costs (that is freight that is included on the PO) you do not have to enter anything here!
The unplanned delivery costs will not post to the freight g/l account. It will post to the expense account of the items that are being invoiced.
Doc. type DO NOT CHANGE THE DEFAULT!
Inv. party Defaults from Vendor Master, if partner vendor is identified within the Vendor master. If an alternative payee is necessary, enter the new vendor number here.
Assignment The assignment number is an additional information reference field in the line item.
Header texts The document header text contains explanations or notes, which apply to the document as a whole, not just for certain line items.
Select the “Tax” tab. Do not make any changes.

Beginner Accounts Payable
(May 2008) 104 Step 3 – Three Way Match: Logistics Invoice Verification
REMEMBER: Do not make any changes on this tax tab!
Select the “Contacts” tab. No action is required on this screen.

Beginner Accounts Payable
Step 3 – Three Way Match: Logistics Invoice Verification 105 (May 2008)
Select the “Note” tab to add any notes or import a local file. Underneath the tabs are the entry fields for reference information. Review the document by pressing the Simulate icon. If the document balances and is correct, select save. If certain errors exist, you will not be able to post it. The system will generate a message “Invoice document still contains messages.” All errors must be resolved prior to posting. After correcting the errors, select save If the document is in balance and no error messages exist, you will receive a document number.
REMEMBER: If you are entering invoices for multiple company codes, remember to change
company codes prior to entering invoices!
NOTE: Both BPA’s and NAF credit card payments will be processed using Direct Invoice Methods, NOT Logistics Invoice Verification. Goods receipts for BPA calls and credit cards wil be handled manually outside SAP. Invoices will be posted as Direct Invoices and payments processed either via EFT or check.

Beginner Accounts Payable
(May 2008) 106 Step 3 – Three Way Match: Logistics Invoice Verification
Invoices where prices vary from that of PO price If your invoices show a price difference from that of the PO line item, your invoice will not “balance” and you will see the following notation when trying to save the invoice. You must resolve these discrepancies prior to posting the document. A price difference requires a purchase order modification (this necessitates a return to the Procurement Department) IF it is more than the 3% (+/- $25) variance (see the beginning of the 3 Way Match section for more details). If there has been a Goods Receipt posted, this must be reversed (please see the “Goods Return” section of this book). If there is a price difference you will get a hard ERROR and you will NOT be able to save/post the invoice.

Beginner Accounts Payable
Step 3 – Three Way Match: Logistics Invoice Verification 107 (May 2008)
Unplanned Delivery Costs (Freight) Usually vendors will add freight or a handling fee when shipping goods. If the amount is known at the time of the purchase order, it is best to include it on the PO. For help with this, please see the Procurement Beginner manual. Sometimes, the amount of freight is not known until the invoice arrives. If this is the case, do NOT include it on the PO. There is an area on the MIRO to include unplanned delivery costs. On the Details tab of the MIRO, there is a field called “Unpl. Del. Csts”. You can enter the amount of freight listed on the invoice. SAP will add this amount to the total of the PO. This should then equal the amount of the invoice. This will not post to the Freight Clearing account (201012), but directly to the Expense accounts and cost centers on the PO (proportioned out).
NOTE: This is only for delivery costs that were NOT included on the purchase order.

Beginner Accounts Payable
(May 2008) 108 Step 3 – Three Way Match: Logistics Invoice Verification
Planned Freight Billed in Separate Invoice Sometimes vendors send separate invoices for the goods ordered and the planned freight. Both invoices are processed using MIRO and can be done at different times. When posting the first invoice for the goods ONLY: Enter the invoice info on the Basic data tab as usual. The amount should be the PO total minus the amount for freight. After entering the PO number, change the “Goods/service items + planned delivery costs” to just “Goods/service items”. This will exclude the line item for freight from the PO. Then, press [Enter] key or

Beginner Accounts Payable
Step 3 – Three Way Match: Logistics Invoice Verification 109 (May 2008)
Notice that the line items do not reflect the charges for freight. You can now post/save the invoice.

Beginner Accounts Payable
(May 2008) 110 Step 3 – Three Way Match: Logistics Invoice Verification
When the freight invoice arrives, you will again use MIRO. Enter the invoice info on the Basic data tab as usual. This should only be the freight (nothing for the goods). Be sure to change the “Goods/service items” to “Planned delivery costs”. This will only show the freight details. Then, press [Enter] key or

Beginner Accounts Payable
Step 3 – Three Way Match: Logistics Invoice Verification 111 (May 2008)
Notice that the freight has been divided out proportionally among the goods ordered. Only the freight totals are included. You can now post/save the invoice.

Beginner Accounts Payable
(May 2008) 112 Step 3 – Three Way Match: Logistics Invoice Verification
Planned Freight Billed by Third Party Vendor Sometimes vendors will use a third party to ship goods. The freight charges are included on the PO, but the freight invoice will come from another vendor. Process the MIRO for the goods as detailed above (Planned Freight Billed in Separate Invoice). When the invoice for the freight arrives, process it by changing the “Goods/service items + planned delivery costs” to “Planned delivery costs”.

Beginner Accounts Payable
Step 3 – Three Way Match: Logistics Invoice Verification 113 (May 2008)
Now go to the Details tab to change the vendor. Also refered to as Invoicing Party.
Note that the invoice is still the original vendor from the purchase order.
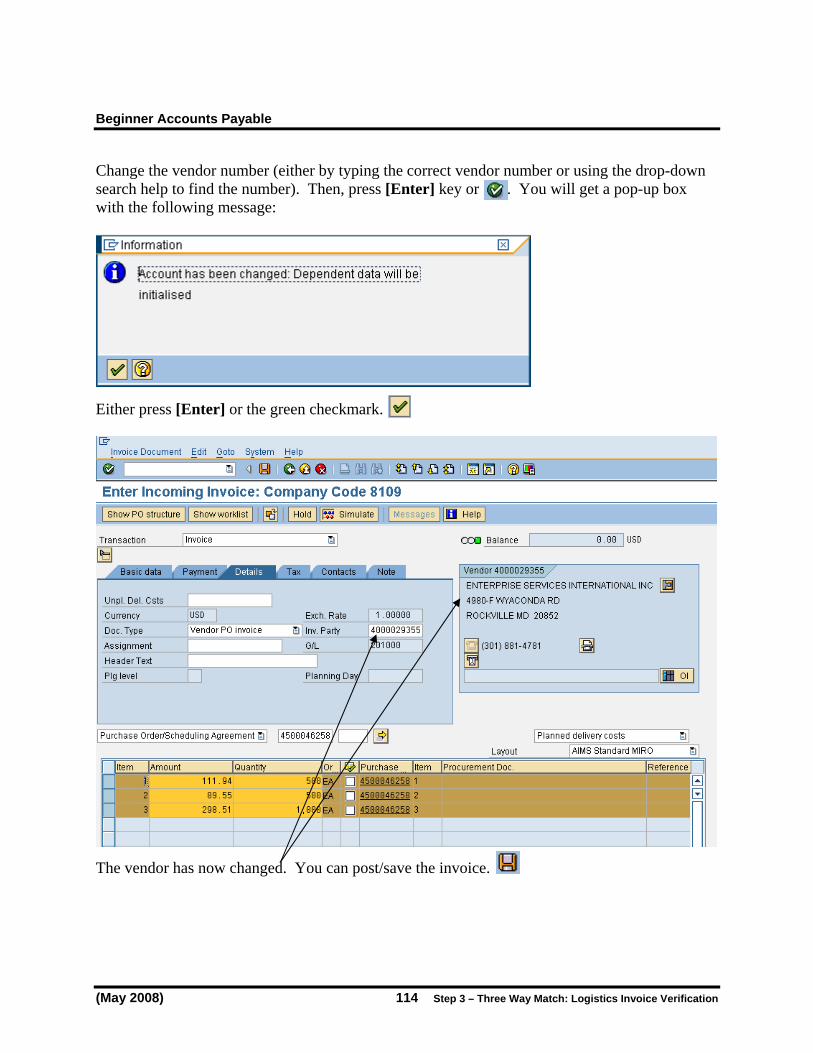
Beginner Accounts Payable
(May 2008) 114 Step 3 – Three Way Match: Logistics Invoice Verification
Change the vendor number (either by typing the correct vendor number or using the drop-down search help to find the number). Then, press [Enter] key or . You will get a pop-up box with the following message: Either press [Enter] or the green checkmark. The vendor has now changed. You can post/save the invoice.

Beginner Accounts Payable
Step 3 – Three Way Match: Logistics Invoice Verification 115 (May 2008)
Credit Memo after MIRO invoice Sometimes goods need to be returned after the invoice is posted. In order to tie it to the original invoice, a credit memo can be entered through the MIRO function. DO NOT use the credit memo t-code (F-41) as this will not give you the history with the PO. Normally, the MIRO screen appears ready for an invoice to be entered. Use the drop-down function to change this to “Credit Memo”.

Beginner Accounts Payable
(May 2008) 116 Step 3 – Three Way Match: Logistics Invoice Verification
All line items come in as selected (highlighted). In this example, we are getting a credit for $500.00 for 25 blankets (the third line item). Un-select all line items except the one that pertains to the credit. Since the background of the fields are white, they can be changed. Change the amount to correspond to the credit. Also, change the quantity to the amount reflected by this credit memo. In this example, $500.00 equals 25 items. Press [Enter] or the green checkmark.

Beginner Accounts Payable
Step 3 – Three Way Match: Logistics Invoice Verification 117 (May 2008)
Notice that the “Balance” light has turned green since the changes were made. If you click on the Simulate icon , you will see what SAP will post.
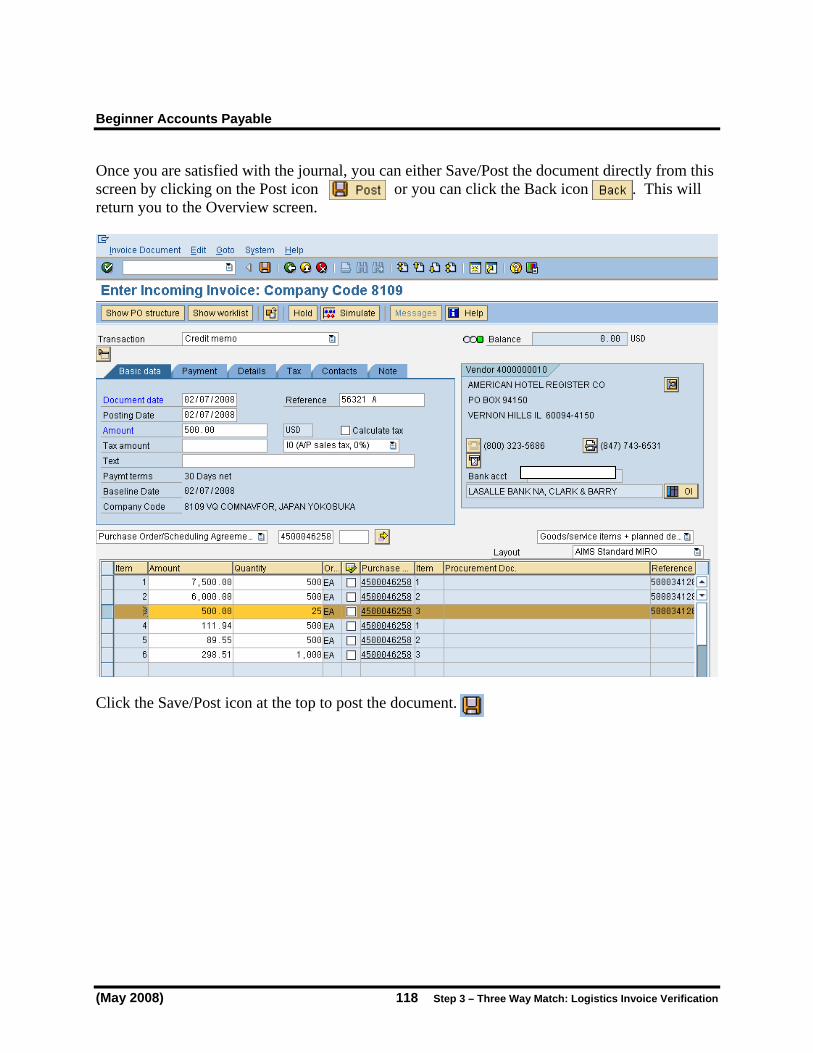
Beginner Accounts Payable
(May 2008) 118 Step 3 – Three Way Match: Logistics Invoice Verification
Once you are satisfied with the journal, you can either Save/Post the document directly from this screen by clicking on the Post icon or you can click the Back icon . This will return you to the Overview screen. Click the Save/Post icon at the top to post the document.

Beginner Accounts Payable
Step 3 – Three Way Match: Logistics Invoice Verification 119 (May 2008)
Subsequent Credit Posting to MIRO Sometimes a vendor will give a credit for an order. It is not associated with a particular good that was ordered or returned. It is a value-only adjustment and will not affect the quantity. In order to tie this to the PO, use the MIRO function. Normally, the MIRO screen appears ready for an invoice to be entered. Use the drop-down function to change this to “Subsequent Credit”.

Beginner Accounts Payable
(May 2008) 120 Step 3 – Three Way Match: Logistics Invoice Verification
Enter the appropriate information like you would for an invoice. Be sure to use the vendor’s document number for the credit in the Reference field since SAP uses this field to check for duplicates. Enter the amount of the credit for the different line items where you want it to be applied. In this example, there is a $500.00 credit that will be applied to all three goods line items (the last three line items pictured above are for freight charges).

Beginner Accounts Payable
Step 3 – Three Way Match: Logistics Invoice Verification 121 (May 2008)
If you click on the Simulate icon , you will see what SAP will post.

Beginner Accounts Payable
(May 2008) 122 Step 3 – Three Way Match: Logistics Invoice Verification
Once you are satisfied with the journal, you can either Save/Post the document directly from this screen by clicking on the Post icon or you can click the Back icon . This will return you to the Overview screen. Click the Save/Post icon at the top to post the document.

Beginner Accounts Payable
Step 3 – Three Way Match: Logistics Invoice Verification 123 (May 2008)
Subsequent Debit Posting to MIRO Sometimes a subsequent debit needs to be posted and associated with a MIRO invoice. This is ONLY for a legitimate pricing adjustment, such as a debit memo received from the vendor. It is a value-only adjustment and will not affect the quantity. In order to tie this to the PO, use the MIRO function. Normally, the MIRO screen appears ready for an invoice to be entered. Use the drop-down function to change this to “Subsequent Debit”.

Beginner Accounts Payable
(May 2008) 124 Step 3 – Three Way Match: Logistics Invoice Verification
Enter the appropriate information like you would for the original invoice. Be sure to use the vendor’s document number for the debit in the Reference field since SAP uses this field to check for duplicates. Enter the amount of the debit for the different line items where you want it to be applied. The +/- 3% (max $25) still applies to this function. Therefore, if the debit is more than a three percent difference or more than $25, then the PO will need to be modified.

Beginner Accounts Payable
Step 3 – Three Way Match: Logistics Invoice Verification 125 (May 2008)
If you click on the Simulate icon , you will see what SAP will post.
Beginner Accounts Payable
(May 2008) 126 Step 3 – Three Way Match: Logistics Invoice Verification
Once you are satisfied with the journal, you can either Save/Post the document directly from this screen by clicking on the Post icon or you can click the Back icon . This will return you to the Overview screen. Click the Save/Post icon at the top to post the document.

Beginner Accounts Payable
Step 3 – Three Way Match: Logistics Invoice Verification 127 (May 2008)
Other Features to Posting MIRO Invoices Invoices with many line items can now be displayed more easily by pressing a button, which will hide the invoice header information. This leaves more room on the screen so that all of the line items can be displayed. Click once on the hide header data icon.

Beginner Accounts Payable
(May 2008) 128 Step 3 – Three Way Match: Logistics Invoice Verification
After you click on the hide header data icon the screen changes to look like the following screen shot. The line items are all displayed. To change it back and display the header information, simply click once more on the same icon.

Beginner Accounts Payable
Step 3 – Three Way Match: Logistics Invoice Verification 129 (May 2008)
It is now also possible to go from the Enter Invoice screen directly to the Vendor’s account. To view the vendor’s open items, click on the line item list icon. After clicking on the line item display icon once, the following screen appears.
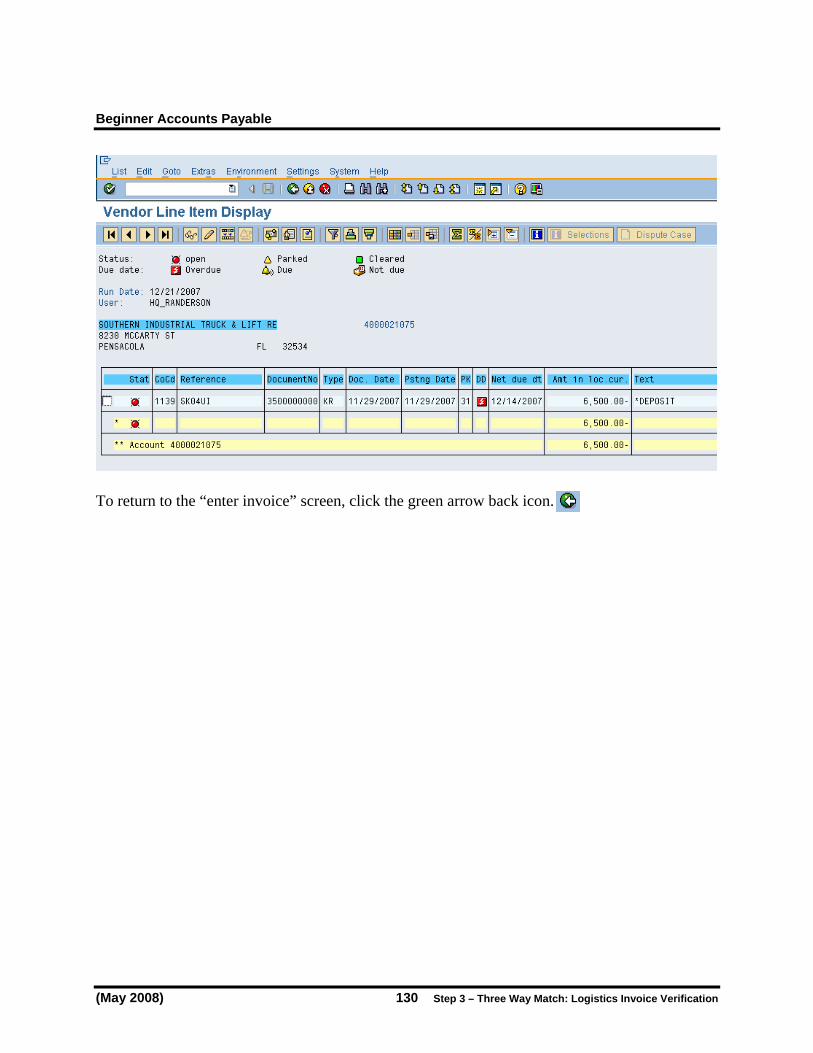
Beginner Accounts Payable
(May 2008) 130 Step 3 – Three Way Match: Logistics Invoice Verification
To return to the “enter invoice” screen, click the green arrow back icon.

Beginner Accounts Payable
Step 3 – Three Way Match: Logistics Invoice Verification 131 (May 2008)
Display Invoice Verification Documents Menu Path: LOGISTICS > RETAILING > PURCHASING > LOGISTICS INVOICE
VERIFICATION > DOCUMENT ENTRY > ENTER INVOICE Transaction code: MIRO This function replaces the old transaction MR3M, which can no longer be used. There is now the capability to display Invoice Verification Documents directly from the MIRO data entry screen. To display, click on the “Other Invoice Document” icon.
Field Description/Usage
Enter Invoice: Company Code 1353
Invoice doc. number
Enter the document number of the invoice you want to display.
Fiscal Year Enter the fiscal year in which the document was posted.

Beginner Accounts Payable
(May 2008) 132 Step 3 – Three Way Match: Logistics Invoice Verification
Click the green checkmark or press Enter to continue. To display the accounting documents associated with this invoice document, click on the “Follow-On Documents” icon.

Beginner Accounts Payable
Step 3 – Three Way Match: Logistics Invoice Verification 133 (May 2008)
Double click on either option to display the documents.

Beginner Accounts Payable
(May 2008) 134 Step 3 – Three Way Match: Logistics Invoice Verification
Reversal of Individual Logistics Invoice Documents Documents that have been posted in error can easily be reversed. SAP provides functionality to automatically generate a reversal document, when the user specifies the original document.
NOTE: An invoice that has already been paid can not be reversed right away since the
payment automatically clears the document. Please call the SAP helpdesk if you need to reverse an invoice that has been paid.
Remember that reversal documents cannot be posted to a period that is already closed. Usually, SAP will use the posting date of the original document as the reversal posting date if it is within the current period. The user may specify a different posting date. It should be in the same accounting period as the original document. If it is determined that an invoice from a previous (closed) period needs to be reversed, you must specify an alternate posting date because the system cannot post to the original. There are two options for reversing documents. The first option is to use T-code MR8M. The second option is from the MIRO screen. First option for reversals: Menu Path: LOGISTICS > RETAILING > PURCHASING > LOGISTICS INVOICE
VERIFICATION > FURTHER PROCESSING > CANCEL INVOICE Transaction code: MR8M

Beginner Accounts Payable
Step 3 – Three Way Match: Logistics Invoice Verification 135 (May 2008)
Field Description/Usage
Reverse Document: Header Data
Invoice doc. number
Enter the document number to be reversed.
Fiscal year Enter the fiscal year in which the document was originally posted. Remember that F&FR uses document numbers that are company code dependant and that reset themselves after they reach the end of the respective number ranges. Therefore a unique document can only be found when both the document number, company code and fiscal year are specified in combination. This combination is a unique key in the database that identifies a particular document.
Details for cancellation posting
Reversal reason Currently, there are three reversal reason codes that can be used. This code is only used for reporting purposes (i.e. document reports can be executed with reversal reason code as a selection criteria). The valid reason codes are: 01 Reversal in current period 02 Reversal in closed period (alt posting date) 03 Accrual reversal
Reason code # 03 should only be used for self-reversing journals (AJVs). Reason code # 01 should be used when the original document to be reversed was posted in the current period. Reason code # 02 should be used when the original document to be reversed was posted in a closed period.
Posting date This field could be left blank if the posting date for the reversed document is similar to that of the original document. This field must be filled when using reversal reason code # 02 - you must indicate the date you want the reversal posted (it CANNOT be in a closed period…it must be a date in the current period you are using). This field should be left blank when using reversal reason code # 01.
Click icon to see the document for cancellation. Click to return to the previous screen. To reverse the document, click on the Save icon.
NOTE: After the reversal has been processed, you will need to manually clear the
reversal document with the original document. (See section on Manually Clearing Documents.)
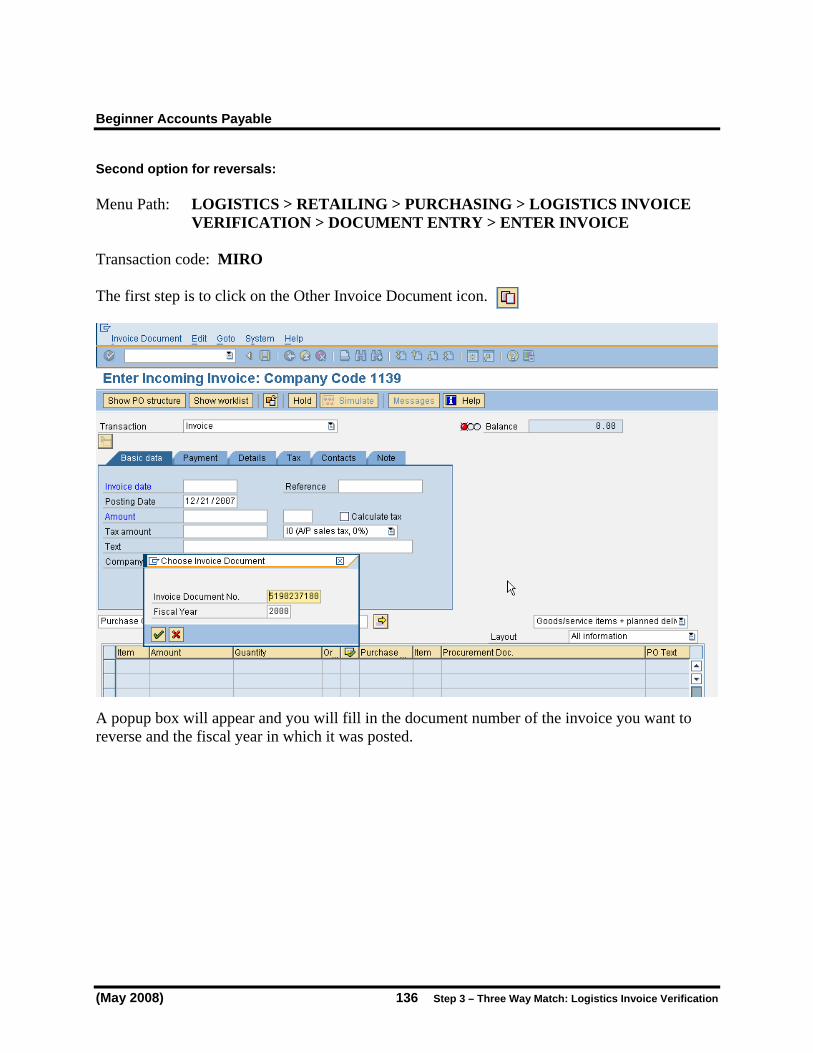
Beginner Accounts Payable
(May 2008) 136 Step 3 – Three Way Match: Logistics Invoice Verification
Second option for reversals: Menu Path: LOGISTICS > RETAILING > PURCHASING > LOGISTICS INVOICE
VERIFICATION > DOCUMENT ENTRY > ENTER INVOICE Transaction code: MIRO The first step is to click on the Other Invoice Document icon. A popup box will appear and you will fill in the document number of the invoice you want to reverse and the fiscal year in which it was posted.

Beginner Accounts Payable
Step 3 – Three Way Match: Logistics Invoice Verification 137 (May 2008)
Once the document appears, click on the reverse document icon.

Beginner Accounts Payable
(May 2008) 138 Step 3 – Three Way Match: Logistics Invoice Verification
Another popup box will appear where you must enter the reversal reason and posting date if it is to be reversed on a date other than the original posting date. Press [Enter] or the green checkmark icon. The following message will appear after the document is reversed:

Beginner Accounts Payable
Analysis of GR/IR & Freight Clearing Accounts 139 (May 2008)
Analysis of GR/IR & Freight Clearing Accounts The GR/IR Clearing (201010) and Freight Clearing (202012) accounts need to be analyzed weekly to ensure that documents are matching up properly. Sometimes an order will be generated using the 3 Way Match process. However, when the invoice comes in, it will be posted using the Direct Invoice method instead of the Invoice Verification (MIRO) method. This results in a credit entry that is never cleared out of the GR/IR Clearing Account and a double posting of the expense. Menu Path: ACCOUNTING > FINANCIAL ACCOUNTING > GENERAL LEDGER >
ACCOUNT > DISPLAY/CHANGE LINE ITEMS Transaction code: FBL3N Enter the G/L Account 201010 (GR/IR) or 202012 (Freight). Enter the appropriate Company Code. You want to look at open items, so leave the default Status under Line item selection. Click on the Execute icon.

Beginner Accounts Payable
(May 2008) 140 Analysis of GR/IR & Freight Clearing Accounts
Notice that the Assignment field contains the PO number along with the line item number. For example, line item 20 of PO 4500025631 would look like 45000256310020. For better analysis, you need to change the layout of the screen. To do this, click on the Select layout icon. A pop-up box will appear.

Beginner Accounts Payable
Analysis of GR/IR & Freight Clearing Accounts 141 (May 2008)
Choose layout /AIMS10: AIMS GR/IR and Freight Clearing Analysis. Either double click the name or click once and then click the green checkmark. The layout will change.

Beginner Accounts Payable
(May 2008) 142 Analysis of GR/IR & Freight Clearing Accounts
The account is now sub-totaled by the purchase document number. It also shows the line item number since there are partial receipts of goods. To learn more about the PO, double click on a line item.

Beginner Accounts Payable
Analysis of GR/IR & Freight Clearing Accounts 143 (May 2008)
The Purchasing Doc. number is listed as well as the line item number and quantity. In order to see the actual purchase order, double click on the Purchasing Doc. field.
Double click here.

Beginner Accounts Payable
(May 2008) 144 Analysis of GR/IR & Freight Clearing Accounts
The screen that appears shows the Account Assignment for the particular line item you chose. For more information about navigating through the Display Purchase Order, please see the Procurement Beginner manual.

Beginner Accounts Payable
Analysis of GR/IR & Freight Clearing Accounts 145 (May 2008)
Correct the GR/IR & Freight Clearing Accounts There is a program that can be run if you find line items in the GR/IR and Freight Clearing accounts that do not match up. SAP will reverse the goods receipt in the current period. The system will process a reverse entry to what was originally posted, assuming that the original GL account (cost element) and cost center are still open and available for postings. If the goods receipt was in a prior fiscal year, you can not specify Prior Fiscal Year Expense. A GJV would need to be done.
Warning: Do NOT attempt to do this if the purchase order contains an asset. If the goods receipt was posted to a fixed asset that has started to depreciate, you can not reverse the GR. Also, you can not reverse a GR that has been posted to a 179 project (asset under construction) if the project has been closed.
Please call the SAP Helpdesk before continuing for asset POs.
Menu Path: LOGISTICS > RETAILING > PURCHASING > LOGISTICS INVOICE
VERIFICATION > GR/IR ACCOUNT MAINTENANCE > MAINTAIN GR/IR CLEARING ACCOUNT
Transaction code: MR11

Beginner Accounts Payable
(May 2008) 146 Analysis of GR/IR & Freight Clearing Accounts

Beginner Accounts Payable
Analysis of GR/IR & Freight Clearing Accounts 147 (May 2008)
Field Description/Usage
Maintain GR/IR Clearing Account
Company Code Enter the appropriate company code.
Posting Date Enter the appropriate posting date. Today’s date will be the default.
Reference This field will apply to all documents that are reversed, so use something that will apply to all.
Purchase Order Date
This is a range of dates to look for POs. This will show outstanding line items in these accounts.
Leave everything else blank or with the default. Click the Execute icon.
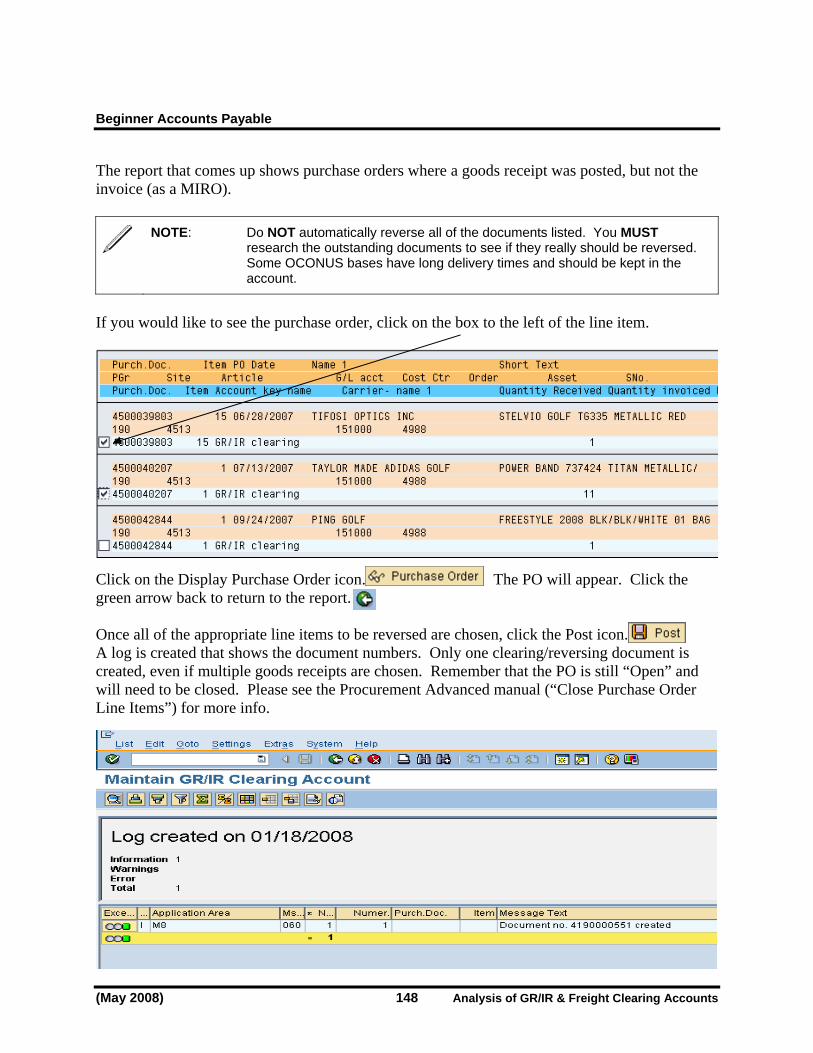
Beginner Accounts Payable
(May 2008) 148 Analysis of GR/IR & Freight Clearing Accounts
The report that comes up shows purchase orders where a goods receipt was posted, but not the invoice (as a MIRO).
NOTE: Do NOT automatically reverse all of the documents listed. You MUST
research the outstanding documents to see if they really should be reversed. Some OCONUS bases have long delivery times and should be kept in the account.
If you would like to see the purchase order, click on the box to the left of the line item. Click on the Display Purchase Order icon. The PO will appear. Click the green arrow back to return to the report. Once all of the appropriate line items to be reversed are chosen, click the Post icon. A log is created that shows the document numbers. Only one clearing/reversing document is created, even if multiple goods receipts are chosen. Remember that the PO is still “Open” and will need to be closed. Please see the Procurement Advanced manual (“Close Purchase Order Line Items”) for more info.

Beginner Accounts Payable
Manually Clear Vendor Line Items 149 (May 2008)
Manually Clear Vendor Line Items Menu Path: ACCOUNTING > FINANCIAL ACCOUNTING > ACCOUNTS PAYABLE
> ACCOUNT > CLEAR Transaction code: F-44
NOTE: This process should be done after a “payment on account” has been
performed and the offsetting source documents (i.e., goods receipt and invoice) have been received.
A “PAYMENT ON ACCOUNT” could be done in a situation where a prepayment to the vendor is required prior to receipt of goods and/or invoice. For example, a check must be prepared in order for the Post Office to authorize a postage meter increase or a check is necessary for prepaid ITT tickets. The check is prepared as a “Payment on Account” resulting in a check being written with NO offsetting invoice or paperwork. (See: “HOT CHECKS” for Payment On Account in the Accounts Payable Advanced manual.) After receipt of the goods or services, (increased meter postage from the Post Office or the ITT tickets), the receiving document should be forwarded to the Accounts Payable Technician for processing. This receipt should be processed as a “goods receipt, then invoice verification” in the case of procurement through a purchase order. If the direct invoicing method is used, the receipt of the postage or the prepaid tickets should be used to enter the “invoice”. Once the invoice has been entered into the system, you will note that the vendor has two “open items” - one invoice and one payment (with matching amounts/items). However, in the SAP system they are unmatched and NOT CLEARED as are normal payments. The SAP system cannot automatically match these items as is (payment first and invoice second), so MANUAL CLEARING is required.
NOTE: The automatic payment run program will handle clearing automatically for most
routine payments.

Beginner Accounts Payable
(May 2008) 150 Manually Clear Vendor Line Items
Field Description/Usage
Clear Vendor: Header Data Account Enter the vendor account number to be cleared. Clearing date Enter the date. Period Enter the fiscal period or leave blank. Company Code Enter the appropriate company code. Currency Enter “USD” even if invoices and payments are in another currency. Clearing
must be done in USD.
Open item selection Special G/L Ind. Can select a Special G/L indicator from drop down, if needed. Normal OI (open item)
Be sure this indicator is flagged.
Additional selections Criteria List Can choose any of the selection criteria.

Beginner Accounts Payable
Manually Clear Vendor Line Items 151 (May 2008)
In the ADDITIONAL SELECTIONS section, you may indicate the field on which to clear. In most Accounts Payable situations, the NONE will be the field used to clear. Click the NONE field. Click and all open items for the selected vendor will appear. In the column “USD Gross”, select (by double clicking) the amounts of the items that you want to clear. The amounts should change color from black to blue (as pictured below) or red depending on your user profile. After you have selected the items (by double-clicking on the line item amount or by clicking once and selecting the “activate items icon” you want to clear), click the Save button. The items are “CLEARED”.
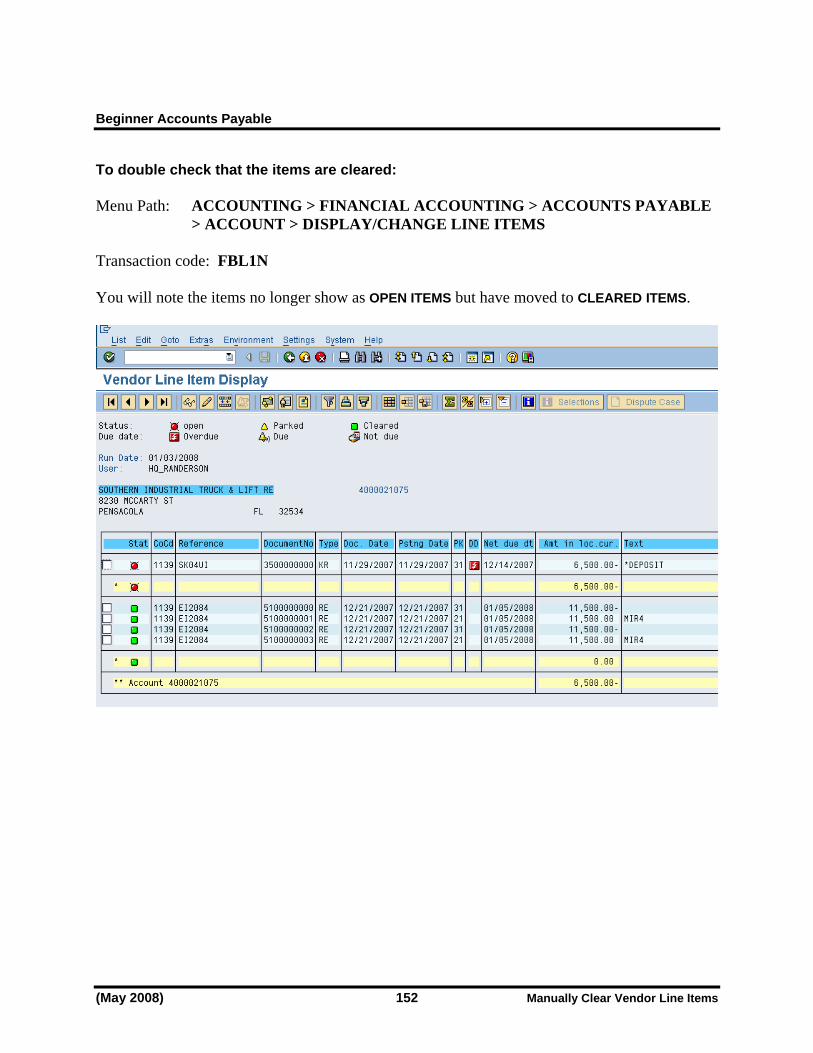
Beginner Accounts Payable
(May 2008) 152 Manually Clear Vendor Line Items
To double check that the items are cleared: Menu Path: ACCOUNTING > FINANCIAL ACCOUNTING > ACCOUNTS PAYABLE
> ACCOUNT > DISPLAY/CHANGE LINE ITEMS Transaction code: FBL1N You will note the items no longer show as OPEN ITEMS but have moved to CLEARED ITEMS.

Beginner Accounts Payable
Reset Vendor Cleared Items 153 (May 2008)
Reset Vendor Cleared Items This procedure is used to reset the clearing between two or more documents. Effectively, this transaction breaks the clearing “link” and makes the documents open items again. For example, two documents may be mistakenly cleared against one another. This transaction is never to be used to reverse check payments to vendors. Always use the check management functionality. Menu Path: ACCOUNTING > FINANCIAL ACCOUNTING > ACCOUNTS PAYABLE
> DOCUMENT > RESET CLEARED ITEMS Transaction code: FBRA
Field Description/Usage
Reset Cleared Items
Clearing document
Clearing document number to be reversed.
Company code Enter the company code for the base/fund in which the cleared items are posted.
Fiscal year The fiscal year in which the clearing document was posted.
To view the related documents, click on [Items] under the toolbar. This will display the line items that were cleared together. To view the individual documents, double-click on the desired line item. Click to return to the original screen. To view a list of the accounts included in the clearing document, click on [Accounts] push-button. Click to return to the original screen, then: To reverse the clearing document, click A “Reversal of Clearing document” screen will appear.

Beginner Accounts Payable
(May 2008) 154 Reset Vendor Cleared Items
The push-button is pressed; the clearing document will be reset as an open item. No reversal posting is generated. The related invoices will be open items again; however the original clearing document will remain. This feature should only be used for resetting manually cleared items. A message “Clearing XXXXXXXXXX reset” will appear. Click to continue. This is followed by another message “Document XXXXXXXXXX was posted in company code XXXX”. Click to continue
*** AUTO-GENERATED WP PLUGIN: This PDF was downloaded from http://www.erpdb.info ***