sap engineering control center interface to solidworks … · cideon software & services gmbh...
TRANSCRIPT
CIDEON Software & Services GmbH & Co. KG SAP Engineering Control Center Interface to SOLIDWORKS - User Manual Peterstrasse 1 • D-02826 Görlitz 2018-07-02 14:05 Web: https://www.cideon.com
User Manual
Management of CAD data and documents in SAP
SAP Engineering Control Center Interface to SOLIDWORKS
SAP Engineering Control Center Interface to SOLIDWORKS manages design data in SAP.
Given by the SAP Engineering Control Center Interface, tight integration of the CAD system to the SAP PLM data available to the company at an early stage in the design process are available. Product lifecycle management thus already begins with the start of design work and not through an interface at the end of it. The coupling between the CAD system and the SAP Engineering Control Center allows you to manage the components designed in the CAD system.
This user manual describes the installation and use of the SAP Engineering Control Center Interface to SOLIDWORKS and describes the functionality provided by this software as well as its operation.
The current version of the manual can be found in the CIDEON Software Portal.

CIDEON Software & Services GmbH & Co. KG SAP Engineering Control Center Interface to SOLIDWORKS - User Manual Peterstrasse 1 • D-02826 Görlitz 2018-07-02 14:04 Web: https://www.cideon.com
© 2018 CIDEON Software & Services GmbH & Co. KG. Germany. All Rights Reserved.
Contents of this document may not be (totally or partly) reproduced, used or published without previous written agreement by the CIDEON Software & Services GmbH & Co. KG.
Copyright applies to all forms of storage and reproduction, in those the available information flowed in particular on magnetic storage, computer expressions or visual announcements.
- 2 / 72 -

CIDEON Software & Services GmbH & Co. KG SAP Engineering Control Center Interface to SOLIDWORKS - User Manual Peterstrasse 1 • D-02826 Görlitz 2018-07-02 14:04 Web: https://www.cideon.com
1 Introduction .............................................................................................................................................................. 5
1.1 System requirements .......................................................................................................................................... 5
2 Installation ................................................................................................................................................................ 6
2.1 Product scope ..................................................................................................................................................... 6
2.2 Automatic installation .......................................................................................................................................... 6
2.3 Problems during parallel operation with the CIDEON CDESK integration ....................................................... 11
3 User interface and controls .................................................................................................................................. 12
3.1 Additional entries in the context menu of ECTR ............................................................................................... 12
3.2 Context menu ................................................................................................................................................... 13
3.3 Depiction of configurations in the ECTR ........................................................................................................... 14
3.4 Main menu ........................................................................................................................................................ 15
3.5 CommandManager ........................................................................................................................................... 16
3.6 Toolbar .............................................................................................................................................................. 17
4 Function description ............................................................................................................................................. 19
4.1 General behavior .............................................................................................................................................. 19
4.1.1 Logging ...................................................................................................................................................... 20
4.2 General functions .............................................................................................................................................. 21
4.2.1 Show CAD Structure ................................................................................................................................. 21
4.2.2 Log on with Single Sign-On ....................................................................................................................... 22
4.2.3 Open ECTR ............................................................................................................................................... 25
4.2.4 About ......................................................................................................................................................... 25
4.3 SAP PLM functions ........................................................................................................................................... 26
4.3.1 New ........................................................................................................................................................... 26
4.3.2 Open .......................................................................................................................................................... 31
4.3.2.1 Open... (SOLIDWORKS) .................................................................................................................... 37
4.3.2.2 Open from SAP through the insertion of a component ...................................................................... 38
4.3.2.3 Open from SAP through the replacement of a component ................................................................ 40
4.3.3 Save .......................................................................................................................................................... 42
4.3.4 Edit ............................................................................................................................................................ 44
4.3.5 Save and Display....................................................................................................................................... 46
4.3.6 Save as ...................................................................................................................................................... 47
4.3.6.1 Save As New Version ........................................................................................................................ 48
4.3.6.2 Save As New Document .................................................................................................................... 49
4.3.7 Refresh ...................................................................................................................................................... 50
4.3.7.1 Refresh Originals ............................................................................................................................... 50
4.3.7.2 Refresh Attributes .............................................................................................................................. 51
4.3.8 Cancel ....................................................................................................................................................... 51
4.3.9 Import ........................................................................................................................................................ 53
4.3.9.1 Support for SOLIDWORKS Toolbox .................................................................................................. 55
4.3.10 Replace Version ........................................................................................................................................ 57
- 3 / 72 -

CIDEON Software & Services GmbH & Co. KG SAP Engineering Control Center Interface to SOLIDWORKS - User Manual Peterstrasse 1 • D-02826 Görlitz 2018-07-02 14:04 Web: https://www.cideon.com
4.3.11 Display Document ..................................................................................................................................... 58
4.3.12 Add to Object List ...................................................................................................................................... 59
4.3.13 Depending Document ................................................................................................................................ 60
4.3.13.1 Open Original of Dependent Document ............................................................................................. 61
4.3.13.2 Create Dependent Document ............................................................................................................ 61
4.3.14 Ballooning .................................................................................................................................................. 61
4.3.15 Extras ........................................................................................................................................................ 62
4.3.15.1 Cancel Edit ......................................................................................................................................... 62
4.3.16 Cloning ...................................................................................................................................................... 62
5 Settings ................................................................................................................................................................... 68
5.1 Settings "Miscellaneous" .................................................................................................................................. 68
5.2 Settings "Application structure"......................................................................................................................... 70
6 Final Remark .......................................................................................................................................................... 72
- 4 / 72 -
CIDEON Software & Services GmbH & Co. KG SAP Engineering Control Center Interface to SOLIDWORKS - User Manual Peterstrasse 1 • D-02826 Görlitz 2018-07-02 14:04 Web: https://www.cideon.com
1 Introduction
The SAP Engineering Control Center Interface to SOLIDWORKS provides access to the SAP Engineering Control Center directly from SOLIDWORKS. This is made possible by making the necessary functionalities over the Control Elements Main Menu, Contextual Menu, Toolbar and CommandManager ("Command-Tab") available directly from within SOLIDWORKS. Through this close link between SOLIDWORKS and the SAP Engineering Control Center Interface to SOLIDWORKS, the manual transfer of document data and details on the execution of the functionality of the SAP Engineering Control Center is eliminated as this information is automatically read from the document currently open in SOLIDWORKS and in most cases can be simply configured and executed.
1.1 System requirements
The following system pre-conditions are necessary for installation and operation of the SAP Engineering Control Center to SOLIDWORKS version 1.1 or higher:
Operating system
As operating system, one of the following Microsoft 64-bit version operating systems must be installed as SAP Engineering Control Center Interface to SOLIDWORKS can only be run on a 64-bit operating system:
▪ Windows 7 with Service Pack 1 ▪ Windows 8 ▪ Windows 8.1 ▪ Windows 10
The choice of operating system version is dependent on the system requirements of the SOLIDWORKS version used.
SOLIDWORKS
SOLIDWORKS 2016 or higher must be installed.
SAP Engineering Control Center
SAP Engineering Control Center version 5.1 or higher must be installed.
SAP
The conditions in relation to the SAP environment are based on the requirements of the SAP Engineering Control Center.
- 5 / 72 -

CIDEON Software & Services GmbH & Co. KG SAP Engineering Control Center Interface to SOLIDWORKS - User Manual Peterstrasse 1 • D-02826 Görlitz 2018-07-02 14:04 Web: https://www.cideon.com
2 Installation
The following section describes the installation of SAP Engineering Control Center Interface to SOLIDWORKS.
IMPORTANT NOTE: Due to the fact that some data models are different a parallel operation of SAP Engineering Control Center Interface to SOLIDWORKS and CIDEON CDESK-Integration for SOLIDWORKS is not supported! For further information to this topic see chapter "Problems during parallel operation with the CIDEON CDESK integration"!
With automatic installation, the process starts with a provided Setup package, which consists of a file containing all the required files and modules. An installation wizard appears that guides the user step by step through the installation process.
Please note that administration rights are required for the installation of SAP Engineering Control Center Interface to SOLIDWORKS! It is strongly recommended to be logged in using the administrator account during the installation.
2.1 Product scope
SAP Engineering Control Center Interface to SOLIDWORKS includes a number of files and modules.
The package includes the following files or modules:
▪ CdnECTRInterfaceSWx_64.dll ▪ plm_conn.dll ▪ start_application_slw.exe ▪ renamer3slw.exe ▪ CdnECTRInterface_messages_de.txt ▪ CdnECTRInterface_messages_en.txt ▪ CdnECTRInterface_messages_es.txt ▪ CdnECTRInterface_messages_fr.txt ▪ CdnECTRInterface_messages_it.txt ▪ CdnECTRInterface_messages_ja.txt ▪ CdnECTRInterface_messages_pt.txt ▪ CdnECTRInterface_messages_ru.txt ▪ CdnECTRInterface_messages_zf.txt ▪ CdnECTRInterface_messages_zh.txt ▪ CIDEON_ECTR-Interface_to_SOLIDWORKS_User_Manual.pdf ▪ CIDEON_ECTR-Interface_to_SOLIDWORKS_Configuration_Manual.pdf ▪ SOLIDWORKS model templates in directory "templates-template" ▪ Templates for customizing files for ECTR in directory "templates-customize"
2.2 Automatic installation
For the automatic installation an installation package is provided. It simply consist of an executable file.
Please note that administrator rights are required for the installation. It is strongly recommended to be logged in as administrator when you install the product!
- 6 / 72 -

CIDEON Software & Services GmbH & Co. KG SAP Engineering Control Center Interface to SOLIDWORKS - User Manual Peterstrasse 1 • D-02826 Görlitz 2018-07-02 14:04 Web: https://www.cideon.com
Please make sure that the SAP Engineering Control Center and SOLIDWORKS 2016, SOLIDWORKS 2017 or SOLIDWORKS 2018 are already installed on the target machine before running the installation of the SAP Engineering Control Center Interface to SOLIDWORKS. Apart from that the installation process failed!
To start the installation process the application must execute. This is a self-extracting ZIP archive.
After start the containing files will be extracted.
Extracting the installation files
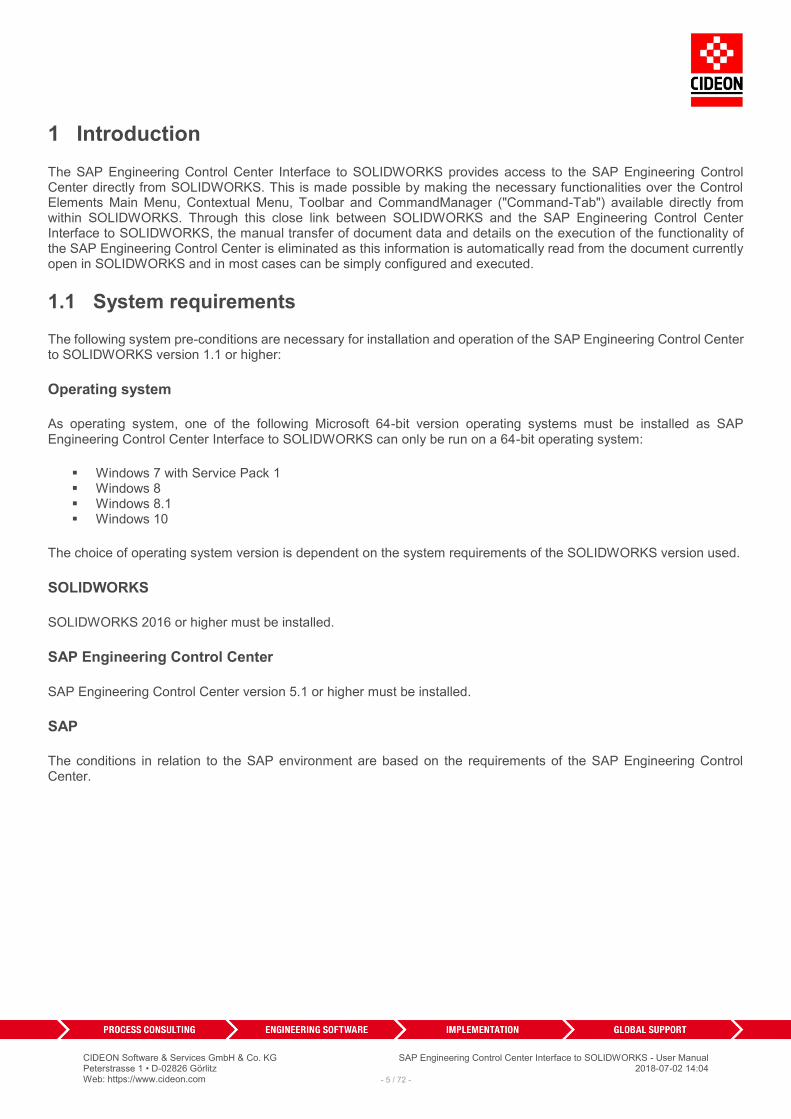
After this process has finished the start screen of the installation assistant appears.
At least now close all running SAP and SOLIDWORKS applications! This is important to prevent failures during the installation process!
Use the "Cancel" button to abort the entire installation process. Navigate with the "Back" button to previous screen i.e. to correct some choices.
- 7 / 72 -
CIDEON Software & Services GmbH & Co. KG SAP Engineering Control Center Interface to SOLIDWORKS - User Manual Peterstrasse 1 • D-02826 Görlitz 2018-07-02 14:04 Web: https://www.cideon.com
Installation assistant - Start screen
If the installation assistant detects a missing requirement an error message appears and the installation process will be aborted.
Installation assistant - Error screen
- 8 / 72 -

CIDEON Software & Services GmbH & Co. KG SAP Engineering Control Center Interface to SOLIDWORKS - User Manual Peterstrasse 1 • D-02826 Görlitz 2018-07-02 14:04 Web: https://www.cideon.com
The button "Next" browses to the component selection screen. Set a check mark into a checkbox at the left side to choose the right component.
If necessary you can browse to the previous screen with the "Back" button.
Installation assistant - Component choice
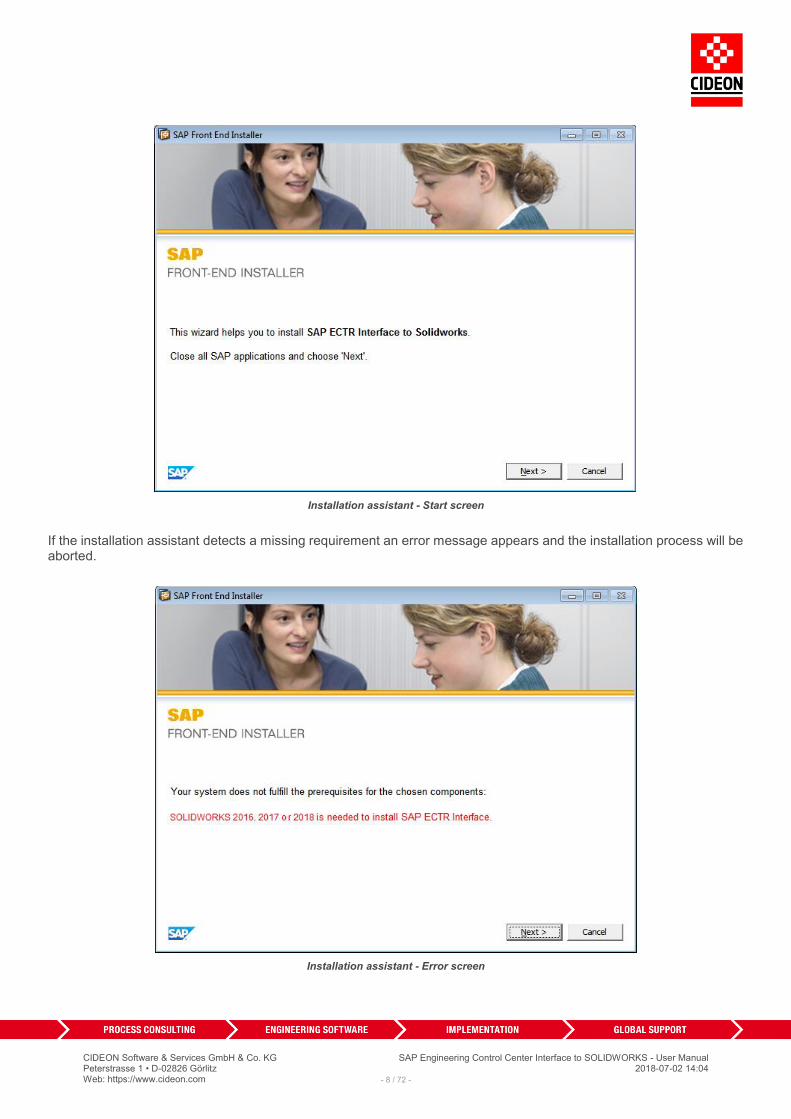
After selection of the component a click on the "Next" button starts installation process. Now a screen appears that informs you about the progress of the installation.
- 9 / 72 -
CIDEON Software & Services GmbH & Co. KG SAP Engineering Control Center Interface to SOLIDWORKS - User Manual Peterstrasse 1 • D-02826 Görlitz 2018-07-02 14:04 Web: https://www.cideon.com
Installation assistant - Progress screen
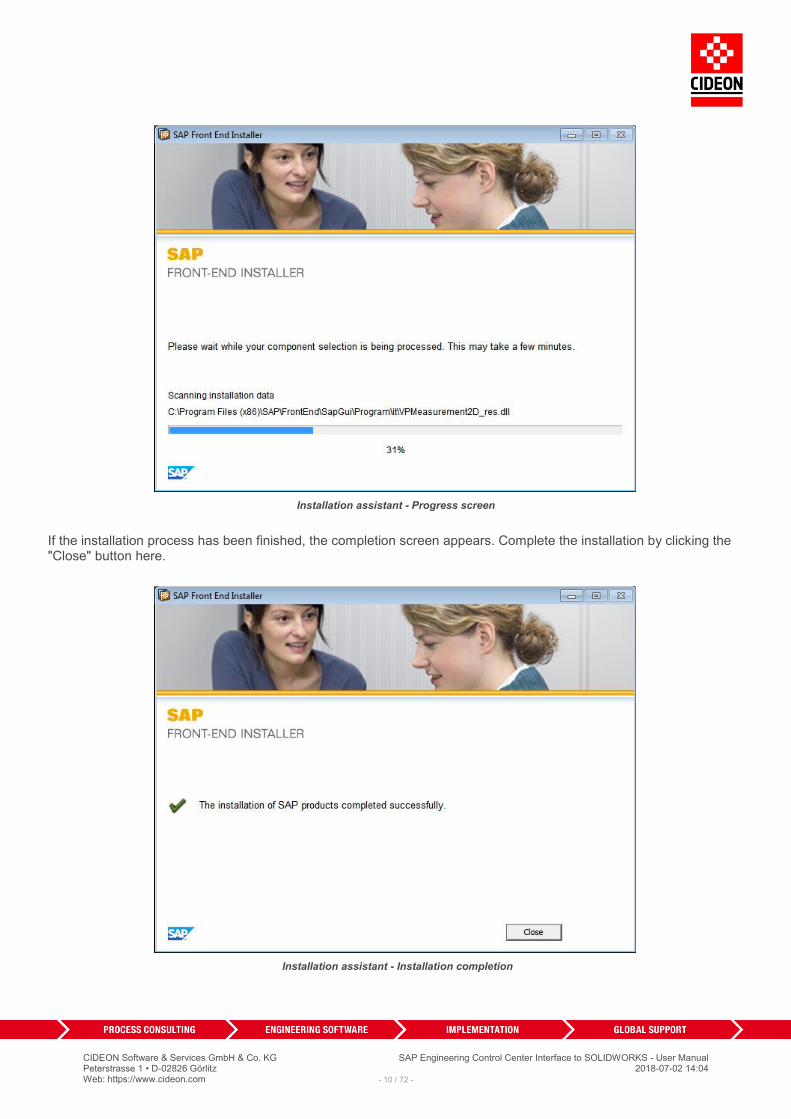
If the installation process has been finished, the completion screen appears. Complete the installation by clicking the "Close" button here.
Installation assistant - Installation completion
- 10 / 72 -

CIDEON Software & Services GmbH & Co. KG SAP Engineering Control Center Interface to SOLIDWORKS - User Manual Peterstrasse 1 • D-02826 Görlitz 2018-07-02 14:04 Web: https://www.cideon.com
2.3 Problems during parallel operation with the CIDEON CDESK integration
Due to the fact that some data models are different a parallel operation is not supported!
To avoid problems with the CIDEON CDESK integration for SOLIDWORKS it should be deactivated first. To do this please open the dialog "Add-Ins" via menu "Tools" and deactivate both checkboxes for "SAP – PLM Interface" and activate both checkboxes for "SAP Engineering Control Center Interface to SOLIDWORKS" (see red mark in the figure). After this changes please restart SOLIDWORKS. This method also may be used to toggle between the two applications.
Make sure to activate only one of both applications at the same time!
SOLIDWORKS dialog "Add-Ins"
- 11 / 72 -

CIDEON Software & Services GmbH & Co. KG SAP Engineering Control Center Interface to SOLIDWORKS - User Manual Peterstrasse 1 • D-02826 Görlitz 2018-07-02 14:04 Web: https://www.cideon.com
3 User interface and controls
The SAP Engineering Control Center Interface to SOLIDWORKS integration offers three different controls that are fully integrated into the SOLIDWORKS user interface. These are all labelled "SAP PLM":
▪ Main Menu ▪ Context Menu ▪ Toolbar ▪ CommandManager (Command tab)
The figure shows the user interface of SOLIDWORKS, including the individual controls of SAP Engineering Control Center Interface to SOLIDWORKS. Since these controls are embedded in the so-called Command Manager of SOLIDWORKS, they can be configured, similarly to all other controls of SOLIDWORKS, managed by the Command Manager, using the "Customize" dialog accessed by selecting the menu command "Tools -> Customize..."
SOLIDWORKS user interface with SAP PLM
By default, the "SAP PLM" menu and the toolbar of SAP Engineering Control Center Interface to SOLIDWORKS are immediately available after SOLIDWORKS is launched, while the "SAP PLM" CommandManager only appears once a document has been opened.
3.1 Additional entries in the context menu of ECTR
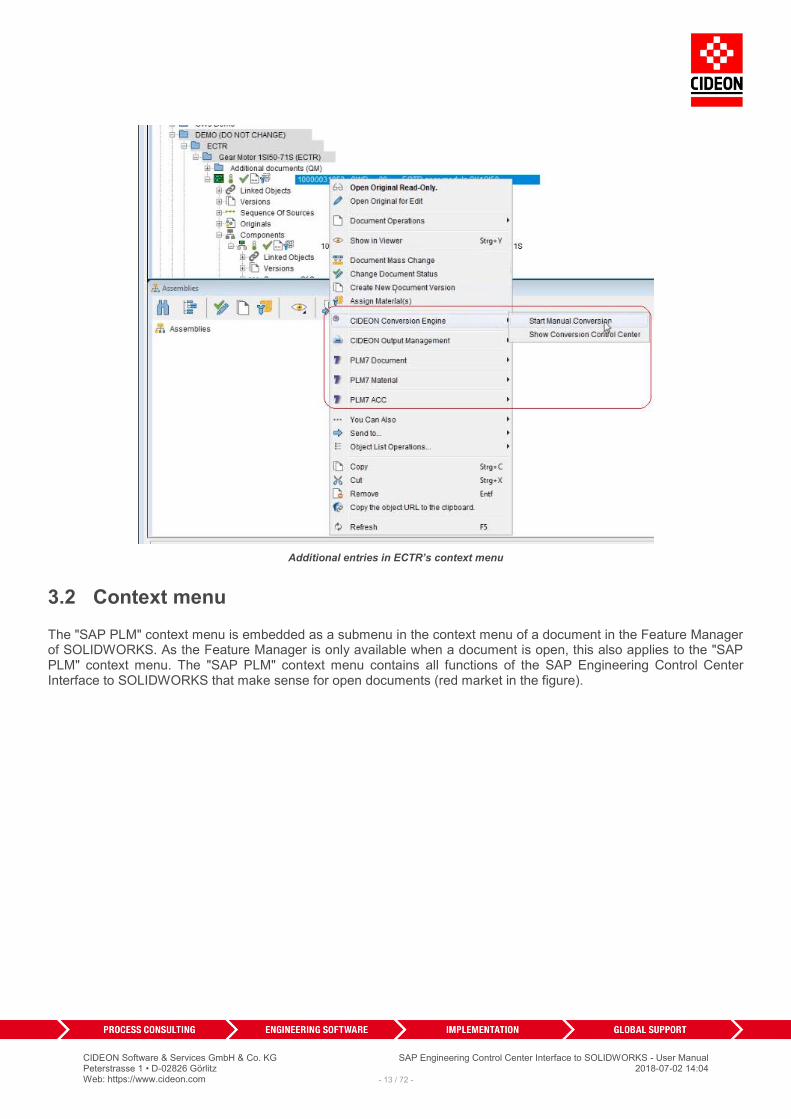
The SAP Engineering Control Center provides the possibility to implement additional function calls as entries in the context menu. Various CIDEON products use this to provide functions directly in the ECTR (i.e. the CIDEON Conversion Engine). If such CIDEON products are in use, corresponding menu commands may appear in ECTR’s context menu (see the red mark in the figure).
- 12 / 72 -
CIDEON Software & Services GmbH & Co. KG SAP Engineering Control Center Interface to SOLIDWORKS - User Manual Peterstrasse 1 • D-02826 Görlitz 2018-07-02 14:04 Web: https://www.cideon.com
Additional entries in ECTR’s context menu
3.2 Context menu
The "SAP PLM" context menu is embedded as a submenu in the context menu of a document in the Feature Manager of SOLIDWORKS. As the Feature Manager is only available when a document is open, this also applies to the "SAP PLM" context menu. The "SAP PLM" context menu contains all functions of the SAP Engineering Control Center Interface to SOLIDWORKS that make sense for open documents (red market in the figure).
- 13 / 72 -

CIDEON Software & Services GmbH & Co. KG SAP Engineering Control Center Interface to SOLIDWORKS - User Manual Peterstrasse 1 • D-02826 Görlitz 2018-07-02 14:04 Web: https://www.cideon.com
Submenu "SAP PLM" in the context menu of the Feature Manager
3.3 Depiction of configurations in the ECTR
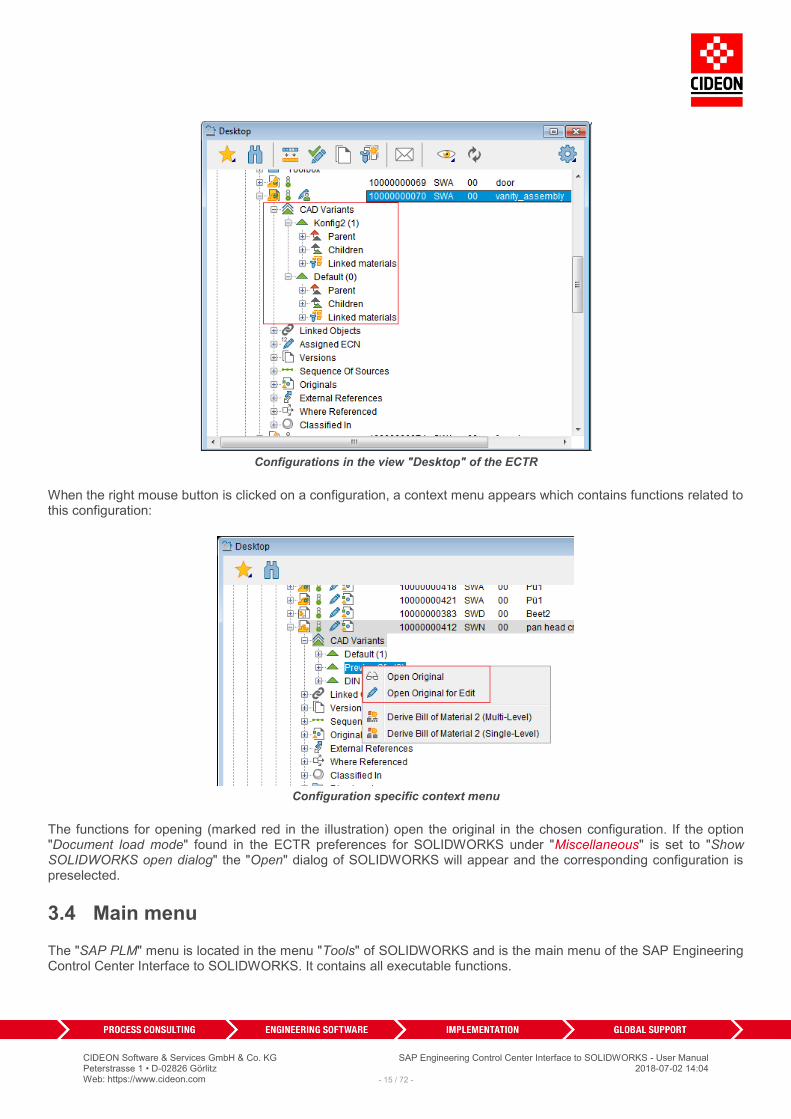
In the structure tree within the view "Desktop" of the SAP Engineering Control Center, all configurations of a SOLIDWORKS assembly will be depicted with their respective elements "Parent", "Children" and "Linked materials" below the node "CAD-Variants" (see red mark in the following figure):
- 14 / 72 -
CIDEON Software & Services GmbH & Co. KG SAP Engineering Control Center Interface to SOLIDWORKS - User Manual Peterstrasse 1 • D-02826 Görlitz 2018-07-02 14:04 Web: https://www.cideon.com
Configurations in the view "Desktop" of the ECTR
When the right mouse button is clicked on a configuration, a context menu appears which contains functions related to this configuration:
Configuration specific context menu
The functions for opening (marked red in the illustration) open the original in the chosen configuration. If the option "Document load mode" found in the ECTR preferences for SOLIDWORKS under "Miscellaneous" is set to "Show SOLIDWORKS open dialog" the "Open" dialog of SOLIDWORKS will appear and the corresponding configuration is preselected.
3.4 Main menu
The "SAP PLM" menu is located in the menu "Tools" of SOLIDWORKS and is the main menu of the SAP Engineering Control Center Interface to SOLIDWORKS. It contains all executable functions.
- 15 / 72 -

CIDEON Software & Services GmbH & Co. KG SAP Engineering Control Center Interface to SOLIDWORKS - User Manual Peterstrasse 1 • D-02826 Görlitz 2018-07-02 14:04 Web: https://www.cideon.com
Main menu "SAP PLM" in SOLIDWORKS
As in all SOLIDWORKS menus, the menu command "Customize Menu" can be used to hide individual menu commands for each SOLIDWORKS document type.
The actual position of the main menu entry "SAP PLM" of SAP Engineering Control Center Interface to SOLIDWORKS within the SOLIDWORKS menu "Tools" depends on whether, how many and which other add-ins are loaded and used! It can, therefore, differ from the position shown in the figure above.
3.5 CommandManager
The SAP Engineering Control Center Interface to SOLIDWORKS also offers the "SAP PLM" CommandManager. This CommandManager (also known as "command tab") behaves similarly to the toolbar, the only difference being that it is located next to the other CommandManager as an "index-tab".
Since the visibility of CommandManagers in SOLIDWORKS is always based on open documents, they only appear when a document has been opened. Accordingly, the CommandManager "SAP PLM" is only visible when a document is open.
Similar to the toolbar, individual icons and functions can be moved from the "SAP PLM" CommandManager to other CommandManagers or toolbars or removed. For more information, please refer to SOLIDWORKS documentation.
Furthermore, it can be displayed with or without the descriptions of the individual symbols by going to the SOLIDWORKS menu "Tools -> Customize" and activating or deactivating the large buttons with text.
- 16 / 72 -

CIDEON Software & Services GmbH & Co. KG SAP Engineering Control Center Interface to SOLIDWORKS - User Manual Peterstrasse 1 • D-02826 Görlitz 2018-07-02 14:04 Web: https://www.cideon.com
CommandManager "SAP PLM" with descriptions
CommandManager "SAP PLM" without descriptions
If the mouse is hovered over one of the buttons in the CommandManager, its function will be displayed as a balloon-style tooltip.
3.6 Toolbar
The toolbar provides several features of SAP Engineering Control Center Interface to SOLIDWORKS in the form of buttons. This makes it even easier to access functions then using the menu. If the mouse is hovered over one of the buttons, its function will be displayed as a balloon-style tooltip.
Tooltip in the toolbar "SAP PLM"
Similar to all other toolbars in SOLIDWORKS, the toolbar of the SAP Engineering Control Center Interface to SOLIDWORKS can float on the user interface or be docked under the menu bar or at the side.
Free-floating "SAP PLM" toolbar
- 17 / 72 -

CIDEON Software & Services GmbH & Co. KG SAP Engineering Control Center Interface to SOLIDWORKS - User Manual Peterstrasse 1 • D-02826 Görlitz 2018-07-02 14:04 Web: https://www.cideon.com
Docked toolbar "SAP PLM"
The individual icons from the "SAP PLM" toolbar can be moved to other toolbars or removed. For more information, please refer to SOLIDWORKS documentation.
- 18 / 72 -

CIDEON Software & Services GmbH & Co. KG SAP Engineering Control Center Interface to SOLIDWORKS - User Manual Peterstrasse 1 • D-02826 Görlitz 2018-07-02 14:04 Web: https://www.cideon.com
4 Function description
A variety of functions of the SAP Engineering Control Center can be accessed directly from the user interface of SOLIDWORKS using SAP Engineering Control Center Interface to SOLIDWORKS. These functions are described in the following text.
It should be noted that SAP and the SAP Engineering Control Center offer extensive configuration options, and the actual behavior of the functions may differ on a case-by-case basis from those described here. The function description in this user's Manual is based on the default configuration of the SAP Engineering Control Center.
4.1 General behavior
If a function is triggered using the SAP Engineering Control Center Interface to SOLIDWORKS, a message will be displayed in the center of the working range of SOLIDWORKS, which provides information about the current action which is being implemented by ECTR.
Information about running ECTR processes
The SAP Engineering Control Center indicates activities initiated by SOLIDWORKS with a yellow colored menu bar during an activity:
ECTR activity indication
This is the standard behavior of the SAP Engineering Control Center, but it is configurable.
The running SAP Engineering Control Center is represented by the ECTR icon in the notification area (known as "Systray") of the Windows taskbar (see red mark in the figure).
ECTR icon in the Windows "Systray" area
- 19 / 72 -

CIDEON Software & Services GmbH & Co. KG SAP Engineering Control Center Interface to SOLIDWORKS - User Manual Peterstrasse 1 • D-02826 Görlitz 2018-07-02 14:04 Web: https://www.cideon.com
Depending on the context or status, a document loaded in a SOLIDWORKS document SAP Engineering Control Center Interface to SOLIDWORKS may not have access to some of the functions!
4.1.1 Logging
The SAP Engineering Control Center Interface to SOLIDWORKS offers the ability to log it's work and store it in a log file. This is particularly useful for questions regarding CIDEON support.
To activate logging, the "Application tracelevel" option under "Common" must be set in the Options menu of the ECTR under "Preferences" of the SAP Engineering Control Center, which is accessible via the gear symbol ("Settings") at the top right:
Options menu of the ECTR
ECTR Option "Application tracelevel"
The different detail levels "Trace", "Debug" and "In Detail" can be selected for the information stored in the log file. The value "Undefined" means the initial state after the installation of the ECTR and is equivalent to "Trace". If the trace level has been changed once, it can no longer be reset to "Undefined".
- 20 / 72 -

CIDEON Software & Services GmbH & Co. KG SAP Engineering Control Center Interface to SOLIDWORKS - User Manual Peterstrasse 1 • D-02826 Görlitz 2018-07-02 14:04 Web: https://www.cideon.com
The log files are stored in the directory path for log files of the ECTR under
<LW>:\SAPPLM\tempdir\logs\applications\slw\
The file name of a log file contains a date and time stamp and has the following structure:
plm_connector_YYYY.MM.DD-HH_MM_SS.log
4.2 General functions
General functions provide access to the SAP Engineering Control Center and are used in administration.
4.2.1 Show CAD Structure
The function "Show CAD Structure " is used to bring the SAP PLM Engineering Control Center in the foreground and open the structure view in which the structure of an open and active document will be displayed.
The "Application Structure" window in the ECTR shows originals and their structures that are loaded in the application. It is possible to refine the view using the filter buttons provided by the dialog.
ECTR view "Application Structure"
The ECTR may add overlay icons to the displayed icons to visualize certain states in which the displayed objects are located. For the meaning of these symbols, please refer to SAP's ECTR documentation.
In the application structure view a context menu is available for the selected object.
- 21 / 72 -

CIDEON Software & Services GmbH & Co. KG SAP Engineering Control Center Interface to SOLIDWORKS - User Manual Peterstrasse 1 • D-02826 Görlitz 2018-07-02 14:04 Web: https://www.cideon.com
Context menu in ECTR view "Application Structure"
Please note the following points during work with the context menu in the application structure view of ECTR 5.1:
▪ Multi-selection is only available with the function "Edit" ▪ An import works only for the top document ▪ A successful import causes a refresh of the application structure ▪ The function "Set Active" is not available at this time ▪ The function "Display" opens the selected document and causes a refresh of the application structure ▪ Unknown commands opens a message box with information about that command to detect wrong
configurations.
It is possible to customize the amount of information and the way to display in the application structure view. For this purpose it exist a number of options in the settings for SAP Engineering Control Center Interface to SOLIDWORKS in the "Application structure" branch.
4.2.2 Log on with Single Sign-On
Single Sign-On (SSO) allows users to authenticate themselves (by entering their password) at a workstation just once and then have access to other systems, programs and services for which they are authorized, without having to authenticate themselves again.
The security features used for the Single Sign-On procedure must never be weaker than those used for the one-time authentication.
Several different versions of Single Sign-On are offered:
▪ SSO via Kerberos ▪ SSO via Microsoft NT LAN Manager SSP ▪ SSO via SAP Single Sign-On
SP has published various SAP notes regarding the Single Sign-On procedure (selection):
▪ 352295 – Microsoft Windows: Single Sign-On options ▪ 150380 – Is Kerberos 5 supported for use with SNC? ▪ 1257108 – Collective note: Analyzing issues with Single Sign-On (SSO) ▪ 1848999 – Central note: CommonCryptoLib 8 (replacing SAPCRYPTOLIB) ▪ 2115486 – The modules that were previously stored in SAP note 352295 are still available here. You can
request access to SAP note 2115486 by issuing a customer notification in the BC-SEC-SNC component.
- 22 / 72 -

CIDEON Software & Services GmbH & Co. KG SAP Engineering Control Center Interface to SOLIDWORKS - User Manual Peterstrasse 1 • D-02826 Görlitz 2018-07-02 14:04 Web: https://www.cideon.com
When using Single Sign-On, you must distinguish between 32 bit and 64 bit. They require different settings and modules, among other differences.
Before using SSO, you must have read the information contained in the aforementioned links regarding the various SSO versions as well as SAP note 147519 – Maintenance strategy / deadlines for SAP GUI.
The version described below is based on SAP note 352295 and Microsoft NT LAN Manager SSP for a 64 bit CAD system. It assumes that the basic requirements for the SAP system and the SAP GUI version are met.
Checking the availability of SNC / Setting the SNC name
To check whether the SAP application server has been correctly configured for Single Sign-On, you can use transaction SU01 on the "SNC" tab in the SAP user area.
If the SNC status is as shown in the figure below, SNC is not activated on the SAP application server. If this is the case, SSO is not possible.
SAP application server without SNC / No SNC name set
If SNC is activated on the SAP application server, you will see the following screen and you can set the SAP user / the user’s SNC name as shown:
SAP user with SNC name specified
Configuring the SAP connection in SAP GUI Logon
In order to use SNC for communication with the SAP application server, you must set up an appropriately configured SAP connection in SAP GUI Logon. This connection can be set up in addition to an SAP connection without SNC to the same SAP system. The properties of the SAP connection must be configured on "Network" tab as shown below.
- 23 / 72 -

CIDEON Software & Services GmbH & Co. KG SAP Engineering Control Center Interface to SOLIDWORKS - User Manual Peterstrasse 1 • D-02826 Görlitz 2018-07-02 14:04 Web: https://www.cideon.com
SAP connection with SNC activated
Notes on the (wrapper) library (Microsoft NTLM)
The modules provided in SAP notes 352295 and 2115486 for Microsoft NT LAN Manager must be available at every workstation.
If you are using only SSO via an SAP connection in SAP Logon or other 32 bit applications, you need only the 32 bit modules.
If you are using a 64 bit application, for example a current version of a CAD system with SAP integration, you must have the 64 bit modules set up. Because this use scenario often includes 32 bit applications as well (such as the SAP GUI itself), we recommend setting up both the 32 bit and 64 modules.
Configuring the (wrapper) library (Microsoft NTLM)
SAP note 1746967 – Support for environment variable SNC_LIB_64 explains the possible storage directories and file names that you may choose.
In the version below, the file names have not been changed and a custom path has been selected.
The 32 bit module "gssntlm.dll" is copied to a path that is accessible to the user. Accordingly, you must create the environment variable SNC_LIB so that it has the same directory as the system or user variable:
SNC_LIB = <drive>:\<path>\gssntlm.dll
The 64 bit module "gx64ntlm.dll" is copied to a path that is accessible to the user. Accordingly, you must create the environment variable SNC_LIB_64 so that it has the same directory as the system or user variable:
SNC_LIB_64 = <drive>:\<path>\gx64ntlm.dll
Both environment variables contain the complete path including the file name.
These modules are not required in the CAD integration directory.
Once the environment variables have been set and the modules are in the configured directories, you must restart all SAP GUI applications and the CAD application. You do not have to restart the computer.
Testing Single Sign-On (32 bit)
- 24 / 72 -

CIDEON Software & Services GmbH & Co. KG SAP Engineering Control Center Interface to SOLIDWORKS - User Manual Peterstrasse 1 • D-02826 Görlitz 2018-07-02 14:04 Web: https://www.cideon.com
Once you have logged on to the operating system as the Windows user for whom SAP user SSO was configured, you can select the SAP connection (with SNC) in SAP GUI Logon. SSO has been successful if the status bar of the SAP GUI appears as follows:
If you assigned an SNC name for the SAP user on multiple clients, you can choose the client and the logon language beforehand.
Testing Single Sign-On via the CAD system and the CAD integration component (64 bit)
To test SSO via the CAD integration component, the necessary parameters must be set correctly in the "SAPlogon.txt" file, which contains the connection data.
In section 1.3 "Connection Group Definitions":
SNC partner name for SSO
sap.logon.snc_partnername = p:<Your Windows domain>\<Your Windows user name>
You can find more information about directly starting the SAP GUI with the SNC configuration here.
In section 1.2 "SAP ECTP Logon Screen Definitions" (optional):
The following parameter suppresses display of the logon dialog. You are then logged on using the SAP connection specified under "sap.logon.defaultindex".
The logon dialog is suppressed
sap.autologon = true
4.2.3 Open ECTR
With the function "Open ECTR ", the SAP Engineering Control Center is activated or started and brought to the front. Depending on a running function, SOLIDWORKS may be blocked for all actions and inputs, until the control is passed back from ECTR to SOLIDWORKS. In that case the blue "back" button in ECTR (see red mark in the figure) is usable to continue working in SOLIDWORKS. Otherwise the button is deactivated (greyed). In any events, SOLIDWORKS will be back in control when the SAP Engineering Control Center is closed.
"Back" button in ECTR
4.2.4 About
The function "About " open a dialog which contains information about the current version of SAP Engineering Control Center Interface to SOLIDWORKS.
- 25 / 72 -
CIDEON Software & Services GmbH & Co. KG SAP Engineering Control Center Interface to SOLIDWORKS - User Manual Peterstrasse 1 • D-02826 Görlitz 2018-07-02 14:04 Web: https://www.cideon.com
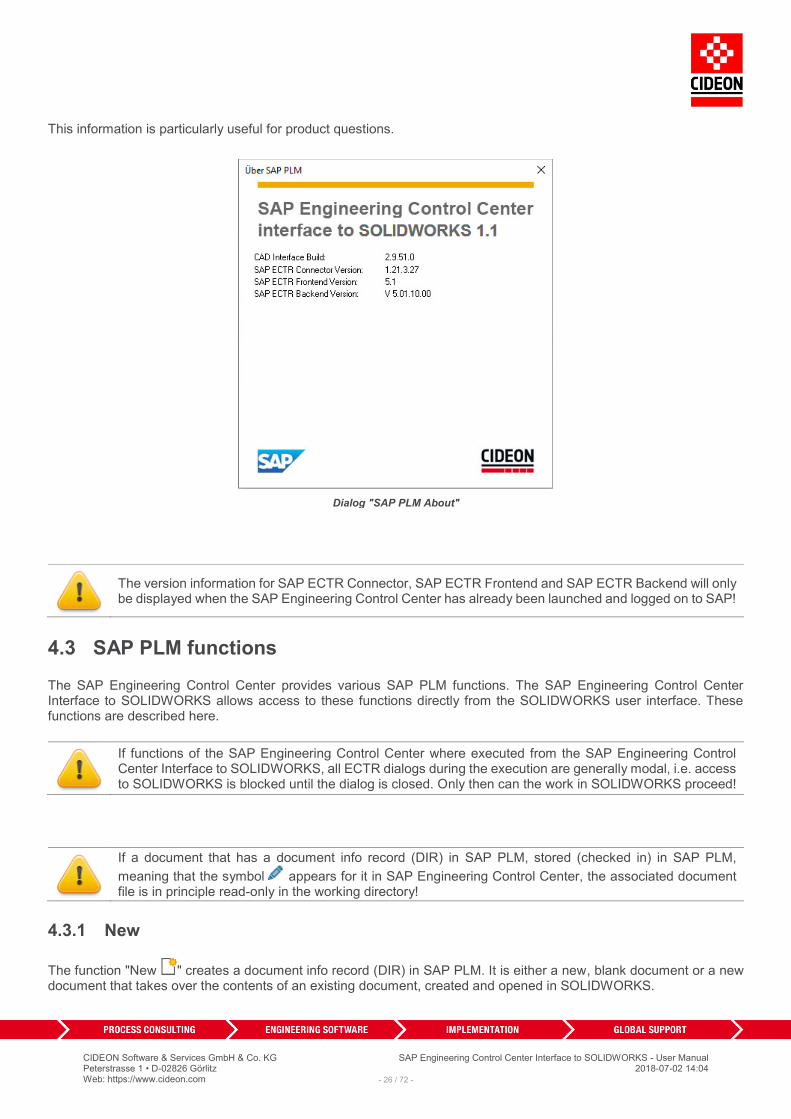
This information is particularly useful for product questions.
Dialog "SAP PLM About"
The version information for SAP ECTR Connector, SAP ECTR Frontend and SAP ECTR Backend will only be displayed when the SAP Engineering Control Center has already been launched and logged on to SAP!
4.3 SAP PLM functions
The SAP Engineering Control Center provides various SAP PLM functions. The SAP Engineering Control Center Interface to SOLIDWORKS allows access to these functions directly from the SOLIDWORKS user interface. These functions are described here.
If functions of the SAP Engineering Control Center where executed from the SAP Engineering Control Center Interface to SOLIDWORKS, all ECTR dialogs during the execution are generally modal, i.e. access to SOLIDWORKS is blocked until the dialog is closed. Only then can the work in SOLIDWORKS proceed!
If a document that has a document info record (DIR) in SAP PLM, stored (checked in) in SAP PLM,
meaning that the symbol appears for it in SAP Engineering Control Center, the associated document file is in principle read-only in the working directory!
4.3.1 New
The function "New " creates a document info record (DIR) in SAP PLM. It is either a new, blank document or a new document that takes over the contents of an existing document, created and opened in SOLIDWORKS.
- 26 / 72 -

CIDEON Software & Services GmbH & Co. KG SAP Engineering Control Center Interface to SOLIDWORKS - User Manual Peterstrasse 1 • D-02826 Görlitz 2018-07-02 14:04 Web: https://www.cideon.com
If the function "New..." from SOLIDWORKS menu "File" is clicked the following dialog appears if configured:
Dialog "Create DIR for new document"
If "Yes" is clicked the ECTR dialog "New Document" appears and the next steps are the same as further described. If the "No" button is clicked the SOLIDWORKS dialog "New SOLIDWORKS document" comes up.
It is configurable wether the dialog comes up or not and the general behaviour of the interface at this point. It exist the option "Create DIR for new document" in the settings for the SAP Engineering Control Center Interface to SOLIDWORKS in the "Miscellaneous" branch.
After selecting the "New" function, the "New Document" dialog of the ECTR appears.
The "New Document" ECTR dialog
The "New Document" dialog is used to select the document info record (DIR) to apply for any SOLIDWORKS document type ("DType") and whether a new, blank document or an existing document selected, its contents will be copied into the new document.
- 27 / 72 -
CIDEON Software & Services GmbH & Co. KG SAP Engineering Control Center Interface to SOLIDWORKS - User Manual Peterstrasse 1 • D-02826 Görlitz 2018-07-02 14:04 Web: https://www.cideon.com
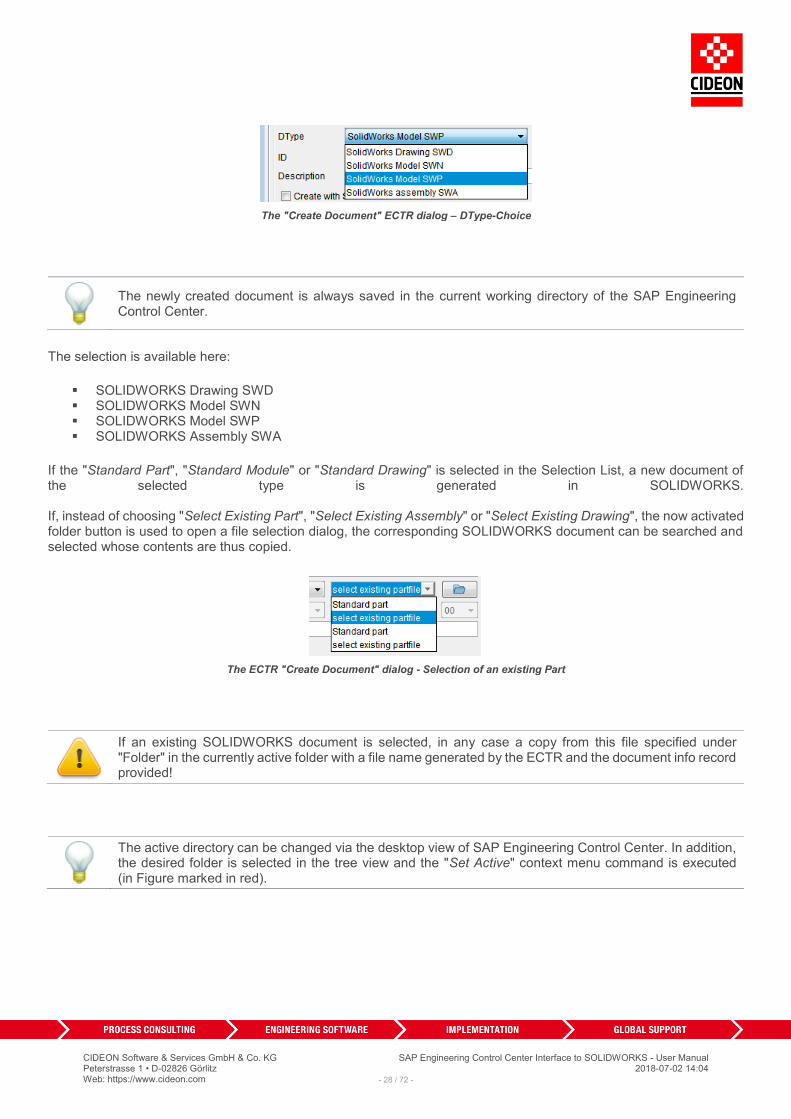
The "Create Document" ECTR dialog – DType-Choice
The newly created document is always saved in the current working directory of the SAP Engineering Control Center.
The selection is available here:
▪ SOLIDWORKS Drawing SWD ▪ SOLIDWORKS Model SWN ▪ SOLIDWORKS Model SWP ▪ SOLIDWORKS Assembly SWA
If the "Standard Part", "Standard Module" or "Standard Drawing" is selected in the Selection List, a new document of the selected type is generated in SOLIDWORKS. If, instead of choosing "Select Existing Part", "Select Existing Assembly" or "Select Existing Drawing", the now activated folder button is used to open a file selection dialog, the corresponding SOLIDWORKS document can be searched and selected whose contents are thus copied.
The ECTR "Create Document" dialog - Selection of an existing Part
If an existing SOLIDWORKS document is selected, in any case a copy from this file specified under "Folder" in the currently active folder with a file name generated by the ECTR and the document info record provided!
The active directory can be changed via the desktop view of SAP Engineering Control Center. In addition, the desired folder is selected in the tree view and the "Set Active" context menu command is executed (in Figure marked in red).
- 28 / 72 -
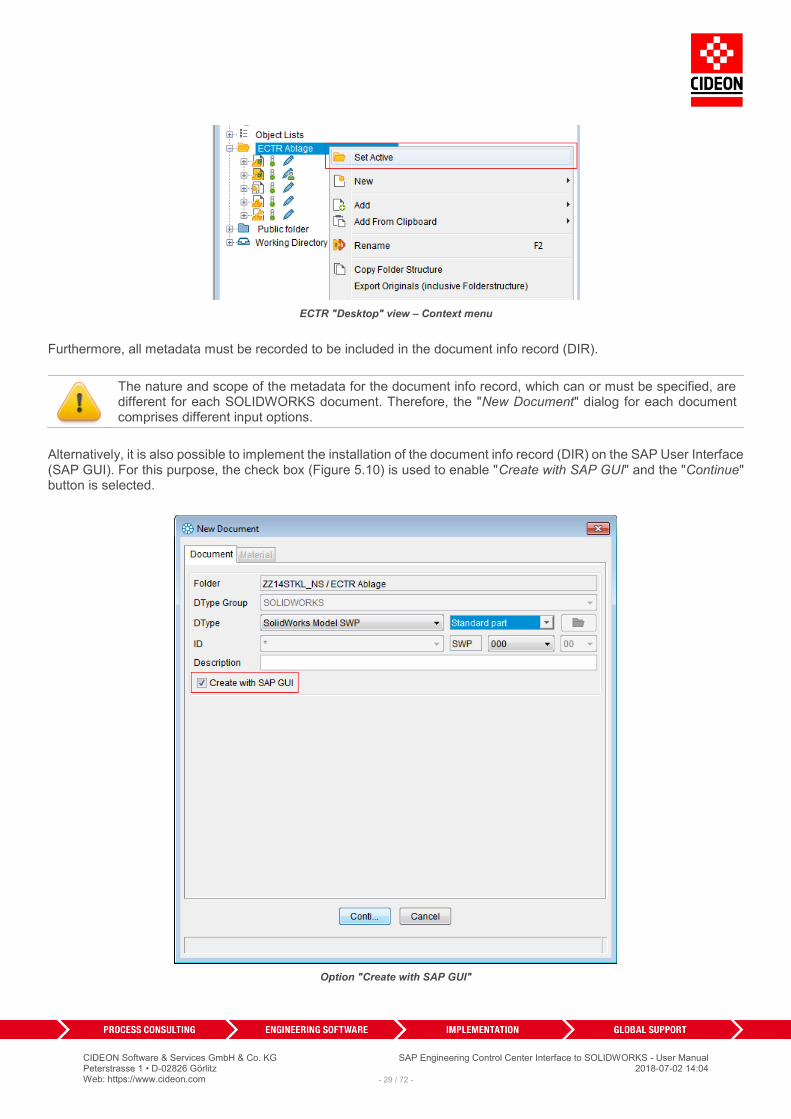
CIDEON Software & Services GmbH & Co. KG SAP Engineering Control Center Interface to SOLIDWORKS - User Manual Peterstrasse 1 • D-02826 Görlitz 2018-07-02 14:04 Web: https://www.cideon.com
ECTR "Desktop" view – Context menu
Furthermore, all metadata must be recorded to be included in the document info record (DIR).
The nature and scope of the metadata for the document info record, which can or must be specified, are different for each SOLIDWORKS document. Therefore, the "New Document" dialog for each document comprises different input options.
Alternatively, it is also possible to implement the installation of the document info record (DIR) on the SAP User Interface (SAP GUI). For this purpose, the check box (Figure 5.10) is used to enable "Create with SAP GUI" and the "Continue" button is selected.
Option "Create with SAP GUI"
- 29 / 72 -

CIDEON Software & Services GmbH & Co. KG SAP Engineering Control Center Interface to SOLIDWORKS - User Manual Peterstrasse 1 • D-02826 Görlitz 2018-07-02 14:04 Web: https://www.cideon.com
This will display the SAP "Create Document View: Initial Screen", in which all the other entries are performed.
SAP GUI View "Create Document: Basic Data"
If the process within the SAP GUI is aborted with , terminated with or navigated back with , you will find yourself back in the ECTR "New Document" dialog. A dialog then indicates with an error message that no document has been created
ECTR "New Document" dialog - error message
With the "Continue" button the SAP view "Create Document" is reopened; with "Cancel", the entire operation is aborted, the "New Document" dialog is closed and control is returned to SOLIDWORKS.
- 30 / 72 -

CIDEON Software & Services GmbH & Co. KG SAP Engineering Control Center Interface to SOLIDWORKS - User Manual Peterstrasse 1 • D-02826 Görlitz 2018-07-02 14:04 Web: https://www.cideon.com
4.3.2 Open
With the "Open " function, one or more documents in SAP PLM can be opened in SOLIDWORKS depending on the ECTR dialog appearing. searched and opened in SOLIDWORKS using different search criteria. When this function is selected, the "Document" dialog of the SAP Engineering Control Center is opened.
It exist the option "Use multi search dialog during 'Open' from SAP" found in the ECTR preferences for SAP Engineering Control Center Interface to SOLIDWORKS at "Miscellaneous" If the value is "No", the ECTR dialog "Open" appears:
ECTR Dialog "Open"
Is the option set to "Yes" the ECTR dialog "Document" comes up instead. Here various search criteria can be entered for the search for the desired document:
ECTR "Document" dialog
- 31 / 72 -

CIDEON Software & Services GmbH & Co. KG SAP Engineering Control Center Interface to SOLIDWORKS - User Manual Peterstrasse 1 • D-02826 Görlitz 2018-07-02 14:04 Web: https://www.cideon.com
When entering search criteria, the wildcard "star" character ('*') is allowed, which makes it possible to specify a substring to search for.
Under "Version Selection" you can choose how and to what extent different versions of this document should be taken into account if multiple versions of the document exist.
ECTR "Document" dialog - Version selection
The following choices are available:
▪ Display All Versions ▪ Display Latest Version Only ▪ Display Latest Released Version Only
According to the selection, the corresponding versions are then presented in the results. The "Clear Fields" button removes all existing records from the fields of the dialog. With "Add Class ..." it is possible to select a class as a search criterion. In this way the search is restricted to the documents conforming to the criterion entered. For this purpose, the class name is entered in the "Classification" field.
It is also possible to search according to classes. These will be initiated via the Classes Search Assistant button.
ECTR "Classification" dialog
With the "Search..." button you get into the actual class search dialog. Here you can specify various search criteria for the class search. In the name and description here the wildcard character '*' is also allowed.
Here, if all fields are left blank, all available classes are delivered as a result.
For type you can select from a list of available class types or "All Class Types".
- 32 / 72 -
CIDEON Software & Services GmbH & Co. KG SAP Engineering Control Center Interface to SOLIDWORKS - User Manual Peterstrasse 1 • D-02826 Görlitz 2018-07-02 14:04 Web: https://www.cideon.com
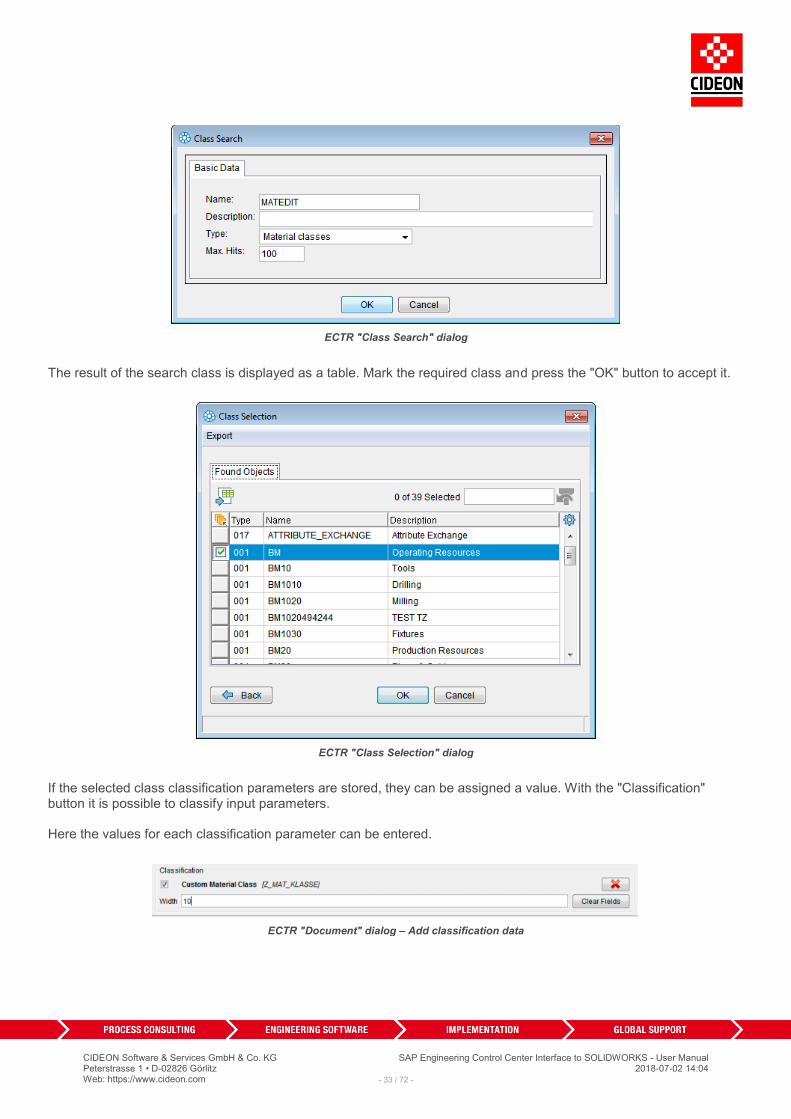
ECTR "Class Search" dialog
The result of the search class is displayed as a table. Mark the required class and press the "OK" button to accept it.
ECTR "Class Selection" dialog
If the selected class classification parameters are stored, they can be assigned a value. With the "Classification" button it is possible to classify input parameters. Here the values for each classification parameter can be entered.
ECTR "Document" dialog – Add classification data
- 33 / 72 -
CIDEON Software & Services GmbH & Co. KG SAP Engineering Control Center Interface to SOLIDWORKS - User Manual Peterstrasse 1 • D-02826 Görlitz 2018-07-02 14:04 Web: https://www.cideon.com
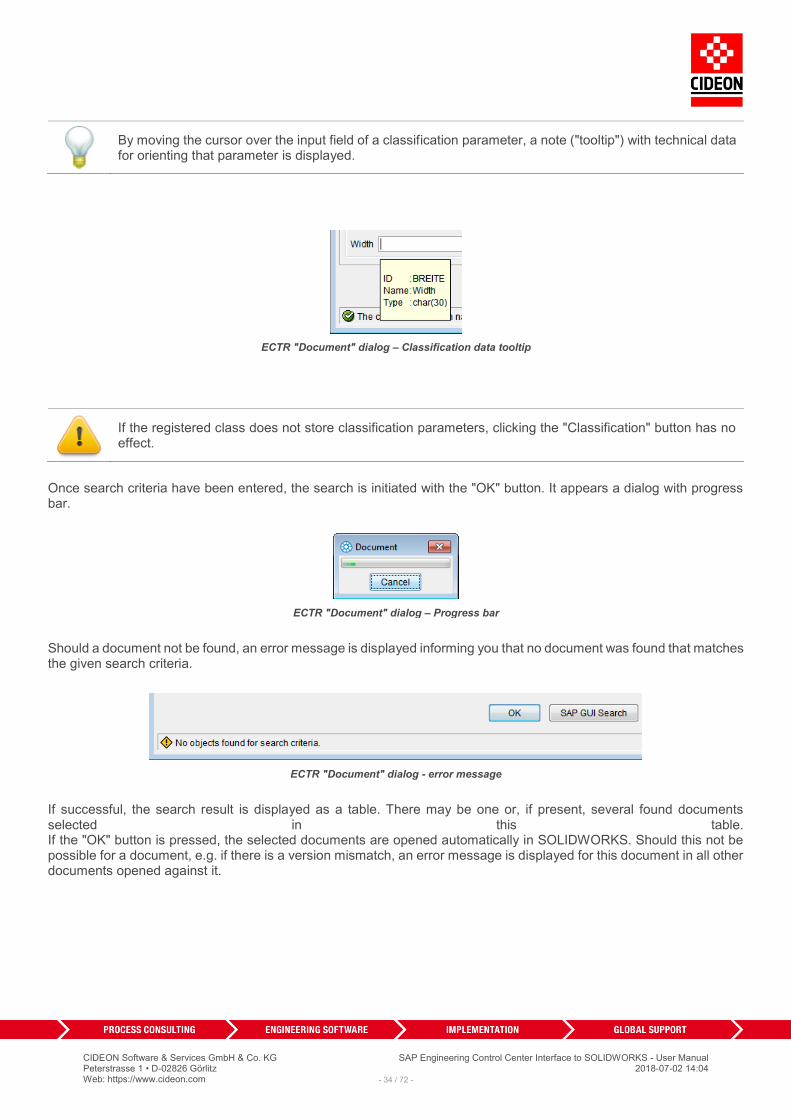
By moving the cursor over the input field of a classification parameter, a note ("tooltip") with technical data for orienting that parameter is displayed.
ECTR "Document" dialog – Classification data tooltip
If the registered class does not store classification parameters, clicking the "Classification" button has no effect.
Once search criteria have been entered, the search is initiated with the "OK" button. It appears a dialog with progress bar.
ECTR "Document" dialog – Progress bar
Should a document not be found, an error message is displayed informing you that no document was found that matches the given search criteria.
ECTR "Document" dialog - error message
If successful, the search result is displayed as a table. There may be one or, if present, several found documents selected in this table. If the "OK" button is pressed, the selected documents are opened automatically in SOLIDWORKS. Should this not be possible for a document, e.g. if there is a version mismatch, an error message is displayed for this document in all other documents opened against it.
- 34 / 72 -

CIDEON Software & Services GmbH & Co. KG SAP Engineering Control Center Interface to SOLIDWORKS - User Manual Peterstrasse 1 • D-02826 Görlitz 2018-07-02 14:04 Web: https://www.cideon.com
ECTR "Document Selection" dialog
If you click on the "Back" button, the entire process is aborted, all dialogs are closed and control returned to SOLIDWORKS. It is also possible to perform the document search entirely via the SAP GUI. For this purpose, the "SAP GUI Search" button is used in the "Document Search" dialog. If this is selected, the SAP view "Search Document View: Selection Criteria" appears. Here it is possible to enter the search criteria as usual in SAP PLM, starting the search with "Run".
SAP GUI view "Find Document: Selection criteria"
- 35 / 72 -
CIDEON Software & Services GmbH & Co. KG SAP Engineering Control Center Interface to SOLIDWORKS - User Manual Peterstrasse 1 • D-02826 Görlitz 2018-07-02 14:04 Web: https://www.cideon.com
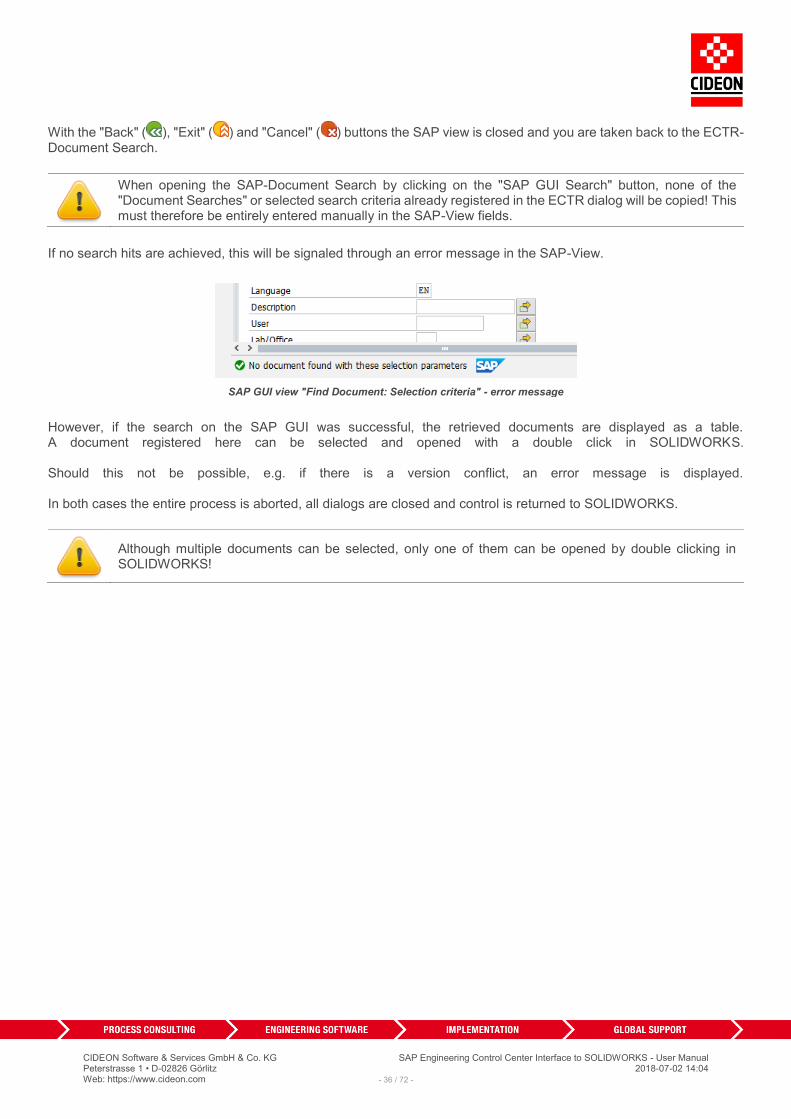
With the "Back" ( ), "Exit" ( ) and "Cancel" ( ) buttons the SAP view is closed and you are taken back to the ECTR-Document Search.
When opening the SAP-Document Search by clicking on the "SAP GUI Search" button, none of the "Document Searches" or selected search criteria already registered in the ECTR dialog will be copied! This must therefore be entirely entered manually in the SAP-View fields.
If no search hits are achieved, this will be signaled through an error message in the SAP-View.
SAP GUI view "Find Document: Selection criteria" - error message
However, if the search on the SAP GUI was successful, the retrieved documents are displayed as a table. A document registered here can be selected and opened with a double click in SOLIDWORKS. Should this not be possible, e.g. if there is a version conflict, an error message is displayed. In both cases the entire process is aborted, all dialogs are closed and control is returned to SOLIDWORKS.
Although multiple documents can be selected, only one of them can be opened by double clicking in SOLIDWORKS!
- 36 / 72 -

CIDEON Software & Services GmbH & Co. KG SAP Engineering Control Center Interface to SOLIDWORKS - User Manual Peterstrasse 1 • D-02826 Görlitz 2018-07-02 14:04 Web: https://www.cideon.com
SAP GUI view "Document List After Selection"
4.3.2.1 Open... (SOLIDWORKS)
When the SOLIDWORKS function "Open..." is invoked via the "File" menu, the SAP Engineering Control Center Interface to SOLIDWORKS offers the option to directly load a document from SAP. Depending on the configuration of the interface the following dialogue may appear:
It is configurable wether the dialog comes up or not and the general behaviour of the interface at this point. It exist the option "Load document from SAP when clicked 'Open'?" in the settings for the SAP Engineering Control Center Interface to SOLIDWORKS in the "Miscellaneous" branch.
"Open document" dialogue
When "Yes" is selected, the SAP Engineering Control Center's "Open" dialogue appears:
- 37 / 72 -

CIDEON Software & Services GmbH & Co. KG SAP Engineering Control Center Interface to SOLIDWORKS - User Manual Peterstrasse 1 • D-02826 Görlitz 2018-07-02 14:04 Web: https://www.cideon.com
ECTR dialogue "Open"
With this dialogue, the document to be loaded from SAP can be chosen.
When the "No" button is clicked, the SOLIDWORKS dialogue "Open" opens. Here, a document to be opened can be chosen locally.
The "Cancel" button cancels the entire process.
4.3.2.2 Open from SAP through the insertion of a component
Components can be inserted into an open module or drawing in SOLIDWORKS in several different ways. If you intend to insert a component that is not already open in SOLIDWORKS, the SAP Engineering Control Center Interface to SOLIDWORKS provides the ability to select a component in the SAP PLM and paste it into the currently opened document. This opens a dialog that offers this possibility.
"Load file from SAP?" dialog
In two scenarios it is the case that:
1) The insertion of an existing part or assembly using the menu command "Insert -> Component -> Existing Part/Assembly ...", in an open module. This will appear at the left of the "Insert Component" dialog. If "Browse ..." is selected there (figure marked in red), the dialog shown in figure opens.
- 38 / 72 -

CIDEON Software & Services GmbH & Co. KG SAP Engineering Control Center Interface to SOLIDWORKS - User Manual Peterstrasse 1 • D-02826 Görlitz 2018-07-02 14:04 Web: https://www.cideon.com
SOLIDWORKS "Insert Component" dialog
2) If a drawing is open and the "..." button is selected while on the "View Palette" in the task pane area of the SOLIDWORKS (red markers in figure, the dialog shown in figure also appears.
SOLIDWORKS "View Palette" in task pane
With the "Load file from SAP?" dialog can now be used to select whether to insert the component to be loaded as a file from SAP PLM or from a local file. If confirmed with the "Yes" button the "Part Selection" dialog of the SAP Engineering Control Center is displayed with which the component can be selected. If, however, the answer is "No", or the ECTR "Part Selection" dialog is aborted, the normal SOLIDWORKS "Open" dialog appears, by means of which a document can be opened from local disk.
- 39 / 72 -
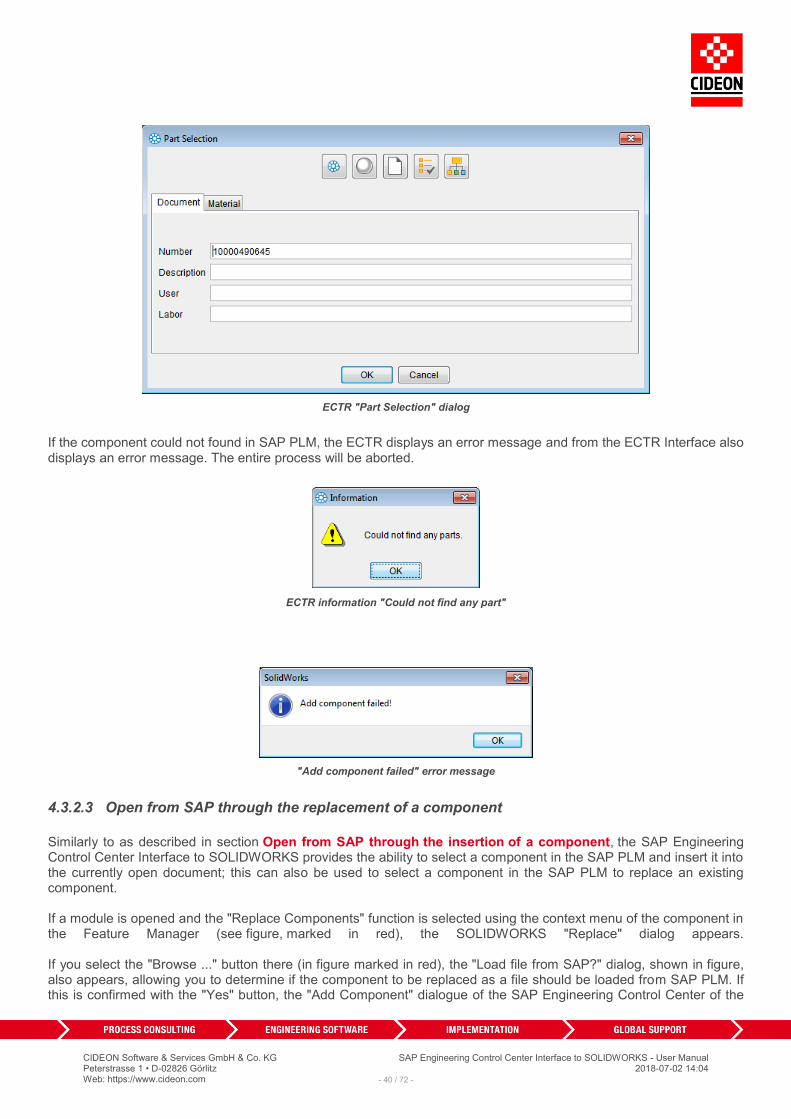
CIDEON Software & Services GmbH & Co. KG SAP Engineering Control Center Interface to SOLIDWORKS - User Manual Peterstrasse 1 • D-02826 Görlitz 2018-07-02 14:04 Web: https://www.cideon.com
ECTR "Part Selection" dialog
If the component could not found in SAP PLM, the ECTR displays an error message and from the ECTR Interface also displays an error message. The entire process will be aborted.
ECTR information "Could not find any part"
"Add component failed" error message
4.3.2.3 Open from SAP through the replacement of a component
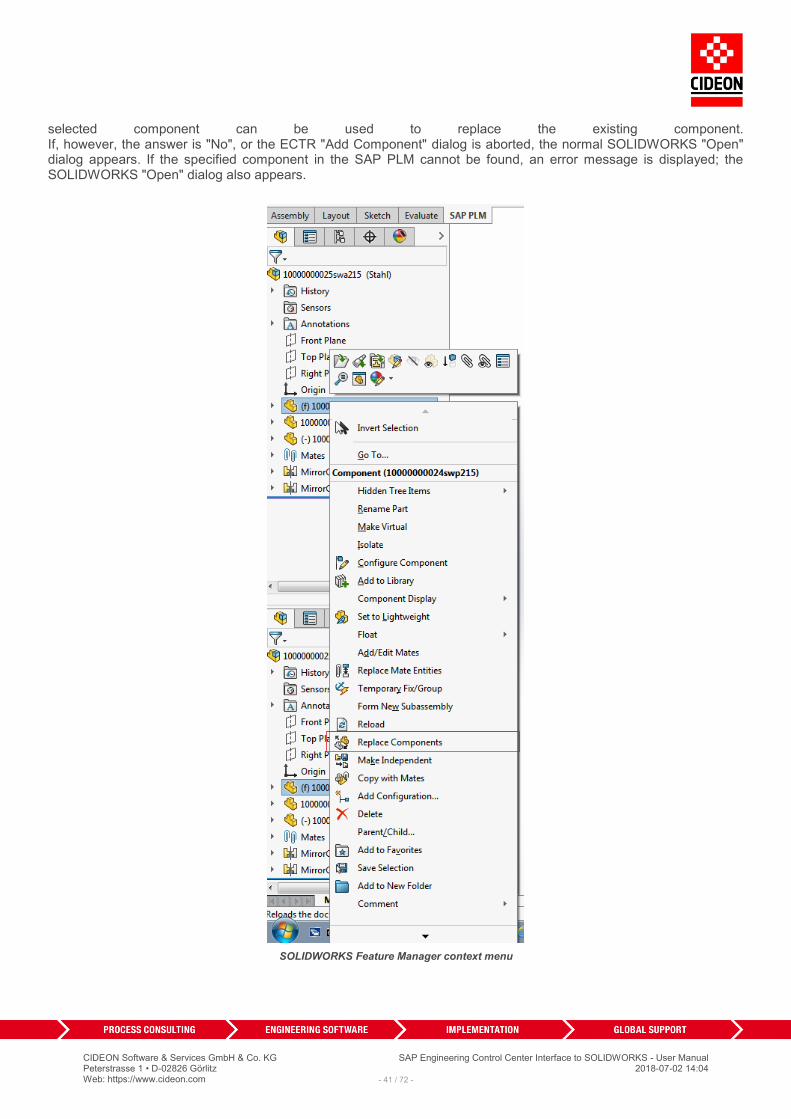
Similarly to as described in section Open from SAP through the insertion of a component, the SAP Engineering Control Center Interface to SOLIDWORKS provides the ability to select a component in the SAP PLM and insert it into the currently open document; this can also be used to select a component in the SAP PLM to replace an existing component. If a module is opened and the "Replace Components" function is selected using the context menu of the component in the Feature Manager (see figure, marked in red), the SOLIDWORKS "Replace" dialog appears. If you select the "Browse ..." button there (in figure marked in red), the "Load file from SAP?" dialog, shown in figure, also appears, allowing you to determine if the component to be replaced as a file should be loaded from SAP PLM. If this is confirmed with the "Yes" button, the "Add Component" dialogue of the SAP Engineering Control Center of the
- 40 / 72 -
CIDEON Software & Services GmbH & Co. KG SAP Engineering Control Center Interface to SOLIDWORKS - User Manual Peterstrasse 1 • D-02826 Görlitz 2018-07-02 14:04 Web: https://www.cideon.com
selected component can be used to replace the existing component. If, however, the answer is "No", or the ECTR "Add Component" dialog is aborted, the normal SOLIDWORKS "Open" dialog appears. If the specified component in the SAP PLM cannot be found, an error message is displayed; the SOLIDWORKS "Open" dialog also appears.
SOLIDWORKS Feature Manager context menu
- 41 / 72 -

CIDEON Software & Services GmbH & Co. KG SAP Engineering Control Center Interface to SOLIDWORKS - User Manual Peterstrasse 1 • D-02826 Görlitz 2018-07-02 14:04 Web: https://www.cideon.com
SOLIDWORKS "Replace" dialog
4.3.3 Save
If a document has a document info record (DIR) that has been taken into work (checked out), opened and edited in SOLIDWORKS, it should be saved at regular intervals. This can only be accomplished using the "Save" command in SOLIDWORKS if the document is saved as only locally on the hard disk or in the currently active working directory but not updated in SAP PLM.
A caching, which updates the document in SAP PLM, provides the function "Save " of the SAP Engineering Control Center, which can easily be accessed from SOLIDWORKS via the SAP Engineering Control Center Interface to SOLIDWORKS. The following steps are implemented in this way:
1. The document is stored locally on the hard disk or in the currently active working directory. As a result, the created document file is updated.
2. The document will be stored in SAP PLM (checked in). 3. The document from SAP PLM is immediately put back into operation (checked out), so that further processing
can be continued in SOLIDWORKS.
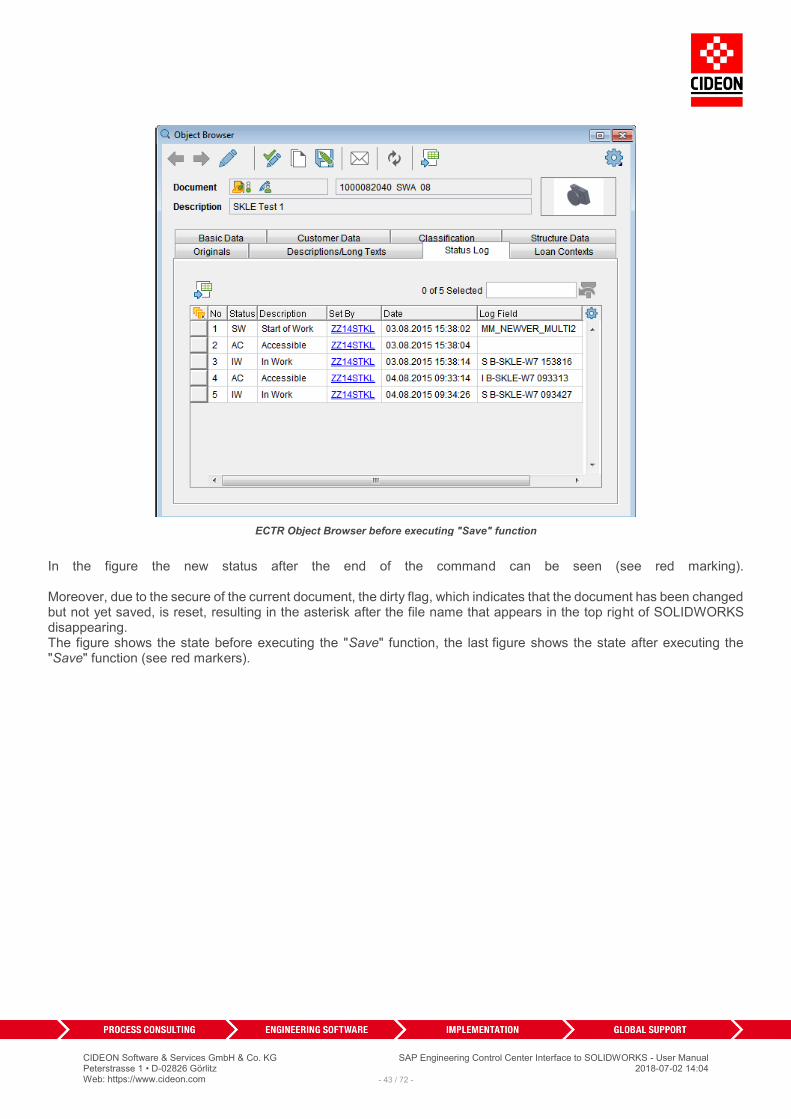
The effect of this function is visible in the browser of the SAP Engineering Control Center, to which two entries have been added in the status log of the document stored in the object, that record that the document is stored in its SAP PLM (checked in status "AC") and has been immediately taken for processing (status "IW" checked). The state before executing "Save" is shown in figure.
- 42 / 72 -
CIDEON Software & Services GmbH & Co. KG SAP Engineering Control Center Interface to SOLIDWORKS - User Manual Peterstrasse 1 • D-02826 Görlitz 2018-07-02 14:04 Web: https://www.cideon.com
ECTR Object Browser before executing "Save" function
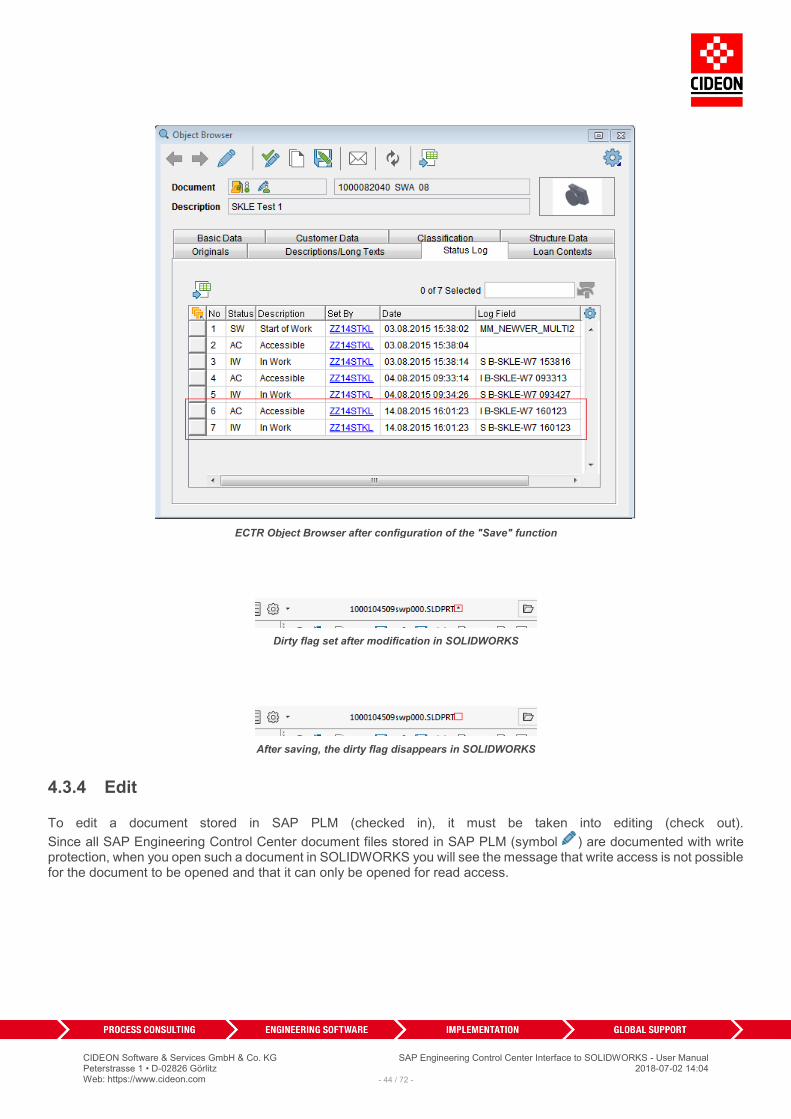
In the figure the new status after the end of the command can be seen (see red marking). Moreover, due to the secure of the current document, the dirty flag, which indicates that the document has been changed but not yet saved, is reset, resulting in the asterisk after the file name that appears in the top right of SOLIDWORKS disappearing. The figure shows the state before executing the "Save" function, the last figure shows the state after executing the "Save" function (see red markers).
- 43 / 72 -
CIDEON Software & Services GmbH & Co. KG SAP Engineering Control Center Interface to SOLIDWORKS - User Manual Peterstrasse 1 • D-02826 Görlitz 2018-07-02 14:04 Web: https://www.cideon.com
ECTR Object Browser after configuration of the "Save" function
Dirty flag set after modification in SOLIDWORKS
After saving, the dirty flag disappears in SOLIDWORKS
4.3.4 Edit
To edit a document stored in SAP PLM (checked in), it must be taken into editing (check out).
Since all SAP Engineering Control Center document files stored in SAP PLM (symbol ) are documented with write protection, when you open such a document in SOLIDWORKS you will see the message that write access is not possible for the document to be opened and that it can only be opened for read access.
- 44 / 72 -

CIDEON Software & Services GmbH & Co. KG SAP Engineering Control Center Interface to SOLIDWORKS - User Manual Peterstrasse 1 • D-02826 Görlitz 2018-07-02 14:04 Web: https://www.cideon.com
SOLIDWORKS "Open file with read-only access" dialog
A document opened with write protection will be marked in SOLIDWORKS with the suffix "[Read-only]" after the file name at the top of the window.
Read-only flag in SOLIDWORKS
The write protection thus functions in this context as an indication that the document has been saved in SAP PLM (checked in).
The presence of write protection does not mean that the open document cannot be edited and changed. However, in order to be edited, it must be saved under a new name in a new file. It is thus an altered copy of the existing document that is stored.
To take in (check out) a stored in SAP PLM document for processing, SAP Engineering Control Center Interface to SOLIDWORKS uses the "Edit" function. This ensures that the document for the editing user for editing is thus checked out and the write protection for the original file in the current working directory is removed. This is indicated by the
symbol for the required document in SAP Engineering Control Center, whose status is set to "IW" (see red markers in the following figure).
ECTR "Object Browser" view after executing "Save" function
- 45 / 72 -
CIDEON Software & Services GmbH & Co. KG SAP Engineering Control Center Interface to SOLIDWORKS - User Manual Peterstrasse 1 • D-02826 Görlitz 2018-07-02 14:04 Web: https://www.cideon.com
Now it is possible to perform editing work, to open the model document in SOLIDWORKS and make changes.
If the work is terminated, either the intermediate state can be saved and stored in SAP PLM Save ), in order to be able to continue working immediately, or the document can be saved and stored permanently in SAP PLM (checked in)
(see Save and Display ).
4.3.5 Save and Display
If a document has a document info record (DIR) has been taken into work (checked out) and is opened and edited in SOLIDWORKS, it must after completion of the work on this document again be stored in SAP PLM (checked in).
This takes care of the "Save and Display " of the SAP Engineering Control Center, which can easily be accessed from SOLIDWORKS via the SAP Engineering Control Center Interface to SOLIDWORKS. The following steps are implemented in this way:
1. The document is stored locally on the hard disk or in the currently active working directory. As a result, the created document file is updated.
2. The document is then stored (checked in) in SAP PLM and the document info record updated.
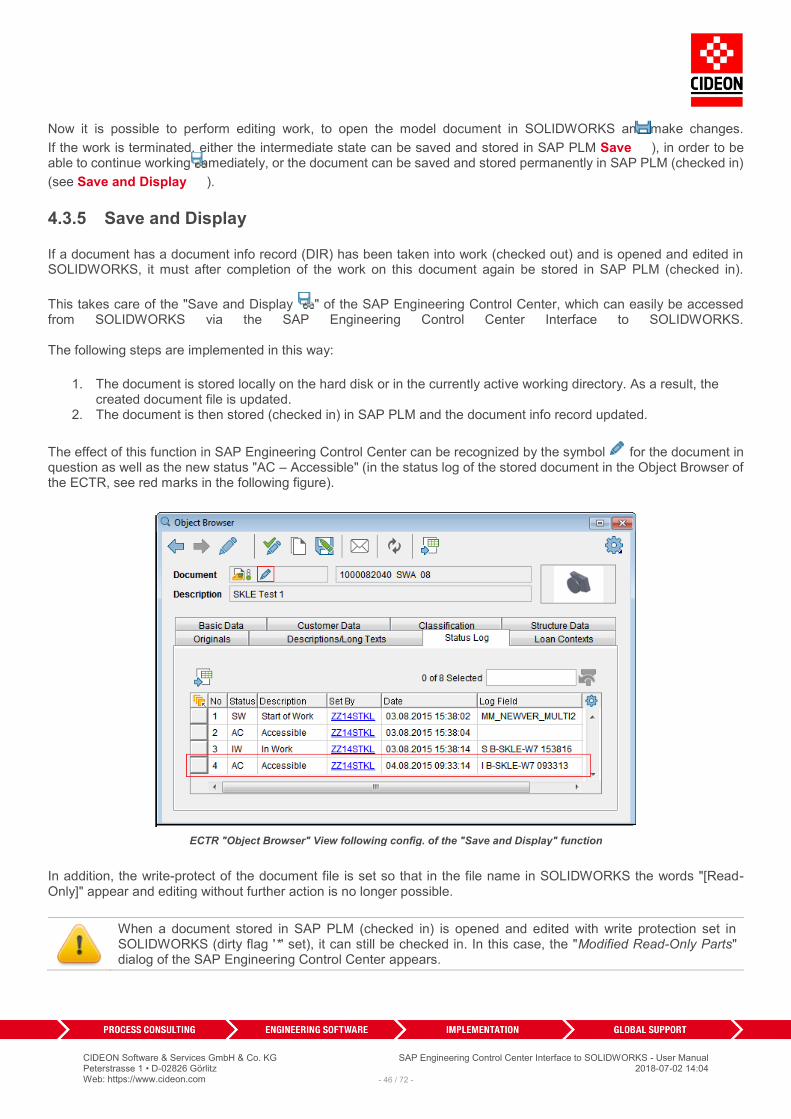
The effect of this function in SAP Engineering Control Center can be recognized by the symbol for the document in question as well as the new status "AC – Accessible" (in the status log of the stored document in the Object Browser of the ECTR, see red marks in the following figure).
ECTR "Object Browser" View following config. of the "Save and Display" function
In addition, the write-protect of the document file is set so that in the file name in SOLIDWORKS the words "[Read-Only]" appear and editing without further action is no longer possible.
When a document stored in SAP PLM (checked in) is opened and edited with write protection set in SOLIDWORKS (dirty flag '*' set), it can still be checked in. In this case, the "Modified Read-Only Parts" dialog of the SAP Engineering Control Center appears.
- 46 / 72 -

CIDEON Software & Services GmbH & Co. KG SAP Engineering Control Center Interface to SOLIDWORKS - User Manual Peterstrasse 1 • D-02826 Görlitz 2018-07-02 14:04 Web: https://www.cideon.com
ECTR "Modified read-only parts" dialog
If the "Save" listbox is selected here, the following things occur:
1. The document is first taken in for editing (checked out). 2. The document file is saved. 3. The document will be stored in SAP PLM (checked in).
If the "No Action" listbox is instead selected and then the "Continue" button key actuated or the dialog is closed by clicking the "Cancel" or the "Close" buttons, the operation is completely canceled and control returned back to SOLIDWORKS.
In any case, making changes to a document stored in SAP PLM and therefore read-only should be avoided in SOLIDWORKS! Instead, a document should be taken in for editing (checked out) before editing using
the function Edit .
4.3.6 Save as
In addition to saving and depositing a processed (checked out) document in SAP PLM, which is the most commonly
used method to store documents in SAP PLM and which is used for the function Save and Display , there are other methods to store documents in SAP PLM:
▪ A document can be saved as a new version ▪ A document can be saved as a new document
The submenu "Save As" found in the SAP PLM main menu and also in the SAP PLM toolbar contains the functions
Save as New Version and Save as New Document . These offer the above-mentioned functionality.
- 47 / 72 -

CIDEON Software & Services GmbH & Co. KG SAP Engineering Control Center Interface to SOLIDWORKS - User Manual Peterstrasse 1 • D-02826 Görlitz 2018-07-02 14:04 Web: https://www.cideon.com
Submenu "Save As" in SAP PLM-Command tab
4.3.6.1 Save As New Version
A document can exist in different versions. Different versions of a document are distinguished in SAP PLM with a version number. When saving a document using the function "Save as New Version," the version number of the SAP Engineering Control Center is incremented. How this is done can be configured on the ECTR side. If a new version is created for a document associated with other documents (a master document), all linked documents (non-master documents) are also automatically versioned, which means that will be created and saved with this new versions. The versions of a document appear in the ECTR-view "Desktop" in the tree below the node "Versions".
ECTR view "Desktop" with versions
When a new version has been created successfully, the most recent changes are incorporated into this version, i.e., there is now a new document with the new version number, which contains these changes. This is now stored in SAP PLM. If there is an error during the process or a condition is violated, perhaps because the status of the previously applied version or the original document does not allow versioning, a dialog will appear which shows this and explains the detailed reasons for the failure.
- 48 / 72 -

CIDEON Software & Services GmbH & Co. KG SAP Engineering Control Center Interface to SOLIDWORKS - User Manual Peterstrasse 1 • D-02826 Görlitz 2018-07-02 14:04 Web: https://www.cideon.com
ECTR "Create New Version" error message
If the versioning was successful, the status of the originally open document which was being processed is now returned
(the saving will be reversed). This is similar to the process described for the function Cancel .
The new version appears in the ECTR view "Desktop" under the node "Versions".
4.3.6.2 Save As New Document
The function "Save as New Document " creates a copy of the current document opened in SOLIDWORKS, and saves it under a new name. Finally, this new document will be saved in SAP PLM. If this function is applied to a document open in SOLIDWORKS, the ECTR dialog "Copy Document" will appear, and in this dialog, the target and description of the document copy can be chosen or changed. Finally, the action must be confirmed with the "OK" button.
ECTR Dialog "Copy Document"
If instead, the process is cancelled with the "Cancel" button or the close button the control will be returned again to SOLIDWORKS.
The procedure corresponds to the function "Clone" with extended options (see chapter "Cloning").
- 49 / 72 -

CIDEON Software & Services GmbH & Co. KG SAP Engineering Control Center Interface to SOLIDWORKS - User Manual Peterstrasse 1 • D-02826 Görlitz 2018-07-02 14:04 Web: https://www.cideon.com
An error notification will display when an error is encountered during processing of the function.
Error notification in dialog "Copy Document"
If the function was completed successfully, the originally opened document which was being processed will now be closed in SOLIDWORKS. The new document will be saved in SAP PLM and opened in SOLIDWORKS. The newly saved document appears in the ECTR view "Desktop".
If the function "Save as New Document" is run on a document which does not yet have a document information record (DIR), an error message appears and the action will be cancelled.
ATTENTION: If this function is applied to a document that contains documents that have not yet been managed within its structure, that is, does not have a DIR, a copy of the DIR is created in the SAP but is not yet saved with the CAD original! Any new sub-documents can then applied to the copy of the assembly in SAP by executing the "Import
" function.
4.3.7 Refresh
The funcitons to update the open documents in SOLIDWORKS with current information from SAP PLM can be found in
the submenu "Refresh ". It contains the functions Refresh Originals and Refresh Attributes , which provides such possibilities.
This submenu is available in the SAP PLM main-menu and in the SAP PLM ribbon.
Submenu "Refresh" in the SAP PLM Command tab
4.3.7.1 Refresh Originals
The function "Refresh Originals " updates the current file that is open in SOLIDWORKS and all of its linked components and their documents to the current SAP PLM status if the current SAP PLM status of this document is
- 50 / 72 -

CIDEON Software & Services GmbH & Co. KG SAP Engineering Control Center Interface to SOLIDWORKS - User Manual Peterstrasse 1 • D-02826 Görlitz 2018-07-02 14:04 Web: https://www.cideon.com
newer as the document in the working directory. If this happens the current files will be replaced in the working directory with the version from SAP. Otherwise the function will be ignored.
Caution! Due to the overwriting of all documents in the working directory with the SAP versions all changes will be lost!
4.3.7.2 Refresh Attributes
Documents that have already been checked-in to SAP - and therefore have a document info record (DIR) - already have various information, including the DIR itself. This can be for example the document description, the material information or the content of the title block of a drawing. The DIR itself contains diverse meta-data (for example document status) which describe the document and are necessary for the maintenance in SAP. This information and the attributes of a document are refreshed automatically via the SAP-PLM functions of the SAP Engineering Control Center Interface to SOLIDWORKS. But it can also happen that an attribute of a currently in SOLIDWORKS opened document has been changed in SAP PLM without the user using a function in the SAP Engineering Control Center Interface. Please user the function
"Refresh Attributes " to make sure all opened documents have the same information as SAP.
4.3.8 Cancel
If a document has been checked-out and edited, for example using the Edit function of the SAP Engineering Control
Center Interface to SOLIDWORKS, it can be saved using the Save and display function and checked-in to SAP PLM.
In some situations however it may make sense to undo a document check-out and discard all the subsequent changes made to the document.
The "Cancel " function is provided to handle this case. The current document is restored to the state it was in prior to being checked out, all changes are discarded. So this function performs a rollback.
After this function is executed, the state of the document in SAP PLM is the same as it was before being checked out,
the document is closed in SOLIDWORKS. The status is set from "Checked-Out" ( ) to "Available" ( ) in SAP PLM.
ATTENTION! This function should be used only with extreme care, because deletion of the document itself or all modifications made to the document since the last check-out will be undone and thus become permanently lost! This action cannot be undone, nor is there a backup copy of the discarded changes!
If the opened document is in "Checked-Out" state, a selection dialog is displayed after selecting the "Cancel " function:
- 51 / 72 -
CIDEON Software & Services GmbH & Co. KG SAP Engineering Control Center Interface to SOLIDWORKS - User Manual Peterstrasse 1 • D-02826 Görlitz 2018-07-02 14:04 Web: https://www.cideon.com
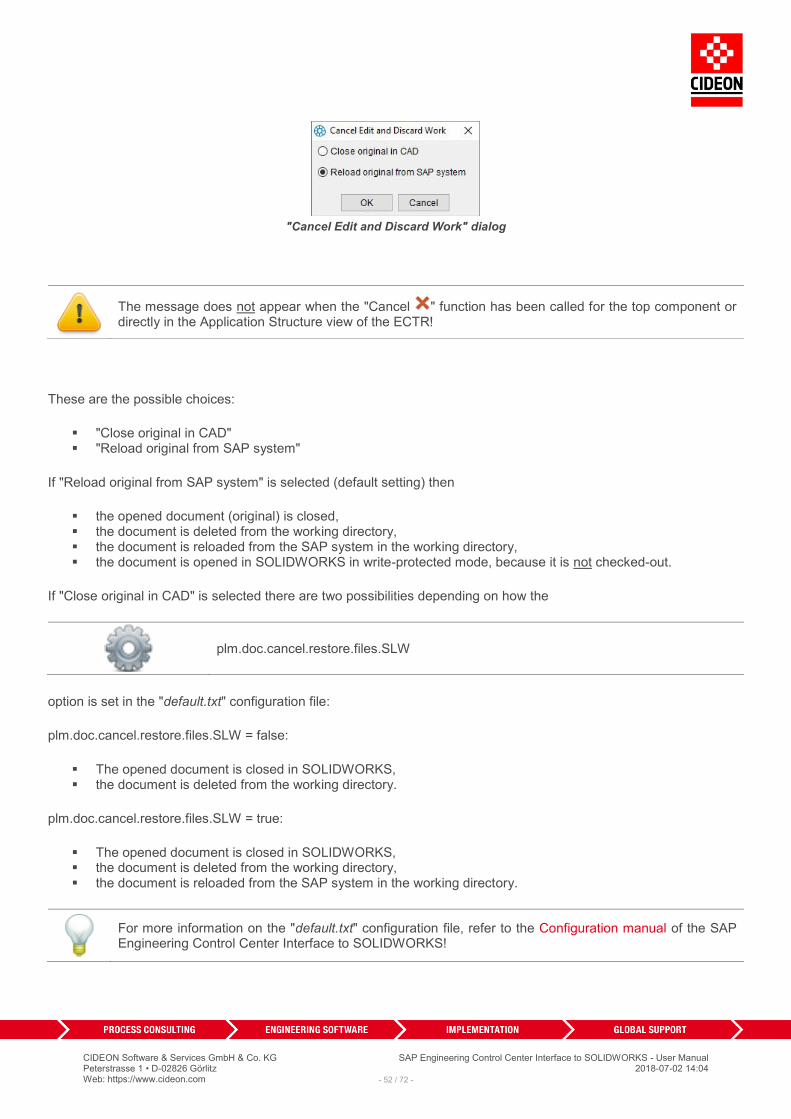
"Cancel Edit and Discard Work" dialog
The message does not appear when the "Cancel " function has been called for the top component or directly in the Application Structure view of the ECTR!
These are the possible choices:
▪ "Close original in CAD" ▪ "Reload original from SAP system"
If "Reload original from SAP system" is selected (default setting) then
▪ the opened document (original) is closed, ▪ the document is deleted from the working directory, ▪ the document is reloaded from the SAP system in the working directory, ▪ the document is opened in SOLIDWORKS in write-protected mode, because it is not checked-out.
If "Close original in CAD" is selected there are two possibilities depending on how the
plm.doc.cancel.restore.files.SLW
option is set in the "default.txt" configuration file:
plm.doc.cancel.restore.files.SLW = false:
▪ The opened document is closed in SOLIDWORKS, ▪ the document is deleted from the working directory.
plm.doc.cancel.restore.files.SLW = true:
▪ The opened document is closed in SOLIDWORKS, ▪ the document is deleted from the working directory, ▪ the document is reloaded from the SAP system in the working directory.
For more information on the "default.txt" configuration file, refer to the Configuration manual of the SAP Engineering Control Center Interface to SOLIDWORKS!
- 52 / 72 -

CIDEON Software & Services GmbH & Co. KG SAP Engineering Control Center Interface to SOLIDWORKS - User Manual Peterstrasse 1 • D-02826 Görlitz 2018-07-02 14:04 Web: https://www.cideon.com
4.3.9 Import
Use the command "Import " to create one or more documents and import the associated originals from SOLIDWORKS to SAP. With the "New" function, a new blank document is produced and a document info record (DIR) is created in SAP PLM
for it. This also applies to single existing documents (see New ). However, in order to create a document info record for all structures such as assemblies and drawings which consist of several sub-documents, the "Import" function should be used because it is able to process several documents in one step. If the master document is not saved, i.e. there is no document file on the disk, you are prompted to save it f irst, and a SOLIDWORKS "Save As" dialog opens.
SOLIDWORKS "Save as" dialog
If this dialog is ended with "Cancel", the whole process will be terminated and control will be returned to SOLIDWORKS.
If the document is saved, the SAP Engineering Control Center will display a table of all documents which are to be saved in a document info record (DIR). The documents to be imported should be marked in this table with the checkboxes!
IMPORTANT! It is essential to ensure that all documents listed in the table in the dialog "Import On Demand Dialog" are marked, especially when it comes to assemblies or drawings, since all listed documents belong to the assembly or drawing! If even one of the documents is not checked, the master document will become inconsistent in SAP PLM!
- 53 / 72 -
CIDEON Software & Services GmbH & Co. KG SAP Engineering Control Center Interface to SOLIDWORKS - User Manual Peterstrasse 1 • D-02826 Görlitz 2018-07-02 14:04 Web: https://www.cideon.com
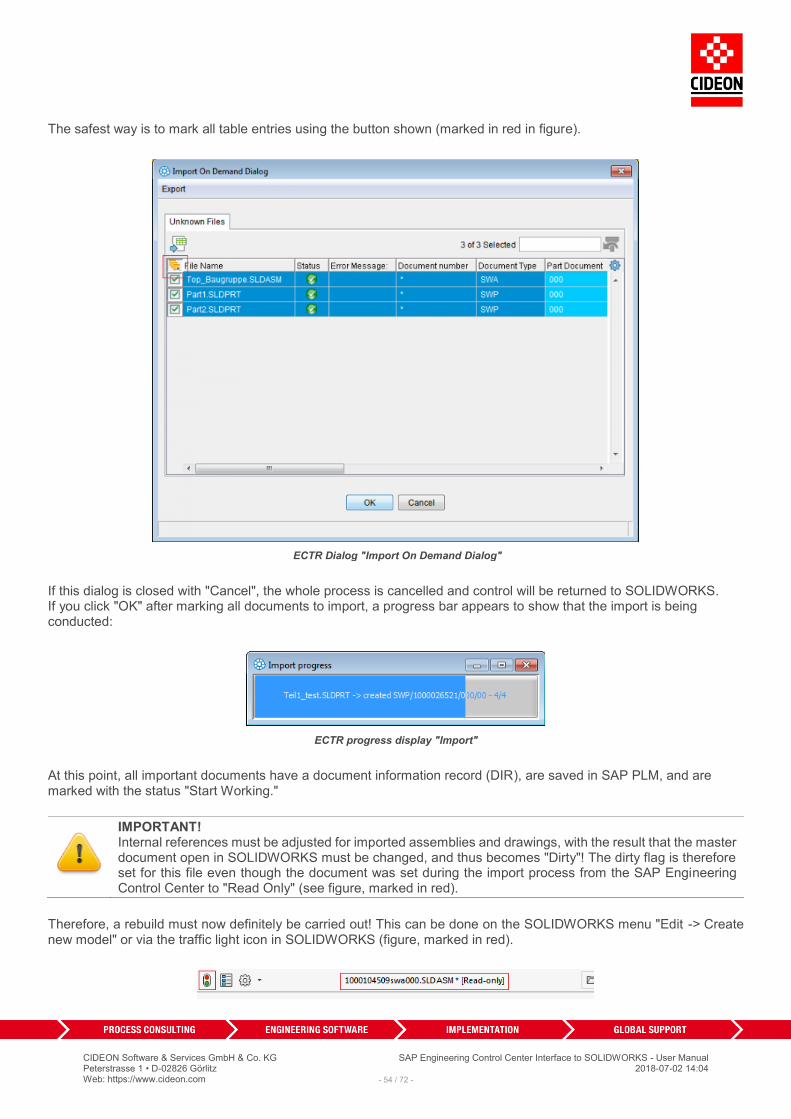
The safest way is to mark all table entries using the button shown (marked in red in figure).
ECTR Dialog "Import On Demand Dialog"
If this dialog is closed with "Cancel", the whole process is cancelled and control will be returned to SOLIDWORKS. If you click "OK" after marking all documents to import, a progress bar appears to show that the import is being conducted:
ECTR progress display "Import"
At this point, all important documents have a document information record (DIR), are saved in SAP PLM, and are marked with the status "Start Working."
IMPORTANT! Internal references must be adjusted for imported assemblies and drawings, with the result that the master document open in SOLIDWORKS must be changed, and thus becomes "Dirty"! The dirty flag is therefore set for this file even though the document was set during the import process from the SAP Engineering Control Center to "Read Only" (see figure, marked in red).
Therefore, a rebuild must now definitely be carried out! This can be done on the SOLIDWORKS menu "Edit -> Create new model" or via the traffic light icon in SOLIDWORKS (figure, marked in red).
- 54 / 72 -

CIDEON Software & Services GmbH & Co. KG SAP Engineering Control Center Interface to SOLIDWORKS - User Manual Peterstrasse 1 • D-02826 Görlitz 2018-07-02 14:04 Web: https://www.cideon.com
Traffic light icon und Read-only indicators in SOLIDWORKS
Finally, the function "Save and Display" (Save and Display ) must be running in order for the master document to be saved with the changed references and stored in SAP PLM!
IMPORTANT! A top-document has to be checked out before an import of a new part can be processed. If not the import will be aborted! Furtherfore neither of the involved components must read-only!
ATTENTION!
Note that the function "Import " in the SAP ECTR ribbon in the CAD system allows only a simple upload of CAD files into the SAP system. When you use this function, a Document Info Record is created and the CAD files are attached as original. Do not use this function to handle "offline collaboration" scenarios (send/receive CAD files to/from externals) or initial data imports during migration projects!
The parameter plm.options.CreateDirDialogForVirtualComponent.SLW in the configuration file "default.txt" can be used to specify that an import of these virtual components should be performed during SOLIDWORKS functionallity "Save virtual component to external file". Please note the following: If not all components are selected in the dialog "Import On Demand Dialog", a DIR is created for the selected components but not saved. Instead, an error message appears that indicates this. After that, the standard CAD process for storing virtual components from SOLIDWORKS continues.
4.3.9.1 Support for SOLIDWORKS Toolbox
The SAP Engineering Control Center Interface to SOLIDWORKS supports the use of standard parts from the SOLIDWORKS Toolbox.
Inserting parts from the Toolbox
If a standard part from the Toolbox, which is not yet known in SAP, is inserted in a model that has been opened and checked out, at the end of the inserting process the "Import on Demand Dialog" dialog is opened by the ECTR into whose file the standard part, which was just inserted, is already entered. The "SWN" DType is assigned by default:
- 55 / 72 -

CIDEON Software & Services GmbH & Co. KG SAP Engineering Control Center Interface to SOLIDWORKS - User Manual Peterstrasse 1 • D-02826 Görlitz 2018-07-02 14:04 Web: https://www.cideon.com
ECTR Import Dialog when inserting standard parts from the Toolbox
In the "default.txt" configuration file the behavior of the SAP Engineering Control Center Interface to SOLIDWORKS when using the SOLIDWORKS Toolbox can be controlled by various parameters. The DType for standard parts is defined by the
plm.document.dtype.ToolboxPart.SLW
parameter. Using the
plm.options.import.standardPart.dark.SLW
parameter you can define that the import of standard parts is done in background. In this case the import dialog is not shown, instead an import is automatically performed in background (dark import) when required.
Toolbox functions "Create parts", "Create configurations"
The "Create parts" and "Create configurations" Toolbox functions, which can be set up in the SOLIDWORKS Toolbox "User settings", in the "Files" section, are supported by the SAP Engineering Control Center Interface to SOLIDWORKS:
- 56 / 72 -

CIDEON Software & Services GmbH & Co. KG SAP Engineering Control Center Interface to SOLIDWORKS - User Manual Peterstrasse 1 • D-02826 Görlitz 2018-07-02 14:04 Web: https://www.cideon.com
SOLIDWORKS Toolbox user settings
The parts files which are created as a result, are imported automatically as described above.
IMPORTANT! It is absolutely necessary to take care in the "Create parts" toolbox function, when selecting the directory for storing the created parts files, that this must in all cases be located on a network drive, that is accessible to everyone who also has access to SAP PLM, otherwise the files stored there will not be found!
4.3.10 Replace Version
The function "Replace Version " enables the user to replace a document - which is currently open in SOLIDWORKS - in the working directory with a different version, as long multiple versions are available in SAP PLM. For this the ECTR dialog "Select version" will appear, and a version can be chosen. The actual version is marked yellow:
ECTR dialog "Select version"
- 57 / 72 -
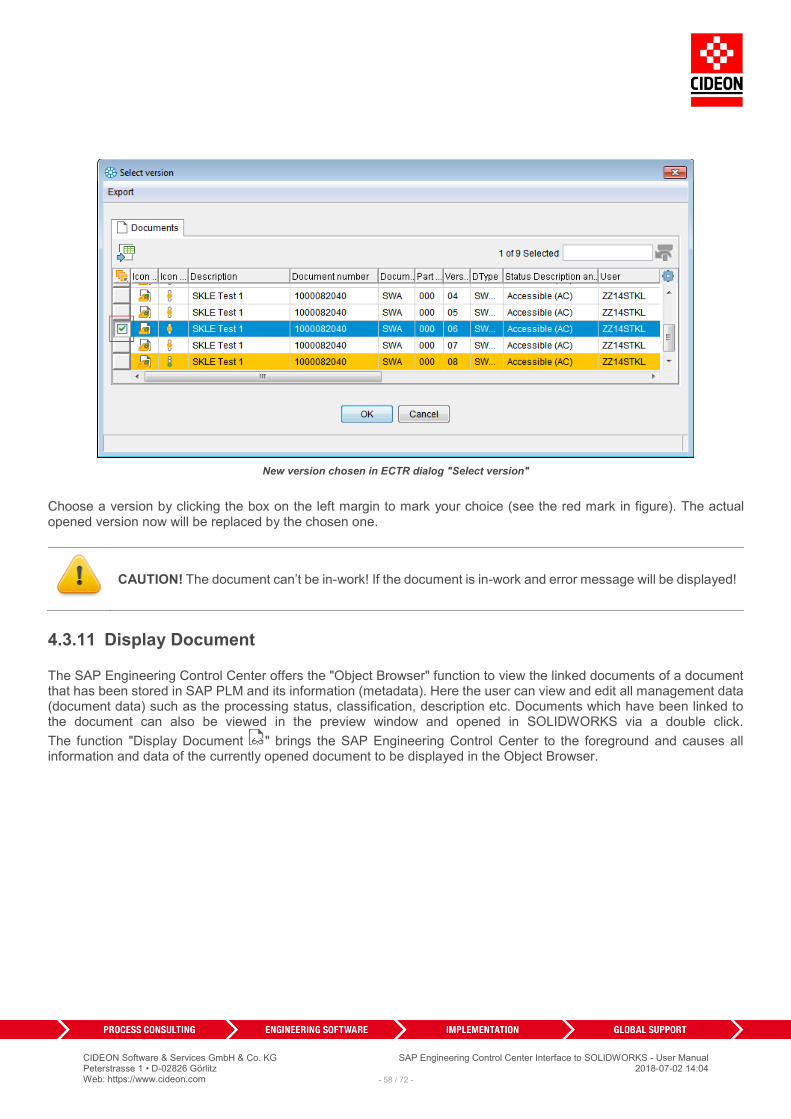
CIDEON Software & Services GmbH & Co. KG SAP Engineering Control Center Interface to SOLIDWORKS - User Manual Peterstrasse 1 • D-02826 Görlitz 2018-07-02 14:04 Web: https://www.cideon.com
New version chosen in ECTR dialog "Select version"
Choose a version by clicking the box on the left margin to mark your choice (see the red mark in figure). The actual opened version now will be replaced by the chosen one.
CAUTION! The document can’t be in-work! If the document is in-work and error message will be displayed!
4.3.11 Display Document
The SAP Engineering Control Center offers the "Object Browser" function to view the linked documents of a document that has been stored in SAP PLM and its information (metadata). Here the user can view and edit all management data (document data) such as the processing status, classification, description etc. Documents which have been linked to the document can also be viewed in the preview window and opened in SOLIDWORKS via a double click.
The function "Display Document " brings the SAP Engineering Control Center to the foreground and causes all information and data of the currently opened document to be displayed in the Object Browser.
- 58 / 72 -
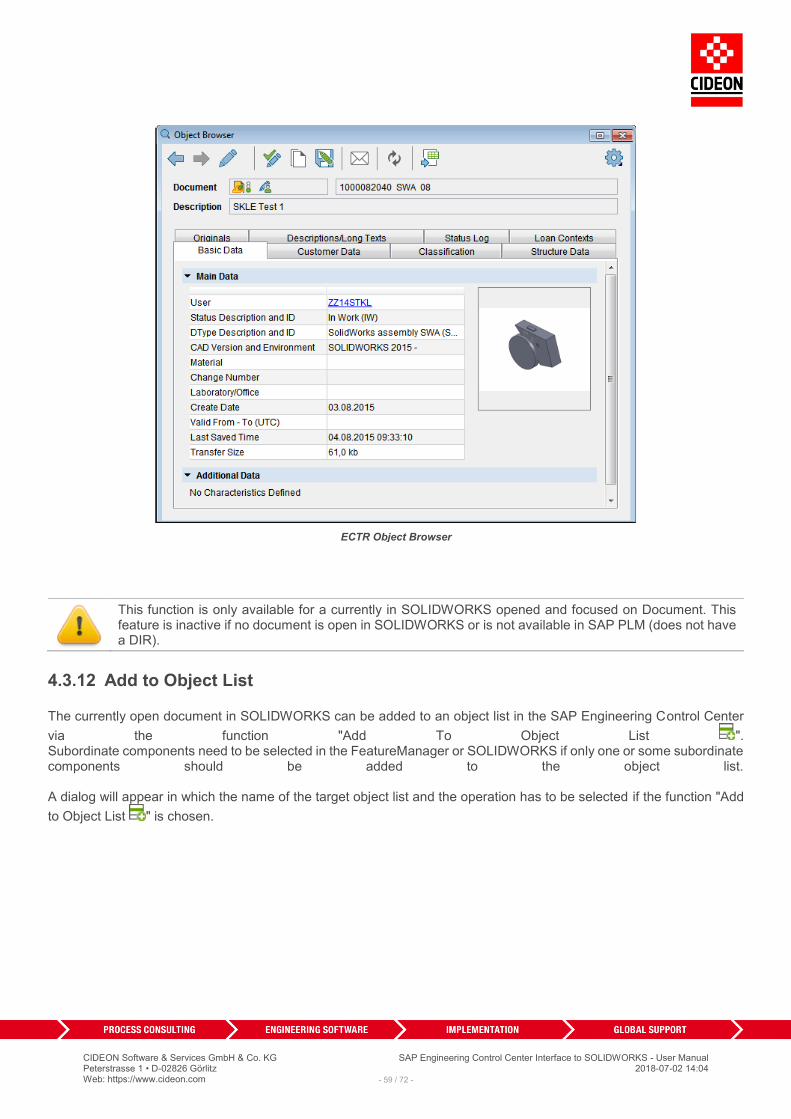
CIDEON Software & Services GmbH & Co. KG SAP Engineering Control Center Interface to SOLIDWORKS - User Manual Peterstrasse 1 • D-02826 Görlitz 2018-07-02 14:04 Web: https://www.cideon.com
ECTR Object Browser
This function is only available for a currently in SOLIDWORKS opened and focused on Document. This feature is inactive if no document is open in SOLIDWORKS or is not available in SAP PLM (does not have a DIR).
4.3.12 Add to Object List
The currently open document in SOLIDWORKS can be added to an object list in the SAP Engineering Control Center
via the function "Add To Object List ". Subordinate components need to be selected in the FeatureManager or SOLIDWORKS if only one or some subordinate components should be added to the object list. A dialog will appear in which the name of the target object list and the operation has to be selected if the function "Add
to Object List " is chosen.
- 59 / 72 -

CIDEON Software & Services GmbH & Co. KG SAP Engineering Control Center Interface to SOLIDWORKS - User Manual Peterstrasse 1 • D-02826 Görlitz 2018-07-02 14:04 Web: https://www.cideon.com
ECTR dialog "New Object List"
If no object list with the stated name exists then a new object list will be created using the given name. If no name is filled out then the name "null" will automatically be used.
After the adding the component will be visible in the corresponding object list and will be displayed in the desktop view of the SAP Engineering Control Center (see red mark in the figure):
Object list in the Engineering Control Center Desktop-View
4.3.13 Depending Document
Dependent documents of a master document can be created or, if already existing, opened with functions which can be found in this submenu.
- 60 / 72 -
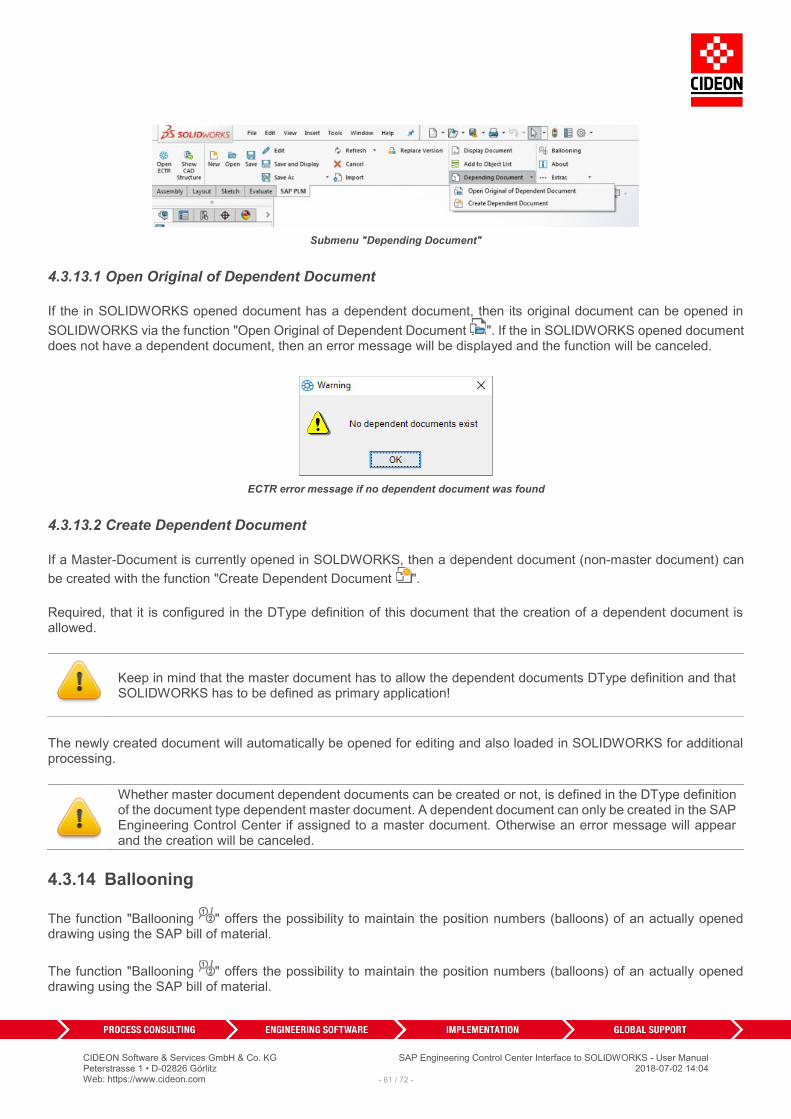
CIDEON Software & Services GmbH & Co. KG SAP Engineering Control Center Interface to SOLIDWORKS - User Manual Peterstrasse 1 • D-02826 Görlitz 2018-07-02 14:04 Web: https://www.cideon.com
Submenu "Depending Document"
4.3.13.1 Open Original of Dependent Document
If the in SOLIDWORKS opened document has a dependent document, then its original document can be opened in
SOLIDWORKS via the function "Open Original of Dependent Document ". If the in SOLIDWORKS opened document does not have a dependent document, then an error message will be displayed and the function will be canceled.
ECTR error message if no dependent document was found
4.3.13.2 Create Dependent Document
If a Master-Document is currently opened in SOLDWORKS, then a dependent document (non-master document) can
be created with the function "Create Dependent Document ".
Required, that it is configured in the DType definition of this document that the creation of a dependent document is allowed.
Keep in mind that the master document has to allow the dependent documents DType definition and that SOLIDWORKS has to be defined as primary application!
The newly created document will automatically be opened for editing and also loaded in SOLIDWORKS for additional processing.
Whether master document dependent documents can be created or not, is defined in the DType definition of the document type dependent master document. A dependent document can only be created in the SAP Engineering Control Center if assigned to a master document. Otherwise an error message will appear and the creation will be canceled.
4.3.14 Ballooning
The function "Ballooning " offers the possibility to maintain the position numbers (balloons) of an actually opened drawing using the SAP bill of material.
The function "Ballooning " offers the possibility to maintain the position numbers (balloons) of an actually opened drawing using the SAP bill of material.
- 61 / 72 -

CIDEON Software & Services GmbH & Co. KG SAP Engineering Control Center Interface to SOLIDWORKS - User Manual Peterstrasse 1 • D-02826 Görlitz 2018-07-02 14:04 Web: https://www.cideon.com
After selection of this function, the position numbers of the elements in the drawing will be matched to the position numbers in the SAP bill of material if available. If no position numbers or SAP bill of material is available an error message will be displayed and the function will be canceled.
Error message during function "Ballooning"
IMPORTANT NOTE! At this time it is not possible to deliver configuration dependent BOM information for SOLIDWORKS!
4.3.15 Extras
Special functions are located in this submenu which are not used often or provides special functionalities relating to SOLIDWORKS.
Submenu "Extras"
4.3.15.1 Cancel Edit
The function "Cancel Edit " changes the status of an opened document from "In Work" (checked-out) back to "Checked-In". But will leave documents locally saved in the working directory untouched.
CAUTION! Be very cautious when using this function. Errors can occur when using this function. It is saver to use the
function "Cancel ", but you can choose simply closing the document in SOLIDWORKS or replace the version in the working directory with the version in SAP. To avoid changes to be overwritten simply save changes under a different document name!
4.3.16 Cloning
The SAP Engineering Control Center provides a "Cloning" function. This has its own "Cloning" window, where individual components as well as large assemblies and drawings can be reproduced. A DIS is also created for a cloned component. In the case of assemblies and drawings, this applies also to their sub-assemblies and components.
- 62 / 72 -

CIDEON Software & Services GmbH & Co. KG SAP Engineering Control Center Interface to SOLIDWORKS - User Manual Peterstrasse 1 • D-02826 Görlitz 2018-07-02 14:04 Web: https://www.cideon.com
ECTR window "Cloning"
The "Cloning" view can be opened by clicking on the icon in the menu "Window" and in the symbol area of the ECTR (see red marks):
ECTR menu "Window"
Icon area of the ECTR
To clone a model, drag it from the desktop view into the "Cloning" window:
- 63 / 72 -

CIDEON Software & Services GmbH & Co. KG SAP Engineering Control Center Interface to SOLIDWORKS - User Manual Peterstrasse 1 • D-02826 Görlitz 2018-07-02 14:04 Web: https://www.cideon.com
Drag the model into the "Cloning" window
The "Tree Manager " button can be used to expand or collapse the structure of the model to be cloned:
Expanded structure in the "Cloning" window
Individual components can be selected within the structure. A context menu is available via the right mouse button, which offers various options for controlling the cloning process as well as further functions for the selected component. The amount of functions offered here depends on whether it is a stand-alone component or the top-level assembly of a structure, or a component subordinate to the structure:
Context menu of a top assembly
- 64 / 72 -

CIDEON Software & Services GmbH & Co. KG SAP Engineering Control Center Interface to SOLIDWORKS - User Manual Peterstrasse 1 • D-02826 Görlitz 2018-07-02 14:04 Web: https://www.cideon.com
Context menu of a subordinate component
The following options are available:
New Internal Number
Copies and replaces the selected document in the structure. If this option is set, the icon appears in the structure tree.
Extended Clone Options
With this option it is possible to change the description of the selected component before assigning a new internal/external number. The ECTR dialog "Copy Document" appears in which the description can be changed:
ECTR dialog "Copy Document"
If this option is set, the icon appears in the structure tree.
The function "Save As New Document" of the SAP Engineering Control Center Interface to
SOLIDWORKS corresponds to the cloning with extended cloning options and can be used alternatively.
Replace Component
The Replace Component function is applied to the selected component.
Change Details
If a document is cloned with a new internal/external number, you can use this option to adjust the document's basic data. The ECTR dialog "Change details" appears:
- 65 / 72 -

CIDEON Software & Services GmbH & Co. KG SAP Engineering Control Center Interface to SOLIDWORKS - User Manual Peterstrasse 1 • D-02826 Görlitz 2018-07-02 14:04 Web: https://www.cideon.com
ECTR dialog "Change Details"
No Action
The selected clone options will be reset to their initial state.
Remove
Removes the component or structure from the "Cloning" window but does not delete any data other than the settings made here to control the cloning process.
Reload
Updates the structure of the model and reloads possible changes to subcomponents.
Starting the cloning process
Once all settings have been made, the actual cloning process can be started by pressing the "Clone" button in the upper left corner of the "Clone" window. Now the ECTR dialog "Cloning Process" appears:
- 66 / 72 -

CIDEON Software & Services GmbH & Co. KG SAP Engineering Control Center Interface to SOLIDWORKS - User Manual Peterstrasse 1 • D-02826 Görlitz 2018-07-02 14:04 Web: https://www.cideon.com
ECTR dialog "Cloning Process"
Here you can additionally define whether dependent documents and other information should be cloned.
Since no structures are displayed in this table, the cloning process should be configured in the normal cloning window!
IMPORTANT! After cloning, it is absolutely necessary for the checked in, cloned models to be manually edited and checked in again! This is to ensure that all the configurations they contain are correctly updated in SAP PLM!
The following restrictions should be noted when cloning:
▪ Cloning of standard parts is not supported! ▪ It is possible to insert several drawing views, e. g. of sub-components, whereby the Master-
Nonmaster relationship always consists of the first added model and all other views are treated as simple components of the drawing. However, it is recommended that only one model is included in each of the non-master drawings!
- 67 / 72 -

CIDEON Software & Services GmbH & Co. KG SAP Engineering Control Center Interface to SOLIDWORKS - User Manual Peterstrasse 1 • D-02826 Görlitz 2018-07-02 14:04 Web: https://www.cideon.com
5 Settings
The user can configure the behavior of the SAP Engineering Control Center Interface to SOLIDWORKS in line with his or her needs. Consequently, the interface offers a number of possible settings (preferences).
The interface settings are located in the Options menu of the SAP Engineering Control Center under "Preferences", which can be reached via the gear symbol ("Settings") in the upper right corner of the ECTR (see red markings in the figure):
Options menu of the ECTR
The view that now opens represents a tree view with the setting categories. This contains a node "Applications" which in turn contains the sub-category "SOLIDWORKS". This contains the items "Miscellaneous" and "Application structure":
Preferences for SOLIDWORKS
5.1 Settings "Miscellaneous"
In the "Miscellaneous" section, settings for the SAP Engineering Control Center Interface to SOLIDWORKS are made up of several areas:
- 68 / 72 -

CIDEON Software & Services GmbH & Co. KG SAP Engineering Control Center Interface to SOLIDWORKS - User Manual Peterstrasse 1 • D-02826 Görlitz 2018-07-02 14:04 Web: https://www.cideon.com
SOLIDWORKS settings "Miscellaneous"
The following options are available:
Options under "Miscellaneous"
Option Values Description
Import also drawings with a reference to imported models
Yes, No
If a drawing contains a reference to the model to be imported, the drawing can also be automatically imported.
Load model fully resolved for save during import on demand
Yes, No
If value = "Yes" the model will be load fully resolved for save, if value = "No" it is loaded reduced only.
Save also drawings which have a reference to saved models
Yes, No
If a drawing contains a reference to the model to be saved, the drawing can also be automatically saved.
Save also external references and their structure
Yes, No
If a model to be saved contains external references, the references and their structure can also be automatically saved.
Update physical properties during save
Yes, No
Physical properties of a model can be updated automatically when saving.
Create DIR for new document Yes, No, Prompt
If the SOLIDWORKS function "New..." is used, a DIS can be created automatically. If value = "Prompt", a selection dialog is displayed.
Load document from SAP when clicked 'Open'?
Yes, No, Prompt
If the SOLIDWORKS function "Open..." is used, the document to be opened can automatically be loaded from SAP PLM. If value = "Prompt", a selection dialog is displayed.
Load document from SAP when add component to assembly/reload model in drawing
Yes, No, Prompt
When adding a document to a BOM or updating a drawing, the model to be added or updated can be automatically loaded from SAP PLM. If value = "Prompt", a selection dialog is displayed.
Use multi search dialog during 'Open' from SAP
Yes, No
If value = "Yes" the multi search dialog from ECTR will be seen during 'Open' from SAP. If value = "No" a more simple dialog with reduced search and filter functionality appears.
- 69 / 72 -
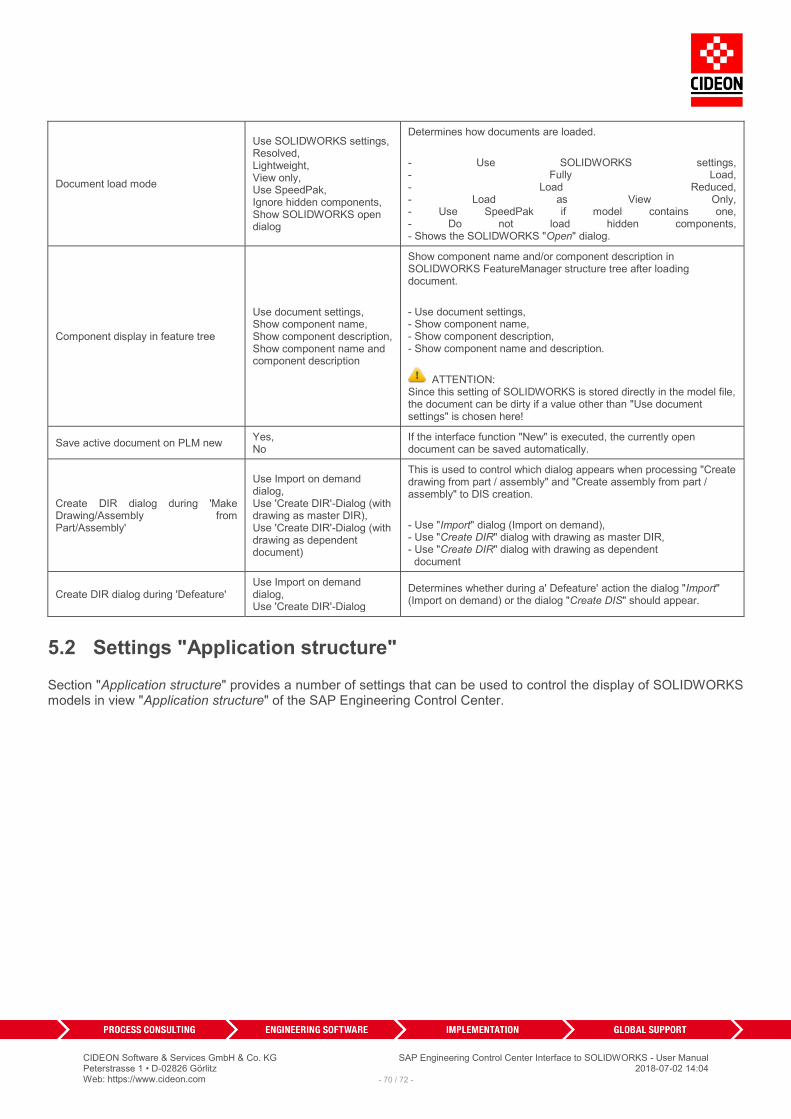
CIDEON Software & Services GmbH & Co. KG SAP Engineering Control Center Interface to SOLIDWORKS - User Manual Peterstrasse 1 • D-02826 Görlitz 2018-07-02 14:04 Web: https://www.cideon.com
Document load mode
Use SOLIDWORKS settings, Resolved, Lightweight, View only, Use SpeedPak, Ignore hidden components, Show SOLIDWORKS open dialog
Determines how documents are loaded.
- Use SOLIDWORKS settings, - Fully Load, - Load Reduced, - Load as View Only, - Use SpeedPak if model contains one, - Do not load hidden components, - Shows the SOLIDWORKS "Open" dialog.
Component display in feature tree
Use document settings, Show component name, Show component description, Show component name and component description
Show component name and/or component description in SOLIDWORKS FeatureManager structure tree after loading document.
- Use document settings, - Show component name, - Show component description, - Show component name and description.
ATTENTION: Since this setting of SOLIDWORKS is stored directly in the model file, the document can be dirty if a value other than "Use document settings" is chosen here!
Save active document on PLM new Yes, No
If the interface function "New" is executed, the currently open document can be saved automatically.
Create DIR dialog during 'Make Drawing/Assembly from Part/Assembly'
Use Import on demand dialog, Use 'Create DIR'-Dialog (with drawing as master DIR), Use 'Create DIR'-Dialog (with drawing as dependent document)
This is used to control which dialog appears when processing "Create drawing from part / assembly" and "Create assembly from part / assembly" to DIS creation.
- Use "Import" dialog (Import on demand), - Use "Create DIR" dialog with drawing as master DIR, - Use "Create DIR" dialog with drawing as dependent document
Create DIR dialog during 'Defeature' Use Import on demand dialog, Use 'Create DIR'-Dialog
Determines whether during a' Defeature' action the dialog "Import" (Import on demand) or the dialog "Create DIS" should appear.
5.2 Settings "Application structure"
Section "Application structure" provides a number of settings that can be used to control the display of SOLIDWORKS models in view "Application structure" of the SAP Engineering Control Center.
- 70 / 72 -

CIDEON Software & Services GmbH & Co. KG SAP Engineering Control Center Interface to SOLIDWORKS - User Manual Peterstrasse 1 • D-02826 Görlitz 2018-07-02 14:04 Web: https://www.cideon.com
SOLIDWORKS settings "Application structure"
The following options are available:
Options under "Application structure"
Parameter Values Description
Collect Entries?
No, Yes (All), Yes (Per Configuration)
There is an option to summarize structure entries of multiple built-in components in order to achieve a better clarity. The entries can be summarized either over the entire structure (value = "Yes (All)") or separately for each configuration (value = "Per Configuration").
Display additional columns
Yes, No
You can display additional columns with the content of the model attributes, which are specified in the "Additional attributes" option. Their names are the column headings.
File properties Attribute names, separated through ';'
You can also display the contents of additional model attributes if there are any. Their names must be specified here separated through ';'. They are displayed only if the option "Show additional columns" is enabled.
Hide structure of Speedpaks
Yes, No
The structure of any existing Speedpaks can either be displayed entirely (value = "No") or hidden (value = "Yes").
Load Drawings Yes, No
If a assembly or a part has a drawing and it exists in the local working directory as a file, it can be displayed in the Application structure. Contrary to the option name, a drawing is not loaded from SAP!
Number of levels which should be submitted to application structure
<Number>, "all"
A number indicates how many substrusture levels of a model are initially transferred for the display. At first, the substructures are displayed as a folded branch in the tree. If the value = "1", the next level of the loading process will be triggered during the expansion. The larger the number the more levels are transferred at the same time, if the value = "all" all levels will be transferred initially.
This option affects the performance because the simultaneous transfer of multiple layers requires even more time!
Display external references
Yes, No
If a model has external references, these can be displayed in the application structure.
Display supressed components
Yes, No
If a model has supressed components, these can be displayed in the application structure.
- 71 / 72 -
CIDEON Software & Services GmbH & Co. KG SAP Engineering Control Center Interface to SOLIDWORKS - User Manual Peterstrasse 1 • D-02826 Görlitz 2018-07-02 14:04 Web: https://www.cideon.com
6 Final Remark
This manual is intended to aid in the use of the product. Because the development of this product is also ongoing, this document applies to the release available at the time of printing. CIDEON Software & Services GmbH & Co. KG is grateful for comments and suggestions from users. Please contact us in this regard via the CIDEON Service Portal (ticket system).
This documentation was prepared with the greatest of care; however, we cannot accept liability for any errors or omissions therein.
You will find additional information and news on our Website!
CIDEON Software & Services GmbH & Co. KG
www.cideon.com
Copyright © 2018 CIDEON Software & Services GmbH & Co. KG. All rights reserved.
No portion of this document may be reproduced or copied by any means or for any purpose without the express permission of CIDEON Software & Services GmbH & Co. KG.
- 72 / 72 -