sap exchange infrastructure - way2sapbasis.comway2sapbasis.com/upload/xi_upgrade_guide.pdf · sap...
TRANSCRIPT
SAP NetWeaver ´04 Component Upgrade Guide
SAP® Exchange Infrastructure
Based on SAP® Web Application Server 6.40
Document Version: 1.01 – 21.04.2004

© Copyright 2004 SAP AG. All rights reserved. No part of this publication may be reproduced or transmitted in any form or for any purpose without the express permission of SAP AG. The information contained herein may be changed without prior notice. Some software products marketed by SAP AG and its distributors contain proprietary software components of other software vendors. Microsoft®, WINDOWS®, NT®, EXCEL®, Word®, PowerPoint® and SQL Server® are registered trademarks of Microsoft Corporation. IBM®, DB2®, DB2 Universal Database, OS/2®, Parallel Sysplex®, MVS/ESA, AIX®, S/390®, AS/400®, OS/390®, OS/400®, iSeries, pSeries, xSeries, zSeries, z/OS, AFP, Intelligent Miner, WebSphere®, Netfinity®, Tivoli®, Informix and Informix® Dynamic Server
TM are
trademarks of IBM Corp. in USA and/or other countries. ORACLE® is a registered trademark of ORACLE Corporation. UNIX®, X/Open®, OSF/1®, and Motif ® are registered trademarks of the Open Group. Citrix®, the Citrix logo, ICA®, Program Neighborhood ®, MetaFrame®, WinFrame®, VideoFrame®, MultiWin® and other Citrix product names referenced herein are trademarks of Citrix Systems, Inc. HTML, DHTML, XML, XHTML are trademarks or registered trademarks of W3C®, World Wide Web Consortium, Massachusetts Institute of Technology. Java®
is a registered trademark of Sun Microsystems, Inc. J2EE™ is a registered trademark of Sun Microsystems, Inc.
JavaScript® is a registered trademark of Sun Microsystems, Inc., used under license for technology invented and implemented by Netscape. MarketSet and Enterprise Buyer are jointly owned trademarks of SAP AG and Commerce One. MaxDB™ is a trademark of MySQL AB, Sweden SAP, R/3, mySAP, mySAP.com, SAP NetWeaver, xApps, xApp, and other SAP products and services mentioned herein as well as their respective logos are trademarks or registered trademarks of SAP AG in Germany and in several other countries all over the world. All other product and service names mentioned are the trademarks of their respective companies. Data contained in this document serves information purposes only. National product specifications may vary. Disclaimer Some components of this product are based on Java™. Any code change in these components may cause unpredictable and severe malfunctions and is therefore expressively prohibited, as is any decompilation of these components. Any Java™ Source Code delivered with this product is only to be used by SAP’s Support Services and may not be modified or altered in any way. Documentation in the SAP Service Marketplace You can find this documentation at the following address: http://service.sap.com/instguidesNW04
SAP AG Neurottstraße 16 69190 Walldorf Germany T +49/18 05/34 34 24 F +49/18 05/34 34 20 www.sap.com

Typographic Conventions
Type Style Description
Example Text Words or characters quoted from the screen. These include field names, screen titles, pushbuttons labels, menu names, menu paths, and menu options.
Cross-references to other documentation
Example text Emphasized words or phrases in body text, graphic titles, and table titles
EXAMPLE TEXT Technical names of system objects. These include report names, program names, transaction codes, table names, and key concepts of a programming language when they are surrounded by body text, for example, SELECT and INCLUDE.
Example text Output on the screen. This includes file and directory names and their paths, messages, names of variables and parameters, source text, and names of installation, upgrade and database tools.
Example text Exact user entry. These are words or characters that you enter in the system exactly as they appear in the documentation.
<Example text>
Variable user entry. Angle brackets indicate that you replace these words and characters with appropriate entries to make entries in the system.
EXAMPLE TEXT Keys on the keyboard, for example, F2 or ENTER.
Icons
Icon Meaning
Caution
Example
Note
Recommendation
Syntax
Additional icons are used in SAP Library documentation to help you identify different types of information at a glance. For more information, see Help on Help → General Information Classes and Information Classes for Business Information Warehouse on the first page of any version of SAP Library.

4 April 2004
mySAP Business Suite Solution and Business Scenario Documentation Landscape
Purpose
SAP has designed a special documentation landscape for implementing mySAP Business Suite solutions and business scenarios. An overview of the individual documents follows. Always use the current documents for your implementation.
Features
The following documents are available for a mySAP Business Suite solution:
• Master Guide, Installation and Upgrade Guides
These documents describe how you install or upgrade the system landscape required by a business scenario. The main document for the installation of each mySAP Business Suite solution is the Master Guide. The main document for the upgrade of each mySAP Business Suite solution is the Upgrade Master Guide. The documents lists the mySAP Business Suite application components and third-party applications required by each business scenario, and refer to their installation and upgrade guides. These are the Component Installation Guides and Component Upgrade Guides.
• Business Scenario Description
This document describes how a business scenario runs once all components have been installed and configured. It comprises a text (business scenario documentation) and a graphic (component view).
− Business-Scenario Configuration Guide
This document describes the settings you use to configure the mySAP Business Suite application components and third-party applications required for a business scenario. This involves a system connection, middleware and data replication, and customizing and master data. The business scenario configuration guide specifies the configuration activity sequence, and their dependencies. Configuration activities can be IMG activities, SAP system transactions, organizational activities, and so on.
• Implementation Guide (IMG)
This tool adjusts SAP systems to fit customer requirements. The IMG contains the IMG activities for all mySAP Business Suite components, and general documentation. The structure is component-oriented, without reference to a business scenario. The IMG is taken from the business scenario configuration guide and is business scenario-specific. The configuration guide identifies the positions in the IMG where you find the (general) IMG activity documentation, but it does not specify actual settings for the business scenario.
• SAP Library
This is the set of functional documentation of all mySAP Business Suite components. It does not refer to business scenarios.

April 2004 5
History The Upgrade Guide is regularly updated on the SAP Service Marketplace at service.sap.com/instguidesNW04.
Make sure you have the latest version of the Upgrade Guide by checking on the SAP Service Marketplace immediately before starting the installation.
The following table provides an overview on the most important changes that were made in the latest versions.
Upgrade Guide Version Important Changes
1.00 (March 2004) -- First version --
1.01 (April 2004) Changes to chapters Importing Data Into the New SLD and Integration Builder Migration.
Upgrade Guide SAP Exchange Infrastructure
6 April 2004
Contents 1 Introduction ....................................................................................8
1.1 Before You Start...............................................................................9 1.1.1 SAP Notes............................................................................................ 9 1.1.2 Further Information ............................................................................. 9 1.1.3 Glossary............................................................................................. 10
2 Overview .......................................................................................11 2.1 Business Scenario Overview........................................................11 2.2 Software Component Matrix .........................................................11
3 Migration Strategy for XI Landscapes.......................................12 3.1 Complete XI Landscapes...............................................................12
3.1.1 Migrating Multiple-SLD Landscapes................................................ 12 3.1.1.1 DEV Landscape Migration .......................................................................................12 3.1.1.2 QA Landscape Migration .........................................................................................13 3.1.1.3 PRD Landscape Migration.......................................................................................13
3.1.2 Migrating Centralized-SLD Landscapes.......................................... 14 3.1.3 Working with Old and New SLD Instances in Parallel.................... 14
3.2 Migration Objectives for Single Landscapes ..............................15 3.2.1 Objectives .......................................................................................... 15 3.2.2 Start and End Configurations........................................................... 16 3.2.3 Migration Method .............................................................................. 16
4 Migration .......................................................................................18 4.1 Technical System Landscape.......................................................18 4.2 Planning ..........................................................................................18 4.3 Preparation .....................................................................................19 4.4 Migration Sequence.......................................................................20
4.4.1 Overview ............................................................................................ 20 4.4.2 Detailed Explanation of the Steps.................................................... 21
4.4.2.1 Integration Server Installation ..................................................................................21 4.4.2.2 Migration of Customizing Data.................................................................................21
4.4.2.2.1 Migrating Users and Roles.................................................................................21 4.4.2.2.2 Migrating the RFC Destinations .........................................................................23
4.4.2.3 Migration of the SAP System Landscape Directory.................................................23 4.4.2.3.1 Configuring and Activating the New SLD...........................................................24 4.4.2.3.2 Locking the Old SLD Against Changes..............................................................24 4.4.2.3.3 Exporting Data From the Old SLD .....................................................................25 4.4.2.3.4 Importing Data Into the New SLD ......................................................................25
4.4.2.4 Migration of the Integration Builder..........................................................................28 4.4.2.4.1 Migration Preparations .......................................................................................28 4.4.2.4.2 Restrict XI 2.0 Usage ........................................................................................29 4.4.2.4.3 Restricting XI 3.0 Usage ....................................................................................32

April 2004 7
4.4.2.4.4 Integration Builder Migration ..............................................................................33 4.4.2.4.4.1 Performing the Export and Import ................................................................33 4.4.2.4.4.2 Migration Servlet Troubleshooting................................................................37
4.4.2.4.4.2.1 Logon Problems......................................................................................37 4.4.2.4.4.2.2 Resetting the Servlet...............................................................................37 4.4.2.4.4.2.3 Server Problems .....................................................................................38
4.4.2.4.5 Activating the Integration Directory ....................................................................39 4.4.2.4.5.1 IDoc Adapter.................................................................................................41 4.4.2.4.5.2 RFC Adapter.................................................................................................41 4.4.2.4.5.3 Sender and Receiver Systems.....................................................................42 4.4.2.4.5.4 Scenarios and Receiver Determinations ......................................................43 4.4.2.4.5.5 Interface Determinations ..............................................................................44 4.4.2.4.5.6 End Points and Logon Data..........................................................................45 4.4.2.4.5.7 Sender Channels and Sender Agreements..................................................46 4.4.2.4.5.8 Value Mapping..............................................................................................47
4.4.2.4.6 Revert Tool Usage Restrictions .........................................................................47 4.4.2.5 Migrate IDoc Adapter Configuration ........................................................................48 4.4.2.6 Integration Server Cache Refresh ...........................................................................49 4.4.2.7 Pre-Downtime Checks and Preparations ................................................................49
4.4.2.7.1 Completing IDoc File Input.................................................................................49 4.4.2.7.2 Optimizing the Exactly-Once Protocoll Switch ...................................................50 4.4.2.7.3 Creating an RFC Destination .............................................................................50
4.4.2.8 Integration Server Migration Steps ..........................................................................51 4.4.2.8.1 Locking IS 2.0.....................................................................................................51 4.4.2.8.2 Locking IS 3.0.....................................................................................................52 4.4.2.8.3 Exactly-Once Protocol Switch ............................................................................52 4.4.2.8.4 EOIO Queue Coupling .......................................................................................53 4.4.2.8.5 Unlocking IS 3.0 .................................................................................................55 4.4.2.8.6 Locking of IS 2.0 ................................................................................................55
4.4.2.9 Switching Addresses ...............................................................................................56 4.4.2.9.1 Connecting Business Systems to SLD 3.0 ........................................................56 4.4.2.9.2 Maintaining System Connections and Destinations...........................................57
4.4.2.10 Integration Server Runout Checks.........................................................................57 4.5 Post-Migration Activities ...............................................................60
4.5.1 Application Systems ......................................................................... 60 4.5.1.1 Asynchronous Exactly-Once Calls...........................................................................60 4.5.1.2 Synchronous Best-Effort Calls.................................................................................60
4.5.2 Integration Server.............................................................................. 60 5 References....................................................................................61
5.1 Documentation ...............................................................................61 5.2 SAP Notes.......................................................................................61

1 Introduction
8 April 2004
1 Introduction
During Ramp-up, this documentation will be updated regularly. For the latest version, see SAP Service Marketplace at service.sap.com\instguidesNW04 → Upgrade.
This documentation provides a central starting point for the technical upgrade of SAP Exchange Infrastructure (SAP XI).
It provides the information about which components have to be upgraded and which guides are required during this process.
• The Introduction contains references to related information and important SAP Notes that are crucial to the upgrade.
• SAP Exchange Infrastructure Overview contains:
− A short introduction to SAP Exchange Infrastructure.
− The software component matrix that provides the information about which business scenario uses which component, and if the corresponding component is mandatory or optional.
− A minimal system landscape
− Technical issues that are relevant to the whole of SAP XI.
• The Migration section contains the following information:
− Information on the technical system landscape.
− A general description and planning and preparatory steps.
− Information about the overall upgrade sequence and subsequent steps.
− References to related installation and configuration guides.
− Information about mutual dependencies that affect two or more components within the scenario.
• In References you can find an overview of all the required documentation and SAP Notes referenced in this Upgrade Guide.
You can find the most current information about the technical upgrade of SAP Exchange Infrastructure and the latest upgrade, installation and configuration guides on the SAP Service Marketplace at service.sap.com/instguidesNW04.
We strongly recommend that you use the documents available there, since the guides are regularly updated.
The technical implementation of SAP Exchange Infrastructure is described in the documentation Master Guide SAP NetWeaver ´04. Refer to this documentation for information on new business scenarios and implementation options. You can find it on the SAP Service Marketplace at service.sap.com/instguidesNW04.

1 Introduction
April 2004 9
1.1 Before You Start
1.1.1 SAP Notes You must read these SAP Notes before you start the migration. They contain the most recent information on the upgrade, as well as corrections to the documentation.
Make sure that you have the up-to-date version of each SAP Note, which you can find on the SAP Service Marketplace at service.sap.com/notes
List of Important SAP Notes
SAP Note Number Title
711752 Collection Note XI Upgrade / Migration Release 2.0/3.0
1.1.2 Further Information List of Related Information
Content Location
The latest version of the upgrade guides for SAP Exchange Infrastructure
SAP Service Marketplace at service.sap.com/instguidesNW04 → Upgrade
Here you can find the most up-to-date information about the technical implementation of SAP Exchange Infrastructure and the latest installation and configuration guides. We strongly recommend that you use the documents that are available on these pages. These guides are updated and enhanced on a regular basis.
Information about released platforms for SAP Exchange Infrastructure 3.0
SAP Service Marketplace at service.sap.com/platforms → Availability for SAP Exchange Infrastructure
Information about sizing The documentation Sizing SAP Exchange Infrastructure provides information on how to size the Integration Server. See the SAP Service Marketplace at service.sap.com/sizing → Media Center.
Information about the technical infrastructure of the SAP Exchange Infrastructure
See the documentation SAP Exchange Infrastructure - Technical Infrastructure

1 Introduction
10 April 2004
1.1.3 Glossary List of Terms and Abbreviations
Term Abbreviation Explanation & Comments
Integration Server IS
Integration Builder IB
Integration Engine IE
SAP System Landscape Directory
SLD
Exactly-Once EO Asynchronous, transactionally secure message protocol, quality of service for XI message transmission
Exactly-Once-In-Order EOIO Asynchronous, transactionally secure message protocol with a serialization gurantee, quality of service for XI message transmission obeying strict serialization
Best-Effort BE Synchronous message protocol, quality of service for XI message transmission
SAP DB / MaxDB by MySQL
Starting with version 7.5, the SAP DB database will be renamed MaxDB by MySQL. In the following, if there is no mentioning of the actual version, the term SAP DB is used instead.
SAP Exchange Infrastructure
SAP XI
SAP Web Application Server
SAP Web AS
2 Overview
April 2004 11
2 Overview
2.1 Business Scenario Overview
2.2 Software Component Matrix This section provides an overview of which business scenario uses which component.
Software Component M = mandatory O = optional
Integration Server 3.0 with at least Support Package 01
M
SAP System Landscape Directory
M
Integration Builder 3.0 M
SAP J2EE Engine 6.40 SP03
M
MaxDB by MySQL database with at least version 7.5.00 Build 006
O 1)
Oracle database with at least version 9.0
O 1)
1) You must use either Oracle or MaxDB by MySQL.
3 Migration Strategy for XI Landscapes
12 April 2004
3 Migration Strategy for XI Landscapes
3.1 Complete XI Landscapes XI customer landscapes contain several separate sub-landscapes for development and test (DEV), quality assurance (QA) and production (PRD). The sub-landscapes are described in the SAP System Landscape Directory (SLD). There are two basic options for the SLD granularity:
• Multiple SLDs:
DEV landscape described in SLD_DEV
QA landscape described in SLD_QA
PRD landscape described in SLD_PRD • Centralized SLD
All sub-landscapes, DEV, QA, and PRD, are described in a single SLD _CENTRAL
The basic strategy for migrating the complete landscape varies depending on which SLD setup you choose. Details are contained in the sub-sections below.
You must migrate the Integration Server and Integration Builder of a given sub-landscape (DEV, QA, or PRD) to Release 3.0 in one step. There is currently no support for migration strategies that differ from the ones described below.
Note that there are no cross-version transport mechanisms for SLD or Integration Builder content. Content can only be transported from XI 2.0 to XI 3.0 as part of a migration.
3.1.1 Migrating Multiple-SLD Landscapes If all sub-landscapes contain a separate SLD, all migrations can be done independently of one another (with only ordinary transport mechanisms for configuration content working between them). This is the easiest and most straightforward migration scenario.
The sections below describe the migration sequence for the complete landscape.
3.1.1.1 DEV Landscape Migration Migration starts with the upgrade of the DEV landscape (including the DEV SLD) to Release 3.0. For more information on the details of the migration process see the Migration chapter [page 18].
The following points are important when planning the migration process:
3 Migration Strategy for XI Landscapes
April 2004 13
• After upgrading the DEV landscape, there is no way to transport configuration data from the DEV 3.0 landscape to the QA 2.0 or PRD 2.0 landscapes.
We recommend that you perform all required transports from DEV to QA or PRD before the migration procedure is started for the whole landscape.
• If you need to make configuration changes after the DEV landscape migration to DEV 3.0, for example, for emergency corrections, you need to make the configuration changes separately and in parallel for DEV 3.0 as well as for QA 2.0 and PRD 2.0.
The transport mechanisms for the SLD and Integration Builder are described in the Online Help.
All application systems in the DEV landscape must switch their addressing to the new Integration Server 3.0 of the DEV landscape. For more information, see the relevant sections below.
3.1.1.2 QA Landscape Migration Once the DEV landscape has been migrated completely and then tested, the QA landscape can be migrated.
Note the following points:
• Once you have completed this step, you can only transport configuration content (SLD or Integration Builder) from DEV 3.0 to QA 3.0.
• If you need to make configuration changes at this stage, for example, for emergency corrections, you must make them separately in DEV 3.0/QA 3.0 and PRD 2.0.
All application systems in the QA landscape must switch their addressing to the new Integration Server 3.0 of the QA landscape. For more information, see the relevant sections below.
3.1.1.3 PRD Landscape Migration Once the DEV and QA landscapes have been migrated completely, and then tested, the PRD landscape can be migrated following the same procedure as for the DEV and QA landscapes.
Note the following points:
• Once the PRD landscape has been migrated, you can transport configuration content (SLD and Integration Builder) throughout the landscape again, that is, from DEV 3.0 to QA 3.0 and PRD 3.0.
• If you need to make configuration changes at this stage, you no longer need to make them in the separate landscape, because all changes can be propagated from landscape to landscape by using transport mechanisms.
All application systems in the PRD landscape must switch their addressing to the new Integration Server 3.0 of the PRD landscape. For more information, see the relevant sections below.

3 Migration Strategy for XI Landscapes
14 April 2004
3.1.2 Migrating Centralized-SLD Landscapes An upgrade of the central SLD together with the DEV XI landscape will also affect the QA and PRD XI landscapes. As the upgraded SLD must work only for the DEV XI landscape in the first upgrade step, two SLD instances are in operation during the upgrade project; a new SLD for the upgraded XI landscapes and an old SLD for the XI landscapes not upgraded yet. The new SLD replaces the old one at the end of the migration process.
The migration process for the whole transport landscape is as follows: ...
1. Set up the new SLD instance. As this XI 2.0 to XI 3.0 upgrade includes a system migration anyway, you do not have to copy the old SLD instance. Just install a new SAP Web AS Java and configure the SLD as described in the sections Configuring and Activating the New SLD [page 24] and Locking the Old SLD Against Changes [page 24].
2. The DEV XI landscape is migrated to Release 3.0 as described in this documentation. The QA and PRD XI landscapes still use the old SLD, which is now locked against changes. If you need to create or change content in the old SLD, refer to the section Working with Old and New SLD Instances in Parallel [page 14].
3. The QA XI landscape is migrated to Release 3.0 as described in this documentation. You do not have to upgrade the SLD any more. Simply switch the XI references to the SLD.
4. The PRD XI landscape is migrated to Release 3.0. The old SLD can be removed after the XI references have been switched to the new SLD.
We recommend that you install the new SLD on a separate server.
3.1.3 Working with Old and New SLD Instances in Parallel If your 2.0 landscape has patch level SP 04 or higher, it is possible to use the SLD transport mechanism of SAP Web AS 6.40 between an XI 3.0 and XI 2.0 landscape. Otherwise, no transport functionality is supported between these releases. It is possible to export data from Release 3.0 and import it to Release 2.0, but not the other way around.
For multiple SLD instances in a transport landscape (DEV → QA → PRD), we recommend that you use the export line “ALL” to transport the content of the DEV SLD to the QA SLD. All changes (including deletions) are transported and thus the QA SLD content is synchronized with the DEV SLD. The CR import from the SAP Service Marketplace is imported only in the DEV SLD and forwarded by your own exports to the QA SLD. The same procedure is recommended for the branch QA → PRD. Export the line “ALL” from the QA SLD and import the result into the PRD SLD. After an initial “full” export, only incremental changes are exported, which are called “delta” exports.
For a central SLD instance, changes may be required in the Release 2.0 SLD during the upgrade project. These changes have to be made in the Release 3.0 SLD and transported to the old one using the same mechanism as described above. It is not possible to transport in the reverse direction. Export the line “ALL” from your Release 3.0 SLD and import the result into your Release 2.0 SLD. As mentioned above, the minimum release required for this procedure is XI 2.0 SP 04.
3 Migration Strategy for XI Landscapes
April 2004 15
3.2 Migration Objectives for Single Landscapes Use
You must perform the following basic tasks when upgrading a single XI landscape:
• Upgrade the Integration Engines from XI 2.0 to 3.0
The Integration Engine is an application system with XI proxies and XI middleware built-in XI 2.0 on SAP Web AS 6.20.
• Adapters and Adapter Engines are never upgraded as such, but installed from scratch with a new release, making use of XI 2.0/3.0 message compatibility in the Integration Server.
• Migrate the SLD, Integration Server, and Integration Builder from XI 2.0 to 3.0.
Integration Engine Upgrade
SAP systems with XI Integration Engines are typically application systems. Thus, their upgrade is handled as part of the standard SAP Web AS upgrade in the (straightforward way, which is well-known from all applications based on SAP Web AS).
This type of upgrade is described in the documentation Component Upgrade Guide SAP Web Application Server 6.40: <Platform>. You can find the documentation on the SAP Service Marketplace at service.sap.com/instguidesNW04 → Upgrade.
You do not need to upgrade the XI Integration Engine when you upgrade the Integration Server, unless your application system requires this. The XI Integration Engine 2.0 is able to communicate with the XI Integration Engine 3.0.
The procedure for upgrading the XI Integration Engines is not included in this documentation.
Adapters and Adapter Engine Upgrades
Adapters and Adapter Engines upgrades are not part of this documentation. Refer to the relevant installation procedures for adapters and XI Adapter Engines for further information.
SLD, XI Integration Server, and Integration Builder Migration
The remainder of this document focuses on the migration of the SLD, the Integration Server, and the Integration Builder from XI 2.0 (based on SAP Web AS 6.20) to XI 3.0 (based on SAP Web AS 6.40).
3.2.1 Objectives This section gives you an overview of the tasks and objectives of migrating both XI Integration Server and Integration Builder .
Since the XI Integration Server requires Integration Builder data for runtime processing, both must be treated in a joint procedure. The objectives are as follows:
• Change the release of the Integration Server from XI 2.0 to XI 3.0.

3 Migration Strategy for XI Landscapes
16 April 2004
• Change the release of the Integration Builder (XI configuration environment) from XI 2.0 to 3.0.
• Need for XI downtime optimizations
• Shift the point-of-no-return to the latest possible stage within the procedure.
• Enable a distributed XI 2.0 installation as the start configuration (different servers for Integration Server and Integration Builder).
• Move a distributed XI 2.0 installation to an all-in-one XI 3.0 installation as the end configuration (which is the default in XI 3.0).
• Enable implicit migration of the Integration Server and the Integration Builder (the Integration Builder was restricted to database system SAP DB in XI 2.0) from one database system to another.
• Take over operative XI 2.0 configuration into the XI 3.0 domain.
• Make the XI 2.0 adapters and XI 2.0 application systems work together seamlessly with the new IS 3.0 (that is, old systems may remain on XI 2.0 even with IS 3.0 in the center).
3.2.2 Start and End Configurations The starting point is an installation of XI 2.0, with a running Integration Builder and Integration Server. These main parts of XI may be running in a distributed configuration (different servers) or in an all-in-one configuration (one server). The Integration Builder of XI 2.0 only runs on the SAP DB. The XI 2.0 Integration Server can run on either the SAP DB or the Oracle database system. The Integration Server system may consist of several SAP Web AS application servers for reasons of load balancing and scaling.
The migration results in a running XI 3.0 Integration Builder and Integration Server in an all-in-one configuration. Any database of SAP Web AS may now be used with XI 3.0. An arbitrary number of SAP Web AS application servers may be added to the system for reasons of load balancing and scaling. The IB/SLD-based configurations of XI are transferred to XI 3.0 in order to operate the same communication tasks as the XI 2.0 system on the source system.
3.2.3 Migration Method When you migrate the Integration Server and the Integration Builder, you install a new IS/IB 3.0 on additional hardware. After completing the Customizing on IS 3.0, you use XI tools to migrate XI configuration and runtime data from the IS 2.0 to the IS 3.0 system. Finally, you have to switch the addressing for all application systems, adapters, and SLD parts from IS 2.0 to IS 3.0.
You can prepare most steps in setting up Release 3.0 without interrupting the operative use of Release 2.0. Therefore, the XI downtime is kept to a minimum.
The basics of the migration procedure are as follows: ...
1. Installation and Customizing of Integration Server and Integration Builder (XI 3.0) on a standby host machine (all-in-one)
2. Migration of SLD data from Release 2.0 to 3.0.
3. Migration of XI Integration Builder data from Release 2.0 to 3.0.
4. Cache refresh.

3 Migration Strategy for XI Landscapes
April 2004 17
5. XI downtime starts, which disables the input stream into IS 2.0 / IS 3.0.
6. Migration of essential runtime data.
7. XI downtime ends, which enables the input stream into IS 3.0 again.
8. Address switching of adapters and application systems from IS 2.0 to IS 3.0.

4 Migration
18 April 2004
4 Migration
4.1 Technical System Landscape The following graphic shows the XI all-in-one configuration.
Host 1XI
Web AS 6.40
J2EE
RDBMS
Runtime Workbench
ABAPIntegration Engine
XI Runtime
XI Runtime
Adapter Framework
Integration Builder
Repository
Directory
SLD
4.2 Planning The configuration model in XI 3.0 differs considerably from XI 2.0 due to the integration of B2B messaging and the business process engine.
The goal of the migration is to finish with the XI 3.0 runtime running like the XI 2.0 runtime. Due to the model changes, you will, however, have to make some manual adjustments after the migration for some of these elements.
For more information about
• The manual changes needed, see the section Activating the Integration Directory [page 39]
• The new configuration model, see the SAP online documentation for the XI 3.0 Integration Directory under SAP Library → SAP NetWeaver → Process Integration → SAP Exchange Infrastructure → Design and Configuration Time → Configuration.
4 Migration
April 2004 19
4.3 Preparation
You must migrate into a newly installed system that does not contain any data.
Besides the activities for preparing the single steps stated below, also make the following preparations:
• Make sure that the Integration Server on the source release XI 2.0 has the required minimum patch level. For more information, see SAP Note 696034.
• Make sure that the Integration Builder on the source release XI 2.0 has the required minimum patch level. For more information, see SAP Note 696034.
• Make sure that you have prepared your message mappings in XI 2.0. For more information, see SAP Note 719301.
• Restart the J2EE Engine server.
• Logging
During migration, messages are stored in file xi.log. in subdirectory /applications/com.sap.xi of the log directory.
The information is grouped in different locations:
Topic Location
Migration steps XIREP.Transport
Integration Repository messages XIREP.Transport
Integration Directory messages XIDIR.Transport
As of XI 3.0, you can view the log file using the J2EE Engine Log Viewer.
We recommend that you archive the log for SAP Support message handling. For more information on archiving logs, see the SAP online documentation under SAP Library → SAP NetWeaver → Application Platform → Java Technology in SAP Web Application Server → Administration Manual → Server Administration → Logging → Log Configuration → Archiving Logs.
• Make sure that you are working with the current version of SAP Note 711752.
• Make sure that the users required for the upgrade have the necessary authorizations:
Step User
Migration of Customizing data DDIC or XISUPER with the relevant Basis authorizations
Migration of RFC destination DDIC or XISUPER with the relevant Basis authorizations
Migration of the IDoc adapter configuration
DDIC or XISUPER with the relevant Basis authorizations
Other steps XISUPER unless otherwise specified in the description below

4 Migration
20 April 2004
4.4 Migration Sequence 4.4.1 Overview This section describes the required steps for the migration procedure. All steps must be made in the sequence stated. Perform all the tests provided before you continue with the next step.
No. Action
[Corresponding Documentation]
Remarks and subsequent steps
[Corresponding Documentation]
1 Install the Integration Server [page 21].
[Installation Guide: SAP Exchange Infrastructure]
The system must not contain any data.
After the installation, import XI SP 01.
[You can find the documentation on SAP Service Marketplace at service.sap.com/ instguidesNW04 → Installation]
2 Migrate the Customizing data, users, and roles [page 21].
3 Migrate the RFC destinations [page 23].
4 Migrate the SAP System Landscape Directory [page 23].
Perform all steps from Migration Preparations to Switch XI to the New SLD.
If necessary, the SAP System Landscape directory can run on a different host.
5 Migrate the Integration Builder [page 28].
Perform all steps from Migration Preparations to Revert Toll Usage Restrictions.
6 Migrate the IDoc adapter configuration [page 48].
7 Refresh the Integration Server Cache [page 49].
8 Perform all necessary checks and preparations before the beginning of downtime [page 49].
9 Migrate the Integration Server [page 51].
Perform all steps from Locking Integration Server 2.0 to Unlocking Integration Server 3.0 described below.
We recommend that you leave the Integration Server 2.0 locked after the upgrade [page 55].
10 Switch the addresses [page 56].
Perform all steps from Connecting Business Systems with IE to IS 3.0 to Reintegration of Business Systems Using the Adapter Engine.
11 Perform the runout checks for the Integration Server [page 57].

4 Migration
April 2004 21
4.4.2 Detailed Explanation of the Steps
4.4.2.1 Integration Server Installation ...
1. Install an Integration Server on a different host as described in the documentation Installation Guide: SAP Exchange Infrastructure.
If you are using a different host, you can choose the same system ID as for the XI 2.0 system. This reduces the amount of work needed for adjusting the SLD.
2. Import XI Support Package 01.
For information on how to implement XI Support Packages, see SAP Note 670388.
4.4.2.2 Migration of Customizing Data Before you can migrate Customizing data, you must first call transaction SM59 and create an RFC destination to the XI 2.0 system. If you are working in a distributed landscape, you need an RFC destination to both the Integration Server and the Integration Builder. Choose user DDIC for the destination.
For security reasons, delete the destinations after you have performed the migration.
4.4.2.2.1 Migrating Users and Roles ...
1. Migrate the customer-specific roles from the source system to the target system: ...
If there are two source systems, in other words, an Integration Server and an Integration Builder, note the following before you continue:
– If the source systems have different roles, you must perform a mass download and import the roles into the target system for both source systems first.
– Roles that exist in both systems and that have the same authorization specifications only need to be taken from one system.
– Roles that exist in both systems and that have different authorization specifications, must be either combined or renamed in one of the systems.
a. In the source system, call transaction PFCG.
b. Choose Utilities → Mass Download to perform a mass download of your own roles.
You must not import the SAP standard roles (role names beginning with SAP) into the target system. They will be shipped again with XI 3.0.
If you want to retain the profile names of the roles, you can transport the roles by using transaction PFCG and choosing Utilities → Mass Transport instead. If you do so, you must ensure that the profile names are unique.

4 Migration
22 April 2004
We recommend you not to transport the profiles, as the role assignment may not be transported.
c. Import the roles into the target system by using one of the following procedures:
Call transaction PFCG and choose Role → Upload.
Import the transport.
d. Call transaction SUPC and perform a mass generation.
e. Call transaction SU25 to carry out a role comparison to adjust the altered authorization default values.
The transaction helps you to determine, which of the uploaded roles are affected by changes to authorization data in the upgraded system. This means that if the authorization data for a transaction is included in the menu of an 'old' role that has been changed with the new release, these changes have to be adjusted. This will guarantee that users, who are assigned to the uploaded roles have the necessary authorizations for all transactions of the roles in the upgraded system. For more information, see the button Information about this transaction on the initial screen of transaction SU25.
You can also do this at a later stage.
2. Consolidate the users
Run the report SXI_USER_MIGRATION_RFC to copy the users from the source system(s) to the current system.
The following steps are performed:
If there are two source systems, in other words, the Integration Server and the Integration Builder, note the following:
– First, the user master records that do not exist in the current system are copied from system 1 (primary system). Next, those user master records that exist neither in the current system nor in system 1 are transferred from system 2 (additional system). – The role assignments are transferred from both systems and cumulated.
– The table UserExtID (assignment of external IDs to users) is only transferred from system 1.
– Company addresses that do not exist in the current system are copied from system 1. Next, those company addresses that exist neither in the current system, nor in system 1 are transferred from system 2.
a. Copy those user master records that do not exist in the current system.
b. Copy the roll assignments for these users.
c. Copy table UserExtID (assignment of external IDs to users).
d. Copy those company addresses, which do not exist in the current system.
e. Create user addresses for all copied user master records.
For more information, see the documentation of report SXI_USER_MIGRATION_RFC.

4 Migration
April 2004 23
4.4.2.2.2 Migrating the RFC Destinations Use report SXI_GET_REMOTE_DESTINATIONS to migrate the RFC destinations from your source Integration Server to the target Integration Server. The report creates all destinations that are not yet present in the target system.
To use the report, you need certain authorizations:
• In the source system, you need the following authorizations:
S_RFC SRTT
S_TABU_RFC with ID ACTVT and field 03 • In the target system, you need the following authorizations:
S_TABU_CLI with ID CLIIDMAINT and field X
S_TCODE for transaction SM59
4.4.2.3 Migration of the SAP System Landscape Directory The SAP System Landscape Directory (SLD) in XI 2.0 used the ABAP database for persistence. In 6.40, this has been changed to a direct database connection, which has two major implications for the upgrade: ...
1. The SLD data has to be migrated from the old storage to the new storage location.
2. The SLD may be moved to any host in this upgrade.
The new SAP System Landscape Directory for XI 3.0 can be configured and activated on any SAP Web AS 6.40, because it is included in the SAP Web AS 6.40 installation.
The following rules will help you to decide about the location of the SLD in your XI 3.0 landscape:
• If you have an SLD for each sub-landscape (DEV, QA, PRD) and if you use the SLD mainly for XI, use the SLD in the XI Integration Server.
• If you plan to include Java development in the future, use a separate SAP Web AS Java instance for the SLD.
• A central SLD saves administration costs. Place the central SLD on the live Integration Server or on a central SAP Web AS used for system landscape monitoring.
• Do not change the XI 2.0 landscape configuration unnecessarily.
SLD migration is usually performed before the upgrade of the Integration Repository and Integration Directory. Since the XI 2.0 landscape runs with an 6.40 SLD, you could perform the SLD upgrade independently of the XI upgrade (not recommended by SAP).
If you install a new SAP Web AS Java but keep the old user store, you require a specific installation variant. See section Configure and Activate the new SLD [page 24] for details.
Check regularly for important information on Support Packages and patches for the SAP System Landscape Directory on the SAP Service Marketplace at service.sap.com/patches → SAP Web AS → Binary Patches.
4 Migration
24 April 2004
4.4.2.3.1 Configuring and Activating the New SLD For information on how to configure and activate the SLD application, see the documentation Post-Installation Guide for SLD 6.40.
Do not load the SLD content from the data carrier now at this point (CR_Content.zip). This has to be done after the data has been migrated.
Check the CR content on http://<newhost:newport>/sld and choose Administration → Details → Data. The following line is displayed: CR Content Version (sld/active): No versioned CR imports detected.
If you have already imported CR_Content.zip, open the SLD main page http://<newhost:newport>/sld and choose Administration → Namespaces. Choose Remove sld/active and confirm the dialog box that all data has been removed.
After the namespace is dropped, restart the application to reimport the data model using the STOP and START buttons on the SLD administration page.
The remaining steps are as follows: ...
1. Choose Administration → Server Settings and set the name of the object server.
2. Choose Administration → Profile and check the parameter BufferInstances in section ObjectManager.
The value has to be set to FALSE on a J2EE cluster with more than one cluster node. On a single node J2EE engine, the value should remain TRUE.
3. If you have made changes, start the application once on the administration page.
If you have a business system based on SAP Web AS 6.20 in your XI landscape, the object server must be identical to the hostname of the computer. This restriction is no longer valid with Release 6.40. We recommend that you use a reserved ABAP prefix without the enclosing slashes for the object server, for example, “mycom” for the reserved prefix “/mycom/”.
We recommend that you use the old ABAP user store with the new SLD. For information on how to connect the SAP J2EE Engine to an ABAP user store, see the SAP Web AS 6.40 online documentation. You require a 6.40 ABAP + J2EE System (J2EE Add-In for ABAP) installation for the old ABAP user store. If you want to use a new user store, see the documentation Post-Installation Guide for SLD 6.40 on how to setup users and groups.
4.4.2.3.2 Locking the Old SLD Against Changes To avoid any data being created accidentally during the configuration downtime of the upgrade, restrict the authorization of all users to read operations on the old SLD, except for the user Administrator. ...
1. Start the SAP J2EE Engine administration tool and go to Server → Services → Security.
2. In the mid frame choose servlet_jsp → security → roles → sld.
3. Write down or make screenshots from all entries in the field GrantedUsers of all resources below sld.
4 Migration
April 2004 25
4. Add all entries under GrantedUsers for each resource to the resource LcrUser (the buttons << and >> are activated by clicking the box Users on Server) starting with resource LcrAdministrator.
5. Remove the assigned users and groups from LcrAdministrator, except for the user Administrator, if present. If the user Administrator is not assigned, add the user to the resource.
6. Repeat this procedure for all other application resources.
We strongly recommend that you note the existing user/group ~ role mapping before you delete the mapping. Otherwise, you might not be able to restore the active state of the old SLD.
After you have done so, only user Administrator has the permission to administrate and change data in the old SLD.
4.4.2.3.3 Exporting Data From the Old SLD ...
1. Log on to the J2EE Engine administration and choose Server0 → Services.
2. Stop the following services using the context menu on the service name:
a. Adapter_Framework_Messaging
b. CPACache
3. Open the old SLD main page http://<oldhost:oldport>/sld with user Administrator.
4. Choose Administration → Export.
5. Create an export file for your old SLD.
Do not set the flag Include Classes. The export takes about 10 to 30 minutes.
6. Save the results to at least two independent file systems.
7. To check the version of the CIM data model, choose Administration → Details → Data.
4.4.2.3.4 Importing Data Into the New SLD ...
1. Open the new SLD main page http://<newhost:newport>/sld.
2. To check the version of the CIM data model, choose Administration → Details → Data.
If the version is lower than the exported model version, update the model first. For more information on downloading file cimsap.zip, see SAP Note 669669.
3. Choose Administration → Import.
4. Import the export file created in Exporting Data From the Old SLD into the new SLD.
This takes about 20 to 60 minutes.
5. To open the SLD server log, choose Administration → Server Log.
6. Check the SLD server log for the successful import message “Results of loading: all <n> objects loaded”.
4 Migration
26 April 2004
If the import ends with error messages, check the model version first. It is possible to update the model and to retry the XI 2.0 import to solve this issue.
If the import failed because you had not removed the SLD namespace before, you must remove the CIM namespace sld/active and start from the beginning.
If the import fails with the message that instances of the CIM class SAP_AssociatedContext were not imported, repeat the import. These errors are caused by a wrong sort order in the export file. When starting the import again ignore the warning that data already exist. Choose Import anyway.
7. Log on to the J2EE Engine administration and choose Server0 → Services.
8. Restart the following services using the context menu on the service name:
a. CPACache
b. Adapter_Framework_Messaging
After the data has been migrated, proceed as follows: ...
1. Check the CR content as described in section Configuring and Activating the New SLD [page 24].
If you started with XI 2.0 SP 04 or higher, the content transfered from the old release is sufficient for XI 3.0. For more information on the source release patch level, see SAP Note 696034.
If you started with a lower Support Package, import the new SAP contents CR_Content.zip for XI 3.0. at this point. Since starting with a patch level lower than SP 04 is not recommended, there normally is no need to do this.
If you have imported SAP contents CR_Content.zip for XI 2.0 Support Package 04 already, a warning is displayed when you try to import CR_Content.zip from XI 3.0 again. Do not choose Import anyway!
2. Make sure that an entry is maintained in the technical and the business landscape pages of the Integration Server.
We recommend that you keep the business system name of the Integration Server. In this case, proceed as follows:
a. If the XI 3.0 Integration Server does not already have an entry in the technical landscape, use transaction RZ70 to start its SLD registration.
For more information, see the Installation Guide – SAP System Landscape Directory or the User Guide – SAP System Landscape Directory.
b. Optional: Define a logical ALE name for each client of the Integration Server in the technical landscape.
c. Assign the product SAP Exchange Infrastructure 3.0 to the technical system of the Integration Server in the technical landscape.
d. Select all software components for this product.
e. Switch the technical system of the Integration Server business system to the new technical system of the XI 3.0 Integration Server in the business landscape.
f. In the business system landscape, select SAP Exchange Infrastructure 3.0 as installed product and save the settings.
g. Log on to the J2EE administration and and choose Server0 → Services → Deploy.

4 Migration
April 2004 27
h. Restart the applications Integration Repository and Integration Directory: sap.com/com.sap.xi.repository and sap.com/com.sap.xi.directory.
i. Start the Integration Builder: Design and the Integration Builder: Configuration Tool so that they can register themselves in the SLD.
This generates an XIIntegrationServer instance in the SLD.
j. The XIIntegrationServer instance needs to be associated to the Integration Server business system and its technical system. You need the LcrAdministration role to perform the following steps:
i. In the SLD, select Administration → Content Maintenance.
ii. Select Class: XI Integration Server.
The XI Integration Server instance is displayed.
iii. Choose the link under Associated Instances for the XI Integration Server.
iv. Select New Association and choose XI Integration Server Logical Identity.
A list of business systems is displayed.
v. Select the Integration Server business system and choose Associate Selected.
vi. Select New Association and choose XI Sub-System viewed Application System.
A list of BC systems is displayed.
vii. Select the BC system of the Integration Server (the BC system is the technical system of the Integration Server that is also listed in the technical landscape) and choose Associate Selected.
k. Log on to the Integration Directory and delete the SLD cache by selecting Environment → Clear SLD Data Cache.
If you need to change the business system name for the Integration Server, proceed as follows:
...
a. If the XI 3.0 Integration Server does not already have an entry in the technical landscape, use transaction RZ70 to start its SLD registration.
For more information, see the Installation Guide – SAP System Landscape Directory or the User Guide – SAP System Landscape Directory.
b. Optional: Define a logical ALE name for each client of the Integration Server in the technical landscape.
c. Assign the product SAP Exchange Infrastructure 3.0 to the technical system of the Integration Server in the technical landscape.
d. Create a new business system for the Integration Server and assign to it the new technical system in the business landscape.
You can use the same name for the business system as the XI 2.0 Integration Server business system had if you delete the old one first. If you do so, make a note of all the business systems that were connected to it because you will need this information in step e.
e. Change the Integration Server of all business systems that used the XI 2.0 Integration Server to the newly created XI 3.0 Integration Server.

4 Migration
28 April 2004
f. Log on to the J2EE administration and choose Server0 → Services → Deploy.
g. Restart the Integration Repository and Integration Directory: sap.com/com.sap.xi.repository and sap.com/com.sap.xi.directory.
h. Start the Integration Builder: Design and the Integration Builder: Configuration so that they can register themselves in the SLD.
4.4.2.4 Migration of the Integration Builder Here and in the next sections <XIUPGRADE> and <ZSAP_XI_UPGRADE_J2EE> are placeholders; however, they may well have actual values XIUPGRADE and ZSAP_XI_UPGRADE_J2EE.
4.4.2.4.1 Migration Preparations Preconditions
The following preconditions must be fulfilled before migrating the Integration Builder data from IB 2.0 to IB 3.0:
• The target SLD is running.
• The XI 3.0 target Integration Builder is installed and configured.
• The XI 3.0 target Integration Builder is running.
• At least Support Package 04 of the XI 2.0 source Integration Builder has been installed.
The Software Components Integration Builder and Integration Services are at least SP4 Patch Level 1.
• You have performed the Integration Repository import of SWCV SAP BASIS 6.40 and the Integration Repository is running.
• All change lists with transport-relevant objects of the source system have been submitted. Objects in open change lists will be ignored during the transport.
• SAP J2EE Engine 6.20 with XI 2.0 is configured against the R/3 system regarding users / groups (= SAP roles).
• SAP J2EE Engine 6.30 with XI 3.0 is configured against the R/3 system regarding users / groups (= SAP roles).
• Upgrade is performed with a single dedicated user, denoted <XIUPGRADE> in the following.
• Message processing must be possible during tool data export and import.
Restrictions
The following restrictions apply:
• Objects in open change lists are not transported.
• The content of historical versions of the transported objects, that is, versions which are older then the current version, are not transported to the target system. Nevertheless, some information such as creation date and creation user will be visible within the object history of the Integration Repository.

4 Migration
April 2004 29
Restart Options
Note that if an export or import fails it is possible to attempt the export or import without deleting the content from the target system or the file system. In this case, the framework tries to continue the last export or import instead of repeating the whole export or import again. If a complete re-export or re-import is required after the initial attempt has failed, it is necessary to delete the content of the export directory (including files starting with ’.’) in the export case. In the import case, replace the content of the import directory with the new export files.
4.4.2.4.2 Restrict XI 2.0 Usage Use
You must restrict access to the Integration Builder (Design and Configuration) so that only user <XIUPGRADE> can log on.
Prerequisites
Administrative privileges for SAP J2EE Engine and SAP R/3 in order to maintain users and user assignments.
This requires the following actions: ... ...
1. In the SAP R/3 system (Integration Builder), call transaction PFCG.
2. Create role <ZSAP_XI_UPGRADE_J2EE>.
3. Create user <XIUPGRADE> and assign role <ZSAP_XI_UPGRADE_J2EE> and all XI roles SAP_XI_*_J2EE to it.
4. Start J2EE Visual Administrator and go to Server →Services → Security.
5. Select tab page User Management.
6. In the field Users on Server, look for the role <ZSAP_XI_UPGRADE_J2EE> (usually under root → guests → external) and check that it is available.
If not, choose Refresh.

4 Migration
30 April 2004
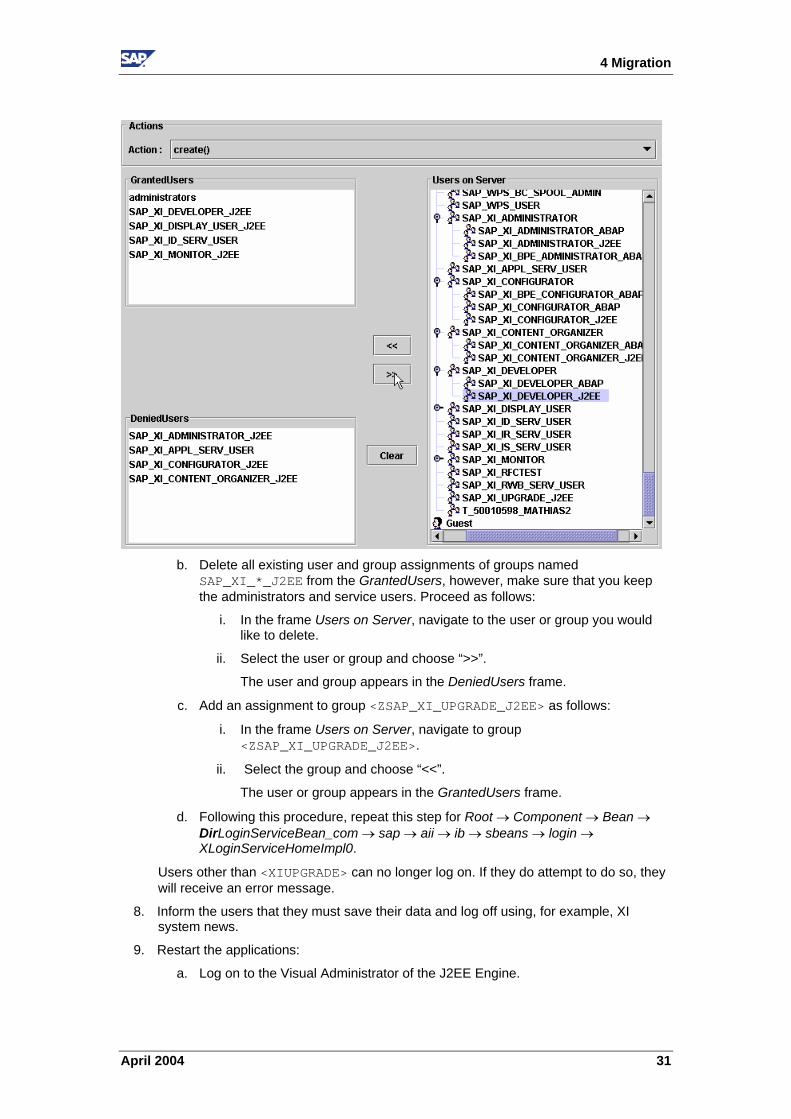
7. Select the tab page Resources and navigate to root → component → bean →
RepLoginServiceBean_com → sap → aii → ib → sbeans → login → XLoginServiceHomeImpl0 (for applications Repository and Directory) and proceed as follows:
a. From the drop-down menu in the right frame, select action create().
The Actions window is displayed.
4 Migration
April 2004 31
b. Delete all existing user and group assignments of groups named
SAP_XI_*_J2EE from the GrantedUsers, however, make sure that you keep the administrators and service users. Proceed as follows:
i. In the frame Users on Server, navigate to the user or group you would like to delete.
ii. Select the user or group and choose “>>”.
The user and group appears in the DeniedUsers frame.
c. Add an assignment to group <ZSAP_XI_UPGRADE_J2EE> as follows:
i. In the frame Users on Server, navigate to group <ZSAP_XI_UPGRADE_J2EE>.
ii. Select the group and choose “<<”.
The user or group appears in the GrantedUsers frame.
d. Following this procedure, repeat this step for Root → Component → Bean → DirLoginServiceBean_com → sap → aii → ib → sbeans → login → XLoginServiceHomeImpl0.
Users other than <XIUPGRADE> can no longer log on. If they do attempt to do so, they will receive an error message.
8. Inform the users that they must save their data and log off using, for example, XI system news.
9. Restart the applications:
a. Log on to the Visual Administrator of the J2EE Engine.

4 Migration
32 April 2004
b. Choose Server → Services → Deploy.
c. At the bottom, select Application.
d. Stop the applications ExchangeRepository and ExchangeDirectory.
e. Start the applications.
This will disconnect any users who are still logged on.
As a result, only <XIUPGRADE> is authorized to log on to Integration Repository and Integration Directory.
4.4.2.4.3 Restricting XI 3.0 Usage You must restrict access to the Integration Builder (Design and Configuration) so that only user <XIUPGRADE> can log on.
User <XIUPGRADE> is case-sensitive. Use the same spelling as you use for the Servlet.
For XI 3.0, two new properties (“ExchangeProfile”) were introduced: the first signals that XI is in restricted-logon-mode, the second defines the users who are nevertheless authorized to log on. Set the properties as follows:
• com.sap.aii.ib.server.upgrade_mode = true
Restricts access to the named users, given by the corresponding parameter com.sap.aii.ib.server.upgrade_users.
• com.sap.aii.ib.server.upgrade_users = <XIUPGRADE>
Comma-separated list of users which are allowed to log on, if the corresponding parameter com.sap.aii.ib.server.upgrade_mode is set to true.
Thus, XI provides a simple means to deny access for “normal” users, independent of the details of the proper security service in place.
In XI 3.0, you do not have to define a dedicated user or user group for the upgrade. So for <XIUPGRADE> you may use the XI administration user created by the standard installation, in other words, XISUPER.
For more information on properties, see the Configuration Guide – SAP Exchange Infrastructure 3.0 → Exchange Infrastructure Profile Parameters.
The parameters com.sap.aii.ib.server.upgrade_mode and com.sap.aii.ib.server.upgrade_users are not yet present in the exchange profile. To be able to use them, you have to enter them in the exchange profile. Proceed as follows:
1. Open the Exchange Profile
2. Choose Integration Builder → New Parameter.
3. Enter the first parameter name and the value true.
4. Save the parameter.
5. Choose Integration Builder → New Parameter.
6. Enter the second parameter name and the authorised users, separated with a comma.
4 Migration
April 2004 33
7. Save the parameter.
8. Start the Integration Builder.
9. Choose Administration → AIIProperties.
10. Choose the Refresh button to update the Exchange Profile settings.
4.4.2.4.4 Integration Builder Migration
4.4.2.4.4.1 Performing the Export and Import Use
If you have configured users, groups, and roles as described above in the SAP J2EE Engine 6.20 and 6.30, you can perform the export and import of the content.
Users other than <XIUPGRADE> are not allowed to log on to XI 2.0 or XI 3.0.
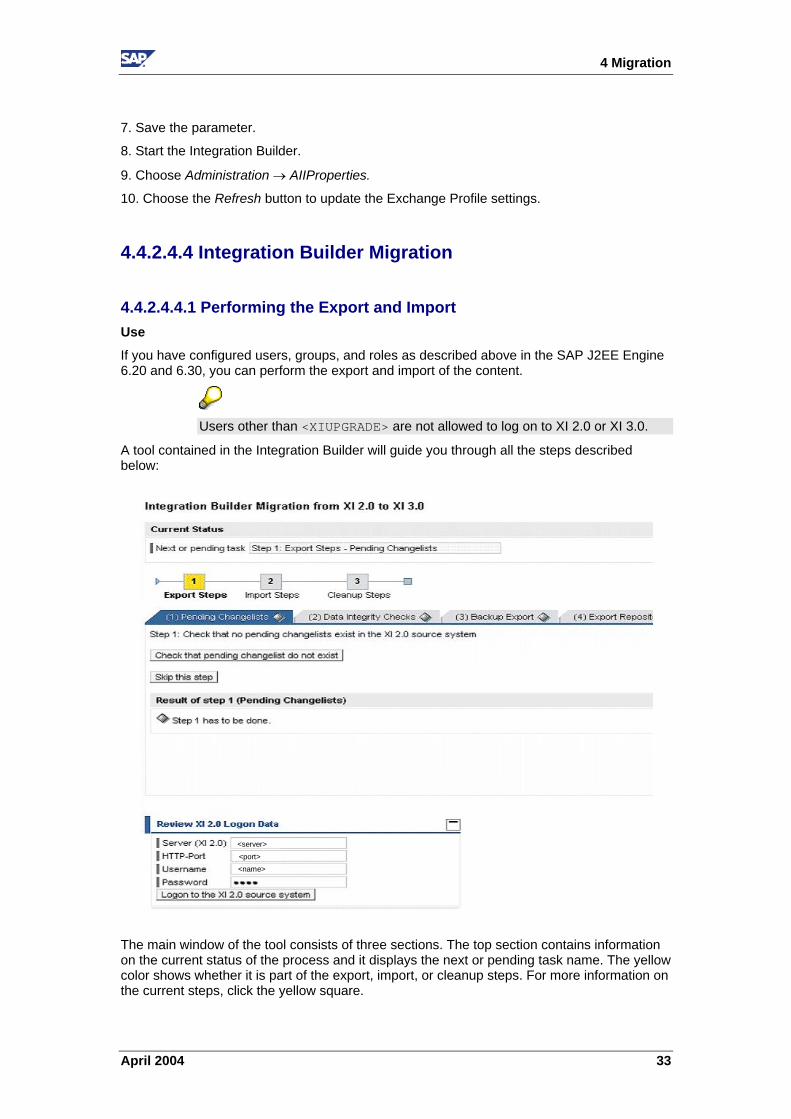
A tool contained in the Integration Builder will guide you through all the steps described below:
<server><port><name>
The main window of the tool consists of three sections. The top section contains information on the current status of the process and it displays the next or pending task name. The yellow color shows whether it is part of the export, import, or cleanup steps. For more information on the current steps, click the yellow square.
4 Migration
34 April 2004
The middle section contains a tab for each export, import, or cleanup step. The icon next to the name of the step indicates its status. A green dot means succeeded, a red square failed, and a yellow triangle skipped. The tab contains buttons to trigger actions and status information, for example, logs.
The third section contains the current logon data. If necessary, you can interrupt the process. After the restart, the tool will automatically continue the process from the step where it was stopped. You will, however, have to enter the logon data again.
Procedure ...
1. Start the XI 3.0 Integration Builder start page http://<xi-host>:<j2ee-port>/rep.
2. Choose Administration → Repository.
3. On tab Repository, choose the link Migration tool.
4. Enter the connection data for the XI 2.0 Integration Builder.
Use the http port of the J2EE Engine.
Use the user <XIUPGRADE> as described under Restricting XI 2.0 Usage. 5. Choose the Logon to the XI 2.0 source system button to submit the data.
6. Decide whether you want to perform the check for open change lists in the Integration Directory or Integration Repository.
The export tool ignores open change lists. If you do not activate these change lists, the changes will not be migrated.
7. Perform the data integrity checks (step Data Integrity Check).
If there are inconsistencies in XI 2.0 database tables, you cannot export the objects concerned. With this step, you can check the Integration Directory and the Integration Repository for inconsistencies:
a. Choose Directory or Repository.
The Exportability Check windows appears.
b. Choose the software component(s) which you want to check.
c. Choose Start check.
d. To display the results, choose Show file.
e. If you cannot repair the objects, delete them.
f. Run the check until there are no more inconsistencies.
g. In the main tool, choose Confirm manual execution.
8. Back up the export directory of the source systems for the Integration Directory and Integration Repository (step Backup Export).
The export tool creates export files that can not be distinguished from those destined for XI 2.0 – XI 2.0 transport purposes. Therefore, we recommend that you back up the contents of the export directory in a different directory and empty the export directory before the export.
You can find the export directories in
<dir_global>\xi\repository_server\export
<dir_global>\xi\directory_server\export

4 Migration
April 2004 35
<dir_global>\xi\runtime_server\export
To find out the value of <dir_global>, call transaction AL11.
The value <dir_global> can be, for example, /usr/sap/<SID>/SYS/global.
Move all files from the corresponding export directory to a backup directory, so that the export directories are empty. After the migration, the export directories will only contain files relevant for migration.
To continue, choose Confirm manual execution.
9. Delete the content of the export directories for the Integration Directory and Integration Repository (step Backup Export).
10. Perform the export.
In the logging area, you can see the status of the migration. Choose the Refresh button to display new messages.
If the export fails, a Restart button is displayed. If you have found and fixed the error, use this button to continue the export.
a. Start the export of the XI 2.0 Repository content (step Export Repository).
When the export has finished, the tool prompts you to continue with the next step.
b. Start the export of the XI 2.0 Directory content (step Export Directory).
When the export has finished, the tool prompts you to continue with the next step.
c. Start the export of the XI 2.0 value mappings (step Export Key Mappings).
When the export has finished, the tool prompts you to continue with the next step.
11. Back up the import directories of the target systems for the Integration Directory and Integration Repository (step Backup Import).
Directory <dir_global>\xi\directory_server\import should be empty and the directory <dir_global>\xi\repository_server\import should contain nothing but files starting with “.”, such as “.state”, or “.step.log”.
If the there are other files, we strongly recommend that you make a backup of these files and delete them.
Do not delete files starting with ".". They contain important state information of the migration servlet.
12. Copy the exported content files from the export directories of the source systems to the import directories of the target systems for the Integration Directory and Integration Repository (step Copy Files).
Copy the XI 2.0 Repository content of <dir_global>\xi\repository_server\export to the XI3.0 directory <dir_global>\xi\repository_server\import.

4 Migration
36 April 2004
Copy the XI 2.0 directory content of <dir_global>\xi\directory_server\export to the XI 3.0 directory <dir_global>\xi\directory_server\import.
Copy the XI 2.0 value mapping content of <dir_global>\xi\runtime_server\export to the XI 3.0 directory <dir_global>\xi\directory_server\import.
13. Enter the connection data for the XI 3.0 Integration Builder (step Import Repository).
Use the user <XIUPGRADE> as described under Restrict XI 3.0 Usage. This user will be used for all imports. Unless you restart the system, you must enter it only once.
14. Perform the import.
If the import fails, a Restart button is displayed. If you have found and fixed the error, use this button to continue the export.
You can also use the button Force Import. The import continues ignoring objects with errors.
Objects ignored with the Force Import button are not migrated.
Do not use Force Import without an active SLD.
a. Start the import of the Integration Repository content (step Import Repository).
When the import has finished, the tool prompts you to continue with the next step.
b. Start the import of the Integration Directory content (step Import Directory).
When the import has finished, the tool prompts you to continue with the next step.
15. Optional: Activate the Integration Directory (step Activate Directory Import).
You can either activate the change lists now, or after you have finished the next steps. For a detailed explanation and procedure, see the following chapter.
16. Import the value mapping content (step Import Value Mappings).
a. If you run an SAP Solution Manager in the XI domain, enter the connection and logon data to the SAP Solution Manager.
The migration of the value mapping content needs information from the SAP Solution Manager. Therefore, it needs a JCo connection to the system in which the SAP Solution Manager is running. Enter the server, system number, client user, and password.
b. Start the import of the value mapping content.
17. Optional: Restore content backup (step Restore Folders).
If you still need the XI 2.0 system, replace the content of the export and import directories of the source systems with the content backup:
.../xi/repository_server/export on <XI 2.0 server>
.../xi/directory_server/export on <XI 2.0 server>
.../xi/runtime_server/export on <XI 2.0 server>
Also replace the files in the XI 3.0 import directories except for the files starting with ".". They contain important state information of the migration servlet:

4 Migration
April 2004 37
<dir_global>/global/xi/repository_server/import on <XI 3.0 server>
<dir_global>/global/xi/directory_server/import on <XI 3.0 server>
18. Make a backup of the contents of the following directories:
<dir_global>/xi/repository_server/import/imported_files
<dir_global>/xi/directory_server/import/imported_files The files in these directories contain the imported files.
Optional: In XI 3.0, delete the imported files from the directory importedFiles within the import directory.
19. Archive the import application log (step Archive Logs).
Backup the files .state and .stepnn.log in the directory <dir_global>/xi/repository_server/import/. These files contain migration information which can be used by the SAP Support in case of problems.
During the import, the tool creates a log file xi.log in directory ./log/application/com.sap.xi/ which you can access using the SAP J2EE Administrator Tool. For information, see SAP online documentation under Application Platform (SAP Web Application Server) → J2EE Technology in SAP Web Application Server → Administration Manual → Server Administration.
4.4.2.4.4.2 Migration Servlet Troubleshooting
4.4.2.4.4.2.1 Logon Problems Use
The following error message appears:
ERROR com.sap.aii.utilxi.hmi.api.HmiHttpClientImpl: Error accessing "http://<server>:<port>/dir/migrationservice/int?" with user "XISUPER". Response code is -1, response message is "null"
Procedure
Enter the logon data in the servlet again and restart the migration step.
4.4.2.4.4.2.2 Resetting the Servlet Use
If there are problems during the migration, you might have to reset the migration servlet between migration steps.
Procedure
Use this procedure if you have accidentally skipped or confirmed a step you should have performed, and the servlet has locked the respective user interface.
Do not reset the user interface while a migration step is running, that is, as long as the current migration step has the status currently in process.
...
1. To prepare the reset, back up the files .step<number>.log from the import directory of the import repository <dir_global>\xi\repository_server\import.

4 Migration
38 April 2004
2. Delete or backup all files starting with .<name> in the import directory in the import directory <dir_global>\xi\repository_server\import.
If you cannot delete a log file (.step<number>.log), you can ignore it.
3. Close all browser windows.
4. Call the migration servlet.
The first migration steps now appears as Next Step.
5. Use Skip or Confirm to proceed to the migration step that you have accidentally skipped or confirmed.
6. Perform the migration step.
4.4.2.4.4.2.3 Server Problems Use
If there are problems with the J2EE server during the migration, you might have to reset the migration servlet during a migration step.
Procedure
Use this procedure if the server has been restarted or if the migration step has stopped with an error although the status of the step is still currently in process (even after a refresh).
You may only perform a migration step if no other migration step is running in parallel. The following procedure bypasses the security measure against parallel processing of steps.
Only use this procedure if you can guarantee that no other migration step is running.
...
1. Make sure that no other migration step is running.
This should be the case if
during the export no new files were created in the export directory of the source server <dir_global>\xi\<repository_server or directory_server or runtime_server>\export
during the import, the automatic transport of the import file from the import directory of the source server <dir_global>\xi\<repository_server or directory_server>\import to the imported files directory was stopped
no new entries were made in the transport log file of the target server during the last hour.
We recommend that you reboot the relevant exporting or importing applications as well as the Integration Repository of the target system.
2. To prepare the reset, back up the file .step<number>.log from the import directory of the import repository <dir_global>\xi\repository_server\import.
3. Delete or backup all files starting with “.” in the import directory of the import repository <dir_global>\xi\repository_server\import.
If you cannot delete a log file (.step<number>.log), you can ignore it.
4. Close all browser windows.
5. Call the migration servlet.
4 Migration
April 2004 39
The first migration steps now appears as Next Step.
6. Use Skip or Confirm to proceed to the migration step in which the migration stopped.
7. Perform the migration step.
4.4.2.4.5 Activating the Integration Directory Use
The configuration model in XI 3.0 differs considerably from XI 2.0 due to the integration of B2B messaging and the business process engine. The configuration model of XI 2.0 consists of scenarios, receiver determinations, mapping relations, end points, logon data, and value mappings. The configuration model of XI 3.0 consists of a collaboration profile, which describes the internal and partner landscapes and their message-related capabilities. The related objects are party, service, and channel.
In the collaboration agreement, the configurator defines the inbound and outbound handling for a specific message by using the sender and receiver agreement. Logical routing and mapping is possible with receiver and interface determinations. Scenarios can consist of any directory object.
XI 3.0 now offers you a variety of new functions. For more information about the new configuration model, see the SAP online documentation for the XI 3.0 Integration Directory under SAP Library → SAP NetWeaver → Process Integration → SAP Exchange Infrastructure → Design and Configuration Time → Configuration.
The goal of migration is to finish with the XI 3.0 runtime running like the XI 2.0 runtime. In the following sections, we will describe the migration scenarios for the following elements:
• IDoc adapters
• Sender and receiver system names
• Scenarios and receiver determinations
• Mapping relations
• End points and logon data
• Sender channel and sender agreements
• Value mapping
The import of the Integration Directory creates the following change lists:
• The change list containing the consistent objects contains objects of which the tool expects no problems during the activation.
• The change list containing the inconsistent objects contains objects that the tool expects to be able to activate without any problems.
After the activation, the tool will present you with one of the following results:
• The change list containing the consistent objects is activated successfully and there is no change list containing the inconsistent objects. You can continue with the next step.
• The change list containing the consistent objects is activated successfully but there is a change list containing the inconsistent objects.
• If an error occurs during the automatic activation of the change list containing the consistent objects and it is not activated completely, you can manually correct the change list at this point.
Procedure
4 Migration
40 April 2004
If you have to manually correct the objects in one of the change lists, proceed as follows: ...
1. Start the Integration Directory with the user for the upgrade which you have used in step Import Repository.
2. Choose the Change Lists tab page.
3. Choose the change list containing the inconsistent objects.
4. Repair each object.
Check whether the objects are still needed. There may be some objects that you can delete. To get detailed information on the function of the object and the error, press F7.
There are objects, that need direct repairs and objects that you can complete either now or at a later point in time. Repair the object or move it to a different change list by using drag and drop.
For more information about which objects need repairing, see the next sections.
5. If applicable, choose the change list containing the consistent objects.
6. In the context menu, choose Activate.

4 Migration
April 2004 41
4.4.2.4.5.1 IDoc Adapter Procedure
There is no need to adjust IDoc adapters during the migration. After the migration, IDoc adapters will work as they did in XI 2.0.
For XI 3.0, there are a few functional enhancements which you may consider using:
• If an IDoc uses IDoc partners and not logical systems as senders or receivers, the partner name is now part of the XI message header. Which means that the configuration of IDocs can consider partners.
• As in XI 2.0, the Integration Directory does not know anything about the IDoc partners, they are not migrated. In the long term, you should define them in the Integration Directory. To avoid an increase in downtime due to the input of the IDoc partner during the migration, this definition is not obligatory and the migration procedure ensures that existing IDoc scenarios will run in the same way as before. This requires a special treatment in the IDoc case – that is in the case that the interface belongs to the IDoc namespace.
• Unlike in XI 2.0, in XI 3.0 the IDoc Adapter sets the receiver party if the IDoc contains a receiver IDoc partner.
The variation to the standard migration procedure is described in the object migration sections. For more information about IDoc adapters, see the SAP online documentation under SAP Library → SAP NetWeaver → Process Integration → SAP Exchange Infrastructure → Runtime → IDoc Adapter.
4.4.2.4.5.2 RFC Adapter Procedure
The XI 2.0 RFC adapter is no longer supported on XI 3.0. XI 3.0 uses the RFC adapter of the central Adapter Engine. The XI 2.0 end points are automatically adapted during the migration. The tools generate receiver channels and agreements that are processed by the central Adapter Engine. There is no need for manual adjustments.
In XI 2.0, the RFC entry is configured in the local property file rfc_adapter.properties in the RFC adapter module of the J2SE Adapter Engine. In XI 3.0, the RFC entry is configured in the Integration Directory. As the migration cannot convert local property files, you have to manually adjust this. For every system that sends RFC calls, the migration generates an incomplete sender channel and agreement. The sender systems are determined using the receiver determination. This includes all sender systems that occur in a receiver determination with an interface to the RFC namespace. You have to manually adjust the channel attributes. The channels and agreements are assigned to the change list containing the inconsistent objects.
Adjusting the Sender Channel ...
1. Print file rfc_adapter.properties from directory \usr\sap\<SID>\SYS\global\tech_adapter\Configuration.
The information in chapter # 2. SUBSECTION FOR REGISTRATION TO CLIENT APPLICATION SYSTEMS is important for the sender channel.
2. Open the respective channel in the Integration Directory and complete the following data with the help of the entries in file rfc_adapter.properties for the corresponding sender system:
RFC server parameter:

4 Migration
42 April 2004
Application server (gateway): corresponds to RfcAdapter.sourceBackend.host
Application server service (gateway): consists of sapgw and RfcAdapter.sourceBackend.sysnr (for example, sapgw00)
Program ID: RfcAdapter.sourceBackend.progid
Use a program ID that differs from the one used for the XI 2.0 RFC adapter.
Unicode: RfcAdapter.sourceBackend.unicode
Initial connections: RfcAdapter.sourceBackend.poolsize
Maximum connections: Set the limit according to your needs.
RFC metadata repository parameter: Application server: RfcAdapter.sourceBackend.host
System number: RfcAdapter.sourceBackend.sysnr
Authentication mode: Use logon Data to SAP System
Logon user: RfcAdapter.sourceBackend.user
Logon password: RfcAdapter.sourceBackend.passwd
Logon language: RfcAdapter.sourceBackend.lang
Logon client: RfcAdapter.sourceBackend.client
3. Save the Channel and aktivate the change list.
You must register a program for a gateway in the property file as well as in the channel. For a controlled transition of the runtime from XI 2.0 to XI 3.0, we recommend that you use a program name that differs from the old one, for example, <program> and <program>_new. Otherwise, you register two handlers for one RFC call and some RFC calls will be processed in XI 2.0 and others in XI 3.0.
This requires that during downtime you change all destinations in the sender systems [page 56] to the new server program.
Adjusting the Sender Agreements
The tools have created sender agreements for every sender system. Proceed as follows: ...
1. Check the sender agreements.
2. Activate the sender agreements.
For more information, see Sender and Receiver Systems [page 42].
4.4.2.4.5.3 Sender and Receiver Systems Use
Every system name used in an XI 2.0 object as sender or receiver is migrated to a service without assignment to a party. There are different types of services:

4 Migration
April 2004 43
• System names described in the SLD as “Business System” migrate to the type “Business System”.
• System names which are not described in the SLD, are migrated to “Business Services”.
• As in XI 3.0 Business Systems should only be created for internal components, the SLD supports the Business System of type “Business Partner” only for XI 2.0 domains. These Business Systems are also migrated to “Business Services”.
4.4.2.4.5.4 Scenarios and Receiver Determinations Use
Receiver determinations are migrated to receiver determinations. The following figure illustrates the standard transformation:
XI2.0 Receiver Determination
Scenario Sender System Interface Namespace
MyScenario SourceBS Request http://abc
XI3.0 Receiver Determination
Sender Receiver Interface
Party Service Party Service Name Namespace
<Empty> SourceBS * * Request http://abc
• Receiver determinations for the same sender system and interface, but depending on different scenarios, are grouped to one receiver determination.
• The sender party is set to space (<Empty>).
However, if the sender interface namespace is the IDoc namespace, the sender party is set to * (asterisk) due to the changes in the behavior of the adapter [page 41].
• Receiver party and service in the receiver determination key is always set to * (asterisk) as the migrated relations cannot use the XI 3.0 “virtual receiver” feature.
• The XI 2.0 receiver business systems are migrated to the XI 3.0 receiver service without party in the attribute part. The party there is set to space.
• In XI 2.0, any receiver determined by the sending application has been accepted by the receiver determination. In XI 3.0, the administrator can decide if he wants to accept them or not. The standard migration accepts the receivers. Receiver determinations for IDocs are migrated to receiver determinations which do not accept the receiver due to the changed behavior of this adapter [page 41].
Procedure
• Define the IDoc partner in the Integration Directory.
• Adapt the business process to the XI 3.0 model.
An upgrade of process definitions from the pilot version of XI 2.0 to XI 3.0 will not be provided. You must replace already running XI 2.0 process integration scenarios with the XI 3.0 version.

4 Migration
44 April 2004
For more information, see the online documentation under SAP Library → SAP NetWeaver → Process Integration → SAP Exchange Infrastructure.
• Adapt the XI 2.0 receiver determination with dynamic receiver determination using value mapping, because it can not be migrated.
The receiver determination is created but it is not complete. It is assigned to the change list containing the consistent objects.
• Adapt the XI 2.0 receiver determinations for RFCs containing a rule which uses the context object Destination urn:sap-com:document:sap:rfc:functions, because they cannot be migrated.
The receiver determination is created but assigned to the change list containing the inconsistent objects.
4.4.2.4.5.5 Interface Determinations Use
Interface determinations are migrated to interface determinations. The following figure illustrates the standard transformation:
XI2.0 Interface Determination
Sender System Receiver System Interface Namespace
SourceBS TargetBS Request http://abc
XI3.0 Interface Determination
Sender Receiver Interface
Party Service Party Service Name Namespace
<Empty> SourceBs <Empty> TargetBS Request http://abc
• The sender and receiver business systems are migrated to sender and receiver services without parties, so the parties are set to space.
• The sender interface name and namespace are migrated to the interface name and namespace.
• In the IDoc case the sender party is set to * (asterisk), due to the changes in the behavior of this adapter (see above).
You will find these objects in the change list containing the consistent objects.
Namespace Mappings for Interface Determinations
Conditions use XPath expressions that may contain namespace prefixes. Each namespace prefix is bound to a Uniform Resource Identifier (URI). The assignment of prefixes to URIs is defined in the namespace mapping.
In XI 2.0, there is a namespace mapping for each condition of a mapping relation. In XI 3.0, there is only one single namespace mapping for all conditions of an interface determination. Therefore, namespace mappings must be merged during the migration of mapping relations.
Procedure
• A prefix that occurs twice and is bound to different URIs is critical. In this case, the interface determination is assigned to the change list containing the inconsistent objects and the second occurrence of the prefix is replaced by a new one.
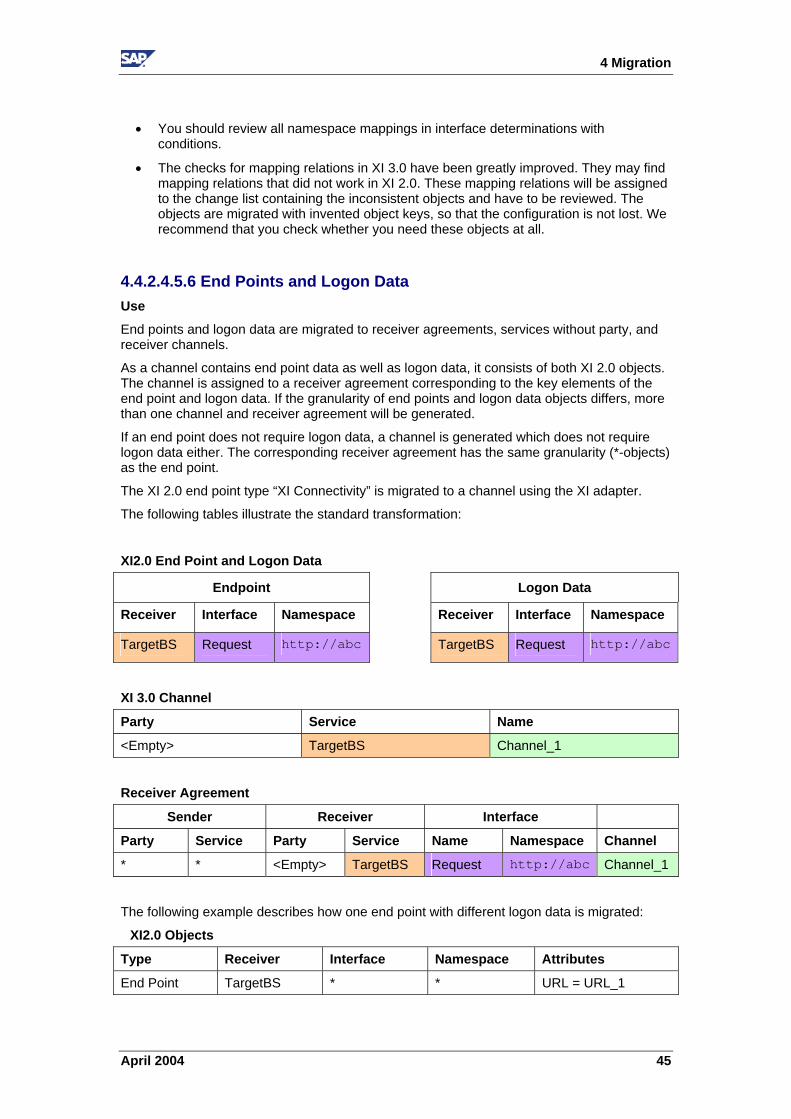
4 Migration
April 2004 45
• You should review all namespace mappings in interface determinations with conditions.
• The checks for mapping relations in XI 3.0 have been greatly improved. They may find mapping relations that did not work in XI 2.0. These mapping relations will be assigned to the change list containing the inconsistent objects and have to be reviewed. The objects are migrated with invented object keys, so that the configuration is not lost. We recommend that you check whether you need these objects at all.
4.4.2.4.5.6 End Points and Logon Data Use
End points and logon data are migrated to receiver agreements, services without party, and receiver channels.
As a channel contains end point data as well as logon data, it consists of both XI 2.0 objects. The channel is assigned to a receiver agreement corresponding to the key elements of the end point and logon data. If the granularity of end points and logon data objects differs, more than one channel and receiver agreement will be generated.
If an end point does not require logon data, a channel is generated which does not require logon data either. The corresponding receiver agreement has the same granularity (*-objects) as the end point.
The XI 2.0 end point type “XI Connectivity” is migrated to a channel using the XI adapter.
The following tables illustrate the standard transformation:
XI2.0 End Point and Logon Data
Endpoint Logon Data
Receiver Interface Namespace Receiver Interface Namespace
TargetBS Request http://abc TargetBS Request http://abc
XI 3.0 Channel
Party Service Name
<Empty> TargetBS Channel_1
Receiver Agreement
Sender Receiver Interface
Party Service Party Service Name Namespace Channel
* * <Empty> TargetBS Request http://abc Channel_1
The following example describes how one end point with different logon data is migrated:
XI2.0 Objects
Type Receiver Interface Namespace Attributes
End Point TargetBS * * URL = URL_1

4 Migration
46 April 2004
Logon Data TargetBS * * User = User_A
Logon Data TargetBS Request http://abc User = User_B
Logon Data TargetBS Order http://xyz User = User_C
XI3.0 CP Objects
Type Party Name Servicename Channel Name Attributes
Service <Empty> TargetBS SystemId = …
Channel <Empty> TargetBS Channel_A URL = URL_1
User = User_A
Channel <Empty> TargetBS Channel_B URL = URL_1
User = User_B
Channel <Empty> TargetBS Channel_C URL = URL_1
User = User_C
XI 3.0 CA Objects – Receiver Agreements
S-Party S-Service R-Party R-Service Interface Namespace Channel
* * <Empty> TargetBS * * Channel_A
* * <Empty> TargetBS Request http://abc Channel_B
* * <Empty> TargetBS Order http://xyz Channel_C
Procedure
• End points for the RFC adapter which use SNC logon data cannot be migrated as the XI 3.0 RFC adapter does not support this feature. The channels created for this combination will appear in the change list containing the inconsistent objects.
• If there are end points that require logon data, but no suitable logon data is found, the migration creates an incomplete channel and assigns it to the change list containing the inconsistent objects. As in XI 2.0 the use of these end points would have resulted in a runtime error, check whether you need these end points at all.
4.4.2.4.5.7 Sender Channels and Sender Agreements Use
The J2SE adapters are configured in local configuration files. The adapter running in the XI 3.0 adapter engine is configured centrally in the Integration Directory with sender channel and agreement on the inbound side, and receiver channel and agreement on the outbound side.
Procedure
• If you want to use the adapter in the Adapter Engine, the local configuration must be reconfigured in the Integration Directory. Currently, there is no tool to support this step, however, you are not obliged to use the new adapter immediately. You may run your system with the old adapters and reconfigure them one by one.

4 Migration
April 2004 47
• The RFC adapter is the only adapter that must run on the XI 3.0 Adapter Engine. Therefore, the migration creates a sender channel and an agreement for each business system that sends an RFC interface. As the configuration data is not available in the XI 2.0 Integration Directory, you must complete the sender channel information. The channel and the agreement are assigned to the change list containing the inconsistent objects. This review [page 42]must be done before you use XI 3.0 productively.
4.4.2.4.5.8 Value Mapping Use
The model of XI 3.0 value mapping differs from that of XI 2.0. In XI2.0, there is one storage location. It contains value mapping groups defined by the Integration Directory and the ABAP API which are used by the SAP Solution Manager. In XI 3.0, the applications are separated: Each application – the integration directory is only one of them – is working only in its own “context”.
The identifiers used in the value mapping are adapted to the global SAP identifier. The XI 2.0 system element corresponds to the XI 3.0 agency element, the XI 3.0 scheme corresponds to the object type name and namespace.
The migration determines the contexts and creates schemes by object type name and namespace. We assume that the applications XI Integration Directory and SAP Solution Manager are using the replication API.
They will use the following contexts
• XI Integration Directory context: http://sap.com/xi/XI
• SAP Solution Manager: http://sap.com/xi/SolutionManager
The object type name and namespace are concatenated and separated with a space.
If you have used the SAP Solution Manager with XI 2.0, the migration tool needs access to the SAP Solution Manager system to get the object types used by the SAP Solution Manager. This is necessary to determine the context.
The value mapping groups belonging to the XI context are migrated to Integration Directory objects. That means that only these groups can be displayed or edited in the Integration Directory. All other groups must be maintained in the original application.
Procedure
Use the XI 3.0 value mapping API in your own mapping programs.
If you have used the replication API in XI 2.0, you will find your value mappings in the XI context. You can decide to maintain them using the Integration Directory value mapping tool. If you want to use the replication API, we recommend strongly that you use the XI 3.0 replication API and the XI 3.0 value mapping runtime API in the mapping programs.
4.4.2.4.6 Revert Tool Usage Restrictions XI 3.0 System
After the migration, you have to revert the access restrictions for the Integration Builder (design and configuration) in the XI 3.0 system. ...
1. Set the property (“ExchangeProfile”) as follows:
com.sap.aii.ib.server.upgrade_mode = false
4 Migration
48 April 2004
2. Start the Integration Builder.
3. Choose Administration → AIIProperties.
4. Choose the Refresh button to update the Exchange Profile settings.
XI 2.0 System
If required, XI 2.0 can be configured back to its former state. This is a simple process because in J2EE Visual Admin, users and groups that were excluded are shown in the Denied users frame.
We recommend that you do not remove the access restrictions in the XI 2.0 system in order to prevent the accidental use of the system.
4.4.2.5 Migrate IDoc Adapter Configuration To migrate the configuration of the IDoc adapter from IS 2.0 to IS 3.0, proceed as follows: ...
1. Perform the standard steps for configuring the IDoc adapter in XI 3.0 as described in the Configuration Guide – SAP Exchange Infrastructure.
2. Make sure that you have merged all RFC destinations from IS 2.0 to IS 3.0 as described in section Migrating the RFC Destinations [page 23]. If this was successful, all required RFC destinations for outbound IDoc handling are present.
3. Apply SAP Note 696367 IDoc Adapter: Checklist IS2.0/IS3.0 Migration to the Integration Server 2.0.
4. Call transaction SE38 and run report Z_IDX_MIGRATE_LIST in IS 2.0.
The report returns a list of open issues for IDoc configuration. To resolve the open issues, proceed as follows:
a. Open issue (A): Table of exception IDocs
IDocs entering the XI Integration Server are by default directed into the IDoc adapter. However, by making entries in a table of exception IDocs, you can direct specific IDocs towards the normal (non-XI) IDoc entry, for example, for user management. You must migrate this table from IS 2.0 to IS 3.0 manually:
i. In IS 3.0, call transaction SE38.
ii. Run report IDX_SELECT_IDOCTYP_WITHOUT_IS to fill the exception table in IS 3.0.
b. Open issue (B): Configure ports and their RFC destinations
Call transaction IDX1 in IS 3.0 to configure the correspondence of ports and their RFC destinations to the source systems for loading IDoc meta data. For the relevant entries, see the result list in issue (B).
c. Open issue (C): Load or copy meta data
The report issues a list of IDoc types that have loaded their meta data. Call transaction IDX2 to manually load or copy the meta data for all types where the first row is marked with 'C'. All other entries do not require additional attention.
For more information, see the online documentation under SAP Exchange Infrastructure → Runtime → Connectivity → Adapters → IDoc Adapter → IDoc Processing with the IDoc Adapter → Loading, Displaying, and Deleting Metadata.
d. Open issue (D): IDoc soft-serialization
4 Migration
April 2004 49
If the report issues any output lines under issue (D), contact SAP Support. To ensure quick issue resolving, create a customer message under component BC-XI-CON-SAP using the problem description “Migrate: IDoc soft-serialization”.
4.4.2.6 Integration Server Cache Refresh The migration of Integration Repository and Integration Directory objects results in an update of runtime caches. In XI 3.0, you can check the cache status in the Integration Repository, Integration Directory and Integration Server:
• Repository ...
a. Log on to the Integration Repository with the upgrade user.
b. Choose Environment → Cache Notification.
A list of notifications is displayed.
c. Check that every cache notification has the status O.K. (green light).
• Directory ...
a. Log on to the Integration Directory with the upgrade user.
b. Choose Environment → Cache Notification.
A list of notifications is displayed.
c. Check that every cache update has the status O.K. (green light).
• Integration Server ...
a. Log on to SAP Web AS.
b. Call transaction SXI_CACHE.
c. Check that the cache is up-to-date (green light).
If any of these checks fails, execute a complete cache update. Proceed as follows: ...
1. Call transaction SXI_CACHE.
2. Choose XI Runtime Cache → Start Complete Cache Refresh.
4.4.2.7 Pre-Downtime Checks and Preparations
4.4.2.7.1 Completing IDoc File Input This subsection is only relevant if you have been sending IDocs into the Integration Server 2.0 using file input.
Before the downtime begins, check for IDoc file input errors. If IDocs have been sent into the Integration Server using the IDoc file upload, you should check for read errors. Read errors leave restart pointer entries in IDoc table EDFI2. To check this table, proceed as follows: ...
1. Call transaction WE08.
2. Confirm all popups until you reach the screen Display View FileStatus: Overview.
3. Check the screen for entries.
4 Migration
50 April 2004
There should be no entries. If table entries exist, try to solve the problem by checking whether they are needed and editing the input file.
Never copy an IDoc input file from IS 2.0 to IS 3.0. Any file that was started by IS 2.0 must be completed by IS 2.0. Incorrect file use can lead to consistency errors.
4.4.2.7.2 Optimizing the Exactly-Once Protocoll Switch There are some actions with which you can minimize the downtime phase during Integration Server migration. If downtime is not critical to you, this step is optional.
Before you perform the following actions, read the section on Exactly-Once Protocol Switch [page 52]. It provides information on whyyou must transfer unique message IDs. As the number of messages IDs can be rather large, the time needed for transferring all entries can be considerable. You can perform the following actions to minimize the time for transfer during downtime: ...
1. Keep the number of ID entries to a minimum.
IDs are deleted by a planned batch job (executing the report RSXMB_DELETE_HISTORY) which should be active in your IS 2.0 system.
a. If this batch job is scheduled regularly, do not start it manually.
b. If this batch job is not scheduled regularly, call transaction SE38 in IS 2.0 and start report RSXMB_DELETE_HISTORY manually.
2. Transfer parts of the ID table from IS 2.0 to IS 3.0 before downtime starts.
You can transfer all IDs that are older than 1 hour to IS 3.0. In transfer report RSXMB_IMPORT_HIST, choose the upper time limit of the transfer to be the current time minus 1 hour and run the report. This will make all selected IDs available in IS 3.0 and largely reduce the number of IDs to be transferred during downtime.
The remaining IDs must be transferred during downtime. You can not complete the transfer of IDs during uptime.
The report remembers the time limit you have set. During downtime [page 52], it will only transfer IDs which have not been transferred, yet.
4.4.2.7.3 Creating an RFC Destination In IS 3.0, create an RFC destination for IS data migration calls from IS 3.0 to IS 2.0. ...
1. Log on to IS 3.0.
2. Call transaction SM59.
3. Create an R/3 connection to the IS 2.0 system.
4. You must register this RFC destination to IS 2.0 within the configuration parameter of IS 3.0 under category RUNTIME and the parameter RFC_DEST_UPGRADE_XI20. Proceed as follows:
a. Call transaction SXMB_ADMIN.
b. Choose Integration Engine Configuration.

4 Migration
April 2004 51
c. Under Specific Configuration Data, select category RUNTIME and choose ENTER.
d. Choose Specific Configuration.
If the area and parameter pair RUNTIME/RFC_DEST_UPGRADE_XI20 exists, insert the name of the RFC destination.
If the parameter does not exist, proceed as follows:
• Choose New Entry from the context menu.
• Enter the category RUNTIME and parameter RFC_DEST_UPGRADE_XI20, and insert the name of the RFC destination.
4.4.2.8 Integration Server Migration Steps
4.4.2.8.1 Locking IS 2.0
You must not perform the upgrade if new messages can still be sent to the old IS 2.0.
Therefore, you must lock IS 2.0 during the upgrade for incoming message traffic for all inbound channels, such as the IDoc adapter, Plain-HTTP adapter, RFC adapter, or XI message communication.
To lock IS 2.0 against incoming message traffic, proceed as follows: ...
1. In IS 2.0, call transaction SXMB_ADMIN.
2. Choose Integration Engine Configuration → Specific Configuration Data.
3. Select category RUNTIME and choose ENTER.
4. Choose Specific Configuration.
If there is an area and parameter pair RUNTIME/ENTRY_LOCK, set it to 1 (locked).
If the parameter has not been created yet, proceed as follows: i. Choose New Entry from the context menu.
ii. Enter category RUNTIME and parameter ENTRY_LOCK, and set the Current Value to 1 (locked).
Once it is locked, the IS 2.0 server will not accept any new incoming message. Callers will receive a system error stating that the Integration Engine is locked. All types of adapters and all types of message modes (for example, all QualityOfService options) are affected by this lock. If for some reason the server needs to be unlocked again at this point, just set the value back to its default of 0 (not locked), or follow the description in the respective unlock section below. In this case, do not continue the upgrade until the server has been locked again.

4 Migration
52 April 2004
4.4.2.8.2 Locking IS 3.0
You must not perform the upgrade if new messages can still be sent into IS 3.0.
Therefore, you must lock IS 3.0 during the upgrade for incoming message traffic for all input channels, such as the IDoc adapter, plain HTTP adapter, RFC adapter, or XI message communication.
To lock IS 3.0 against incoming message traffic, proceed as follows: ...
1. In IS 3.0 call transaction SXMB_ADMIN.
2. Choose Integration Engine Configuration → Specific Configuration Data.
3. Select category RUNTIME and choose ENTER.
4. Choose Specific Configuration.
If there is an area and parameter pair RUNTIME/ENTRY_LOCK, set it to a value of 1 (locked).
If the parameter has not been created yet, proceed as follows: i. Choose New Entry from the context menu.
ii. Enter the category RUNTIME and parameter ENTRY_LOCK, and set the Current Value to 1 (locked).
Once it is locked, the IS 3.0 server will not accept any new incoming message. Callers will receive a system error stating that the Integration Engine is locked. All types of adapters and all types of message modes (for example, all QualityOfService options) are affected by this lock. If for some reason the server needs to be unlocked again at this point, just set the value back to its default of 0 (not locked), or follow the description in the respective unlock section below. In this case, do not continue the migration until the server has been locked again.
4.4.2.8.3 Exactly-Once Protocol Switch Use In this phase, the table containing the unique XI message IDs is transferred from IS 2.0 to IS 3.0.
The remaining IDs must be transferred during downtime.
You can not complete the transfer of IDs during uptime.
A sender system (or receiver system) and the IS may well have different views on the success of a message transmission between them. That is why the Exactly-Once message transmission protocol defines that as long as a sender is not sure that the IS has received a given message, a sender will keep resending an identical message with identical contents and ID. If the sender receives positive notification that the transmission was successful, normally a synchronous reply to the sender’s HTTP post request, it will stop resending this message. Thus, a sender may think that certain messages must be re-sent at a given point in

4 Migration
April 2004 53
time. The IS always retains the IDs of messages it has received so it is able to differentiate between messages in re-send mode and new messages.
Problems may arise if two IS instances run in parallel. During an upgrade, a newly installed IS 3.0 runs in addition to the IS 2.0 server. In this case, the sender may have reached IS 2.0 with a message and succeded, but may not have received a reply because of, for example, a transmission failure or network shutdown. The message will then be re-sent to IS 3.0 and may succeed there. The result of the parallel IS instances would then be duplicate message processing by IS 2.0 and IS 3.0.
This explains why the table of unique IDs in IS 2.0 must be transferred to IS 3.0 before any message is allowed to be processed in IS 3.0. It also explains why the table of message IDs read from IS 2.0 must not be extended haphazardly, as no message is allowed to enter IS 2.0 during this time.
Procedure
If you have transferred IDs before the downtime started, as described in section Optimizing the Exactly-Once Protocol Switch [page 50], make sure you do not change the default settings of the time limit parameters below. The report will make sure that only the remaining IDs will be transferred.
To transfer the message IDs from IS 2.0 to IS 3.0, proceed as follows: ...
1. In IS 3.0, execute report RSXMB_IMPORT_HIST using, for example, transaction SE38.
2. If needed, overwrite the default settings for the particular parameters.
For a detailed description on the meaning of the parameters, press CTRL + F1 or choose the info button.
3. To transfer the data, press F8 or choose the appropriate push-button.
4.4.2.8.4 EOIO Queue Coupling Use In this phase, the serialization queues (Exactly-Once-In-Order queues only) of IS 3.0 are coupled to the corresponding queues of IS 2.0. This guarantees serialization across the IS migration.
A sender system has sent some messages to the XI IS 2.0 in Exactly-Once-In-Order mode (EOIO) to a queue named “MyAppQ1”. These messages must be strictly serialized for semantical reasons. In addition, assume that during the migration phase in which the IS 3.0 is installed in parallel to IS 2.0, at a given point in time the sender continues sending EOIO messages to “MyAppQ1”. However, the address for message transmission to the IS is switched to the second IS, IS 3.0. On IS 3.0, the first message to “MyAppQ1” has no predecessors, so it is processed immediately. If IS 2.0 has, for some reason, not yet completed all predecessors in its own local “MyAppQ1”, then serialization can no longer be guaranteed.
Remember that EOIO queues do not span different IS instances automatically. They do, however, span different application servers within one single IS system, for example within the IS 2.0 system.
Before allowing any EOIO message to enter IS 3.0 queue, coupling must be switched on.

4 Migration
54 April 2004
With coupling enabled, IS 3.0 will cross-check message delivery in IS 2.0 to check whether there are any messages pending in IS 2.0 EOIO queues which need to precede the current message delivered into IS 3.0. If pending messages in IS 2.0 are found, the corresponding queue in IS 3.0 will be stopped. The new EOIO message will be inserted into this stopped queue and remain waiting there for an unlock signal. A batch process frequently running in IS 3.0 is used to unlock this queue once all predecessors in IS 2.0 have been processed successfully. This batch job checks for any IS 3.0 queues that can be unlocked because the corresponding IS 2.0 queue has finished.
If there are no more EOIO queues in IS 2.0, the queue coupling will automatically be disabled in IS 3.0. Therefore, queue coupling as such need not be switched off. Only the batch job checking for completed queues in IS 2.0 must be deleted explicitly.
Note that coupling queues is only relevant for EOIO queues which explicitly require and specify a semantic serialization order. Although EO queues do exist in the IS, they are not affected here. It is possible to send messages with Quality-Of-Service = Exactly-Once = EO to IS 2.0 and IS 3.0 in parallel, because no order restrictions apply to them. If one EO message overtakes an other, there will not be an application problem. Otherwise, these messages must be sent in EOIO mode. Furthermore, EO messages may even overtake each other within one IS, because several EO queues or message containers are used to process them in parallel.
Procedure Before allowing any (EOIO) messages to enter IS 3.0 EOIO queues you must switch on queue coupling as described below: ...
1. Activate Queue Coupling
In order to couple the EOIO queues of IS 3.0 to the existing IS 2.0 queues, proceed as follows:
...
a. In IS 3.0, call transaction SXMB_ADMIN.
b. Choose Integration Engine Configuration → Specific Configuration Data.
c. Select category RUNTIME and choose ENTER.
d. Choose Specific Configuration.
If the area/parameter pair RUNTIME/QUEUE_UPGRADE_XI20 exists, set the value to 1.
If the parameter does not exist, proceed as follows:
(i) Choose New Entry from the context menue.
(ii) Enter the category RUNTIME and the parameter QUEUE_UPGRADE_XI20, and set the Current Value to 1 (queue upgrade started).
As a result of this setting, all incoming EOIO calls will be cross-checked against possible predecessors in IS 2.0. If predecessors exist, the IS 3.0 queue will be locked.
2. Configure Job for Decoupling Emptied EOIO Queues
In IS 3.0, a periodic batch job must be created which regularily executes the program SXMS_CHECK_XI20_QUEUES. We recommend a job period of 5 - 10 minutes. This period determines how fast EOIO queues are unlocked in IS 3.0 once their respective predecessors have been completed in IS 2.0.
The program loops through all queues which are locked in IS 3.0 and checks for any remaining predecessor messages in IS 2.0 EOIO queues. If no queues (no entries in these queues) are found in IS 2.0, the respective IS 3.0 queues are unlocked and subsequent EOIO messages are now processed on IS 3.0.

4 Migration
April 2004 55
You can check the remaining queues in the source IS 2.0 in transaction SMQ2. Check for queues starting with the name XBQI* and XBQO*.
3. Delete Job
As soon as all EOIO queues on IS 2.0 have completed processing and there are no EOIO queues left, the category/parameter pair RUNTIME/QUEUE_UPGRADE_XI20 is set to the 0 (zero).
The scheduled batch job should be canceled afterwards.
4.4.2.8.5 Unlocking IS 3.0 The migration has proceeded to the stage where messages are allowed into the new IS 3.0. Incoming message traffic is possible again for all inbound channels (IDoc adapter, plain-HTTP adapter, RFC adapter, XI message communication, or any other adapters). To unlock IS 3.0, proceed as follows: ...
1. In IS 3.0, call transaction SXMB_ADMIN.
2. Choose Integration Engine Configuration → Specific Configuration Data.
3. Select category 'RUNTIME' and choose ENTER.
4. Choose Specific Configuration.
The area and parameter pair RUNTIME/ENTRY_LOCK should exist and be set to 1.
5. Set RUNTIME/ENTRY_LOCK to 0 (unlocked). The IS 3.0 server will now accept incoming messages again. Callers no longer receive the system errors that the Integration Engine is locked. All types of adapters and all types of message modes (for example, all QualityOfService options) are now open to incoming messages.
4.4.2.8.6 Locking of IS 2.0
We highly recommend to leave IS 2.0 in the locked state.
Leaving IS 2.0 locked makes sure that all systems that have not yet switched their addressing to IS 3.0 will not be able to send messages to IS 3.0. It is mandatory that from now on they only send messages to the new IS 3.0. Keeping IS 2.0 locked enforces this requirement.
Sending messages to the old IS 2.0 and succeeding in doing so because of an unlocked IS 2.0 at this stage would lead to serious errors, such as violations of the EO or EO guarantees.
4 Migration
56 April 2004
4.4.2.9 Switching Addresses The newly installed IS 3.0 resides at a new network address. You must make address changes at several locations in order to account for this change.
The following actions are performed automatically:
• Configuration of central Integration Server IS 3.0 is performed during XI 3.0 installation. See above for details.
• Communication from IS 3.0 to business systems is set up during IB migration, which contains the communication channels for these business systems.
• A connection is created between IS 3.0 and SLD 3.0 during XI 3.0 installation, see above for details.
The following sections contain a detailed description of all necessary manual address changes.
4.4.2.9.1 Connecting Business Systems to SLD 3.0 Use
Business systems with an Integration Engine require a connection to the SLD server to obtain their name from the SLD. The business system name is used in the header of the message sent to the Integration Server. The connection to the SLD is established by creating an RFC destination (as described below) and calling a registered server program, which is defined on the SAP J2EE JRFC Engine of the Integration Server. The server program is called with the HTTP address as a parameter that is maintained with transaction SLDAPICUST.
Procedure ...
1. Use transaction SLDAPICUST in the business system to define the SLD access data. This data consists of the host and port of the SLD as well as a user and password (XIAPPLUSER and XIPASS). You can use the entries that you maintained on your Integration Server.
2. You have to change all RFC destinations on your business system. They use the same registered server program, which is defined as part of the JRFC engine settings of the SAP J2EE Engine on the SLD host. This means that all business systems can use the same server program ID (SAPSLDAPI _UNICODE or SAPSLDAPI _NONUNICODE) for their RFC destinations LCRSAPRFC and SAPSLDAPI.
3. You must also change the RFC destinations in
All business system (enter the new Integration Server and, if necessary, adjust the roles)
All technical adapters
File SLDaccessor.properties in directory /tech_adapter/BaseConfiguration
4. In XI 3.0, you must enter the Gateways in file etc/services.
5. In the case of Unicode business systems (program ID SAPSLDAPI _UNICODE), the Unicode flag is set in the JRFC engine settings. In the case of non-unicode business systems (program ID SAPSLDAPI_NONUNICODE), the Unicode flag is not set.
4 Migration
April 2004 57
4.4.2.9.2 Maintaining System Connections and Destinations If the host name and port of your Integration Server have changed after the migration, you have to readjust destinations and connections between the Integration Server and the Integration Engines and adapters. For information on how to perform the single tasks, see the Configuration Guide – SAP Exchange Infrastructure 3.0. The respective sections in this guide are stated below.
• Update of HTTP destinations
Update the HTTP destination that points from the Integration Engines (business systems) to the Integration Server 3.0.
For more information, see section Connecting Business Systems with an Integration Engine to the Central Integration Server.
• Optional: Destinations to IS 3.0 for Receiver Pre-Identification
In the Integration Engine, update RFC destination AI_INTEGRATION_SERVER.
For more information, see the section Creating a Destination to the Integration Server for Receiver Pre-Identification.
• Optional: Destinations to IS 3.0 for Maintenance of Value-Mapping Table
In the Integration Engine, update RFC destination AI_INTEGRATION_SERVER.
For more information, see the section Creating a Destination to the Integration Server for Maintaining the Value Mapping Table.
• System Connections for the RFC Adapter
In all application systems, change the program ID in transaction SM59 RFC Destination to the new program ID defined in your sender channels in the section RFC Adapter [page 41].
For more information, see the section System Connections for the RFC Adapter.
• Re-Integration of Business Systems using the XI 2.0 IDoc Adapter.
In the sending system, update the RFC destination to the Integration Server.
For more information, see the section Settings for the IDoc Sending System (R/3).
• Integration of Business Systems using the Plain J2SE Adapter Engine
Update the URL of the http destination to the Integration Server in the sender adapters.
For more information, see thesection Integration of Business Systems using the Plain J2SE Adapter Engine.
4.4.2.10 Integration Server Runout Checks To make sure that the Integration Server 2.0 can be taken offline completely, you must perform the following runout checks in the old Integration Server: ...
1. Check processing queues.
Check all queues for hanging entries or hanging situations. Proceed as follows:
a. Call transaction SMQ2.
b. Select all queue names starting with “XB*”.

4 Migration
58 April 2004
This gives you an overview of non-empty XI queues with the numbers of hanging messages in them.
c. For more information on the problem, double-click on the queue name.
d. On the next dialog box, double-click the queue name again.
You receive a status text, which will provide an explanation for the problem.
e. To find out the message GUID of the problematic message under Parameter Value, double-click in the relevant entry line of the user name.
You can use this message GUID to select the relevant message and find out the problem using transaction SXMB_MONI.
2. Obtain an overview on message processing states.
As a starting point, get an overview of messages which remain in non-processed states. Proceed as follows:
a. Call transaction SXMB_ADMIN.
b. In sub-section Monitoring choose Processing Statistics.
Ideally, all messages appear under XML Messages Successfully Processed. However, there almost always remain messages in states other than this. These messages must be canceled before IS 2.0 can be taken offline completely.
c. Change and finalize the open messages.
d. Refresh the results of the Processing Statistics in order to monitor the IS 2.0 runout actions.
3. Cancel any messages that have not been successfully processed on IS 2.0.
If messages remain in non-finalized states, use transaction SXMB_MONI to find and resolve the problem. You can find some hints about actions and checks under section Troubleshooting Methods in transaction SXMB_MONI.
XML Messages with Errors Messages in error status can be handled by in the following ways:
Try to resolve the errors and subsequently process the messages.
Decide not to resolve the error and cancel the specific message. Note that only messages with QoS (QualityOfService) unequal to BE (BestEffort) can either be restarted or cancelled. BE messages need not be cleared from the monitor, although they appear in the overview statistics.
Proceed as follows:
i. Choose Monitor for processed XML messages.
ii. Under Select XML Messages choose Only messages with errors and select for a very early starting date to select all error messages.
iii. If you decide to resolve the error by cancelling, proceed as follows:
a. Select the messages.
b. Mark the messages in the column on the far left.
c. Choose Cancel selected messages (with error) or Ctrl+F8.
d. Confirm your action in the dialog box. The bottom line will provide a confirmation about the message cancellation
4 Migration
April 2004 59
iv. If you decide to resolve the error by repair, you should first repair the configuration error that led to the failed message execution and then restart the message.
XML Messages Awaiting Processing Check if the corresponding messages in the queues are hanging (EOIO or EO queues). Consider restarting and/or registering queues as described under section Troubleshooting Methods in transaction SXMB_MONI. This should make all messages pass through the queues and be processed one after the other.
XML Messages Being Processed The relevant messages are generally being processed in outbound sending to receivers. The system is trying to send to a receiver for the first time or retrying this after a connection failure. This type of messages disappear automatically, because retry and outbound processing may stop following a timeout and turn into an error status.
If the messages do not disappear, try to select and check these messages as follows:
...
i. Select the message by selecting ‘Message Status’ to be either ‘Automatic Retry’ or ‘Scheduled for Outbound Processing’.
ii. Check the message for problems or errors.
iii. Keep checking processing queues.
While going through the steps (a) – (c) make sure you keep re-checking the state of queues (as described in step (1)).
Make sure no messages keep hanging in queues.
4. Check messages waiting for archiving.
Check for this type of message only after you have performed all steps mentioned above. You can only tell which messages are pending for archiving after all other messages have been processed.
In Processing Statistics there is a section named XML Messages Selected for Archiving. If the number of messages is larger than 0, you have to wait for the next archiving job to finish. If the number remains larger than 0, check your archiving jobs are configured and functioning correctly.
5. Check for entries in the tRFC layer.
Call transaction SM58 with ‘User Name’ selecting for ‘*’ in order to find pending tRFC entries. You should make sure all tRFC entries have been processed before finally shutting down the XI 2.0 Integration Server.

4 Migration
60 April 2004
4.5 Post-Migration Activities
4.5.1 Application Systems
4.5.1.1 Asynchronous Exactly-Once Calls During the downtime of the Integration Server, when IS 2.0 is locked and IS 3.0 is not unlocked, yet, the transfer of messages in Quality-Of-Service Exactly-Once and Exactly-Once-In-Order from application systems to the Integration Server temporarily fails. There are at least two kinds of messages:
• IDoc (reaching the IS through IDoc Adapter)
• EO proxy calls from the latest application systems (SAP Web AS 6.20 and higher)
There are automatic retry mechanisms that ensure that most temporary connection failures will be repaired by attempting to reestablish the connection. However, retry mechanisms also contain timeouts (limited number of retries). This may lead to messages sent during downtime that are left in the state of error, especially if the IS is down for a long period of time.
Therefore, you must check that these messages are finally re-sent to the Integration Server. You can do this for both cases:
• For IDocs:
a. Call transaction SM58.
b. Check for failed messages (with transmission failure).
c. Restart failed messages.
• For proxy calls: ...
a. Call transaction SXMB_MONI.
b. Check for messages in error state.
c. Restart messages with errors.
4.5.1.2 Synchronous Best-Effort Calls Note that synchronous Best-Effort calls to the Integration Server may have failed during downtime as well. If synchronous calls are part of more complex scenarios on the appllcation system, these scenarios will have failed, too. We recommended that you check all applications on systems that send to XI for hanging processes.
4.5.2 Integration Server See the Integration Server runout checks above in the section Integration Server Runout Checks for IS 2.0 [page 57].
IS 3.0 requires no further interactive work.

5 References
April 2004 61
5 References
5.1 Documentation The following table lists the documentation that is mentioned in this documentation.
Title Where to find
Component Installation Guide: SAP Web Application Server 6.40 on <operating system>: <database>
You can find the upgrade documentation on SAP Service Marketplace at service.sap.com/ instguidesNW04 → Installation
Post-Installation Guide for SLD 6.40 You can find the upgrade documentation on SAP Service Marketplace at service.sap.com/ landscape → Media Center
Installation Guide – SAP System Landscape Directory
You can find the upgrade documentation on SAP Service Marketplace at service.sap.com/ landscape → Media Center
Configuration Guide – SAP Exchange Infrastructure 3.0
You can find the upgrade documentation on SAP Service Marketplace at service.sap.com/ instguidesNW04 → Fundamentals
5.2 SAP Notes The following table lists all SAP Notes mentioned in this documentation.
SAP Note Number Title
711752 Collection Note XI Upgrade / Migration Release 2.0/3.0
696034 Source Release for XI 2.0 – XI 3.0 Migration
719301 Migration of XI 2.0 Message Mapping
619519 CC-ADMIN: SAP_UONL, SAP_CUSX, SAP_APPX and SAP_PROF
669669 Update of the SAP Component Repository
696367 IDoc Adapter: Checklist IS2.0/IS3.0 Migration
670388 SAP Exchange Infrastructure 3.0: Patch Procedure