sap hana modeling guide - sap help portal · pdf filepublic sap hana platform 2.0 sps 01...
TRANSCRIPT

PUBLIC
SAP HANA Platform 2.0 SPS 01Document Version: 1.0 – 2017-04-12
SAP HANA Modeling GuideFor SAP HANA Studio
Content
1 SAP HANA Modeling Guide. . . . . . . . . . . . . . . . . . . . . . . . . . . . . . . . . . . . . . . . . . . . . . . . . . . . .7
2 Introduction to Modeling. . . . . . . . . . . . . . . . . . . . . . . . . . . . . . . . . . . . . . . . . . . . . . . . . . . . . . 8
3 SAP HANA Architecture. . . . . . . . . . . . . . . . . . . . . . . . . . . . . . . . . . . . . . . . . . . . . . . . . . . . . . . 93.1 SAP HANA In-Memory Database. . . . . . . . . . . . . . . . . . . . . . . . . . . . . . . . . . . . . . . . . . . . . . . . . . 9
Columnar Data Storage. . . . . . . . . . . . . . . . . . . . . . . . . . . . . . . . . . . . . . . . . . . . . . . . . . . . . . 9Parallel Processing. . . . . . . . . . . . . . . . . . . . . . . . . . . . . . . . . . . . . . . . . . . . . . . . . . . . . . . . .10Simplifying Applications. . . . . . . . . . . . . . . . . . . . . . . . . . . . . . . . . . . . . . . . . . . . . . . . . . . . . 11
3.2 SAP HANA Database Architecture. . . . . . . . . . . . . . . . . . . . . . . . . . . . . . . . . . . . . . . . . . . . . . . . 11
4 Getting Started. . . . . . . . . . . . . . . . . . . . . . . . . . . . . . . . . . . . . . . . . . . . . . . . . . . . . . . . . . . . .134.1 Add a System. . . . . . . . . . . . . . . . . . . . . . . . . . . . . . . . . . . . . . . . . . . . . . . . . . . . . . . . . . . . . . . 154.2 Create an Information View. . . . . . . . . . . . . . . . . . . . . . . . . . . . . . . . . . . . . . . . . . . . . . . . . . . . . 16
SAP HANA Studio. . . . . . . . . . . . . . . . . . . . . . . . . . . . . . . . . . . . . . . . . . . . . . . . . . . . . . . . . 16Attributes and Measures. . . . . . . . . . . . . . . . . . . . . . . . . . . . . . . . . . . . . . . . . . . . . . . . . . . . .21Required Permissions. . . . . . . . . . . . . . . . . . . . . . . . . . . . . . . . . . . . . . . . . . . . . . . . . . . . . . 23Supported Object Types. . . . . . . . . . . . . . . . . . . . . . . . . . . . . . . . . . . . . . . . . . . . . . . . . . . . 24
5 Importing Table Definitions and Data. . . . . . . . . . . . . . . . . . . . . . . . . . . . . . . . . . . . . . . . . . . .255.1 Import Table Definitions. . . . . . . . . . . . . . . . . . . . . . . . . . . . . . . . . . . . . . . . . . . . . . . . . . . . . . . 255.2 Load Data into Tables. . . . . . . . . . . . . . . . . . . . . . . . . . . . . . . . . . . . . . . . . . . . . . . . . . . . . . . . . 26
Suspend and Resume Data Load. . . . . . . . . . . . . . . . . . . . . . . . . . . . . . . . . . . . . . . . . . . . . . .28Upload Data from Flat Files. . . . . . . . . . . . . . . . . . . . . . . . . . . . . . . . . . . . . . . . . . . . . . . . . . .29
5.3 Copy Content Delivered by SAP. . . . . . . . . . . . . . . . . . . . . . . . . . . . . . . . . . . . . . . . . . . . . . . . . . 305.4 Map Authoring Schema to the Physical Schema. . . . . . . . . . . . . . . . . . . . . . . . . . . . . . . . . . . . . . 32
Maintain Package Specific Default Schemas. . . . . . . . . . . . . . . . . . . . . . . . . . . . . . . . . . . . . . 33Change Authoring Schemas. . . . . . . . . . . . . . . . . . . . . . . . . . . . . . . . . . . . . . . . . . . . . . . . . . 36
6 Setting Up the Modeling Environment. . . . . . . . . . . . . . . . . . . . . . . . . . . . . . . . . . . . . . . . . . . 386.1 Set Modeler Preferences. . . . . . . . . . . . . . . . . . . . . . . . . . . . . . . . . . . . . . . . . . . . . . . . . . . . . . .38
Modeler Preferences. . . . . . . . . . . . . . . . . . . . . . . . . . . . . . . . . . . . . . . . . . . . . . . . . . . . . . . 39Keyboard Shortcuts. . . . . . . . . . . . . . . . . . . . . . . . . . . . . . . . . . . . . . . . . . . . . . . . . . . . . . . 40
6.2 Apply Filters to Packages. . . . . . . . . . . . . . . . . . . . . . . . . . . . . . . . . . . . . . . . . . . . . . . . . . . . . . .416.3 Apply Filter to Objects. . . . . . . . . . . . . . . . . . . . . . . . . . . . . . . . . . . . . . . . . . . . . . . . . . . . . . . . .42
7 Creating Information Views and Previewing its Output. . . . . . . . . . . . . . . . . . . . . . . . . . . . . . 437.1 Generate Time Data. . . . . . . . . . . . . . . . . . . . . . . . . . . . . . . . . . . . . . . . . . . . . . . . . . . . . . . . . . 43
Supported Calendar Types to Generate Time Data. . . . . . . . . . . . . . . . . . . . . . . . . . . . . . . . . . 44
2 P U B L I CSAP HANA Modeling Guide
Content

Time Range to Generate Time Data. . . . . . . . . . . . . . . . . . . . . . . . . . . . . . . . . . . . . . . . . . . . . 457.2 Using Attribute Views. . . . . . . . . . . . . . . . . . . . . . . . . . . . . . . . . . . . . . . . . . . . . . . . . . . . . . . . . 45
Create Attribute Views. . . . . . . . . . . . . . . . . . . . . . . . . . . . . . . . . . . . . . . . . . . . . . . . . . . . . . 46Attribute View Types. . . . . . . . . . . . . . . . . . . . . . . . . . . . . . . . . . . . . . . . . . . . . . . . . . . . . . . 50
7.3 Using Analytic Views. . . . . . . . . . . . . . . . . . . . . . . . . . . . . . . . . . . . . . . . . . . . . . . . . . . . . . . . . .50Create Analytic Views. . . . . . . . . . . . . . . . . . . . . . . . . . . . . . . . . . . . . . . . . . . . . . . . . . . . . . 52
7.4 Using Calculation Views. . . . . . . . . . . . . . . . . . . . . . . . . . . . . . . . . . . . . . . . . . . . . . . . . . . . . . . 56Create Script-Based Calculation Views. . . . . . . . . . . . . . . . . . . . . . . . . . . . . . . . . . . . . . . . . . 57Create Graphical Calculation Views. . . . . . . . . . . . . . . . . . . . . . . . . . . . . . . . . . . . . . . . . . . . . 62Supported Data Categories for Information Views. . . . . . . . . . . . . . . . . . . . . . . . . . . . . . . . . . 72
7.5 Working With View Nodes. . . . . . . . . . . . . . . . . . . . . . . . . . . . . . . . . . . . . . . . . . . . . . . . . . . . . . 73Create Joins. . . . . . . . . . . . . . . . . . . . . . . . . . . . . . . . . . . . . . . . . . . . . . . . . . . . . . . . . . . . . 73Create Unions. . . . . . . . . . . . . . . . . . . . . . . . . . . . . . . . . . . . . . . . . . . . . . . . . . . . . . . . . . . . 87Create Rank Nodes. . . . . . . . . . . . . . . . . . . . . . . . . . . . . . . . . . . . . . . . . . . . . . . . . . . . . . . . 93Filter Output of Data Foundation Node. . . . . . . . . . . . . . . . . . . . . . . . . . . . . . . . . . . . . . . . . . 94Filter Output of Aggregation or Projection View Nodes. . . . . . . . . . . . . . . . . . . . . . . . . . . . . . . 95
7.6 Preview Information View Output. . . . . . . . . . . . . . . . . . . . . . . . . . . . . . . . . . . . . . . . . . . . . . . . . 97Data Preview Editor. . . . . . . . . . . . . . . . . . . . . . . . . . . . . . . . . . . . . . . . . . . . . . . . . . . . . . . . 99SQL Editor. . . . . . . . . . . . . . . . . . . . . . . . . . . . . . . . . . . . . . . . . . . . . . . . . . . . . . . . . . . . . 100
8 Working With Attributes and Measures. . . . . . . . . . . . . . . . . . . . . . . . . . . . . . . . . . . . . . . . . . 1018.1 Create Counters. . . . . . . . . . . . . . . . . . . . . . . . . . . . . . . . . . . . . . . . . . . . . . . . . . . . . . . . . . . . 101
Counter Properties. . . . . . . . . . . . . . . . . . . . . . . . . . . . . . . . . . . . . . . . . . . . . . . . . . . . . . . 102Example: Counters. . . . . . . . . . . . . . . . . . . . . . . . . . . . . . . . . . . . . . . . . . . . . . . . . . . . . . . .103
8.2 Create Calculated Columns. . . . . . . . . . . . . . . . . . . . . . . . . . . . . . . . . . . . . . . . . . . . . . . . . . . . 104Calculated Column Properties. . . . . . . . . . . . . . . . . . . . . . . . . . . . . . . . . . . . . . . . . . . . . . . .106Example: Calculated Measures. . . . . . . . . . . . . . . . . . . . . . . . . . . . . . . . . . . . . . . . . . . . . . . 106Example: Calculated Attributes. . . . . . . . . . . . . . . . . . . . . . . . . . . . . . . . . . . . . . . . . . . . . . . 107
8.3 Create Restricted Columns. . . . . . . . . . . . . . . . . . . . . . . . . . . . . . . . . . . . . . . . . . . . . . . . . . . . 109Restricted Column Properties. . . . . . . . . . . . . . . . . . . . . . . . . . . . . . . . . . . . . . . . . . . . . . . . 110Example: Restricted Columns. . . . . . . . . . . . . . . . . . . . . . . . . . . . . . . . . . . . . . . . . . . . . . . . .111
8.4 Assign Variables. . . . . . . . . . . . . . . . . . . . . . . . . . . . . . . . . . . . . . . . . . . . . . . . . . . . . . . . . . . . .111Supported Variable Types. . . . . . . . . . . . . . . . . . . . . . . . . . . . . . . . . . . . . . . . . . . . . . . . . . . 114Variable Properties. . . . . . . . . . . . . . . . . . . . . . . . . . . . . . . . . . . . . . . . . . . . . . . . . . . . . . . . 114
8.5 Assign Semantics. . . . . . . . . . . . . . . . . . . . . . . . . . . . . . . . . . . . . . . . . . . . . . . . . . . . . . . . . . . 114Extract and Copy Semantics From Underlying Data Sources. . . . . . . . . . . . . . . . . . . . . . . . . . 115Propagate Columns to Semantics. . . . . . . . . . . . . . . . . . . . . . . . . . . . . . . . . . . . . . . . . . . . . 116Supported Semantic Types for Measures. . . . . . . . . . . . . . . . . . . . . . . . . . . . . . . . . . . . . . . . 117Supported Semantic Types for Attributes. . . . . . . . . . . . . . . . . . . . . . . . . . . . . . . . . . . . . . . . 117
8.6 Create Input Parameters. . . . . . . . . . . . . . . . . . . . . . . . . . . . . . . . . . . . . . . . . . . . . . . . . . . . . . 118Map Input Parameters or Variables. . . . . . . . . . . . . . . . . . . . . . . . . . . . . . . . . . . . . . . . . . . . 122Input Parameters. . . . . . . . . . . . . . . . . . . . . . . . . . . . . . . . . . . . . . . . . . . . . . . . . . . . . . . . . 123
SAP HANA Modeling GuideContent P U B L I C 3
Input Parameter Properties. . . . . . . . . . . . . . . . . . . . . . . . . . . . . . . . . . . . . . . . . . . . . . . . . .1248.7 Using Hierarchies for Reporting. . . . . . . . . . . . . . . . . . . . . . . . . . . . . . . . . . . . . . . . . . . . . . . . . 125
Create Level Hierarchies. . . . . . . . . . . . . . . . . . . . . . . . . . . . . . . . . . . . . . . . . . . . . . . . . . . . 126Create Parent-Child Hierarchies. . . . . . . . . . . . . . . . . . . . . . . . . . . . . . . . . . . . . . . . . . . . . . 129Query Shared Hierarchies. . . . . . . . . . . . . . . . . . . . . . . . . . . . . . . . . . . . . . . . . . . . . . . . . . . 133Root Node Visibility. . . . . . . . . . . . . . . . . . . . . . . . . . . . . . . . . . . . . . . . . . . . . . . . . . . . . . . 134Orphan Nodes. . . . . . . . . . . . . . . . . . . . . . . . . . . . . . . . . . . . . . . . . . . . . . . . . . . . . . . . . . . 135
8.8 Using Currency and Unit of Measure Conversions. . . . . . . . . . . . . . . . . . . . . . . . . . . . . . . . . . . . 135Associate Measures with Currency. . . . . . . . . . . . . . . . . . . . . . . . . . . . . . . . . . . . . . . . . . . . 136Associate Measures with Unit of Measure. . . . . . . . . . . . . . . . . . . . . . . . . . . . . . . . . . . . . . . 140
8.9 Enable Attributes for Drilldown in Reporting Tools. . . . . . . . . . . . . . . . . . . . . . . . . . . . . . . . . . . . 142Supported Drilldown Types for Attributes. . . . . . . . . . . . . . . . . . . . . . . . . . . . . . . . . . . . . . . .143
8.10 Trace Columns in Information Views With Data Lineage. . . . . . . . . . . . . . . . . . . . . . . . . . . . . . . . 1438.11 Assign Value Help for Attributes. . . . . . . . . . . . . . . . . . . . . . . . . . . . . . . . . . . . . . . . . . . . . . . . . 1448.12 Add Descriptions to Attributes. . . . . . . . . . . . . . . . . . . . . . . . . . . . . . . . . . . . . . . . . . . . . . . . . . 1458.13 Group Related Measures. . . . . . . . . . . . . . . . . . . . . . . . . . . . . . . . . . . . . . . . . . . . . . . . . . . . . . 1468.14 Convert Attribute Values to Required Formats. . . . . . . . . . . . . . . . . . . . . . . . . . . . . . . . . . . . . . . 147
9 Working With Information View Properties. . . . . . . . . . . . . . . . . . . . . . . . . . . . . . . . . . . . . . .1499.1 Deprecate Information Views. . . . . . . . . . . . . . . . . . . . . . . . . . . . . . . . . . . . . . . . . . . . . . . . . . . 1499.2 Filter Data for Specific Clients. . . . . . . . . . . . . . . . . . . . . . . . . . . . . . . . . . . . . . . . . . . . . . . . . . 150
Assign Default Client . . . . . . . . . . . . . . . . . . . . . . . . . . . . . . . . . . . . . . . . . . . . . . . . . . . . . . 151Default Client Values. . . . . . . . . . . . . . . . . . . . . . . . . . . . . . . . . . . . . . . . . . . . . . . . . . . . . . . 151
9.3 Enable Information Views for Time Travel Queries. . . . . . . . . . . . . . . . . . . . . . . . . . . . . . . . . . . . 1529.4 Invalidate Cached Content. . . . . . . . . . . . . . . . . . . . . . . . . . . . . . . . . . . . . . . . . . . . . . . . . . . . . 153
Enable Support for Cache Invalidation. . . . . . . . . . . . . . . . . . . . . . . . . . . . . . . . . . . . . . . . . . 1549.5 Maintain Modeler Object Labels in Multiple Languages. . . . . . . . . . . . . . . . . . . . . . . . . . . . . . . . . 1549.6 Quick Reference: Information View Properties. . . . . . . . . . . . . . . . . . . . . . . . . . . . . . . . . . . . . . . 155
10 Defining Data Access Privileges. . . . . . . . . . . . . . . . . . . . . . . . . . . . . . . . . . . . . . . . . . . . . . . 16210.1 Create Classical XML-based Analytic Privileges. . . . . . . . . . . . . . . . . . . . . . . . . . . . . . . . . . . . . . 164
Analytic Privileges. . . . . . . . . . . . . . . . . . . . . . . . . . . . . . . . . . . . . . . . . . . . . . . . . . . . . . . . 166Structure of XML-Based Analytic Privileges. . . . . . . . . . . . . . . . . . . . . . . . . . . . . . . . . . . . . . 167Dynamic Value Filters in the Attribute Restriction of XML-Based Analytic Privileges. . . . . . . . . . 171Runtime Authorization Check of Analytic Privileges. . . . . . . . . . . . . . . . . . . . . . . . . . . . . . . . . 173Example: Using Analytic Privileges. . . . . . . . . . . . . . . . . . . . . . . . . . . . . . . . . . . . . . . . . . . . . 176Example: Create an XML-Based Analytic Privilege with Dynamic Value Filter. . . . . . . . . . . . . . . 178Supported Restriction Types in Analytic Privileges. . . . . . . . . . . . . . . . . . . . . . . . . . . . . . . . . 180
10.2 Create SQL Analytic Privileges. . . . . . . . . . . . . . . . . . . . . . . . . . . . . . . . . . . . . . . . . . . . . . . . . . 180Static SQL Analytic Privileges. . . . . . . . . . . . . . . . . . . . . . . . . . . . . . . . . . . . . . . . . . . . . . . . 182Dynamic SQL Analytic Privileges. . . . . . . . . . . . . . . . . . . . . . . . . . . . . . . . . . . . . . . . . . . . . . 183Structure of SQL-Based Analytic Privileges. . . . . . . . . . . . . . . . . . . . . . . . . . . . . . . . . . . . . . 183
4 P U B L I CSAP HANA Modeling Guide
Content
11 Migrating an Object Type to a Different Object Type. . . . . . . . . . . . . . . . . . . . . . . . . . . . . . . 18611.1 Convert Attribute Views and Analytic Views to Graphical Calculation Views. . . . . . . . . . . . . . . . . . 187
Migration Impact. . . . . . . . . . . . . . . . . . . . . . . . . . . . . . . . . . . . . . . . . . . . . . . . . . . . . . . . . 18911.2 Convert Script-based Calculation Views to Graphical Calculation Views. . . . . . . . . . . . . . . . . . . . . 19111.3 Convert Classical XML-based Analytic Privileges to SQL-based Analytic Privileges. . . . . . . . . . . . . 19311.4 Simulate a Migration Activity. . . . . . . . . . . . . . . . . . . . . . . . . . . . . . . . . . . . . . . . . . . . . . . . . . . 19511.5 Undo Migration Changes. . . . . . . . . . . . . . . . . . . . . . . . . . . . . . . . . . . . . . . . . . . . . . . . . . . . . . 19611.6 Activate Migrated Objects. . . . . . . . . . . . . . . . . . . . . . . . . . . . . . . . . . . . . . . . . . . . . . . . . . . . . 19711.7 Migration Log. . . . . . . . . . . . . . . . . . . . . . . . . . . . . . . . . . . . . . . . . . . . . . . . . . . . . . . . . . . . . . 19811.8 Best Practice: Migrating an Object Type to a Different Object Type. . . . . . . . . . . . . . . . . . . . . . . . 198
12 Additional Functionality for Information Views. . . . . . . . . . . . . . . . . . . . . . . . . . . . . . . . . . . 20012.1 Performance Analysis. . . . . . . . . . . . . . . . . . . . . . . . . . . . . . . . . . . . . . . . . . . . . . . . . . . . . . . .200
Open Information Views in Performance Analysis Mode. . . . . . . . . . . . . . . . . . . . . . . . . . . . . .201Debug Calculation Views. . . . . . . . . . . . . . . . . . . . . . . . . . . . . . . . . . . . . . . . . . . . . . . . . . . 203Validate Performance of Calculation Views. . . . . . . . . . . . . . . . . . . . . . . . . . . . . . . . . . . . . . 205
12.2 Maintain Comments for Modeler Objects. . . . . . . . . . . . . . . . . . . . . . . . . . . . . . . . . . . . . . . . . . 20612.3 Replacing Nodes and Data Sources. . . . . . . . . . . . . . . . . . . . . . . . . . . . . . . . . . . . . . . . . . . . . . 208
Replace a View Node in Calculation Views. . . . . . . . . . . . . . . . . . . . . . . . . . . . . . . . . . . . . . . 208Remove and Replace a View Node in Calculation Views. . . . . . . . . . . . . . . . . . . . . . . . . . . . . . 210Replace a Data Source in Calculation Views. . . . . . . . . . . . . . . . . . . . . . . . . . . . . . . . . . . . . . .211
12.4 Renaming Information Views and Columns. . . . . . . . . . . . . . . . . . . . . . . . . . . . . . . . . . . . . . . . . 211Rename Information Views. . . . . . . . . . . . . . . . . . . . . . . . . . . . . . . . . . . . . . . . . . . . . . . . . . 211Rename Columns in Information Views. . . . . . . . . . . . . . . . . . . . . . . . . . . . . . . . . . . . . . . . . 212
12.5 Using Functions in Expressions. . . . . . . . . . . . . . . . . . . . . . . . . . . . . . . . . . . . . . . . . . . . . . . . . 213Conversion Functions. . . . . . . . . . . . . . . . . . . . . . . . . . . . . . . . . . . . . . . . . . . . . . . . . . . . . . 214String Functions. . . . . . . . . . . . . . . . . . . . . . . . . . . . . . . . . . . . . . . . . . . . . . . . . . . . . . . . . .215Mathematical Functions. . . . . . . . . . . . . . . . . . . . . . . . . . . . . . . . . . . . . . . . . . . . . . . . . . . . 218Date Functions. . . . . . . . . . . . . . . . . . . . . . . . . . . . . . . . . . . . . . . . . . . . . . . . . . . . . . . . . . .219Miscellaneous Functions. . . . . . . . . . . . . . . . . . . . . . . . . . . . . . . . . . . . . . . . . . . . . . . . . . . .221Spatial Functions. . . . . . . . . . . . . . . . . . . . . . . . . . . . . . . . . . . . . . . . . . . . . . . . . . . . . . . . . 222Spatial Predicates. . . . . . . . . . . . . . . . . . . . . . . . . . . . . . . . . . . . . . . . . . . . . . . . . . . . . . . . 224
12.6 Trace Performance Issues. . . . . . . . . . . . . . . . . . . . . . . . . . . . . . . . . . . . . . . . . . . . . . . . . . . . . 22512.7 Maintain Search Attributes. . . . . . . . . . . . . . . . . . . . . . . . . . . . . . . . . . . . . . . . . . . . . . . . . . . . 22512.8 Configure Tracing. . . . . . . . . . . . . . . . . . . . . . . . . . . . . . . . . . . . . . . . . . . . . . . . . . . . . . . . . . . 22612.9 View the Job Log. . . . . . . . . . . . . . . . . . . . . . . . . . . . . . . . . . . . . . . . . . . . . . . . . . . . . . . . . . . .22712.10 Validate Models. . . . . . . . . . . . . . . . . . . . . . . . . . . . . . . . . . . . . . . . . . . . . . . . . . . . . . . . . . . . 22712.11 Manage Editor Layout. . . . . . . . . . . . . . . . . . . . . . . . . . . . . . . . . . . . . . . . . . . . . . . . . . . . . . . . 22712.12 Search For Tables, Models and Column Views. . . . . . . . . . . . . . . . . . . . . . . . . . . . . . . . . . . . . . . 229
13 Managing Objects in SAP HANA Systems. . . . . . . . . . . . . . . . . . . . . . . . . . . . . . . . . . . . . . . 23013.1 Activate Objects. . . . . . . . . . . . . . . . . . . . . . . . . . . . . . . . . . . . . . . . . . . . . . . . . . . . . . . . . . . . 230
SAP HANA Modeling GuideContent P U B L I C 5
13.2 Copy an Object. . . . . . . . . . . . . . . . . . . . . . . . . . . . . . . . . . . . . . . . . . . . . . . . . . . . . . . . . . . . .23313.3 Manage Information Views with Missing Objects. . . . . . . . . . . . . . . . . . . . . . . . . . . . . . . . . . . . . 23413.4 Check Object References. . . . . . . . . . . . . . . . . . . . . . . . . . . . . . . . . . . . . . . . . . . . . . . . . . . . . 23513.5 Generate Object Documentation. . . . . . . . . . . . . . . . . . . . . . . . . . . . . . . . . . . . . . . . . . . . . . . . 23613.6 Refactoring Objects. . . . . . . . . . . . . . . . . . . . . . . . . . . . . . . . . . . . . . . . . . . . . . . . . . . . . . . . . 237
Refactor Modeler Objects in SAP HANA Modeler Perspective. . . . . . . . . . . . . . . . . . . . . . . . . 237Refactor Modeler Objects in SAP HANA Development Perspective. . . . . . . . . . . . . . . . . . . . . .238
14 Working with SAP BW Models. . . . . . . . . . . . . . . . . . . . . . . . . . . . . . . . . . . . . . . . . . . . . . . . 24014.1 Import BW Objects. . . . . . . . . . . . . . . . . . . . . . . . . . . . . . . . . . . . . . . . . . . . . . . . . . . . . . . . . . 24014.2 BW InfoProviders as SAP HANA Models. . . . . . . . . . . . . . . . . . . . . . . . . . . . . . . . . . . . . . . . . . . 24214.3 BW Analysis Authorizations as Analytic Privileges. . . . . . . . . . . . . . . . . . . . . . . . . . . . . . . . . . . . 243
15 Working with Decision Tables . . . . . . . . . . . . . . . . . . . . . . . . . . . . . . . . . . . . . . . . . . . . . . . . 24615.1 Migrate Decision Tables. . . . . . . . . . . . . . . . . . . . . . . . . . . . . . . . . . . . . . . . . . . . . . . . . . . . . . 24615.2 Create Decision Tables. . . . . . . . . . . . . . . . . . . . . . . . . . . . . . . . . . . . . . . . . . . . . . . . . . . . . . . 247
Add Tables, a Table Type, or Information Views . . . . . . . . . . . . . . . . . . . . . . . . . . . . . . . . . . . 249Create Joins. . . . . . . . . . . . . . . . . . . . . . . . . . . . . . . . . . . . . . . . . . . . . . . . . . . . . . . . . . . . 251Add Attributes . . . . . . . . . . . . . . . . . . . . . . . . . . . . . . . . . . . . . . . . . . . . . . . . . . . . . . . . . . .251Add Conditions and Actions. . . . . . . . . . . . . . . . . . . . . . . . . . . . . . . . . . . . . . . . . . . . . . . . . 251Add Conditions and Action Values. . . . . . . . . . . . . . . . . . . . . . . . . . . . . . . . . . . . . . . . . . . . . 252Optional Step: Validate Decision Table. . . . . . . . . . . . . . . . . . . . . . . . . . . . . . . . . . . . . . . . . .254Activate Decision Table. . . . . . . . . . . . . . . . . . . . . . . . . . . . . . . . . . . . . . . . . . . . . . . . . . . . 255Execute Decision Table Procedure. . . . . . . . . . . . . . . . . . . . . . . . . . . . . . . . . . . . . . . . . . . . 256
15.3 Changing the Layout of a Decision Table. . . . . . . . . . . . . . . . . . . . . . . . . . . . . . . . . . . . . . . . . . . 25715.4 Use Parameters in a Decision Table. . . . . . . . . . . . . . . . . . . . . . . . . . . . . . . . . . . . . . . . . . . . . . 258
Supported Parameter Types. . . . . . . . . . . . . . . . . . . . . . . . . . . . . . . . . . . . . . . . . . . . . . . . .25815.5 Use Calculated Attributes in Decision Tables. . . . . . . . . . . . . . . . . . . . . . . . . . . . . . . . . . . . . . . .259
16 Managing Object Versions. . . . . . . . . . . . . . . . . . . . . . . . . . . . . . . . . . . . . . . . . . . . . . . . . . . 26116.1 Switch Ownership of Inactive Objects. . . . . . . . . . . . . . . . . . . . . . . . . . . . . . . . . . . . . . . . . . . . . 26116.2 Toggle Versions of Content Objects. . . . . . . . . . . . . . . . . . . . . . . . . . . . . . . . . . . . . . . . . . . . . . 26216.3 View Version History of Content Objects. . . . . . . . . . . . . . . . . . . . . . . . . . . . . . . . . . . . . . . . . . .263
6 P U B L I CSAP HANA Modeling Guide
Content

1 SAP HANA Modeling Guide
This guide explains how to create information models based on data that can be used for analytical purposes using the SAP HANA modeler. It includes graphical data modeling tools that allow you to create and edit data models and stored procedures.
SAP HANA Modeling GuideSAP HANA Modeling Guide P U B L I C 7

2 Introduction to Modeling
Modeling refers to an activity of refining or slicing data in database tables by creating views to depict a business scenario. The views can be used for reporting and decision making.
The modeling process involves the simulation of entities, such as customer, product, and sales, and the relationships between them. These related entities can be used in analytics applications such as SAP BusinessObjects Explorer and Microsoft Office. In SAP HANA, these views are known as information views.
Information views use various combinations of content data (that is, non-metadata) to model a business use case. Content data can be classified as follows:
● Attribute: Descriptive data, such as customer ID, city, and country.● Measure: Quantifiable data, such as revenue, quantity sold and counters.
You can model entities in SAP HANA using the Modeler perspective, which includes graphical data modeling tools that allow you to create and edit data models (content models) and stored procedures. With these tools, you can also create analytic privileges that govern the access to the models, and decision tables to model related business rules in a tabular format for decision automation.
You can create the following types of information views:
● Attribute Views● Analytic Views● Calculation Views
Who should read this guide
This guide is intended for a modeler, who is also known as a business analyst, data analyst or database expert, concerned with the definition of the model and schemas that will be used in SAP HANA, the specification and definition of tables, views, primary keys, indexes, partitions, and other aspects of the layout and interrelationship of the data in SAP HANA.
The data modeler is also concerned with designing and defining authorization and access control, through the specification of privileges, roles, and users.
The modeler uses the Administration Console and Modeler perspectives and tools of the SAP HANA studio.
8 P U B L I CSAP HANA Modeling GuideIntroduction to Modeling
3 SAP HANA Architecture
SAP HANA is an in-memory data platform that can be deployed on premise or on demand. At its core, it is an innovative in-memory relational database management system.
SAP HANA can make full use of the capabilities of current hardware to increase application performance, reduce cost of ownership, and enable new scenarios and applications that were not previously possible. With SAP HANA, you can build applications that integrate the business control logic and the database layer with unprecedented performance. As a developer, one of the key questions is how you can minimize data movements. The more you can do directly on the data in memory next to the CPUs, the better the application will perform. This is the key to development on the SAP HANA data platform.
3.1 SAP HANA In-Memory Database
SAP HANA runs on multi-core CPUs with fast communication between processor cores, and containing terabytes of main memory. With SAP HANA, all data is available in main memory, which avoids the performance penalty of disk I/O. Either disk or solid-state drives are still required for permanent persistency in the event of a power failure or some other catastrophe. This does not slow down performance, however, because the required backup operations to disk can take place asynchronously as a background task.
3.1.1 Columnar Data Storage
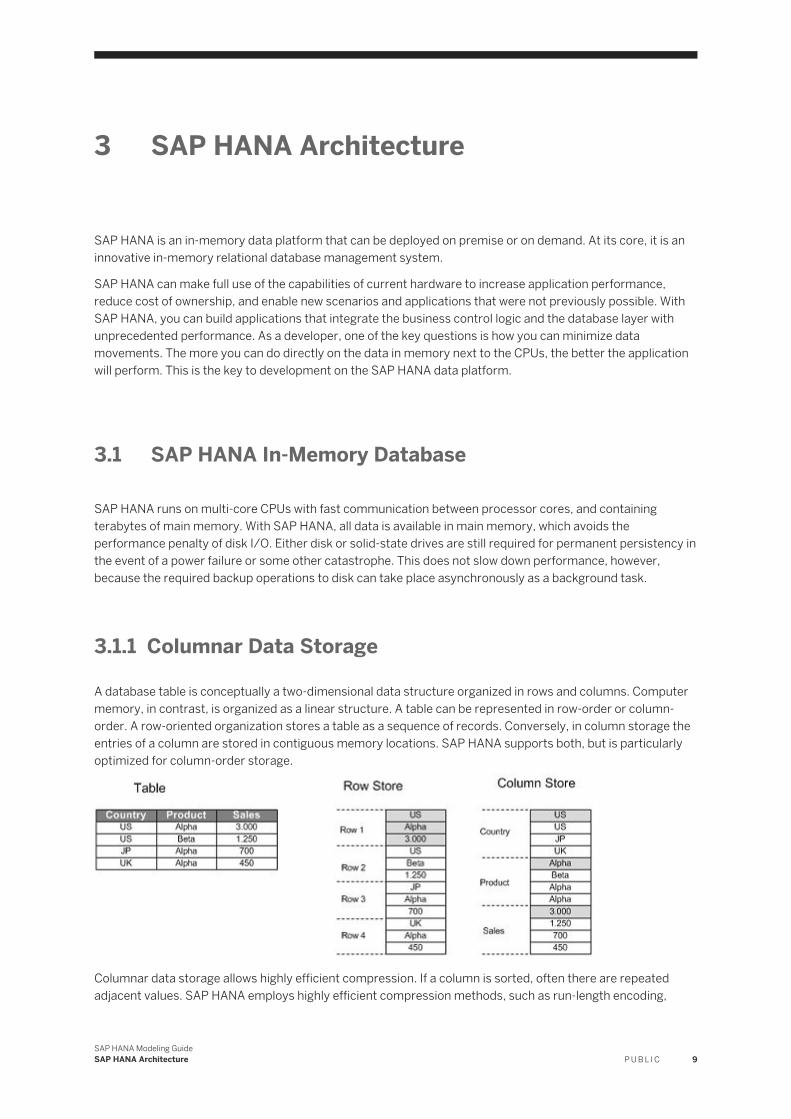
A database table is conceptually a two-dimensional data structure organized in rows and columns. Computer memory, in contrast, is organized as a linear structure. A table can be represented in row-order or column-order. A row-oriented organization stores a table as a sequence of records. Conversely, in column storage the entries of a column are stored in contiguous memory locations. SAP HANA supports both, but is particularly optimized for column-order storage.
Columnar data storage allows highly efficient compression. If a column is sorted, often there are repeated adjacent values. SAP HANA employs highly efficient compression methods, such as run-length encoding,
SAP HANA Modeling GuideSAP HANA Architecture P U B L I C 9
cluster coding and dictionary coding. With dictionary encoding, columns are stored as sequences of bit-coded integers. That means that a check for equality can be executed on the integers; for example, during scans or join operations. This is much faster than comparing, for example, string values.
Columnar storage, in many cases, eliminates the need for additional index structures. Storing data in columns is functionally similar to having a built-in index for each column. The column scanning speed of the in-memory column store and the compression mechanisms – especially dictionary compression – allow read operations with very high performance. In many cases, it is not required to have additional indexes. Eliminating additional indexes reduces complexity and eliminates the effort of defining and maintaining metadata.
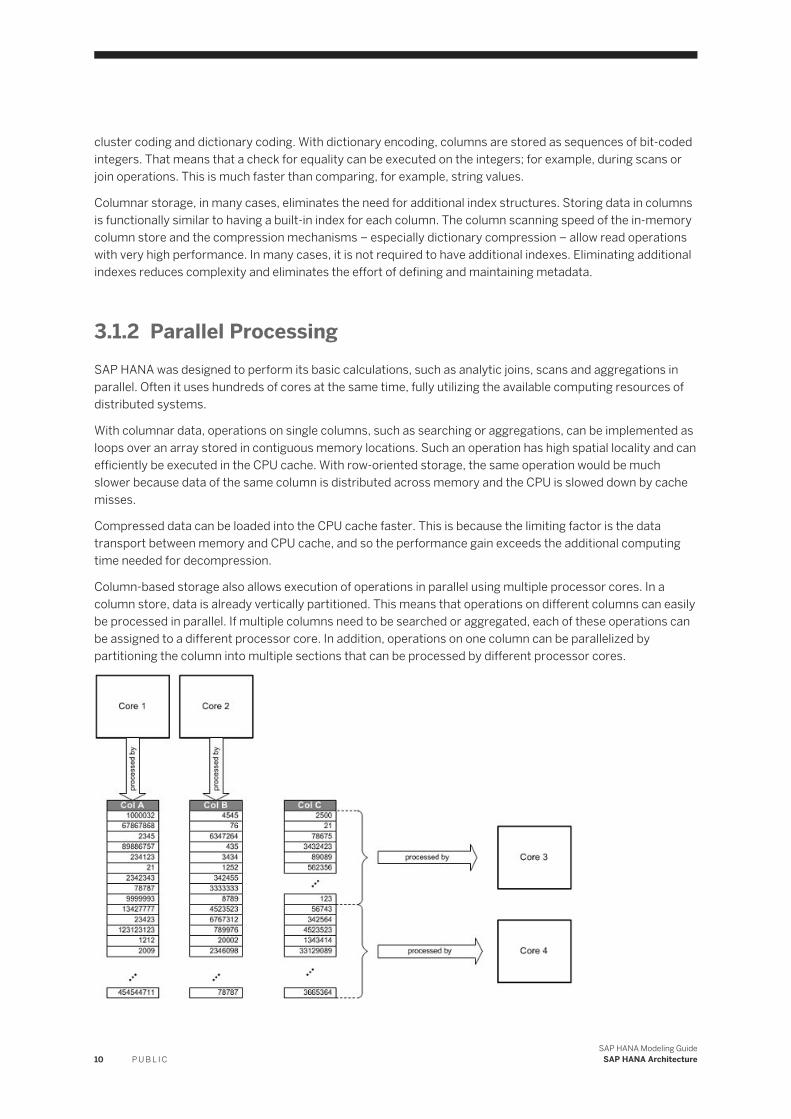
3.1.2 Parallel ProcessingSAP HANA was designed to perform its basic calculations, such as analytic joins, scans and aggregations in parallel. Often it uses hundreds of cores at the same time, fully utilizing the available computing resources of distributed systems.
With columnar data, operations on single columns, such as searching or aggregations, can be implemented as loops over an array stored in contiguous memory locations. Such an operation has high spatial locality and can efficiently be executed in the CPU cache. With row-oriented storage, the same operation would be much slower because data of the same column is distributed across memory and the CPU is slowed down by cache misses.
Compressed data can be loaded into the CPU cache faster. This is because the limiting factor is the data transport between memory and CPU cache, and so the performance gain exceeds the additional computing time needed for decompression.
Column-based storage also allows execution of operations in parallel using multiple processor cores. In a column store, data is already vertically partitioned. This means that operations on different columns can easily be processed in parallel. If multiple columns need to be searched or aggregated, each of these operations can be assigned to a different processor core. In addition, operations on one column can be parallelized by partitioning the column into multiple sections that can be processed by different processor cores.
10 P U B L I CSAP HANA Modeling Guide
SAP HANA Architecture
3.1.3 Simplifying Applications
Traditional business applications often use materialized aggregates to increase performance. These aggregates are computed and stored either after each write operation on the aggregated data, or at scheduled times. Read operations read the materialized aggregates instead of computing them each time they are required.
With a scanning speed of several gigabytes per millisecond, SAP HANA makes it possible to calculate aggregates on large amounts of data on-the-fly with high performance. This eliminates the need for materialized aggregates in many cases, simplifying data models, and correspondingly the application logic. Furthermore, with on-the fly aggregation, the aggregate values are always up-to-date unlike materialized aggregates that may be updated only at scheduled times.
3.2 SAP HANA Database Architecture
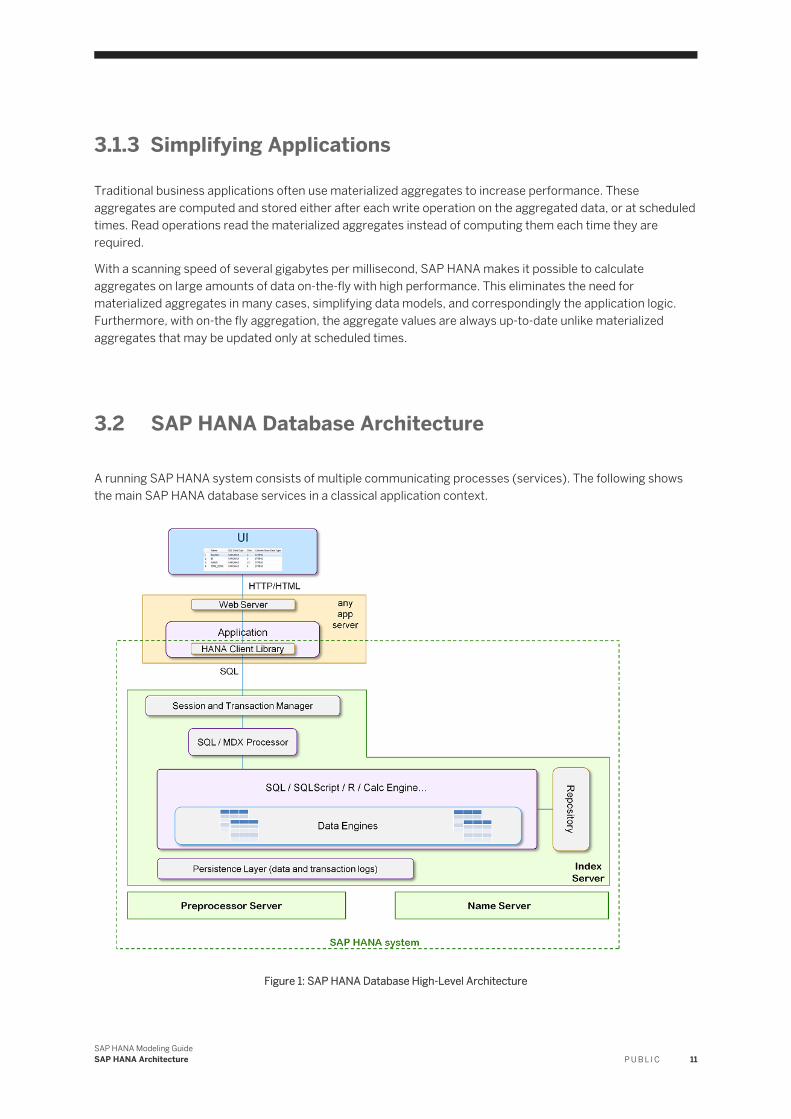
A running SAP HANA system consists of multiple communicating processes (services). The following shows the main SAP HANA database services in a classical application context.
Figure 1: SAP HANA Database High-Level Architecture
SAP HANA Modeling GuideSAP HANA Architecture P U B L I C 11

Such traditional database applications use well-defined interfaces (for example, ODBC and JDBC) to communicate with the database management system functioning as a data source, usually over a network connection. Often running in the context of an application server, these traditional applications use Structured Query Language (SQL) to manage and query the data stored in the database.
The main SAP HANA database management component is known as the index server, which contains the actual data stores and the engines for processing the data. The index server processes incoming SQL or MDX statements in the context of authenticated sessions and transactions.
The SAP HANA database has its own scripting language named SQLScript. SQLScript embeds data-intensive application logic into the database. Classical applications tend to offload only very limited functionality into the database using SQL. This results in extensive copying of data from and to the database, and in programs that slowly iterate over huge data loops and are hard to optimize and parallelize. SQLScript is based on side-effect free functions that operate on tables using SQL queries for set processing, and is therefore parallelizable over multiple processors.
In addition to SQLScript, SAP HANA supports a framework for the installation of specialized and optimized functional libraries, which are tightly integrated with different data engines of the index server. Two of these functional libraries are the SAP HANA Business Function Library (BFL) and the SAP HANA Predictive Analytics Library (PAL). BFL and PAL functions can be called directly from within SQLScript.
SAP HANA also supports the development of programs written in the R language.
SQL and SQLScript are implemented using a common infrastructure of built-in data engine functions that have access to various meta definitions, such as definitions of relational tables, columns, views, and indexes, and definitions of SQLScript procedures. This metadata is stored in one common catalog.
The database persistence layer is responsible for durability and atomicity of transactions. It ensures that the database can be restored to the most recent committed state after a restart and that transactions are either completely executed or completely undone.
The index server uses the preprocessor server for analyzing text data and extracting the information on which the text search capabilities are based. The name server owns the information about the topology of SAP HANA system. In a distributed system, the name server knows where the components are running and which data is located on which server.
12 P U B L I CSAP HANA Modeling Guide
SAP HANA Architecture

4 Getting Started
The below flow diagram shows the modeling process in SAP HANA modeler.
Before performing any modeling activities in SAP HANA modeler:
● You have installed all the SAP HANA components that are necessary to enable data replication.● You have installed the SAP HANA studio.● You have a live SAP HANA system to connect.● You have a user on the SAP HANA server that has at least the following roles or their equivalent:
○ MODELING: This is used as a template role that can be used to create users to work on content.○ CONTENT_ADMIN: This is used as a template role for users who are responsible for managing
repository content at a higher level, and for managing teams who develop and test the content. Users with this role can:○ Maintain delivery units○ Import and export content○ Create, update, and delete active native and imported packages and objects in these packages○ Grant these privileges to other users
The below tables lists the tasks you can perform in the SAP HANA Modeler perspective
SAP HANA Modeling GuideGetting Started P U B L I C 13

Table 1:
Task Meaning SAP HANA Modeler perspective
SAP HANA Development perspective
Import metadata Create tables by importing the table definitions from the source systems using the Data Services infrastructure.
For more information, see Import Table Definitions [page 25].
You can also create tables from scratch using the SAP HANA Development perspective.
Load data Load data into the table definitions imported from the source system using the Load Controller, SAP Sybase Replication Server or SAP Landscape Transformation, and from flat files.
For more information, see Load Data into Tables [page 26].
You can also provision data into the table definitions in the SAP HANA Development perspective.
Create packages Logically group objects together in a structured way.
Logically group objects together in a structured way.
Create information views Model various slices of the data stored in the SAP HANA database. Information views are often used for analytical use cases, such as operational data mart scenarios or multidimensional reporting on revenue, profitability, and so on.
For more information, see Creating Information Views and Previewing its Output [page 43]
You can also create information views in the SAP HANA Development perspective.
Create procedures Create procedures using SQLScript for implementing a complex logic that cannot be achieved using other objects.
Create analytic privileges Control which data that individual users sharing the same data foundation or view can see.
For more information, see Defining Data Access Privileges [page 162].
Import SAP BW objects Import SAP BW objects into SAP HANA, and expose them as information views.
For more information, see Import BW Objects [page 240].
Create decision tables Create a tabular representation of related rules using conditions and actions.
For more information, see Working with Decision Tables [page 246].
Import and export objects Import and export the content objects from and to the client and server location.
14 P U B L I CSAP HANA Modeling Guide
Getting Started
4.1 Add a System
For creating modeling objects, you have to first add a system in your SAP HANA studio for establishing a connection between your SAP HANA studio and your SAP HANA system.
Procedure
1. Launch SAP HANA studio.2. In the context menu of SAP HANA Systems view, select Add System.3. In the System window, specify the host name, instance number, and a description for the SAP HANA
system that you want to add.4. Select Next.5. Enter a user name and password.6. Select Finish.
Results
NoteAfter you have completed working on an instance, it is recommended to disconnect instances of all SAP HANA systems within your SAP HANA studio. You can disconnect a specific SAP HANA instance by executing the below steps:
1. In SAP HANA studio, choose an SAP HANA system instance.2. In the context menu of the system, choose Log Off.
You can reconnect to an instance by selecting Log on from context menu.
SAP HANA Modeling GuideGetting Started P U B L I C 15

4.2 Create an Information View
There are three types of information views: attribute view, analytic view, and calculation view. All three types of information views are non-materialized views. This creates agility through the rapid deployment of changes as there is no latency when the underlying data changes.
Procedure
1. Open the SAP HANA Modeler perspective.2. To set the view parameter, execute the steps described in Creating Information Views [page 43]
The view editor opens where you can define the input elements of the view and its output structure.3. To design a view that you can use for analytical purposes, see Creating Information Views [page 43]
4.2.1 SAP HANA Studio
The SAP HANA studio is an Eclipse-based development and administration tool for working with SAP HANA, including creating projects, creating development objects, and deploying them to SAP HANA. As a developer, you may want to also perform some administrative tasks, such as configuring and monitoring the system.
There are several key Eclipse perspectives that you will use while developing:
● Modeler: Used for creating various types of views and analytical privileges.● SAP HANA Development: Used for programming applications, that is, creating development objects that
access or update the data models, such as server-side JavaScript or HTML files.● Debug: Used to debug code, such as server-side JavaScript or SQLScript.● Administration: Used to monitor the system and change settings.
To open a perspective, go to Window Open Perspective , or select on the toolbar.
16 P U B L I CSAP HANA Modeling Guide
Getting Started
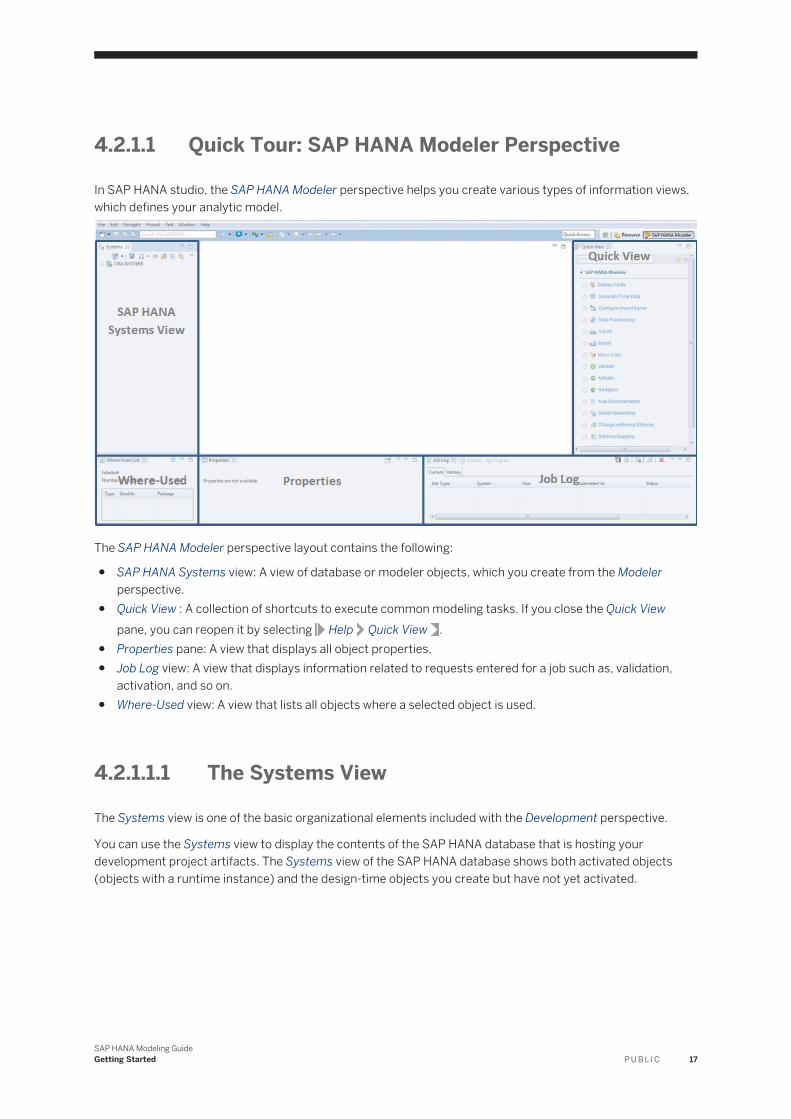
4.2.1.1 Quick Tour: SAP HANA Modeler Perspective
In SAP HANA studio, the SAP HANA Modeler perspective helps you create various types of information views, which defines your analytic model.
The SAP HANA Modeler perspective layout contains the following:
● SAP HANA Systems view: A view of database or modeler objects, which you create from the Modeler perspective.
● Quick View : A collection of shortcuts to execute common modeling tasks. If you close the Quick View pane, you can reopen it by selecting Help Quick View .
● Properties pane: A view that displays all object properties.● Job Log view: A view that displays information related to requests entered for a job such as, validation,
activation, and so on.● Where-Used view: A view that lists all objects where a selected object is used.
4.2.1.1.1 The Systems View
The Systems view is one of the basic organizational elements included with the Development perspective.
You can use the Systems view to display the contents of the SAP HANA database that is hosting your development project artifacts. The Systems view of the SAP HANA database shows both activated objects (objects with a runtime instance) and the design-time objects you create but have not yet activated.
SAP HANA Modeling GuideGetting Started P U B L I C 17

The Systems view is divided into the following main sections:
● SecurityContains the roles and users defined for this system.
● CatalogContains the database objects that have been activated, for example, from design-time objects or from SQL DDL statements. The objects are divided into schemas, which is a way to organize activated database objects.
● ProvisioningContains administrator tools for configuring smart data access, data provisioning, and remote data sources
● ContentContains design-time database objects, both those that have been activated and those not activated. If you want to see other development objects, use the Repositories view.
18 P U B L I CSAP HANA Modeling Guide
Getting Started
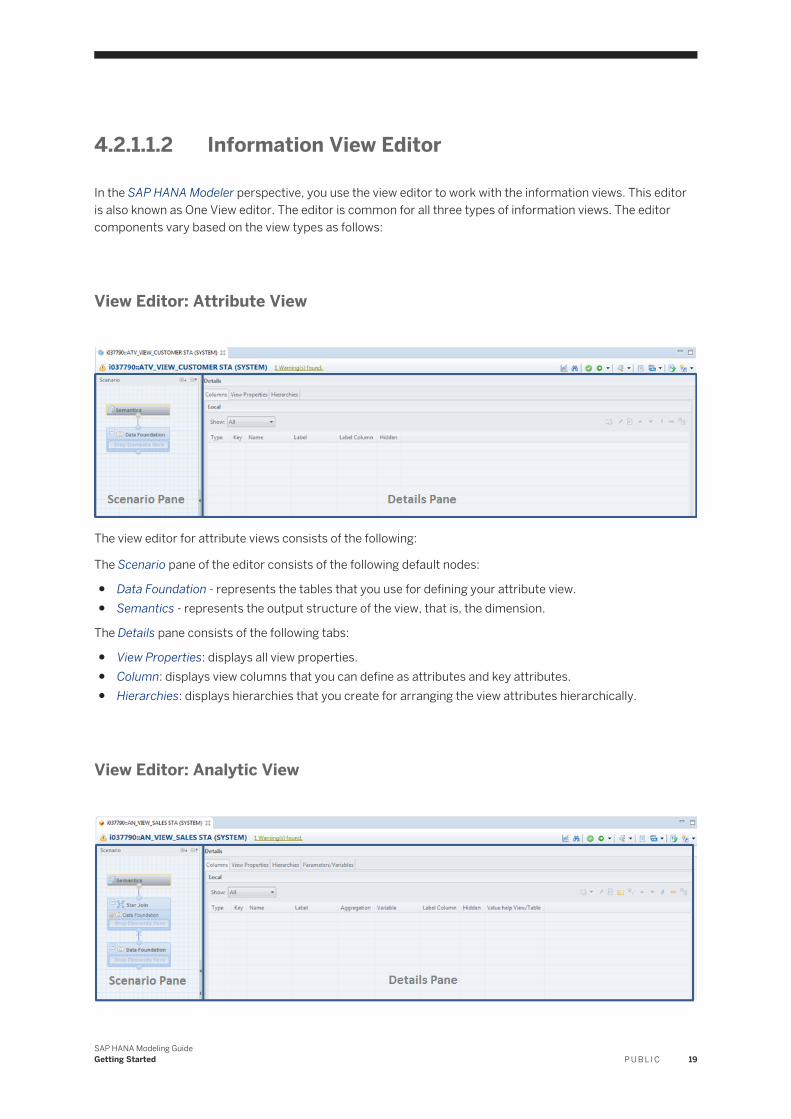
4.2.1.1.2 Information View Editor
In the SAP HANA Modeler perspective, you use the view editor to work with the information views. This editor is also known as One View editor. The editor is common for all three types of information views. The editor components vary based on the view types as follows:
View Editor: Attribute View
The view editor for attribute views consists of the following:
The Scenario pane of the editor consists of the following default nodes:
● Data Foundation - represents the tables that you use for defining your attribute view.● Semantics - represents the output structure of the view, that is, the dimension.
The Details pane consists of the following tabs:
● View Properties: displays all view properties.● Column: displays view columns that you can define as attributes and key attributes.● Hierarchies: displays hierarchies that you create for arranging the view attributes hierarchically.
View Editor: Analytic View
SAP HANA Modeling GuideGetting Started P U B L I C 19
The view editor for analytic views consists of the following:
Scenario pane of the editor consists of the following default nodes:
● Data Foundation - represents the tables that you use for defining the fact table and related tables of analytic view.
● Star Join - represents the relationship between the selected table fields (fact table) and attribute views, which you use to create a star schema.
● Semantics - represents the output structure of the analytic view.
The Details pane consists of the following tabs:
● View Properties: displays all view properties● Column: contains local columns of the analytic view, which you can define as attributes and measures, and
the shared attributes from the underlying attribute views.● Hierarchies: contains hierarchies from the underlying attribute views● Parameters/Variables: contains variables and input parameters, which you use to filter attribute data
based values you provide at runtime or parameterize information views respectively.
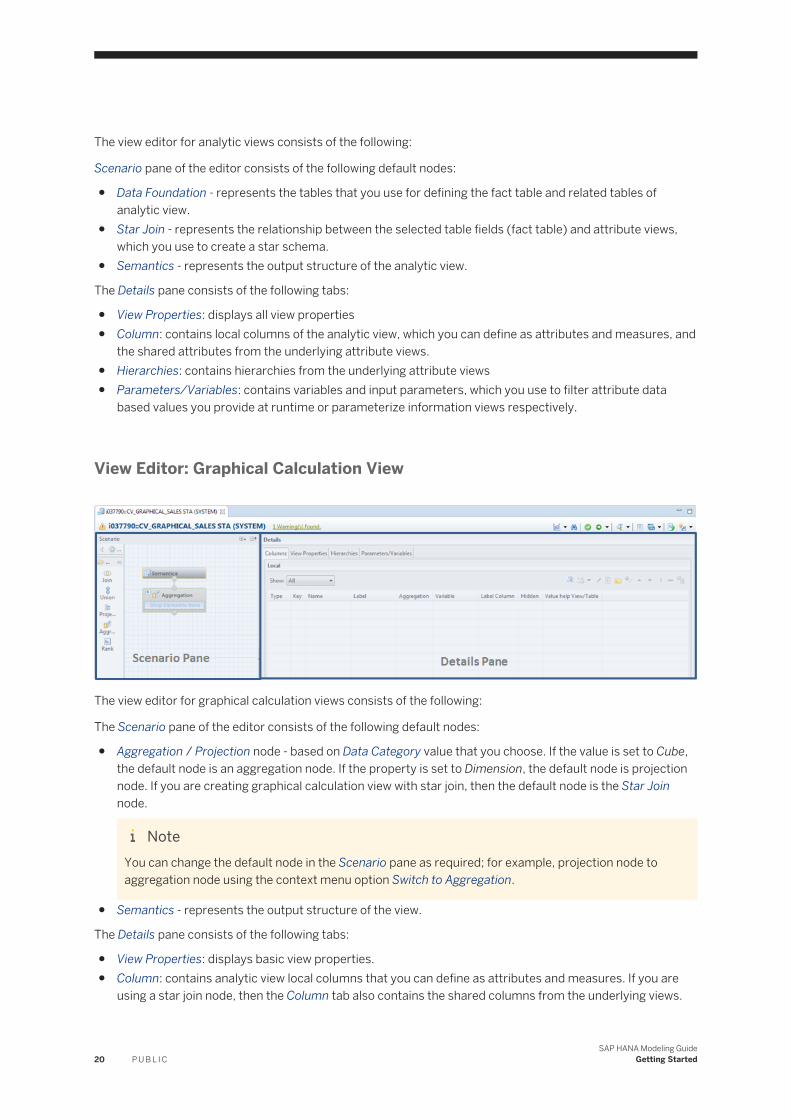
View Editor: Graphical Calculation View
The view editor for graphical calculation views consists of the following:
The Scenario pane of the editor consists of the following default nodes:
● Aggregation / Projection node - based on Data Category value that you choose. If the value is set to Cube, the default node is an aggregation node. If the property is set to Dimension, the default node is projection node. If you are creating graphical calculation view with star join, then the default node is the Star Join node.
NoteYou can change the default node in the Scenario pane as required; for example, projection node to aggregation node using the context menu option Switch to Aggregation.
● Semantics - represents the output structure of the view.
The Details pane consists of the following tabs:
● View Properties: displays basic view properties.● Column: contains analytic view local columns that you can define as attributes and measures. If you are
using a star join node, then the Column tab also contains the shared columns from the underlying views.
20 P U B L I CSAP HANA Modeling Guide
Getting Started
● Hierarchies: contains the hierarchies from the underlying dimension calculation views and the hierarchies defined on the calculation view.
● Parameters/Variables: contains variables and input parameters, which you use to filter attribute data based values you provide at runtime or parameterize information views respectively.
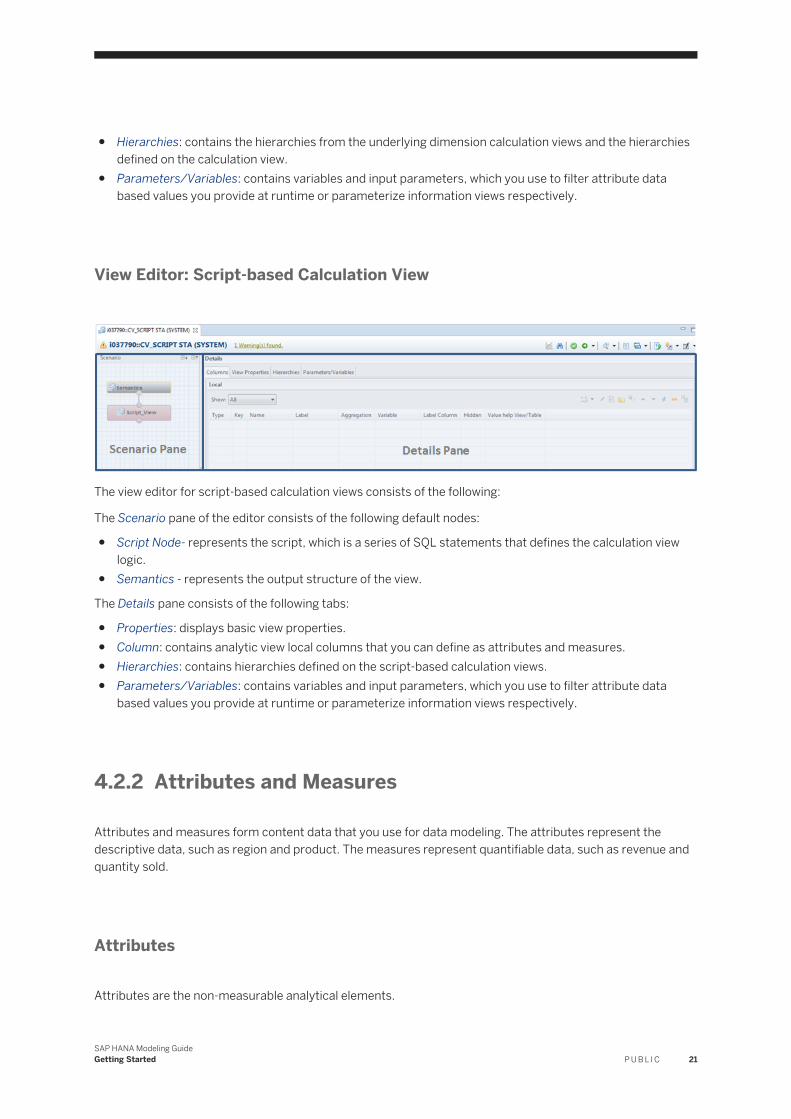
View Editor: Script-based Calculation View
The view editor for script-based calculation views consists of the following:
The Scenario pane of the editor consists of the following default nodes:
● Script Node- represents the script, which is a series of SQL statements that defines the calculation view logic.
● Semantics - represents the output structure of the view.
The Details pane consists of the following tabs:
● Properties: displays basic view properties.● Column: contains analytic view local columns that you can define as attributes and measures.● Hierarchies: contains hierarchies defined on the script-based calculation views.● Parameters/Variables: contains variables and input parameters, which you use to filter attribute data
based values you provide at runtime or parameterize information views respectively.
4.2.2 Attributes and Measures
Attributes and measures form content data that you use for data modeling. The attributes represent the descriptive data, such as region and product. The measures represent quantifiable data, such as revenue and quantity sold.
Attributes
Attributes are the non-measurable analytical elements.
SAP HANA Modeling GuideGetting Started P U B L I C 21
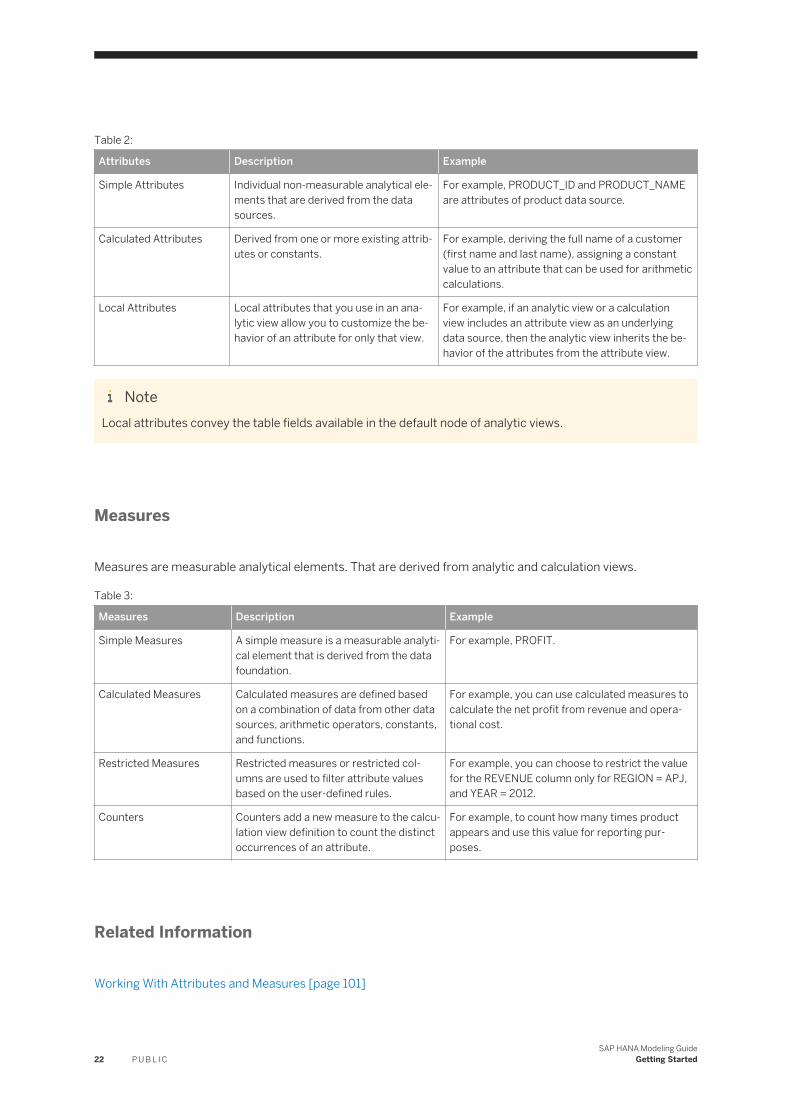
Table 2:
Attributes Description Example
Simple Attributes Individual non-measurable analytical elements that are derived from the data sources.
For example, PRODUCT_ID and PRODUCT_NAME are attributes of product data source.
Calculated Attributes Derived from one or more existing attributes or constants.
For example, deriving the full name of a customer (first name and last name), assigning a constant value to an attribute that can be used for arithmetic calculations.
Local Attributes Local attributes that you use in an analytic view allow you to customize the behavior of an attribute for only that view.
For example, if an analytic view or a calculation view includes an attribute view as an underlying data source, then the analytic view inherits the behavior of the attributes from the attribute view.
NoteLocal attributes convey the table fields available in the default node of analytic views.
Measures
Measures are measurable analytical elements. That are derived from analytic and calculation views.
Table 3:
Measures Description Example
Simple Measures A simple measure is a measurable analytical element that is derived from the data foundation.
For example, PROFIT.
Calculated Measures Calculated measures are defined based on a combination of data from other data sources, arithmetic operators, constants, and functions.
For example, you can use calculated measures to calculate the net profit from revenue and operational cost.
Restricted Measures Restricted measures or restricted columns are used to filter attribute values based on the user-defined rules.
For example, you can choose to restrict the value for the REVENUE column only for REGION = APJ, and YEAR = 2012.
Counters Counters add a new measure to the calculation view definition to count the distinct occurrences of an attribute.
For example, to count how many times product appears and use this value for reporting purposes.
Related Information
Working With Attributes and Measures [page 101]
22 P U B L I CSAP HANA Modeling Guide
Getting Started
4.2.3 Required Permissions
You need a minimum set of permissions to perform the modeling activities such as, create, activate, and data preview on views and analytic privileges.
● Object Privileges1. _SYS_BI - SELECT privilege2. _SYS_BIC - SELECT privilege
NoteIf you are using front end tools such as, SAP Lumira or Advanced Analysis for Office, see SAP Note 1907696 to grant SQL privileges.
3. REPOSITORY_REST (SYS) - EXECUTE privilege4. <schema_where_tables_reside> - SELECT privilege
NoteThe above permissions need not be Grantable to other users and roles.
● Analytic Privileges1. _SYS_BI_CP_ALL
If you want to grant users with full data access to all information views in your SAP HANA system, then assign the analytic privilege _SYS_BI_CP_ALL to the users, for example, in development systems. If you want to grant only restricted data access to information views, for example, in production systems, then create an analytic privilege with filters by including these information views as secured models, and assign this analytic privilege to the user role. For more information, see Defining Data Access Privileges.
● Package Privileges1. Root Package - REPO.MAINTAIN_NATIVE_PACKAGES privilege.
If you want grant users with access to all packages, then for the root package select privilege, REPO.MAINTAIN_NATIVE_PACKAGES and assign it to the users, for example, in development systems. It is otherwise recommended to assign a more suitable package privilege.
2. <package_used_for_content_objects> - REPO.READ, REPO.EDIT_NATIVE_OBJECTS & REPO.ACTIVATE_NATIVE_OBJECTS
NoteThe above permissions need not be Grantable to other users and roles.
● In the _SYS_REPO user, grant select on schema <schema_where_tables_reside> with Grantable to Others.
● For creation of delivery units, you need the REPO.MAINTAIN_DELIVERY_UNITS system privilege● For export & import of delivery units, use the REPO.IMPORT, REPO.EXPORT system privileges● For working in foreign workspaces, use the REPO.WORK_IN_FOREIGN_WORKSPACES system privileges
SAP HANA Modeling GuideGetting Started P U B L I C 23
4.2.4 Supported Object Types
In SAP HANA Modeler perspective, the SAP HANA Systems view lists both the active and inactive objects available in default workspace.
SAP HANA Modeler perspective supports the below object types:
● Attribute Views● Analytic Views● Calculation Views● Procedures● Analytic Privileges● Decision Tables● Business Scenarios
The object types not listed above are not completely supported in SAP HANA Modeler perspective. This means that, in SAP HANA Modeler perspective, you can open those objects, which are not listed above, in simple text editors only. You use the respective SAP HANA perspectives to open those objects.
24 P U B L I CSAP HANA Modeling Guide
Getting Started
5 Importing Table Definitions and Data
This section discusses on various options available for importing table definitions and data from the SAP HANA Modeler perspective.
5.1 Import Table Definitions
You need to import the table definitions as a prerequisite for creation of information views.
Prerequisites
You have configured the SAP HANA modeler for importing metadata using the Data Services infrastructure.
1. In the Quick View tab page, choose Configure Import Server.2. Select a system where you want to perform this operation.3. Enter the IP address of the server from which you want to import data.4. Enter the repository name.5. Enter the ODBC data source, and choose OK.
Context
Based on your requirements, use one of the following approaches:
● Mass Import: To import all table definitions from a source system. For example, you can use this approach if this is a first import from the given source system.
● Selective Import: To import only selected table definitions from a source system. For example, you can use this approach if there are only few table definitions added or modified in the source system after your last import.
Procedure
1. If you want to import all table definitions from a source system, do the following:a. In the File menu, choose Import.b. Expand the SAP HANA Content node.c. Choose Mass Import of Metadata, and choose Next.
SAP HANA Modeling GuideImporting Table Definitions and Data P U B L I C 25
d. Select the target system where you want to import all the table definitions, and choose Next.e. In the Connection Details dialog, enter the operating system username and password of the target
system.f. Select the required source system, and choose Finish.
NoteIf the required system is not available from the dropdown list, you need to contact your administrator.
2. If you only want to import selective table definitions from a source system, do the following:a. In the File menu, choose Import.b. Expand the SAP HANA Content node.c. Choose Selective Import of Metadata, and choose Next.d. Select the target system where you want to import the table definitions, and choose Next.e. Select the required source system.
NoteIf the required system is not available from the dropdown list, you need to add the new source system using Manage Connections. For more information about installing and using Manage Connections functionality, refer to 1942414 .
f. In the Type of Objects to Import field, select the required type, and choose Next.g. Add the required objects (tables or extractors) that you want to import.
NoteIf you want to add dependent tables of a selected table, select the required table in the Target pane, and choose Add Dependent Tables in the context menu.
h. Select the schema into which you want to import the metadata.i. If you selected object type as extractor, select the package into which you want to place the
corresponding objects.j. Choose Next, then review and confirm the import by choosing Finish.
5.2 Load Data into Tables
Before you begin creating information models, you have to import all necessary table definitions into the SAP HANA database and load them with data.
Prerequisites
● If you are using the Load Controller or Sybase Replication Server infrastructure, make sure that you have imported all table definitions into the SAP HANA database. For more information, see Import Table Definitions [page 25].
26 P U B L I CSAP HANA Modeling Guide
Importing Table Definitions and Data
● If you are using the SLT component, the source systems, the target schema, are configured by the administrator during the installation.
Context
Use this procedure to load data into your table definitions. Depending on your requirements, you can perform the following:
● Initial Load - to load all data from a source SAP ERP system into the SAP HANA database by using Load Controller or SAP Landscape Transformation (SLT). This is applicable when you are loading data from the source for the first time.
● Data Replication - to keep the data of selected tables in the SAP HANA database up-to-date with the source system tables by using SAP Sybase Replication Server or SAP Landscape Transformation (SLT).
Procedure
1. In the Quick View pane, choose Data Provisioning.2. Select a system where you want to perform this operation.3. If you are using SLT-based replication, choose one of the source systems from the Select Source System
dropdown list.
NoteSelect Source System dropdown list contains all the ERP and non-ERP source systems, which are connected to the SLT system.
4. If you are using the SLT-based replication, select the target schema, which is configured for SAP ERP or non-SAP systems in the Target Schema Configured dropdown list.
5. Choose Load for initial load or Replicate for data replication.6. Select the required tables to load or replicate data in any of the following ways:
○ Search for the required tables.1. Select the table from the list, and choose Add.2. Select the Export selected tables checkbox if you want to save the selected list of tables locally for
future reference, and specify the target location.○ Load the list of tables from a local file as follows:
1. Choose Load from file.2. Select the file that contains the required list of tables.
NoteThe supported file type is .csv.
7. If you are using the load controller infrastructure, choose Next and enter the operating system user name and password.
SAP HANA Modeling GuideImporting Table Definitions and Data P U B L I C 27

8. Choose Finish.
Next Steps
Over a period of time the SAP HANA status tables grow very large with data load action status entries, which do not need to be maintained. You can choose to delete these entries from the SAP HANA status tables using the delete button in the Data Load Management view. Once you choose this option in the follow-on dialog, you can select which entries you want to delete in the status tables:
1. Choose Operation for which you want to delete the status table entries such as load, replicate, or create.2. In the Entry Type dropdown list, select the required option.
NoteTo delete all the entries from the status tables for a particular operation, choose All, otherwise Specific.
3. If the value for Entry Type is Specific, in the Value dropdown list, select the tables for which you want to delete the entries.
4. If you want to delete the entries for a specific time period, select it using the From and To calendar options.5. Choose Delete.
5.2.1 Suspend and Resume Data Load
When loading data into tables using SLT- based replication, you can choose to stop data replication temporarily for a selected list of tables, and later resume data load for these.
Procedure
1. In the Quick View pane, choose Data Provisioning.2. Select the source system for which you want to suspend or resume data load.3. Choose Suspend or Resume .4. Select the tables, and choose Add.5. Choose Finish.
28 P U B L I CSAP HANA Modeling Guide
Importing Table Definitions and Data
5.2.2 Upload Data from Flat Files
You can upload data from flat files in a client file system to the SAP HANA database.
Context
● If the table schema corresponding to the file to be uploaded already exists in the SAP HANA database, the new data records are appended to the existing table.
● If the required table for loading the data does not exist in the SAP HANA database, create a table structure based on the flat file.
The application suggests the column names and data types for the new tables, and allows you to edit them. There is a 1:1 mapping between the file and table columns in the new table. The application does not allow you to overwrite any columns or change the data type of existing data. The supported file types are: .csv, .xls, and .xlsx.
NoteBy default, the application considers up to 2000 records in the file to determine the data types of columns in the new table. You can modify this value by choosing Window Preferences SAP HANA ModelerData from Local File Decision Maker Count
Procedure
1. In the File menu, choose Import.2. In the Select an import source section, expand the SAP HANA content node.3. Select Data from Local File, and choose Next.4. In the Target System section, select the target system to which you want to import the data using the flat
file, and choose Next.5. In the Define Import Properties page, browse and select the file containing the data you want to load.
a. If you have selected a CSV file, select a delimiter.
NoteA delimiter is used to determine columns and pick the correct data from them. In a csv file, the accepted delimiters are ',', ';' and ':'.
b. If you have selected an .xls or .xlsx file, select a worksheet.6. Select the New option if you want to load the data into a new table.
a. Choose Next.b. On the Manage Table Definition and Data Mapping screen, map the source and target columns.
SAP HANA Modeling GuideImporting Table Definitions and Data P U B L I C 29
Note○ Only 1:1 column mapping is supported. You can also edit the table definition by changing the
data types, renaming columns, adding or deleting the columns, and so on.○ You can choose to map the source and target columns using the Auto Map option. If you
choose the one to one option, then the first column from the source is mapped to the first column of the target. If you choose the Map by name option, the source and target columns with the same name are mapped.
7. Select the Existing option if you want to append the data to an existing table.a. Choose Next.b. On the Manage Table Definition and Data Mapping screen, map the source and target columns.
8. Perform the following steps if you want to provide a constant value for a column at the target:a. Right-click the column. From the context menu, choose Make As Constant.b. In the Constant dialog box, enter a value, and choose OK.
NoteYou can set a column to constant if it is not mapped to a source column.
9. Enter a value in the Default Value column to provide a default value for a column at the target. Choose Finish.
5.3 Copy Content Delivered by SAP
Copy standard content delivered by SAP or by an SAP partner to a local package in the SAP HANA system, and use this content for modeling information views. For example, copy content from the package sap.ecc.fin to the package customer.ecc.fin.
Prerequisites
You have the following privileges:
● REPO.READ for the source package.● REPO.MAINTAIN_NATIVE_PACKAGES and REPO.EDIT_NATIVE_OBJECTS for the target root package.
Context
Copying the content shipped by SAP or an SAP partner to a local package in your SAP HANA system, helps avoid overwriting any changes to the existing content during the subsequent import. You can also copy modeler objects that you have created from one local package to another local package in your SAP HANA system.
30 P U B L I CSAP HANA Modeling Guide
Importing Table Definitions and Data

NoteIf you are copying dependent objects for script-based calculation views or procedures to a local package, manually change the script or procedure to adjust references in impacted objects after copying.
Procedure
1. Launch SAP HANA studio.2. In the Quick View pane, choose Mass Copy.3. Select a system where you want to perform this operation.4. Choose Next.5. Select a source package and a target package.
Modeler creates a mapping for the source package and the target package.
NoteYou can copy the content delivered by SAP to a target root package (or to sub packages within the root package), and maintain package mappings accordingly.
6. If you want to create more than one source-target package mapping, then on the next row, choose the source package and target package as required.
7. Store mappings.Modeler allows you to store mappings information in either the Global Catalog Store (M_CONTENT_MAPPING table) or in the Local Workspace.a. In the Store Package Mappings section, select the required option.
NoteIf you are launching this dialog for the first time, modeler fetches the package mapping information from the Global Catalog Store.
8. Choose Next9. Copying selected modeler objects.
If you want to copy only selected modeler objects from the source package to the target package,
a. Expand the source package.b. Select the modeler objects to copy.c. Choose Add.
10. Convert analytic views to calculation views in the target package.
If you are copying analytic views from the source package to the target package, you can convert them to calculation views before copying it to the target package,
a. In the Copy as Calculation View(s) section, select the checkbox.11. Choose Next to view summary of the copy process.12. Override existing objects in target.
SAP HANA Modeling GuideImporting Table Definitions and Data P U B L I C 31
Modeler does not copy an object in the source package if it already exists in the target package. If you want to override the existing object in the target package,
a. Select the object in the summary page.13. Choose Finish to confirm content copy.
NoteIf you are copying objects to the target package without copying its dependent objects, the copied object has references to the dependent objects in the source package.
Next Steps
After copying modeler objects to the target package, you need to manually activate the copied objects.
5.4 Map Authoring Schema to the Physical Schema
Schema mapping is essential when the physical schema in the target system is not the same as the physical schema in the source system. For example, in a transport scenario, to access and deploy transported objects, you need to map the authoring schema to the physical schema.
Context
Content object definitions are stored in the repository and contain references to the physical database schemas. When you copy the content objects to a different system, for example, from an SAP system to a customer system or between customer systems, the object definition still refers to the physical database schemas at the source. Modeler uses the schema mapping definitions in the configuration table “_SYS_BI”.”M_SCHEMA_MAPPING” to resolve conflicts.
Schema mappings are applicable only to references from the repository objects to the catalog objects. It is not recommended to use them for repository to repository references.
NoteYou need to map the references of script-based calculation views and procedures manually by changing the script, and by checking if the tables are qualified with the schema. If the tables are not qualified, the default schema of the view is used, and the schema mapping is also applied to the default schema.
You can map several authoring schemas to the same physical schema. For example, content objects delivered by SAP refer to different authoring schemas, whereas in the customer system, all these authoring schemas are mapped to a single physical schema where the tables are replicated.
32 P U B L I CSAP HANA Modeling Guide
Importing Table Definitions and Data
NoteIf a system does not have schema mapping, the authoring schema is filled 1:1 from the physical schema; otherwise, the default schema cannot be changed.
Procedure
1. In the Quick View pane, choose Schema Mapping.2. Select a system where you want to perform this operation.3. Choose Add.4. Enter the authoring schema and physical schema that need to be mapped.5. Choose OK.
NoteIf you are using an SAP HANA system with multitenant database containers and performing cross database access between tenants, then you need also provide the authoring DB name and the physical DB name in the schema mapping definition. Use the table, SYS_BI.M_DATABASE_SCHEMA_MAPPING to maintain schema mapping definitions.
5.4.1 Maintain Package Specific Default Schemas
For each package in your SAP HANA system, you can define and maintain a default authoring schema, which is specific to that particular package. You maintain all package specific default schema definitions in the table, M_PACKAGE_DEFAULT_SCHEMA (Schema: _SYS_BI).
Procedure
1. In the context menu of your SAP HANA system, choose SAP HANA Modeler Maintain package specific default schema .
2. Choose Add.3. Select Package Name and Default Schema.
The Package Column dropdown list displays all packages available in this SAP HANA system and the Default Schema dropdown list displays all authoring schemas with definitions available in the _SYS_BI.M_SCHEMA_MAPPING table.
4. Choose Finish.
SAP HANA Modeling GuideImporting Table Definitions and Data P U B L I C 33
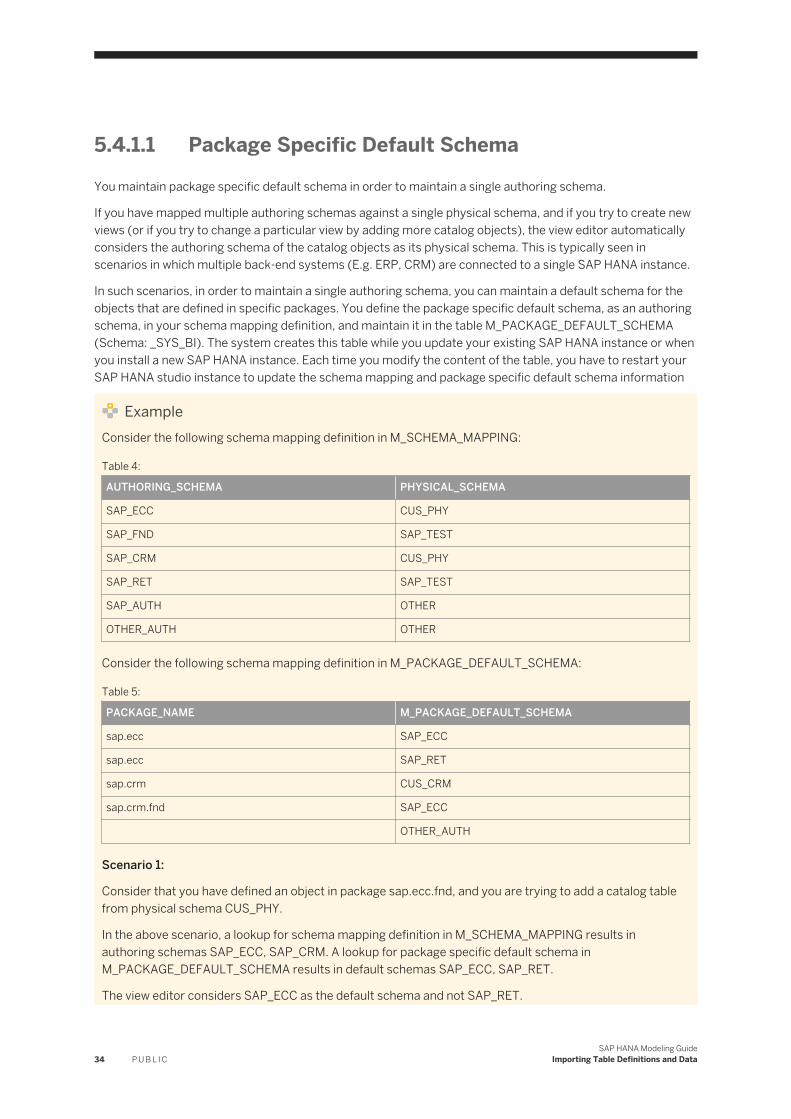
5.4.1.1 Package Specific Default Schema
You maintain package specific default schema in order to maintain a single authoring schema.
If you have mapped multiple authoring schemas against a single physical schema, and if you try to create new views (or if you try to change a particular view by adding more catalog objects), the view editor automatically considers the authoring schema of the catalog objects as its physical schema. This is typically seen in scenarios in which multiple back-end systems (E.g. ERP, CRM) are connected to a single SAP HANA instance.
In such scenarios, in order to maintain a single authoring schema, you can maintain a default schema for the objects that are defined in specific packages. You define the package specific default schema, as an authoring schema, in your schema mapping definition, and maintain it in the table M_PACKAGE_DEFAULT_SCHEMA (Schema: _SYS_BI). The system creates this table while you update your existing SAP HANA instance or when you install a new SAP HANA instance. Each time you modify the content of the table, you have to restart your SAP HANA studio instance to update the schema mapping and package specific default schema information
ExampleConsider the following schema mapping definition in M_SCHEMA_MAPPING:
Table 4:
AUTHORING_SCHEMA PHYSICAL_SCHEMA
SAP_ECC CUS_PHY
SAP_FND SAP_TEST
SAP_CRM CUS_PHY
SAP_RET SAP_TEST
SAP_AUTH OTHER
OTHER_AUTH OTHER
Consider the following schema mapping definition in M_PACKAGE_DEFAULT_SCHEMA:
Table 5:
PACKAGE_NAME M_PACKAGE_DEFAULT_SCHEMA
sap.ecc SAP_ECC
sap.ecc SAP_RET
sap.crm CUS_CRM
sap.crm.fnd SAP_ECC
OTHER_AUTH
Scenario 1:
Consider that you have defined an object in package sap.ecc.fnd, and you are trying to add a catalog table from physical schema CUS_PHY.
In the above scenario, a lookup for schema mapping definition in M_SCHEMA_MAPPING results in authoring schemas SAP_ECC, SAP_CRM. A lookup for package specific default schema in M_PACKAGE_DEFAULT_SCHEMA results in default schemas SAP_ECC, SAP_RET.
The view editor considers SAP_ECC as the default schema and not SAP_RET.
34 P U B L I CSAP HANA Modeling Guide
Importing Table Definitions and Data
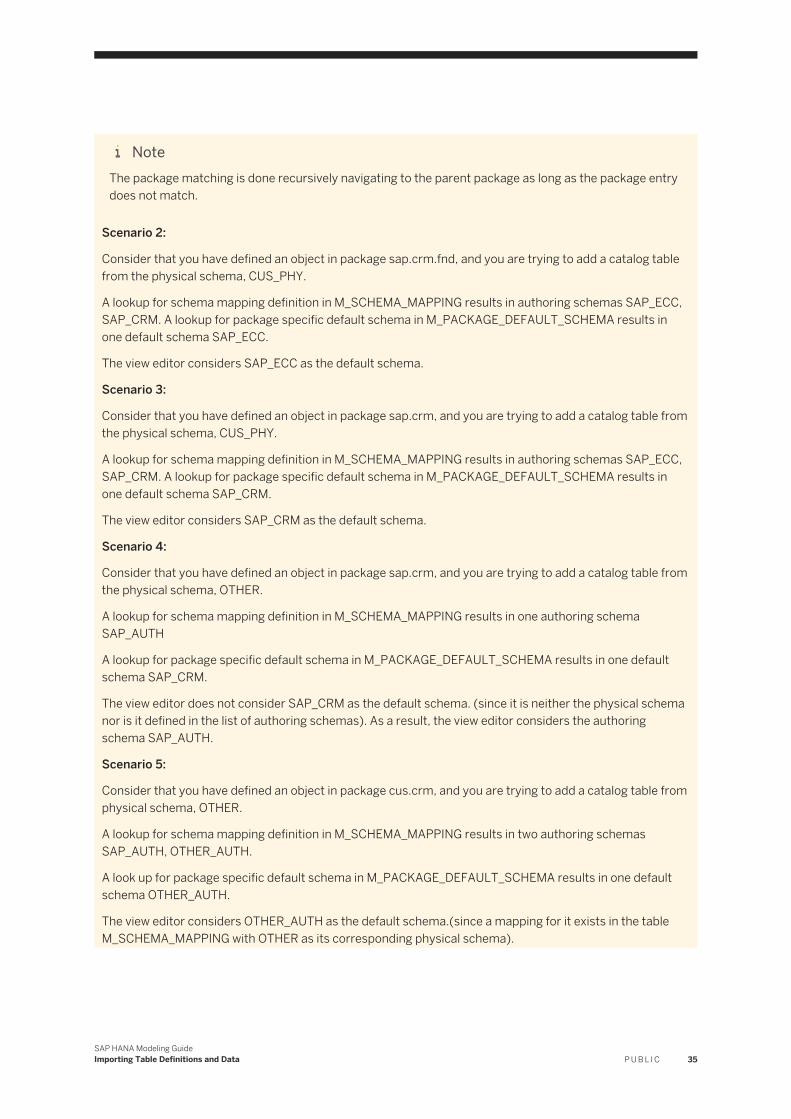
NoteThe package matching is done recursively navigating to the parent package as long as the package entry does not match.
Scenario 2:
Consider that you have defined an object in package sap.crm.fnd, and you are trying to add a catalog table from the physical schema, CUS_PHY.
A lookup for schema mapping definition in M_SCHEMA_MAPPING results in authoring schemas SAP_ECC, SAP_CRM. A lookup for package specific default schema in M_PACKAGE_DEFAULT_SCHEMA results in one default schema SAP_ECC.
The view editor considers SAP_ECC as the default schema.
Scenario 3:
Consider that you have defined an object in package sap.crm, and you are trying to add a catalog table from the physical schema, CUS_PHY.
A lookup for schema mapping definition in M_SCHEMA_MAPPING results in authoring schemas SAP_ECC, SAP_CRM. A lookup for package specific default schema in M_PACKAGE_DEFAULT_SCHEMA results in one default schema SAP_CRM.
The view editor considers SAP_CRM as the default schema.
Scenario 4:
Consider that you have defined an object in package sap.crm, and you are trying to add a catalog table from the physical schema, OTHER.
A lookup for schema mapping definition in M_SCHEMA_MAPPING results in one authoring schema SAP_AUTH
A lookup for package specific default schema in M_PACKAGE_DEFAULT_SCHEMA results in one default schema SAP_CRM.
The view editor does not consider SAP_CRM as the default schema. (since it is neither the physical schema nor is it defined in the list of authoring schemas). As a result, the view editor considers the authoring schema SAP_AUTH.
Scenario 5:
Consider that you have defined an object in package cus.crm, and you are trying to add a catalog table from physical schema, OTHER.
A lookup for schema mapping definition in M_SCHEMA_MAPPING results in two authoring schemas SAP_AUTH, OTHER_AUTH.
A look up for package specific default schema in M_PACKAGE_DEFAULT_SCHEMA results in one default schema OTHER_AUTH.
The view editor considers OTHER_AUTH as the default schema.(since a mapping for it exists in the table M_SCHEMA_MAPPING with OTHER as its corresponding physical schema).
SAP HANA Modeling GuideImporting Table Definitions and Data P U B L I C 35
Scenario 6:
Consider that there are no default schemas found in M_PACKAGE_DEFAULT_SCHEMA (matching default schemas for package or parent packages, or an entry with <empty> package name). In such scenarios, view editor considers the authoring schemas matched to the corresponding physical schema from the table M_SCHEMA_MAPPING.
5.4.2 Change Authoring Schemas
You can change the authoring schema of the catalog objects referenced in a model, and also change the authoring schema of elements of the object.
Context
Each information model points to catalog objects such as, tables from various schemas. In the case of a transport scenario, the physical schema where these catalog objects are placed may vary when the models are transported from one system to another. To work with the transported models, the physical schema information is separated with the information models using schema mapping. With correct schema mapping at the target system, you can work on the transported models without modifying them.
As all the information models save authoring schema details, if required, the modeler or content administrator can change the existing authoring schema of one or more information models to a new one.
Procedure
1. In the Quick View pane, choose Change Authoring Schema.2. Select a system where you want to perform this operation.3. In the Change Authoring Schema dialog, select the objects for which you want to change the authoring
schema.
NoteIf you change the authoring schema of an analytic view where underlying objects such as tables also point to the same authoring schema, the authoring schema for all these elements also changes. The default schema (containing currency related tables) for the selected analytic view also changes.
4. Select or enter the authoring schema that you want to change for the objects selected above in the Source dropdown list.
5. Select or enter the authoring schema that you want to associate with the objects selected above in the Target dropdown list and choose OK.
NoteIf you enter an authoring schema as a target that does not exist in the schema mapping defined for the current system instance, then the specified authoring schema name is set in the information models
36 P U B L I CSAP HANA Modeling Guide
Importing Table Definitions and Data
irrespective of whether a schema mapping exists. In this case, you need to map the authoring schema to the physical schema.
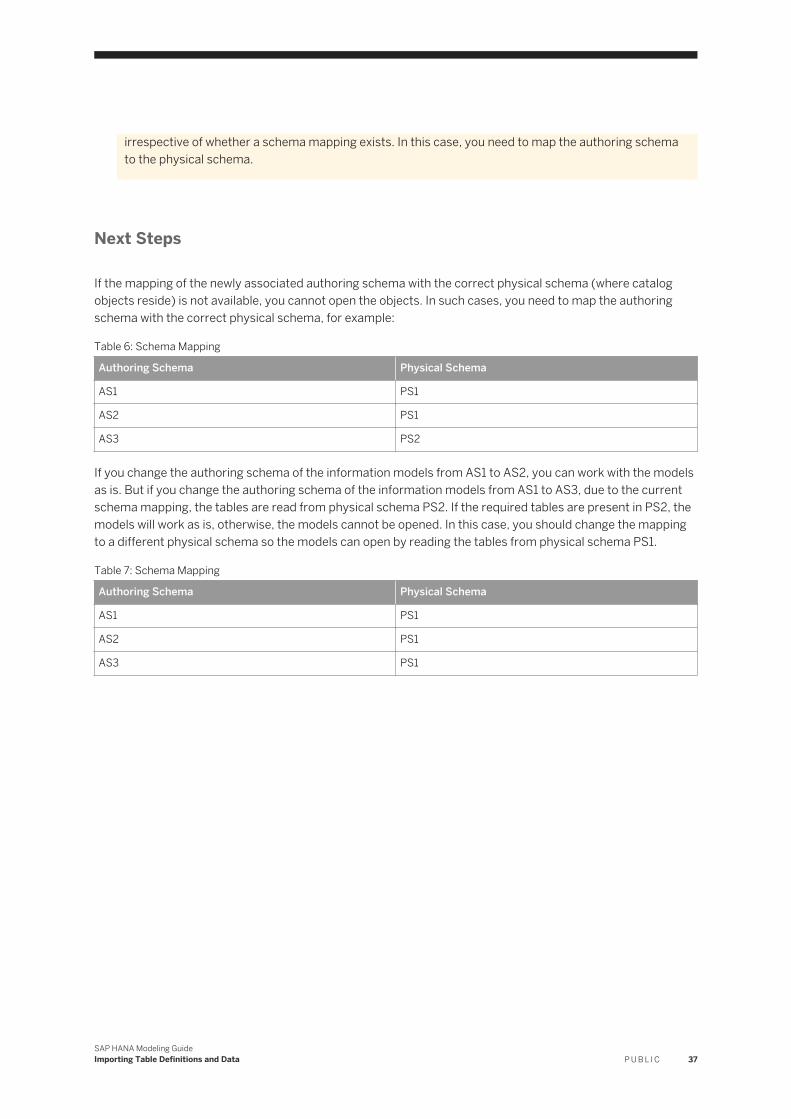
Next Steps
If the mapping of the newly associated authoring schema with the correct physical schema (where catalog objects reside) is not available, you cannot open the objects. In such cases, you need to map the authoring schema with the correct physical schema, for example:
Table 6: Schema Mapping
Authoring Schema Physical Schema
AS1 PS1
AS2 PS1
AS3 PS2
If you change the authoring schema of the information models from AS1 to AS2, you can work with the models as is. But if you change the authoring schema of the information models from AS1 to AS3, due to the current schema mapping, the tables are read from physical schema PS2. If the required tables are present in PS2, the models will work as is, otherwise, the models cannot be opened. In this case, you should change the mapping to a different physical schema so the models can open by reading the tables from physical schema PS1.
Table 7: Schema Mapping
Authoring Schema Physical Schema
AS1 PS1
AS2 PS1
AS3 PS1
SAP HANA Modeling GuideImporting Table Definitions and Data P U B L I C 37
6 Setting Up the Modeling Environment
This section describes how you can change the default settings and define certain preferences before you begin working with the SAP HANA modeling environment.
Related Information
Setting Up the Modeling Environment [page 38]Set Modeler Preferences [page 38]Apply Filters to Packages [page 41]Apply Filter to Objects [page 42]
6.1 Set Modeler Preferences
Launch the modeler preferences screen to view and manage the default settings that the system must use each time you logon to the SAP HANA Modeler perspective.
Procedure
1. Choose Window Preferences SAP HANA Modeler .2. Choose the type of preference you want to specify.3. Choose Apply and OK.
NoteChoose Restore Defaults to restore your earlier preferences.
Related Information
Modeler Preferences [page 39]Keyboard Shortcuts [page 40]
38 P U B L I CSAP HANA Modeling Guide
Setting Up the Modeling Environment
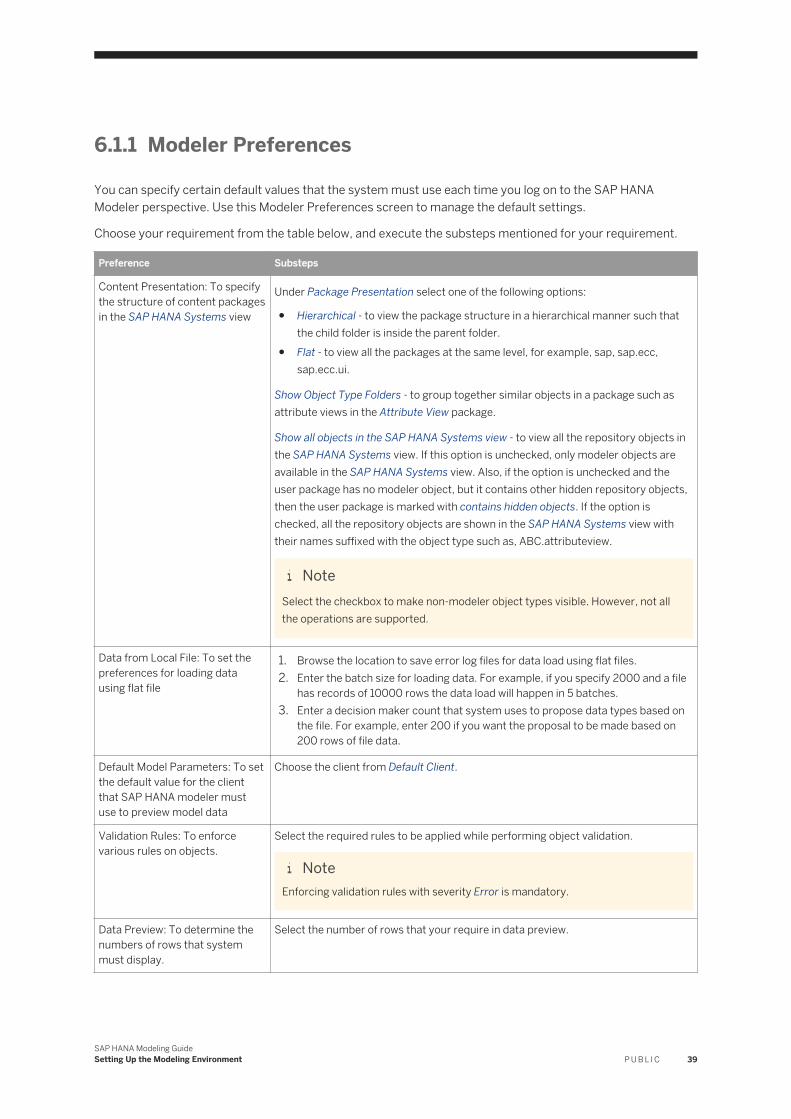
6.1.1 Modeler Preferences
You can specify certain default values that the system must use each time you log on to the SAP HANA Modeler perspective. Use this Modeler Preferences screen to manage the default settings.
Choose your requirement from the table below, and execute the substeps mentioned for your requirement.
Preference Substeps
Content Presentation: To specify the structure of content packages in the SAP HANA Systems view
Under Package Presentation select one of the following options:
● Hierarchical - to view the package structure in a hierarchical manner such that the child folder is inside the parent folder.
● Flat - to view all the packages at the same level, for example, sap, sap.ecc, sap.ecc.ui.
Show Object Type Folders - to group together similar objects in a package such as attribute views in the Attribute View package.
Show all objects in the SAP HANA Systems view - to view all the repository objects in the SAP HANA Systems view. If this option is unchecked, only modeler objects are available in the SAP HANA Systems view. Also, if the option is unchecked and the user package has no modeler object, but it contains other hidden repository objects, then the user package is marked with contains hidden objects. If the option is checked, all the repository objects are shown in the SAP HANA Systems view with their names suffixed with the object type such as, ABC.attributeview.
NoteSelect the checkbox to make non-modeler object types visible. However, not all the operations are supported.
Data from Local File: To set the preferences for loading data using flat file
1. Browse the location to save error log files for data load using flat files.2. Enter the batch size for loading data. For example, if you specify 2000 and a file
has records of 10000 rows the data load will happen in 5 batches.3. Enter a decision maker count that system uses to propose data types based on
the file. For example, enter 200 if you want the proposal to be made based on 200 rows of file data.
Default Model Parameters: To set the default value for the client that SAP HANA modeler must use to preview model data
Choose the client from Default Client.
Validation Rules: To enforce various rules on objects.
Select the required rules to be applied while performing object validation.
NoteEnforcing validation rules with severity Error is mandatory.
Data Preview: To determine the numbers of rows that system must display.
Select the number of rows that your require in data preview.
SAP HANA Modeling GuideSetting Up the Modeling Environment P U B L I C 39
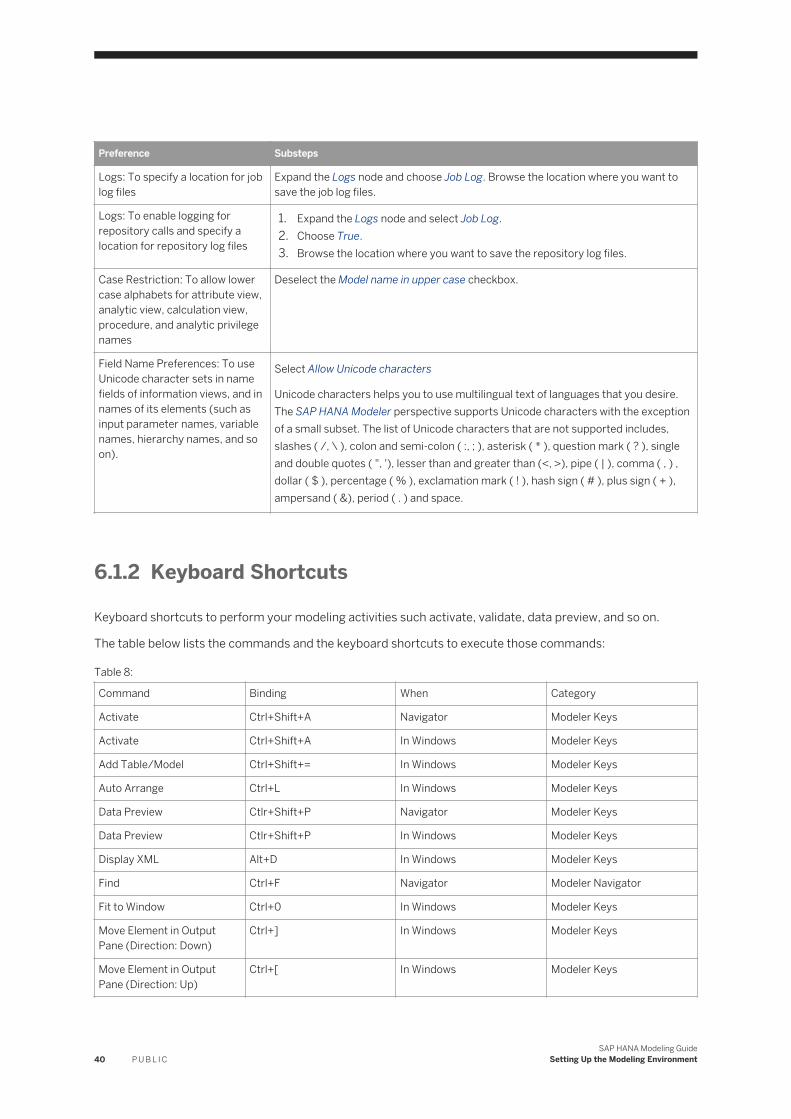
Preference Substeps
Logs: To specify a location for job log files
Expand the Logs node and choose Job Log. Browse the location where you want to save the job log files.
Logs: To enable logging for repository calls and specify a location for repository log files
1. Expand the Logs node and select Job Log.2. Choose True.3. Browse the location where you want to save the repository log files.
Case Restriction: To allow lower case alphabets for attribute view, analytic view, calculation view, procedure, and analytic privilege names
Deselect the Model name in upper case checkbox.
Field Name Preferences: To use Unicode character sets in name fields of information views, and in names of its elements (such as input parameter names, variable names, hierarchy names, and so on).
Select Allow Unicode characters
Unicode characters helps you to use multilingual text of languages that you desire. The SAP HANA Modeler perspective supports Unicode characters with the exception of a small subset. The list of Unicode characters that are not supported includes, slashes ( /, \ ), colon and semi-colon ( :, ; ), asterisk ( * ), question mark ( ? ), single and double quotes ( ", '), lesser than and greater than (<, >), pipe ( | ), comma ( , ) , dollar ( $ ), percentage ( % ), exclamation mark ( ! ), hash sign ( # ), plus sign ( + ), ampersand ( &), period ( . ) and space.
6.1.2 Keyboard Shortcuts
Keyboard shortcuts to perform your modeling activities such activate, validate, data preview, and so on.
The table below lists the commands and the keyboard shortcuts to execute those commands:
Table 8:
Command Binding When Category
Activate Ctrl+Shift+A Navigator Modeler Keys
Activate Ctrl+Shift+A In Windows Modeler Keys
Add Table/Model Ctrl+Shift+= In Windows Modeler Keys
Auto Arrange Ctrl+L In Windows Modeler Keys
Data Preview Ctlr+Shift+P Navigator Modeler Keys
Data Preview Ctlr+Shift+P In Windows Modeler Keys
Display XML Alt+D In Windows Modeler Keys
Find Ctrl+F Navigator Modeler Navigator
Fit to Window Ctrl+0 In Windows Modeler Keys
Move Element in Output Pane (Direction: Down)
Ctrl+] In Windows Modeler Keys
Move Element in Output Pane (Direction: Up)
Ctrl+[ In Windows Modeler Keys
40 P U B L I CSAP HANA Modeling Guide
Setting Up the Modeling Environment
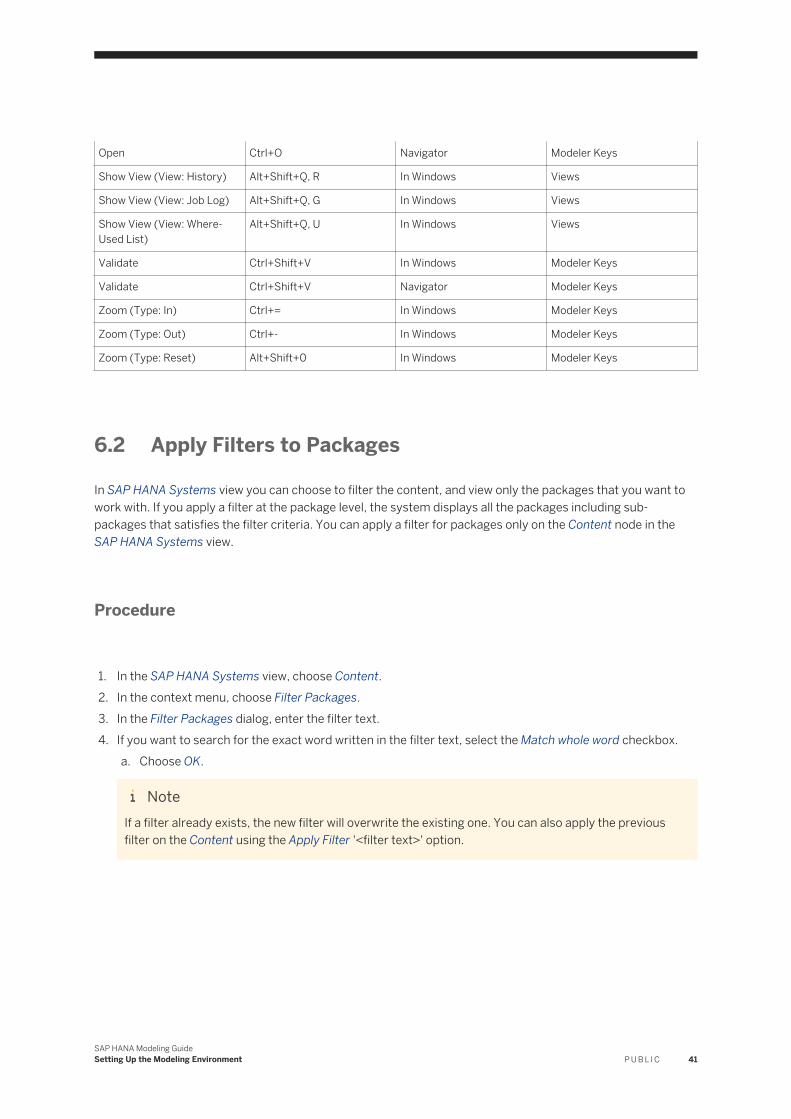
Open Ctrl+O Navigator Modeler Keys
Show View (View: History) Alt+Shift+Q, R In Windows Views
Show View (View: Job Log) Alt+Shift+Q, G In Windows Views
Show View (View: Where-Used List)
Alt+Shift+Q, U In Windows Views
Validate Ctrl+Shift+V In Windows Modeler Keys
Validate Ctrl+Shift+V Navigator Modeler Keys
Zoom (Type: In) Ctrl+= In Windows Modeler Keys
Zoom (Type: Out) Ctrl+- In Windows Modeler Keys
Zoom (Type: Reset) Alt+Shift+0 In Windows Modeler Keys
6.2 Apply Filters to Packages
In SAP HANA Systems view you can choose to filter the content, and view only the packages that you want to work with. If you apply a filter at the package level, the system displays all the packages including sub-packages that satisfies the filter criteria. You can apply a filter for packages only on the Content node in the SAP HANA Systems view.
Procedure
1. In the SAP HANA Systems view, choose Content.2. In the context menu, choose Filter Packages.3. In the Filter Packages dialog, enter the filter text.4. If you want to search for the exact word written in the filter text, select the Match whole word checkbox.
a. Choose OK.
NoteIf a filter already exists, the new filter will overwrite the existing one. You can also apply the previous filter on the Content using the Apply Filter '<filter text>' option.
SAP HANA Modeling GuideSetting Up the Modeling Environment P U B L I C 41
6.3 Apply Filter to Objects
In SAP HANA Systems view, filter the content and view only objects that you want to work with. You can apply a filter for objects at the package level including sub-packages.
Procedure
1. In the SAP HANA Systems view, expand Content.2. In the context menu of a package, choose Filter Objects....3. In the Filter Objects dialog, enter the filter text.4. If you want to search for the exact word written in the filter text, select Match whole word checkbox.5. If you want to apply the filter on the sub-packages, choose the Apply filter to sub packages checkbox.
a. If you want to apply a filter to a package that does not already have one applied to it, choose Apply only if no filter already exists.
b. If you want to replace an existing filter with a new one, choose Apply to all and overwrite existing.6. Choose OK.
42 P U B L I CSAP HANA Modeling Guide
Setting Up the Modeling Environment
7 Creating Information Views and Previewing its Output
Information views are used for analytical use cases such as operational data mart scenarios or multidimensional reporting on revenue, profitability, and so on. There are three types of information views: attribute view, analytic view, and calculation view.
All three types of information views that you create in SAP HANA Modeler perspective are non-materialized views, which creates agility through the rapid deployment of changes. You can create information views to depict a business scenario using content data (attributes and measures). This sections describes how you can create and use the different information views that SAP HANA modeler supports.
Related Information
Generate Time Data [page 43]Using Attribute Views [page 45]Using Analytic Views [page 50]Using Calculation Views [page 56]Preview Information View Output [page 97]
7.1 Generate Time Data
Generate time data into default time-related tables present in the _SYS_BI schema and use these tables in information views to add a time dimension.
Context
For modeling business scenarios that require time dimension, you generate time data in default time related tables available in the _SYS_BI schema. You can select the calendar type and granularity and generate the time data for a specific time span.
Procedure
1. Launch SAP HANA studio.
SAP HANA Modeling GuideCreating Information Views and Previewing its Output P U B L I C 43
2. In the Quick View pane, choose Generate Time Data.3. Select a system where you want to perform this operation.4. Choose Next.5. In the Calendar Type dropdown list, select a calendar type.6. In the From Year and To Year textboxes, enter the time range for which you want to generate time data
into time-related tables.7. If you have selected the Gregorian calendar type, in the Granularity dropdown list select the required
granularity.
NoteFor the granularity level Week, you need to specify the first day of the week.
8. If you have selected the Fiscal calendar type,a. In Variant Schema dropdown list, select a variant schema that contains tables having variant data.
NoteTables T009 and T009B contain variant data.
b. Select the required variant.
The variant specifies the number of periods along with the start and end dates.9. Choose Finish.
NoteFor the Gregorian calendar type, modeler generates time dimension data into M_TIME_DIMENSION_YEAR, M_TIME_DIMENSION_MONTH, M_TIME_DIMENSION_WEEK, M_TIME_DIMENSION tables and for the Fiscal calendar type, the modeler populates the generated time dimension data into the M_FISCAL_CALENDAR table. These tables are present in _SYS_BI schema.
Related Information
Supported Calendar Types to Generate Time Data [page 44]Time Range to Generate Time Data [page 45]
7.1.1 Supported Calendar Types to Generate Time Data
SAP HANA modeler supports generating time dimension data using the Fiscal or Gregorian calendar types.
The table below provides more information on each of the calendar types.
44 P U B L I CSAP HANA Modeling Guide
Creating Information Views and Previewing its Output
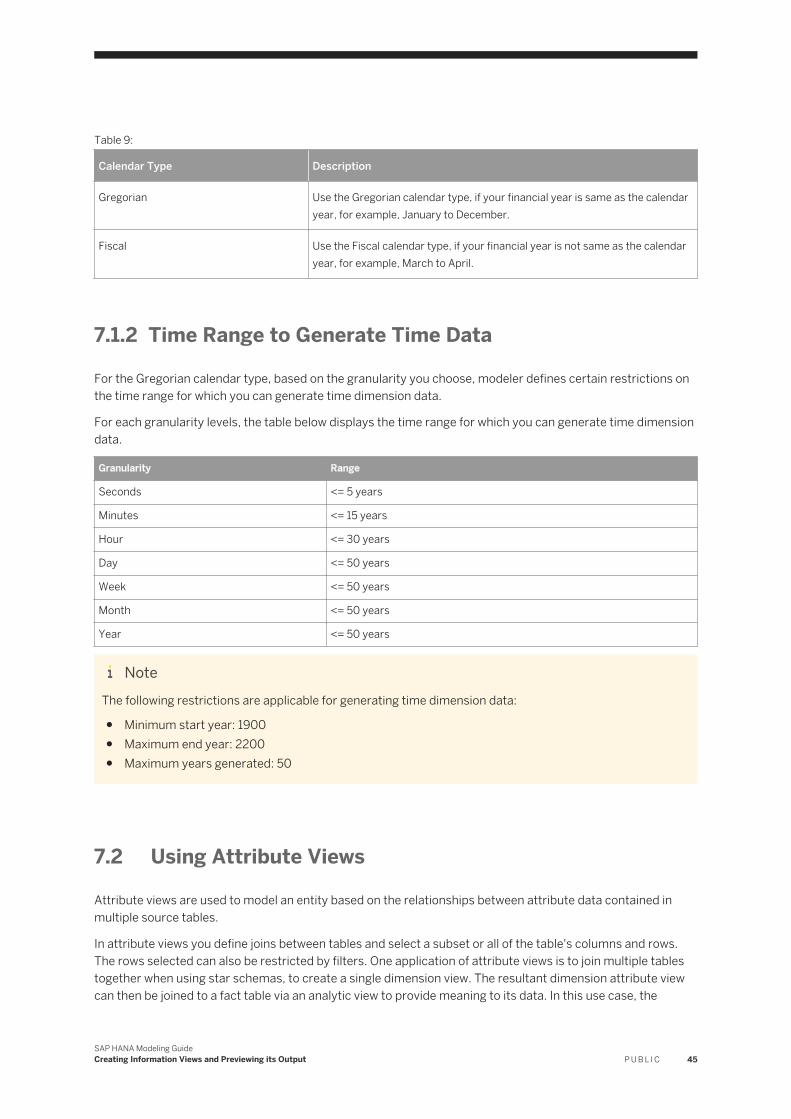
Table 9:
Calendar Type Description
Gregorian Use the Gregorian calendar type, if your financial year is same as the calendar year, for example, January to December.
Fiscal Use the Fiscal calendar type, if your financial year is not same as the calendar year, for example, March to April.
7.1.2 Time Range to Generate Time Data
For the Gregorian calendar type, based on the granularity you choose, modeler defines certain restrictions on the time range for which you can generate time dimension data.
For each granularity levels, the table below displays the time range for which you can generate time dimension data.
Granularity Range
Seconds <= 5 years
Minutes <= 15 years
Hour <= 30 years
Day <= 50 years
Week <= 50 years
Month <= 50 years
Year <= 50 years
NoteThe following restrictions are applicable for generating time dimension data:
● Minimum start year: 1900● Maximum end year: 2200● Maximum years generated: 50
7.2 Using Attribute Views
Attribute views are used to model an entity based on the relationships between attribute data contained in multiple source tables.
In attribute views you define joins between tables and select a subset or all of the table's columns and rows. The rows selected can also be restricted by filters. One application of attribute views is to join multiple tables together when using star schemas, to create a single dimension view. The resultant dimension attribute view can then be joined to a fact table via an analytic view to provide meaning to its data. In this use case, the
SAP HANA Modeling GuideCreating Information Views and Previewing its Output P U B L I C 45
attribute view adds more columns and also hierarchies as further analysis criteria to the analytic view. In the star schema of the analytic view, the attribute view is shown as a single dimension table (although it might join multiple tables), that can be joined to a fact table. For example, attribute views can be used to join employees to organizational units which can then be joined to a sales transaction via an analytic view
You can create hierarchies to arrange the attributes hierarchically. Hierarchies helps you to visualize and analyze the data in a hierarchical fashion. You can create Level hierarchies and Parent Child hierarchies by specifying the attributes that correspond to different levels, and parent child nodes respectively.
Related Information
Create Attribute Views [page 46]
7.2.1 Create Attribute Views
You can create a view that is used to model descriptive attribute data by using attributes, that is data that does not contain measures. Attribute views are used to define joins between tables and to select a subset or all of the table's columns and rows.
Prerequisites
You have imported SAP system tables T009 and T009B tables of type Time to create time attribute views.
Procedure
1. Launch SAP HANA studio.2. In SAP HANA System view, expand the content node.3. In the navigator, select a package where you want to create the new calculation view.
4. In the context menu of the package, select New Attribute View5. Provide name and description.6. In the Subtype dropdown list, select the type of the attribute view.7. Choose Finish.8. Add data sources.
a. Select the data foundation node.b. In the context menu, choose Add Objects.c. In Find Data Sources dialog, enter the name of the data source and select it from the list.
46 P U B L I CSAP HANA Modeling Guide
Creating Information Views and Previewing its Output
NoteYou cannot add column views to the Data Foundation.
d. Choose OK.
NoteYou can to add the same table again in Data Foundation using table aliases in the editor.
9. Define output columns.a. Select the data foundation node.a. In the Details pane, select the columns that you want to add to the output of the data foundation node.b. In the context menu, choose Add To Output.
NoteIf you want to add all columns from the data source to the output, in the context menu of the data source, choose Add All To Output.
10. Hide attributes in reporting tools.
If you want to hide the attributes form the client tools or reporting tools when you execute the attribute view, then
a. Select the Semantics node.b. Choose the Columns tab.c. Select an attribute.d. Select the Hidden checkbox.
11. Define key attributes.
You need to define at least one attribute as a key attribute. If there are more than one key attribute, all the key attributes must point to the same table, also referred to as the central table, in the data foundation.
a. Select the Semantics node.b. Choose the Columns tab.c. Select an attribute.d. Select the Key checkbox.e. In the Attributes tab page of the Column pane, select the required attribute and select the Type as Key
Attribute.
NoteFor auto generated time attribute views, the attributes and key attributes are automatically assigned.
12. Activate the attribute view.○ If you are in the SAP HANA Modeler perspective:
○ Save and Activate - to activate the current view and redeploy the affected objects if an active version of the affected object exists. Otherwise only current view gets activated.
○ Save and Activate All - to activate the current view along with the required and affected objects.
SAP HANA Modeling GuideCreating Information Views and Previewing its Output P U B L I C 47
NoteYou can also activate the current view by selecting the view in the SAP HANA Systems view and choosing Activate in the context menu. The activation triggers validation check for both the client side and the server side rules. If the object does not meet any validation check, the object activation fails.
○ If you are in the SAP HANA Development perspective:1. In the Project Explorer view, select the required object.
2. In the context menu, select Team Activate .
NoteThe activation triggers the validation check only for the server side rules. Hence, if there are any errors on the client side, they are skipped and the object activation goes through if no error found at the server side.
13. Assign Changesa. In the Select Change dialog, either create a new ID or select an existing change ID that you want to use
to assign your changes.b. Choose Finish.
For more information on assigning changes, see chapter SAP HANA Change Recording of the SAP HANA Developer Guide.
14. Choose Finish.
Results
RestrictionThe behavior of attribute views with the new editor is as follows:
● Consider that you have added an object to the editor and the object was modified after it was added. In such cases, it is recommended to close and open the editor. The helps reflect the latest changes of the modified object in the editor. For more information, see SAP Note 1783668 .
Next Steps
After creating an attribute view, you can perform certain additional tasks to obtain the desired output. The table below lists the additional tasks that you can perform to enrich the attribute view.
48 P U B L I CSAP HANA Modeling Guide
Creating Information Views and Previewing its Output
Table 10:
Requirement Task to Perform
If you want to filter the output of data foundation node. Filter Output of Data Foundation Node.
Table 11: Working With Attributes
Requirement Task to perform
If you want to create new output columns and calculate its values at runtime using an expression.
Create Calculated Columns
If you want to assign semantic types to provide more meaning to attributes in the attribute views.
Assign Semantics
If you want to create level hierarchies to organize data in reporting tools. Create Level Hierarchies
If you want to create parent-child hierarchies to organize data in reporting tools. Create Parent-Child Hierarchies
Table 12: Working With Attribute View Properties
Requirement Task to perform
If you want to filter the view data either using a fixed client value or using a session client set for the user.
Filter Data for Specific Clients
If you want to execute time travel queries on attribute views. Enable Information Views for Time Travel Queries
If you want to invalidate or remove data from the cache after specific time intervals. Invalidate Cached Content
If you want to maintain object label texts in different languages. Maintain Modeler Objects in Multiple Languages
If you do not recommend using an attribute view. Deprecate Information Views
Related Information
Attribute View Types [page 50]Create Calculated Columns [page 104]Assign Semantics [page 114]Create Level Hierarchies [page 126]Create Parent-Child Hierarchies [page 129]Deprecate Information Views [page 149]Filter Data for Specific Clients [page 150]Enable Information Views for Time Travel Queries [page 152]Invalidate Cached Content [page 153]Maintain Modeler Object Labels in Multiple Languages [page 154]Quick Reference: Information View Properties [page 155]Preview Information View Output [page 97]
SAP HANA Modeling GuideCreating Information Views and Previewing its Output P U B L I C 49
7.2.2 Attribute View Types
SAP HANA modeler supports three types of attribute views. The below table provides information on attribute view types.
Table 13:
Attribute View Type Description
Standard A standard attribute view with table attributes.
Time An attribute view with time characteristics.
You can select the calendar type as Fiscal or Gregorian and model time attribute views.
In addition, you can also auto-create time attribute views. When you select, auto-create, modeler auto-creates these attribute views based on the default time tables. It also defines the appropriate columns or attributes based on the granularity, and creates the required filters.
Derived Create an attribute view that is derived from an existing attribute view. You cannot modify derived attribute views. It only acts as reference to the base attribute view from which it is derived.
Derived attribute views are read-only. The only editable value is the description of the attribute view.
NoteThe tables used in time attribute views for calendar type Gregorian are, M_TIME_DIMENSION, M_TIME_DIMENSION_ YEAR, M_TIME_DIMENSION_ MONTH, M_TIME_DIMENSION_WEEK and for calendar type Fiscal is M_FISCAL_CALENDAR. If you want to do a data preview for the created attribute view, you need to generate time data into tables from the Quick View.
7.3 Using Analytic Views
Analytic views can contain two types of columns: attributes and measures. Measures are simple, calculated or restricted. If analytic views are used in SQL statements, then the measures have to be aggregated.
For example, using the SQL functions SUM(<column name>), MIN(<column name>), or MAX(<column name>). Normal columns can be handled as regular attributes and do not need to be aggregated.
You can also include attribute views in the analytic view definition. In this way, you can achieve additional depth of attribute data. The analytic view inherits the definitions of any attribute views that are included in the definition.
TipYou can assign one or more alternate names (or aliases) to tables. For example, if you want to improve the readability of a table name or if you want to add the same table again to your data foundation node, then
50 P U B L I CSAP HANA Modeling Guide
Creating Information Views and Previewing its Output
you can use aliases to avoid name conflicts. From the Details pane, select a table and provide your Alias Name value in the table properties pane. You can use this alias value for all references to the table.
If you are not able to activate your information view because of name conflicts between shared and local attributes of a column view, then you can use aliases to resolve such conflicts and activate the information view. Select the semantics node and in the Shared Attribute pane, provide Alias Name and Alias Label values.
If you come across errors due to aliases, while trying to open an information view that was already created, then you can use the Quick Fix option to resolve the error. Select the error message or the problem in the Problems view, and choose Quick Fix in the context menu. This resolves the issue by assigning right names to the column and alias.
You can choose to hide the attributes and measures that are not required for client consumption by assigning value true to the property Hidden in the Properties pane, or selecting the Hidden checkbox in the Column view. The attributes or measures marked as hidden are not available for input parameters, variables, consumers or higher level views that are built on top of the analytic view. For old models (before SPS06), if the hidden attribute is already used, you can either unhide the element or remove the references.
For an analytic view, you can set the property Data Category to Cube or Dimension. If the Data Category property of the analytic view is set to Dimension, the view will not be available for multidimensional reporting purposes. If the value is set to Cube, an additional column Aggregation is available to specify the aggregation type for measures.
You can enable relational optimization for your analytic view such as, Optimize stacked SQL for example, convert
SELECT a, SUM(X) FROM ( SELECT * FROM AV) GROUP BY A
to
SELECT A, SUM(X) FROM AV GROUP BY A
by setting the property Allow Relational Optimization.
Setting this property would be effective only for analytic views having complex calculations such that deployment of analytic view generates catalog calculation view on top of the generated catalog OLAP view.
CautionIn this case, if this flag is set counters and SELECT COUNT may deliver wrong results
Related Information
Create Analytic Views [page 52]Create Temporal Joins [page 78]
SAP HANA Modeling GuideCreating Information Views and Previewing its Output P U B L I C 51
7.3.1 Create Analytic Views
Analytic views are used to model data that includes measures. For example, transactional fact table representing sales order history would include measures for quantity, price, and so on.
Procedure
1. Launch SAP HANA studio.2. In SAP HANA System view, expand the content node.3. In the navigator, select a package where you want to create the new calculation view.
4. In the context menu of the package, select New Analytic View .5. Provide name and description.6. Choose Finish.
Modeler launches a new analytic view editor with the semantics node, star join node and the data foundation.
7. Add data sources.a. Select the star join node.b. In the context menu, choose Add Objects.c. In Find Data Sources dialog, enter the name of the data source.
NoteYou can only dimensions (attribute views) as a data source in star join node of analytic views.
d. Select the required attribute view from the list.e. Choose OK.
8. Define the central fact table in the data foundation node.
Continue modeling the analytic view with a cube structure, which includes attributes and measures. The input to the star join node must provide the central fact table.
a. Select the data foundation node.b. In the context menu, choose Add Objects.c. In Find Data Sources dialog, enter the name of the data source and select it from the list.
NoteYou cannot add column views to the Data Foundation.
d. Choose OK.
NoteYou can to add the same table again in Data Foundation using table aliases in the editor.
52 P U B L I CSAP HANA Modeling Guide
Creating Information Views and Previewing its Output
e. If there are more than one table in the data foundation node, specify the central table (fact table) from which the modeler must derive the measures. Select the Data foundation node and define the property, Central Entity in the Properties pane.
9. Define output columns.a. Select the data foundation node or star join node.a. In the Details pane, select the columns that you want to add to the output of the node.b. In the context menu, choose Add To Output.
NoteIf you want to add all columns from the data source to the output, in the context menu of the data source, choose Add All To Output.
10. In the Star Join node, create joins to join the attribute views with the fact table (star schema).
You can also create a temporal joins between date fields of the fact table to an interval (to and from) field of the attribute view.
RestrictionSelf-joins are not supported. While creating joins, ensure that a table does not appear twice in any join path. A join path is the set of joins that links the fact table to other tables.
While creating joins between analytic view and attribute view:
○ The same table cannot be used in the join path of analytic view and attribute view○ The table of the attribute view which is linked to the fact table should not have an alias table
11. Define attributes and measuresa. Select the Semantics node.b. Choose the Columns tab.c. In the Local section, select a output column.d. In the Type dropdown list, select a measure or attribute.e. If you want to hide the measure of attribute in the reporting tool, select the Hidden checkbox.
NoteThe Shared tab page shows attributes from the attribute views that are used in the analytic view.
12. Activate the analytic view:○ If you are in the SAP HANA Modeler perspective:
○ Save and Activate - to activate the current view and redeploy the affected objects if an active version of the affected object exists. Otherwise only current view gets activated.
○ Save and Activate All - to activate the current view along with the required and affected objects.
NoteYou can also activate the current view by selecting the view in the SAP HANA Systems view and choosing Activate in the context menu. The activation triggers validation check for both the client side and the server side rules. If the object does not meet any validation check, the object activation fails.
SAP HANA Modeling GuideCreating Information Views and Previewing its Output P U B L I C 53
○ If you are in the SAP HANA Development perspective:1. In the Project Explorer view, select the required object.
2. In the context menu, select Team Activate .
NoteThe activation triggers the validation check only for the server side rules. Hence, if there are any errors on the client side, they are skipped and the object activation goes through if no error found at the server side.
NoteIf an active version of the affected objects exist, activating the current view redeploys the affected objects. In the SAP HANA Modeler perspective, even if the affected object redeployment fails, the current view activation might go through. However, in the SAP HANA Development perspective, if any of the affected objects redeployment fails, the current view activation also fails.
NoteWhile modeling an analytic view, if you have also opened and edited an attribute view that is used in the analytic view, then close and reopen the analytic view editor to see any changes that you have made to the attribute view. For more information, see SAP Note 1783668 .
13. Assign Changesa. In the Select Change dialog, either create a new ID or select an existing change ID that you want to use
to assign your changes.b. Choose Finish.
For more information on assigning changes, see chapter SAP HANA Change Recording of the SAP HANA Developer Guide.
14. Choose Finish.
Next Steps
After creating an analytic view, you can perform certain additional tasks to obtain the desired output. The table below lists the additional tasks that you can perform to enrich the analytic view.
Table 14: Working With View Nodes
Requirement Task to Perform
If you want to filter the output of the data foundation node. Filter Output of Data Foundation Node.
Table 15: Working With Attributes and Measures
Requirement Task to perform
If you want to count the number of distinct values for a set of attribute columns. Create Counters
54 P U B L I CSAP HANA Modeling Guide
Creating Information Views and Previewing its Output
Requirement Task to perform
If you want to create new output columns and calculate its values at runtime using an expression.
Create Calculated Columns
If you want to restrict measure values based on attribute restrictions. Create Restricted Columns
If you want to assign semantic types to provide more meaning to attributes and measures in analytic views.
Assign Semantics
If you want to parameterize attribute views and execute them based on the values users provide at query runtime.
Create Input Parameters
If you want to, for example, filter the results based on the values that users provide to attributes at runtime.
Assign Variables
If you want associate measures with currency codes and perform currency conversions.
Associate Measures with Currency
If you want associate measures with unit of measures and perform unit conversions. Associate Measures with Unit of Measure
If you want to group related measures together in a folder. Group Related Measures.
Table 16: Working With Analytic View Properties
Requirement Task to perform
If you want to filter the view data either using a fixed client value or using a session client set for the user.
Filter Data for Specific Clients
If you want to execute time travel queries on analytic views. Enable Information Views for Time Travel Queries
If you want to invalidate or remove data from the cache after specific time intervals. Invalidate Cached Content
If you want to maintain object label texts in different languages. Maintain Modeler Objects in Multiple Languages
If you do not recommend using an analytic view. Deprecate Information Views
Related Information
Create Temporal Joins [page 78]Preview Information View Output [page 97]Working With Attributes and Measures [page 101]Working With Information View Properties [page 149]Quick Reference: Information View Properties [page 155]
SAP HANA Modeling GuideCreating Information Views and Previewing its Output P U B L I C 55
7.4 Using Calculation Views
A calculation view is a flexible information view that you can use to define more advanced slices on the data available in the SAP HANA database. Calculation views are simple and yet powerful because they mirror the functionality found in both attribute views and analytic views, and also other analytic capabilities.
Use calculation views when your business use cases require advanced data mdoeling logic, which cannot be achieved by creating analytic views or attribute views. For example, you can create calculation views with layers of calculation logic, which includes measures sourced from multiple source tables, or advanced SQL logic, and much more. A calculation view can include any combination of tables, column views, attribute views and analytic views. You can create joins, unions, projections, and aggregation levels on its data sources.
Calculation views can also include measures and be used for multidimensional reporting, or can contain no measures and used for list-type reporting. There are two types of calculation views that you can create:
● Graphical calculation views: create using a graphical editor.● Script-based calculation views: create by writing SQL scripts.
Some general characteristics of calculation views are listed below:
● Support both OLAP and OLTP models.● Support complex expressions (i.e. IF, Case, Counter).● Support reusing Analytic views, Attribute views and other Calculation views (Graphical and Scripted).● Support analytic privileges (for example, restricting a user for a certain cost center).● Support SAP ERP specific features (for example, client handling, language, currency conversion).● Combine facts from multiple tables.● Support additional data processing operations. (for example, union operation, explicit aggregation).● Leverage specialized languages (for example, R-Lang).● Leverage both column and row tables.
Related Information
Create Script-Based Calculation Views [page 57]Create Graphical Calculation Views [page 62]Supported Data Categories for Information Views [page 72]Working With Information View Properties [page 149]Quick Reference: Information View Properties [page 155]
56 P U B L I CSAP HANA Modeling Guide
Creating Information Views and Previewing its Output
7.4.1 Create Script-Based Calculation Views
Create script-based calculation views to depict complex calculation scenarios by writing SQL script statements. It is a viable alternative to depict complex business scenarios, which you cannot achieve by creating other information views (Attribute, Analytical, and Graphical Calculation views).
Context
For example, if you want to create information views that require certain SQL functions (i.e. window), or predictive functions (i.e. R-Lang), then you use script-based calculation views. Sufficient knowledge of SQL scripting including the behavior and optimization characteristics of the different data models is a prerequisite for creating script-based calculation views.
Procedure
1. Launch SAP HANA studio.2. In SAP HANA System view, expand the content node.3. In the navigator, select a package where you want to create the new calculation view.
4. In the context menu of the package, select New Calculation View .5. Provide name and description.6. Select calculation view type.
In the Type dropdown list, select SQL Script.7. Set Parameter Case Sensitive to True or False based on how you require the naming convention for the
output parameters of the calculation view.8. Choose Finish.9. Select default schema
a. Select the Semantics node.b. Choose the View Properties tab.c. In the Default Schema dropdown list, select the default schema.
NoteIf you do not select a default schema while scripting, then you need to provide fully qualified names of the objects used.
10. Choose SQL Script node in the Semantics node.
NoteThe IN function does not work in SQL script to filter a dynamic list of values. You have to use APPLY_FILTER functions instead.
SAP HANA Modeling GuideCreating Information Views and Previewing its Output P U B L I C 57
11. Define the output structure.a. In the Output pane, choose Create Target.b. Add the required output parameters and specify its length and type.
12. If you want to add multiple columns that are part of existing information views or catalog tables or table functions to the output structure of script-based calculation views, then:
a. In the Output pane, choose New Add Columns From .b. Enter the name of the object that contains the columns you want to add to the output.c. Select one or more objects from the dropdown list.d. Choose Next.e. In the Source pane, choose the columns that you want to add to the output.f. If you want to add selective columns to the output, then select those columns and choose Add.g. If you want to add all columns of an object to the output, then select the object and choose Add.
NoteFor all duplicate column names in the Target pane, the modeler displays an error. You cannot add two columns with the same name to your output. If you want to retain both the columns, then change the name of columns in the Target pane before you add them to the output.
h. If you want to override the existing output structure, select Replace existing output columns in the Output.
i. Choose Finish.
NoteThe defined order and data types of columns and parameters must match with the order and data types of the columns and parameters in the select query, which is assigned to the output function var_out.
13. Write the SQL Script statements to fill the output columns.
You can drag information views from the navigator pane to the SQL editor to obtain an equivalent SQL statement that represents the deployed schema name for the information view.
NoteFor information on providing input parameters in script-based calculation views, see SAP Note 2035113
14. Activate the script-based calculation view.
○ If you are in the SAP HANA Modeler perspective:○ Save and Activate - to activate the current view and redeploy the affected objects if an active
version of the affected object exists. Otherwise, only the current view is activated.○ Save and Activate All - to activate the current view along with the required and affected objects.
NoteYou can also activate the current view by selecting the view in the SAP HANA Systems view and choosing Activate in the context menu. The activation triggers validation check for both the client
58 P U B L I CSAP HANA Modeling Guide
Creating Information Views and Previewing its Output
side and the server side rules. If the object does not meet any validation check, the object activation fails.
○ If you are in the SAP HANA Development perspective:1. In the Project Explorer view, select the required object.
2. In the context menu, select Team Activate .
NoteThe activation only triggers the validation check for the server side rules. If there are any errors on the client side, they are skipped, and the object activation goes through if no error is found on the server side.
For more information about the details of the functions available on content assist (pressing Ctrl + Space in the SQL Console while writing procedures) in the SAP HANA SQLScript Reference.
15. Assign Changesa. In the Select Change dialog, either create a new ID or select an existing change ID that you want to use
to assign your changes.b. Choose Finish.
For more information on assigning changes, see SAP HANA Change Recording of the SAP HANA Developer Guide.
16. Choose Finish.
Next Steps
After creating a script-based calculation view, you can perform certain additional tasks to obtain the desired output. The table below lists the additional tasks that you can perform to enrich the calculation view.
Table 17: Working With Attributes and Measures
Requirement Task to perform
If you want to assign semantic types to provide more meaning to attributes and measures in calculation views.
Assign Semantics
If you want to parameterize calculation views and execute them based on the values users provide at query runtime.
Create Input Parameters
If you want to, for example, filter the results based on the values that users provide to attributes at runtime.
Assign Variables
If you want associate measures with currency codes and perform currency conversions.
Associate Measures with Currency
If you want associate measures with unit of measures and perform unit conversions. Associate Measures with Unit of Measure
If you want to create level hierarchies to organize data in reporting tools. Create Level Hierarchies
If you want to create parent-child hierarchies to organize data in reporting tools. Create Parent-Child Hierarchies
If you want to group related measures together in a folder. Group Related Measures.
SAP HANA Modeling GuideCreating Information Views and Previewing its Output P U B L I C 59
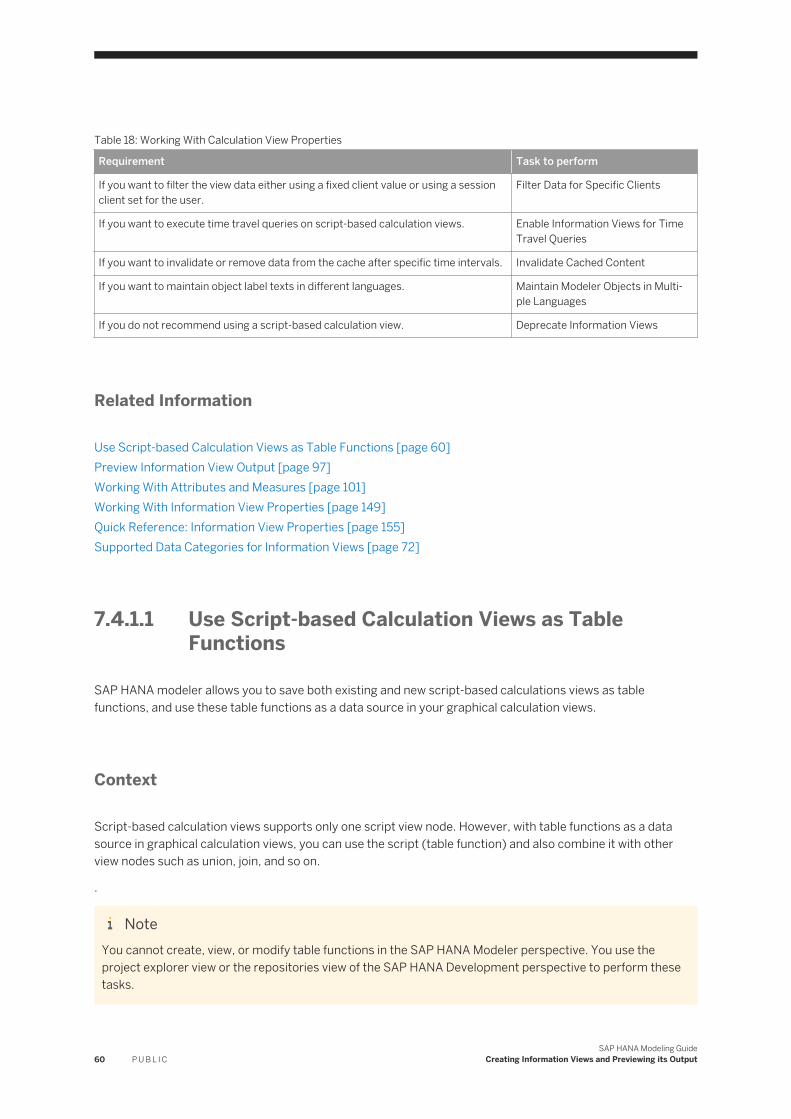
Table 18: Working With Calculation View Properties
Requirement Task to perform
If you want to filter the view data either using a fixed client value or using a session client set for the user.
Filter Data for Specific Clients
If you want to execute time travel queries on script-based calculation views. Enable Information Views for Time Travel Queries
If you want to invalidate or remove data from the cache after specific time intervals. Invalidate Cached Content
If you want to maintain object label texts in different languages. Maintain Modeler Objects in Multiple Languages
If you do not recommend using a script-based calculation view. Deprecate Information Views
Related Information
Use Script-based Calculation Views as Table Functions [page 60]Preview Information View Output [page 97]Working With Attributes and Measures [page 101]Working With Information View Properties [page 149]Quick Reference: Information View Properties [page 155]Supported Data Categories for Information Views [page 72]
7.4.1.1 Use Script-based Calculation Views as Table Functions
SAP HANA modeler allows you to save both existing and new script-based calculations views as table functions, and use these table functions as a data source in your graphical calculation views.
Context
Script-based calculation views supports only one script view node. However, with table functions as a data source in graphical calculation views, you can use the script (table function) and also combine it with other view nodes such as union, join, and so on.
.
NoteYou cannot create, view, or modify table functions in the SAP HANA Modeler perspective. You use the project explorer view or the repositories view of the SAP HANA Development perspective to perform these tasks.
60 P U B L I CSAP HANA Modeling Guide
Creating Information Views and Previewing its Output
Procedure
1. Open a script-based calculation view in the view editor.
2. Choose the icon.3. Choose a menu option:
Menu Option Description
Save Saves your existing script-based calculation view as a new table function and also retains the script-based calculation view within the same package.
Migrate Creates a new table function and migrates the script-based calculation view into a graphical calculation view, which uses the table function as a data source.
4. Provide the name of the graphical calculation view that uses this table function as a data source in its default node (aggregation or projection).
5. Provide a name to the new table function.
NoteIf a table function with the same name exists within the same package, then overwrite the existing table function with this new table function by selecting the checkbox Overwrite changes to an existing table function.
6. Select the checkbox Open the Graphical calculation view to open the graphical calculation view in a new view editor.
Results
You have now saved your script-based calculation view as a table function and included it as a data source in the default node of the new graphical calculation view. You can access all three objects (the new graphical calculation view, the script-based calculation view, and the table function) from within the same package.
SAP HANA Modeling GuideCreating Information Views and Previewing its Output P U B L I C 61
7.4.3 Create Graphical Calculation Views
Create graphical calculation views using a graphical editor to depict a complex business scenario. You can also create graphical calculation views to include layers of calculation logic and with measures from multiple data sources.
Context
Graphical calculation views can bring together normalized data that are generally dispersed. You can combine multiple transaction tables and analytic views, while creating a graphical calculation view.
NoteIf you want to execute calculation views in SQL engine, see SAP NOTE 1857202
Procedure
1. Launch SAP HANA studio.2. In SAP HANA System view, expand the content node.3. In the navigator, select a package where you want to create the new calculation view.
4. In the context menu of the package, select New Calculation View .5. Provide name and description.6. Select calculation view type.
In the Type dropdown list, select Graphical.7. Select a Data Category type.8. Choose Finish.
Modeler launches a new graphical calculation view editor with the semantics node and default aggregation or projection node depending on the data category of the calculation view.
9. Continue modeling the graphical calculation view by dragging and dropping the necessary view nodes from the tools palette.
10. Add data sources.
If you want to add data sources to your view node, then
a. Select a view node.b. In the context menu, choose Add Objects.c. In the Find dialog, enter the name of the data source and select it from the list.
You can add one or more data sources depending on the selected view node.d. Choose OK.
11. Define output columns.a. Select a view node.
62 P U B L I CSAP HANA Modeling Guide
Creating Information Views and Previewing its Output
b. In the Details pane, select the columns that you want to add to the output of the node.c. In the context menu, choose Add To Output.d. If you want to add all columns from the data source to the output, in the context menu of the data
source, choose Add All To Output.
NoteUsing keep flag column property. The keep flag property helps retrieve columns from the view node to the result set even if you do not request it in your query. In other words, if you want to include those columns into the SQL group by clause even if you do not select them in the query, then:
1. Select the view node.2. In the Output pane, select an output column.3. In the Properties pane, set the value of Keep Flag property to True.
12. Define attributes and measures.
If you are creating a calculation view with data category as cube, then to successfully activate the information view, you have to specify at least one column as a measure.
a. Select the Semantics node.b. Choose the Columns tab.c. In the Local section, select an output column.d. In the Type dropdown list, select Measure or Attribute.
If the value is set to Cube, an additional Aggregation column is available to specify the aggregation type for measures.
NoteIf the default node of the calculation view is aggregation, you can always aggregate the measures even if no aggregation function is specified in the SQL.
1. Select the default aggregation node.
2. In the Properties tab, set the value of the property Always Aggregate Results to True
e. If you want to hide the measure of attribute in the reporting tool, select the Hidden checkbox.f. If you want to force the query to retrieve selected attribute columns from the database even when not
requested in the query, set the Keep Flag property to True for those attributes.
This means that you are including those columns into the group by clause even if you do not select them in the query. To set the Keep Flag property of attributes to True, select an attribute in the Output pane, and in the Properties pane set the Keep Flag property to True.
NoteIf you are using any attribute view as a data source to model the calculation view, the Shared section displays attributes from the attribute views that are used in the calculation view.
13. Activate the calculation view.○ If you are in the SAP HANA Modeler perspective,
○ Save and Activate - to activate the current view and redeploy the affected objects if an active version of the affected object exists. Otherwise, only the current view is activated.
SAP HANA Modeling GuideCreating Information Views and Previewing its Output P U B L I C 63
○ Save and Activate All - to activate the current view along with the required and affected objects.
NoteYou can also activate the current view by selecting the view in the SAP HANA Systems view and choosing Activate in the context menu. The activation triggers validation check for both the client side and the server side rules. If the object does not meet any validation check, the object activation fails.
○ If you are in the SAP HANA Development perspective,1. In the Project Explorer view, select the required object.
2. In the context menu, select Team Activate .
NoteThe activation only triggers the validation check for the server side rules. If there are any errors on the client side, they are skipped, and the object activation goes through if no error is found on the server side.
Note1. For an active calculation view, you can preview output data of an intermediate node. This helps to
debug each level of a complex calculation scenarios ( having join, union, aggregation, projection, and output nodes). Choose the Data Preview option from the context menu of a node.When you preview the data of an intermediate now, SAP HANA studio activates the intermediate calculation model with the current user instead of the user _SYS_REPO. The data you preview for a node is for the active version of the calculation view. If no active version for the object exists then you need to activate the object first.
14. Assign Changesa. In the Select Change dialog, either create a new ID or select an existing change ID that you want to use
to assign your changes.b. Choose Finish.
For more information on assigning changes, see chapter SAP HANA Change Recording of the SAP HANA Developer Guide.
15. Choose Finish.
Next Steps
After creating a graphical calculation view, you can perform certain additional tasks to obtain the desired output. The table below lists the additional tasks that you can perform to enrich the calculation view.
Table 19: Working With View Nodes
Requirement Task to Perform
If you want to query data from two data sources and combine records from both the data sources based on a join condition or to obtain language specific data.
Create Joins
64 P U B L I CSAP HANA Modeling Guide
Creating Information Views and Previewing its Output
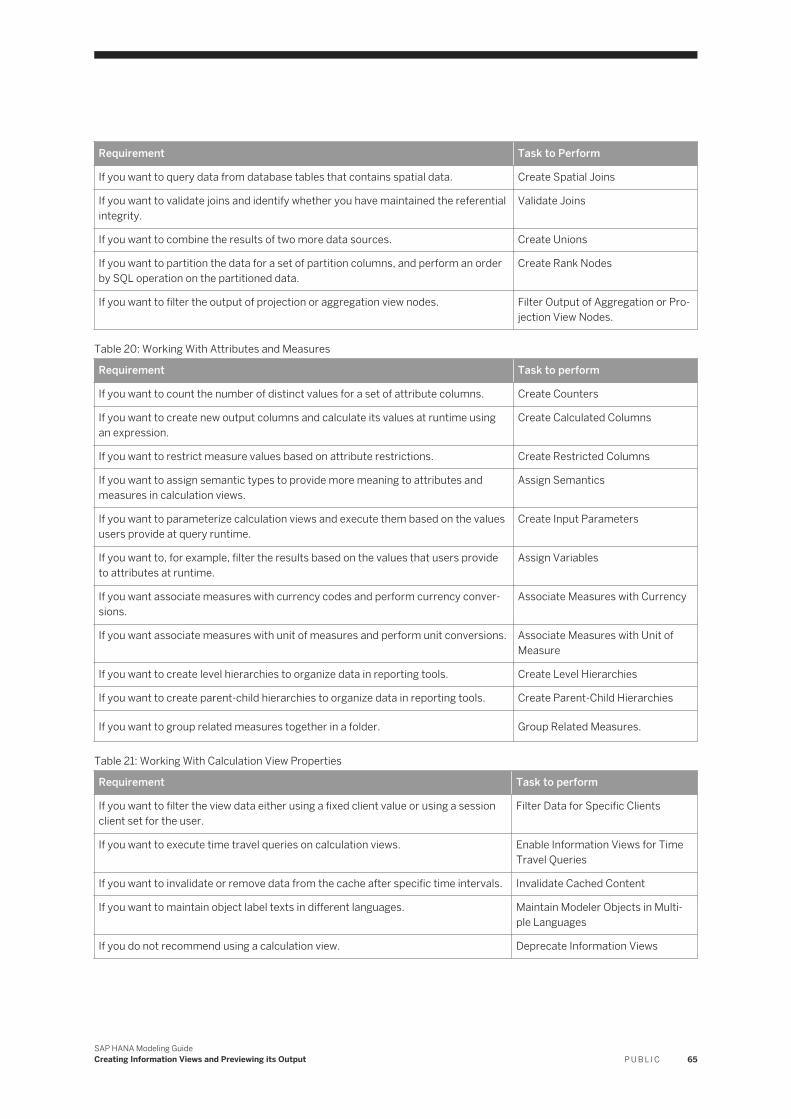
Requirement Task to Perform
If you want to query data from database tables that contains spatial data. Create Spatial Joins
If you want to validate joins and identify whether you have maintained the referential integrity.
Validate Joins
If you want to combine the results of two more data sources. Create Unions
If you want to partition the data for a set of partition columns, and perform an order by SQL operation on the partitioned data.
Create Rank Nodes
If you want to filter the output of projection or aggregation view nodes. Filter Output of Aggregation or Projection View Nodes.
Table 20: Working With Attributes and Measures
Requirement Task to perform
If you want to count the number of distinct values for a set of attribute columns. Create Counters
If you want to create new output columns and calculate its values at runtime using an expression.
Create Calculated Columns
If you want to restrict measure values based on attribute restrictions. Create Restricted Columns
If you want to assign semantic types to provide more meaning to attributes and measures in calculation views.
Assign Semantics
If you want to parameterize calculation views and execute them based on the values users provide at query runtime.
Create Input Parameters
If you want to, for example, filter the results based on the values that users provide to attributes at runtime.
Assign Variables
If you want associate measures with currency codes and perform currency conversions.
Associate Measures with Currency
If you want associate measures with unit of measures and perform unit conversions. Associate Measures with Unit of Measure
If you want to create level hierarchies to organize data in reporting tools. Create Level Hierarchies
If you want to create parent-child hierarchies to organize data in reporting tools. Create Parent-Child Hierarchies
If you want to group related measures together in a folder. Group Related Measures.
Table 21: Working With Calculation View Properties
Requirement Task to perform
If you want to filter the view data either using a fixed client value or using a session client set for the user.
Filter Data for Specific Clients
If you want to execute time travel queries on calculation views. Enable Information Views for Time Travel Queries
If you want to invalidate or remove data from the cache after specific time intervals. Invalidate Cached Content
If you want to maintain object label texts in different languages. Maintain Modeler Objects in Multiple Languages
If you do not recommend using a calculation view. Deprecate Information Views
SAP HANA Modeling GuideCreating Information Views and Previewing its Output P U B L I C 65
Related Information
Create Graphical Calculation Views With Star Joins [page 66]Use Table Functions as a Data Source [page 68]Use CDS Entity and CDS Views as a Data Source [page 69]Supported View Nodes for Modeling Graphical Calculation Views [page 70]Multitenant Database Containers Support for Modeling Graphical Calculation Views [page 71]Supported Data Categories for Information Views [page 72]Working With View Nodes [page 73]Preview Information View Output [page 97]Working With Attributes and Measures [page 101]Working With Information View Properties [page 149]Defining Data Access Privileges [page 162]Additional Functionality for Information Views [page 200]
7.4.3.1 Create Graphical Calculation Views With Star Joins
Create graphical calculation views with star joins to join multiple dimensions with a single fact table. In other words, you use star joins to join a central entity to multiple entities that are logically related.
Context
Star joins in calculation views help you to join a fact table with dimensional data. The fact table contains data that represent business facts such price, discount values, number of units sold, and so on. Dimension tables represent different ways to organize data, such as geography, time intervals, and contact names and so on.
Procedure
1. Launch SAP HANA studio.2. In SAP HANA System view, expand the content node.3. In the navigator, select a package where you want to create the new calculation view.
4. In the context menu of the package, select New Calculation View5. Provide name and description.6. In the Type dropdown list, select Graphical.7. In the Data Category dropdown list, select Cube.8. Select With Star Join.
66 P U B L I CSAP HANA Modeling Guide
Creating Information Views and Previewing its Output
NoteYou can create star join with data category as cube only.
9. Choose Finish.
Modeler launches a new graphical calculation view editor with the semantics node and the star join node.10. Add data sources.
a. Select the star join node.b. In the context menu, choose Add Objects.c. In Find Data Sources dialog, enter the name of the data source.
NoteYou can only add calculation views with data category types as dimension or blank as a data source in star join node.
d. Select the required calculation view from the list.e. Choose OK.
11. Rearrange data sources
By default, the last data source (first from the bottom) in the star join node is executed first. If you want to rearrange the data sources after adding it to the star join node:
a. Select the data source.b. In the context menu, choose Move.c. Choose Up of Down to rearrange the data sources.
12. Add inputs to star join node.
Continue modeling the graphical calculation view with a cube structure, which includes attributes and measures. The input to the star join node must provide the central fact table.
13. Maintain star join properties.a. Select the Star Join node.b. In the Details tab, create joins by selecting a column from one data source, holding the mouse button
down and dragging to a column in the central fact table.c. Select the join.d. In the context menu, choose Edit.e. In the Properties section, define necessary join properties.
NoteYou can assign the join types, Right Outer or Full Outer Join only to the last data source (first from the bottom) and no other data sources in the star join node must have the right outer or full outer join types.
14. Activate the calculation view.
SAP HANA Modeling GuideCreating Information Views and Previewing its Output P U B L I C 67
Related Information
Create Joins [page 73]Join Properties [page 85]Supported Join Types [page 86]
7.4.3.2 Use Table Functions as a Data Source
Table functions as a data source in graphical calculation views helps build calculation views for complex calculation scenarios.
Context
Table functions in graphical calculation views are an alternate to script-based calculation views that you use generally for building complex calculation views.
NoteThe IN function does not work in SQL script to filter a dynamic list of values. You have to use APPLY_FILTER functions instead.
Procedure
1. Open the graphical calculation view in the view editor.2. Select a view node.3. In the context menu, choose Add Objects.4. In the Find dialog, enter the name of the table function and select it from the dropdown list.
You can also add catalog table functions as data source.5. Choose OK.
Related Information
Create Table Functions [page 69]
68 P U B L I CSAP HANA Modeling Guide
Creating Information Views and Previewing its Output
7.4.3.2.1 Create Table Functions
Table functions are functions that users can query like any other database tables, and you can add it as a data source in your graphical calculation views. You can use the from clause of a SQL statement to call a table function.
Context
You can create and edit table functions in both, the project explorer view or in the repositories view of SAP HANA Development perspective.
Procedure
1. Open New Table Function wizard.Go to the Project Explorer view in the SAP HANA Development perspective, right-click on the file name, choose New Other SAP HANA Database Development Table Function . The New Table Function wizard appears.
2. Define the function parameters.Enter or select the parent folder, enter the file name, and choose Finish.The editor opens containing a default template for the function. In a shared project, the design-time function name is generated containing the full path. In an unshared project, the full function name must be added manually.
3. Commit and activate your function.
7.4.3.3 Use CDS Entity and CDS Views as a Data Source
For modeling graphical calculation views, you can also use CDS entities and CDS views as a data source. The entity is the core artifact for persistence-model definition using the CDS syntax and CDS views are database views created using the CDS syntax.
Prerequisites
● You have upgraded to SAP HANA 1.0 SPS 10 server where the version of rest API DU (HANA_DT_BASE) is 1.3.11
● You have the user role permission, sap.hana.xs.dt.base::restapi
SAP HANA Modeling GuideCreating Information Views and Previewing its Output P U B L I C 69
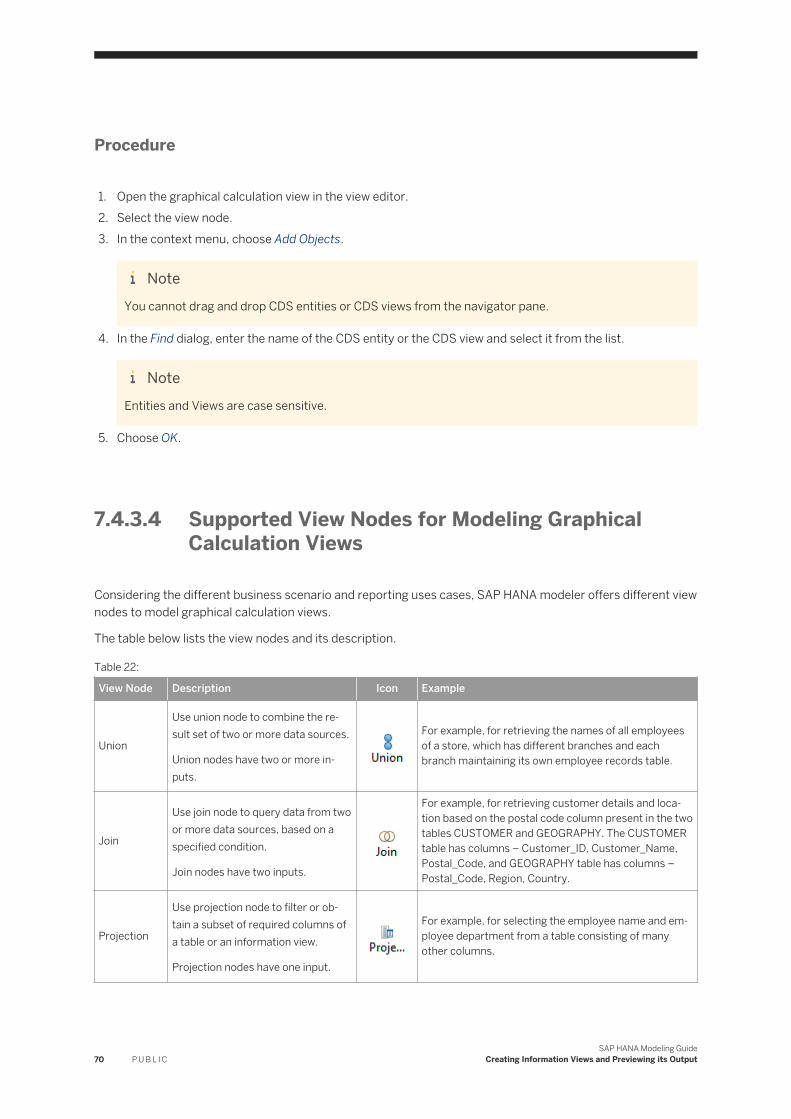
Procedure
1. Open the graphical calculation view in the view editor.2. Select the view node.3. In the context menu, choose Add Objects.
NoteYou cannot drag and drop CDS entities or CDS views from the navigator pane.
4. In the Find dialog, enter the name of the CDS entity or the CDS view and select it from the list.
NoteEntities and Views are case sensitive.
5. Choose OK.
7.4.3.4 Supported View Nodes for Modeling Graphical Calculation Views
Considering the different business scenario and reporting uses cases, SAP HANA modeler offers different view nodes to model graphical calculation views.
The table below lists the view nodes and its description.
Table 22:
View Node Description Icon Example
Union
Use union node to combine the result set of two or more data sources.
Union nodes have two or more inputs.
For example, for retrieving the names of all employees of a store, which has different branches and each branch maintaining its own employee records table.
Join
Use join node to query data from two or more data sources, based on a specified condition.
Join nodes have two inputs.
For example, for retrieving customer details and location based on the postal code column present in the two tables CUSTOMER and GEOGRAPHY. The CUSTOMER table has columns – Customer_ID, Customer_Name, Postal_Code, and GEOGRAPHY table has columns – Postal_Code, Region, Country.
Projection
Use projection node to filter or obtain a subset of required columns of a table or an information view.
Projection nodes have one input.
For example, for selecting the employee name and employee department from a table consisting of many other columns.
70 P U B L I CSAP HANA Modeling Guide
Creating Information Views and Previewing its Output
View Node Description Icon Example
Aggregation
Use aggregation node to summarize data for a group of row values, by calculating values in a column.
Aggregation nodes have one input.
For example, for retrieving total sales of a product in a month. The supported aggregation types are sum, min, and max.
Rank
Use rank node to partition the data for a set of partition columns, and performs an order by operation on the partitioned data.
Rank nodes have one input.
For example, consider a TRANSACTION table with two columns PRODUCT and SALES. If you want to retrieve the top five products based on its sales, then use a rank node.
NoteYou can use data sources, union, join, projection, or aggregation view nodes and the inputs to union, join, projection, and aggregation view nodes.
7.4.3.5 Multitenant Database Containers Support for Modeling Graphical Calculation Views
SAP HANA supports multiple isolated databases in a single SAP HANA system. These are referred to as multitenant database containers.
An SAP HANA system installed in multiple-container mode is capable of containing more than one multitenant database containers. Otherwise, it is a single-container system. A multiple-container system always has exactly one system database and any number of multitenant database containers (including zero), also called tenant databases. An SAP HANA system installed in multiple-container mode is identified by a single system ID (SID).
You can model graphical calculation views in an SAP HANA system with multiple isolated databases. This means that, while modeling graphical calculation views, you can add data source from any of the isolated databases.
NoteModeler supports adding only the catalog tables, SQL views and graphical calculation views as data sources from the tenant databases. These data sources must be already activated before you use them for modeling graphical calculation views in multi DB scenario.
Prerequisites
● You have added the SAP HANA system having multiple isolated databases to the SAP HANA Systems view.
● For activating graphical calculation views with remote data sources, the _SYS_REPO in the local data base needs to be a remote identity of (mapped to) a user in the remote data base that has the privileges for the remote tables. The database does not allow the administrator to add a remote identity to SYS_REPO in
SAP HANA Modeling GuideCreating Information Views and Previewing its Output P U B L I C 71
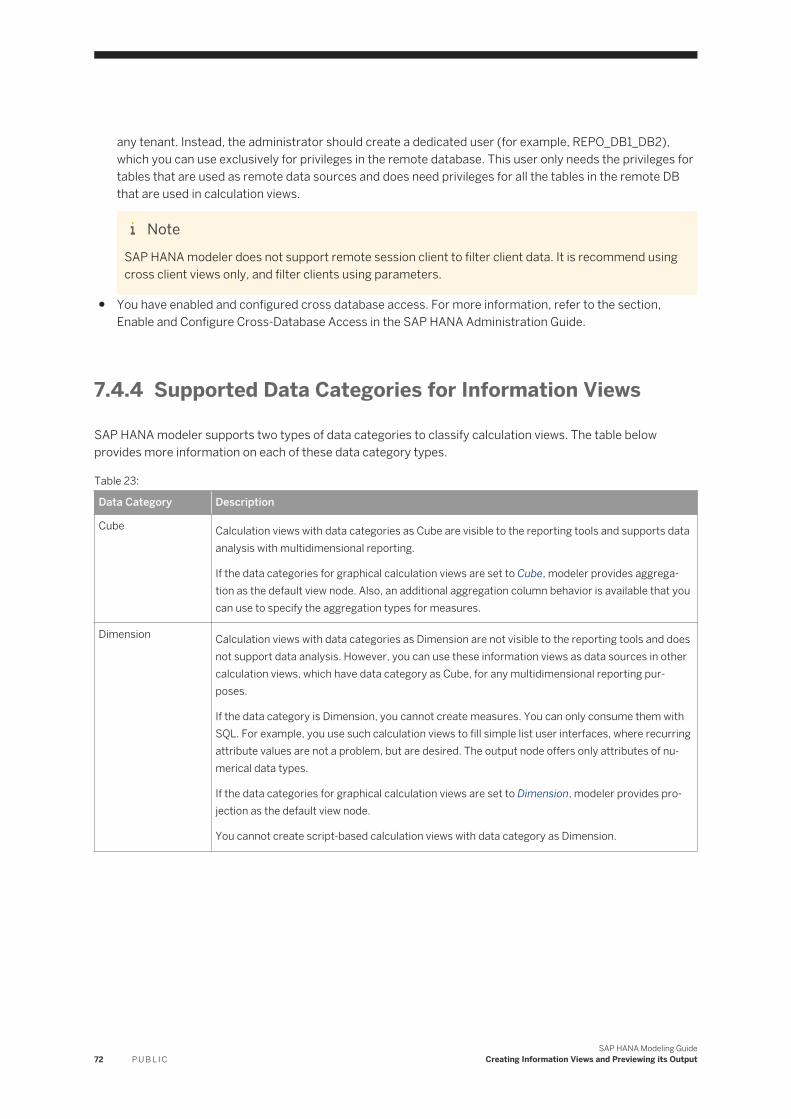
any tenant. Instead, the administrator should create a dedicated user (for example, REPO_DB1_DB2), which you can use exclusively for privileges in the remote database. This user only needs the privileges for tables that are used as remote data sources and does need privileges for all the tables in the remote DB that are used in calculation views.
NoteSAP HANA modeler does not support remote session client to filter client data. It is recommend using cross client views only, and filter clients using parameters.
● You have enabled and configured cross database access. For more information, refer to the section, Enable and Configure Cross-Database Access in the SAP HANA Administration Guide.
7.4.4 Supported Data Categories for Information Views
SAP HANA modeler supports two types of data categories to classify calculation views. The table below provides more information on each of these data category types.
Table 23:
Data Category Description
Cube Calculation views with data categories as Cube are visible to the reporting tools and supports data analysis with multidimensional reporting.
If the data categories for graphical calculation views are set to Cube, modeler provides aggregation as the default view node. Also, an additional aggregation column behavior is available that you can use to specify the aggregation types for measures.
Dimension Calculation views with data categories as Dimension are not visible to the reporting tools and does not support data analysis. However, you can use these information views as data sources in other calculation views, which have data category as Cube, for any multidimensional reporting purposes.
If the data category is Dimension, you cannot create measures. You can only consume them with SQL. For example, you use such calculation views to fill simple list user interfaces, where recurring attribute values are not a problem, but are desired. The output node offers only attributes of numerical data types.
If the data categories for graphical calculation views are set to Dimension, modeler provides projection as the default view node.
You cannot create script-based calculation views with data category as Dimension.
72 P U B L I CSAP HANA Modeling Guide
Creating Information Views and Previewing its Output
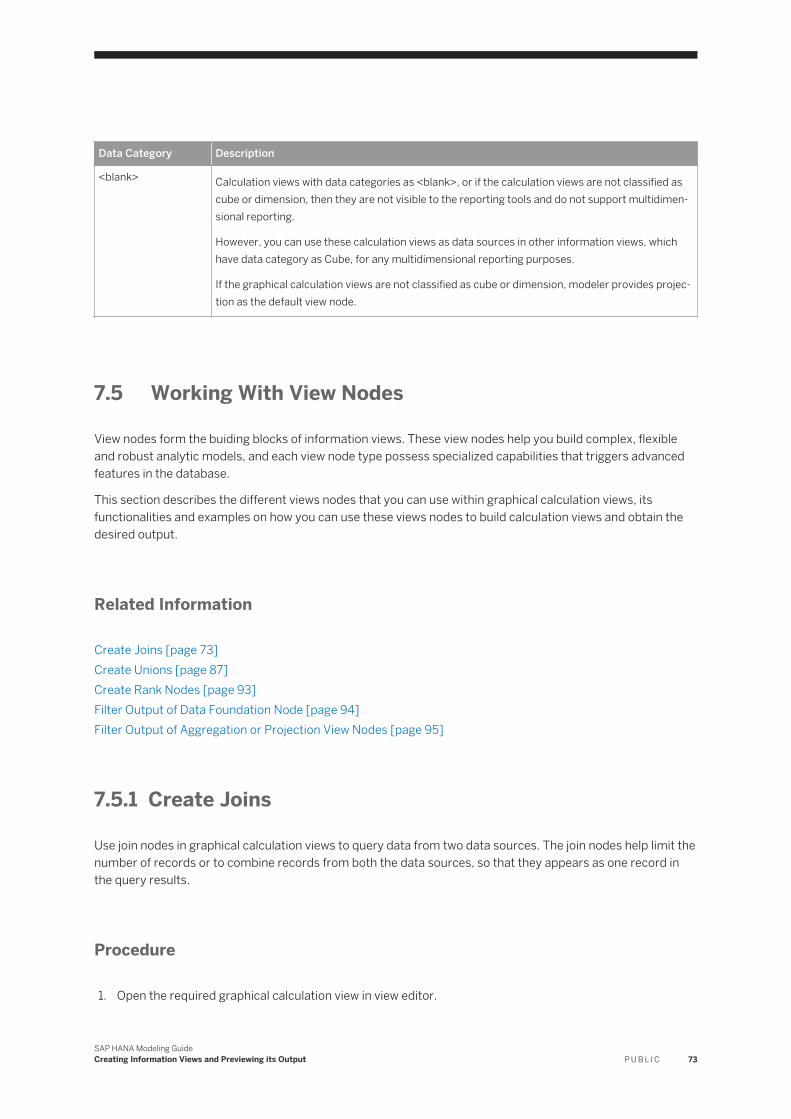
Data Category Description
<blank> Calculation views with data categories as <blank>, or if the calculation views are not classified as cube or dimension, then they are not visible to the reporting tools and do not support multidimensional reporting.
However, you can use these calculation views as data sources in other information views, which have data category as Cube, for any multidimensional reporting purposes.
If the graphical calculation views are not classified as cube or dimension, modeler provides projection as the default view node.
7.5 Working With View Nodes
View nodes form the buiding blocks of information views. These view nodes help you build complex, flexible and robust analytic models, and each view node type possess specialized capabilities that triggers advanced features in the database.
This section describes the different views nodes that you can use within graphical calculation views, its functionalities and examples on how you can use these views nodes to build calculation views and obtain the desired output.
Related Information
Create Joins [page 73]Create Unions [page 87]Create Rank Nodes [page 93]Filter Output of Data Foundation Node [page 94]Filter Output of Aggregation or Projection View Nodes [page 95]
7.5.1 Create Joins
Use join nodes in graphical calculation views to query data from two data sources. The join nodes help limit the number of records or to combine records from both the data sources, so that they appears as one record in the query results.
Procedure
1. Open the required graphical calculation view in view editor.
SAP HANA Modeling GuideCreating Information Views and Previewing its Output P U B L I C 73
2. From the editor’s tools pallet, drag and drop a join node to the editor.3. Add data sources.
a. Select the join node.b. In the context menu, choose Add Objects.c. In Find Data Sources dialog, enter the name of the data source and select it from the list.d. Choose OK.
NoteBy default, modeler consider the data source that you add first to the join node as the left table and the data source that you add next as the right table.
4. Define output columns.a. In the Details pane, select the columns you want to add to the output of the join node.b. In the context menu, choose Add To Output.
NoteIf you want to add all columns from the data source to the output, in the context menu of the data source, choose Add All To Output.
5. Create a join.a. In the Details pane, create a join by selecting a column from one data source, holding the mouse
button down and dragging to a column in the other data source.
NoteIf you want to switch the left and right tables, in the context menu of the join, select Swap Left and Right Tables.
6. Edit join properties.a. Select the join.b. In the context menu, choose Edit.c. In the Properties section, define necessary join properties.
Related Information
Create Spatial Joins [page 75]Text Joins [page 80]Dynamic Joins [page 81]Optimize Join Execution [page 84]Validate Joins [page 84]Join Properties [page 85]Supported Join Types [page 86]
74 P U B L I CSAP HANA Modeling Guide
Creating Information Views and Previewing its Output
7.5.1.1 Create Spatial Joins
Create spatial joins by using the join nodes in graphical calculation views to query data from data sources that have spatial data.
Procedure
1. Open the required graphical calculation view in view editor.2. From the editor’s tools palette, drag and drop a join node to the editor.3. Add data sources.
a. Select the join node.b. In the context menu, choose Add Objects.c. In Find Data Sources dialog, enter the name of the data source with spatial data and select it from the
list.d. Choose OK.
NoteBy default, modeler consider the data source that you add first to the join node as the left table and the data source that you add next as the right table.
4. Define output columns.a. In the Detailsb. In the context menu, choose Add To Output.
NoteIf you want to add all columns from the data source to the output, in the context menu of the data source, choose pane, select the columns you want to add to the output of the join node.Add All To Output.
5. Create a join.a. In the Details pane, select the columns you want pane, create a join by selecting a column from one
data source, holding the mouse button down and dragging to a column in the other data source.
NoteFor spatial joins, you join the two databases tables on columns of spatial data types.
6. Define spatial join properties.a. Select the join.b. In the context menu, choose Edit.c. Select the Spatial Properties tab.d. In the Predicates dropdown list, select a predicate value.
SAP HANA Modeling GuideCreating Information Views and Previewing its Output P U B L I C 75
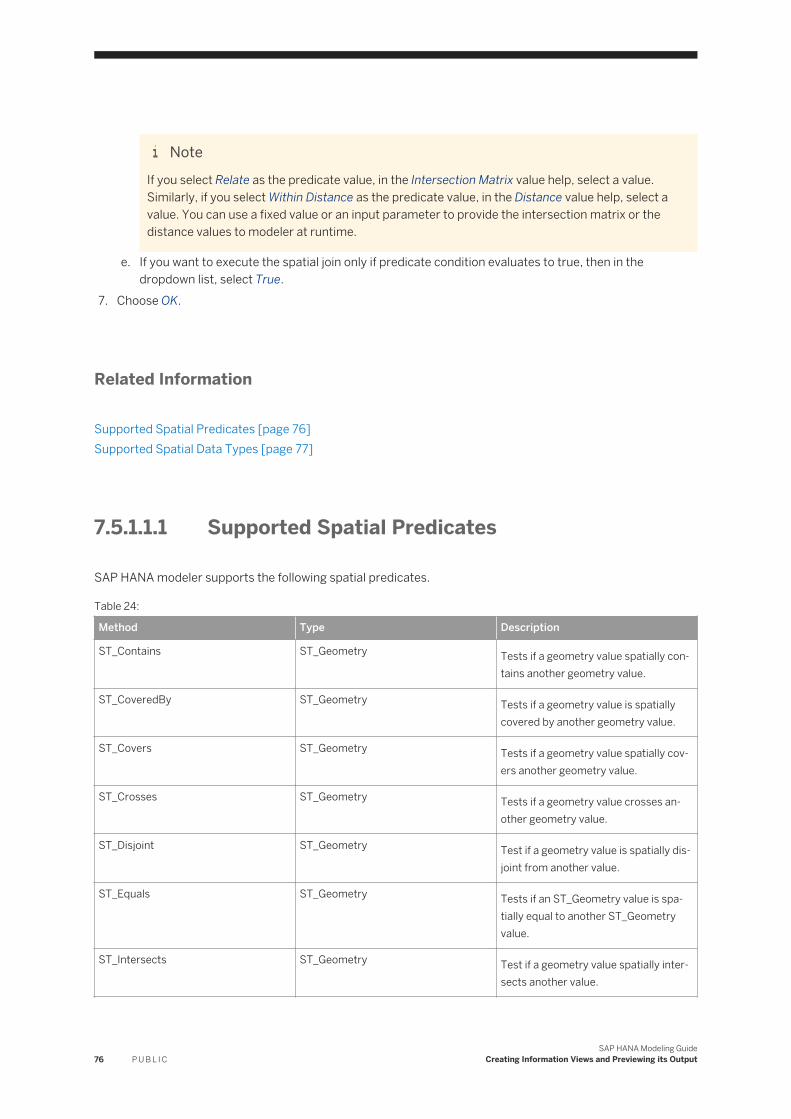
NoteIf you select Relate as the predicate value, in the Intersection Matrix value help, select a value. Similarly, if you select Within Distance as the predicate value, in the Distance value help, select a value. You can use a fixed value or an input parameter to provide the intersection matrix or the distance values to modeler at runtime.
e. If you want to execute the spatial join only if predicate condition evaluates to true, then in the dropdown list, select True.
7. Choose OK.
Related Information
Supported Spatial Predicates [page 76]Supported Spatial Data Types [page 77]
7.5.1.1.1 Supported Spatial Predicates
SAP HANA modeler supports the following spatial predicates.
Table 24:
Method Type Description
ST_Contains ST_Geometry Tests if a geometry value spatially contains another geometry value.
ST_CoveredBy ST_Geometry Tests if a geometry value is spatially covered by another geometry value.
ST_Covers ST_Geometry Tests if a geometry value spatially covers another geometry value.
ST_Crosses ST_Geometry Tests if a geometry value crosses another geometry value.
ST_Disjoint ST_Geometry Test if a geometry value is spatially disjoint from another value.
ST_Equals ST_Geometry Tests if an ST_Geometry value is spatially equal to another ST_Geometry value.
ST_Intersects ST_Geometry Test if a geometry value spatially intersects another value.
76 P U B L I CSAP HANA Modeling Guide
Creating Information Views and Previewing its Output
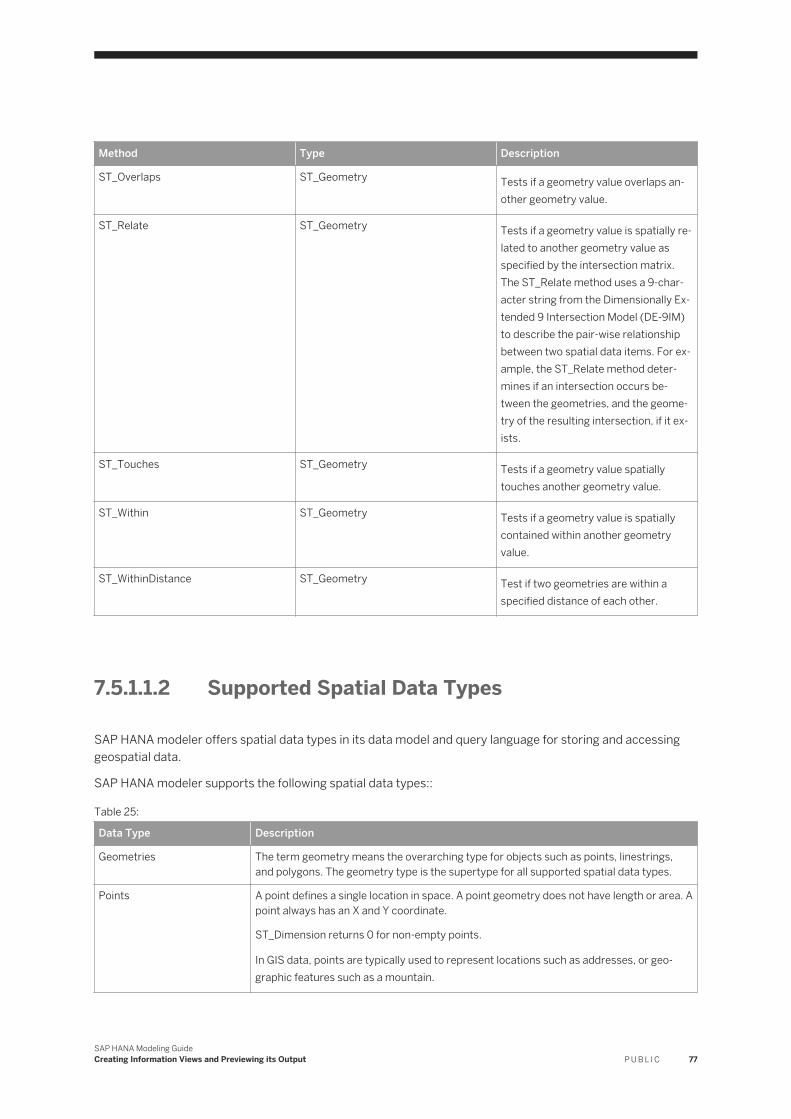
Method Type Description
ST_Overlaps ST_Geometry Tests if a geometry value overlaps another geometry value.
ST_Relate ST_Geometry Tests if a geometry value is spatially related to another geometry value as specified by the intersection matrix. The ST_Relate method uses a 9-character string from the Dimensionally Extended 9 Intersection Model (DE-9IM) to describe the pair-wise relationship between two spatial data items. For example, the ST_Relate method determines if an intersection occurs between the geometries, and the geometry of the resulting intersection, if it exists.
ST_Touches ST_Geometry Tests if a geometry value spatially touches another geometry value.
ST_Within ST_Geometry Tests if a geometry value is spatially contained within another geometry value.
ST_WithinDistance ST_Geometry Test if two geometries are within a specified distance of each other.
7.5.1.1.2 Supported Spatial Data Types
SAP HANA modeler offers spatial data types in its data model and query language for storing and accessing geospatial data.
SAP HANA modeler supports the following spatial data types::
Table 25:
Data Type Description
Geometries The term geometry means the overarching type for objects such as points, linestrings, and polygons. The geometry type is the supertype for all supported spatial data types.
Points A point defines a single location in space. A point geometry does not have length or area. A point always has an X and Y coordinate.
ST_Dimension returns 0 for non-empty points.
In GIS data, points are typically used to represent locations such as addresses, or geographic features such as a mountain.
SAP HANA Modeling GuideCreating Information Views and Previewing its Output P U B L I C 77
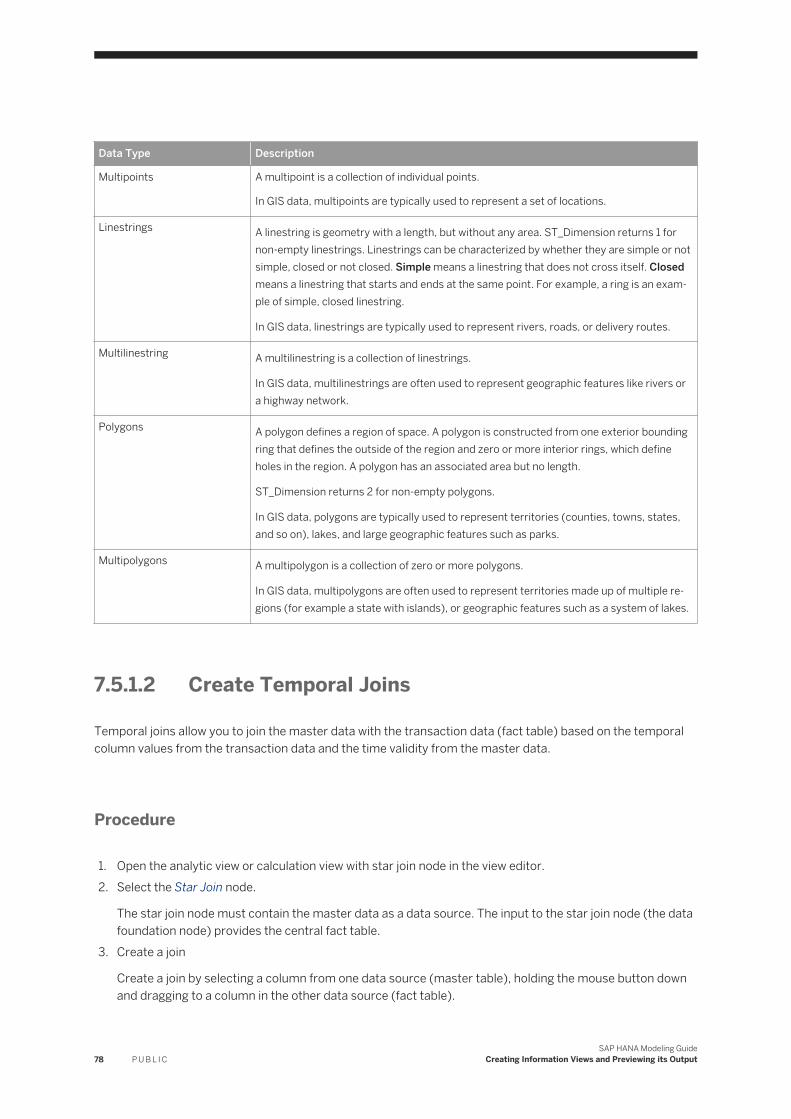
Data Type Description
Multipoints A multipoint is a collection of individual points.
In GIS data, multipoints are typically used to represent a set of locations.
Linestrings A linestring is geometry with a length, but without any area. ST_Dimension returns 1 for non-empty linestrings. Linestrings can be characterized by whether they are simple or not simple, closed or not closed. Simple means a linestring that does not cross itself. Closed means a linestring that starts and ends at the same point. For example, a ring is an example of simple, closed linestring.
In GIS data, linestrings are typically used to represent rivers, roads, or delivery routes.
Multilinestring A multilinestring is a collection of linestrings.
In GIS data, multilinestrings are often used to represent geographic features like rivers or a highway network.
Polygons A polygon defines a region of space. A polygon is constructed from one exterior bounding ring that defines the outside of the region and zero or more interior rings, which define holes in the region. A polygon has an associated area but no length.
ST_Dimension returns 2 for non-empty polygons.
In GIS data, polygons are typically used to represent territories (counties, towns, states, and so on), lakes, and large geographic features such as parks.
Multipolygons A multipolygon is a collection of zero or more polygons.
In GIS data, multipolygons are often used to represent territories made up of multiple regions (for example a state with islands), or geographic features such as a system of lakes.
7.5.1.2 Create Temporal Joins
Temporal joins allow you to join the master data with the transaction data (fact table) based on the temporal column values from the transaction data and the time validity from the master data.
Procedure
1. Open the analytic view or calculation view with star join node in the view editor.2. Select the Star Join node.
The star join node must contain the master data as a data source. The input to the star join node (the data foundation node) provides the central fact table.
3. Create a join
Create a join by selecting a column from one data source (master table), holding the mouse button down and dragging to a column in the other data source (fact table).
78 P U B L I CSAP HANA Modeling Guide
Creating Information Views and Previewing its Output
4. Select the join.5. In the context menu, choose Edit.6. Define join properties.
In the Properties section, define the join properties.
NoteFor temporal joins in analytic views, you can use Inner or Referential join types only and for temporal joins in calculation views, you can use Inner join type only.
7. Define temporal column and temporal conditions
In the Temporal Properties section, provide values to create temporal join.
a. In the Temporal Column dropdown list, select a time column in the analytic view.b. In the From Column and To Column dropdown lists specify the start and end time values from the
attribute view to fetch the records.c. In the Temporal Condition dropdown list, select a condition.
8. Choose OK.
Related Information
Temporal Joins [page 79]Temporal Conditions [page 80]Example: Temporal Joins [page 80]
7.5.1.2.1 Temporal Joins
A temporal join indicates the time interval mapping between the master data and the transaction data for which you want to fetch the records.
A temporal join, between two columns of the fact table and master table, is based on the date field from the fact table and time interval (to and from fields) of the master table. The date field from the fact table is referred to as the temporal column.
This means that, the tables are joined if the temporal column values in the fact table value are within the valid time interval values from the master table. A time interval is assigned to each record in the results set, and the records are valid for the duration of the interval to which they are assigned.
The supported data types for Temporal Column, From Column and To Column are timestamp, date, and integers only.
SAP HANA Modeling GuideCreating Information Views and Previewing its Output P U B L I C 79
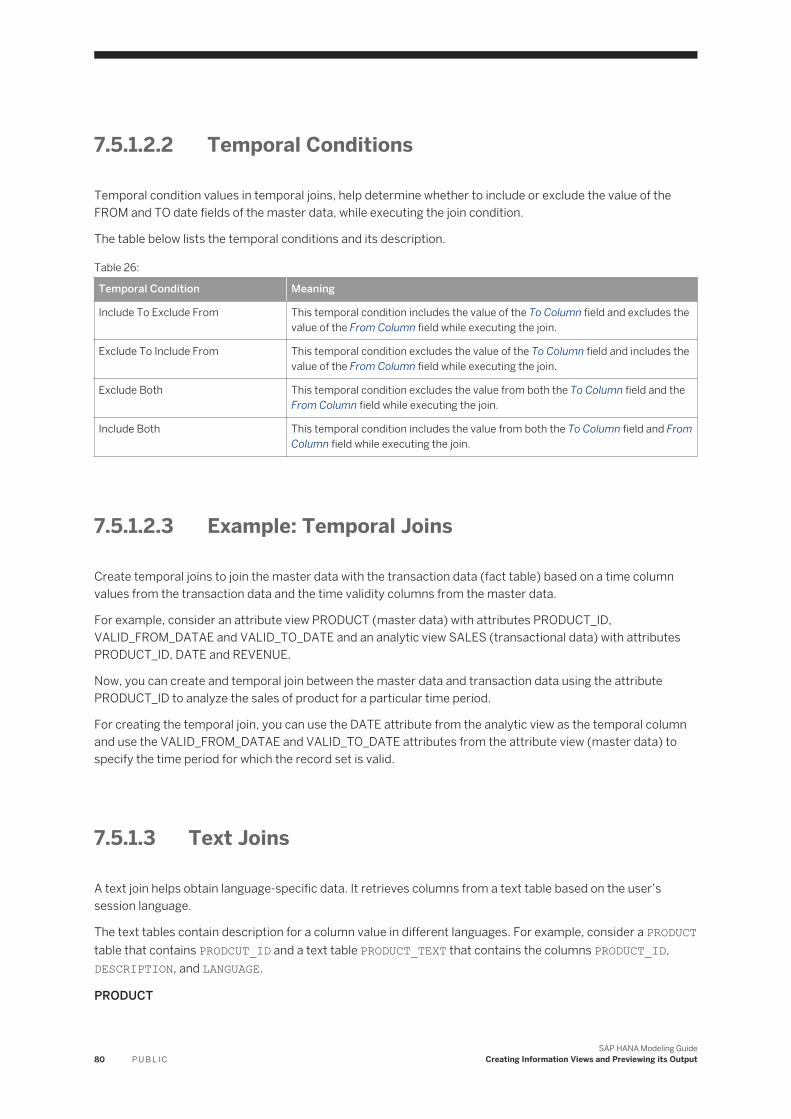
7.5.1.2.2 Temporal Conditions
Temporal condition values in temporal joins, help determine whether to include or exclude the value of the FROM and TO date fields of the master data, while executing the join condition.
The table below lists the temporal conditions and its description.
Table 26:
Temporal Condition Meaning
Include To Exclude From This temporal condition includes the value of the To Column field and excludes the value of the From Column field while executing the join.
Exclude To Include From This temporal condition excludes the value of the To Column field and includes the value of the From Column field while executing the join.
Exclude Both This temporal condition excludes the value from both the To Column field and the From Column field while executing the join.
Include Both This temporal condition includes the value from both the To Column field and From Column field while executing the join.
7.5.1.2.3 Example: Temporal Joins
Create temporal joins to join the master data with the transaction data (fact table) based on a time column values from the transaction data and the time validity columns from the master data.
For example, consider an attribute view PRODUCT (master data) with attributes PRODUCT_ID, VALID_FROM_DATAE and VALID_TO_DATE and an analytic view SALES (transactional data) with attributes PRODUCT_ID, DATE and REVENUE.
Now, you can create and temporal join between the master data and transaction data using the attribute PRODUCT_ID to analyze the sales of product for a particular time period.
For creating the temporal join, you can use the DATE attribute from the analytic view as the temporal column and use the VALID_FROM_DATAE and VALID_TO_DATE attributes from the attribute view (master data) to specify the time period for which the record set is valid.
7.5.1.3 Text Joins
A text join helps obtain language-specific data. It retrieves columns from a text table based on the user’s session language.
The text tables contain description for a column value in different languages. For example, consider a PRODUCT table that contains PRODCUT_ID and a text table PRODUCT_TEXT that contains the columns PRODUCT_ID, DESCRIPTION, and LANGUAGE.
PRODUCT
80 P U B L I CSAP HANA Modeling Guide
Creating Information Views and Previewing its Output
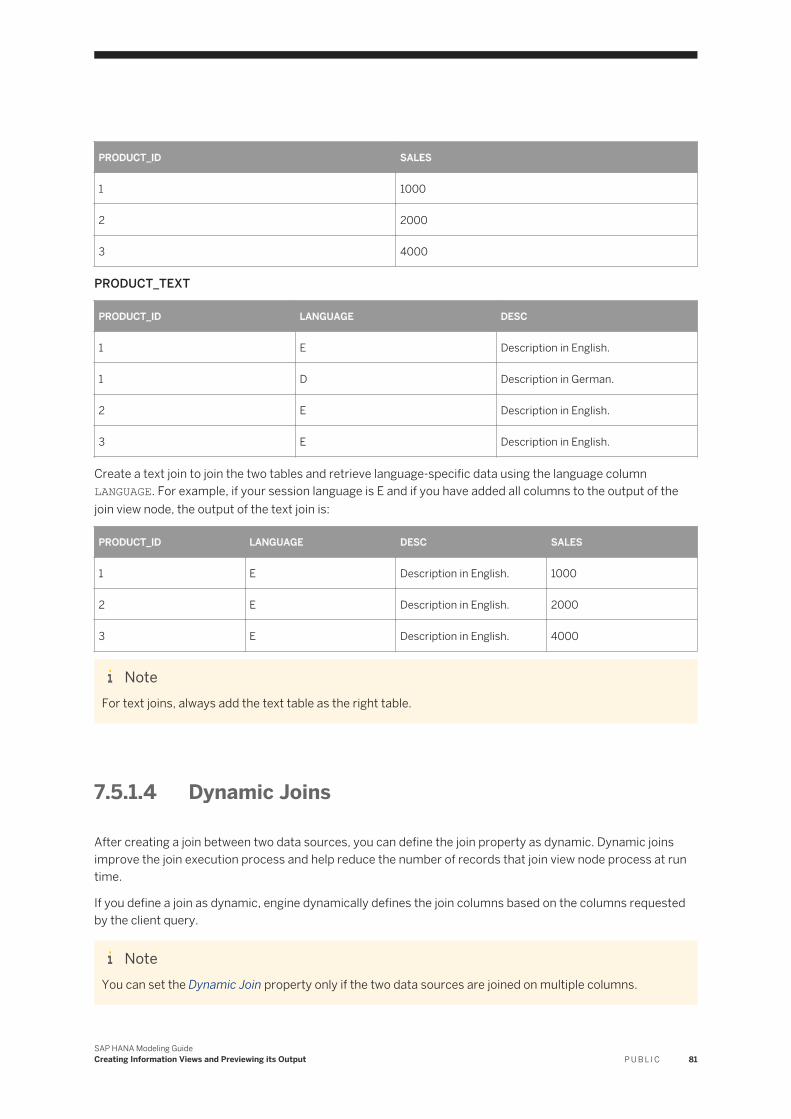
PRODUCT_ID SALES
1 1000
2 2000
3 4000
PRODUCT_TEXT
PRODUCT_ID LANGUAGE DESC
1 E Description in English.
1 D Description in German.
2 E Description in English.
3 E Description in English.
Create a text join to join the two tables and retrieve language-specific data using the language column LANGUAGE. For example, if your session language is E and if you have added all columns to the output of the join view node, the output of the text join is:
PRODUCT_ID LANGUAGE DESC SALES
1 E Description in English. 1000
2 E Description in English. 2000
3 E Description in English. 4000
NoteFor text joins, always add the text table as the right table.
7.5.1.4 Dynamic Joins
After creating a join between two data sources, you can define the join property as dynamic. Dynamic joins improve the join execution process and help reduce the number of records that join view node process at run time.
If you define a join as dynamic, engine dynamically defines the join columns based on the columns requested by the client query.
NoteYou can set the Dynamic Join property only if the two data sources are joined on multiple columns.
SAP HANA Modeling GuideCreating Information Views and Previewing its Output P U B L I C 81
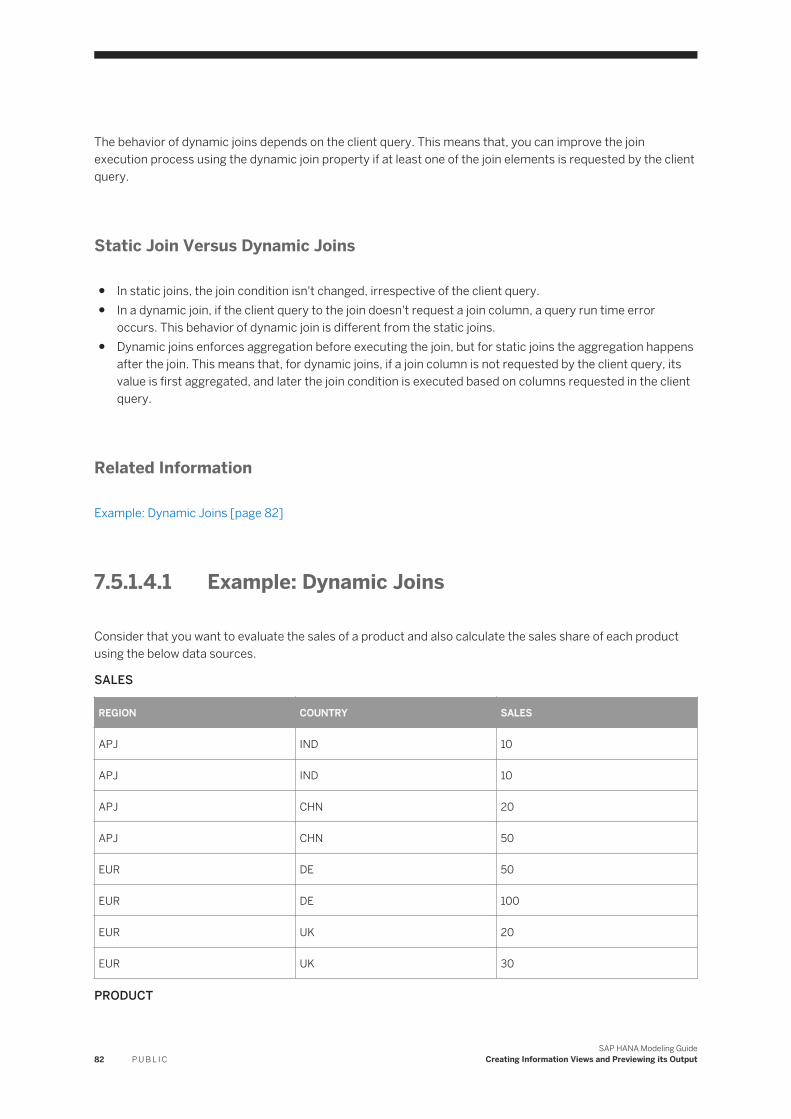
The behavior of dynamic joins depends on the client query. This means that, you can improve the join execution process using the dynamic join property if at least one of the join elements is requested by the client query.
Static Join Versus Dynamic Joins
● In static joins, the join condition isn't changed, irrespective of the client query.● In a dynamic join, if the client query to the join doesn't request a join column, a query run time error
occurs. This behavior of dynamic join is different from the static joins.● Dynamic joins enforces aggregation before executing the join, but for static joins the aggregation happens
after the join. This means that, for dynamic joins, if a join column is not requested by the client query, its value is first aggregated, and later the join condition is executed based on columns requested in the client query.
Related Information
Example: Dynamic Joins [page 82]
7.5.1.4.1 Example: Dynamic Joins
Consider that you want to evaluate the sales of a product and also calculate the sales share of each product using the below data sources.
SALES
REGION COUNTRY SALES
APJ IND 10
APJ IND 10
APJ CHN 20
APJ CHN 50
EUR DE 50
EUR DE 100
EUR UK 20
EUR UK 30
PRODUCT
82 P U B L I CSAP HANA Modeling Guide
Creating Information Views and Previewing its Output
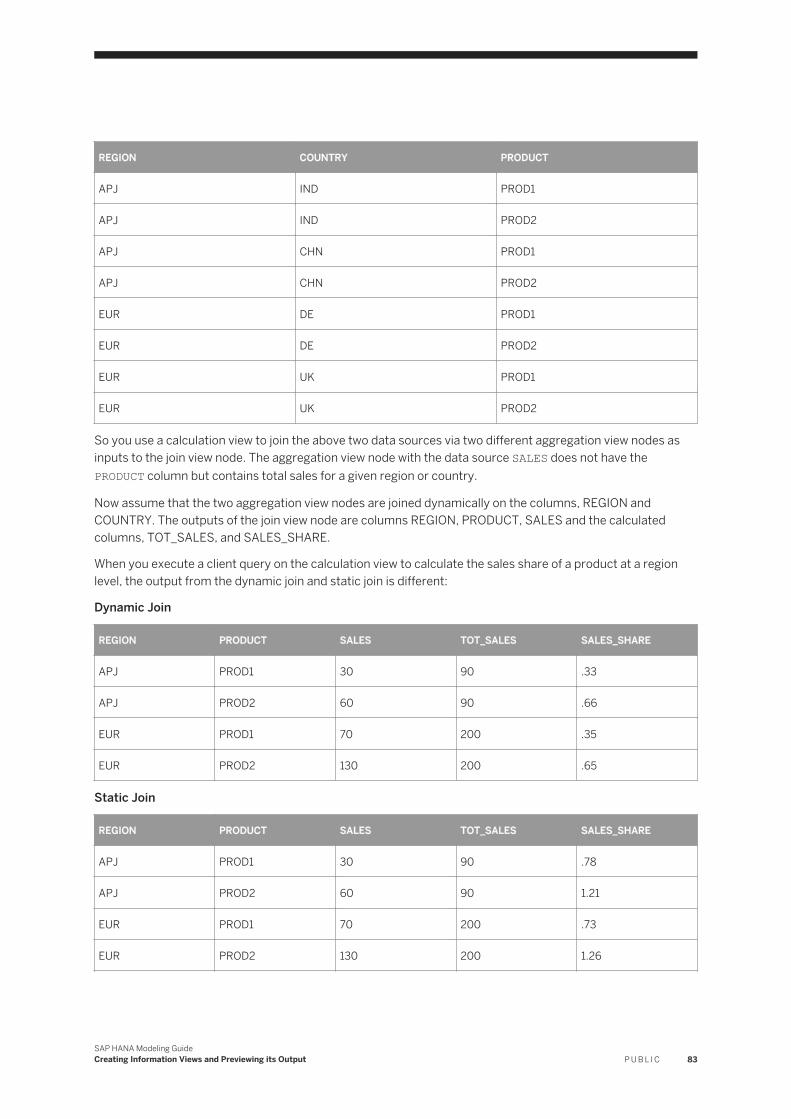
REGION COUNTRY PRODUCT
APJ IND PROD1
APJ IND PROD2
APJ CHN PROD1
APJ CHN PROD2
EUR DE PROD1
EUR DE PROD2
EUR UK PROD1
EUR UK PROD2
So you use a calculation view to join the above two data sources via two different aggregation view nodes as inputs to the join view node. The aggregation view node with the data source SALES does not have the PRODUCT column but contains total sales for a given region or country.
Now assume that the two aggregation view nodes are joined dynamically on the columns, REGION and COUNTRY. The outputs of the join view node are columns REGION, PRODUCT, SALES and the calculated columns, TOT_SALES, and SALES_SHARE.
When you execute a client query on the calculation view to calculate the sales share of a product at a region level, the output from the dynamic join and static join is different:
Dynamic Join
REGION PRODUCT SALES TOT_SALES SALES_SHARE
APJ PROD1 30 90 .33
APJ PROD2 60 90 .66
EUR PROD1 70 200 .35
EUR PROD2 130 200 .65
Static Join
REGION PRODUCT SALES TOT_SALES SALES_SHARE
APJ PROD1 30 90 .78
APJ PROD2 60 90 1.21
EUR PROD1 70 200 .73
EUR PROD2 130 200 1.26
SAP HANA Modeling GuideCreating Information Views and Previewing its Output P U B L I C 83
The dynamic join calculates the sales share at the region level by aggregating the sales values before joining the data sources. The static join, on the other hand, first calculates the sales share at the region level and the country level (because the join condition contains both region and country), and then aggregates the resulting sales share after the join is executed.
7.5.1.5 Optimize Join Execution
While executing the join, by default, the query retrieves join columns from the database even if you don't specify it in the query. The query automatically includes the join columns into the SQL GROUP BY clause without you selecting them in the query.
You can avoid this behavior by using the join property Optimizing Join Columns. When this property for a join is set to True, only the columns specified in the query are retrieved from the database.
NoteOptimizing join columns is supported only for left outer joins, or text joins (with cardinality 1:1 or N:1), and right outer joins (with cardinality 1:1 or 1:N).
The join optimizer cannot remove attributes of static filters if the filters are defined on join columns for which you have enabled Optimize Join Columns. In this case, you can optimize the join column by introducing a dummy projection view node between the join and the input node with static filters.
7.5.1.6 Validate Joins
SAP HANA modeler allows you to validate the join cardinality and identify whether you have maintained the referential integrity for the join tables.
Prerequisites
You have SELECT privileges on the catalog tables participating in the join to view the join validation status. If the participating catalog tables are virtual tables, then you can view the join validation status only if the user has SELECT privileges on the virtual table and also if the user credential to remote source has SELECT privileges on the remote table.
Context
While defining a join, you can validate the cardinality and identify whether you have maintained referential integrity for the join tables. If you have chosen a cardinality, which is not optimal for the join tables, modeler recommends to you cardinality after analyzing the data in the participating join tables.
84 P U B L I CSAP HANA Modeling Guide
Creating Information Views and Previewing its Output
NoteChoosing a valid cardinality for your data sources is necessary to avoid incorrect results from the engine, and to achieve better performance. If you are not aware of the optimal cardinality for your join, then it is recommended not to provide any cardinality value.
Procedure
1. Open the graphical calculation view in the view editor.2. Select the Join node.3. In the Details pane, select a join.4. In the context menu of the join, choose Validate Join.
Results
After analyzing the participating tables in your join definition, in the Validation Information section of the Validate Join dialog, modeler recommends to you an optimal cardinality and also specifies whether you have maintained referential integrity for the join tables. You can choose to modify the join definition based on this recommendation.
NoteThe cardinality that SAP HANA modeler recommends is applicable only to the current state of the system. It becomes invalid if you perform any changes to the data or if you transport your calculation view to another system with a different data set.
7.5.1.7 Join Properties
After creating a join, define its properties to obtain a desired output when you execute the join.
SAP HANA modeler allows you to define the following join properties.
Join Properties Description
Join Type The value of this property specifies the join type used for creating a join. For more information, see Supported Join Types.
Cardinality The value of this property specifies the cardinality used for creating a join.
SAP HANA Modeling GuideCreating Information Views and Previewing its Output P U B L I C 85
Join Properties Description
By default, the cardinality of the join is empty. If you are not sure about the right cardinality for the join tables, it is recommended to not specify any cardinality. Modeler determines the cardinality when executing the join.
Language Column The value of this property specifies the langue column that modeler must use for executing text joins. For more information, see Text Joins.
Dynamic Join The value of this property determines whether modeler must dynamically define the columns of the join condition based on the client query. For more information, see Dynamic Joins.
Optimize Join Columns The value of this property determines whether modeler must retrieve the columns that are not specified in the query from the database. For more information, see Optimize Join Execution.
7.5.1.8 Supported Join Types
When creating a join between two tables, you specify the join type. The below table lists the supported join types in SAP HANA modeler.
Table 27:
Join Type Description
Inner This join type returns all rows when there is at least one match in both the database tables.
Left Outer This join type returns all rows from the left table, and the matched rows from the right table.
Right Outer This join type returns all rows from the right table, and the matched rows from the left table.
Referential This join type is similar to inner join type, but assumes referential integrity is maintained for the join tables.
Text Join This join type is used to obtain language-specific data from the text tables using a language column.
Full Outer Joins This join type displays results from both left and right outer joins and returns all (matched or unmatched) rows from the tables on both sides of the join clause.
NoteFull outer join type is supported only in new calculation views created with SPS 11 version onwards.
86 P U B L I CSAP HANA Modeling Guide
Creating Information Views and Previewing its Output

7.5.2 Create Unions
Use union nodes in graphical calculation views to combine the results of two or more data sources.
Context
A union node combines multiple data sources, which can have multiple columns. You can manage the output of a union node by mapping the source columns to the output columns or by creating a target output column with constant values.
For a source column that does not have a mapping with any of the output columns, you can create a target output column and map it to the unmapped source columns. You can also create a target column with constant values.
Procedure
1. Open the required graphical calculation view in view editor.2. From the editor’s tools palette, drag and drop a union node to the editor.3. Add data sources.
a. Select the union node.b. In the context menu, choose Add Objects.c. In Find Data Sources dialog, enter the name of the data source and select it from the list.d. Choose OK.
4. Define output columns.a. In the Details pane, select the columns you want to add to the output of the union node.b. In the context menu, choose Add To Output.
NoteIf you want to add all columns from the data source to the output, in the context menu of the data source, choose Add All To Output.
5. Assign constant value.This helps to denote the underlying data of the source columns with constant values in the output.
If you want to assign a constant value to any of the target columns, then
a. In the Target section, select an output column.b. In the context menu, choose Manage Mappings.c. In the Manage Mappings dialog, set the Source Column value as blank.d. In the Constant Value field, enter a constant value.e. Choose OK.
6. Create a constant output column.
If you want to create a new output column and assign a constant value to it, then
SAP HANA Modeling GuideCreating Information Views and Previewing its Output P U B L I C 87
a. In the Target section, choose .b. In the Create Target dialog, provide name and data type for the new output column.c. Choose OK.
NoteBy default, the value of the constant output column in null.
Related Information
Example: Constant Columns [page 91]Prune Data in Union Nodes [page 88]
7.5.2.1 Prune Data in Union Nodes
Pruning data in union nodes helps optimize the query execution. You prune data by creating and using a pruning configuration table that specifies the filter conditions to limit the result set.
Context
For pruning data in union nodes, you need to define the pruning configuration table that modeler must use in the view properties of the calculation view.
Modeler cannot prune the data in union nodes, if queries that you execute on the union node are unfolded and does not perform any aggregation. In such cases, you can switch of the unfolding behavior with the hint, NO_CALC_VIEW_UNFOLDING. Unfolding is the normal query execution behavior where the query execution is passed to the SQL engine or the optimizer after the calculation engine instantiates the query. But, unfolding is not possible for complex calculation views.
Procedure
1. Open the calculation view in the view editor.2. Select the Semantics node.3. Choose the View Properties tab.4. In the Pruning Configuration Table field, select the dropdown.5. In the Find dialog, enter the name of the pruning configuration table.
88 P U B L I CSAP HANA Modeling Guide
Creating Information Views and Previewing its Output
NoteYou can use catalog tables or repository tables or views as pruning configuration tables.
6. Select the table from the list.
Related Information
Pruning Configuration Table [page 89]Example: Pruning Data in Union Nodes [page 90]
7.5.2.1.1 Pruning Configuration Table
Pruning configuration table helps prune data in union nodes. The table holds the filter conditions that limit the result set when you execute a query on the union node.
Modeler refers to the pruning configuration table while executing queries on the union node. The pruning configuration table that you create must have the following table structure:
Table 28:
SCHEMA CALC_SCENARIO INPUT COLUMN OPTION LOW_VALUE HIGH_VALUE
NoteAll columns must be of type VARCHAR or NVARCHAR only.
The description for each of the column value is as follows:
● SCHEMA: Name of the schema that contains the calculation view● CALC_SCENARIO: Name of the calculation view in the format package/viewname● INPUT: Name of the data source in the union node (the data source or the view node ID in the repository
model).● COLUMN: Target column name● OPTION: Operator. The following operations are allowed. (=, <, >, <=, >=, BETWEEN)● LOW_VALUE and HIGH_VALUE: Filter conditions
NoteIf you have already defined filters on columns outside of the pruning configuration table, for example, consider:
Filter where “U1”. “Column1” = ‘5’
Pruning Table: U1 , Column1, =, ’5‘
In the above case, pruning is not done U1 because pruning table shows that all records in U1 has value “5” in Column1.
SAP HANA Modeling GuideCreating Information Views and Previewing its Output P U B L I C 89
Similarly, consider:
Filter : where “U1”. “Column1” = ‘5’
Pruning Table: U1 , Column1, =, ’6‘
Here, U1 is pruned because pruning table shows that all records in U1 has value “6” in Column1. But, you cannot obtain any result even if the union operation is executed.
If you are creating multiple filter conditions using the same column, then the filter conditions are combined using the logical OR operator. Similarly, if you are using different columns to provide the filter conditions, then the filter conditions are combined using the logical AND operator.
NoteAt runtime the table is read with definer privileges of the view. This means that, SYS_REPO needs to have read access for the pruning configuration table.
7.5.2.1.2 Example: Pruning Data in Union Nodes
Pruning data in union nodes of calculation views helps optimize query execution. The below is an example of a pruning configuration table and a query that you can possibly execute.
Table 29:
SCHEMA CALC_SCENARIO INPUT COLUMN OPTION LOW HIGH
a b u C1 BETWEEN 2000 2005
a b u C1 = 2008
a b u C2 < 1998
a b u C2 > 2005
The above example is an equivalent of ('2000' <= C1 <= '2005' OR C1 = '2008') AND (C2 < '1998' OR C2 > '2005')
NoteSQL queries that you use must have numerical constants enclosed within single quotes. For example, the below query cannot be pruned:
SELECT * from p1.p2/CV1 WHERE YEAR = 2008;
You can prune the above query only if the numerical constants are enclosed within single quotes as shown below:
SELECT * from p1.p2/CV1 WHERE YEAR = '2008';
90 P U B L I CSAP HANA Modeling Guide
Creating Information Views and Previewing its Output
7.5.2.2 Example: Constant Columns
Constant output columns help denote the underlying data from the source columns with constant values in the output. You can also map the unmapped source columns to a constant output column based on the business requirement.
For example, consider that you want to compare the planned sales of each quantity with its actual sales using two data sources with similar structures, ACTUALSALES and PLANNEDSALES.
ACTUALSALES
SALES_QUANTITY PRODUCT_ID
5000 P1
3000 P2
PLANNEDSALES
SALES_QUANTITY PRODUCT_ID
4000 P1
4000 P2
When you use a union view node to combine the results of the two data sources, you cannot differentiate the data from these data source.
SALES_QUANTITY PRODUCT_ID
5000 P1
3000 P2
4000 P1
4000 P2
In such cases, create a constant output column PLANNED_OR_ACTUAL and assign the constant value ACTUAL to ACTUALSALES and the constant value PLANNED to PLANNEDSALES.
SALES_QUANTITY PRODUCT_ID PLANNEDORACTUAL
5000 P1 ACTUAL
3000 P2 ACTUAL
4000 P1 PLANNED
4000 P2 PLANNED
Now, you can identify the data source and its underlying data.
SAP HANA Modeling GuideCreating Information Views and Previewing its Output P U B L I C 91
7.5.2.3 Empty Union Behavior
The value of the Empty Union Behavior property for a data source in the union node, helps modeler determine whether any queries on union nodes with constant output columns shall return values if no other columns from the data source is queried.
This property is useful, for example, for value help queries in applications. You can select either No Row or Row with Constant as values for the Empty Union Behavior property. Select the data source in the mapping definition and in the Properties tab define the values for this property based on your business requirement.
For understanding the Empty Union Behavior property and how the value this property determines the output data, consider the following mapping definition in a union node:
Constant values A and B are defined for Projection_1 and Projection_2 using the constant column CONSTANT.
When you execute a query on calculation view with this union node, and if the column CUSTOMER_ID is not queried, the Empty Union Behavior property for the Projection_2 data source determines whether the constant column CONSTANT returns the constant value A for Projection_2 in the output.
● If the Empty Union Behavior property is set to No Row, no data from Projection _2 appears in the output data. In the other words, only data from Projection_1 appears in the output data.
● If the Empty Union Behavior property is set to Row with Constant, then the output data includes one record from Projection _2. In this one record, the constant value A appears for the CONSTANT column and values for all other columns appears as null.
92 P U B L I CSAP HANA Modeling Guide
Creating Information Views and Previewing its Output
7.5.3 Create Rank Nodes
Use rank nodes in graphical calculation views to partition the data for a set of partition columns, and perform an order by SQL operation on the partitioned data.
Context
For example, consider a TRANSACTION table with two columns PRODUCT and SALES. If you want to retrieve the top five products based on its sales, use a rank node. The rank node first partitions the TRANSACTION table with the PRODUCT as the partition column, and performs an order by operation on the partitioned table using the SALES column to retrieve the top five products based on sales.
Procedure
1. Open the required graphical calculation view in view editor.2. From the editor’s tools palette, drag and drop a rank node to the editor.3. Add data source.
a. Select the rank node.b. In the context menu, choose Add Objects.c. In Find dialog, enter the name of the data source and select it from the list.d. Choose OK.
4. Define output columns.a. In the Details pane, select the columns you want to add to the output of the rank node.b. In the context menu, choose Add To Output.
NoteIf you want to add all columns from the data source to the output, in the context menu of the data source, choose Add All To Output.
5. Define sort direction.a. In the Sort Direction dropdown list, select a sort direction.
Table 30:
Sort Direction Description
Descending (Top N) Retrieves top N values from the ordered set where N is the threshold value that you define.
SAP HANA Modeling GuideCreating Information Views and Previewing its Output P U B L I C 93
Sort Direction Description
Ascending (Bottom N) Retrieves bottom N values from the ordered set where N is the threshold value that you define
6. Define threshold value.
Use a Fixed value or an Input Parameter as the threshold value. It helps modeler identify the number of records that are of interest to you from the ordered set.
a. In the Threshold Value value help, select a threshold value type and provide the threshold value accordingly.
7. In the Order By dropdown list, select a column that modeler must use to perform the order by operation.8. Partition the data.
a. In the Partition By section, choose Add.b. In the Partition By Column dropdown list, select a partition column that modeler must use to partition
the data.
NoteYou can partition the data using more than one partition columns.
9. If you want to partition the data only with the partition by columns that query requests for processing the rank node, select the Dynamic Partition Elements checkbox.
NoteIf you do not select this checkbox, modeler partitions the data with all partition columns that you have added in the Partition By section even if it is not requested in the query to process the rank node.
10. If you want generate an additional output column to store the column rank value, select the Generate Rank Column checkbox.
7.5.4 Filter Output of Data Foundation Node
Apply filters on columns in the data foundation nodes of attribute views and analytic view to filter the output of these nodes.
Context
You apply filters, for example, to retrieve the sales of a product where (revenue >= 100 AND region = India) OR (revenue >=50 AND region = Germany). You can also define filters using nested or complex expressions.
Filters on columns are equivalent to the HAVING clause of SQL. At runtime, the modeler executes the filters after performing all the operations that you have defined in the data foundation nodes. You can also use input parameters to provide values to filters at runtime.
94 P U B L I CSAP HANA Modeling Guide
Creating Information Views and Previewing its Output
Procedure
Applying filters on columns of attribute views or analytic views.
If you want to define filters on columns of data foundation node in attribute views or analytic views:
a. Open the analytic view or attribute in the view editor.b. Select the Data Foundation node.c. In the Details pane, select a column.d. In the context menu, choose Apply Filter.e. In the Apply Filter dialog, select an operator.f. In the Value field, select a fixed value or an input parameter (applicable for analytic views) from the value
help.
NoteYou can also use an input parameter to apply filters. But, if you are using the attribute view or analytic view in calculation views, then map the input parameter to another input parameter with the same name in the calculation view. This allows you to filter the attribute or analytic view when you execute the calculation view. If you do not map the input parameters, modeler uses unfiltered data from the attribute or analytic views.
g. Choose OK.
7.5.5 Filter Output of Aggregation or Projection View Nodes
Apply filters on columns in the projection or the aggregation view nodes (except the default aggregation or projection node) to filter the output of these nodes.
Context
You apply filters, for example, to retrieve the sales of a product where (revenue >= 100 AND region = India) OR (revenue >=50 AND region = Germany). You can also define filters using nested or complex expressions.
Filters on columns are equivalent to the HAVING clause of SQL. At runtime, the modeler executes the filters after performing all the operations that you have defined in the aggregation or projection. You can also use input parameters to provide values to filters at runtime.
Procedure
1. Applying filters on columns of calculation views.
SAP HANA Modeling GuideCreating Information Views and Previewing its Output P U B L I C 95
If you want to define filters on columns of projection or aggregation view nodes in calculation views:
a. Open the calculation view in the view editor.b. Select a projection or aggregation view node.c. In the Details pane, select a column.d. In the context menu, choose Apply Filter.e. In the Apply Filter dialog, select an operator.f. In the Value field, select a fixed value or an input parameter from the value help.
NoteIn the selected view node, if you are using other information views as data sources (and not tables), then you can use only input parameters to apply filters on columns.
g. Choose OK.2. Choose OK.3. If you want to apply filters on columns or at the node level using expressions.
You can create expression in SQL language or the column engine language to apply filters. For example, match("ABC",'*abc*') is an expression in the column engine language.
a. Select the aggregation or projection node.b. In the Output pane, expand Filters.c. In the context menu of Expression, choose Open.d. Enter the expression by selecting the required elements, operators, input parameters, calculated
columns and functions.e. Choose OK.
NoteFor expression in SQL language, modeler supports only a limited list of SQL functions.
Related Information
Supported Operators for Filters [page 96]
7.5.5.1 Supported Operators for Filters
The table below lists the operators and its meanings, which you can use while defining filter conditions.
Table 31:
Filter Operator Description
Equal To filter and show data corresponding to the filter value
Not Equal To filter and show data other than the filter value
96 P U B L I CSAP HANA Modeling Guide
Creating Information Views and Previewing its Output
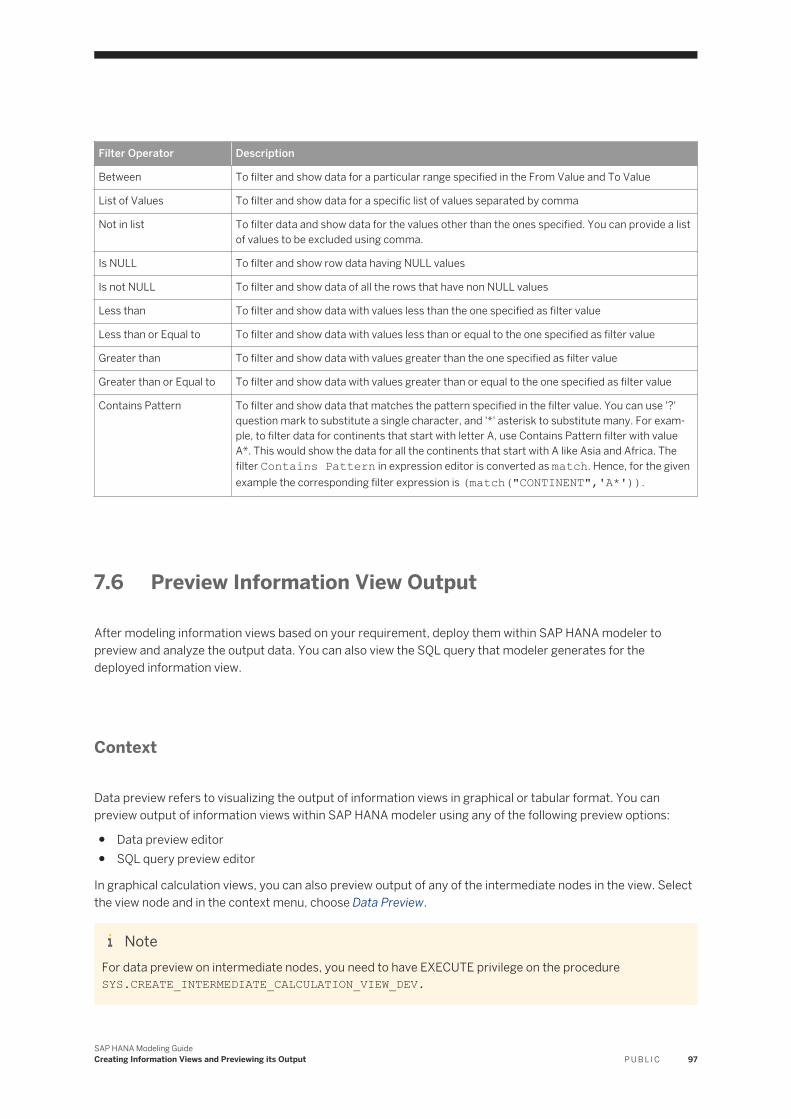
Filter Operator Description
Between To filter and show data for a particular range specified in the From Value and To Value
List of Values To filter and show data for a specific list of values separated by comma
Not in list To filter data and show data for the values other than the ones specified. You can provide a list of values to be excluded using comma.
Is NULL To filter and show row data having NULL values
Is not NULL To filter and show data of all the rows that have non NULL values
Less than To filter and show data with values less than the one specified as filter value
Less than or Equal to To filter and show data with values less than or equal to the one specified as filter value
Greater than To filter and show data with values greater than the one specified as filter value
Greater than or Equal to To filter and show data with values greater than or equal to the one specified as filter value
Contains Pattern To filter and show data that matches the pattern specified in the filter value. You can use '?' question mark to substitute a single character, and '*' asterisk to substitute many. For example, to filter data for continents that start with letter A, use Contains Pattern filter with value A*. This would show the data for all the continents that start with A like Asia and Africa. The filter Contains Pattern in expression editor is converted as match. Hence, for the given example the corresponding filter expression is (match("CONTINENT",'A*')).
7.6 Preview Information View Output
After modeling information views based on your requirement, deploy them within SAP HANA modeler to preview and analyze the output data. You can also view the SQL query that modeler generates for the deployed information view.
Context
Data preview refers to visualizing the output of information views in graphical or tabular format. You can preview output of information views within SAP HANA modeler using any of the following preview options:
● Data preview editor● SQL query preview editor
In graphical calculation views, you can also preview output of any of the intermediate nodes in the view. Select the view node and in the context menu, choose Data Preview.
NoteFor data preview on intermediate nodes, you need to have EXECUTE privilege on the procedure SYS.CREATE_INTERMEDIATE_CALCULATION_VIEW_DEV.
SAP HANA Modeling GuideCreating Information Views and Previewing its Output P U B L I C 97
Procedure
1. Launch SAP HANA studio.2. Open the required information view in the view editor.3. Preview data in graphical format.
If you want to view all attributes and measures in graphical format,
a. In the view editor menu bar, choose the icon dropdown.b. Choose Open in Data Preview Editor.c. If you have defined any variables or input parameters, provide your values and choose OK.
This opens a new editor and displays output data in graphical format.4. Preview raw data.
If you want to view all attributes along with its data in a simple table format,
a. In the view editor menu bar, choose the icon dropdown.b. Choose Open in Data Preview Editor.c. If you have defined any variables or input parameters, provide your values and choose OK.d. Choose the Raw Data tab.
5. Preview SQL query.
If you want to analyze or edit the SQL query that modeler generates for a deployed information view,
a. In the view editor menu bar, choose the icon dropdown.b. Choose Open in SQL Editor.c. If you have defined any variables or input parameters, provide your values and choose OK.
This opens a new editor to preview the output data. In the Results tab, the SQL console displays the SQL query that modeler generates for the deployed information view and also the equivalent output data in simple table format.
d. If you want to modify the SQL query and view results accordingly, in the SQL tab, modify the query
and choose to see output for the modified query.
NoteYou can drag information views from the navigator pane to the SQL editor to obtain an equivalent SQL statement that represents the deployed schema name for the information view.
6. Generate SQL query from the navigator pane.
You can also generate the SQL query for an information view from the navigator pane (SAP HANA systems view).
a. In the SAP HANA Systems view, expand the Content node.b. Select the required information view in the navigator pane.c. In the context menu, choose Generate Select SQL.
Modeler opens an SQL editor with equivalent SQL query for the selected information view.
98 P U B L I CSAP HANA Modeling Guide
Creating Information Views and Previewing its Output

NoteIf the information view has any variables or input parameters, modeler provides placeholders for them in the SQL query. You can replace the placeholders with values for the input parameters and variables.
d. Choose to see the raw data output of the information view.
e. If you want to modify the SQL query, enter the new query in the SQL editor and choose to view output for the modified query.
NoteInvalidated view error. If there are inconsistencies in runtime information (that is, calculation views in catalog or in tables related to runtime) of an information view, you get invalidated view errors. In such cases, redeploy the view to correct the inconsistencies in runtime information.
Related Information
Data Preview Editor [page 99]SQL Editor [page 100]
7.6.1 Data Preview Editor
Use data preview editor to preview raw data output or to view all attributes and measures in graphical formal.
In data preview editor, includes the following tab pages:
● Raw Data● Distinct Values● Analysis
Tab Page Information Displayed User Options
Raw Data All attributes along with data in a table format.
● Filter data. For example, define filters on columns and filter the data based on company names.
● • Export data to different file formats to analyze them in other reporting tools.
Distinct values All attributes along with data in a graphical format.
Basic data profiling
Analysis All attributes and measures in a graphical format.
● Perform advance analysis using labels and value axis. For example, analyze sales based on country by adding Country to the labels axis and Sales to the value axis.
SAP HANA Modeling GuideCreating Information Views and Previewing its Output P U B L I C 99
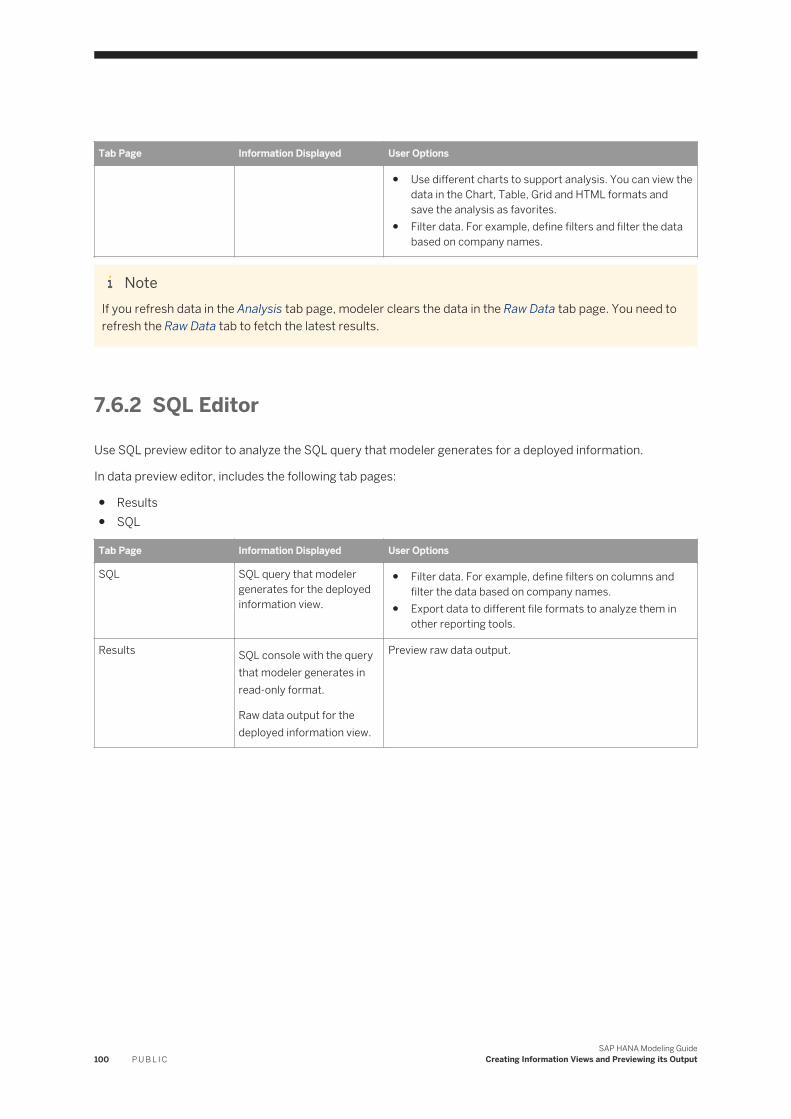
Tab Page Information Displayed User Options
● Use different charts to support analysis. You can view the data in the Chart, Table, Grid and HTML formats and save the analysis as favorites.
● Filter data. For example, define filters and filter the data based on company names.
NoteIf you refresh data in the Analysis tab page, modeler clears the data in the Raw Data tab page. You need to refresh the Raw Data tab to fetch the latest results.
7.6.2 SQL Editor
Use SQL preview editor to analyze the SQL query that modeler generates for a deployed information.
In data preview editor, includes the following tab pages:
● Results● SQL
Tab Page Information Displayed User Options
SQL SQL query that modeler generates for the deployed information view.
● Filter data. For example, define filters on columns and filter the data based on company names.
● Export data to different file formats to analyze them in other reporting tools.
Results SQL console with the query that modeler generates in read-only format.
Raw data output for the deployed information view.
Preview raw data output.
100 P U B L I CSAP HANA Modeling Guide
Creating Information Views and Previewing its Output
8 Working With Attributes and Measures
Attributes and measures form content data that you use for data modeling. The attributes represent the descriptive data such as city and country and the measures represent quantifiable data such as revenue and quantity sold.
Information views can contain two types of columns, the measures and the attributes. Measures are columns for which you define an aggregation. If information views are used in SQL statements, then you have to aggregate the measures, for example, using the SQL functions SUM(<column name>), MIN(<column name>), or MAX(<column name>. Attributes can be handled as regular columns as they do not need to be aggregated.
This section describes the different operations you can perform using the attributes and measures. For example, you can create calculated attributes or calculated measures.
Related Information
Working With Attributes and Measures [page 101]Create Counters [page 101]Create Calculated Columns [page 104]Create Restricted Columns [page 109]Assign Semantics [page 114]Assign Variables [page 111]Create Input Parameters [page 118]Using Currency and Unit of Measure Conversions [page 135]Trace Columns in Information Views With Data Lineage [page 143]Group Related Measures [page 146]
8.1 Create Counters
If you want to count the number of distinct values for one or more attribute columns, you create counters, which are special type of columns that displays the distinct count of attribute columns.
Context
You can create counters for multiple attribute columns at a time. For example, if you create a counter for two columns, then the counter displays the count of distinct combinations of both the columns.
SAP HANA Modeling GuideWorking With Attributes and Measures P U B L I C 101
NoteYou can create counters for attribute columns in the default star join node or in the default aggregation view node only.
Procedure
1. Open the required information view in the view editor.2. Choose the Star Join or the Aggregation node.
3. In the Output pane, choose the icon dropdown.4. Choose the New Counter menu option.5. In the Counter dialog, provide counter name and description.6. If you want to hide the counter for data preview, then select the Hidden checkbox.7. In the Counters pane, choose Add.8. In the dropdown list, choose an attribute.9. Choose OK.
NoteTransparent Filter Flag
You have to set the transparent filter flag on attribute columns to True for obtaining correct counter results in the following scenarios:○ Stacked calculation views on top of other dependent calculation views, and if you have defined
count distinct measures in the dependent views.○ Queries on main calculation views contains filter on a column that you do not want to project.
For the above scenarios, you have to set the transparent filter flag to True for the filtered, non-projected columns. The filter should be set for these columns in all nodes of the upper calculation view and in the default node of the lower dependent calculation view. This helps correct the unexpected counter numbers.
Related Information
Example: Counters [page 103]
8.1.1 Counter Properties
After creating a counter, you can view its properties or change them based on your business requirements.
Modeler displays the following properties for counters in the Semantics node.
102 P U B L I CSAP HANA Modeling Guide
Working With Attributes and Measures
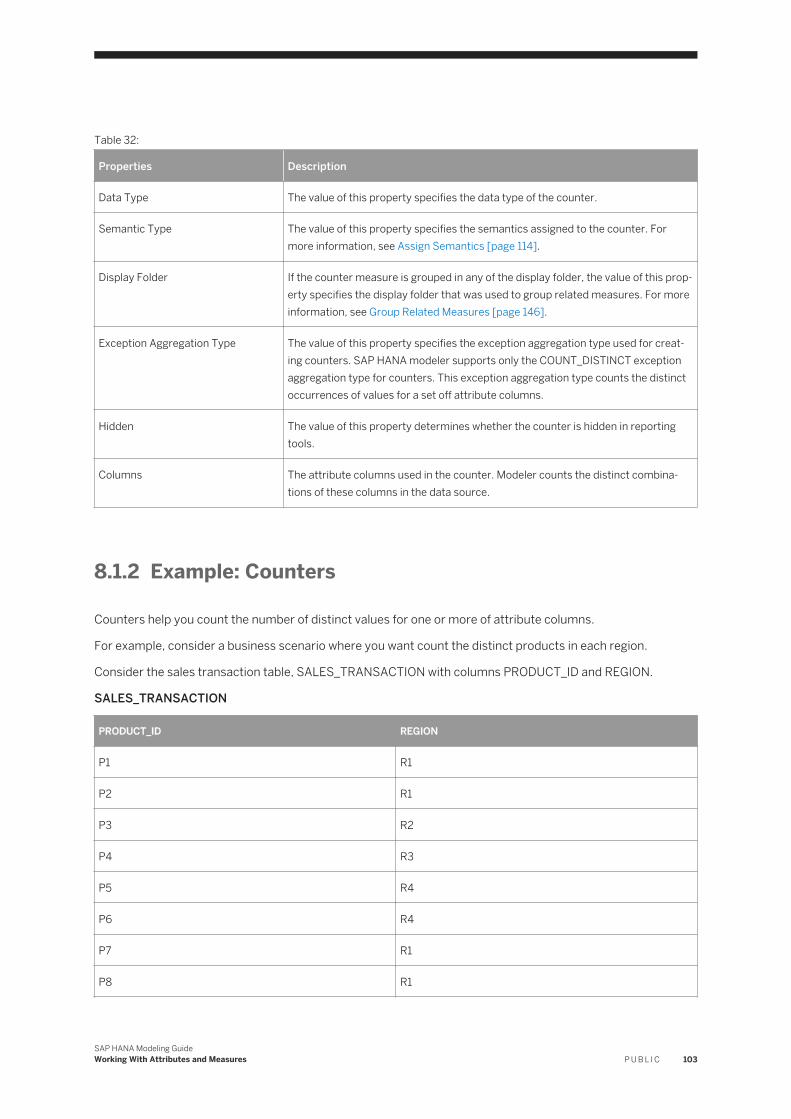
Table 32:
Properties Description
Data Type The value of this property specifies the data type of the counter.
Semantic Type The value of this property specifies the semantics assigned to the counter. For more information, see Assign Semantics [page 114].
Display Folder If the counter measure is grouped in any of the display folder, the value of this property specifies the display folder that was used to group related measures. For more information, see Group Related Measures [page 146].
Exception Aggregation Type The value of this property specifies the exception aggregation type used for creating counters. SAP HANA modeler supports only the COUNT_DISTINCT exception aggregation type for counters. This exception aggregation type counts the distinct occurrences of values for a set off attribute columns.
Hidden The value of this property determines whether the counter is hidden in reporting tools.
Columns The attribute columns used in the counter. Modeler counts the distinct combinations of these columns in the data source.
8.1.2 Example: Counters
Counters help you count the number of distinct values for one or more of attribute columns.
For example, consider a business scenario where you want count the distinct products in each region.
Consider the sales transaction table, SALES_TRANSACTION with columns PRODUCT_ID and REGION.
SALES_TRANSACTION
PRODUCT_ID REGION
P1 R1
P2 R1
P3 R2
P4 R3
P5 R4
P6 R4
P7 R1
P8 R1
SAP HANA Modeling GuideWorking With Attributes and Measures P U B L I C 103
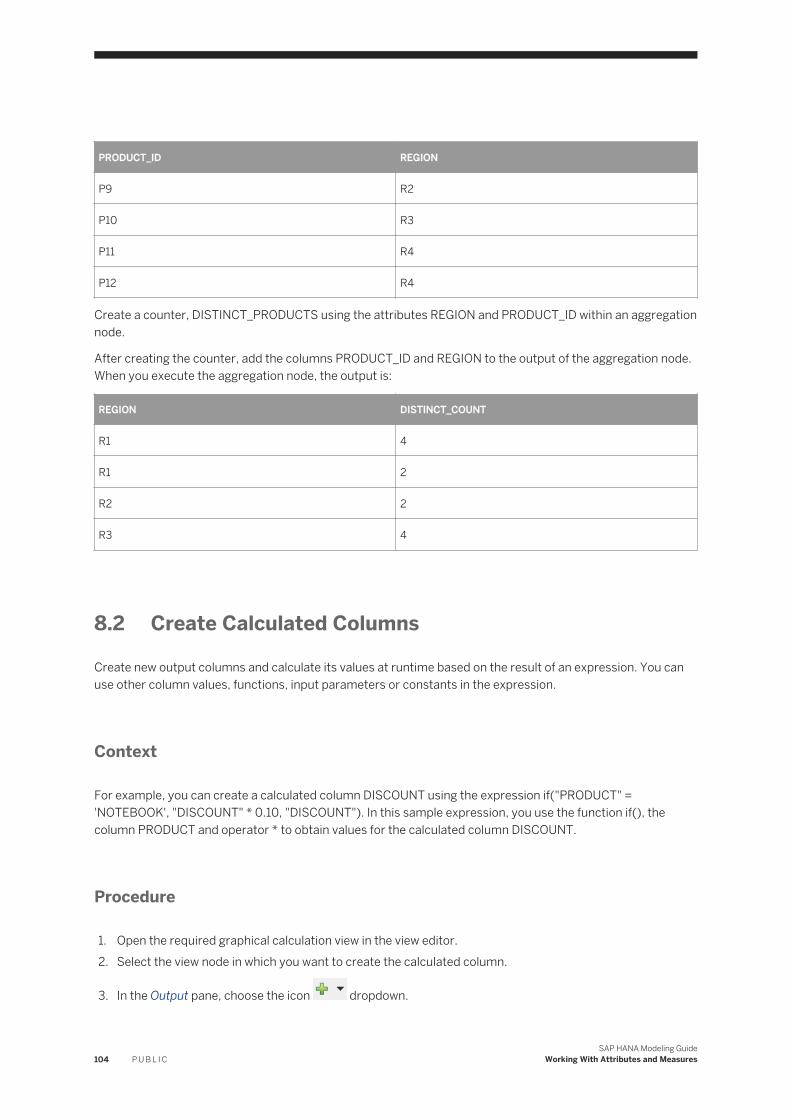
PRODUCT_ID REGION
P9 R2
P10 R3
P11 R4
P12 R4
Create a counter, DISTINCT_PRODUCTS using the attributes REGION and PRODUCT_ID within an aggregation node.
After creating the counter, add the columns PRODUCT_ID and REGION to the output of the aggregation node. When you execute the aggregation node, the output is:
REGION DISTINCT_COUNT
R1 4
R1 2
R2 2
R3 4
8.2 Create Calculated Columns
Create new output columns and calculate its values at runtime based on the result of an expression. You can use other column values, functions, input parameters or constants in the expression.
Context
For example, you can create a calculated column DISCOUNT using the expression if("PRODUCT" = 'NOTEBOOK', "DISCOUNT" * 0.10, "DISCOUNT"). In this sample expression, you use the function if(), the column PRODUCT and operator * to obtain values for the calculated column DISCOUNT.
Procedure
1. Open the required graphical calculation view in the view editor.2. Select the view node in which you want to create the calculated column.
3. In the Output pane, choose the icon dropdown.
104 P U B L I CSAP HANA Modeling Guide
Working With Attributes and Measures
4. Choose the New Calculated Column menu option.5. In the Calculated Column, enter a name and description for the new calculated column.6. In the Data Type dropdown list, select the data type of the calculated column.7. Enter length and scale based on the data type you select.
Modeler ignores the length for VARCHAR data type. If you want to, for example, truncate length, you must use the relevant string functions in calculated column expression.
8. Select a column type.
You can create calculated attributes or calculated measures using attributes or measures respectively.
a. In the Column Type dropdown list, select a value.
NoteIf you want to create a calculated measure and enable client side aggregation for the calculated measure, select the Enable client side aggregation checkbox.
This allows you to propose the aggregation that client needs to perform on calculated measures.
9. If you want to hide the calculated column in reporting tools, select the Hidden checkbox.10. Choose OK.11. Provide an expression.
You can create an expression using the SQL language or the column engine language.
a. In the Language dropdown list, select the expression language.a. In the Expression Editor, enter a valid expression.
Modeler computes this expression at runtime to obtain values of calculated columns.
For example, the expression in column engine language, if("PRODUCT" = 'NOTEBOOK', "DISCOUNT" * 0.10, "DISCOUNT") which is equivalent to, if attribute PRODUCT equals the string ‘NOTEBOOK’ then DISCOUNT equals to DISCOUNT multiplied by 0.10 should be returned. Else use the original value of the attribute DISCOUNT.
NoteYou can also create an expression by dragging and dropping the expression elements, operators and functions from the menus to the expression editor. For expression in SQL language, modeler supports only a limited list of SQL functions.
b. Choose Validate Syntax to validate your expression.12. Assign semantics to the calculated column.
a. Choose the Semantics tab.b. In the Semantic Type dropdown list, select a semantic value.
Related Information
Using Functions in Expressions [page 213]Calculated Column Properties [page 106]
SAP HANA Modeling GuideWorking With Attributes and Measures P U B L I C 105
Example: Calculated Measures [page 106]Example: Calculated Attributes [page 107]
8.2.1 Calculated Column Properties
After creating a calculated attribute or a calculated measure, you can view its properties or change them based on your business requirements.
Select a calculated column in the Semantics node. Modeler displays the following properties for calculated columns in the Properties pane.
Table 33:
Properties Description
Data Type The value of this property specifies the data type of the calculated attributes or calculated measures.
Semantic Type The value of this property specifies the semantics assigned to the calculated attributes or calculated measures. For more information, see Assign Semantics [page 114].
Hidden The value of this property determines whether the calculated column is hidden in reporting tools.
Drill Down Enablement The value of this property determines whether the calculated attribute is enabled for drill down in reporting tools. If it is enabled, the value of this property specifies the drill down type. For more information, see Enable Attributes for Drilldown in Reporting Tools [page 142].
Display Folder If the calculated measure is grouped in any of the display folder, the value of this property specifies the display folder that was used to group related measures. For more information, see Group Related Measures [page 146].
8.2.2 Example: Calculated Measures
Create a new measure column and calculate its value at runtime based on the result of an expression.
For example, consider a business scenario where you want to create a new calculated measure column, PRODUCT_PROFIT_PERCENT within an aggregation node. This measure column stores the profit of a product in percentage.
Consider the sales transaction table, SALES_TRANSACTION with columns, PRODUCT_ID, PRODUCT_COST_PRICE and PRODUCT_SALES_PRICE.
SALES_TRANSACTION
106 P U B L I CSAP HANA Modeling Guide
Working With Attributes and Measures
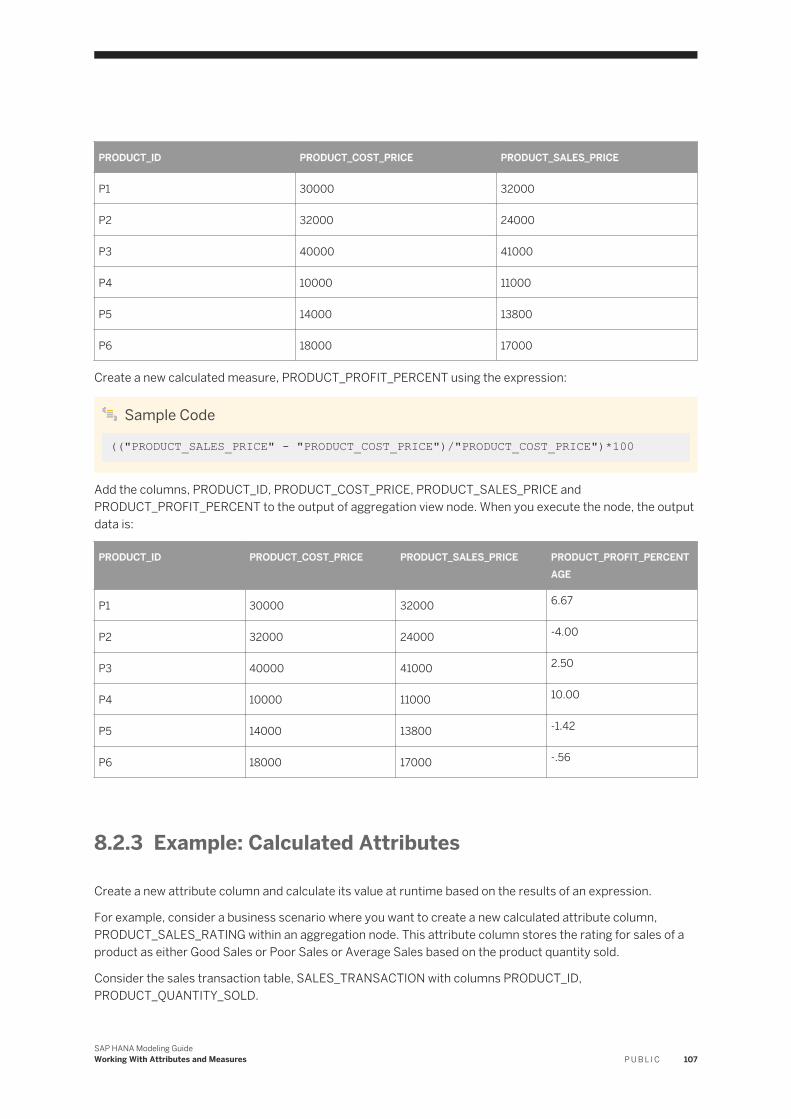
PRODUCT_ID PRODUCT_COST_PRICE PRODUCT_SALES_PRICE
P1 30000 32000
P2 32000 24000
P3 40000 41000
P4 10000 11000
P5 14000 13800
P6 18000 17000
Create a new calculated measure, PRODUCT_PROFIT_PERCENT using the expression:
Sample Code
(("PRODUCT_SALES_PRICE" - "PRODUCT_COST_PRICE")/"PRODUCT_COST_PRICE")*100
Add the columns, PRODUCT_ID, PRODUCT_COST_PRICE, PRODUCT_SALES_PRICE and PRODUCT_PROFIT_PERCENT to the output of aggregation view node. When you execute the node, the output data is:
PRODUCT_ID PRODUCT_COST_PRICE PRODUCT_SALES_PRICE PRODUCT_PROFIT_PERCENTAGE
P1 30000 32000 6.67
P2 32000 24000 -4.00
P3 40000 41000 2.50
P4 10000 11000 10.00
P5 14000 13800 -1.42
P6 18000 17000 -.56
8.2.3 Example: Calculated Attributes
Create a new attribute column and calculate its value at runtime based on the results of an expression.
For example, consider a business scenario where you want to create a new calculated attribute column, PRODUCT_SALES_RATING within an aggregation node. This attribute column stores the rating for sales of a product as either Good Sales or Poor Sales or Average Sales based on the product quantity sold.
Consider the sales transaction table, SALES_TRANSACTION with columns PRODUCT_ID, PRODUCT_QUANTITY_SOLD.
SAP HANA Modeling GuideWorking With Attributes and Measures P U B L I C 107
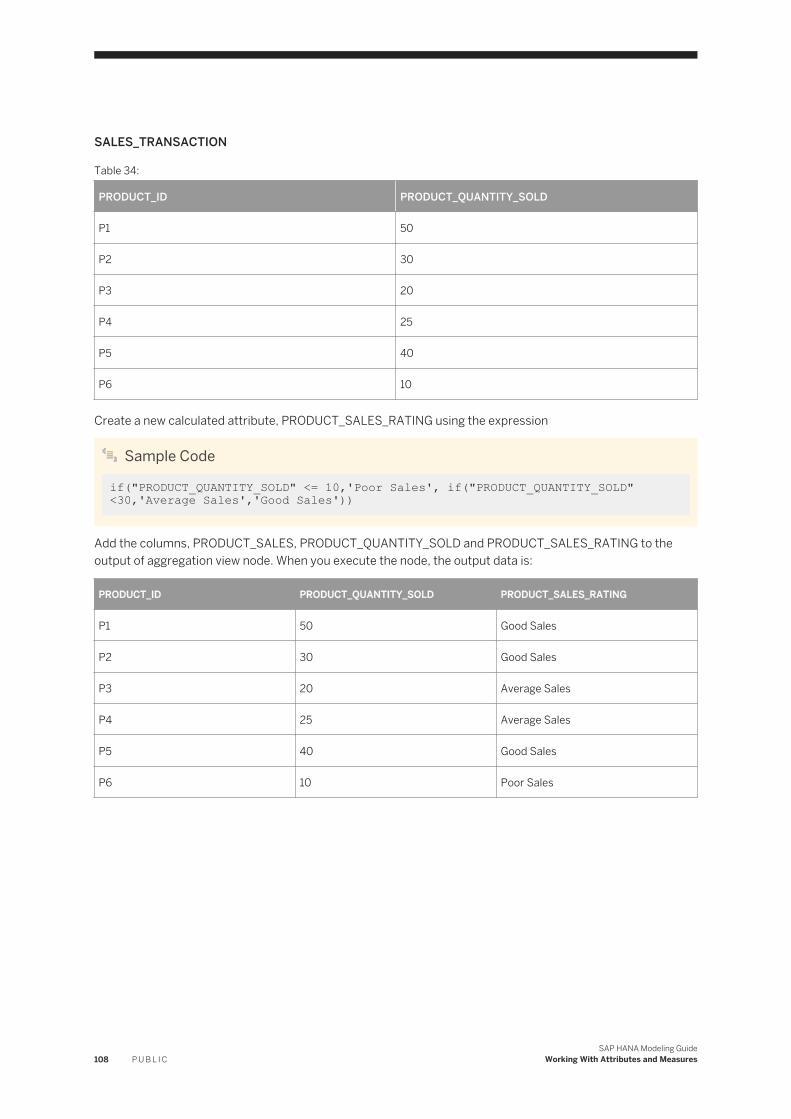
SALES_TRANSACTION
Table 34:
PRODUCT_ID PRODUCT_QUANTITY_SOLD
P1 50
P2 30
P3 20
P4 25
P5 40
P6 10
Create a new calculated attribute, PRODUCT_SALES_RATING using the expression
Sample Code
if("PRODUCT_QUANTITY_SOLD" <= 10,'Poor Sales', if("PRODUCT_QUANTITY_SOLD" <30,'Average Sales','Good Sales'))
Add the columns, PRODUCT_SALES, PRODUCT_QUANTITY_SOLD and PRODUCT_SALES_RATING to the output of aggregation view node. When you execute the node, the output data is:
PRODUCT_ID PRODUCT_QUANTITY_SOLD PRODUCT_SALES_RATING
P1 50 Good Sales
P2 30 Good Sales
P3 20 Average Sales
P4 25 Average Sales
P5 40 Good Sales
P6 10 Poor Sales
108 P U B L I CSAP HANA Modeling Guide
Working With Attributes and Measures
8.3 Create Restricted Columns
Create restricted columns to restrict values of measures based on attribute restrictions. For example, you can choose to restrict the value for the REVENUE column only for REGION = APJ, and YEAR = 2012.
Context
You can apply restrictions on measures defined in the semantics node by using any of the below approaches:
● Apply restrictions on attribute values by using values from other attribute columns.● Apply restriction on attribute values using expressions.
NoteFor restricted columns, modeler applies the aggregation type of the base column, and you can create restricted columns in the default aggregation view node or star join node only.
Procedure
1. Open the required graphical calculation view in the editor.2. Select the default aggregation node.
NoteYou can also create restricted columns in star join nodes.
3. In the Output pane, choose the icon dropdown.4. Choose the New Restricted Column menu option.5. In the New Restricted Column, enter a name and description for the new calculated column.6. In the Column dropdown list, choose a base measure on which you want to apply restrictions.7. If you want to hide the calculated column in reporting tools, select the Hidden checkbox.8. Apply restrictions using column values.
You can define a condition using attribute columns to apply restrictions on the base measure.a. Select Columns.b. Choose Add.c. In the Column dropdown list, selecte an attribute column.d. In the Operator dropdown list, select a required operation to define the condition.e. In the Value field, select a value from the value help.f. In the Type dropdown list, select the value type.
You can provide a fixed value or use input parameter to provide values to the condition at runtime.
SAP HANA Modeling GuideWorking With Attributes and Measures P U B L I C 109
g. If you want to apply restrictions only for the defined conditions, choose Include.
NoteYou can apply restrictions using more than one attribute column.
9. Apply restrictions using expressions.
You can create an expression using the SQL language or the column engine language. If you want to use an expression to apply restrictions on the base measure, then:
a. Select Expression.b. In the Language dropdown list, select an expression langauge.c. In the Expression Editor, enter your expression.
NoteYou can also use input parameters in your expressions to create restricted columns. For expression in SQL language, modeler supports only a limited list of SQL functions.
Related Information
Using Functions in Expressions [page 213]Restricted Column Properties [page 110]Example: Restricted Columns [page 111]
8.3.1 Restricted Column Properties
After creating a restricted column, you can view its properties or change them based on your business requirements.
Select a restrcited column in the Semantics node. Modeler displays the following properties for calculated columns in the Properties pane.
Table 35:
Properties Description
Data Type The value of this property specifies the data type of the restricted column.
Hidden The value of this property determines whether the restricted column is hidden in reporting tools.
Display Folder If the restricted measure is grouped in any of the display folder, the value of this property specifies the display folder that was used to group related measures. For more information, see Group Related Measures [page 146].
110 P U B L I CSAP HANA Modeling Guide
Working With Attributes and Measures

8.3.2 Example: Restricted Columns
Restricted columns help you restrict measure values based on attribute restrictions.
For example, consider a business scenario where you want to create a new restricted measure column, REGION_SALES within an aggregation node. This restricted column is used to restrict values of the measure, QUANTITY_SOLD using the attribute, REGION.
Consider the sales transaction table, SALES_TRANSACTION with columns PRODUCT_ID, REGION, COUNTRY and QUANTITY_SOLD.
SALES_TRANSACTION
PRODUCT_ID REGION COUNTRY QUANTITY_SOLD
P1 Europe DE 3000
P1 Europe UK 4000
P1 Europe GR 5000
P1 APJ India 2000
P1 APJ CHN 2500
P1 APJ JAP 3500
Create a restricted column for the measure QUANTITY_SOLD using the attribute restriction, REGION=Europe
After creating the restricted column, add columns, PRODUCT_ID, REGION, QUANTITY_SOLD and the restricted measure, REGION_SALES to the output of the aggregation node. When you execute the aggregation node, the output is:
PRODUCT_ID REGION QUANTITY_SOLD SALES_REGION
P1 Europe 12000 12000
P1 APJ 8000 ?
8.4 Assign Variables
Information views contain variables that are bound to specific attributes in an information view. Based on the attribute data, you can provide values to variables, while executing the calculation view..
Context
You assign variables to attributes in information views, for example, to filter the results. At runtime, you can provide values to variables by manually entering a value or by selecting them from the value help dialog.
SAP HANA Modeling GuideWorking With Attributes and Measures P U B L I C 111
Procedure
1. Maintain variable details.a. Select the Semantics node.b. Choose the Parameters/Variables tab.
c. Choose the icon dropdown.d. Choose the Create Variable menu option.e. Provide a name and description for your variable.
2. Define value list for value help dialog.a. In the Attribute dropdown list, choose an attribute value.
Modeler uses this attribute data to provide values in the value help dialog at runtime.
NoteIf you want to use attribute data from another information view as the reference column, in View/Table for value help dropdown list, select the information view that contains the required attribute.
b. If you want use a hierarchy to organize the filtered data in reporting tools, in the Hierarchy dropdown list, select a hierarchy.
NoteThe hierarchy must contain the variable’s reference column at the leaf level (in level hierarchies) or as a parent attribute (in parent-child hierarchies).
3. Define a variable type.a. In the Selection Type dropdown list, select a variable type.b. If you want to configure the variable to mandatorily accept a value at runtime, select the Is Mandatory
checkbox.
NoteIf you do not provide a value to variable at runtime and if you have not selected the Is Mandatory checkbox, then modeler displays unfiltered data.
c. If you want to configure the variables to accept multiple values from client tools at runtime, select the Multiple Entries checkbox.
For example, you can assign variables to identify the revenue for the period 2000 to 2005 and 2012, at runtime.
4. Provide a default value.
Provide a default value that modeler must consider as the variable value when you do not provide any value to the variable.
a. In the Default Value section, provide default values using constant values or expressions.
112 P U B L I CSAP HANA Modeling Guide
Working With Attributes and Measures
Table 36:
Default Value Meaning
Constant If you want to use a constant as the default variable value,1. In the Default Value section, choose Add.2. In the Type dropdown list, select Constant.3. Provide the From Value or both From Value and To Value depending on the variable type
and the operator.For example, if you are using variable type Single Value and operator Equal, then provide just the From value.
Expression If you want to provide the result of an expression as the default value,1. In the Default Value section, choose Add.2. In the Type dropdown list, select Expression.3. Provide the From Value or both From Value and To Value depending on the variable type
and the operator.For example, if you are using variable type Single Value and operator Equal, then provide just the From value.
4. In the From Value field or To Value field, choose the value help icon to open the expression editor.
5. In the Expression Editor, provide a valid expression.6. Choose OK.
For example, you can evaluate the expression date(Now()), and use the result as the default value.
NoteProviding multiple default values.
If you have configured the variable to accept multiple values at the runtime by selecting the Multiple Entries checkbox, then you can provide multiple default values to the variable. In the Default Value section, choose Add to add multiple default values. These values appear on the selection screen when you execute the information view.
5. Assign variables to attributes.
Assign the variable to an attribute to filter its data at runtime.
a. In the Apply the variable filter to section, choose Add to add an attribute.b. In the Attributes dropdown list, select an attribute.
6. Choose OK.
Related Information
Supported Variable Types [page 114]Variable Properties [page 114]
SAP HANA Modeling GuideWorking With Attributes and Measures P U B L I C 113
8.4.1 Supported Variable Types
SAP HANA modeling environment supports the following variable types:
Type Description
Single Value Use this to filter and view data based on a single attribute value. For example, to view the sales of a product where the month is equal to January.
Interval Use this to filter and view a specific set of data. For example, to view the expenditure of a company from March to April.
Range Use this to filter view data based on the conditions that involve operators such as "="(equal to), ">" (greater than), "<" (less than), ">=" (greater than or equal to), and "<=" (less than or equal to). For example, to view the sales of all products in a month where the quantity sold is >= 100..
8.4.2 Variable Properties
After creating a variable, you can view its properties or change them based on your business requirement.
In the Parameters/Variables tab, select a variable. Modeler displays the following variable properties in the Properties tab.
Table 37:
Properties Description
Attribute The value of this property specifies the attribute data that modeler uses to provide values in the value help at runtime.
Selection Type The value of this property specifies the variable type used for creating the variable.
Multiple Entries The value of this property specifies whether the variable is configured to support multiple values at runtime.
8.5 Assign Semantics
Assigning semantics to attributes and measures helps define the output structure of an information view. The semantics provide meaning to attributes and measures of an information view.
Procedure
1. Open the information view in the view editor.2. Select the Semantics node.
114 P U B L I CSAP HANA Modeling Guide
Working With Attributes and Measures
3. In the Semantic Type column, choose the value help.4. In the Semantic Type dropdown list, select a value.5. Choose OK.
Related Information
Extract and Copy Semantics From Underlying Data Sources [page 115]Propagate Columns to Semantics [page 116]Supported Semantic Types for Measures [page 117]Supported Semantic Types for Attributes [page 117]
8.5.1 Extract and Copy Semantics From Underlying Data Sources
Defining semantics for calculation views includes defining the output columns of the calculation views (its label, its label column, its aggregation type, and its semantic type) and the hierarchies. While defining the semantics for a calculation view, you can extract and copy the semantic definitions of columns and hierarchies from their underlying data sources.
Context
For example, consider that you are modeling a complex calculation view with multiple underlying data sources and these data source have their own semantic definitions for its columns and hierarchies. In such cases, you can extract and copy the semantic definitions of columns and hierarchies from their underlying data sources to define the semantics of the calculation view. This way of extracting and copying the semantic definitions helps you save the effort of manually defining the semantics of the calculation view.
Procedure
1. Open the required graphical calculation view in view editor.2. Select the Semantics node.3. Choose the Columns tab.
4. Choose .
In the Extract Semantics dialog, modeler displays the output columns and hierarchies of underlying data sources.
5. Select columns and columns properties.
SAP HANA Modeling GuideWorking With Attributes and Measures P U B L I C 115
If you want to extract and copy semantic definition of columns from thier underlying data sources,
a. In the Columns tab, select the columns available in the underlying data sources.
NoteIf the same column is available in two or more data sources specify the data source that modeler must use to extract and copy the semantic definition. In the Data Sources dropdown list, select the data source.
b. Select the checkbox of those column properties (Label, Label column, Aggregation Type and Semantic Type) that you want to extract and copy to the semantic definition of the calculation view.
6. Select hierarchies.
If you want to extract and copy hierarchies defined in the underlying views to the semantic definition,
a. Select the Hierarchies tab.
NoteYou can extract and copy hierarchies only if the nodes in the hierarchies are available as output columns of the calculation view.
b. Select the hierarchies defined in the underlying views.c. If hierarchies with same name already exist in the calculation view, in the New Name field, provide a
different name.7. If you want to override the existing semantic definition of the calculation view with the extracted
semantics, in the Columns tab, select the Overwrite semantics already defined checkbox.8. Choose OK.
8.5.2 Propagate Columns to Semantics
Propagate columns from underlying view nodes to the semantics node and to other view nodes that are in the joined path. In other words, you can reuse the output columns of underlying view nodes in other view nodes up to the semantic node.
Context
Modeler allows you to propagate columns from an underlying view node to all nodes in the joined path up to the semantics node. This helps you to avoid defining the output columns of each node if the same columns are available in its underlying node and you also require them as output columns in the above nodes up to the semantics node. Propagating columns are useful in complex calculation views with many levels of view nodes.
116 P U B L I CSAP HANA Modeling Guide
Working With Attributes and Measures
Procedure
1. Open the required graphical calculation view in view editor.2. Select a view node.
NoteYou cannot select the default view node and propagate columns to the semantics node.
3. In the Details tab, select an output column (or target column in union nodes) that you want to propagate to the semantics node.
NoteYou can select more than one column using the CTRL key.
4. In the context menu, choose Propagate to Semantics.
Results
The modeler propagates the columns you select to all view nodes and up to the semantics node. If a column is already present in any of the view node in the propagated path, the columns are not propagated.
8.5.3 Supported Semantic Types for Measures
The following semantic types are supported for measures.
● Amount with Currency Code● Quantity with Unit of Measures
8.5.4 Supported Semantic Types for Attributes
Client tools use semantic types to represent data in appropriate format. The system supports the following semantic types for attributes.
● Amount with Currency Code● Quantity with Unit of Measures● Currency Code● Unit of Measure● Date● Date – Business Date From● Date – Business Date To
SAP HANA Modeling GuideWorking With Attributes and Measures P U B L I C 117

● Geo Location - Longitude● Geo Location - Latitude● Geo Location - Carto ID● Geo Location – Normalized Name
8.6 Create Input Parameters
Input parameters helps you parameterize information views and execute them based on the values you provide to the input parameters at query runtime. The engine considers input parameters as the PLACEHOLDER clause of the SQL statement.
Context
You create an input parameter at design time (while creating your information views), and provide value to the engine at runtime and execute information views accordingly. For example, if you want your information view to provide data for a specific region, then REGION is a possible input parameter. You can provide value to REGION at runtime.
Procedure
1. If you want to create an input parameter from the Semantics node, thena. Select the Semantincs node.b. In the Details pane, choose the Parameters/Variables tab.
c. In the toolbar, choose .d. Choose Create Input Parameter.
2. 2. If you want create an input parameter at view node other than the Semantics node,a. Select the view node.b. In the Output pane, choose Input Parameters.c. In the context menu, choose New.
3. Provide a name and description to your input parameter.4. Define input parameter type.
a. In the Parameter Type dropdown list, selct an input parameter type.
118 P U B L I CSAP HANA Modeling Guide
Working With Attributes and Measures
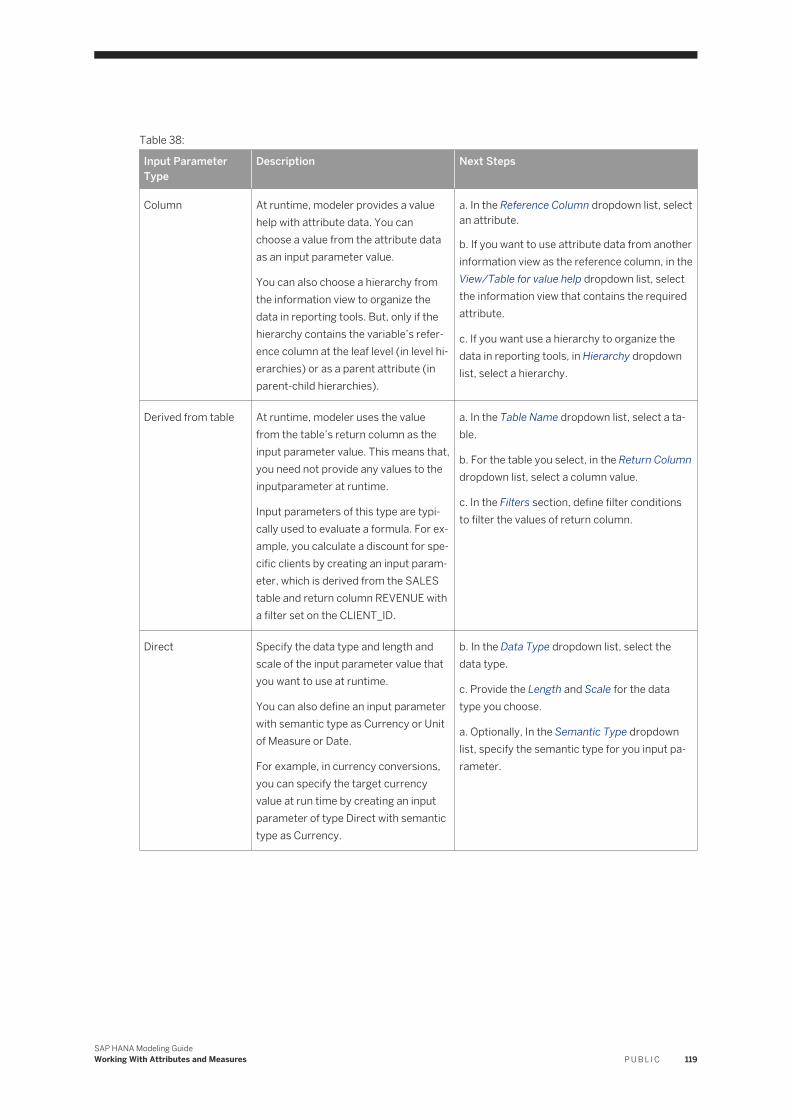
Table 38:
Input Parameter Type
Description Next Steps
Column At runtime, modeler provides a value help with attribute data. You can choose a value from the attribute data as an input parameter value.
You can also choose a hierarchy from the information view to organize the data in reporting tools. But, only if the hierarchy contains the variable’s reference column at the leaf level (in level hierarchies) or as a parent attribute (in parent-child hierarchies).
a. In the Reference Column dropdown list, select an attribute.
b. If you want to use attribute data from another information view as the reference column, in the View/Table for value help dropdown list, select the information view that contains the required attribute.
c. If you want use a hierarchy to organize the data in reporting tools, in Hierarchy dropdown list, select a hierarchy.
Derived from table At runtime, modeler uses the value from the table’s return column as the input parameter value. This means that, you need not provide any values to the inputparameter at runtime.
Input parameters of this type are typically used to evaluate a formula. For example, you calculate a discount for specific clients by creating an input parameter, which is derived from the SALES table and return column REVENUE with a filter set on the CLIENT_ID.
a. In the Table Name dropdown list, select a table.
b. For the table you select, in the Return Column dropdown list, select a column value.
c. In the Filters section, define filter conditions to filter the values of return column.
Direct Specify the data type and length and scale of the input parameter value that you want to use at runtime.
You can also define an input parameter with semantic type as Currency or Unit of Measure or Date.
For example, in currency conversions, you can specify the target currency value at run time by creating an input parameter of type Direct with semantic type as Currency.
b. In the Data Type dropdown list, select the data type.
c. Provide the Length and Scale for the data type you choose.
a. Optionally, In the Semantic Type dropdown list, specify the semantic type for you input parameter.
SAP HANA Modeling GuideWorking With Attributes and Measures P U B L I C 119
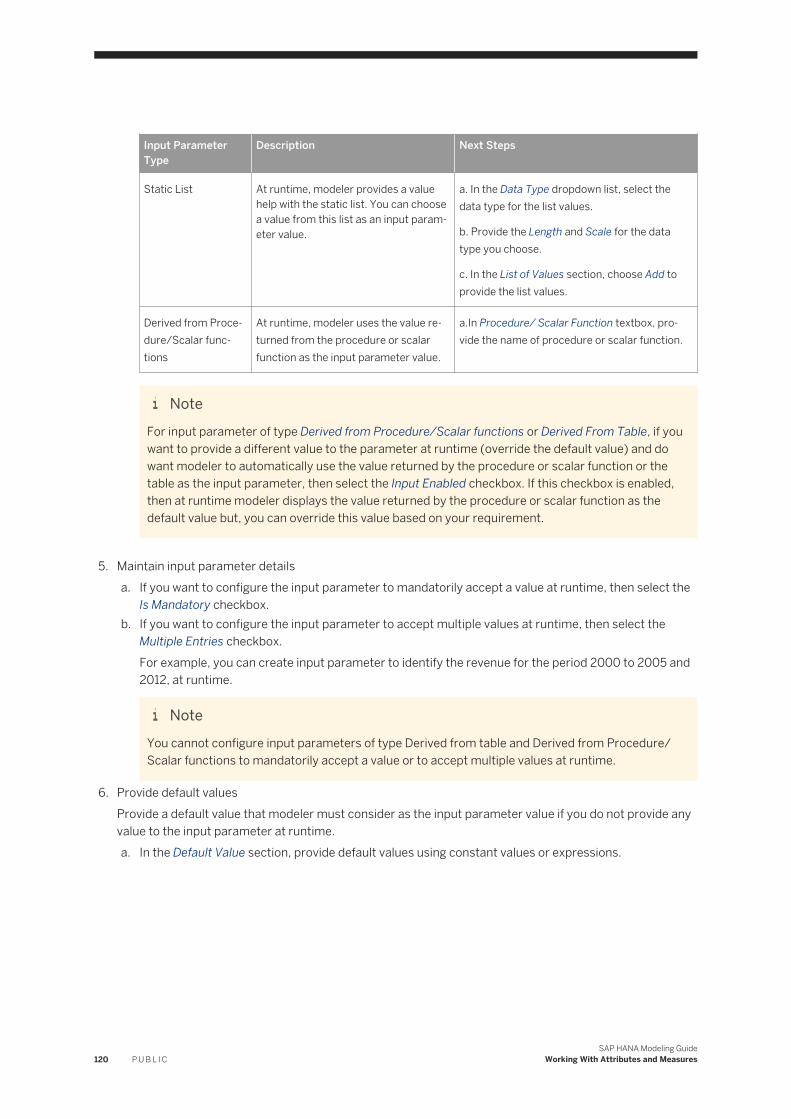
Input Parameter Type
Description Next Steps
Static List At runtime, modeler provides a value help with the static list. You can choose a value from this list as an input parameter value.
a. In the Data Type dropdown list, select the data type for the list values.
b. Provide the Length and Scale for the data type you choose.
c. In the List of Values section, choose Add to provide the list values.
Derived from Procedure/Scalar functions
At runtime, modeler uses the value returned from the procedure or scalar function as the input parameter value.
a.In Procedure/ Scalar Function textbox, provide the name of procedure or scalar function.
NoteFor input parameter of type Derived from Procedure/Scalar functions or Derived From Table, if you want to provide a different value to the parameter at runtime (override the default value) and do want modeler to automatically use the value returned by the procedure or scalar function or the table as the input parameter, then select the Input Enabled checkbox. If this checkbox is enabled, then at runtime modeler displays the value returned by the procedure or scalar function as the default value but, you can override this value based on your requirement.
5. Maintain input parameter detailsa. If you want to configure the input parameter to mandatorily accept a value at runtime, then select the
Is Mandatory checkbox.b. If you want to configure the input parameter to accept multiple values at runtime, then select the
Multiple Entries checkbox.For example, you can create input parameter to identify the revenue for the period 2000 to 2005 and 2012, at runtime.
NoteYou cannot configure input parameters of type Derived from table and Derived from Procedure/Scalar functions to mandatorily accept a value or to accept multiple values at runtime.
6. Provide default valuesProvide a default value that modeler must consider as the input parameter value if you do not provide any value to the input parameter at runtime.a. In the Default Value section, provide default values using constant values or expressions.
120 P U B L I CSAP HANA Modeling Guide
Working With Attributes and Measures
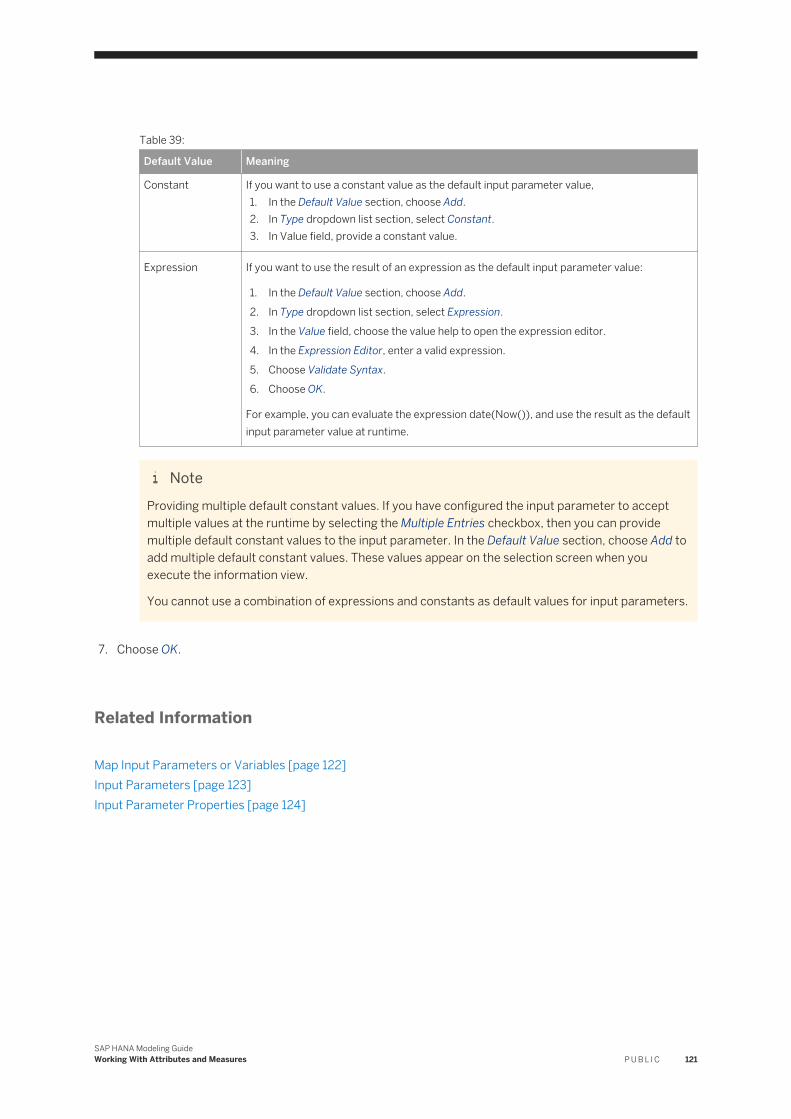
Table 39:
Default Value Meaning
Constant If you want to use a constant value as the default input parameter value,1. In the Default Value section, choose Add.2. In Type dropdown list section, select Constant.3. In Value field, provide a constant value.
Expression If you want to use the result of an expression as the default input parameter value:
1. In the Default Value section, choose Add.2. In Type dropdown list section, select Expression.3. In the Value field, choose the value help to open the expression editor.4. In the Expression Editor, enter a valid expression.5. Choose Validate Syntax.6. Choose OK.
For example, you can evaluate the expression date(Now()), and use the result as the default input parameter value at runtime.
NoteProviding multiple default constant values. If you have configured the input parameter to accept multiple values at the runtime by selecting the Multiple Entries checkbox, then you can provide multiple default constant values to the input parameter. In the Default Value section, choose Add to add multiple default constant values. These values appear on the selection screen when you execute the information view.
You cannot use a combination of expressions and constants as default values for input parameters.
7. Choose OK.
Related Information
Map Input Parameters or Variables [page 122]Input Parameters [page 123]Input Parameter Properties [page 124]
SAP HANA Modeling GuideWorking With Attributes and Measures P U B L I C 121
8.6.1 Map Input Parameters or Variables
If you are creating a calculation view by using other calculation views, attribute views or analytic views, which have input parameters or variables defined on it, then you can map the input parameters or variables of the underlying data sources with the input parameters or variables of the calculation view that you are creating.
Context
Similarly, for the following scenarios, mapping input parameter and variables is necessary:
● If you are creating a calculation view, which consists of other external views as value help references in its variables or input parameters, then you map the parameters/ variable of external views with the parameters or variables of the calculation view that you are creating.
● If you are creating a calculation view, and for the attributes in the underlying data sources of this calculation view, if you have defined a value help view or a table that provides values to filter the attribute at run time, then you map the parameters or variables of the attribute’s value help views with the parameters or variables of the calculation view.
NoteOnly those input parameters that you use in the dependent data sources are available for mapping.
Mapping parameters of the current view to the parameters of the underlying data sources, moves the filters down to the underlying data sources during runtime, which reduces the amount of data transferred across them. For value-helps from external views, in addition to the parameters, you could also map variables from current view to the external views.
NoteIf you are using attribute view with input parameters as an underlying data source, then you must map attribute view input parameters to calculation view input parameters with the same name only. For example, consider that you have defined an attribute view GEO with filter set on COUNTRY column such that, the filter value is an input parameter $$IP$$. When you use this attribute view in a calculation view, you need to define a same name input parameter IP and map it with the attribute view parameter. When you perform data preview on the calculation view, the runtime help for the calculation view input parameter is shown. The value selected for calculation view parameter serves as input for the attribute view parameter to filter the data.
Procedure
1. Open the calculation view in the editor.2. Select Semantics node.
3. Choose the Parameters/Variables tab, choose .
122 P U B L I CSAP HANA Modeling Guide
Working With Attributes and Measures
4. In the Select Type dropdown list, select a value.
Value Description
Data Sources If you are using other data sources in your calculation view and if you want map input parameters of these data sources with the input parameters of the calculation view.
Views for value help for variables/input parameters
If you are using input parameters or variables, which refer to external views for value help references and if you want to map input parameters or variables of external views with the input parameters or variables of the calculation view.
Views for value help for attributes
If you are creating a calculation view, and for the attributes in the underlying data sources of this calculation view, if you have defined a value help view or a table that provides values to filter the attribute at runtime.
5. Manage mappings for the source and target’s input parameters or variables by selecting a value from the source, holding the mouse button down and dragging to a value in the target.
NoteYou cannot map input parameters defined in external views for value help references to the input parameters of type Derived from table.
6. If you want auto-map source and target input parameter or variables based on its names, then:
a. In the toolbar, choose .b. Choose Auto Map.
NoteIf you are choosing Auto Map, then for mapping all unmapped source input parameters or variables, the system creates an input parameter or variable of the same name at the target. If you want avoid creating a new target parameter or variable, then select a source input parameter or variable and choose Map by Name in the context menu.
7. If you want to create a constant value at the target calculation view, then:a. Select Create Constant.b. Enter constant value.c. Choose OK.
NoteIf you want to map input parameters of type derived from table or derived from procedure or scalar function, which are input enabled, then you can only map them to a constant value of the target calculation view.
8.6.2 Input ParametersYou use input parameters to define internal parameterization of the view to obtain a desired functionality when you run the view.
This means that the engine needs to know and use the parameter value, for example, calculate a formula for a calculated measure. The parameter value is passed to the engine through the PLACEHOLDER clause of the
SAP HANA Modeling GuideWorking With Attributes and Measures P U B L I C 123
SQL statement. Normally, a parameter can only have a single value, for example, for currency conversion. However, when working with the in() function in filter expressions of the calculation views, you can pass several values as an IN List. The quoting must be followed as shown here:
For numerical type parameters
The filter expression of a calculation view CV1 is defined as follows:
in("attr", $$param$$)
Then you need to pass several values as:
select ... from CV1( 'PLACEHOLDER' = ('$$var$$' = 'VAL1,VAL2,VAL3')
For string type parameters
The filter expression of a calculation view CV1 is defined as:
in("attr", $$param$$)
Then you need to pass several values (with double quotes) as:
select ... from CV1( 'PLACEHOLDER' = ('$$var$$' = '''VAL1'',''VAL2'',''VAL3''')
You use input parameters as placeholders during currency conversion, unit of measure conversion, or in calculated column expressions. When used in formulas, the calculation of the formula is based on the input that you provide at run time during data preview.
The expected behavior of the input parameter when a value at run time is not provided is as follows:
Table 40:
Default Value Expected Behavior
Yes Calculates the formula based on the default value
No Results in error
The table implies that it is mandatory to provide a value for the input parameter at run time, or assign a default value while creating the view, to avoid errors.
8.6.3 Input Parameter Properties
After creating an input parameter, you can view its properties or change them based on your business requirement.
In the Parameters/Variables tab, select an input parameter. Modeler displays the following input parameter properties in the Properties tab.
Table 41:
Properties Description
Default Value The value of this property specifies the default value that modeler uses if you do not provide any values to the input parameter at runtime.
124 P U B L I CSAP HANA Modeling Guide
Working With Attributes and Measures
Properties Description
Parameter Type The value of this property specifies the input parameter type..
Multiple Entries The value of this property specifies whether the input parameter is configured to support multiple values at runtime.
Is Mandatory The value of this property specifies whether the input parameter is configured to mandatorily accept a value at runtime.
8.7 Using Hierarchies for Reporting
SAP HANA modeler helps create hierarchies to organize data in a tree structure for multidimensional reporting. Each hierarchy comprises of a set of levels having many-to-one relationships between each other and collectively these levels make up the hierarchical structure.
For example, a time hierarchy comprises of levels such as Fiscal Year, Fiscal Quarter, Fiscal Month, and so on. You can create the following two types of hierarchies in SAP HANA Modeler:
● Level Hierarchies● Parent-child Hierarchies
NoteHierarchies in attribute views are not available in a calculation views that reuses the attribute view.
Related Information
Create Level Hierarchies [page 126]Create Parent-Child Hierarchies [page 129]Query Shared Hierarchies [page 133]
SAP HANA Modeling GuideWorking With Attributes and Measures P U B L I C 125
8.7.1 Create Level Hierarchies
In level hierarchies each level represents a position in the hierarchy. For example, a time dimension can have a hierarchy that represents data at the month, quarter, and year levels.
Context
Level hierarchies consist of one or more levels of aggregation. Attributes roll up to the next higher level in a many-to-one relationship and members at this higher level roll up into the next higher level, and so on, until they reach the highest level. A hierarchy typically comprises of several levels, and you can include a single level in more than one hierarchy. A level hierarchy is rigid in nature, and you can access the root and child node in a defined order only.
Procedure
1. Launch SAP HANA studio.2. Open the required attribute view or graphical calculation view in the view editor.3. Select the Semantics node.4. Choose the Hierarchies tab.
5. Choose the icon .6. Provide a name and description to the new hierarchy.7. In Hierarchy Type dropdown list, select Level Hierarchy.8. Define node style
The node style determines the node ID for the level hierarchy.
a. In the Node section, choose Add.b. In the Node Style dropdown list, select a value.
9. Create levels.a. In the Nodes tab, choose Add to create a level.b. In the Element dropdown list, select a column value for each level.c. In Level Type dropdown list, select a required level type.
The level type specifies the semantics for the level attributes. For example, level type TIMEMONTHS indicates that the attributes are months such as, "January", February, and similarly level type REGULAR indicates that the level does not require any special formatting.
d. In the Order BY dropdown list, select a column value that modeler must use to order the hierarchy members.
NoteMDX client tools use attribute values to sort hierarchy members.
126 P U B L I CSAP HANA Modeling Guide
Working With Attributes and Measures

a. In the Sort Direction dropdown list, select a value that modeler must use to sort and display the hierarchy members.
10. Define level hierarchy properties.
In the Advanced tab, you can define certain additional properties for your hierarchy.
a. a. If you want to include the values of intermediate nodes of the hierarchy to the total value of the hierarchy’s root node, in the Aggregate All Nodes dropdown list select True. If you set the Aggregate All Nodes value to False, modeler does not roll-up the values of intermediate nodes to the root node.
NoteThe value of Aggregate All Nodes property is interpreted only by the SAP HANA MDX engine. In the BW OLAP engine, the modeler always counts the node values. Whether you want to select this property depends on the business requirement. If you are sure that there is no data posted on aggregate nodes, you should set the option to false. The engine then executes the hierarchy faster.
b. In the Default Member textbox, enter a value for the default member.
This value helps modeler identify the default member of the hierarchy. If you do not provide any value, all members of hierarchy are default members.
c. In the Orphan Nodes dropdown list, select a value.
This value helps modeler know how to handle orphan nodes in the hierarchy.
NoteIf you select Stepparent option to handle orphan nodes, in the Stepparent text field, enter a value (node ID) for the step parent node. The step parent node must already exist in the hierarchy at the root level and you must enter the node ID according to the node style that you select for the hierarchy. For example if you select node style Level Name, the stepparent node ID can be [Level2].[B2]. The modeler assigns all orphan nodes under this node.
d. In the Root Node Visibility dropdown list, select a value.
The value helps modeler know if it needs to add an additional root node to the hierarchy.e. If you want the level hierarchy to support multiple parents for its elements, select the Multiple Parent
checkbox.11. Create a Not Assigned Member, if required.
In attribute view or calculation views of type dimensions, you can create a new Not Assigned Member that captures all values in fact table, which do not have corresponding values in the master table. In level hierarchies, the not assigned member appears at each level of the hierarchy.
a. Select the Not Assigned Member tab.b. If you want to capture values in the fact tables that do not have corresponding values in the master
table, then in the Not Assigned Members dropdown list, select Enable .
By default, modeler does not provide a hierarchy member to capture such values. This means that, Not Assigned Members are disabled. You can either enable or choose Auto Assign to handle not assigned members.
SAP HANA Modeling GuideWorking With Attributes and Measures P U B L I C 127
NoteSelecting, Auto Assign to handle not assigned members impacts the performance of your calculation views. Select Auto Assign with caution.
c. Provide a name and label to the hierarchy member.
This label value appears in reporting tools to capture not assigned members.d. If you want to drilldown this member in reporting tool, select the Enable Drilldown checkbox.e. If you want to use null convert values to process NULL values in the fact table, which do not have any
corresponding records in the master table, select the Null Value Processing checkbox.
By default, modeler uses the string _#_ as the null convert value. You can change this value in the Name field under the Null Value Member Properties section.
f. Provide a label for the null value member.
This value appears in the reporting tools to capture null values.
Related Information
Node Style [page 128]Level Hierarchy Properties [page 129]Root Node Visibility [page 134]Orphan Nodes [page 135]Query Shared Hierarchies [page 133]
8.7.1.1 Node Style
Node style is applicable for level hierarchies, and helps modeler identify the format the node ID. For example, if the node ID must comprise of the level name and the node name in the reporting tools.
Table 42:
Node Style Description
Level Name For this node style, the node ID comprises of the level name and the node name. For example, for a fiscal hierarchy, the Level Name node style implies: MONTH.JAN
Name Only For this node style, the node ID comprises of the level name only. For example, for a fiscal hierarchy, the Name Only node style implies: JAN
Name Path For this node style, the node ID comprises of the node name and the names of all ancestors apart from the (single physical) root node. For example, for a fiscal hierarchy, the Level Name node style implies: FISCAL_2015.QUARTER_1.JAN
128 P U B L I CSAP HANA Modeling Guide
Working With Attributes and Measures
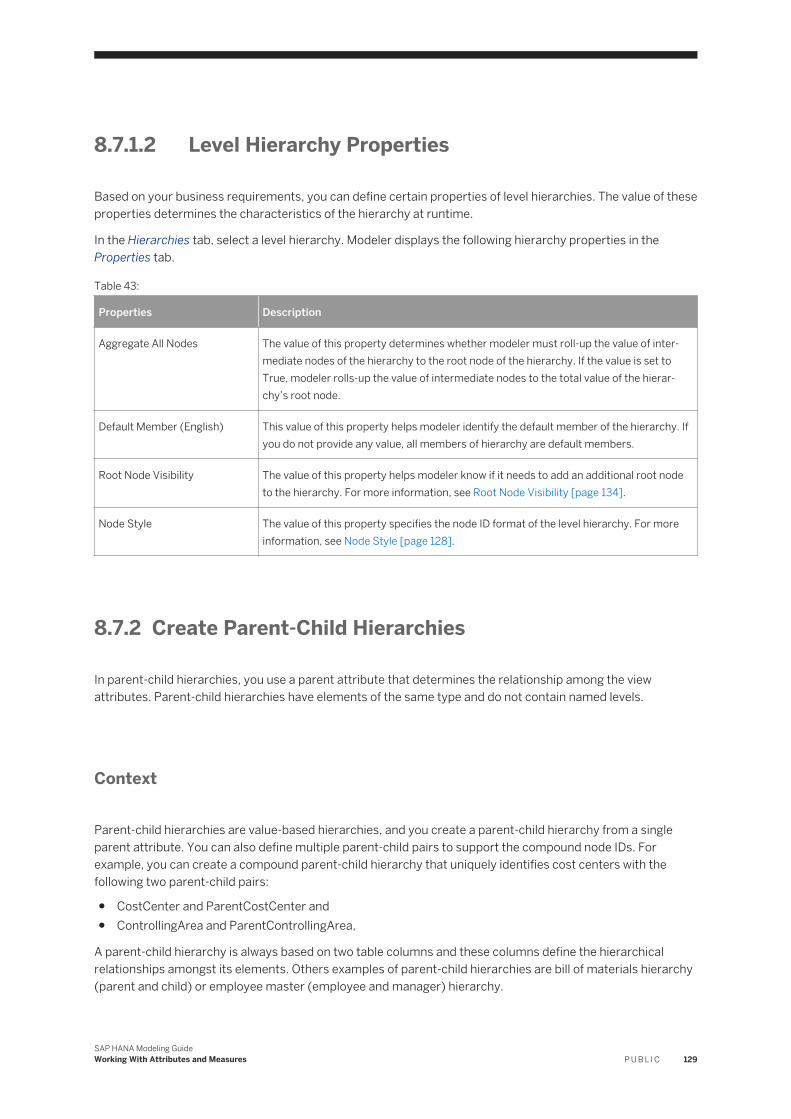
8.7.1.2 Level Hierarchy Properties
Based on your business requirements, you can define certain properties of level hierarchies. The value of these properties determines the characteristics of the hierarchy at runtime.
In the Hierarchies tab, select a level hierarchy. Modeler displays the following hierarchy properties in the Properties tab.
Table 43:
Properties Description
Aggregate All Nodes The value of this property determines whether modeler must roll-up the value of intermediate nodes of the hierarchy to the root node of the hierarchy. If the value is set to True, modeler rolls-up the value of intermediate nodes to the total value of the hierarchy’s root node.
Default Member (English) This value of this property helps modeler identify the default member of the hierarchy. If you do not provide any value, all members of hierarchy are default members.
Root Node Visibility The value of this property helps modeler know if it needs to add an additional root node to the hierarchy. For more information, see Root Node Visibility [page 134].
Node Style The value of this property specifies the node ID format of the level hierarchy. For more information, see Node Style [page 128].
8.7.2 Create Parent-Child Hierarchies
In parent-child hierarchies, you use a parent attribute that determines the relationship among the view attributes. Parent-child hierarchies have elements of the same type and do not contain named levels.
Context
Parent-child hierarchies are value-based hierarchies, and you create a parent-child hierarchy from a single parent attribute. You can also define multiple parent-child pairs to support the compound node IDs. For example, you can create a compound parent-child hierarchy that uniquely identifies cost centers with the following two parent-child pairs:
● CostCenter and ParentCostCenter and● ControllingArea and ParentControllingArea,
A parent-child hierarchy is always based on two table columns and these columns define the hierarchical relationships amongst its elements. Others examples of parent-child hierarchies are bill of materials hierarchy (parent and child) or employee master (employee and manager) hierarchy.
SAP HANA Modeling GuideWorking With Attributes and Measures P U B L I C 129
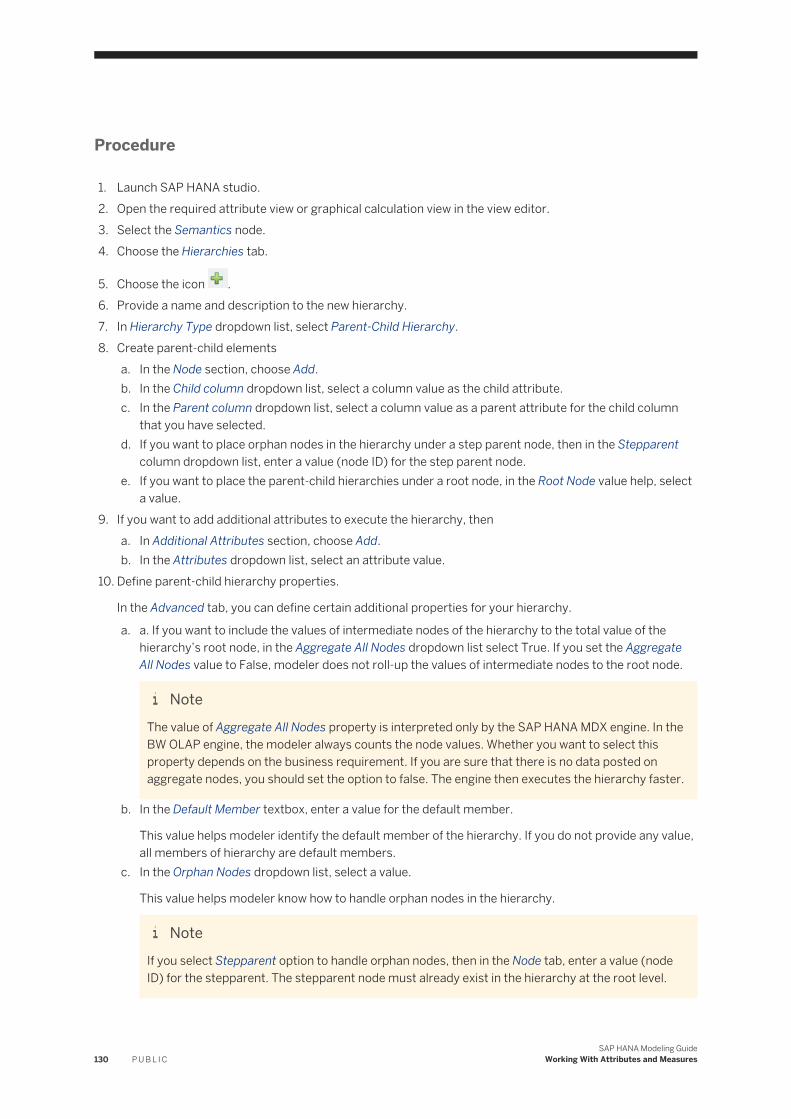
Procedure
1. Launch SAP HANA studio.2. Open the required attribute view or graphical calculation view in the view editor.3. Select the Semantics node.4. Choose the Hierarchies tab.
5. Choose the icon .6. Provide a name and description to the new hierarchy.7. In Hierarchy Type dropdown list, select Parent-Child Hierarchy.8. Create parent-child elements
a. In the Node section, choose Add.b. In the Child column dropdown list, select a column value as the child attribute.c. In the Parent column dropdown list, select a column value as a parent attribute for the child column
that you have selected.d. If you want to place orphan nodes in the hierarchy under a step parent node, then in the Stepparent
column dropdown list, enter a value (node ID) for the step parent node.e. If you want to place the parent-child hierarchies under a root node, in the Root Node value help, select
a value.9. If you want to add additional attributes to execute the hierarchy, then
a. In Additional Attributes section, choose Add.b. In the Attributes dropdown list, select an attribute value.
10. Define parent-child hierarchy properties.
In the Advanced tab, you can define certain additional properties for your hierarchy.
a. a. If you want to include the values of intermediate nodes of the hierarchy to the total value of the hierarchy’s root node, in the Aggregate All Nodes dropdown list select True. If you set the Aggregate All Nodes value to False, modeler does not roll-up the values of intermediate nodes to the root node.
NoteThe value of Aggregate All Nodes property is interpreted only by the SAP HANA MDX engine. In the BW OLAP engine, the modeler always counts the node values. Whether you want to select this property depends on the business requirement. If you are sure that there is no data posted on aggregate nodes, you should set the option to false. The engine then executes the hierarchy faster.
b. In the Default Member textbox, enter a value for the default member.
This value helps modeler identify the default member of the hierarchy. If you do not provide any value, all members of hierarchy are default members.
c. In the Orphan Nodes dropdown list, select a value.
This value helps modeler know how to handle orphan nodes in the hierarchy.
NoteIf you select Stepparent option to handle orphan nodes, then in the Node tab, enter a value (node ID) for the stepparent. The stepparent node must already exist in the hierarchy at the root level.
130 P U B L I CSAP HANA Modeling Guide
Working With Attributes and Measures
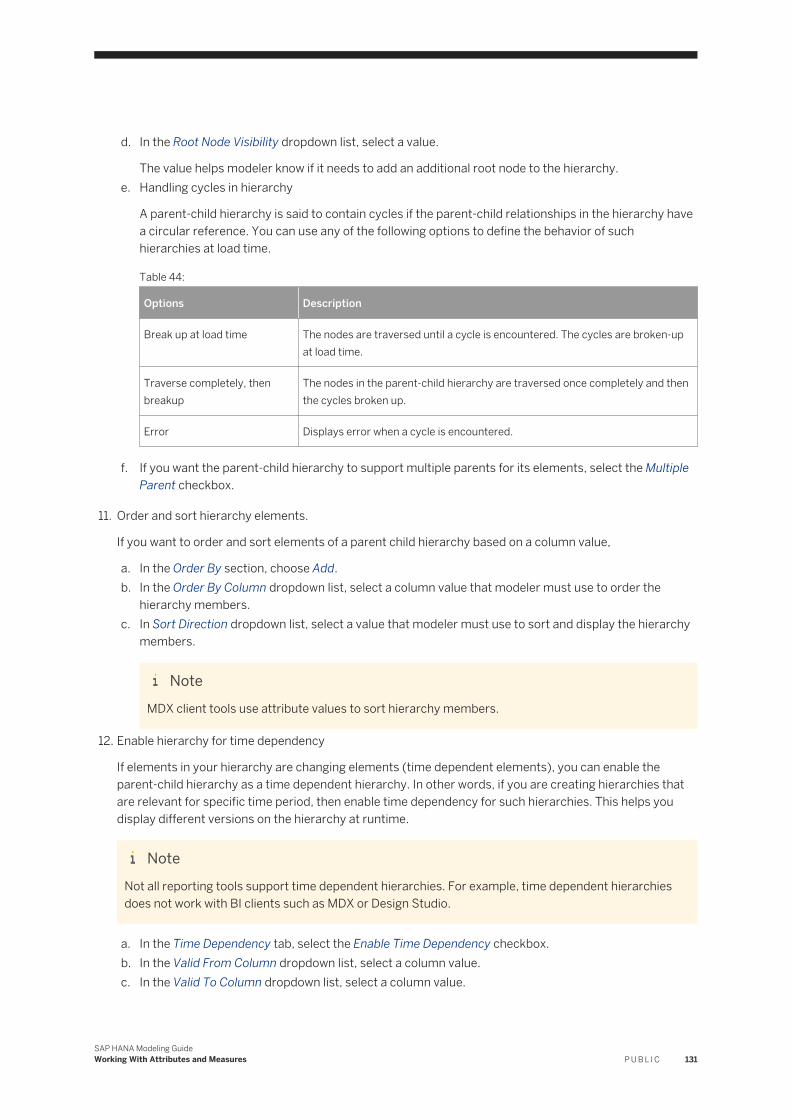
d. In the Root Node Visibility dropdown list, select a value.
The value helps modeler know if it needs to add an additional root node to the hierarchy.e. Handling cycles in hierarchy
A parent-child hierarchy is said to contain cycles if the parent-child relationships in the hierarchy have a circular reference. You can use any of the following options to define the behavior of such hierarchies at load time.
Table 44:
Options Description
Break up at load time The nodes are traversed until a cycle is encountered. The cycles are broken-up at load time.
Traverse completely, then breakup
The nodes in the parent-child hierarchy are traversed once completely and then the cycles broken up.
Error Displays error when a cycle is encountered.
f. If you want the parent-child hierarchy to support multiple parents for its elements, select the Multiple Parent checkbox.
11. Order and sort hierarchy elements.
If you want to order and sort elements of a parent child hierarchy based on a column value,
a. In the Order By section, choose Add.b. In the Order By Column dropdown list, select a column value that modeler must use to order the
hierarchy members.c. In Sort Direction dropdown list, select a value that modeler must use to sort and display the hierarchy
members.
NoteMDX client tools use attribute values to sort hierarchy members.
12. Enable hierarchy for time dependency
If elements in your hierarchy are changing elements (time dependent elements), you can enable the parent-child hierarchy as a time dependent hierarchy. In other words, if you are creating hierarchies that are relevant for specific time period, then enable time dependency for such hierarchies. This helps you display different versions on the hierarchy at runtime.
NoteNot all reporting tools support time dependent hierarchies. For example, time dependent hierarchies does not work with BI clients such as MDX or Design Studio.
a. In the Time Dependency tab, select the Enable Time Dependency checkbox.b. In the Valid From Column dropdown list, select a column value.c. In the Valid To Column dropdown list, select a column value.
SAP HANA Modeling GuideWorking With Attributes and Measures P U B L I C 131
SAP HANA modeler uses Valid From Column and Valid To Column values as the validity time for the time dependent hierarchies.
13. If you want to use an input parameter to specify the validity of the time dependent hierarchy at runtime,a. In the Validity Period section, select Interval.b. In the From Date Parameter dropdown list, select an input parameter that you want to use to provide
the valid from date at runtime.c. In the To Date Parameter dropdown list, select an input parameter that you want to use to provide the
valid to date at run time.14. If you want to use an input parameter to specify the key date at run time,
a. In the Validity Period section, select Key Date.b. In the Key Date Parameter dropdown list, select an input parameter value that you want to use to
provide key date value at runtime.15. Create a Not Assigned Member, if required.
In attribute views or calculation views of type dimensions, you can create a new Not Assigned Member that captures all values in fact table, which do not have corresponding values in the master table.
a. Select the Not Assigned Member tab.b. If you want to capture values in the fact tables that do not have corresponding values in the master
table, then in the Not Assigned Members dropdown list, select Enable .
By default, modeler does not provide a hierarchy member to capture such values. This means that, Not Assigned Members are disabled. You can either enable or choose Auto Assign to handle not assigned members.
NoteSelecting, Auto Assign to handle not assigned members impacts the performance of your calculation views. Select Auto Assign with caution.
c. Provide a name and label to the hierarchy member.
This label value appears in reporting tools to capture not assigned members.d. If you want to drilldown this member in reporting tool, select the Enable Drilldown checkbox.e. If you want to use null convert values to process NULL values in the fact table, which do not have any
corresponding records in the master table, select the Null Value Processing checkbox.
By default, modeler uses the string _#_ as the null convert value. You can change this value in the Name field under the Null Value Member Properties section.
f. Provide a label for the null value member.
This value appears in the reporting tools to capture null values.
Related Information
Create Parent-Child Hierarchies [page 129]Parent-Child Hierarchy Properties [page 133]Query Shared Hierarchies [page 133]Root Node Visibility [page 134]
132 P U B L I CSAP HANA Modeling Guide
Working With Attributes and Measures
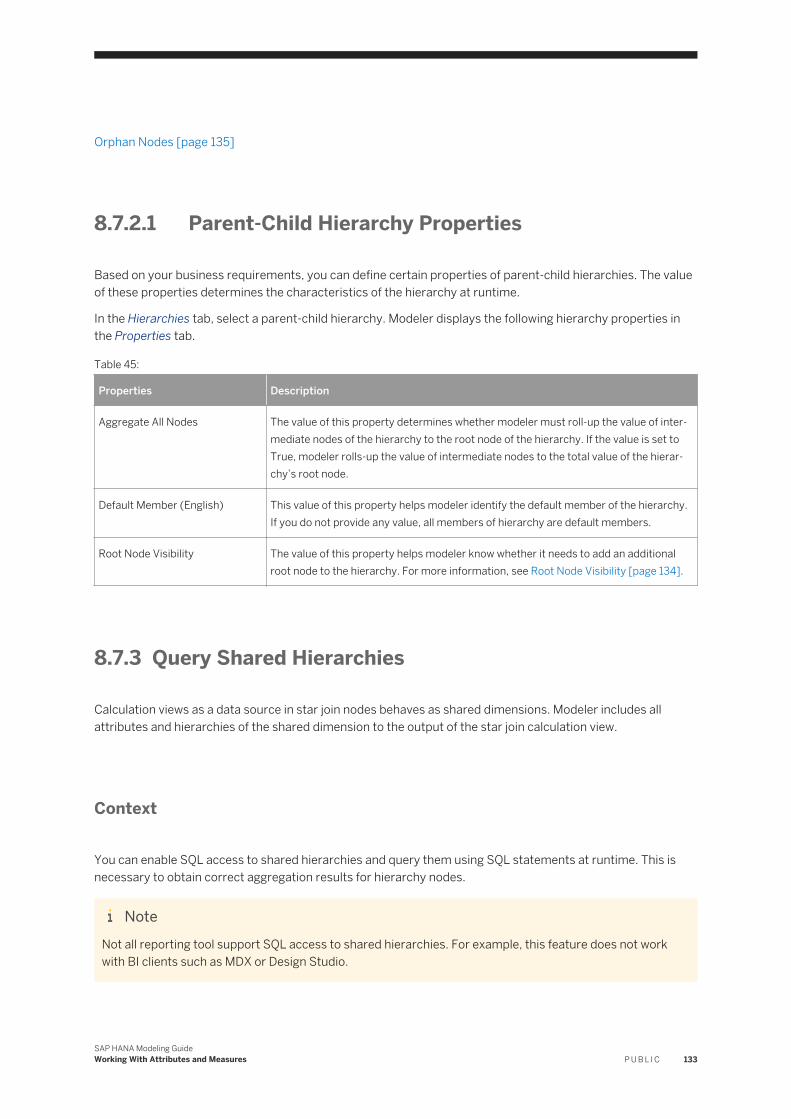
Orphan Nodes [page 135]
8.7.2.1 Parent-Child Hierarchy Properties
Based on your business requirements, you can define certain properties of parent-child hierarchies. The value of these properties determines the characteristics of the hierarchy at runtime.
In the Hierarchies tab, select a parent-child hierarchy. Modeler displays the following hierarchy properties in the Properties tab.
Table 45:
Properties Description
Aggregate All Nodes The value of this property determines whether modeler must roll-up the value of intermediate nodes of the hierarchy to the root node of the hierarchy. If the value is set to True, modeler rolls-up the value of intermediate nodes to the total value of the hierarchy’s root node.
Default Member (English) This value of this property helps modeler identify the default member of the hierarchy. If you do not provide any value, all members of hierarchy are default members.
Root Node Visibility The value of this property helps modeler know whether it needs to add an additional root node to the hierarchy. For more information, see Root Node Visibility [page 134].
8.7.3 Query Shared Hierarchies
Calculation views as a data source in star join nodes behaves as shared dimensions. Modeler includes all attributes and hierarchies of the shared dimension to the output of the star join calculation view.
Context
You can enable SQL access to shared hierarchies and query them using SQL statements at runtime. This is necessary to obtain correct aggregation results for hierarchy nodes.
NoteNot all reporting tool support SQL access to shared hierarchies. For example, this feature does not work with BI clients such as MDX or Design Studio.
SAP HANA Modeling GuideWorking With Attributes and Measures P U B L I C 133

Procedure
1. Open the calculation view with star join node.2. Select the Semantics node.3. If you want enable SQL access to only a selected list of shared hierarchies, then:
a. Choose the Hierarchies tab.b. In the Shared section, select a hierarchy to which you want to enable SQL access.
c. Choose .d. Choose the SQL Access tab.e. Select the Enable SQL access checkbox.
4. If you want enable SQL access to all shared hierarchies of the current version of the calculation view, then:a. Select the View Properties tab.b. In the General section, select the Enable Hierarchies for SQL access checkbox.
Results
After you enable SQL access to shared hierarchies, modeler generates a Node column and a Hierarchy Expression Parameter for the shared hierarchy with default names. You can use the node column to filter and perform SQL group by operation and use the hierarchy expression parameter to filter the hierarchy nodes (for example, if you want query only the children nodes of a parent-child hierarchy).
For example, the below query shows uses the node column to filter and perform SQL group by operation:
Sample Code
select "HierarchyNodeColumn", sum("Revenue") as "Revenue"FROM "_SYS_BIC"."mini/CvSalesCubeHier" group by "HierarchyNodeColumn";
8.7.4 Root Node Visibility
Based on your business requirement, choose to add an additional root node to the hierarchy and place all other nodes as its descendants.
Table 46:
Root Node Visibility Description
Add Root Node If Defined This applicable only for parent-child hierarchies. Modeler adds a root node only if you have defined a root node value, while creating the parent child hierarchy.
134 P U B L I CSAP HANA Modeling Guide
Working With Attributes and Measures
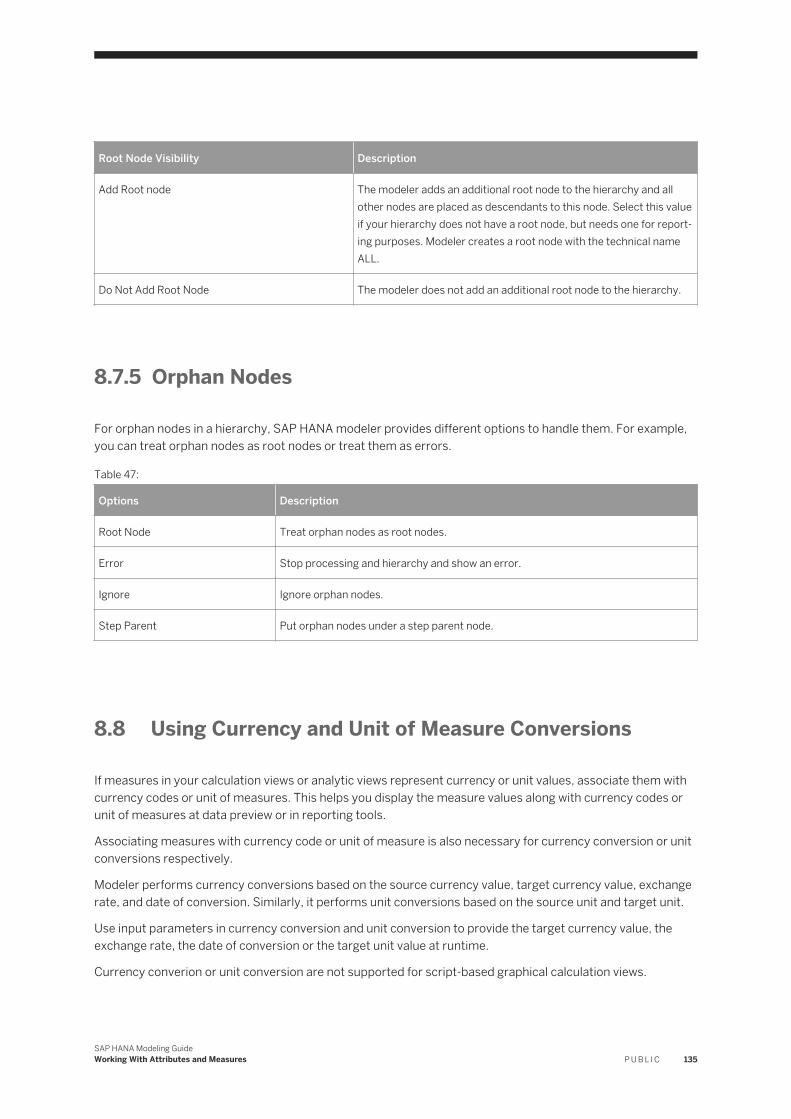
Root Node Visibility Description
Add Root node The modeler adds an additional root node to the hierarchy and all other nodes are placed as descendants to this node. Select this value if your hierarchy does not have a root node, but needs one for reporting purposes. Modeler creates a root node with the technical name ALL.
Do Not Add Root Node The modeler does not add an additional root node to the hierarchy.
8.7.5 Orphan Nodes
For orphan nodes in a hierarchy, SAP HANA modeler provides different options to handle them. For example, you can treat orphan nodes as root nodes or treat them as errors.
Table 47:
Options Description
Root Node Treat orphan nodes as root nodes.
Error Stop processing and hierarchy and show an error.
Ignore Ignore orphan nodes.
Step Parent Put orphan nodes under a step parent node.
8.8 Using Currency and Unit of Measure Conversions
If measures in your calculation views or analytic views represent currency or unit values, associate them with currency codes or unit of measures. This helps you display the measure values along with currency codes or unit of measures at data preview or in reporting tools.
Associating measures with currency code or unit of measure is also necessary for currency conversion or unit conversions respectively.
Modeler performs currency conversions based on the source currency value, target currency value, exchange rate, and date of conversion. Similarly, it performs unit conversions based on the source unit and target unit.
Use input parameters in currency conversion and unit conversion to provide the target currency value, the exchange rate, the date of conversion or the target unit value at runtime.
Currency converion or unit conversion are not supported for script-based graphical calculation views.
SAP HANA Modeling GuideWorking With Attributes and Measures P U B L I C 135
Related Information
Associate Measures with Currency [page 136]Associate Measures with Unit of Measure [page 140]Create Input Parameters [page 118]
8.8.1 Associate Measures with Currency
If measures in your calculation views or analytic views represent currency or unit values, associate them with currency codes or unit of measures. This helps you display the measure values along with currency codes or unit of measures at data preview or in reporting tools.
Prerequisites
You have imported the currency tables TCURC, TCURF, TCURN, TCURR, TCURT, TCURV, TCURW, and TCURX.
Context
Associating measures with currency codes is also necessary for currency conversions. For example, consider that you want to generate a sales report for a region in a particular currency code and you have the sales data in the database table with a different currency code. In such cases, create a calculation view by using the table column containing the sales data in different currency as a measure and associate the measure with your desired currency to perform currency conversion. Activate the calculation view to generate required reports.
Procedure
1. Open the required graphical calculation view in the view editor.2. Select the Semantics node.3. In the Columns tab, select a measure to associate it with currency code.
4. Choose the icon dropdown list.5. Choose the Assign Semantics menu option.6. In the Semantic Type dropdown list, select Amount with Currency Code.
You can also assign semantics and perform currency conversion on measures in any of the intermediate aggregation nodes. Select the measure in the Output pane and in the Properties tab assign a value to the Semantic Type property.
136 P U B L I CSAP HANA Modeling Guide
Working With Attributes and Measures
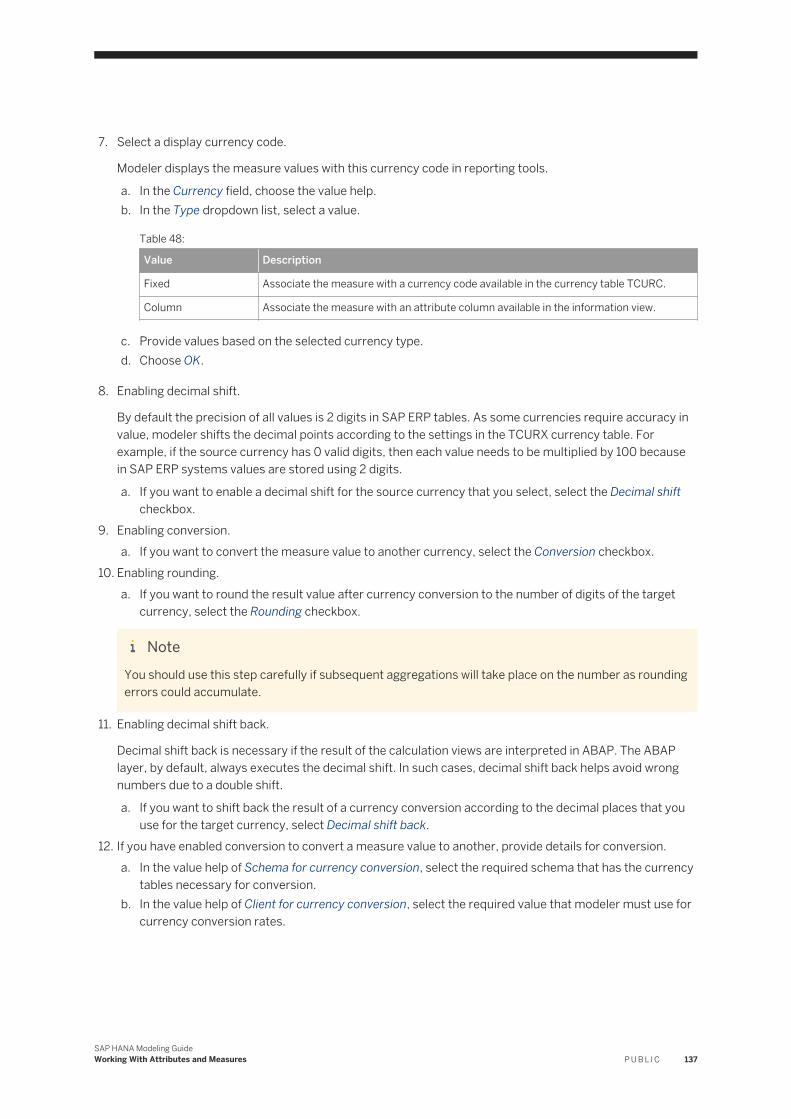
7. Select a display currency code.
Modeler displays the measure values with this currency code in reporting tools.
a. In the Currency field, choose the value help.b. In the Type dropdown list, select a value.
Table 48:
Value Description
Fixed Associate the measure with a currency code available in the currency table TCURC.
Column Associate the measure with an attribute column available in the information view.
c. Provide values based on the selected currency type.d. Choose OK.
8. Enabling decimal shift.
By default the precision of all values is 2 digits in SAP ERP tables. As some currencies require accuracy in value, modeler shifts the decimal points according to the settings in the TCURX currency table. For example, if the source currency has 0 valid digits, then each value needs to be multiplied by 100 because in SAP ERP systems values are stored using 2 digits.
a. If you want to enable a decimal shift for the source currency that you select, select the Decimal shift checkbox.
9. Enabling conversion.a. If you want to convert the measure value to another currency, select the Conversion checkbox.
10. Enabling rounding.a. If you want to round the result value after currency conversion to the number of digits of the target
currency, select the Rounding checkbox.
NoteYou should use this step carefully if subsequent aggregations will take place on the number as rounding errors could accumulate.
11. Enabling decimal shift back.
Decimal shift back is necessary if the result of the calculation views are interpreted in ABAP. The ABAP layer, by default, always executes the decimal shift. In such cases, decimal shift back helps avoid wrong numbers due to a double shift.
a. If you want to shift back the result of a currency conversion according to the decimal places that you use for the target currency, select Decimal shift back.
12. If you have enabled conversion to convert a measure value to another, provide details for conversion.a. In the value help of Schema for currency conversion, select the required schema that has the currency
tables necessary for conversion.b. In the value help of Client for currency conversion, select the required value that modeler must use for
currency conversion rates.
SAP HANA Modeling GuideWorking With Attributes and Measures P U B L I C 137
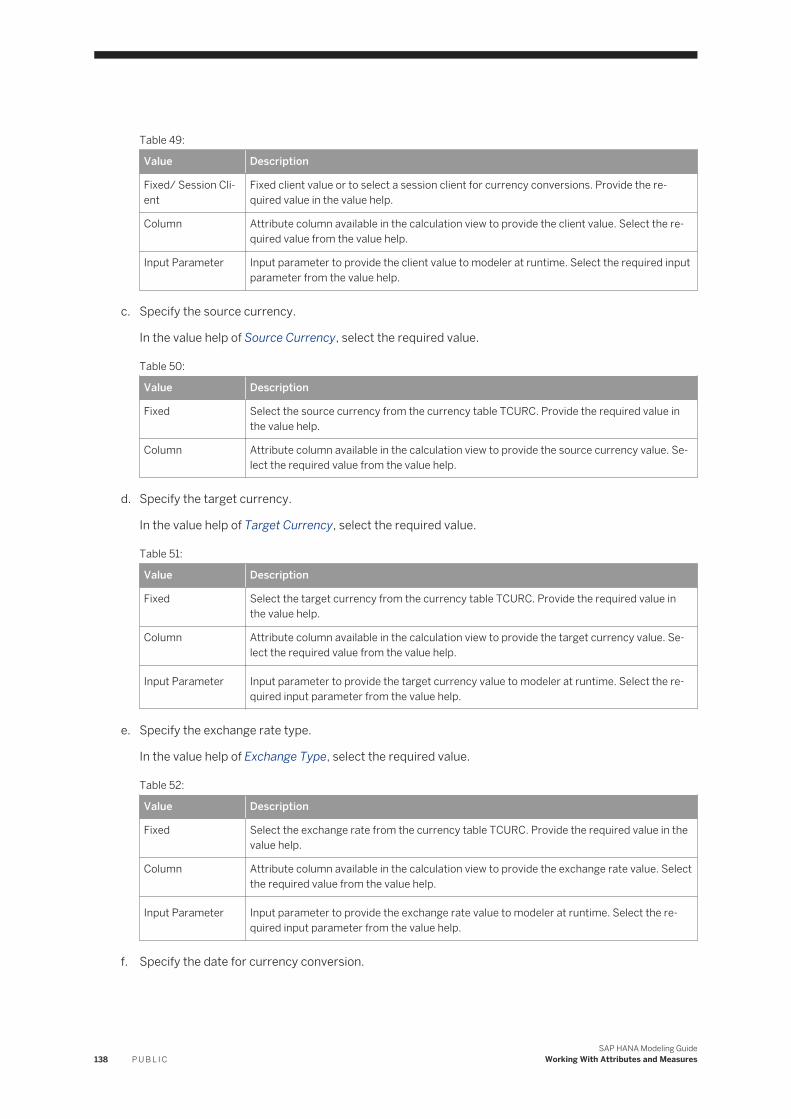
Table 49:
Value Description
Fixed/ Session Client
Fixed client value or to select a session client for currency conversions. Provide the required value in the value help.
Column Attribute column available in the calculation view to provide the client value. Select the required value from the value help.
Input Parameter Input parameter to provide the client value to modeler at runtime. Select the required input parameter from the value help.
c. Specify the source currency.
In the value help of Source Currency, select the required value.
Table 50:
Value Description
Fixed Select the source currency from the currency table TCURC. Provide the required value in the value help.
Column Attribute column available in the calculation view to provide the source currency value. Select the required value from the value help.
d. Specify the target currency.
In the value help of Target Currency, select the required value.
Table 51:
Value Description
Fixed Select the target currency from the currency table TCURC. Provide the required value in the value help.
Column Attribute column available in the calculation view to provide the target currency value. Select the required value from the value help.
Input Parameter Input parameter to provide the target currency value to modeler at runtime. Select the required input parameter from the value help.
e. Specify the exchange rate type.
In the value help of Exchange Type, select the required value.
Table 52:
Value Description
Fixed Select the exchange rate from the currency table TCURC. Provide the required value in the value help.
Column Attribute column available in the calculation view to provide the exchange rate value. Select the required value from the value help.
Input Parameter Input parameter to provide the exchange rate value to modeler at runtime. Select the required input parameter from the value help.
f. Specify the date for currency conversion.
138 P U B L I CSAP HANA Modeling Guide
Working With Attributes and Measures
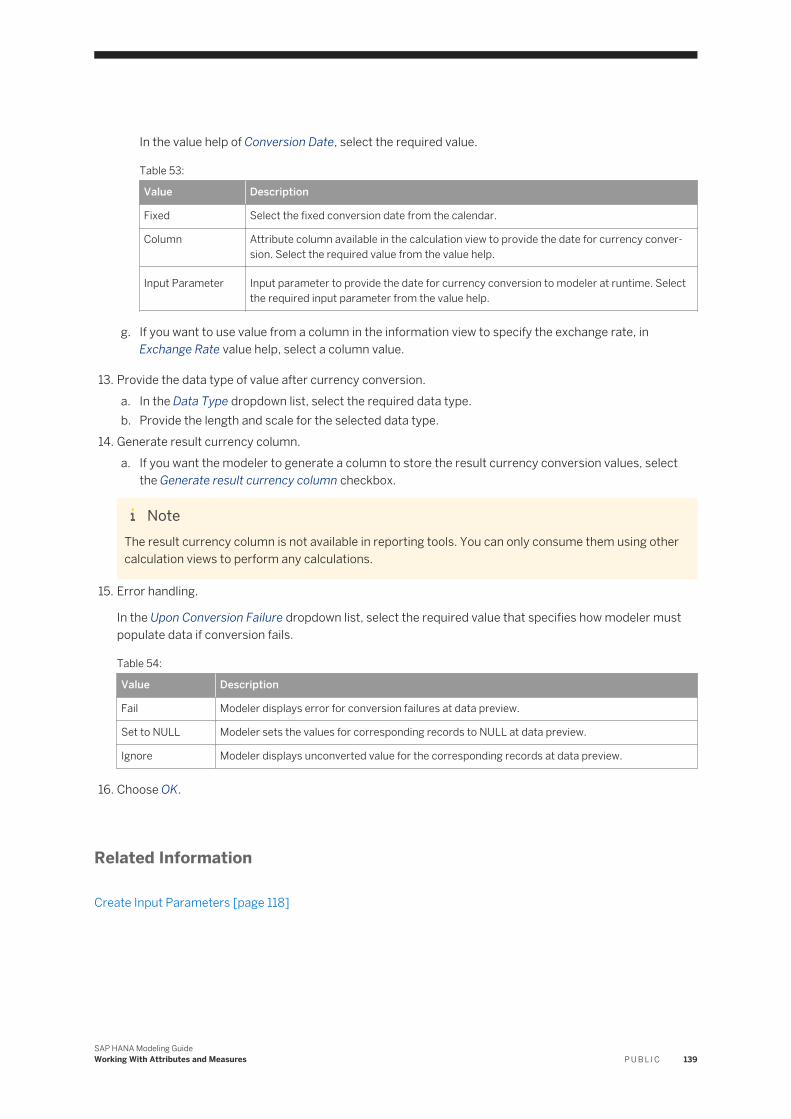
In the value help of Conversion Date, select the required value.
Table 53:
Value Description
Fixed Select the fixed conversion date from the calendar.
Column Attribute column available in the calculation view to provide the date for currency conversion. Select the required value from the value help.
Input Parameter Input parameter to provide the date for currency conversion to modeler at runtime. Select the required input parameter from the value help.
g. If you want to use value from a column in the information view to specify the exchange rate, in Exchange Rate value help, select a column value.
13. Provide the data type of value after currency conversion.a. In the Data Type dropdown list, select the required data type.b. Provide the length and scale for the selected data type.
14. Generate result currency column.a. If you want the modeler to generate a column to store the result currency conversion values, select
the Generate result currency column checkbox.
NoteThe result currency column is not available in reporting tools. You can only consume them using other calculation views to perform any calculations.
15. Error handling.
In the Upon Conversion Failure dropdown list, select the required value that specifies how modeler must populate data if conversion fails.
Table 54:
Value Description
Fail Modeler displays error for conversion failures at data preview.
Set to NULL Modeler sets the values for corresponding records to NULL at data preview.
Ignore Modeler displays unconverted value for the corresponding records at data preview.
16. Choose OK.
Related Information
Create Input Parameters [page 118]
SAP HANA Modeling GuideWorking With Attributes and Measures P U B L I C 139
8.8.2 Associate Measures with Unit of Measure
If measures in calculation views or analytic views represent unit values, associate the measures with a unit of measure. This helps you display the measure values along with the unit of measures at data preview or in reporting tools.
Prerequisites
You have imported the unit tables T006, T006D, and T006A.
Context
Associating measures with unit of measures is also necessary for unit conversions. For example, if you want to convert a unit of a measure from cubic meters to barrels to perform volume calculations, then associate the unit of measure with the sematic type Quantity with Unit of Measure and perform unit conversions.
Procedure
1. Open the required graphical calculation view in the view editor.2. Select the Semantics node.3. In the Columns tab, select a measure to associate it with currency code.
4. Choose the icon dropdown list.5. Choose the Assign Semantics menu option.6. In the Semantic Type dropdown list, select Quantity with Unit Of Measure.
You can also assign semantics and perform unit conversion on measures in any of the intermediate aggregation nodes. Select the measure in the Output pane and in the Properties tab assign a value to the Semantic Type property.
7. Select a display unit.
Modeler displays the measure values with this unit in reporting tools.
a. In the Unit field, choose the value help.b. In the Type dropdown list, select a value.
Table 55:
Value Description
Fixed Associate the measure with a unit of measure available in the unit tables T006, T006A or T006D.
140 P U B L I CSAP HANA Modeling Guide
Working With Attributes and Measures
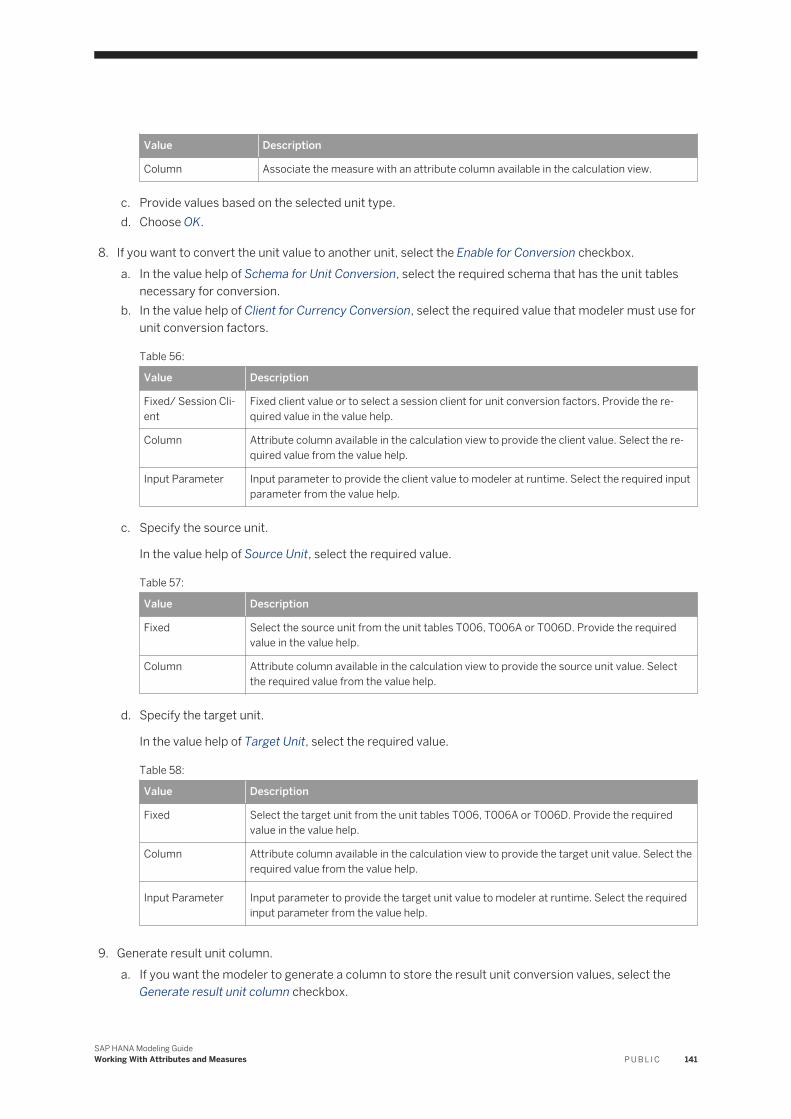
Value Description
Column Associate the measure with an attribute column available in the calculation view.
c. Provide values based on the selected unit type.d. Choose OK.
8. If you want to convert the unit value to another unit, select the Enable for Conversion checkbox.a. In the value help of Schema for Unit Conversion, select the required schema that has the unit tables
necessary for conversion.b. In the value help of Client for Currency Conversion, select the required value that modeler must use for
unit conversion factors.
Table 56:
Value Description
Fixed/ Session Client
Fixed client value or to select a session client for unit conversion factors. Provide the required value in the value help.
Column Attribute column available in the calculation view to provide the client value. Select the required value from the value help.
Input Parameter Input parameter to provide the client value to modeler at runtime. Select the required input parameter from the value help.
c. Specify the source unit.
In the value help of Source Unit, select the required value.
Table 57:
Value Description
Fixed Select the source unit from the unit tables T006, T006A or T006D. Provide the required value in the value help.
Column Attribute column available in the calculation view to provide the source unit value. Select the required value from the value help.
d. Specify the target unit.
In the value help of Target Unit, select the required value.
Table 58:
Value Description
Fixed Select the target unit from the unit tables T006, T006A or T006D. Provide the required value in the value help.
Column Attribute column available in the calculation view to provide the target unit value. Select the required value from the value help.
Input Parameter Input parameter to provide the target unit value to modeler at runtime. Select the required input parameter from the value help.
9. Generate result unit column.a. If you want the modeler to generate a column to store the result unit conversion values, select the
Generate result unit column checkbox.
SAP HANA Modeling GuideWorking With Attributes and Measures P U B L I C 141
NoteThe result unit column is not available in reporting tools. You can only consume them using other calculation views to perform any calculations.
10. Error handling.
In the Upon Conversion Failure dropdown list, select the required value that specifies how modeler must populate data if conversion fails.
Table 59:
Value Description
Fail Modeler displays error for conversion failures at data preview.
Set to NULL Modeler sets the values for corresponding records to NULL at data preview.
Ignore Modeler displays unconverted value for the corresponding records at data preview.
11. Choose OK.
Related Information
Create Input Parameters [page 118]
8.9 Enable Attributes for Drilldown in Reporting Tools
By default, SAP HANA modeler allows you to drilldown attributes or calculated attributes in reporting tools. For attributes in calculation views with data category as dimension, you can drilldown using flat hierarchies in MDX based tools.
Procedure
1. Open the information view in the view editor.2. Select the Semantics node.3. Select an attribute.4. Select the Properties tab.5. In the Drill Down Enablement property, set a value.
142 P U B L I CSAP HANA Modeling Guide
Working With Attributes and Measures
Related Information
Supported Drilldown Types for Attributes [page 143]
8.9.1 Supported Drilldown Types for Attributes
Enable attributes in informatio views for drilldown or disable them for drilldown in reporting tools.
SAP HANA modeler supports the following drilldown types for attributes in calculation views.
Table 60:
Drilldown Type Description
<blank> Attributes are not available for drilldown operations and the tool does not generate an additional flat hierarchy.
Drill Down Attributes appear as a separate dimension in the reporting tools and is available for drilldown operations.
Drill Down with flat hierarchy (MDX) This drilldown option is available for the attributes in calculation views (with data category as dimension) and also for the attributes in attribute views.
The attributes are available for drilldown in reporting tools and the tool generates an additional flat hierarchy for this attribute. In this hierarchy, all the distinct attribute values make up the first and the only level of the hierarchy.
The hierarchy enables the attribute for drilldown in MDX based tools.
8.10 Trace Columns in Information Views With Data Lineage
Data lineage in SAP HANA modeler helps you visualize the origin of attributes and measures in information views.
Context
You can use data lineage to visualize the flow of an attribute or measure within an information view. It is a useful feature for impact analysis and to trace errors and debug them.
SAP HANA Modeling GuideWorking With Attributes and Measures P U B L I C 143

Procedure
1. Launch SAP HANA studio.2. Open the required information view with view editor.3. Select the Semantics node.4. Choose the Columns tab.5. In the Columns tab, select a column for data lineage.
6. In the Local section, choose .
Results
In the Scenario pane, modeler highlights the column, its data source and the flow of the column from its data source to the Semantics node.
8.11 Assign Value Help for Attributes
If you are using attribute data to provide values to variables and input parameters at runtime, you can assign a value help to that attribute in order to use values from other attributes, which are available within the same information view or in other tables or other information views.
Context
For example, consider you have defined an input parameter in calculation view CV1 using the attribute CUSTOMER_ID. If you want to provide values to the input parameter using the attribute CUSTOMER_ID of calculation view CV2, then assign the value to attribute in CV1 with the reference column CUSTOMER_ID of CV2.
Procedure
1. Select the Semantics node.2. Choose the Columns tab.3. Select an attribute.
4. Choose the icon dropdown.5. Choose the Assign Value Help menu option.
144 P U B L I CSAP HANA Modeling Guide
Working With Attributes and Measures

6. Select information view or table.a. In the View/Table for value help field, select the information view or table that you want to use for
providing values.7. Select an attribute.
Modeler displays attributes that are available in the selected table or information view.
a. a. In the Attribute dropdown list, select an attribute.
Results
At runtime, modeler provides a value help that has values from the selected attribute. You can use these values for input parameters and variables.
8.12 Add Descriptions to Attributes
In an information view, you can associate an attribute or a column having texts, as a label column to another attribute or column.
Context
Based on user settings like KEY, TEXT, KEY(TEXT), TEXT(KEY), some of the reporting tools displays attribute or dimension values in combination with their texts, For such scenarios, in your information view, you can associate an attribute having texts, for example, PRODUCT TEXT, as a label column to another attribute, for example, PRODUCT. In data preview, the attribute column and its label column, which contains its descriptions, appear next to each other.
Procedure
1. Open the information view in the editor.2. Select the Semantics node.3. In the Columns tab, select an attribute for which you want to associate label column.4. In the Label Column dropdown list, select an attribute from the information view that contains necessary
descriptions.
If you have created an object using the old editor (which supported the old style of description mapping), and if you try to open it using the new editor, then you will see a new column <attribute>.description (as an attribute), which is hidden. You can rename the value and use it like other attributes based on your requirements.
SAP HANA Modeling GuideWorking With Attributes and Measures P U B L I C 145
8.13 Group Related Measures
In your analytic views or calculation views, if you are using multiple measures and if you want to organize them, for example, to segregate the planned measures with the actual measures, then you can create a folder and group all related measures within this folder.
Context
SAP HANA modeler allows you create a Display Folder, which essentially is a folder that you can use to group related measures of attribute views and calculation views.
Procedure
1. Open an analytic view or calculation view.2. Select the Semantics node.3. In the Columns tab, select a measure.
4. In the toolbar, choose .5. In the context menu of the Display Folder, choose New.6. Drag and drop the measure to the new folder.
NoteYou can also create display folder from the Properties pane. For each measure, the value you provide in its Display Folder property text field determines the name of the folder that the system creates to group measures.
If you want to group the measure in just one folder, then in the Display Folder textbox property, enter the folder name.
For example, Folder1
If you want to create a hierarchy structure of folders, then in the Display Folder text box property, provide values for more than one display folder separated by slashes.
For example: Folder1/Folder1.1/Folder1.1
If you want to associate a measure with multiple Display Folders, then in the Display Folder text box property, provide values for more than one display folder separated by semi-colon (;).
For example: Folder1; Folder2; Folder3…..
146 P U B L I CSAP HANA Modeling Guide
Working With Attributes and Measures
8.14 Convert Attribute Values to Required Formats
SAP HANA modeler allows you to use scalar functions that converts the formats of attribute values, both internal and external values.
Context
After creating a scalar function that converts the formats of attribute values, you can assign these values to attributes, input parameters, filters, variables and so on. For example, the ABAP table stores data in YYYYMMDD format. You can use a scalar function that converts the internal value, 20150305 to 2015.03.05 and use the new value for reporting purposes.
The below are scenarios where you can use such scalar functions:
● If you want to display attribute values in reporting tools or client tools in a specific format, and if these values are stored in the database in a different format.If you want to provide values to filter, variable or parameters in a specific format, but database accepts formats different from the input format.
NoteThis feature is currently not supported by SAP analytic client tools. You can convert attribute values through external or customer applications that read column meta data from the BIMC_DIMENSION_VIEW.
Procedure
1. Launch SAP HANA Studio.2. Open the required information view in the view editor.3. Select the Semantics node.4. Choose the Columns tab.5. Select an attribute.6. In the Conversion Functions field, select the dropdown.7. Assign internal to external conversion function.
If you want to format an internal value for reporting use cases.
a. In the Internal to External Conversion Functions field, select the dropdown.b. In the Find dialog, search for the required scalar function.c. c. Choose OK.
8. Assign an external to internal conversion function.
If you want to format an external value, for example values of variables, input parameter and so on.
SAP HANA Modeling GuideWorking With Attributes and Measures P U B L I C 147
a. In the External to Internal Conversion Functions field, select the dropdown.b. In the Find dialog, search for the required scalar function.c. c. Choose OK.
NoteYou can assign two scalar functions to an attribute value, an internal to external conversion function and an external to internal conversion function.
9. If the scalar functions preserve the order, for example, 20150305 as 2015.03.05, then set the Preserve Order flag.
NoteThese functions are not applied in the database layer. It is used for providing hints to analytic clients on how to convert values before displaying them in the client user interface (UI).
148 P U B L I CSAP HANA Modeling Guide
Working With Attributes and Measures
9 Working With Information View Properties
SAP HANA modeler allows you to define certain properties for information views. The modeler refers to the values of these properties, for example, to access the data from the database or identify how to execute the information view.
This section describe the different calculation view properties, the possible values for each property and how these values help modeler determine the activation or execution behavior of the information view.
For defining the view properties, select the Semantics node and define the properties in the View Properties tab.
Related Information
Deprecate Information Views [page 149]Filter Data for Specific Clients [page 150]Enable Information Views for Time Travel Queries [page 152]Invalidate Cached Content [page 153]Maintain Modeler Object Labels in Multiple Languages [page 154]Quick Reference: Information View Properties [page 155]
9.1 Deprecate Information Views
Deprecated information views in SAP HANA modeler indicated that although an information view is supported in SAP HANA modeler, it is not recommended to use it in other information views or in analytic privileges.
Context
As a data modeler, you can deprecate information views view, which you do not recommend for use in other information views for various reasons based on your business requirement.
Procedure
1. Open the required information view in the view editor.
SAP HANA Modeling GuideWorking With Information View Properties P U B L I C 149
2. Select the Semantics node.3. In the View Properties tab, select the Deprecate checkbox.
Results
Modeler displays a warning for information views or analytic privileges with deprecated information views in the menu bar of view editor.
9.2 Filter Data for Specific Clients
Filter the view data either using a fixed client value or using a session client set for the user. You can also specify and obtain data from all clients.
Context
Filtering data based on specific client values is typically applicable to SAP application tables having MANDT or CLIENT columns within them. In addition, you can apply filters to the table (data source) only if the table column is according to the following conditions:
● Field name is MANDT or CLIENT.● Data type is navchar (3).● It is the first field in the table.● It is part of primary key for the table.
Procedure
1. Open the information view in the view editor.2. Select the Semantics node.3. Choose the View Properties tab.4. In the Default Client dropdown list, select a value.
Related Information
Assign Default Client [page 151]Default Client Values [page 151]
150 P U B L I CSAP HANA Modeling Guide
Working With Information View Properties
9.2.1 Assign Default Client
Associate information views in your SAP HANA system with a default client value to filter and view data at runtime relevant to specific clients.
Procedure
1. Navigate to Window Preferences SAP HANA Modeler Default Model Parameters .2. In the Default Client field, choose Session Client or assign a fixed client value, for example 001, as the
default client.3. Choose OK.
NoteThe following are useful SAP Notes related to default client property.○ Handling Default Client Property after SPS 07 server, see SAP Note 0002079087 .○ Default client property behavior for calculation views in SPS 07 and SPS 06 servers, see SAP Note
0002079551 .○ Impact on Default Client property in Currency conversion definitions (For SPS 07 server and
before), see SAP Note 0002079554
9.2.2 Default Client Values
Assign a default client to a calculation view and filter data at runtime based on the default client value. The table below lists the default client value types you can assign and their description.
Table 61:
Default Client Value Description
Session Client If you use session client as the default client value, then at run time, the tool filters the table data according to the value you specify as the session client in the user profile.
Cross Client If you use cross client as the default client value, the tool does not filter the table data against any client and you see values relevant to all clients.
Fixed Client If you want to use a fixed client value, for example, 001, then the tool filters the table data for this client value.
SAP HANA Modeling GuideWorking With Information View Properties P U B L I C 151
9.3 Enable Information Views for Time Travel Queries
Time travel queries are queries against the historical states of the database. When you execute a time travel query on your information view, you can query the data at a specified time in past.
Context
If you have enabled time travel for information views, you can view data for a specific time in the past using the AS OF SQL extension. For example, you can execute the following SQL statement on information views as a timestamp query:
select * from <information_view> AS OF TIMESTAMP <timestamp>
SAP HANA supports creating history tables, which allows you to track changes made to other database tables. These tables help you associate time related information to your data. For example, you can use HISTORY table to track changes performed to the CUSTOMER table. When you use history tables as data sources in calculation views, specify a parameter that you can use to provide the timestamp at runtime, and execute time travel queries on calculation views with history tables.
Procedure
1. Open your information view in the view editor.2. Select the Semantics node.3. In the View Properties tab, select the Enable History checkbox.4. In the History Input Parameter dropdown list, choose an input parameter.
You use input parameters to specify the timestamp in time travel queries.
NoteYou must use input parameters with data type DATE or SECONDDATE or TIMESTAMP or VARCHAR(8) of semantic type DATE to specify the timestamp.
152 P U B L I CSAP HANA Modeling Guide
Working With Information View Properties

9.4 Invalidate Cached Content
In order to maintain the significance of the cached data for your calculation views, the modeler supports cache invalidation.
Prerequisites
You have enabled caching support for your SAP HANA system.
Context
The system invalidates or removes the data from the cache after specific time intervals or when underlying data is modified. Time based cache invalidation is necessary to refresh the data after every specific time period. By default, the cache invalidation period is null. This means that the result of the complex query that you execute resides in the cache until you execute the next query. Similarly, if you set your cache invalidation period as one hour, the result of the query resides in the cache for one hour, and system does not clear the cache for all other queries that you execute until this time period.
NoteCache invalidation is applicable only to complex SQL queries, which you execute for your calculation views.
Procedure
1. Open required information view in the view editor.2. Select the Semantics node.3. Choose the View Properties tab.4. In the Cache Invalidation Period dropdown list, select a value.
In the dropdown list, the values Hourly or Daily is for time-based cache invalidation and the value Transactional invalidates the cache when underlying data is modified.
Related Information
Enable Support for Cache Invalidation [page 154]
SAP HANA Modeling GuideWorking With Information View Properties P U B L I C 153
9.4.1 Enable Support for Cache Invalidation
Enable cache invalidation for your SAP HANA system to invalidate or remove data from the cache after specific time intervals or when underlying data is modified.
Context
You enable support for cache invalidation on your SAP HANA system. This acton, by default, enables cache invalidation support for all views in the system.
Procedure
1. In Systems view, double click your SAP HANA system.
2. Under Configuration tab, navigate to indexserver.ini cache .3. Set the property resultcache_enabled toyes.
NoteYou can also enable cache invalidation support for specific information views. Open the information view in the view editor, and in the View Properties tab, select the Cache checkbox.
9.5 Maintain Modeler Object Labels in Multiple Languages
SAP HANA modeler supports maintaining object label texts in different languages. For each object label, other than in the default language text, you can choose additional languages to maintain object labels.
Prerequisites
You have enabled the Translate property for the information view.
1. Open the information view in the view editor.2. Select the Semantics node.3. Select the View Properties tab.4. In the General section, select the Translate checkbox.
NoteIf you deselect the checkbox and save you information view, modeler deletes all existing language texts in repository text tables.
154 P U B L I CSAP HANA Modeling Guide
Working With Information View Properties
Context
In multi-geographical business environment, it is necessary to have the flexibility to view object label texts in different languages in reporting tools. For example, as a modeler, if you are creating labels with the default English language, you can choose an additional language Chinese and maintain the equivalent Chinese language text for the same label. At runtime, analysts can select the Chinese language and view labels in Chinese.
NoteYou can maintain objects labels in multiple languages at the same time.
Procedure
1. Launch SAP HANA studio.2. Open the required information view in the view editor.
3. In the view editor menu bar, choose .4. Maintain label texts.
Use the Multi-language support for object labels dialog to maintain object labels in multiple languages.a. In the Language dropdown list, select a language in which you want to maintain object labels.b. Choose Load Text.
Modeler loads the all objects and its exiting labels on the dialog.c. If you want to filter and view labels for specific object, in the Show dropdown list, select the objects.d. In the Translated Label column, enter the translated text value for labels.e. Choose Save to updates changes in active repository text tables.
NoteMaintain labels in multiple languages. In the Language dropdown list, select other languages and follow the same procedure to maintain labels in different languages at the same time.
9.6 Quick Reference: Information View Properties
Considering different business scenarios, SAP HANA modeler allows you to define certain properties for information views. The value of these properties determines the characteristics of the view at runtime.
When you are modeling your information views, in the View Properties tab of the Semantics node, SAP HANA modeler allows you to define the following properties.
SAP HANA Modeling GuideWorking With Information View Properties P U B L I C 155
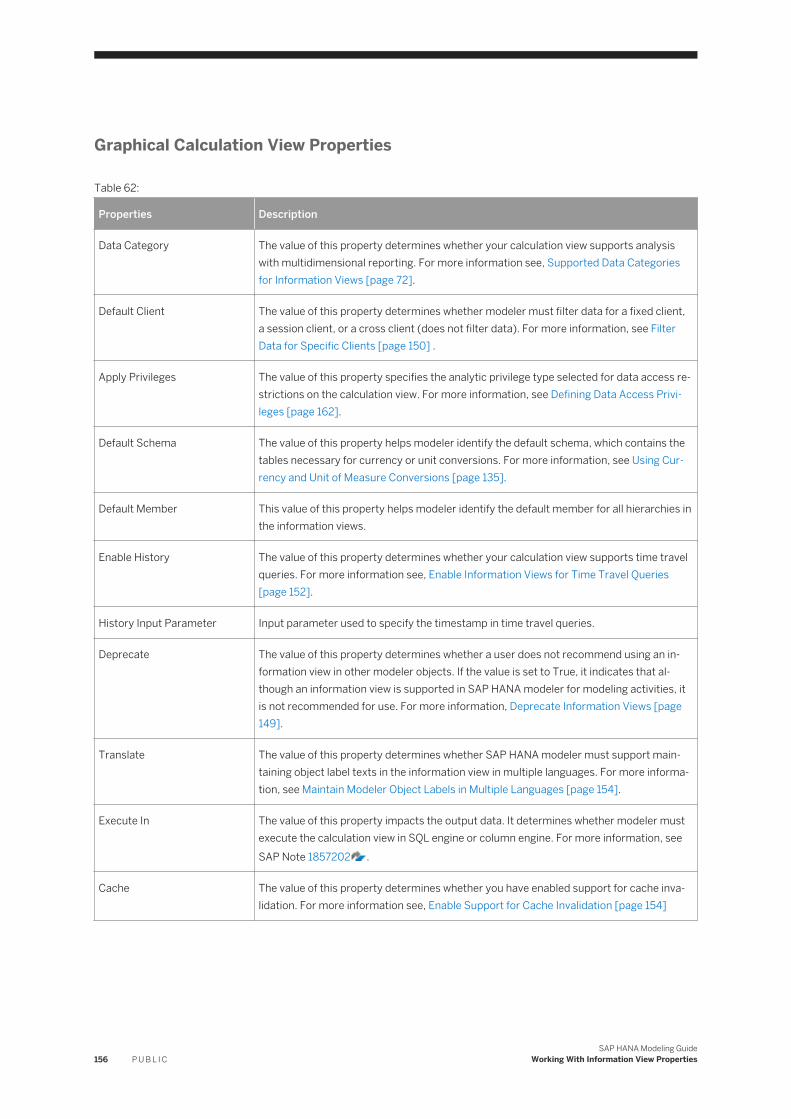
Graphical Calculation View Properties
Table 62:
Properties Description
Data Category The value of this property determines whether your calculation view supports analysis with multidimensional reporting. For more information see, Supported Data Categories for Information Views [page 72].
Default Client The value of this property determines whether modeler must filter data for a fixed client, a session client, or a cross client (does not filter data). For more information, see Filter Data for Specific Clients [page 150] .
Apply Privileges The value of this property specifies the analytic privilege type selected for data access restrictions on the calculation view. For more information, see Defining Data Access Privileges [page 162].
Default Schema The value of this property helps modeler identify the default schema, which contains the tables necessary for currency or unit conversions. For more information, see Using Currency and Unit of Measure Conversions [page 135].
Default Member This value of this property helps modeler identify the default member for all hierarchies in the information views.
Enable History The value of this property determines whether your calculation view supports time travel queries. For more information see, Enable Information Views for Time Travel Queries [page 152].
History Input Parameter Input parameter used to specify the timestamp in time travel queries.
Deprecate The value of this property determines whether a user does not recommend using an information view in other modeler objects. If the value is set to True, it indicates that although an information view is supported in SAP HANA modeler for modeling activities, it is not recommended for use. For more information, Deprecate Information Views [page 149].
Translate The value of this property determines whether SAP HANA modeler must support maintaining object label texts in the information view in multiple languages. For more information, see Maintain Modeler Object Labels in Multiple Languages [page 154].
Execute In The value of this property impacts the output data. It determines whether modeler must execute the calculation view in SQL engine or column engine. For more information, see SAP Note 1857202 .
Cache The value of this property determines whether you have enabled support for cache invalidation. For more information see, Enable Support for Cache Invalidation [page 154]
156 P U B L I CSAP HANA Modeling Guide
Working With Information View Properties
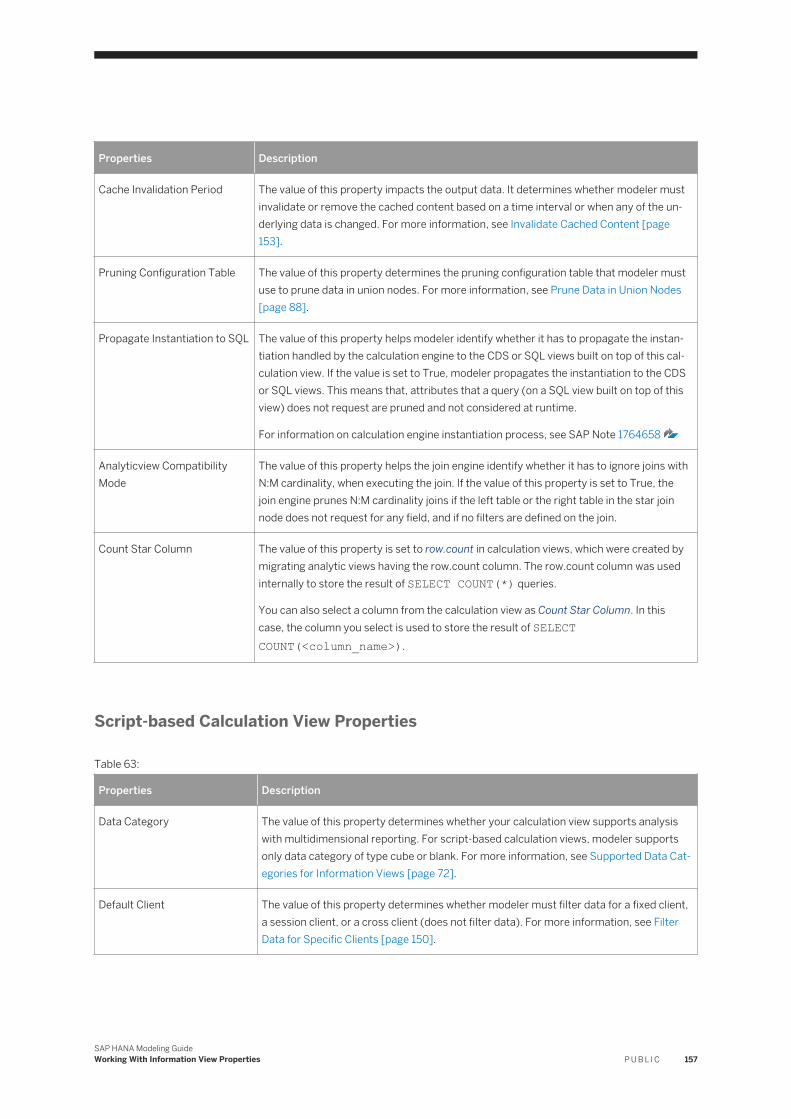
Properties Description
Cache Invalidation Period The value of this property impacts the output data. It determines whether modeler must invalidate or remove the cached content based on a time interval or when any of the underlying data is changed. For more information, see Invalidate Cached Content [page 153].
Pruning Configuration Table The value of this property determines the pruning configuration table that modeler must use to prune data in union nodes. For more information, see Prune Data in Union Nodes [page 88].
Propagate Instantiation to SQL The value of this property helps modeler identify whether it has to propagate the instantiation handled by the calculation engine to the CDS or SQL views built on top of this calculation view. If the value is set to True, modeler propagates the instantiation to the CDS or SQL views. This means that, attributes that a query (on a SQL view built on top of this view) does not request are pruned and not considered at runtime.
For information on calculation engine instantiation process, see SAP Note 1764658
Analyticview Compatibility Mode
The value of this property helps the join engine identify whether it has to ignore joins with N:M cardinality, when executing the join. If the value of this property is set to True, the join engine prunes N:M cardinality joins if the left table or the right table in the star join node does not request for any field, and if no filters are defined on the join.
Count Star Column The value of this property is set to row.count in calculation views, which were created by migrating analytic views having the row.count column. The row.count column was used internally to store the result of SELECT COUNT(*) queries.
You can also select a column from the calculation view as Count Star Column. In this case, the column you select is used to store the result of SELECT COUNT(<column_name>).
Script-based Calculation View Properties
Table 63:
Properties Description
Data Category The value of this property determines whether your calculation view supports analysis with multidimensional reporting. For script-based calculation views, modeler supports only data category of type cube or blank. For more information, see Supported Data Categories for Information Views [page 72].
Default Client The value of this property determines whether modeler must filter data for a fixed client, a session client, or a cross client (does not filter data). For more information, see Filter Data for Specific Clients [page 150].
SAP HANA Modeling GuideWorking With Information View Properties P U B L I C 157
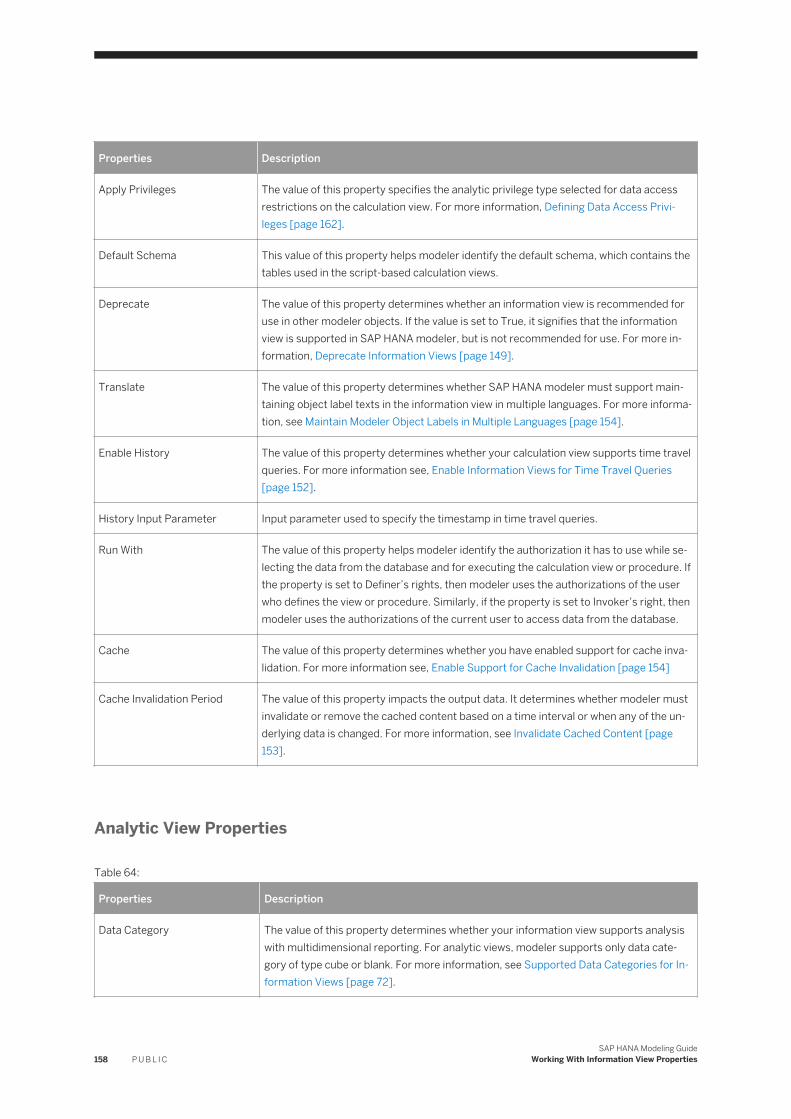
Properties Description
Apply Privileges The value of this property specifies the analytic privilege type selected for data access restrictions on the calculation view. For more information, Defining Data Access Privileges [page 162].
Default Schema This value of this property helps modeler identify the default schema, which contains the tables used in the script-based calculation views.
Deprecate The value of this property determines whether an information view is recommended for use in other modeler objects. If the value is set to True, it signifies that the information view is supported in SAP HANA modeler, but is not recommended for use. For more information, Deprecate Information Views [page 149].
Translate The value of this property determines whether SAP HANA modeler must support maintaining object label texts in the information view in multiple languages. For more information, see Maintain Modeler Object Labels in Multiple Languages [page 154].
Enable History The value of this property determines whether your calculation view supports time travel queries. For more information see, Enable Information Views for Time Travel Queries [page 152].
History Input Parameter Input parameter used to specify the timestamp in time travel queries.
Run With The value of this property helps modeler identify the authorization it has to use while selecting the data from the database and for executing the calculation view or procedure. If the property is set to Definer’s rights, then modeler uses the authorizations of the user who defines the view or procedure. Similarly, if the property is set to Invoker’s right, then modeler uses the authorizations of the current user to access data from the database.
Cache The value of this property determines whether you have enabled support for cache invalidation. For more information see, Enable Support for Cache Invalidation [page 154]
Cache Invalidation Period The value of this property impacts the output data. It determines whether modeler must invalidate or remove the cached content based on a time interval or when any of the underlying data is changed. For more information, see Invalidate Cached Content [page 153].
Analytic View Properties
Table 64:
Properties Description
Data Category The value of this property determines whether your information view supports analysis with multidimensional reporting. For analytic views, modeler supports only data category of type cube or blank. For more information, see Supported Data Categories for Information Views [page 72].
158 P U B L I CSAP HANA Modeling Guide
Working With Information View Properties
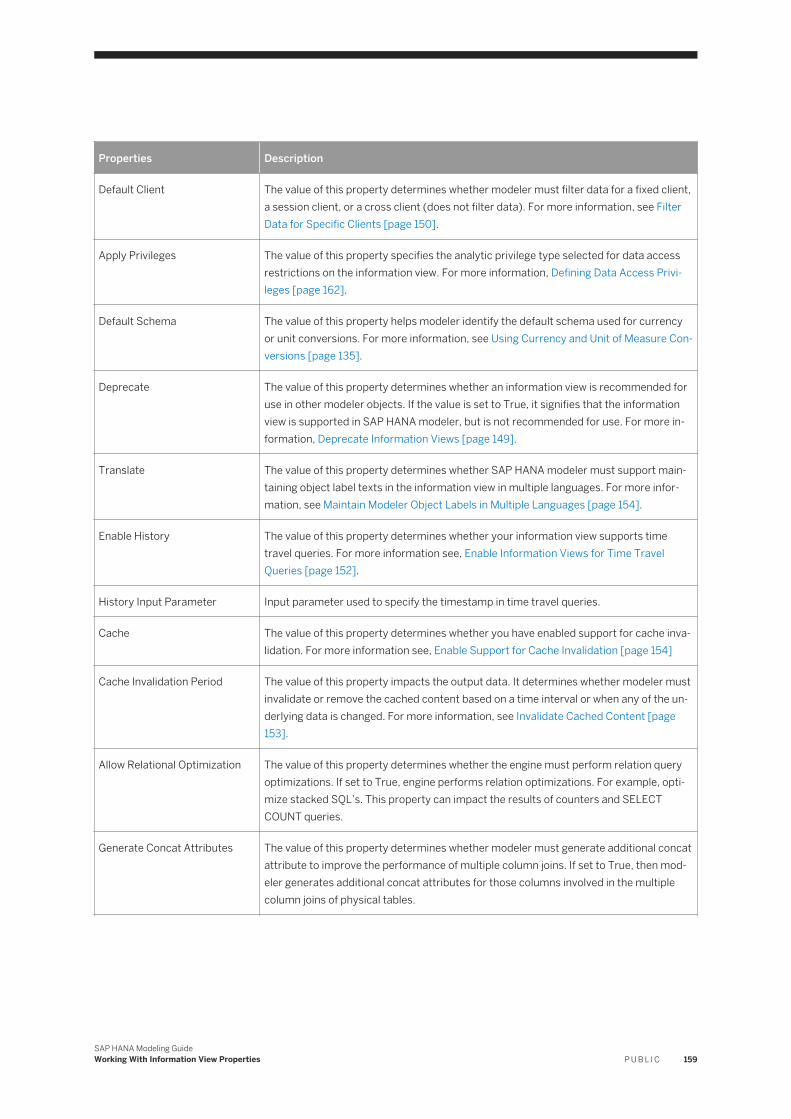
Properties Description
Default Client The value of this property determines whether modeler must filter data for a fixed client, a session client, or a cross client (does not filter data). For more information, see Filter Data for Specific Clients [page 150].
Apply Privileges The value of this property specifies the analytic privilege type selected for data access restrictions on the information view. For more information, Defining Data Access Privileges [page 162].
Default Schema The value of this property helps modeler identify the default schema used for currency or unit conversions. For more information, see Using Currency and Unit of Measure Conversions [page 135].
Deprecate The value of this property determines whether an information view is recommended for use in other modeler objects. If the value is set to True, it signifies that the information view is supported in SAP HANA modeler, but is not recommended for use. For more information, Deprecate Information Views [page 149].
Translate The value of this property determines whether SAP HANA modeler must support maintaining object label texts in the information view in multiple languages. For more information, see Maintain Modeler Object Labels in Multiple Languages [page 154].
Enable History The value of this property determines whether your information view supports time travel queries. For more information see, Enable Information Views for Time Travel Queries [page 152].
History Input Parameter Input parameter used to specify the timestamp in time travel queries.
Cache The value of this property determines whether you have enabled support for cache invalidation. For more information see, Enable Support for Cache Invalidation [page 154]
Cache Invalidation Period The value of this property impacts the output data. It determines whether modeler must invalidate or remove the cached content based on a time interval or when any of the underlying data is changed. For more information, see Invalidate Cached Content [page 153].
Allow Relational Optimization The value of this property determines whether the engine must perform relation query optimizations. If set to True, engine performs relation optimizations. For example, optimize stacked SQL’s. This property can impact the results of counters and SELECT COUNT queries.
Generate Concat Attributes The value of this property determines whether modeler must generate additional concat attribute to improve the performance of multiple column joins. If set to True, then modeler generates additional concat attributes for those columns involved in the multiple column joins of physical tables.
SAP HANA Modeling GuideWorking With Information View Properties P U B L I C 159
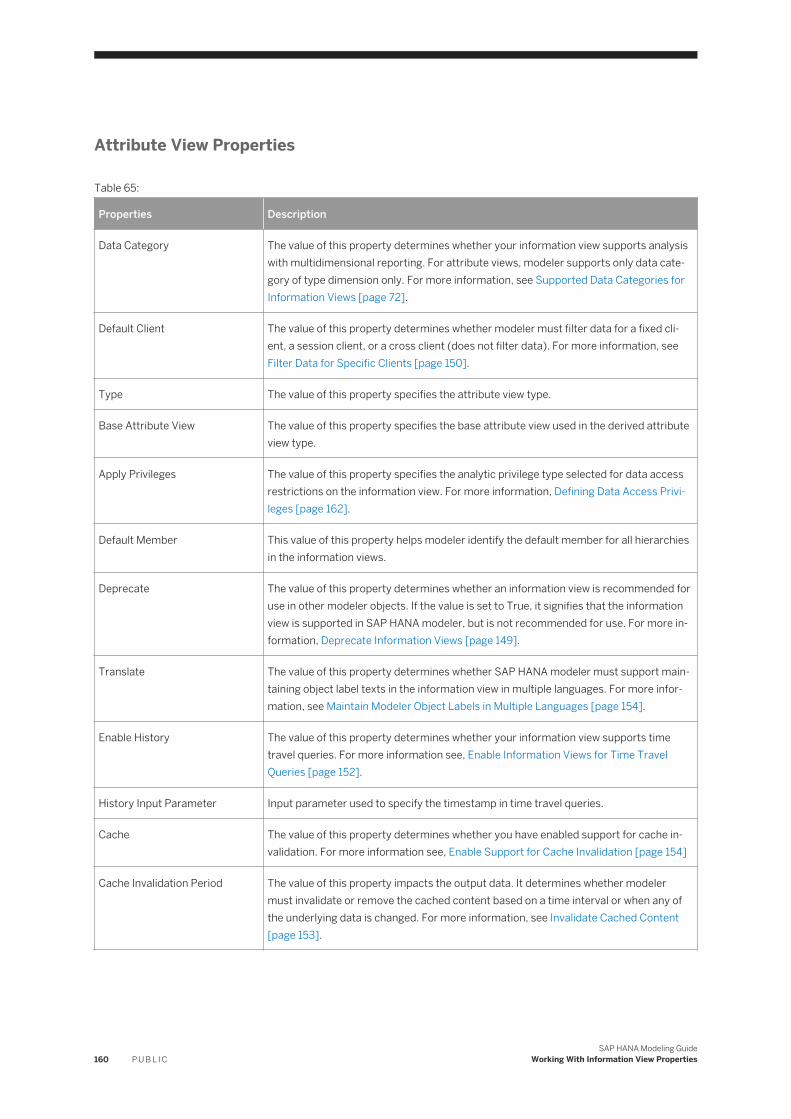
Attribute View Properties
Table 65:
Properties Description
Data Category The value of this property determines whether your information view supports analysis with multidimensional reporting. For attribute views, modeler supports only data category of type dimension only. For more information, see Supported Data Categories for Information Views [page 72].
Default Client The value of this property determines whether modeler must filter data for a fixed client, a session client, or a cross client (does not filter data). For more information, see Filter Data for Specific Clients [page 150].
Type The value of this property specifies the attribute view type.
Base Attribute View The value of this property specifies the base attribute view used in the derived attribute view type.
Apply Privileges The value of this property specifies the analytic privilege type selected for data access restrictions on the information view. For more information, Defining Data Access Privileges [page 162].
Default Member This value of this property helps modeler identify the default member for all hierarchies in the information views.
Deprecate The value of this property determines whether an information view is recommended for use in other modeler objects. If the value is set to True, it signifies that the information view is supported in SAP HANA modeler, but is not recommended for use. For more information, Deprecate Information Views [page 149].
Translate The value of this property determines whether SAP HANA modeler must support maintaining object label texts in the information view in multiple languages. For more information, see Maintain Modeler Object Labels in Multiple Languages [page 154].
Enable History The value of this property determines whether your information view supports time travel queries. For more information see, Enable Information Views for Time Travel Queries [page 152].
History Input Parameter Input parameter used to specify the timestamp in time travel queries.
Cache The value of this property determines whether you have enabled support for cache invalidation. For more information see, Enable Support for Cache Invalidation [page 154]
Cache Invalidation Period The value of this property impacts the output data. It determines whether modeler must invalidate or remove the cached content based on a time interval or when any of the underlying data is changed. For more information, see Invalidate Cached Content [page 153].
160 P U B L I CSAP HANA Modeling Guide
Working With Information View Properties

Properties Description
Generate Concat Attributes The value of this property determines whether modeler must generate additional concat attribute to improve the performance of multiple column joins. If set to True, then modeler generates additional concat attributes for those columns involved in the multiple column joins of physical tables.
SAP HANA Modeling GuideWorking With Information View Properties P U B L I C 161

10 Defining Data Access Privileges
This section describes how to create analytic privileges and assign them to different users to provide selective data access control to activated information views.
Analytic privileges grant different users access to different portions of data in the same view based on their business role. Within the definition of an analytic privilege, the conditions that control which data users see is either contained in an XML document or defined using SQL.
Standard object privileges (SELECT, ALTER, DROP, and so on) implement coarse-grained authorization at object level only. Users either have access to an object, such as a table, view or procedure, or they don't. While this is often sufficient, there are cases when access to data in an object depends on certain values or combinations of values. Analytic privileges are used in the SAP HANA database to provide such fine-grained control at row level of which data individual users can see within the same view.
ExampleSales data for all regions are contained within one analytic view. However, regional sales managers should only see the data for their region. In this case, an analytic privilege could be modeled so that they can all query the view, but only the data that each user is authorized to see is returned.
SAP HANA modeler supports creating the following two types of analytic privileges, the classical XML-based analytic privileges and the SQL analytic privileges.
XML- Versus SQL-Based Analytic Privileges
Before you implement row-level authorization using analytic privileges, you need to decide which type of analytic privilege is suitable for your scenario. In general, SQL-based analytic privileges allow you to more easily formulate complex filter conditions that might be cumbersome to model using XML-based analytic privileges.
The following are the main differences between XML-based and SQL-based analytic privileges:
Table 66:
Feature SQL-Based Analytic Privileges
Classical XML-Based Analytic Privileges
Control of read-only access to SAP HANA information models:
● Attribute views● Analytic views● Calculation views
Yes Yes
Control of read-only access to SQL views Yes No
Control of read-only access to database tables No No
162 P U B L I CSAP HANA Modeling Guide
Defining Data Access Privileges
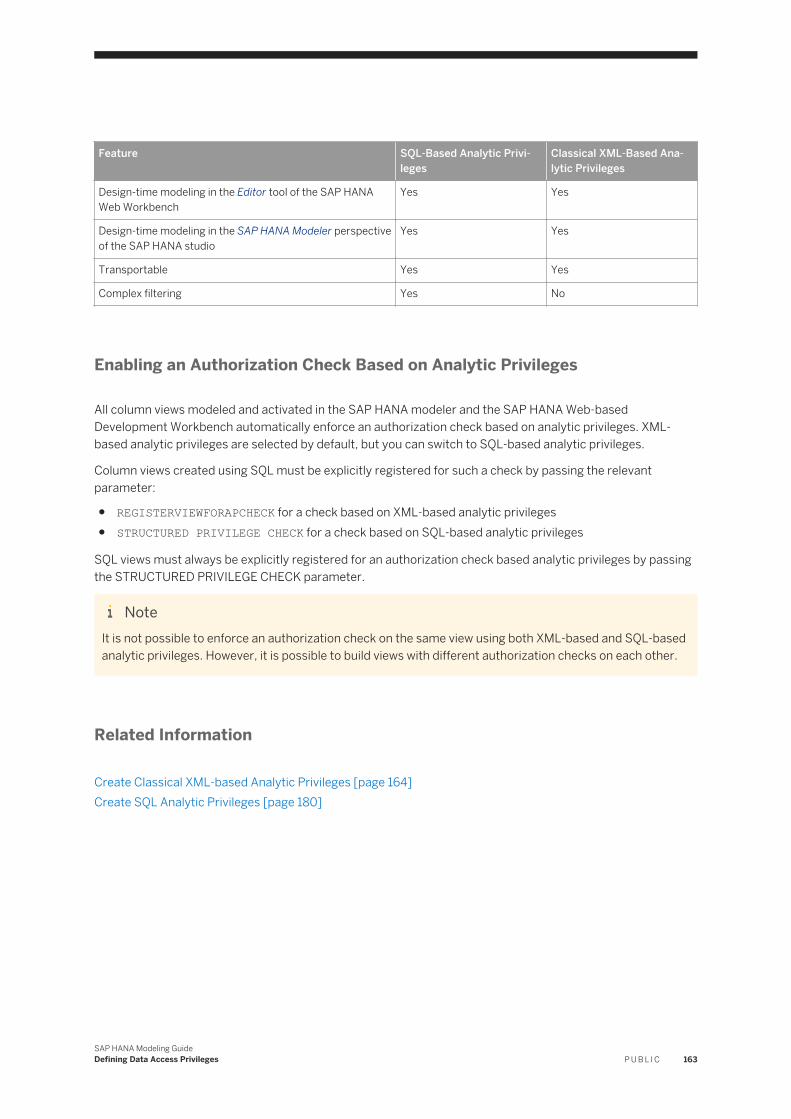
Feature SQL-Based Analytic Privileges
Classical XML-Based Analytic Privileges
Design-time modeling in the Editor tool of the SAP HANA Web Workbench
Yes Yes
Design-time modeling in the SAP HANA Modeler perspective of the SAP HANA studio
Yes Yes
Transportable Yes Yes
Complex filtering Yes No
Enabling an Authorization Check Based on Analytic Privileges
All column views modeled and activated in the SAP HANA modeler and the SAP HANA Web-based Development Workbench automatically enforce an authorization check based on analytic privileges. XML-based analytic privileges are selected by default, but you can switch to SQL-based analytic privileges.
Column views created using SQL must be explicitly registered for such a check by passing the relevant parameter:
● REGISTERVIEWFORAPCHECK for a check based on XML-based analytic privileges● STRUCTURED PRIVILEGE CHECK for a check based on SQL-based analytic privileges
SQL views must always be explicitly registered for an authorization check based analytic privileges by passing the STRUCTURED PRIVILEGE CHECK parameter.
NoteIt is not possible to enforce an authorization check on the same view using both XML-based and SQL-based analytic privileges. However, it is possible to build views with different authorization checks on each other.
Related Information
Create Classical XML-based Analytic Privileges [page 164]Create SQL Analytic Privileges [page 180]
SAP HANA Modeling GuideDefining Data Access Privileges P U B L I C 163
10.1 Create Classical XML-based Analytic Privileges
Create analytic privileges for information views and assign them to different users to provide selective access that are based on certain combinations of data.
Prerequisites
If you want to use a classical XML-based analytic privilege to apply data access restrictions on information views, set the Apply Privileges property for the information view to Classical Analytic Privileges.
1. Open the information view in the view editor.2. Select the Semantics node.3. Choose the View Properties tab.4. In the Apply Privileges dropdown list, select Classical Analytic Privileges.
Context
Analytic privileges help restrict data access to information views based on attributes or procedures. You can create and apply analytic privileges for a selected group of models or apply them to all models across packages.
After you create analytic privileges, assign it to users. This restricts users to access data only for certain combinations of dimension attributes.
Procedure
1. Launch SAP HANA studio.2. In the SAP HANA Systems view, expand the content node.3. In the navigator pane, select a package where you want to create the new analytic privilege.
4. In the context menu of the package, select New Analytic Privilege .5. Provide a name and description.6. In the Type dropdown list, select Classical Analytic Privilege.7. Choose Finish.8. Define validity for the analytic privilege.
In the Privilege Validity section, specify the time period for which the analytic privilege is valid.a. Choose Add.b. Select a required operator.c. Provide the validity period based on the selected operator.
9. Define scope of the analytic privilege.
164 P U B L I CSAP HANA Modeling Guide
Defining Data Access Privileges
In the Secured Models section, select the models for which the analytic privileges restrictions are applicable.a. Choose Add.b. If you want to create an analytic privilege and apply the data access restrictions for selected list of
models, in the Select Information Models dialog, select the models for which you want apply the analytic privilege restrictions.
c. Choose OK.d. If you want to create an analytic privilege and apply the data access restrictions for all models, then in
the General section, select the Apply to all information models checkbox.10. Select attributes.
Use attributes from the secured models to define data access restrictions.
a. In the Associated Attributes Restrictions section, choose Add.b. In the Select Objects dialog, select the attributes.
NoteSelect a model if you want to use all attributes from the model to define restrictions.
c. Choose OK.11. Define attribute restrictions
Modeler uses the restrictions defined on the attributes to restrict data access. Each attribute restriction is associated with only one attribute, but can contain multiple value filters. You can create more than one attribute restrictions.
a. In the Assign Restrictions section, choose Add.b. In the Type dropdown list, select a restriction type.c. Select the required operator and provide a value using the value help.d. For catalog procedure or repository procedure, you can also provide values using the syntax <schema
name>::<procedure name> or <package name>::<procedure name> respectively.12. Define Attribute Restrictions Using Hierarchy Node Column
If you have enabled SQL access for calculation views, modeler generates a node column. You can use the node column to filter and perform SQL group by operation. For analytic privileges, you can maintain a filter expression using this node column.
a. Select the Hierarchy tab.b. In the Hierarchy dropdown list, select a parent-child hierarchy.c. In the Value field, select a node value.
For example, if the node column is SalesRepHierarchyNode for a parent-child hierarchy, then you can create a hierarchical analytic privilege for a calculation view that filters the subtree of the node at runtime. "SalesRepHierarchyNode" = MAJESTIX
NoteYou can create hierarchical analytic privileges only if all secured models are shared dimensions used in star join calculation views and if the view property of the calculation views are enabled for SQL access.
13. Activate analytic privileges.
SAP HANA Modeling GuideDefining Data Access Privileges P U B L I C 165
a. If you want to activate the analytic privilege, then in the toolbar choose Save and Activate.b. If you want to activate the analytic privilege along with all objects, then in the toolbar choose Save and
Activate All.
NoteActivate the analytic privilege only if you have defined at least one restriction on attributes in the Associated Attributes Restrictions section.
14. Assign privileges to a user.If you want to assign privileges to an authorization role, then in your SAP HANA studio, execute the following steps:
a. In the SAP HANA Systems view, go to Security Authorizations Users .b. Select a user.c. In the context menu, choose Open.d. In the Analytic Privileges tab page, add the privilege.e. In the editor toolbar, choose Deploy.
Related Information
Analytic Privileges [page 166]Structure of Analytic Privileges [page 167]Example: Using Analytic Privileges [page 176]Example: Create an XML-Based Analytic Privilege with Dynamic Value Filter [page 178]Supported Restriction Types in Analytic Privileges [page 180]
10.1.1 Analytic Privileges
Analytic privileges are intended to control read-only access to SAP HANA information models (attribute views, analytic views, calculation views
The attribute restriction of an analytic privilege specifies the value range that the user is permitted to access using value filters. In addition to static scalar values, stored procedures can be used to define filters. This allows user-specific filter conditions to be determined dynamically in runtime, for example, by querying specified tables or views. As a result, the same analytic privilege can be applied to many users, while the filter values for authorization can be updated and changed independently in the relevant database tables.
After activation, an analytic privilege needs to be assigned to a user before taking any effect. The user views the filtered data based on the restrictions defined in the analytic privilege. If no analytic privilege applicable for models is assigned to a user, he or she cannot access the model. If a user is assigned to multiple analytic privileges, the privileges are combined with OR conditions.
RememberIn addition to the analytic privileges, a user needs SQL Select privileges on the generated column views.
166 P U B L I CSAP HANA Modeling Guide
Defining Data Access Privileges
The generated column views adhere to the following naming conventions:
For a view “MyView” in package “p1.p2” (that is, sub-package p2 of package p1), the generated column view lies in the deployment schema. Ensure that the users who are allowed to see the view have select privileges on the view (or the entire deployment schema).
NoteMultiple restrictions applied on the same column are combined by OR. However, restrictions across several columns are always combined by AND.
10.1.2 Structure of XML-Based Analytic Privileges
An analytic privilege consists of a set of restrictions against which user access to a particular attribute view, analytic view, or calculation view is verified. In an XML-based analytic privilege, these restrictions are specified in an XML document that conforms to a defined XML schema definition (XSD).
Each restriction in an XML-based analytic privilege controls the authorization check on the restricted view using a set of value filters. A value filter defines a check condition that verifies whether or not the values of the view (or view columns) qualify for user access.
The following restriction types can be used to restrict data access:
● View● Activity● Validity● Attribute
The following operators can be used to define value filters in the restrictions.
NoteThe activity and validity restrictions support only a subset of these operators.
● IN <list of scalar values>● CP <pattern with *>● EQ (=), LE (<=), LT (<), GT (>), GE (>=) <scalar value>● BT <scalar value as lower limit><scalar value as upper limit>● IS_NULL● NOT_NULL
All of the above operators, except IS_NULL and NOT_NULL, accept empty strings (" ") as filter operands. IS_NULL and NOT_NULL do not allow any input value.
The following are examples of how empty strings can be used with the filter operators:
● For the IN operator: IN ("", "A", "B") to filter on these exact values● As a lower limit in comparison operators, such as:
○ BT ("", “XYZ”), which is equivalent to NOT_NULL AND LE "XYZ”"GT "", which is equivalent to NOT_NULL
SAP HANA Modeling GuideDefining Data Access Privileges P U B L I C 167
○ LE "", which is equivalent to EQ ""○ LT "", which will always return false○ CP "", which is equivalent to EQ ""
The filter conditions CP "*" will also return rows with empty-string as values in the corresponding attribute.
View Restriction
This restriction specifies to which column view(s) the analytic privilege applies. It can be a single view, a list of views, or all views. An analytic privilege must have exactly one cube restriction.
ExampleIN ("Cube1", "Cube2")
NoteWhen an analytic view is created in the SAP HANA modeler, automatically-generated views are included automatically in the cube restriction.
NoteThe SAP HANA modeler uses a special syntax to specify the cube names in the view restriction: _SYS_BIC:<package_hierarchy>/<view_name>
For example:
<cubes> <cube name="_SYS_BIC:test.sales/AN_SALES" /> <cube name="_SYS_BIC:test.sales/AN_SALES/olap" /></cubes>
Activity Restriction
This restriction specifies the activities that the user is allowed to perform on the restricted view(s), for example, read data. An analytic privilege must have exactly one activity restriction.
ExampleEQ "read", or EQ "edit"
NoteCurrently, all analytic privileges created in the SAP HANA modeler are automatically configured to restrict access to READ activity only. This corresponds to SQL SELECT queries. This is due to the fact that the attribute, analytic, and calculation views are read-only views. This restriction is therefore not configurable.
168 P U B L I CSAP HANA Modeling Guide
Defining Data Access Privileges
Validity Restriction
This restriction specifies the validity period of the analytic privilege. An analytic privilege must have exactly one validity restriction.
ExampleGT 2010/10/01 01:01:00.000
Attribute Restriction
This restriction specifies the value range that the user is permitted to access. Attribute restrictions are applied to the actual attributes of a view. Each attribute restriction is relevant for one attribute, which can contain multiple value filters. Each value filter represents a logical filter condition.
NoteThe SAP HANA modeler uses different ways to specify attribute names in the attribute restriction depending on the type of view providing the attribute. In particular, attributes from attribute views are specified using the syntax "<package_hierarchy>/<view_name>$<attribute_name>", while local attributes of analytic views and calculation views are specified using their attribute name only. For example:
<dimensionAttribute name="test.sales/AT_PRODUCT$PRODUCT_NAME"> <restrictions> <valueFilter operator="IN"> <value value="Car" /> <value value="Bike" /> </valueFilter> </restrictions> </dimensionAttribute>
Value filters for attribute restrictions can be static or dynamic.
● A static value filter consists of an operator and either a list of values as the filter operands or a single value as the filter operand. All data types are supported except those for LOB data types (CLOB, BLOB, and NCLOB).For example, a value filter (EQ 2006) can be defined for an attribute YEAR in a dimension restriction to filter accessible data using the condition YEAR=2006 for potential users.
NoteOnly attributes, not aggregatable facts (for example, measures or key figures) can be used in dimension restrictions for analytic views.
● A dynamic value filter consists of an operator and a stored procedure call that determines the operand value at runtime.For example, a value filter (IN (GET_MATERIAL_NUMBER_FOR_CURRENT_USER())) is defined for the attribute MATERIAL_NUMBER. This filter indicates that a user with this analytic privilege is only allowed to access material data with the numbers returned by the procedure GET_MATERIAL_NUMBER_FOR_CURRENT_USER.
SAP HANA Modeling GuideDefining Data Access Privileges P U B L I C 169
It is possible to combine static and dynamic value filters as shown in the following example.
Example
<dimensionAttribute name=" test.sales/AT_PRODUCT$PRODUCT_NAME "> <restrictions> <valueFilter operator="CP"> <value value="ELECTRO*"/> </valueFilter> <valueFilter operator="IN"> <procedureCall schema="PROCEDURE_OWNER" procedure="DETERMINE_AUTHORIZED_PRODUCT_FOR_USER" /> </valueFilter > </restrictions> </dimensionAttribute> <dimensionAttribute name=" test.sales/AT_TIME$YEAR "> <restrictions> <valueFilter operator="EQ"> <value value="2012"/> </valueFilter> <valueFilter operator="IN"> <procedureCall schema="PROCEDURE_OWNER" procedure="DETERMINE_AUTHORIZED_YEAR_FOR_USER" /> </valueFilter > </restrictions>
An analytic privilege can have multiple attribute restrictions, but it must have at least one attribute restriction. An attribute restriction must have at least one value filter. Therefore, if you want to permit access to the whole content of a restricted view, then the attribute restriction must specify all attributes.
Similarly, if you want to permit access to the whole content of the view with the corresponding attribute, then the value filter must specify all values.
The SAP HANA modeler automatically implements these two cases if you do not select either an attribute restriction or a value filter.
ExampleSpecification of all attributes:
<dimensionAttributes> <allDimensionAttributes/ > </dimensionAttributes>
ExampleSpecification of all values of an attribute:
<dimensionAttributes> <dimensionAttribute name="PRODUCT"> <all /> </dimensionAttribute> </dimensionAttributes>
Logical Combination of Restrictions and Filter Conditions
The result of user queries on restricted views is filtered according to the conditions specified by the analytic privileges granted to the user as follows:
● Multiple analytic privileges are combined with the logical operator OR.
170 P U B L I CSAP HANA Modeling Guide
Defining Data Access Privileges
● Within one analytic privilege, all attribute restrictions are combined with the logical operator AND.● Within one attribute restriction, all value filters on the attribute are combined with the logical operator OR.
ExampleYou create two analytic privileges AP1 and AP2. AP1 has the following attribute restrictions:
● Restriction R11 restricting the attribute Year with the value filters (EQ 2006) and (BT 2008, 2010)● Restriction R12 restricting the attribute Country with the value filter (IN ("USA", "Germany"))
Given that multiple value filters are combined with the logical operator OR and multiple attribute restrictions are combined with the logical operator AND, AP1 generates the condition:
((Year = 2006) OR (Year BT 2008 and 2010)) AND (Country IN ("USA", "Germany"))
AP2 has the following restriction:
Restriction R21 restricting the attribute Country with the value filter (EQ "France")
AP2 generates the condition:
(Country = "France")
Any query of a user who has been granted both AP1 and AP2 will therefore be appended with the following WHERE clause:
((Year = 2006) OR (Year BT 2008 and 2010)) AND (Country IN ("USA", "Germany"))) OR (Country = "France")
10.1.3 Dynamic Value Filters in the Attribute Restriction of XML-Based Analytic Privileges
The attribute restriction of an XML-based analytic privilege specifies the value range that the user is permitted to access using value filters. In addition to static scalar values, stored procedures can be used to define filters.
By using storing procedures to define filters, you can have user-specific filter conditions be determined dynamically in runtime, for example, by querying specified tables or views. As a result, the same analytic privilege can be applied to many users, while the filter values for authorization can be updated and changed independently in the relevant database tables. In addition, application developers have full control not only to design and manage such filter conditions, but also to design the logic for obtaining the relevant filter values for the individual user at runtime.
Procedures used to define filter conditions must have the following properties:
● They must have the security mode DEFINER.● They must be read-only procedures.● A procedure with a predefined signature must be used. The following conditions apply:
○ No input parameter○ Only 1 output parameter as table type with one single column for the IN operator○ Only 1 output parameter of a scalar type for all unary operators, such as EQUAL○ Only 2 output parameters of a scalar type for the binary operator BETWEEN
SAP HANA Modeling GuideDefining Data Access Privileges P U B L I C 171
● Only the following data types are supported as the scalar types and the data type of the column in the table type:○ Date/Time types DATE, TIME, SECONDDATE, and TIMESTAMP○ Numeric types TINYINT, SMALLINT, INTEGER, BIGINT, DECIMAL, REAL, and DOUBLE○ Character string types VARCHAR and NVARCHAR○ Binary type VARBINARY
NULL as Operand for Filter Operators
In static value filters, it is not possible to specify NULL as the operand of the operator. The operators IS_NULL or NOT_NULL must be used instead. In dynamic value filters where a procedure is used to determine a filter condition, NULL or valid values may be returned. The following behavior applies in the evaluation of such cases during the authorization check of a user query:
Filter conditions of operators with NULL as the operand are disregarded, in particular the following:
● EQ NULL, GT NULL, LT NULL, LE NULL, and CP NULL● BT NULL and NULL
If no valid filter conditions remain (that is, they have all been disregarded because they contain the NULL operand), the user query is rejected with a “Not authorized” error.
ExampleDynamic analytic privilege 1 generates the filter condition (Year >= NULL) and dynamic analytic privilege 2 generates the condition (Country EQ NULL). The query of a user assigned these analytic privileges (combined with the logical operator OR) will return a “Not authorized” error.
ExampleDynamic analytic privilege 1 generates the filter condition (Year >= NULL) and dynamic analytic privilege 2 generates the condition (Country EQ NULL AND Currency = “USD”). The query of a user assigned these analytic privileges (combined with the logical operator OR) will be filtered with the filter Currency = ‘USD’.
In addition, a user query is not authorized in the following cases even if further applicable analytic privileges have been granted to the user.
● The BT operator has as input operands a valid scalar value and NULL, for example, BT 2002 and NULL or BT NULL and 2002
● The IN operator has as input operand NULL among the value list, for example, IN (12, 13, NULL)
Permitting Access to All Values
If you want to allow the user to see all the values of a particular attribute, instead of filtering for certain values, the procedure must return "*" and '' '' (empty string) as the operand for the CP and GT operators respectively. These are the only operators that support the specification of all values.
172 P U B L I CSAP HANA Modeling Guide
Defining Data Access Privileges
Implementation Considerations
When the procedure is executed as part of the authorization check in runtime, note the following:
● The user who must be authorized is the database user who executes the query accessing a secured view. This is the session user. The database table or view used in the procedure must therefore contain a column to store the user name of the session user. The procedure can then filter by this column using the SQL function SESSION_USER. This table or view should only be accessible to the procedure owner.
CautionDo not map the executing user to the application user. The application user is unreliable because it is controlled by the client application. For example, it may set the application user to a technical user or it may not set it at all. In addition, the trustworthiness of the client application cannot be guaranteed.
● The user executing the procedure is the _SYS_REPO user. In the case of procedures activated in the SAP HANA modeler, _SYS_REPO is the owner of the procedures. For procedures created in SQL, the EXECUTE privilege on the procedure must be granted to the _SYS_REPO user.
● If the procedure fails to execute, the user’s query stops processing and a “Not authorized” error is returned. The root cause can be investigated in the error trace file of the indexserver, indexserver_alert_<host>.trc.
When designing and implementing procedures as filter for dynamic analytic privileges, bear the following in mind:
● To avoid a recursive analytic privilege check, the procedures should only select from database tables or views that are not subject to an authorization check based on analytic privileges. In particular, views activated in the SAP HANA modeler are to be avoided completely as they are automatically registered for the analytic privilege check.
● The execution of procedures in analytic privileges slows down query processing compared to analytic privileges containing only static filters. Therefore, procedures used in analytic privileges must be designed carefully.
10.1.4 Runtime Authorization Check of Analytic Privileges
When a user requests access to data stored in an attribute, analytic, calculation, or SQL views, an authorization check based on analytic privileges is performed and the data returned to the user is filtered accordingly. The EFFECTIVE_STRUCTURED_PRIVILEGES system view can help you to troubleshoot authorization problems.
Access to a view and the way in which results are filtered depend on whether the view is independent or associated with other views (dependent views).
SAP HANA Modeling GuideDefining Data Access Privileges P U B L I C 173
Independent Views
The authorization check for a view that is not defined on another column view is as follows:
1. The user's authorization to access the view is checked.A user can access the view if both of the following prerequisites are met:○ The user has been granted the SELECT privilege on the view or the schema in which it is located.
NoteThe user does not require SELECT on the underlying base tables or views of the view.
○ The user has been granted an analytic privilege that is applicable to the view.Applicable analytic privileges are those that meet all of the following criteria:
Table 67:
XML-Based Analytic Privilege SQL-Based Analytic Privilege
A view restriction that includes the accessed view An ON clause that includes the accessed view
A validity restriction that applies now If the filter condition specifies a validity period (for example, WHERE (CURRENT_TIME BETWEEN ... AND ....) AND <actual filter>) ), it must apply now
An action in the activity restriction that covers the action requested by the query
NoteAll analytic privileges created and activated in the SAP HANA modeler and SAP HANA Web-based Development Workbench fulfill this condition. The only action supported is read access (SELECT).
An action in the FOR clause that covers the action requested by the query
NoteAll analytic privileges created and activated in the SAP HANA Web-based Development Workbench fulfill this condition. The only action supported is read access (SELECT).
An attribute restriction that includes some of the view’s attributes
A filter condition that applies to the view
NoteWhen the analytic privilege is created, the filter is checked immediately to ensure that it applies to the view. If it doesn't, creation will fail. However, if the view definition subsequently changes, or if a dynamically generated filter condition returns a filter string that is not executable with the view, the authorization check will fail and access is rejected.
If the user has the SELECT privilege on the view but no applicable analytic privileges, the user’s request is rejected with a Not authorized error. The same is true if the user has an applicable analytic privilege but doesn't have the SELECT privilege on the view.
2. The value filters specified in the dimension restrictions (XML-based) or filter condition (SQL-based) are evaluated and the appropriate data is returned to the user. Multiple analytic privileges are combined with the logical operator OR.
174 P U B L I CSAP HANA Modeling Guide
Defining Data Access Privileges
For more information about how multiple attribute restrictions and/or multiple value filters in XML-based analytic privileges are combined, see XML-Based Analytic Privileges.
Dependent Views
The authorization check for a view that is defined on other column views is more complex. Note the following behavior.
Calculation and SQL views● Individual views in the hierarchy are filtered according to their respective analytic privileges, which use the
logical OR combination.● The filtered result of the calculation view is derived from the filtered result of its underlying views. This
corresponds to a logic AND combination of the filters generated by the analytic privileges for the individual views.
Result filtering on the view is then performed as follows:
● The user has been granted the SELECT privilege on the view or the schema that contains the view.● The user has been granted analytic privileges that apply to the view itself and all the other column views in
the hierarchy that are registered for a structured privilege check.
A user can access a calculation or SQL view based on other view(s) if both of the following prerequisites are met:
If a user requests access to a calculation view that is dependent on another view, the behavior of the authorization check and result filtering is performed as follows:
Calculation views and SQL views can be defined by selecting data from other column views, specifically attribute views, analytic views, and other calculation views. This can lead to a complex view hierarchy that requires careful design of row-level authorization.
Analytic viewsAn analytic view can also be defined on attribute views, but this does not represent a view dependency or hierarchy with respect to authorization check and result filtering. If you reference an attribute view in an analytic view, analytic privileges defined on the attribute view are not applied.
This represents a view hierarchy for which the prerequisites described above for calculation views also apply.
● Currency or unit conversions● Calculated attributes● Calculated measures that use attributes, calculated attributes, or input parameters in their formulas
If an analytic view designed in the SAP HANA modeler contains one of the elements listed below, it will automatically be activated with a calculation view on top. The name of this calculation view is the name of the analytic view with the suffix /olap.
SAP HANA Modeling GuideDefining Data Access Privileges P U B L I C 175
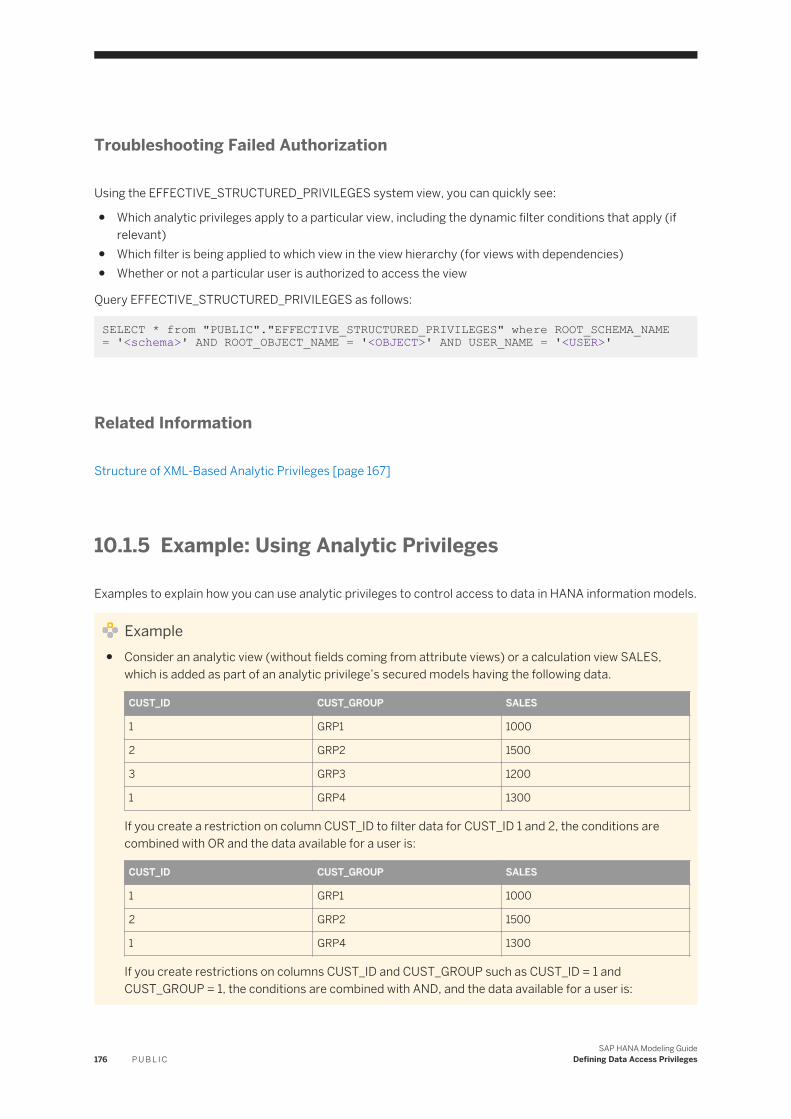
Troubleshooting Failed Authorization
Using the EFFECTIVE_STRUCTURED_PRIVILEGES system view, you can quickly see:
● Which analytic privileges apply to a particular view, including the dynamic filter conditions that apply (if relevant)
● Which filter is being applied to which view in the view hierarchy (for views with dependencies)● Whether or not a particular user is authorized to access the view
Query EFFECTIVE_STRUCTURED_PRIVILEGES as follows:
SELECT * from "PUBLIC"."EFFECTIVE_STRUCTURED_PRIVILEGES" where ROOT_SCHEMA_NAME = '<schema>' AND ROOT_OBJECT_NAME = '<OBJECT>' AND USER_NAME = '<USER>'
Related Information
Structure of XML-Based Analytic Privileges [page 167]
10.1.5 Example: Using Analytic Privileges
Examples to explain how you can use analytic privileges to control access to data in HANA information models.
Example● Consider an analytic view (without fields coming from attribute views) or a calculation view SALES,
which is added as part of an analytic privilege’s secured models having the following data.
CUST_ID CUST_GROUP SALES
1 GRP1 1000
2 GRP2 1500
3 GRP3 1200
1 GRP4 1300
If you create a restriction on column CUST_ID to filter data for CUST_ID 1 and 2, the conditions are combined with OR and the data available for a user is:
CUST_ID CUST_GROUP SALES
1 GRP1 1000
2 GRP2 1500
1 GRP4 1300
If you create restrictions on columns CUST_ID and CUST_GROUP such as CUST_ID = 1 and CUST_GROUP = 1, the conditions are combined with AND, and the data available for a user is:
176 P U B L I CSAP HANA Modeling Guide
Defining Data Access Privileges
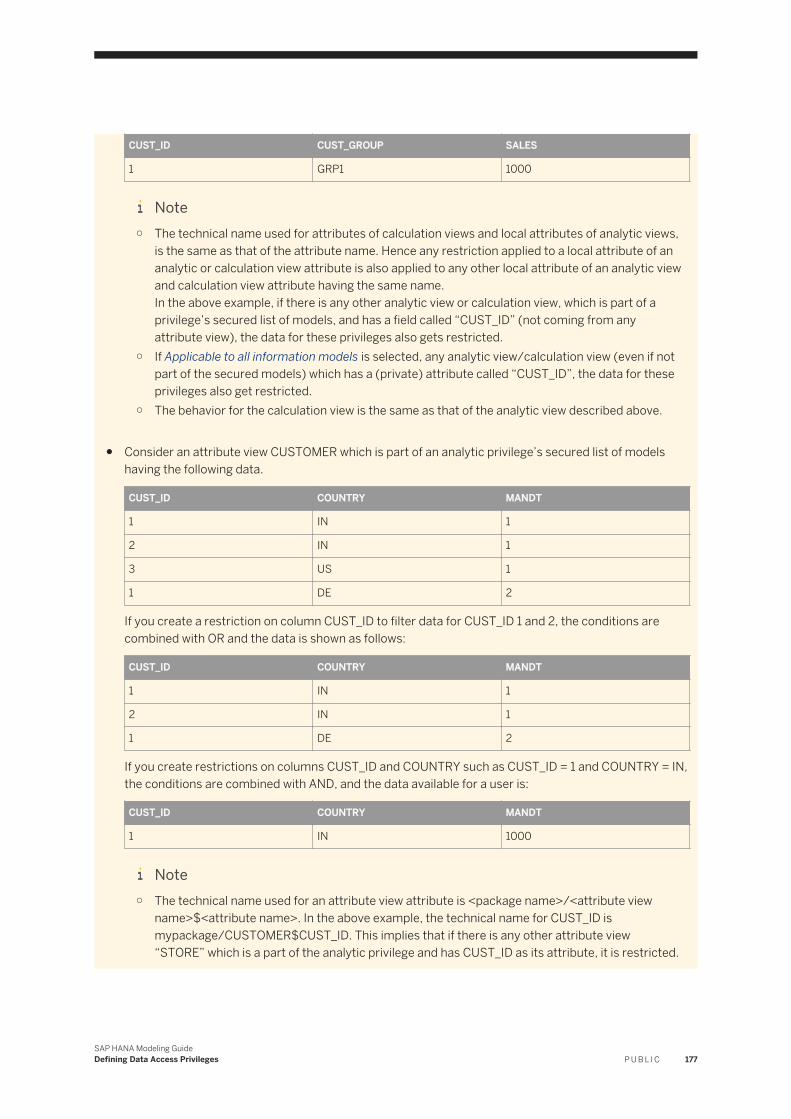
CUST_ID CUST_GROUP SALES
1 GRP1 1000
Note○ The technical name used for attributes of calculation views and local attributes of analytic views,
is the same as that of the attribute name. Hence any restriction applied to a local attribute of an analytic or calculation view attribute is also applied to any other local attribute of an analytic view and calculation view attribute having the same name.In the above example, if there is any other analytic view or calculation view, which is part of a privilege’s secured list of models, and has a field called “CUST_ID” (not coming from any attribute view), the data for these privileges also gets restricted.
○ If Applicable to all information models is selected, any analytic view/calculation view (even if not part of the secured models) which has a (private) attribute called “CUST_ID”, the data for these privileges also get restricted.
○ The behavior for the calculation view is the same as that of the analytic view described above.
● Consider an attribute view CUSTOMER which is part of an analytic privilege’s secured list of models having the following data.
CUST_ID COUNTRY MANDT
1 IN 1
2 IN 1
3 US 1
1 DE 2
If you create a restriction on column CUST_ID to filter data for CUST_ID 1 and 2, the conditions are combined with OR and the data is shown as follows:
CUST_ID COUNTRY MANDT
1 IN 1
2 IN 1
1 DE 2
If you create restrictions on columns CUST_ID and COUNTRY such as CUST_ID = 1 and COUNTRY = IN, the conditions are combined with AND, and the data available for a user is:
CUST_ID COUNTRY MANDT
1 IN 1000
Note○ The technical name used for an attribute view attribute is <package name>/<attribute view
name>$<attribute name>. In the above example, the technical name for CUST_ID is mypackage/CUSTOMER$CUST_ID. This implies that if there is any other attribute view “STORE” which is a part of the analytic privilege and has CUST_ID as its attribute, it is restricted.
SAP HANA Modeling GuideDefining Data Access Privileges P U B L I C 177
○ Any analytic view that is part of the privilege’s secured list of models and has this attribute view as its required object, is also restricted. In the example above, if an analytic view contains the attribute views CUSTOMER and STORE, both CUST_ID attributes are handled independently, because their internal technical name used for the privilege check are mypackage/CUSTOMER$CUST_ID and myotherpackage/STORE$UST_ID.
○ If Applicable to all information models is selected, any analytic view (even if it is not part of the secured models) having this attribute view as its required object, is also restricted.
10.1.6 Example: Create an XML-Based Analytic Privilege with Dynamic Value Filter
Use the CREATE STRUCTURED PRIVILEGE statement to create an XML-based analytic privilege that contains a dynamic procedure-based value filter and a fixed value filter in the attribute restriction.
Context
NoteThe analytic privilege in this example is created using the CREATE STRUCTURED PRIVILEGE statement. Under normal circumstances, you create XML-based analytic privileges using the SAP HANA modeler or the SAP HANA Web-based Development Workbench. Analytic privileges created using CREATE STRUCTURED PRIVILEGE are not owned by the user _SYS_REPO. They can be granted and revoked only by the actual database user who creates them.
Assume you want to restrict access to product data in secured views as follows:
● Users should only see products beginning with ELECTRO, or● Users should only see products for which they are specifically authorized. This information is contained in
the database table PRODUCT_AUTHORIZATION_TABLE in the schema AUTHORIZATION.
To be able to implement the second filter condition, you need to create a procedure that will determine which products a user is authorized to see by querying the table PRODUCT_AUTHORIZATION_TABLE.
Procedure
1. Create the table type for the output parameter of the procedure:
CREATE TYPE "AUTHORIZATION"."PRODUCT_OUTPUT" AS TABLE("PRODUCT" int); 2. Create the table that the procedure will use to check authorization:
CREATE TABLE "AUTHORIZATION"."PRODUCT_AUTHORIZATION_TABLE" ("USER_NAME" NVARCHAR(128), "PRODUCT" int);
178 P U B L I CSAP HANA Modeling Guide
Defining Data Access Privileges
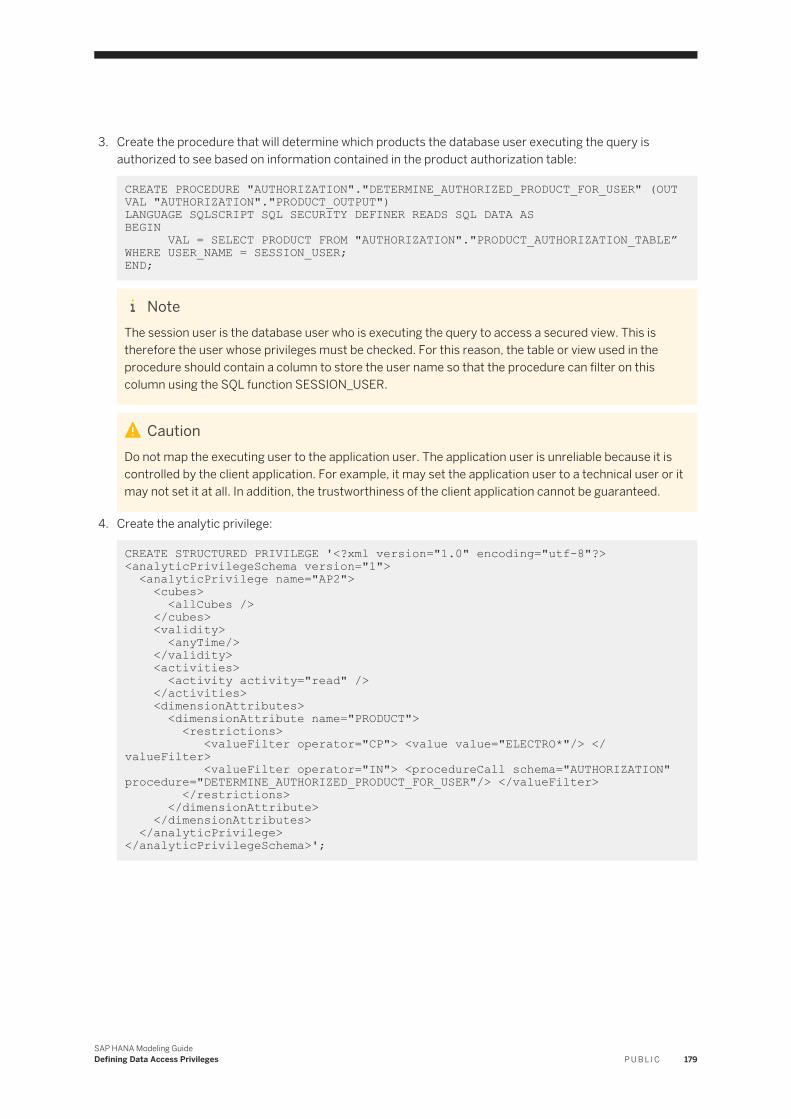
3. Create the procedure that will determine which products the database user executing the query is authorized to see based on information contained in the product authorization table:
CREATE PROCEDURE "AUTHORIZATION"."DETERMINE_AUTHORIZED_PRODUCT_FOR_USER" (OUT VAL "AUTHORIZATION"."PRODUCT_OUTPUT") LANGUAGE SQLSCRIPT SQL SECURITY DEFINER READS SQL DATA ASBEGIN VAL = SELECT PRODUCT FROM "AUTHORIZATION"."PRODUCT_AUTHORIZATION_TABLE” WHERE USER_NAME = SESSION_USER; END;
NoteThe session user is the database user who is executing the query to access a secured view. This is therefore the user whose privileges must be checked. For this reason, the table or view used in the procedure should contain a column to store the user name so that the procedure can filter on this column using the SQL function SESSION_USER.
CautionDo not map the executing user to the application user. The application user is unreliable because it is controlled by the client application. For example, it may set the application user to a technical user or it may not set it at all. In addition, the trustworthiness of the client application cannot be guaranteed.
4. Create the analytic privilege:
CREATE STRUCTURED PRIVILEGE '<?xml version="1.0" encoding="utf-8"?> <analyticPrivilegeSchema version="1"> <analyticPrivilege name="AP2"> <cubes> <allCubes /> </cubes> <validity> <anyTime/> </validity> <activities> <activity activity="read" /> </activities> <dimensionAttributes> <dimensionAttribute name="PRODUCT"> <restrictions> <valueFilter operator="CP"> <value value="ELECTRO*"/> </valueFilter> <valueFilter operator="IN"> <procedureCall schema="AUTHORIZATION" procedure="DETERMINE_AUTHORIZED_PRODUCT_FOR_USER"/> </valueFilter> </restrictions> </dimensionAttribute> </dimensionAttributes> </analyticPrivilege></analyticPrivilegeSchema>';
SAP HANA Modeling GuideDefining Data Access Privileges P U B L I C 179
Results
Now when a database user requests access to a secured view containing product information, the data returned will be filtered according to the following condition:
(product LIKE "ELECTRO*" OR product IN (AUTHORIZATION.DETERMINE_AUTHORIZED_PRODUCT_FOR_USER())
10.1.7 Supported Restriction Types in Analytic Privileges
Define data access restrictions on information views using fixed restrictions or dynamic restrictions.
Table 68:
Restriction Type Description Example
Fixed Value A fixed value or static value filter consists of an operator and either a list of values as the filter operands or a single value as the filter operand. All data types are supported except those for LOB data types (CLOB, BLOB, and NCLOB).
For example, a value filter (EQ 2006) can be defined for an attribute YEAR in a dimension restriction to filter accessible data using the condition YEAR=2006 for potential users.
Catalog Procedure or Repository Procedure.
Catalog Procedures or Repository Procedures are dynamic value filters, which consists of an operator and a stored procedure call that determines the operand value at runtime.
For example, a value filter (IN (GET_MATERIAL_NUMBER_FOR_CURRENT_USER())) is defined for the attribute MATERIAL_NUMBER. This filter indicates that a user with this analytic privilege is only allowed to access material data with the numbers returned by the procedure GET_MATERIAL_NUMBER_FOR_CURRENT_USER.
10.2 Create SQL Analytic Privileges
SQL based analytic privileges provides you the flexibility to create analytic privileges within the familiar SQL environment. You can create and apply SQL analytic privileges for a selected group of models or apply them to all models across packages.
Prerequisites
If you want to use a SQL analytic privilege to apply data access restrictions on information views, set the Apply Privileges property for the information view to SQL Analytic Privileges.
1. Open the information view in the view editor.2. Select the Semantics node.
180 P U B L I CSAP HANA Modeling Guide
Defining Data Access Privileges
3. Choose the View Properties tab.4. In the Apply Privileges dropdown list, select SQL Analytic Privileges.
Context
SAP HANA modeler support types SQL analytic privileges, the static SQL analytic privileges with predefined static filter conditions, and dynamic SQL analytic privileges with filter conditions determined dynamically at runtime using a database procedure.
Procedure
1. Launch SAP HANA studio.2. In the SAP HANA Systems view, expand the Content node.3. In the navigator pane, select a package where you want to create the new analytic privilege.
4. In the context menu of the package, select New Analytic Privilege .5. Provide a name and description.6. In the Type dropdown list, select SQL Analytic Privilege.7. Choose Finish.8. In the header region, select SQL Editor.
NoteYou can also use the attribute editor to create the analytic privilege using the attribute restrictions and then switch to the SQL editor to deploy the same privilege as SQL analytic privilege.
9. Select information models.
If you want to create an analytic privilege and apply the data access restrictions for selected list of models, in the Secured Models section,
a. Choose Add.b. In the Select Information Models dialog, select the models for which you want apply the analytic
privilege restrictions.c. Choose OK.
10. Defining static SQL analytic privileges.
If you want to define static SQL analytic privileges, then
a. In the SQL editor, provide the attribute restrictions and its validity.For example,
(("REGION" = 'EAST') OR ("REGION" = 'NORTH')) AND (("CUSTOMER_ID" = 'SAP')) AND ((CURRENT_DATE BETWEEN 2015-05-15 00:00:00.000 AND 2015-05-15 23:59:59.999))
SAP HANA Modeling GuideDefining Data Access Privileges P U B L I C 181
NoteIf you have enabled SQL access for calculation views (of type dimensions used in a star join calculation view), modeler generates a node column. For analytic privileges, you can maintain a filter expression using this node column.. For example, if SalesRepHierarchyNode is the node column that modeler generates for a parent-child hierarchy, then "SalesRepHierarchyNode" = "MAJESTIX" is a possible filter expression.
11. Defining dynamic SQL analytic privileges.Dynamic SQL analytic privileges determine the filter condition string at runtime. If you want to define dynamic SQL analytic privileges,a. In the SQL editor, specify the procedure within the CONDITION PROVIDER clause.
For example, CONDITION PROVIDER schema_name.procedure_name.12. Activate analytic privileges.
a. If you want to activate the analytic privilege, then in the toolbar choose Save and Activate.b. If you want to activate the analytic privilege along with all objects, then in the toolbar choose Save and
Activate All.
NoteActivate the analytic privilege only if you have defined at least one restriction on attributes in the Associated Attributes Restrictions section.
13. Assign privileges to a user.If you want to assign privileges to an authorization role, then in your SAP HANA studio, execute the following steps:
a. In the SAP HANA Systems view, go to Security Authorizations Users .b. Select a user.c. In the context menu, choose Open.d. In the Analytic Privileges tab page, add the privilege.e. In the editor toolbar, choose Deploy.
10.2.1 Static SQL Analytic Privileges
Static SQL analytic privileges or fixed analytic privileges allows you to combine one or multiple filter conditions on the same attribute or different attributes using the logical AND or OR operators.
Static SQL analytic privileges conditions typically have the following structure, <attribute> <operator> <scalar_operands_or_subquery>. For example, "country IN (scalar_operands_or_subquery) AND product = (scalar_operands_or_subquery)." The supported operator types are IN, LIKE, BETWEEN, <=, >=, <, >.
If you want to create static SQL analytic privileges using subqueries, then the user creating the analytic privileges must have corresponding privileges on the database objects (tables/views) involved in the subqueries.
182 P U B L I CSAP HANA Modeling Guide
Defining Data Access Privileges
10.2.2 Dynamic SQL Analytic Privileges
In dynamic analytic privileges, you use a database procedure to dynamically obtain the filter condition string at runtime. You can provide the database procedure value within the CONDITION PROVIDER clause.
You can use only procedures, which achieve the following conditions to define dynamic SQL analytic privileges.
● DEFINER procedures.● Read-only procedures.● Procedure with no input parameters● Procedure with only one output parameter of type VARCHAR or NVARCHAR for the filter condition string.● Procedures executable by _SYS_REPO. This means that, _SYS_REPO is either the owner of the procedure
or the owner of the procedure has all privileges on the underlying tables/views with GRANT OPTION and has granted the EXECUTE privilege on the procedure to the _SYS_REPO user.
NoteModeler supports only simple filter conditions in dynamic SQL analytic privileges and you cannot use subqueries for dynamic analytic privileges.
10.2.3 Structure of SQL-Based Analytic Privileges
An analytic privilege consists of a set of restrictions against which user access to a particular attribute view, analytic view, calculation view, or SQL view is verified. In an SQL-based analytic privilege, these restrictions are specified as filter conditions that are fully SQL based.
SQL-based analytic privileges are created using the CREATE STRUCTURED PRIVILEGE statement:
CREATE STRUCTURED PRVILEGE <privilege_name> FOR <action> ON <view_name> <filter_condition>
The FOR clause is used restrict the type of access (only the SELECT action is supported). The ON clause is used to restrict access to one or more views with the same filter attributes.
The <filter condition> parameter is used to restrict the data visible to individual users. The following methods of specifying filter conditions are possible:
● Fixed filter (WHERE) clause● Dynamically generated filter (CONDITION PROVIDER) clause
Fixed Filter Clauses
A fixed filter clause consists of an WHERE clause that is specified in the definition of the analytic privilege itself.
You can express fixed filter conditions freely using SQL, including subqueries.
SAP HANA Modeling GuideDefining Data Access Privileges P U B L I C 183
By incorporating built-in SQL functions into the subqueries, in particular SESSION_USER, you can define an even more flexible filter condition.
Examplecountry IN (SELECT a.country FROM authorizationtable a WHERE SESSION_USER= a.user_name)
NoteA calculation view cannot be secured using an SQL-based analytic privilege that contains a complex filter condition if the view is defined on top of analytic and/or attributes views that themselves are secured with an SQL-based analytic privilege with a complex filter condition.
RememberIf you use a subquery, you (the creating user) must have the required privileges on the database objects (tables and views) involved in the subquery.
Comparative conditions can be nested and combined using AND and OR (with corresponding brackets).
Dynamically Generated Filter Clauses
With a dynamically generated filter clause, the WHERE clause that specifies the filter condition is generated every time the analytic privilege is evaluated. This is useful in an environment in which the filter clause changes very dynamically. The filter condition is determined by a procedure specified in the CONDITION PROVIDER clause, for example:
Sample CodeCREATE STRUCTURED PRVILEGE dynamic_ap FOR SELECT ON schema1.v1 CONDITION PROVIDER schema2.procedure1;
Procedures in the CONDITION PROVIDER clause must have the following properties:
● They must have the security mode DEFINER.● They must be read-only procedures.● They must have a predefined signature. Here, the following conditions apply:
○ No input parameter○ Only one output parameter for the filter condition string
● The procedure may only return conditions expressed with the following operators:○ =, <=, <, >, >=○ LIKE○ BETWEEN○ IN
A complex filter condition, that is a subquery, may not be returned.● The procedure must be executable by _SYS_REPO, that is, either_SYS_REPO must be the owner of the
procedure or the owner of the procedure has all privileges on the underlying tables/views with GRANT OPTION and has granted the EXECUTE privilege on the procedure to the _SYS_REPO user.
184 P U B L I CSAP HANA Modeling Guide
Defining Data Access Privileges

If errors occur in procedure execution, the user receives a Not authorized error, even if he has the analytic privileges that would grant access.
SAP HANA Modeling GuideDefining Data Access Privileges P U B L I C 185

11 Migrating an Object Type to a Different Object Type
This section describes the different migration activities that users can perform within the SAP HANA modeler tool. The migration activities involve converting analytic views or attribute views or script-based calculation views to graphical calculation views or converting classical XML-based analytical privileges to SQL analytic privileges.
You can perform the migration activity at the package level or at the object level. This means that, you can select a package and convert all objects within this package to the new object type or select any individual objects and convert the same to the new object type. After performing a migration activity, the modeler converts and replaces the target object types with the new object types having the same name.
NoteMigrating from object type to another object type is an optional task that SAP recommends and is required only if you want to move to the XSA advanced model (HDI). Before you perform the migration activity, we recommend that you read the section, Best Practice: Migrating an Object Type to a Different Object Type [page 198].
Related Information
Convert Attribute Views and Analytic Views to Graphical Calculation Views [page 187]Convert Script-based Calculation Views to Graphical Calculation Views [page 191]Convert Classical XML-based Analytic Privileges to SQL-based Analytic Privileges [page 193]Simulate a Migration Activity [page 195]Undo Migration Changes [page 196]Activate Migrated Objects [page 197]Migration Log [page 198]
186 P U B L I CSAP HANA Modeling Guide
Migrating an Object Type to a Different Object Type
11.1 Convert Attribute Views and Analytic Views to Graphical Calculation Views
In the future, as graphical calculation views becomes the standard for creating information views, SAP recommends that you create graphical calculation views for all analytical use cases and also convert existing analytic views or attribute views to graphical calculation views.
Prerequisites
You have the permissions to perform the modeling activities such as, create, activate, and data preview information views and analytic privileges.
Before you perform the migration activity, you have read the section, Best Practice: Migrating an Object Type to a Different Object Type [page 198].
Context
SAP HANA modeler (SPS 11 version onwards) allows you to perform a migration activity within the SAP HANA modeler tool to convert analytic views or attribute views to graphical calculation views. The migration activity converts and replaces the target attribute views or analytic views with new graphical calculation views having the same name.
NoteConverting analytic views and attribute views to graphical calculation views is an optional task that SAP recommends and is required only if you want to move to the XSA advanced model (HDI).
Procedure
1. Launch SAP HANA studio.2. In the Quick View pane, choose Migrate.3. Select a system where you want to perform the migration activity.4. Choose Next.5. Select Attribute views and analytic views to calculation Views.6. Create a migration log.
Migration log records changes that modeler performs during this migration activity and provides information on the status of each migrated content.
a. Select Create Migration Log.
SAP HANA Modeling GuideMigrating an Object Type to a Different Object Type P U B L I C 187
b. Browse to the folder location where you want to save the migration log.7. Choose Next.8. Select an object or a package that contains the objects that you want to convert to graphical calculation
views.9. Choose Add.
If you are converting analytic views to graphical caclculation views, then the join engine prunes N:M cardinality joins if either the left table or the right table does not request any field and if no filters are defined on the join path.
10. If you want to use the hidden columns of analytic views or attribute views and if you want to perform any operations using these columns in the new graphical calculation views, select Unhide Hidden Columns.
NoteThe behaviors of hidden columns are different for graphical calculation views. If you convert the views without selecting the checkbox, then the hidden columns appear as proxies in the new graphical calculation views. If you want to use these hidden columns in the graphical calculation views and also to avoid activation errors due to missing columns, it is necessary to unhide the hidden columns. Now, the columns appear in the client tools for end users as they are not hidden anymore.
11. Activate the objects, if required.
If you want to automatically activate the new object types after the migration activity, select Activate objects after migration.
NoteYou can also use the workspace activation if you want to activate all migrated content that are in the inactive state and also if you want to delete those objects that modeler has marked for delete.
12. Choose Next.
NoteSimulate the migration activity. If you want to perform a migration activity without impacting any of the exiting objects, for example, to preview the impact of the migration activity, then you can simulate using the Copy and migrate feature. Simulating a migration activity does not adjust reference of impacted objects. For more information, see Simulate a Migration Activity [page 195].
13. Confirm changes
In the Impacted Objects dialog, modeler displays the list of objects that you have selected for the migration activity, the impacted objects and the references of impacted objects that modeler can automatically adjust.
a. After verifying the changes, choose Finish to proceed and complete the migration activity.
NoteIf the impacted objects are in different package and not in the package that you have selected for migration, then modeler cannot automatically adjust the references of those impacted objects. In such cases, it is recommended that you also migrate the impacted attribute and analytic views. You can refer
188 P U B L I CSAP HANA Modeling Guide
Migrating an Object Type to a Different Object Type
to the migration log to identify those impacted objects for which modeler could not automatically adjust the references.
Related Information
Migration Impact [page 189]Simulate a Migration Activity [page 195]Undo Migration Changes [page 196]Activate Migrated Objects [page 197]Migration Log [page 198]
11.1.1 Migration Impact
An analytic view or attribute view comprises of entities such as the joins, columns, analytic privileges, view properties and so on. The behavior of some of these entities change after you convert the analytic view or attribute view to graphical calculation view.
For converting an attribute view or analytic view to graphical calculation view, it is necessary to modify the behavior of some of its entities. The following table provides information on the entities and the impact of migration on the behaviors of such entities.
Table 69:
Entity Impact on Behavior
row.counter Analytic views contain a row.count column that modeler uses internally to calculate the result of select count(*) queries. You can also use row.count in SQL statements, SQL script and calculation views built on top of such analytic views.
The migration activity to convert the analytic view to graphical calculation views, updates the calculation view property, Row Counter with value of row.count. This is to ensure that modeler generates the column into the catalog calculation view with same semantics as that of the analytic view. If you do not want to use this column in SQL or upper views, remove it by setting the view property Row Counter to <BLANK>. If the property is set to <BLANK>, the column is no longer visible in the calculation view, but is used internally only to calculate the result of select count(*) queries.
Referential Joins All referential joins in the analytic views and attribute views are preserved after converting these views to new graphical calculation views. However, if a filter is applied on any of the tables in the join, then all referential joins, which exists in the join path of this table and the fact table, are converted to inner joins in the new graphical calculation views.
Filters All column filters in the attribute views and analytic views are converted to an equivalent filter expressions in the new graphical calculation views.
SAP HANA Modeling GuideMigrating an Object Type to a Different Object Type P U B L I C 189
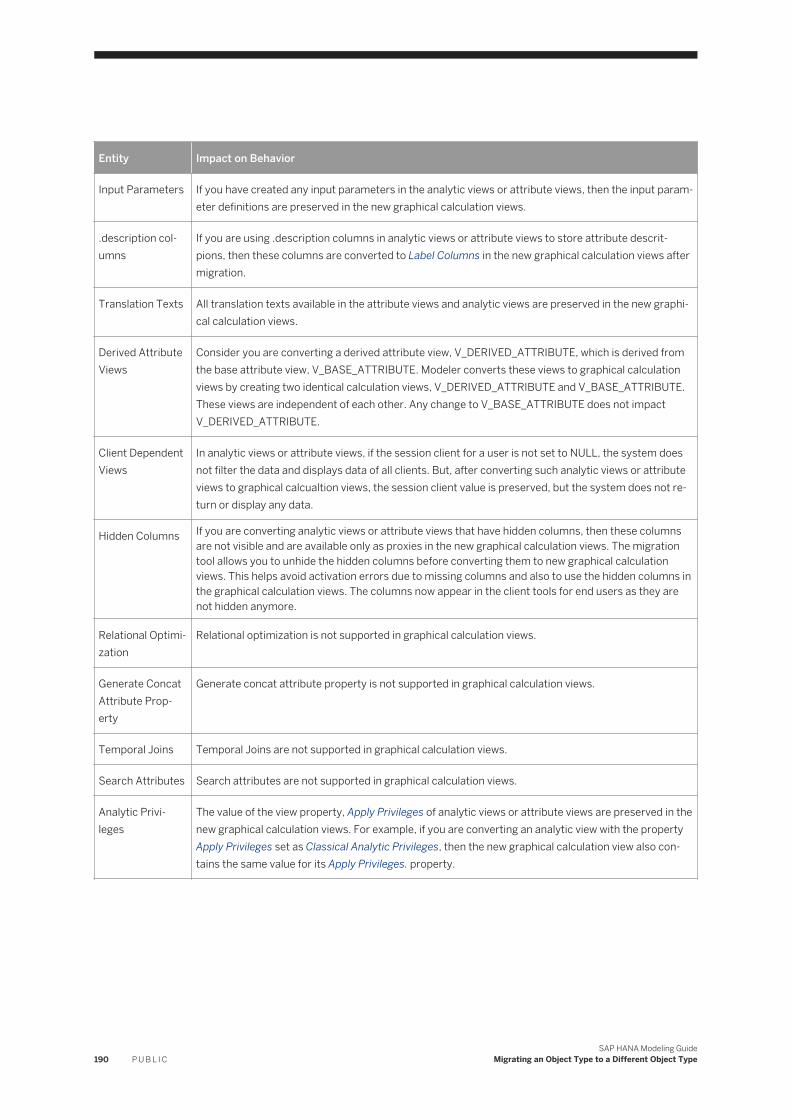
Entity Impact on Behavior
Input Parameters If you have created any input parameters in the analytic views or attribute views, then the input parameter definitions are preserved in the new graphical calculation views.
.description columns
If you are using .description columns in analytic views or attribute views to store attribute descritpions, then these columns are converted to Label Columns in the new graphical calculation views after migration.
Translation Texts All translation texts available in the attribute views and analytic views are preserved in the new graphical calculation views.
Derived Attribute Views
Consider you are converting a derived attribute view, V_DERIVED_ATTRIBUTE, which is derived from the base attribute view, V_BASE_ATTRIBUTE. Modeler converts these views to graphical calculation views by creating two identical calculation views, V_DERIVED_ATTRIBUTE and V_BASE_ATTRIBUTE. These views are independent of each other. Any change to V_BASE_ATTRIBUTE does not impact V_DERIVED_ATTRIBUTE.
Client Dependent Views
In analytic views or attribute views, if the session client for a user is not set to NULL, the system does not filter the data and displays data of all clients. But, after converting such analytic views or attribute views to graphical calcualtion views, the session client value is preserved, but the system does not return or display any data.
Hidden Columns If you are converting analytic views or attribute views that have hidden columns, then these columns are not visible and are available only as proxies in the new graphical calculation views. The migration tool allows you to unhide the hidden columns before converting them to new graphical calculation views. This helps avoid activation errors due to missing columns and also to use the hidden columns in the graphical calculation views. The columns now appear in the client tools for end users as they are not hidden anymore.
Relational Optimization
Relational optimization is not supported in graphical calculation views.
Generate Concat Attribute Property
Generate concat attribute property is not supported in graphical calculation views.
Temporal Joins Temporal Joins are not supported in graphical calculation views.
Search Attributes Search attributes are not supported in graphical calculation views.
Analytic Privileges
The value of the view property, Apply Privileges of analytic views or attribute views are preserved in the new graphical calculation views. For example, if you are converting an analytic view with the property Apply Privileges set as Classical Analytic Privileges, then the new graphical calculation view also contains the same value for its Apply Privileges. property.
190 P U B L I CSAP HANA Modeling Guide
Migrating an Object Type to a Different Object Type
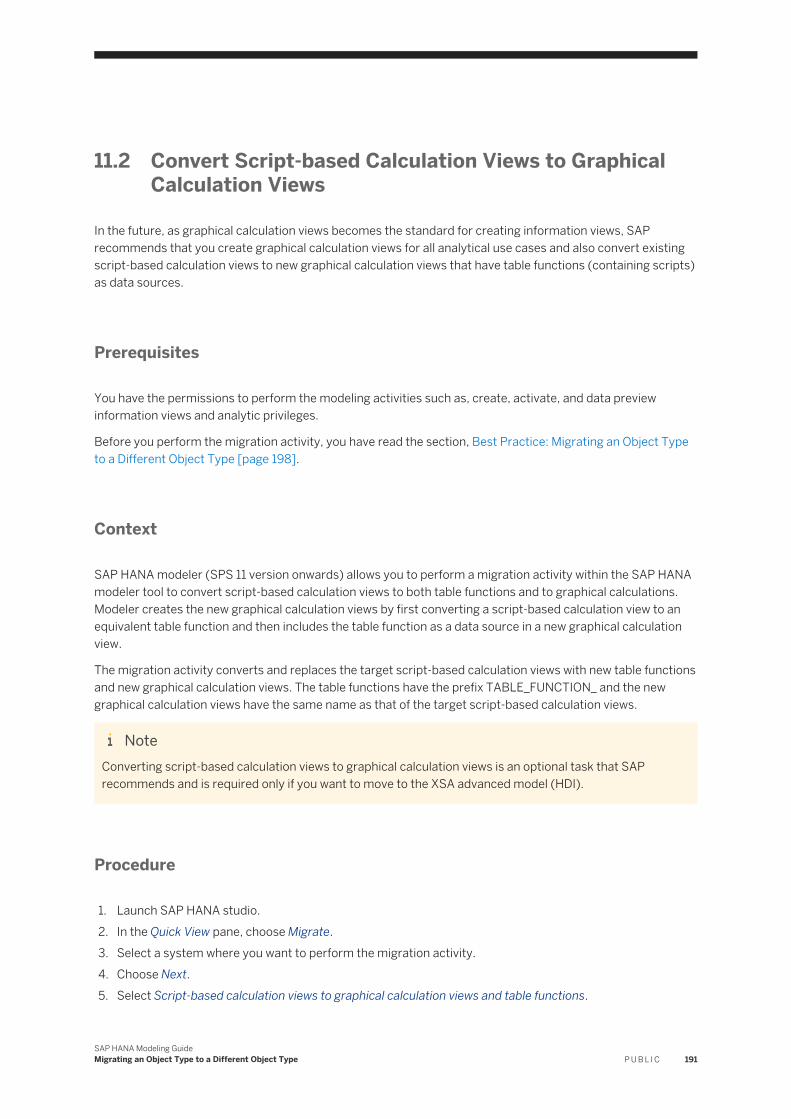
11.2 Convert Script-based Calculation Views to Graphical Calculation Views
In the future, as graphical calculation views becomes the standard for creating information views, SAP recommends that you create graphical calculation views for all analytical use cases and also convert existing script-based calculation views to new graphical calculation views that have table functions (containing scripts) as data sources.
Prerequisites
You have the permissions to perform the modeling activities such as, create, activate, and data preview information views and analytic privileges.
Before you perform the migration activity, you have read the section, Best Practice: Migrating an Object Type to a Different Object Type [page 198].
Context
SAP HANA modeler (SPS 11 version onwards) allows you to perform a migration activity within the SAP HANA modeler tool to convert script-based calculation views to both table functions and to graphical calculations. Modeler creates the new graphical calculation views by first converting a script-based calculation view to an equivalent table function and then includes the table function as a data source in a new graphical calculation view.
The migration activity converts and replaces the target script-based calculation views with new table functions and new graphical calculation views. The table functions have the prefix TABLE_FUNCTION_ and the new graphical calculation views have the same name as that of the target script-based calculation views.
NoteConverting script-based calculation views to graphical calculation views is an optional task that SAP recommends and is required only if you want to move to the XSA advanced model (HDI).
Procedure
1. Launch SAP HANA studio.2. In the Quick View pane, choose Migrate.3. Select a system where you want to perform the migration activity.4. Choose Next.5. Select Script-based calculation views to graphical calculation views and table functions.
SAP HANA Modeling GuideMigrating an Object Type to a Different Object Type P U B L I C 191
6. Create a migration log.
Migration log records changes that modeler performs during this migration activity and provides information on the status of each migrated content.
a. Select Create Migration Log.b. Browse to the folder location where you want to save the migration log.
7. Choose Next.8. Select an object or a package that contains the objects that you want to convert to graphical calculation
views and table functions.9. Choose Add.10. Activate the objects, if required.
If you want to automatically activate the new object types after the migration activity, select Activate objects after migration.
NoteYou can also use the workspace activation if you want to activate all migrated content that are in the inactive state and also if you want to delete those objects that modeler has marked for delete.
11. Choose Finish.
After migration, the security mode of the new graphical calculation views is DEFINER even if its target script-based calculation view had INVOKER as the security mode.
NoteSimulate the migration activity. If you want to perform a migration activity without impacting any of the exiting objects, for example, to preview the impact of the migration activity, then you can simulate using the Copy and migrate feature. Simulating a migration activity does not adjust reference of impacted objects. For more information, see Simulate a Migration Activity [page 195].
Related Information
Simulate a Migration Activity [page 195]Undo Migration Changes [page 196]Activate Migrated Objects [page 197]Migration Log [page 198]
192 P U B L I CSAP HANA Modeling Guide
Migrating an Object Type to a Different Object Type
11.3 Convert Classical XML-based Analytic Privileges to SQL-based Analytic Privileges
In the future, as SQL-based analytic privileges becomes the standard for creating analytic privileges, SAP recommends that you convert existing classical XML-based analytic privileges to SQL-based analytic privileges and use SQL analytic privileges to provide restricted access to information views.
Prerequisites
You have the permissions to perform the modeling activities such as, create, activate, and data preview information views and analytic privileges.
Before you perform the migration activity, you have read the section, Best Practice: Migrating an Object Type to a Different Object Type [page 198].
Context
SAP HANA modeler (SPS 11 version onwards) allows you to perform a migration activity within the SAP HANA modeler tool to convert the classical XML-based analytic privileges to SQL-based analytic privileges. These new SQL analytic privileges essentially provide the same restricted access to information views that was earlier restricted using the classical XML-based analytic privileges.
NoteConverting XML-based analytic privileges to SQL analytic privileges is an optional task that SAP recommends and is required only if you want to move to the XSA advanced model (HDI). Based on a selected classical XML-based analytic privilege, the modeler may convert a single classical XML-based analytic privilege to multiple SQL analytic privileges. These multiple SQL analytic privileges together provide the restricted access the information views. But, in such cases, where modeler creates multiple SQL analytic privileges, you have to manually re-assign the users or roles to the new SQL analytic privileges. You can refer to the migration log or the job log for information on SQL analytic privileges that does not have any roles or users assigned to it.
Procedure
1. Launch SAP HANA studio.2. In the Quick View pane, choose Migrate.3. Select a system where you want to perform the migration activity.4. Choose Next.5. Select Classical XML-based analytic privileges to SQL analytic privileges.
SAP HANA Modeling GuideMigrating an Object Type to a Different Object Type P U B L I C 193
6. Create a migration log.
Migration log records changes that modeler performs during this migration activity and provides information on the status of each migrated content.
a. Select Create Migration Log.b. Browse to the folder location where you want to save the migration log.
7. Choose Next.8. Select an object or a package that contains the objects that you want to convert to SQL analytic privileges.
NoteIf the package already contains SQL analytic privileges, then modeler skips converting these objects. Modeler does not convert the classical XML-based analytic privileges in the selected package to SQL analytic privileges,○ If the analytic privilege is used to apply the data access restrictions to all models in the system
using the Apply to all information models property.○ If the analytic privilege is of read-only type.○ If the analytic privilege is defined using stored procedures to apply data access restrictions on
models.
9. Choose Add.10. Activate the objects, if required.
If you want to automatically activate the new object types after the migration activity, select Activate objects after migration.
NoteYou can also use the workspace activation if you want to activate all migrated content that are in the inactive state and also if you want to delete those objects that modeler has marked for delete.
11. Choose Next.12. Confirm changes
In the Impacted Objects page, modeler displays the list of objects that you have selected for the migration activity.
a. Choose Finish to convert the selected object to SQL analytic privileges.
NoteActivate the impacted objects. While modeling an information view, you can set the value of the view property, Apply Privileges as either Classical Analytic Privilege or as SQL Analytic Privilege. If the Apply Privileges value is Classical Analytic Privilege for information views impacted during this migration activity, then modeler automatically changes the view property of these impacted information views to SQL Analytic Privilege after the migration.
Related Information
Undo Migration Changes [page 196]
194 P U B L I CSAP HANA Modeling Guide
Migrating an Object Type to a Different Object Type
Activate Migrated Objects [page 197]Migration Log [page 198]
11.4 Simulate a Migration Activity
Simulating a migration activity helps perform a migration activity without impacting any of the existing objects. For example, you can simulate only to preview the impact of a migration.
Context
Previewing the impact of migration activity is necessary to decide whether to proceed with the migration activity. By default, a migration activity converts modeler objects to different object types having the same name, and replaces the old objects in the package with the new objects. This means that, the old objects are no longer available in the selected package. However, if you do not want the migration activity to impact any of the existing objects, and instead if you want to just preview the possible impact of a migration activity, then you can simulate the migration activity. The simulation operation allows you to select a target package to save the new object types.
When compared to the actual migration, in a simulation activity:
● Modeler does not display the list of impacted objects.● Modeler does not automatically adjust references of the impacted objects.
Procedure
1. Launch SAP HANA studio.2. In the Quick View pane, choose Migrate.3. Select a system where you want to perform the migration activity.4. Choose Next.5. Select a required migration type.
NoteYou can perform simulation operation only for converting analytic views and attribute views to graphical calculation views and for converting script-based calculation views to table functions and graphical calculation views.
6. Choose Next.7. Select a package that contains the objects that you want to convert.8. Choose Next.9. Select a package that contains the objects that you want to convert to graphical calculation views.
SAP HANA Modeling GuideMigrating an Object Type to a Different Object Type P U B L I C 195
10. Choose Add.11. Select Copy and migrate.12. Browse to the target package that modeler must use to save the new object types.13. Continue with the migration activity.
Related Information
Convert Attribute Views and Analytic Views to Graphical Calculation Views [page 187]Convert Script-based Calculation Views to Graphical Calculation Views [page 191]Convert Classical XML-based Analytic Privileges to SQL-based Analytic Privileges [page 193]Best Practice: Migrating an Object Type to a Different Object Type [page 198]
11.5 Undo Migration Changes
SAP HANA modeler allows you to undo the changes to the modeler objects due to a migration activity.
Context
After performing a migration activity, modeler creates new object types that remain in the inactive state and marks the old objects types for delete. Modeler helps undo the migration changes by restoring all inactive objects in the workspace to its last active version and also by restoring the objects that was marked for delete to its last active state.
NoteIt is recommended that you start the migration process with a clean workspace. You can undo the changes only if you have not yet activated the new object types that modeler has created after a migration activity. In other words, if you have performed a workspace activation after a migration activity, you cannot undo the changes to the modeler objects.
Procedure
1. Launch SAP HANA studio.2. In the Quick View pane, choose Delete Inactive Objects.3. Select a system where you want to undo the migration changes.4. Choose Next.
196 P U B L I CSAP HANA Modeling Guide
Migrating an Object Type to a Different Object Type
5. Undo migration changes
The Delete Inactive Objects dialog displays all inactive objects in the workspace and the objects that modeler has marked for delete after a migration activity.
a. Choose Finish.
11.6 Activate Migrated Objects
After you perform a migration activity and convert one modeler object type to another, the new object types are in the inactive state. You must activate the new object types and also delete the old objects types that are marked for delete.
Context
For example, after converting analytic views to graphical calculation views, the new graphical calculation views remain in the inactive state and modeler marks the target analytic views for delete. SAP HANA modeler provides workspace activation to activate all migrated content that are in the inactive state and also to delete those objects that modeler has marked for delete.
NoteStart migration with a clean workspace. Before you perform the migration activity it is recommended to have only objects that are in the active state. After a migration is complete, the new object types are in the inactive state. Starting with a clean workspace helps identify those objects that are impacted by the migration activity and also activate all inactive objects at the same time.
Procedure
1. Launch SAP HANA studio.2. In the Quick View pane, choose Activate.3. Select a system where you want to perform the activation.4. Choose Next.5. Activate objects
The Activate dialog displays all inactive objects in the workspace and the objects that are marked for delete due to migration activity. You can activate selected objects or activate all the inactive objects.
a. Choose Finish to complete activation.
NoteIf you are activating selected objects, first delete the objects that are marked for delete and then activate the inactive objects. For example, if you are converting an analytic view to graphical calculation
SAP HANA Modeling GuideMigrating an Object Type to a Different Object Type P U B L I C 197
view, you must first delete the analytic view that the modeler has marked for delete and then activate the graphical calculation view.
Related Information
Activate Objects [page 230]
11.7 Migration Log
SAP HANA modeler allows you to create a migration log while performing a migration activity. This log records critical changes that modeler performs during the migration activity and provides information on the status of the migration activity.
The migration log is an .html file that you can save on your local system. The following are some of the details that a migration log records during a migration activity.
● The total number of objects that you have selected for migration.● The total number of objects successfully converted to new object types.● The objects that need user actions before you can successfully activate those objects.● The list of impacted objects whose references modeler could automatically adjust.● The list of impacted objects whose references modeler could not automatically adjust. You have to
manually select such impacted objects and convert it to the new object types in a new migration activity.● For converting classical XML-based analytical privileges, the log records the roles and users associated
with the analytic privileges.
NoteWhile converting attribute views and analytic views to graphical calculation views, if the impacted objects are in different packages and not in the packages that you selected for the migration, then modeler cannot automatically adjust references of those impacted objects. In such cases, you can refer to the migration log and identify these impacted objects and convert them to graphical calculation views.
11.8 Best Practice: Migrating an Object Type to a Different Object Type
The best practices or recommendations described in this section, if adopted, helps perform a smooth migration activity to convert one modeler object type to another.
● Start migration with a clean workspaceBefore you perform the migration activity it is recommended to have only models that are in the active state. After a migration is complete, the new object types are in this inactive state. Starting with a clean
198 P U B L I CSAP HANA Modeling Guide
Migrating an Object Type to a Different Object Type
workspace helps you identify those objects that are impacted by the migration activity and also to undo the changes of the migration activity.
● Migrate information views before migrating analytic privilegesIf you want to convert information views and classical XML privileges to graphical calculation views and SQL analytic privileges respectively, then in the first migration activity convert the analytic views or attribute views or script-based calculation views to graphical calculation views and in the next migration activity convert the classical XML-based analytic privileges to SQL analytic privileges.
● Assign roles and privileges to new objectsAfter migrating classical XML-based privileges to SQL analytic privileges, you have to manually assign the roles and users to the new SQL analytic privileges. You can refer to the job log or to the migration log for information on SQL analytic privileges that does not have the users or roles assigned to them.
● Undo changes before activating the objectsIf you want to undo the migration changes, you can use the Delete Inactive Objects option available in the Quick View pane. This operation restores all inactive objects to its last active version and also restores all objects that are marked for delete. But, it is necessary that you perform the undo operation before activating the objects impacted by migration.
● Simulate the migration activity before migratingIf you want to convert attribute views and analytic views to graphical calculation views, then it is recommended to first simulate the migration activity and understand the impact of the migration. You can proceed with the migration after analyzing the impact. For more information on simulating a migration activity, see Simulate a Migration Activity [page 195].
● Take a back-up of all objectsBefore performing a migration activity, it is recommended to take a back-up of all modeler objects.
Related Information
Convert Attribute Views and Analytic Views to Graphical Calculation Views [page 187]Convert Script-based Calculation Views to Graphical Calculation Views [page 191]Convert Classical XML-based Analytic Privileges to SQL-based Analytic Privileges [page 193]
SAP HANA Modeling GuideMigrating an Object Type to a Different Object Type P U B L I C 199

12 Additional Functionality for Information Views
After modeling information views or at design time you can perform certain additional functions, which helps improve the efficieny of modeling information views.
This section describes the different additional functions that SAP HANA modeler offers and how you can use these functions to efficiently model views.
Related Information
Performance Analysis [page 200]Maintain Comments for Modeler Objects [page 206]Replacing Nodes and Data Sources [page 208]Renaming Information Views and Columns [page 211]
12.1 Performance Analysis
Open information views in performance analysis mode and obtain information on the catalog tables. This information helps you analyze the possible performance impacts on information views at runtime. For example, you can obtain information on table partitions, number of rows in tables, and so on.
In performance analysis mode, you obtain following key information and much more depending on data sources in your information view.
Identify number of rows in a table
Identify those data sources that have number of rows above a certain threshold value. You can configure this threshold value in the SAP HANA studio preferences.
1. In the menu bar, choose Windows Preferences SAP HANA Modeler Performance Analysis .2. In the Threshold values for rows in a table textbox, provide a threshold value.3. Choose Apply.4. Choose OK.
Identify Table Partitions and Table Types
If you have partitioned tables, identify the partitioned tables along with partition type (Hash, Range, Round Robin) and columns used for partitioning the tables. In addition, you can also obtain information on the table type. For example, if you are using virtual tables, then modeler provides information on the virtual table properties (remote DB, remote source, remote owner, and remote object) and its values.
200 P U B L I CSAP HANA Modeling Guide
Additional Functionality for Information Views
NoteIf you have enabled performance analysis mode, modeler displays a warning icon across those catalog tables that have number of rows more than the threshold value that you have defined. Similarly, modeler also displays certain indicators across the tables, which helps you to identify the partition type of those particular tables.
Related Information
Open Information Views in Performance Analysis Mode [page 201]Debug Calculation Views [page 203]Validate Performance of Calculation Views [page 205]
12.1.1 Open Information Views in Performance Analysis Mode
The number of rows in a data source and table partitions impact the performance of your queries. When you open an information view in performance analysis mode, you can obtain information on join tables, table partitions, table types and other useful information, which helps you analyze your calculation view and its possible performance impacts at runtime.
Procedure
1. Launch SAP HANA studio.2. Open the required graphical calculation view in the view editor.
NotePerformance analysis is not supported for script-based calculation views.
3. Select a view node with catalog tables.
NoteYou cannot analyze the performance of the Semantics node.
4. In the menu bar, choose the icon to enable performance analysis mode.The modeler displays the following information in the Performance Analysis tab.○ Join Details○ Data Source Details
SAP HANA Modeling GuideAdditional Functionality for Information Views P U B L I C 201
NoteYou can choose the same icon to hide performance analysis mode for an information view.
NoteIf you want to always open an information view in performance analysis mode by default, configure the SAP HANA studio preferences.
1. In the menu bar, choose Windows Preferences SAP HANA Modeler Performance Analysis .
2. In the Threshold values for rows in a table textbox, provide a threshold value.3. Choose Apply.4. Choose OK.
Related Information
Join Details [page 202]Data Source Details [page 203]
12.1.1.1 Join Details
Open a calculation view in performance analysis mode and select a join view node that has catalog tables as data sources.
If you have defined a join for the catalog tables, then the JOIN DETAILS section in Performance Analysis tab provides the following information:
● Catalog tables participating in the join. This includes the left table and right table.● The cardinality and join type that you have selected for each join.● Information on whether you have maintained the referential integrity for the join table.● If the cardinality that the tool proposes is different from the cardinality that you select or if you have not
maintained referential integrity, tool displays a warning.
NoteOnly users with SELECT privileges on the catalog tables participating in the join can view join validation status.
202 P U B L I CSAP HANA Modeling Guide
Additional Functionality for Information Views
12.1.1.2 Data Source Details
Open a calculation view in performance analysis mode and select a view node that has catalog tables as data sources.
For a selected view node, the DATA SOURCE DETAILS section in Performance Analysis tab provides the following information:
● The catalog tables available in a selected view node.● The catalog table type.● If catalog table is partitioned, then tool provides details on the partition type (Hash, Range, Round Robin).● Number of rows in the catalog table. Also, tool displays a warning icon for catalog tables with number of
rows more than the threshold value that you have defined.● If you are using scale-out architecture with multiple nodes connected to an SAP HANA system, the tool
provides information on the table group name, and the table group type and its subtype.
NoteOnly users with system privilege INIFILE ADMIN can identify whether a system is using a scale-out architecture.
12.1.2 Debug Calculation Views
SAP HANA modeler provides a debugger editor, which allows you to write and use SQL queries for debugging calculation views. This debugging operation helps you analyze the runtime behavior of calculation views and to improve the performance of calculation views.
Context
You can use the SAP HANA debugger editor to write and execute SQL queries that debug and perform a runtime analysis of objects. This editor offers several debug actions. For example, you can write a SQL query for debugging a calculation view and identify those attributes or data sources that engine consumes, while executing the query.
NoteThe debugger editor only supports debugging calculation views that you have activated at least once after upgrading to SPS 09 server. Only users with SELECT and CREATE ANY privilege on _SYS_BIC can debug calculation views.
SAP HANA Modeling GuideAdditional Functionality for Information Views P U B L I C 203
Procedure
1. Open an information view in the view editor.
2. Choose the icon dropdown.3. Choose Debug this view.
This operation launches a SQL editor. The SQL editor, by default, proposes a query, which you can execute and debug the calculation view. The modeler proposes this query after analyzing the existing version of your calculation view. If you have made changes to the existing version, then ensure to reactivate the information view before debugging it.
You can modify the SQL query to debug the information view. The system always saves this query for that editor session. In other words, if you close this debug session, and start a new debug session for the same information view, you can still see your last saved query.
At any point, you can refer to the query that modeler had proposed and compare it with your query by
selecting the icon from the toolbar of the SQL editor.
Related Information
Start Debugging [page 204]Debugger Editor [page 205]
12.1.2.1 Start Debugging
Once you have identified the query to debug your object, you can begin the debugging process and analyze the runtime behavior calculation views. This anlysis can provide you with the information to improve performance of calculation views.
Procedure
From the tool bar of the SQL editor, select the icon to execute the query and start debugging.This operation launches a debugger editor in read-only mode. The debugger editor does not allow you to modify the content of the calculation view. You can only modify it in the view editor outside of this debug session.
204 P U B L I CSAP HANA Modeling Guide
Additional Functionality for Information Views

12.1.2.2 Debugger Editor
You use the debugger editor in SAP HANA modeler for the runtime performance analysis of an information view.
Based on the query you execute, the debugger editor displays the following debugging information:
● For each node in the target column view, the debugger editor displays an icon for the view node type (join, projection, aggregation or union). This means that, the engine needs to convert the node to be able to execute your query. For example, if you have used a join node, then the engine may convert it and execute it as a projection node based on the query you execute. This information helps you to use optimal nodes in your column views.
● Pruned and unpruned data sources in your target information view. Pruned data sources refer to those data sources that engine does not require for executing the query on your target information view, and unpruned data sources refer to those involved in the execution of the view. For all unpruned data sources
of type calculation view, choose icon for further analysis. Similarly, the output pane provides information on pruned and unpruned attributes and measures in your target information view.
● The details pane provides more information for each node. You can use the query area in details pane for a simple data preview. For the default node, the query area displays the query that you use for debugging your information view, and for all other underlying nodes, the query area displays the sub-queries.
NoteThe Planviz editor provides the execution plan of the engine in a graphical editor. This editor helps you analyze the performance impacts of the calculation view at runtime. You can then use this anlysis
information to rectify the calculation view at design time. Choose the icon on the debugger editor toolbar to launch its relevant Planviz editor.
12.1.3 Validate Performance of Calculation Views
SAP HANA modeler provides certain validation rules that when executed, validate the calculation view and help identify if there are any design time factors that affect the performance of your calculation views.
Context
SAP HANA modeler provides you the following validation rules for performance validations. Execute these rules to identify the impact on the performance of the calculation view, and make corrections to the view accordingly.
● Calculation in filter expression rule● Calculation in joins rule● Partition types in join rule.
SAP HANA Modeling GuideAdditional Functionality for Information Views P U B L I C 205

For example, calculated columns or aggregated columns in filter expressions impact the performance of your calculation view. When you execute the calculation in filter expression validation rule, you can identify whether you have modeled your calculation view with calculated columns or aggregated columns in filter expressions.
NoteYou can view these validation rules and its definition under the Performance_Workbench category in
Windows Preferences SAP HANA Modeler Validation Rules . Select these rules if you want modeler to execute them when you Save and Validate or when you Save and Activate your calculation view.
Procedure
1. Open the calculation view in the view editor.
2. In the menu bar, choose icon the dropdown.3. Choose Run Performance Validations for this View.
SAP HANA modeler executes the validation rules and provides the validation results in the job log.
12.2 Maintain Comments for Modeler Objects
When you are modeling an information view, you can also maintain comments for the view or for its objects such as parameters, hierarchies, view nodes and so on. The comments can include, for example, information that provides more clarity on the information view or its objects for data modelers accessing the same view or its objects.
Context
Maintaining comments helps your store more information related to the information view or to store and provide reference information for other data modelers working on the same information view. You can also use the comments for documentation purposes:
● Columns in the semantics node● View Node● Input Parameters and Variables● Hierarchies● Calculated columns and restricted columns in underlying view nodes
NoteYou cannot translate comments that you maintain for the modeler objects.
206 P U B L I CSAP HANA Modeling Guide
Additional Functionality for Information Views
Procedure
1. Launch SAP HANA studio.2. Open the information view for which you want to maintain comments in view editor.3. Maintain comments for the information view at the view level.
a. Select the Semantics node.b. Place the mouse pointer on the Semantics node.
c. Choose .d. Enter a new comment or edit an existing comment.
4. Maintain comments for columns in the semantics node.a. Select the Semantics node.b. Choose the Columns tab.c. Select the column for which you want to maintain comments.
d. Choose .e. Enter a new comment or edit an existing comment.
5. Maintain comments for view nodes.a. In the Scenario pane, select a view node other than the Semantics node and the default view node.b. Place the mouse pointer on the Semantics node.
c. Choose .d. Enter a new comment or edit an existing comment.
6. Maintain comments for input parameters and variables.a. Select the Semantics node.b. Choose the Parameters/Variables tab.c. Select an input parameter or variable for which you want to maintain comments.
d. Choose .e. Enter a new comment or edit an existing comment.
7. Maintain comments for hierarchies.a. Select the Semantics node.b. Choose the Hierarchies tab.c. Select a hierarchy for which you want to maintain comments.
d. Choose .e. Enter a new comment or edit an existing comment.
8. Maintain comments for calculated columns.a. Select a view node with a calculated column.b. In the Output pane, choose Calculated Columns.c. Select the calculated column for which you want to maintain comments.d. In the context menu, choose Edit.
e. In the footer region of Calculated Column dialog, choose .f. Enter a new comment or edit an existing comment.
SAP HANA Modeling GuideAdditional Functionality for Information Views P U B L I C 207
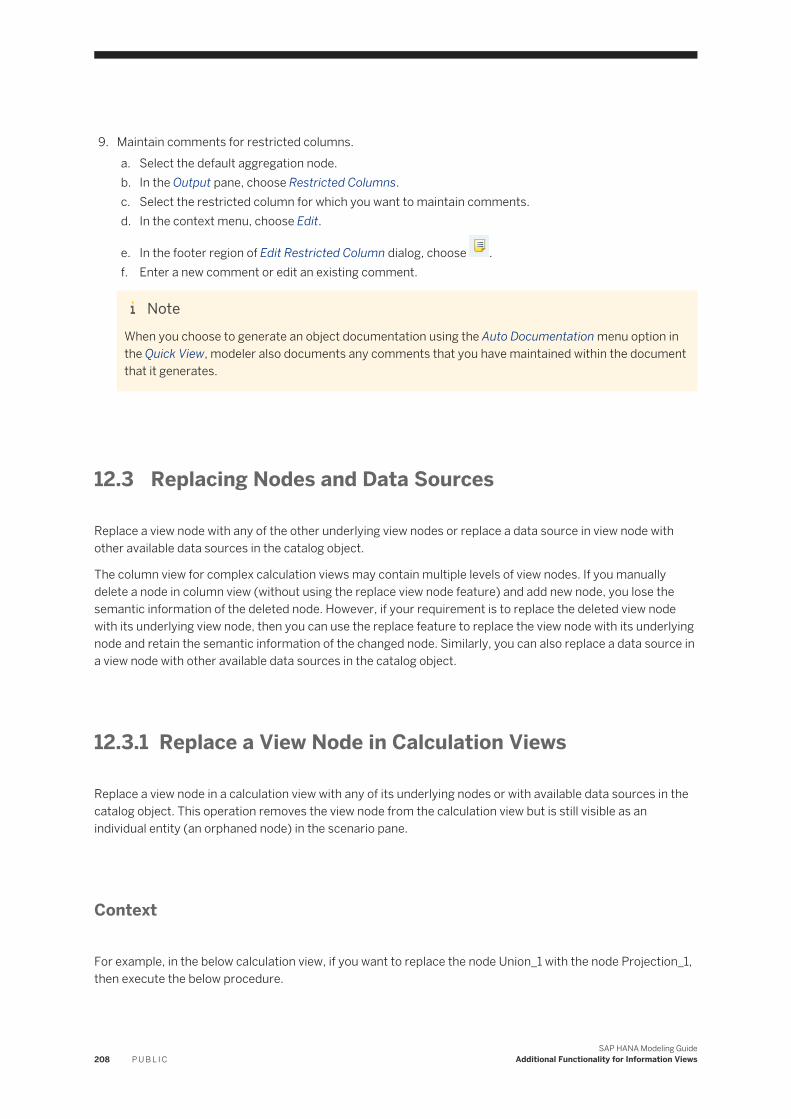
9. Maintain comments for restricted columns.a. Select the default aggregation node.b. In the Output pane, choose Restricted Columns.c. Select the restricted column for which you want to maintain comments.d. In the context menu, choose Edit.
e. In the footer region of Edit Restricted Column dialog, choose .f. Enter a new comment or edit an existing comment.
NoteWhen you choose to generate an object documentation using the Auto Documentation menu option in the Quick View, modeler also documents any comments that you have maintained within the document that it generates.
12.3 Replacing Nodes and Data Sources
Replace a view node with any of the other underlying view nodes or replace a data source in view node with other available data sources in the catalog object.
The column view for complex calculation views may contain multiple levels of view nodes. If you manually delete a node in column view (without using the replace view node feature) and add new node, you lose the semantic information of the deleted node. However, if your requirement is to replace the deleted view node with its underlying view node, then you can use the replace feature to replace the view node with its underlying node and retain the semantic information of the changed node. Similarly, you can also replace a data source in a view node with other available data sources in the catalog object.
12.3.1 Replace a View Node in Calculation Views
Replace a view node in a calculation view with any of its underlying nodes or with available data sources in the catalog object. This operation removes the view node from the calculation view but is still visible as an individual entity (an orphaned node) in the scenario pane.
Context
For example, in the below calculation view, if you want to replace the node Union_1 with the node Projection_1, then execute the below procedure.
208 P U B L I CSAP HANA Modeling Guide
Additional Functionality for Information Views
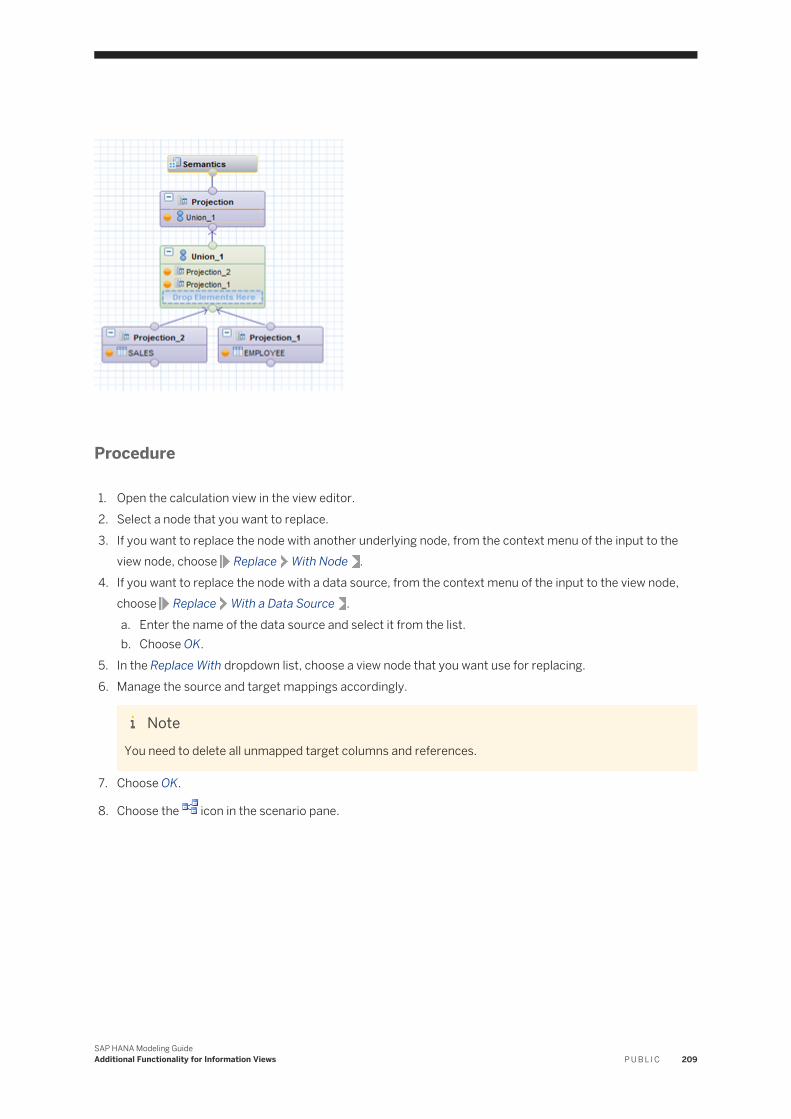
Procedure
1. Open the calculation view in the view editor.2. Select a node that you want to replace.3. If you want to replace the node with another underlying node, from the context menu of the input to the
view node, choose Replace With Node .4. If you want to replace the node with a data source, from the context menu of the input to the view node,
choose Replace With a Data Source .a. Enter the name of the data source and select it from the list.b. Choose OK.
5. In the Replace With dropdown list, choose a view node that you want use for replacing.6. Manage the source and target mappings accordingly.
NoteYou need to delete all unmapped target columns and references.
7. Choose OK.
8. Choose the icon in the scenario pane.
SAP HANA Modeling GuideAdditional Functionality for Information Views P U B L I C 209
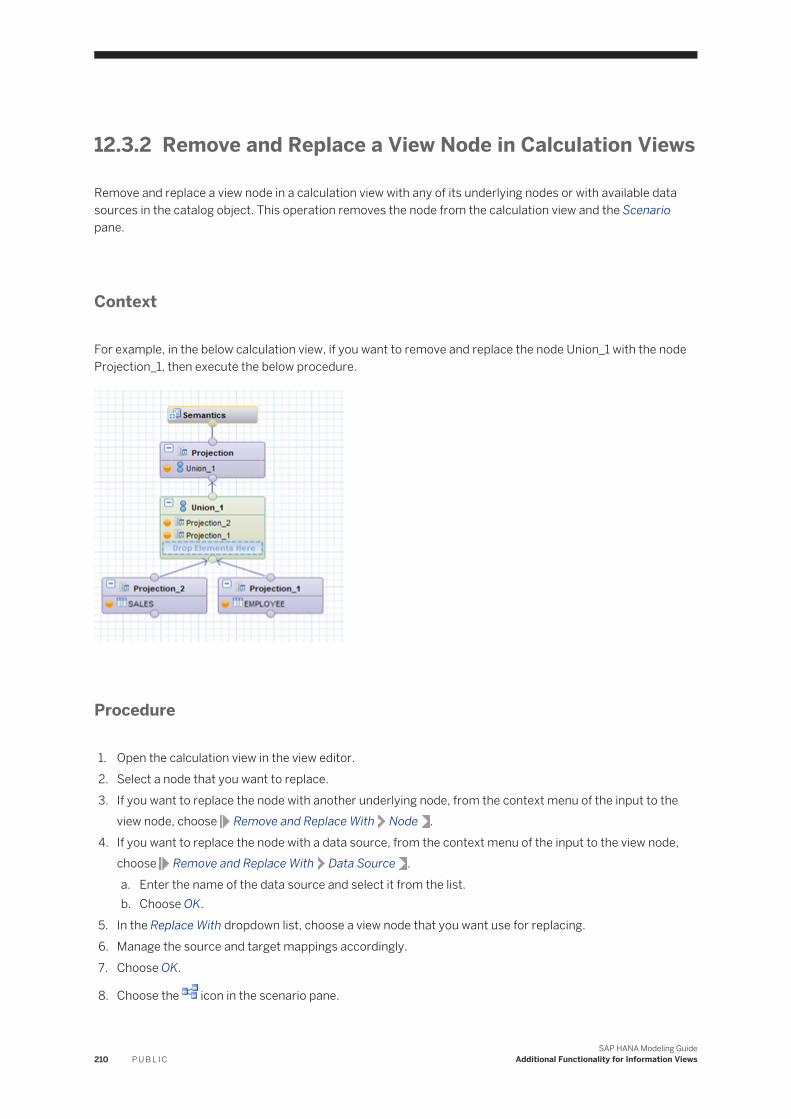
12.3.2 Remove and Replace a View Node in Calculation Views
Remove and replace a view node in a calculation view with any of its underlying nodes or with available data sources in the catalog object. This operation removes the node from the calculation view and the Scenario pane.
Context
For example, in the below calculation view, if you want to remove and replace the node Union_1 with the node Projection_1, then execute the below procedure.
Procedure
1. Open the calculation view in the view editor.2. Select a node that you want to replace.3. If you want to replace the node with another underlying node, from the context menu of the input to the
view node, choose Remove and Replace With Node .4. If you want to replace the node with a data source, from the context menu of the input to the view node,
choose Remove and Replace With Data Source .a. Enter the name of the data source and select it from the list.b. Choose OK.
5. In the Replace With dropdown list, choose a view node that you want use for replacing.6. Manage the source and target mappings accordingly.7. Choose OK.
8. Choose the icon in the scenario pane.
210 P U B L I CSAP HANA Modeling Guide
Additional Functionality for Information Views
12.3.3 Replace a Data Source in Calculation Views
Replace a data source in calculation views with other available data sources in the catalog object, without losing the semantic information of the replaced data source.
Procedure
1. Open a graphical calculation view in the view editor.2. In the calculation view, select a data source that you want to replace.3. In the context menu of the data source, choose Replace with Data Source.4. In the Find wizard, enter the name of the data source and select it from the list.5. Choose OK.
12.4 Renaming Information Views and Columns
Rename information views or their columns without losing their existing behavior. If these information views or columns are referred in other modeler objects, then SAP HANA modeler automatically adjusts the references of these information views or columns in impacted objects.
Related Information
Rename Information Views [page 211]Rename Columns in Information Views [page 212]
12.4.1 Rename Information Views
Rename information views without losing its existing behavior. If there are any impacted objects, modeler automatically adjusts the references of these information views in impacted objects.
Procedure
1. Open the SAP HANA Modeler perspective.2. In the SAP HANA Systems view, expand the Content node.3. In the navigator pane, select the required information view.
SAP HANA Modeling GuideAdditional Functionality for Information Views P U B L I C 211
4. In the context menu, choose Refactor Rename .5. In the Name textbox, enter the new name for the information view.6. Choose Next.
In the Summary page, modeler displays the existing name and the new name of the information view. Expand the node to view impacted objects.
NoteModeler cannot adjust references if the impacted objects are script-based calculation views, table functions or procedures. In such cases, manually adjust the references.
7. If you want to copy the information view references to the clipboard, choose .8. Choose Finish.
NoteAfter you rename an information view, manually activate the impacted objects and activate your workspace to delete the objects with earlier names.
12.4.2 Rename Columns in Information Views
Rename columns available in the information views without losing its existing behavior. If there are any impacted objects, modeler automatically adjusts the references of these columns in impacted objects.
Procedure
1. Open the information view in the view editor.2. Select the Semantics node.
3. In the Columns tab, choose .
NoteIn the Rename and Adjust References wizard, modeler displays all columns available in the information view output.
4. In the New Name column, provide a new name to a selected column.5. Choose Next.
Modeler displays all impacted objects due to the rename process.
212 P U B L I CSAP HANA Modeling Guide
Additional Functionality for Information Views
NoteModeler cannot adjust references if the impacted objects are analytic privileges, script-based calculation views, table functions, expressions (for calculated column, restricted columns, and so on.) and procedures. In such cases, manually adjust the references.
6. If you want to identify the column references in the impacted objects,a. Select an impacted object.b. In the More Information field, choose the value help.
7. If you want to copy column references to the clipboard, choose .8. If you want to skip the rename operation for a particular impacted object, deselect the impacted object.
NoteIf you deselect an impacted object, you have after to manually adjust the column references in the impacted objects after rename.
9. Choose Finish.
NoteAfter you rename columns, you have to manually activate the impacted objects.
12.5 Using Functions in Expressions
This section describes the functions, which you can use while creating expressions for calculated attributes and calculated measures.
You can create expressions, for example in calculated columns using the column engine (CS) language or the SQL language.
NoteRelated SAP Notes. The SAP Note 2252224 describes the differences between the CS and SQL string expression with respect to Unicode or multi-byte encoding. The SAP Note 1857202 describes the SQL execution of calculation views.
Related Information
String Functions [page 215]Conversion Functions [page 214]Mathematical Functions [page 218]Date Functions [page 219]
SAP HANA Modeling GuideAdditional Functionality for Information Views P U B L I C 213
Miscellaneous Functions [page 221]Using Functions in Expressions [page 213]
12.5.1 Conversion Functions
Data type conversion functions are used to convert arguments from one data type to another, or to test whether a conversion is possible.
Function Syntax Purpose Example
int int int(arg) convert arg to int type int(2)
float float float(arg) convert arg to float type float(3.0)
double double double (arg) convert arg to double type double(3)
sdfloat sdfloat sdfloat (arg) convert arg to sdfloat type
decfloat decfloat decfloat (arg) convert arg to decfloat type
fixed fixed fixed (arg, int, int) arg2 and arg3 are the intDigits and fractdigits parameters, respectively. Convert arg to a fixed type of either 8, 12, or 16 byte length, depending on intDigits and fractDigits
fixed(3.2, 8, 2) + fixed(2.3, 8, 3)
string string string (arg) convert arg to string type
raw raw raw (arg) convert arg to raw type
date date date(stringarg)
date date(fixedarg)
date date(int, int)
date date(int, int, int)
date date(int, int, int, int)
date date(int, int, int, int, int)
date date(int, int, int, int, int, int)
convert arg to date type. The first version parses a string in the format "yyyy-mm-dd hh:mi:ss" where trailing components except for the year may be omitted. The version with one fixed number arg strips digits behind the comma and tries to make a date from the rest. The other versions accept the individual components to be set.
date(2009) -> date('2009')
date(2009, 1, 2) -> date('2009-01-02')
date(fixed(20000203135026.1234567, 10, 4)) -> date('2000-02-03 13:50:26')
longdate longdate longdate(stringarg)
longdate longdate(fixedarg)
longdate longdate(int, int, int)
convert arg to longdate type, similar to date function above.
longdate(fixed(20000203135026.1234567, 10, 5)) -> longdate('2000-02-03 13:50:26.1234500')
214 P U B L I CSAP HANA Modeling Guide
Additional Functionality for Information Views

Function Syntax Purpose Example
longdate longdate(int, int, int, int, int)
longdate longdate(int, int, int, int, int, int)
longdate longdate(int, int, int, int, int, int, int)
longdate(2011, 3, 16, 9, 48, 12, 1234567) -> longdate('2011-03-16 09:48:12.1234567')
time time time(stringarg)
time time(fixedarg)
time time(int, int)
time time(int, int, int)
convert arg to time type, similar to date function above
seconddate seconddate(string)
seconddate(int, int, int, int, int, int)
Convert to seconddate. One stringargs is a string with default parsing; two stringargs is a format string in the second arg, numeric args are the date components.
secondtime secondtime(string)
secondtime(string, string)
secondtime(int, int, int)
Converto to secondtime.
12.5.2 String Functions
String functions are scalar functions that perform an operation on a string input value and return a string or numeric value.
Function Syntax Purpose
strlen int strlen(string) Returns the length of a string in bytes, as an integer number.
midstr string midstr(string, int, int) Returns a part of the string starting at arg2, arg3 bytes long.
arg2 is counted from 1 (not 0).
midstru string midstru(string, int)
string midstru(string, int, int)
Returns a part of the string starting at character or surrugate arg2, arg3 characters or surrogates long.
SAP HANA Modeling GuideAdditional Functionality for Information Views P U B L I C 215
Function Syntax Purpose
leftstr string leftstr(string, int) Returns arg2 bytes from the left of the arg1. If arg1 is shorter than the value of arg2, the complete string will be returned.
rightstr string rightstr(string, int) Returns arg2 bytes from the right of the arg1. If arg1 is shorter than the value of arg2, the complete string will be returned.
rightsru string rightstru(string, int) return arg2 characters from the right of string. If arg1 is shorter than arg2 characters, the complete string will be returned.
instr int instr(string, string) Returns the position of the first occurrence of the second string within the first string (>
= 1) or 0, if the second string is not contained in the first.
instru int instru(string, string) return the character position of the first occurrence of the second string within the first string (>= 1) or 0, if the second string is not contained in the first. This assumes inputs to be unicode expressed in utf-8, if the input is not encoded this way, the result will be less meaningful.
hextoraw string hextoraw(string) Convert a hexadecimal representation of bytes to a string of bytes. The hexadecimal string may contain 0-9, upper or lowercase a-f and no spaces between the two digits of a byte; spaces between bytes are allowed.
rawtohex string rawtohex(string) convert a string of bytes to its hexadecimal representation.
The output will contain only 0-9 and (upper case) A-F, no spaces and is twice as many bytes as the original string.
ltrim string ltrim(string)
string ltrim(string, string)
removes a whitespace prefix from a string. The Whitespace characters may be specified in an optional argument. This functions operates on raw bytes of the UTF8-string and has
216 P U B L I CSAP HANA Modeling Guide
Additional Functionality for Information Views
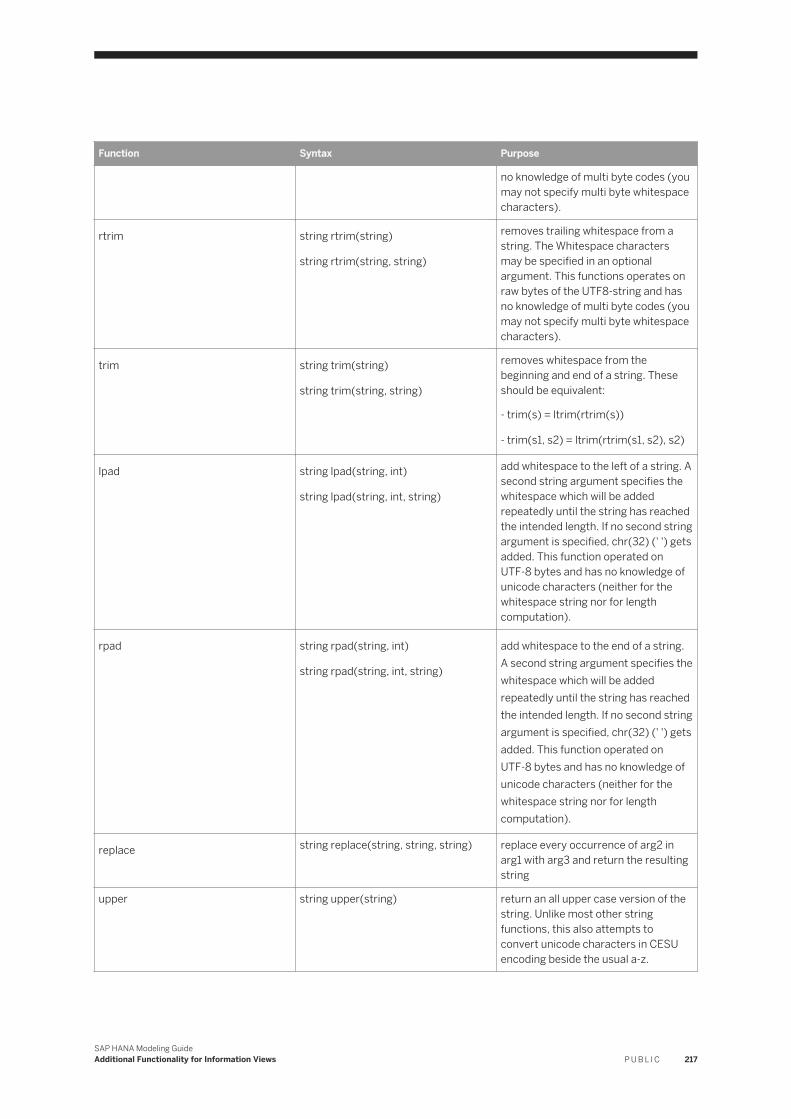
Function Syntax Purpose
no knowledge of multi byte codes (you may not specify multi byte whitespace characters).
rtrim string rtrim(string)
string rtrim(string, string)
removes trailing whitespace from a string. The Whitespace characters may be specified in an optional argument. This functions operates on raw bytes of the UTF8-string and has no knowledge of multi byte codes (you may not specify multi byte whitespace characters).
trim string trim(string)
string trim(string, string)
removes whitespace from the beginning and end of a string. These should be equivalent:
- trim(s) = ltrim(rtrim(s))
- trim(s1, s2) = ltrim(rtrim(s1, s2), s2)
lpad string lpad(string, int)
string lpad(string, int, string)
add whitespace to the left of a string. A second string argument specifies the whitespace which will be added repeatedly until the string has reached the intended length. If no second string argument is specified, chr(32) (' ') gets added. This function operated on UTF-8 bytes and has no knowledge of unicode characters (neither for the whitespace string nor for length computation).
rpad string rpad(string, int)
string rpad(string, int, string)
add whitespace to the end of a string. A second string argument specifies the whitespace which will be added repeatedly until the string has reached the intended length. If no second string argument is specified, chr(32) (' ') gets added. This function operated on UTF-8 bytes and has no knowledge of unicode characters (neither for the whitespace string nor for length computation).
replace string replace(string, string, string) replace every occurrence of arg2 in arg1 with arg3 and return the resulting string
upper string upper(string) return an all upper case version of the string. Unlike most other string functions, this also attempts to convert unicode characters in CESU encoding beside the usual a-z.
SAP HANA Modeling GuideAdditional Functionality for Information Views P U B L I C 217

Function Syntax Purpose
lower string lower(string) return an all lower case version of the string. Unlike most other string functions, this also attempts to convert unicode characters in CESU encoding beside the usual A-Z.
rightstru string rightstru(string, int) return arg2 characters from the right of string. If arg1 is shorter than arg2 characters, the complete string will be returned.
chars chars(string) return the number of characters in a string. This returns the number of characters in a UTF-8 encoded string. In a CESU-8 encoded string, it will return the number of 16-bit words of that string if it were encoded if UTF-16.
charpos charpos(string, int) return the position of the nth character in a string (n starting with 1). The string is interpreted as UTF-8 as it is in the chars() function above.
12.5.3 Mathematical Functions
Scalar math functions perform a calculation, usually based on input values that are provided as arguments, and return a numeric value.
Function Syntax Purpose Example
sign int sign(double)
int sign(time)
int sign(date)
Sign returns -1, 0 or 1 depending on the sign of its argument. Sign is implemented for all numeric types, date and time.
abs double abs(double)
decfloat abs(decfloat)
decfloat abs(decfloat)
time abs(time)
Abs returns arg, if arg is positive or zero, -arg else. Abs is implemented for all numeric types and time.
round double round(double, int) Round does rounding of absolute values toward zero while the sign is retained
round(123.456, 0) = 123
round(123.456, 1) = 123.5
round(-123.456, 1) = -123.5
round(123.456, -1) = 120
218 P U B L I CSAP HANA Modeling Guide
Additional Functionality for Information Views
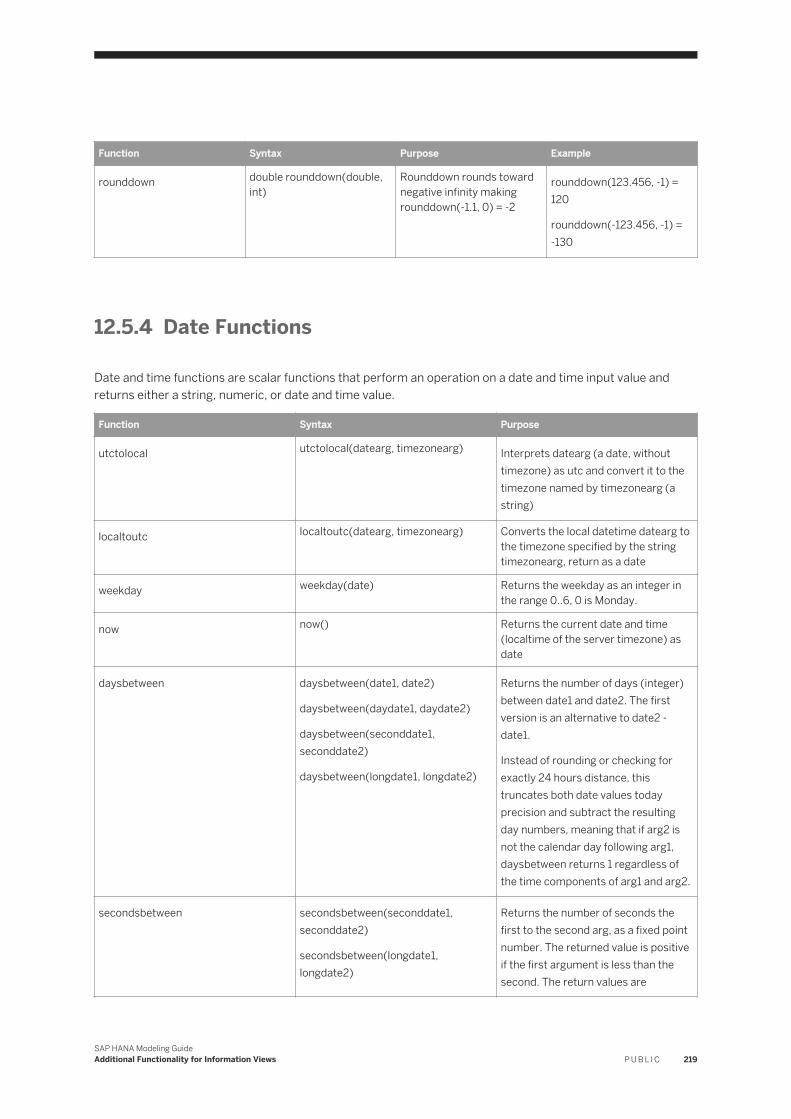
Function Syntax Purpose Example
rounddown double rounddown(double, int)
Rounddown rounds toward negative infinity making rounddown(-1.1, 0) = -2
rounddown(123.456, -1) = 120
rounddown(-123.456, -1) = -130
12.5.4 Date Functions
Date and time functions are scalar functions that perform an operation on a date and time input value and returns either a string, numeric, or date and time value.
Function Syntax Purpose
utctolocal utctolocal(datearg, timezonearg) Interprets datearg (a date, without timezone) as utc and convert it to the timezone named by timezonearg (a string)
localtoutc localtoutc(datearg, timezonearg) Converts the local datetime datearg to the timezone specified by the string timezonearg, return as a date
weekday weekday(date) Returns the weekday as an integer in the range 0..6, 0 is Monday.
now now() Returns the current date and time (localtime of the server timezone) as date
daysbetween daysbetween(date1, date2)
daysbetween(daydate1, daydate2)
daysbetween(seconddate1, seconddate2)
daysbetween(longdate1, longdate2)
Returns the number of days (integer) between date1 and date2. The first version is an alternative to date2 - date1.
Instead of rounding or checking for exactly 24 hours distance, this truncates both date values today precision and subtract the resulting day numbers, meaning that if arg2 is not the calendar day following arg1, daysbetween returns 1 regardless of the time components of arg1 and arg2.
secondsbetween secondsbetween(seconddate1, seconddate2)
secondsbetween(longdate1, longdate2)
Returns the number of seconds the first to the second arg, as a fixed point number. The returned value is positive if the first argument is less than the second. The return values are
SAP HANA Modeling GuideAdditional Functionality for Information Views P U B L I C 219
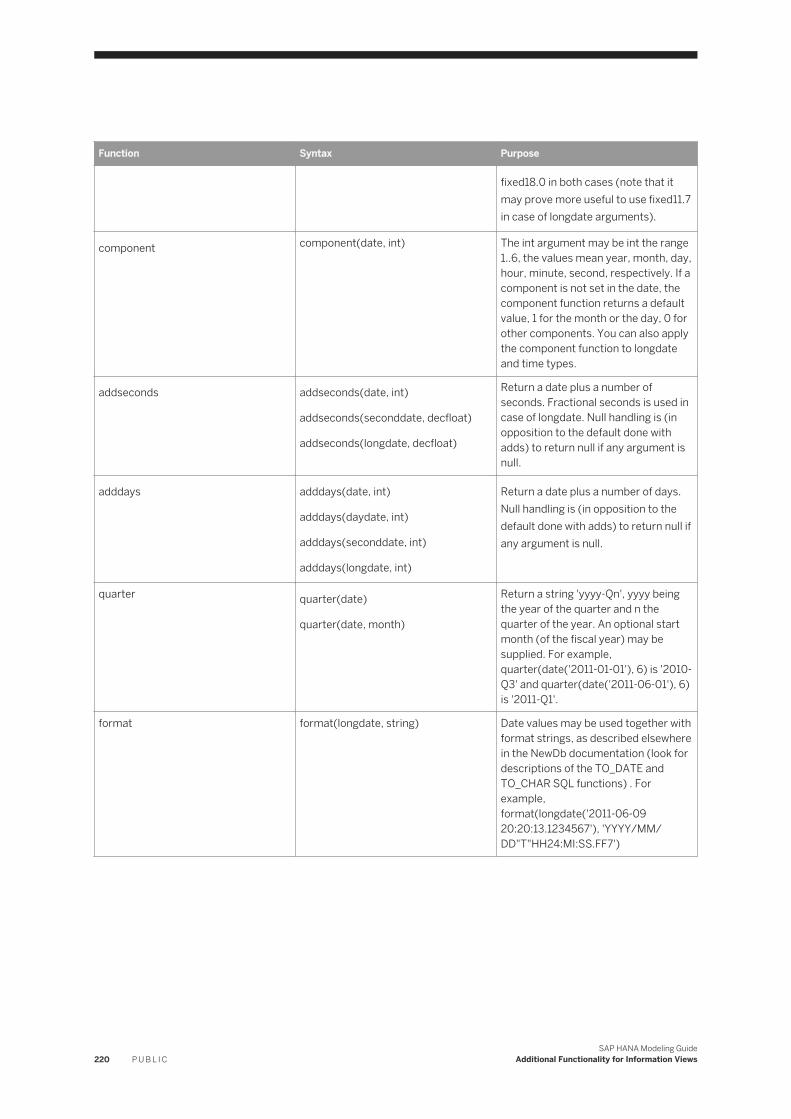
Function Syntax Purpose
fixed18.0 in both cases (note that it may prove more useful to use fixed11.7 in case of longdate arguments).
component component(date, int) The int argument may be int the range 1..6, the values mean year, month, day, hour, minute, second, respectively. If a component is not set in the date, the component function returns a default value, 1 for the month or the day, 0 for other components. You can also apply the component function to longdate and time types.
addseconds addseconds(date, int)
addseconds(seconddate, decfloat)
addseconds(longdate, decfloat)
Return a date plus a number of seconds. Fractional seconds is used in case of longdate. Null handling is (in opposition to the default done with adds) to return null if any argument is null.
adddays adddays(date, int)
adddays(daydate, int)
adddays(seconddate, int)
adddays(longdate, int)
Return a date plus a number of days. Null handling is (in opposition to the default done with adds) to return null if any argument is null.
quarter quarter(date)
quarter(date, month)
Return a string 'yyyy-Qn', yyyy being the year of the quarter and n the quarter of the year. An optional start month (of the fiscal year) may be supplied. For example, quarter(date('2011-01-01'), 6) is '2010-Q3' and quarter(date('2011-06-01'), 6) is '2011-Q1'.
format format(longdate, string) Date values may be used together with format strings, as described elsewhere in the NewDb documentation (look for descriptions of the TO_DATE and TO_CHAR SQL functions) . For example, format(longdate('2011-06-09 20:20:13.1234567'), 'YYYY/MM/DD"T"HH24:MI:SS.FF7')
220 P U B L I CSAP HANA Modeling Guide
Additional Functionality for Information Views
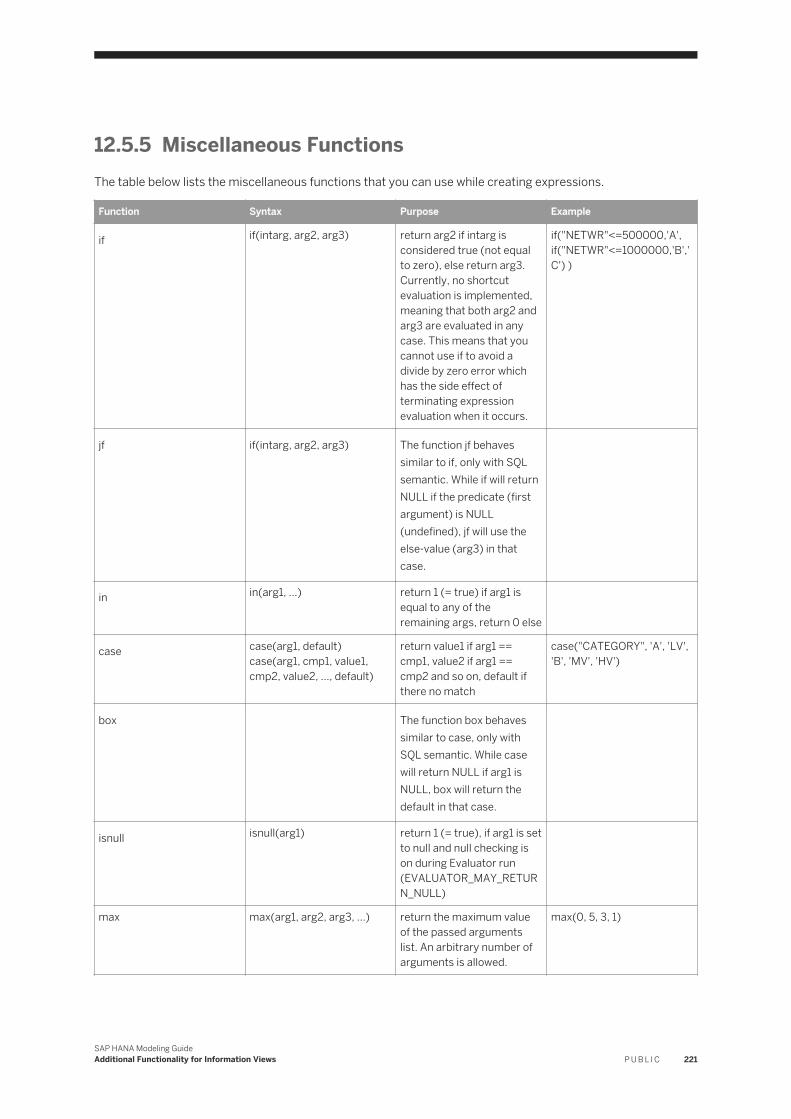
12.5.5 Miscellaneous FunctionsThe table below lists the miscellaneous functions that you can use while creating expressions.
Function Syntax Purpose Example
if if(intarg, arg2, arg3) return arg2 if intarg is considered true (not equal to zero), else return arg3. Currently, no shortcut evaluation is implemented, meaning that both arg2 and arg3 are evaluated in any case. This means that you cannot use if to avoid a divide by zero error which has the side effect of terminating expression evaluation when it occurs.
if("NETWR"<=500000,'A', if("NETWR"<=1000000,'B','C') )
jf if(intarg, arg2, arg3) The function jf behaves similar to if, only with SQL semantic. While if will return NULL if the predicate (first argument) is NULL (undefined), jf will use the else-value (arg3) in that case.
in in(arg1, ...) return 1 (= true) if arg1 is equal to any of the remaining args, return 0 else
case case(arg1, default) case(arg1, cmp1, value1, cmp2, value2, ..., default)
return value1 if arg1 == cmp1, value2 if arg1 == cmp2 and so on, default if there no match
case("CATEGORY", 'A', 'LV', 'B', 'MV', 'HV')
box The function box behaves similar to case, only with SQL semantic. While case will return NULL if arg1 is NULL, box will return the default in that case.
isnull isnull(arg1) return 1 (= true), if arg1 is set to null and null checking is on during Evaluator run (EVALUATOR_MAY_RETURN_NULL)
max max(arg1, arg2, arg3, ...) return the maximum value of the passed arguments list. An arbitrary number of arguments is allowed.
max(0, 5, 3, 1)
SAP HANA Modeling GuideAdditional Functionality for Information Views P U B L I C 221
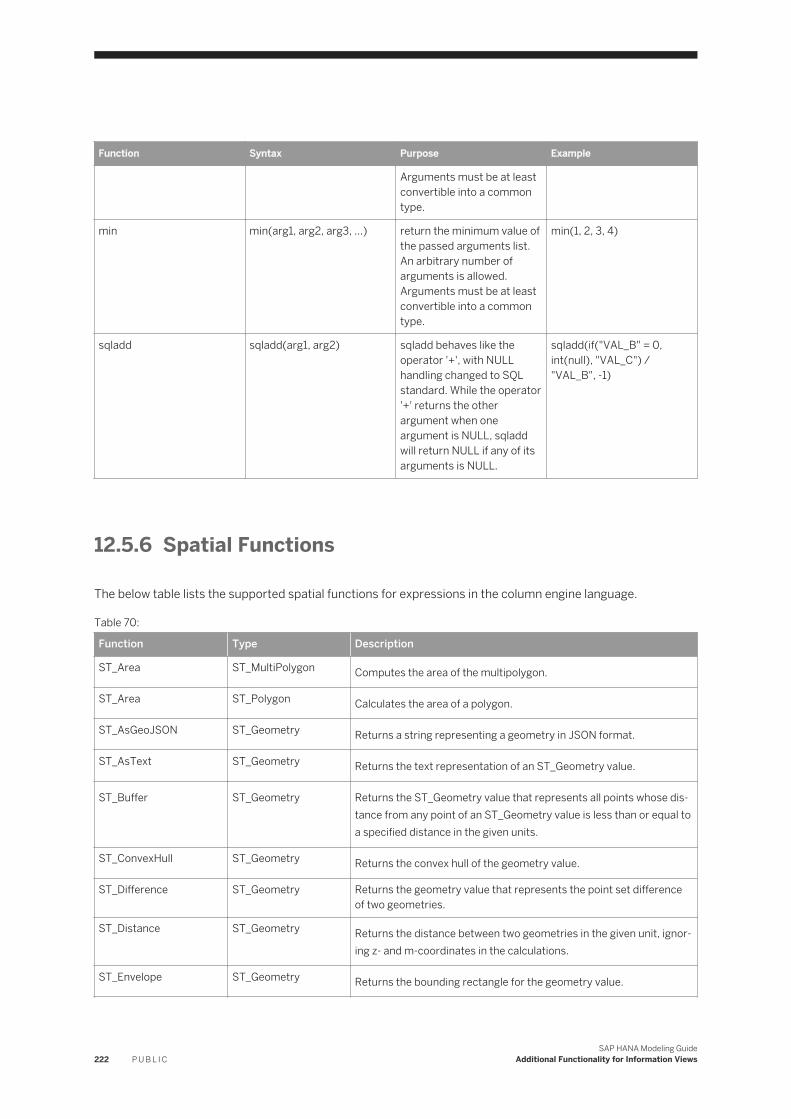
Function Syntax Purpose Example
Arguments must be at least convertible into a common type.
min min(arg1, arg2, arg3, ...) return the minimum value of the passed arguments list. An arbitrary number of arguments is allowed. Arguments must be at least convertible into a common type.
min(1, 2, 3, 4)
sqladd sqladd(arg1, arg2) sqladd behaves like the operator '+', with NULL handling changed to SQL standard. While the operator '+' returns the other argument when one argument is NULL, sqladd will return NULL if any of its arguments is NULL.
sqladd(if("VAL_B" = 0, int(null), "VAL_C") / "VAL_B", -1)
12.5.6 Spatial Functions
The below table lists the supported spatial functions for expressions in the column engine language.
Table 70:
Function Type Description
ST_Area ST_MultiPolygon Computes the area of the multipolygon.
ST_Area ST_Polygon Calculates the area of a polygon.
ST_AsGeoJSON ST_Geometry Returns a string representing a geometry in JSON format.
ST_AsText ST_Geometry Returns the text representation of an ST_Geometry value.
ST_Buffer ST_Geometry Returns the ST_Geometry value that represents all points whose distance from any point of an ST_Geometry value is less than or equal to a specified distance in the given units.
ST_ConvexHull ST_Geometry Returns the convex hull of the geometry value.
ST_Difference ST_Geometry Returns the geometry value that represents the point set difference of two geometries.
ST_Distance ST_Geometry Returns the distance between two geometries in the given unit, ignoring z- and m-coordinates in the calculations.
ST_Envelope ST_Geometry Returns the bounding rectangle for the geometry value.
222 P U B L I CSAP HANA Modeling Guide
Additional Functionality for Information Views
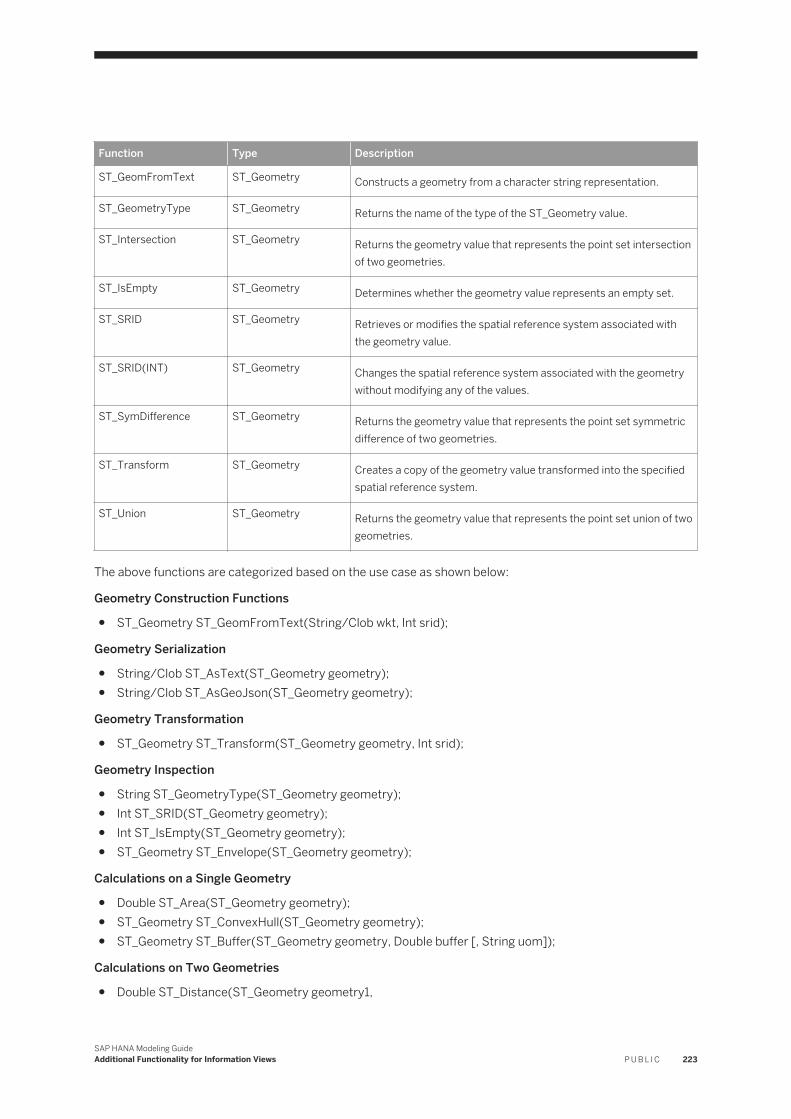
Function Type Description
ST_GeomFromText ST_Geometry Constructs a geometry from a character string representation.
ST_GeometryType ST_Geometry Returns the name of the type of the ST_Geometry value.
ST_Intersection ST_Geometry Returns the geometry value that represents the point set intersection of two geometries.
ST_IsEmpty ST_Geometry Determines whether the geometry value represents an empty set.
ST_SRID ST_Geometry Retrieves or modifies the spatial reference system associated with the geometry value.
ST_SRID(INT) ST_Geometry Changes the spatial reference system associated with the geometry without modifying any of the values.
ST_SymDifference ST_Geometry Returns the geometry value that represents the point set symmetric difference of two geometries.
ST_Transform ST_Geometry Creates a copy of the geometry value transformed into the specified spatial reference system.
ST_Union ST_Geometry Returns the geometry value that represents the point set union of two geometries.
The above functions are categorized based on the use case as shown below:
Geometry Construction Functions
● ST_Geometry ST_GeomFromText(String/Clob wkt, Int srid);
Geometry Serialization
● String/Clob ST_AsText(ST_Geometry geometry);● String/Clob ST_AsGeoJson(ST_Geometry geometry);
Geometry Transformation
● ST_Geometry ST_Transform(ST_Geometry geometry, Int srid);
Geometry Inspection
● String ST_GeometryType(ST_Geometry geometry);● Int ST_SRID(ST_Geometry geometry);● Int ST_IsEmpty(ST_Geometry geometry);● ST_Geometry ST_Envelope(ST_Geometry geometry);
Calculations on a Single Geometry
● Double ST_Area(ST_Geometry geometry);● ST_Geometry ST_ConvexHull(ST_Geometry geometry);● ST_Geometry ST_Buffer(ST_Geometry geometry, Double buffer [, String uom]);
Calculations on Two Geometries
● Double ST_Distance(ST_Geometry geometry1,
SAP HANA Modeling GuideAdditional Functionality for Information Views P U B L I C 223
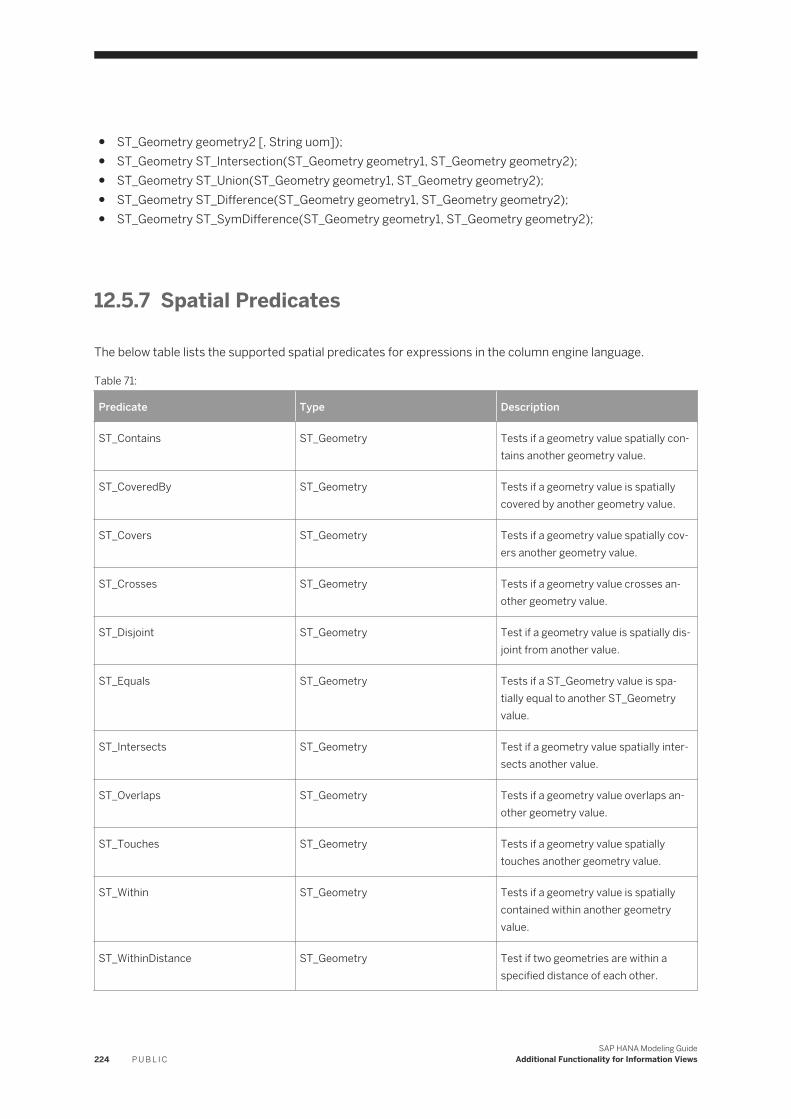
● ST_Geometry geometry2 [, String uom]);● ST_Geometry ST_Intersection(ST_Geometry geometry1, ST_Geometry geometry2);● ST_Geometry ST_Union(ST_Geometry geometry1, ST_Geometry geometry2);● ST_Geometry ST_Difference(ST_Geometry geometry1, ST_Geometry geometry2);● ST_Geometry ST_SymDifference(ST_Geometry geometry1, ST_Geometry geometry2);
12.5.7 Spatial Predicates
The below table lists the supported spatial predicates for expressions in the column engine language.
Table 71:
Predicate Type Description
ST_Contains ST_Geometry Tests if a geometry value spatially contains another geometry value.
ST_CoveredBy ST_Geometry Tests if a geometry value is spatially covered by another geometry value.
ST_Covers ST_Geometry Tests if a geometry value spatially covers another geometry value.
ST_Crosses ST_Geometry Tests if a geometry value crosses another geometry value.
ST_Disjoint ST_Geometry Test if a geometry value is spatially disjoint from another value.
ST_Equals ST_Geometry Tests if a ST_Geometry value is spatially equal to another ST_Geometry value.
ST_Intersects ST_Geometry Test if a geometry value spatially intersects another value.
ST_Overlaps ST_Geometry Tests if a geometry value overlaps another geometry value.
ST_Touches ST_Geometry Tests if a geometry value spatially touches another geometry value.
ST_Within ST_Geometry Tests if a geometry value is spatially contained within another geometry value.
ST_WithinDistance ST_Geometry Test if two geometries are within a specified distance of each other.
224 P U B L I CSAP HANA Modeling Guide
Additional Functionality for Information Views
12.6 Trace Performance Issues
You use performance tracing to look into the reasons that cause different Modeler operations a longer time to complete. For example, you may have problems in mass activation of objects and you want to troubleshoot this problem.
Context
The performance trace contains the information about the total time spent in performing a specific operation, which includes various function calls and their execution. The performance trace log file supports two formats:
● CSV- in this format the log file contains entries in the comma separated format. Developers can use external tools like Microsoft Excel to read the trace to troubleshoot the problem.
● Simple - in this format the log file contains information in the simple user readable text format.
It is recommended to keep the log file as small as possible by recording the activity or action you want to troubleshoot. Also, the recommended format for log file is CSV.
To start recording a particular action, perform the following:
Procedure
1. Navigate to Window Preference Modeler Logs Performance Trace2. In Enable Performance Trace dropdown list, choose True.3. Select the format for the log file.4. Browse the location where you want to save the log file.
By default it is the log file is saved in the eclipse workspace.5. Choose OK.6. Perform the activity that you want to troubleshoot.7. To stop the performance tracer after performing the required activity, in the Enable Performance Trace,
choose False.
12.7 Maintain Search Attributes
You use this procedure to enable an attribute search for an attribute used in a view. Various properties related to attribute search are as follows:
● Freestyle Search: Set to True if you want to enable the freestyle search for an attribute. You can exclude attributes from freestyle search by setting the property to False.
● Weights for Ranking: To influence the relevancy of items in the search results list, you can vary the weighting of the attribute. You can assign a higher or lower weighting (range 0.0 to 1.0). The higher the
SAP HANA Modeling GuideAdditional Functionality for Information Views P U B L I C 225
weighting of the attribute, the more influence it has in the calculation of the relevance of an item. Items with a higher relevance are located higher up the search results list. Default value: 0.5.
NoteTo use this setting the property Freestyle Search must be set to True.
● Fuzzy Search: This parameter enables the fault-tolerant search. Default: False.● Fuzziness Threshold: If you have set the parameter Fuzzy Search to True you can fine-tune the threshold
for the fault-tolerant search between 0 and 1. Default: 0.8
NoteWe recommend using the default values for Weights for Ranking and Fuzziness Threshold to start with. Later on, you can fine-tune the search settings based on your experiences with the search. You can also fine-tune the search using feedback collected from your users.
12.8 Configure Tracing
Configuring tracing support for SAP HANA modeler helps you generate trace files, which you can use to report any modeling related issues to SAP support team.
Context
If you want to configure logging and tracing, then execute the below steps:
Procedure
1. In SAP HANA studio, choose Windows Preferences Tracing SAP HANA Modeler .2. Set the debug plugin value to true.3. Select Output to file radio button.4. In the Output to file field, provide the path to save the trace file.5. Choose OK.
NoteIt is recommended to stop recording the trace as soon you finish replicating and reporting the issue.
226 P U B L I CSAP HANA Modeling Guide
Additional Functionality for Information Views
12.9 View the Job Log
The job log displays information related to requests entered for a job. A job log consists of two tab pages as follows:
● Current: Lists all waiting, running, and last five jobs.● History: Lists all the jobs.
NoteYou can terminate the job only if it is in the waiting state.
You can perform the following operations using the job log:
● Open Job Details: Use this to view the job summary in the current tab page.● Open Job Log File: Use this to view the information pertaining to a job in detail using the internal
browser.● Clear Log Viewer: Use this to delete all the job from the current tab page.● Export Log File: Use this to export the log file to a target location other than the default location for
further reference.● Delete Job: Use this to delete single job from the current tab page.
12.10 Validate Models
You can check if there are any errors in an information object and if the object is based on the rules that you specified as part of preferences. For example, the "Check join: SQL" rule checks that the join is correctly formed.
Procedure
1. On the Quick View page, choose Validate.2. Select a system where you want to perform this operation.3. From the Available list, select the required models that system must validate, and choose Add.4. Choose Validate.
12.11 Manage Editor Layout
You use this procedure to adjust the data foundation and logical view layout comprising user interface controls like, tables and attribute views in a more readable manner. This functionality is supported for attribute views and analytic views.
SAP HANA Modeling GuideAdditional Functionality for Information Views P U B L I C 227
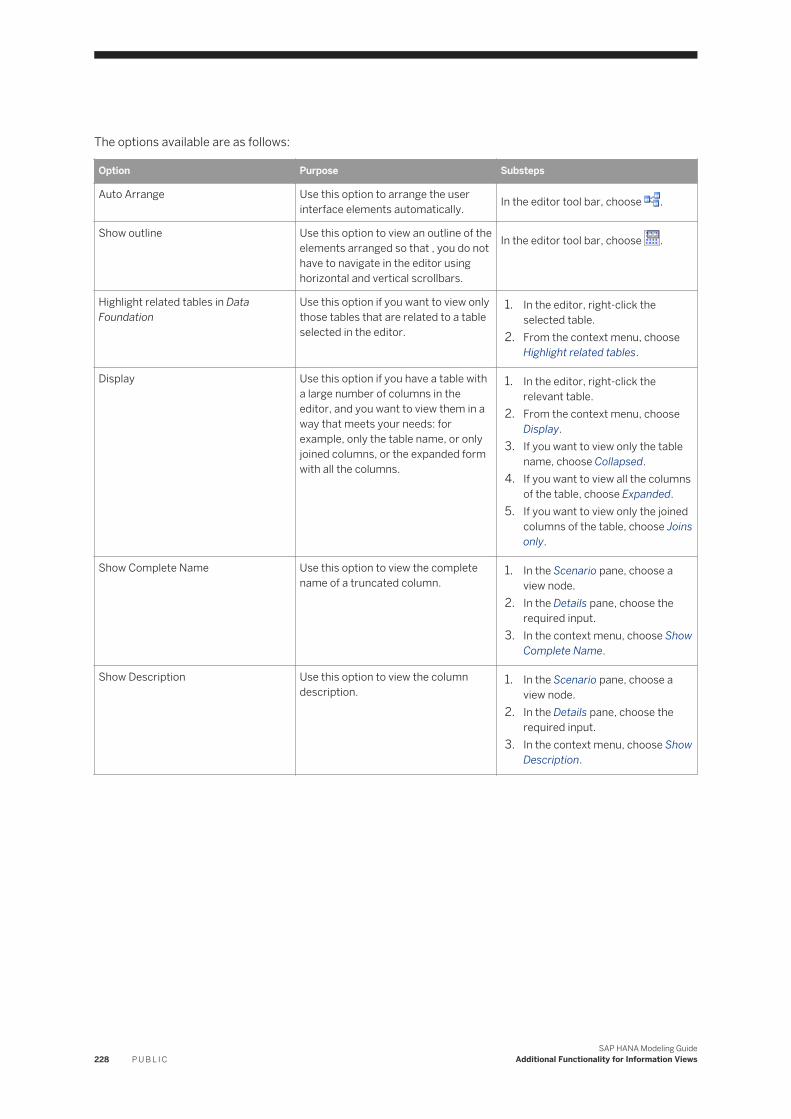
The options available are as follows:
Option Purpose Substeps
Auto Arrange Use this option to arrange the user interface elements automatically. In the editor tool bar, choose .
Show outline Use this option to view an outline of the elements arranged so that , you do not have to navigate in the editor using horizontal and vertical scrollbars.
In the editor tool bar, choose .
Highlight related tables in Data Foundation
Use this option if you want to view only those tables that are related to a table selected in the editor.
1. In the editor, right-click the selected table.
2. From the context menu, choose Highlight related tables.
Display Use this option if you have a table with a large number of columns in the editor, and you want to view them in a way that meets your needs: for example, only the table name, or only joined columns, or the expanded form with all the columns.
1. In the editor, right-click the relevant table.
2. From the context menu, choose Display.
3. If you want to view only the table name, choose Collapsed.
4. If you want to view all the columns of the table, choose Expanded.
5. If you want to view only the joined columns of the table, choose Joins only.
Show Complete Name Use this option to view the complete name of a truncated column.
1. In the Scenario pane, choose a view node.
2. In the Details pane, choose the required input.
3. In the context menu, choose Show Complete Name.
Show Description Use this option to view the column description.
1. In the Scenario pane, choose a view node.
2. In the Details pane, choose the required input.
3. In the context menu, choose Show Description.
228 P U B L I CSAP HANA Modeling Guide
Additional Functionality for Information Views

12.12 Search For Tables, Models and Column Views
While creating information views, search for tables, models or column views available in the catalog table of SAP HANA system, and use them in the information view that you create.
Context
SAP HANA modeler supports search operations, which you case use for the following:
● Searching tables available in SAP HANA system to either view table definitions or to add them to your information view editor.
● Searching models available in your SAP HANA system to either open the models in the view editor, or if you want to add them to your analytic view or calculation view editors.
● Searching column views available in your SAP HANA system to either open column view definitions, or if you want to add them to your calculation view editor.
NoteYou can add matching search entities (tables, models, column views) to your information views only if your view editor is open in edit mode and supports adding the search entity. For example, you cannot search for an attribute view and add it to the view editor of another attribute view.
Procedure
1. In the SAP HANA search bar, enter the name of the table you want to search.
2. Choose .3. Choose Tables or Models or Column Views tabs based on the search entity.4. In the search list, select the required entity.5. If you want to open matching search entity, then choose Open.6. If you want to add table to the information view, choose Add.
NoteSearch in specific SAP HANA systems by selecting the required system from the dropdown list of the
icon
SAP HANA Modeling GuideAdditional Functionality for Information Views P U B L I C 229

13 Managing Objects in SAP HANA Systems
This section describes how you can manage objects within the SAP HANA systems. In addition, it also describes a few important functions that you can perform on these objects.
13.1 Activate Objects
You activate objects available in your workspace to expose the objects for reporting and analysis.
Based on your requirements, you can do the following:
● Activate - Deploys the inactive objects.● Redeploy - Deploys the active objects in one of the following scenarios:
○ If your runtime object gets corrupted or deleted, and you want to create it again.○ In case of runtime problems during object activation, and the object status is still active.
The following activation modes are supported:
● Activate and ignore the inconsistencies in affected objects - To activate the selected objects even if it results in inconsistent affected objects. For example, if you choose to activate an object A that is used by B and C, and it causes inconsistencies in B and C but you can choose to go ahead with the activation of A. This is the default activation mode.
● Stop activation in case of inconsistencies in affected objects - To activate the selected objects only if there are no inconsistent affected objects.
NoteIf even one of the selected objects fails (either during validation or during activation), the complete activation job fails and none of the selected objects is activated.
Depending on where you invoke the activation, redeployment or cascade activation, the behavior is as follows:
Context Activate Redeploy
Quick View pane A dialog box appears with a preselected list of all your inactive objects.
A dialog box appears with a list of active objects in your workspace.
Package context menu A dialog box appears with a preselected list of all your inactive objects.
A dialog box appears with a list of active objects in your workspace.
Content context menu A dialog box appears with a preselected list of all your inactive objects.
Not applicable
230 P U B L I CSAP HANA Modeling Guide
Managing Objects in SAP HANA Systems
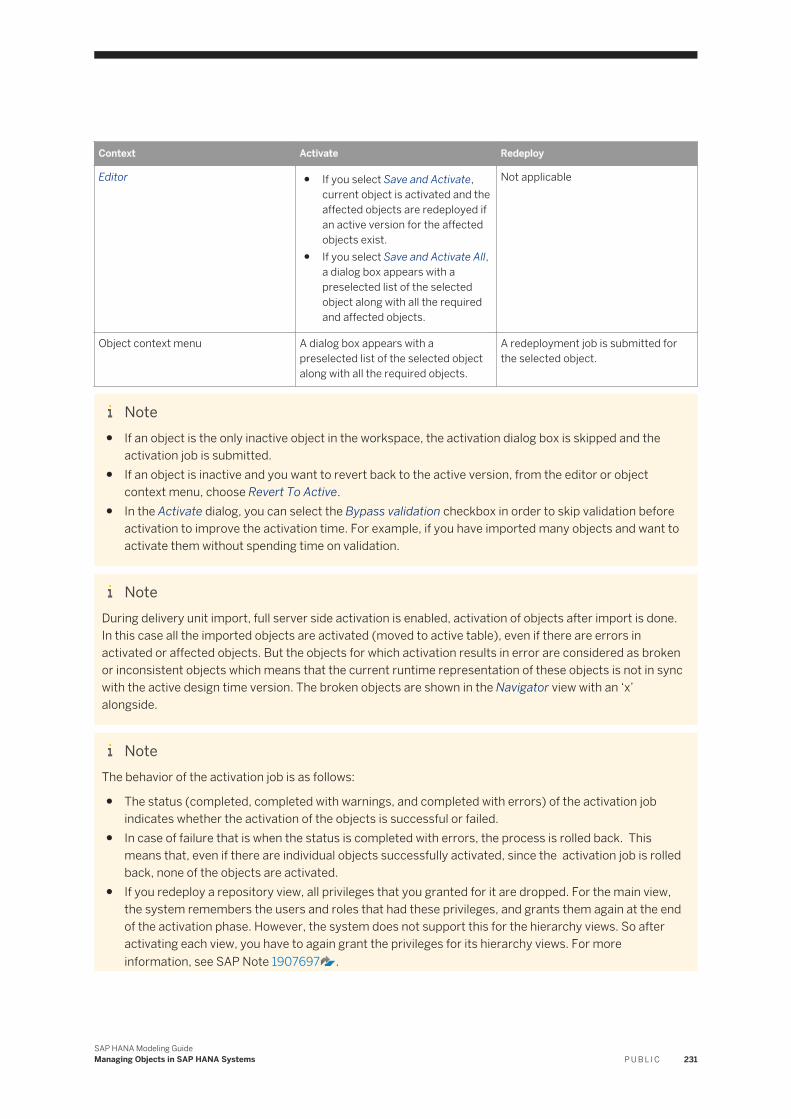
Context Activate Redeploy
Editor ● If you select Save and Activate, current object is activated and the affected objects are redeployed if an active version for the affected objects exist.
● If you select Save and Activate All, a dialog box appears with a preselected list of the selected object along with all the required and affected objects.
Not applicable
Object context menu A dialog box appears with a preselected list of the selected object along with all the required objects.
A redeployment job is submitted for the selected object.
Note● If an object is the only inactive object in the workspace, the activation dialog box is skipped and the
activation job is submitted.● If an object is inactive and you want to revert back to the active version, from the editor or object
context menu, choose Revert To Active.● In the Activate dialog, you can select the Bypass validation checkbox in order to skip validation before
activation to improve the activation time. For example, if you have imported many objects and want to activate them without spending time on validation.
NoteDuring delivery unit import, full server side activation is enabled, activation of objects after import is done. In this case all the imported objects are activated (moved to active table), even if there are errors in activated or affected objects. But the objects for which activation results in error are considered as broken or inconsistent objects which means that the current runtime representation of these objects is not in sync with the active design time version. The broken objects are shown in the Navigator view with an ‘x’ alongside.
NoteThe behavior of the activation job is as follows:
● The status (completed, completed with warnings, and completed with errors) of the activation job indicates whether the activation of the objects is successful or failed.
● In case of failure that is when the status is completed with errors, the process is rolled back. This means that, even if there are individual objects successfully activated, since the activation job is rolled back, none of the objects are activated.
● If you redeploy a repository view, all privileges that you granted for it are dropped. For the main view, the system remembers the users and roles that had these privileges, and grants them again at the end of the activation phase. However, the system does not support this for the hierarchy views. So after activating each view, you have to again grant the privileges for its hierarchy views. For more information, see SAP Note 1907697 .
SAP HANA Modeling GuideManaging Objects in SAP HANA Systems P U B L I C 231
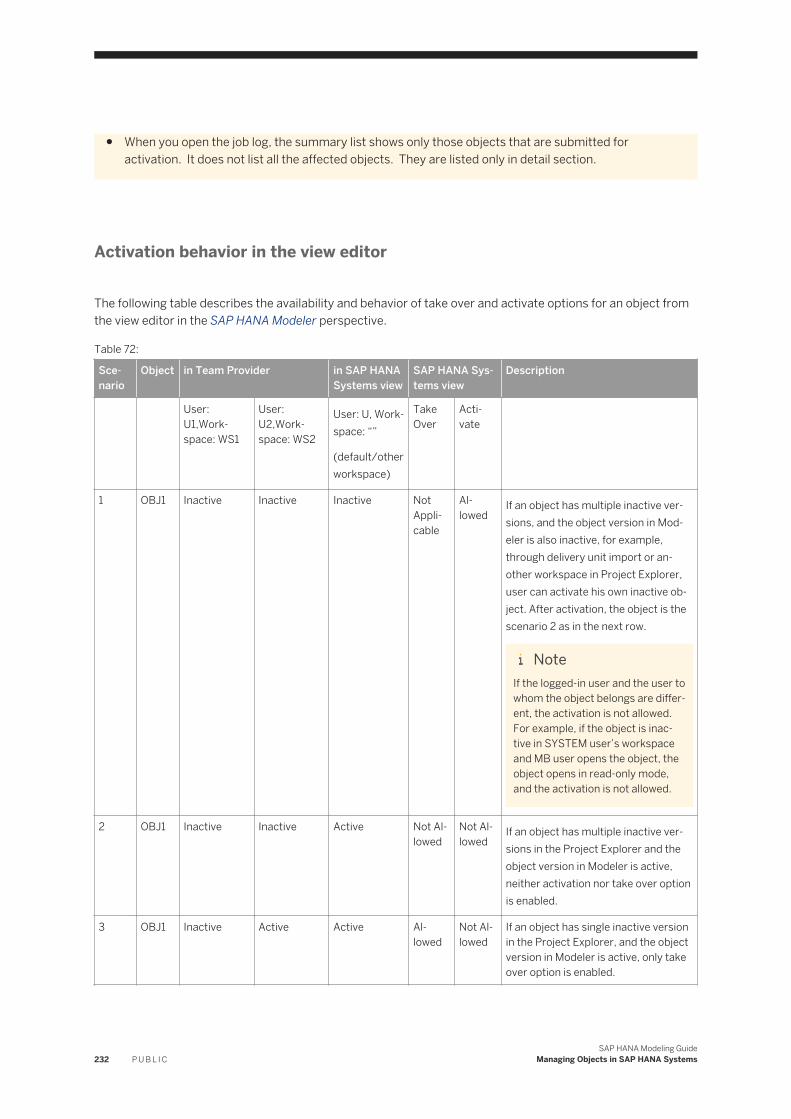
● When you open the job log, the summary list shows only those objects that are submitted for activation. It does not list all the affected objects. They are listed only in detail section.
Activation behavior in the view editor
The following table describes the availability and behavior of take over and activate options for an object from the view editor in the SAP HANA Modeler perspective.
Table 72:
Scenario
Object in Team Provider in SAP HANA Systems view
SAP HANA Systems view
Description
User: U1,Workspace: WS1
User: U2,Workspace: WS2
User: U, Workspace: “”
(default/other workspace)
Take Over
Activate
1 OBJ1 Inactive Inactive Inactive Not Applicable
Allowed
If an object has multiple inactive versions, and the object version in Modeler is also inactive, for example, through delivery unit import or another workspace in Project Explorer, user can activate his own inactive object. After activation, the object is the scenario 2 as in the next row.
NoteIf the logged-in user and the user to whom the object belongs are different, the activation is not allowed. For example, if the object is inactive in SYSTEM user’s workspace and MB user opens the object, the object opens in read-only mode, and the activation is not allowed.
2 OBJ1 Inactive Inactive Active Not Allowed
Not Allowed
If an object has multiple inactive versions in the Project Explorer and the object version in Modeler is active, neither activation nor take over option is enabled.
3 OBJ1 Inactive Active Active Allowed
Not Allowed
If an object has single inactive version in the Project Explorer, and the object version in Modeler is active, only take over option is enabled.
232 P U B L I CSAP HANA Modeling Guide
Managing Objects in SAP HANA Systems
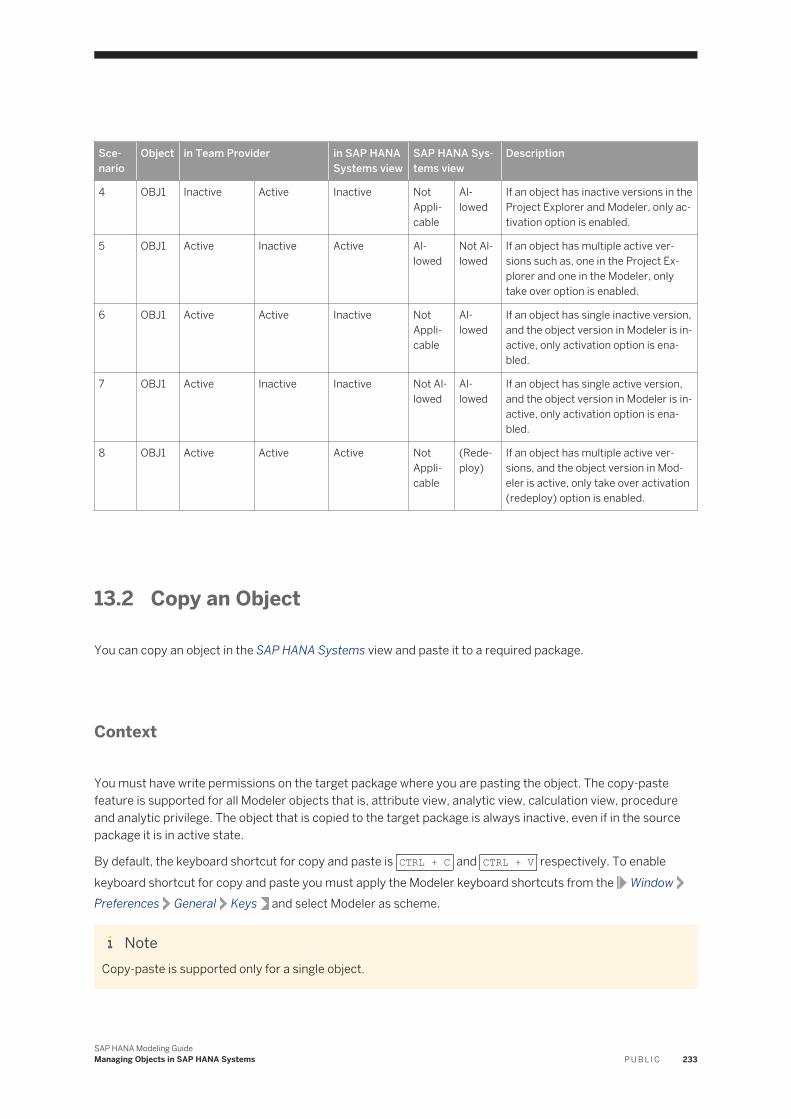
Scenario
Object in Team Provider in SAP HANA Systems view
SAP HANA Systems view
Description
4 OBJ1 Inactive Active Inactive Not Applicable
Allowed
If an object has inactive versions in the Project Explorer and Modeler, only activation option is enabled.
5 OBJ1 Active Inactive Active Allowed
Not Allowed
If an object has multiple active versions such as, one in the Project Explorer and one in the Modeler, only take over option is enabled.
6 OBJ1 Active Active Inactive Not Applicable
Allowed
If an object has single inactive version, and the object version in Modeler is inactive, only activation option is enabled.
7 OBJ1 Active Inactive Inactive Not Allowed
Allowed
If an object has single active version, and the object version in Modeler is inactive, only activation option is enabled.
8 OBJ1 Active Active Active Not Applicable
(Redeploy)
If an object has multiple active versions, and the object version in Modeler is active, only take over activation (redeploy) option is enabled.
13.2 Copy an Object
You can copy an object in the SAP HANA Systems view and paste it to a required package.
Context
You must have write permissions on the target package where you are pasting the object. The copy-paste feature is supported for all Modeler objects that is, attribute view, analytic view, calculation view, procedure and analytic privilege. The object that is copied to the target package is always inactive, even if in the source package it is in active state.
By default, the keyboard shortcut for copy and paste is CTRL + C and CTRL + V respectively. To enable keyboard shortcut for copy and paste you must apply the Modeler keyboard shortcuts from the WindowPreferences General Keys and select Modeler as scheme.
NoteCopy-paste is supported only for a single object.
SAP HANA Modeling GuideManaging Objects in SAP HANA Systems P U B L I C 233
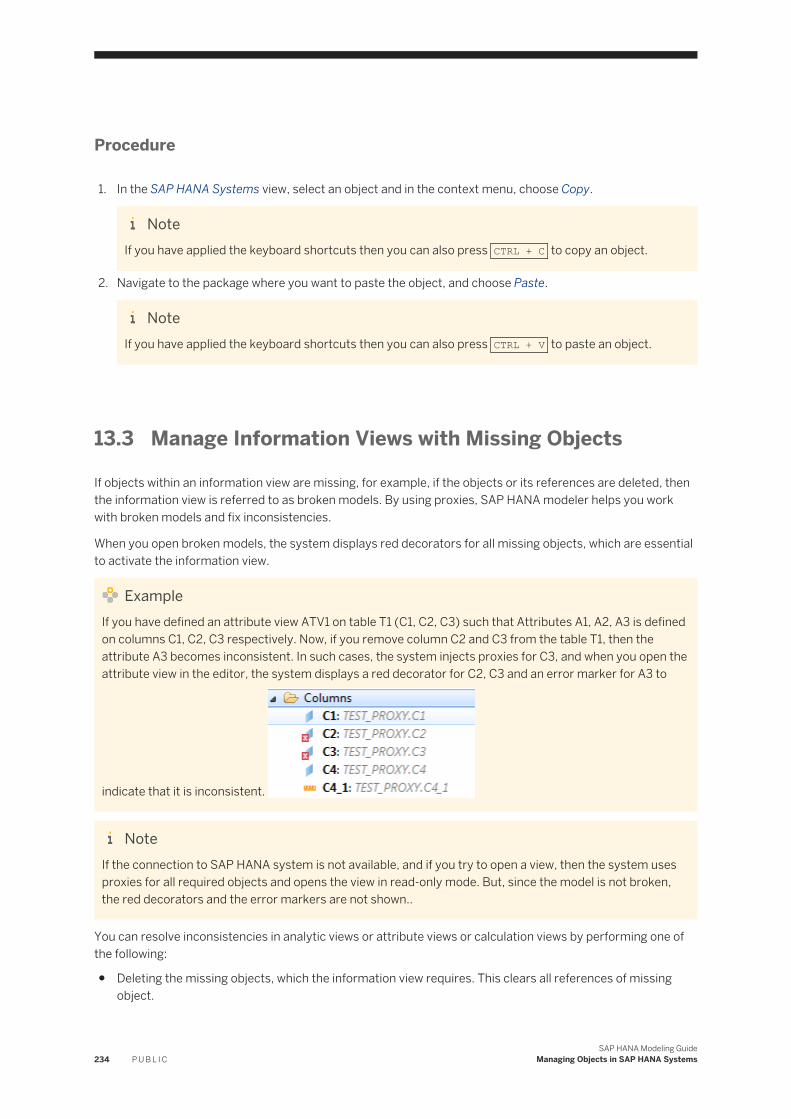
Procedure
1. In the SAP HANA Systems view, select an object and in the context menu, choose Copy.
NoteIf you have applied the keyboard shortcuts then you can also press CTRL + C to copy an object.
2. Navigate to the package where you want to paste the object, and choose Paste.
NoteIf you have applied the keyboard shortcuts then you can also press CTRL + V to paste an object.
13.3 Manage Information Views with Missing Objects
If objects within an information view are missing, for example, if the objects or its references are deleted, then the information view is referred to as broken models. By using proxies, SAP HANA modeler helps you work with broken models and fix inconsistencies.
When you open broken models, the system displays red decorators for all missing objects, which are essential to activate the information view.
ExampleIf you have defined an attribute view ATV1 on table T1 (C1, C2, C3) such that Attributes A1, A2, A3 is defined on columns C1, C2, C3 respectively. Now, if you remove column C2 and C3 from the table T1, then the attribute A3 becomes inconsistent. In such cases, the system injects proxies for C3, and when you open the attribute view in the editor, the system displays a red decorator for C2, C3 and an error marker for A3 to
indicate that it is inconsistent.
NoteIf the connection to SAP HANA system is not available, and if you try to open a view, then the system uses proxies for all required objects and opens the view in read-only mode. But, since the model is not broken, the red decorators and the error markers are not shown..
You can resolve inconsistencies in analytic views or attribute views or calculation views by performing one of the following:
● Deleting the missing objects, which the information view requires. This clears all references of missing object.
234 P U B L I CSAP HANA Modeling Guide
Managing Objects in SAP HANA Systems
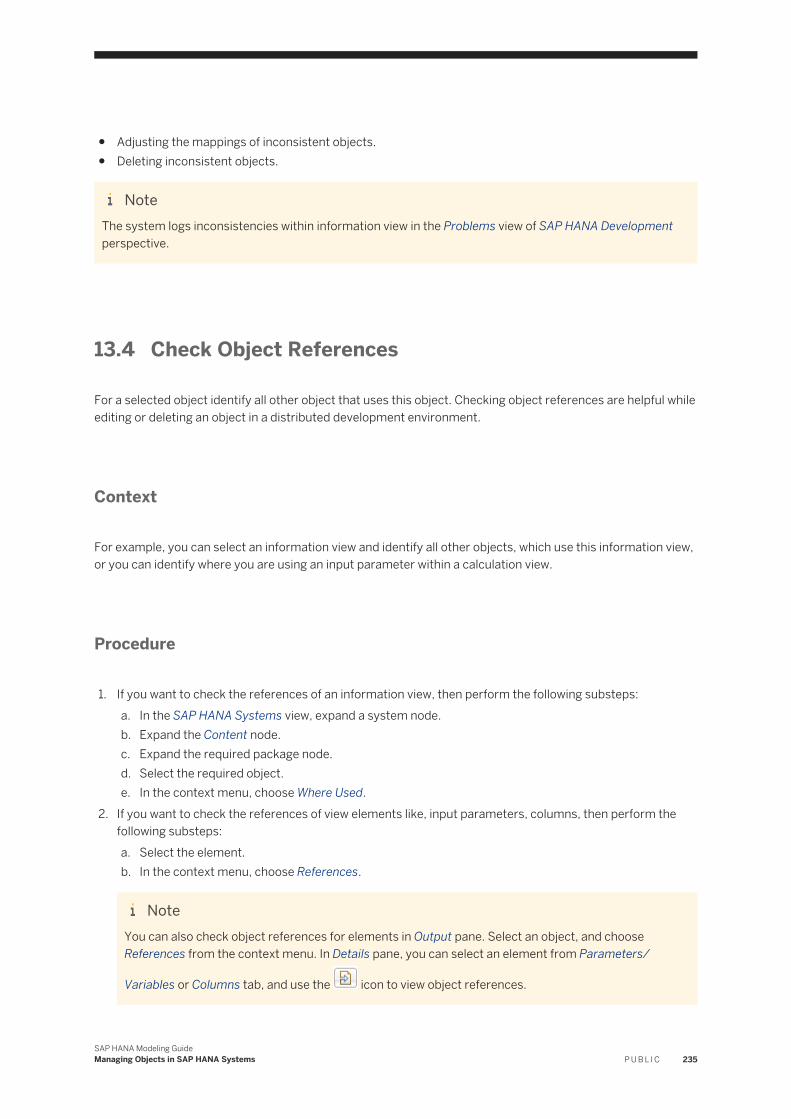
● Adjusting the mappings of inconsistent objects.● Deleting inconsistent objects.
NoteThe system logs inconsistencies within information view in the Problems view of SAP HANA Development perspective.
13.4 Check Object References
For a selected object identify all other object that uses this object. Checking object references are helpful while editing or deleting an object in a distributed development environment.
Context
For example, you can select an information view and identify all other objects, which use this information view, or you can identify where you are using an input parameter within a calculation view.
Procedure
1. If you want to check the references of an information view, then perform the following substeps:a. In the SAP HANA Systems view, expand a system node.b. Expand the Content node.c. Expand the required package node.d. Select the required object.e. In the context menu, choose Where Used.
2. If you want to check the references of view elements like, input parameters, columns, then perform the following substeps:a. Select the element.b. In the context menu, choose References.
NoteYou can also check object references for elements in Output pane. Select an object, and choose References from the context menu. In Details pane, you can select an element from Parameters/
Variables or Columns tab, and use the icon to view object references.
SAP HANA Modeling GuideManaging Objects in SAP HANA Systems P U B L I C 235
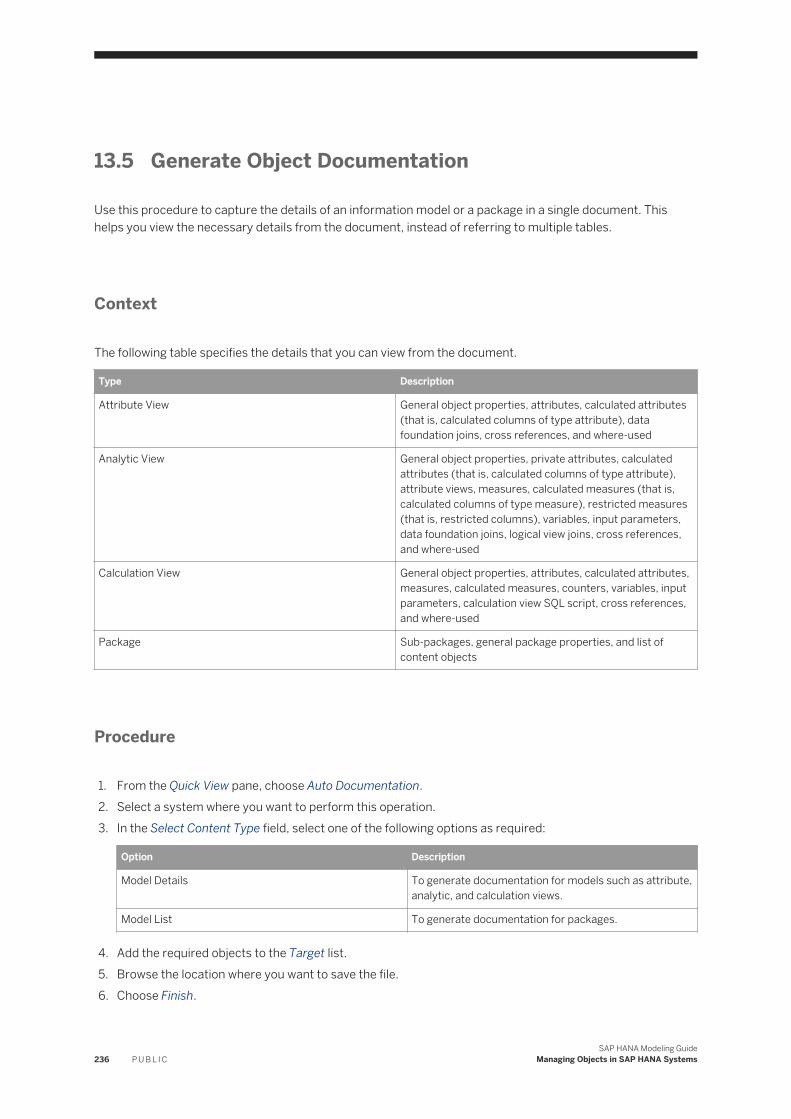
13.5 Generate Object Documentation
Use this procedure to capture the details of an information model or a package in a single document. This helps you view the necessary details from the document, instead of referring to multiple tables.
Context
The following table specifies the details that you can view from the document.
Type Description
Attribute View General object properties, attributes, calculated attributes (that is, calculated columns of type attribute), data foundation joins, cross references, and where-used
Analytic View General object properties, private attributes, calculated attributes (that is, calculated columns of type attribute), attribute views, measures, calculated measures (that is, calculated columns of type measure), restricted measures (that is, restricted columns), variables, input parameters, data foundation joins, logical view joins, cross references, and where-used
Calculation View General object properties, attributes, calculated attributes, measures, calculated measures, counters, variables, input parameters, calculation view SQL script, cross references, and where-used
Package Sub-packages, general package properties, and list of content objects
Procedure
1. From the Quick View pane, choose Auto Documentation.2. Select a system where you want to perform this operation.3. In the Select Content Type field, select one of the following options as required:
Option Description
Model Details To generate documentation for models such as attribute, analytic, and calculation views.
Model List To generate documentation for packages.
4. Add the required objects to the Target list.5. Browse the location where you want to save the file.6. Choose Finish.
236 P U B L I CSAP HANA Modeling Guide
Managing Objects in SAP HANA Systems
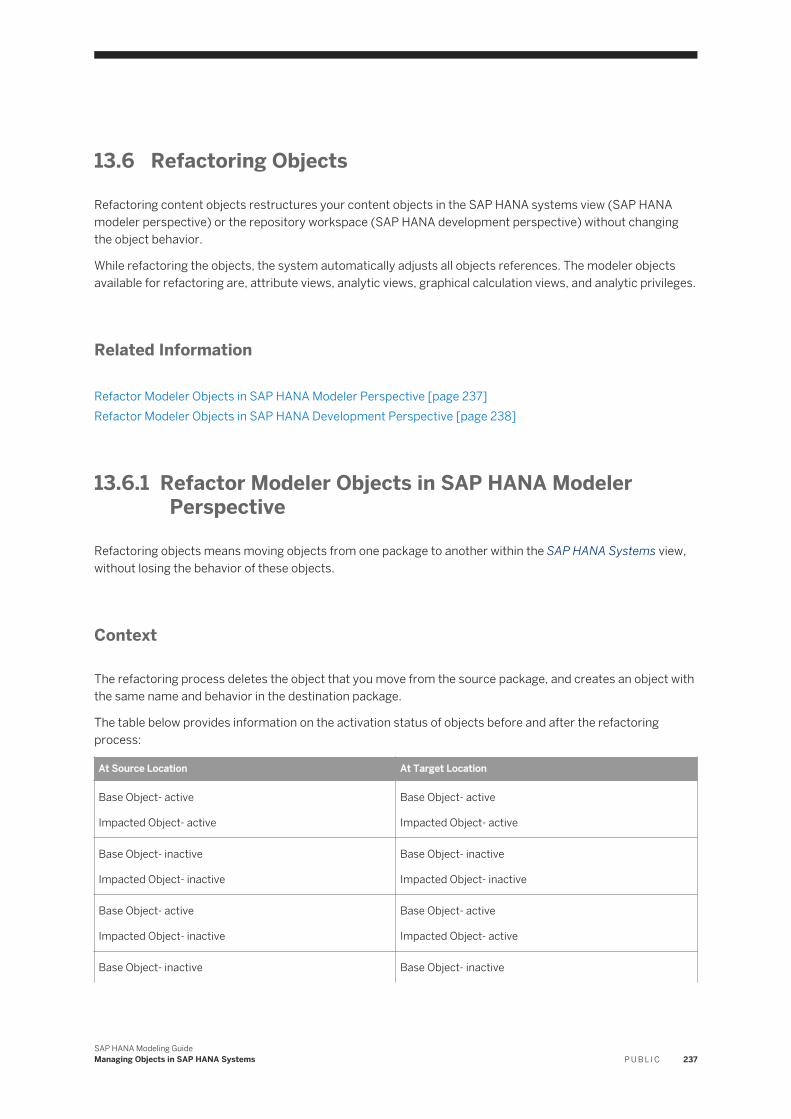
13.6 Refactoring Objects
Refactoring content objects restructures your content objects in the SAP HANA systems view (SAP HANA modeler perspective) or the repository workspace (SAP HANA development perspective) without changing the object behavior.
While refactoring the objects, the system automatically adjusts all objects references. The modeler objects available for refactoring are, attribute views, analytic views, graphical calculation views, and analytic privileges.
Related Information
Refactor Modeler Objects in SAP HANA Modeler Perspective [page 237]Refactor Modeler Objects in SAP HANA Development Perspective [page 238]
13.6.1 Refactor Modeler Objects in SAP HANA Modeler Perspective
Refactoring objects means moving objects from one package to another within the SAP HANA Systems view, without losing the behavior of these objects.
Context
The refactoring process deletes the object that you move from the source package, and creates an object with the same name and behavior in the destination package.
The table below provides information on the activation status of objects before and after the refactoring process:
At Source Location At Target Location
Base Object- active
Impacted Object- active
Base Object- active
Impacted Object- active
Base Object- inactive
Impacted Object- inactive
Base Object- inactive
Impacted Object- inactive
Base Object- active
Impacted Object- inactive
Base Object- active
Impacted Object- active
Base Object- inactive Base Object- inactive
SAP HANA Modeling GuideManaging Objects in SAP HANA Systems P U B L I C 237
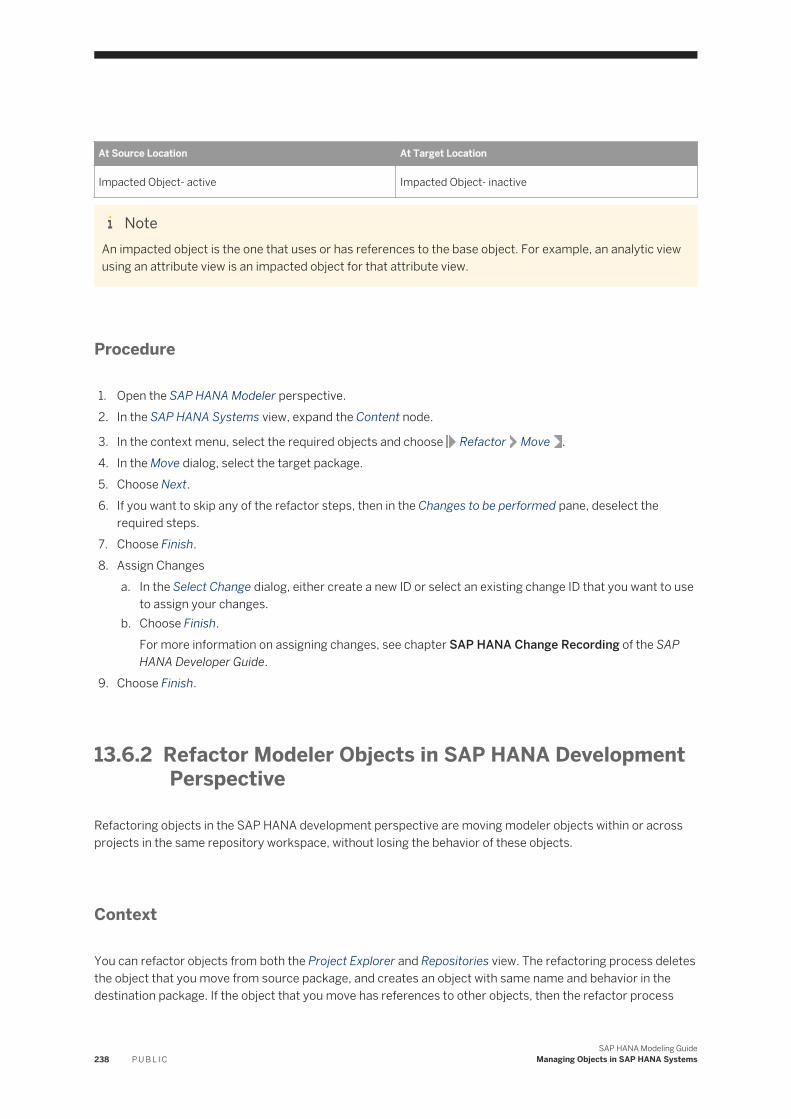
At Source Location At Target Location
Impacted Object- active Impacted Object- inactive
NoteAn impacted object is the one that uses or has references to the base object. For example, an analytic view using an attribute view is an impacted object for that attribute view.
Procedure
1. Open the SAP HANA Modeler perspective.2. In the SAP HANA Systems view, expand the Content node.
3. In the context menu, select the required objects and choose Refactor Move .4. In the Move dialog, select the target package.5. Choose Next.6. If you want to skip any of the refactor steps, then in the Changes to be performed pane, deselect the
required steps.7. Choose Finish.8. Assign Changes
a. In the Select Change dialog, either create a new ID or select an existing change ID that you want to use to assign your changes.
b. Choose Finish.For more information on assigning changes, see chapter SAP HANA Change Recording of the SAP HANA Developer Guide.
9. Choose Finish.
13.6.2 Refactor Modeler Objects in SAP HANA Development Perspective
Refactoring objects in the SAP HANA development perspective are moving modeler objects within or across projects in the same repository workspace, without losing the behavior of these objects.
Context
You can refactor objects from both the Project Explorer and Repositories view. The refactoring process deletes the object that you move from source package, and creates an object with same name and behavior in the destination package. If the object that you move has references to other objects, then the refactor process
238 P U B L I CSAP HANA Modeling Guide
Managing Objects in SAP HANA Systems
automatically updates all references in the affected objects residing in the same repository workspace. You manually activate all moved objects and their affected objects.
Procedure
1. In the Project Explorer or Repositories view, select one or more objects.2. In the context menu of the selected objects, choose Move.3. Choose a destination folder or package.4. If you want to skip any of the refactor steps, then in the Changes to be performed pane, deselect the
required steps.5. In the change comparison editor, you can compare the original object at the source location and the
changes to this object at the target location due to the refactoring process.6. Choose Finish to complete the refactoring process.
NoteYou can use the keyboard shortcut Ctrl + Z to undo the refactoring process.
SAP HANA Modeling GuideManaging Objects in SAP HANA Systems P U B L I C 239
14 Working with SAP BW Models
This sections describes how you can import and use SAP BW objects, within the modeling environment, for reporting purposes.
Additional information is available for using Multidimensional Expressions (MDX) in the SAP HANA Developer Guide (for SAP HANA Studio). The link is included in Related Information.
Related Information
Import BW Objects [page 240]BW InfoProviders as SAP HANA Models [page 242]BW Analysis Authorizations as Analytic Privileges [page 243]
14.1 Import BW Objects
You can import SAP Business Warehouse (SAP BW) models that are SAP HANA-optimized InfoCubes, Standard DataStore Objects, Query Snapshot InfoProviders, and InfoObjects of type Characteristics to the SAP HANA modeling environment.
Prerequisites
● You have implemented SAP Notes 1703061 , 1759172 , 1752384 , 1733519 , 1769374 , 1790333, 1870119 , 1994754 , and 1994755 .
● You have installed SAP HANA 1.0 SPS 05 Revision 50 or above.● You have added BW schema in the SQL privileges for the Modeler user to import BW models.● _SYS_REPO user has SELECT with GRANT privileges on the schema that contains the BW tables.
Context
You need to import SAP BW objects to expose it as SAP HANA models to the reporting tools.
Note● You can only import those Standard DataStore objects that have SID Generation set to During
Activation.
240 P U B L I CSAP HANA Modeling Guide
Working with SAP BW Models

● For an InfoObject you can import Characteristics having key figures as attributes.
Procedure
1. Open the SAP HANA Modeler perspective.
2. In the main menu, choose File Import .3. Expand the SAP HANA Content node.4. Choose SAP BW Models, and choose Next.5. Establish connection with your SAP BW system (underlying BW Application Server). Iin the Provide Source
System Detailspage, enter the SAP BW system credentials and choose Next.
NoteTo add new connection details, select New Connection option from the Connection dropdown list. The connection details are saved and are available as dropdown options on subsequent logons.
6. Optional Step: Provide SAProuter String
You can use SAProuter string to connect to the SAP BW System over the internet. You can obtain the SAProuter string information of your SAP BW system from your SAP Logon. In your SAP Logon screen, choose your SAP BW system Edit Connection
7. Optional Step: Activate Secure Network Connections (SNC)
Select Activate Secure Network Connections and provide the SNC Name of your communication partner. You can use SNC to encrypt the data communication paths that exist between an SAP HANA Studio and your SAP BW system. You can obtain the SNC name of your SAP BW system from SAP Logon. In your SAP Logon screen, choose your SAP BW system Edit Network
8. Select the target system (an SAP BW on SAP HANA) to, which you want to import the models, and choose Next.
9. Select the BW InfoProviders that you want to import and expose as SAP HANA information models.
RememberIn order to import the QuerySnapshot InfoProvider, make sure that the BW Query is unlocked in transaction RSDDB, and an index is created via the same transaction before it can be used as InfoProviders.
10. Select the target package where you want to place the generated models, and analytic privileges.
NoteYour package selection is saved during the subsequent import. Hence, the next time you visit the same wizard you get to view the package that was selected previous time. You can though change the package where you want to import objects.
11. If you want import the selected models along with the display attributes for IMO Cube and Standard DSO, select Include display attributes.For InfoObjects all the attributes are added to the output and joined to their text tables if exists.
SAP HANA Modeling GuideWorking with SAP BW Models P U B L I C 241
12. If you want to replace previously imported models in the target system with a new version, select Overwrite existing objects.
13. If you do not want to import the analysis authorizations associated with the selected InfoProviders, deselect Generate InfoProvider based analytic privileges.
14. If you want to import the role based analysis authorizations as analytic privileges, select Generate Role based analytic privileges, and choose Next.If you have selected both the InfoProviders and InfoObjects, only authorizations set on InfoProviders can be imported after selecting the checkbox.
15. Select the roles to import the related analysis authorizations.16. Choose Finish.
NoteWhile importing your SAP BW models, the SAP HANA system imports the column labels of these models in the language that you specify in its properties. However, in your SAP BW system, for any of the columns, if you do not maintain column labels in the language that you specify in your SAP HANA system properties, then those column labels appears as blank after import. If you want to check the default language for your SAP HANA system, then:1. In the Systems View, select the SAP HANA system in which you are importing the models.2. In the context menu, choose Properties.3. In the Additional Properties tab, the dropdown list Locale specifies the language of objects, which
you create in SAP HANA repository.
Results
The generated information models and analytic privileges are placed in the package selected above. In order to view the data of generated models, you need to assign the associated analytic privileges that are generated as part of the model import to the user. If these privileges are not assigned, user is not authorized to view the data.
Related Information
Secure Network Communications (SNC)
14.2 BW InfoProviders as SAP HANA Models
The SAP HANA modeling environment has the capability to expose BW objects as SAP HANA information models to the reporting tools via SQL and client tools such as, SAP BusinessObjects Explorer, SAP BusinessObjects BI 4.0 Suite (Web Intelligence via Universes, Dashboards, Crystal Reports), Microsoft Office, and so on.. The metadata of SAP BW models forms the basis for the model properties.
242 P U B L I CSAP HANA Modeling Guide
Working with SAP BW Models
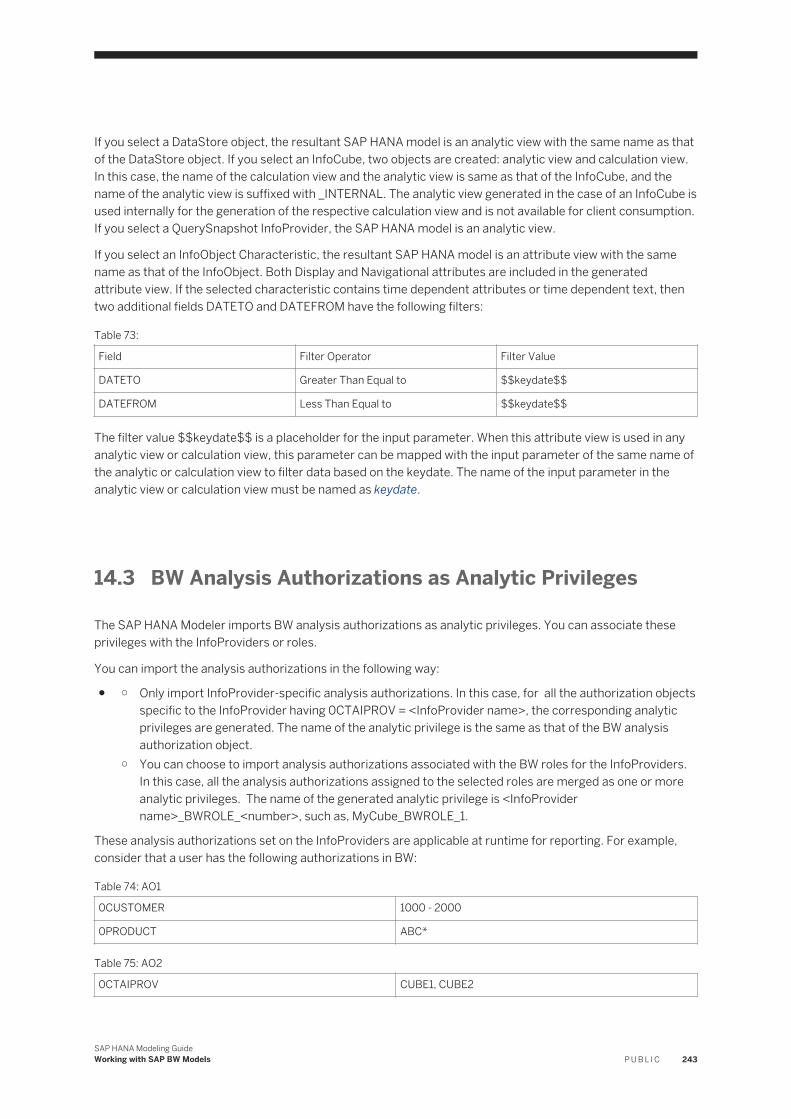
If you select a DataStore object, the resultant SAP HANA model is an analytic view with the same name as that of the DataStore object. If you select an InfoCube, two objects are created: analytic view and calculation view. In this case, the name of the calculation view and the analytic view is same as that of the InfoCube, and the name of the analytic view is suffixed with _INTERNAL. The analytic view generated in the case of an InfoCube is used internally for the generation of the respective calculation view and is not available for client consumption. If you select a QuerySnapshot InfoProvider, the SAP HANA model is an analytic view.
If you select an InfoObject Characteristic, the resultant SAP HANA model is an attribute view with the same name as that of the InfoObject. Both Display and Navigational attributes are included in the generated attribute view. If the selected characteristic contains time dependent attributes or time dependent text, then two additional fields DATETO and DATEFROM have the following filters:
Table 73:
Field Filter Operator Filter Value
DATETO Greater Than Equal to $$keydate$$
DATEFROM Less Than Equal to $$keydate$$
The filter value $$keydate$$ is a placeholder for the input parameter. When this attribute view is used in any analytic view or calculation view, this parameter can be mapped with the input parameter of the same name of the analytic or calculation view to filter data based on the keydate. The name of the input parameter in the analytic view or calculation view must be named as keydate.
14.3 BW Analysis Authorizations as Analytic Privileges
The SAP HANA Modeler imports BW analysis authorizations as analytic privileges. You can associate these privileges with the InfoProviders or roles.
You can import the analysis authorizations in the following way:
● ○ Only import InfoProvider-specific analysis authorizations. In this case, for all the authorization objects specific to the InfoProvider having 0CTAIPROV = <InfoProvider name>, the corresponding analytic privileges are generated. The name of the analytic privilege is the same as that of the BW analysis authorization object.
○ You can choose to import analysis authorizations associated with the BW roles for the InfoProviders. In this case, all the analysis authorizations assigned to the selected roles are merged as one or more analytic privileges. The name of the generated analytic privilege is <InfoProvider name>_BWROLE_<number>, such as, MyCube_BWROLE_1.
These analysis authorizations set on the InfoProviders are applicable at runtime for reporting. For example, consider that a user has the following authorizations in BW:
Table 74: AO1
0CUSTOMER 1000 - 2000
0PRODUCT ABC*
Table 75: AO2
0CTAIPROV CUBE1, CUBE2
SAP HANA Modeling GuideWorking with SAP BW Models P U B L I C 243
0CUSTOMER 3000 - 4000
0CTAACTVT 03 (display)
● If only import InfoProvider specific authorizations,on the SAP HANA side, the user will only see 0CUSTOMER from 3000 to 4000.
● If import role based authorizations, on the SAP HANA side, the user will see 0CUSTOMER from 1000 to 4000, and 0PRODUCT = ABC*.
Note● In the case of Query Snapshot, all the BW Analysis Authorization objects that are applicable for the
underlying InfoProvider of the query, will also be applicable for the Query Snapshot.● These BW analysis authorization objects will be imported as analytic privileges when importing the
query snapshot.
You can choose to place the generated models and analytic privileges in any of the user-defined packages in the import wizard where you can enhance the generated models. However, with the subsequent import of the same objects, the changes are overridden. Also, changes made to the models on the BW side are not automatically reflected in the generated models. This may lead to inconsistent generated models based on the changes made to the physical tables. To avoid this, you need to reimport the models.
Caution● The calculated key figures (CKFs) and restricted key figures (RKFs) defined on the SAP BW models are
not created for the generated SAP HANA models. In this case, you can create an RKF as restricted measure in the generated analytic view. For CKF you can create calculated measures in the generated calculation view or analytic view. These CKFs and RKFs are retained during subsequent import. Additionally, the calculated attributes created on the generated analytic views (in case of InfoCubes, DSOs and Query Snapshot) are also retained during subsequent import. If a change is made to the characteristics or key figures based on which these restricted measures and calculated measures are created, this may lead to inconsistency in the generated models. In this case, you need to manually adjust these restricted measures and calculated measures.
● The hierarchies defined on the selected InfoObejcts are not created for the generated SAP HANA Models. However, you can create calculated attributes and hierarchies on the generated attribute view. These calculated attributes and hierarchies are not retained during the subsequent import.
● The BW analysis authorization objects are not always mapped 1:1 with the generated analytic privileges on the SAP HANA Modeler side. If the BW Analysis Authorization object does not include 0TCAIPROV, the authorization is not moved to SAP HANA. Also, restrictions created in the BW analysis authorization are skipped if they do not match with the restrictions supported by the SAP HANA Modeler. In such cases, the data available for reporting for an SAP HANA Modeler user differs from the SAP BW user with the assigned restrictions.
For reporting purposes, data that is visible to a user is:
● For a DSO generated analytic view, all the data in the active table is available for reporting.● For an InfoCube generated calculation view, only successfully loaded requests are available for reporting
(these are the green requests in Manage InfoCube section).
244 P U B L I CSAP HANA Modeling Guide
Working with SAP BW Models
Restriction● The following features are not supported on the generated SAP HANA models:
○ DSO without any key figure○ Currency and unit of measure conversion
NoteOnly currency mapping is supported and not the conversion.
○ Time dependent text and attributes○ Non-cumulative key figures○ Conversion routines in the BW system○ Hierarchies
● The following features are not supported on generated analytic privileges:○ Exclude operator○ Undefined operator ‘#’○ Aggregated value operator ‘:’○ Variables, User exits○ Authorization on Key Figures○ Authorization on hierarchy node○ Exception aggregation such as, average, counter, first value, last value, no aggregation, standard
deviation is not supported for generated measures.● The query name for the Query Snapshot should not be the same as the BW InfoProvider name (this
results in conflict on the SAP HANA side).● Query Snapshot InfoProvider for BOE supports only key figures with aggregation types MIN, MAX,
SUM, and COUNT.● The following features are not supported for InfoObjects:
○ Info Objects of type Key figures○ InfoObjects having Master Data Access as - Own Implementation, Data Access, or SAP HANA
Attribute View○ InfoObjects with no master data at all (that is, no P, Q and T tables)○ InfoObjects with Time and 0FISC* (Fiscal) characteristics○ Hierarchies○ Authorizations on InfoObjects
SAP HANA Modeling GuideWorking with SAP BW Models P U B L I C 245
15 Working with Decision Tables
This section describes how you can create and manage decision tables within the SAP HANA modeling environment.
Related Information
Migrate Decision Tables [page 246]Create Decision Tables [page 247]Changing the Layout of a Decision Table [page 257]Use Parameters in a Decision Table [page 258]Use Calculated Attributes in Decision Tables [page 259]
15.1 Migrate Decision Tables
Perform the migration activity to convert decision tables to different object types. Based on the decision table definition, modeler converts it to different object types.
Context
Migrating decision tables is an optional step that SAP recommends and is required if you want to move the XS advanced model (HD).
NoteThe decision table that you migrate must be in active state.
Procedure
1. Launch SAP HANA studio.2. Open SAP HANA Development perspective.3. If you have a modeled decision table, check out the modeled decision table.4. In the context menu of the decision table, choose Migrate.
246 P U B L I CSAP HANA Modeling Guide
Working with Decision Tables

○ After the successful migration, you can view the migrated artifacts in the same package.○ You can view the list of generated artifacts in the Job Log:
○ <Decisiontablename>_MigratedProc.hdbprocedure○ <Decisiontablename>_CV.attributeview, generated only for decision table, which is modelled on
multiple tables.○ <Decisiontablename>_TT.hdbstructure, generated only for decision table, which has parameters
as action (output).○ <Decisiontablename>_RV.hdbtablefunction, generated for table user-defined function.
ExampleConsider a decision table named CALCULATE_DISCOUNT.hdbruledec. On choosing Migrate, this decision table gets migrated into following artifacts:○ CALCULATE_DISCOUNT_MigratedProc.hdbprocedure○ CALCULATE_DISCOUNT_CV.attributeview○ CALCULATE_DISCOUNT_TT.hdbstructure○ CALCULATE_DISCOUNT_RV.hdbtablefunction
5. Select the generated artifacts, in the context menu, choose Team Activate .
NoteYou can view the activation status in theJob Log view.
15.2 Create Decision Tables
You use this procedure to create a decision table to model related business rules in a tabular format for decision automation. You can use decision tables to manage business rules, data validation, and data quality rules.
You use this procedure to create a decision table to model related business rules in a tabular format for decision automation. You can use decision tables to manage business rules, data validation, and data quality rules, without needing any knowledge of technical languages such as SQL Script or MDX. A data architect or a developer creates the decision table and activates it. The active version of the decision table can be used in applications.
Prerequisites
This task describes how to create a decision table. Before you start this task, note the following prerequisites:
● You must have access to an SAP HANA system.● To activate and validate the decision table, the _SYS_REPO user requires the SELECT, EXECUTE, and
UPDATE privileges on your schema.● If you are using the SAP HANA Development perspective, you must ensure the following prerequisites are
also met:
SAP HANA Modeling GuideWorking with Decision Tables P U B L I C 247
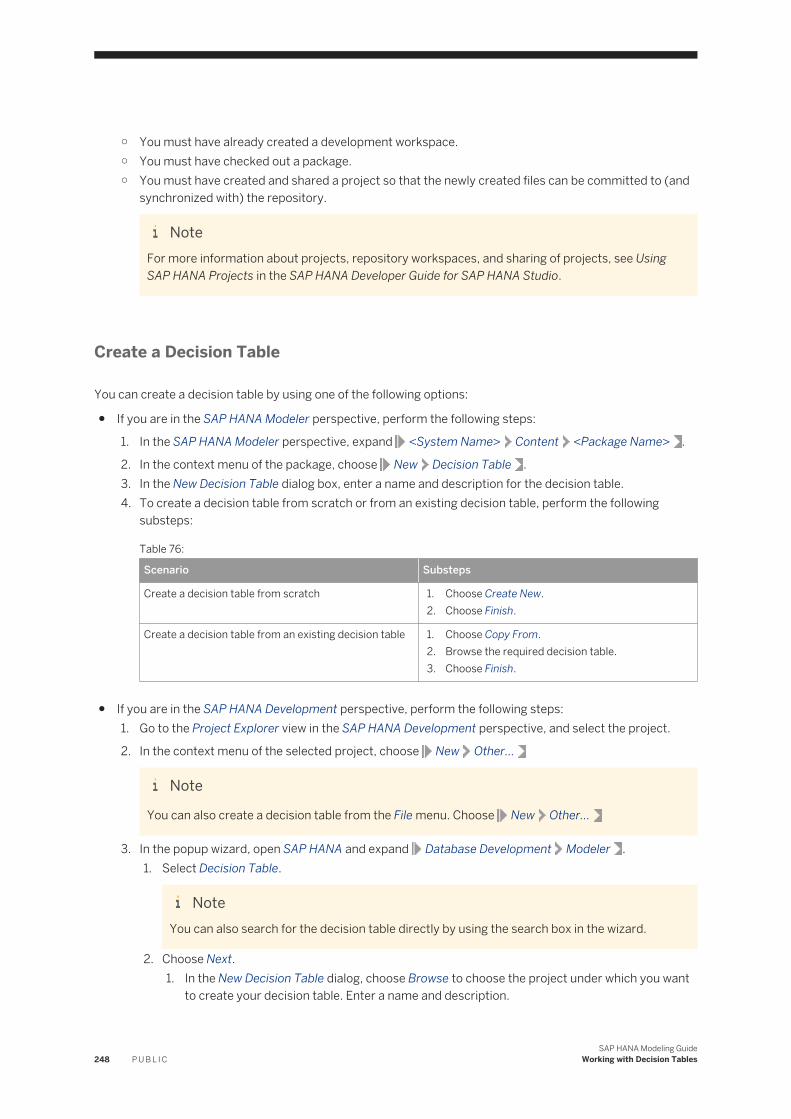
○ You must have already created a development workspace.○ You must have checked out a package.○ You must have created and shared a project so that the newly created files can be committed to (and
synchronized with) the repository.
NoteFor more information about projects, repository workspaces, and sharing of projects, see Using SAP HANA Projects in the SAP HANA Developer Guide for SAP HANA Studio.
Create a Decision Table
You can create a decision table by using one of the following options:
● If you are in the SAP HANA Modeler perspective, perform the following steps:
1. In the SAP HANA Modeler perspective, expand <System Name> Content <Package Name> .
2. In the context menu of the package, choose New Decision Table .3. In the New Decision Table dialog box, enter a name and description for the decision table.4. To create a decision table from scratch or from an existing decision table, perform the following
substeps:
Table 76:
Scenario Substeps
Create a decision table from scratch 1. Choose Create New.2. Choose Finish.
Create a decision table from an existing decision table 1. Choose Copy From.2. Browse the required decision table.3. Choose Finish.
● If you are in the SAP HANA Development perspective, perform the following steps:1. Go to the Project Explorer view in the SAP HANA Development perspective, and select the project.
2. In the context menu of the selected project, choose New Other...
Note
You can also create a decision table from the File menu. Choose New Other...
3. In the popup wizard, open SAP HANA and expand Database Development Modeler .1. Select Decision Table.
NoteYou can also search for the decision table directly by using the search box in the wizard.
2. Choose Next.1. In the New Decision Table dialog, choose Browse to choose the project under which you want
to create your decision table. Enter a name and description.
248 P U B L I CSAP HANA Modeling Guide
Working with Decision Tables

NoteIf the project is shared, the Package field specifies the package that is associated with the project.
2. Choose Finish.
The decision table editor opens. It consists of three panes: Scenario, Details, and Output.
● The Scenario pane of the editor consists of the Decision Table and Data Foundation nodes. Selecting any of these nodes shows the specific node information in the Details pane.
● The Details pane of the Data Foundation node displays the tables or information models used for defining the decision table. The Details pane of the Decision Table node displays the modeled rules in tabular format.
● The Output pane displays the vocabulary, conditions, and actions, and allows you to perform edit operations. Expand the vocabulary node to display the parameters, attributes, and calculated attributes sub-nodes. In the Output pane, you can also view properties of the selected objects within the editor.
15.2.1 Add Tables, a Table Type, or Information Views
You can add tables, a table type, or an information view to the decision table in any of the following ways
Procedure
1. In the Scenario pane, drag the required table or table type to the Data Foundation node.
Note○ In the SAP HANA Development perspective, you can view the physical tables and table types under
Catalog in the SAP HANA System Library. The information views are displayed under Package, and you need to check out views to use them in decision tables.
○ In the SAP HANA Modeler perspective, you can view tables and table types under Catalog, while information views are under Content in Package.
2. Hover over the Data Foundation node and choose the + icon next to the node to search for the object you want to add.
3. In the context menu of the Scenario pane, choose Add Objects and search for the object you want to add.4. In the Scenario pane, select the Data Foundation node. In the context menu of the Details pane, choose
Add... and search for the object you want to add.
Note○ You can create a decision table by using an analytic view only if it has a calculated attribute.○ You can model a decision table on one table type or information view only, or on multiple physical
tables.
SAP HANA Modeling GuideWorking with Decision Tables P U B L I C 249

○ You can mark table type columns and information view columns only as conditions and not as actions. You can use only parameters as actions.
RememberYou can set the decision table property Mutually Exclusive to True or False. The value of this property is set to True by default.○ If the value is set to True, then the search stops when any condition row is partially matched in the
decision table, even though there might be other rows that could have been fully matched.○ If the value is set to False, then all the condition rows are checked from top to bottom and the
action value is updated based on the first match.
For example, consider a scenario where you would like to give a 10% discount on all cold drinks in the summer season for the country India. The decision table has been modeled as follows:
Table 77:
Country Season Discount
India Summer 10
Winter 9
Any Any 8
If the Mutually Exclusive property is set to True, then the discounts on cold drinks will be calculated as follows:
Table 78:
Country Season Discount
India Winter 9
India Autumn 0
If the Mutually Exclusive property is set to False, then the discounts on cold drinks will be calculated as follows:
Table 79:
Country Season Discount
India Winter 9
India Autumn 8
250 P U B L I CSAP HANA Modeling Guide
Working with Decision Tables
15.2.2 Create Joins
You can join the Decision Tables to each other.
Procedure
1. If you want to model a decision table based on multiple tables, go to the Data Foundation node. In the context menu of the Details pane, choose Create Join.
NoteYou can also join two tables by linking a column of one table to a column in another table.
2. Enter the required details.
15.2.3 Add Attributes
Procedure
1. In the Details pane of the Data Foundation node, select the required table column.2. From the context menu of the table column, choose Add as Attribute.
Note○ Attributes contain a subset of columns that can be used as conditions, actions, and in calculated
attributes.○ To delete attributes from the Attributes node, choose Remove from the context menu of the Output
pane. However, you cannot delete the attributes that are already used as actions or conditions.
15.2.4 Add Conditions and Actions
You can add different conditions and actions on the attributes present in the table.
Procedure
In the Output pane, expand the Attributes node and perform the following substeps:
SAP HANA Modeling GuideWorking with Decision Tables P U B L I C 251
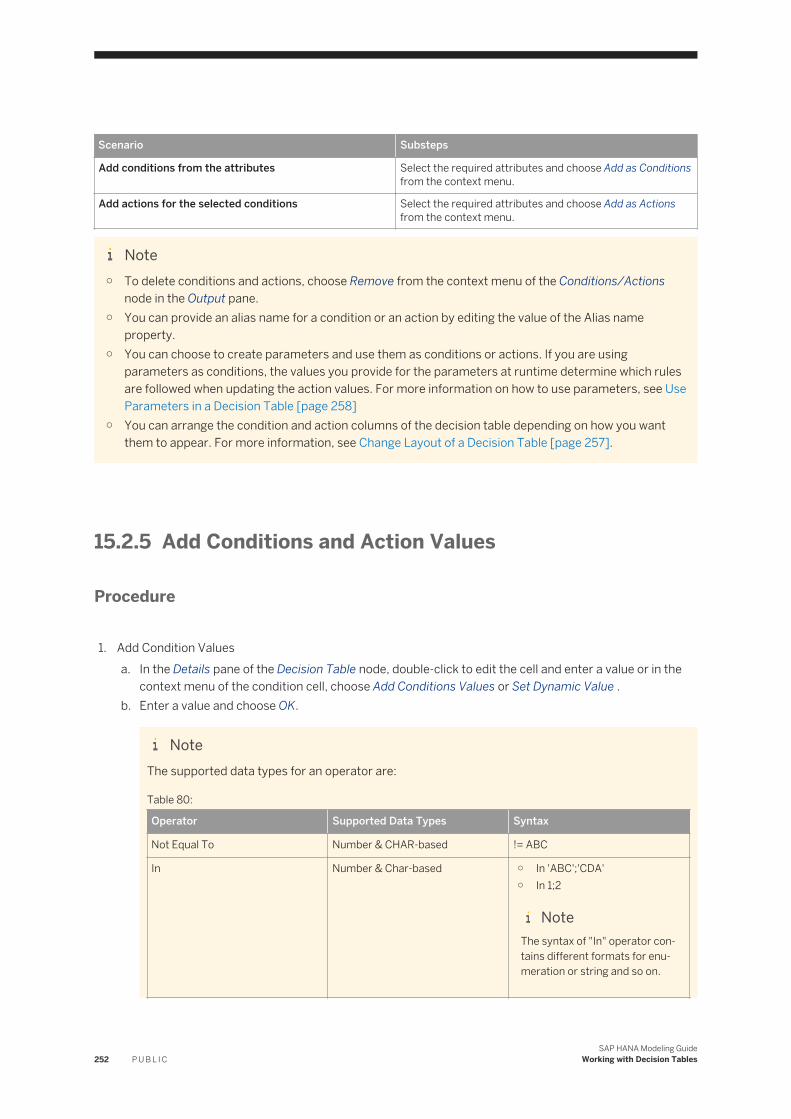
Scenario Substeps
Add conditions from the attributes Select the required attributes and choose Add as Conditions from the context menu.
Add actions for the selected conditions Select the required attributes and choose Add as Actions from the context menu.
Note○ To delete conditions and actions, choose Remove from the context menu of the Conditions/Actions
node in the Output pane.○ You can provide an alias name for a condition or an action by editing the value of the Alias name
property.○ You can choose to create parameters and use them as conditions or actions. If you are using
parameters as conditions, the values you provide for the parameters at runtime determine which rules are followed when updating the action values. For more information on how to use parameters, see Use Parameters in a Decision Table [page 258]
○ You can arrange the condition and action columns of the decision table depending on how you want them to appear. For more information, see Change Layout of a Decision Table [page 257].
15.2.5 Add Conditions and Action Values
Procedure
1. Add Condition Valuesa. In the Details pane of the Decision Table node, double-click to edit the cell and enter a value or in the
context menu of the condition cell, choose Add Conditions Values or Set Dynamic Value .b. Enter a value and choose OK.
NoteThe supported data types for an operator are:
Table 80:
Operator Supported Data Types Syntax
Not Equal To Number & CHAR-based != ABC
In Number & Char-based ○ In 'ABC';'CDA'○ In 1;2
NoteThe syntax of "In" operator contains different formats for enumeration or string and so on.
252 P U B L I CSAP HANA Modeling Guide
Working with Decision Tables
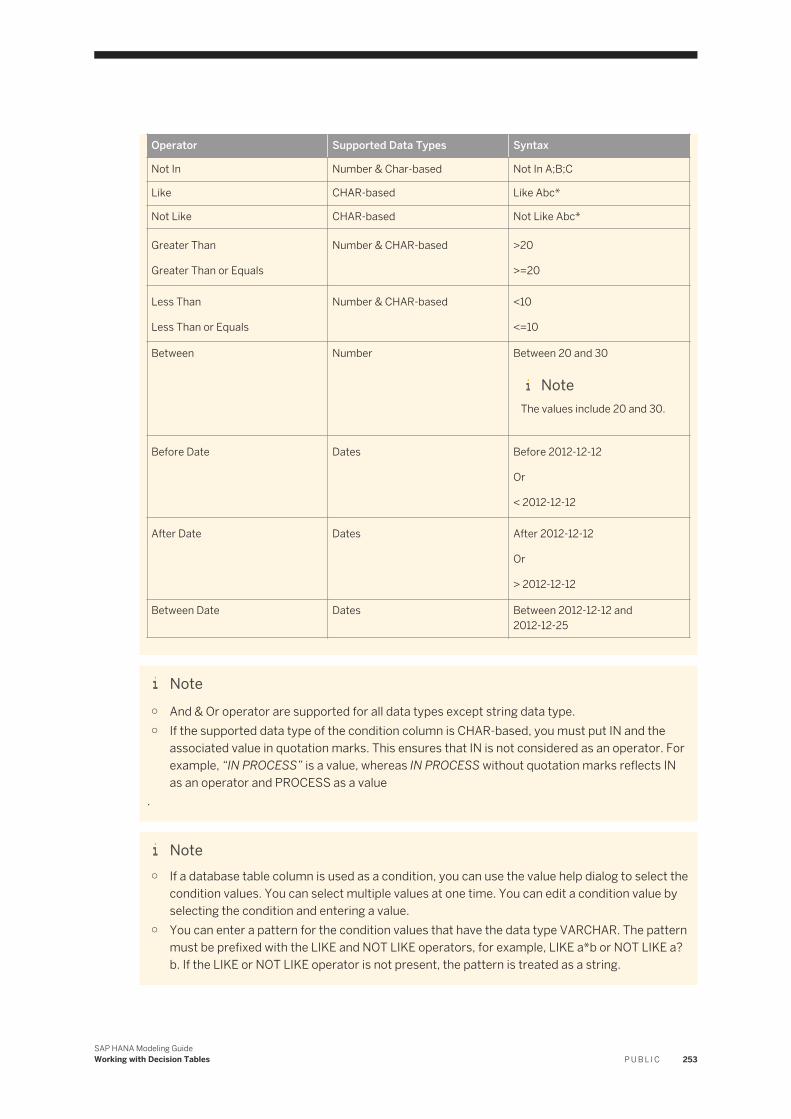
Operator Supported Data Types Syntax
Not In Number & Char-based Not In A;B;C
Like CHAR-based Like Abc*
Not Like CHAR-based Not Like Abc*
Greater Than
Greater Than or Equals
Number & CHAR-based >20
>=20
Less Than
Less Than or Equals
Number & CHAR-based <10
<=10
Between Number Between 20 and 30
NoteThe values include 20 and 30.
Before Date Dates Before 2012-12-12
Or
< 2012-12-12
After Date Dates After 2012-12-12
Or
> 2012-12-12
Between Date Dates Between 2012-12-12 and 2012-12-25
Note○ And & Or operator are supported for all data types except string data type.○ If the supported data type of the condition column is CHAR-based, you must put IN and the
associated value in quotation marks. This ensures that IN is not considered as an operator. For example, “IN PROCESS” is a value, whereas IN PROCESS without quotation marks reflects IN as an operator and PROCESS as a value
.
Note○ If a database table column is used as a condition, you can use the value help dialog to select the
condition values. You can select multiple values at one time. You can edit a condition value by selecting the condition and entering a value.
○ You can enter a pattern for the condition values that have the data type VARCHAR. The pattern must be prefixed with the LIKE and NOT LIKE operators, for example, LIKE a*b or NOT LIKE a?b. If the LIKE or NOT LIKE operator is not present, the pattern is treated as a string.
SAP HANA Modeling GuideWorking with Decision Tables P U B L I C 253
2. Add Action Valuesa. In the Details pane of the Decision Table node, double-click to edit the cell and enter a value or in the
context menu of the action cell, select Set Dynamic Value and enter a value.3. Add a Complex Expression
a. If you want to write a complex expression as an action or condition value, Right-click the action field.b. From the context menu, choose Set Dynamic Value.c. Write the expression in the pop-up. for example, PRICE-(PRICE*0.1).
NoteThe expression can contain a combination of:○ Even number of open and close braces○ Arithmetic operators (+, -, *, /)○ Dynamic Value consists of Attributes, Parameters and Calculated Attributes of same type
d. To edit a value, you need to select that value.
NoteYou can use parameters and attributes of the same data type as that of the action or condition in expressions. For example, if the data type of the condition is integer, then all parameters and attributes of the integer data type can be used in the condition expression.
4. Use Table Data through Value Helpa. To assign a value to a condition or an action based on the table data, choose Open Value Help Dialog.b. In the Value Help for Column dialog, enter the search string, and choose Find.
NoteIf you do not provide a value for the search and choose Find, all the data corresponding to the selected column is shown.
c. Select a value, and choose OK.
NoteYou can export decision table data to an Excel sheet by using the context menu option Export Data to Excel in the Details pane of the Decision Table node. You can also import decision table data from the Excel by using the context menu option Import Data from Excel in the Details pane of the Decision Table node.
15.2.6 Optional Step: Validate Decision Table
Procedure
1. To set the rules that you want to use for validation, do the following:
a. Choose Window Preferences .
254 P U B L I CSAP HANA Modeling Guide
Working with Decision Tables
b. In the Preferences dialog box, expand SAP HANA Modeler Validation Rules .c. In the Validation Rules view, select the Decision Table checkbox to check for all the rules during
validationd. If you want to check for individual rules, select the required rules.e. Choose OK
2. In the decision table editor, choose Validate in the editor toolbar
NoteIn the Job Log section, you can see the validation status and detailed report of the decision table.
NoteIn the SAP HANA Development perspective, only client-side validation will occur. However, in the SAP HANA Modeler perspective, both client- and server-side validation occurs.
15.2.7 Activate Decision Table
Activate the decision table by using one of the following options:
● If you are in the SAP HANA Modeler perspective, do the following as required:○ Save and Activate - Activates the current decision table.○ Save and Activate All - Activates the current decision table along with the required objects.
● If you are in the SAP HANA Development perspective, do the following:1. In the Project Explorer view, select the required object.
2. From the context menu, select Team Commit .
3. From the context menu, select Team Activate .
Note
● You can choose to save and activate the view from the editor by using .● The activation always triggers the validation check for the server-side rules. However, if you have
selected validation rules in the Preferences dialog box, then the client-side validation is also triggered.
Result: Upon successful activation, a procedure corresponding to the decision table is created in the _SYS_BIC schema. The name of the procedure is in the format <package name>/<decision table name>. In addition, if a parameter is used as an action in the decision table, the corresponding table type is created in the _SYS_BIC schema. The name of the table type is in the format <package name>/<decision table name>/TT.
RememberIf parameters are used as conditions in a decision table, corresponding IN parameters are generated. Also, if the parameters are used as actions, an OUT parameter is generated.
SAP HANA Modeling GuideWorking with Decision Tables P U B L I C 255
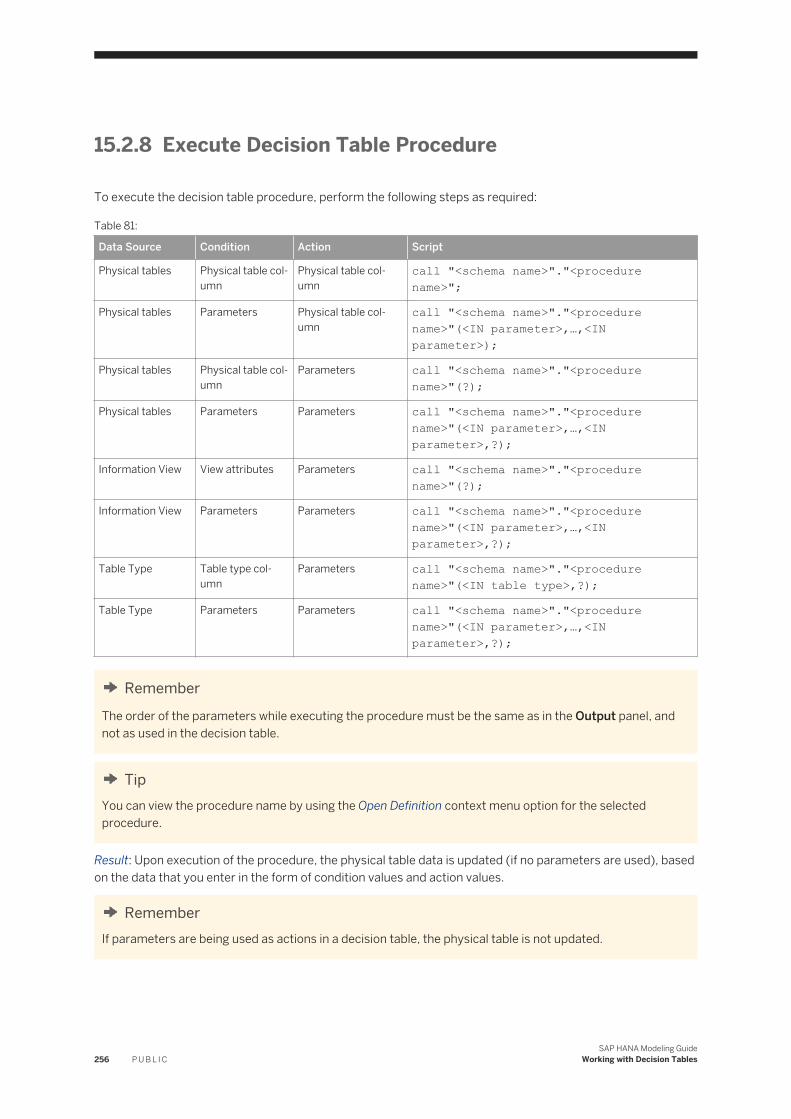
15.2.8 Execute Decision Table Procedure
To execute the decision table procedure, perform the following steps as required:
Table 81:
Data Source Condition Action Script
Physical tables Physical table column
Physical table column
call "<schema name>"."<procedure name>";
Physical tables Parameters Physical table column
call "<schema name>"."<procedure name>"(<IN parameter>,…,<IN parameter>);
Physical tables Physical table column
Parameters call "<schema name>"."<procedure name>"(?);
Physical tables Parameters Parameters call "<schema name>"."<procedure name>"(<IN parameter>,…,<IN parameter>,?);
Information View View attributes Parameters call "<schema name>"."<procedure name>"(?);
Information View Parameters Parameters call "<schema name>"."<procedure name>"(<IN parameter>,…,<IN parameter>,?);
Table Type Table type column
Parameters call "<schema name>"."<procedure name>"(<IN table type>,?);
Table Type Parameters Parameters call "<schema name>"."<procedure name>"(<IN parameter>,…,<IN parameter>,?);
RememberThe order of the parameters while executing the procedure must be the same as in the Output panel, and not as used in the decision table.
TipYou can view the procedure name by using the Open Definition context menu option for the selected procedure.
Result: Upon execution of the procedure, the physical table data is updated (if no parameters are used), based on the data that you enter in the form of condition values and action values.
RememberIf parameters are being used as actions in a decision table, the physical table is not updated.
256 P U B L I CSAP HANA Modeling Guide
Working with Decision Tables
15.3 Changing the Layout of a Decision Table
You use this procedure to change the decision table layout by arranging the condition and action columns. By default, all the conditions appear as vertical columns in the decision table. You can choose to mark a condition as a horizontal condition, and view the corresponding values in a row. The evaluation order of the conditions is such that the horizontal condition is evaluated first, and then the vertical ones.
NoteYou can only change the layout of a decision table if it has more than one condition. You can mark only one condition as a horizontal condition.
Procedure
Mark as Horizontal Condition
1. Select the Decision Table node.2. In the context menu of the Details pane, choose Change Layout.3. If you want to view a condition as a horizontal condition, in the Change Decision Table Layout dialog, select
the Table Has Horizontal Condition (HC) checkbox.
NoteThe first condition in the list of conditions is marked as horizontal by default.
4. Choose OK.5. Save the changes.
NoteYou can also set a condition as horizontal from the context menu of the condition in the Output pane. You can also arrange the conditions and actions in the desired sequence in the Output pane by using the navigation buttons in the toolbar.
Rearranging Conditions and Actions
1. Select the Decision Table node.2. In the context menu of the Details pane, choose Change Layout.3. In the Conditions and Actions section, choose the options on the right-hand side of the dialog box to
arrange the conditions and actions in the desired sequence.The following options are available for arranging the conditions in a sequence:○ Move Condition to Top
SAP HANA Modeling GuideWorking with Decision Tables P U B L I C 257
○ Move Condition Up○ Move Condition Down○ Move Condition to Bottom
NoteYou can also arrange the sequence by using the navigation buttons at the top of the Output pane.
15.4 Use Parameters in a Decision Table
You use this procedure to create a parameter that can be used to simulate a business scenario.
Procedure
1. Create a Parametera. In the Output pane, select the Parameters node.b. From the context menu, choose New and Enter a name and description.c. Select the required data type from the dropdown listd. Enter the length and scale as required.e. Choose the required Type from the dropdown list.
NoteIf you have selected Static List for Type, choose Add in the List of Values section to add values. You can also provide an alias for the enumeration value.
a. Choose OK.2. Use Parameter as Condition or Action
a. In the Output pane, select the Parameters node.b. From the context menu of the parameter, choose Add as Conditions/ Add as Actions.
15.4.1 Supported Parameter Types
Parameters are used to simulate a business scenario.You can use parameters as conditions and actions in the decision table at design time. Parameters used as conditions determine the set of physical table rows to be updated based on the parameter value that you provide at runtime during the procedure call. Parameters used as actions simulate the physical table without updating it.
The following parameter types are supported:
258 P U B L I CSAP HANA Modeling Guide
Working with Decision Tables
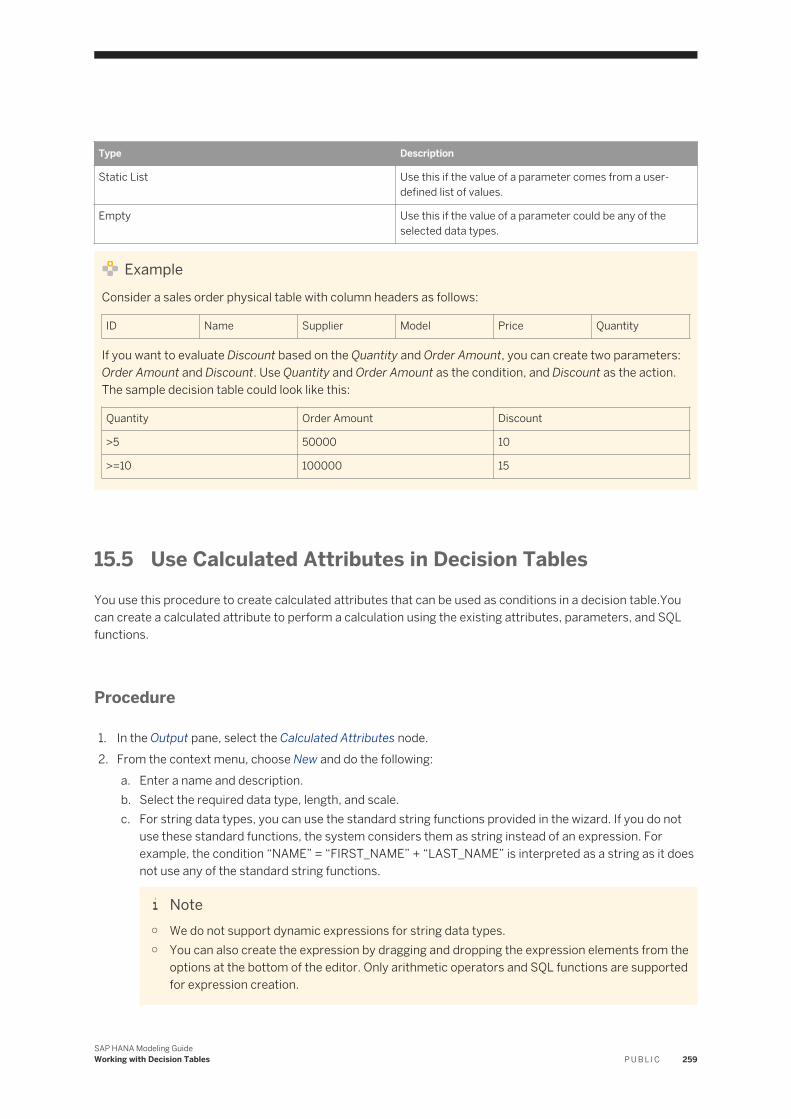
Type Description
Static List Use this if the value of a parameter comes from a user-defined list of values.
Empty Use this if the value of a parameter could be any of the selected data types.
ExampleConsider a sales order physical table with column headers as follows:
ID Name Supplier Model Price Quantity
If you want to evaluate Discount based on the Quantity and Order Amount, you can create two parameters: Order Amount and Discount. Use Quantity and Order Amount as the condition, and Discount as the action. The sample decision table could look like this:
Quantity Order Amount Discount
>5 50000 10
>=10 100000 15
15.5 Use Calculated Attributes in Decision TablesYou use this procedure to create calculated attributes that can be used as conditions in a decision table.You can create a calculated attribute to perform a calculation using the existing attributes, parameters, and SQL functions.
Procedure
1. In the Output pane, select the Calculated Attributes node.2. From the context menu, choose New and do the following:
a. Enter a name and description.b. Select the required data type, length, and scale.c. For string data types, you can use the standard string functions provided in the wizard. If you do not
use these standard functions, the system considers them as string instead of an expression. For example, the condition “NAME” = “FIRST_NAME” + “LAST_NAME” is interpreted as a string as it does not use any of the standard string functions.
Note○ We do not support dynamic expressions for string data types.○ You can also create the expression by dragging and dropping the expression elements from the
options at the bottom of the editor. Only arithmetic operators and SQL functions are supported for expression creation.
SAP HANA Modeling GuideWorking with Decision Tables P U B L I C 259

3. Choose OK.4. Add the required calculated attribute as a condition.
260 P U B L I CSAP HANA Modeling Guide
Working with Decision Tables
16 Managing Object Versions
This sections describes on how you can manage active and inactive versions of objects in SAP HANA modeling environement.
Related Information
Switch Ownership of Inactive Objects [page 261]Toggle Versions of Content Objects [page 262]View Version History of Content Objects [page 263]
16.1 Switch Ownership of Inactive Objects
You use this procedure to take over the ownership of the inactive version of an object from other users' workspace.
Prerequisites
You have obtained the Work in Foreign Workspace authorization.
Context
Objects in edit mode in other workspaces are not available for modification. In order to modify such objects you need to own the inactive object. The options available for changing the inactive object ownership are as follows:
Option Purpose
Switch Ownership To take over multiple inactive objects from other users. Inactive objects that do not have an active version are also available for take over using this option
Take Over To take a single inactive object from another workspace that you wish to edit using the editor.
SAP HANA Modeling GuideManaging Object Versions P U B L I C 261
NoteUsing this functionality you can only own the inactive version of the object. The active version is owned by the user who created and activated the object.
Procedure
1. If you want to own multiple inactive objects from other workspaces, do the following:a. In the Quick View pane, choose Switch Ownership.b. Select a system where you want to perform this operation.c. In the Source User field, select the user who owns the inactive objects.d. Add the required inactive objects to the Selected Models section.e. Choose OK.
2. If an object opens in read only mode and you want to edit it, do the following:a. In the editor toolbar, select Switch Version.b. Choose Take Over.
NoteYou can choose to save the changes made by the other user (previous owner of the inactive version) to the inactive version of the object.
16.2 Toggle Versions of Content Objects
You use this procedure to view the active version of an information object while working with its inactive version for example, to view the changes made to the active version.
Procedure
1. In the SAP HANA Modeler perspective, expand the Content node of the required system.2. Select the required object from a package.3. In the context menu, choose Open.4. In the editor pane, choose Show Active Version.5. Compare inactive and active versions of the object.6. Choose OK.
262 P U B L I CSAP HANA Modeling Guide
Managing Object Versions

16.3 View Version History of Content Objects
You use this procedure to view the version details of an information model for tracking purposes.
Procedure
1. In the Modeler perspective, expand the Content node of the required system.2. Select the required object from a package.3. From the context menu, choose History.
SAP HANA Modeling GuideManaging Object Versions P U B L I C 263
Important Disclaimer for Features in SAP HANA Platform, Options and Capabilities
SAP HANA server software and tools can be used for several SAP HANA platform and options scenarios as well as the respective capabilities used in these scenarios. The availability of these is based on the available SAP HANA licenses and the SAP HANA landscape, including the type and version of the back-end systems the SAP HANA administration and development tools are connected to. There are several types of licenses available for SAP HANA. Depending on your SAP HANA installation license type, some of the features and tools described in the SAP HANA platform documentation may only be available in the SAP HANA options and capabilities, which may be released independently of an SAP HANA Platform Support Package Stack (SPS). Although various features included in SAP HANA options and capabilities are cited in the SAP HANA platform documentation, each SAP HANA edition governs the options and capabilities available. Based on this, customers do not necessarily have the right to use features included in SAP HANA options and capabilities. For customers to whom these license restrictions apply, the use of features included in SAP HANA options and capabilities in a production system requires purchasing the corresponding software license(s) from SAP. The documentation for the SAP HANA options is available in SAP Help Portal. If you have additional questions about what your particular license provides, or wish to discuss licensing features available in SAP HANA options, please contact your SAP account team representative.
264 P U B L I CSAP HANA Modeling Guide
Important Disclaimer for Features in SAP HANA Platform, Options and Capabilities
Important Disclaimers and Legal Information
Coding SamplesAny software coding and/or code lines / strings ("Code") included in this documentation are only examples and are not intended to be used in a productive system environment. The Code is only intended to better explain and visualize the syntax and phrasing rules of certain coding. SAP does not warrant the correctness and completeness of the Code given herein, and SAP shall not be liable for errors or damages caused by the usage of the Code, unless damages were caused by SAP intentionally or by SAP's gross negligence.
AccessibilityThe information contained in the SAP documentation represents SAP's current view of accessibility criteria as of the date of publication; it is in no way intended to be a binding guideline on how to ensure accessibility of software products. SAP in particular disclaims any liability in relation to this document. This disclaimer, however, does not apply in cases of willful misconduct or gross negligence of SAP. Furthermore, this document does not result in any direct or indirect contractual obligations of SAP.
Gender-Neutral LanguageAs far as possible, SAP documentation is gender neutral. Depending on the context, the reader is addressed directly with "you", or a gender-neutral noun (such as "sales person" or "working days") is used. If when referring to members of both sexes, however, the third-person singular cannot be avoided or a gender-neutral noun does not exist, SAP reserves the right to use the masculine form of the noun and pronoun. This is to ensure that the documentation remains comprehensible.
Internet HyperlinksThe SAP documentation may contain hyperlinks to the Internet. These hyperlinks are intended to serve as a hint about where to find related information. SAP does not warrant the availability and correctness of this related information or the ability of this information to serve a particular purpose. SAP shall not be liable for any damages caused by the use of related information unless damages have been caused by SAP's gross negligence or willful misconduct. All links are categorized for transparency (see: http://help.sap.com/disclaimer).
SAP HANA Modeling GuideImportant Disclaimers and Legal Information P U B L I C 265

go.sap.com/registration/contact.html
© 2017 SAP SE or an SAP affiliate company. All rights reserved.No part of this publication may be reproduced or transmitted in any form or for any purpose without the express permission of SAP SE or an SAP affiliate company. The information contained herein may be changed without prior notice.Some software products marketed by SAP SE and its distributors contain proprietary software components of other software vendors. National product specifications may vary.These materials are provided by SAP SE or an SAP affiliate company for informational purposes only, without representation or warranty of any kind, and SAP or its affiliated companies shall not be liable for errors or omissions with respect to the materials. The only warranties for SAP or SAP affiliate company products and services are those that are set forth in the express warranty statements accompanying such products and services, if any. Nothing herein should be construed as constituting an additional warranty.SAP and other SAP products and services mentioned herein as well as their respective logos are trademarks or registered trademarks of SAP SE (or an SAP affiliate company) in Germany and other countries. All other product and service names mentioned are the trademarks of their respective companies.Please see http://www.sap.com/corporate-en/legal/copyright/index.epx for additional trademark information and notices.