sap on db2 udb for os/390 and z/os: implementing ...ps-2.kev009.com/basil.holloway/all...
TRANSCRIPT

ibm.com/redbooks
SAP on DB2 UDB for OS/390 and z/OS:Implementing Application Serverson Linux for zSeries
Viviane Anavi-ChaputAndre Borkenfeld
Florence DuboisDon Geissler
Lars Morten HagaMatthias Hein
Wolfgang ReichertMike Zazulak
Installing SAP application servers on Linux
Cloning SAP application servers on Linux
Planning considerations
Front cover


SAP on DB2 UDB for OS/390 and z/OS: Implementing Application Servers on Linux for zSeries
August 2002
International Technical Support Organization
SG24-6847-00

© Copyright International Business Machines Corporation 2002Note to U.S. Government Users Restricted Rights -- Use, duplication or disclosure restricted by GSA ADP ScheduleContract with IBM Corp.
First Edition (August 2002)
This edition applies to IBM z/OS V1R2 (5694-A01), IBM z/VM V4.2 (5739-A04), SuSE Linux Enterprise Server 7 for IBM zSeries (64-bit), IBM DB2 UDB for z/OS V7.1 (5675-DB2), and SAP R/3 4.6C SR2.
Note: Before using this information and the product it supports, read the information in “Notices” on page vii.

Contents
Notices . . . . . . . . . . . . . . . . . . . . . . . . . . . . . . . . . . . . . . . . . . . . . . . . . . . . . . viiTrademarks . . . . . . . . . . . . . . . . . . . . . . . . . . . . . . . . . . . . . . . . . . . . . . . . . . . viii
Preface . . . . . . . . . . . . . . . . . . . . . . . . . . . . . . . . . . . . . . . . . . . . . . . . . . . . . . . ixThe team that wrote this redbook. . . . . . . . . . . . . . . . . . . . . . . . . . . . . . . . . . . . ixBecome a published author . . . . . . . . . . . . . . . . . . . . . . . . . . . . . . . . . . . . . . . . xiComments welcome. . . . . . . . . . . . . . . . . . . . . . . . . . . . . . . . . . . . . . . . . . . . . . xi
Chapter 1. SAP and Linux overview . . . . . . . . . . . . . . . . . . . . . . . . . . . . . . . 11.1 SAP R/3 architecture. . . . . . . . . . . . . . . . . . . . . . . . . . . . . . . . . . . . . . . . . . 21.2 SAP business requirements . . . . . . . . . . . . . . . . . . . . . . . . . . . . . . . . . . . . 3
1.2.1 Continuous availability . . . . . . . . . . . . . . . . . . . . . . . . . . . . . . . . . . . . 41.2.2 Performance . . . . . . . . . . . . . . . . . . . . . . . . . . . . . . . . . . . . . . . . . . . . 41.2.3 Scalability . . . . . . . . . . . . . . . . . . . . . . . . . . . . . . . . . . . . . . . . . . . . . . 41.2.4 Manageability . . . . . . . . . . . . . . . . . . . . . . . . . . . . . . . . . . . . . . . . . . . 51.2.5 Ease of deployment . . . . . . . . . . . . . . . . . . . . . . . . . . . . . . . . . . . . . . 51.2.6 Total cost of ownership . . . . . . . . . . . . . . . . . . . . . . . . . . . . . . . . . . . . 5
1.3 Linux for zSeries . . . . . . . . . . . . . . . . . . . . . . . . . . . . . . . . . . . . . . . . . . . . . 71.3.1 Possible configurations . . . . . . . . . . . . . . . . . . . . . . . . . . . . . . . . . . . . 7
1.4 Benefits of zLinux for SAP. . . . . . . . . . . . . . . . . . . . . . . . . . . . . . . . . . . . . . 91.4.1 Consolidation of operating system platforms . . . . . . . . . . . . . . . . . . . 91.4.2 Server consolidation . . . . . . . . . . . . . . . . . . . . . . . . . . . . . . . . . . . . . 101.4.3 Native LPAR . . . . . . . . . . . . . . . . . . . . . . . . . . . . . . . . . . . . . . . . . . . 101.4.4 64-bit addressing. . . . . . . . . . . . . . . . . . . . . . . . . . . . . . . . . . . . . . . . 101.4.5 z/VM Linux image cloning . . . . . . . . . . . . . . . . . . . . . . . . . . . . . . . . . 111.4.6 IFL engines . . . . . . . . . . . . . . . . . . . . . . . . . . . . . . . . . . . . . . . . . . . . 11
Chapter 2. Planning for SAP on Linux for zSeries . . . . . . . . . . . . . . . . . . . 132.1 Designing the system . . . . . . . . . . . . . . . . . . . . . . . . . . . . . . . . . . . . . . . . 14
2.1.1 Adding Linux application servers to an existing SAP system . . . . . . 142.1.2 Building new SAP systems from scratch. . . . . . . . . . . . . . . . . . . . . . 152.1.3 Consolidating many SAP systems . . . . . . . . . . . . . . . . . . . . . . . . . . 17
2.2 Designing the network. . . . . . . . . . . . . . . . . . . . . . . . . . . . . . . . . . . . . . . . 182.3 Resource sharing considerations . . . . . . . . . . . . . . . . . . . . . . . . . . . . . . . 21
2.3.1 Processors . . . . . . . . . . . . . . . . . . . . . . . . . . . . . . . . . . . . . . . . . . . . 212.3.2 Real memory. . . . . . . . . . . . . . . . . . . . . . . . . . . . . . . . . . . . . . . . . . . 222.3.3 Disk storage . . . . . . . . . . . . . . . . . . . . . . . . . . . . . . . . . . . . . . . . . . . 222.3.4 Swap space. . . . . . . . . . . . . . . . . . . . . . . . . . . . . . . . . . . . . . . . . . . . 232.3.5 Network adapters . . . . . . . . . . . . . . . . . . . . . . . . . . . . . . . . . . . . . . . 23
© Copyright IBM Corp. 2002. All rights reserved. iii

2.4 Hardware and software requirements . . . . . . . . . . . . . . . . . . . . . . . . . . . . 242.4.1 Hardware requirements. . . . . . . . . . . . . . . . . . . . . . . . . . . . . . . . . . . 242.4.2 Software requirements . . . . . . . . . . . . . . . . . . . . . . . . . . . . . . . . . . . 25
2.5 Planning the software configuration . . . . . . . . . . . . . . . . . . . . . . . . . . . . . 262.6 Professional support and maintenance . . . . . . . . . . . . . . . . . . . . . . . . . . . 28
Chapter 3. Preparing the system environment . . . . . . . . . . . . . . . . . . . . . . 293.1 System configuration. . . . . . . . . . . . . . . . . . . . . . . . . . . . . . . . . . . . . . . . . 303.2 Network configuration . . . . . . . . . . . . . . . . . . . . . . . . . . . . . . . . . . . . . . . . 31
3.2.1 Network setup for vmlinux8. . . . . . . . . . . . . . . . . . . . . . . . . . . . . . . . 323.3 Installing z/VM . . . . . . . . . . . . . . . . . . . . . . . . . . . . . . . . . . . . . . . . . . . . . . 333.4 Creating virtual images . . . . . . . . . . . . . . . . . . . . . . . . . . . . . . . . . . . . . . . 343.5 Linux installation and customization . . . . . . . . . . . . . . . . . . . . . . . . . . . . . 37
3.5.1 Basic installation . . . . . . . . . . . . . . . . . . . . . . . . . . . . . . . . . . . . . . . . 373.5.2 Configuring networking devices . . . . . . . . . . . . . . . . . . . . . . . . . . . . 433.5.3 Configuring networking interfaces. . . . . . . . . . . . . . . . . . . . . . . . . . . 453.5.4 Dynamic routing - Zebra setup . . . . . . . . . . . . . . . . . . . . . . . . . . . . . 473.5.5 Customizing SuSE Linux Enterprise Server . . . . . . . . . . . . . . . . . . . 523.5.6 Creating swap space. . . . . . . . . . . . . . . . . . . . . . . . . . . . . . . . . . . . . 533.5.7 Installing SAP locales . . . . . . . . . . . . . . . . . . . . . . . . . . . . . . . . . . . . 543.5.8 Installing ICLI client and server . . . . . . . . . . . . . . . . . . . . . . . . . . . . . 55
3.6 Final checks before installing SAP . . . . . . . . . . . . . . . . . . . . . . . . . . . . . . 563.6.1 Checking the system configuration . . . . . . . . . . . . . . . . . . . . . . . . . . 563.6.2 Checking the /etc/services . . . . . . . . . . . . . . . . . . . . . . . . . . . . . . . . 573.6.3 Checking /etc/hosts . . . . . . . . . . . . . . . . . . . . . . . . . . . . . . . . . . . . . . 573.6.4 Checking consistent name resolution . . . . . . . . . . . . . . . . . . . . . . . . 583.6.5 Checking installed languages . . . . . . . . . . . . . . . . . . . . . . . . . . . . . . 593.6.6 Creating redadm and sapsys . . . . . . . . . . . . . . . . . . . . . . . . . . . . . . 593.6.7 Checking kernel and swap space . . . . . . . . . . . . . . . . . . . . . . . . . . . 593.6.8 Checking the time . . . . . . . . . . . . . . . . . . . . . . . . . . . . . . . . . . . . . . . 61
Chapter 4. Installing SAP application servers on Linux . . . . . . . . . . . . . . 634.1 Installing the central instance on Linux . . . . . . . . . . . . . . . . . . . . . . . . . . . 64
4.1.1 Creating an installation directory for the SAP installation . . . . . . . . . 644.1.2 Setting up the file system for the central instance. . . . . . . . . . . . . . . 644.1.3 Installing the central instance . . . . . . . . . . . . . . . . . . . . . . . . . . . . . . 704.1.4 Post installation activities . . . . . . . . . . . . . . . . . . . . . . . . . . . . . . . . . 744.1.5 Memory configuration . . . . . . . . . . . . . . . . . . . . . . . . . . . . . . . . . . . . 764.1.6 Operating an SAP application server on Linux . . . . . . . . . . . . . . . . . 78
4.2 Installing a dialog instance on Linux . . . . . . . . . . . . . . . . . . . . . . . . . . . . . 814.2.1 File system setup for homogenous application servers . . . . . . . . . . 824.2.2 Installing the dialog instance . . . . . . . . . . . . . . . . . . . . . . . . . . . . . . . 84
4.3 Heterogeneous environment considerations. . . . . . . . . . . . . . . . . . . . . . . 85
iv SAP on DB2 UDB for OS/390 and z/OS: Implementing Application Servers on Linux for zSeries

4.3.1 File system setup . . . . . . . . . . . . . . . . . . . . . . . . . . . . . . . . . . . . . . . 854.3.2 Maintaining the SAP kernel. . . . . . . . . . . . . . . . . . . . . . . . . . . . . . . . 89
4.4 Dialog instance setup in a heterogeneous environment . . . . . . . . . . . . . . 894.4.1 Mounting NFS file systems from z/OS . . . . . . . . . . . . . . . . . . . . . . . 894.4.2 Installing the dialog instance . . . . . . . . . . . . . . . . . . . . . . . . . . . . . . . 91
Chapter 5. Cloning an SAP dialog instance . . . . . . . . . . . . . . . . . . . . . . . . 935.1 Reasons for cloning. . . . . . . . . . . . . . . . . . . . . . . . . . . . . . . . . . . . . . . . . . 945.2 Benefits of cloning . . . . . . . . . . . . . . . . . . . . . . . . . . . . . . . . . . . . . . . . . . . 945.3 Ways of cloning . . . . . . . . . . . . . . . . . . . . . . . . . . . . . . . . . . . . . . . . . . . . . 95
5.3.1 Cloning without minidisk sharing . . . . . . . . . . . . . . . . . . . . . . . . . . . . 955.3.2 Cloning with /usr directory sharing . . . . . . . . . . . . . . . . . . . . . . . . . . 995.3.3 Cloning with sharing as much code as possible . . . . . . . . . . . . . . . 100
5.4 Cloning scenario: share as much code as possible . . . . . . . . . . . . . . . . 1025.5 Cloning the Linux operating system . . . . . . . . . . . . . . . . . . . . . . . . . . . . 103
5.5.1 Overview of the cloning process . . . . . . . . . . . . . . . . . . . . . . . . . . . 1035.5.2 Customizing the master Linux. . . . . . . . . . . . . . . . . . . . . . . . . . . . . 109
5.6 Cloning SAP application instances . . . . . . . . . . . . . . . . . . . . . . . . . . . . . 1195.6.1 Creating profile templates . . . . . . . . . . . . . . . . . . . . . . . . . . . . . . . . 1195.6.2 Implementing the SAP-specific tasks at boot time . . . . . . . . . . . . . 123
5.7 Cloning an SAP dialog instance on Linux on zSeries . . . . . . . . . . . . . . . 1265.8 Hints and tips for the cloning approach . . . . . . . . . . . . . . . . . . . . . . . . . . 127
5.8.1 Using the device file system . . . . . . . . . . . . . . . . . . . . . . . . . . . . . . 1275.8.2 Using LVM2. . . . . . . . . . . . . . . . . . . . . . . . . . . . . . . . . . . . . . . . . . . 128
Appendix A. R3SETUP output . . . . . . . . . . . . . . . . . . . . . . . . . . . . . . . . . . 129
Appendix B. Cloning . . . . . . . . . . . . . . . . . . . . . . . . . . . . . . . . . . . . . . . . . . 147B.1 Customize LVM. . . . . . . . . . . . . . . . . . . . . . . . . . . . . . . . . . . . . . . . . . . . 147B.2 Script wrapcmd . . . . . . . . . . . . . . . . . . . . . . . . . . . . . . . . . . . . . . . . . . . . 150B.3 Script fstab-local.sh. . . . . . . . . . . . . . . . . . . . . . . . . . . . . . . . . . . . . . . . . 151B.4 CLONE EXEC. . . . . . . . . . . . . . . . . . . . . . . . . . . . . . . . . . . . . . . . . . . . . 152B.5 SWPCLN EXEC . . . . . . . . . . . . . . . . . . . . . . . . . . . . . . . . . . . . . . . . . . . 152B.6 STARTLIN EXEC . . . . . . . . . . . . . . . . . . . . . . . . . . . . . . . . . . . . . . . . . . 153B.7 USER DIRECTory. . . . . . . . . . . . . . . . . . . . . . . . . . . . . . . . . . . . . . . . . . 153B.8 The boot script . . . . . . . . . . . . . . . . . . . . . . . . . . . . . . . . . . . . . . . . . . . . 155
Related publications . . . . . . . . . . . . . . . . . . . . . . . . . . . . . . . . . . . . . . . . . . 171IBM Redbooks . . . . . . . . . . . . . . . . . . . . . . . . . . . . . . . . . . . . . . . . . . . . . . . . 171
Other resources . . . . . . . . . . . . . . . . . . . . . . . . . . . . . . . . . . . . . . . . . . . . 171Referenced Web sites . . . . . . . . . . . . . . . . . . . . . . . . . . . . . . . . . . . . . . . . . . 172How to get IBM Redbooks . . . . . . . . . . . . . . . . . . . . . . . . . . . . . . . . . . . . . . . 172
IBM Redbooks collections. . . . . . . . . . . . . . . . . . . . . . . . . . . . . . . . . . . . . 173
Contents v

Index . . . . . . . . . . . . . . . . . . . . . . . . . . . . . . . . . . . . . . . . . . . . . . . . . . . . . . . 175
vi SAP on DB2 UDB for OS/390 and z/OS: Implementing Application Servers on Linux for zSeries

Notices
This information was developed for products and services offered in the U.S.A.
IBM may not offer the products, services, or features discussed in this document in other countries. Consult your local IBM representative for information on the products and services currently available in your area. Any reference to an IBM product, program, or service is not intended to state or imply that only that IBM product, program, or service may be used. Any functionally equivalent product, program, or service that does not infringe any IBM intellectual property right may be used instead. However, it is the user's responsibility to evaluate and verify the operation of any non-IBM product, program, or service.
IBM may have patents or pending patent applications covering subject matter described in this document. The furnishing of this document does not give you any license to these patents. You can send license inquiries, in writing, to: IBM Director of Licensing, IBM Corporation, North Castle Drive Armonk, NY 10504-1785 U.S.A.
The following paragraph does not apply to the United Kingdom or any other country where such provisions are inconsistent with local law: INTERNATIONAL BUSINESS MACHINES CORPORATION PROVIDES THIS PUBLICATION "AS IS" WITHOUT WARRANTY OF ANY KIND, EITHER EXPRESS OR IMPLIED, INCLUDING, BUT NOT LIMITED TO, THE IMPLIED WARRANTIES OF NON-INFRINGEMENT, MERCHANTABILITY OR FITNESS FOR A PARTICULAR PURPOSE. Some states do not allow disclaimer of express or implied warranties in certain transactions, therefore, this statement may not apply to you.
This information could include technical inaccuracies or typographical errors. Changes are periodically made to the information herein; these changes will be incorporated in new editions of the publication. IBM may make improvements and/or changes in the product(s) and/or the program(s) described in this publication at any time without notice.
Any references in this information to non-IBM Web sites are provided for convenience only and do not in any manner serve as an endorsement of those Web sites. The materials at those Web sites are not part of the materials for this IBM product and use of those Web sites is at your own risk.
IBM may use or distribute any of the information you supply in any way it believes appropriate without incurring any obligation to you.
Information concerning non-IBM products was obtained from the suppliers of those products, their published announcements or other publicly available sources. IBM has not tested those products and cannot confirm the accuracy of performance, compatibility or any other claims related to non-IBM products. Questions on the capabilities of non-IBM products should be addressed to the suppliers of those products.
This information contains examples of data and reports used in daily business operations. To illustrate them as completely as possible, the examples include the names of individuals, companies, brands, and products. All of these names are fictitious and any similarity to the names and addresses used by an actual business enterprise is entirely coincidental.
COPYRIGHT LICENSE: This information contains sample application programs in source language, which illustrates programming techniques on various operating platforms. You may copy, modify, and distribute these sample programs in any form without payment to IBM, for the purposes of developing, using, marketing or distributing application programs conforming to the application programming interface for the operating platform for which the sample programs are written. These examples have not been thoroughly tested under all conditions. IBM, therefore, cannot guarantee or imply reliability, serviceability, or function of these programs. You may copy, modify, and distribute these sample programs in any form without payment to IBM for the purposes of developing, using, marketing, or distributing application programs conforming to IBM's application programming interfaces.
© Copyright IBM Corp. 2002. All rights reserved. vii
TrademarksThe following terms are trademarks of the International Business Machines Corporation in the United States, other countries, or both:
AIX®DB2®DB2 Universal Database™ECKD™IBM®MVS™OS/2®OS/390®
Parallel Sysplex®Perform™PR/SM™PR/SM™RACF®Redbooks(logo)™S/390®SP™
SystemPac®WebSphere®z/Architecture™z/OS™z/VM™zSeries™
The following terms are trademarks of other companies:
ActionMedia, LANDesk, MMX, Pentium and ProShare are trademarks of Intel Corporation in the United States, other countries, or both.
Microsoft, Windows, Windows NT, and the Windows logo are trademarks of Microsoft Corporation in the United States, other countries, or both.
Java and all Java-based trademarks and logos are trademarks or registered trademarks of Sun Microsystems, Inc. in the United States, other countries, or both.
C-bus is a trademark of Corollary, Inc. in the United States, other countries, or both.
UNIX is a registered trademark of The Open Group in the United States and other countries.
SET, SET Secure Electronic Transaction, and the SET Logo are trademarks owned by SET Secure Electronic Transaction LLC.
Other company, product, and service names may be trademarks or service marks of others.
viii SAP on DB2 UDB for OS/390 and z/OS: Implementing Application Servers on Linux for zSeries

Preface
This IBM Redbook focuses on the implementation of SAP application servers on Linux for zSeries. It applies to IBM z/OS V1R2 (5694-A01), IBM z/VM V4.2 (5739-A04), SuSE Linux Enterprise Server 7 for IBM zSeries (64-bit), IBM DB2 UDB for z/OS V7.1 (5675-DB2), and SAP R/3 4.6C SR2.
The book provides overviews of SAP and Linux and describes the planning needed for SAP on Linux for zSeries, including resource sharing considerations, hardware and software requirements, and support and maintenance.
It focuses on how to prepare the system environment, describing system and network configurations, as well as installation and customization tasks. After detailing how to install SAP application servers in z/VM Linux images, it concludes with a description of how to clone those images.
The team that wrote this redbookThis redbook was produced by a team of specialists from around the world working at the International Technical Support Organization, Poughkeepsie Center.
Viviane Anavi-Chaput is a Senior IT Specialist for BI, ERP and DB2 at the IBM International Technical Support Organization, Poughkeepsie Center. She writes extensively, teaches worldwide, and presents at international conferences on all areas of Business Intelligence and DB2 for OS/390. Before joining the ITSO in 1999, Viviane was a Senior Data Management Consultant at IBM Europe, France. She was also an ITSO Specialist for DB2 at the San Jose Center from 1990 to 1994.
Andre Borkenfeld is an IT Architect who has worked for IBM Global Services in Germany since 1996. He is a certified SAP R/3 Basis Consultant. His areas of expertise include AIX, Linux on zSeries, Oracle, and DB2 for OS/390 and z/OS. Andre studied business information management at the University of Münster.
Florence Dubois is an IT Specialist for DB2 on z/OS at the IBM EMEA ATS Products and Solutions Support Center, Montpellier, France. She has been with IBM since 1997, taking part in SAP performance benchmarks and providing onsite performance reviews to large SAP customers in EMEA. Her areas of expertise include data sharing, and performance and tuning.
© Copyright IBM Corp. 2002. All rights reserved. ix

Don Geissler is an IBM Consulting Field Technical Sales Specialist in e-business Technical Sales for the Americas. He has been with IBM since 1983, providing systems engineering support to large S/390 customers. In September 1996, Don became a member of the IBM/SAP Competency Center, working with SAP R/3 on DB2 for OS/390 and z/OS. His primary responsibilities are consulting with SAP R/3 on z/OS customers in the areas of high availability, data sharing, database backup and recovery, and disaster recovery.
Lars Morten Haga is a Systems Programmer at BBS A/S in Oslo, Norway. He has eight years of experience with S/390 systems. For the last year, he has been deeply involved in implementing SAP at his company, and he also has some experience with Linux.
Matthias Hein is an IT specialist working for IBM zSeries field technical sales support in Germany. He has seven years of experience with Linux and three years of experience with S/390 and zSeries. He holds a Ph.D. in physics from Heinrich Heine Universität, Düsseldorf. His areas of expertise include SAP on z/OS and on Linux for zSeries.
Wolfgang Reichert is a Senior Software Engineer in the IBM development laboratory in Böblingen, Germany. Since 1995 he has been a member of the joint IBM/SAP platform team. In his position as solution architect, he is responsible for enabling the SAP solution on IBM zSeries.
Mike Zazulak is an IBM Technical Sales Specialist in ERP Solutions Sales of North America. He has been with IBM since 1982. Since September 1998, Mike has been a member of the ERP Competency Center S/390 and zSeries team, working with SAP R/3 for DB2 UDB for OS/390 and z/OS. His primary responsibilities are supporting the sales team and customers with SAP R/3 for DB2 UDB on OS/390. Prior to this he was a member of the joint IBM/SAP DB2 UDB Porting Team in Walldorf, Germany, where the SAP R/3 was ported to run on DB2 UDB for OS/390 and z/OS.
Special thanks to the following people for their support in setting up the system environment:
David Bennin, Richard Conway, Roy Costa, Robert Haimowitz, William G. WhiteIBM International Technical Support Organization, Poughkeepsie, NY, USA
Deon GeorgeIBM, Australia
Mark PerryConsultant, Germany
Thanks to the following people for their contributions to this project:
x SAP on DB2 UDB for OS/390 and z/OS: Implementing Application Servers on Linux for zSeries
Michael Gordon, Patrick Horkan, Albert RodiIBM USA
Erich Amrehn, Thomas Gnech, Regina Illner, Joachim Jordan, Gerold Kurth, Paul Lekkas, Elisabeth Puritscher, Bill Reeder, Gert Ruland, Jochen Ziegler, and Ralf WeidlerIBM Germany
Frank KirschnerConsultant, Germany
Oliver PaukstadtSenior Consultant, Millenux, Germany
Thanks also to Terry Barthel, Alison Chandler, and Alfred Schwab for their editorial assistance, and Ella Buslovich for her graphics assistance.
Become a published authorJoin us for a two- to six-week residency program! Help write an IBM Redbook dealing with specific products or solutions, while getting hands-on experience with leading-edge technologies. You'll team with IBM technical professionals, Business Partners and/or customers.
Your efforts will help increase product acceptance and customer satisfaction. As a bonus, you'll develop a network of contacts in IBM development labs, and increase your productivity and marketability.
Find out more about the residency program, browse the residency index, and apply online at:
ibm.com/redbooks/residencies.html
Comments welcomeYour comments are important to us!
We want our Redbooks to be as helpful as possible. Send us your comments about this or other Redbooks in one of the following ways:
� Use the online Contact us review redbook form found at:
ibm.com/redbooks
Preface xi

� Send your comments in an Internet note to:
� Mail your comments to:
IBM Corporation, International Technical Support OrganizationDept. HYJ Mail Station P0992455 South RoadPoughkeepsie, NY 12601-5400
xii SAP on DB2 UDB for OS/390 and z/OS: Implementing Application Servers on Linux for zSeries

Chapter 1. SAP and Linux overview
This chapter gives a brief overview of SAP R/3 architecture and its hardware/software implementations when DB2 UDB for OS/390 and z/OS1 is used as the database server. We discuss the new support for Linux application servers, how those Linux application servers help address business requirements, and the benefits they bring.
A more detailed overview of the SAP R/3 architecture can be found in the following IBM Redbooks:
– SAP R/3 on DB2 for OS/390: Application Servers on OS/390, SG24-5840– SAP R/3 on DB2 for OS/390: Implementing with AIX or Windows NT
Application Servers, SG24-4945– Database Administration Experiences: SAP R/3 on DB2 for OS/390,
SG24-2078– High Availability Considerations: SAP R/3 on DB2 for OS/390, SG24-2003
1
1 Whenever the term “z/OS” is used, it applies to both OS/390 and z/OS unless otherwise noted.
© Copyright IBM Corp. 2002. All rights reserved. 1

1.1 SAP R/3 architectureSAP R/3 provides a complete set of applications that combine all business activities into an integrated process. SAP R/3 provides an integrated database containing real time business data. Business reporting and administration can be done on a departmental, divisional, or global level.
The SAP R/3 applications are designed around software services that are hardware independent. The SAP R/3 architecture is has three logical tiers or layers, each providing a different category of service. The three categories of services are:
� Presentation servicesSAP R/3 graphical user interface (GUI) that runs on Windows, OS/2, MAC, or AIX platforms. There are also interfaces that are Web-based and others that are Java-based.
� Application servicesSAP R/3 application logic is executed on this layer. This layer provides services for online users, batch processes, and so on. SAP also provides monitoring utilities which are executed on this layer.
� Database servicesVendor-provided database systems. SAP R/3 uses the database server to store data from various application servers. The SAP R/3 application code and statistical data is also stored in database.
This design allows a more dynamic approach to managing workloads. It is possible to configure an SAP system where two tiers reside on one physical machine, i.e. application server and database server. When the workload grows to exceed the capacity of one physical machine, then the tiers can be split to run on different hardware. It is also possible to use multiple physical machines to support the application server tier.
For several years AIX, Windows, Solaris and z/OS have been supported application server platforms with the DB2 UDB for OS/390 and z/OS database server. On March 13, 2002, SAP announced that Linux on zSeries would be a supported application server platform with the DB2 UDB for OS/390 and z/OS database server. The Linux on zSeries became generally available on May 17, 2002. See Figure 1-1 on page 3 for the currently supported application server platforms and configurations with DB2 UDB for OS/390 and z/OS database server.
This figure highlights the Linux application server for zSeries. SAP application server on Linux for zSeries complements the existing SAP application server supported platforms. It gives our customers another configuration option to better meet their business requirements.
2 SAP on DB2 UDB for OS/390 and z/OS: Implementing Application Servers on Linux for zSeries

Figure 1-1 SAP application servers for zSeries
1.2 SAP business requirementsFor most customers, the production SAP system provides mission-critical applications. In the worst case, if the production SAP system is down, then the business stops. In order to meet business requirements, CIOs are under extreme pressure to keep these systems available at all times, and this is especially true for global companies.
In order to do so, they must have systems that provide continuous availability, performance, and scalability, and also be easy to manage. For many companies the business environment changes quickly and workloads can grow very quickly—therefore, they need systems that are easy to deploy. They also have to control the total cost of ownership for these systems.
In the following sections we discuss how the SAP Linux application server can meet these business requirements.
Network
SAPDatabase
IBM ^̂̂̂ zSeries
DB2 Subsystem
Application ServerOS/390 or z/OS
(31-bit) HiperSockets
ICLI Server
Application Server
ICLI Client
Linux for zSeries (64-bit) in DB Server CEC
DB Server: OS/390 or z/OS
ICLI ServerICLI Server
GUIGUIGUIGUI
Application Server
ICLI Client
Linux for zSeries (64-bit) on other zSeries
GUI GUI
IBM ^̂̂̂ zSeriesICLI Client
Application ServerAIX
WindowsSolarisGUIGUI
GUI GUI
Chapter 1. SAP and Linux overview 3

1.2.1 Continuous availabilityContinuous availability is a combination of high availability and continuous operation. An SAP system with a zSeries database server can provide continuous availability by using DB2 data sharing in conjunction with SAP sysplex failover. This is documented in the IBM Redbook Database Administration Experiences: SAP R/3 on DB2 for OS/390, SG24-2078. The Linux application server on zSeries fully participates in the configurations described in that redbook.
1.2.2 PerformanceWhen the Linux application server is running in an LPAR on the same zSeries hardware as the DB2 database server, the connection to the database server uses HiperSockets (network in a box). HiperSockets eliminates the need for adapter cards for the application server-to-database server connection. Because of this, HiperSockets speeds server-to-server communication by using the zSeries memory bus, thus reducing network latency significantly (with hardware latency close to zero) and providing high-end security, since no network traffic flows outside the server. This improved network time can significantly improve the performance of long-running, database-intensive transactions.
If the Linux LPARs are using regular engines (not IFL2), then Intelligent Resource Director (IRD) can be used to provide more efficient CPU resource allocation. Linux Application servers can have their CPU weights automatically managed by IRD. This would ensure that higher priority Linux application servers would get the CPU resources needed to meet service level agreements. See 18.5.3, “Enabling non-z/OS CPU management, in z/OS V1R3.0 MVS Planning: Workload Management, SA22-7602.
1.2.3 ScalabilityThe SAP architecture provides for the ability to add application servers when the capacity of the hardware has been exceeded. Also customers typically have multiple non-production SAP systems. Generally each SAP system or application server resides on its own hardware. For large installations, this means many physical servers are required.
A zSeries processor can scale from one to sixteen engines and, using PR/SM, the machine can be partitioned into as many as fifteen logical partitions (LPARs). LPARs can share CPU and I/O resources which are managed by PR/SM. Each LPAR could support a Linux application server, thus providing the ability to run fifteen application servers on a single zSeries machine. z/VM provides the added
2 See “IFL engines” on page 11 for a discussion of IFLs.
4 SAP on DB2 UDB for OS/390 and z/OS: Implementing Application Servers on Linux for zSeries

capability of running multiple Linux application servers in a single zSeries LPAR. Using z/VM, the number of Linux application servers that could be run on one zSeries machine is limited only by the capacity of the zSeries machine.
Linux on zSeries application servers also fully support DB2 data sharing. With DB2 data sharing, database servers can be added to provide additional capacity beyond that of a physical zSeries machine. This means that you can add Linux application servers to an SAP system and maintain a physical two-tier configuration by adding additional DB2 database servers on additional zSeries machines. This provides scalability beyond a single zSeries machine.
1.2.4 ManageabilityThe management of Linux application servers on zSeries is simplified because of the outstanding scalability of the zSeries hardware. The UNIX paradigm is “one application server per machine”. This is not true for zSeries. With zSeries, many application server instances can be put on one machine. By reducing the number of physical systems and application instances from many to one, the effort for administration and maintenance can go down considerably.
With z/VM, the number of Linux application server instances that can be run on zSeries is increased. Another advantage of using z/VM is that the management procedures of the z/VM guest machines (Linux application servers) are common for all guest machines. This will further ease the management of multiple Linux application servers running on zSeries.
1.2.5 Ease of deploymentIn today’s world of fast-changing business volumes and acquisitions, the need to quickly deploy applications is key to business success. The ability to use z/VM to clone Linux application servers makes deployment easy and fast. See “Cloning SAP application instances” on page 119 for a detailed discussion for doing this.
1.2.6 Total cost of ownershipThe use of Linux on zSeries helps control the total cost of ownership (TCO) by allowing the consolidation of multiple application servers on a single zSeries machine. The incremental cost of adding an application server is less than that of the traditional UNIX environment. The availability of the new Integrated Facility for Linux (IFL)3 and its special pricing also help lower the TCO for Linux on zSeries.
3 See “IFL engines” on page 11 for a description of IFLs.
Chapter 1. SAP and Linux overview 5

There are many aspects of the TCO that can justify using Linux on zSeries:
� Increase utilization of server hardware, software, and network� Lower total cost including employee cost, floor space and energy� Increased availability, lower downtime costs� Faster deployment of servers, faster to market� Lower total cost for administration and maintenance
In order to calculate the TCO, several areas must be considered. These areas include (but are not limited to) the following:
Hardware� Servers� Disk� System management� Racks (+cables)
Hardware components will vary greatly between architectures being compared for solving the same problem. It is important to keep in mind that due to server differences in architecture and performance, it is important to correctly size the comparative workloads.
Software� Operating system� Linux SW support� System management� Database
Software costs make up a very large component in the TCO model. In the distributed model, most of the ISV software cost is based on the number of processors (CPUs), independent of whether the machine is running at 3% or 100%. Depending on the Linux for zSeries-based pricing, there can often be savings in ISV software.
People� Person days or full-time equivalent
People costs need to be examined carefully to make sure that the cost per person and the ratio of IT staff per server reflects the customer situation. It is frequently a very sensitive area.
Occupancy� Area� Utilities
6 SAP on DB2 UDB for OS/390 and z/OS: Implementing Application Servers on Linux for zSeries

There is a lot of variability to cost of floor space and utility costs in different geographies. When looking at floor space costs, examine if there are any constraints. If there are, the acquisition of more space will probably have a very high initial starting cost. This large additional cost can often weigh heavily on the total cost analysis.
DowntimeDowntime is an aggregated number based on expected downtime of each of the different architectures and on industry numbers for the cost of downtime. Cost of downtime numbers should be examined as a means of demonstrating the number of customer satisfaction issues that may occur within the different architectures. Downtime numbers are valuable for highlighting some of the hidden costs in an IT environment.
1.3 Linux for zSeriesThe following section describes some possible configurations for the zSeries machine with Linux application servers. Note that these are not all the possible configurations, simply the more common ones. For additional configurations see “Designing the system” on page 14.
1.3.1 Possible configurationsThe configurations in Figure 1-2 on page 8 show the Linux application servers running in native zSeries LPARs. The Linux application server on the left is using standard Central Processor (CP) engines. The Linux application servers on the right are using the new Integrated Facility for Linux (IFL) engines. This configuration is most suited for production SAP systems.
Chapter 1. SAP and Linux overview 7

Figure 1-2 Configuration options - examples (1)
The configuration in Figure 1-3 on page 9 shows the Linux application servers running as guest machines under zVM using IFL engines. It is also possible to run this configuration using standard engines.
This configuration is best suited for non-production environments. However, it is possible to run production environments in this configuration, provided that the additional z/VM overhead is acceptable. With this configuration the cloning of Linux application servers becomes much easier.
reg.eng.
LPAR
SAPApp
LPAR
DB2
LPAR
Linuxz/OS
reg.eng. reg.eng.
zSeries CEC
LPAR
SAPApp
LPAR
Linux
IFLIFLreg.eng.
LPAR
SAPApp
LPAR
DB2
LPAR
Linuxz/OS
IFLIFLreg.eng.
zSeries CEC
or
8 SAP on DB2 UDB for OS/390 and z/OS: Implementing Application Servers on Linux for zSeries

Figure 1-3 Configuration options - examples (2)
1.4 Benefits of zLinux for SAPLinux for zSeries inherits all the reliability, availability, and serviceability of the zSeries server. The following sections discuss the additional benefits of running Linux SAP application servers on zSeries.
1.4.1 Consolidation of operating system platformsWe believe that Linux is becoming one of the three most important operating systems in the IT industry. Customers are looking for an industry standard operating system that is open, flexible, and can easily deploy new applications at reduced costs. As Linux becomes more widely used, it makes sense to deploy critical business applications like SAP on Linux on zSeries. This would link the benefits of Linux with those of the zSeries hardware platform.
reg.eng.
DB2
LPAR
z/OS
reg.eng.
z/VM
LPAR
SAPApps
Linux
SAPApps
Linux
SAPApps
Linux
IFL IFL IFL IFL IFL
zSeries CEC
Chapter 1. SAP and Linux overview 9

1.4.2 Server consolidationLinux for zSeries provides for two types of consolidation, physical consolidation and virtual consolidation. Physical consolidation is the combining of multiple SAP application servers into one Linux application server on zSeries. The vertical scalability (from one to fifteen processors) of the zSeries server provides the capability to do this. Physical consolidation works best when the servers being considered are underutilized (less than 15% busy). Reducing the number of servers from many to one reduces administration and maintenance efforts. Cost savings can be realized in the areas of lower operations cost, people costs, and improved disaster recovery.
Virtual consolidation is moving the same number of SAP application servers to one zSeries machine. This can be accomplished by using PR/SM-managed LPARs or z/VM. This allows multiple SAP application servers to share hardware resources. It is very possible that the CPU requirements for the zSeries server would be less than the aggregate CPU resource of the consolidated applications servers, especially when consolidating development systems and quality assurance systems. Administration and maintenance costs will be less because of the need to manage only one hardware platform.
Another benefit of running Linux applications servers under z/VM is the ability to easily and quickly clone application servers. This addresses the requirement for quick and easy deployment of systems. Using z/VM for application server consolidation also addresses the requirement for ease of management and control of costs.
1.4.3 Native LPARIRD can be used if the Linux application servers are in a native LPAR using regular engines. As stated in “Performance” on page 4, IRD can be used to provide more efficient CPU resource allocation. It recommended that production Linux application servers should be run in a native LPAR in order to take advantage of IRD.
If IFLs are used, then capacity can be assigned to each of the Linux LPARs as needed, based on business requirements, using standard PR/SM functions such as LPAR capping. Multiple Linux LPARs that are sharing IFLs can take advantage of PR/SM features that dynamically share capacity while insuring that each LPAR receives the minimum capacity it needs.
1.4.4 64-bit addressingLinux application server on zSeries is the first Linux application server to support 64-bit addressing. The benefits of 64-bit addressing is the ability to address large
10 SAP on DB2 UDB for OS/390 and z/OS: Implementing Application Servers on Linux for zSeries

amounts of storage. This increases the size of the SAP buffers and provides for the ability to hold more data and programs in memory. By keeping more data and programs in memory, database requests can be avoided. If sufficient real storage is provided, then swapping and paging is avoided—thus leading to performance improvements for systems with many users per application server.
1.4.5 z/VM Linux image cloningThe ability to do image cloning with z/VM is key to the ability to easily and quickly deploy systems when there is a business need. The quicker a business can respond to changing business needs, the more competitive it will be. See “Cloning the Linux operating system” on page 103 for more information on Linux image cloning.
1.4.6 IFL enginesA new feature designed specifically for the Linux operating environment, called the Integrated Facility for Linux (IFL), is available on G5, G6, and zSeries servers. The IFL is a new type processor or engine that is dedicated to the Linux operating system on a logically partitioned machine.
IFLs are priced at a lower rate than regular engines used by z/OS. Also, because IFLs are dedicated to Linux workloads, the added capacity does not increase software fees in the z/OS environment. z/OS software pricing is confined to the capacity of the regular engines allocated to the z/OS LPARs. (Note that this reflects pricing as of the time of writing, which may have changed since the publication date. Consult your IBM server sales representative to obtain the most current pricing structure information.)
Chapter 1. SAP and Linux overview 11

12 SAP on DB2 UDB for OS/390 and z/OS: Implementing Application Servers on Linux for zSeries

Chapter 2. Planning for SAP on Linux for zSeries
This chapter discusses topics you need to consider before installing an SAP application server on Linux for zSeries. We discuss the following:
� Designing the system � Designing the network � Resource sharing considerations� Planning the software configuration� Professional support
To prepare the planning phase, also refer to the following publications:
� SAP R/3 on DB2 UDB for OS/390 and z/OS: Connectivity Guide, Fourth Edition, SC33-7965
� SAP R/3 on DB2 UDB for OS/390 and z/OS: Planning Guide, Second Edition, SAP R/3 Release 4.6D SC33-7965
2
© Copyright IBM Corp. 2002. All rights reserved. 13

2.1 Designing the systemAll planning steps you may have to consider depend on where you come from and where you want to go. As we cannot expand on all possible situations, we discuss three typical system configuration scenarios. We believe one of these scenarios should come close to your own environment.
2.1.1 Adding Linux application servers to an existing SAP systemOne possible scenario is that you might want to add to an existing SAP system application server running on Linux for zSeries. Figure 2-1 illustrates different possibilities of adding application servers running on Linux for zSeries.
Figure 2-1 Scenario 1: Adding SAP application servers on Linux for zSeries to an existing SAP system
AIX
W2k
z/OS
Linux
z/VM Linux
Linux
LinuxLinux
z/VM Linux
zSeriespSeries
xSeries
zSeries
DB2
ICLI
ENQ
AS
AS
ASAS
AS
AS
AS
LinuxLinux
14 SAP on DB2 UDB for OS/390 and z/OS: Implementing Application Servers on Linux for zSeries

Reasons for adding application servers running on a Linux for zSeries environment can be:
� Deciding to consider Linux as a strategic platform within the IT environment
� Replacing z/OS application servers to leverage 64-bit addressing and reduce software costs, without sacrificing the advantages of the hardware platform
� Replacing UNIX or NT/W2K application servers with Linux application servers running on the same CEC as the z/OS database subsystem, in order to reduce network latency and thereby the response time of long-running transactions
In this scenario, you face the following decisions:
� Will Linux run on the same hardware as the database server, or on a separate central electronic complex (CEC)?
The answer to this question depends on your current configuration. If your database system is already running on a zSeries server that has enough spare capacity or can be easily upgraded, you will probably place at least some of the application server workload on this server. I
If your database server is on an S/390 G5 or G6 platform, your decision whether to upgrade the database server or add a separate zSeries footprint will depend on your reasons to look for the Linux for zSeries solution in the first place.
� Will I deploy Linux native in an LPAR, or as a virtual image in a z/VM guest?
We recommend that you place the application servers of production systems in a separate LPAR, and development and test systems in z/VM guests. But this decision also depends on your environment. For example, application instances dedicated to batch workloads that use several hundred MB up to two GB of storage may run well in a z/VM guest. On the other hand, development systems that are used for capacity tests with thousands of emulated users should be configured the same way as their production systems.
2.1.2 Building new SAP systems from scratchIf you decide to implement a new SAP system landscape on DB2 UDB for z/OS, with application servers running under Linux on zSeries, you face the following questions:
� Will Linux run on the same hardware as the database server, or on a separate CEC?
� Will I deploy Linux in an LPAR or in a z/VM guest?
Chapter 2. Planning for SAP on Linux for zSeries 15

Those questions are discussed in 2.1.1, “Adding Linux application servers to an existing SAP system” on page 14. The same arguments hold here also. As you are using new hardware for both database and application servers, it makes sense to try to put them all together in same CEC.
� Do I want to use the high availability features that Parallel Sysplex provides?
Figure 2-2 describes an example of an SAP setup that addresses high availability. In our experience, many customers who set up a new SAP environment from scratch look especially for the Parallel Sysplex functions when they make the platform decision in favor of IBM zSeries.
Figure 2-2 Scenario 2: Highly available SAP systems with Linux application servers on zSeries
Decisions on the above questions provide the basis for the system layout and the network setup.
CF
LAN
z/OS
Linux
z/VM
zSeries
DB2
ICLI
ENQ
Linux AS
AS
Linux AS
Linux AS
z/OS
Linux
z/VM
zSeries
DB2
ICLI
ENQ
Linux AS
AS
Linux AS
Linux AS
zSeries
Linux
z/VM Linux
AS
LinuxLinux
16 SAP on DB2 UDB for OS/390 and z/OS: Implementing Application Servers on Linux for zSeries

2.1.3 Consolidating many SAP systemsWhere the zSeries really show its mettle is when it comes to server consolidation. This scenario assumes that you already have a number of different SAP systems running with some UNIX or Windows database server. As SAP systems over time increase in size and number, the number of installed hardware boxes will also increase in these environments.
Moving these systems to zSeries will give you the following advantages:
� Adding new SAP systems will, in most cases, result in setting up new LPARs and z/VM guests, not in adding more CECs.
� Increasing the number of servers does not necessarily require adding more capacity. Once you decide on the general system layout, you just add virtual servers. Only when the system workload grows do you increase your hardware capacity.
� By using several DB2 instances per z/OS image, and by placing z/OS and Linux into LPARs and z/VM guests with shared processors and shared I/O-channels, the system hardware can be used more efficiently.
� Utilizing Parallel Sysplex will provide outstanding high availability features.
When planning for this consolidation scenario, you have to decide on the following issues:
� Are Parallel Sysplex high availability features to be implemented?
� How many z/OS LPARs should be set up, and how many DB2 instances will run in each of them?
� Which Linux images will run in LPARs, and which in z/VM guests?
� Will all application servers run on the same footprint as their primary database instance?
� To which degree do I separate production, quality assurance, production and test?
The answers to most of these questions depend on the size of the SAP systems you are going to migrate.
As shown in Figure 2-3 on page 18, we recommend a setup with two zSeries servers, with z/OS LPARs running DB2 in data sharing mode. Use different LPARs for production databases and other databases. At a minimum, the largest production application servers should run natively in LPARs.
Chapter 2. Planning for SAP on Linux for zSeries 17

Figure 2-3 Scenario 3: Consolidating many SAP systems on zSeries
2.2 Designing the network After deciding on your system layout (that is, the hardware platforms to be used and where the database and application instances will be), it’s time to think about the communications setup. You can refer to SAP R/3 on DB2 UDB for OS/390 and z/OS: Connectivity Guide, Fourth Edition, SC33-7965 for detailed guidance on this topic.
One advantage of setting up SAP application servers on Linux for zSeries is the possibility to use HiperSockets to connect to a database instance on the same CEC.
CF
zSeries zSeries
zSeries zSeries
z/OS DB2
ENQ
DB2
ENQ
ICLIICLI
z/OS DB2
ENQ
DB2
ENQ
ICLIICLI
z/OS DB2
ENQ
DB2
ENQ
ICLIICLI
z/OS DB2
ENQ
DB2
ENQ
ICLIICLI
Linux AS
Linux AS
Linux AS
Linux AS
Linux AS
Linux AS
Linux AS
Linux ASLAN
z/VM LinuxLinuxLinux
z/VM LinuxLinuxLinux
18 SAP on DB2 UDB for OS/390 and z/OS: Implementing Application Servers on Linux for zSeries

HiperSockets provide up to four integrated TCP/IP simulated LANs accessible by combinations of LPAR partitions and z/VM virtual servers within the zSeries. It has no external network dependencies, no external components or associated latency, or risk of impact from network outages or slowdowns.
HiperSockets are meant to speed up server-to-server communication by using the zSeries memory bus, reducing the network latency significantly, and providing greater security since no network traffic flows outside the server.
From the viewpoint of network topology, HiperSockets behave much like OSA-Express adapters used for LPAR-to-LPAR communication. The difference is that there is no way to access directly the subnet to which HiperSockets belong from the outside. This means that all outbound traffic that has its origin in such a subnet has to be routed by an operating system having access to a HiperSockets adapter.
This has consequences for the TCP/IP high availability setup described in Chapter 4, SAP R/3 on DB2 UDB for OS/390 and z/OS: Connectivity Guide, Fourth Edition, SC33-7965. This setup assumes that by using a switching device between the application servers and the database servers, every adapter has access to every system. Figure 2-4 on page 20 shows an example of a similar configuration that integrates HiperSockets and TCP/IP over XCF.
Chapter 2. Planning for SAP on Linux for zSeries 19

Figure 2-4 Example of highly available TCP/IP configuration for a zSeries-only solution using OSA-Express Gigabit Ethernet and HiperSockets
In this HiperSockets configuration, there are two switches to connect the host environment to the presentation layer in the client network. All servers implement Open Shortest Path First (OSPF) routing, giving the HiperSockets connection the preference over the Gigabit connection. In case the primary ICLI server fails, the OSA adapter will be used for failover to the backup ICLI server.
The idea behind this setup is to provide redundant connections between application server and database server, as well as between application server and presentation layer. But you might decide to leave out the XCF and the direct OSA connection between the two sides of the configuration. In this case, the failover connection for the ICLI traffic and the communication between application servers and enqueue instance will go over the switches.
XCFz/OS A
Linux A
VIPA10.99.1.1
Adapter 110.1.1.1
Adapter 510.1.3.1
VIPA10.99.1.3
Adapter 310.1.1.3
Adapter 11192.168.50.3
Adapter 9192.168.50.1
Adapter 710.1.3.3
HS
Adapter 13192.168.60.1
Adapter 1710.1.4.1
Adapter 15192.168.60.3
OS
AO
SA
OS
A
z/OS B
Linux B
VIPA10.99.1.2
Adapter 210.1.2.1
Adapter 610.1.3.2
VIPA10.99.1.4
Adapter 410.1.2.3
Adapter 12192.168.50.4
Adapter 10192.168.50.2
Adapter 810.1.3.4
HS
Adapter 14192.168.60.2
Adapter 1810.1.4.2
Adapter 16192.168.60.4
OS
AO
SA
OS
A
switch
switch
DVIPA10.98.1.1
20 SAP on DB2 UDB for OS/390 and z/OS: Implementing Application Servers on Linux for zSeries

The high availability setup for TCP/IP is only complete when you use source VIPA on the application server. How to set up VIPA addresses by defining dummy devices is described in Linux for zSeries: Device Drivers and Installation Commands (March 4,2002), Linux Kernel 2.4, LNUX-1103, which can be found at:
http://www10.software.ibm.com/developerworks/opensource/linux390/documentation-2.4.17.shtml
However, to use source VIPA you need a special patch which is still marked as “experimental”. This patch is available at:
http://www10.software.ibm.com/developerworks/opensource/linux390/useful_add-ons.shtml
2.3 Resource sharing considerationsThe sharing of resources is one of the great strengths of Linux for zSeries. In the following section, we briefly discuss the options you have to share resources in a Linux for zSeries environment such as processors, real memory, disk storage, swap space, and network.
2.3.1 ProcessorsThe processing units (PUs) on a zSeries processor board come in different flavors, depending on the licensed internal code (LIC) that runs on the machine. Two of these PU flavors can be used to run operating systems:
� All-purpose central processors (CPs) can be used for all kinds of S/390 and zSeries operating systems: OS/390, z/OS, z/VM, VSE, Linux on S/390 and on zSeries (31-bit and 64-bit).
� Integrated Facilities for Linux (IFLs): only Linux on S/390 and z/VM V4 and higher. You cannot run OS/390, z/OS, z/VM V3 or VSE on these processors. The purpose of IFLs is that adding an IFL to your traditional environment should not increase your software costs. Adding an IFL will leave the machine type, model and serial number the same.
Defining LPARs or z/VM guests on a S/390 or zSeries system gives you the opportunity to share either CPs or IFLs. For instance, if you have 5 physical CPs and 3 physical IFLs, you can define LPARs which each have either up to 5 logical CPs or 3 logical IFLs. Be aware, however, that at this time you cannot define IFLs and CPs to the same LPAR. There is also the possibility to dedicate physical CPs or IFLs to LPARs. Dedicating PUs to an LPAR will reduce the number of PUs that can be logically defined or dedicated to the other LPARs.
With z/VM, the type of PU (CP or IFL) that can be defined to guests is inherited by the type of PU that is defined to the LPAR that z/VM runs in. In contrast to
Chapter 2. Planning for SAP on Linux for zSeries 21

LPARs, you can define more PUs to a guest that are available to the LPAR or even physically installed on the machine. For performance reasons, this feature should be used for testing purposes only.
2.3.2 Real memoryYou have to dedicate real memory to LPARs. If you want to increase the memory available to an LPAR, you have these options:
� If you have unused memory on your system, you can shut down your LPAR, add this memory in the hardware configuration definitions, and then reactivate the LPAR.
� Take memory away from another LPAR. For this, you have to deactivate both LPARs.
� Increase the amount of installed memory and give it to the LPAR.
Memory given to z/VM guests is normally virtual memory, which means that theoretically you can give each guest as much memory as you want, as long as you have enough paging space available. How much you can overcommit the physically available memory without serious performance degradation depends on the kind of operating system and workload you are running. You can increase the amount of virtual storage available to a guest without affecting others, except perhaps in performance.
2.3.3 Disk storageWith z/VM, you have several possibilities to virtualize disk storage:
� Dedicated minidisks
To the operating system, these look like DASD ECKD-devices, except that they can be tailored in size. The maximum size is that of the physical disk they are carved from. Minidisks cannot span multiple physical disks.
� Shared minidisks
When you share minidisks between Linux images, they must be mounted read-only on every image. Any other approach could lead to damaging the file system, as Linux tries to cache large amounts of these file systems in its memory, and there is no way to achieve coherence of this cache between multiple Linux images.
� Virtual disks (VDISKs)
They live only in virtual memory, are created with logon to the z/VM guest, and destructed on logoff. Therefore, they can only be used for temporarily used disks (for example, swap space).
22 SAP on DB2 UDB for OS/390 and z/OS: Implementing Application Servers on Linux for zSeries

z/VM also provides its own minidisk caching. It might be a good idea to use minidisk caching when you share minidisks between many Linux images. On the other hand, you should switch it off for minidisks Linux uses as swap devices.
For a standard setup, you might want to stick to dedicated minidisks which will make the initial configuration simple and easy to understand. If you want to ease system maintenance and save disk space, you might be interested in a shared disk approach as described in Chapter 5, “Cloning an SAP dialog instance” on page 93.
When planning the DASD configuration of a Linux LPAR, we recommend you make sure that Linux gets no access to volumes containing other production data or other non-Linux operating systems. This can be done in the hardware configuration definition (HCD) by either using the PARTITION parameter on the CHPID statement (which will dedicate all devices that are accessed by this CHPID to the Linux partition), or by using the PARTITION parameter on the IODEVICE statement and defining the CHPIDs as shared. In this case, you can select the devices that will be dedicated. The disadvantage is that Linux at IPL will still sense all devices that are accessible through the CHPIDs available to the LPAR, no matter which devices are dedicated.The way to configure DASD devices to your LPAR is described in Linux for zSeries and S/390: Distributions, SG24-6264in Chapter 3.
2.3.4 Swap spaceThere are several possibilities of setting up swap space in a z/VM Linux environment using DASD, minidisk, Linux RAMdisk or the XPRAM driver. The latter is not available for Linux for zSeries in 64-bit mode, because expanded storage is not recognized in that architecture. For a detailed discussion of these options, refer to Chapter 3 of Linux on IBM eServer zSeries and S/390: ISP/ASP Solutions, SG24-6299.
2.3.5 Network adaptersThere are several ways to share network adapters in an SAP Linux for zSeries environment. We recommend the following, in order of priority:
1. Share a HiperSockets “LAN” between all operating system images on the same box that participate in the SAP configuration. A total of 4000 IP addresses can be kept for the four possible IP address lookup tables of zSeries HiperSockets. To find more information on HiperSockets, refer to zSeries HiperSockets, SG24-6816.
2. Using OSA-Express adapters in QDIO mode as network devices, you can share one physical port over 80 TCP/IP stacks (operating systems) and also define up to 512 IP addresses to it, which makes 1024 IP addresses per
Chapter 2. Planning for SAP on Linux for zSeries 23
OSA-Express feature on a z900, using both ports. OSA adapters using QDIO mode also offer priority queueing, which allows you to establish TCP/IP connections with different quality of service over the same port.
Communication between LPARs that access directly the same port is especially efficient, as the adapter delivers the IP packages without adding a hardware link layer. For more information on OSA-Express Gigabit adapters, refer to "OSA-Express Implementation Guide", SG24-5948-01.
3. Use z/OS HiperSockets accelerator as router. It allows very efficient routing between a QDIO LAN connection and a HiperSockets “LAN” on the lowest possible data link control level. No higher level TCP/IP stack routing functions are involved.
4. Under z/VM, use Linux as a router between the OSA or HiperSocket LAN and the other z/VM guests if you don’t want the guests to attach directly to the OSA adapter. The network connection between the guests will be preferably z/VM guest LAN, or virtual CTCs or IUCV. In order to keep the network configuration as simple as possible, we prefer direct attachment of the Linux images to the OSA-Express adapter.
5. You can also use the z/VM TCP/IP stack as a router between the outer world and an internal server network, or to connect the Linux images within z/VM to the database server.
2.4 Hardware and software requirementsYou have to fulfill certain requirements for hardware and software in order to be able to run the SAP application server on Linux for zSeries in a certified environment.
2.4.1 Hardware requirementsHardware needed for the application server on Linux for zSeries:
� 64-bit z/Architecture hardware, which is available today with z900 and z800
Hardware needed for the database server:
� S/390 G5 or higher, or zSeries
Attention: Whenever you use a TCP/IP stack in an LPAR as a router between an OSA adapter and an internal LAN (for example, HiperSockets, z/VM guest LAN), this stack must be defined as primary router (PRIRouter) to the OSA port. Only one PRIRouter can be defined to an OSA port.
24 SAP on DB2 UDB for OS/390 and z/OS: Implementing Application Servers on Linux for zSeries

2.4.2 Software requirementsFor the Linux 64-bit application server you need the following as a minimum:
� The latest SAP release 4.6D kernel, with SAP database release 4.6B or higher.
� For high availability, you need some more standalone modules; refer to SAP note 524816.
� IBM DB2 Universal Database (UDB) for OS/390 and z/OS V6 or higher.
� For the database server instance, OS/390 2.8 or higher is required.
� If you want to use the z/VM virtualization technology, you need z/VM V4.2 or higher.
� A 64-bit Linux distribution with glibc 2.2.4 and kernel 2.4.x is mandatory. At the time of writing, SuSE Linux Enterprise Server 7 is the only supported distribution.
� The communication protocol between an SAP application server on Linux for zSeries and the database server is TCP/IP.
� PTF requirements for SAP on zSeries.
These checks should be performed not only at installation time, but also on a regular basis for an active environment. SAP helps you with this task by providing a tool called PTF checker. This tool is described in SAP note 183311.
The specifics for Linux for zSeries in this note as of today are shown in Example 2-1 on page 26. We follow the recommendations given here and apply the RPMs1 and z/VM APARs.
Important: Before installing SAP on DB2 for z/OS and OS/390, or before you add application servers on Linux for zSeries to an existing environment, always verify that the PTF requirements mentioned in the most current SAP note 81737 “DB2/390 APAR list” are fulfilled.
1 The RedHat Package Manager (RPM) is a widely used tool to create packages of software or patches in the Linux environment. These packages are themselves called RPMs.
Chapter 2. Planning for SAP on Linux for zSeries 25

Example 2-1 Part of SAP note 81737 concerning Linux for zSeries (Version 0383 as of 06/06/2002)
===== mySAP.com on Linux for zSeries =====
Supported Linux Distribution:------------------------------ SuSE Linux Enterprise Server 7 for zSeries
Before installing SAP perform the tasks described in the followingdocuments located in the SuSE support database:ftp.suse.com/pub/projects/sap/SLES7/zSeries/Note.pdf (English)ftp.suse.com/pub/projects/sap/SLES7/zSeries/Hinweis.pdf (Deutsch)
To operate SAP, the following RPM packages have to be installed:- saplocales-2.2.4-1.s390x.rpm (adjusted SAP code pages
for 64 bit)- saplocales-32bit-2.2.4-1.s390.rpm (adjusted SAP code pages
for 32 bit COMPAT mode)- suse-sapinit.rpm (Setting of necessary Linux
kernel parameters)
Running Linux under z/VM:1. z/VM 4.2 and higher is required2. Make sure the following APAR is applied:Release 420VM62840 UM30220 NEW FUNCTION: ENHANCED PAGE FAULT HANDSHAKING
2.5 Planning the software configurationWhen you make software product decisions, it is important to understand that the system configuration options you make will have an impact on the software products that will be supported on your actual configuration. For example, the availability of a product may vary with the kernel release and the file system type you have chosen.
The following system options will determine the possibilities you will have in selecting other software products:
� SAP release and SAP kernelCurrently the SAP application server is available for the 4.6D kernel. For up-to-date information, read SAP note 156554.
26 SAP on DB2 UDB for OS/390 and z/OS: Implementing Application Servers on Linux for zSeries

� The Linux distribution you have chosen At the time of writing, only SuSE Linux Enterprise Server 7 for 64-bit IBM eServer zSeries is available. For news check SAP note 156554, as well as the following site:
http://www.sap.com/linux/platforms/index.asp
� The Linux kernel version and the version of gccIf you have Linux already installed, try cat /proc/version to get the versions. Otherwise, ask your distribution provider.We used Linux version 2.4.17-timer as the Linux kernel, and gcc version 2.95.3.
� File system typeSpecify which file system type you will use (different types of file systems are ext2, ext3, ReiserFS, JFS). We recommend that you use a journaling file system when possible. We chose ReiserFS because it integrates nicely with the SuSE distribution.
� Logical Volume Manager (LVM)To be able to extend a file system on the fly, or to span a file system over more than one volume, we recommend that you use the Logical Volume Manager. It is included in the SuSE distribution and offers great flexibility. For information concerning the LVM see either of the following sites:
http://www.suse.de/en/support/whitepapers/lvm/http://www.sistina.com/products_lvm.htm
You may have to go through several decision iterations until you can reconcile your system options with the other software products you want to install and run together with SAP.
Many products are available to help you with systems management of the following areas:
� Backup Recovery� Job scheduling� Automation and High Availability� Monitoring� Archiving � Printing
However, because the SuSE Linux Enterprise Server 7 for 64-bit IBM eServer zSeries distribution is quite new, at the time of writing we cannot provide a complete list of products in this environment. Refer to your sales representative for information on available products.
Chapter 2. Planning for SAP on Linux for zSeries 27

For systems management guidance, you can also refer to the following IBM Redbooks:
� Linux for S/390, SG24-4987� Linux for zSeries and S/390: Distributions, SG24-6264� Linux on IBM eServer zSeries and S/390: ISP/ASP Solutions, SG24-6299� Linux on zSeries and S/390: Systems Management, SG24-6820 (this
publication also discusses Open Source software)
2.6 Professional support and maintenanceIn a production environment, you often contract professional support for your entire IT environment (hardware, z/OS, DB2 for z/OS, SAP, AIX). We recommend that you also contract professional support for Linux on zSeries, just as for any other operating system in your company.
IBM offers professional support for Linux through the Linux Support line. For additional information, refer to:
http://www.ibm.com/linux/support
Depending on customer needs, IBM offers 24x7 Internet and voice support, ranging from answering general questions to identifying problems.
For customers using the SuSE Linux Enterprise Server, IBM Global Services and SuSE have an agreement to provide customers with a high standard level of support.
Major distributors also offer support for Linux on zSeries. For information on SuSe, refer to:
http://www.suse.com/index_us.html
We also recommend that you contract maintenance from your Linux distributor in order to be informed about available updates that may concern you. Distributors often offer a download site and a description of how to download and implement the updates.
28 SAP on DB2 UDB for OS/390 and z/OS: Implementing Application Servers on Linux for zSeries

Chapter 3. Preparing the system environment
This chapter describes our system configuration and the preparation tasks required before installing an SAP application server on Linux for zSeries running under z/VM.
We discuss the following:
� System configuration� Network configuration� Installing z/VM� Installing Linux for zSeries� Verification steps
3
© Copyright IBM Corp. 2002. All rights reserved. 29

3.1 System configurationWe designed our configuration based on the configuration described in SAP on DB2 UDB for OS/390 and z/OS - High Availability Solution Using System Automation, SG24-6837.
Figure 3-1 shows the system configuration we used, which consists of three LPARs.
Figure 3-1 SAP system configuration
Two of the LPARs, SC42 and SC04, are running z/OS with DB2 in data sharing mode. The third LPAR, WTSCVMT, is used for z/VM. Three Linux images are defined under z/VM: vmlinux6, vmlinux7, and vmlinux8. They are used for running SAP application servers.
IBM zSeries
LPAR 2 - z/OS - SC04LPAR 2 - z/OS - SC04
NetView 1.4
SA 2.1
ENQREPL
SAP Apps Server
ICLI Server
DB2 data sharing member 2
saposcol
rfcoscol
ParallelSysplex-
DB2-SAPDatabase
XCFXCFIBM zSeries
LPAR 1 - z/OS - SC42LPAR 1 - z/OS - SC42
NFSServer
NetView 1.4
SA 2.1
SAP Apps Server
ICLI Server
DB2 data sharing member 1
ENQ MSG GW rslgcoll
rslgsend
saposcol
rfcoscol
LPAR 3 - z/VM Linux Images - WTSCVMT
SAP Apps Server
ICLI Client
SAP Apps Server
ICLI Client
SAP Apps Server
ICLI Clientvmlinux8
vmlinux7
vmlinux6 ICLI Client
30 SAP on DB2 UDB for OS/390 and z/OS: Implementing Application Servers on Linux for zSeries

This redbook focuses mostly on vmlinux7 and vmlinux8, which are the two Linux images we use for documenting z/VM installation, virtual image creation for Linux, and implementation and cloning of SAP on Linux.
The SAP application servers we install are connected to an existing SAP system in a sysplex environment that we use for the high availability project. We also take advantage of the DB2 data sharing configuration we already have to test SAP sysplex failover for our Linux image.
3.2 Network configurationFigure 3-2 shows our network configuration.
Figure 3-2 Network configuration
We use three different kinds of transport layers for the TCP/IP network:
� A HiperSockets connection between the Linux guests in z/VM and the z/OS SC42 image.
IBM zSeries IBM zSeriesParallelSysplex-
XCFXCF
LPAR 1 - SC42 - z/OS
E 192.168.50.4H 192.168.60.4
Hostname = .................
Static VIPA for LPAR SC42 VIPA 172.21.11.1
Dynamic DVIPA for SAPREDDVIPA 172.20.10.1
Dynamic DVIPA for SAPNFSDVIPA 172.20.10.2
LPAR 2 - SC04 - z/OS
E 192.168.50.5Hostname = ................
Static VIPA for LPAR SC04 VIPA 172.21.10.1
Dynamic DVIPA for SAPRED DVIPA 172.20.10.1
Dynamic DVIPA for SAPNFSDVIPA 172.20.10.2
Zebra
TCP/IP
Zebra
TCP/IP
Zebra
TCP/IPOSA-E(QDIO)
Hip
erS
ocke
ts
OSA-E(QDIO)
OSPF
TCP/IP
OSPF
TCP/IP
Fast EthernetFast Ethernet
Router 2210Router 2210OSPF
VMLINUX6 Linux
VMLINUX7 Linux
VMLINUX8 Linux
E 192.168.50.6H 192.168.60.6
E 192.168.50.7H 192.168.60.7
E 192.168.50.8H 192.168.60.8LP
AR
3 -
WT
SC
VM
T -
z/V
M
Fast Ethernet
HiperSockets
Connections
GUIGUI GUIGUI GUIGUI GUIGUI
Token Ring
Chapter 3. Preparing the system environment 31

� Two OSA-Express Fast Ethernet adapters running in QDIO-mode. These adapters are connected to a router (IBM model 2210) that provides access to the LAN.
� TCP/IP communication using the cross-coupling facility (XCF) service provided by Parallel Sysplex for the z/OS images.
3.2.1 Network setup for vmlinux8Figure 3-3 shows more detail in our network setup for vmlinux8. We use two interfaces for communication between the SAP application server and the data base, one HiperSockets and one OSA-Express Fast Ethernet adapter. During the installation of vmlinux8 we also use a third adapter, that has access to the FTP server with the Linux installation sources.
Figure 3-3 Network setup of vmlinux8
Establishing networking routesOnce we’ve set up our IP configuration, we need to establish networking routes to be able to reach other subnets. On z/OS, we use OMPROUTE and on Linux we use Zebra to implement OSPF routing. We have the choice between static routing and dynamic routing.
Dynamic routing is more flexible than static routing. If there are several network paths available to a given connection, it provides a more fault-tolerant networking path.
Adapter 1HiperSockets192.168.60.8
vmlinux8
Zebra
LAN (to installation ftp server)
LAN (SAP system)
z/OS SC42 (SAP system)
Adapter 2FE (QDIO)
192.168.50.8
Adapter 3FE (LCS)9.12.6.72
32 SAP on DB2 UDB for OS/390 and z/OS: Implementing Application Servers on Linux for zSeries

Checking the NFS serverIn our configuration, NFS is used to share file directories between vmlinux7 and vmlinux8.
3.3 Installing z/VMIn this section we provide a brief outline of how to install z/VM using SystemPac/VM.
z/VM installation includes the following steps:
1. Standalone restore of the preconfigured DASD using DDRXA.You will need tape access for the LPAR you want to install z/VM into.
2. IPL the new sysres.
3. Edit the SYSTEM CONFIG file.One of the things you can decide here is which devices z/VM should sense and vary online at IPL. Example 3-1 shows the Status of Devices section of the z/VM SYSTEM CONFIG file. Be aware that the statements relate to consoles and networking devices as well as to DASD.
Example 3-1 z/VM SYSTEM CONFIG file - status of devices at IPL time
/**********************************************************************/ /* Status of Devices*//**********************************************************************/ DEVICES , OFFLINE_AT_IPL 0000-FFFF, NOTSENSED 0000-FFFF,
ONLINE_AT_IPL 0161-0162 13A0-13AF 1A65 1A8F 22DD-22DF 2510-2512, 232E 138A-138F 18BC-18BF 18C1-18C6 0200 C0E0-C0EF, C0F0-C0FF 139A 139B 1F54-1F55 1F60 1F64-1F66 1F68, 1F6C 1F6D 1F72 1F77 1FB1 1FB2 1FB4 1FB7 22AC 22AD, 22DC 240C 1480-1489 14A0 14A2 14A4-14A6 B100-B10E, B1FE,
SENSED 0161-0162 13A0-13AF 1A65 1A8F 22DD-22DF 2510-2512,
Tip: If you don’t have z/VM yet, but plan to install it, ask your IBM sales representative to order a SystemPac/VM for you. You’ll get tapes with a z/VM already preconfigured to your environment, and with a current and well-defined PTF level. Then it will take only about a day to install and configure z/VM.
Chapter 3. Preparing the system environment 33

232E 138A-138F 18BC-18BF 18C1-18C6 0200 C0E0-C0EF, C0F0-C0FF 139A 139B 1F54-1F55 1F60 1F64-1F66 1F68, 1F6C 1F6D 1F72 1F77 1FB1 1FB2 1FB4 1FB7 22AC 22AD, 22DC 240C 1480-1489 14A0 14A2 14A4-14A6 B100-B10E, B1FE
4. Edit the USER DIRECT file.Be sure to create backup copies before changing anything. The changes necessary to set up the Linux guests are described in “Linux installation and customization” on page 37.
5. Configure TCP/IP.The syntax of the configuration files is mainly the same as in TCP/IP for z/OS.
We already have a virtual machine defined to host our Linux guests. The LPAR running z/VM is already installed and has three GB of memory and two shared CPs. It has access to two OSA-Express Fast Ethernet adapters, one running in LCS and one in QDIO mode, and to HiperSockets. We are running z/VM V4.2. The Linux servers are defined with 512 MB each.
3.4 Creating virtual imagesThe installation of a Linux virtual image in a z/VM guest is documented in the following publications:
� Linux for S/390, SG24-4987, Chapters 6, 7 and 16� Building Linux Systems under IBM VM, redp0120� Linux for zSeries and S/390:Distributions, SG24-6264, Section 5.2� Linux for zSeries and S/390:ISP/ASP Solutions, SG24-6299, Chapter 9
We focus on the implementation steps that are specific to SAP.
Tip: You can find information regarding z/VM at:
www.vm.ibm.com
The VM performance tips, as well as the following topics, are particularly useful:
� Linux Performance when running under VM� Configuring Processor Storage� Performance-related APARs
34 SAP on DB2 UDB for OS/390 and z/OS: Implementing Application Servers on Linux for zSeries

The first step in setting up a virtual image is to create a definition statement in the USER DIRECTory of z/VM. The definition we use is given in Example 3-2.
Example 3-2 Definition statement for Linux virtual server in the z/VM USER DIRECT file.
USER VMLINUX8 XXXXXXXX 512M 1G G ACCOUNT ITS30000
IPL CMS PARM AUTOCR MACH ESA 4 POSIXINFO UID 85 DEDICATE 292E 292E DEDICATE 292F 292F DEDICATE 7208 7208 DEDICATE 7209 7209 DEDICATE 720A 720A DEDICATE 2888 2888 DEDICATE 2889 2889 DEDICATE 288A 288A CONSOLE 0009 3215 SPOOL 000C 3505 A SPOOL 000D 3525 A SPOOL 000E 1403 A LINK MAINT 0190 0190 RR LINK MAINT 019E 019E RR LINK MAINT 019F 019F RR LINK MAINT 019D 019D RR MDISK 0191 3390 1791 50 VMZU1A MR MDISK 0200 3390 0001 10016 LX3EA2 MR MDISK 0201 3390 0001 2500 LX3BA2 MR MDISK 0202 3390 2501 0020 LX3BA2 MR MDISK 0203 3390 2521 0200 LX3BA2 MR MDISK 0204 3390 2721 0600 LX3BA2 MR MDISK 0205 3390 3321 1000 LX3BA2 MR MDISK 0206 3390 4321 0200 LX3BA2 MR MDISK 0207 3390 4521 0200 LX3BA2 MR MDISK 0208 3390 4721 0200 LX3BA2 MR
The statements in Example 3-2 have the following meanings:
USER VMLINUX8 xxxxxxxx 512M 1G GCreate a z/VM guest, also called user, named VMLINUX8 with password xxxxxxxx. The user will start with 512 MB virtual storage, which can be extended to 1 GB by the user himself. The last letter “G” in the row denotes the access rights of the user. In this case, the user can only access resources given to explicitly in the USER
Chapter 3. Preparing the system environment 35

DIRECTory, which is sufficient to run Linux and provides the highest security.
IPL CMS PARM AUTOCRStart CMS when user logs on. This is necessary run the PROFILE EXEC file of vmlinux8, where further customization can be done.
MACH ESA 4 The user will run a machine in ESA-mode, in our case z/Architecture. A maximum of 4 virtual CPs can be defined to the guest.
POSIXINFO UID 85 Specifies that the user gets a POSIX user ID of 85.
DEDICATE 292E 292EUsing the DEDICATE-statement, real devices can be passed through to the z/VM guest. In this case, a real device with number 0x292E will be passed to the user with a virtual device address of 0x292E. In our definition, we use the statement to dedicate networking devices to the user:292E,292F: OSA-Express, LCS-mode7208-720A: zSeries HiperSockets2888-288A: OSA-Express, QDIO-mode
CONSOLE 0009 3215 Define a virtual console.
SPOOL 000C 3505 A Define a virtual reader.
SPOOL 000D 3525 A Define a virtual puncher.
SPOOL 000E 1403 A Define a virtual printer.
LINK MAINT 0190 0190 RRLink minidisk that belongs to user MAINT with a device number of 190 as a minidisk with device number 190 in read only mode. We use this to provide the user with the necessary disks to run CMS.
MDISK 0191 3390 1791 50 VMZU1A MRCreate a minidisk with device number 191, device type 3390. The minidisk has 50 cylinders (CYLs), carved out of a disk with volid VMZU1A, starting at cylinder 1791.
After making the modifications to the USER DIRECTory and activating it using the DIRECTXA command, logon to your new z/VM guest. Issue the command FORMAT 191 A to make minidisk 191 ready for CMS.
Then, create a file PROFILE EXEC A that is called every time you IPL CMS. This file allows you to customize your environment by setting runtime parameters,
36 SAP on DB2 UDB for OS/390 and z/OS: Implementing Application Servers on Linux for zSeries

linking minidisks and creating network connections to other z/VM guests. Our PROFILE EXEC is shown in Example 3-3.
Example 3-3 PROFILE EXEC file of z/VM guest VMLINUX8
/* DEFAULT PROFILE EXEC */ 'VMLINK TCPMAINT 592 ( NONAMES' 'CP SET MSG ON' 'CP SET EMSG ON' 'CP SET RUN ON' 'CP SET PF12 RETRIEVE' 'CP SET RETRIEVE MAX' 'CP TERM CHARDEL OFF' IF WORD(DIAGRC(24,-1),2) = 2 THEN /* USER IS DISCONNECTED - RC=2 */ 'CP IPL 202' EXIT
We have no networking statements in the PROFILE EXEC because we use only dedicated networking devices which we define in the USER DIRECTory.
3.5 Linux installation and customizationTo install Linux for zSeries, we follow the explanations given in Linux for zSeries and S/390:Distributions, SG24-6264, Section 5.2 “Installation of SuSE under VM”.
3.5.1 Basic installationFirst, we collect all the information necessary for the installation. Table 3-1 lists the VM data we have to collect. We place the LINK statement for the TCPMAINT disk containing the FTP program in the PROFILE EXEC file.
Table 3-1 VM data needed for Linux install
In the beginning of the installation process, you have to set up an installation system that is accessible via TCP/IP, because you need to run the YaST tool in a
VM data Value
VM guest password xxxxxxx
Disk with FTP program LINK TCPMAINT 592 120 RR
Tape unit (not needed when installing from VM reader)
Not used
Chapter 3. Preparing the system environment 37

VT100 telnet session. We put together the necessary network data in Table 3-2 on page 38.
Table 3-2 Network data needed for initial Linux setup
Now let’s discuss the storage devices we plan to give to our installation. Our layout, which you can see in Table 3-3, contains more minidisks than we need right now for the Linux and for the SAP installation for two reasons:
� We are going to use the installation as a base for the cloning procedure we describe in Chapter 5, “Cloning an SAP dialog instance” on page 93. For cloning the operating system, we need two additional minidisks, 202 and 203.
� By using the Logical Volume Manager (LVM) and ReiserFS, we have the option to dynamically increase our partitions and file systems. We show this by adding small minidisks, 206-208, to our setup.
Table 3-3 Minidisk layout
Network data Value
Host name vmlinux8.itso.ibm.com
IP address 9.12.6.72
Netmask 255.255.254.0
Broadcast address 9.12.7.255
Gateway address 9.12.6.92
IP address of DNS 9.12.2.7
DNS search domain itso.ibm.com
Device number
Device name Mount point or volume group
Size in CYLS
Size in MB
200 /dev/dasda1 SWAP 10016 7011
201 /dev/dasdb1 / 2500 1750
202 /dev/dasdc1 (cloning) 20 14
203 /dev/dasdd1 (cloning) 200 140
204 /dev/dasde1 (SAP) 600 420
205 /dev/dasdf1 (SAP) 1000 700
206 /dev/dasdg1 - spare - 200 140
207 /dev/dasdh1 - spare - 200 140
38 SAP on DB2 UDB for OS/390 and z/OS: Implementing Application Servers on Linux for zSeries

For the SAP code, we plan to use minidisks 204 and 205.
Later in the installation process, you have to tell YaST where it will find the installation sources. Table 3-4 summarizes the information you will need.
Table 3-4 Information on Linux installation sources
After all the necessary data has been collected, you can proceed with the installation process:
1. Transfer the Linux kernel image, the initial ramdisk image, and the parmline from the installation file system to minidisk A of z/VM user VMLINUX8 using FTP.
2. Create a REXX procedure LIN EXEC to punch the kernel, parmline and ramdisk image to the virtual reader and to IPL from the reader.
3. Invoke LIN EXEC to IPL the installation system.
4. Answer the questions of the installation routine, using the values collected in Table 3-2 on page 38. For this part of the installation we use the OSA-Express adapter that runs in LCS mode, so we choose Option 2) OSA Ethernet on the first panel.
208 /dev/dasdi1 - spare - 200 140
Note: When installing a standalone server, we would normally use a journalling file system for the root (/) -partition. This implies you have a separate partition with the ext2-file system, for example mounted on /boot, that you use to IPL from.
In our case, we are going to share the root-file system read-only in the cloning scenario. For that reason we don’t need a journalling file system here, which in turn makes a separate /boot-partition obsolete. Therefore we install the complete operating system in one file system on /dev/dasdb1.
NFS. FTP or SMB server data Value
IP address or hostname 9.12.6.53
Path to CDROM-data /code/suse7_sles7prof/cd1
UID costa
Password XXXX
Device number
Device name Mount point or volume group
Size in CYLS
Size in MB
Chapter 3. Preparing the system environment 39

Note that Option 3) OSA-Gigabit Ethernet or OSA-Express Fast Ethernet is only for OSA-Express adapters in QDIO mode. In our case, because there is only one adapter in LCS mode defined to our z/VM guest, we can use the auto configuration option instead of giving the device numbers manually.
5. After the routine successfully runs its network test, we perform an additional check to see if we can reach the installation ftp server:ping -c1 9.12.6.53After the successful test, we logon to the system via telnet.
6. Load the dasd driver by issuing:insmod dasd dasd=200-208You can check the load of the module issuing lsmod and the recognition of the minidisks by using the command: cat /proc/dasd/devices
7. Perform a low-level format on all minidisks using dasdfmt. We do not want to partition our disks and have no OS/390 running under z/VM that could access these minidisks. Therefore it is safe to use the -d ldl parameter and create non-labeled disks with only a single partition. We do that using the commanddasdfmt -y -d ldl -b 4096 -f /dev/dasda -pfor /dev/dasda up to /dev/dasdp.
Formatting the 7 GB swap device /dev/dasda we need for SAP takes some time, so for increased efficiency, we format the other volumes using two more telnet sessions.
8. Enter yast to perform the last steps in the installation process.
9. We choose the following:
– English as installation language
– Installation from an FTP site
– Install Linux from Scratch
– Select device number 200 as swap partition
10.The next choice is between “Do not partition” and “Setting up LVM”. We select Do not partition as we are not going to use LVM for the basic operating system install. In the following step, we choose file system types and mount points, as shown in Figure 3-4 on page 41.
Tip: Do not try to modify the size of your telnet window while working with YaST; it will simply exit.
40 SAP on DB2 UDB for OS/390 and z/OS: Implementing Application Servers on Linux for zSeries

Figure 3-4 Yast panel - Creating file systems
Set up the installation source with values given in Table 3-4 on page 39.
11.Select Load configuration. Within the Load configuration panel, we select SuSE Standard as the base configuration, as this is recommended by SAP.
12.Back on the previous panel, we select Change or create configuration to apply the following changes:
– We deselect all packages connected with KDE, as we do not want to use a window manager.
– We select ucdsnmp, which is a prerequisite to the routing package Zebra, from the n - network support series. As we are going to recompile Zebra, we will install it later on. Otherwise, we would also select the Zebra package from series n.
– In the doc - Documentation series, we deselect the susehelp and susetour packages to resolve dependency issues resulting from deselecting kde.
13.The next step is “Start Installation”. Now the packages selected will be installed on the system.
+-----------------------------CREATING FILESYSTEMS-----------------------------+¦ ¦¦ Current list of the file systems on the existing hard drives: ¦¦ Device name Blocks Inodes Format FsType Mount point Partition ¦¦ +--------------------------------------------------------------------------+ ¦¦ ¦ 0201:1 1799988 4096 normal ext2 / S390 DASD ¦ ¦¦ ¦ 0202:1 14388 2048 No ext2 S390 DASD ¦ ¦¦ ¦ 0203:1 143988 4096 No ext2 S390 DASD ¦ ¦¦ ¦ 0204:1 431988 4096 No ext2 S390 DASD ¦ ¦¦ ¦ 0205:1 719988 4096 No ext2 S390 DASD ¦ ¦¦ ¦ 0206:1 143988 2048 No ext2 S390 DASD ¦ ¦¦ ¦ 0207:1 143988 2048 No ext2 S390 DASD ¦ ¦¦ ¦ 0208:1 143988 2048 No ext2 S390 DASD ¦ ¦¦ +--------------------------------------------------------------------------+ ¦¦ ¦¦ ¦¦ ¦¦ ¦¦ ¦¦ ¦¦ F1=Help F3=Change type F4=Mount point ¦+-F5=Expert menu --F6=Format --F7=Read fstab -------------¦¦ < Continue > < Abort > ¦+------------------------------------------------------------------------------+
Chapter 3. Preparing the system environment 41

14.After installation, we can give our preferences for the kernel setup, as shown in Figure 3-5.
Figure 3-5 YaST Panel - SELECT KERNEL
15.Now YaST guides us through more panels. This is the information we provide to YaST:
– Select timezone EST5EDT (Eastern Daylight Saving time)
– Hostname: vmlinux8Domain: itso.ibm.com
– We are running in “real network” mode.
– vmlinux8 is not a DHCP client.
– We confirm the network setup given in Table 3-2 on page 38.
– Yes, we want to start inetd, the portmapper and the NFS server.
– Our name server has the IP address 9.12.2.7.
– Sendmail will be configured with the YaST standard setup for “Hosts with permanent network connection (SMTP)”.
16.Now we are ready to reboot. The YaST tool has written the boot-sector on the root-device which has device number 201. The next steps are:
– Shutdown the system:shutdown -h now
– Go to the VM session for user VMLINUX8 and issue:IPL 201
The newly installed Linux system should come up.
----------------------------SELECT KERNEL------------------------------+¦ Please select the appropriate kernel to boot your system. ¦¦ For additional information about the boot kernels, use the help system ¦¦ (F1). You may use F2 to change the destination path for the kernel. F3 ¦¦ may be used to change the destination of the .config file. ¦¦ Kernel destination: /boot ¦¦ Destination of .config file: /usr/src/linux ¦¦ +-------------------------------------------------------------------+ ¦¦ ¦ Kernel 2.4.17 for zSeries ¦ ¦¦ +-------------------------------------------------------------------+ ¦+--------------------------------------------------------------------------¦¦ < Continue > < Abort > ¦+--------------------------------------------------------------------------+
42 SAP on DB2 UDB for OS/390 and z/OS: Implementing Application Servers on Linux for zSeries

3.5.2 Configuring networking devices The first step in configuring our network setup is to define the network devices we need for communication with the database. We use YaST to integrate the HiperSockets and Fast Ethernet interfaces in our Linux operating system (see Figure 3-6). Invoke YaST and select System Administration -> Integrate hardware into system -> Configure networking device.
Figure 3-6 Configure networking device
On the next screen we press F3 to select hsi0, as shown in Figure 3-7. After that we do the same for the Fast Ethernet adapter, except that we select eth1 for the Fast Ethernet adapter.
+-------------------YaST - Yet another Setup Tool----------------¦ YaST Version 1.11.4 -- (c) 1994-2002 SuSE GmbH +----------------------------------------------------------------¦ Language: English ¦ Media: FTP site ftp://9.12.6.53/code/suse7_sles7prof/c¦ Root Device: /dev/dasdb1 +----------------------------------------------------------------¦ +----------------+-------------------------------------------+¦ ¦ General install¦ Integrate hardware into system -> ¦ ¦ ¦ Installation se¦ Kernel a+----------------------------------¦ ¦ Package Managem¦ Network ¦ Mouse configuration ¦ ¦ Update entire s¦ Login co¦ Modem configuration ¦ ¦ System Administ¦ Settings¦ CD/DVD configuration ¦ ¦ Show README Fil¦ User adm¦ Configure printers ¦ ¦ Copyright ¦ Group ad¦ Configure ISDN hardware ¦ ¦ Exit YaST ¦ Create b¦ Configure your scanner ¦ +----------------¦ Security¦ Configure networking device ¦ ¦ Set the ¦ Configure Channel Devices +-------------------¦ Set time+---------------------------------- ¦ Configure ¦ Configure GPM ¦ ¦ Change configuration file ¦ +-------------------------------------------+
Chapter 3. Preparing the system environment 43

Figure 3-7 SELECTION OF NETWORKING DEVICE Panel
Then we exit YaST to make some changes manually.
chandev.confThe next step is to update the file chandev.conf. This file is used to provide the Linux kernel with the parameters related to the device channel layer. We have to make appropriate entries for our two devices.
The HiperSockets device uses the qeth device driver. The addresses for this device are 0x7208,0x7209,0x720A. We add the following line to the end of /etc/chandev.conf file:
qeth0,0x7208,0x7209,0x720A
To the Fast Ethernet adapter, which also uses the qeth device driver, we add the following lines:
add_parms,0x10,0x2888,0x2889,0x288A,portname:OSA2880qeth1,0x2888,0x2889,0x288A
modules.confTo be sure that the correct modules will be loaded by the kernel, we checked that hsi0 and eth1 each have one entry in /etc/modules.conf (see Figure 3-8 on page 45).
+-------------------SELECTION OF NETWORKING DEVICE-------------------+ ¦ Here you may select your networking device. ¦ ¦ Your selections will be written to /etc/modules.conf ¦ ¦ ¦ ¦ ¦ ¦ ¦ ¦ Network type :hsi0 : ¦ ¦ ¦ ¦ Networking device module [HSI Network ] ¦ ¦ ¦ ¦ ¦ ¦ Module options ¦ ¦ :# options for kernel 2.2 here, use /etc/chandev.conf for 2.4 : ¦ ¦ ¦ ¦ ¦ ¦ ¦ ¦ F3=Selection list ¦ +--------------------------------------------------------------------¦ ¦ < Continue > < Abort > ¦ +--------------------------------------------------------------------+
44 SAP on DB2 UDB for OS/390 and z/OS: Implementing Application Servers on Linux for zSeries

Figure 3-8 Checking modules.conf
Now we activate our changes to chandev.conf by using the command:
rcchandev reload
For more detailed information concerning the device driver for Linux on zSeries, see Linux for zSeries: Device Drivers and Installation Commands (March 4,2002), Linux Kernel 2.4, LNUX-1103.
3.5.3 Configuring networking interfacesNow we configure the network interfaces with YaST -> System Administration -> Network configuration -> Network base configuration. By using the function keys, we configure hsi0 and eth1 (see Figure 3-9 and Figure 3-10 on page 46).
Figure 3-9 Configuring hsi0
# Configuration file for loadable modules; used by modprobe and ke#
# Aliases - specify your hardwarealias eth0 lcsalias hsi0 qethalias eth1 qethalias tr0 offalias scsi_hostadapter offalias fb0 off
+----+--------------------ENTER THE NETWORK ADDRESSES---------------------+----+¦ The¦ Please enter the data required for the configuration of your ¦ ¦¦ ass¦ network. This is the IP address you want to give the machine ¦ ; ¦¦ thi¦ currently being installed (e.g. 192.168.17.42) and the netmask of ¦ ¦¦ be ¦ your network. The latter is 255.255.255.0 for most (smaller) ¦ ¦¦ ¦ networks, but you may wish to set it to a different value. If you ¦ ¦¦ ¦ need a gateway to access the server, please enter the IP address of¦ ¦¦ Nu¦ the gateway host. ¦ ¦¦+---¦ ¦ -+¦¦¦ [¦ Type of network: hsi0 ¦ ¦¦¦¦ [¦ ¦ ¦¦¦¦ [¦ IP address of your machine: :192.168.60.8 : ¦ ¦¦¦¦ [¦ ¦¦¦¦ ¦ Dynamic IP address (ippp, for example) [ ] ¦ ¦¦¦¦ ¦ ¦ ¦¦¦¦ ¦ Netmask (usually 255.255.255.0): :255.255.255.0 : ¦ ¦¦¦¦ ¦ ¦ ¦¦¦+---¦ Default gateway address (if required): :192.168.50.75 : ¦ -+¦¦ F3=¦ IP address of the Point-to-Point partner : : ¦ ¦¦ F7=¦ Maximal Transfer Unit - MTU : : ¦ ¦+----¦ (in doubt leave field empty) ¦ --¦¦ +--------------------------------------------------------------------¦ ¦+----¦ < Continue > < Abort > ¦
Chapter 3. Preparing the system environment 45
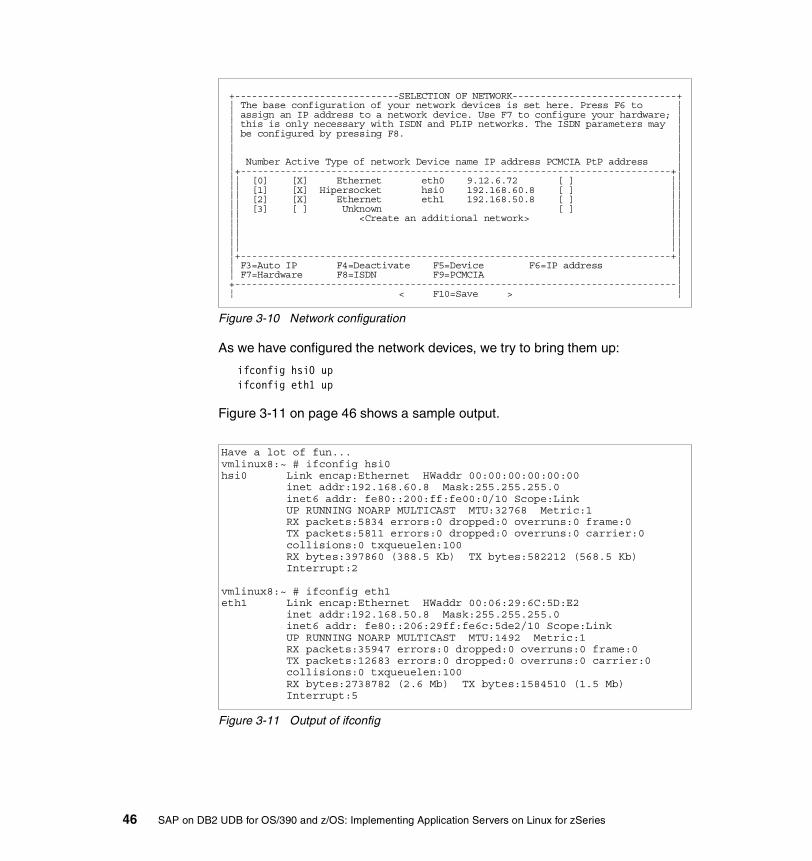
Figure 3-10 Network configuration
As we have configured the network devices, we try to bring them up:
ifconfig hsi0 upifconfig eth1 up
Figure 3-11 on page 46 shows a sample output.
Figure 3-11 Output of ifconfig
+-----------------------------SELECTION OF NETWORK-----------------------------+¦ The base configuration of your network devices is set here. Press F6 to ¦¦ assign an IP address to a network device. Use F7 to configure your hardware; ¦¦ this is only necessary with ISDN and PLIP networks. The ISDN parameters may ¦¦ be configured by pressing F8. ¦¦ ¦¦ ¦¦ Number Active Type of network Device name IP address PCMCIA PtP address ¦¦+----------------------------------------------------------------------------+¦¦¦ [0] [X] Ethernet eth0 9.12.6.72 [ ] ¦¦¦¦ [1] [X] Hipersocket hsi0 192.168.60.8 [ ] ¦¦¦¦ [2] [X] Ethernet eth1 192.168.50.8 [ ] ¦¦¦¦ [3] [ ] Unknown [ ] ¦¦¦¦ <Create an additional network> ¦¦¦¦ ¦¦¦¦ ¦¦¦¦ ¦¦¦+----------------------------------------------------------------------------+¦¦ F3=Auto IP F4=Deactivate F5=Device F6=IP address ¦¦ F7=Hardware F8=ISDN F9=PCMCIA ¦+------------------------------------------------------------------------------¦¦ < F10=Save > ¦
Have a lot of fun...vmlinux8:~ # ifconfig hsi0hsi0 Link encap:Ethernet HWaddr 00:00:00:00:00:00 inet addr:192.168.60.8 Mask:255.255.255.0 inet6 addr: fe80::200:ff:fe00:0/10 Scope:Link UP RUNNING NOARP MULTICAST MTU:32768 Metric:1 RX packets:5834 errors:0 dropped:0 overruns:0 frame:0 TX packets:5811 errors:0 dropped:0 overruns:0 carrier:0 collisions:0 txqueuelen:100 RX bytes:397860 (388.5 Kb) TX bytes:582212 (568.5 Kb) Interrupt:2
vmlinux8:~ # ifconfig eth1eth1 Link encap:Ethernet HWaddr 00:06:29:6C:5D:E2 inet addr:192.168.50.8 Mask:255.255.255.0 inet6 addr: fe80::206:29ff:fe6c:5de2/10 Scope:Link UP RUNNING NOARP MULTICAST MTU:1492 Metric:1 RX packets:35947 errors:0 dropped:0 overruns:0 frame:0 TX packets:12683 errors:0 dropped:0 overruns:0 carrier:0 collisions:0 txqueuelen:100 RX bytes:2738782 (2.6 Mb) TX bytes:1584510 (1.5 Mb) Interrupt:5
46 SAP on DB2 UDB for OS/390 and z/OS: Implementing Application Servers on Linux for zSeries

You can also use the command ping to reach some ip adresses that share the same subnet with hsi0 or eth1. If the devices do not start correctly, you might have to reboot your Linux server.
3.5.4 Dynamic routing - Zebra setupWe use Zebra to implement OSPF routing on Linux on zSeries. Zebra is an Open Source product and has the following Web site:
http://www.zebra.org
Zebra is included in the SuSE distribution. You can also download a fresh copy of Zebra, as we did, from:
http://www.zebra.org/download.html
Creating a new Zebra package The following steps describe the procedure to create a new RPM package for Zebra. This new package contains zebra-0.92a but no sources, so it is very small and can be used to install Zebra on every machine, if you wish. You have to perform this task just once.
It doesn’t matter on which Linux machine you create this package. We created it on a different machine simply because we had to install some software components in order to run rpm -bb for Zebra, which we don’t want to have on our SAP system.
Let’s start to build the package.
1. We install Zebra, including the sources from the SuSe CDs. For installation we used YaST -> Package Management (Update, Installation, Queries) -> Select your installation media -> Change or create configuration.
Install the package zebra_spm from the source packages (see Figure 3-13 on page 48). You find Zebra in the source packages of your SuSe Distribution. (see Figure 3-12 on page 48).
After installing the package, go to /usr/src/packages/SOURCE. There you will find the source of Zebra for version zebra-0.9 and a patch.
Tip: In our configuration, the MTU size for the HiperSockets adapter hsi0 is 32786, because we used the default value. Recent measurements show that an MTU size of 8 K is recommended for performance reasons.
Chapter 3. Preparing the system environment 47

Figure 3-12 Installing the Zebra sources -1
Figure 3-13 Installing the Zebra sources - 2
Verify that the packages readline and autoconf are already installed. You need them to run an rpm -bb later on.
vmlinux6:~ # rpm -q readline-develreadline-devel-2.05-78vmlinux6:~ # rpm -q autoconf-2.13-347autoconf-2.13-347
+- Series ---------------------------------------------------------------------+¦ spl Spell checking utilities and databases [ 11.3 M] ¦¦¦ tcl Tcl/Tk/TclX, Tcl-Language and Tk-Toolkit for X [ 26.0 M] ¦¦¦ tex TeX/LaTeX and applications [724.1 K] ¦¦¦ x Base X Window System - XFree86\tm [110.2 M] ¦¦¦ x3d 3D software for X11 and console [ 4.6 M] ¦¦¦ xap X Applications [ 10.8 M] ¦¦¦ xdev Development under X11 [ 25.3 M] ¦¦¦ xv XView (OpenLook, Applications) [ 0 B] ¦¦¦ xwm Window managers and desktop environments [ 40.8 M] ¦¦¦ yast YaST Components [ 50.2 M] ¦¦¦ zkm Kernel module sources [ 0 B] ¦¦¦ zq Source packages [ 0 B] ¦¦+------------------------------------------------------------------------------++- <F3>=Zoom ------------------------------------------------------------------+¦device name partition total used free free% mount point ¦¦ ¦¦/dev/dasdb1 DASD 132.6 M 104.2 M 28.4 M 21% / ¦¦/...L1/lvhome LVM 18.7 M 2.4 M 16.3 M 87% /home ¦¦/.../lvsapmnt LVM 193.7 M 10.0 M 183.7 M 94% /sapmnt ¦¦/...GS1/lvusr LVM 1.65 G 1.01 G 648.6 M 38% /usr ¦+------------------------------------------------------------------------------+
+---------------------------------------------------------------++- <F3>=Zoom -+¦ [ ] yp-tools_spm Sources for yp-tools: N¦¦¦Mount point ¦¦ [ ] ypbind_spm Sources for ypbind: NIS¦¦¦ Free¦¦ [ ] ypserv_spm Sources for ypserv: YP ¦¦¦/ ¦¦ [ ] ytalk_spm Sources for ytalk: Mult¦¦¦ 28.4 M¦¦ [ ] ytree_spm Sources for ytree: A fi¦¦¦/home ¦¦ [ ] yudit_spm Sources for yudit: Unic¦¦¦ 16.3 M¦¦ [X] zebra_spm Sources for zebra: free¦¦¦/sapmnt ¦¦ [ ] zimg_spm Sources for zimg: displ¦¦¦ 183.7 M¦¦ [ ] zip_spm Sources for zip: Pack p¦¦¦/usr ¦¦ [ ] ziptool_spm Sources for ziptool: To¦¦¦ 647.7 M¦¦ [ ] zircon_spm Sources for zircon: Tcl¦¦¦/usr/sap/RED ¦¦ [ ] zoo_spm Sources for zoo: Pack p¦¦¦ 167.9 M¦¦ [ ] zope_spm Sources for zope: An ap¦¦¦/...sap/trans¦¦ [ ] zsh_spm Sources for zsh: zsh sh¦¦¦ 183.7 M¦+---------------------------------------------------------------++-------------++------------------------------------------------------------------------------+¦Version: 0.90a-54 ¦¦Package Size: installed 5.2 M (compressed 885.3 K) ¦¦GNU Zebra is free software that manages TCP/IP based routing protocols. It ¦¦supports BGP-4 protocol as described in RFC1771 (A Border Gateway Protocol 4) ¦+------------------------------------------------------------------------------+
48 SAP on DB2 UDB for OS/390 and z/OS: Implementing Application Servers on Linux for zSeries

If you have a different output, then install them as previously described for Zebra. The difference is that you find them in the d - Development series of the YaST panel displayed in Figure 3-12 on page 48.
Figure 3-14 Creating a new rpm for Zebra
2. We downloaded the new Zebra SOURCES from:
http://www.zebra.org/download.html
We put it in the directory that contains the Zebra packages we installed in 1 (see point 2 in Figure 3-14).
3. We changed three entries in the spec as shown in point 3 in Figure 3-14.
4. We invoked rpm -bb zebra.spec, which created the package zebra-0.92a-54.s390x.rpm in /usr/src/packages/RPMS/s390x (see point 4 in Figure 3-14).
We had now created the Zebra package that we used for the installation on vmlinux8.
Installing the new Zebra package on vmlinux8Zebra requires the package ucdsnmp. It will not be installed if you choose only the “standard” SuSe Linux setup. As we planned using Zebra, we selected the package manually during the installation process described in 3.5, “Linux installation and customization” on page 37. If you need to do it now, you find it in the “n - network support” series.
1. cd /usr/src/packages/SOURCES2. cp <download_path>/zebra-0.92a.tar.gz .3. vi /usr/src/packages/SPECS/zebra.spec
:Name: zebraCopyright: GPL Version 2Group: Networking/DaemonsURL: http://www.zebra.org#Provides:#Requires: ucdsnmpSummary: free routing software (e.g. for BGP and OSPF)Version: 0.92aRelease: 54Source0: zebra-0.92a.tar.gzPatch0: zebra-0.90.difPatch2: zebra-configure.diff::#/etc/zebra/README.mbgp::
4. rpm -bb zebra.spec
Chapter 3. Preparing the system environment 49

Figure 3-15 Installing Zebra
We then transferred our newly created package, zebra-0.92a-54.s390x.rpm, to vmlinux8 and invoked rpm -i zebra-0.92a-54.s390x.rpm to install Zebra (see Figure 3-15.
Configuring Zebra After installing Zebra, we had to set it up. The configuration files were located in /etc/zebra. There were also some sample configuration files after installation, shown in Example 3-4.
Example 3-4 Sample files in /etc/zebra
vmlinux8:~ # ls -l /etc/zebra/total 48drwxr-x--- 2 root root 4096 Jun 13 12:23 .drwxr-xr-x 31 root root 4096 Jun 13 19:17 ..-rw------- 1 root root 572 May 28 10:07 bgpd.conf.sample-rw------- 1 root root 2859 May 28 10:07 bgpd.conf.sample2-rw------- 1 root root 1178 May 28 10:07 ospf6d.conf.sample-rw-r--r-- 1 root root 243 Jun 13 12:23 ospfd.conf-rw------- 1 root root 182 May 28 10:07 ospfd.conf.sample-rw------- 1 root root 412 May 28 10:07 ripd.conf.sample-rw------- 1 root root 396 May 28 10:07 ripngd.conf.sample-rw-r--r-- 1 root root 67 May 28 10:07 vtysh.conf.sample-rw-r--r-- 1 root root 160 Jun 13 12:23 zebra.conf-rw------- 1 root root 375 May 28 10:07 zebra.conf.sample
We used zebra.conf.sample and ospfd.conf.sample to create the real configuration files zebra.conf and ospfd.conf, as shown in Example 3-5 and Example 3-6 on page 51.
Example 3-5 Configuration file /etc/zebra/zebra.conf
!-*- zebra -*-!hostname Routerpassword zebraenable password zebra!! Interface's description.interface eth1interface hsi0
vmlinux8:/home/andre # rpm -i zebra-0.92a-54.s390x.rpmUpdating etc/rc.config...Done.
50 SAP on DB2 UDB for OS/390 and z/OS: Implementing Application Servers on Linux for zSeries

!log file /var/log/zebra.log
The only things you have to provide in these configuration files are the network device names and the IP addresses of the subnets they are attached to. Eventually, you can prioritize connections by giving different weights to network interfaces in the ospfd.conf file.
Example 3-6 Configuration file /etc/zebra/ospfd.conf
! -*- ospf -*-hostname ospfdpassword zebra!interface hsi0 ip ospf cost 5 ip ospf priority 5!interface eth1 ip ospf cost 10 ip ospf priority 0!router ospf network 192.168.50.0/24 area 0 network 192.168.60.0/24 area 0!log stdout
The Zebra and OSPF daemons need ports for communication with other routers and for remote administration. We made sure that the necessary ports were available in the /etc/services file, and were not occupied by other applications.
Example 3-7 TCP/IP configuration file /etc/services.
[...]zserv 346/tcp # Zebra serverzserv 346/udp # Zebra server[...]zebrasrv 2600/tcp # zebra servicezebra 2601/tcp # zebra vty[...]ospfd 2604/tcp # OSPFd vty[...]
Startup and shutdown of ZebraNow we were ready to start the dynamic routing. We did this with:
Chapter 3. Preparing the system environment 51

/etc/init.d/zebra start/etc/init.d/ospfd start
To make the startup of Zebra persistent, we modified /etc/rc.config as shown in Figure 3-16. Zebra then automatically started at IPL.
Figure 3-16 Modify rc.config
Checking VIPA addressesWe checked whether the dynamic routing was active using the command netstat -r to see if there were dynamically learned routes. We also did a ping to the static and dynamic VIPA addresses of the database hosts (which reside in different subnets). This worked fine.
3.5.5 Customizing SuSE Linux Enterprise ServerSuSE offers a small rpm package to customize your Linux. You can download this package from:
ftp://ftp.suse.com/pub/projects/sap/SLES7/zSeries/packages/suse-sapinit.rpm.
We installed this package with the command
rpm -i suse-sapinit.rpm
Two kernel parameters are modified (Figure 3-17 on page 53) when installing this package. shmmax sets the maximum shared memory to 2 GB. msgmni sets the maximum number of message queue identifiers to 1024.
vi /e tc /r c. co nf ig::# Start the zebra routing daemon?#
ST AR T_ ZE BR A= "y es "
## bgpd is a Border Gateway Protocol 4 (BGP-4) protocol daemon. BGP-4 is::# ospfd provides an OSPF version 2 routing protocol as described in# RFC2178. OSPF is one of IGPs (Interior Gateway Protocols). Compared# with RIP, OSPF can serve much more networks and priod of convergence# is very short. OSPF is widely used in large networks such as ISP# backbone and enterprise network.## Start the opsf daemon (zebra)
ST AR T_ OS PF D= "y es "
#::
52 SAP on DB2 UDB for OS/390 and z/OS: Implementing Application Servers on Linux for zSeries

Figure 3-17 Automatic adaptation of kernel parameter shmmax and msgmni
You may check the success of this with ipcs -l (Figure 3-18).
Figure 3-18 checking the ipc limits
The rpm package also provides entries in rc.config to automatically start the SAP application server at IPL. We recommend not to use this option. We think that it is better to have a controlled startup of the SAP application server. This should be done manually or with job scheduling tools. So we don’t modify this entry (see Figure 3-19).
Figure 3-19 SAP-related entry in rc.config
3.5.6 Creating swap spaceThe SAP application server uses a large amount of memory. For installation you need at least three times the amount of RAM plus 500 MB as swap space. But especially with 64 bit and the so-called zero administration memory management from SAP it is possible that even this amount of swap space is not sufficient. It depends on the memory configuration of the SAP application server and the workload it processes. SAP recommends at least 20 GB of swap space for
vmlinux8:/tmp # cat /etc/sysctl.conf# Kernel settings (for SAP R/3)#kernel.shmmax=2147483648kernel.msgmni=1024
vmlinux8:/tmp # ipcs -l
------ Shared Memory Limits --------max number of segments = 4096max seg size (kbytes) = 2097152max total shared memory (kbytes) = 8388608min seg size (bytes) = 1
------ Semaphore Limits --------max number of arrays = 128max semaphores per array = 250max semaphores system wide = 32000max ops per semop call = 32semaphore max value = 32767
------ Messages: Limits --------max queues system wide = 1024max size of message (bytes) = 8192default max size of queue (bytes) = 16384
# Start SAP R/3 ?#START_SAP="no"
Chapter 3. Preparing the system environment 53

productive SAP instances. For more information regarding this topic, see SAP note 0153641.
In Figure 3-20 we see that 7 GB of swap space are available on vmlinux8.
Figure 3-20 Available swap space
Because we had a small test installation, we decided that this was sufficient for our environment. In real life we recommend that you monitor the swap space consumption of your SAP application servers even for non-production systems. With time and experience you will get a firmer idea of your swap space requirements.
For more information on how to create swap space, refer to section 10.3 in Linux for S/390, SG24-4987. The 2 GB restriction for real memory mentioned there is no longer true with a 64-bit kernel.
3.5.7 Installing SAP locales
SAP provides adapted locales for Linux. You can download these as rpm packages from ftp.sap.com. At the time we installed them, saplocales-32bit-2.2.4-1.s390.rpm was in a different place than documented in the paper from SuSE. We found it, together with saplocales-2.2.4-1.s390x.rpm, in /pub/linuxlab/sapcd/glibc-2.2.4, as shown in Figure 3-21.
vmlinux8:~ # cat /proc/swapsFilename Type Size Used Priority/dev/dasda1 partition 7211500 0 -1
Note: SuSE provides a small paper with hints for installing SAP R/3 with Linux on zSeries. We downloaded this paper from;
ftp://ftp.suse.com/pub/projects/sap/SLES7/zSeries/Note.pdf
The next steps are based on this paper.
54 SAP on DB2 UDB for OS/390 and z/OS: Implementing Application Servers on Linux for zSeries

Figure 3-21 Downloading saplocales
We install them with the following commands:
vmlinux8:/home/andre # rpm -i saplocales-32bit-2.2.4-1.s390.rpmvmlinux8:/home/andre # rpm -i saplocales-2.2.4-1.s390x.rpm
3.5.8 Installing ICLI client and serverAs on any other platform such as AIX, Sun or NT, we need a vehicle on Linux to connect our SAP application server to the database. This is the ICLI server. (Only if you run your application server on Unix System Services, no ICLI server is required).
The ICLI server is delivered as a PTF. See the most current SAP note 81737 for your release.
The Installation of the ICLI server is the same as for any other platform. It is described in chapters 8 and 10 in SAP R/3 on DB2 UDB for OS/390 and z/OS: Planning Guide, SC33-7966.
The ICLI server also handles ASCII/EBCDIC conversion.
Platform differences are handled by the ICLI clients. For each operating system platform, you have a specific ICLI client. The ICLI client for Linux is initially stored in SYS1.SFOMDATA (FOME46DX) on z/OS. It is also a component of the ICLI PTF. During installation, this library is automatically downloaded by R3SETUP to your SAP kernel directory and renamed to ibmiclic.so. The ICLI client is a shared library and is automatically loaded when the SAP application server is started.
Figure 3-22 on page 56 shows the started task we used to start the ICLI server REDICLI8.
f t p> pw d2 5 7 " /p u b /l i n ux l a b/ s a pc d /g l i bc - 2 .2 . 4 " i s c u r re n t d i re c t or y .f t p> di r2 0 0 P OR T co m m an d su c c es s fu l .1 5 0 O pe n i ng A SC I I m o d e d at a co n n ec t i on f or / bi n /l s .t o ta l 2 4 3 2- r w- r -- r - - 1 f t p 1 02 7 04 0 Ma y 17 1 2: 2 7 s a pl o c al e s -2 . 2 .4 - 1 .s 3 9 0x . rp m- r w- r -- r - - 1 f t p 19 3 01 9 Ma y 17 1 2: 2 7 s a pl o c al e s -3 2 b it - 2 .2 . 4 -1 . s3 9 0 .2 2 6 T ra n s fe r co m p le t e .1 6 7 b yt e s r e c ei v e d i n 0 . 03 s ec o n ds ( 5. 5 7 K b y te s /s e c )f t p> bi n2 0 0 T yp e se t to I .f t p> pr o m ptI n te r ac t i ve m od e Of f .f t p> mg e t *
Chapter 3. Preparing the system environment 55

Figure 3-22 Started task REDICLI8
Figure 3-23 shows the directories of the ICLI servers and the content of their environment configuration file.
Figure 3-23 ICLI server files and directories on Unix System Services
3.6 Final checks before installing SAPThe final preparation steps are as follows:
3.6.1 Checking the system configurationYou should perform the steps described on pages 24-25 in SAP R/3 Installation on Linux for zSeries: IBM DB2 UDB for OS/390 and z/OS, SG24-5948 to check the systems requirements.
Menu Utilities Compilers Help sssssssssssssssssssssssssssssssssssssssssssssssssssssssssssssssssssssssssssssss BROWSE SYS1.PROCLIB(REDICLI8) - 01.02 Line 00000000 Col 001 080 Command ===> Scroll ===> CSR ********************************* Top of Data **********************************//* ICLI server started task JCL //REDICLI8 EXEC PGM=BPXBATCH,TIME=NOLIMIT,REGION=0M, // PARM='PGM /usr/sbin/fome46ds -PLAN FOMEP46D -LOGDIR /usr/sap/ // RED/icli/icli8 -PORT 5008' //STDENV DD PATH='/usr/sap/RED/icli/iclienv' //*TEPLIB DD DISP=SHR,DSN='DB7X7.SDSNEXIT:DB7X7.SDSNLOAD' //STEPLIB DD DISP=SHR,DSN=DB7X7.SDSNLOAD //STDERR DD PATH='/usr/sap/RED/icli/icli8/redicli8.&SYSNAME..err', // PATHOPTS=(OWRONLY,OCREAT,OTRUNC), // PATHMODE=(SIRWXU) //STDOUT DD PATH='/usr/sap/RED/icli/icli8/redicli8.&SYSNAME..out', // PATHOPTS=(OWRONLY,OCREAT,OTRUNC), // PATHMODE=(SIRWXU) //SYSUDUMP DD SYSOUT=* //SYSMDUMP DD SYSOUT=* ******************************** Bottom of Data ********************************
1. SAPRES2 @ SC42:/sap/RED/icli> ls -artltotal 704-rw-r--r-- 1 redadm SAPSYS 88 Apr 29 17:18 iclienv-rw-r--r-- 1 redadm SAPSYS 591 Apr 29 17:37 iclitask.jcl-rw-r--r-- 1 redadm SAPSYS 642 Apr 29 17:37 icli.jcl-rwxr-xr-x 1 redadm SAPSYS 261 Apr 29 18:56 iclistartdrwxr-xr-x 9 redadm SYS1 8192 May 28 17:23 ..drwxr-xr-x 6 redadm SAPSYS 8192 Jun 4 16:22 .drwxr-xr-x 2 redadm SAPSYS 8192 Jun 6 19:24 icli9drwxr-xr-x 2 redadm SAPSYS 8192 Jun 6 19:24 icli8drwxr-xr-x 2 redadm SAPSYS 8192 Jun 6 19:24 icli7drwxr-xr-x 2 redadm SAPSYS 8192 Jun 6 19:24 icli6
2. SAPRES2 @ SC42:/sap/RED/icli>cat iclienvICLI_TRACE_LEVEL=0NLSPATH=/usr/lib/nls/msg/%L/%NSTEPLIB=DB7X7.SDSNEXIT:DB7X7.SDSNLOAD
56 SAP on DB2 UDB for OS/390 and z/OS: Implementing Application Servers on Linux for zSeries

3.6.2 Checking the /etc/servicesWith the Standard SuSE installation comes a /etc/services with a lot of entries. Some of them interfere with the SAP application server. SAP uses port number 4800 plus a system number for its gateway services.
We have to comment out the iims entries as shown in Figure 3-24, because they are used by the gateway service (port 4800). This /etc/services also shows entries that will later be generated by R3SETUP during installation in the lower part of Figure 3-24 beginning with the entry sapdp00. If you have a different instance number, for example 01, you have to check for port 4801. Also check if the other SAP ports are free, especially the port you have chosen for your ICLI server.
Figure 3-24 Output of /etc/services
3.6.3 Checking /etc/hostsAfter performing the initial Linux install, we had duplicate entries for vmlinux8 in /etc/hosts. We changed /etc/hosts as shown in Figure 3-25 on page 58. Now we had just the entry for the hostname and the Fast Ethernet, which should be used for the communication to the SAP front ends. SAP requires a clean TCP/IP setup. R3SETUP was complaining because of these duplicate entries.
cat /etc/services:#iims 4800/tcp # Icona Instant Me#iims 4800/udp # Icona Instant Meiwec 4801/tcp # Icona Web Embeddiwec 4801/udp # Icona Web Embeddilss 4802/tcp # Icona License Syilss 4802/udp # Icona License Syhtcp 4827/tcp # HTCPhtcp 4827/udp # HTCP:sapdp00 3200/tcpsapgw00 3300/tcpsapgw00s 4800/tcpsapmsRED 3600/tcpsapdb2RED 5008/tcp
Chapter 3. Preparing the system environment 57

Figure 3-25 Updating of /etc/hosts
To make sure that these entries would not be added again each time /sbin/SuSEconfig runs, we changed CHECK_ETC_HOSTS in /etc/rc.config from yes to no (see Figure 3-26).
Figure 3-26 Modifying /etc/rc.config
3.6.4 Checking consistent name resolutionCorrect resolution of host names is very important in SAP. An installation without it will definitely fail. So the results of the commands shown in Example 3-8 should be consistent.
Example 3-8 Commands to check consistent name resolution
vmlinux8:~ # nslookup 192.168.50.8Server: itsodns.itso.ibm.comAddress: 9.12.2.7
Name: vmlinux8.itso.ibm.com
Content of /etc/hosts before changing127.0.0.1 localhost::9.12.6.72 vmlinux8.itso.ibm.com vmlinux8192.168.60.8 vmlinux8.itso.ibm.com192.168.50.8 vmlinux8.itso.ibm.com
Content of /etc/hosts afterward 127.0.0.1 localhost::192.168.50.8 vmlinux8.itso.ibm.com vmlinux8
Vi /etc/rc.config::# SuSEconfig can do some checks and modifications in /etc/hosts.# If this is not wanted, set the following variable to 'no' (yes/no).#CHECK_ETC_HOSTS=no
## If CHECK_ETC_HOSTS is set to yes, SuSEconfig sorts your /etc/hosts.# But in some cases this may be unwanted. So here is a flag which tells# SuSEconfig to "beautify" your /etc/hosts. (yes/no)#BEAUTIFY_ETC_HOSTS=no
::
58 SAP on DB2 UDB for OS/390 and z/OS: Implementing Application Servers on Linux for zSeries

Address: 192.168.50.8
vmlinux8:~ # nslookup vmlinux8Server: itsodns.itso.ibm.comAddress: 9.12.2.7
Name: vmlinux8.itso.ibm.comAddress: 192.168.50.8
vmlinux8:~ # hostnamevmlinux8
3.6.5 Checking installed languagesWe verified that the required languages en_En and de_DE were installed using the command locale -a.
3.6.6 Creating redadm and sapsysThe administrative user for SAP is the UNIX user redadm. He belongs to the group sapsys.
It is possible to create users and groups manually or have R3SETUP create them. We decided to let R3SETUP create the users and groups automatically. The only thing you have to do then is to define a userid for redadm and a groupid for sapsys. R3SETUP prompts for these values. The userid should be unique in your UNIX environment except on the UNIX servers that belong to the same SAP system. There it must be the same for redadm. We chose 204 as userid and 202 as groupid. The groupid should be the same for all SAP systems that share data (for example, /usr/sap/trans).
3.6.7 Checking kernel and swap spaceSAP offers the memlimits tool to verify some kernel parameters and the total available swap space. To do this we mounted the SAP kernel cd and extracted memlimits as described in chapter 2 of SAP R/3 Installation on Linux for zSeries: IBM DB2 UDB for OS/390 and z/OS, SG24-5948 .
Important: When installing redadm manually, we recommend that you define redadm using the c shell as login shell.
Chapter 3. Preparing the system environment 59

Then, we start memlimits as shown in Figure 3-27 with some special parameters. For the meaning of these parameters, see Table 3-5 on page 61.
Figure 3-27 Starting memlimits
Important: We had problems when specifying more space to test than we had configured. With the option l - 20000 as described in SAP R/3 Installation on Linux for zSeries: IBM DB2 UDB for OS/390 and z/OS, SG24-5948 , memlimits allocates almost all the available memory, and hangs. So we recommend just to let memlimits allocate as much space as you have defined.
If you have problems with memlimits, just run the UNIX command free to see how much swap space is really available.
vmlinux8:redadm 50> ./memlimits -a yes_w -s mf -l 7000 -t 9000SAP R/3 address space configuration test tool V3.2 (98/01/14)=========================================================================
Check the maximum data size per process (malloc)Access allocated pages to force swap space allocationin systems with lazy (late) swap allocation strategy.The checking will time out after 9000 secondsCheck the available swap space (malloc in several processes)Process 4040 allocating / accessing ... Size = 7000MB Total: 7000MBUpper size limit 7000 reached. Finish checking
Total available swap space = 7000MB
+-------------------------------------------------------+| Result |+-------------------------------------------------------+Maximum heap size per process........: 7000 MB measurement limited to 7000 MB this value is probably limited by swap spaceTotal available swap space...........: 7000 MB measurement limited to 7000 MB main memory size x 3 recommended , minimum 1 GBvmlinux8:redadm 51>
60 SAP on DB2 UDB for OS/390 and z/OS: Implementing Application Servers on Linux for zSeries

Table 3-5 Parameters used by memlimits
3.6.8 Checking the timeYou can run SAP application servers on Linux on zSeries that connect to a remote zSeries database server. There may be some other SAP instances connecting to the same database. Verify that all these servers have the same time and time zone settings. With the output of the date command, you can check your time zone settings (Example 3-9).
Example 3-9 Output of the date command
vmlinux8:/home/andre # dateThu Jun 13 15:08:31 EDT 2002
Parameter Our value
Meaning
-a yes_w Linux uses lazy swap allocation. This means that swap space is only reserved with a real access. With yes_w we force read/write access to each allocated page.
-s mf SAP extended memory on Linux is not implemented using the function mmap. This option suppresses mapped file checking.
-l 7000 We force memlimits to check just 7000 MB. You should adjust this to your environment.
-t 9000 The default timeout for memlimits is 900 seconds. This is not sufficient.
Chapter 3. Preparing the system environment 61

62 SAP on DB2 UDB for OS/390 and z/OS: Implementing Application Servers on Linux for zSeries

Chapter 4. Installing SAP application servers on Linux
This chapter focuses on SAP application server installation on Linux for zSeries. It includes the following:
� Installing the central instance on Linux
� Installing a dialog instance on Linux
� Heterogeneous environment considerations
� Dialog instance setup in a heterogeneous environment
We do not consider DB2 UDB for OS/390 and z/OS installation, nor do we cover the R/3 database load, RFCOSCOL installation or WLM configuration. For those installations, refer to the following publications:
� SAP R/3 on DB2 UDB for OS/390 and z/OS: Planning Guide, SC33-7966
� SAP R/3 on DB2 for OS/390: Connectivity Guide, SC33-7965
� SAP R/3 Installation on OS/390 UNIX System Services, Release 4.6C SR2 (product publication)
� SAP R/3 on DB2 for OS/930: Implementing with AIX or Windows NT Application Servers, SG24-4945
4
© Copyright IBM Corp. 2002. All rights reserved. 63

4.1 Installing the central instance on LinuxBefore starting your installation of the central instance, we recommend that you read the latest SAP notes concerning the installation and perform the actions that are discussed there.
We used the following SAP notes:
� Number 387074 R/3 Installation on UNIX - 4.6C SR2� Number 387078 SAP Software on UNIX: OS Dependencies 4.6C SR2� Number 387127R/3 Installation on UNIX - DB2 UDB for OS/390� Number 15023 Initialization TCPDB
4.1.1 Creating an installation directory for the SAP installation
Create an installation directory with at least 50 MB of free space. The SAP default for this is /tmp/install. On Linux, the /tmp directory is cleaned regularly. Either you change this or choose a different installation directory.
We created /usr/sap/install with mkdir /usr/sap/install. Then we changed the permissions with chmod 777 /usr/sap/install.
4.1.2 Setting up the file system for the central instanceAfter reading the SAP notes and before setting up the SAP file systems, we made two decisions:
1. We recommend to use a journaling file system for the SAP file systems. We chose ReiserFS as a journaling file system because it is very well integrated in our SuSE distribution.
2. We recommend to use the Logical Volume Manager (LVM) for the SAP file systems. This gave us all the comfort and flexibility that comes with LVM, such as extending a running file system without the need to unmount it, or to have file systems that span multiple volumes.
In general, you need three file systems for your central instance. These file systems are /sapmnt, /usr/sap and, depending on the location of the transport directory in your environment, /usr/sap/trans.
The size of the file systems depends on your requirements. For the minimum free space requirement of each file system, see chapter 1 in SAP R/3 Installation on Linux for zSeries: IBM DB2 UDB for OS/390 and z/OS, SG24-5948 . Keep in mind to add at least 30 MB required for the ReiserFS log to your space requirement for each of your file systems.
64 SAP on DB2 UDB for OS/390 and z/OS: Implementing Application Servers on Linux for zSeries

To create these file systems, call YaST --> Installation settings --> Configure the Logical Volume Manager as shown in Figure 4-1.
Figure 4-1 Accessing the Logical Volume Manager in YaST
We recommend that you create at least one volume group for your SAP file systems. If you like to clone your SAP application server later on, you should create more volume groups, as we did (Chapter 5, “Cloning an SAP dialog instance” on page 93). Assign the volumes you need to satisfy your space requirements. After that, create the required logical volumes together with their required file systems of type ReiserFS.
We created two volume groups (VGs) to provide space for our file systems. Table 4-1 lists these volume groups and the logical volumes associated with them. It also shows the assigned minidisk and the mount points for the file systems.
Table 4-1 Volume groups and associated file systems
The following screen shots show how to createa volume group VGL1 (Figure 4-2 on page 66), how to assign a volume group to the minidisks (Figure 4-3 on page 66), and how to create logical volumes (Figure 4-4 on page 67, Figure 4-5 on page 67, Figure 4-6 on page 68, and Figure 4-7 on page 68).
Volume Group
Minidisk Size in MB
Logical volume Mount point Size in MB
VGL1 204 420 /dev/VGL1/lvusrsap /usr/sap 420
VGM1 205 700 /dev/VGM1/lvsapmnt /sapmnt 350
/dev/VGM1/lvsaptrans /usr/sap/trans 200
+-------------------YaST - Yet another Setup Tool--------------------+ ¦ YaST Version 1.11.4 -- (c) 1994-2002 SuSE GmbH ¦ +--------------------------------------------------------------------¦ ¦ Language: English ¦ ¦ Media: FTP site ftp://9.12.6.53/code/suse7_sles7prof/cd1/¦ ¦ Root Device: /dev/dasdb1 ¦ +--------------------------------------------------------------------¦ ¦ +--------------------------------------------------------------+ ¦ ¦ ¦ General installation help ¦ ¦ ¦ ¦ Installation se+-------------------------------------------+ ¦ ¦ ¦ ¦ Package Managem¦ Select language ¦ ¦ ¦ ¦ Update entire s¦ Select keymap ¦ ¦ ¦ ¦ System Administ¦ Select installation medium ¦ ¦ ¦ ¦ Show README Fil¦ Configure hard disk partitions ¦ ¦ ¦ ¦ Copyright ¦ Set target partitions/file systems ¦ ¦ ¦ ¦ Exit YaST ¦ Configure the Logical Volume Manager ¦ ¦ ¦ +----------------¦ Installation to a directory ¦ ¦ ¦ +-------------------------------------------+ ¦ +--------------------- --+
Chapter 4. Installing SAP application servers on Linux 65
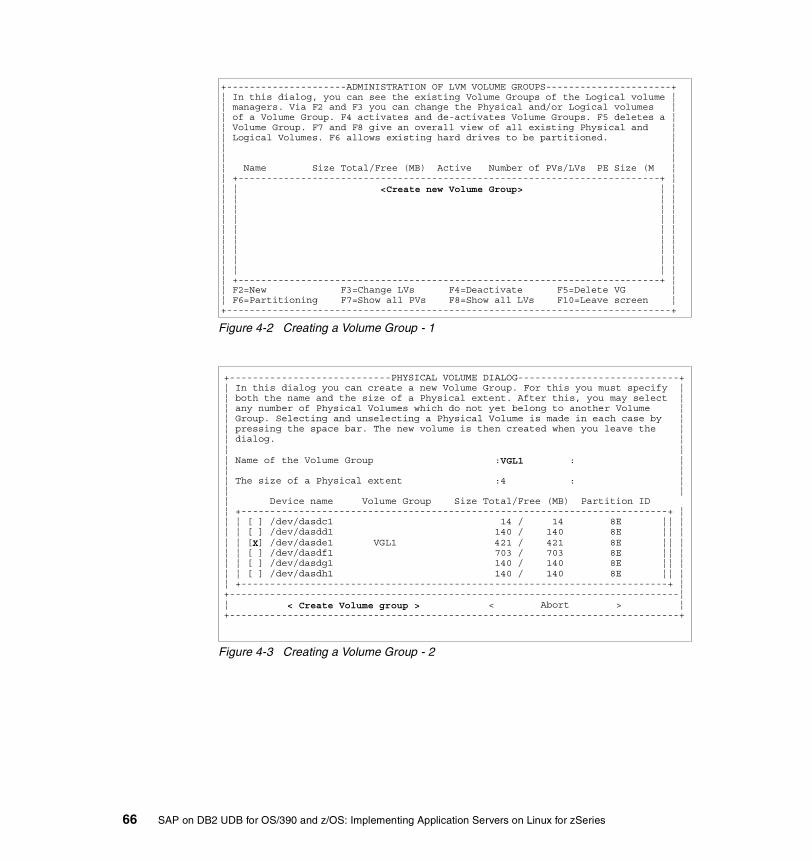
Figure 4-2 Creating a Volume Group - 1
Figure 4-3 Creating a Volume Group - 2
+---------------------ADMINISTRATION OF LVM VOLUME GROUPS----------------------+¦ In this dialog, you can see the existing Volume Groups of the Logical volume ¦¦ managers. Via F2 and F3 you can change the Physical and/or Logical volumes ¦¦ of a Volume Group. F4 activates and de-activates Volume Groups. F5 deletes a ¦¦ Volume Group. F7 and F8 give an overall view of all existing Physical and ¦¦ Logical Volumes. F6 allows existing hard drives to be partitioned. ¦¦ ¦¦ ¦¦ Name Size Total/Free (MB) Active Number of PVs/LVs PE Size (M ¦¦ +--------------------------------------------------------------------------+ ¦¦ ¦ <Create new Volume Group> ¦ ¦¦ ¦ ¦ ¦¦ ¦ ¦ ¦¦ ¦ ¦ ¦¦ ¦ ¦ ¦¦ ¦ ¦ ¦¦ ¦ ¦ ¦¦ ¦ ¦ ¦¦ ¦ ¦ ¦¦ +--------------------------------------------------------------------------+ ¦¦ F2=New F3=Change LVs F4=Deactivate F5=Delete VG ¦¦ F6=Partitioning F7=Show all PVs F8=Show all LVs F10=Leave screen ¦+------------------------------------------------------------------------------+
+----------------------------PHYSICAL VOLUME DIALOG----------------------------+¦ In this dialog you can create a new Volume Group. For this you must specify ¦¦ both the name and the size of a Physical extent. After this, you may select ¦¦ any number of Physical Volumes which do not yet belong to another Volume ¦¦ Group. Selecting and unselecting a Physical Volume is made in each case by ¦¦ pressing the space bar. The new volume is then created when you leave the ¦¦ dialog. ¦¦ ¦¦ Name of the Volume Group :VGL1 : ¦¦ ¦¦ The size of a Physical extent :4 : ¦¦ ¦¦ Device name Volume Group Size Total/Free (MB) Partition ID¦ +--------------------------------------------------------------------------+ ¦¦ ¦ [ ] /dev/dasdc1 14 / 14 8E ¦¦ ¦¦ ¦ [ ] /dev/dasdd1 140 / 140 8E ¦¦ ¦¦ ¦ [X] /dev/dasde1 VGL1 421 / 421 8E ¦¦ ¦¦ ¦ [ ] /dev/dasdf1 703 / 703 8E ¦¦ ¦¦ ¦ [ ] /dev/dasdg1 140 / 140 8E ¦¦ ¦¦ ¦ [ ] /dev/dasdh1 140 / 140 8E ¦¦ ¦¦ +--------------------------------------------------------------------------+ ¦+------------------------------------------------------------------------------¦¦ < Create Volume group > < Abort > ¦+------------------------------------------------------------------------------+
66 SAP on DB2 UDB for OS/390 and z/OS: Implementing Application Servers on Linux for zSeries

Figure 4-4 Creating a Logical Volume - 1
Figure 4-5 Creating a Logical Volume - 2
+---------------------ADMINISTRATION OF LVM VOLUME GROUPS----------------------+¦ In this dialog, you can see the existing Volume Groups of the Logical volume ¦¦ managers. Via F2 and F3 you can change the Physical and/or Logical volumes ¦¦ of a Volume Group. F4 activates and de-activates Volume Groups. F5 deletes a ¦¦ Volume Group. F7 and F8 give an overall view of all existing Physical and ¦¦ Logical Volumes. F6 allows existing hard drives to be partitioned. ¦¦ ¦¦ ¦¦ Name Size Total/Free (MB) Active Number of PVs/LVs PE Size (M ¦¦ +--------------------------------------------------------------------------+ ¦¦ ¦ VGL1 420 / 420 [X] 1 / 0 4 ¦ ¦¦ ¦ VGM1 700 / 700 [X] 1 / 0 4 ¦ ¦¦ ¦ <Create new Volume Group> ¦ ¦¦ ¦ ¦ ¦¦ ¦ ¦ ¦¦ ¦ ¦ ¦¦ ¦ ¦ ¦¦ ¦ ¦ ¦¦ ¦ ¦ ¦¦ +--------------------------------------------------------------------------+ ¦¦ F2=Change PVs F3=Change LVs F4=Deactivate F5=Delete VG ¦¦ F6=Partitioning F7=Show all PVs F8=Show all LVs F10=Leave screen ¦+------------------------------------------------------------------------------+
+----------------------------LOGICAL VOLUME DIALOG-----------------------------+¦ In this dialog, you can both change the size of Logical Volumes, as well as ¦¦ create new ones and delete existing ones. ¦¦ ¦¦ Free space in MB still available in the VG: 420 ¦¦ ¦¦ Name Vg Name Mount Point Size in MB Stripes ¦¦ +--------------------------------------------------------------------------+ ¦¦ ¦ <Create new Logical Volume> ¦ ¦¦ ¦ ¦ ¦¦ ¦ ¦ ¦¦ ¦ ¦ ¦¦ ¦ ¦ ¦¦ ¦ ¦ ¦¦ ¦ ¦ ¦¦ ¦ ¦ ¦¦ ¦ ¦ ¦¦ ¦ ¦ ¦¦ ¦ ¦ ¦¦ +--------------------------------------------------------------------------+ ¦¦ ¦+- F2=Change size -- F3=Delete LV -- F10=Leave screen ----¦¦ < Continue > ¦+------------------------------------------------------------------------------+
Chapter 4. Installing SAP application servers on Linux 67

Figure 4-6 Creating a Logical Volume - 3
Figure 4-7 Creating a Logical Volume - 4
After creating our logical volumes, we created the file systems with YaST --> Installation setup --> Set target partitions/file systems.
+----------------------------LOGICAL VOLUME DIALOG-----------------------------+¦ In this dialog, you can both change the size of Logical Volumes, as well as ¦¦ create new ones and delete existing ones. ¦¦ ¦¦ Free spa+---------------CREATE A NEW LOGICAL VOLUME----------------+ ¦¦ ¦ In this dialog, you can create a new Logical Volume. The ¦ ¦¦ Name ¦ size may optionally be given with a K,M,G,or T, standing ¦ s ¦¦ +-------¦ for Kilo, Mega, Giga, or Terabyte. The default is M. ¦ -----+ ¦¦ ¦ ¦ ¦ ¦ ¦¦ ¦ ¦ ¦ ¦ ¦¦ ¦ ¦ Name of the Logical Volume <vusrsap : ¦ ¦ ¦¦ ¦ ¦ ¦ ¦ ¦¦ ¦ ¦ Size of the Logical Volume :420 : ¦ ¦ ¦¦ ¦ ¦ ¦ ¦ ¦¦ ¦ ¦ Number of stripes :1 : ¦ ¦ ¦¦ ¦ ¦ ¦ ¦ ¦¦ ¦ +----------------------------------------------------------¦ ¦ ¦¦ ¦ ¦ < Continue > < Abort > ¦ ¦ ¦¦ ¦ +----------------------------------------------------------+ ¦ ¦¦ +--------- -----+ ¦¦ ¦+- F2=Change size -- F3=Delete LV -- F10=Leave screen ----¦¦ < Continue > ¦+------------------------------------------------------------------------------+
+----------------------------LOGICAL VOLUME DIALOG-----------------------------+¦ In this dialog, you can both change the size of Logical Volumes, as well as ¦¦ create new ones and delete existing ones. ¦¦ ¦¦ Free space in MB still available in the VG: 0 ¦¦ ¦¦ Name Vg Name Mount Point Size in MB Stripes ¦¦ +--------------------------------------------------------------------------+ ¦¦ ¦ /dev/VGL1/lvusrsap VGL1 420 1 ¦ ¦¦ ¦ <Create new Logical Volume> ¦ ¦¦ ¦ ¦ ¦¦ ¦ ¦ ¦¦ ¦ ¦ ¦¦ ¦ ¦ ¦¦ ¦ ¦ ¦¦ ¦ ¦ ¦¦ ¦ ¦ ¦¦ ¦ ¦ ¦¦ ¦ ¦ ¦¦ +--------------------------------------------------------------------------+ ¦¦ ¦+- F2=Change size -- F3=Delete LV -- F10=Leave screen ----¦¦ < Continue > ¦+------------------------------------------------------------------------------+
68 SAP on DB2 UDB for OS/390 and z/OS: Implementing Application Servers on Linux for zSeries

The following screen shots (Figure 4-8, Figure 4-9 and Figure 4-10 on page 70) show how to create the file systems.
Figure 4-8 Creating the file system - 1
Figure 4-9 Creating the file system - 2
----------------YaST - Yet another Setup Tool--------------------+¦ YaST Version 1.11.4 -- (c) 1994-2002 SuSE GmbH ¦+--------------------------------------------------------------------¦¦ Language: English ¦¦ Media: FTP site ftp://9.12.6.53/code/suse7_sles7prof/cd1/¦¦ Root Device: /dev/dasdb1 ¦+--------------------------------------------------------------------¦¦ +--------------------------------------------------------------+ ¦¦ ¦ General installation help ¦ ¦¦ ¦ Installation se+-------------------------------------------+ ¦ ¦¦ ¦ Package Managem¦ Select language ¦ ¦¦ ¦ Update entire s¦ Select keymap ¦ ¦¦ ¦ System Administ¦ Select installation medium ¦ ¦¦ ¦ Show README Fil¦ Configure hard disk partitions ¦ ¦¦ ¦ Copyright ¦ Set target partitions/file systems ¦ ¦¦ ¦ Exit YaST ¦ Configure the Logical Volume Manager ¦ ¦¦ +----------------¦ Installation to a directory ¦ ¦¦ +-------------------------------------------+ ¦+--------------------- --+
+-----------------------------CREATING FILESYSTEMS-----------------------------+¦ ¦¦ Current list of the file systems on the existing hard drives: ¦¦ Device name Blocks Inodes Format FsType Mount point Partition ¦¦ +--------------------------------------------------------------------------+ ¦¦ ¦ 0201:1 1799988 4096 No ext2 / S390 DASD ¦ ¦¦ ¦ 0202:1 14388 2048 No ext2 S390 DASD ¦ ¦¦ ¦ 0203:1 143988 2048 No ext2 S390 DASD ¦ ¦¦ ¦ 0206:1 143988 2048 No ext2 S390 DASD ¦ ¦¦ ¦ 0207:1 +---------------------PLEASE WAIT---------------------+ASD ¦ ¦¦ ¦ 0208:1 ¦ ¦ D ¦ ¦¦ ¦ ...vusrs¦ Creating file system on "/dev/VGL1/lvusrsap"... ¦ M ¦ ¦¦ ¦ ...vsapm¦ ¦ M ¦ ¦¦ ¦ ...aptra+-----------------------------------------------------+ M ¦ ¦¦ ¦ proc ¦ ¦¦ +--------------------------------------------------------------------------+ ¦¦ ¦¦ ¦¦ ¦¦ ¦¦ F1=Help F3=Change type F4=Mount point ¦+-F5=Expert menu --F6=Format --F7=Read fstab -------------¦¦ < Continue > < Abort > ¦+------------------------------------------------------------------------------+
Chapter 4. Installing SAP application servers on Linux 69

Figure 4-10 Creating the ile system - 3
After creating all our file systems, we mounted all of them with:
mount -a
Because we created all file systems within the same dialog, YaST failed to create one mount point correctly. YaST created /usr/sap/trans, but mounted /usr/sap over it. So we created a new mount point for /usr/sap/trans while /usr/sap was already mounted. We used the command:
mkdir /usr/sap/trans
After that, all file systems were mounted correctly (Figure 4-11).
Figure 4-11 Mounted file systems
4.1.3 Installing the central instanceNow we were ready to do the installation of the central instance, as follows:
1. Logon to vmlinux8 as root.
+-----------------------------CREATING FILESYSTEMS-----------------------------+¦ ¦¦ Current list of the file systems on the existing hard drives: ¦¦ Device name Blocks Inodes Format FsType Mount point Partition ¦¦ +--------------------------------------------------------------------------+ ¦¦ ¦ 0201:1 1799988 4096 No ext2 / S390 DASD ¦ ¦¦ ¦ 0202:1 14388 2048 No ext2 S390 DASD ¦ ¦¦ ¦ 0203:1 143988 2048 No ext2 S390 DASD ¦ ¦¦ ¦ 0206:1 143988 2048 No ext2 S390 DASD ¦ ¦¦ ¦ 0207:1 143988 2048 No ext2 S390 DASD ¦ ¦¦ ¦ 0208:1 143988 2048 No ext2 S390 DASD ¦ ¦¦ ¦ ...vusrsap 430080 No reiser /usr/sap Linux LVM ¦ ¦¦ ¦ ...vsapmnt 360448 No reiser /sapmnt Linux LVM ¦ ¦¦ ¦ ...aptrans 204800 No reiser /usr/sap/trans Linux LVM ¦ ¦¦ ¦ proc proc /proc ¦ ¦¦ +--------------------------------------------------------------------------+ ¦¦ ¦¦ ¦¦ ¦¦ ¦¦ F1=Help F3=Change type F4=Mount point ¦+-F5=Expert menu --F6=Format --F7=Read fstab -------------¦¦ < Continue > < Abort > ¦+------------------------------------------------------------------------------+
vmlinux8:~ # mount -avmlinux8:~ # mount/dev/dasdb1 on / type ext2 (rw)proc on /proc type proc (rw)devpts on /dev/pts type devpts (rw,mode=0620,gid=5)shmfs on /dev/shm type shm (rw)/dev/VGM1/lvsapmnt on /sapmnt type reiserfs (rw)/dev/VGL1/lvusrsap on /usr/sap type reiserfs (rw)/dev/VGM1/lvsaptrans on /usr/sap/trans type reiserfs (rw)
70 SAP on DB2 UDB for OS/390 and z/OS: Implementing Application Servers on Linux for zSeries

2. Because there is no CD-ROM attached to a z/VM guest, we have to mount the SAP kernel CD from a remote NFS server which owns a CD-ROM:
mount <nfsserverhostname>:/<sapkernel cdpatch> /mnt
Export the file system <sapkernelcdpath> on your NFS server <nfsserverhostname>.
3. Go to the installation directory with cd /usr/sap/install.
4. Start the shell script INSTTOOL.SH from the SAP kernel CD. This script copies the installation tool R3SETUP and some command files to your installation directory (see Figure 4-12).
Figure 4-12 Invoking INSTTOOL.SH
vmlinux8:/usr/sap/install # /mnt/UNIX/INSTTOOL.SHWelcome
This script copies installation tools and files to thecurrent installation directory.
copying /mnt/UNIX/S390X_64/R3SETUP ...copying /mnt/UNIX/S390X_64/INSTGUI ...copying /mnt/UNIX/S390X_64/SAPCAR ...copying /mnt/UNIX/COMMON/INSTALL/SPLITSTR.PL ...copying /mnt/UNIX/S390X_64/CENTRAL.R3S ...copying /mnt/UNIX/S390X_64/DATABASE.R3S ...copying /mnt/UNIX/S390X_64/DB2PMCL.R3S ...copying /mnt/UNIX/S390X_64/DBDROP.R3S ...copying /mnt/UNIX/S390X_64/DBEXPORT.R3S ...copying /mnt/UNIX/S390X_64/DBMIG.R3S ...copying /mnt/UNIX/S390X_64/DBR3CP.R3S ...copying /mnt/UNIX/S390X_64/DIALOG.R3S ...copying /mnt/UNIX/S390X_64/INSTPFL.R3S ...extracting Online-Documentation for R3SETUP ...SAPCAR: processing archive /mnt/DOCU/R3S_DOC.SAR...SAPCAR: 319 file(s) extracted
The available installation services are: CENTRAL.R3S: Install central instanceDATABASE.R3S: Install database DB2PMCL.R3S: Install DB2 Performance Monitor CAPI DLLs DBDROP.R3S: Drop databaseDBEXPORT.R3S: Export source database (R3load system copy) DBMIG.R3S: Install target database (R3load system copy) DBR3CP.R3S: Install target database using DB backup (R3COPY) DIALOG.R3S: Install dialog instance (additional application server INSTPFL.R3S: Adapt instance profile
Run R3SETUP with a command file: ./R3SETUP -f <SERVICE>.R3SR3SETUP creates a log file <SERVICE>.log.In some (non standard) cases you need to customize the command file.Please read the installation documentation and latest notes.
Checking if C++ runtime is installed ...Found C++ runtime.
Chapter 4. Installing SAP application servers on Linux 71

5. Now you have the possibility to make some adjustments in the command file CENTRAL.R3S. We didn’t change anything.
6. We decided not to use INSTGUI as a graphical user interface.
7. We started R3SETUP by invoking:
./R3SETUP -f CENTRAL.R3S
We don’t describe the installation in detail. There is no difference compared to other platforms. R3SETUP is an interactive program that will ask you for the required input data. Table 4-2 lists most parameters and our input values.
Table 4-2 Input during Installation with R3SETUP
Parameter Our Value
SAPSYSTEMNAME RED
SAPSYSNR 00
SAPMOUNT /sapmnt
CIHOSTNAME vmlinux8
DBHOSTNAME wtsc42a
DBATTACHNAME D7XG
VCAT SAPRED
HIGHLEVELQUALIFIER SYS1
LOADLIB DB7X7.SDSNLOAD
DSNTIADLIB DB7XU.RUNLIB.LOAD
FAILOVER 1
FAILOVERHOST wtsc04a
FAILOVERPORT 5008
RAM_INSTANCE 490
1_LOCATION (Kernel CD) /mnt
PORT for the message server 3600
PORT for the ICLI server 5008
GROUPID 202
USERID 204
SIGNON 1
72 SAP on DB2 UDB for OS/390 and z/OS: Implementing Application Servers on Linux for zSeries

When the install was done, we logged on with user REDADM and started the SAP R/3 instance as shown in Figure 4-13.
Figure 4-13 Starting the SAP R/3 instance
Issues during installationThe installation of the SAP application server for Linux on zSeries was very smooth and almost without interruption.
The only installation phase that abended was the grant job. This job tries to grant DB2 privileges to a DB2 authorization ID. Because we used Version 7 of DB2, we changed the PLAN specification to DSNTIA71 as shown in Figure 4-14 on page 74 and re-ran R3SETUP -f CENTRAL.R3S.
SIGNONUSERID REDADM
SIGNONAPPLICATION icli0000
MSGCLASS T
JCLUSERNAME Userid and password are secret;-)
LDAP_TYPE 3
ICLIRUN REDADM
INSTALL 2
Parameter Our Value
vmlinux8:redadm 26> startsap
Starting SAP-Collector Daemon ------------------------------******************************************************************************* This is Saposcol Version COLL 20.76 02/02/20 46D - V1.9 for Linux* Usage: saposcol -l: Start OS Collector* saposcol -k: Stop OS Collector* saposcol -d: OS Collector Dialog Mode* saposcol -s: OS Collector Status* Starting collector (create new process)******************************************************************************could not move /usr/sap/tmp/dev_coll to /usr/sap/tmp/dev_coll.old saposcol on host vmlinux8 started
Checking SAP R/3 RED Database------------------------------ Database is running
Starting SAP R/3 Instance ------------------------------ Startup-Log is written to /home/redadm/startsap_vmlinux8_00.log Instance on host vmlinux8 started
vmlinux8:redadm 27>
Chapter 4. Installing SAP application servers on Linux 73

Figure 4-14 Changing the grant job
The Zebra daemon has a parsing bug regarding the comment sign “!”. Removing the “!” sign from the zebra.conf file resolves the problem.
4.1.4 Post installation activitiesAfter the install is complete, some post installation activities have to be performed. These steps are described in SAP R/3 Installation on Linux for zSeries: IBM DB2 UDB for OS/390 and z/OS, SG24-5948 .
We just discuss two steps that are not covered in the guide but are mentioned in the SAP notes and are specific to the SAP application server connected to DB2 UDB for OS/390 and z/OS.
Sysplex failover functionality, SAP note 387127We installed the central instance with R3SETUP, including the option to use the sysplex failover functionality. As recommended in SAP note 387127, we added the appropriate profile parameter to the instance profile (Figure 4-15).
Figure 4-15 Failover profile parameter of the central instance
After restarting the instance, we tested the sysplex failover mechanism by stopping the ICLI server on SC42. As expected, the sysplex failover worked. (Figure 4-16 on page 75).
vmlinux8:/usr/sap/install # vi FOMEGRNT.jcl
//SYSTSIN DD * DSN SYSTEM(D7XG) RUN PROGRAM(DSNTIAD) PLAN(DSNTIA71) LIB('DB7X7U.RUNLIB.LOAD') END/*
vmlinux8:redadm 43> vi RED_DVEBMGS00_vmlinux8:dbs/db2/ssid = D7XGdbs/db2/ssid_standby = D7X2dbs/db2/hosttcp = wtsc42adbs/db2/hosttcp_standby = wtsc04arsdb/db2_host_standby = wtsc04arsdb/db2_port_standby = 5008rsdb/reco_ping_cmd =rsdb/reco_sleep_time = 1rsdb/reco_symmetric = ONrsdb/reco_sync_all_server = OFF:
74 SAP on DB2 UDB for OS/390 and z/OS: Implementing Application Servers on Linux for zSeries

Figure 4-16 Sysplex failover test
After starting the SAP application server, we checked the transaction SM21. We noticed the errors shown in Figure 4-17 on page 76. We resolved the problem by following the instructions given in SAP note 434744.
: Reconnect state is entered by connection:B 0: name = R/3, concnt= 000000 state = ACTIVE , perm = YES, reco = YESB ***LOG BYM=> severe db error 0 work process is in the reconnect statB hdl_error_on_commit_rollback: DB-ROLLBACK ok. RECONNECT stateB db_con_reconnect performing the reconnect for con:B 0: name = R/3, concnt= 000000 state = INACTIVE , perm = YES, reco = YESC DBSL TRACE: ICLI client functions successfully loaded. (lib=/usr/sap/RED/SYS/C ********* Profile Parameter for connection 0 **********C Connecting to standby-HostC DBIF Versions:C R/3 Version : 14 (4.6D)C API Version : 9C ICLI-Client Versions:C R/3 Version : 14 (4.6D)C API Version : 9C PROTOCOL Version : 1C Internal Version : 8C Workprocess : 1C USE_NO_HOLD : 0C USE_OPT_1_ROW : 0C DB_UID : SAPR3C DB_ID : REDC SAPSYSTEM : 00C Definitions for standby hostC DB_SSID : D7X2C DBHOST : wtsc04aC PORT : 5008C CCSID : 819C KEEP_X_LOCK : 1C RO_COMMIT_SUPPRESS : 0C --------------------------------------C Used Bugfixes:C **************************************C Network-Protocol : TCPC Your DB2 system works with ASCII code page 819 and EBCDIC code page 37B Connection 0 openedB Wp Hdl ConName ConCnt ConState TX PRM RCT Date TimeB 000 000 R/3 000000 INACTIVE NO YES NO 20020605 092821B 001 000 R/3 000000 ACTIVE NO YES NO 20020605 092852B 002 000 R/3 000000 ACTIVE NO YES NO 20020605 092821::B 016 000 R/3 000000 ACTIVE NO YES NO 20020605 092823B 017 000 R/3 000000 INACTIVE NO YES NO 20020605 091432B Successful reconnect for connection:B 0: name = R/3, concnt= 000000 state = ACTIVE , perm = YES, reco = NOB ***LOG BYY=> work process left reconnect state [dblink 1860 ]
Chapter 4. Installing SAP application servers on Linux 75

Figure 4-17 Output of transaction SM21
4.1.5 Memory configurationThe SAP application server on Linux on zSeries is a 64-bit application server. This makes the SAP system administration much easier for managing memory configuration and for handling dialog or batch tasks that would have failed for exceeding memory limits on a 32-bit application server. The address space for running a UNIX process is practically unlimited.
The SAP memory management for the SAP application server on Linux on zSeries is a standard UNIX implementation. Refer to SAP notes, such as 146289, for memory considerations. You don’t have to implement any specific configuration as recommended for other operating systems running in a 32- or 64-bit implementation.
Important: If you let R3SETUP create the user, don’t forget to set a password for REDADM. As root, you may use the command passwd redadm.
76 SAP on DB2 UDB for OS/390 and z/OS: Implementing Application Servers on Linux for zSeries

If you run a production system with enough real memory, we recommend that you use a generous memory configuration as shown in Figure 4-18.
Figure 4-18 Memory configuration for a large production system
On the other hand, if you plan to run a lot of SAP application servers as z/VM guests, you may be interested in restricting their memory consumption. Figure 4-19 shows a more restrictive memory configuration. This limits the maximum memory that can be used by a single work process.
Figure 4-19 Memory configuration with memory consumption restriction
If your SAP application server needs more memory, you can modify it manually during runtime using the parameter roll_extension, for example. This will lead to swapping within your z/VM guest and you may want to assign more memory to this guest. But often large memory consumption is the result of badly written ABAP programs or Reports starting without using proper variables.
It also makes sense to keep your R/3 buffer as small as possible.
Important: When configuring a generous memory layout, make sure that you have enough swap space available. SAP recommends 20 GB.
em/initial_size_MB 2048 #intial size of extended memory (EM)em/address_space_MB 2048 #max adressspace per processem/max_size_MB 6000 #max total EMem/blocksize_KB 4096ztta/roll_first 1ztta/roll_area 3000000ztta/roll_extension 2000000000 (2GB)abap/heap_area_dia 2000000000 (2GB)abap/heap_area_nondia 2000000000 (2GB)
abap/heap_area_total 2000000000 (2GB)
em/initial_size_MB 1024 em/address_space_MB 1024 em/max_size_MB 2048 em/blocksize_KB 4096ztta/roll_first 1ztta/roll_area 3000000ztta/roll_extension 1000000000 (1GB)abap/heap_area_dia 1000000000 (1GB)abap/heap_area_nondia 1000000000 (1GB)abap/heap_area_total 1000000000 (1GB)
Chapter 4. Installing SAP application servers on Linux 77

4.1.6 Operating an SAP application server on LinuxOperating an SAP application server for Linux on zSeries is pretty much the same as for any other UNIX platform.
Starting and stopping an SAP systemWe generally start the SAP system for Linux on zSeries as for every other SAP system:
1. We log on to our central instance (vmlinux8) as user REDADM and invoke the command startsap to start the central instance.
2. Then, we log on to our dialog instance (for example, vmlinx10) and invoke startsap for that server.
3. We repeat step 2 for every other SAP application server.
Stopping the whole SAP system is as follows:
1. We log on to our dialog instances (for example, vmlinx10) and invoke stopsap to stop the SAP instance.
2. We do this for each dialog instance.
3. Finally, we log on to the central instance on vmlinux8 as REDADM and stop the server with stopsap.
Getting system informationThis section talks about how to obtain system information on the SAP application server using the GUI.
System statusWithin each SAP transaction, you can use system --> status to get the current system information. Figure 4-20 on page 79 shows, in the host data section, that the server is running on Linux. The platform is recognized correctly as s390x. The internal platform ID for Linux on zSeries is 389.
78 SAP on DB2 UDB for OS/390 and z/OS: Implementing Application Servers on Linux for zSeries

Figure 4-20 SAP system status
Hardware information Now let’s have a look at the hardware information that can be retrieved using the transaction ST06 --> Detailed analysis --> HW info. Figure 4-21 on page 80 shows the Linux kernel version, the parmline that was used during boot time, the vendor information, and the loaded Linux kernel modules. Scrolling down you can see information on available DASDs and the mounted file systems, including NFS. This might be useful information for you.
Chapter 4. Installing SAP application servers on Linux 79

Figure 4-21 ST06 - hardware information
80 SAP on DB2 UDB for OS/390 and z/OS: Implementing Application Servers on Linux for zSeries

Workload analysisST03 invokes the SAP R/3 Workload Analysis. Figure 4-22 shows performance informations such as response times.
Figure 4-22 ST03 - Load analysis
As you can see, nothing has changed from the SAP basis administration point of view. All SAP transactions behave as usual.
4.2 Installing a dialog instance on LinuxThe installation of a dialog instance on Linux is pretty much the same as the installation of a central instance. Refer to Chapter 3, “Preparing the system environment” on page 29 and 4.1, “Installing the central instance on Linux” on page 64 and, of course, section 3.9, “Installing a Dialog Instance” in SAP R/3 Installation on Linux for zSeries: IBM DB2 UDB for OS/390 and z/OS, SG24-5948 .
The next sections describe the differences that must be taken into account when installing a dialog instance instead of a central instance. We assume that we have a homogeneous SAP environment concerning the application servers.
Chapter 4. Installing SAP application servers on Linux 81

When talking about a homogenous environment, we mean that all application servers run on the same operating system.
4.2.1 File system setup for homogenous application serversThe biggest difference between installing a dialog instance instead of the central instance is the file system setup, because some of the file systems that you created for the central instance will now also be used by the dialog instance.
There are some files that have to be shared between all instances belonging to an SAP system. These so-called global directories, /sapmnt/RED/profile and /sapmnt/RED/global, must be shared between the application servers.
When the application servers are on Unix System Services, the sharing could be realized with a shared Hirarchical File System (HFS). But shared HFS is available only on OS/390 and z/OS.
In the UNIX world, sharing file systems is realized with NFS. So, /sapmnt/RED/profile and /sapmnt/RED/global must be mounted from the central instance via NFS.
You have the option of sharing the kernel directory /sapmnt/RED/exe or having a local kernel installed. With a local kernel, you have to create the file system /sapmnt/RED/exe locally. In a homogeneous environment, it is common to share the kernel directory because of easier system administration. The kernel directory is mounted from the central instance. So you don’t have to create a /sapmnt/RED file system on our dialog instance.
If you have different operating system platforms within your R/3 system, things will be different (see 4.3, “Heterogeneous environment considerations” on page 85).
Figure 4-23 on page 83 shows a typical file system setup in a homogeneous application server environment.
82 SAP on DB2 UDB for OS/390 and z/OS: Implementing Application Servers on Linux for zSeries

Figure 4-23 Sharing files in a homogeneous application server environment
Creating the local instance file systemWe created one file system for the SAP dialog instance on Linux. This is the local instance directory, /usr/sap/RED. We recommend that you use a journaling file system like ReiserFS and the LVM, as well.
We defined a volume group and a logical volume to create the file system /usr/sap/RED with YaST.
The minimum size that is required by SAP is 350 MB as free space. If you use a ReiserFS, we recommend a file system of at least 400 MB.
Instance directory/usr/sap/RED/...
Kernel directory/sapmnt/RED/exe
Transport directory/usr/sap/trans
Global directories/sapmnt/RED/profile/sapmnt/RED/global
Central instance n dialog instances
Instance directory/usr/sap/RED/...
Mount points/sapmnt/RED/exe/sapmnt/RED/profile/sapmnt/RED/global/usr/sap/trans
NFS-mount
unix link
Legend
Chapter 4. Installing SAP application servers on Linux 83

Mounting an NFS file system in a homogeneous environmentFile systems such as /sapmnt/RED/exe, /sapmnt/RED/profile, and /sapmnt/RED/global, have to be mounted from the central instance.
Depending on the location of your transport directory, /usr/sap/trans also has to be mounted from the central instance.
To mount a file system to a dialog instance (for example, vmlinux10) from a central instance (vmlinux8), perform the following steps:
On vmlinux8:1. Log on as root.
2. Edit /etc/exports to make the file system available to vmlinux10. We recommend to export the file system in rw mode to specific hosts.
3. To activate the new export, invoke exportfs -r. You can check your success with exportfs -v.
On vmlinux10:1. Log on as root.
2. Create a mount point <mountpoint> for your NFS file system.
3. Change permissions with chmod 777 <mountpoint>.
4. To mount this NFS file system at IPL, add the following entry to /etc/fstab:
vmlinux8:/<sourcefilesystem> <mountpoint> nfs intr,rsize=8192,wsize=8192
5. To mount all file systems added to /etc/fstab, invoke the command:
mount -a
6. We recommend to check if it is possible to write to the NFS-mounted file systems with the following commands:
touch <mountpoint>/nfs_testam <mountpoint>/nfs_test
4.2.2 Installing the dialog instanceInstalling a dialog instance is very similar to installing a central instance. The differences are as follows:
� When installing a dialog instance, it is required to choose the same UID and GID for the user redadm and the group sapsys that are used on the central instance.
� It’s up to you whether to create your own ICLI server for your new instance or not.
84 SAP on DB2 UDB for OS/390 and z/OS: Implementing Application Servers on Linux for zSeries

� Use R3SETUP -f DIALOG.R3S to install a dialog instance instead of invoking R3SETUP -f CENTRAL.R3S, which installs a central instance.
4.3 Heterogeneous environment considerationsWe speak of a heterogeneous environment if at least one SAP application server runs on a different operating system platform than the other SAP application servers within your SAP system. For example, you have a heterogeneous environment when running your central instance on OS/390 or z/OS and the other dialog instances on Linux on zSeries.
4.3.1 File system setup In a heterogeneous environment you should spend some thoughts on the file system setup for your whole SAP system.
We recommend a file system setup similar to the one shown in Figure 4-24 on page 86.
Chapter 4. Installing SAP application servers on Linux 85

Figure 4-24 Sharing files in a heterogeneous environment
For each platform, we chose to define a specific kernel directory (for example, /sapmnt/RED/Linux), which holds the kernel executable for the specific platform.
Instance directory/usr/sap/RED/...
Kernel directory/sapmnt/RED/exe/sapmnt/RED/Linux/exe/sapmnt/RED/Aix/exe/sapmnt/RED/Sun/exe
Transport directory/usr/sap/trans
Global directories/sapmnt/RED/profile/sapmnt/RED/global
Central instanceLinux dialog instances
Instance directory/usr/sap/RED/...
Mount points/sapmnt/RED/exe/sapmnt/RED/profile/sapmnt/RED/global/usr/sap/trans
Aix dialog instances
Instance directory/usr/sap/RED/...
Mount points/sapmnt/RED/exe/sapmnt/RED/profile/sapmnt/RED/global/usr/sap/trans
Solaris dialog instances
Instance directory/usr/sap/RED/...
Mount points/sapmnt/RED/exe/sapmnt/RED/profile/sapmnt/RED/global/usr/sap/trans
NFS-mount (sap kernel)
Symbolic link
Legend
NFS-mount (global/profile/trans)
86 SAP on DB2 UDB for OS/390 and z/OS: Implementing Application Servers on Linux for zSeries

Because the whole SAP system is available when the central instance is available, we decided that the central instance is the right place to put the kernel for each platform. This is especially true if you have the SAP HA solution implemented as described in SAP on DB2 UDB for OS/390 and z/OS - High Availability Solution Using System Automation, SG24-6837. In this solution the NFS server is highly available as well.
Each SAP application server mounts the appropriate kernel directory for its platform.
An alternative file system setup is shown in Figure 4-26 on page 88. On the central instance SC42 we created an additional file system on directory /sapmnt/RED/USS/exe. It stores the SAP kernel for the z/OS Unix System Services. The former kernel directory for the Unix System Services kernel /sapmnt/RED/exe is replaced by a symbolic link to /sapmnt/RED/USS/exe. This symbolic link has to be created manually.
The same principle applies to all dialog instances. For Linux, for example, we mounted /sapmnt/RED/Linux/exe from SC42 to the local mount point /sapmnt/RED/Linux/exe via NFS. Then we created a symbolic link, /sapmnt/RED/exe, pointing to /sapmnt/RED/Linux/exe.
We saw in this approach the advantage of a clearer setup. On a Linux machine you would see output as shown in Figure 4-25 when navigating through the file system. Also, a df command will show you /sapmnt/RED/Linux/exe as NFS file system for the SAP kernel. So you are reminded to have the specific Linux kernel mounted.
Figure 4-25 Navigating through the file system
The disadvantage is, of course, that you have to create some additional links on your server before starting the installation of your SAP instances.
vmlinux6:/sapmnt/RED/exe # su - redadmDirectory: /home/redadmvmlinux6:redadm 51> cd /sapmnt/RED/exeDirectory: /sapmnt/RED/exevmlinux6:redadm 52> pwd/sapmnt/RED/Linux/exevmlinux6:redadm 53>
Chapter 4. Installing SAP application servers on Linux 87

Figure 4-26 Alternative file system setup
Instance directory/usr/sap/RED/...
Link/sapmnt/RED/exeKerneldirectory/sapmnt/RED/USS/exe/sapmnt/RED/Linux/exe/sapmnt/RED/Aix/exe/sapmnt/RED/Sun/exe
Transport directory/usr/sap/trans
Global directories/sapmnt/RED/profile/sapmnt/RED/global
Central instance
Solaris dialog instances
NFS-mount (SAP kernel)
Symbolic link
Legend
NFS-mount (global/profile/trans)
Linux dialog instances
Instance directory
/usr/sap/RED/...
Link/sapmnt/RED/exeMount points/sapmnt/RED/Linux/exe/sapmnt/RED/profile/sapmnt/RED/global/usr/sap/trans
/usr/sap/RED/...
/usr/sap/RED/...
Link/sapmnt/RED/exeMount points/sapmnt/RED/Linux/exe/sapmnt/RED/profile/sapmnt/RED/global/usr/sap/trans
AIX dialog instances
Instance directory/usr/sap/RED/...
Instance directory/usr/sap/RED/...
Link/sapmnt/RED/exeMount points/sapmnt/RED/Linux/exe/sapmnt/RED/profile/sapmnt/RED/global/usr/sap/trans
/usr/sap/RED/...
88 SAP on DB2 UDB for OS/390 and z/OS: Implementing Application Servers on Linux for zSeries

4.3.2 Maintaining the SAP kernelRunning SAP with more than one operating system requires a different SAP kernel. Each kernel has its own patch level. Patches remove errors or provide other changes in the SAP kernel. Because of this we recommend that you use the same patch level for all operating system platforms, or at least keep the gap as close as possible.
SAP tolerates it to have one patch level for each platform active in a running SAP system. It is not possible to run two servers belonging to the same type of platform with different kernel patch levels.
When implementing a new kernel patch for one platform we recommend that you shut down the whole SAP system if you want to restart the SAP server belonging to that platform afterwards.
This is so because SAP buffers the current patch level that is active for a platform. If you change the patch level for one platform while you keep running the rest of the system, SAP will refuse the connection of the upgraded SAP systems during the restart of this specific server.
As a conclusion we recommend that you always apply the newest kernel patches for all operating system platforms at once so you don’t have more planned outages just because you have more operating system platforms.
4.4 Dialog instance setup in a heterogeneous environment
The installation of a dialog instance in a heterogeneous environment is similar to the installation of a dialog instance in a homogeneous environment. The considerations for one are true for the other, except for the mounting of the NFS file systems and some pitfalls during the installation when the central instance is running on z/OS. We describe those exceptions only.
4.4.1 Mounting NFS file systems from z/OSConsider the implementation of an SAP application server for Linux on zSeries, such as vmlinux6, with the central instance running on z/OS (SC42). Before starting the installation of the SAP application server for Linux on zSeries, we recommend that you create a directory or file system like /sapmnt/RED/Linux on SC42. This is the place where the SAP kernel for Linux on zSeries will be stored. So we like to have a file system set up as shown in Figure 4-24 on page 86 or Figure 4-26 on page 88.
Chapter 4. Installing SAP application servers on Linux 89

We had to make the file system available for vmlinux6. To do this, we performed the following steps:
1. We checked the security options of the NFS server on z/OS. Figure 4-27 shows the right entry for the security options. This makes the NFS server accept mount requests from the Linux client, if it is specified in EXPORTS. If you have to change these options, restart the NFS server.
Figure 4-27 Security options for the NFS server
2. We created an entry for each file system to be mounted on vmlinux6 in the export data set member of the NFS server. In our case the data set name member was OS390NFS.SAPRED.PARMS(EXPORTS). See Figure 4-28.
Figure 4-28 Content of the EXPORTS data set
3. We issued the following z/OS modify command to the NFS server (in our case, mvsnfssa) to export the file system:F MVSNFSSA, EXPORTFS
After that, we logged on to the Linux on zSeries server as root and mounted the Linux kernel directory from SC42. The mounting is described in 4.2, “Installing a dialog instance on Linux” on page 81. Note that the mount options that are used
Menu Utilities Compilers Help sssssssssssssssssssssssssssssssssssssssssssssssssssssssssssssssss BROWSE OS390NFS.SAPRED.PARMS(ATTRIB) - 01.08 CHAR Command ===> Scrsidefile(OS390NFS.SAPRED.NFS.MAPPING) security(saf,exports,saf) pcnfsd leadswitch mintimeout(1)
Menu Utilities Compilers Help sssssssssssssssssssssssssssssssssssssssssssssssssssssssssssssssssssssssssssssss BROWSE OS390NFS.SAPRED.PARMS(EXPORTS) - 01.18 Line 00000000 Col 001 080 Command ===> Scroll ===> CSR ********************************* Top of Data **********************************####################################################################### # # # OS/390 Network File System Server Sample EXPORTS @P02C # # # ::/hfs/sapmnt/RED/profile -access=vmlinux6 /hfs/sapmnt/RED/global -access=vmlinux6 /hfs/sapmnt/RED/Linux/exe -access=vmlinux6 /hfs/sap/trans -access=vmlinux6 ******************************** Bottom of Data **************************
90 SAP on DB2 UDB for OS/390 and z/OS: Implementing Application Servers on Linux for zSeries

there assume that the central instance is a system that uses an ASCII code page like Linux on zSeries.
If we run the central instance on a z/OS system like SC42, we have to take care of ASCII-EBCDIC conversions (Chapter 3 in SAP R/3 on DB2 UDB for OS/390 and z/OS: Planning Guide, SC33-7966). By using a special mount option, the ASCII-EBCDIC conversion is done automatically by the NFS server.
See Figure 4-29 for the correct entries in /etc/fstab.
Figure 4-29 Content of /etc/fstab
We changed the access rights for the shared file systems just for installation with the following commands on SC42:
chmod 777 /sapmnt/RED/Linux/exechmod 755 /sapmnt/RED/profilechmod 755 /sapmnt/RED/global
Try to write a file in the mounted directory on vmlinux6 with the command:
touch /sapmnt/RED/exe/nfs_test
If this is successful, you can start the installation of the dialog instance.
4.4.2 Installing the dialog instanceAfter having set up the NFS file systems, you can install the dialog instance as described for the installation of a dialog instance in a homogenous environment.
There are some additional things you have to care about. Before starting R3SETUP -f DIALOG.R3S, you should edit the configuration file DIALOG.R3S.
For your first SAP instance installation for the platform Linux on zSeries, you have to specify the key EXTRACT_ON_NFS=yes for some steps that extract files. For example, the SAP kernel for Linux has to be extracted when installing your first instance for Linux on zSeries. We added this entry to some sections in DIALOG.R3S (see Figure 4-30 on page 92).
sapnfs:/hfs/sapmnt/RED/global,text,xlat(oemvs311) /sapmnt/RED/global nfs intr,rsize=8192,wsize=8192sapnfs:/hfs/sapmnt/RED/profile,text,xlat(oemvs311) /sapmnt/RED/profile nfs intr,rsize=8192,wsize=8192sapnfs:/hfs/sapmnt/RED/Linux/exe,text,xlat(oemvs311) /sapmnt/RED/exe nfs intr,rsize=8192,wsize=8192sapnfs:/hfs/sap/trans,text,xlat(oemvs311) /usr/sap/trans nfs intr,rsize=8192,wsize=8192
Chapter 4. Installing SAP application servers on Linux 91

Figure 4-30 Editing DIALOG.R3S
Because of the different security behavior of the NFS server on z/OS, R3SETUP will abort when it tries to change permission bits and ownership on SC42. When this happens, log on to SC42 as superuser and change the permission bits and the ownership manually with the commands:
chown redadm:SAPSYS /sapmnt/RED/Linux/exe/*chown 0:SAPSYS /sapmnt/RED/Linus/exe/saposcolchmod 4755 /sapmnt/RED/Linux/exe/saposcol
R3SETUP should work when restarted.
[DOWNLOADICLICLIENT_IND_DB2]:EXTRACT_ON_NFS=YESMSGID=RI_GIST_DOWNLOADICLICLIENT_IND_IND:
[EXTRACTSAPEXE_IND_IND]:ARCHIVE=/sapkernelCD/UNIX/S390X_64/SAPEXE.SAR:EXTRACT_ON_NFS=YESGROUP=sapsys:
[EXTRACTSAPEXEDB_IND_IND]:ARCHIVE=/sapkernelCD/UNIX/S390X_64/SAPEXEDB.SAR:EXTRACT_ON_NFS=YES:
[SIGNONKEY_IND_DB2]:CONFIRMED=SIGNON SIGNONUSERID SIGNONAPPLICATION SIGNONKEYEXTRACT_ON_NFS=YES:
92 SAP on DB2 UDB for OS/390 and z/OS: Implementing Application Servers on Linux for zSeries

Chapter 5. Cloning an SAP dialog instance
This chapter discusses the cloning of an SAP dialog instance on Linux. The cloning methodology we discuss here considers sharing disk space and having only a single copy of the operating system to maintain.
We cover the following topics:
� Reasons for cloning
� Benefits of cloning
� Ways of cloning
� Cloning scenario—share as much code as possible
� Cloning the Linux operating system
� Cloning SAP application instances
� Hints and tips for the cloning approach
5
© Copyright IBM Corp. 2002. All rights reserved. 93

5.1 Reasons for cloningWhat do we mean by cloning? Cloning means that instead of doing a full install of a new Linux system, we copy minidisks of an existing Linux system to create a new one. After that, we modify some parameters in the configuration files to make the new clone unique (for example, a new host name). The more the cloning process is automated, the faster it gets.
Cloning makes sense when you have a lot of homogeneous servers. The more different they are, the less the advantage.
5.2 Benefits of cloningCloning offers great opportunities, especially when the systems are running on the same machine:
� Sharing disks
z/VM offers great opportunities to share resources between different systems. With z/VM you can link a minidisk from one system to another. In an environment with virtual Linux servers, these servers access the shared minidisks in read-only mode as Linux systems count on having exclusive access to their file systems and have no means to synchronize their buffers and file system cache with other Linux servers. Since standard installations of Linux are not prepared to operate on a disk that is read-only, you need to customize such an installation. The possibility of sharing minidisks saves the largest part of the disk space required by the operating system.
� Faster installation
Creating a new clone is much faster than installing a new Linux system from scratch, especially if additional components have to be installed or created after the normal installation.
� Maintaining the clone colony
When using one Linux image as a master system, you can save a lot of administration effort when applying maintenance to this master system. Then you just have to distribute your new system to the clones. So you don’t have to maintain every clone. Depending on your environment, this may save a lot of work. You may even be able to implement a clone setup that eliminates the need to distribute the changes totally. That would be a great deal. And last but not least you are then sure that your clones have comparable configurations. This should increase the overall availability of your cloned systems.
94 SAP on DB2 UDB for OS/390 and z/OS: Implementing Application Servers on Linux for zSeries

5.3 Ways of cloningThere are three different approaches for cloning. We discuss these approaches in the following sections and give some considerations on the applicability of the benefits we have just defined.
5.3.1 Cloning without minidisk sharingOne way to set up your clones is to define z/VM guests with their own minidisks. No minidisks are shared between the z/VM guests. So when you create your clone from one source system as shown in Figure 5-1 you just copy the content of all minidisks to the new z/VM guest, except the minidisks containing /usr/sap/trans and /sapmnt if you are cloning a dialog instance out of a master central instance. After that you may boot from a RAM disk and make your adjustments to meet the new TCP/IP configuration. This concept is described in detail in Linux on IBM eServer zSeries and S/390: ISP/ASP Solutions, SG24-6299.
We think that it is essential to use the LVM for the SAP file systems in order to be more flexible. When setting up your file systems for a system that will later be used to clone not just the operating system, but the SAP as well, you should create different volume groups for your SAP file systems.
We recommend that you set up at least two volume groups for the SAP file systems as shown in Figure 5-1.
Figure 5-1 Cloning without minidisk sharing
Copy
Share per NFS, rw/sapmntVGM1
/
VGL1 /usr/sap
Part1: Operating System
Part2: SAP System
Central instance
Master Clone
Copy
Mount point /sapmnt
/
VGL1 /usr/sap
Part1: Operating System
Part2: SAP System
Dialog instance
Chapter 5. Cloning an SAP dialog instance 95

The first volume group VGL1contains the file system /usr/sap. VGL1 will contain the local instance directory. The other volume group will be VGM1. VGM1 will hold all file systems that are special for a central instance and will later be mounted by SAP dialog instances. These file systems are /usr/sap/trans and /sapmnt.
The reason for this setup is that, depending of what you want to clone, you copy the disks belonging to one volume group or you copy both volume groups.
Copy VGM1 and VGL1 when you want to create a new central instance by cloning. When you want to set up a new dialog instance, instead, just copy the disks belonging to VGL1. During boot time of the newly created clone, the LVM automatically performs a volume group scan. Each disk is scanned. If you just copied the disks for VGL1, the LVM recognizes these disks as LVM-managed and activates VGL1 with all its logical volumes and file systems. When copying VGM1 and VGL1, the LVM automatically recognizes both volume groups correctly. So with this setup, you have to make no adjustments concerning the LVM when cloning.
After having configured your newly cloned Linux on zSeries, you have to adjust some SAP file system names, SAP profiles and user profiles. There are several SAP parameters that may may have to be changed, depending on whether you clone a central or a dialog instance (e.g., change the SID, the system number, the host name, DBHOSTNAME, DBATTACHNAME, and the failover parameter). Table 5-1 provides a checklist of what may need to be changed when adjusting your new SAP instance to your needs. This list is not exhaustive, but should give you some hints. Of course you also have to mount /sapmnt and /usr/sap/trans from your central instance when cloning a dialog instance.
Table 5-1 SAP parameters that need to be customized for the clone system
Name File name/file system What may be changed?
dbenv files /home/redadm/.dbenv.<hn>.csh/home/redadm/.dbenv.<hn>.sh
SAPDBHOSTSID (e.g. RED) in pathnamesR3_DB2_SSID (DB2 group attach name)ICLI_TRUSTED_CONNECTIONS
sapenv files /home/redadm/.sapenv.<hn>.csh/home/redadm/.sapenv.<hn>.sh
SAPSYSTEMNAMESID in pathnames
startsap script /home/redadm/startsap_<hn>_<nr> START_PROFILE
startsap script /home/redadm/startsap_<hn>_<nr> START_PROFILE
96 SAP on DB2 UDB for OS/390 and z/OS: Implementing Application Servers on Linux for zSeries

Legend:
<hn> Hostname, e.g. vmlinux8<nr> Instance number, e.g. 00<SID> SAP system identifier, e.g. RED<INSTANCENAME> Instancename, e.g. DVEBMGS00
default profile /sapmnt/<SID>/profile/DEFAULT.PFL SAPSYSTEMNAME SAPDBHOSTrdisp/mshost rdisp/sna_gatewayrdisp/sna_gw_service, when other <nr>rdisp/vbname rdisp/enqname rdisp/btcname
start profile /sapmnt/<SID>/profile/START_<INSTANCENAME>_<hn>e.gSTART_D00_vmlinux8
SAPSYSTEMNAME INSTANCE_NAME (e.g. DVMGS00->D99)links to the instance profile
instance profile
/sapmnt/<SID>/profile/<SID>_<INSTANCENAME>_<hn>e.g.RED_D00_vmlinux8
SAPSYSTEMNAME INSTANCE_NAMESAPSYSTEM SAPDBHOSTdbs/db2/ssid dbs/db2/hosttcprsdb/db2_host_standby rsdb/db2_port_standbyrsdb/reco_symmetric rsdb/reco_sync_all_server rsdb/reco_trials = ::and other instance specific profile parameters
Instance directory
/usr/sap/<SID>/<INSTANCENAME>e.g./usr/sap/RED/DVEBMGS00
etc service /etc/service sapdb2<SID> ICLI server portnamesapdp<nr> 32<nr>sapgw<nr> 33<nr>sapgw<nr>s 48<nr>sapms<SID> 36<nr>
Name File name/file system What may be changed?
Chapter 5. Cloning an SAP dialog instance 97

How to read Table 5-1 on page 96:
� Column “File/file system”
When there are variables like <hn> in the path name of a file or file system, it means that you have to rename the directory or the file system to your new host name.
When a file name contains a variable like <hn>, you have to rename or copy the file to reflect your new host name, for example.
� Column “What you may change”
Here are some variables or hints to path names that may have to be changed, depending on differences between your clone and the original master system.
You see that there are a lot of parameters to adjust. Because of this we recommend that you copy your whole master system (operating system and SAP application server code) when you want to clone. Then adjust the SAP file systems and configuration files manually, because the tasks may vary a lot, depending on what has changed. It makes sense to automate this cloning process when you have a large number of SAP instances.
Optionally, you can create a new SAP instance just by cloning the operating system and doing a new SAP installation as described in Chapter 4, “Installing SAP application servers on Linux” on page 63. This makes sense if many parameters change and you do not have many SAP instances to install.
Evaluating the benefits� Sharing disks
This approach doesn’t take advantage of sharing minidisks.
� Faster installation
This approach is a faster way to install a new Linux server. It is also a faster way to install a new SAP instance when there is not much difference between the SAP clone and the SAP source system.
� Maintaining the clone colony
The main advantage of this approach is that it is simple. Each clone is independent from the other after the initial cloning. Even maintaining the colony may be easier because you can maintain each clone independently of the others. There are no limitations, but on the other hand, this is also a disadvantage because it means you have to maintain each clone! The larger the number of servers, the bigger the total maintenance effort gets.
Another alternative is to have one master system for maintenance. Every time you make changes to the master system, you copy the operating system again to each clone and adjust parameters that are specific to the clone.
98 SAP on DB2 UDB for OS/390 and z/OS: Implementing Application Servers on Linux for zSeries

5.3.2 Cloning with /usr directory sharingAnother approach of cloning is to share only the /usr directory of the Linux file system. The /usr directory stores binaries. So it can be shared in read-only mode by z/VM during normal operation. Figure 5-2 shows an overview of the setup.
Figure 5-2 Cloning with sharing /usr
The cloning process itself is similar to cloning without sharing, except that you have to put the /usr file system on a separate disk. This disk is not copied during cloning. The clone has read-only access to the minidisk.
Evaluating the benefits� Sharing disks
This approach does take advantage of sharing minidisks. Most of the Linux operating system is stored in this directory. This saves approximately 780 MB for each clone, depending on your installation.
� Faster installation
This approach is similar to the previous one concerning the speed of installation. It is even a little bit faster because you don’t have to copy /usr.
� Maintaining the clone colony
Copy
Share per NFS, rw
Copy
Mount point /sapmnt
/
Part1: Operating System
/sapmntVGM1
VGL1 /usr/sap
Part2: SAP System
/usr
/
Part1: Operating System
VGL1 /usr/sap
Part2: SAP System
/usrShare minidisks, ro
Master Clone
Central instance Dialog instance
Chapter 5. Cloning an SAP dialog instance 99

We think that maintaining a system that shares only some parts of the operating system is very difficult. There is a very good discussion on this topic in section 10.5 of Linux for zSeries and S/390:ISP/ASP Solutions, SG24-6299.
5.3.3 Cloning with sharing as much code as possible This approach is completely different from the cloning approach with no sharing. In this approach we try to share as much code as possible. This means that nearly the whole operating system is stored on a minidisk, which is accessed by its clones in read-only mode, as shown in Figure 5-3.
Figure 5-3 Cloning with sharing as much code as possible
There is only one small minidisk for the file system /rw that belongs to the operating system. It contains some specific files for the clones and offers read/write access to a disk for the operations of the operating system that require rw access to a disk.
The setup for the SAP-specific part is the same as for the other cloning approaches. This is because /use/sap/trans and /sapmnt are shared by NFS,
Copy only once
Share minidisks, ro
Share per NFS, rw/sapmntVGM1
/
VGL1 /usr/sap
/rw
Part1: Operating System
Part2: SAP System
Copy only once
Mount point /sapmnt
/
VGL1/usr/sap
/rw
Part1: Operating System
Part2: SAP System
Dialog instanceCentral instance
Master Clone
100 SAP on DB2 UDB for OS/390 and z/OS: Implementing Application Servers on Linux for zSeries

and the instance directory is unique for each instance and needs read/write access for running the SAP instance. So it doesn’t make sense to share it.
Of course there is no standard distribution that automatically offers a Linux installation that divides the read-only part and the read/write part of an operating system properly or that optionally supports cloning. So these modifications have to be done manually.
These modifications should be done only when you are really experienced with Linux and are willing to invest time in testing the environment. You should also verify that you will still get professional support to set up and maintain such a cloning environment.
It would be very beneficial if Linux distributions for zSeries could offer the option to install a master system that can later be used for cloning.
Evaluating the benefits:� Sharing disks
This approach takes the greatest advantage of sharing minidisks. You share, and therefore save, space that is needed by the operating system.
� Faster installation
Once you have spent the effort of setting up the cloning environment, it becomes the fastest way of creating a clone. As shown in Figure 5-3 on page 100, you just have to copy the small read/write disk for the operating system and the instance directory of the SAP instance.
� Maintaining the clone colony
The main advantage of this approach is that it has the potential to dramatically reduce the effort that you need to maintain the clone colony. When you install a new rpm package, for example, you have to install it just once for the master system that offers the read-only disks to the clones. When you start your Linux clones, the rpm package is instantly available for these clones.
You should also have a maintenance strategy. When applying maintenance to a master system, the disks can’t be shared in read-only mode by the clones any more. It may be a good idea to set up a special maintenance system that holds different sets of Linux images, some for production and some for maintenance. So you can apply maintenance to one set of disks that belong to an image while providing the active images in read-only mode to the clones.
If you have a large number of Linux images and are experienced with Linux, it is obvious that the advantages of this approach outweigh the effort of implementing such a cloning environment.
Chapter 5. Cloning an SAP dialog instance 101

5.4 Cloning scenario: share as much code as possibleIn this section we describe the cloning scenario we implemented using the approach of sharing as much code as possible.
The other cloning approaches are discussed in Linux for zSeries and S/390:ISP/ASP Solutions, SG24-6299, and we outlined the SAP-specific actions in 5.3, “Ways of cloning” on page 95.
In the limited time frame of this project, we chose to install a very simple cloning environment. This is certainly not what a production environment would look like. We provide a proof of concept that shows the mechanisms of creating a clone that shares as much code as possible. Our proof of concept intends to show:
� The cloning process
� Hints to some restrictions
� Efforts and skills required to implement the cloning process
We decided to use the central instance as a master to clone new dialog instances belonging to the same SAP system (Figure 5-4 on page 102).
Figure 5-4 Cloning - share as much code as possible
Copy only once
Share minidisks, ro
Share per NFS, rw/sapmntVGM1,ReiserFS
//usr/var
VGL1,ReisreFS /usr/sap
No VolumeGroup defined,ext2
No Volume Group defined,ReiserFS /rw/
devetchomelocalroottmpvar
Part1: Operating System
Part2: SAP System
Central Instance VMLINUX8
Copy only once
Mount point /sapmnt
//usr/var
VGL1,ReisreFS /usr/sap
No VolumeGroup defined,ext2
No Volume Group defined,ReiserFS /rw/
devetchomelocalroottmpvar
Part1: Operating System
Part2: SAP System
Master CloneDialog Instance VMLINUX7
102 SAP on DB2 UDB for OS/390 and z/OS: Implementing Application Servers on Linux for zSeries

5.5 Cloning the Linux operating systemWe describe the cloning process for the Linux operating system using the approach of sharing as much code as possible.
5.5.1 Overview of the cloning processOur cloning process is based on the Redpaper Linux on IBM zSeries and S/390: Server Consolidation with Linux for zSeries, REDP0222.
The basic idea of this share as much code as possible approach is that every file or directory that a server does not need to have write access to during normal operation, should be on a single read-only file system shared by all servers. In our environment, these files make up about 97% of the installed operating system code. If you take into account the files needed for the SAP application, the share of the files that can be kept in a read-only file system is still at 88%.
To have so much of your operating system and middleware data shared implies not only savings in disk space, but more importantly, a reduction in administrative tasks. A patch you normally have to distribute to every member in your server environment will be applied once and made available to every other server by simply restarting it.
The challenge we face now is that a Linux file system is not by its nature divided into a read-only part and a read/write part. There is a possible division, but it does not go as far as we would like it to go. Example 5-1shows the disk usage of a typical 64-bit Linux for zSeries installation classified by the / subdirectories the files belong to.
Example 5-1 Disk usage of the files belonging to the subdirectories of the / directory
vmlinux6:/ # du -h -s *7.0M bin4.2M boot32k dev23M etc3.4M home12M lib7.3M lib6416k lost+found4.0k mnt141M opt0 proc68k root13M sbin3.2M tmp933M usr
Chapter 5. Cloning an SAP dialog instance 103

32M var
Some subdirectory structures can be shared in read-only mode, like /bin, /boot, /lib, /lib64, /sbin and /usr. These subdirectory structures already use the largest part of the file system. But to really make administration and maintenance of the clone colony easy, we need to share more operating system code. Directories that must be in read/write mode are /home, /tmp, and /var. That leaves us with a few “in doubt” directories, which we want to examine more closely:
/dev The device file system carries information about the devices used by the system. There are only a few files in this directory that must be writable. The ones we found are the pts subdirectory and the subdirectories that define LVM volume groups.
/etc The /etc-directory is the place for most of the configuration files used in a UNIX environment. As our clones are going to be much alike, it made sense to share as much as possible of these files. We placed the following files in a writable file system within our environment: exports, services, HOSTNAME, mtab, rc.config, and the ssh subdirectory.
/opt In general, this directory should be treated like the /usr directory. It is used to install software products like KDE, IBM WebSphere or Oracle. Some of these products, like WebSphere, place log files into the /opt directory hierarchy, by default. This issue can be overcome by either creating a symbolic link from a writable file system to the specific log file, or by changing the path for the log file, if the application allows it. We had no products at all installed in the /opt-directory, and so it was all read-only.
The directories not mentioned yet, like /mnt or /proc, are only mount points for temporary or virtual file systems we did not need to consider in this context.
The way to share as much code as possible and to make selected files and directories writable at the same time is to mount the complete “/” file system in read-only, and to replace the files that need to be writable by a link to a writable file system.
Figure 5-5 on page 105 shows the file system layout we created for our master Linux image, from which we cloned additional servers.
104 SAP on DB2 UDB for OS/390 and z/OS: Implementing Application Servers on Linux for zSeries

Figure 5-5 File system layout of our master Linux image
The design involves two minidisks and the proc file system, a virtual file system that is created at startup and holds dynamic information about the system.
The first minidisk held the root file system and was about 1.7 GB in size. We could create this partition with an ext2-file system, because it was read-only most of the time. This allowed us to keep the setup as simple as possible. All our clones shared this same minidisk, using the z/VM link statement.
The second minidisk held the file system mounted on /rw. Every virtual Linux server has its own copy and mounts it in read-write mode. Because the disk content can be changed during normal operation, it is advisable to use a journaling file system for this partition. We chose to use ReiserFS, because it is a
/usr
/bin
/opt
/mnt/lib64
/lib
/home
/etc
/dev
/boot
/var
/tmp
/sbin
/root
/proc
/
./home
./etc
./dev
./var
./tmp
./root
/rw
./VGL1
./pts
./services
./exports
./rc.config
./ssh
./HOSTNAME
./mtab
./VGM1
./mounts
ro, ext2 rw, ReiserFS
procfs
./local./local
Chapter 5. Cloning an SAP dialog instance 105

standard installation option of the SuSE distribution. The size of this minidisk is 140 MB in our environment.
The arrows with broken lines in Figure 5-5 on page 105 denote files and directories in the / file system that we replaced by links pointing to equivalent files and directories within the /rw file system, or in case of /etc/mtab to /proc/mounts. We created a link from /usr/local to the writable file system as location for applications that are private to the virtual servers, and are not shared.
Now we had to find a way to personalize each of our clones. For this purpose, we used configuration scripts we placed in /usr/sbin/cloning. These scripts were called by the /etc/init.d/boot script and by a script we placed in /etc/init.d, with a link in /etc/init.d/rc3.d pointing to it, so it was called every time we entered runlevel 3. This last script was only needed to make modifications to SAP applications; we did not need it for configuring the operating system or the TCP/IP.
We placed the configuration data in an additional file system that was mounted in read-only to retrieve the configuration data and then unmounted again. Mounting it in read-only allowed us to share this disk among all Linux clones. But, because it was not mounted at all by any server for most of the time, we could also mount it on /usr/var of the master Linux in read/write mode to make changes to the configuration.
Figure 5-6 on page 107 shows the order of the cloning-pecific tasks that were initiated by the /etc/init.d/boot script.
106 SAP on DB2 UDB for OS/390 and z/OS: Implementing Application Servers on Linux for zSeries

Figure 5-6 Order of the cloning-specific scripts invoked by /etc/init.d/boot
The information stored in the files net1 and net2 was written as environment variable definitions to rc.config-tcpip and sourced afterwards. The variables we defined here were the ones used by SuSE to do the network configuration.
The following is a methodology we propose for customizing your master Linux system:
1. Start with the original Linux image (see 3.5, “Linux installation and customization” on page 37).
2. Create the /rw file system.
3. Copy the directories /dev, /home, /etc, /root, /tmp, /usr/local, and /var to /rw. It is not necessary to copy all the files in /dev and /etc, because you need only the ones you are going to link, but it is convenient to do so.
4. Delete the directories /home, /tmp, /root, /usr/local, and /var, and create links to their twins in the /rw file system.
/e tc /in it.d /b o o t
m o u n t /rw -file s y s te m
/u s r/s b in /c lo n in g /c lo n e -tcp ip -c o n fig
s o u rc e /rw /e tc /rc .c o n figw h ich s o u rce s /rw /e tc /rc .tcp ip -c o n fig
m o u n t /u s r/v a r-file s ys te m
u n m o u n t o f /u s r/v a r
lo a d c p in t m o d u le
/u s r/s b in /c lo n in g /c lo n e -tc p ipa sk fo r z /V M g u e s t n a m e ,g e t in p u t fro m
/u s r/v a r/c o n fig /n e t1/u s r/v a r/c o n fig /n e t2
w ith th is in fo rm a tio n ,w rite
/rw /e tc /rc .c o n fig -tc p ip
Chapter 5. Cloning an SAP dialog instance 107

5. Replace the directory /dev/pts by a link to /rw/dev/pts. This is necessary because a login to a tty creates an entry in this directory, so it must be writable.
6. We are using LVM and want to be able to create new logical volumes in the two volume groups we defined. The two volume groups are VGL1, which is private to every virtual server, and VGM1, which belongs only to the master Linux and is made available to the other images via NFS. We replace /dev/VGL1 and /dev/VGM1 by links to /rw/dev/VGL1 and /rw/dev/VGM1.
7. /etc/rc.config is a profile script containing environment variables SuSE uses for system configuration. We expect that it will be replaced by some other configuration tool in SLES 8. To be able to apply local modifications, replace it by a link to /rw/etc/rc.config.
The first call to rc.config is done during startup at the beginning of the script /etc/init.d/boot. Make sure that the system is able to retrieve a configuration even when the /rw file system is not available. So create a copy of rc.config called /etc/rc.config-shared, and change the boot-script to point to this file.
8. Now replace the files /etc/exports, /etc/services, /etc/HOSTNAME and the directory /etc/ssh by links to the equivalent files and directories in /rw/etc.
9. /etc/mtab is replaced by a link to /proc/mounts.
10.Create mount point /usr/var, thencreate file system /usr/var and mount it. Place configuration data files in /usr/var/config and unmount the file system again.
11.Create the subdirectory /cloning in /usr/sbin. This is where we put our configuration scripts that are called on server startup.
12.Change /etc/init.d/boot to make it mount the /rw file system. Delete the lines that remount the / file system read-write. Then insert commands to call /usr/sbin/cloning/clone-tcpip-config and to source /rw/etc/rc.config afterwards.
At this point you have customized your master Linux.
Now, to create a clone, do the following:
1. Set up a Linux guest, including the following specifications:
– The minidisk specifications are the same as for the master Linux, except that the minidisks carrying the / and the /usr/var file systems are not needed.
– The network devices should be defined as in the master Linux.
– Devices with the same function in the master Linux and the clone should be defined with the same device address.
2. For all minidisks defined to the clone guest, copy the content of the equivalent master Linux minidisks to them. Shut down the master Linux for this in order
108 SAP on DB2 UDB for OS/390 and z/OS: Implementing Application Servers on Linux for zSeries

to have the file systems in a consistent state. Also copy the minidisk for swap space, or format it using the CMS FORMAT command.
3. Link the two minidisks for the / and /usr/var file systems and IPL on the minidisk containing the / file system.
5.5.2 Customizing the master LinuxAfter this introduction to the cloning process, let’s now describe the actual steps we performed to customize the master Linux in our test environment.
First, we reviewed our current minidisk setup in Table 5-2.
Table 5-2 Minidisk layout of the master Linux system
What we had now were minidisk 200 for swap, 201 for the / file system containing the complete operating system code, and 204, 205 for the volume groups containing the SAP code. Next, we created file systems on /dev/dasdc1 and /dev/dasdd1 as follows:
mke2fs -b 4096 /dev/dasdc1
We then turned off the file system check on boot time, to be sure that the Linux clones that have this minidisk linked in read-only mode didn’t get irritated:
tune2fs -i0 -c0 /dev/dasdc1
Example 5-2 shows the commands to format /dev/dasdd1 and mount it on /rw.
Example 5-2 Creating and mounting the /rw file system
vmlinux8:~ # mkreiserfs /dev/dasdd1mkreiserfs 3.x.1b (2002)mkreiserfs: Guessing about desired format..mkreiserfs: Kernel 2.4.17-timer is running.Format 3.6 with standard journal
Device number
Device name Mount point or volume group
Size in CYLS Size in MB
200 /dev/dasda1 SWAP 10016 7011
201 /dev/dasdb1 / 2500 1750
202 /dev/dasdc1 /usr/var 20 14
203 /dev/dasdd1 /rw 200 140
204 /dev/dasde1 VGL1 600 420
205 /dev/dasdf1 VGM1 1000 700
Chapter 5. Cloning an SAP dialog instance 109

Count of blocks on the device: 35997Number of blocks consumed by mkreiserfs formatting process: 8213Blocksize: 4096Hash function used to sort names: "r5"Journal Size 8193 blocks (first block 18)Journal Max transaction length 1024inode generation number: 0UUID: 0611aaf7-70aa-4964-9b18-aa6dd35b6dc9ATTENTION: YOU SHOULD REBOOT AFTER FDISK! ALL DATA WILL BE LOST ON '/dev/dasdd1'!Continue (y/n): yInitializing journal - 0%....20%....40%....60%....80%....100%Syncing..okPlease visit www.namesys.com for information about ReiserFS sponsors
vmlinux8:~ # mkdir /rwvmlinux8:~ # mount /dev/dasdd1 /rwvmlinux8:~ # dfFilesystem 1k-blocks Used Available Use% Mounted on/dev/dasdb1 1743548 994392 659160 61% //dev/VGM1/lvsapmnt 360432 168068 192364 47% /sapmnt/dev/VGL1/lvusrsap 430060 46496 383564 11% /usr/sap/dev/VGM1/lvsaptrans 204788 32840 171948 17% /usr/sap/transshmfs 251116 0 251116 0% /dev/shm/dev/dasdd1 143976 32840 111136 23% /rw
Then we copied the files and directories we needed to have writable to the /rw directory:
cp -a {/var,/home,/dev,/etc,/tmp,/usr/local,/root} /rw
The next step was to replace /var, /home, /tmp, /usr/local, and /root by links to the corresponding directories in /rw, for example for /var:
vmlinux8:/ # rm -rf /var
vmlinux8:/ # ln -s /rw/var /var
Example 5-3 shows the results of these actions.
Example 5-3 Directories created in /rw and the symbolic links pointing to them
vmlinux8:/rw # du -hs /rw/*27k /rw/dev23M /rw/etc3.6M /rw/home1.3M /rw/local1.5M /rw/root
110 SAP on DB2 UDB for OS/390 and z/OS: Implementing Application Servers on Linux for zSeries

1.0k /rw/tmp24M /rw/var
vmlinux8:/ # ls -ltotal 77drwxr-xr-x 16 root root 4096 Jun 14 15:37 .drwxr-xr-x 16 root root 4096 Jun 14 15:37 ..drwxr-xr-x 2 root root 4096 Jun 13 10:15 bindrwxr-xr-x 4 root root 4096 Jun 13 10:29 bootdrwxr-xr-x 5 root root 16384 Jun 14 15:53 devdrwxr-xr-x 28 root root 4096 Jun 19 18:25 etclrwxrwxrwx 1 root root 8 Jun 14 11:08 home -> /rw/homedrwxr-xr-x 5 root root 4096 Jun 13 10:10 libdrwxr-xr-x 3 root root 4096 Jun 14 14:04 lib64drwx------ 2 root root 16384 Jun 13 09:27 lost+founddrwxr-xr-x 2 root root 4096 Jun 13 10:07 mntdrwxr-xr-x 11 root root 4096 Jun 13 10:14 optdr-xr-xr-x 59 root root 0 Jun 18 15:18 proclrwxrwxrwx 1 root root 8 Jun 14 11:15 root -> /rw/rootdrwxr-xr-x 10 root root 216 Jun 14 11:30 rwdrwxr-xr-x 4 root root 72 Jun 13 14:53 sapmntdrwxr-xr-x 4 root root 4096 Jun 14 14:04 sbinlrwxrwxrwx 1 root root 7 Jun 14 11:17 tmp -> /rw/tmpdrwxr-xr-x 19 root root 4096 Jun 14 19:03 usrlrwxrwxrwx 1 root root 7 Jun 14 11:17 var -> /rw/var
vmlinux8:/ # ls -l /usr/locallrwxrwxrwx 1 root root 9 Jun 14 11:32 /usr/local -> /rw/local
In /etc, we created a copy of rc.config called rc.config-shared, sourced at the very beginning of the /etc/init.d/boot script, and replaced rc.config itself by a link:
vmlinux8:/etc # cp rc.config rc.config-shared
vmlinux8:/etc # rm rc.config
vmlinux8:/etc # ln -s /rw/etc/rc.config rc.config
We changed two parameters in rc.config and rc.config-shared:
ENABLE_SUSECONFIG=”no” To disable the SuSEconfig scripts.
SYSLOGD_PARAMS="-p /rw/dev/log" To have syslogd use a device in /rw/dev.
At the end of /rw/etc/rc.config we added the following line:
. /rw/etc/rc.config-tcpip
Chapter 5. Cloning an SAP dialog instance 111

to source the TCP/IP configuration we created at startup of the server.
Example 5-4 shows the creation of links pointing from /etc to /proc and /rw/etc.
Example 5-4 Creating links in /etc
vmlinux8:/etc # rm mtabvmlinux8:/etc # ln -s /proc/mounts mtabvmlinux8:/etc # ls -l mtablrwxrwxrwx 1 root root 12 Jun 14 12:11 mtab -> /proc/mountsvmlinux8:/etc # rm -rf sshvmlinux8:/etc # ln -s /rw/etc/ssh sshvmlinux8:/etc # ls -l sshlrwxrwxrwx 1 root root 11 Jun 14 11:50 ssh -> /rw/etc/ssh
There are some modifications concerning LVM we had to make. The logical volumes LVM provides belong to volume groups. In the /dev directory, each volume group has its own subdirectory that contains a special file for each logical volume belonging to that group. In order to be able to add new logical volumes to the existing volume groups, their volume group subdirectories must be writable. For this reason we created links pointing from /dev to /rw/dev; see Example 5-5.
Example 5-5 Create links in /dev for subdirectories belonging to LVM
vmlinux8:/dev # rm -r VGM1vmlinux8:/dev # ln -s /rw/dev/VGM1 /devvmlinux8:/dev # ls -l VGM1lrwxrwxrwx 1 root root 12 Jun 14 15:39 VGM1 -> /rw/dev/VGM1vmlinux8:/dev # ln -s /rw/dev/VGL1 /devvmlinux8:/dev # ls -l VGL1lrwxrwxrwx 1 root root 12 Jun 14 15:39 VGL1 -> /rw/dev/VGL1
During startup of the server, the LVM tool vgscan scans the available partitions for LVM signatures and writes the result of these scans in a file, /etc/lvmtab, and a directory, /etc/lvmtab.d. As both file and directory are newly created with every vgscan, it doesn’t make sense to create links from /etc to /rw/etc.
Instead, you have two options:
� Don’t use vgscan on startup. This is possible, when /etc/lvmtab and /etc/lvmtab.d are already created, but less flexible, as you can only add new volumes to the volume groups by making the / file system writable on the master Linux and shutting down all other images that share this file system.
Have LVM use other, writable places in your file system for its configuration tables. We decided to use this option because it provides more flexibility. Unfortunately, there is currently no option or environment variable you can set to achieve this. The only way is to make a small change in the code of LVM.
112 SAP on DB2 UDB for OS/390 and z/OS: Implementing Application Servers on Linux for zSeries

The changes we made are described in B.1, “Customize LVM” on page 147. (There will soon be a new version of LVM, LVM2, that allows you to set all parameters for file locations in a configuration file. Then a code change and recompile of LVM won’t be necessary at all.)
After applying the changes, we removed the old package with:
vmlinux8:/usr/src/packages/RPMS/s390x # rpm -e lvm-0.9.1_beta7-46
and installed the new one with:
vmlinux8:/usr/src/packages/RPMS/s390x # rpm -i lvm-0.9.1_beta7-46.s390x.rpm
Now the modified version of LVM was successfully installed and fit nicely into our cloning environment.
We had to make another change to /dev: With every creation of a PseudoTTY, a file in the /dev/pts directory is created, which means that this directory must be writable. We created the appropriate link pointing from /dev/pts to /rw/dev/pts, as we had done with the volume group.
Adding new users and groups to the operating system environment or changing passwords involves changes to /etc/passwd, /etc/groups, /etc/shadow, /etc/gshadow, and writing lock files to the /etc directory. The latter involves a change to /etc itself, which was not possible in our environment. Instead, we kept all these files in /rw/etc, and performed changing of passwords and adding of users with the command chroot /rw.
This required some changes to the file system; we did the following:
� Created links for the database files of the shadow-suite:
lrwxrwxrwx 1 root root 14 Jun 5 16:45 passwd -> /rw/etc/passwdlrwxrwxrwx 1 root root 14 Jun 5 16:48 shadow -> /rw/etc/shadowlrwxrwxrwx 1 root root 14 Jun 5 16:45 group -> /rw/etc/grouplrwxrwxrwx 1 root root 14 Jun 5 16:48 gshadow -> /rw/etc/gshadow
� Created some empty directories: /rw/sbin, /rw/lib, /rw/usr/bin, /rw/usr/sbin, and /rw/usr/lib.
� Set the suid flag for suidperl: chmod s+u /usr/bin/suidperl.
� Created the directory /usr/var/bin, where we put some wrapper scripts for the commands of the shadow suite.
Chapter 5. Cloning an SAP dialog instance 113
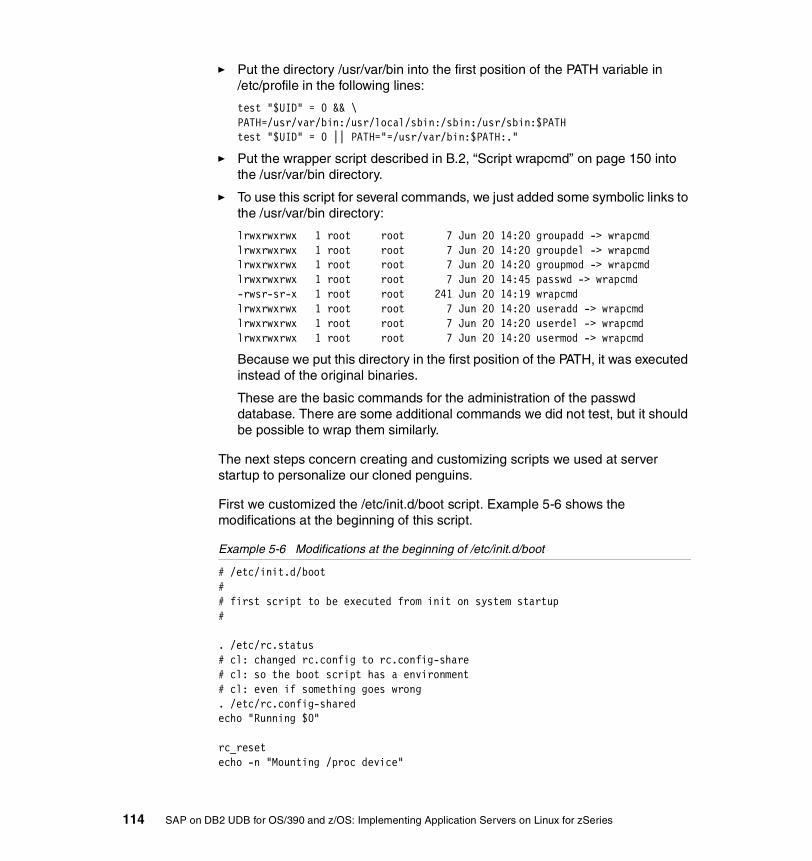
� Put the directory /usr/var/bin into the first position of the PATH variable in /etc/profile in the following lines:
test "$UID" = 0 && \ PATH=/usr/var/bin:/usr/local/sbin:/sbin:/usr/sbin:$PATHtest "$UID" = 0 || PATH="=/usr/var/bin:$PATH:."
� Put the wrapper script described in B.2, “Script wrapcmd” on page 150 into the /usr/var/bin directory.
� To use this script for several commands, we just added some symbolic links to the /usr/var/bin directory:
lrwxrwxrwx 1 root root 7 Jun 20 14:20 groupadd -> wrapcmdlrwxrwxrwx 1 root root 7 Jun 20 14:20 groupdel -> wrapcmdlrwxrwxrwx 1 root root 7 Jun 20 14:20 groupmod -> wrapcmdlrwxrwxrwx 1 root root 7 Jun 20 14:45 passwd -> wrapcmd-rwsr-sr-x 1 root root 241 Jun 20 14:19 wrapcmdlrwxrwxrwx 1 root root 7 Jun 20 14:20 useradd -> wrapcmdlrwxrwxrwx 1 root root 7 Jun 20 14:20 userdel -> wrapcmdlrwxrwxrwx 1 root root 7 Jun 20 14:20 usermod -> wrapcmd
Because we put this directory in the first position of the PATH, it was executed instead of the original binaries.
These are the basic commands for the administration of the passwd database. There are some additional commands we did not test, but it should be possible to wrap them similarly.
The next steps concern creating and customizing scripts we used at server startup to personalize our cloned penguins.
First we customized the /etc/init.d/boot script. Example 5-6 shows the modifications at the beginning of this script.
Example 5-6 Modifications at the beginning of /etc/init.d/boot
# /etc/init.d/boot## first script to be executed from init on system startup#
. /etc/rc.status# cl: changed rc.config to rc.config-share# cl: so the boot script has a environment# cl: even if something goes wrong. /etc/rc.config-sharedecho "Running $0"
rc_resetecho -n "Mounting /proc device"
114 SAP on DB2 UDB for OS/390 and z/OS: Implementing Application Servers on Linux for zSeries

mount -n -t proc proc /procrc_status -v -r
# cl: mounting of /rw to have access to# cl: clientspecific files# cl: has to be donw before mounting pts and lvm setupmount /dev/dasdd1 /rw
echo -n "Mounting /dev/pts"optpts="-o mode=0620,gid=5"mount -n -t devpts $optpts devpts /dev/ptsrc_status -v1 -r
# cl: generating the ip configurationecho "Generating the ip configuration"/usr/sbin/cloning/clone-tcpip-config. /rw/etc/rc.config
We replaced the call of the /etc/rc.config script that points to the /rw-partition not yet mounted by /etc/rc-config-shared. Then we mounted /proc, /rw and /dev/pts, one after the other. The following call of clone-tcpip-config resulted in the creation of our network configuration script, /rw/etc/rc.config-tcpip, which was then called by /rw/etc/rc.config; see also Figure 5-6 on page 107.
Example 5-7 shows further changes we made to the boot script. There are three lines in the script that remount the / file system in read/write mode. We commented these out, as well as the line removing the files nologin, fastboot ,and mtab. Then we deactivated the part that resets the time zone during each startup.
Example 5-7 Further modifications to /etc/init.d/boot
# /etc/init.d/boot[...]## Find and activate volume groups (HM 1/1/1999)#if test -d /rw/etc/lvmtab.d/ -a -x /sbin/vgscan -a -x /sbin/vgchange ; then [...] else echo "Remounting root file system (/) read/write for vgscan..." # cl: ro for the root filesystem # cl: mount -n -o remount,rw / echo "Scanning for LVM volume groups..." /sbin/vgscan mount -n -o remount,ro / echo "Activating LVM volume groups..." /sbin/vgchange -a y
Chapter 5. Cloning an SAP dialog instance 115

fifi[...]## do fsck and start sulogin, if it fails.#FSCK_RETURN=0if test ! -f /fastboot -a -z "$fastboot" ; then [...] sync # cl: no rw for the root filesystem # cl: mount -n -o remount,rw / else [...]else echo "File systems are NOT being checked." # cl: no rw for the root filesystem # cl: mount -n -o remount,rw /fi[...]## clean up## cl: rm -f /etc/mtab* /etc/nologin /nologin /fastboot[...]# cl: this is just necessary if timezone changes# cl: Let zic set timezone - if present.## cl: if test -n "$TIMEZONE" -a "$TIMEZONE" != "YAST_ASK" -a -x /usr/sbin/zic ; # then# cl: echo -n Setting up timezone data# cl: this is just necessary if timezone changes# cl: /usr/sbin/zic -l $TIMEZONE# cl: rc_status -v -r# cl: fi
Example 5-8 shows the content of the /usr/sbin/cloning/clone-tcpip-config script, which is called by the boot script.
Example 5-8 Content of /usr/sbin/cloning/clone-tcpip-config
#!/bin/bash
#loading cpint module/sbin/cpint_load
#mounting /usr/var to generate /rw/etc/rc.config-tcpip#this is included in rc.config
116 SAP on DB2 UDB for OS/390 and z/OS: Implementing Application Servers on Linux for zSeries

mount -o ro /dev/dasdc1 /usr/var/usr/sbin/cloning/clone-tcpipumount /usr/var
In this script we made sure that the cpint script was loaded, mounted the /usr/var partition containing our configuration data, and called the perl script clone-tcpip shown in Example 5-9.
Example 5-9 Content of /usr/sbin/cloning/clone-tcpip
#!/usr/bin/perluse strict;my($HCP) = '/sbin/hcp';#my($HOSTNAMES) = '/usr/var/config/hosts';my($NET1) = '/usr/var/config/net1';my($NET2) = '/usr/var/config/net2';my($CONFIG_LOCAL) = '/rw/etc/rc.config-tcpip';
my($DEBUG) = 0;my($guest) = '';my($net1) = '';my($ip1) = '';my($bc1) = '';my($nm1) = '';my($net2) = '';my($ip2) = '';my($bc2) = '';my($nm2) = '';
my($GUESTNAME) = split(/ /,`$HCP query userid`);print("HOST: $GUESTNAME\n") if $DEBUG;
#IP data for eth1open(NET1,"< $NET1") || \\die("Could not open $NET1: $!\n");while(<NET1>) { chomp; ($guest, $net1, $ip1, $bc1, $nm1) = split; last if ($guest eq $GUESTNAME);}close(NET1);print("Guestname: $guest\n") if $DEBUG;print("IP: $ip1\n") if $DEBUG;print("Broadcast: $bc1\n") if $DEBUG;print("Netmask: $nm1\n") if $DEBUG;
#IP data for hsi
Chapter 5. Cloning an SAP dialog instance 117

open(NET2,"< $NET2") || \\die("Could not open $NET2: $!\n");while(<NET2>) { chomp; ($guest, $net2, $ip2, $bc2, $nm2) = split; last if ($guest eq $GUESTNAME);}close(NET2);print("Guestname: $guest\n") if $DEBUG;print("IP: $ip2\n") if $DEBUG;print("Broadcast: $bc2\n") if $DEBUG;print("Netmask: $nm2\n") if $DEBUG;
# writing ip data for guest to rc.config-ipopen(CONFIG_LOCAL,"> $CONFIG_LOCAL") || \\die("Could not open $CONFIG_LOCAL: $!\n");print(CONFIG_LOCAL qq{FQHOSTNAME="$net2.itso.ibm.com"\n} );print(CONFIG_LOCAL qq{NETCONFIG="_1 _2\"\n} );print(CONFIG_LOCAL qq{IPADDR_1="$ip1"\n} );print(CONFIG_LOCAL qq{IPADDR_2="$ip2"\n} );print(CONFIG_LOCAL qq{IFCONFIG_1="$ip1 broadcast $bc1 netmask $nm1 up"\n} );print(CONFIG_LOCAL qq{IFCONFIG_2="$ip2 broadcast $bc2 netmask $nm2 up"\n} );close(CONFIG_LOCAL);
This script uses the hcp command from the cpint package to find out the name of the z/VM guest the Linux image is running in. Then it takes the TCP/IP configuration data stored in net1 and net2 in /usr/var/config shown in Example 5-10 and writes this data to /rw/etc/rc.config-tcpip, where it is used for network configuration at server startup.
Example 5-10 Content of net and net2 in /usr/var/config
vmlinux8:/etc # cat /usr/var/config/net1VMLINUX8 vmlinux8hs 192.168.60.8 192.168.60.255 255.255.255.0VMLINUX7 vmlinux7hs 192.168.60.7 192.168.60.255 255.255.255.0vmlinux8:/etc # cat /usr/var/config/net2VMLINUX8 vmlinux8 192.168.50.8 192.168.50.255 255.255.255.0VMLINUX7 vmlinux7 192.168.50.7 192.168.50.255 255.255.255.0
Each of the two files net1 and net2 contained the configuration data for one of the two network adapters we were using.
Now we could test the setup we created, first by restarting the master Linux image. Then we edited net1 and net2 to contain the configuration data for our first clone. We logged on to the z/VM guest of this clone, linked minidisks 201 and 202, and copied minidisks 200 and 203. You find a detailed description of
118 SAP on DB2 UDB for OS/390 and z/OS: Implementing Application Servers on Linux for zSeries

these tasks in 5.7, “Cloning an SAP dialog instance on Linux on zSeries” on page 126. After IPL on volume 201, the new Linux clone comes up with its own network configuration.
5.6 Cloning SAP application instancesThe previous sections focused on cloning the Linux operating system. This section deals with the tasks that have to be done to clone our SAP dialog instance. To keep our scripts simple, we just changed the connection parameters to the database (SAPDBHOST and ICLI port) during the cloning process, together with the host name change in the IP configuration.
5.6.1 Creating profile templates At first we determined which files store configuration parameters for the SAP instance. They are:
� The user environment profiles in the home directory of the user redadm� The start and stop SAP script � The instance-specific SAP profiles in /sapmnt/RED/profile
To make the later cloning of our SAP instances easier, we created a set of default profiles and default start and stop scripts. These are templates that are used when setting up a new SAP instance. In these templates we put some eye catchers to make it easier to replace these values automatically by scripts later on.
We created these templates by copying the appropriate original file from the environment of the central instance.
In Figure 5-7 on page 120, Figure 5-8 on page 121 and Figure 5-9 on page 122 we use the diff command to show which files we created and which adjustments we made. The diff command shows exactly what is changed and in which line the change occurs.
Chapter 5. Cloning an SAP dialog instance 119

Figure 5-7 Creating the templates for the user environment
For the user environment, we show the c shell-related environment (Figure 5-7). We changed the environment profiles for the korn shell in a similar way.
vmlinux8:/home/redadm # diff .cshrc.di .cshrc12,13c12,13< if ( -e $HOME/.sapenv_di.csh ) then< source $HOME/.sapenv_di.csh---> if ( -e $HOME/.sapenv_`hostname`.csh ) then> source $HOME/.sapenv_`hostname`.csh19,20c19,20< if ( -e $HOME/.apoenv_di.csh ) then< source $HOME/.apoenv_di.csh---> if ( -e $HOME/.apoenv_`hostname`.csh ) then> source $HOME/.apoenv_`hostname`.csh24,25c24,25< if ( -e $HOME/.dbenv_di.csh ) then< source $HOME/.dbenv_di.csh---> if ( -e $HOME/.dbenv_`hostname`.csh ) then> source $HOME/.dbenv_`hostname`.csh
vmlinux8:/home/redadm # diff .dbenv_di.csh .dbenv_vmlinux8.csh16c16< setenv SAPDBHOST sapdbhost---> setenv SAPDBHOST wtsc42a
vmlinux8:/home/redadm # diff .sapenv_di.csh .sapenv_vmlinux8.csh252c252< alias cdD 'cd /usr/sap/$SAPSYSTEMNAME/D*[0-9][0-9]'---> alias cdD 'cd /usr/sap/$SAPSYSTEMNAME/DVEBM*[0-9][0-9]'263c263< set list=`$lscommand $HOME | grep '^startsap_di_[0-9][0-9]$'`---> set list=`$lscommand $HOME | grep '^startsap_'${hostname}'_[0-9][0-9]$'`271c271< set list=`$lscommand $HOME | grep '^stopsap_di_[0-9][0-9]$'`---> set list=`$lscommand $HOME | grep '^stopsap_'${hostname}'_[0-9][0-9]$'`
120 SAP on DB2 UDB for OS/390 and z/OS: Implementing Application Servers on Linux for zSeries

Figure 5-8 Creating the templates for startsap and stopsap
vmlinux8:/home/redadm # diff startsap_di_00 startsap_vmlinux8_0053c53< START_PROFILE="START_D00_di"---> START_PROFILE="START_DVEBMGS00_vmlinux8"141c141< _f=$PROFILE_DIR/"$SAPSYSTEMNAME"_"$INSTANCE"_di---> _f=$PROFILE_DIR/"$SAPSYSTEMNAME"_"$INSTANCE"_\`hostname\`
vmlinux8:/home/redadm # diff stopsap_di_00 stopsap_vmlinux8_0037c37< START_PROFILE="START_D00_di"---> START_PROFILE="START_DVEBMGS00_vmlinux8"129c129< _f=$PROFILE_DIR/"$SAPSYSTEMNAME"_"$INSTANCE"_di---> _f=$PROFILE_DIR/"$SAPSYSTEMNAME"_"$INSTANCE"_\`hostname\`
Chapter 5. Cloning an SAP dialog instance 121

Figure 5-9 Creating the templates for the SAP instance and SAP startup profile
All dialog instances have the same file names for the user environment profiles, and the startsap (startsap_di_00) and stopsap (stopsap_di_00) commands. But after making all adjustments during the cloning process (5.6.2, “Implementing the SAP-specific tasks at boot time” on page 123) for a new clone, the startsap and stopsap scripts refer to individual SAP profiles for the SAP instances. This is necessary to configure each SAP instance individually.
vmlinux8:/sapmnt/RED/profile # diff START_D00_di START_DVEBMGS00_vmlinux83c3< INSTANCE_NAME =D00---> INSTANCE_NAME =DVEBMGS009c9< Execute_00 =local $(DIR_EXECUTABLE)/sapmscsa -n pf=$(DIR_PROFILE)/RED_D00_di---> Execute_00 =local $(DIR_EXECUTABLE)/sapmscsa -n pf=$(DIR_PROFILE)/RED_DVEBMGS15c15< _MS =ms.sapRED_D00---> _MS =ms.sapRED_DVEBMGS0018c18< Start_Program_01 =local $(_MS) pf=$(DIR_PROFILE)/RED_D00_di---> Start_Program_01 =local $(_MS) pf=$(DIR_PROFILE)/RED_DVEBMGS00_vmlinux824c24< _DW =dw.sapRED_D00---> _DW =dw.sapRED_DVEBMGS0027c27< Start_Program_02 =local $(_DW) pf=$(DIR_PROFILE)/RED_D00_di---> Start_Program_02 =local $(_DW) pf=$(DIR_PROFILE)/RED_DVEBMGS00_vmlinux833c33< _CO =co.sapRED_D00---> _CO =co.sapRED_DVEBMGS0036c36< Start_Program_03 =local $(_CO) -F pf=$(DIR_PROFILE)/RED_D00_di---> Start_Program_03 =local $(_CO) -F pf=$(DIR_PROFILE)/RED_DVEBMGS00_vmlinux842c42< _SE =se.sapRED_D00
vmlinux8:/sapmnt/RED/profile # diff RED_D00_di RED_DVEBMGS00_vmlinux82c2< INSTANCE_NAME = D00---> INSTANCE_NAME = DVEBMGS004c4< SAPDBHOST = sapdbhost---> SAPDBHOST = wtsc42a6,10c6,10< #rdisp/wp_no_vb = 3< #rdisp/wp_no_vb2 = 1< #rdisp/wp_no_enq = 1< #rdisp/wp_no_btc = 2< #rdisp/wp_no_spo = 1---> rdisp/wp_no_vb = 3> rdisp/wp_no_vb2 = 1> rdisp/wp_no_enq = 1> rdisp/wp_no_btc = 2> rdisp/wp_no_spo = 1
122 SAP on DB2 UDB for OS/390 and z/OS: Implementing Application Servers on Linux for zSeries

5.6.2 Implementing the SAP-specific tasks at boot timeWhen a clone starts up, it has to perform some specific tasks to create the correct SAP environment.
To provide the clone with its specific information, we used configuration files that were created on vmlinux8 in /usr/var/config. The files are specific for each SAP instance.
The file name for the new dialog instance on vmlinux7 is VMLINUX7.sapconfig. The configuration file has the following content:
TYPE=dialoginstanceICLIPORT=5007SAPDBHOST=wtsc04a
This specifies that vmlinux7 is a dialog instance. Then we have the parameters for the database server and the ICLI port that will be used by the new clone.
This file is evaluated during the first startup of the clone to make the necessary adjustments. The adjustments are done by the script /usr/sbin/cloning/clonesap, which we will create on vmlinux8 as shown in Figure 5-10 on page 124. This script will be available for the clone in read-only mode at startup time.
Chapter 5. Cloning an SAP dialog instance 123

Figure 5-10 Script /usr/sbin/cloning/clonesap
#! /bin/sh########################################################## Customizing SAP application server clones #########################################################
# Who am i ? ###########################################GUEST=`/sbin/hcp query userid | awk '{print $1}'`HNLNX=`hostname`#echo "Guest $GUEST: Start customisation" date ## This is where we get our configuration: ##############mount /usr/var . /usr/var/config/$GUEST.sapconfig/rw/etc/fstab-local.sh #if test "$TYPE" = dialoginstance ; then
echo " Configuring dialoginstance..." # # Create new profiles... echo "start copying..." cp -p /home/redadm/.cshrc.di /home/redadm/.cshrc cp -p /sapmnt/RED/profile/START_D00_di /sapmnt/RED/profile/START_D00_$HNLNX cp -p /sapmnt/RED/profile/RED_D00_di /sapmnt/RED/profile/RED_D00_$HNLNX ## ...and customize them. echo "editing /home/redadm/.dbenv_di.csh to set SAPDBHOST..." vi -e -n -c g/sapdbhost/s//$SAPDBHOST/g -c wq /home/redadm/.dbenv_di.csh echo echo "editing /home/redadm/.dbenv_di.sh to set SAPDBHOST..." vi -e -n -c g/sapdbhost/s//$SAPDBHOST/g -c wq /home/redadm/.dbenv_di.sh echo echo "editing /home/redadm/startsap_di_00..." vi -e -n -c g/START_D00_di/s//START_D00_$HNLNX/g -c wq /home/redadm/startsap_di_00 echo vi -e -n -c g/START_D00_di/s//START_D00_$HNLNX/g -c wq /home/redadm/startsap_di_00 echo echo "editing /home/redadm/stopsap_di_00..." vi -e -n -c g/START_D00_di/s//START_D00_$HNLNX/g -c wq /home/redadm/stopsap_di_00 echo echo "editing /sapmnt/RED/profile/START_D00_$HNLNX..." vi -e -n -c g/RED_D00_di/s//RED_D00_$HNLNX/g -c wq /sapmnt/RED/profile/START_D00_$HNLNX echo echo "editing /sapmnt/RED/profile/RED_D00_$HNLNX..." vi -e -n -c g/sapdbhost/s//$SAPDBHOST/g -c wq /sapmnt/RED/profile/RED_D00_$HNLNX echo echo "editing /etc/services to set ICLI port..." vi -e -n -c g/5008/s//$ICLIPORT/g -c wq /etc/services echo echo "renaming instance directory to D00..." mv /usr/sap/RED/DVEBMGS00 /usr/sap/RED/D00else # here the definitions for a central instance should go! echo "to be implemented... ;-)" fiecho " ====== customization finished ========"
124 SAP on DB2 UDB for OS/390 and z/OS: Implementing Application Servers on Linux for zSeries

With this script we first evaluated which guest we were and what our configuration was by reading the config file VMLINUX7.sapconfig. After that we mounted the instance-specific file systems with /rw/etc/fstab-local.sh (see B.3, “Script fstab-local.sh” on page 151 for the content). This file resides on the /rw disk and can be modified individually for each clone during the lifetime of the clone. Each specific file system that is created on the clone later on has to be included in this script.
After having mounted the necessary file systems, we copied the.cshrc.di to .cshrc so that redadm would have its proper environment files. We also copied our SAP profile templates to create the right SAP profiles for our new instance on vmlinux7.
When the copy was done, we changed the contents of specific files that are necessary to adjust the SAP environment (see Figure 5-10).
Now we have described the configuration file that describes the SAP instance of the cloned system (for example, VMLINUX7.sapconfig) and we have discussed the script /usr/sbin/cloning/clonesap which does the specific SAP adjustments of the clone. The next script we created was a script that evaluates at startup time whether cloning tasks have to be done. This script is called clone_startup; it is shown in Figure 5-11.
Figure 5-11 Script /etc/init.d/clone_startup
#! /bin/sh
# Who am i ? ###########################################GUEST=`/sbin/hcp query userid | awk '{print $1}'`
## Let's set up logging: ################################LOG=/rw/var/log/clonesap.$GUEST.logif [ ! -f $LOG ]; then touch $LOG; fiecho "=====================================" >>$LOG 2>&1date >>$LOG 2>&1
# check, if this is the first startup of the clone ######OK=/rw/etc/clonesetup.$GUEST.OKif [ ! -f $OK ]; then echo "Setting up the clone..." >>$LOG 2>&1 /usr/sbin/cloning/clonesap >>$LOG 2>&1 touch /rw/etc/clonesetup.$GUEST.OK >>$LOG 2>&1;else echo "Normal Startup" >>$LOG 2>&1 /rw/etc/fstab-local.sh >>$LOG 2>&1;fi
Chapter 5. Cloning an SAP dialog instance 125

The script first evaluates which clone is starting. After setting up a log file, it determines whether the clone is starting for the first time. If so, we run the script /usr/sbin/cloning/clonesap to make some initial adjustments to the new environment. Then we create a /rw/etc/clonesetup.$GUEST.OK to indicate that the initial setup is done for the next startup.
When the clone starts again it recognizes that it ran before and performs the specific tasks for a normal startup. In our case this was just the mounting of the clone-specific file systems via the script /rw/etc/fstab-local.sh. This script resides in the /rw directory and can be changed on each clone individually (see B.3, “Script fstab-local.sh” on page 151).
Now we just have to define when the clone_startup script is invoked during the startup process of the Linux clone. We decided to run this script at the end of the startup procedure for runlevel 3. Therefore, we put the script in /etc/init.d and created a link with the following command:
ln -s /etc/init.d/clone_startup /etc/init.d/rc3.d/S21clone_startup
5.7 Cloning an SAP dialog instance on Linux on zSeriesWe have now set up our clone environment on the central instance vmlinux8. This work has to be done only once. From now on we can start to clone dialog instances very fast.
In this section we describe which steps have to be done to create a new clone on vmlinux7, including a SAP dialog instance.
1. We defined the TCP/IP and SAP configuration data on our master system, vmlinux8. To do this we did the following on vmlinux8:
a. Issued mount -o rw /usr/var.
b. Issued cd /use/var/config.
c. Edited net1 and net2 to define the network parameters shown in Figure 5-12.
Figure 5-12 Network parameters for vmlinux7 and vmlinux8
vmlinux8:/usr/var/config # cat net1VMLINUX8 vmlinux8hs 192.168.60.8 192.168.60.255 255.255.255VMLINUX7 vmlinux7hs 192.168.60.7 192.168.60.255 255.255.255vmlinux8:/usr/var/config # cat net2VMLINUX8 vmlinux8 192.168.50.8 192.168.50.255 255.255.255.0VMLINUX7 vmlinux7 192.168.50.7 192.168.50.255 255.255.255.0
126 SAP on DB2 UDB for OS/390 and z/OS: Implementing Application Servers on Linux for zSeries

d. Created the file for the specific SAP data for vmlinux7, as shown in Figure 5-13.
Figure 5-13 SAP configuration data for vmlinux7
e. Issued umount /usr/var.
2. We logged on to MAINT (z/VM) to create a default Linux guest vmlinux7 (see B.7, “USER DIRECTory” on page 153).
3. We logged on to the guest vmlinux7 to copy the disk belonging to the volume group VGL1 and our disk that contains the /rw file system. The other disks of the operating system are shared. We did this automatically with the REXX script CLONE EXEC (see B.4, “CLONE EXEC” on page 152).
4. We copied the minidisk containing the swap space with the REXX script SWPCLN EXEC (see (B.5, “SWPCLN EXEC” on page 152). Depending on the size of the swap space, this may take some minutes. To be faster, you can also copy a bunch of swap spaces in advance and attach a swap space disk to a guest when you want to create a new clone. You can also create a new swap space during your cloning procedure, but we don’t think that this is faster.
5. The last step is to invoke the REXX script STARTLIN EXEC to start vmlinux7 (see B.6, “STARTLIN EXEC” on page 153).
Now we can log on to vmlinux7 as user readadm and start the SAP dialog instance.
5.8 Hints and tips for the cloning approachAs we were implementing the SAP cloning on Linux on zSeries during this project, we discovered some hints that might help you extend and simplify the cloning approach.
5.8.1 Using the device file systemSharing the whole root file system in read-only mode also means to share the /dev file system in read-only. This file system contains entries that describe the
vi VMLINUX7.sapconfig
TYPE=dialoginstanceICLIPORT=5007SAPDBHOST=wtsc04a
Chapter 5. Cloning an SAP dialog instance 127

hardware devices for the Linux system. We found a way of using the read-only /dev file system by creating links for the existing volume groups and for /dev/pts to connect to the /rw directory. This is not very flexible. One limitation, for example, is that you have to predefine the names of the volume groups that you will use (because of the links you have to create for the volume groups). Within these volume groups you can create and manage independent logical volumes that are specific for each clone.
When you use a read-only /dev file system you have to make compromises that may not be necessary if you use the new devfs file system. The devfs file system is like the /proc file system, that is, a virtual file system that resides in the memory and is built up dynamically. So you don’t have to deal with a read-only /dev any more.
For more information, see page 447 in Linux for zSeries and S/390:ISP/ASP Solutions, SG24-6299.
5.8.2 Using LVM2For the LVM we had to change the variables LVMTAB, LVMTAB_DIR and VG_BACKUP_DIR in liblvm.h. Afterwards we recompiled the LVM as described in B.1, “Customize LVM” on page 147.
LVM2 will use the same metadata as the current LVM. So there will be a smooth migration.
In our environment, LVM2 will have one main advantage: It uses a configuration file instead of hard-coded variables. So you will have the possibility to configure the LVM2 by a simple configuration file instead of changing and recompiling the LVM to be able to deal with a read-only file system.
For more information on the LVM, go to:
www.sistina.com.
This simplifies the setup of the cloning environment and offers more flexibility.
128 SAP on DB2 UDB for OS/390 and z/OS: Implementing Application Servers on Linux for zSeries

Appendix A. R3SETUP output
In this appendix we provide the R3SETUP output generated during the installation of the central instance on vmlinux8.
R3SETUP creates a log file <SERVICE>.log.In some (non standard) cases you need to customize the command file.Please read the installation documentation and latest notes.
INFO 2002-06-13 15:17:25 Main :0 ./R3SETUP started
INFO 2002-06-13 15:17:25 Main :0 InstController has been successfully created
INFO 2002-06-13 15:17:25 Main :0 Command line options are ok.
INFO 2002-06-13 15:17:25 InstController Prepare:0 R3SETUP Version: 20020411
INFO 2002-06-13 15:17:25 InstController Prepare:0 Logfile will be set to CENTRAL.log Check CENTRAL.log for further messages.
Requesting Installation Details
R3Setup needs general information about the configuration of the SAP Systemyou want to install. Enter the required data.
A
© Copyright IBM Corp. 2002. All rights reserved. 129

For further information see HTML documentation:step: CENTRALINSTANCE_IND_DB2 and key: SAPSYSTEMNAME
Enter/confirm the SAP System ID (three-character string in uppercase).
Please enter the parameter or confirm default [C11]: RED
Requesting Installation Details
R3Setup needs general information about the configuration of the SAP Systemyou want to install. Enter the required data.For further information see HTML documentation:step: CENTRALINSTANCE_IND_DB2 and key: SAPSYSNR
Enter/confirm the SAP Instance Number (two digits).
Please enter the parameter or confirm default [00]:
Requesting Installation Details
R3Setup needs general information about the configuration of the SAP Systemyou want to install. Enter the required data.For further information see HTML documentation:step: CENTRALINSTANCE_IND_DB2 and key: SAPMOUNT
Enter/confirm the SAPMOUNT directory:
Please enter the parameter or confirm default [/sapmnt]:
Requesting Installation Details
R3Setup needs general information about the configuration of the SAP Systemyou want to install. Enter the required data.For further information see HTML documentation:step: CENTRALINSTANCE_IND_DB2 and key: CIHOSTNAME
Enter/confirm the name of the SAP central instance host.
Please enter the parameter or confirm default [vmlinux8]:
Requesting Installation Details
R3Setup needs general information about the configuration of the SAP Systemyou want to install. Enter the required data.For further information see HTML documentation:step: CENTRALINSTANCE_IND_DB2 and key: DBHOSTNAME
Enter/confirm the name of the SAP database server host.
130 SAP on DB2 UDB for OS/390 and z/OS: Implementing Application Servers on Linux for zSeries

Please enter the parameter or confirm default [vmlinux8]: wtsc42a
Reading and Checking DB2 for OS/390 Specific Keys
This step reads a number of DB2 for OS/390 specific keys that are required forsubsequent steps from the command file. It checks whether the key values arevalid.Moreover, it provides necessary environment variables for subsequent steps inthe list [DB_ENV]. For example, to switch the DBSL trace on add TRACE=1>/TT>in the list [DB_ENV]>/TT>.For further information see HTML documentation:step: DBCOMMONPARAMETERS_IND_DB2 and key: DBATTACHNAME
Enter the Dbattach Name. This is the name the ICLI server uses to attach tothe DB2 subsystem.If DB2 data sharing is not used, the Database Attach Name must be either theDB2 Subsystem Name or the DB2 Group Attach Name.If DB2 data sharing is used, it must be the Database Group Attach Name, whichmust be the same across the data sharing group.
Please enter the parameter or confirm default [DSNX]: D7XG
Reading and Checking DB2 for OS/390 Specific Keys
This step reads a number of DB2 for OS/390 specific keys that are required forsubsequent steps from the command file. It checks whether the key values arevalid.Moreover, it provides necessary environment variables for subsequent steps inthe list [DB_ENV]. For example, to switch the DBSL trace on add TRACE=1>/TT>in the list [DB_ENV]>/TT>.For further information see HTML documentation:step: DBCOMMONPARAMETERS_IND_DB2 and key: VCAT
Enter the Volumes Catalog Identifier (VCAT).
Please enter the parameter or confirm default [DSN00X]:
Reading and Checking DB2 for OS/390 Specific Keys
This step reads a number of DB2 for OS/390 specific keys that are required forsubsequent steps from the command file. It checks whether the key values arevalid.Moreover, it provides necessary environment variables for subsequent steps inthe list [DB_ENV]. For example, to switch the DBSL trace on add TRACE=1>/TT>in the list [DB_ENV]>/TT>.For further information see HTML documentation:step: DBCOMMONPARAMETERS_IND_DB2 and key: HIGHLEVELQUALIFIER
Enter the high level qualifier (<HLQ>) of the data sets <HLQ>.SFOMDATA and
Appendix A. R3SETUP output 131

<HLQ>.SAMPLIB where the ICLI software is provided on OS/390.
Please enter the parameter or confirm default [SYS1]:
Reading and Checking DB2 for OS/390 Specific Keys
This step reads a number of DB2 for OS/390 specific keys that are required forsubsequent steps from the command file. It checks whether the key values arevalid.Moreover, it provides necessary environment variables for subsequent steps inthe list [DB_ENV]. For example, to switch the DBSL trace on add TRACE=1>/TT>in the list [DB_ENV]>/TT>.For further information see HTML documentation:step: DBCOMMONPARAMETERS_IND_DB2 and key: LOADLIB
Enter the data set name of the load library of your DB2 subsystem.
Please enter the parameter or confirm default [SAPRED.V610.SDSNLOAD]: DB7X7.SDSNLOAD
Reading and Checking DB2 for OS/390 Specific Keys
This step reads a number of DB2 for OS/390 specific keys that are required forsubsequent steps from the command file. It checks whether the key values arevalid.Moreover, it provides necessary environment variables for subsequent steps inthe list [DB_ENV]. For example, to switch the DBSL trace on add TRACE=1>/TT>in the list [DB_ENV]>/TT>.For further information see HTML documentation:step: DBCOMMONPARAMETERS_IND_DB2 and key: DSNTIADLIB
Enter the data set name containing the DB2 utility DSNTIAD.
Please enter the parameter or confirm default [SAPRED.V610.RUNLIB.LOAD]: DB7XU.RUNLIB.LOAD
Reading and Checking DB2 for OS/390 Specific Keys
This step reads a number of DB2 for OS/390 specific keys that are required forsubsequent steps from the command file. It checks whether the key values arevalid.Moreover, it provides necessary environment variables for subsequent steps inthe list [DB_ENV]. For example, to switch the DBSL trace on add TRACE=1>/TT>in the list [DB_ENV]>/TT>.For further information see HTML documentation:step: DBCOMMONPARAMETERS_IND_DB2 and key: FAILOVER
Do you want to use SYSPLEX Failover Support (YES/NO)?
132 SAP on DB2 UDB for OS/390 and z/OS: Implementing Application Servers on Linux for zSeries

(1) Yes -> (2) No
Please select one of the options by entering the preceding numberor confirm default [2]: 1
Reading and Checking DB2 for OS/390 Specific Keys
This step reads a number of DB2 for OS/390 specific keys that are required forsubsequent steps from the command file. It checks whether the key values arevalid.Moreover, it provides necessary environment variables for subsequent steps inthe list [DB_ENV]. For example, to switch the DBSL trace on add TRACE=1>/TT>in the list [DB_ENV]>/TT>.For further information see HTML documentation:step: DBCOMMONPARAMETERS_IND_DB2 and key: FAILOVERHOST
Enter the name of the standby database server for the SYSPLEX Failover Support:
Please enter the parameter or confirm default [ihsapa3c]: wtsc04a
Reading and Checking DB2 for OS/390 Specific Keys
This step reads a number of DB2 for OS/390 specific keys that are required forsubsequent steps from the command file. It checks whether the key values arevalid.Moreover, it provides necessary environment variables for subsequent steps inthe list [DB_ENV]. For example, to switch the DBSL trace on add TRACE=1>/TT>in the list [DB_ENV]>/TT>.For further information see HTML documentation:step: DBCOMMONPARAMETERS_IND_DB2 and key: FAILOVERPORT
Enter the port number of the ICLI connection port of the ICLI instance on thestandby database server for SYSPLEX Failover Support:
Please enter the parameter or confirm default [5003]: 5008
Reading and Checking DB2 for OS/390 Specific Keys
This step reads a number of DB2 for OS/390 specific keys that are required forsubsequent steps from the command file. It checks whether the key values arevalid.Moreover, it provides necessary environment variables for subsequent steps inthe list [DB_ENV]. For example, to switch the DBSL trace on add TRACE=1>/TT>in the list [DB_ENV]>/TT>.For further information see HTML documentation:step: DBCOMMONPARAMETERS_IND_DB2 and key: STANDBYSSID
Enter the database attach name that is used by the ICLI server instance on the
Appendix A. R3SETUP output 133

standby database server to attach to the standby DB2 subsystem for SYSPLEXFailover Support:
Please enter the parameter: D7X2
Calculating RAM Distribution
This step calculates how the RAM available on the host is distributed betweenthe SAP instances and the database.For further information see HTML documentation:step: CALCRAM_IND_IND and key: RAM_INSTANCE
Enter/confirm how much RAM you want to use for this SAP System:If you install an SAP instance and a database instance on the same host, theRAM is used for both.If you install the SAP instance and database instance on different hosts, theRAM is only used for the current instance.
Please enter the parameter or confirm default [490]:
Requesting Information on CD-ROMs
Installation tool needs information about the installation CDs. On thefollowing screens you have to enter the location of some of the CDs andspecify whether any of them have to be copied to your local disk.For further information see HTML documentation:step: CDSERVERKERNEL46CSR2_IND_DB2 and key: 1_LOCATION
Enter/confirm the path to the KERNEL CD.
Please enter the parameter or confirm default [/sapcd]: /mnt
Creating the Service Entry for the Message Server
The components of an SAP System communicate via registered services. Duringthe installation, a port number is assigned to every service.The SAP message server requires the service sapms<SAPSID> with the port number3600+<SAPSYSTEMNUMBER of central instance>.The port number must be identical for all instances belonging to the same SAPSystem.For further information see HTML documentation:step: R3MESSAGEPORT_IND_IND and key: PORT
Enter/confirm the port number for the message server.
Please enter the parameter or confirm default [3600]:
Creating the ICLI Connection Port
134 SAP on DB2 UDB for OS/390 and z/OS: Implementing Application Servers on Linux for zSeries

This step creates the port entry for the ICLI client: The ICLI client usesthis port to connect to the server.For further information see HTML documentation:step: ICLICONNECTIONPORT_IND_DB2 and key: PORT
A service entry for the connection between ICLI client and server must becreated. Please specify a port number.Be sure that this number is not occupied by another service and that the IcliServer is started using this port.
Please enter the parameter or confirm default [4000]: 5008
Creating the SAP Administration Group sapsys
To allow administration users access to SAP System files and directories,these users must be members of the group sapsys. This step creates the groupsapsys if it does not yet exist. Note that the group does not have to be created by the installation tool. Youmay create the group manually before the installation. In this case, theinstallation tool only checks whether the group exists. If the Network Information Service (NIS) is being used, you should create thegroup at the NIS server before the installation. To avoid problems, create thegroup for the entire network and not just locally.For further information see HTML documentation:step: OSGROUPSAPSYS_IND_IND and key: GROUPID
Enter/confirm the group ID (GID).If no ID is displayed, you can press ENTER to let the system choose one.
Please enter the parameter: 202
Creating the SAP System Administrator
An operating system user must be set up for administrating the SAP System. Thename of this user is always <sapsid>adm. For example, an SAP System named C11needs a user called c11adm. The user <sapsid>adm must be a member of the group sapsys. Note that the operating system user need not necessarily be created by theinstallation tool. You may create the user manually before the installation.In this case, the installation tool only checks whether the user exists. If the Network Information Service (NIS) is in use, you should create theusers at the NIS server before the installation. In order to avoid problems,the user should be created for the entire network and not just locally.For further information see HTML documentation:step: OSUSERSIDADM_IND_IND and key: USERID
Enter/confirm the user ID (UID).If no ID is displayed, you can press ENTER to let the system choose one.
Appendix A. R3SETUP output 135

Please enter the parameter: 204
Enabling PassTicket Signon Function
The ICLI server by default requires the ICLI client to use PassTicket Signon,which requires RACF or a compatible security product to be installed onOS/390.If no security product is installed you must disable the PassTicket Signonfunction. To do this, set the SIGNON key to NO and the environment variableICLI_TRUSTED_CONNECTIONS to 1 for the ICLI server. R3SETUP sets thisenvironment variable on the application server side where it is necessary.This step gathers information for the PassTicket Signon function (for moreinformation, see the IBM documentation SAP R/3 on DB2 for OS/390: PlanningGuide) and creates the iclipt file in the <exe> directory on the applicationserver. The values of SIGNONAPPLICATION, SIGNONKEY and SIGNONUSERID are storedin the iclipt file.After the installation of the central instance, R3SETUP sets authorizationsin such a way that iclipt can only be read by <sapsid>adm.For further information see HTML documentation:step: SIGNONKEY_IND_DB2 and key: SIGNON
Do you want to enable Pass Ticket Signon (YES/NO)?
(1) Yes -> (2) No
Please select one of the options by entering the preceding numberor confirm default [2]: 1
Enabling PassTicket Signon Function
The ICLI server by default requires the ICLI client to use PassTicket Signon,which requires RACF or a compatible security product to be installed onOS/390.If no security product is installed you must disable the PassTicket Signonfunction. To do this, set the SIGNON key to NO and the environment variableICLI_TRUSTED_CONNECTIONS to 1 for the ICLI server. R3SETUP sets thisenvironment variable on the application server side where it is necessary.This step gathers information for the PassTicket Signon function (for moreinformation, see the IBM documentation SAP R/3 on DB2 for OS/390: PlanningGuide) and creates the iclipt file in the <exe> directory on the applicationserver. The values of SIGNONAPPLICATION, SIGNONKEY and SIGNONUSERID are storedin the iclipt file. After the installation of the central instance, R3SETUP sets authorizationsin such a way that iclipt can only be read by <sapsid>adm.For further information see HTML documentation:step: SIGNONKEY_IND_DB2 and key: SIGNONUSERID
Enter/confirm the Pass Ticket Signon user ID.
136 SAP on DB2 UDB for OS/390 and z/OS: Implementing Application Servers on Linux for zSeries

Please enter the parameter: redadm
Enabling PassTicket Signon Function
The ICLI server by default requires the ICLI client to use PassTicket Signon,which requires RACF or a compatible security product to be installed onOS/390.If no security product is installed you must disable the PassTicket Signonfunction. To do this, set the SIGNON key to NO and the environment variableICLI_TRUSTED_CONNECTIONS to 1 for the ICLI server. R3SETUP sets thisenvironment variable on the application server side where it is necessary.This step gathers information for the PassTicket Signon function (for moreinformation, see the IBM documentation SAP R/3 on DB2 for OS/390: PlanningGuide) and creates the iclipt file in the <exe> directory on the applicationserver. The values of SIGNONAPPLICATION, SIGNONKEY and SIGNONUSERID are storedin the iclipt file. After the installation of the central instance, R3SETUP sets authorizationsin such a way that iclipt can only be read by <sapsid>adm.For further information see HTML documentation:step: SIGNONKEY_IND_DB2 and key: SIGNONAPPLICATION
Enter/confirm the Pass Ticket Signon application name.
Please enter the parameter: icli0000Enabling PassTicket Signon Function
The ICLI server by default requires the ICLI client to use PassTicket Signon,which requires RACF or a compatible security product to be installed onOS/390.If no security product is installed you must disable the PassTicket Signonfunction. To do this, set the SIGNON key to NO and the environment variableICLI_TRUSTED_CONNECTIONS to 1 for the ICLI server. R3SETUP sets thisenvironment variable on the application server side where it is necessary.This step gathers information for the PassTicket Signon function (for moreinformation, see the IBM documentation SAP R/3 on DB2 for OS/390: PlanningGuide) and creates the iclipt file in the <exe> directory on the applicationserver. The values of SIGNONAPPLICATION, SIGNONKEY and SIGNONUSERID are storedin the iclipt file. After the installation of the central instance, R3SETUP sets authorizationsin such a way that iclipt can only be read by <sapsid>adm.Enter the SIGNONKEY password, which is the RACF secured signon key and musthave 16 hexadecimal characters [0-9A-F]:
Please enter the password.>Please re-enter the password.>
Appendix A. R3SETUP output 137

Preparing JCL Submission Service
This step creates a jobcard, jobcard.tpl, in the <INSTDIR> directory.Moreover, this step checks whether the FTP connection to the host is possible,creates a test job called iefbr14.jcl and delivers values for subsequentsteps.You can modify the jobcard created in this step (jobcard.tpl) in the nextstep, EXITJCLJOBCARD_IND_DB2.For more information about the JCL submission service, see the installationguide.For further information see HTML documentation:step: PREPAREJCLSS_IND_DB2 and key: MSGCLASS
Enter the JES HOLD output class, i.e. a class that refers to the hold queue.In JES3 the output class must refer to a hold queue reserved for externalwriters. This is the class that says HOLD=EXWTR in the JES3 installationstream.
Please enter the parameter or confirm default [Q]: T
Preparing JCL Submission Service
This step creates a jobcard, jobcard.tpl, in the <INSTDIR> directory.Moreover, this step checks whether the FTP connection to the host is possible,creates a test job called iefbr14.jcl and delivers values for subsequentsteps.You can modify the jobcard created in this step (jobcard.tpl) in the nextstep, EXITJCLJOBCARD_IND_DB2.For more information about the JCL submission service, see the installationguide.For further information see HTML documentation:step: PREPAREJCLSS_IND_DB2 and key: JCLSSUSERNAME
Enter the user, who is to initiate all JCL jobs.This user must be SYSADM or must have the rights specified in the IBMdocumentation 'SAP System on DB2 for OS/390: Planning Guide'
Please enter the parameter or confirm default [SYSADM]: SAPRES1
Preparing JCL Submission Service
This step creates a jobcard, jobcard.tpl, in the <INSTDIR> directory.Moreover, this step checks whether the FTP connection to the host is possible,creates a test job called iefbr14.jcl and delivers values for subsequentsteps.You can modify the jobcard created in this step (jobcard.tpl) in the nextstep, EXITJCLJOBCARD_IND_DB2.For more information about the JCL submission service, see the installationguide.
138 SAP on DB2 UDB for OS/390 and z/OS: Implementing Application Servers on Linux for zSeries

Enter the password of the user, who is to initiate all JCL jobs.
Please enter the password.>Please re-enter the password.>
LDAP Support
SAP now supports LDAP directories to simplify the administration of your SAPSystems. If you have already setup an LDAP directory server, R3Setup canconfigure your new system to use the directory.For further information see HTML documentation:step: LDAPPARAMETERS_IND_IND and key: LDAP_TYPE
Specify how R3Setup must install LDAP support
-> (1) Active Directory Service (2) Generic LDAP Directory (3) No LDAP support
Please select one of the options by entering the preceding numberor confirm default [1]: 3Creating Bind and Grant Jobs
This step loads templates from the appropriate data sets and creates bind andgrant jobs (FOMEBIND.jcl, FOMEGRNT.jcl).Background information: Packages FOME<REL> and plan FOMEP<REL> are bound. You can find a sample bind job in the IBM documentation SAP R/3 on DB2 forOS/390: Planning Guide.The user performing steps of this class should be SYSADM and must have thepermissions to execute bind and grant jobs or the RACF specific permissionsfor BIND and GRANT. In addition, the ICLI user has to be entered who startsthe ICLI server. (See the IBM documentation SAP R/3 on DB2 for OS/390:Planning Guide.)R3SETUP downloads the templates for the bind and grant job: <HLQ>.SAMPLIB(FOME<REL>B) <HLQ>.SAMPLIB(FOME<REL>G)R3SETUP then creates two files in the <INSTDIR>: FOMEBIND.jcl FOMEGRNT.jclFor further information see HTML documentation:step: CREATEBINDGRANTJOBS_IND_DB2 and key: ICLIRUN
Enter the ICLIRUN user who runs the ICLI server on OS/390:
Please enter the parameter or confirm default [ICLIRUN]: redadm
Installing saposcol, rfcoscol and RFC Library for OS/390
Appendix A. R3SETUP output 139
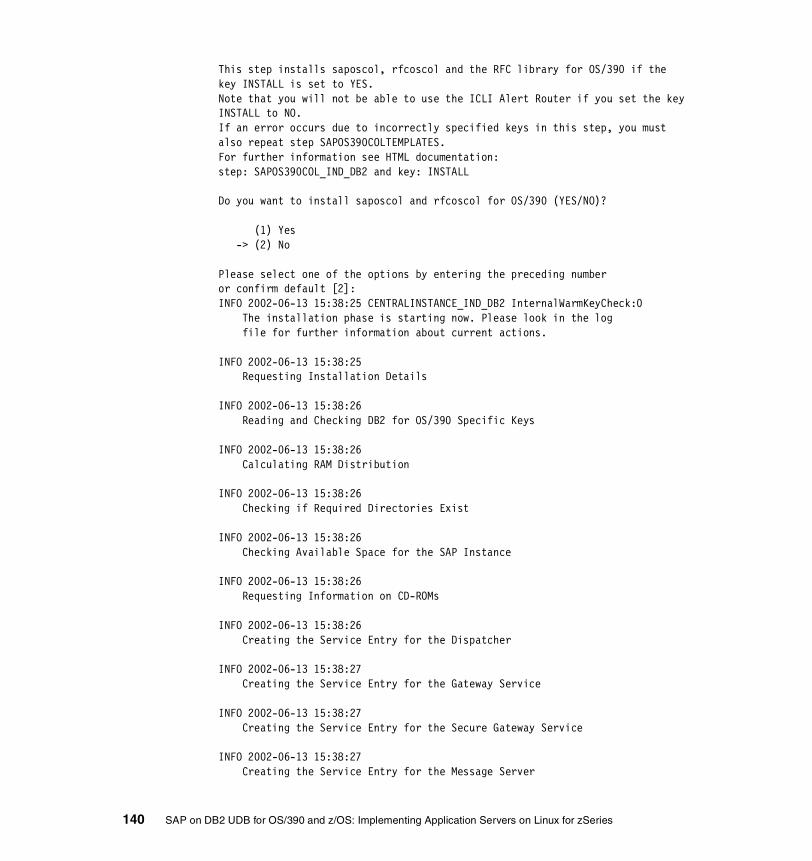
This step installs saposcol, rfcoscol and the RFC library for OS/390 if thekey INSTALL is set to YES.Note that you will not be able to use the ICLI Alert Router if you set the keyINSTALL to NO.If an error occurs due to incorrectly specified keys in this step, you mustalso repeat step SAPOS390COLTEMPLATES.For further information see HTML documentation:step: SAPOS390COL_IND_DB2 and key: INSTALL
Do you want to install saposcol and rfcoscol for OS/390 (YES/NO)?
(1) Yes -> (2) No
Please select one of the options by entering the preceding numberor confirm default [2]:INFO 2002-06-13 15:38:25 CENTRALINSTANCE_IND_DB2 InternalWarmKeyCheck:0 The installation phase is starting now. Please look in the log file for further information about current actions.
INFO 2002-06-13 15:38:25 Requesting Installation Details
INFO 2002-06-13 15:38:26 Reading and Checking DB2 for OS/390 Specific Keys
INFO 2002-06-13 15:38:26 Calculating RAM Distribution
INFO 2002-06-13 15:38:26 Checking if Required Directories Exist
INFO 2002-06-13 15:38:26 Checking Available Space for the SAP Instance
INFO 2002-06-13 15:38:26 Requesting Information on CD-ROMs
INFO 2002-06-13 15:38:26 Creating the Service Entry for the Dispatcher
INFO 2002-06-13 15:38:27 Creating the Service Entry for the Gateway Service
INFO 2002-06-13 15:38:27 Creating the Service Entry for the Secure Gateway Service
INFO 2002-06-13 15:38:27 Creating the Service Entry for the Message Server
140 SAP on DB2 UDB for OS/390 and z/OS: Implementing Application Servers on Linux for zSeries

INFO 2002-06-13 15:38:27 Creating the ICLI Connection Port
INFO 2002-06-13 15:38:27 Creating the SAP Administration Group sapsys
INFO 2002-06-13 15:38:28 Creating the SAP System Administrator
INFO 2002-06-13 15:38:28 Creating Directories
INFO 2002-06-13 15:38:29 Creating Symbolic Links
INFO 2002-06-13 15:38:29 Adapting Permissions for Directories
INFO 2002-06-13 15:38:30 Extracting the SAP Executables
INFO 2002-06-13 15:39:04 Change permissions for saposcol
INFO 2002-06-13 15:39:04 Extracting the Database-Dependent SAP system Executables
INFO 2002-06-13 15:39:34 Enabling PassTicket Signon Function
INFO 2002-06-13 15:39:34 Preparing JCL Submission Service
ERROR 2002-06-13 15:39:35 PREPAREJCLSS_IND_DB2 JclSsStart:0
Start of JCL submission service failed, rc=7 (invalid host).
ERROR 2002-06-13 15:39:35 PREPAREJCLSS_IND_DB2 InstallationDo:0 Phase failed.
ERROR 2002-06-13 15:39:38 Main :0 Installation aborted.
===============================================================================The installation aborted here due to a networking problem. After the network was up again, we restarted R3SETUP.vmlinux8:/usr/sap/install # ping wtsc42a
Appendix A. R3SETUP output 141

PING wtsc42a.itso.ibm.com (172.21.11.1): 56 data bytes--- wtsc42a.itso.ibm.com ping statistics ---3 packets transmitted, 0 packets received, 100% packet loss--> host connection is down
vmlinux8:/usr/sap/install # ./R3SETUP -f CENTRAL.R3S===============================================================================INFO 2002-06-13 16:14:47 Main :0 ./R3SETUP started
INFO 2002-06-13 16:14:47 Main :0 InstController has been successfully created
INFO 2002-06-13 16:14:47 Main :0 Command line options are ok.
INFO 2002-06-13 16:14:47 InstController Prepare:0 R3SETUP Version: 20020411
INFO 2002-06-13 16:14:47 InstController Prepare:0 Logfile will be set to CENTRAL.log Check CENTRAL.log for further messages.
Preparing JCL Submission Service
This step creates a jobcard, jobcard.tpl, in the <INSTDIR> directory.Moreover, this step checks whether the FTP connection to the host is possible,creates a test job called iefbr14.jcl and delivers values for subsequentsteps.You can modify the jobcard created in this step (jobcard.tpl) in the nextstep, EXITJCLJOBCARD_IND_DB2.For more information about the JCL submission service, see the installationguide.Enter the password of the user, who is to initiate all JCL jobs.
Please enter the password.>Please re-enter the password.>
INFO 2002-06-13 16:15:26 CENTRALINSTANCE_IND_DB2 InternalWarmKeyCheck:0 The installation phase is starting now. Please look in the log file for further information about current actions.
INFO 2002-06-13 16:15:26 Requesting Installation Details
INFO 2002-06-13 16:15:26 Reading and Checking DB2 for OS/390 Specific Keys
142 SAP on DB2 UDB for OS/390 and z/OS: Implementing Application Servers on Linux for zSeries

INFO 2002-06-13 16:15:26 Calculating RAM Distribution
INFO 2002-06-13 16:15:26 Checking if Required Directories Exist
INFO 2002-06-13 16:15:26 Checking Available Space for the SAP Instance
INFO 2002-06-13 16:15:26 Requesting Information on CD-ROMs
INFO 2002-06-13 16:15:26 Creating the Service Entry for the Dispatcher
INFO 2002-06-13 16:15:26 Creating the Service Entry for the Gateway Service
INFO 2002-06-13 16:15:26 Creating the Service Entry for the Secure Gateway Service
INFO 2002-06-13 16:15:27 Creating the Service Entry for the Message Server
INFO 2002-06-13 16:15:27 Creating the ICLI Connection Port
INFO 2002-06-13 16:15:27 Creating the SAP Administration Group sapsys
INFO 2002-06-13 16:15:27 Creating the SAP System Administrator
INFO 2002-06-13 16:15:27 Creating Directories
INFO 2002-06-13 16:15:27 Creating Symbolic Links
INFO 2002-06-13 16:15:27 Adapting Permissions for Directories
INFO 2002-06-13 16:15:27 Extracting the SAP Executables
INFO 2002-06-13 16:15:27 Change permissions for saposcol
Appendix A. R3SETUP output 143

INFO 2002-06-13 16:15:27 Extracting the Database-Dependent SAP system Executables
INFO 2002-06-13 16:15:27 Enabling PassTicket Signon Function
INFO 2002-06-13 16:15:27 Preparing JCL Submission Service
INFO 2002-06-13 16:15:29 Exit to Adapt jobcard.tpl
Exit to Adapt jobcard.tpl
At this point, you can exit R3SETUP to adapt the default jobcard (jobcard.tpl)that has been created in step PREPAREJCLSS_IND_DB2.The installation is NOT completed after this step. You must continue/restartR3SETUP.For further information see HTML documentation:step: EXITJCLJOBCARD_IND_DB2 and key: EXIT
Enter CONT to continue with R3SETUP now.Enter EXIT to exit R3SETUP, perform the necessary modifications and afterwardsrestart R3SETUP to continue the installation procedure.
(1) Continue installation -> (2) Exit
Please select one of the options by entering the preceding numberor confirm default [2]: 1
INFO 2002-06-13 16:17:12 Multiplying the Jobcard
INFO 2002-06-13 16:17:12 Creating the Test JCL Job
INFO 2002-06-13 16:17:12 Testing JCL Submission Service
INFO 2002-06-13 16:17:45 Downloading ICLI Client
INFO 2002-06-13 16:17:46 LDAP Support
INFO 2002-06-13 16:17:46 Creating the Default Profile
144 SAP on DB2 UDB for OS/390 and z/OS: Implementing Application Servers on Linux for zSeries

INFO 2002-06-13 16:17:47 Adapting Files
INFO 2002-06-13 16:17:49 Setting Environment for User <sapsid>adm
INFO 2002-06-13 16:17:50 Creating the Instance Profile
WARNING 2002-06-13 16:17:52 INSTANCEPROFILE_IND_DB2 CheckProfile:0 /sapmnt/RED/exe/sappfpar returns with error 1.
INFO 2002-06-13 16:17:52 Setting File Permissions
INFO 2002-06-13 16:17:53 Setting Authorizations for File iclipt
INFO 2002-06-13 16:17:54 Creating Bind and Grant Jobs
INFO 2002-06-13 16:17:56 Exit R3SETUP for Bind and Grant Job
Exit R3SETUP for Bind and Grant Job
At this point, you can exit R3SETUP to check, adapt and submit the bind andthe grant job (FOMEBIND.jcl and FOMEGRNT.jcl) created by R3SETUP.The installation is NOT completed after this step. You must continue/restartR3SETUP.For further information see HTML documentation:step: EXITBINDGRNT_IND_DB2 and key: EXIT
Enter CONT to continue with R3SETUP now.Enter EXIT to exit R3SETUP, perform the necessary modifications and afterwardsrestart R3SETUP to continue the installation procedure.
(1) Continue installation -> (2) Exit
Please select one of the options by entering the preceding numberor confirm default [2]: 1
INFO 2002-06-13 16:18:48 Executing the Bind Job
INFO 2002-06-13 16:39:00 Executing the Grant Job
Appendix A. R3SETUP output 145

ERROR 2002-06-13 16:39:29 GRANTJCLSSEXE_IND_DB2 RunAsynJobs:0
Execution of job /usr/sap/install/FOMEGRNT.jcl with jobid 10291 failed with condition code 8.
ERROR 2002-06-13 16:39:30 GRANTJCLSSEXE_IND_DB2 RunAsynJobs:0
Of 1 started processes ended 0 successfully.
ERROR 2002-06-13 16:39:30 GRANTJCLSSEXE_IND_DB2 InstallationDo:0 Phase failed.
ERROR 2002-06-13 16:39:33 Main :0 Installation aborted.=====================================================================After adaption of FOMEGRNT.jclrestart of R3SETUP -f CENTRAL.R3S=====================================================================INFO 2002-06-13 16:46:52 Adapting Template Files for saposcol, rfcoscol and RFC Library for OS/390
INFO 2002-06-13 16:46:54 Installing saposcol, rfcoscol and RFC Library for OS/390
INFO 2002-06-13 16:46:57 Main :0 ./R3SETUP finished
146 SAP on DB2 UDB for OS/390 and z/OS: Implementing Application Servers on Linux for zSeries

Appendix B. Cloning
This appendix contains the following:
� Information on how to change and recompile the Logical Volume Manager
� Scripts that facilitate the user management in a cloning environment
� Scripts that are used during the cloning process
� A modified boot script
B.1 Customize LVMWe want LVM to use /rw/etc/lvmtab instead of /etc/lvmtab, and /rw/etc/lvmtab.d instead of /etc/lvmtab.d. To apply the change, we first install the source rpm for LVM using YaST. This leaves us with the packaged source code in /usr/src/packages/SOURCES and a configuration file in /usr/src/packages/SPECS:
vmlinux8:/etc # cd /usr/src/packages/SOURCES/vmlinux8:/usr/src/packages/SOURCES # ls. dynmajor-0.9.1beta7.patch lvm_0.9.1_beta7.tar.gz zsh-4.0.1-pre-3.tar.bz2.. lvm_0.9.1.dif zsh-4.0.1-pre-3.dif
vmlinux8:/ # cd /usr/src/packages/SPECS/vmlinux8:/usr/src/packages/SPECS # ls
B
© Copyright IBM Corp. 2002. All rights reserved. 147

. .. lvm.spec zsh.spec
In /usr/src/packages/SOURCES we create a subdirectory called test and unpack the LVM sources into this directory:
vmlinux8:/usr/src/packages/SOURCES/test# tar xzf ../lvm_0.9.1_beta7.tar.gz
Example B-1 shows the result of our search for occurences of /etc/lvmtab in the LVM sources.
Example: B-1 Searching the LVM sources for /etc/lvmtab
vmlinux8:/usr/src/packages/SOURCES/test/LVM/0.9.1_beta7 # grep -r /etc/lvmtab *ABSTRACT:created backup files, which are stored in the /etc/lvmtab.d directory.CHANGELOG: - added checking for /etc/lvmtab and /etc/lvmtab.d existenceCHANGELOG:vgscan - implemented: builds /etc/lvmtab and /etc/lvmtab.dCHANGELOG: suffixes for /etc/lvmtab.dKNOWN_BUGS: configuration changed or your lost your /etc/lvmtab* entries.tools/lib/liblvm.h:#define LVMTAB "/etc/lvmtab" /* LVM table of VGs */tools/lib/liblvm.h:#define LVMTAB_DIR "/etc/lvmtab.d" /* storage dir VG data */tools/man8/vgscan.8:/etc/lvmtab and /etc/lvmtab.d/* which are the database fortools/vgdisplay.c: * 09/11/1997 - added use /etc/lvmtab in addition direct disk access (opt_D)
We identify the file where the changes have to be made as tools/lib/liblvm.h and edit the values of the variables LVMTAB, LVMTAB_DIR, and VG_BACKUP_DIR, as shown in Example B-2.
Example: B-2 Editing the variables in tools/lib/liblvm.h
vmlinux8:/usr/src/packages/SOURCES/test/LVM/0.9.1_beta7# vi tools/lib/liblvm.h[...]#define LVM_ID "HM" /* Identifier PV (id in pv_t) */#define EXPORTED "PV_EXP" /* Identifier exported PV (system_id in pv_t) */#define IMPORTED "PV_IMP" /* Identifier imported PV ( " ) */#define LVMTAB "/rw/etc/lvmtab" /* LVM table of VGs */#define LVMTAB_DIR "/rw/etc/lvmtab.d" /* storage dir VG data */#define LVMTAB_MINSIZE ( sizeof ( vg_t) + sizeof ( lv_t) + sizeof ( pv_t))#define LVM_DEV "/dev/lvm"#define VG_BACKUP_DIR "/rw/etc/lvmconf"#define DISK_NAME_LEN 8#define LV_MIN_NAME_LEN 5#define LV_MAX_NAME_LEN 7#define MIN_PART 1#define MAX_PART 15
148 SAP on DB2 UDB for OS/390 and z/OS: Implementing Application Servers on Linux for zSeries

[...]
We save the file and create a new tarball of the lvm source tree, which we call test.tgz:
vmlinux8:/usr/src/packages/SPECS # cd /usr/src/packages/SOURCES/testvmlinux8:/usr/src/packages/SOURCES/test # tar czf ../test.tgz *
Next, we edit the specification file of the lvm rpm and change the name of the source we are going to use for the recompile, as shown in Example B-3.
Example: B-3 Editing the specifications file of the lvm rpm
vmlinux8:/usr/src/packages/SOURCES # cd /usr/src/packages/SPECS/vmlinux8:/usr/src/packages/SPECS # vi lvm.spec[...]Name: lvmCopyright: 1999 - Heinz MauelshagenGroup: System Environment/BaseProvides: lvmAutoreqprov: onVersion: 0.9.1_beta7Release: 46Summary: LVM tools#Source: lvm_0.9.1_beta7.tar.gzSource: test.gzPatch: lvm_0.9.1.difPatch390: dynmajor-0.9.1beta7.patch[...]
Now, we can recompile the whole package issuing the following command:
vmlinux8:/usr/src/packages/SPECS # rpm -bb lvm.spec
This leaves us with a new rpm:
vmlinux8:/usr/src/packages/SPECS # cd ../RPMS/s390x/vmlinux8:/usr/src/packages/RPMS/s390x # lltotal 324drwxrwxrwt 2 root root 4096 Jun 14 14:00 .drwxrwxrwt 4 root root 4096 Jun 13 10:08 ..-rw-r--r-- 1 root root 316083 Jun 14 14:00 lvm-0.9.1_beta7-46.s390x.rpm
Appendix B. Cloning 149

B.2 Script wrapcmdThe script wrapcmd resides in the /usr/var/bin and has the following content.
#!/usr/bin/suidperl
my(@allowed_commands) = ('passwd','chsh','chfn','useradd','userdel','usermod','groupadd','groupdel','groupmod');
$ENV{PATH}='/usr/local/bin:/usr/local/sbin:/bin:/sbin:/usr/bin:/usr/sbin';chroot("/rw") || die("could not chroot to /rw: $!\n");
# set euid back to the calling uid($>,$)) = ($<,$();
# get the basename of the commandmy($command) = $0;$command =~ s/^.*\///;
for (@allowed_commands){ if ($_ eq $command) { exec($_, @ARGV); }}print("Command '$command' is not allowed to execute.\n");
This Perl program first changes the root environment to /rw, then checks if the called program is in the list of allowed programs. If it is, it then executes it. Any lock and backup files will now be allocated in /rw/etc. The script must have set the suid flag.
150 SAP on DB2 UDB for OS/390 and z/OS: Implementing Application Servers on Linux for zSeries

B.3 Script fstab-local.shScript fstab-local.sh resides in /rw/etc and has the following content.
#!/bin/bash## This script is intended to perform mounts local to the cloned system.## What vm-guest am I running in?NAME=`/sbin/hcp query userid | awk '{print $1}'`## Source the config-file for TYPE:if [ -d /usr/var/config ]; then
. /usr/var/config/$NAME.sapconfig;else mount /usr/var . /usr/var/config/$NAME.sapconfig umount /usr/var;fi
# Now we start mounting...case $TYPE in
dialoginstance)mount -t reiserfs /dev/VGL1/lvusrsap /usr/sap mount vmlinux8:/sapmnt /sapmnt;;
centralinstance)mount -t reiserfs /dev/VGM1/lvsapmnt /sapmnt mount -t reiserfs /dev/VGL1/lvusrsap /usr/sap mount -t reiserfs /dev/VGM1/lvsaptrans /usr/sap/trans ;;
esac# mounts for special chroot enviroment for user managementmount --bind /bin /rw/binmount --bind /lib /rw/libmount --bind /sbin /rw/sbinmount --bind /usr/sbin /rw/usr/sbinmount --bind /usr/bin /rw/usr/binmount --bind /usr/lib /rw/usr/lib
Appendix B. Cloning 151
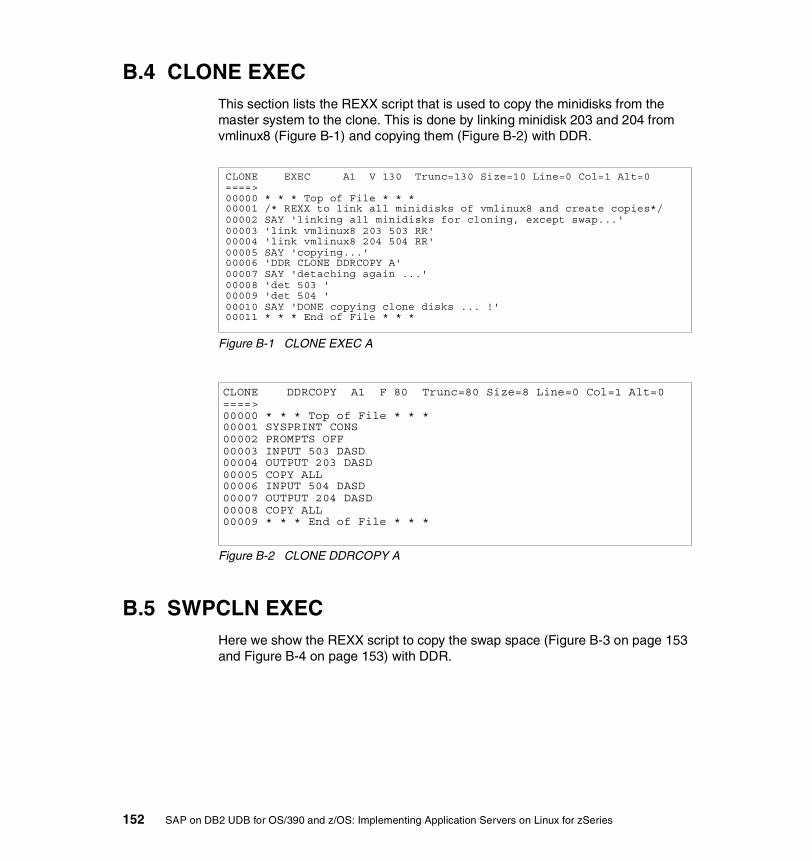
B.4 CLONE EXECThis section lists the REXX script that is used to copy the minidisks from the master system to the clone. This is done by linking minidisk 203 and 204 from vmlinux8 (Figure B-1) and copying them (Figure B-2) with DDR.
Figure B-1 CLONE EXEC A
Figure B-2 CLONE DDRCOPY A
B.5 SWPCLN EXECHere we show the REXX script to copy the swap space (Figure B-3 on page 153 and Figure B-4 on page 153) with DDR.
CLONE EXEC A1 V 130 Trunc=130 Size=10 Line=0 Col=1 Alt=0 ====> 00000 * * * Top of File * * * 00001 /* REXX to link all minidisks of vmlinux8 and create copies*/ 00002 SAY 'linking all minidisks for cloning, except swap...' 00003 'link vmlinux8 203 503 RR' 00004 'link vmlinux8 204 504 RR' 00005 SAY 'copying...' 00006 'DDR CLONE DDRCOPY A' 00007 SAY 'detaching again ...' 00008 'det 503 ' 00009 'det 504 ' 00010 SAY 'DONE copying clone disks ... !' 00011 * * * End of File * * *
CLONE DDRCOPY A1 F 80 Trunc=80 Size=8 Line=0 Col=1 Alt=0 ====> 00000 * * * Top of File * * * 00001 SYSPRINT CONS 00002 PROMPTS OFF 00003 INPUT 503 DASD 00004 OUTPUT 203 DASD 00005 COPY ALL 00006 INPUT 504 DASD 00007 OUTPUT 204 DASD 00008 COPY ALL 00009 * * * End of File * * *
152 SAP on DB2 UDB for OS/390 and z/OS: Implementing Application Servers on Linux for zSeries

Figure B-3 SWPCLN EXEC A
Figure B-4 SWPCLN DDRCOPY A
B.6 STARTLIN EXECHere we show the REXX program that is used to start a cloned dialog instance.
Figure B-5 STARTLIN EXEC A
B.7 USER DIRECToryFigure B-6 on page 154 provides the sections of the USER DIRECTory for VMLINUX7 and VMLINUX8.
SWPCLN EXEC A1 V 130 Trunc=130 Size=8 Line=0 Col=1 Alt=0 ====> 00000 * * * Top of File * * * 00001 /* REXX to link all minidisks of vmlinux8 and create copies*/ 00002 SAY 'linking swap device ... ' 00003 'link vmlinux8 200 500 RR' 00004 SAY 'copying...' 00005 'DDR SWPCLN DDRCOPY A' 00006 SAY 'detaching again ...' 00007 'det 500 ' 00008 SAY 'DONE copying swap space!' 00009 * * * End of File * * *
SWPCLN DDRCOPY A1 F 80 Trunc=80 Size=5 Line=0 Col=1 Alt=0 ====> 00000 * * * Top of File * * * 00001 SYSPRINT CONS 00002 PROMPTS OFF 00003 INPUT 500 DASD 00004 OUTPUT 200 DASD 00005 COPY ALL 00006 * * * End of File * * *
STARTLIN EXEC A1 V 130 Trunc=130 Size=6 Line=0 Col=1 Alt=0 ====> 00000 * * * Top of File * * * 00001 /* REXX to start cloned linux image */ 00002 SAY 'link / and /usr/var' 00003 'LINK vmlinux8 201 201 RR' 00004 'LINK vmlinux8 202 202 RR' 00005 SAY 'now booting LINUX !!!' 00006 'ipl 201 clear' 00007 * * * End of File * * *
Appendix B. Cloning 153

Figure B-6 USER DIRECTory
USER VMLINUX7 XXXXXXXX 512M 1G G ACCOUNT ITS30000 IPL CMS PARM AUTOCR MACH ESA 4 POSIXINFO UID 84 DEDICATE 292E 2952 DEDICATE 292F 2953 DEDICATE 7208 7204 DEDICATE 7209 7205 DEDICATE 720A 7206 DEDICATE 2888 2884 DEDICATE 2889 2885 DEDICATE 288A 2886 CONSOLE 0009 3215 SPOOL 000C 3505 A SPOOL 000D 3525 A SPOOL 000E 1403 A LINK MAINT 0190 0190 RR LINK MAINT 019E 019E RR LINK MAINT 019F 019F RR LINK MAINT 019D 019D RR MDISK 0191 3390 1741 50 VMZU1A MR MDISK 0200 3390 0001 10016 LX3CA2 MR MDISK 0203 3390 0001 0200 LX3D44 MR MDISK 0204 3390 0201 0600 LX3D44 MR MDISK 0205 3390 0801 1000 LX3D44 MR MDISK 0206 3390 1801 0200 LX3D44 MR MDISK 0207 3390 2001 0200 LX3D44 MR MDISK 0208 3390 2201 0200 LX3D44 MR
USER VMLINUX8 TERM1OAK 512M 1G G ACCOUNT ITS30000 IPL CMS PARM AUTOCR MACH ESA 4 POSIXINFO UID 85 DEDICATE 292E 292E DEDICATE 292F 292F DEDICATE 7208 7208 DEDICATE 7209 7209 DEDICATE 720A 720A DEDICATE 2888 2888 DEDICATE 2889 2889 DEDICATE 288A 288A CONSOLE 0009 3215 SPOOL 000C 3505 A SPOOL 000D 3525 A SPOOL 000E 1403 A LINK MAINT 0190 0190 RR LINK MAINT 019E 019E RR LINK MAINT 019F 019F RR LINK MAINT 019D 019D RR MDISK 0191 3390 1791 50 VMZU1A MR MDISK 0200 3390 0001 10016 LX3EA2 MR MDISK 0201 3390 0001 2500 LX3BA2 MR MDISK 0202 3390 2501 0020 LX3BA2 MR MDISK 0203 3390 2521 0200 LX3BA2 MR MDISK 0204 3390 2721 0600 LX3BA2 MR MDISK 0205 3390 3321 1000 LX3BA2 MR MDISK 0206 3390 4321 0200 LX3BA2 MR MDISK 0207 3390 4521 0200 LX3BA2 MR MDISK 0208 3390 4721 0200 LX3BA2 MR
154 SAP on DB2 UDB for OS/390 and z/OS: Implementing Application Servers on Linux for zSeries

B.8 The boot scriptThis section shows the modified boot script that resides in /etc/init.d.
#! /bin/sh## Copyright (c) 1996 SuSE GmbH Nuernberg, Germany. All rights reserved.## Author: Ruediger Oertel <[email protected]>, 1996-2000# Werner Fink <[email protected]>, 1996-2000# Burchard Steinbild <[email protected]>, 1996-2000# Florian La Roche <[email protected]>, 1996## /etc/init.d/boot## first script to be executed from init on system startup#
. /etc/rc.status# cl: changed rc.config to rc.config-share# cl: so the boot script has a environment # cl: even if something goes wrong. /etc/rc.config-sharedecho "Running $0"
rc_resetecho -n "Mounting /proc device"mount -n -t proc proc /procrc_status -v -r
# cl: mounting of /rw to have access to # cl: clientspecific files # cl: has to be donw before mounting pts and lvm setup mount /dev/dasdd1 /rw
echo -n "Mounting /dev/pts"optpts="-o mode=0620,gid=5"mount -n -t devpts $optpts devpts /dev/ptsrc_status -v1 -r
# cl: generating the ip configurationecho "Generating the ip configuration"/usr/sbin/cloning/clone-tcpip-configcat /rw/etc/rc.config-tcpip. /rw/etc/rc.config
## Start blogd, requires /proc and /dev/pts.
Appendix B. Cloning 155

# Export the real device in variable REDIRECT.#if test -x /sbin/showconsole; then REDIRECT="`showconsole 2>/dev/null`" test -x /sbin/blogd && /sbin/blogd $REDIRECT export REDIRECTfi
## possibly there are file systems on devices, which need a kernel # module to be loaded. So start kerneld as early as possible.#if test "$START_KERNELD" = yes -a \ -x /sbin/kerneld -a ! -e /proc/sys/kernel/modprobe ; then echo -n "Starting kerneld:" /sbin/kerneld > /dev/null 2>&1 rc_status -v -rfi
## check if sysrq should be enabled#if test -e /proc/sys/kernel/sysrq ; thenif test "$ENABLE_SYSRQ" = yes ; then echo "1" > /proc/sys/kernel/sysrq else echo "0" > /proc/sys/kernel/sysrq fifi
## check if STOP-A should be enabled#if test -e /proc/sys/kernel/stop-a ; thenif test "$ENABLE_STOP_A" = yes ; then echo "1" > /proc/sys/kernel/stop-aelse echo "0" > /proc/sys/kernel/stop-afifi
## check if splashscreen should be disabled#if test -e /proc/splash ; then if test "$BOOT_SPLASH" = "no" ; then
echo "0" > /proc/splash fifi
156 SAP on DB2 UDB for OS/390 and z/OS: Implementing Application Servers on Linux for zSeries

# Disable ECN if required.if test "$DISABLE_ECN" = "yes" -a -f /proc/sys/net/ipv4/tcp_ecn; then
echo "0" >/proc/sys/net/ipv4/tcp_ecnfi
## maybe we use "Multiple devices". So initialize MD.#if test -f /etc/raidtab -a -x /sbin/raid0run ; then echo "Initializing Multiple Devices..." /sbin/raid0run -a if test -x /sbin/raidstart ; then
/sbin/raidstart -a fielif test -f /etc/mdtab -a -x /sbin/mdadd ; then echo "Initializing Multiple Devices..." /sbin/mdadd -ar && MDADD_RETURN=0 || MDADD_RETURN=1 if test $MDADD_RETURN -ne 0 ; then if test -x /sbin/ckraid ; then echo "Initializing Multiple Devices failed. Trying to recover it..."
/sbin/mdstop -a for i in /etc/raid?.conf ; do /sbin/ckraid --fix $i done /sbin/mdadd -ar
rc_status -v1 -r else rc_status -v1 -r fi fifi
## s390 is 'like' serial console(better: no console ttys at all)# and we don't have access to the HW Clock#case "$HOSTTYPE" in s390*) SERIAL_CONSOLE=yes HWCLOCK_ACCESS=noesac
## If we use a serial console, don't use the fsck progress bar#if test -z "$SERIAL_CONSOLE"; then FSCK_PROGRESSBAR="-C"else
Appendix B. Cloning 157

FSCK_PROGRESSBAR=""fi
## Find and activate volume groups (HM 1/1/1999)## cl: before starting the lvm, we have to mount /rw so that the lvm# cl: related links point to /rw/lvm#mount /dev/dasdd1 /rwif test -d /rw/etc/lvmtab.d/ -a -x /sbin/vgscan -a -x /sbin/vgchange ; then echo "Run file system check on root for LVM activation" while read des fs type rest; do
case "$des" in ""|\#*) continue ;; esaccase "$fs" in /) break ;; *) ;;esac
done < /etc/fstab
FSCK_RETURN=0 # on first startup of a system with a lvm root device lvm /dev entries # may not exist at this time, so skip fsck in this case # skip fsck also for reiserfs case if test "$fs" = / -a -f "$des" -a "$type" != "reiserfs" then
fsck $FSCK_PROGRESSBAR -a -t $type /FSCK_RETURN=$?
fi # A return code of 1 indicates that file system errors # were corrected, but that the boot may proceed. # A return code of 2 or larger indicates failure. test $FSCK_RETURN -lt 2 rc_status -v1 -r if test $FSCK_RETURN -gt 1 ; then
# Stop blogd since we reboot after sulogin[ -x /sbin/blogd ] && killproc -QUIT /sbin/blogdif test -x /etc/init.d/kbd ; then /etc/init.d/kbd startfiechoecho "fsck for root file system (/) failed."echo "Please repair it manually and reboot."echo "The root file system is currently mounted read-only."echoecho "Attention: Only CONTROL-D will reboot the system in this"echo "maintanance mode. shutdown or reboot will not work."echoPS1="(repair filesystem) # "export PS1
158 SAP on DB2 UDB for OS/390 and z/OS: Implementing Application Servers on Linux for zSeries

/sbin/sulogin /dev/console
# if the user has mounted something rw, this should be umountedecho "Unmounting file systems (ignore error messages)"umount -avn
# on umsdos fs this would lead to an error message. so direct# errors to /dev/nullmount -no remount,ro / 2> /dev/null
syncreboot -f
elseecho "Remounting root file system (/) read/write for vgscan..."# cl: ro for the root filesystem
# cl: mount -n -o remount,rw /echo "Scanning for LVM volume groups..."/sbin/vgscanmount -n -o remount,ro /echo "Activating LVM volume groups..."/sbin/vgchange -a y
fifi
## fsck may need a huge amount of memory, so make sure, it is there.#echo "Activating swap-devices in /etc/fstab..."swapon -a &> /dev/nullrc_status -v1 -r
case `uname -r` in 0.*|1.*|2.[01].*|2.2.?|2.2.10) echo -n "Running update (bdflush) daemon" /sbin/update rc_status -v -r
;;esac
## do fsck and start sulogin, if it fails.#FSCK_RETURN=0if test ! -f /fastboot -a -z "$fastboot" ; then FSCK_FORCE="" test -f /forcefsck && FSCK_FORCE="-f" # on an umsdos root fs this mount will fail, so direct error messages # to /dev/null. # this seems to be ugly, but should not really be a problem.
Appendix B. Cloning 159

mount -n -o remount,ro / 2> /dev/null if test $? = 0; then echo "Checking file systems..." fsck $FSCK_PROGRESSBAR -A -a $FSCK_FORCE # A return code of 1 indicates that file system errors # were corrected, but that the boot may proceed. # A return code of 2 or larger indicates failure. FSCK_RETURN=$?
test $FSCK_RETURN -lt 2rc_status -v1 -r
if test $FSCK_RETURN -gt 1; then # Stop blogd since we reboot after sulogin [ -x /sbin/blogd ] && killproc -QUIT /sbin/blogd if test -x /etc/init.d/kbd ; then
/etc/init.d/kbd start fi
echo echo "fsck failed. Please repair manually and reboot. The root" echo "file system is currently mounted read-only. To remount it" echo "read-write do:" echo echo " bash# mount -n -o remount,rw /" echo echo "Attention: Only CONTROL-D will reboot the system in this" echo "maintanance mode. shutdown or reboot will not work." echo PS1="(repair filesystem) # " export PS1 /sbin/sulogin /dev/console
# if the user has mounted something rw, this should be umounted echo "Unmounting file systems (ignore error messages)" umount -avn
# on umsdos fs this would lead to an error message. so direct # errors to /dev/null mount -no remount,ro / 2> /dev/null
sync reboot -f fi sync # cl: no rw for the root filesystem # cl: mount -n -o remount,rw / else
mounts=/etc/mtabtest -r /proc/mounts && mounts=/proc/mountswhile read des fs type rest; do case "$fs" in
160 SAP on DB2 UDB for OS/390 and z/OS: Implementing Application Servers on Linux for zSeries

/) break ;; *) ;; esacdone < $mounts
if test "$fs" = / -a "$type" != "umsdos" ; then echo echo '*** ERROR! Cannot fsck because root is not read-only!' echofi
fielse echo "File systems are NOT being checked." # cl: no rw for the root filesystem # cl: mount -n -o remount,rw /fi
## clean up## cl: no rw for the root filesystem# cl: rm -f /etc/mtab* /etc/nologin /nologin /fastboot
## initialize database for kerneld. This should be done earlier, but# could cause a lot of trouble with damaged file systems.# restart of kerneld will be done by /etc/init.d/kerneld# MODULES_DIR=/lib/modules/`uname -r` if test -x /sbin/depmod -a -d $MODULES_DIR ; then for i in $MODULES_DIR/* $MODULES_DIR/*/* /etc/modules.conf ; do test -e $i || continue if test $i -nt $MODULES_DIR/modules.dep ; then rm -f $MODULES_DIR/modules.dep break fi done if test ! -e $MODULES_DIR/modules.dep ; then echo -n Setting up $MODULES_DIR /sbin/depmod -a > /dev/null 2>&1
rc_status -v -r fifi
## Mount local filesystems in '/etc/fstab' (and create an entry # for / and /proc).#echo "Mounting local file systems..."
Appendix B. Cloning 161

mount -fv -t proc proc /procrc_statusmount -fv -t devpts $optpts devpts /dev/ptsrc_statusmount -av -t nonfs,noproc,nodevptsrc_status -v1 -r
## Run boot.crypto before fideling with files and file systems#if test -x /etc/init.d/boot.crypto ; then # # Set argv[0] for the process and source the file # to get auto detection of forced execution working. # /bin/bash -c '. /etc/init.d/boot.crypto' S01boot.crypto startfi
## After mounting we may activate swap files in /etc/fstab# .. this should work know with the new swapon behavio(u)r#echo "Activating remaining swap-devices in /etc/fstab..."swapon -a &> /dev/nullrc_status -v1 -r
# set and adjust the CMOS clockif test "$HWCLOCK_ACCESS" != "no" ; thenecho -n Setting up the CMOS clockCLOCKCMD=hwclockwhile read line; do
case "$line" in# *MacRISC*) CLOCKCMD=clock ;;
*MTX\ Plus*) CLOCKCMD="hwclock --mtxplus --directisa" ;;*PReP\ Dual\ MTX*) CLOCKCMD="hwclock --mtxplus --directisa" ;;
esacdone < /proc/cpuinfo
test "$GMT" != "YAST_ASK" && $CLOCKCMD --hctosys $GMTrc_statustest -f /etc/adjtime || echo "0.0 0 0.0" > /etc/adjtimeif test "$GMT" != "YAST_ASK" -a "$START_XNTPD" != "yes" ; then $CLOCKCMD --adjust $GMT rc_statusfirc_status -v -relse # We need to compensate for missing hwclock access on S/390: if [ -z "$GMT" ]; then
162 SAP on DB2 UDB for OS/390 and z/OS: Implementing Application Servers on Linux for zSeries
# if system clock is local time, we need to set the Linux # internal time to GMT to have proper time: date `date -u +'%m%d%H%M%Y'` fifi
## reinit quota, if fsck has returned value != 0#if test $FSCK_RETURN -gt 0 -a -n "$START_QUOTA" -a "$START_QUOTA"="yes" ; then # Check quota and then turn quota on. if test -x /sbin/quotacheck ; then echo "Checking quotas. This may take some time." /sbin/quotacheck -avug
rc_status -v1 -r fifi
# Let ld.so rebuild its cache.# But do some tests before if it is really needed ([email protected] 01/2000)LDCONFIG_NEEDED=falsetest -s /etc/ld.so.cache || LDCONFIG_NEEDED=truetest "$run_ldconfig" = true && LDCONFIG_NEEDED=truetest -x /usr/bin/find -a "$LDCONFIG_NEEDED" = false && { for DUMMY in `/usr/bin/find /etc/ld.so.cache -mtime +30` ; do LDCONFIG_NEEDED=true done}LIBDIRS="/lib /usr/lib /usr/local/lib"test -s /etc/ld.so.conf && { for DIR in `cat /etc/ld.so.conf` ; do case $DIR in /*) test -d "$DIR" && LIBDIRS="$LIBDIRS $DIR" ;; esac done}for DIR in $LIBDIRS ; do test $DIR -nt /etc/ld.so.cache && { LDCONFIG_NEEDED=true break }done
test -x /sbin/ldconfig -a "$LDCONFIG_NEEDED" = true && { echo -n "Starting ldconfig (setting up /etc/ld.so.cache)" { /sbin/ldconfig -X 2>/dev/null || \ { echo ; echo -e "ldconfig $rc_failed" ; } ; } &
Appendix B. Cloning 163

rc_status -v -r}
## cl: this is just necessary if timezone changes# cl: Let zic set timezone - if present.## cl: if test -n "$TIMEZONE" -a "$TIMEZONE" != "YAST_ASK" -a -x /usr/sbin/zic ; then# cl: echo -n Setting up timezone data# cl: this is just necessary if timezone changes# cl: /usr/sbin/zic -l $TIMEZONE# cl: rc_status -v -r# cl: fi
## initialize loopback device#if test "$START_LOOPBACK" = yes; then echo -n Setting up loopback device ifconfig lo 127.0.0.1 netmask 255.0.0.0 up rc_status case `uname -r` in 0.*|1.*|2.[012].*)
route add -net 127.0.0.0 netmask 255.0.0.0 dev lorc_status
;; esac rc_status -v -rfi
# clean up old yp bindingsrm -f /var/yp/binding/*.[12]
## set hostname and domainname#test -n "$FQHOSTNAME" && { echo -n Setting up hostname hostname ${FQHOSTNAME%%.*} rc_status -v -r}test -n "$YP_DOMAINNAME" && { echo -n Setting up YP domainname domainname $YP_DOMAINNAME rc_status -v -r} || domainname ""
164 SAP on DB2 UDB for OS/390 and z/OS: Implementing Application Servers on Linux for zSeries

## clean up#rm -f /var/lock/* /var/lock/*/* /tmp/.X*lock \ /var/run/* /var/run/*/* /var/spool/uucp/LCK* 2>/dev/nullrm -rf /tmp/screens 2>/dev/nullrm -f /var/run/utmpecho -n > /var/run/utmpchmod 664 /var/run/utmpchown root.tty /var/run/utmp# Restore a possibly dynamically modified /etc/resolv.confif ls /etc/resolv.conf.saved.by.* &>/dev/null ; then echo "/sbin/modify_resolvconf:" /sbin/modify_resolvconf cleanup echo -e "$rc_done_up"fi
if test "$CLEAR_TMP_DIRS_AT_BOOTUP" = yes; then echo -n "Cleaning temporary directories $TMP_DIRS_TO_CLEAR" for CURDIR in $TMP_DIRS_TO_CLEAR ; do find $CURDIR -printf '%P\0' | ( cd $CURDIR ; xargs -0 rm -rf ) done for CURDIR in /tmp /tmp/.X11-unix /var/tmp /var/tmp/vi.recover ; do
test -d $CURDIR || mkdir -p $CURDIRchown root.root $CURDIRchmod 1777 $CURDIR
done rc_status -v -rfi
## there could be a new kernel version. reinit /etc/psdevtab, to be sure.#rm -f /etc/psdevtabtest -x /bin/ps && /bin/ps > /dev/null 2> /dev/null
## mount shmfs is necessary (2.4 kernels)#unset HAVE_SHMwhile read dev type; do test "$type" = "shm" && HAVE_SHM=1done < /proc/filesystemsif test ! -z "$HAVE_SHM"; then ECHO_RETURN=$rc_done test -d /dev/shm || mkdir /dev/shm echo -n "Mount SHM FS on /dev/shm" mount -t shm shmfs /dev/shm || ECHO_RETURN=$rc_failed echo -e $ECHO_RETURN
Appendix B. Cloning 165

fi #unset HAVE_SHM
## start bootup client scripts.#if test -d /etc/init.d/boot.d/ ; then for i in /etc/init.d/boot.d/S*; do
test -f $i || continueif test -x "$i" ; then # Active boot scripts, should have their own messages $i startelse # Old boot scripts, may not have any message echo Running $i /bin/sh $i b rc_status -v1 -rfi
donefi
## setup PNP if config file is present#if test -r /etc/isapnp.conf -a -x /sbin/isapnp -a "$START_ISAPNP" = yes ; then echo "Initializing PnP devices" /sbin/isapnp /etc/isapnp.conf rc_status -v1 -rfi
## start user defined bootup script.#if test -f /etc/init.d/boot.local ; then echo "Running /etc/init.d/boot.local" /bin/sh /etc/init.d/boot.local
rc_status -v1 -rfi
# Read all kernel messages generated until now and put them in one file.test -s /var/log/boot.msg && mv -f /var/log/boot.msg /var/log/boot.omsgif test -x /sbin/klogd ; then
echo Creating /var/log/boot.msg/sbin/klogd -s -o -n -f /var/log/boot.msg/bin/sleep 1test -s /var/log/boot.msgrc_status -v1 -r
elif test -x /bin/dmesg ; thenecho Creating /var/log/boot.msg
166 SAP on DB2 UDB for OS/390 and z/OS: Implementing Application Servers on Linux for zSeries

/bin/dmesg -s16384 > /var/log/boot.msg/bin/sleep 1test -s /var/log/boot.msgrc_status -v1 -r
fiif test -x /usr/sbin/klogconsole ; then if test -z "$SERIAL_CONSOLE" ; then
( test -c /dev/tty10 && > /dev/tty10 ) > /dev/null 2>&1 && /usr/sbin/klogconsole -r10 else
/usr/sbin/klogconsole -l 7 -r 0 fifi
## Say blogd that I/O is possible now#[ -x /sbin/blogd ] && killproc -IO /sbin/blogd
## enable DEXE binary format#if test -d /proc/sys/fs/binfmt_misc -a -x /usr/bin/dosexec; then echo -n "Registering DEXE for binfmt" echo :DEXE:M::\\x0eDEXE::/usr/bin/dosexec: > \ /proc/sys/fs/binfmt_misc/register rc_status -v -rfi
## Enable "dynamic IP patch"#if test -n "$IP_DYNIP" -a "$IP_DYNIP" != no -a \ -e /proc/sys/net/ipv4/ip_dynaddr ; then echo -n "Enabling dynamic IP patch" case "$IP_DYNIP" in
yes) echo 7 ; ECHO_RETURN=$rc_done ;;[1-9]) echo $IP_DYNIP ; ECHO_RETURN=$rc_done ;;*) ECHO_RETURN=" invalid IP_DYNIP=$IP_DYNIP $rc_skipped" ;;
esac > /proc/sys/net/ipv4/ip_dynaddr || ECHO_RETURN=$rc_failed echo -e "$ECHO_RETURN"fi
## Enable syn flood protection#if test -n "$IP_TCP_SYNCOOKIES" -a "$IP_TCP_SYNCOOKIES" != no -a \ -e /proc/sys/net/ipv4/tcp_syncookies ; then echo -n "Enabling syn flood protection"
Appendix B. Cloning 167

case "$IP_TCP_SYNCOOKIES" in yes) echo 1 ; ECHO_RETURN=$rc_done ;; *) ECHO_RETURN=" invalid IP_TCP_SYNCOOKIES=$IP_TCP_SYNCOOKIES $rc_skipped" ;; esac > /proc/sys/net/ipv4/tcp_syncookies || ECHO_RETURN=$rc_failed echo -e "$ECHO_RETURN"fi
## Enable IP forwarding ?#if test -e /proc/sys/net/ipv4/ip_forward -a -n "$IP_FORWARD" ; then case $IP_FORWARD in yes) echo -n "Enabling IP forwarding" echo "1" > /proc/sys/net/ipv4/ip_forward ;; *) echo -n "Disabling IP forwarding" echo "0" > /proc/sys/net/ipv4/ip_forward ;; esac rc_status -v -rfi
## insert memstat module for xosview#if test "$LOAD_MEMSTAT_MODULE" = yes ; then if test -f $MODULES_DIR/misc/memstat.o ; then echo Loading memstat module insmod $MODULES_DIR/misc/memstat.o rc_status -v1 -r fifi
## Stop blogd#[ -x /sbin/blogd ] && killproc -QUIT /sbin/blogd
## look for stuff to do for first bootup.#if test -e /var/adm/setup/setup.newinst -o -e /usr/lib/YaST/.configured2 ; then if test -w / -a "$NO_AUTO_SETUP" != true ; then
test -n "$REDIRECT" && exec 0<> $REDIRECT 1>&0 2>&0 if test -e /usr/lib/YaST/.configured2 ; then
168 SAP on DB2 UDB for OS/390 and z/OS: Implementing Application Servers on Linux for zSeries

echo echo It seems, that last installation setup has not been finished... echo To be sure, it will be started again. echo sleep 2 rm -f /usr/lib/YaST/.configured2 fi if test -x /etc/init.d/kbd ; then /etc/init.d/kbd start fi /lib/YaST/bootsetup # # maybe YaST has started gpm. This can lead into trouble with # setserial. Since it is started again, when entering into # runlevel 2, we can kill it here. #
test -x /usr/sbin/gpm && \ killproc -TERM /usr/sbin/gpm > /dev/null 2> /dev/null fifi
## Let YaST2 finish its installation, if you installed with YaST2#if test -f /var/lib/YaST2/runme_at_boot ; then test -n "$REDIRECT" && exec 0<> $REDIRECT 1>&0 2>&0 # if yast2 failed, this ensures proper system setup touch /var/lib/YaST2/run_suseconfig if test -x /usr/lib/YaST2/bin/YaST2.firstboot; then
/usr/lib/YaST2/bin/YaST2.firstboot else
# oops, yast2 not installedrm -f /var/lib/YaST2/runme_at_boot
fifi# run SuSEconfig (with args) if neededif test -f /var/lib/YaST2/run_suseconfig ; then /sbin/SuSEconfig `cat /var/lib/YaST2/run_suseconfig` rm -f /var/lib/YaST2/run_suseconfigfi
rc_resetexit 0
Appendix B. Cloning 169

170 SAP on DB2 UDB for OS/390 and z/OS: Implementing Application Servers on Linux for zSeries

Related publications
The publications listed in this section are considered particularly suitable for a more detailed discussion of the topics covered in this redbook.
IBM RedbooksFor information on ordering these publications, see “How to get IBM Redbooks” on page 172.
� SAP on DB2 UDB for OS/390 and z/OS - High Availability Solution Using System Automation, SG24-6837
� Linux on IBM eServer zSeries and S/390: ISP/ASP Solutions, SG24-6299
� Linux for S/390, SG24-4987
� Linux for zSeries and S/390: Distributions, SG24-6264
� Building Linux Systems under IBM VM, REDP0120
� OSA-Express Implementation Guide, SG24-5948
� zSeries HiperSockets, SG24-6816
� SAP R/3 on DB2 for OS/390: Application Servers on OS/390, SG24-5840
� SAP R/3 on DB2 for OS/390: Implementing with AIX or Windows NT Application Servers, SG24-4945
� Database Administration Experiences: SAP R/3 on DB2 for OS/390, SG24-2078
� High Availability Considerations: SAP R/3 on DB2 for OS/390, SG24-2003
� Linux on IBM zSeries and S/390: Server Consolidation with Linux for zSeries, REDP0222
Other resourcesThese publications are also relevant as further information sources:
� z/OS V1R3.0 MVS Planning: Workload Management, SA22-7602
� SAP R/3 on DB2 UDB for OS/390 and z/OS: Connectivity Guide, Fourth Edition, SC33-7965
� SAP R/3 on DB2 UDB for OS/390 and z/OS: Planning Guide, Second Edition, SAP R/3 Release 4.6D SC33-7965
© Copyright IBM Corp. 2002. All rights reserved. 171

� z/OS V1R3.0 MVS Planning: Workload Management, SA22-7602
� SAP R/3 Installation on OS/390 UNIX System Services, Release 4.6C SR2 (product publication)
� SAP R/3 Installation on Linux for zSeries: IBM DB2 UDB for OS/390 and z/OS (product publication)
Referenced Web sitesThese Web sites are also relevant as further information sources:
� Linux
http://www10.software.ibm.com/developerworks/opensource/linux390/documentation-2.4.17.shtml
http://www10.software.ibm.com/developerworks/opensource/linux390/useful_add-ons.shtml
http://www.sap.com/linux/platforms/index.asp
http://www.suse.de/en/support/whitepapers/lvm/
http://www.sistina.com/products_lvm.htm
http://www.ibm.com/linux/support.
http://www.suse.com/index_us.html
http://www.namesys.com
� Zebra
http://www.zebra.org
http://www.zebra.org/download.html
� z/VM
www.vm.ibm.com
How to get IBM RedbooksYou can order hardcopy Redbooks, as well as view, download, or search for Redbooks at the following Web site:
ibm.com/redbooks
172 SAP on DB2 UDB for OS/390 and z/OS: Implementing Application Servers on Linux for zSeries172 SAP on DB2 UDB for OS/390 and z/OS: Implementing Application Servers on Linux for zSeries

You can also download additional materials (code samples or diskette/CD-ROM images) from that site.
IBM Redbooks collectionsRedbooks are also available on CD-ROMs. Click the CD-ROMs button on the Redbooks Web site for information about all the CD-ROMs offered, as well as updates and formats.
Related publications 173

174 SAP on DB2 UDB for OS/390 and z/OS: Implementing Application Servers on Linux for zSeries174 SAP on DB2 UDB for OS/390 and z/OS: Implementing Application Servers on Linux for zSeries

Index
Symbols/etc/hosts 57/etc/services 57
Numerics64-bit addressing 10, 76
Bboot 123
script 155
Ccentral instance 64
installation on Linux 64directory 64file system 64installing the central instance 70issues 73memory configuration 76operations 78post-installation activities 74R3SETUP 129
CLONE EXEC 152cloning 93, 147
benefits 94customize LVM 147dialog instance 119, 126
STARTLIN EXEC 153fstab-local.sh 151hints and tips 127Linux operating system 103
customizing the master Linux 109reasons 94SWPCLN EXEC 152with /usr directory sharing 99with sharing as much code as possible 100
scenario 102without minidisk sharing 95wrapcmd 150
configurationmemory 76network 31
© Copyright IBM Corp. 2002. All rights reserved.
system 30consolidation
operating systems 9servers 10
Ddevice file system 127dialog instance 81, 93, 126
cloning 93installation on Linux, heterogeneous 81, 89
file system 85NFS 89
installing the dialog instance 91installation on Linux, homogeneous
file system 82local instance 83NFS 84
installing the dialog instance 84
Ffile system
heterogeneous 85homogeneous 82
fstab-local.sh 151
Hheterogeneous environment 85
IICLI
client 55server 55
IFL 11
Kkernel 59, 89
Llanguages 59Linux for zSeries 1, 7
benefits for SAP 9
175

configurations 7installation 37
basic install 37checking the system 56configuring networking devices 43configuring networking interfaces 45creating swap space 53customizing SuSE 52installing ICLI client and server 55installing SAP locales 54installing Zebra 47
LPAR 10LVM2 128
Mmemory configuration 76
Nname resolution 58network 23
adapters 23configuration 31design 18devices 43interfaces 45networking routes 32vmlinux8 setup 32
NFS server 33
OOMPROUTE 32OSPF 32, 47
Pprofile templates 119
RR3SETUP 129redadm 59Redbooks Web site 172
Contact us xiresource sharing 21
disk storage 22network adapters 23processors 21real memory 22swap space 23
REXX 152
SSAP
application serverconfiguration scenarios 14
adding Linux application servers to an existing SAP system 14building new SAP systems from scratch 15consolidating many SAP systems 17
hardware and software requirements 24installation on Linux 63
central instance 64dialog instance 81
network design 18planning 13preparing the system 29resource sharing 21software configuration 26support and maintainance 28
architecture 2business requirements 3
continuous availability 4ease of deployment 5manageability 5performance 4scalability 4total cost of ownership 5
SAP locales 54sapsys 59starting and stopping an SAP system 78STARTLIN EXEC 153SuSE 52
customization 52swap space 23, 53, 59, 152SWPCLN EXEC 152system information 78
Ttime 61
UUSER DIRECTory 153
VVIPA 52
176 SAP on DB2 UDB for OS/390 and z/OS: Implementing Application Servers on Linux for zSeries

vmlinux6 30vmlinux7 30, 126vmlinux8 30, 37
Wwrapcmd 150
Zz/VM
installation 33Linux image cloning 11virtual images 34
Zebra 32, 47configuring 50creating a new RPM package 47startup and shutdown 51
Index 177

178 SAP on DB2 UDB for OS/390 and z/OS: Implementing Application Servers on Linux for zSeries

(0.2”spine)0.17”<->0.473”
90<->249 pages
SAP on DB2 UDB for OS/390 and z/OS: Implem
enting Application Servers on Linux for zSeries


®
SG24-6847-00 ISBN 0738426539
INTERNATIONAL TECHNICALSUPPORTORGANIZATION
BUILDING TECHNICALINFORMATION BASED ONPRACTICAL EXPERIENCE
IBM Redbooks are developed by the IBM International Technical Support Organization. Experts from IBM, Customers and Partners from around the world create timely technical information based on realistic scenarios. Specific recommendations are provided to help you implement IT solutions more effectively in your environment.
For more information:ibm.com/redbooks
SAP on DB2 UDB for OS/390 and z/OS:Implementing Application Serverson Linux for zSeries
Installing SAP application servers on Linux
Cloning SAP application servers on Linux
Planning considerations
This IBM Redbook focuses on the implementation of SAP application servers on Linux for zSeries. It applies to IBM z/OS V1R2 (5694-A01), IBM z/VM V4.2 (5739-A04), SuSE Linux Enterprise Server 7 for IBM zSeries (64-bit), IBM DB2 UDB for z/OS V7.1 (5675-DB2), and SAP R/3 4.6C SR2.
The book provides overviews of SAP and Linux and describes the planning needed for SAP on Linux for zSeries, including resource sharing considerations, hardware and software requirements, and support and maintenance.
It focuses on how to prepare the system environment, describing system and network configurations, as well as installation and customization tasks. After detailing how to install SAP application servers in z/VM Linux images, it concludes with a description of how to clone those images.
Back cover