sas credit risk management for banking 4.2: post ... · – webdav server (such as xythos or...
TRANSCRIPT

SAS®
Credit Risk Management for Banking 4.2Post-Installation Tasks

The correct bibliographic citation for this manual is as follows: SAS Institute Inc. 2006.SAS ® Credit Risk Management for Banking 4.2: Post-Installation Tasks. Cary, NC: SASInstitute Inc.
SAS® Credit Risk Management for Banking 4.2: Post-Installation TasksCopyright © 2006, SAS Institute Inc., Cary, NC, USAAll rights reserved. Produced in the United States of America.For a hard-copy book: No part of this publication may be reproduced, stored in aretrieval system, or transmitted, in any form or by any means, electronic, mechanical,photocopying, or otherwise, without the prior written permission of the publisher, SASInstitute Inc.For a Web download or e-book: Your use of this publication shall be governed by theterms established by the vendor at the time you acquire this publication.U.S. Government Restricted Rights Notice. Use, duplication, or disclosure of thissoftware and related documentation by the U.S. government is subject to the Agreementwith SAS Institute and the restrictions set forth in FAR 52.227-19 Commercial ComputerSoftware-Restricted Rights (June 1987).SAS Institute Inc., SAS Campus Drive, Cary, North Carolina 27513.1st printing, March 2006SAS Publishing provides a complete selection of books and electronic products to helpcustomers use SAS software to its fullest potential. For more information about oure-books, e-learning products, CDs, and hard-copy books, visit the SAS Publishing Web siteat support.sas.com/pubs or call 1-800-727-3228.SAS® and all other SAS Institute Inc. product or service names are registered trademarksor trademarks of SAS Institute Inc. in the USA and other countries. ® indicates USAregistration.Other brand and product names are registered trademarks or trademarks of theirrespective companies.

Post-installation Tasks
Contents
OVERVIEW OF POST-INSTALLATION TASKS . . . . . . . . . . . . . . 3Definition of Credit Risk Settings . . . . . . . . . . . . . . . . . . . . . . . 3SAS Servers . . . . . . . . . . . . . . . . . . . . . . . . . . . . . . . . . . 3
POST-INSTALLATION TASKS . . . . . . . . . . . . . . . . . . . . . . . . 4SAS Configuration Wizard Tasks . . . . . . . . . . . . . . . . . . . . . . . 4Most Current Instructions . . . . . . . . . . . . . . . . . . . . . . . . . . . 5Install Current Hot Fixes . . . . . . . . . . . . . . . . . . . . . . . . . . . 5Set Up Security For SAS Credit Risk Management for Banking . . . . . . . 5Set Up SAS Servers for SAS Credit Risk Management for Banking . . . . . 9Set Up Java Application Servers . . . . . . . . . . . . . . . . . . . . . . . 13Verify the SAS Credit Risk Management for Banking Installation . . . . . . 15Initialize SAS Credit Risk Management for Banking Data . . . . . . . . . . 18Complete the Installation . . . . . . . . . . . . . . . . . . . . . . . . . . . 18
OPTIONAL CONFIGURATION . . . . . . . . . . . . . . . . . . . . . . . . 19Workspace Connection Pooling . . . . . . . . . . . . . . . . . . . . . . . . 19

2

Post-installation TasksOverview of Post-installation Tasks
Definition of Credit Risk Settings
Below are conventions for the setting “placeholders” that are used in the SASConfiguration Wizard instructions for SAS Credit Risk Management for Banking.Whenever you encounter a setting placeholder, you should replace it with the corre-sponding value for your installation The following examples use the Windows oper-ating system conventions:
• Your SAS home is <SAS–HOME> (e.g., c:\Program Files\SAS).
• Your trusted administrative user IDs for SAS Credit Risk Management forBanking is <criskm.privileged.userid> (e.g., A12345\saswbadm).
• Your SAS configuration directory is <config.dir> (e.g., c:\SAS\CriskM) .
• Your SAS Credit Risk Management for Banking installation direc-tory on this machine is <install.dir> (e.g., c:\Program Files\SAS\SASCreditRiskManagement\4.2).
• The application server is SASApp.
Note: In a multi-machine environment, you can have different installation direc-tories for the different machines. For example, the middle tier can be installed atc:\Program Files\SAS\SASCreditRiskManagement\4.2, while the SAS server tiercan be installed at . . . /data/SAS/SASCreditRiskManagement/4.2. When you substi-tute for <install.dir> in a particular step in these instructions, be sure that you use thevalue appropriate to the machine on which you are performing the step.
SAS Servers
The following servers are used during the run-time of the SAS Credit RiskManagement for Banking solution:
• SAS server tier:
– SAS Workspace Server– SAS Stored Process Server– SAS Metadata Server
• SAS middle tier
– Java application server (such as WebSphere or Tomcat)– WebDAV Server (such as Xythos or Apache)
4 � Post-installation Tasks
Typically, SAS Credit Risk Management for Banking components are installed onboth a server tier machine and a middle tier machine. However, it is possible toinstall all tiers on a single machine. Be sure that you have a clear understanding ofthe topology of your deployment before proceeding.
Be sure to perform all of the following steps in the proper order and to performthe steps that are appropriate to the operating system where you are installing. Forexample, if a step specifies the server-tier machine, then do not perform the task whenconfiguring the middle tier machine.
Post-installation Tasks
SAS Configuration Wizard Tasks
There are tasks that you must do after your SAS Intelligence Platform and SAS CreditRisk Management for Banking software installs successfully. The SAS ConfigurationWizard enables you to perform these tasks during the configuration stage of yourinstallation. You can find the SAS Credit Risk Management for Banking post-installation configuration tasks in the instructions.html file located in the fol-lowing directory:<config.dir>\CriskM
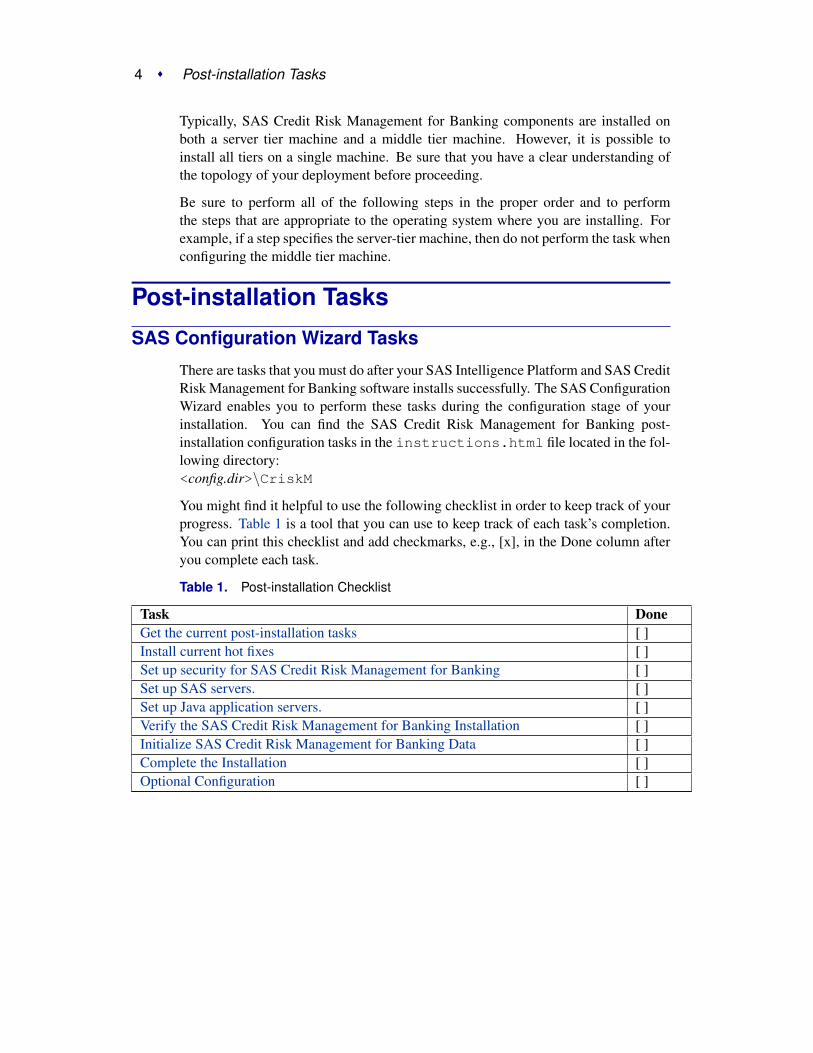
You might find it helpful to use the following checklist in order to keep track of yourprogress. Table 1 is a tool that you can use to keep track of each task’s completion.You can print this checklist and add checkmarks, e.g., [x], in the Done column afteryou complete each task.
Table 1. Post-installation Checklist
Task DoneGet the current post-installation tasks [ ]Install current hot fixes [ ]Set up security for SAS Credit Risk Management for Banking [ ]Set up SAS servers. [ ]Set up Java application servers. [ ]Verify the SAS Credit Risk Management for Banking Installation [ ]Initialize SAS Credit Risk Management for Banking Data [ ]Complete the Installation [ ]Optional Configuration [ ]

Set Up Security For SAS Credit Risk Management for Banking � 5
Most Current Instructions
For the most current installation and configuration information, see the followingWeb site and select SAS Credit Risk Management for Banking as your product:
http://support.sas.com/documentation/onlinedoc/index.html
Install Current Hot Fixes
You must install the current hot fixes for SAS 9.1.3 on the machine that the SASWorkspace Server runs. The required hot fixes can be downloaded from the followingWeb address:http://ftp.sas.com/techsup/download/hotfix/op_home.html
Set Up Security For SAS Credit Risk Management forBanking
SAS Credit Risk Management for Banking users and groups must be defined bothin SAS metadata and in the operating system of the SAS server tier machine.Permissions must be set appropriately in both the metadata and the operating sys-tem. For information about setting up user IDs and groups, see the SAS IntelligencePlatform documentation set at the following Web address:http://support.sas.com/onlinedoc/913/docMainpage.jsp.
There are many possible security scenarios that depend on operating systems, config-urations, and the desired level of security. These instructions are not meant to coverevery possible scenario, so it might be necessary to adjust the details to match yourneeds.
1. Create SAS Credit Risk Management for Banking users in the operating sys-tem.If you have not created users in the operating system as a pre-installation task,then you must create perform this task now. For a more secure deployment,you can consult with your system administrator to create a SAS Credit RiskManagement for Banking user group, and ensure that the group contains all ofthe SAS Credit Risk Management for Banking users.
You must include any user who runs SAS code in batch mode or fromthe Web as part of the group. In addition, the group must contain the<criskm.privileged.userid> user and the user ID under which the SAS StoredProcess Server runs, which usually is the sassrv user ID.

6 � Post-installation Tasks
If there is an existing operating system group that serves your purpose, thenyou can use that existing group, or you can create a new group such asSASCreditRiskUsers. The exact details of how to create this group varies ac-cording to which operating system is in use.
Note: In UNIX, the group that you define must be the primary default groupfor the SAS Credit Risk Management for Banking users and the SAS serverusers (<criskm.privileged.userid>) and the Stored Process Server user (e.g.,sassrv). The primary default group is the group whose ID is associated withthe user ID in the /etc/passwd file.
2. Grant Write permission on the SAS Credit Risk Management for Banking di-rectory.Verify that SAS Credit Risk Management users can Read and Write to the in-stallation directory (<install.dir>).
The exact details of how to grant these permissions varies according to whichoperating system groups are defined and how restrictive you want your securityto be. The following examples are given for purposes of illustration only. Theexamples might not be applicable to your situation.
• Example: Suppose you installed SAS Credit Risk Management forBanking on Windows and a SAS Credit Risk Management user withthe user ID sasdemo is a member of the SASCreditRiskUsers securitygroup. In Windows Explorer, right-click on the <install.dir> folderand select Properties. Under the Security tab, if necessary add the"SASCreditRiskUsers" group and assign it Full Control.
Tip: When you set security on the SAS Credit Risk Management forBanking directory(e.g., c:\program files\sas\sascreditriskmanagement\4.2), you shouldselect the Advanced window and check Replace permission entries onall child objects with entries shown here that apply to child objects.Otherwise, access does not propagate permissions down to individualfiles.
• Example: Suppose you installed SAS Credit Risk Management forBanking on UNIX. In order to grant users Write permissions to the SASCredit Risk Management for Banking installation directory, you use thechgrp command that assigns group ownership of the SAS Credit RiskManagement installation directory to an operating system group that con-tains the SAS Credit Risk Management for Banking users. At the levelabove the top-level SAS Credit Risk Management for Banking directory<install.dir>, use a chmod command to grant Read and Write permis-sions to the directory. For example:chmod -R g+rw <install.dir>
• For more information about these commands, see a UNIX text or use theman command.
3. UNIX Only: Set the umask option for newly created files.The umask option sets the permissions on new files. New files are created when

Set Up Security For SAS Credit Risk Management for Banking � 7
you execute SAS code that is part of the SAS Credit Risk Management forBanking solution either by using the Web or in batch mode. The default umaskoption setting for your system might not be appropriate to ensure that SASCredit Risk Management for Banking users can Read and Write to new files. Inorder to grant Read and Write permissions, edit the file that is used to run SAS.Usually, the file is named sas.sh and is located under the Base SAS directory(e.g., <SAS–HOME>/SAS–9.1). Add an appropriate umask command at thestart of this file after the heading. For example, add the following:umask g+rw
For more information and options, see the man page for the umask command.
Note: If you only want to execute the umask option for the SAS Credit RiskManagement users, then you can add conditional logic similar to the followingcode. In the following example, GID=201 is the group ID for the SAS CreditRisk Management for Banking user group:
• AIX:CMD=/usr/bin/idCURR-GID=eval $CMD -gGID=201if [$CURR-GID -eq $GID]; then umask g+rw fi
• H64 (HP-Risc):CMD=/usr/bin/idCURR-GID=eval $CMD -gGID=201if [ $CURR-GID -eq $GID ] ; then umask 007 fi
• H64I (HP-Itanium):CMD=/usr/bin/idCURR-GID=eval $CMD -gGID=201if [ $CURR-GID -eq $GID ] ; then umask 007 fi
4. If necessary, start the SAS Metadata Server.On Windows, you can start the metadata server by using the Control Panel |Administrative Tools | Services.On UNIX, you can start the metadata server by running the following script:
<config.dir>/Lev1/SASApp/MetadataServer/MetadataServer.shstop<config.dir>/Lev1/SASApp/MetadataServer/MetadataServer.shstart
By default, the log file for the metadata server is located at<config.dir>/Lev1/SASApp/MetadataServer/logs.
5. Define the SAS Credit Risk Management for Banking users and groups in theSAS Metadata Server by performing the following steps:

8 � Post-installation Tasks
(a) Open SAS Management Console and connect to your metadata server.Log on as the SAS administrative user, and go to User Manager.
Set Up SAS Servers for SAS Credit Risk Management for Banking � 9
(b) Create the following SAS Credit Risk Management for Banking groups:
• CreditRiskAdmin• CreditRiskAnalyst• CreditRiskUser
Note: The names must match exactly with no spaces and case sensitivecharacters.
(c) Double-click on each group and add users to it. For example, you can addthe sasdemo user to all groups. If you want to create new users, then youneed to follow the same procedures that you used in the SAS IntelligencePlatform Pre-installation checklist for users such as sasadm and sasdemo.You must add new users to the operating system as well.
6. Add the privileged user <criskm.privileged.userid> to the SAS MetadataCreditRiskAdmin group. Also, verify that the SAS Metadata AuthenticationDomain for the CreditRiskAdmin group user is set appropriately for this user.Under the Logins tab in the user’s Properties window, the AuthenticationDomain should be set to the one that you assigned (e.g., DefaultAuth).
Note: You add the privileged user after you install and configure the middletier machine. If you have not completed the installation and configuration ofyour middle tier machine at this time, then you must complete this step laterwhen the middle tier machine is ready.
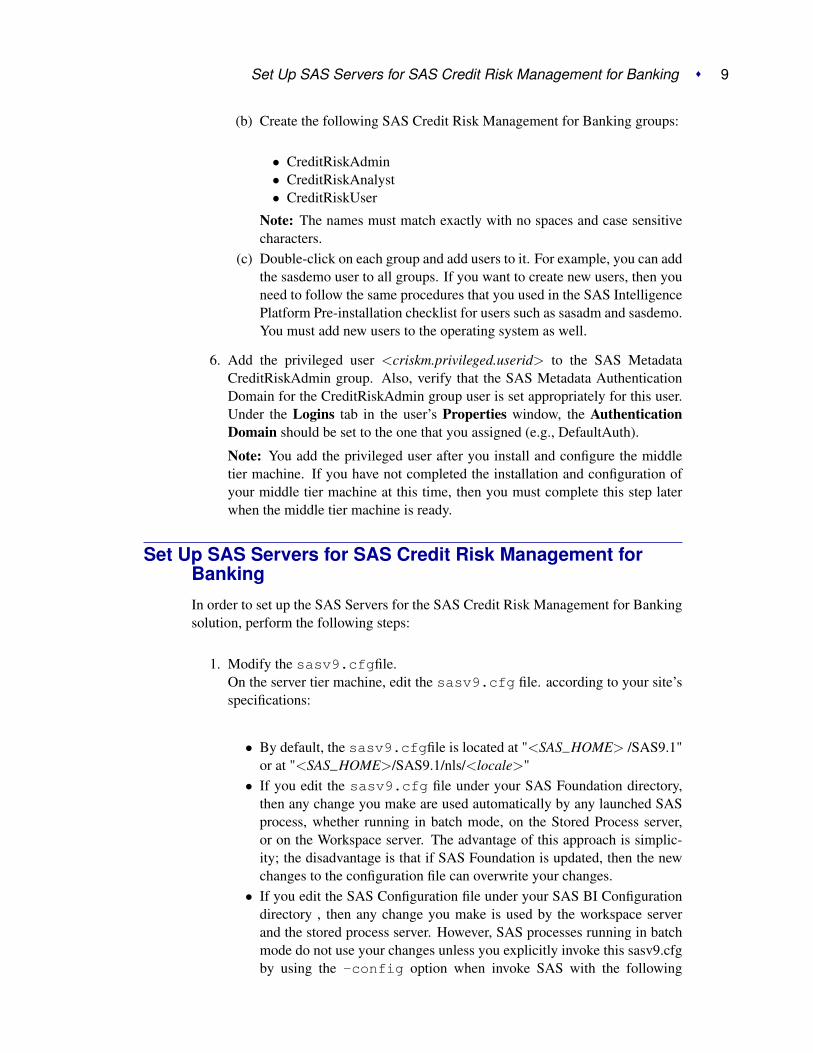
Set Up SAS Servers for SAS Credit Risk Management forBanking
In order to set up the SAS Servers for the SAS Credit Risk Management for Bankingsolution, perform the following steps:
1. Modify the sasv9.cfgfile.On the server tier machine, edit the sasv9.cfg file. according to your site’sspecifications:
• By default, the sasv9.cfgfile is located at "<SAS–HOME> /SAS9.1"or at "<SAS–HOME>/SAS9.1/nls/<locale>"
• If you edit the sasv9.cfg file under your SAS Foundation directory,then any change you make are used automatically by any launched SASprocess, whether running in batch mode, on the Stored Process server,or on the Workspace server. The advantage of this approach is simplic-ity; the disadvantage is that if SAS Foundation is updated, then the newchanges to the configuration file can overwrite your changes.
• If you edit the SAS Configuration file under your SAS BI Configurationdirectory , then any change you make is used by the workspace serverand the stored process server. However, SAS processes running in batchmode do not use your changes unless you explicitly invoke this sasv9.cfgby using the -config option when invoke SAS with the following

10 � Post-installation Tasks
command:
-config "<config.dir>/Lev1/SASApp/sasv9.cfg"
One disadvantage of this approach is that if you update your SAS BIplatform, then the updates might overwrite your changes.
UNIX Tip: You might need to examine the script that you are using tolaunch SAS in order to determine the correct sasv9.cfg file to edit. Itmight be that this sasv9.cfg file uses a -config option to point at a filethat in turn has a -config option that points at another sasv9.cfg file.
2. After you determined which sasv9.cfg file to edit, make the other modifi-cations listed below. You must match the case of each letter. Use the forwardslash ("/") or back slash ("\") in the path that is appropriate for your operatingsystem.
Note: Depending on your installation, it mighty be necessary to make ad-justments to the modifications listed here such as pathnames. The followingexamples are given for purposes of illustration only. The examples might notbe completely applicable to your situation. The “. . . ” indicates that there canbe other items present.
(a) Add variables that are used by the SAS Credit Risk Management forBanking code:-SET CMHOME "<install.dir>"-SET CMINDATA "<install.dir>"-SET CMUSER "<install.dir>"
(b) Add the SAS Credit Risk Management for Banking macro folder to theSASAUTOS search path.
• Windows:-SET SASAUTOS ("!sasroot\core\sasmacro"... "<install.dir>\sascode\macros"...)-sasautos (’!SASROOT\core\sasmacro’ ... ’<install.dir>\sascode\macros’ ...)
• UNIX:-SET SASAUTOS ("!sasroot/sasautos"..."<install.dir>/sascode/macros"...)-sasautos (’!SASROOT/sasautos’ ... ’<install.dir>/sascode/macros’ ...)

Set Up SAS Servers for SAS Credit Risk Management for Banking � 11
(c) (Optional) If your server does not have a default printer installed,then you might need to specify the -uprint option in thesasv9.cfg file. On the Windows operating system, you canspecify the -uprintmenuswitch option as well.
3. Configure SAS servers.You must configure the SAS servers by performing the following steps:
(a) Open SAS Management Console by running the script or executable filethat is located in the following pathname:<SAS–HOME>/SASManagementConsole).Log on as the SAS administrative user.
(b) Navigate to the workspace server by selectingServer Manager → <application-server → Logical Workspace Server.By default, the application server is SASApp.Right-click on the workspace server and select Properties. UnderOptions, if the MEMSIZE option is specified, then add the following ar-guments to the launch command for SAS and adjust the pathnames, ifnecessary:-memsize MAXNote: The memsize parameter is simply a maximum. By setting thememsize parameter to this value does not pre-allocate this much mem-ory. The maximum setting only specifies an upper bound on what can beallocated in the worst case.Note: There can be multiple configuration files. Check each configura-tion file.
(c) Add the following option to Object Server Parameters:metaautoinit
(d) Repeat this procedure for the stored process server and OLAP server,which are located under Server Manager. Add the object server andSAS start command options above.Tip: Examine your sasv9.cfg file to verify that there is not a-memsize option listed in the file. If the -memsize option is listed,then it will override the entry above.
4. Set up connection pooling for the workspace server. In SAS ManagementConsole, expand Server Manager and right-click on SASApp - LogicalWorkspace Server. Select Convert To → Pooling . . . . In the Pooling Optionsdialog box, create a new Puddle named CreditRiskPuddle. For additionalsecurity, you can specify a logon <criskm.privileged.userid> and general ac-cess group CreditRiskAdmin. Click OK.
5. Restart (or start) the SAS servers.
(a) Restart the object spawner.
• Windows: Navigate to the Services window by selecting ControlPanel → Administrative Tools → Services.

12 � Post-installation Tasks
• UNIX: Run the following script:<config.dir>/Lev1/SASApp/ObjectSpawner/ObjectSpawner.sh stop<config.dir>/Lev1/SASApp/ObjectSpawner/ObjectSpawner.sh start
By default, the log file for the object spawner is located at<config.dir>/Lev1/SASApp/ObjectSpawner/logs.
(b) Restart the SAS OLAP Server.
• Windows: Navigate to the Services window by selecting ControlPanel → Administrative Tools → Services.
• UNIX: Run the following script:<config.dir>/Lev1/SASApp/OLAPServer/OLAPServer.sh stop<config.dir>/Lev1/SASApp/OLAPServer/OLAPServer.sh start
By default, the log file for the OLAP Server is located at<config.dir>/Lev1/SASApp/OLAPServer/logs.
(c) Launch the SAS Services Application. This RMI server runs SASRemote Foundation Services.
• Windows: You can launch the application from the Start Menu byselecting Start → Programs → SAS → CRiskM → Start SASServices Application. A command prompt window opens.
• UNIX: You can use the ps -aef | grep java commandin order to check for currently running instances. To launch theapplication, you can issue the following commands:
cd <config.dir>/Lev1/web/Deployments/RemoteServices/WEB-INF ./StartRemoteServices.sh
By default, the log file for the SAS Remote Services Application islocated at<config.dir>/Lev1/web/Deployments/RemotesServices/logs/RemoteServices.log.

Set Up Java Application Servers � 13
Set Up Java Application Servers
On the middle tier machine, you set up the Java application servers for SAS CreditRisk Management for Banking by assigning policy rights and deploying the SASCredit Risk Management for Banking application to your application server.
Tip: SAS Web applications, such as SAS Credit Risk Management for Banking,and the SAS Intelligence Platform architecture cause heavy memory demands onapplication servers. Verify that your JVM memory startup options are large enoughfor your site. The following sample parameters are for illustration purposes only.
-server -Xms1024m -Xmx1024m -XX:NewSize=256m-XX:MaxNewSize=256m-XX:PermSize=256m -XX:MaxPermSize=256m
These parameters can be set either in the application server startup script or in theapplication server administrative console. For information and additional tuningparameters, see the documentation for your application server and the following Website about third party software downloads:http://support.sas.com/documentation/configuration/thirdpartysupport/index.html.
• Tomcat:
1. Edit the file $TOMCAT-HOME$/conf/catalina.policy and addthe following lines:grant codeBase “file:${catalina.home}/webapps/criskm/-” {permission java.security.AllPermission;};
2. To deploy, either use the Manager tool (e.g., http://localhost:8080/manager)or copy the war file <install.dir>/criskm.war toyour Tomcat Web application directory that is located in$TOMCAT-HOME$/webapps, by default. Verify that there areno other XML files or folders in this directory that try to assign thecontext path /criskm.Note: Do not attempt to use an XML file to point to the SAS Credit RiskManagement for Banking directory if it is in a path that contains spaces,such as C:\Program Files\SAS\....

14 � Post-installation Tasks
• WebLogic:You can set up the Weblogic application server by doing either one of the fol-lowing methods:
– The most secure option is to edit the start up script for the WebLogicdomain that contains the SAS Credit Risk Management application, suchasc:\bea\user-projects\domains\mydomain\startWebLogic.cmd.Modify the -Djava.security.policy argument to specify a filecontaining the following text:grant { permission java.security.AllPermission;};
– You can edit the weblogic.policy file that, by default, is located atc:\bea\weblogic81\ server\lib\so that the file contains only the following code:grant { permission java.security.AllPermission;};
Note: If you choose to edit the weblogic.policy file, then be sure thatyou backup the weblogic.policy file first. Use the administrative console(e.g., http://localhost:7501/console) to deploy the application bybrowsing to the <install.dir>/webapps/criskm directory. RestartWebLogic.
• Websphere:You can set up the Websphere application server by performing the followingsteps:
1. Open the Websphere Administration Console (e.g., http://localhost:9090/admin) and select Applications → InstallNew Application.
2. Browse to the location of the criskm.war file (<install.dir>) and as-sign the context root criskm.
3. In the next series of screens, select the checkboxes to map the virtual hostand precompile JSP’s. For the other options, you can accept the defaults.
4. Save data to the master configuration file when prompted.5. Edit the file WAS-ROOT/AppServer/properties/wsjaas.conf
and add the contents of the file<install.dir>/webapps/conf/login.config.
6. Go to the metadata location for the criskm application in Websphere.For example, go toWAS-ROOT/AppServer/config/cells/CELL-NAME/applications/criskm-war.ear, substituting your system’s cellname.Edit the file deployments/criskm-war/META-INF/was.policyas follows:grant codeBase "file:${application}" {

Verify the SAS Credit Risk Management for Banking Installation � 15
permission java.security.AllPermission;};
Note: For troubleshooting purposes, metadata about the criskm applica-tion is stored at the above location. The actual program code is extractedfrom the war file to WAS-ROOT/AppServer/installedApps.
7. Restart Websphere. If necessary, start the SAS Credit Risk Managementfor Banking application in the Websphere Administration Console.
Verify the SAS Credit Risk Management for BankingInstallationYou can verify the installation of SAS Credit Risk Management software by perform-ing the following steps:
1. Define a content area on your WebDAV Server for the SAS Credit RiskManagement solution to use. Verify that your WebDAV server (Xythos orApache) is setup correctly:
(a) Verify that you created the base directory for the WebDAV server (e.g.,/sasdav).
(b) Create a subdirectory for SAS Credit Risk Management for Banking con-tent named crisk. You should have a directory in WebDav that matches/sasdav/crisk.
(c) Set permissions on the directory that grants the server tier Read andWrite permissions. Ensure that <criskm.privileged.userid>has the ability to create folders under the crisk folder.
Note: For information about on how to create folders and assign secu-rity, see your specific WebDav vendor’s documentation. For Xythos, inthe administrative console, select Search for Users and Groups. Enteradministrator in the Contains field. Select OK. Choose the SAS WebAdministrator and select OK. Assign all permissions to this user bychanging No to Yes for each permission. Select the Save Changes but-ton. Then set all the permissions from No to Yes for the ‘Public’ user andfor ‘Users with accounts’.
(d) Open SAS Management Console and log on as the SAS administrativeuser. Verify that the local Information Service has the WebDAVrepository configured for auto-connect. SelectFoundation Services Manager → ID Local Portal Services → BIPLocal Services OMR.Right-click on BIP Information Service and select Properties. SelectService Configuration → Edit Configuration. Under Repositories,verify that the Web DAV repository has Auto-Connect set. If Auto-Connect is not set, then click Edit.
Tip: There are 3 places in SAS Management Console where WebDAVsettings are stored:

16 � Post-installation Tasks
• Repositories in the Properties window of the BIP InformationService node in SAS Management Console
• Server Manager in SAS Management Console• Properties window for the BIP Tree under Business Report Manager
node.
Tip: If you are using Xythos for WebDAV, then ensure that the logonfor <criskm.privileged.userid> has the same Authentication Domain asthe HTTP DAV Server. In SAS Management Console, select ServerManager HTTP DAV → Server. Right click on the Connection ob-ject and select Properties. On the Options tab note the AuthenticationDomain. Select the properties for <criskm.privileged.userid> underthe User Manager. On the Logins tab, verify that the AuthenticationDomain is the same as the one for the HTTP DAV Server.
2. (Optional) Change the title displayed in the banner of the SAS Portal.The installation of the SAS Credit Risk Management for Banking applicationincludes a configured deployment of the SAS Portal Web application. TheSAS Portal is configured with pages, portlets, and links to the SAS Credit RiskManagement for Banking application. If you want to change the title that isdisplayed in the banner of the SAS Portal from SAS Portal to Risk Studio, thenperform the following steps:
(a) Edit the file PortalConfigure/install-defaults.propertiesin the SAS Portal installation directory that is locatedat tt <SAS–HOME>/Web, by default. Set the propertyNAME–IN–BANNER to Risk Studio.
(b) Regenerate the SAS Portal WAR file by running theconfigure-wik.bat script in the SAS Portal installation di-rectory. This script refreshes the Portal.war file in the samedirectory.
(c) Redeploy the Portal.war file to your application server.
3. Verify that the SAS Information Delivery Portal is initialized.The SAS Portal application must be initialized before running the SAS jobsbelow that register the Risk Studio portal metadata information. The jobs createthe required metadata structure required by the Risk Studio portal application.You can initialize the SAS Portal application in the following ways:
• Ensure the Portal war file is deployed and log on to the Portal asthe SAS Web Administrator by opening a browser and log intohttp://host:port/Portal.
• Run the script initPortalData to create the metadata struc-ture. By default, the script is located in <SAS-HOME>/Web/Portal2.0.1/Tools.
4. Check SAS Themes installation.Verify that the SASTheme–default Web application has deployed successfully.If the deployment is not successful, then the .war file is located in the Portal

Verify the SAS Credit Risk Management for Banking Installation � 17
installation directory (e.g., <SAS-HOME>/Web/Portal2.0.1). By de-fault, the SASTheme–default Web application deploys on the same applicationserver as other SAS Web applications.
Tip: It is recommended that you select an application server (WebSphere,WebLogic, or Tomcat) before installing any of the SAS Intelligence Platformcomponents and do not change the application server while installing andconfiguring all SAS components, such as Portal, Web Report Studio, andSAS Credit Risk Management for Banking. If you want to change applicationservers after the initial installation (for example, start with Tomcat and thenswitch to WebSphere), then you need to modify the portal metadata for whereto find the SASTheme–default application. You can change applicationservers by running the job located in the Portal installation directory(e.g., <SAS-HOME>/Web/Portal2.0.1/OMR/UpdateThemeConnection.sas). For more information, seehttp://support.sas.com/rnd/itech/doc9/portal_admin/deploy/ag_diststhapp.html.
5. DBCS Installation. If you are installing the SAS Credit Risk Management forBanking server tier on Windows and you are using one of the Double ByteCharacter Set (DBCS) languages such as Korean or Japanese, then you mustmodify the path separator used by the application.
(a) Edit the file under your Web application deployment location:.../WEB-INF/classes/com/sas/ets/creditrisk/config.properties
(b) Change the lib.pathsep property value from “/” to “\\”(c) Change the path separators in lib.groups.location property value
from “/” to “\\”(d) Change the path separators in lib.usrprefs.location property
value from “/” to “\\”(e) Change the path separators in lib.template.usr.location
property value from “/” to “\\”(f) Change the path separators in lib.template.usrprefs.location
property value from “/” to “\\”(g) Change the path separators in lib.template.grp.location
property value from “/” to “\\”(h) Change the path separators in lib.datamart.location property
value from “/” to “\\”
6. Install Java Plug-in on client browsers.For all client browsers that access the application, ensure that the JavaPlug-in is installed and configured for that browser. If the Java Plug-in is not installed, then you can download the Java Plug-in and JRE athttp://www.java.com/en/download. Be sure that you download thesame version of Java as your Java Application Server (e.g., version 1.4.2).
Note: On the Windows operating system, if you download the Java Plug-in,then the Java Plug-in is put in the Windows Control Panel. You can use this

18 � Post-installation Tasks
Java Plug-in to check whether your browser and the plug-in are configuredcorrectly.
Initialize SAS Credit Risk Management for Banking Data
In order to initialize SAS Credit Risk Management for Banking data, run the SASjobs that load metadata and initialize the SAS Credit Risk Management for Bankingsystem on the server tier machine.
1. You must be logged on as a user who which must be a member of the primarydefault group on UNIX (e.g., <criskm.privileged.userid>.
2. Run SAS /data/SAS/SAS91/sas on the following programs in the or-der listed. It is recommended that you run these in batch mode (e.g.,<SAS–HOME>/SAS91/sas <sas-file-name> After each step, examine the logfile that is created and verify that no errors occurred.
Note: These programs might take a long time to complete.
(a) <install.dir>/omr/load–credit–risk–metadata.sas loads the SAS CreditRisk Studio metadata.
(b) <install.dir>/omr/Portal/Load–risk–studio–metadata.sas loads RiskStudio (Portal) metadata.
(c) <install.dir>/sascode/batch/installation–batch–job.sas runs SAS CreditRisk Management for Banking batch jobs to initialize necessary data.
Note: If the installation-batch-job.sas program is not runat this point, then you can run it from the Credit Risk Web application.Under Analysis → Analysis Wizard →Credit Risk analysis calcula-tions, run Valuation Project. If you are logged on the application as amember of the CreditRiskAdmin group, then it is recommended that yourun the program now in order to verify your SAS setup.
Complete the Installation
1. Restart your application server.Open a browser window and go to the following Web address:http://<midtier-hostname:port>/criskm/pre-compile.jsp.For example, go to http://localhost:8080/criskm/pre_compile.jsp.You must substitute the correct hostname and port number that is appropriatefor your configuration. Log on as one of the CreditRiskAdmin users thatyou created.Note: The page can take some time to load.
2. Enter the Credit Risk Studio Web application.Go to the appropriate root URL for the Credit Risk Studio Web application:http://<hostname:port>/criskm.For example, go to http://localhost:8080/criskm.

Workspace Connection Pooling � 19
You must substitute the correct hostname and port number that is appropriatefor your configuration. After the Web page loads, if there are any additionalinstructions that are required to finish your installation and configuration, thencomplete them. Otherwise, your installation and configuration is complete.
3. Open the Risk Studio Portal.Open a browser window and go to the appropriate root URL for the Risk StudioPortal:http://<hostname:port>/Portal.For example, go to http://localhost:8080/Portal.You must substitute the correct hostname and port number that is appropriatefor your configuration.
Optional Configuration
Workspace Connection Pooling
The SAS Stored Process Server and the SAS Workspace Server are used to provideJDBC access. The workspace configuration data is retrieved from the metadata as
Figure 1. Figure 1. Workspace Configuration Data

20 � Post-installation Tasks
If the SAS Workspace Server is configured for connection pooling, then only a limitedpool of SAS processes are used and shared by all users. SAS Credit Risk Studioworks automatically with whatever configuration is set.
If you want to secure the connection pool, the following settings are recommended:
• Login: saswbadm (or the privileged user ID that you use)
• Grant Access To Group: CreditRiskAdmin
Figure 2 shows the recommended settings.
Figure 2. Recommended Settings
Note: Optionally, you can use a Standard configuration. By default, SAS Credit RiskStudio uses a servlet filter to open and to close a connection for access to each Webpage. If pooling is configured, then by closing a connection releases the connectionback to the pool. If the Standard configuration is used, then a SAS process starts foreach Web page that is accessed and then exits. In SAS Credit Risk Management forBanking 4.1, each user login session has a dedicated SAS process that starts whenthe user logs on and exits when the user logs out. To revert back to that behavior,you use the Standard configuration and edit the SAS Credit Risk Studio deploymentdescriptor (. . . /WEB-INF/web.xml) to comment out the following: <filter>
<filter-name>CreditRiskCleanupFilter</filter-name>
<filter-class>com.sas.ets.creditrisk.httpfilters.CleanupFilter</filter-class>
< /filter>
<filter-mapping>

Workspace Connection Pooling � 21
<filter-name>CreditRiskCleanupFilter</filter-name>
<url-pattern>/*</url-pattern>
< /filter-mapping>

22