sas® office analytics
TRANSCRIPT
1
PharmaSUG 2016 - Paper AD19
SAS® Office Analytics: An Application In Practice
Monitoring and Ad-Hoc Reporting Using Stored Process
Mansi Singh, Roche Molecular Systems Inc., Pleasanton, CA
Smitha Krishnamurthy, Roche Molecular Systems Inc., Pleasanton, CA
Chaitanya Chowdagam, MaxisIT Inc., Metuchen, NJ
Kamal Chugh, Roche Molecular Systems Inc., Pleasanton, CA
ABSTRACT
There is always time constrains when it comes to ad-hoc reporting while the project work is on full swing. There are always numerous and urgent requests from various cross-functional groups regarding the study progress, e.g. enrollment rate and so on. Typically a programmer has to work on these requests along with the study work, which can be stressful. To address this need for monitoring of data in real time and tailor the requirements of clients to create portable reports, SAS® has come out with a powerful tool SAS Office Analytics/Visual Analytics. SAS Office Analytics with Microsoft Add-in provides excellent real-time data monitoring and report generation capabilities with which a SAS programmer can take the reporting and monitoring to the next level. Using this powerful tool, a programmer can build interactive customized reports, which can be saved as a "stored process" and anyone can view, customize, and comment on these reports using Microsoft Office. This paper will show how to create these customized reports in SAS, convert these reports into stored process using SAS Enterprise Guide® Software and how these reports can then be run anytime using Microsoft Office Add-in feature. Anyone with knowledge of Microsoft Office can then harness the power of SAS running in the background to generate these reports once a programmer has converted these client needs into stored processes.
INTRODUCTION
Before SAS Office Analytics with Microsoft® Add-In tool was introduced by SAS, sharing ad-hoc and monitoring reports has been a semi-manual process. Once the data is retrieved, programs are executed, new updated reports and data are generated and saved, programmer has to place the reports and/or data at designated location and then notify the appropriate group usually via email regarding the updated reports. This process is laborious and any change request can trigger numerous iterations of reports making it cumbersome and time critical.
Whereas in case of using Microsoft Office Add-In feature with SAS Office Analytics, once the program is created and converted into a stored process, the power is in the hands of the user. The user (SAS savvy or not) can run the report whenever they want and as many times as they want with a click of a button within Microsoft Office (Word, Excel and, Power point) without waiting for programmer’s notification. Not only one can run the report at their convenience, but they can also use prompting mechanism setup by the programmer to run simple queries or subset the data and get the latest information with just one click or using refresh button.
Advantages of using SAS Office Analytics with Microsoft Add-In while monitoring and sharing reports or accessing study data are,
Power of SAS in the hands of non-SAS users Convenience of sharing Increase in productivity Live monitoring of numbers and data with just one click No time delays or lag in decision making information No SAS installation required for the end user Make use of Microsoft Office to play with the data provided
There are a lot of tools within Microsoft Office that can be utilized to further summarize the data either by creating reports or graphs once the access to these reports are granted to the users.
SAS® Office Analytics: An Application In Practice Monitoring and Ad-Hoc Reporting Using Stored Process, continued
2
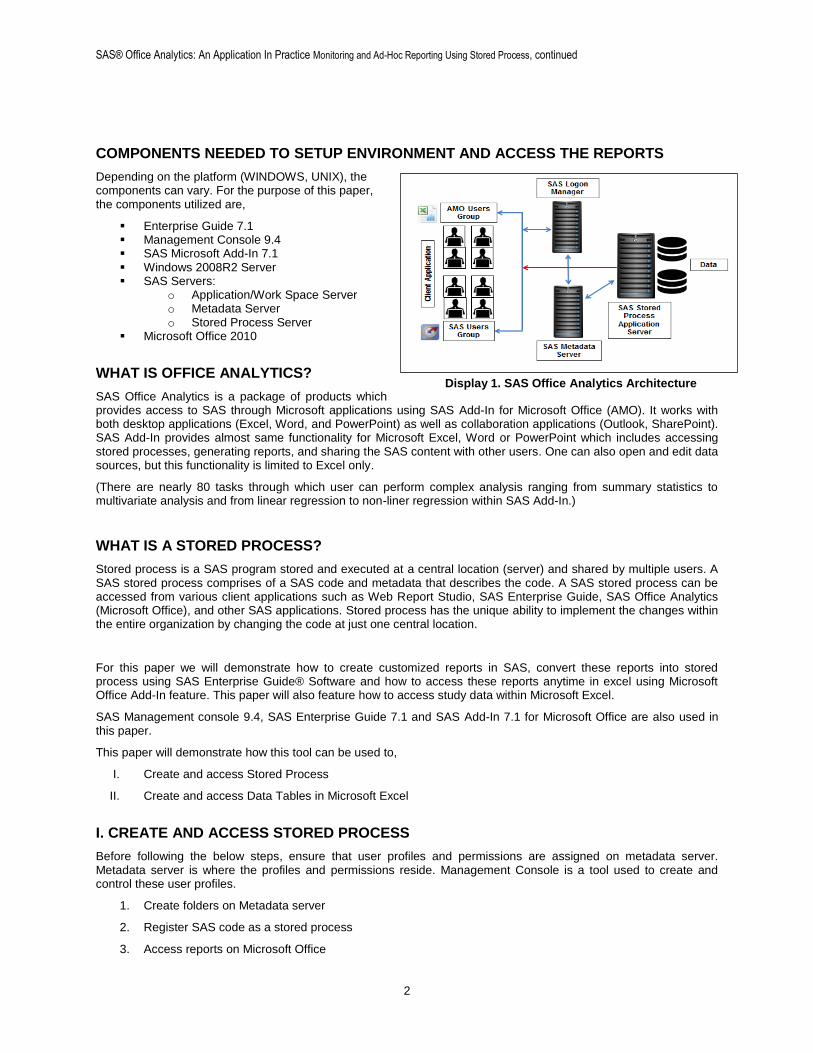
COMPONENTS NEEDED TO SETUP ENVIRONMENT AND ACCESS THE REPORTS
Depending on the platform (WINDOWS, UNIX), the components can vary. For the purpose of this paper, the components utilized are,
Enterprise Guide 7.1 Management Console 9.4 SAS Microsoft Add-In 7.1 Windows 2008R2 Server SAS Servers:
o Application/Work Space Server o Metadata Server o Stored Process Server
Microsoft Office 2010
WHAT IS OFFICE ANALYTICS?
SAS Office Analytics is a package of products which provides access to SAS through Microsoft applications using SAS Add-In for Microsoft Office (AMO). It works with both desktop applications (Excel, Word, and PowerPoint) as well as collaboration applications (Outlook, SharePoint). SAS Add-In provides almost same functionality for Microsoft Excel, Word or PowerPoint which includes accessing stored processes, generating reports, and sharing the SAS content with other users. One can also open and edit data sources, but this functionality is limited to Excel only.
(There are nearly 80 tasks through which user can perform complex analysis ranging from summary statistics to multivariate analysis and from linear regression to non-liner regression within SAS Add-In.)
WHAT IS A STORED PROCESS?
Stored process is a SAS program stored and executed at a central location (server) and shared by multiple users. A SAS stored process comprises of a SAS code and metadata that describes the code. A SAS stored process can be accessed from various client applications such as Web Report Studio, SAS Enterprise Guide, SAS Office Analytics (Microsoft Office), and other SAS applications. Stored process has the unique ability to implement the changes within the entire organization by changing the code at just one central location.
For this paper we will demonstrate how to create customized reports in SAS, convert these reports into stored process using SAS Enterprise Guide® Software and how to access these reports anytime in excel using Microsoft Office Add-In feature. This paper will also feature how to access study data within Microsoft Excel.
SAS Management console 9.4, SAS Enterprise Guide 7.1 and SAS Add-In 7.1 for Microsoft Office are also used in this paper.
This paper will demonstrate how this tool can be used to,
I. Create and access Stored Process
II. Create and access Data Tables in Microsoft Excel
I. CREATE AND ACCESS STORED PROCESS
Before following the below steps, ensure that user profiles and permissions are assigned on metadata server. Metadata server is where the profiles and permissions reside. Management Console is a tool used to create and control these user profiles.
1. Create folders on Metadata server
2. Register SAS code as a stored process
3. Access reports on Microsoft Office
Display 1. SAS Office Analytics Architecture
SAS® Office Analytics: An Application In Practice Monitoring and Ad-Hoc Reporting Using Stored Process, continued
3
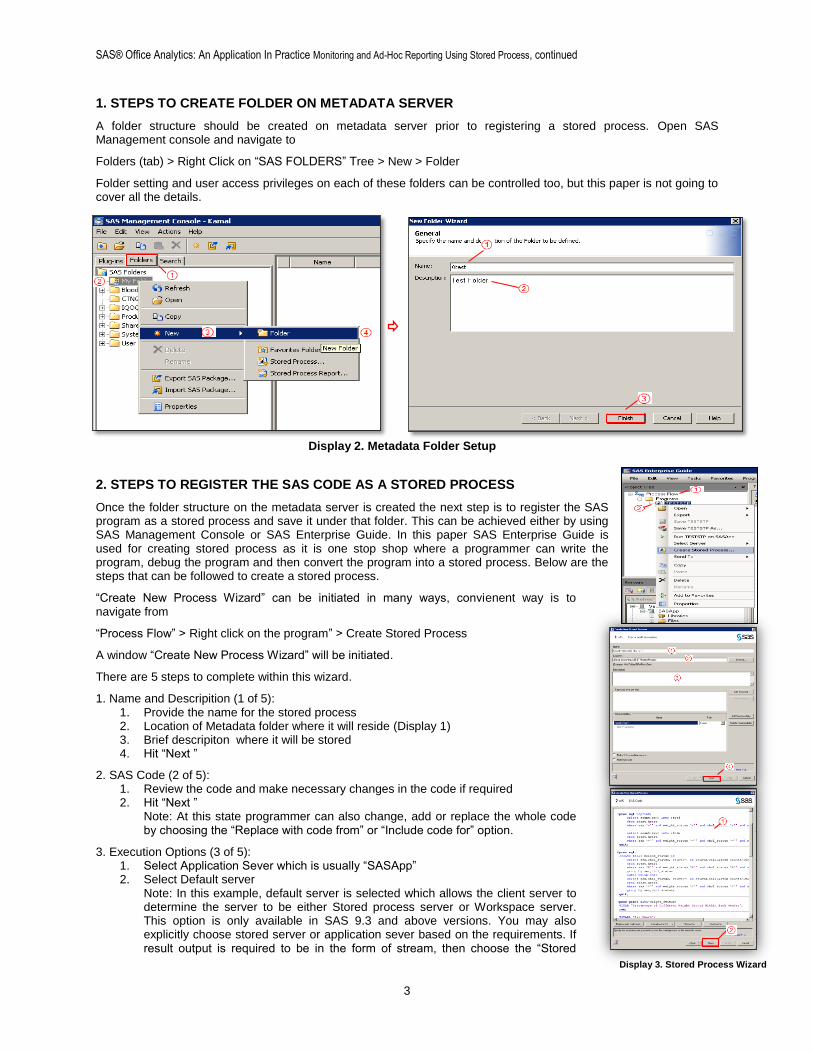
1. STEPS TO CREATE FOLDER ON METADATA SERVER
A folder structure should be created on metadata server prior to registering a stored process. Open SAS Management console and navigate to
Folders (tab) > Right Click on “SAS FOLDERS” Tree > New > Folder
Folder setting and user access privileges on each of these folders can be controlled too, but this paper is not going to cover all the details.
2. STEPS TO REGISTER THE SAS CODE AS A STORED PROCESS
Once the folder structure on the metadata server is created the next step is to register the SAS program as a stored process and save it under that folder. This can be achieved either by using SAS Management Console or SAS Enterprise Guide. In this paper SAS Enterprise Guide is used for creating stored process as it is one stop shop where a programmer can write the program, debug the program and then convert the program into a stored process. Below are the steps that can be followed to create a stored process.
“Create New Process Wizard” can be initiated in many ways, convienent way is to navigate from
“Process Flow” > Right click on the program” > Create Stored Process
A window “Create New Process Wizard” will be initiated.
There are 5 steps to complete within this wizard.
1. Name and Descripition (1 of 5): 1. Provide the name for the stored process 2. Location of Metadata folder where it will reside (Display 1) 3. Brief descripiton where it will be stored 4. Hit “Next ”
2. SAS Code (2 of 5): 1. Review the code and make necessary changes in the code if required 2. Hit “Next ”
Note: At this state programmer can also change, add or replace the whole code by choosing the “Replace with code from” or “Include code for” option.
3. Execution Options (3 of 5): 1. Select Application Sever which is usually “SASApp” 2. Select Default server
Note: In this example, default server is selected which allows the client server to determine the server to be either Stored process server or Workspace server. This option is only available in SAS 9.3 and above versions. You may also explicitly choose stored server or application sever based on the requirements. If result output is required to be in the form of stream, then choose the “Stored
Display 2. Metadata Folder Setup
Display 3. Stored Process Wizard
SAS® Office Analytics: An Application In Practice Monitoring and Ad-Hoc Reporting Using Stored Process, continued
4
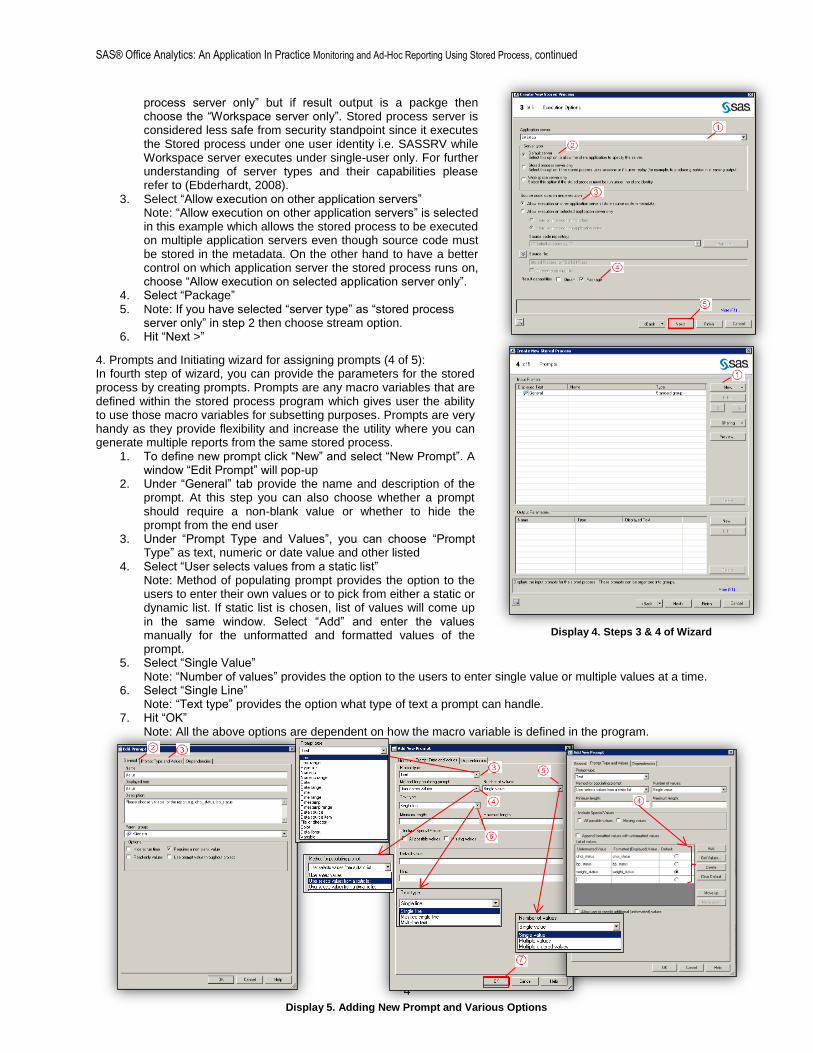
process server only” but if result output is a packge then choose the “Workspace server only”. Stored process server is considered less safe from security standpoint since it executes the Stored process under one user identity i.e. SASSRV while Workspace server executes under single-user only. For further understanding of server types and their capabilities please refer to (Ebderhardt, 2008).
3. Select “Allow execution on other application servers” Note: “Allow execution on other application servers” is selected in this example which allows the stored process to be executed on multiple application servers even though source code must be stored in the metadata. On the other hand to have a better control on which application server the stored process runs on, choose “Allow execution on selected application server only”.
4. Select “Package” 5. Note: If you have selected “server type” as “stored process
server only” in step 2 then choose stream option. 6. Hit “Next >”
4. Prompts and Initiating wizard for assigning prompts (4 of 5): In fourth step of wizard, you can provide the parameters for the stored process by creating prompts. Prompts are any macro variables that are defined within the stored process program which gives user the ability to use those macro variables for subsetting purposes. Prompts are very handy as they provide flexibility and increase the utility where you can generate multiple reports from the same stored process.
1. To define new prompt click “New” and select “New Prompt”. A window “Edit Prompt” will pop-up
2. Under “General” tab provide the name and description of the prompt. At this step you can also choose whether a prompt should require a non-blank value or whether to hide the prompt from the end user
3. Under “Prompt Type and Values”, you can choose “Prompt Type” as text, numeric or date value and other listed
4. Select “User selects values from a static list” Note: Method of populating prompt provides the option to the users to enter their own values or to pick from either a static or dynamic list. If static list is chosen, list of values will come up in the same window. Select “Add” and enter the values manually for the unformatted and formatted values of the prompt.
5. Select “Single Value” Note: “Number of values” provides the option to the users to enter single value or multiple values at a time.
6. Select “Single Line” Note: “Text type” provides the option what type of text a prompt can handle.
7. Hit “OK” Note: All the above options are dependent on how the macro variable is defined in the program.
Display 5. Adding New Prompt and Various Options
Display 4. Steps 3 & 4 of Wizard
SAS® Office Analytics: An Application In Practice Monitoring and Ad-Hoc Reporting Using Stored Process, continued
5
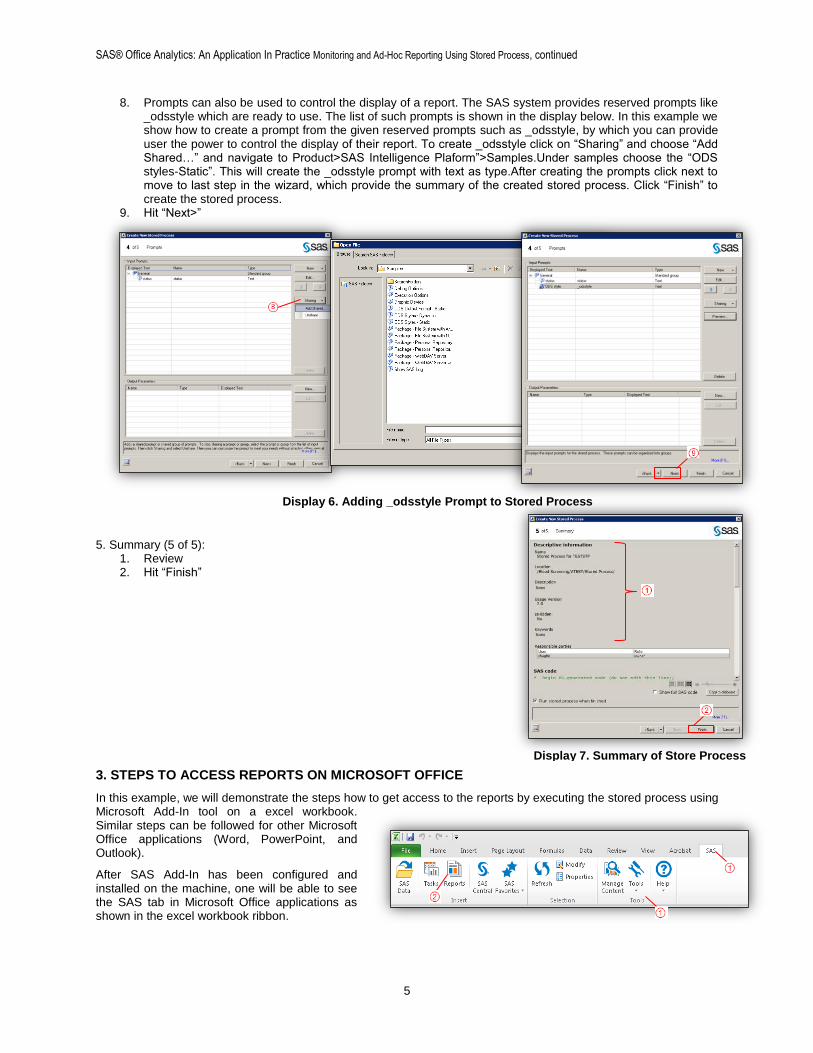
8. Prompts can also be used to control the display of a report. The SAS system provides reserved prompts like _odsstyle which are ready to use. The list of such prompts is shown in the display below. In this example we show how to create a prompt from the given reserved prompts such as _odsstyle, by which you can provide user the power to control the display of their report. To create _odsstyle click on “Sharing” and choose “Add Shared…” and navigate to Product>SAS Intelligence Plaform”>Samples.Under samples choose the “ODS styles-Static”. This will create the _odsstyle prompt with text as type.After creating the prompts click next to move to last step in the wizard, which provide the summary of the created stored process. Click “Finish” to create the stored process.
9. Hit “Next>”
5. Summary (5 of 5):
1. Review 2. Hit “Finish”
3. STEPS TO ACCESS REPORTS ON MICROSOFT OFFICE
In this example, we will demonstrate the steps how to get access to the reports by executing the stored process using Microsoft Add-In tool on a excel workbook. Similar steps can be followed for other Microsoft Office applications (Word, PowerPoint, and Outlook).
After SAS Add-In has been configured and installed on the machine, one will be able to see the SAS tab in Microsoft Office applications as shown in the excel workbook ribbon.
Display 6. Adding _odsstyle Prompt to Stored Process
Display 7. Summary of Store Process
SAS® Office Analytics: An Application In Practice Monitoring and Ad-Hoc Reporting Using Stored Process, continued
6
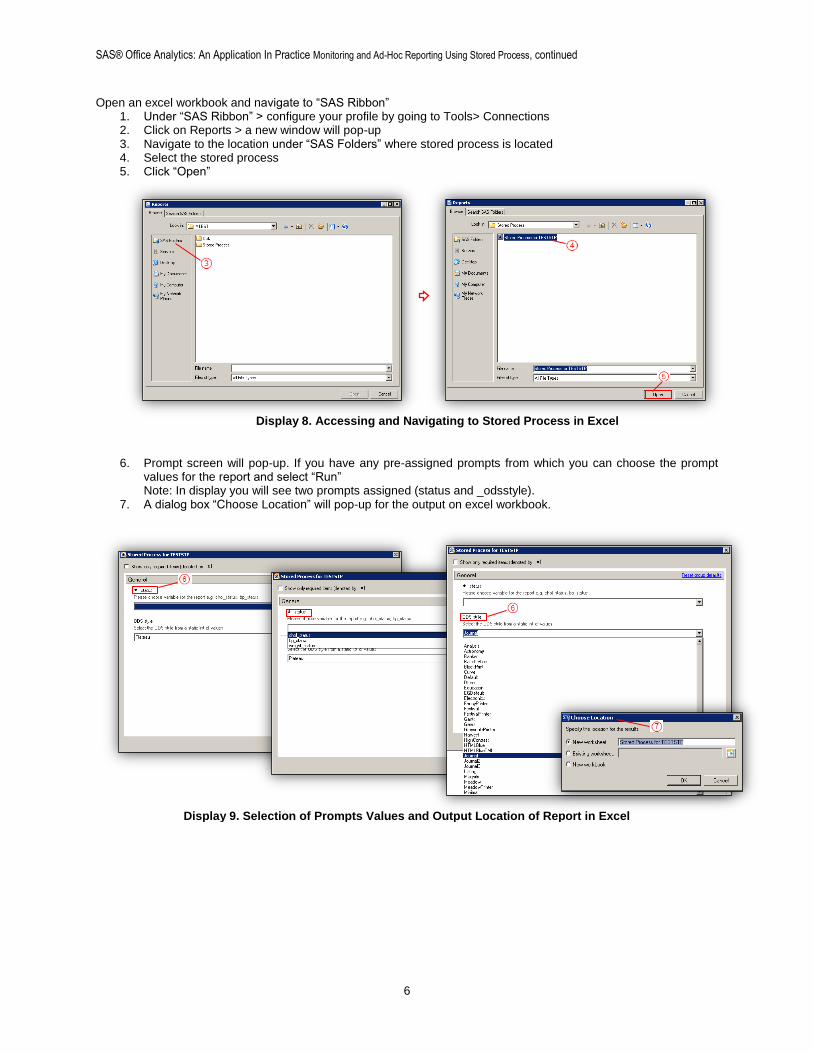
Open an excel workbook and navigate to “SAS Ribbon” 1. Under “SAS Ribbon” > configure your profile by going to Tools> Connections 2. Click on Reports > a new window will pop-up 3. Navigate to the location under “SAS Folders” where stored process is located 4. Select the stored process 5. Click “Open”
6. Prompt screen will pop-up. If you have any pre-assigned prompts from which you can choose the prompt values for the report and select “Run” Note: In display you will see two prompts assigned (status and _odsstyle).
7. A dialog box “Choose Location” will pop-up for the output on excel workbook.
Display 8. Accessing and Navigating to Stored Process in Excel
Display 9. Selection of Prompts Values and Output Location of Report in Excel
SAS® Office Analytics: An Application In Practice Monitoring and Ad-Hoc Reporting Using Stored Process, continued
7
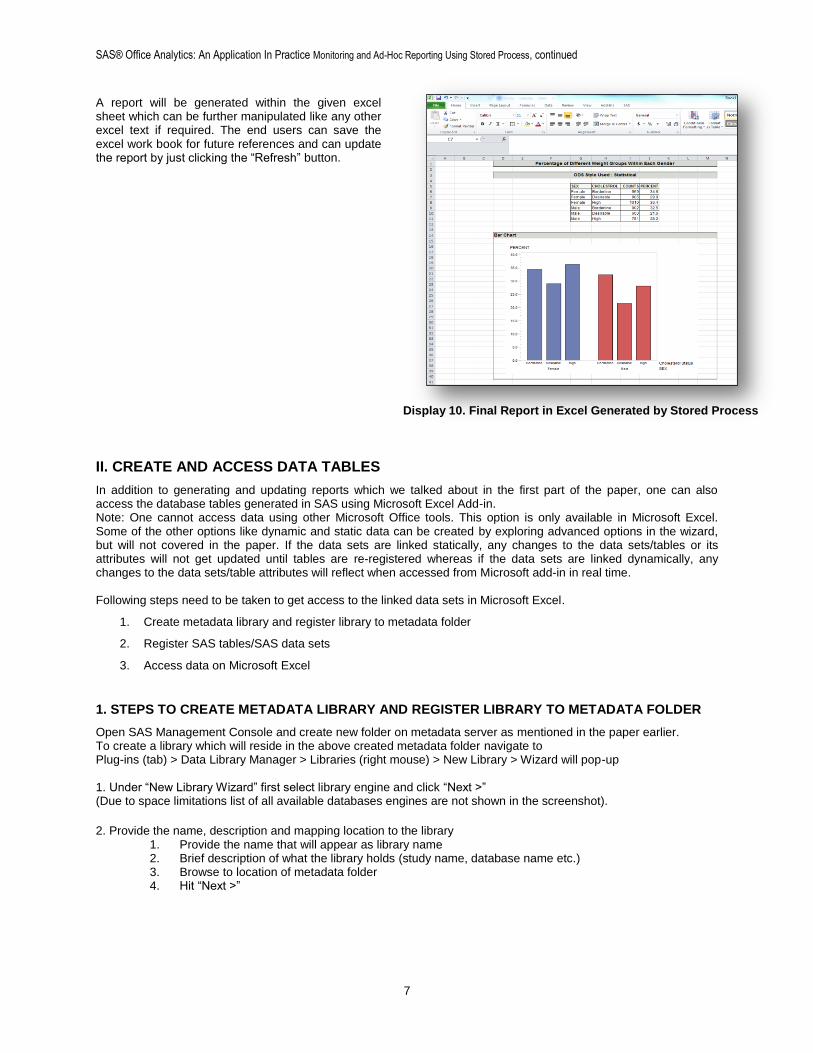
A report will be generated within the given excel sheet which can be further manipulated like any other excel text if required. The end users can save the excel work book for future references and can update the report by just clicking the “Refresh” button.
II. CREATE AND ACCESS DATA TABLES
In addition to generating and updating reports which we talked about in the first part of the paper, one can also access the database tables generated in SAS using Microsoft Excel Add-in. Note: One cannot access data using other Microsoft Office tools. This option is only available in Microsoft Excel. Some of the other options like dynamic and static data can be created by exploring advanced options in the wizard, but will not covered in the paper. If the data sets are linked statically, any changes to the data sets/tables or its attributes will not get updated until tables are re-registered whereas if the data sets are linked dynamically, any changes to the data sets/table attributes will reflect when accessed from Microsoft add-in in real time. Following steps need to be taken to get access to the linked data sets in Microsoft Excel.
1. Create metadata library and register library to metadata folder
2. Register SAS tables/SAS data sets
3. Access data on Microsoft Excel
1. STEPS TO CREATE METADATA LIBRARY AND REGISTER LIBRARY TO METADATA FOLDER
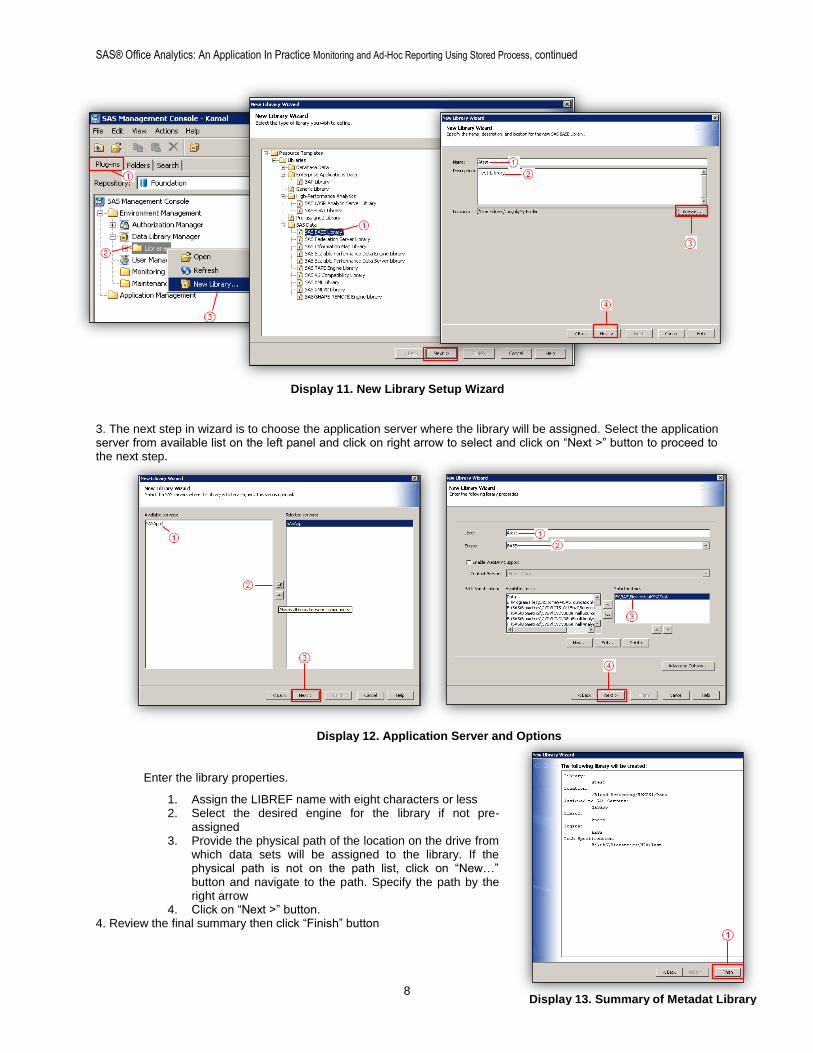
Open SAS Management Console and create new folder on metadata server as mentioned in the paper earlier. To create a library which will reside in the above created metadata folder navigate to Plug-ins (tab) > Data Library Manager > Libraries (right mouse) > New Library > Wizard will pop-up
1. Under “New Library Wizard” first select library engine and click “Next >” (Due to space limitations list of all available databases engines are not shown in the screenshot).
2. Provide the name, description and mapping location to the library 1. Provide the name that will appear as library name 2. Brief description of what the library holds (study name, database name etc.) 3. Browse to location of metadata folder 4. Hit “Next >”
Display 10. Final Report in Excel Generated by Stored Process
SAS® Office Analytics: An Application In Practice Monitoring and Ad-Hoc Reporting Using Stored Process, continued
8
3. The next step in wizard is to choose the application server where the library will be assigned. Select the application server from available list on the left panel and click on right arrow to select and click on “Next >” button to proceed to the next step.
Enter the library properties.
1. Assign the LIBREF name with eight characters or less 2. Select the desired engine for the library if not pre-
assigned 3. Provide the physical path of the location on the drive from
which data sets will be assigned to the library. If the physical path is not on the path list, click on “New…” button and navigate to the path. Specify the path by the right arrow
4. Click on “Next >” button. 4. Review the final summary then click “Finish” button
Display 11. New Library Setup Wizard
Display 12. Application Server and Options
Display 13. Summary of Metadat Library
SAS® Office Analytics: An Application In Practice Monitoring and Ad-Hoc Reporting Using Stored Process, continued
9
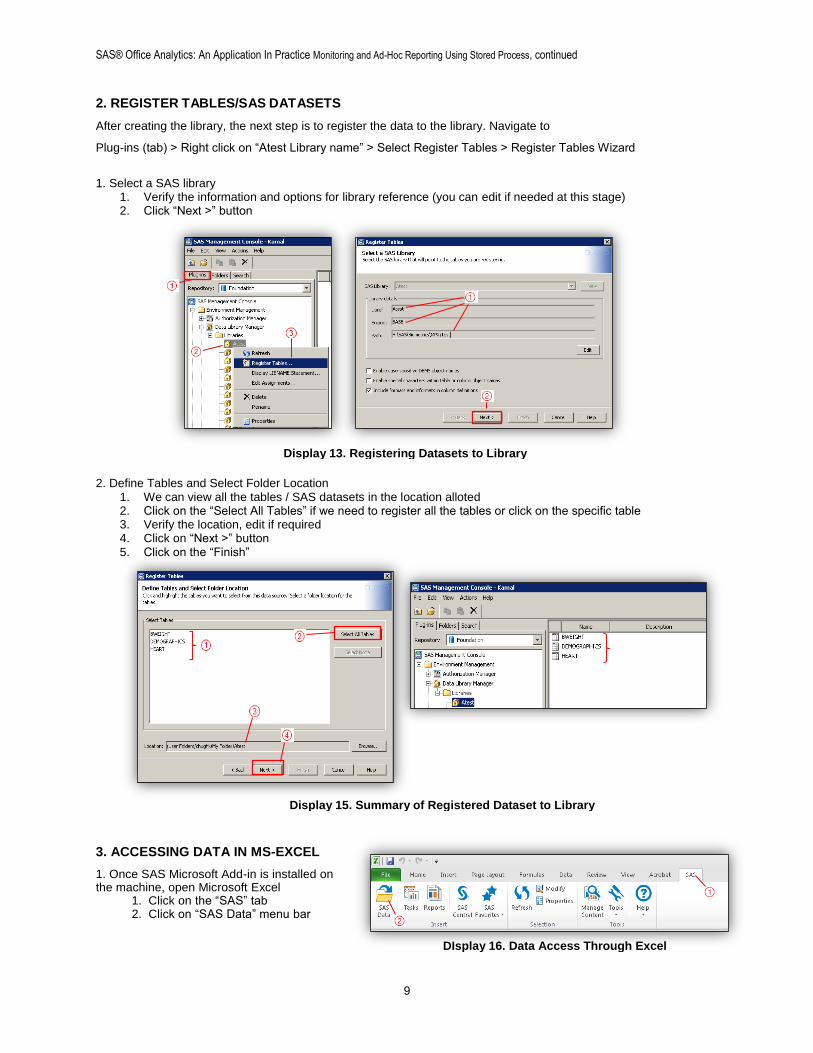
2. REGISTER TABLES/SAS DATASETS
After creating the library, the next step is to register the data to the library. Navigate to
Plug-ins (tab) > Right click on “Atest Library name” > Select Register Tables > Register Tables Wizard
1. Select a SAS library 1. Verify the information and options for library reference (you can edit if needed at this stage) 2. Click “Next >” button
2. Define Tables and Select Folder Location 1. We can view all the tables / SAS datasets in the location alloted 2. Click on the “Select All Tables” if we need to register all the tables or click on the specific table 3. Verify the location, edit if required 4. Click on “Next >” button 5. Click on the “Finish”
3. ACCESSING DATA IN MS-EXCEL
1. Once SAS Microsoft Add-in is installed on the machine, open Microsoft Excel
1. Click on the “SAS” tab 2. Click on “SAS Data” menu bar
Display 13. Registering Datasets to Library
Display 15. Summary of Registered Dataset to Library
DIsplay 16. Data Access Through Excel
SAS® Office Analytics: An Application In Practice Monitoring and Ad-Hoc Reporting Using Stored Process, continued
10
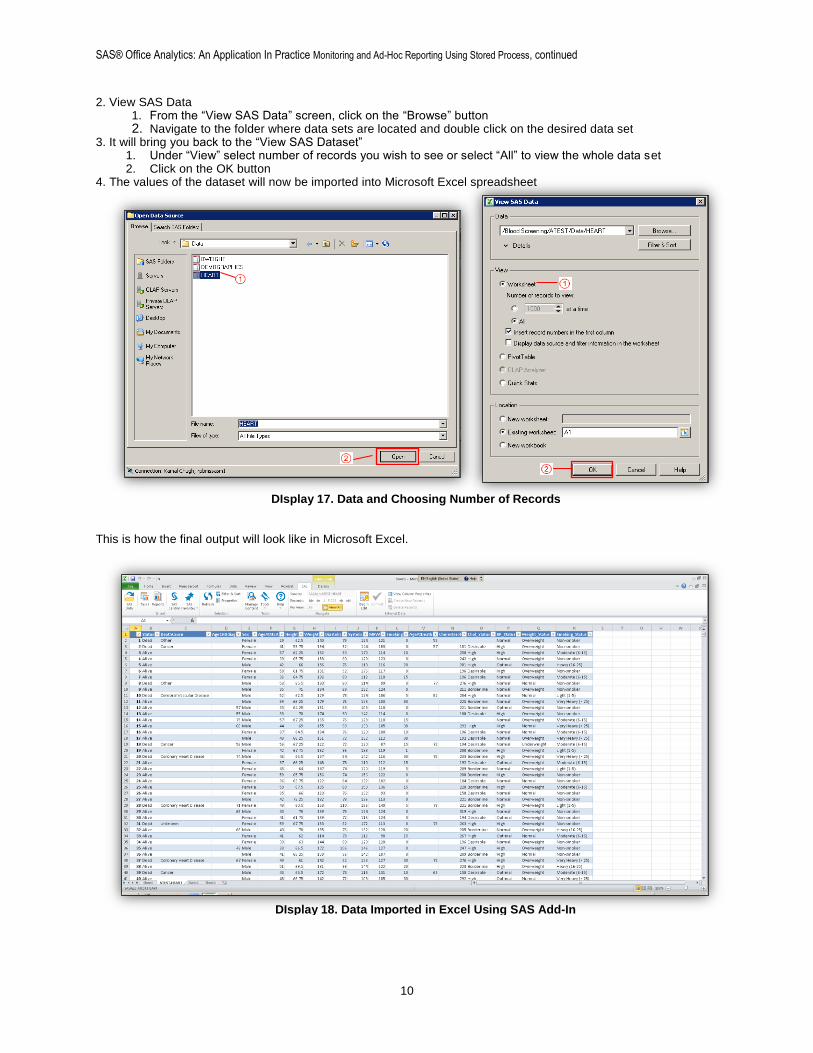
2. View SAS Data 1. From the “View SAS Data” screen, click on the “Browse” button 2. Navigate to the folder where data sets are located and double click on the desired data set
3. It will bring you back to the “View SAS Dataset” 1. Under “View” select number of records you wish to see or select “All” to view the whole data set 2. Click on the OK button
4. The values of the dataset will now be imported into Microsoft Excel spreadsheet
This is how the final output will look like in Microsoft Excel.
DIsplay 17. Data and Choosing Number of Records
DIsplay 18. Data Imported in Excel Using SAS Add-In

SAS® Office Analytics: An Application In Practice Monitoring and Ad-Hoc Reporting Using Stored Process, continued
11
CONCLUSION
Creating ad-hoc reports in Microsoft Office by leveraging the power of stored process is very convenient and powerful. Setting up stored process or giving access to study data is simple and straight forward and requires only SAS programs which make it easy for SAS programmers to generate. The initial set up for stored process server can be challenging financially but it is a very powerful tool which has a wide range of applications. Creating ad-hoc reports using stored process and AMO is only one of the ways in which it can be applied. Following the steps discussed in the paper will make it easy for the SAS programmer in setting up the stored process for ad-hoc reporting and giving the power to the non-SAS users to monitor reports or study data through Microsoft Office. The steps mentioned in paper can also be easily followed and implemented in other Microsoft Office products.
SAS® Office Analytics: An Application In Practice Monitoring and Ad-Hoc Reporting Using Stored Process, continued
12
REFERENCES
Eberhardt, Peter.2008. “Crossing the Border: Steps to Writing SAS© Stored Processes.” Proceedings of the SAS Global 2008 Forum. San Antonio, Texas, March 22-25, 2009. Available at http://www2.sas.com/proceedings/forum2008/035-2008.pdf
ACKNOWLEDGMENTS
We would like to acknowledge Michael Santulli, Head of Biometrics, Roche Molecular Systems, Inc. for his continued support and encouragement.
RECOMMENDED READING
SAS® Add-In 7.1 for Microsoft Office Getting Started in Microsoft Excel, Microsoft Word, and Microsoft
PowerPoint Second Edition
The 50 Keys to Learning SAS Stored Processes: Must have guide for SAS Developers
CONTACT INFORMATION
Your comments and questions are valued and encouraged. Contact the authors at:
Name: Mansi Singh Enterprise: Roche Molecular Systems, Inc. Address: 4300 Hacienda Drive City, State ZIP: Pleasanton, CA, 94588 Work Phone: (925) 730-8724 Fax: (925) 730-8990 E-mail: [email protected] Name: Smitha Krishnamurthy Enterprise: Roche Molecular Systems, Inc. Address: 4300 Hacienda Drive City, State ZIP: Pleasanton, CA, 94588 Work Phone: (925) 730-8313 Fax: (925) 730-8990 E-mail: [email protected] Name: Chaitanya Chowdagam Enterprise: MaxisIT Inc.
Address: 203 Main Street City, State ZIP: Metuchen, NJ 08840 Work Phone: (925) 730-8667 Fax: (925) 730-8990 E-mail: [email protected]
Name: Kamal Chugh Enterprise: Roche Molecular Systems, Inc. Address: 4300 Hacienda Drive City, State ZIP: Pleasanton, CA, 94588 Work Phone: (925) 730-8293 Fax: (925) 730-8990 E-mail: [email protected]
SAS and all other SAS Institute Inc. product or service names are registered trademarks or trademarks of SAS Institute Inc. in the USA and other countries. ® indicates USA registration.
Other brand and product names are trademarks of their respective companies.