save these instructions - seattle coffee gear · coffee maker cafeterie cafetera macchina da caffÈ...
TRANSCRIPT
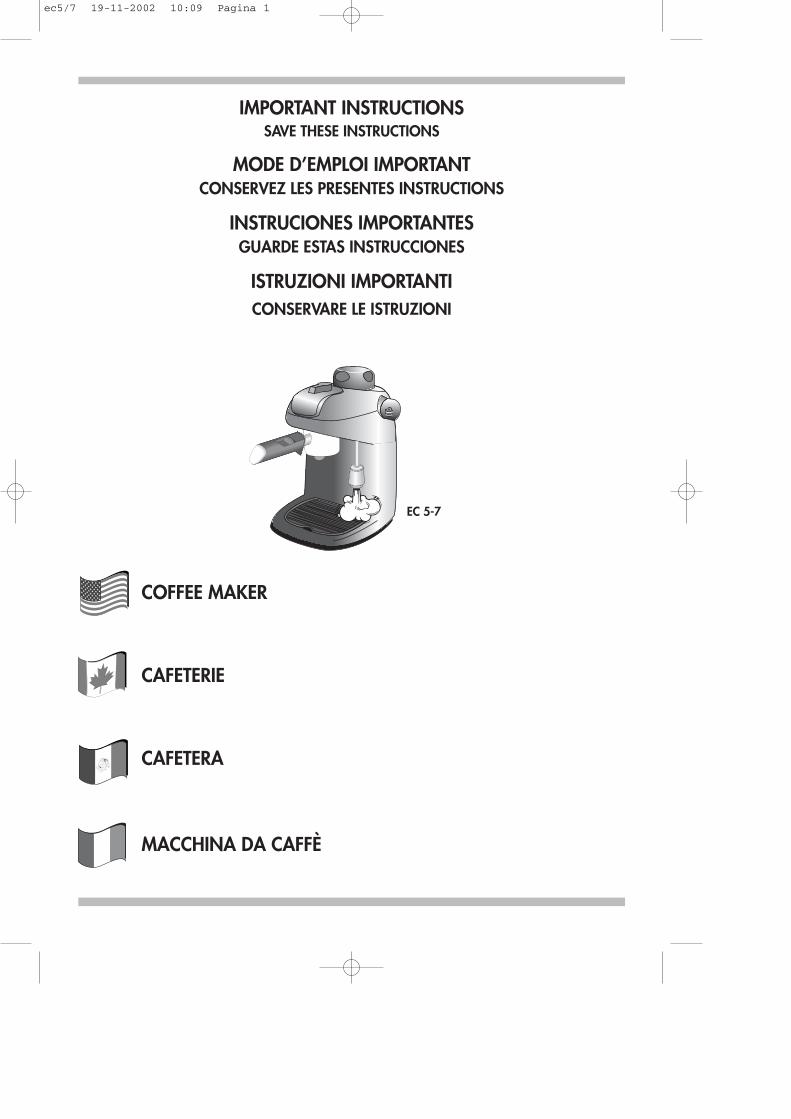
COFFEE MAKER
CAFETERIE
CAFETERA
MACCHINA DA CAFFÈ
EC 5-7
IMPORTANT INSTRUCTIONSSAVE THESE INSTRUCTIONS
MODE D’EMPLOI IMPORTANTCONSERVEZ LES PRESENTES INSTRUCTIONS
INSTRUCIONES IMPORTANTESGUARDE ESTAS INSTRUCCIONES
ISTRUZIONI IMPORTANTICONSERVARE LE ISTRUZIONI
ec5/7 19-11-2002 10:09 Pagina 1

ec5/7 19-11-2002 10:09 Pagina 2

HI
J
G
K
L
M
B
O A
CN
D
F
E
ec5/7 19-11-2002 10:09 Pagina 3
4
3
4
1
7 9
6
2
8
5
1110 12
ec5/7 19-11-2002 10:09 Pagina 4
151413
16 17 18
19 20
ec5/7 19-11-2002 10:09 Pagina 5
6
SHORT CORD INSTRUCTIONS- A short power cord is provided to reduce risks resulting from becoming entangled in or tripping
over a longer cord.- Longer, detachable power supply cords or extension cords are available and may be used if
care is exercised in their use.- If an extension cord is used, the marked electrical rating should be at least as great as the electri-
cal rating of the appliance. If the appliance is provided with 3- wire, grounding type cord, theextension should be a GROUNDING TYPE 3 - WIRE CORD. The longer cord should be arrangedso that it will not drape over the counter-top or table top where it can be pulled on by children ortripped over.
- Your product is equipped with a polarized alternating current line plug (a plug having one bladewider than the other). This plug will fit into the power outlet only one way. This is a safety featu-re. If you are unable to insert the plug fully into the outlet, try reversing the plug. If the plugshould still fail to fit, contact your electrician to replace your obsolete outlet. Do not defeat thesafety purpose of the polarized plug.
IMPORTANT SAFEGUARDSWhen using electrical appliances, basic safety precautions should always be followed, including thefollowing:• Read all instructions.• Do not touch hot surfaces. Use handles and knobs.• To protect against fire, electrical shock and personal injury, do not immerse cord, plug or
appliance in water or other liquid.• Never allow the appliance to be used by children or unfit persons.• Unplug from the outlet when not in use and before cleaning. Allow to cool before fitting or
taking off parts, and before cleaning the appliance.• Do not operate with a damaged cord or plug, or after the appliance malfunctions, or has been
damaged in any manner. Return the appliance to the nearest authorized service facility for exa-mination, repair or adjustment.
• The use of accessory attachments or spare parts not recommended by the appliance manufactu-rer may result in fire, electrical shock or personal injury.
• Do not use outdoors.• Do not let the cord hang over the edge of the table or counter, or touch hot surfaces.• Do not place on or near a hot gas or electrical burner, or in a heated oven.• Plug cord into the wall outlet. To disconnect, turn any control to “off”, then remove plug from
wall outlet.• Do not use the appliance for other than the intended use. This appliance is to be utilised for dome-
stic use only. Any other use is to be considered improper and therefore, dangerous.• DO NOT unscrew or remove boiler cap while the machine is in operation. Wait until brewing
cycle is completed and all water and steam has been used up.
SAVE THESE INSTRUCTIONSTHIS PRODUCT IS FOR HOUSEHOLD USE ONLY
ec5/7 GB 19-11-2002 10:08 Pagina 6
7
DESCRIPTION OF THE APPLIANCEThe following terms are used throughout theinstruction manual:A. Water tankB. Cap with safety valveC. Steam knobD. Steam tubeE. Drip trayF Cup trayG. Carafe with lidH. Cappuccino nozzleI. Cup adapter (if included)J. Filter holderK. FilterL. Measuring spoonM. ON/OFF SwitchN. Boiler outletO. Vario system (if included)
SAFETY WARNINGS• This machine has been built to “make coffee”
and to “reheat beverages”; please be careful toavoid burns from the sprays of hot water orsteam and avoid any improper use.
• When the appliance is in use, do not touch anyof the machine’s hot surfaces.
• After unpacking, make sure that the machine iscomplete and undamaged. In case of doubt, donot use the appliance and seek the advice of aqualified De’Longhi service professional.
• Packaging materials (plastic bags, foam poly-styrene, etc.) should not be left within the reachof children as this could be a potential source ofdanger.
• This appliance is to be utilized for domestic useonly. Any other use is to be consideredimproper and therefore, dangerous.
• The manufacturer takes no responsibility fordamage derived from improper use.
• Never touch the appliance with wet or damphands.
• The appliance is not intended for use by chil-dren without supervision.
• Children should be supervised to ensure thatthey do not play with the appliance.
• In case of breakdown or malfunctioning, turnoff the appliance immediately and do not touchit. For repairs, please contact an authorizedDe’Longhi Service Center and request the use oforiginal replacement parts only. The lack ofrespect for this point may compromise the safeuse of the appliance.
• The power supply cable of this appliance mustnever be replaced by the user, because itsreplacement requires the use of special tools. Ifthe cord should become damaged, or in case itneeds to be replaced, please go to an authorizedDe’Longhi Service Center.
• When the appliance is not in use, turn off anddisconnect the plug from the outlet.
• As with any electrical appliance, the instructionsaim to cover as many eventualities as possible.Caution and common sense should be appliedwhen operating your appliance, particularly inthe vicinity of children.
INSTALLATION• Place the coffee maker on flat work surface at a
safe distance from taps and sinks.• Check that the voltage corresponds to that indicat-
ed on the appliance rating plate. The appliancemust always be connected to a well-groundedoutlet rated at 10 A minimum. The manufactureris not liable for damage caused by inadequategrounding of the appliance.
• In the event of incompatibility between the plugon the appliance and the outlet, have the plugreplaced with another of the right type by aqualified De’Longhi professional.If the cord is damaged or requires replacing,contact an authorized De’Longhi ServiceCenter.
• Never install the machine in an environment thatcan reach a temperature less than or equal to 0°C(32°F) (if the water in it freezes, the coffee makermay be damaged).
• In the event of breakdowns or malfunctioning,do not tamper with the appliance and switch itoff by unplugging it.
Please read this instruction bookletcarefully before installing the appli-ance and keep it handy for futureconsultation. In so doing you willobtain the best result and maximumsafety in its use.
ec5/7 GB 19-11-2002 10:08 Pagina 7
8
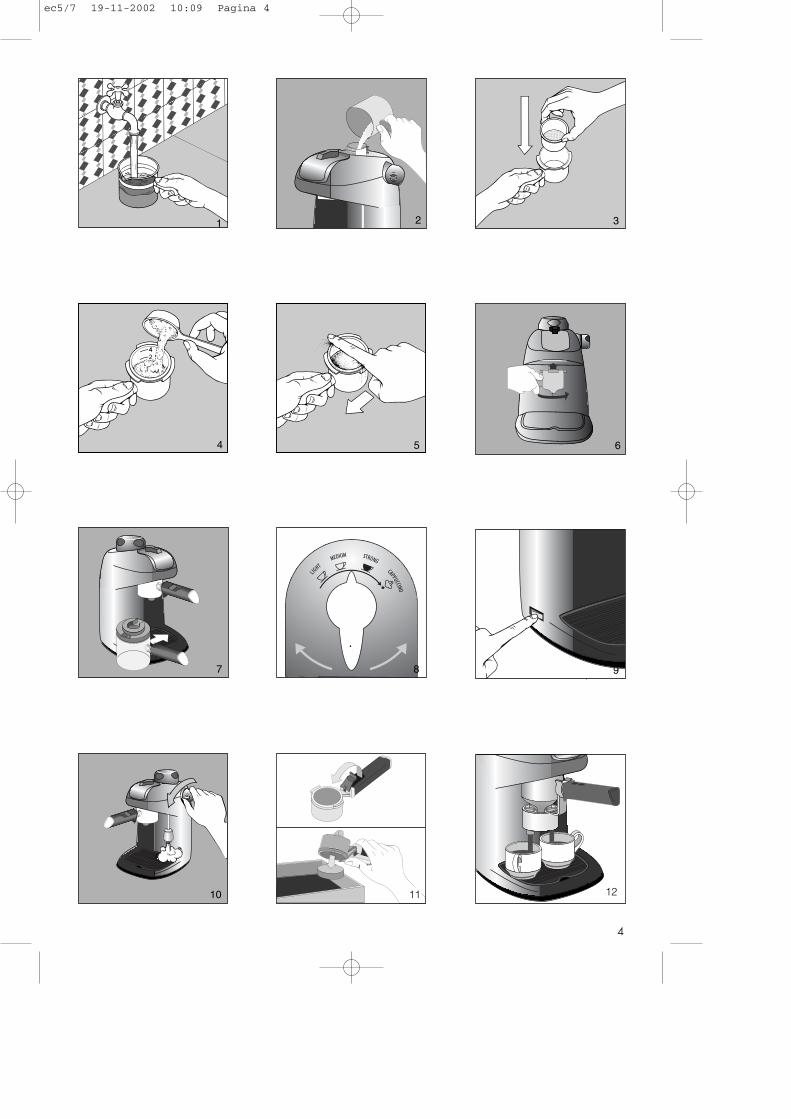
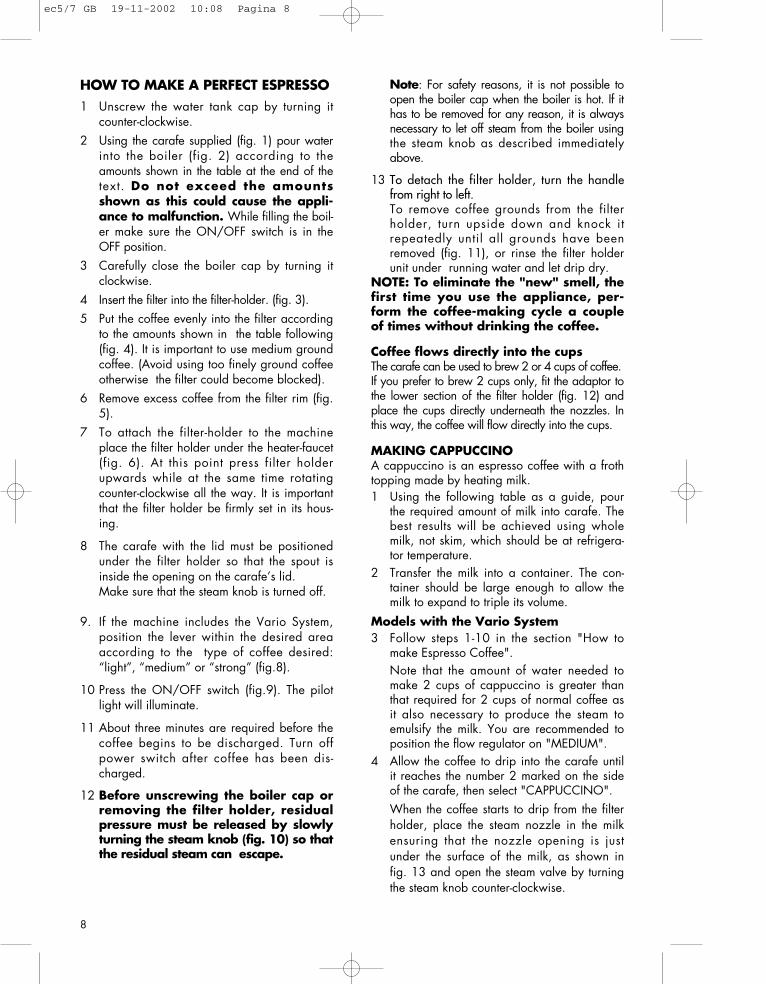
HOW TO MAKE A PERFECT ESPRESSO1 Unscrew the water tank cap by turning it
counter-clockwise.2 Using the carafe supplied (fig. 1) pour water
into the boiler (fig. 2) according to theamounts shown in the table at the end of thetext. Do not exceed the amountsshown as this could cause the appli-ance to malfunction. While filling the boil-er make sure the ON/OFF switch is in theOFF position.
3 Carefully close the boiler cap by turning itclockwise.
4 Insert the filter into the filter-holder. (fig. 3).5 Put the coffee evenly into the filter according
to the amounts shown in the table following(fig. 4). It is important to use medium groundcoffee. (Avoid using too finely ground coffeeotherwise the filter could become blocked).
6 Remove excess coffee from the filter rim (fig.5).
7 To attach the filter-holder to the machineplace the filter holder under the heater-faucet(fig. 6). At this point press filter holderupwards while at the same time rotatingcounter-clockwise all the way. It is importantthat the filter holder be firmly set in its hous-ing.
8 The carafe with the lid must be positionedunder the filter holder so that the spout isinside the opening on the carafe’s lid.Make sure that the steam knob is turned off.
9. If the machine includes the Vario System,position the lever within the desired areaaccording to the type of coffee desired:“light”, “medium” or “strong” (fig.8).
10 Press the ON/OFF switch (fig.9). The pilotlight will illuminate.
11 About three minutes are required before thecoffee begins to be discharged. Turn offpower switch after coffee has been dis-charged.
12 Before unscrewing the boiler cap orremoving the filter holder, residualpressure must be released by slowlyturning the steam knob (fig. 10) so thatthe residual steam can escape.
Note: For safety reasons, it is not possible toopen the boiler cap when the boiler is hot. If ithas to be removed for any reason, it is alwaysnecessary to let off steam from the boiler usingthe steam knob as described immediatelyabove.
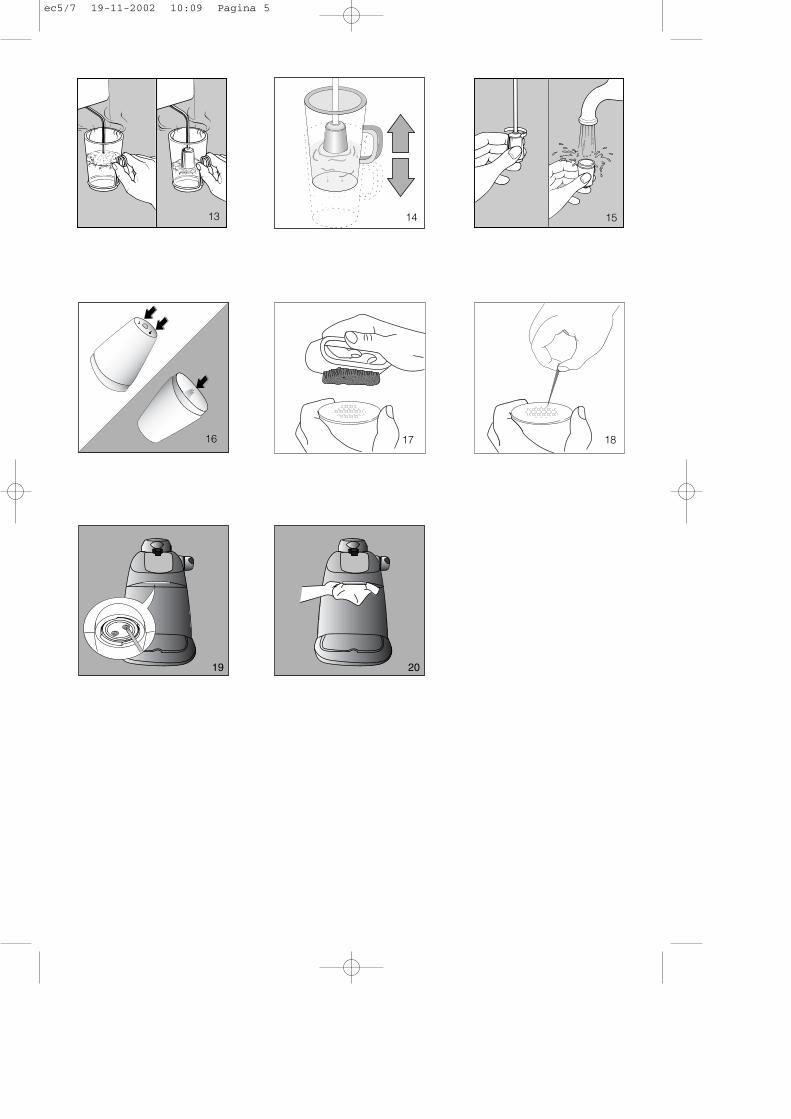
13 To detach the filter holder, turn the handlefrom right to left.To remove coffee grounds from the filterholder, turn upside down and knock itrepeatedly until all grounds have beenremoved (fig. 11), or rinse the filter holderunit under running water and let drip dry.
NOTE: To eliminate the "new" smell, thefirst time you use the appliance, per-form the coffee-making cycle a coupleof times without drinking the coffee.
Coffee flows directly into the cupsThe carafe can be used to brew 2 or 4 cups of coffee.If you prefer to brew 2 cups only, fit the adaptor tothe lower section of the filter holder (fig. 12) andplace the cups directly underneath the nozzles. Inthis way, the coffee will flow directly into the cups.
MAKING CAPPUCCINOA cappuccino is an espresso coffee with a frothtopping made by heating milk.1 Using the following table as a guide, pour
the required amount of milk into carafe. Thebest results will be achieved using wholemilk, not skim, which should be at refrigera-tor temperature.
2 Transfer the milk into a container. The con-tainer should be large enough to allow themilk to expand to triple its volume.
Models with the Vario System3 Follow steps 1-10 in the section "How to
make Espresso Coffee".Note that the amount of water needed tomake 2 cups of cappuccino is greater thanthat required for 2 cups of normal coffee asit also necessary to produce the steam toemulsify the milk. You are recommended toposition the flow regulator on "MEDIUM".
4 Allow the coffee to drip into the carafe untilit reaches the number 2 marked on the sideof the carafe, then select "CAPPUCCINO". When the coffee starts to drip from the filterholder, place the steam nozzle in the milkensuring that the nozzle opening is justunder the surface of the milk, as shown infig. 13 and open the steam valve by turningthe steam knob counter-clockwise.
ec5/7 GB 19-11-2002 10:08 Pagina 8
9
5 Move the container up and down under thesteam nozzle as in fig. 14 (this will givemaximum froth). Froth the milk until thesteam in the boiler has been com-pletely used up, then turn the steam knobin a clockwise direction in order to close thesteam valve and set the ON/OFF switch to“OFF”Warning: Always empty the boiler ofany residual water or steam afterusing the appliance by turning onthe steam knob.
6 Pour gently or preferably spoon the frothy milkonto the coffee, then sprinkle on a little choco-late powder for perfect cappuccino coffee.
Models without the Vario System3 Follow steps 1-10 in the section "Making
Espresso".Note that the amount of water needed tomake 2 cups of cappuccino is greater thanthat required for 2 cups of normal coffee asit also necessary to produce the steam toemulsify the milk.
4 When the coffee starts to drip from the filterholder, place the steam nozzle in the milkensuring that the nozzle opening is justunder the surface of the milk, as shown infig. 13 and open the steam valve by turningthe steam knob counter-clockwise.
5. Move the container up and down under thesteam nozzle as in fig. 14 (this will givemaximum froth). Froth the milk until thesteam in the boiler has been com-pletely used up, then turn the steam knobin a clockwise direction.
6 Allow the remaining coffee to drip thorughthe filter holder into the carafe, it takes about3 minutes,then switch the appliance OFF. Warning: Always empty the boiler ofany residual water or steam afterusing the appliance by turning onthe steam knob.
7 Pour the coffee into cups, gently pour, orpreferably spoon the frothy milk onto the cof-fee, then sprinkle on a little chocolate pow-der for perfect cappuccino coffee.
Cleaning the cappuccino nozzleClean the steam tube (with the cappuccino noz-zle) of milk immediately after use, as dried milkcan be difficult to remove.
Remember: You do this by turning thesteam control knob counter-clockwise.
IMPORTANT: Always clean the milk frother andsteam nozzle immediately after use. Proceed asfollows:• By turning the steam knob (fig. 15), allow a
little steam to come out for a few seconds.• Check that the 3 holes shown in fig. 16 are not
blocked. If necessary, clean them with the helpof a pin.
• Wash the cappuccino maker and steam noz-zle thoroughly with warm water.
• Re-attach the cappuccino maker.
HINTSMaking good espresso and cappuccino is notdifficult, however it does require practice. Thefollowing tips will help you get the best resultsfrom your machine:• Warm the cups before filling with coffee.• Use a dedicated espresso coffee for best
results. They are now widely available fromsupermarkets.
• Freshly ground coffee provides the best fla-vor. To maintain flavor, fresh coffee is beststored in an airtight container in a coolplace, even in the fridge.
CLEANING AND MAINTENANCE1.Do not use solvents or detergents in cleaning the
coffee maker. Use a soft, damp cloth.2.Clean the filter-holder, filter and drip tray reg-
ularly.ATTENTION: During cleaning, never immersethe unit in water – it is an electrical appliance.
CLEANING THE FILTER HOLDERAbout every 300 coffees, clean the filter holderfor ground coffee as follows:• Remove the filter• Clean the inside of the filter holder. Never wash
in a dishwasher.• Rinse all components and clean the metal filter
thoroughly in hot water using a brush (fig. 17).Make sure the holes in the metal filter are notblocked. If necessary, clean with a pin (fig. 18).
ec5/7 GB 19-11-2002 10:08 Pagina 9
10
Failure to clean as described above invalidatesthe warranty.
CLEANING THE ESPRESSO BOILER OUTLETAbout every 300 coffees, the espresso boiler out-let must be cleaned as follows:• check that the coffee machine is not warm and
the plug is detached from the mains;• using a screwdriver, unscrew the two screws that
hold the outlet of the espresso boiler (fig. 19);• clean the boiler with a damp cloth (fig. 20);• clean the outlet thoroughly in hot water using a
brush. Make sure the holes are not blocked. Ifnecessary, clean with a pin.
• rinse the outlet under the tap, still scrubbing it;• replace the outlet of the espresso boiler.Failure to clean as described above invalidatesthe guarantee.
DESCALINGYou are recommended to descale the coffeemachine about every 300 coffees. You should usea commercially available product specifically fordescaling espresso coffee machines. If you cannotobtain such a product, you can also follow theprocedure below.1. First clean the coffee machine, turn off and
unplug from the outlet.
2. Fill the carafe to the brim. 3. Dissolve 1 spoonful (about 10/15 g) of citric
acid;4. Pour the solution into the boiler.5. Replace the boiler cap and leave the solution
to work for about 30 minutes.6. Place the selector in the "LIGHT" position.7. Put the filter and filter holder in position (without
coffee).8. Position the carafe on the drip tray.9. Plug into the outlet.10.Turn the coffee machine on. After a few min-
utes, the hot solution will start to flow throughthe filter holder into the carafe.
11.Place the steam tube in a glass or cup. Openthe steam knob for a few seconds while thedescaling solution flows through the filterholder. This cleans all residues of milk frominside the tube.
12.Close the steam knob (the descaling solutionwill continue to flow into the carafe).
13.When the solution stops flowing into thecarafe, turn off and allow the machine tocool down. Remove the filter holder, filterand carafe and rinse with hot water.
14.To remove traces of descaler, perform atleast 2 coffee-making cycles without coffee.
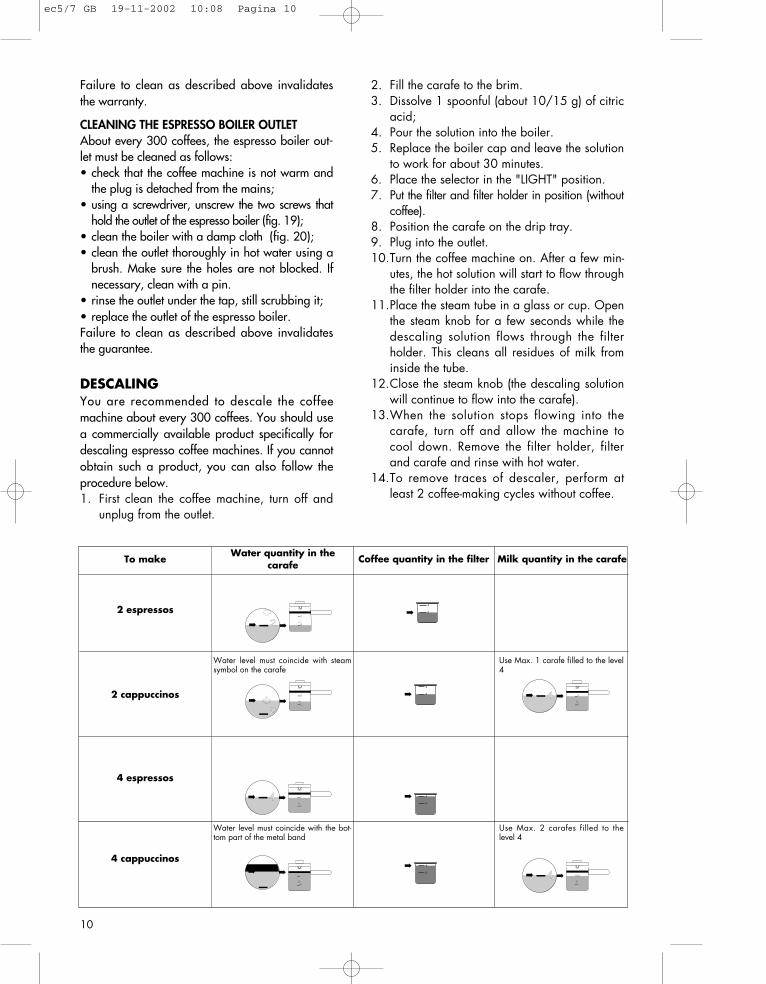
2
4
4
2
4
2
2
4
Water quantity in thecarafe Coffee quantity in the filter Milk quantity in the carafe
Water level must coincide with steamsymbol on the carafe
Water level must coincide with the bot-tom part of the metal band
Use Max. 1 carafe filled to the level4
Use Max. 2 carafes filled to thelevel 4
To make
2 espressos
2 cappuccinos
4 espressos
4 cappuccinos
ec5/7 GB 19-11-2002 10:08 Pagina 10

11
Limited WarrantyWhat Does This Warraty Cover? We warrant each Espresso Coffee Machine to be free from defects in mate-rial and workmanship. Our obligation under this warranty is limited to replacement or repair, free of charge at ourfactory or authorized service centers, of any defective part or parts thereof other than parts damaged in transit,which shall be returned to us, transportation prepaid. This warranty shall apply only if the Espresso Coffee Machineis used in accordance with the factory directions which accompany it.How Long Does The Coverage Last? This warranty runs for one year from the date of delivery and appliesonly to the original purchaser.What Does This Warranty Not Cover? This warranty does not cover defects or damage of the EspressoCoffee Machine which result from repairs or alterations to the machine outside our factory or authorized servicecenters, nor shall it apply to any Espresso Coffee Machine which has been subject to abuse, misuse, negligence oraccidents. Also, consequential and incidental damages resulting from the use of this product or arising out of anybreach of contract or breach of this warranty are not recoverable under this warranty. Some states do not allow theexclusion or limitation of incidental or consequential damages, so the above limitation may not apply to you.How Do You Get Service? If repairs become necessary or spare parts are needed, plase write to:
De’Longhi America Inc.Park 80 West Plaza One, 4th floorSaddle Brook NJ 07663or call Service Tel. No 1-800-322-3848or visit our internet site: www.delonghiusa.com
The above warranty is in lieu of all other express warranties and representations; All implied warranties are limitedto the applicable warranty period set forth above. This limitation does apply if you enter into an extended warrantywith De’Longhi. Some states do not allow limitations on how long an implied warranty lasts, so the above exclusionsconnection with the sale or use of its Espresso Coffee Machine.How Does State Law Apply? This warranty gives you specific legal rights, and you may also have other rightswhich vary from state to state.
De’ Longhi CANADA1040 Ronsa Court
MISSISSAUGA, ONTARIOL4W 3Y4 CANADA
ec5/7 GB 19-11-2002 10:08 Pagina 11