saw vise copy - sharp crosscutsharpcrosscut.com/files/saw vise with tool tray and photo.pdf · with...
TRANSCRIPT

Crosscut Saw Sharpening Vise There are many ways to build a saw vise. This design is simple, sturdy and easy to transport and set up. It’s not a vice; it’s a vise.
Materials:
2) 6 ft. long 2”x10” boards. I recommend premium grade, kiln dried. It is very important that they be straight and flat. You may substitute similar dimension plywood or other laminated veneer lumber. If you expect that most of the saws you sharpen will be over 6’ long, you should use longer boards. However, you can sharpen a long saw in a short vise if you let some saw ‘hang out the end.’
2) 8 ft. 2” x 6” boards.
6) eyebolts @ 3/8” diameter x 4” 2) eyebolts @ 1/2” diameter x 6” 2) carriage bolts @ 1/2” diameter x 4”
10) washers: 1/8” thick, 1/2” inside diameter, 1.75 - 2” outside diameter
6) washers: 3/8” inside diameter, 1” outside diameter
4) washers: ½” inside diameter, 1.5 outside diameter
4) hex nuts: 1/2” inside diameter to fit on 1/2” carriage and eye bolts
6) T-nuts: 3/8” inside diameter. You can buy prong T-nuts, as pictured or screw-in, or brad-hole (nail-in) T-nuts.
7) optional tool pouch: heavy fabric @ 16” x 60”, 15’ of cord or light rope and stitching or grommets.
Chapman’s Sharp Crosscut Saws: SharpeningVise 1 of 6
T-nut

Building the vise:
Look at the end grain of the 2” x 10”sand place them together so that the convexsides of the grain go together as shown.
Use a ‘Skil” saw, then disc or belt sander to shape tops of boards into smooth matching arcs, then use drawknife or sander or rasp to taper the tops of the ‘jaws.’
Clamp boards together and drill through - using a 13/32” drill bit - 6 holes evenly spaced along the length of the vise and 3” up from the bottom edge. The first and last holes must be 5” in from ends of the vise.
These holes are for your 3/8” diameter eye bolts and T- nuts. On one side of the vise, use a 1/2” bit to countersink the hole enough to set your T- nuts.
Chapman’s Sharp Crosscut Saws: SharpeningVise 2 of 6
6’
6”
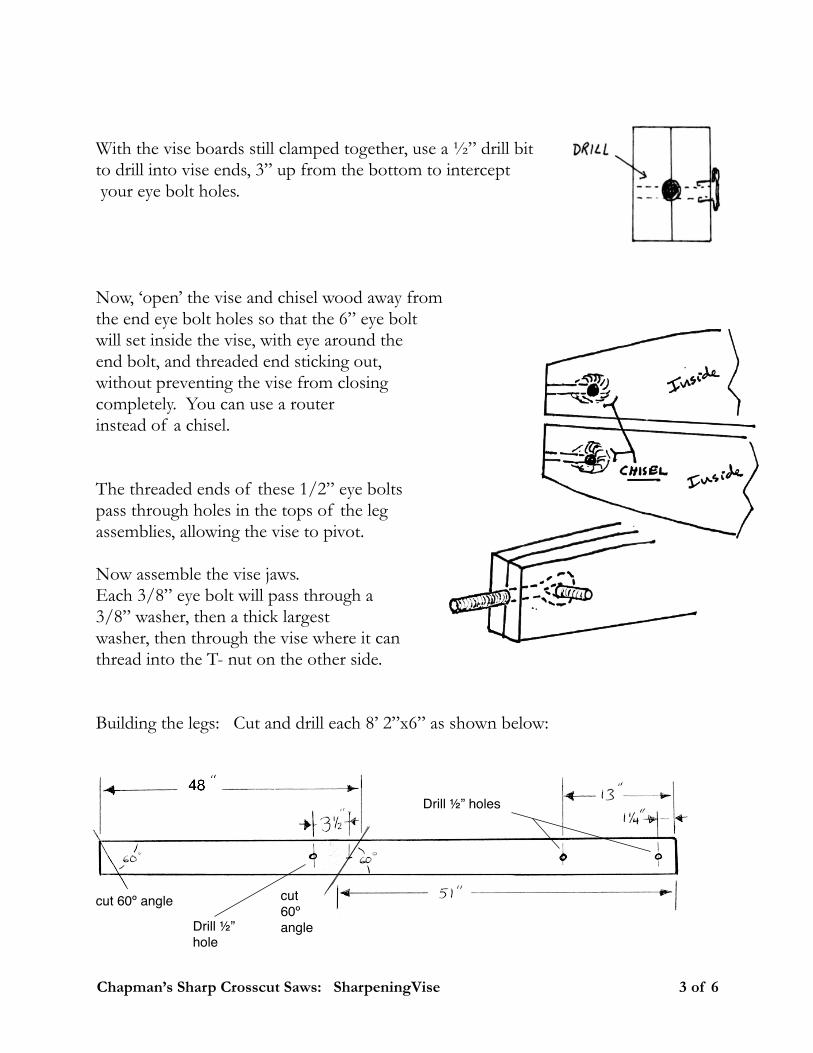
With the vise boards still clamped together, use a ½” drill bit to drill into vise ends, 3” up from the bottom to intercept your eye bolt holes.
Now, ‘open’ the vise and chisel wood away from the end eye bolt holes so that the 6” eye bolt will set inside the vise, with eye around the end bolt, and threaded end sticking out, without preventing the vise from closing completely. You can use a routerinstead of a chisel.
The threaded ends of these 1/2” eye bolts will pass through holes in the tops of the leg assemblies, allowing the vise to pivot.
Now assemble the vise jaws. Each 3/8” eye bolt will pass through a 3/8” washer, then a thick largestwasher, then through the vise where it canthread into the T- nut on the other side.
Building the legs: Cut and drill each 8’ 2”x6” as shown below:
Chapman’s Sharp Crosscut Saws: SharpeningVise 3 of 6
Drill ½” holes
cut 60º angleDrill ½”
hole
cut 60º angle

Assemble the vise:
Legs assemble as shown with carriage bolt head to outside and washers and nuts on inside. Use large ½’ washer on wood, then small washerand hex nut. Expand or fold in legs to adjust theheight. The top holes, for the vise pivot bolts,should be at the height of your elbows whenyour arms are at your side.
Put vise onto leg assemblies as shown. Put large washers, then medium washers, then hex nuts on outside of leg tops. The eyebolt eyes should face you as you stand at the vise. You may use a screw driver or any type of rod to tighten and loosen the vise. You will need to keep a wrench handy to tighten and loosen the hex nuts on the main pivot bolts.
Chapman’s Sharp Crosscut Saws: SharpeningVise 4 of 6
round off the top of the 2”x6” legs

Chapman’s Sharp Crosscut Saws: SharpeningVise 5 of 6
Optional Tool Tray for Crosscut Saw Sharpening Vise(in lieu of optional tool pouch)
Adding this simple tool tray to your saw vise willsave you a lot of time in keeping track of yourtools. The tray also makes your vise more stable.
Materials:
1) 6 ft. 1” x 6” pine board (actual dimension is ¾” x 5.5”)
1) 8ft. 1” x 6” pine board (actual dimension is ¾” x 5.5”)
2) 3/8” bolts and hex nuts: bolts @ 3”
4) 3/8” washers
Wood glue and finishing nails or #6 x 1 ¼” wood screws - about 2 dozen. Building and installing tool tray: 1) Cut both pine boards to exactly the length of your vise jaws minus 2 times the
thickness of these boards and 2 times the thickness of vise leg material. If your vise was built according to my plans with standard lumber, this length will be 67.5”
2) Rip one board in two, lengthwise.3) Cut small part of 8’ board into 2 pieces 7’ long Drill and angle cut corners as shown above:
Assemble tray as shown here:
Drill 13/32” holes in short vise leg, about 30” up.Bolt tray between short vise legs as shown in photo of finished vise.
tray end
Tray glued and screwed or nailed together

Saw Vise with Tool Tray
Assembled and packed for Travel or storage
Chapman’s Sharp Crosscut Saws: SharpeningVise 6 of 6