scanning and indexing supporting documents for new … and indexing hr forms … · scanning and...
TRANSCRIPT
Scanning and Indexing Supporting Documents for New Student Hires in DocFinity
This document provides instructions on how to submit completed pre-hire packet and foreign national information documents to the Human Resources Department using DocFinity.

Contents Step 1: Login to DocFinity ............................................................................................................... 1
Step 2: Fill in Scan Configuration information ................................................................................ 2
Step 3: Scan Pre-Hire Packet documents ........................................................................................ 4
Step 5: Scan the I-9 document ........................................................................................................ 7
Step 6: Scan Foreign National documents if applicable ................................................................. 7
Step 7: Name your Batch and select your Index Group ................................................................. 8
Step 8: Send your Batch to the Indexing queue ............................................................................. 9
Step 9: Go to the Indexing Workspace ......................................................................................... 10
Step 10: Select the Batch to Index ................................................................................................ 11
Step 11: Index your documents .................................................................................................... 12
Step 12: Send your Batch to Human Resources ........................................................................... 14
Step 13: Logout of DocFinity ......................................................................................................... 15

1 | P a g e Loyola University Chicago │Step 1: Login to DocFinity
Step 1: Login to DocFinity For all new student hires, the New Hire Packet form available in the following LUC Human Resources website needs to be completed: http://www.luc.edu/media/lucedu/hr/pdfs/New%20Hire%20Packet%20UPDATED%201%2005%202016.pdf
Completed pre-hire packet documents then need to be submitted to the Human Resources Department using DocFinity, a web-based Enterprise Content Management system at the University.
To log into DocFinity, open the following web link using either Internet Explorer or Chrome: https://docfinity10.luc.edu Enter your UVID (in all lower cases) and password then click on the ‘Submit’ button:

2 | P a g e Loyola University Chicago │Step 2: Fill in Scan Configuration information
Step 2: Fill in Scan Configuration information Upon successful login, the following Welcome Screen will appear. Click on ‘Scanning’ to open the Scanning Workspace:
The Scan Panel will appear as follows:
Note: Aside from the Welcome Screen, you can also navigate to other workspaces by clicking on the Workspace menu at the top and selecting the workspace you want to be in:

3 | P a g e Loyola University Chicago │Step 2: Fill in Scan Configuration information
In the Scan Configuration section, select the following options unless otherwise noted:
You may use Kofax VRS instead of PaperStream IP as your scanner option.
You can optionally pre-select your document category & document type at the time of scanning. Choose “HUMAN RESOURCES” & “PRELIM PRE-HIRE PACKET” for scanning a pre-hire packet.
If you are scanning using a flatbed scanner, please select that option.
Note: Required fields are marked by an asterisk (*). If you don’t want to select the Category and Document Type of the documents you are about to scan at this stage in the process, you can wait to make these selections in the Indexing Workspace. The last-used settings are saved per user.
If your document needs to be scanned in Color, please select ‘Color_Multi_200’ as your scan profile option. ** Please note that scanning in color can produce much larger file sizes. You may as well only scan certain pages in Color.

4 | P a g e Loyola University Chicago │Step 3: Scan Pre-Hire Packet documents
Step 3: Scan Pre-Hire Packet documents Important Note: Please make sure to separate the I-9 paperwork from the pre-hire packet. As of September 2016, this document will need to be scanned to HR separately
Place your completed pre-hire packet documents in the feeder of the scanner with the first page of your document and header (top part of the sheet) both facing down.
Once the documents are ready to be scanned, click on the ‘Start Scanning’ menu option located near the top of the Scan Panel in DocFinity:
The folder and individual page icons that appear in the Scan Progress section of the Scan Panel are an indication that your documents have been scanned successfully:
The first page of your document will also automatically appear in the Document Preview Panel.
Click here to start scanning your documents.
Each folder is a document. Click the arrow here to hide or show individual pages of your document.
5 | P a g e Loyola University Chicago │Step 3: Scan Pre-Hire Packet documents
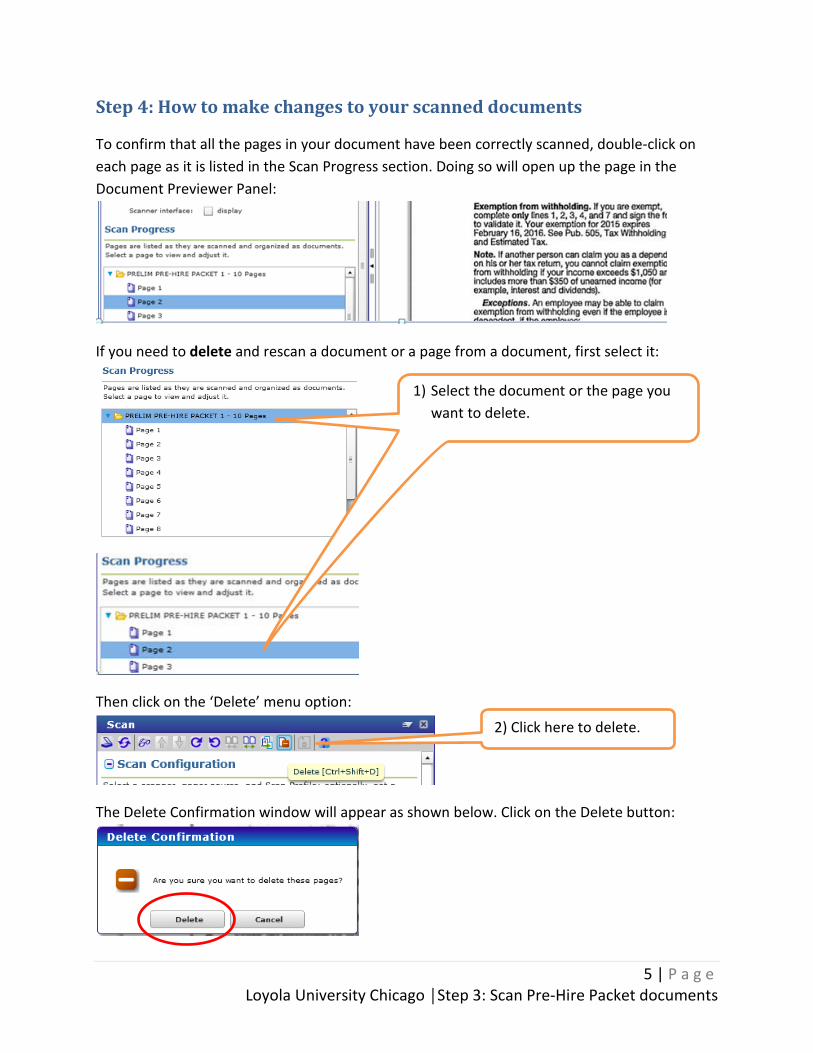
Step 4: How to make changes to your scanned documents
To confirm that all the pages in your document have been correctly scanned, double-click on each page as it is listed in the Scan Progress section. Doing so will open up the page in the Document Previewer Panel:
If you need to delete and rescan a document or a page from a document, first select it:
Then click on the ‘Delete’ menu option:
The Delete Confirmation window will appear as shown below. Click on the Delete button:
2) Click here to delete.
1) Select the document or the page you want to delete.

6 | P a g e Loyola University Chicago │Step 3: Scan Pre-Hire Packet documents
If you need to combine two or more documents, select the folders/documents you want to combine while holding the Shift key on your keyboard:
Then click on the ‘Combine Pages’ menu option:
To move a page from one folder to another, click on the page you want to move, then drag it to its new location:
To re-arrange the order of the pages in a folder, click on the page you want to move, then use the up and down arrows in the menu bar to move it:
To rotate a page, select the page you want to rotate, then click on the ‘Rotate Clockwise’ and ‘Rotate counterclockwise’ menu options accordingly:
1) Select the folders you want to combine.
2) Click here to combine the selected documents.
This black line indicates the new location of the page you selected to move.

7 | P a g e Loyola University Chicago │
Step 5: Scan the I-9 document The I-9 Form is included in the pre-hire packet on HR’s website, please be sure to scan this form separately (it is not necessary to scan in the instruction pages):
In the Scan Configuration section, select the ‘Temporary I-9’ document type:
Please refer to the scanning instructions in Step 3 and instructions on how to make changes to your scanned documents in Step 4.
Step 6: Scan Foreign National documents if applicable All new student hires who are not a U.S. Citizen or Legal Permanent Resident need to provide copies of their immigration document, including:
1) U.S. Immigration document: - I-20, Certificate of Eligibility for Nonimmigrant Student Status (F-1) - DS-2019, Certificate of Eligibility for Exchange Visitor Status (J-1) - I-797, Notice of Action (H-1B or other status)
2) I-94 Departure Record (you may obtain a copy at www.cbp.gov/I94) 3) Copy of Passport Information Page and passport stamp 4) Copy of Visa sticker in passport 5) Employment Authorization Card (EAD) (only if applicable)
You can optionally pre-select your document category & document type at the time of scanning. Choose “HUMAN RESOURCES” & “Temporary I-9”

8 | P a g e Loyola University Chicago │Step 7: Name your Batch and select your Index Group
For more information, see the Nonresident Alien Compliance website: http://www.luc.edu/finance/nracompliance/
In the Scan Configuration section, select the ‘Prelim Foreign National Information’ document type:
Please refer to the scanning instructions in Step 3 and instructions on how to make changes to your scanned documents in Step 4.
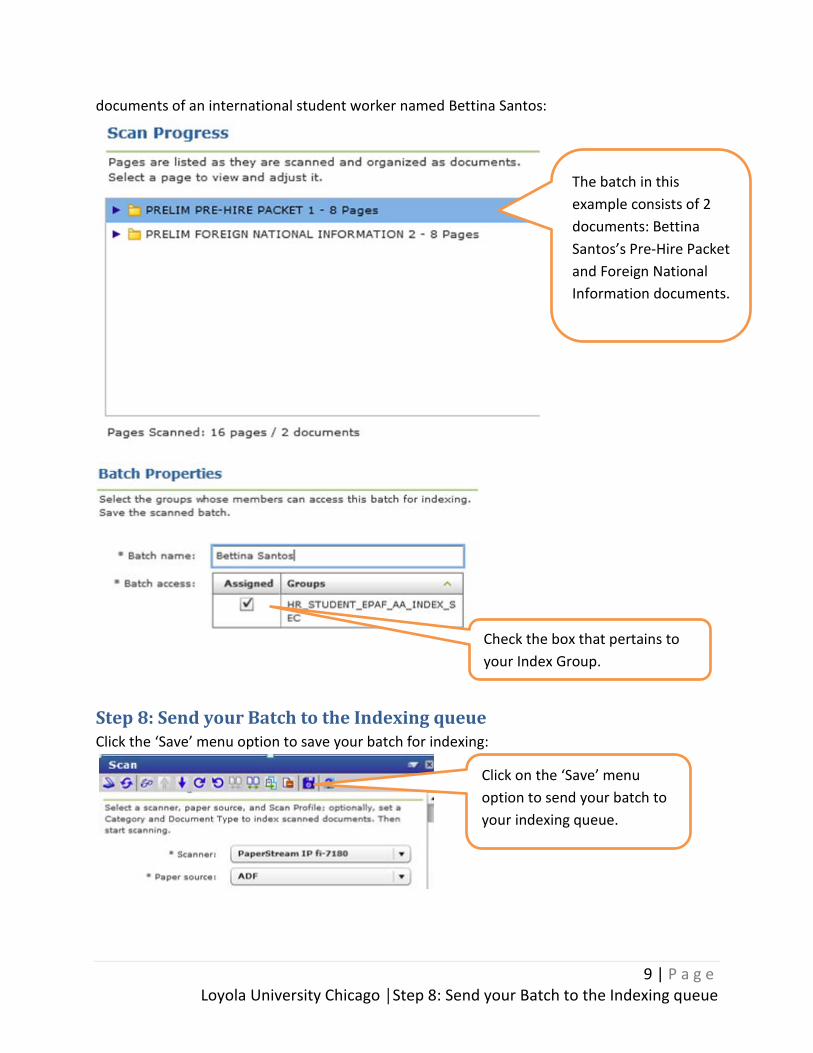
Step 7: Name your Batch and select your Index Group A batch refers to the set of documents that have been scanned and appear in the Scan Progress section of the Scan Panel. A batch can consist of a single document or a group of documents.
When you are ready to save your batch for indexing, you can scroll down to the Batch Properties section of the Scan Panel and create a customized name for it. In the screenshot below, the user created a batch out of the Pre-Hire Packet and Foreign National Information
You can optionally pre-select your document category & document type at the time of scanning. Choose “HUMAN RESOURCES” & “PRELIM FOREIGN NATIONAL INFORMATION” for scanning a foreign national information document.
9 | P a g e Loyola University Chicago │Step 8: Send your Batch to the Indexing queue
documents of an international student worker named Bettina Santos:
Step 8: Send your Batch to the Indexing queue Click the ‘Save’ menu option to save your batch for indexing:
The batch in this example consists of 2 documents: Bettina Santos’s Pre-Hire Packet and Foreign National Information documents.
Check the box that pertains to your Index Group.
Click on the ‘Save’ menu option to send your batch to your indexing queue.

10 | P a g e Loyola University Chicago │Step 9: Go to the Indexing Workspace
After clicking on the ‘Save’ button, the batch should disappear from the Scan Progress section of the Scan Panel as follows:
Step 9: Go to the Indexing Workspace Navigate to the Indexing Workspace by clicking on the Workspace menu at the top and selecting ‘Indexing’:
1) Click on ‘Workspace’
2) Click on ‘Indexing’

11 | P a g e Loyola University Chicago │Step 10: Select the Batch to Index
Step 10: Select the Batch to Index Once you are in the Indexing Workspace, you will see a list of all the batches assigned to your group for indexing. Select the batch you are ready to index by double-clicking on it:
Alternatively, you can also click on the ‘Check out batch’ menu option while the batch is selected:
Double-click on the batch you want to index.
2) Click on the ‘Check out batch’ menu option.
1) Select the batch you want to index.
12 | P a g e Loyola University Chicago │Step 11: Index your documents
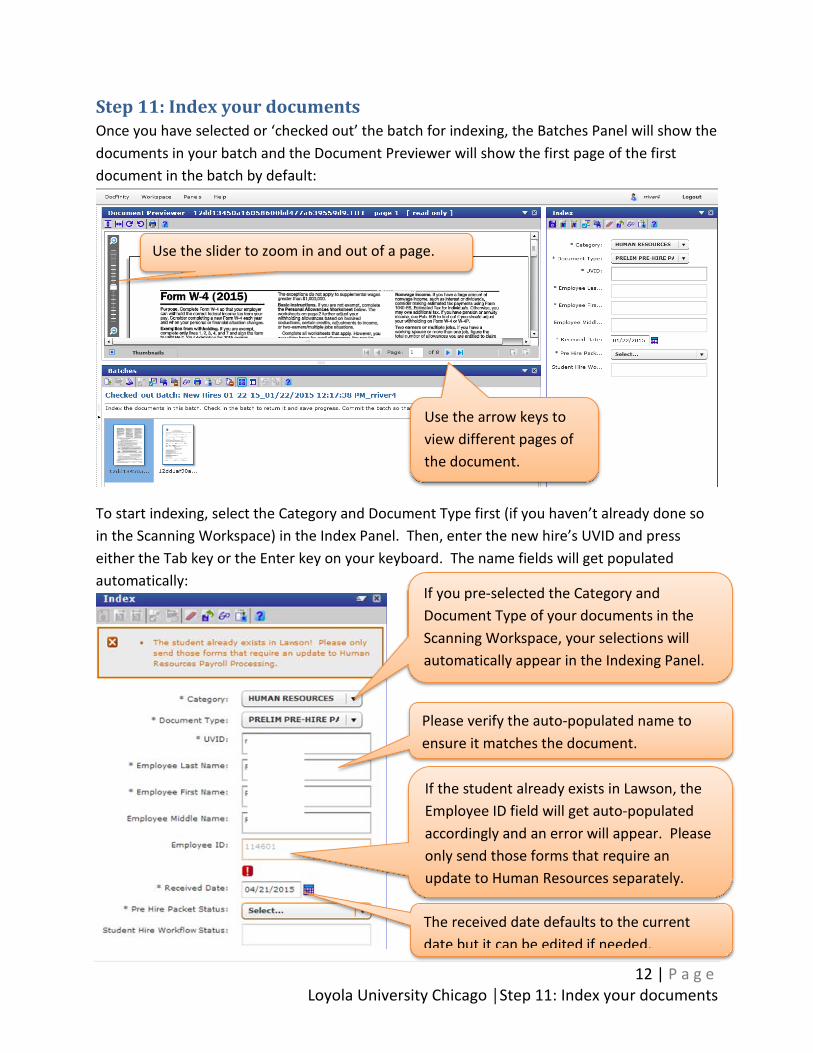
Step 11: Index your documents Once you have selected or ‘checked out’ the batch for indexing, the Batches Panel will show the documents in your batch and the Document Previewer will show the first page of the first document in the batch by default:
To start indexing, select the Category and Document Type first (if you haven’t already done so in the Scanning Workspace) in the Index Panel. Then, enter the new hire’s UVID and press either the Tab key or the Enter key on your keyboard. The name fields will get populated automatically:
Use the slider to zoom in and out of a page.
Use the arrow keys to view different pages of the document.
The received date defaults to the current date but it can be edited if needed.
If you pre-selected the Category and Document Type of your documents in the Scanning Workspace, your selections will automatically appear in the Indexing Panel.
Please verify the auto-populated name to ensure it matches the document.
If the student already exists in Lawson, the Employee ID field will get auto-populated accordingly and an error will appear. Please only send those forms that require an update to Human Resources separately.

13 | P a g e Loyola University Chicago │Step 11: Index your documents
Next, select an option for the Status field. If this is the first time you are submitting this document for the student, choose the “INITIAL SUBMISSION – TO BE REVIEWED” option. If you are re-submitting, then choose the “RESUBMITTED – TO BE REVIEWED” option:
Click on the ‘Save’ menu option to save the indexing work you have done for this document:
If you have more than one document in your batch, you can start indexing the next document by selecting it in the Batches panel.
Make your selection by clicking one of the options listed here.
Click here to save the indexing information for the document that appears in the Document Previewer.

14 | P a g e Loyola University Chicago │Step 12: Send your Batch to Human Resources
Step 12: Send your Batch to Human Resources Once you are done indexing the documents in your batch, click on the ‘Commit Batch’ menu option:
After clicking the ‘Commit batch’ menu option, a confirmation window will appear as follows:
Click ‘Commit’ and your documents will be sent to Human Resources for their review. Only the documents that contain all required metadata will be committed. Any incomplete documents will remain in your batch.
If all the documents in your batch have been committed successfully, DocFinity will take you back to the batches queue as shown below:
Click here to commit your batch.

15 | P a g e Loyola University Chicago │Step 13: Logout of DocFinity
Step 13: Logout of DocFinity To logout of DocFinity, click on the ‘Logout’ menu option at the upper right corner:
Click here to logout of DocFinity.