school gardens manual - unesco · school gardens manual guide on how to plan, ... finance project...
TRANSCRIPT

School Gardens Manual
Guide on How to Plan, Establish &
Maintain a School Garden
Second Edition, 2013
Banjul, The Gambia
With contributions from:
SAFMU, NaNA, the Horticultural Department of the MoA & FIOH

SCHOOL GARDENS MANUAL PAGE 2
Table of Contents
F oreword.. ......... .......... ......... ........ ......... .......... ....... ......... .......... .......... ....... ......... .......... . 4
A ck nowledgements . ...... .......... .......... ....... ......... .......... ......... ....... .......... .......... ....... ....... 5 Glossary of A cronyms ... .......... ......... .......... ....... ......... .......... ....... .......... ......... .......... ...... 6
Why School Gardens? .... ......... .......... ......... ....... .......... .......... ....... ......... .......... ......... ..... 7
Planning a School G arden ..... .......... ......... ........ ......... .......... ......... ....... .......... .......... ...... 8 Who Will Be Involved? ................................................................................................... 9
What Will We Do?.........................................................................................................10
Who Will Do What?.......................................................................................................11 Making a Plan...............................................................................................................12
Sample Action Plan ......................................................................................................13 Sample Timeline ..........................................................................................................14
Sample Weekly Work Schedule ..................................................................................14
Where Can We Go for Help? ........................................................................................15 Establishing a School Garden ...... ......... .......... ....... ......... .......... .......... ....... ......... ........ 17
Choosing a Site ............................................................................................................18 Garden Size ..................................................................................................................19
Garden Lay-out .............................................................................................................20
Gardening Calenda r .....................................................................................................21 A Sample Garden Plan .................................................................................................22
Live Fencing..................................................................................................................22
Garden Equipment and Tools......................................................................................26 Seedling Production ........ .......... .......... ....... ......... .......... .......... ....... ......... .......... ....... ... 27
Seed Boxes ...................................................................................................................28 Planting out ..................................................................................................................29
Nursery managem ent ..................................................................................................30
Weeds & Pests .............................................................................................................31 Transplanting................................................................................................................31
Maintaining the Garden . ........ .......... ......... ....... .......... ......... .......... ....... .......... ......... .... 32
Tillage............................................................................................................................33 Spacing .........................................................................................................................33
Watering Beds ..............................................................................................................33 Manures........................................................................................................................34
Seed Collection and Sto rage . .......... ......... .......... ....... ......... .......... ........ ......... ......... ..... 35
Compost-Making & Pest Control .. ......... .......... .......... ....... ......... .......... ....... ......... ........ 37 Compost-Making: Introduction ....................................................................................38
Principles of Composting .............................................................................................38
Composting Methods ...................................................................................................40 Pest Control: Agents Responsible for Crop Losses ....................................................43
Managing Crop Losses ................................................................................................40

PAGE 1 SCHOOL GARDENS MANUAL
Pest Control Methods ..................................................................................................41
Organic Pesticides .......................................................................................................46
Nutrition, Health & Hygiene and School G ardens . ......... .......... .......... ....... ......... ......... 50
Why is Nutrition Important? ........................................................................................51 Which Nutrients are Important & Why? ......................................................................53
What Vegetables Should We Grow? ...........................................................................55
A Healthy, Balanced Diet .............................................................................................56 The Food Pyramid: A Guide to Good Eating................................................................57
Teaching Children about Nutrition ..............................................................................57 Keeping Food Safe and Clean.....................................................................................58
School Gardens & the E nvironment . ...... .......... .......... ....... ......... .......... ......... ....... ....... 61
Why is Preserving the Environment Important?.........................................................62 What is Organic Farming? ...........................................................................................62
How Will Organic Farming Benefit the Environm ent? ................................................63
Why is Organic Farming Beneficial in The Gambia? ..................................................63 What Else Can I do? .....................................................................................................64
How to Recycle in the Garden .....................................................................................65 R ecord-Keeping .. .......... ......... .......... ....... .......... ......... ....... .......... ......... .......... ....... ....... 66
Introduction ..................................................................................................................67
Production and Financial Records ..............................................................................68 Evaluation .....................................................................................................................71
Reporting ......................................................................................................................72
Using School Gardens as a Teaching Aid: Tips & Tricks . ..... ......... .......... ....... .......... ... 73 Closing Remarks .......... ......... .......... ....... ......... .......... ......... ........ ......... .......... ....... ........ 78
Annex I: Contact List .. .......... .......... ......... ....... .......... ......... ....... .......... .......... ......... ....... 79 Annex II: Termly Reporting Format .. .......... ......... .......... ....... ......... .......... ....... .......... .... 80

SCHOOL GARDENS MANUAL PAGE 3
Introduction
PAGE 4 SCHOOL GARDENS MANUAL
Acknowledgements
This manual has been developed by World Food Programme (WFP) The Gambia in
collaboration with the School Agriculture and Food Management Unit (SAFMU) of the
Ministry of Basic and Secondary Education, the Horticulture Department of the Ministry
of Agriculture and the National Nutrition Agency. It also draws on the Gambian Garden
Manual developed by Peace Corps, The Gambia as well as input from volunteers.
Resources on school gardening were shared from Concern Universal to aid in the latest
edition of this manual. Many thanks are extended to these organizations for their
valuable inputs.
Gratitude is also extended to the Food and Agriculture Organization (FAO) and Rural
Finance Project (RFP), who jointly implemented The National School Garden Programme
(2010-2012). They provided valuable input during the planning and organization of the
training and manual.
Thank you to the schools included in the first two years of the school garden
programme. It has been a pleasure to work with and learn from you all.

SCHOOL GARDENS MANUAL PAGE 6
Glossary of Acronyms
BCS Basic Cycle School
CM Cluster Monitor
ECDC Early Childhood Development Center
FAO Food and Agriculture Organization of the United Nations
FFE Food for Education
FIOH Future In Our Hands
FMC Food Management Committee
GoTG Government of the Gambia
LBS Lower Basic School
MDG Millennium Development Goal
MoA Ministry of Agriculture
MoBSE Ministry of Basic and Secondary Education
NaNA National Nutrition Agency
PTA Parent Teacher Association
RED Regional Educational Directorate
RFP Rural Finance Project, Ministry of Agriculture
SAFMU School Agriculture and Food Management Unit, Ministry of Basic and
Secondary Education
SAU School Agriculture Unit, Ministry of Basic and Secondary Education
SFP School Feeding Programme
SMC School Management Committee
WFP World Food Programme
PAGE 7 WHY SCHOOL GARDENS?
Why School Gardens?
These are some of the benefits that establishing a school garden provides for the
school, the staff, students and community:
Nutritional: improves children’s diet by supplementing school meals with
vegetables and fruits that are rich in vitamins and minerals
Educational: reinforces theory with practice by teaching children about food
production, natural resource management, health and nutrition, business skills
and entrepreneurship, and provides an outdoor space for teaching and learning.
Environmental: improves the school environment while creating environmental
awareness and understanding
Life Skills: children learn how to plan, make decisions, take responsibility and
collaborate with others
Community: brings together the school and the community

SCHOOL GARDENS MANUAL PAGE 8
Planning a School Garden

PAGE 9 PLANNING A SCHOOL GARDEN
Planning a School Garden
Who Will Be Involved?
Before starting work on the garden, establish who will be involved and what their
responsibilities will be. The school should already have a School Managem ent
Committee (SMC) and a Learner Welfare & School Environment sub-committee in place.
One of this sub-committee’s key tasks is the management of the school feeding
programme and the school garden or farm (see p. 42 of the SMC Manual, January 2008
edition).
The school Headmaster and Garden Master, if there already is one, should create
enthusiasm for the project by sensitizing the community on the importance of school
gardens as an educational tool and a nutritional supplement to WFP school meals. This
sensitization could be done as a school or in coordination with the local Ministry of
Agriculture and NaNA extension officers. Find individuals who are willing to commit time
towards the planning and execution of a garden.
A Garden Master and Assistant Garden Master should be appointed. These should be
people with some specialized knowledge of gardening and agriculture, and it is
particularly useful if he/she is also a ‘people person’ who can encourage people, adults
and children alike, to get excited about gardening.
These are some other people who can be involved in making the garden a success:
School Head Master
Agricultural, Home Economics, Science or any other teachers
School caretaker
Members of the PTA, SMC, Food Management Committee (FMC), School
Environment & Learners’ Welfare Committee Members or Mothers’ Club
School cooks
Village Alkalo / Imam
Extension workers from the Ministry of Agriculture and Ministry of Forestry
Students
Parents and any other interested community members

SCHOOL GARDENS MANUAL PAGE 10
The more people that are involved, the less burden will fall on individuals. Getting the
community to participate is also important in ensuring that gardening knowledge and
training gets shared. This will prevent knowledge from being lost when a staff member
leaves the school or community members move, thus ensuring the continuity and
sustainability of the garden.
What Will We Do?
The Garden Master will have the most important
role in planning, establishing and maintaining the
garden. He/she should establish what needs to be
done, delegate jobs and supervise the work
conducted. However, there are also a multitude of
other things that can be done for, in and around the
garden. Here are some of the things that teachers,
students, parents and community members can do
to help make the garden a success:
Organize community participation, a garden clean-up day or the sales of the
garden’s extra produce;
Participate in deciding what the garden will look like, what vegetables will be
grown and how the garden will be integrated into the curriculum as well as the
school meals;
Build a garden shed, fence or wall;
Demonstrate / Train people in gardening techniques, good nutrition or food
hygiene and preparation (this is particularly useful in rural areas where many
families already farm and a good way for school cooks to be involved);
Provide seeds, tools, manure, materials for the compost heap, sticks / poles for
fencing, recipes, etc;
Help with digging, weeding, watering, clearing land or tending to the garden
during holidays;
Encourage children and other community members to participate in gardening
activities and teachers to use the garden as a learning center.

PAGE 11 PLANNING A SCHOOL GARDEN
Who Will Do What?
It is important to establish beforehand what everyone’s roles and responsibilities will be.
Garden Masters cannot do all the work by themselves. Similarly, children can do many
small chores in the garden, but they are not a labor force. Gardening should first and
foremost be a fun learning activity, where children learn how to take on responsibilities,
make decisions, plan, organize and collaborate. If gardening is seen as a punishment,
the whole activity will defeat its purpose.
Before starting, make a clear plan of who is responsible for what. There are many ways
to go about this. Gardening can be done during class time or as an after school activity.
Small groups of children can each tend to their own bed, or each grade can be
responsible for one activity, such as tilling, watering or weeding the garden.
Responsibilities can be rotated on a monthly or termly basis so that everyone gets to do
different jobs and people do not get bored. Whatever the arrangement, make a
schedule of activities and make sure people stick to it. It is particularly important that
the garden does not get neglected during the holidays. Giving people incentives is a
good way to make sure the work gets done (usually more so than giving out
punishments if they don’t). See Using a School Garden as Teaching Aid: Tips & Tricks,
p. 74.)

SCHOOL GARDENS MANUAL PAGE 12
Making a Plan
”He who fails to plan is planning to fail.” - Winston Churchill
Involve as many people as possible right from the planning stage. If people take part in
the decision-making process it promotes ownership and people will be keener on
investing time and energy in the garden. Brainstorm on:
what the garden should look like, what will be grown,
how it will be integrated into the curriculum and
what will be done with the produce.
It is a good idea to have a meeting to sensitize the community and involve them in
planning the garden.
Once you’ve decided on the key issues, make an action plan, identifying the people
responsible and deadlines. This should include activities necessary for the establishment
of the garden, but can also include long-term goals such as when you foresee the first
harvest, or when you want to sell the first produce. Check your action plan often to assure
that your activities are on schedule and you don’t forget anything. Make several copies of
the action plan. Keep one in the garden record book and post one on the wall in the head
teacher’s office. Post others where they are visible and can serve as a reminder of tasks.
Creating a timeline for larger events together with the children also teaches kids planning
and gives them something to look forward to. Individual classes or smaller groups of
students can create a weekly or monthly work schedule to plan what needs to be done in
their own beds and in communal areas such as the nursery or compost heap.
The following examples should serves as templates for the formatting of your action plan,
timeline and work schedule. You should modify activities, persons responsible and the
schedule to suit your school.

PAGE 13 PLANNING A SCHOOL GARDEN
Sample Action Plan
Activity
Persons Responsible
Deadline
Decide on a variety of
vegetables to grow in garden
Garden Master, School Cooks, Garden
Club
10 September
2013
Create map of garden lay-out
Garden Master, Agricultural Sciences
teacher, Grade 5 students
12 September
2013
Organize a teacher work
session to cooperate on making
lesson plans that incorpora te
the garden into the curriculum
Head Master, Garden Master, teachers
for all grade 1-6 classes, Agricultural
Sciences, Science & Maths teachers
26 September
2013
Inspect and repair fence around
garden
Garden Master, community members
1 October 2013
Prepare seedboxes
Agricultural Sciences teacher, Grades 3-
4
1 October 2013
Prepare nursery beds
Agricultural Sciences teacher, Grade 6
3 October 2013
Water nursery bed daily
Grade 5 students
1 October 2013
until outplanting
Bring materials for compost
heap
All children, community members
4 October 2013
Start compost heap
Agricultural Sciences teacher, Ministry of
Agriculture Extension Worker, grade 6
students
6 October 2013
Remove weeds from nursery
bed
Garden master, grade 3 students
8 October 2013
Planting of seeds in seedboxes
& nursery
Garden Master, Grades 3-4
9 October 2013

SC
HO
OL
G
AR
DE
NS
M
AN
UA
L
PA
GE
14
Sample Timeline
Action 2013 2014
Sep Oct Nov Dec Jan Feb Mar Apr May Jun Jul Aug Sep
Fencing Garden
Preparation of
Seedbox & Nursery
Preparation of
Garden Beds
Composting
Harvesting
Seed collection
Sales of Produce
Sample Weekly Work Schedule
Weekly Work Schedule Green Team, Grade 6
Week: April 14-18, 2014
Monday Tuesday Wednesday Thursday Friday Saturday Sunday
Gardening
Watering -
Lamin
Watering &
Spraying Neem
- Binta & Isatou
Preparing
neem pesticide
– Bakary & Ami
Watering &
Weeding -
Momodou & Ali
Checking &
Recording Measure Plant
Growth - Ali Check for
Pests - Binta Write Report -
Binta & Ali
C o m m un a l
W o r k
Turn Compost -
Lamin
Fix Fence -
Momodou &
Isatou
Class Work
Class Display on
Garden Bugs &
Insects - All

PAGE 15 PLANNING A SCHOOL GARDEN
Where Can We Go for Help?
When it comes to gardening, you are not alone! There are a multitude of people and
institutions you can contact for tips, advice or if you’ve encountered some problems
along the way.
School Staff: agricultural science, math, home economics and business studies
teachers are an easy first point of reference for any issues pertaining to
gardening, nutrition, food hygiene, preparation and conservation, marketing
sales and accounting. School caretakers usually know more about the school
environment than any other school staff and have lots of practical know-how.
Home gardens near the school: identify well-managed home and communtiy
gardens near the school and ask the owners for help. They will probably be more
than willing to offer advice, show children around, demonstrate gardening
techniques or even donate seeds, seedlings or compost materials.
Agriculture extension workers: a source of technical information and support for
the school garden. They are great resources for answers to questions on pest
control, chosing vegetables to grow, and any agricultural issues.
Agricultural businesses: identify businesses in your area and ask if they would
be willing to show students around or give a talk at the school. E.g. Alkharafi
Vegetable Garden in Kafuta, Kanilai Farm, etc.
Farmers & Market Garden Centers: such centers are often happy to allow
children to visit, give information or demonstrations on horticultural techniques,
marketing, food storage and conservation, or even to contribute seeds and lend
out tools.
Youth Clubs: persuade youth organizations such as your local scouts or sports
club to lend a hand in cleaning the garden or doing other heavy-duty work.
Local Shops, Markets & Vendors: these can provide an outlet for your fresh
produce or provide useful advice on sales and marketing.
Local Council / Water Authorities: the Department of Water Resources, Area
Council or other local authorities can help the school build a well, install running
water, offer advise on implementing an irrigation system or help with rainwater
collection.

SCHOOL GARDENS MANUAL PAGE 16
Forestry personnel: Foresters can help to advise on live fencing and tree
nurseries for your garden.
Regional Public Sector Services: your regional environmental focal point,
community development officer or other service providers can give relevant
technical information and offer advice on possible trainings being offered in
your area.
Health Service: your regional health team, and particularly the nutrition focal
point, can give advice on children’s nutrition needs, the nutritional values of
certain foods and offer guidance on school meals and what nutritious
vegetables you might want to plant.
Specialized NGO’s: NGO’s may be able to help with funding, supplies or
expertise in a wide variety of areas such as agriculture or education. E.g.
Concern Universal, Catholic Relief Services, Association of Farmers, Educators
and Traders (AFET), Volunteer Services Overseas (VSO), Locust Emergence
Project, etc.
Local Charities & Churches: appeal to smaller local charities for financial or in-
kind aid, for instance with garden tools or fencing. E.g. Anglican and Methodist
Churches, Jammeh Foundation for Peace, Dakar-Banjul Plymouth, etc.
Companies & Firms: larger businesses are sometimes willing to donate some
money in exchange for some good publicity. E.g. Africell, Comium, Standard
Chartered Bank, Trust Bank, etc.
The Media & Publicity Outlets: contact newspapers, radio and TV to publicize
your garden’s accomplishments or appeal for help in attaining a specific goal.
Public places such as market centers, a local mosque or clinic can also be used
to hang up posters advertising a produce sale or other garden event.
Alkali, District Chiefs & Governors: important local politicians can often help give
your garden some publicity or get your in touch with other persons or institutions
that may be of some help.
Research Centers: these can provide technical information or advice.
Regional Educational Directorates & SAFMU: The REDs & SAFMU (best
contacted through your Cluster Monitor) are always available to offer technical
support, advice or other general information. At the very least they will be able
to point you in the right direction for where to get specialized help.

PAGE 17 ESTABLISHING A SCHOOL GARDEN
Establishing a School Garden

SCHOOL GARDENS MANUAL PAGE 18
Establishing a School Garden
Choosing a Site
A vegetable garden should be an essential part of every school. This is a piece of land
where crops are intensively cultivated in the smallest space available. Unsuitable land
near the school should not be abandoned for a distant piece of land where the soil ap-
pears to be more suitable. In such a situation, every attempt should be made by teach-
ers and students to improve the land available and make good use of it.
A properly organized garden offers an opportunity for developing children’s minds and
giving students healthy outdoor exercise which often eliminates classroom boredom.
When organized properly, school gardens are also an excellent teaching and learning
resources.
The following points will contribute to the successful selection of a suitable site for gar-
dening:
1. Water: There should be an adequate supply of water in or near (less than 100m)
the area selected for a garden either from a well, hand pump or tap. Open wells
should not be used as they can be dangerous for children.
2. Level Site: The site must be leveled using appropriate garden tools.
3. Fertile Soil: The soil selected must be potentially fertile for an increased produce
yield. The best soil for gardening is loam, which is a combination of sand, clay
and silt with a high content of decomposed organic matter. This type of soil has a
number of advantages such as its high nutritional value for plant growth, and its
water-retaining capacity.
4. Quality Seeds: The quality of seeds determines to a large extent the yield a gar-
dener is likely to get. Viable seeds give an optimum number of plants per hec-
tare.
5. Exposure to Wind and Sun: The garden should not be exposed to strong winds as
they are bad for seedlings. Similarly, avoid areas with dense shade as this weak-
ens seedlings. If the garden is established in a windy area, put up wind breaks.

PAGE
1919 ESTABLISHING A SCHOOL GARDEN
6. Proximity to the School: The garden should be reasonably close to the school so
that children don’t have to walk too far to conduct garden activities, and to be
able to closely monitor for insects, diseases and rodents. It is also useful if it is
near a main road to facilitate transportation.
Garden Size
A school garden should be big enough to accommodate the needs of the school’s pupils
and should thus take into account the school’s enrolment. Similarly, it should also not
be so big as to become unmanageable. It is always better to start small and expand
once teachers, students and community members have gained gardening experience.
Stakeholders will also be more motivated to put in the work the garden needs when they
see how successful a small garden can be.
It is recommended that every 3 pupils share a bed of 1 x 5m = 5 m2. Allowance should
be made for about 50 cm. of space between beds, so calculate 1.5 x 5.5 = 8.25 m2 for
every 3 students. This means that a garden of 20 x 20m = 400 m2 can accommodate
about 48 beds (400 / 8.25 = 48.48) and 144 students (48 x 3 = 144). Similarly, a gar-
den of 50 x 50m = 2500 m2 can accommodate about 303 beds (2500 / 8.25 =
303.03) and 909 pupils (303 x 3 = 909). On top of this, also take into account approxi-
mately a 10% buffer for a possible increase in school enrolment.
Example:
If a school has a roll of 580, you need about 194 beds (580 / 3 = 193.3) to accommo-
date all the children. Each bed plus footpaths is 8.25 m2, so the school would need ap-
proximately 1600 m2 of space (194 x 8.25 = 1600.5) to suit its current enrolment. An
extra 10% can be added to allow for expansion (1600 x 0.1 = 160), bringing the total to
1760 m2. This is equal to a plot of land of 44 x 40m = 1760 m2.
If the space or resources that your school has available are smaller than the recom-
mended amount, this should not be a cause for concern. More than 3 children can be
assigned to one bed and a smaller garden can still be incredibly valuable in providing
nutritional supplements and as a learning resource. However, 20 x 20m should be tak-
en as a minimum size if the garden is to function as a proper learning resource.
PAGE
2020 ESTABLISHING A SCHOOL GARDEN
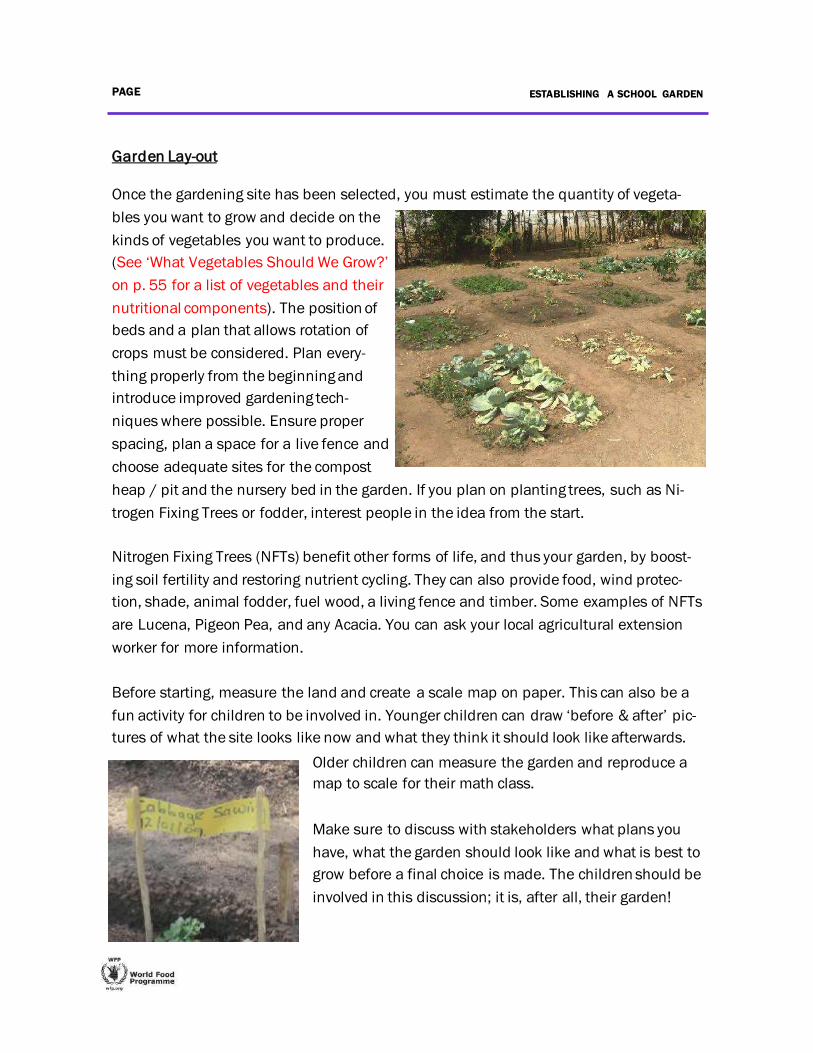
Garden Lay-out
Once the gardening site has been selected, you must estimate the quantity of vegeta-
bles you want to grow and decide on the
kinds of vegetables you want to produce.
(See ‘What Vegetables Should We Grow?’
on p. 55 for a list of vegetables and their
nutritional components). The position of
beds and a plan that allows rotation of
crops must be considered. Plan every-
thing properly from the beginning and
introduce improved gardening tech-
niques where possible. Ensure proper
spacing, plan a space for a live fence and
choose adequate sites for the compost
heap / pit and the nursery bed in the garden. If you plan on planting trees, such as Ni-
trogen Fixing Trees or fodder, interest people in the idea from the start.
Nitrogen Fixing Trees (NFTs) benefit other forms of life, and thus your garden, by boost-
ing soil fertility and restoring nutrient cycling. They can also provide food, wind protec-
tion, shade, animal fodder, fuel wood, a living fence and timber. Some examples of NFTs
are Lucena, Pigeon Pea, and any Acacia. You can ask your local agricultural extension
worker for more information.
Before starting, measure the land and create a scale map on paper. This can also be a
fun activity for children to be involved in. Younger children can draw ‘before & after’ pic-
tures of what the site looks like now and what they think it should look like afterwards.
Older children can measure the garden and reproduce a
map to scale for their math class.
Make sure to discuss with stakeholders what plans you
have, what the garden should look like and what is best to
grow before a final choice is made. The children should be
involved in this discussion; it is, after all, their garden!

SCHOOL GARDENS MANUAL PAGE 21
Gardening Calendar
It is important to choose the right vegetables that are appropriate for cool and warm
season weather. The following is a list of vegetables according to which season / term
they can be grown. Contact your local agricultural extension worker for more details and
advice. When choosing your vegetables also consider which vegetables should be grown
for their nutritional value (See What Vegetables Should We Grow? p. 55)
1st T e rm :
Sept. - D e c.
Cool S easo n
2nd T e rm :
J a n . - A pril
Warm Se aso n
3rd T e rm :
A p r i l - J u ly
Warm S e aso n
Summer H o lidays:
July - Se pt .
Wet S easo n Beans
Beetroot Bitter Tomato
Broccoli Cabbage
Carrot Cauliflower
C o r n Cowpea
Cucumber Garden Egg Irish Potato
L e e k Lettuce
O k r a O n i o n Parsley P e a s
Pepper Pumpkin
Soya Bean Spinach Squash
Sweet Corn Sweet Potato
Tomato Turnip
Watermelon

PAGE 22 ESTABLISHING A SCHOOL GARDEN
A Sample Garden Plan
C arrot
Tomato
Cabbage
C arrot
Garden Eggs
Beet root
Radish
Compost Pit
Lettuce
Onions
Greens
Hot Pepper
Cucumber
Bitter Tomatoes
Nursery Bed
Beans
S orrel
Sweet Pepper
Tomato
C arrot
Garden Eggs
Cabbage
Onions
Radish
Cucumber
Lettuce
Hot Pepper
A convenient width for a vegetable bed is 1m and length can be anywhere from 3 -5m.
The distance between the bed paths can range from 30 – 50 cm. The approved plan
should be kept to serve as a guide while making measurements during the actual work
of laying out the garden. Long pointed pickets and larger number of short ones about 30
cm long will be needed for setting the permanent boundary lines. The construction of
straight garden paths makes a garden look tidy and neat.
Live Fencing
Live fencing is the use of trees and shrubs to create an animal-proof barrier. A live
fence can help to reduce pressure on the environment by replacing dead wood fencing
with live materials. Additionally many live fence species have multiple uses such as
food, fuel wood, fodder, poles, medicine, other raw materials, etc.
The challenge of live fences is that they require significant maintenance. Watering dur-
ing establishment, pruning, reinforcing with dead material, and periodic replanting may
be necessary. Pruning of most live fencing species can be an unpleasant job since they
are extremely thorny;
SCHOOL GARDENS MANUAL PAGE
2323
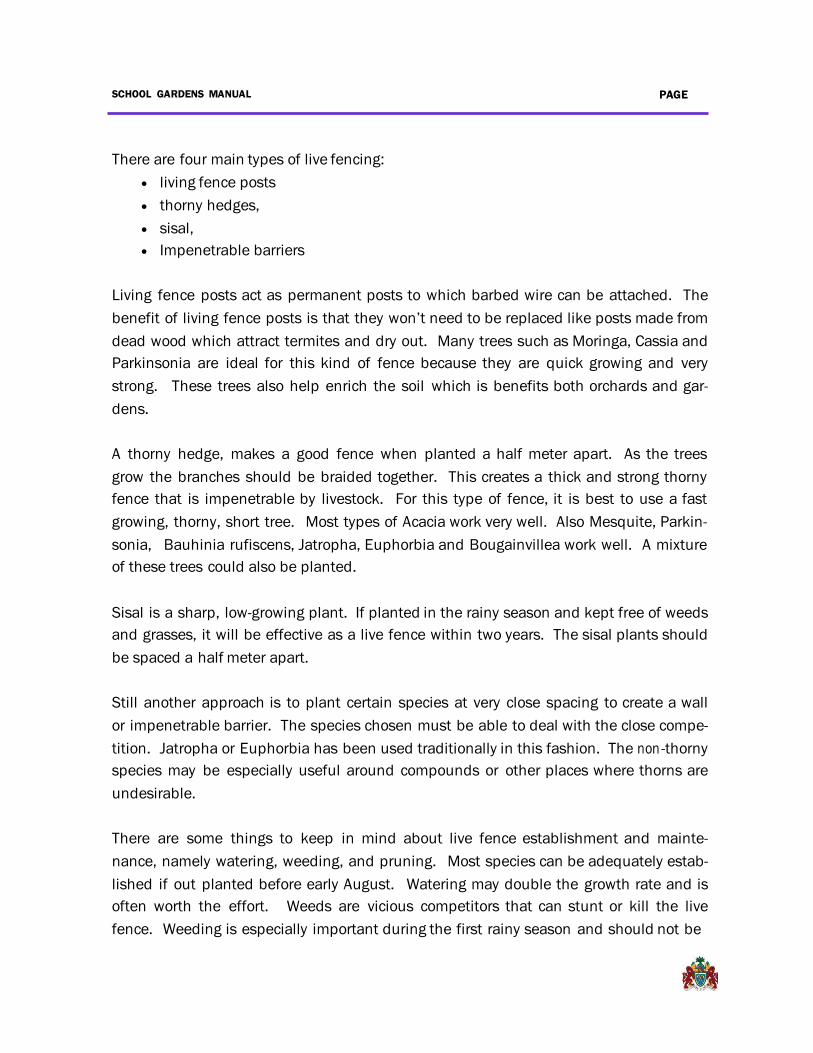
There are four main types of live fencing:
living fence posts
thorny hedges,
sisal,
Impenetrable barriers
Living fence posts act as permanent posts to which barbed wire can be attached. The
benefit of living fence posts is that they won’t need to be replaced like posts made from
dead wood which attract termites and dry out. Many trees such as Moringa, Cassia and
Parkinsonia are ideal for this kind of fence because they are quick growing and very
strong. These trees also help enrich the soil which is benefits both orchards and gar-
dens.
A thorny hedge, makes a good fence when planted a half meter apart. As the trees
grow the branches should be braided together. This creates a thick and strong thorny
fence that is impenetrable by livestock. For this type of fence, it is best to use a fast
growing, thorny, short tree. Most types of Acacia work very well. Also Mesquite, Parkin-
sonia, Bauhinia rufiscens, Jatropha, Euphorbia and Bougainvillea work well. A mixture
of these trees could also be planted.
Sisal is a sharp, low-growing plant. If planted in the rainy season and kept free of weeds
and grasses, it will be effective as a live fence within two years. The sisal plants should
be spaced a half meter apart.
Still another approach is to plant certain species at very close spacing to create a wall
or impenetrable barrier. The species chosen must be able to deal with the close compe-
tition. Jatropha or Euphorbia has been used traditionally in this fashion. The non -thorny
species may be especially useful around compounds or other places where thorns are
undesirable.
There are some things to keep in mind about live fence establishment and mainte-
nance, namely watering, weeding, and pruning. Most species can be adequately estab-
lished if out planted before early August. Watering may double the growth rate and is
often worth the effort. Weeds are vicious competitors that can stunt or kill the live
fence. Weeding is especially important during the first rainy season and should not be

SCHOOL GARDENS MANUAL PAGE
2424
Also be sure to protect the fence with a firebreak during the dry season. Thorny species
must be regularly pruned to create a dense, impenetrable barrier. The best time to do
major yearly pruning of established plants is during dormancy, to inflict as little stress as
possible. In The Gambia, it is optimal to prune live fence species a month or two before
the rains, when they are dormant but will soon be actively growing.

SCHOOL GARDENS MANUAL PAGE
2525
Windbreaks:
Windbreaks are strips of vegetation planted for the specific purpose of decreasing wind
speed to protect soils, crops and communities. Excessive wind can decrease the
productivity of crops by impairing flower pollination (i.e.: cashew and mango) or by in-
creasing water stress from evaporation and transpiration. Limiting wind speed increas-
es crop productivity and decreases wind erosion. It can also create a microclimate pro-
tected from extreme temperatures.
A good windbreak should slow the wind but not entirely block it. The most effective
planting scheme involves a row or two of low shrubs placed on the windward side and
two or three rows of taller trees placed on the inside.
Planting a windbreak takes up space that could be used for crops which could some-
times be discouraging. However, windbreaks protect the crops and help them to have a
higher yield. Also with carefully chosen species, they may provide other useful products
such as medicine, animal fodder, fuel wood, food, or timber.
Shade:
Trees are useful in providing shade for humans, crops and animals. The temperature
under a tree is much cooler than in the sun. By having trees for shade, children can get
more work done in the garden. Many plants in the garden benefit from shade in addition
to the young seedlings in a tree nursery. Most trees filter the sunlight to the plants be-
low rather that blocking the sun entirely which allows the plants to get enough sunlight
to grow
SCHOOL GARDENS MANUAL PAGE
2626
Reforestation:
As in many places all over the world, the forests and the trees of The Gambia are disap-
pearing. Trees and forests are essential to life in The Gambia. It is important that every
citizen plant trees and support the rebuilding and protection of the forests.
When building a tree nursery, it is necessary to think about this issue. Every school with
a tree nursery should include some trees that will be planted around the garden. These
trees can include any species that is common in the bush presently, but also plant trees
that used to be common but now are scarce. Bush Mango and Silk Cotton are all trees
that are often removed from the forest and rarely replanted. These are slow growing
trees, but they have an important role to play in our live fencing and reforestation in The
Gambia. The types of trees that people use in the area should also be considered.
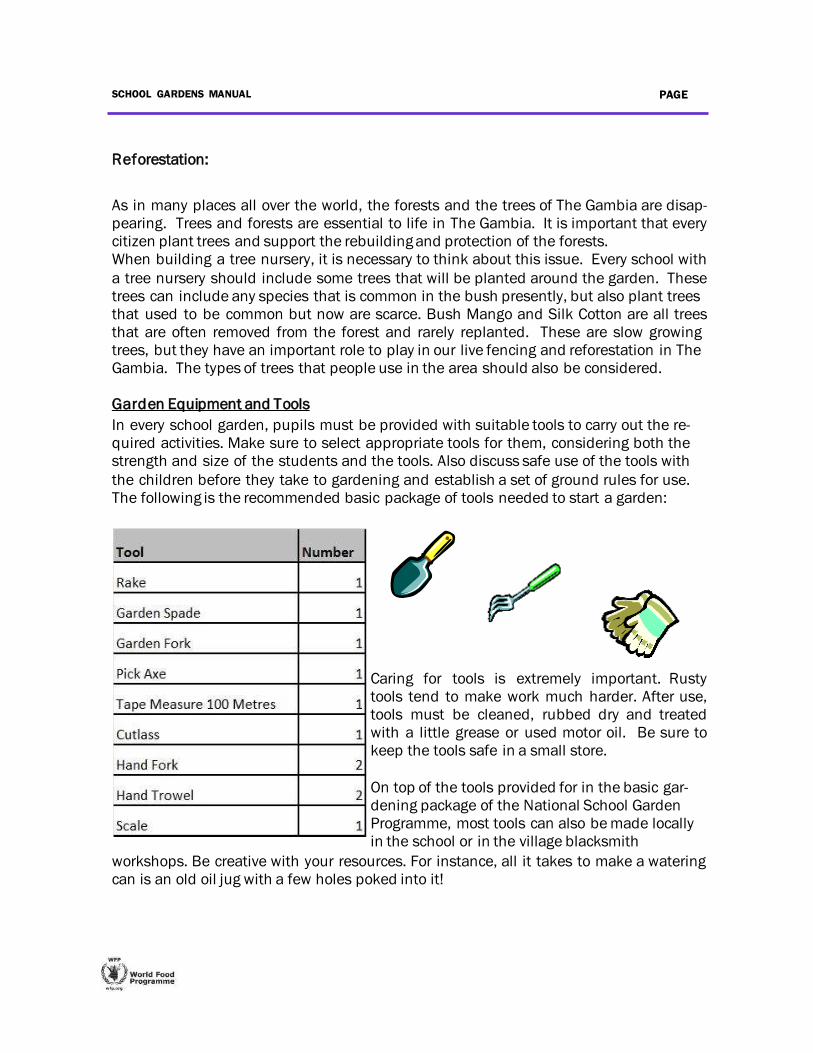
Garden Equipment and Tools
In every school garden, pupils must be provided with suitable tools to carry out the re-
quired activities. Make sure to select appropriate tools for them, considering both the
strength and size of the students and the tools. Also discuss safe use of the tools with
the children before they take to gardening and establish a set of ground rules for use.
The following is the recommended basic package of tools needed to start a garden:
Caring for tools is extremely important. Rusty
tools tend to make work much harder. After use,
tools must be cleaned, rubbed dry and treated
with a little grease or used motor oil. Be sure to
keep the tools safe in a small store.
On top of the tools provided for in the basic gar-
dening package of the National School Garden
Programme, most tools can also be made locally
in the school or in the village blacksmith
workshops. Be creative with your resources. For instance, all it takes to make a watering
can is an old oil jug with a few holes poked into it!

PAGE 27 SEEDLING PRODUCTION
Seedling Production
SCHOOL GARDENS MANUAL PAGE 28
Seedling Production
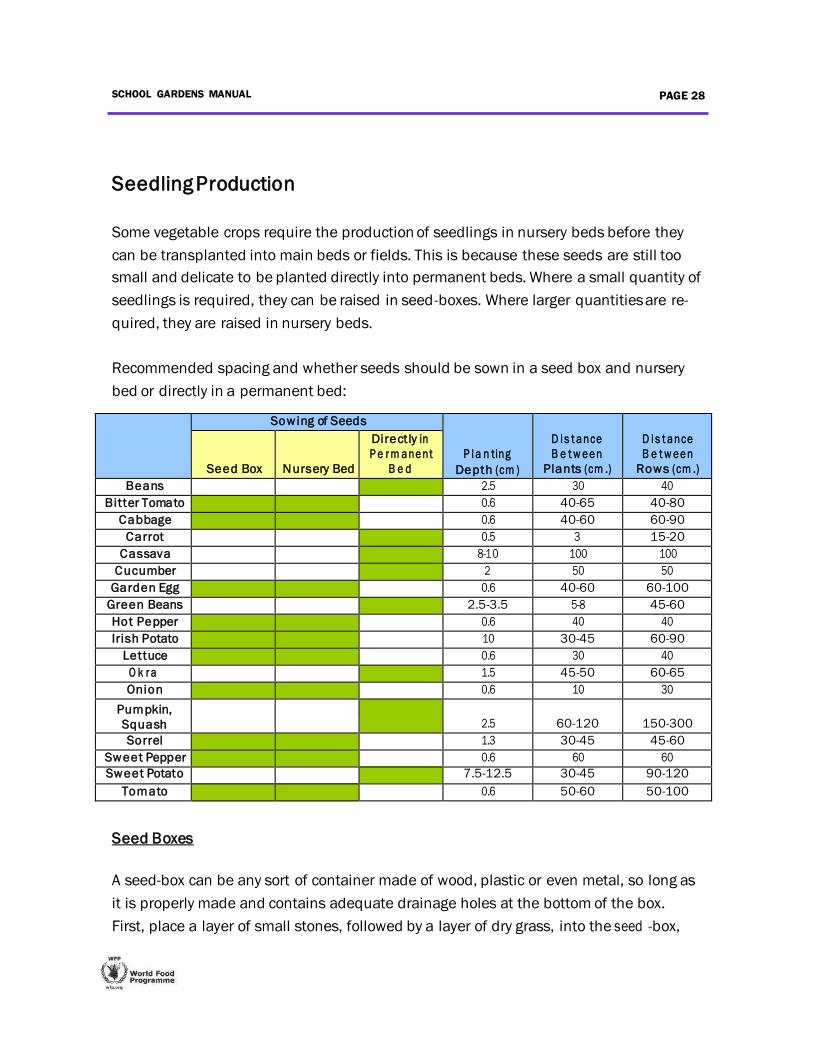
Some vegetable crops require the production of seedlings in nursery beds before they
can be transplanted into main beds or fields. This is because these seeds are still too
small and delicate to be planted directly into permanent beds. Where a small quantity of
seedlings is required, they can be raised in seed-boxes. Where larger quantities are re-
quired, they are raised in nursery beds.
Recommended spacing and whether seeds should be sown in a seed box and nursery
bed or directly in a permanent bed:
Sowing of Seeds
P l a n ting
Depth (cm )
D i s t ance
B e t w e en
Plants (cm .)
D i s t ance
B e t w e en
Rows (cm .)
Seed Box
Nursery Bed
Directly in
P e r m anent
B e d Beans 2.5 30 40
Bitter Tomato 0.6 40-65 40-80 Cabbage 0.6 40-60 60-90
Carrot 0.5 3 15-20 Cassava 8-10 100 100
Cucumber 2 50 50 Garden Egg 0.6 40-60 60-100
Green Beans 2.5-3.5 5-8 45-60 Hot Pepper 0.6 40 40 Irish Potato 10 30-45 60-90
Lettuce 0.6 30 40 O k r a 1.5 45-50 60-65 Onion 0.6 10 30
Pumpkin,
Squash
2.5
60-120
150-300 Sorrel 1.3 30-45 45-60
Sweet Pepper 0.6 60 60 Sweet Potato 7.5-12.5 30-45 90-120
Tomato 0.6 50-60 50-100
Seed Boxes
A seed-box can be any sort of container made of wood, plastic or even metal, so long as
it is properly made and contains adequate drainage holes at the bottom of the box.
First, place a layer of small stones, followed by a layer of dry grass, into the seed -box,

PAGE 29 SEEDLING PRODUCTION
then fill it with the finest loam soil. This soil is usually top soil. If your soil is sandy, it
should be mixed with well rotted organic matter or compost. Once the soil has been put
in the seed-boxes, it should be watered when dry. The soil in the seed-box should then
be sterilized with hot boiling water to destroy harmful weed seeds and soil organisms
which can cause plant diseases.
It is important that the seed box spends a large part of the day in the shade, especially
upcountry where it gets very hot during the day. The box should receive shade between
11:00 am and 4:00 pm. The best solution is to plant trees, which offer light shade and
simultaneously enrich the soil. You can also place the box on a verandah or under a
nursery shed at its eastern end. Ideally, the boxes should be placed on a surface where
they can be placed both in the shade and in the sun, as required by the weather.
In the seed box, make drills across the soil with a blunt stick about the size of a pencil.
Drills should be 1.5 cm deep and not less than 8 cm apart. Then sow the seeds in the
drilled holes and allow even distribution of the soil with a watering can. Label the box
with the name of the plant and the date of sowing.
Care should be taken while watering the seed box as over-watering induces waterlog.
Only water when the soil appears dry. In preparation for transplanting, the seedlings
should be somewhat ‘hardened off,’ i.e. the amount of water they are given should be
decreased as the time for transplanting approaches.
Planting out
Once the seedlings have sprouted to a height of about 5 cm. and are strong enough to
be transplanted to permanent beds they can be taken from the seed boxes to the nurse-
ry beds. Here they should be planted with wider spacing to allow the developing seed-
lings to continue their growth. The best time to transplant is usually in the evening and
not in the morning or during the heat of the day. Mix compost manure with the soil be-
fore transplanting your seedlings. After planting, use a watering can to water the plants.

SCHOOL GARDENS MANUAL PAGE 30
Nursery management
Nursery management begins with proper seed bed prepara-
tion to give the seeds the required optimum conditions for
germination. Demarcate the nursery with pegs dividing the
different seed beds. Follow the same method of sowing as
described for the seed boxes, taking care that each different
kind of seed is sown according to its requirements, and
drilled to the correct depth and properly spaced.
If the nursery beds are exposed to the sun, they should be
mulched. Mulching conserves moisture, keeps the soil temperature down, inhibits weed
growth and lessens erosion damage by placing a protective layer over the soil. A variety
of mulches can be used, depending on the local environment, including leaves, grass
clippings, hay, straw, shredded bark, sawdust, shells, wood chips, shredded newspaper,
cardboard, manure, etc. Decayed leaves or other organic matter are generally best as
they can also simultaneously act as a composting system. Remove the mulch as soon
as the seeds begin to germinate.
You may also consider having the nursery in an area of dappled shade (shade from
trees with high branches and sparse leaves, still allowing some sunlight through), in or-
der to protect the seedlings from direct sunrays. However, this may not be necessary
during the cool months of December and January, especially in Western Division.
Watering of the nursery beds must be carried out regularly to prevent the seeds from
rotting and should be done during early morning or late evening to prevent evaporation.
As soon as the seeds begin to germinate the mulch or shade should be removed. Thin
out the seedlings where they are over-crowded to prevent spindly growth. The thinned
out seedlings can be transplanted into the new nursery boxes or nursery beds until they
are ready for transplanting to the field. Fertilizer such as farm yard manure (FYM) and/
or compost manure are to be applied as recommended for each crop and incorporated
into the soil.
PAGE 31 SEEDLING PRODUCTION
Weeds & Pests
Weeds should never be tolerated in the seed boxes or nursery beds and must be re-
moved immediately to prevent competition with the vegetables. Any seedling found to
be diseased must also be removed quickly and destroyed. The persons looking after the
nursery should be particularly on alert for pests. Any larvae, eggs or adult insect found
must be handpicked and killed. (See the section on Pest Control Methods, p. 45 for
more information.)
Transplanting
The stage at which seedlings are transplanted to their permanent beds differs from crop
to crop, but should generally be done as soon as they are big enough for handling, any-
where between 5-8 cm. In some cases it can be done as soon as six weeks after sowing.
In general, transplanting early on in the plant’s development is better than waiting until
it is too big. Transplanting is best done during the evening and not in the morning or dur-
ing the day when the sun is hot. Transplanting in the evening will give the plants over 12
hours to recover from shock before they are exposed to the heat of the sun.
When transplanting, the seedling should be lifted from the box or bed with a trowel.
Care must be taken to avoid damaging the root system.
The seed boxes and nursery beds should be watered
heavily about half an hour before lifting. This will enable
you to remove the plant with a ball of soil around the
root system. A hole should be prepared on the perma-
nent bed for each plant prior to lifting so that minimum
time is wasted between removal and planting. Watering
the vegetables regularly in the mornings and evenings
should continue for 1-2 weeks after transplanting.

SCHOOL GARDENS MANUAL PAGE 32
Maintaining the Garden

PAGE 33 MAINTAINING THE GARDEN
Maintaining the Garden
Tillage
Tillage involves digging, ploughing, ripping or turning soil to provide appropriate condi-
tions for crops to grow. It is an essential operation in preparing the land for planting, as
it eliminates weeds, aerates the soil and helps micro-organisms grow, thus maintaining
soil fertility. It will also allow for water and roots to penetrate the soil more easily.
Deep tillage is done from about 20-30 cm. After turning the earth, the soil should be al-
lowed to weather for two weeks while big clods are broken down. During this period or-
ganic matter (cow dung or compost) should be added. If your garden site is in a low and
wet area, raise the beds slightly. If the area is high and dry, sunken beds should be con-
structed as they help to retain moisture. Sunken beds are about 15 cm. deep, although
sometimes the sides of the bed are built up above the surface.
You can also already add a natural pesticide to the soil while digging beds, such as
wood ash or neem leaf powder, as this will help fight against termites and bugs. (See
the section on Organic Pesticides, p. 46)
Spacing
Use a garden line or tape measure to ensure proper spacing between plants and to line
them up on the bed. The roots of seedlings should be allowed to spread naturally in the
hole. It is important to make sure that they are not twisted or coiled as this will cause
retarded growth. Use both hands to firm the soil around the root system of the trans-
planted seedling, taking care not to damage it. (Take care to follow the spacing advice in
the chart on p. 28)
Watering Beds
It is crucial that watering the beds is done adequately and at regular intervals. Seeds /
seedlings should be watered as soon as they are sown or transplanted. After this,
watering should be done twice a day, in the mornings and evenings to allow for
SCHOOL GARDENS MANUAL PAGE 34
maximum infiltration and minimum evaporation. In general, plants should receive 5 mm
of water during each watering, though this obviously differs per crop. The top 20 cm. of
the bed should be kept moist.
Water the plants close to the roots to avoid splashing the leaves. Also water the beds
gradually so that the water does not run off, but rather soaks into the ground. If water is
simply dumped on the bed it can cause the bed to erode, the seeds to be flooded and
the plants to be injured by the sheer force of the water. Use a watering can or make
one out of an old oil jug by poking holes into it.
Keeping gardens adequately watered is often where school gardens fail, particularly
when there is nobody to take responsibility for the garden during school holidays. That is
why it is crucial to decide on a watering schedule beforehand and stick to it. Also make
sure that if the garden has a lock on the gate, the key is present when the garden is set
to be watered. If all the teachers leave during the holidays, appoint a community
member or one of the older, responsible children to be in charge. It would be a shame
to lose all your vegetable crops simply because the plants didn’t receive enough water
during the holidays!
Manures
It is important that the garden gets a regular supply of organic matter in the form of ma-
nure. Manure can be farm yard manure (FYM), green manure or compost manure. Com-
post manure is the most common form of manure and easiest to obtain for a garden.
(See the section on Compost-Making, p. 38 for more information.) Animal manure can
be obtained from herds, sheep and goat pens or poultry houses. A green manure crop
can be planted in the garden during the rainy season and ploughed just before the end
of the rains when there is enough moisture for decomposition.
High temperatures in the tropics encourage rapid breakdown of organic matter in the
soil. This has made many types of tropical soils deficient in organic matter, particularly
the well-drained, sandy soils. The Gambia is no exception and there is no amount of or-
ganic matter applied in a garden which can last for more than one year.

PAGE 35 SEED COLLECTION AND STORAGE
Seed Collection and Storage
One of the benefits of gardening is that, if done right, the
garden can be self-sustaining. One need not rely on buying
seedlings if you know how to properly collect and store the
seeds that are produced in the garden itself.
The most important, and overlooked, fact about seeds is
that they are alive. Metabolic activities are continuous
throughout the life of a seed. This is why you must always
protect seeds from moisture, heat, animals and insects.
These are some general tips on seed collection and storage for later use in the garden:
1. Collect seeds from multiple, healthy plants. Look at the entire plant from which
you are collecting seeds.
2. Label when collecting. Be as thorough as possible and include name, variety,
date, location, etc.
3. Timing is important, as seeds that are collected too early will not contain enough
stored nutrition:
a. Fleshy fruits (tomatoes, eggplant, pepper, etc.): Collect seeds when fruit is
slightly overripe, but make sure it is not rotting.
b. Seed crops (the seed is the edible part of the plan, e.g. corn, beans, etc.):
These have a large time frame to collect the seed. Collect when it has
dried on the plant; further drying may still be required.
c. Plants that shatter readily (lettuce, onions, okra, etc.): These seeds dis-
perse when mature, so you have to be ready to collect them. Daily obser-
vation may be required; a ventilated bag can also work to catch dispers-
ing seeds.
d. Onions are biennial, which means they take two years to complete their
biological cycle. Collect the first year plants just as they start to bulb and hang
them in a dry place until the next planting season. Replant the small bulbs and
these will produce seeds. If you’re planting onions for seeds, sow in February, so
that you will harvest close to the rainy season and have less time to store the
seeds.

SCHOOL GARDENS MANUAL PAGE 36
4. Once collected, wash and dry seeds. Large seeds need 5-6 days of drying, small
seeds need 3-4 days. Seeds should be dried in the shade. Store only thoroughly
dried seeds and once dried, do not allow seeds to become damp again.
5. Fleshy, pulpy seeds (especially tomato) can be fermented in water for a few days
after collection to reduce bacterial canker. This will also help remove all of the
pulp, which is very important before storage.
6. Keep the storage area as cool and dry as possible.
7. Peas and beans store best in bags, rather than airtight containers.
8. Check stored seeds often for fungus and insect damage. It is also a good idea to
periodically open airtight containers to release water vapor coming off stored
seeds.
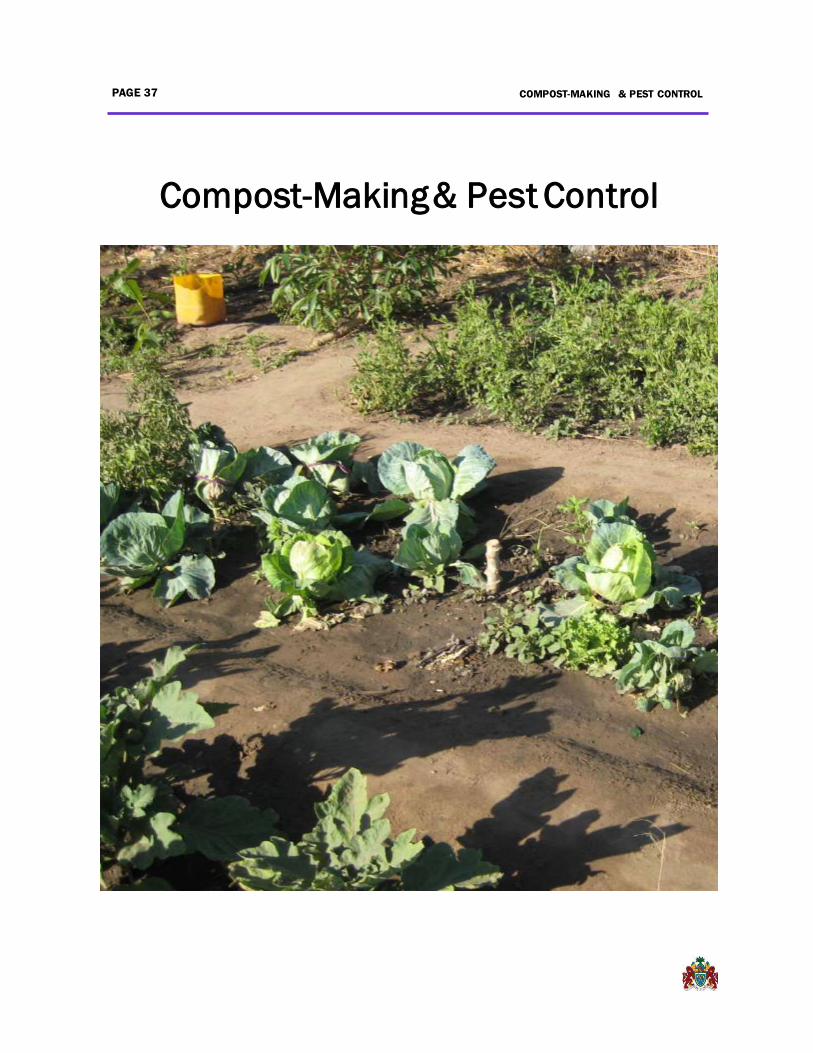
PAGE 37 COMPOST-MAKING & PEST CONTROL
Compost-Making & Pest Control

SCHOOL GARDENS MANUAL PAGE 38
Compost-Making During training sessions, this section is treated as a practical one, where the required materials, for
composting (mentioned below) are made available in advance, for demonstrations. It is recommended
that all trainees should fully participate in the practical exercise.
Introduction
In The Gambia, the sustainable upkeep of the country’s tropical soil is currently a point
of concern, as drought in the last decade and deforestation, combined with the
extens ive and continuous use of farmlands has rendered the country’s fertile soils quite
poor. Compost-making is thus the ideal way to conserve the fertility of a garden’s soil to
enhance crop quality, production and productivity.
Compost is organic matter such as crop residues or manure that has been well
decomposed in either a pile or pit and is well on its way to becoming humus. Compost is
largely the result of the activities of various micro-organisms: bacteria, fungi, protozoa,
algae, as well as earthworms and insects. These organisms feed on the materials and
gradually convert them into humus.
The use of compost is not only a means of fertilizing soil, but also improves soil
structure, texture, circulation of water, air and nutrients. Compost added to sandy soils
increases its water retention capacity. This means that water stays in the soil longer and
thus remains available to plants for a longer period, which is particularly useful during
drought periods. A good soil structure can better resist the impact of rain and wind and
a soil medium with adequate organic matter is less sensitive to erosion.
Principles of Composting
1. Materials
Good compost needs mixed organic materials, micro-organisms, a little soil and water.
Any sort of non-woody plant material, crop residue (maize stalks, ground nut hay),
vegetable remains, food left-overs, or chicken or livestock manure can be used. Do not
use the faeces of humans, dogs or cats, as they are likely to contain parasites and avoid
infected vegetable and plant waste. Stones, thin pottery, pieces of metal, wire, plastic
bottles, sheet plastics, rubber, nylon and other man-made fibers, as well as hard thorns
and roots should also be removed.
PAGE 39 COMPOST-MAKING & PEST CONTROL
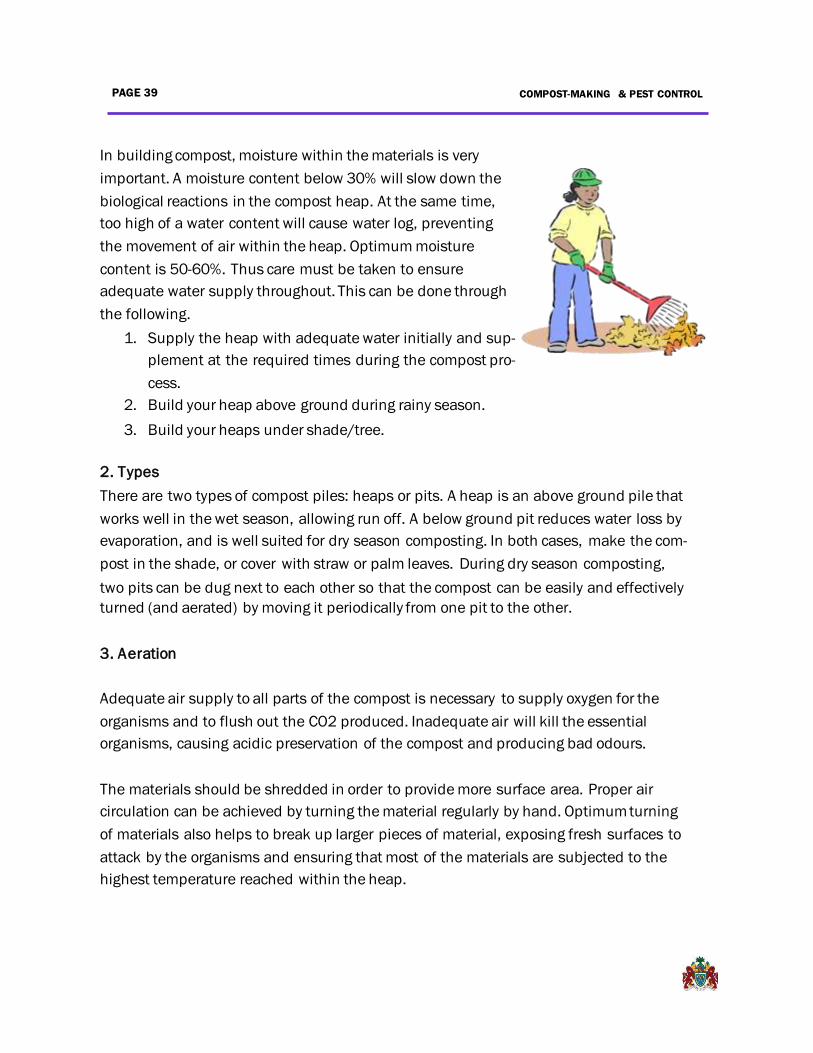
In building compost, moisture within the materials is very
important. A moisture content below 30% will slow down the
biological reactions in the compost heap. At the same time,
too high of a water content will cause water log, preventing
the movement of air within the heap. Optimum moisture
content is 50-60%. Thus care must be taken to ensure
adequate water supply throughout. This can be done through
the following.
1. Supply the heap with adequate water initially and sup-
plement at the required times during the compost pro-
cess.
2. Build your heap above ground during rainy season.
3. Build your heaps under shade/tree.
2. Types
There are two types of compost piles: heaps or pits. A heap is an above ground pile that
works well in the wet season, allowing run off. A below ground pit reduces water loss by
evaporation, and is well suited for dry season composting. In both cases, make the com-
post in the shade, or cover with straw or palm leaves. During dry season composting,
two pits can be dug next to each other so that the compost can be easily and effectively
turned (and aerated) by moving it periodically from one pit to the other.
3. Aeration
Adequate air supply to all parts of the compost is necessary to supply oxygen for the
organisms and to flush out the CO2 produced. Inadequate air will kill the essential
organisms, causing acidic preservation of the compost and producing bad odours.
The materials should be shredded in order to provide more surface area. Proper air
circulation can be achieved by turning the material regularly by hand. Optimum turning
of materials also helps to break up larger pieces of material, exposing fresh surfaces to
attack by the organisms and ensuring that most of the materials are subjected to the
highest temperature reached within the heap.

SCHOOL GARDENS MANUAL PAGE 40
4. Nutrients
The provision of nitrogen for cell proteins is also
important for the composting process. It is the
most important nutrient, and in general, if
sufficient nitrogen is available in the organic
matter most other nutrients will also be available
in adequate quantities.
In The Gambia’s environmental situation fresh
green wastes such as weeds could be used with
animal refuse. Nitrogen may also be added to
compost heaps in the form of organic fertilizers
such as bone meal, oil cakes and dried blood. Inorganic nitrogen fertilizers such as urea
and ammonium nitrate may also be used. In order to maximize the nutrient content of
the product compost it is important to reduce serious leaching from the heap by
protecting it against heavy rain and water logging.
5. Temperature
High temperatures help in accelerating the decomposition of organic materials. This is
because the beneficial micro-organisms are active at temperatures between 60 - 70°C.
During decomposition some of the energy released by the breakdown of materials gives
off heat and this causes a rise in temperature.
Composting Methods
Several methods are used to build compost. The method used would generally depend
upon the following:
1. The environmental situation surrounding you
2. The type of waste available, whether they are easy to breakdown and contain
many pathogens
3. The quantity of materials required for the process
4. The allowable cost in terms of time labour, equipment and space
5. What the compost will be used for

PAGE 41 COMPOST-MAKING & PEST CONTROL
1. Pit Method
The pit method entails building the compost in layers and is repeated to a convenient
height. The dimensions of the heap could be 2m x 2m x 1m height (4m3). The layers of
the compost could be built in the following manner:
Layer 1 (at the base of the pit)
- Topsoil at the base
- Green leaves, weeds, plant and succulent dried grasses (finely chopped)
- Small quantities of chemical fertilizer (Urea)
- Kitchen waste
- Fish bone
- Rice and groundnut waste
- Ash or lime could be added
Layer 2
- Sawdust
- Wood ash
Layer 3
- Chicken manure
- Sheep manure
- Cattle manure
- Goat manure
Layer 4
- Topsoil
- Water
The building of layers should be done quickly and the layers can be repeated until you
reach the height envisaged. The first turning of the heap should be done after 2 -3
weeks. Turning aids the aerobic bacteria in the decomposition process. A second
turning is done 3 weeks after the first turning and it may even be necessary to turn the
heap over again for a third time. Maturation of the compost takes about 3 -6 months

SCHOOL GARDENS MANUAL PAGE 42
depending on the environment and the material used. Watering the heap every third
day is important because this encourages the growth of bacteria. The watering should
not be too wet to saturation level. The compost is ready once it has reached a semi -
rotted state where the materials are no longer distinguishable.
Moisture tests are important and are done by putting a bundle of straw in the heap. If
after 5 minutes the straw feels dumpy then the moisture level is good but if it is still dry
then the moisture is too low.
Temperature tests are done by putting a stick in the centre of the heap about 5 days
after completing the compost heap or after the final turning over. Leave the stick for 5 -
10 minutes, then remove it and feel it immediately. If the warmth of the stick is higher
than normal body temperature (37°C) then decomposition is taking place. The ideal
temperature for the heap is 60-70°C.
2. Quick Method
Materials
Millet husk, rice straw or saw dust – 10 bags (500kg)
Animal manure – 10 bags
Top soil – 100 kg.
Vinegar – 0.5 litre
Sugar – 0.5 kg.
Urea – 1 kg.
Water – 20-40 liters (as a start and add more as required)
Method
1. Mix the millet husk or other waste with the animal manure and topsoil
2. Sprinkle the solution of vinegar, sugar, urea and water on the mixture
3. Add extra water to make it moist. Press the mixture with your hand, when it is
wet then the moisture content is enough
4. Place the mixture under the shade and cover the compost with plastic bags for 7
-10 days and it will be ready for harvest.

PAGE 43 COMPOST-MAKING & PEST CONTROL
Note
Top soil contains some humus, which helps decomposition go faster
Vinegar also contains acids, which helps the organisms to do their work. If you
don’t have vinegar, water from sour milk or water in which rice has been washed
(not cooked) can be used
Urea helps decomposition go faster and contains nitrogen, which can dissolve
easily; chicken manure can replace urea.
Pest Control For training purposes, this module is a practical one that requires demonstrations, with the full
participation of the groups being trained, therefore all materials to be made available in advance .
Samples of plants affected by the different types of pest groups should also be presented, if possible.
Agents Responsible for Crop Losses
Numerous factors are responsible for influencing the growth of vegetable crops, both
favourably and adversely. Unsuitable environmental conditions are sometimes
responsible for physiological disorders leading to poor plant growth. These include a
shortage or excess of water, imbalance of nutritional elements, excessive heat,
unsuitable soil reactions, etc. Aside from these environmental factors, there are five
main pest groups: viral, fungal, bacterial, insecticidal and animal.
Viruses are spread by insects (aphids, leafhoppers, whitefly, thrips and nematodes) and
humans (e.g. grafting with a dirty knife). All parts of the plant can be susceptible to
viruses. Symptoms caused by viruses include small fruit yields and/or poor quality fruits,
spotting or wilting of leaves, yellow and green discolorations on the leaves, general
spotting on leaves, and dwarfed leaves or curling under of leaves.
The solution to many viruses is death. If the plants are in the seedling or very young
stage, start over and make sure your seed stock is from a good source. Try weed
control, removing excess debris and cleaning garden tools. Proper spacing will reduce
stress on plants and make them less vulnerable to attack. Removing the harvestable
part of the plant as soon as it’s ripe and burning infected plant material will also cut
down on attacks.

SCHOOL GARDENS MANUAL PAGE 44
Fungi are spread through nearly all possible vectors. The most harmful fungi are
parasitic. The fungi family includes blights, moulds, mildews, rusts and mushrooms
(which do not damage vegetables).
Good sanitation and crop rotation can prevent most fungus attacks. However, if one
occurs try using either a bleach, garlic or soap solution.
Bacteria are microscopic organisms that can be found in the air, water, soil and any
other imaginable place. Some are good and some are bad.
There are three main effects of bad bacteria on plants: rots, wilting and galls. Rots
attack the leaves, stems, branches and tubers of the plant. Infected parts appear to be
soft and slimy. Wilting causes the plant to look like it is dying. Galls appear as
overgrowths in a specific part of the plant.
Insects can attack four main parts of a plant:
Roots are attacked by nematodes and root maggots.
Stems are attacked by borers, aphids, stalk-yed fly and
mealy bugs.
Leaves are attacked by aphids, grasshoppers, locusts,
thrips, caterpillars, cutworms, leaf miners and white flies.
Fruit is attacked by fruit flies and squash bugs.
Seedlings can also be attacked by army worms, leaf
beetles, cutworms and hairy caterpillars
Managing Crop Losses
The protection of vegetable crops should be essentially preventive. This requires
frequent phytosanitary inspection to discover the start of attacks and to manage their
development by the most appropriate means. There are multiple ways to manage such
attacks. Before considering the use of any organic or inorganic pesticide, consider using
traditional cultural techniques. Cultural techniques are economical, easy to apply and
will not expose any danger to the farmers, the consumer and the environment.

PAGE 45 COMPOST-MAKING & PEST CONTROL
These techniques include:
Playing with the date of sowing or planting
The establishment of a well planned crop rotation pattern
The selection of a good garden site, for example an area with well drained soil
The use of resistant varieties of vegetables either to the vector or the pathogen
The use of fresh water supply for irrigation
The use of quality, healthy seeds or seedlings as planting materials
Timely application of fertilizer at the recommended dose
Carrying out regular weed control
Hand picking of caterpillars and crossing them when they are found in the garden
in small quantities
Application of adequate organic fertilizer
At the end of each vegetable growing season all crop residues should be uprooted,
dried and burnt
Pest Control Methods
If unfortunately, after using the cultural practices mentioned above, damages to crops
still occur, one can resort to the use of pesticides, bearing in mind that pesticides can
cause damages to the farmer himself, his family, the consumer and the environment.
Pesticides are chemicals used to prevent, control or destroy pests. They include:
Chemical growth regulators used to regulate plant growth
Chemical repellents used to repel pests
Chemicals that kill the pest upon contact
Pesticides are grouped according to their chemical nature. The major groups are:
1. Plant-derived organic pesticides
2. Inorganic pesticides
3. Synthetic pesticides
When using pest control methods in vegetable production preference should be given to
the use of organic or plant-derived pesticides or botanicals.

SCHOOL GARDENS MANUAL PAGE 46
Only when cultural techniques have been applied and plant-derived pesticides have
failed to solve the pest problem in the garden, one can consider using synthetic pesti-
cides judiciously. In using the synthetic pesticides we should select those that are least
persistent, such as oregano phosphates, carbamates and pyrethrinoides, which are par-
ticularly effective. When using any pesticide, ensure that the proper application tech-
niques are followed before and during use:
1. Know the pest and the problem it causes
2. Select the right pesticide to control that pest
3. Use the right spraying equipment with the right nozzle and the correct calibration
4. Respect the recommended dose
5. Localize the application (treating only the infested area)
6. Use proper protection when applying pesticides
7. Keep children out of the garden for at least 24 hours after applying a synthetic
pesticide.
8. Avoid preventive treatment
Organic Pesticides
1. Castor bean
Pests: Moles, rats, burrowing/digging rodents
Method: Plant the plants around the garden, they act as a natural repellent.
2. Eucalyptus
Pests: Bean beetle, potato tuber moth.
Method: Take the leaves of the eucalyptus and dry in the shade, then crumble into a
powder. Use it to sprinkle on to wounded plants and reapply every few days.
3. Flour
Pests: Aphids, caterpillars, red spider mites, thrips and whiteflies
Method 1: Mix two cups (200g) of white flour with 10 liters of water. Spray on infested
plants in the early morning. As the sun dries out the flour mixture, mites, aphides, eggs
of caterpillars, etc. will be encrusted and killed.
Method 2: Stir together 1 cup of sour milk, 8 cups of fine white flour and 50 liters of wa-
ter. Spray onto affected crops including underside of leaves. Destroys the adults as well
as the eggs and larva of mites, thrips and whiteflies.
PAGE 47 COMPOST-MAKING & PEST CONTROL
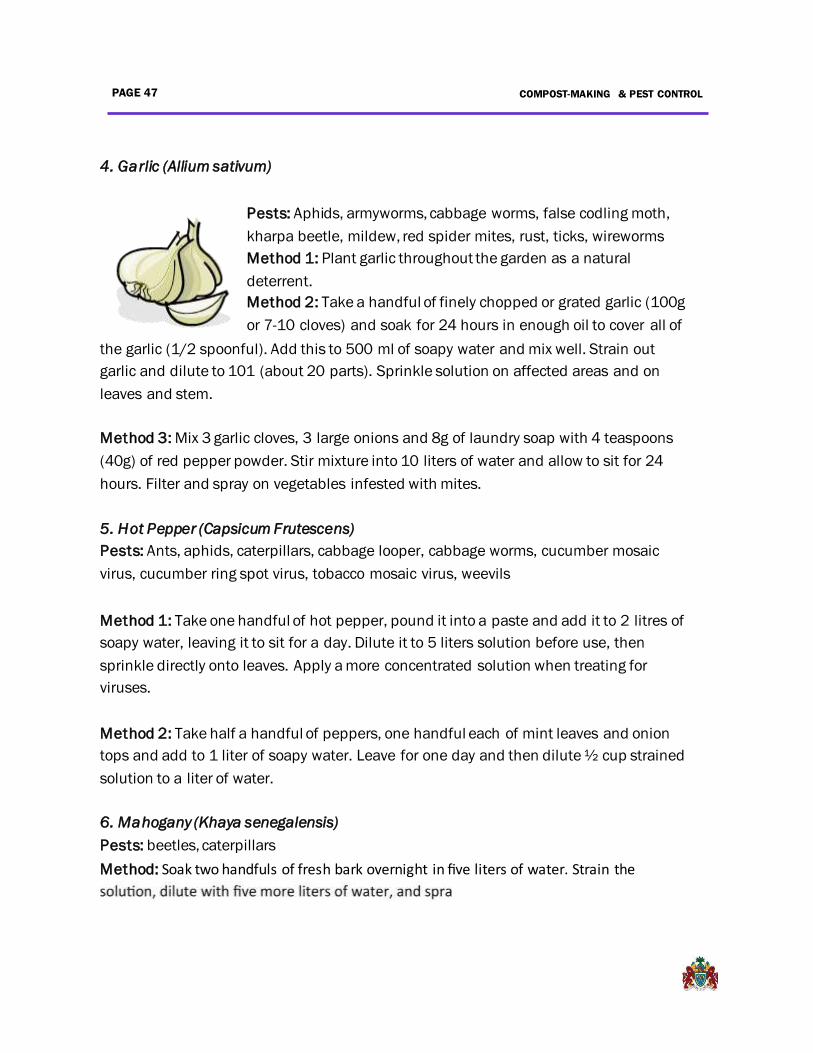
4. Garlic (Allium sativum)
Pests: Aphids, armyworms, cabbage worms, false codling moth,
kharpa beetle, mildew, red spider mites, rust, ticks, wireworms
Method 1: Plant garlic throughout the garden as a natural
deterrent.
Method 2: Take a handful of finely chopped or grated garlic (100g
or 7-10 cloves) and soak for 24 hours in enough oil to cover all of
the garlic (1/2 spoonful). Add this to 500 ml of soapy water and mix well. Strain out
garlic and dilute to 101 (about 20 parts). Sprinkle solution on affected areas and on
leaves and stem.
Method 3: Mix 3 garlic cloves, 3 large onions and 8g of laundry soap with 4 teaspoons
(40g) of red pepper powder. Stir mixture into 10 liters of water and allow to sit for 24
hours. Filter and spray on vegetables infested with mites.
5. Hot Pepper (Capsicum Frutescens)
Pests: Ants, aphids, caterpillars, cabbage looper, cabbage worms, cucumber mosaic
virus, cucumber ring spot virus, tobacco mosaic virus, weevils
Method 1: Take one handful of hot pepper, pound it into a paste and add it to 2 litres of
soapy water, leaving it to sit for a day. Dilute it to 5 liters solution before use, then
sprinkle directly onto leaves. Apply a more concentrated solution when treating for
viruses.
Method 2: Take half a handful of peppers, one handful each of mint leaves and onion
tops and add to 1 liter of soapy water. Leave for one day and then dilute ½ cup strained
solution to a liter of water.
6. Mahogany (Khaya senegalensis)
Pests: beetles, caterpillars
Method: Soak two handfuls of fresh bark overnight in five liters of water. Strain the

SCHOOL GARDENS MANUAL PAGE 48
7. Neem (Azadirachta indica A. Juss)
Pests: Aphids, armyworm, borers, brown plant hopper, cabbage looper, cabbage worm,
cricket, corn earworm, cucumber beetle, cutworm, diamondback moth, flea beetle, fruit
fly, grasshopper, leafhooper jassids, leaf miner, locust, mealy bugs, milkweed bug,
nematodes (root knot), scales, (red) spider mite, termite, tomato fruit worm, tomato leaf
spot fungus, whiteflies
Characteristics: apply in the evening for highest effectiveness as the active ingredient
breaks down in sunlight; doesn’t affect bees.
Method 1—Aqueous Extracts (Pulverized neem seeds): (a) Pulverize 500g (three double
handfuls) of neem seeds into a paste. Thoroughly mix the paste with 10 litres of water
and leave to sit overnight (12-24 hours), filter and spray on affected plants. (b) Mix 20
match boxes of neem powder for each 10 liters of water. Wrap the paste in a cloth
which is then suspended in the water for 12-24 hours, squeezed to remove excess liq-
uid, and removed from the water. Apply to plants with a sprayer or hand brush shaken
over plants. Repeat treatment every 10 days and 15 days or weekly in gardens with high
pest infestation.
Method 2—Fresh Neem Fruit: Shred and crush 2 kg. of neem fruit and add 1 liter of wa-
ter. Allow this mixture to sit overnight. Add more water, to make the total amount of wa-
ter 15 litres, and spray on affected plants.
Method 3—Neem Leaves: Pound 1.5 kg. of fresh neem leaves into a paste, mix the
paste with 1 liter of water and add 5g of laundry soap. Allow this mixture to sit overnight,
squeeze to mix the paste and soap thoroughly. Filter the water and add more water, to
make the total amount of water 10 litres, and spray.
Method 4– Leaf (only for prevention, not treatment): Put neem leaves into a bucked
until it is 1/4—1/3 full. Fill the remainder of the bucket with water. (You may use old
laundry water if you wish.) Cover the bucket and let sit for 1 week. After 1 week, remove
leaves. Apply the liquid to plants using a sprayer, neem branches or local broom.
8. Papaya (Carica Papaya)
Pests: Fungicide against powdery mildews
Method: Take 1 kg. of finely yellow and dried leaves, put it in 1 liter of water and shake
it well. Let it sit for a few hours, then strain or squeeze through a cloth. Dilute it with 4
liters of soapy water, then spray / sprinkle on plant leaves, stem, fruit.

SCHOOL GARDENS MANUAL PAGE 4
9. Tobacco (Nicotiana Tabacum)
Pests: Aphids, borers, cabbage worms, caterpillars, leaf cur vi-
rus, leave miners, mites, rust, scaling insects, trips, weevils
Method: Take 250g of tobacco, half a handful of soap shavings
and 4 liters of water. Then simmer the mixture for 30 minutes
to get the base. For every 1 litre of the mixture, add 4 litres of
water and spray onto leaves. (Do not spray peppers, tomatoes,
eggplants and potato plants with this mixture because it can
transfer viral diseases).
10. Wood Ash
Pests: Effective against most pests, specifically borers, caterpillars, chewing insects,
leaf miners
Characteristics: May raise pH of soil if used excessively. Is a good source of potassium
for soil.
Method 1: Dust leaves of garden plants lightly with wood ash to kill soft-bodied or suck-
ing insects such as aphids, caterpillars, grasshoppers, red spider mites, termites,
thrips, whiteflies.
Method 2: Spread ash thickly around plants and as mulch over the soil to deter nema-
todes, weevils, slugs, snails, cutworms and other insects.
Method 3: Make a solution made from 2 cups of wood ash and 1 cup of powdered lime
mixed with 4 litres of water. Particularly effective against cucumber beetles and mag-
gots.
Method 4: When cutting potatoes for planting, dip each portion in wood ash before
planting to protect against insect attacks.
Method 5: Mix 6 teaspoons of kerosene with 1 kg. of wood ash. Apply as dust over
vegetables twice weekly in the early morning or late evening to effectively prevent at-
tacks from sucking types of insects. It is less effective once the plants are already in-
fested.
Method 6: To control fungal diseases such as mildew, odium and rust, as well as vari-
ous pests and their eggs or larvae, mix one heaped tablespoon of wood ash overnight.
Filter this solution and add one cup of milk. Dilute this again with water at a 1.3 ratio
before spraying.

SCHOOL GARDENS MANUAL PAGE 50
Nutrition, Health & Hygiene
in School Gardens

PAGE 51 NUTRITION, HEALTH & HYGIENE IN SCHOOL GARDENS
Nutrition, Health & Hygiene in School Gardens
Why is Nutrition Important?
Good nutrition is critical for a child’s physical
and mental growth and development.
School children need plenty of good food, as
their energy and nutrient needs are
particularly high in relation to their size.
Children who have a diet rich in nutrients—
including proteins, vitamins and minerals—
can learn better because the foods they eat
provide the body with the energy it needs to
function and helps it to store information in
the brain. The foods that children eat when
they are young will help to determine whether they become smart, healthy and productive adults.
This is why improving children’s nutrition is one of the biggest benefits, and in fact the main goal,
of keeping a school garden.
What happens if school-age children do not eat well?
They grow more slowly than well-nourished children
They have little energy to play, study or do physical work
They have short attention spans and do not do as well in school
Their educational achievements may be poor and they may drop out of school early
Poor nutrition during childhood not only decreases individual potential; in the long term it can
also adversely affect the development of communities and nations.
Nutrients can be divided into many different categories but here we’ll divide them into Go foods,
Grow foods, and Glow foods. This is in addition to the main carbohydrates and starches, found in
rice and coos. Go foods provide energy, and include groundnuts and oil. Grow foods builds the
body through protein, and include meats and vegetables such as beans, cassava and sorrel. Glow
foods provide vitamins and minerals and help protect against diseases, and can be found in fruits
and vegetables.

SCHOOL GARDENS MANUAL PAGE 52
WFP Provides children with four staple foods in its school feeding programme. These are
their main nutritional components and why they are important.
Item Value Importance
Rice Carbohydrate
Little bit of protein – superior quality and better utilized by the body
Fibers
Minerals and vitamins
Builds muscles Provides healthy skin and hair
Gives clearer eyesight
Nourishes the heart and lungs
Nourishes the brain, tendons, nervous system, etc.
Peas Cholesterol lowering fiber Minerals and vitamins
Proteins
Fatty Acids
Amino Acids
Manages blood sugar
Reduces the risk of certain health
conditions
Iodised Salt Iodine and thyroxine Mental and physical development of
children
Increases the appetite Increases the IQ
Vegetable Oil Fatty acid Aids in the easy passage of food Eases digestion
Essential for the utilization of vitamins

PAGE 53 NUTRITION, HEALTH & HYGIENE IN SCHOOL GARDENS
Which Nutrients are important and why?
School Gardens serve as the sustainable way to complement these the food bowl staples
with fruit and vegetables with important vitamins that are often lacking in the school food
bowl in The Gambia. Below are some key nutrients and why they are essential to the
body:
Nutrients
Sources
Properties
Deficiencies Caused
Protein Animals
Plants
Fish
Needed for growth and
development
Needed for fighting illnesses
Needed for muscle
maintenance
Source of energy
Needed for healthy blood
supply
Lack of growth
Lack of ability to fight disease
Lack of energy needed to do
work
Iron Beef
Dark green, leafy
vegetables
Beans
Eggs
Needed for healthy blood
Keeps up oxygen levels, thus
maintaining adequate energy
levels
Women need more because
of menstruation
Pregnant women need more
to supply the foetus
Death to pregnant women
caused from anaemia and
loss of blood
Fatigue, resulting in low
productivity in daily activities
Anaemia
Paleness under eyelids and in
gums
Vi tamin A Carrots
Pumpkin
Orange sweet
potatoes
Eggs
Needed for good eyesight
Needed for healthy skin and
hair energy levels
Helps immune system fight
illness, especially respiratory
Blindness, first occuring as
night blindness
Glaucoma and cataracts
Eye disorders such as
xerophthalmia, bitot's spots,
corneal ulcers and trachoma
Susceptibility to infections,
especialy of the skin and
respiratory tract
Children have incresed
chance of dying from Vitamin
A related diseas es
Unhealthy, scaly skin

SCHOOL GARDENS MANUAL PAGE 54
Which Nutrients are important and why continued:
Nutrients Sources P ro perties Deficiencies Caused
B Vi tamins Meat
Cereals
Milk
Helps release energy from other
foods Poor growth
Skin problems
Mental health problems
Body weakness Vi tamin C Citrus
Fruits Required for the absorption of
other nutrients Scurvy
Slow healing of wounds
Bleeding of gums Calcium Milk
Milk
products
Helps build bones and teeth, which
are made primarily of calciu m
·Helps make muscles do their work
Muscle weakness, spasms and
seizures
Osteoporosis(adults)
Bone fractures
Potassium Vegetables
Bananas Important in nerve transmission,
general body function Weakness, fatigue
·Impaired growth
Weak memory
Prone to heart problems such as
hypertension Iodine Iodize d
salt A component of hormones and
enzymes Goitre
Cretinism(mental retardation)

SC
HO
OL
G
AR
DE
NS
M
AN
UA
L
PA
GE
55
What Vegetables Should We Grow?
The following is a list of local vegetables and some of their nutritional components. ** denotes a good source, *** a very
good source and **** an excellent source. Adding any of these vegetables to a school meal helps children get the
nutrients they need in their daily diet

PAGE 56 NUTRITION, HEALTH & HYGIENE IN SCHOOL GARDENS
Healthy, Balanced Diet
A healthy, balanced diet provides a person with the
correct amounts of food energy, macro- and micro-
nutrients that he/she needs every day. A balanced
diet should consist of at least all food groups over
three meals a day, plus snacks, which are composed
of a variety of different types of foods in varying
proportions. Too little or too much of certain foods
can be harmful to the body, but you can never eat too
many fruits or vegetables! That’s why maintaining a
school garden is a feasible way to provide children with daily fresh fruits and vegetables
that are rich in those nutrients that children need to
grow and prosper.
A good meal should contain:
1. A staple food (grains and tubers)
2. Other foods that may be made into a sauce, stew or
relish. These should include:
Legumes and /or animal-derived foods;
At least one vegetable and fruit
Some fat or oil (but not too much) to increase the energy desired and
improve taste of food..
It is important to eat fruits with a meal (or as a snack) and to drink plenty of water
during the day. Avoid drinking tea or coffee until 1-2 hours after a meal (when food will
have left the stomach) as these reduce the absorption of nutrition from food.

SCHOOL GARDENS MANUAL
PAGE 57
The Food Pyramid: A Guide to Good Eating
Oils, Fats
and
Sweets
Meats,
Fish, Eggs,
and Dairy
Fruits
and Veg-
etables
Bread,
Cereal,
Potatoes
and Pasta
Use the food pyramid as a guide to good food combinations. Try to eat from
all of the food groups at every meal but eat more from the bottom 3 groups of the food pyr-
amid and only a small amount from the top group. Also be sure to get plenty of exercise
and drink at least 8 glasses of safe water every day .
Teaching Children about nutrition
The Food Guide for Gambians Over the Age of 5 is a good tool for teaching about
nutrition. If possible, have a copy posted in the classroom or copy one onto the
chalkboard.

PAGE 58 NUTRITION, HEALTH & HYGIENE IN SCHOOL GARDENS
Possible Class Activity:
1. Display the Food Pyramid and ask the class what foods they eat each day. There
are no right or wrong answers, and everyone can participate. Write these foods on
the board.
2. Look at the list the children have made. Ask if there is any group of foods which
they don’t eat as often as recommended. Note their answers.
How can a garden help? Write down their suggestions.
These are some of the reasons school
gardens can make a real difference to
children’s health. Discuss them with the
class and ask the children what they think.
Gardens:
Give children nutrient-rich fresh
vegetables and fruits that are
lacking in their diet;
Show children how to grow, prepare
and eat them;
Encourage families to grow them
too;
Help children to understand what makes a good diet;
Help children learn to like nutritious, home-grown foods;
Show children the link between what they grow, what they eat, and how they
feel.
Vitamin A, iodine, and iron are often lacking in the diets of people of The Gambia.
When discussing nutrition, emphasize in particular those foods which provide
Vitamin A and iron, and encourage the use of iodized salt. Iodized salt provides the
iodine needed to prevent goiter and mental retardation.
Keeping Food Safe and Clean
The food we grow in our gardens should not only provide us with needed nutrients,
but must be safe to eat. If germs (such as harmful micro-organisms) and parasites
get into our foods and drinks they may make us sick with diarrhoea and vomiting.
Children and weak people are the most likely to get sick.
PAGE 59
SCHOOL GARDENS MANUAL
Most food-borne illnesses can be prevented by following a few basic and simple
rules of hygiene that aim to:
Prevent germs from reaching foods and drinks by covering cooked foods.
Many germs come from human or animal faeces. These germs can get into
foods from dirty hands, flies and other insects, mice and animals, and dirty
utensils. Water supplies which are not protected from contamination can
also cause illness.
Prevent germs from multiplying in foods. Germs grow fastest in food that is
warm and wet (e.g. porridge) especially if it contains sugar or animal protein,
such as milk.
Separate raw and cooked foods.
Personal Hygiene
Wash hands with clean water and soap (or ashes):
- After going to the toilet, cleaning a baby’s bottom, or anytime hands may
have come into contact with faeces;
- Before and after preparing food and eating;
- Before feeding a child or sick person.
Dry hands by shaking and rubbing them together or using a clean cloth that
is only for this purpose.
Avoid coughing or spitting near food or water.
Cover any cuts on hands to prevent contaminating food
Use a covered latrine and keep it clean and free of flies
Clean up animal faeces near cooking areas.
Clean and safe water
Use water that comes from a safe source or is boiled before drinking
If water is not safe, boil rapidly for one minute before using
Use clean, covered containers to collect and store water
Buying and storing food
Cover foods to keep them clean and safe
Buy fresh meat or fish on the day you will eat them
Cover raw and cooked foods to protect them from insects, rodents and dust
Store fresh and cooked foods in a cool place or refrigerator if available

PAGE 60
NUTRITION, HEALTH & HYGIENE IN SCHOOL GARDENS
Keep flour, grains and legumes in a dry, cool place protected from pests
Use leftovers at the next meal unless refrigerated. Store covered and reheat them until
steaming and hot all the way through.
Preparing food
Keep raw meat, poultry and fish fseparately from other foods
Use clean, washed dishes and utensils to store, prepare, serve and eat food
Prepare food where there is less dust
Wash vegetables and fruits with clean water
Wash surfaces touched by raw meat, fish or poultry with hot water and soap
Do not eat raw or cracked eggs
Boil milk unless it has come from a safe source. Soured milk may be safer than fresh milk
Cook food thoroughly, especially meat, poultry, seafood and eggs

SCHOOL GARDENS MANUAL
PAGE 61
School Gardens & the Environment

PAGE 62 COMPOST-MAKING & PEST CONTROL
School Gardens & the Environment
Why is Preserving the Environment Important?
Humans have an enormous impact on the environment.
Everything we do consumes energy, uses natural
resources or produces waste, whether it’s using
firewood or coal for cooking, using water to wash
ourselves or disposing of the plastic bags and
containers that we store our food in. In the long run,
such activities can harm the environment and damage
ecosystems, sometimes permanently. For instance, we
cannot endlessly cut down trees to clear land for
building sites or to use its wood for firewood or building
materials, because sooner or later we may have cut down the whole forest.
Endlessly using our environment and the resources it provides us with, without any
regard for the consequences, can thus cause environmental degradation. This can have
a variety of effects on our way of living: the soil we use for agriculture may become less
fertile, the water we drink can become polluted and certain types of plants and animals
may become extinct.
Yet we depend on the environment to be able to live. The trees around us produce the
oxygen that we breathe, fertile soil produces the food we eat and drinking clean water
means that we do not become ill with diseases. That is why it’s important to minimize, to
the extent possible, our impact on the environment and to preserve the earth for future
generations. One of the best ways in which you can protect the environment is to
practice organic farming.
What is Organic Farming?
Organic farming is a form of agriculture which uses completely natural methods to
maintain soil productivity and control pests and diseases. These methods include using
natural manures, compost, regular crop rotation and biological pest control, rather than
relying on commercial agro-chemicals such as fertilizers and pesticides. Such chemical

SCHOOL GARDENS MANUAL PAGE 63
products can, in the long run, cause more harm than they do good, killing not only the
pests they target but also forms of life that are beneficial to the land, polluting water,
depleting the soil’s nutrients and eventually landing in our food. By practicing organic
farming, you maintain the health of the soil, the food that it produces and eventually
also the people that eat the food. It is a true win-win situation.
How Will Organic Farming Benefit the Environment?
In essence, organic farming maintains the environment’s natural balance. By using only
natural farming techniques you will enhance soil structures by maintaining its nutrient
content and minimize water losses. This makes the soil
more resistant to floods, droughts and land degradation
processes. Organic farming also ensures continued
biodiversity by preserving seed and crop diversity and
allowing crops to build up a natural resistance to pests
and diseases. Overall, less energy is spent per unit of
land and the organic matter that is built up in the soil and
the plants stores carbon, thus reducing greenhouse
gases and even mitigating climate change.
Why is Organic Farming Beneficial in The Gambia?
It is sustainable because there is abundant natural manure in The Gambia
It is freely affordable in small villages and communities and can help schools and
communities save money
It is environmentally friendly and does not pollute the country’s soil structure,
water or atmosphere
It does not kill beneficial animals such as butterflies and bees
It does not pose health hazards to people, animals and plants
It can enhance agricultural production and productivity in The Gambia
It does not create dependency on external agencies like chemical fertilizers

PAGE 64 COMPOST-MAKING & PEST CONTROL
What Else Can I Do?
There are many other things, large and small, that you can do in the garden, at school or
at home to protect the environment!
Avoid chemicals and pesticides: for all the reasons listed above, this is one of the
easiest and most effective things you can do for the environment
Plant trees: trees produce oxygen, clean the soil and the air and fight soil erosion
Use Live Fencing: it adds natural manure to the soil and can produce food and
timber (See section on Live Fencing, p. 22)
Use waste from the garden and kitchen as compost: this will both reduce the
amount of waste you produce and improve your garden’s soil, allowing you to
grow healthier vegetables (see Compost-making, p. 34)
Save Water: water your garden either in the early morning or in the evening and
avoid watering when it’s very hot or windy, as this causes a lot of the water to be
lost through evaporation
Collect Rainwater: during the wet season it’s easy to collect rainwater using
barrels or buckets, which can then be reused in the garden
Use plants in your garden that are indigenous to that area: because indigenous
plants are adapted to local conditions they need less maintenance, less watering
and are less susceptible to pests and diseases. They also thrive even in more
extreme local weather conditions (heat, dryness, rain) and complement other
local plants.
Recycle: you can make seed-boxes out of old containers, make
watering cans by poking holes into a used oil drum and use old
bottles as plant containers (see next section).
Collect and Store Seeds: saving seeds instead of buying them
saves energy in production and transport and is much cheaper
(see Seed Collection and Storage, p. 35)
Produce local, buy local, eat local: eat the food that you produce and buy other
foods that are produced locally. It’s cheaper and saves an enormous amount of
energy spent on transporting food.
In short, gardens can be good for the environment, healthy, sustainable and
economical!

PAGE 65 SCHOOL GARDENS & THE ENVIRONMENT
How to Recycle in the Garden
There are many things that would normally be thrown away that can be reused in a
garden. Using recycled materials as plant containers extends the items’ life, minimizes
waste and adds alot of personality to the garden! Plus, it’s a fun activity for children to
cut up old containers and see where they can be used in the garden. If you use your
imagination, the sky is the limit! There are just two things that are important when
recycling containers in your garden:
Make sure that the container is completely clean before you use it, otherwise
residue bacteria could kill your seeds or plants. Use a high pressure hose or some
dish washer fluid or bleach and water.
Ensure that the container has proper drainage for the water to exit by poking holes
in the bottom.
Plastic pots retain moisture well and are therefore excellent for planting seeds and for
use in the nursery. These are some things you could use:
The bottom half of a plastic bottle
Yoghurt cups
Plastic drinking cups
Broken buckets or watering cans
Old oil jugs cut in half
Paper wax milk or juice cartons also work well (and are biodegradable!)
You can also use plastic lids to place on top of the containers; this keeps seeds warm
and moist during germination.
Here are a few more tips:
Wooden crates and wicker baskets also make great plant holders. Since they are not
waterproof, line them with some fabric or an old plastic bag or mat before filling
them with soil.
Rubber tires make excellent vegetable planters and can be placed anywhere since
they take up very little space
Old tins and cans (Nescafe tins, or milk or vetable cans) can be used for small plants
and flowers
Used oil jugs (such as the ones that WFP oil comes in) can be used as watering cans
by poking holes in the top.
Old plastic bags and test booklet bags make good poly-pots for the tree nursery.

PAGE 66 RECORD-KEEPING
Record-Keeping

SCHOOL GARDENS MANUAL PAGE 67
Record-Keeping
Introduction
Keeping written accounts of the activities that are conducted in the school garden is
important for monitoring the school garden’s progress and for knowing whether you are
achieving your goals. It helps you look back at what has been achieved so far and make
plans for the future. Garden records also serve as a basis for the termly reports you will
have to send to the School Agriculture and Food Management Unit (SAFMU), and are
important for handing over gardening activities if the Garden Master leaves the school
and someone else takes over.
It is advisable to keep a garden book, diary or folder where all the information regarding
the school garden is kept in one place. Records can be kept on a multitude of things,
depending on what your initial objectives were and where your interests lie. Some
examples are the dates of sowing, transplanting and harvesting; which activities are
conducted when; plant growth; crop yields per vegetable; amount of produce consumed
and sold; and money spent and received.
It is primarily the Garden Master’s responsibility to keep accurate records and fill in
reports. However, older children can also help with this and even do it as part of one of
their subjects. For them it serves as an important educational exercise as it teaches
children the importance of maintaining records and keeping track of progress; plus it
aids in transparency! (Also see Using School Gardens as a Teaching Aid: Tips & Tricks, p.
73)
This is why keeping garden records is important:
Helps in recalling what has been done and what progress has been made
Serves as a source of information
Ensures transparency within the school and towards outsiders
Facilitates reporting and information sharing with other stakeholders
Enables the farmer to know the amount of profit or loss made
Enables assessment of the garden or farm’s different enterprises

PAGE 68
RECORD-KEEPING
May aid in obtaining loans from financial institutions
Aid in budgeting and planning for future development
Builds up students’ habits of keeping track of progress and finances
Produces something to show parents, visitors, pupils and other interested parties
Makes students aware of the significance of events
Types of Garden Records
There are two main types of farm records: production and financial records.
1. Production Records are records that show what has been pumped into the garden in
terms of labor, seeds, etc. and the output that it has yielded. Following are some
examples of production records:
Crops Grown in the Garden / Farm
Size of B ed
Number of Plants
Beans
1 x 5m
36
Carrot
1 x 3m
500
Sweet Potato
1 x 5m (2 beds)
20
Bitter Tomato
1 x 5m (2 beds)
50
Garden Egg
1 x 3m
10
Cassava
8 x 8m
64
Pepper
1 x 3m
15
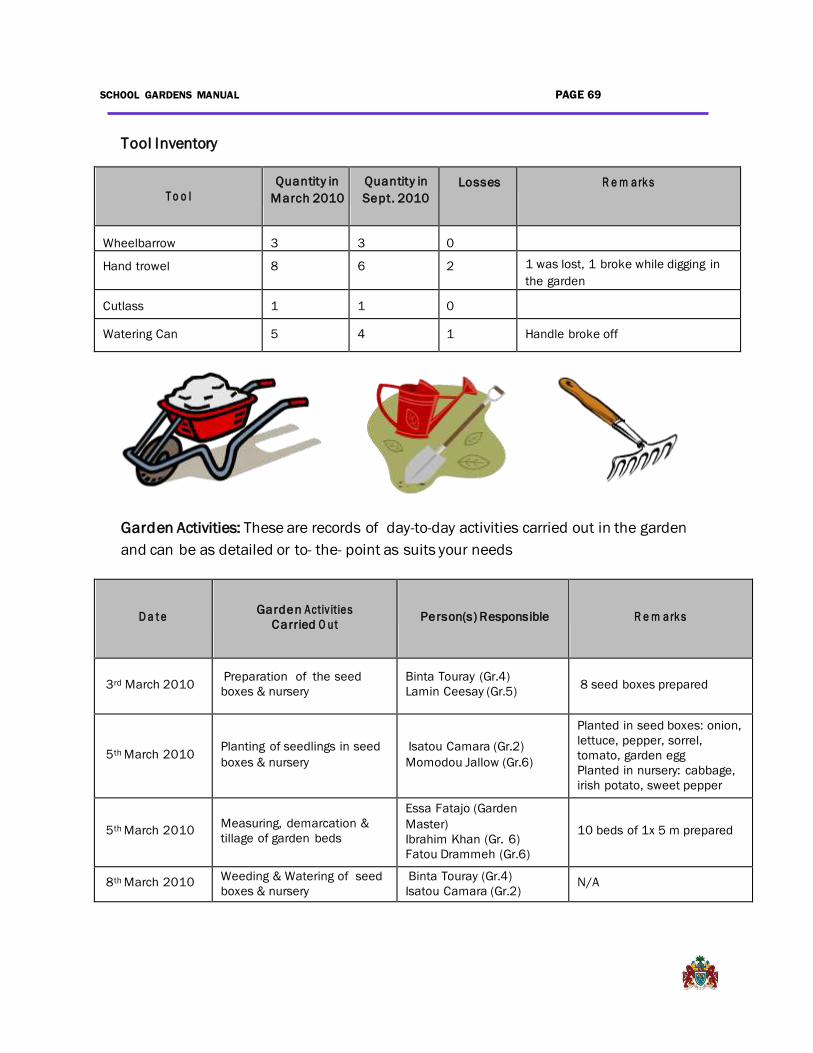
SCHOOL GARDENS MANUAL PAGE 69
Tool Inventory
T o o l
Quantity in
March 2010
Quantity in
Sept. 2010
Losses
R e m ark s
Wheelbarrow
3
3
0
Hand trowel
8
6
2 1 was lost, 1 broke while digging in
the garden
Cutlass
1
1
0
Watering Can
5
4
1
Handle broke off
Garden Activities: These are records of day-to-day activities carried out in the garden
and can be as detailed or to- the- point as suits your needs
D a t e
Garden Activ ities
Carried O ut
Person(s) Responsible
R e m ark s
3rd March 2010
Preparation of the seed
boxes & nursery
Binta Touray (Gr.4)
Lamin Ceesay (Gr.5)
8 seed boxes prepared
5th March 2010
Planting of seedlings in seed
boxes & nursery
Isatou Camara (Gr.2)
Momodou Jallow (Gr.6)
Planted in seed boxes: onion,
lettuce, pepper, sorrel,
tomato, garden egg
Planted in nursery: cabbage,
irish potato, sweet pepper
5th March 2010
Measuring, demarcation &
tillage of garden beds
Essa Fatajo (Garden
Master)
Ibrahim Khan (Gr. 6)
Fatou Drammeh (Gr.6)
10 beds of 1x 5 m prepared
8th March 2010 Weeding & Watering of seed
boxes & nursery Binta Touray (Gr.4)
Isatou Camara (Gr.2)
N/A

PAGE 70 RECORD-KEEPING
Crop Production: This keeps track of what crops have been harvested and whether they
were consumed or sold.
D a t e
Item Description
Quantity
Unit Price (D)
Income ( + )
E x p e nse s
( – )
30 / 4 / 10
Bitter tomato
5 kg.
D 50 / kg.
D 250
30 / 4 /10
Carrot
70 kg.
D 20 / kg.
D 1400
10 / 5 /10
Fish & condiments
for school meals
10 fish,
500 g
condiments
D 300
12 / 5 /10
School notebooks
50
D 10
D 500
12 / 5 / 10
Pencils
200
D 5
D 1000
11 / 9 / 10
Cassava
30 kg.
D 25 / kg.
D 750
T O T A L
D 2400
D 1800
Balance (Income – Expenses)
D 600
It is up to the school to determine the records to keep and how detailed to prepare
them. However, it is necessary to at least keep records of crop production as you will
also need to report on this in the termly report to SAFMU.
2. Financial Records are records of the garden’s cash flow, both income from crop sales
and expenses spent on goods or services. If the total income made from the garden is
greater than total expenditures, the account will have a net profit. However, if
expenditures are greater than income, the account will have a net loss.
It is advisable to have a gardening account that is kept separate from other school
finances to ensure transparency. Not keeping records can cause suspicion among
stakeholders about what is happening with the income from the school garden. You will
also need to provide financial records in the termly report to SAFMU.

SCHOOL GARDENS MANUAL PAGE 71
If you are planning on selling part of the garden’s produce, establish beforehand what
you will do with the profit. Of course it is best if the garden’s proceeds are pumped back
into the garden or into things which aid in improving children’s nutrition. For instance,
you can buy seeds, garden tools, fencing materials, or meat, fish and condiments to
further complement school meals. Of course proceeds can also be used towards
general school maintenance, such as buying books, learning materials, or repairing
furniture and renovating buildings.
D a t e
Item Description
Quantity
Unit Price (D)
Income ( + )
Expens
30 / 4 / 10
Bitter tomato
5 kg.
D 50 / kg.
D 250
30 / 4 /10
Carrot
70 kg.
D 20 / kg.
D 1400
10 / 5 /10
Fish & condiments
for school meals
10 fish,
500 g
D 300
12 / 5 /10
School notebooks
50
D 10
D 500
12 / 5 / 10
Pencils
200
D 5
D 1000
11 / 9 / 10
Cassava
30 kg.
D 25 / kg.
D 750
T O T A L
D 2400
D
Balance (Income – Expenses)
D 600
Evaluation
It is a good idea to evaluate the garden’s progress every so often. Evaluation serves to
reflect on what you have achieved so far, what you have learned, and what this implies
for the future. Ask yourself some of the following questions:
What has happened so far?
What have we achieved?
Did we meet all of our objectives?
What went well?
What problems or obstacles did we encounter?
And most importantly, What did we learn?

PAGE 72 RECORD-KEEPING
You can learn as much from failures as you can from success (if not more!) so don’t be
afraid to discuss problems that you have had along the way. Everyone should be
involved in this activity, including the children. You can make it a fun brainstorming
activity where each child has to say something that went well and something that didn’t.
Let past experiences serve as a learning experience for future planning and activities!
Reporting
Because your school is included in the National School Garden Programme, you will be
required to send in a termly report documenting what has been achieved in the garden
that term. The report serves to inform relevant stakeholders about how children and the
school as a whole have benefited from gardening (produce consumed in the school and
income generated), but also to take stock of what problems schools have encountered.
The head teacher should sign and submit the report no later than two weeks after the
end of term to their Cluster Monitor, who will double check the information and also sign
the form. The Cluster Monitor will ensure that it gets to the Regional Educational
Directorate, and eventually SAFMU.
See Annex II, p. 76 for the Termly Reporting Format.

PAGE 73
SCHOOL GARDENS MANUAL
Using School Gardens as a
Teaching Aid: Tips & Tricks

PAGE 74 USING SCHOOL GARDENS AS A TEACHING AID: TIPS & TRICKS
Using School Gardens as a Teaching Aid: Tips & Tricks
Keep Kids Motivated
One of the most important things in working with
children in a school garden is to keep them motivated.
You can do this by making sure that gardening is not
seen as a chore but as a fun activity. If children see
garden work as a chore, they will resent the time they
spend working in the garden. This means they will not
learn as much from the experience and the garden will
defeat its purpose. Gardening should thus never be
used as a form of punishment. One of the best things
you can do to motivate children is to set the right example. If you show kids that
gardening can be fun and that agricultural work and manual labor are not something to
be looked down on, kids will copy this attitude. When planning garden activities always
keep in the back of your mind: “If I were a kid, would I want to do that?”
Be Patient
A lot of garden planning and work may go more quickly and efficiently if it is done by
adults. However, this defeats the purpose of using the garden as a learning tool. Take
the time to explain and discuss garden issues with children and let them participate in
decision-making. Don’t just dictate what you think or know is right. When children
participate they will enjoy themselves and learn much more, making the experience all
the more valuable for it.
Make it Interactive
Children learn better when they are engaged on many different levels. In this regard,
gardens can be a valuable resource in almost all academic subjects:
Math: Use the rows and beds in the gardens to teach children how to measure,
draw accurate scaled maps or how to do their times tables
Science: Have children do experiments where they observe and record plant
growth, map out eco-systems, observe insects and other garden animals

SCHOOL GARDENS MANUAL PAGE 75
Art: Children can draw the garden and make creative, colorful signs to label the
different beds or the garden produce when it is sold
English: The garden can be a great source of inspiration in writing
Health: The garden is an excellent way to integrate nutrition, health & hygiene in
the school curriculum. (See Nutrition, Health & Hygiene in School Gardens, p. 50
for more information)
This does not mean that garden activities should be limited to schoolwork. Have
children share their knowledge with outsiders. They can take interested visitors on
guided tours or do ‘homework’ by teaching their families what they have learned in the
garden and implementing it in their home gardens if they have one. You can also have
children suggest a fun activity, class or learning exercise that they would like to see
done in the garden.
Teach Life Skills
One of the great things about gardens is that they
can encourage holistic child development. These
are some things you can do to teach children
important life skills such as planning, making
decisions, taking responsibility and working in
groups:
Ensure that children are involved on every level of the garden’s planning and
decision-making. Have them brainstorm about what the garden should look like
and what vegetables should be grown, involve them in meetings with the garden
club or community and let them have a say in final decisions.
Promote group work and garden ownership by giving small groups of children their
own bed to care for (‘our garden, my patch’). You can also incorporate an element
of competition here (see next section).
Instead of having one large compost heap, give each grade the responsibility of
creating and maintaining one smaller compost heap. This is also a great place to
conduct small science experiments.
Give children small responsibilities that make them feel like they are contributing
and give them a sense of pride (though make sure that they don’t do work that is
too heavy for them). They can measure beds, plant seeds, look for materials to add
to the compost heap, care for equipment, water plants, monitor plant growth,
PAGE 76 USING SCHOOL GARDENS AS A TEACHING AID: TIPS & TRICKS
harvest produce, etc.
Give older children the responsibility of being in charge when the school is closed
during holidays or when gardening work is done after school hours.
Make it Competitive
Friendly competition is very healthy and fun and can be an extra motivation for kids to
do their best. Here are some ideas for incorporating a competitive element in the
garden:
If small groups of children or classes each have their own bed, have them compete
with each other: Who has the nicest looking bed? Which bed produces the highest
yield? Which bed made the most money? etc. Give out awards accordingly at the
end of the term or academic year.
Have gender competitions where boys do the watering and other ‘women’s chores’
and girls have to get dirty. This also encourages children to think outside the box.
Organize a friendly competition with other schools in the area for Best Garden. You
can have multiple categories such as: most aesthetic, best management, most
community involvement, most / tastiest produce, nicest meals made with garden
produce, etc. Have a ceremony and party where awards are given out and lots of
vegetables are eaten.
Integrate Business & Financial Skills
Particularly for older children, school gardens are a great way of learning valuable
business and financial skills. You can have children:
Maintain the records of what crops are grown, which activities are conducted, what
is harvested, what is consumed in the school and what is sold. Particularly if
children are the ones doing most of the garden work, they should record when they
work and what they do in the garden.
Keep records of income and expenses, calculate profits (or losses) and help
manage the money. This serves as an excellent math exercise. Make sure to help
them and double-check everything.
If you are selling part of your produce, have children think about pricing and
marketing: What have we spent on this produce in terms of money and labor?
What is the demand for this product? How much would a customer be willing to

SCHOOL GARDENS MANUAL PAGE 77
pay? What does my competition charge? What is a fair price to ask? etc.
If children do most of the garden work, it might be extra motivational for them to
receive half of the proceeds from their beds. This teaches them financial
responsibility and the rewards of hard work.
Celebrate
Celebrate the school’s achievements when it comes to the garden! There is no better
incentive for children to do garden activities. For instance, use the proceeds from the
garden’s produce to throw a party or have a ‘Harvest Party’ where children get to taste
all the different vegetables from the garden. This is also a great opportunity to give out
awards for the different competitions.

CLOSING REMARKS PAGE 78
Closing Remarks
This School Garden Manual is meant to cover the fundamentals of establishing and
maintaining a school garden. It cannot, however, cover every topic that may be relevant
to your situation and location. That is why it’s important to seek out help from
professionals or other knowledgeable individuals who can further help you with
technica l expertise, should you require it. WFP hopes that this manual will be of use to
your school and that your garden will prosper, providing school children with a delicious
supplement to their daily lunch whilst improving their health, nutrition and education.
Good luck!

ANNEX I: CONTACT LIST PAGE 79
Annex 1: Contact List
School Ag ric u ltur e
Focal P o int
NaNA Field Officer
A g r i cu ltura l
Ex tension W o rk e r
Peace C o rps
V o l un te e r
Western Region
Ousainou Jobe
9937461
Malang Janneh
9947868 3947868
Ousman Ceesay
9922501
North Bank Region
Amadou Cham
7915250
Amadou Jallow
6241295
Batch Samba Njie
3648337
Lower River Region
Musa Bah
9932643
Dodou Sowe
6503650
Omar Sanneh
Central R ive r
R e g i on
Alhagie Sanneh
7125524
Alpha Mballow
9904919
Sisawo Manneh
7311997
Upper River Region
Samba Bah
Saikou Drammeh
9926520
Ebou Lowe
7373168
WFP Programme
Phone: 44947 8 2
Fax: 4494 7 8 4

SCHOOL GARDENS MANUAL
PAGE 80

-
I I 1"1----------,
PAGE 81
<;p
3. Ca&h Flow
-
SCHOOL GARDEN TERML Y REPORT
SCHOOL GARDEN TERMLY REPO
-RT
Date Item Dncrlptlon Quantity Unit Price Income (+) Expen... (-)
- ~
I-
I TOTAL
Belanco at tho ond of tho month (Incomo - Ex,.,... ) 4. Comments I ObservaUons (facilitating factors. obstacles encountered. gaps In Ialow ledge I tools. Justlf lcatlon of 8l1penses,etc.):
Head Taacner's Name I Signature
Date.
I hereby C'.ertlfy receipt of form from the Head I saCher ard confirm that the form has been verif ied.
Cluster Monitor's Name: Signature: Date: I

SCHOOL GARDENS MANUAL PAGE 8282
Bibliography
Burgess, Ann and Peter Glasauer. Family Nutrition Guide. FAO, 2004.
International Federation of Organic Agricultural Movements (IFOAM).
http://www.ifoam.org. 2009.
Peace Corps/The Gambia. Gambian Garden Manual. 2000.
Setting Up and Running a School Garden: A Manual for Teachers, Parents and
Communities. FAO, 2005.
Wardlaw, Gordon M. and Anne M. Smith. Contemporary Nutrition. 6thEdition. McGraw
Hill Higher Education, 2006.

SCHOOL GARDENS MANUAL PAGE 8383