school management information...
TRANSCRIPT
School Management Information System - User Guide for Student Admission
Department of School Education, Haryana 01-Apr-15

School Management Information System
Page 1
Versions Version Comments V1.5 Following things are included in this version :
Fresh Admission , Pending Admission , Re Admission , Section Allocation & Subject Selection , Roll Number Allocation , Edit Student Profile , Student Attendance , Marks Entry
V1.6 Following things are included in this version :Updated screen shots, updated screens of Disability & Genetic Disorder, Next Previous buttons.
V1.7 Following things are included in this version :Updated screen shots.
V1.8 Following things are included in this version :School Leaving, Student Transition, Updated Re admission screen.
School Management Information System
Page 2
About School Management Information System
Is an initiative to build a comprehensive and integrated system for school for transforming public school education in Haryana, to ensure high-learning level outcomes sustainably. In order to ensure ready availability of authentic data while simplifying data collection processes, the Department of School Education seeks to create a consolidated and comprehensive
Management Information System as a single source of authentic data.
Stakeholders of the system:
Teaching and Administrative Staff Schools Students Parents Governing Bodies, etc.
MIS

School Management Information System
Page 3
Contents
STUDENT ADMISSION .......................................................................................................................................................... 4 STUDENT MANAGEMENT ..................................................................................................................................................... 5 FRESH ADMISSION ........................................................................................................................................................... 6
CLASS SELECTION ............................................................................................................................................................ 7 PERSONAL DETAILS ......................................................................................................................................................... 9 PARENT / GUARDIAN DETAILS ..................................................................................................................................... 11 SIBLINGS DETAILS .......................................................................................................................................................... 15 ADDRESS DETAILS ......................................................................................................................................................... 17 CONTACT DETAILS ....................................................................................................................................................... 20 PHOTO DETAILS ............................................................................................................................................................ 22 RESERVATION DETAILS .................................................................................................................................................. 24 DISABILITIES .................................................................................................................................................................... 26 GENETIC DISORDER ...................................................................................................................................................... 28 OTHER DETAILS ............................................................................................................................................................. 30 STUDENT BANK DETAILS .............................................................................................................................................. 32 ADMISSION REVIEW ....................................................................................................................................................... 35
PENDING ADMISSION ................................................................................................................................................... 37 SCHOOL LEAVING ......................................................................................................................................................... 40 RE ADMISSION ................................................................................................................................................................ 45 STUDENT TRANSITION ................................................................................................................................................ 49 EDIT STUDENT PROFILE .............................................................................................................................................. 53 SECTION ALLOCATION AND SUBJECT SELECTION............................................................................................. 56 ROLL NUMBER ALLOCATION ..................................................................................................................................... 60 STUDENT ATTENDANCE ............................................................................................................................................. 64

School Management Information System
Page 4
Student Admission
Following are menus under Student Admission:
Fresh Admission: It is an admission process for students who do not have Student Registration Number
(SRN) and whose records will be entered in the system for the first time.
Pending Admission: It is an admission process for students who do not have Student Registration Number
(SRN) but their partial / complete records are entered in the system.
School Leaving: With the help of this menu, a student can be relieved from the school.
Re Admission: It is an admission process for students who have Student Registration Number (SRN)
generated and wish to transfer from other school to your school.
Student Transition: It is a process where students are shifted to next higher class. The student must have
‘Student Registration Number’ for this process. Note that the class and sections must be already defined
before performing the Student Transitions.
Edit Student Profile: Edit required details of already admitted students.
Section Allocation and Subject Selection: Subjects and section can be allocated to a student once the
Student Registration Number (SRN) is generated.
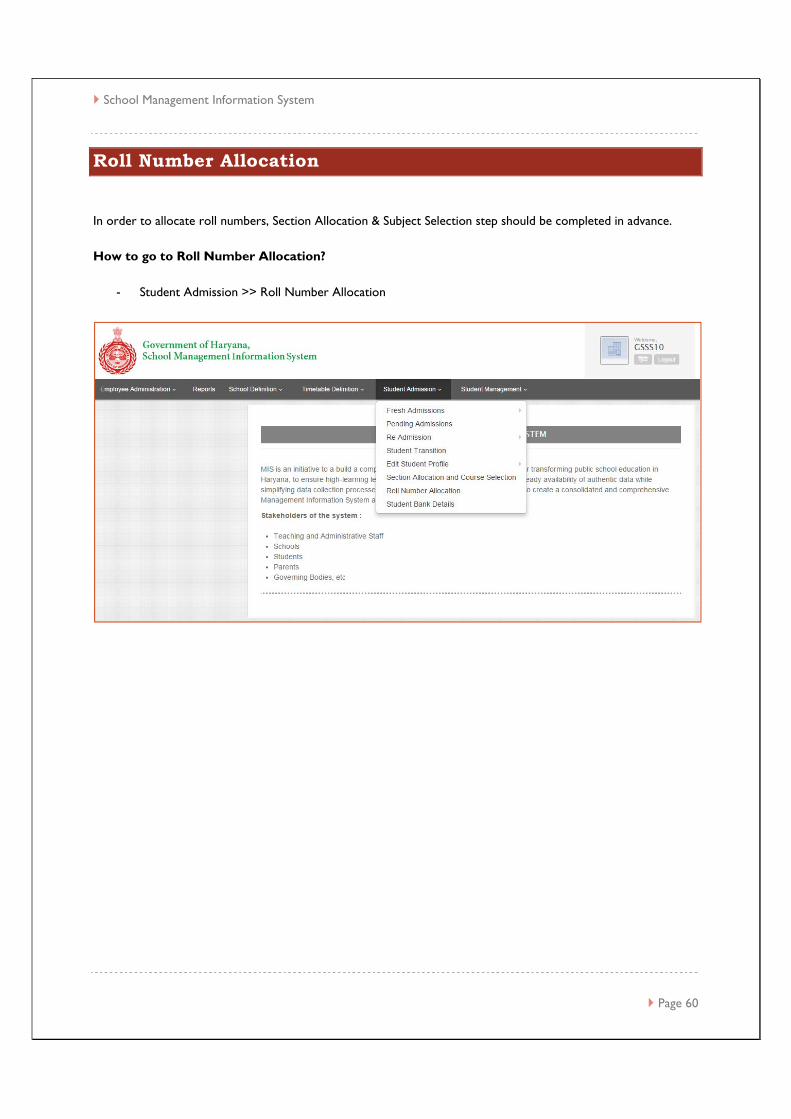
Roll Number Allocation: In order to allocate roll numbers, Section Allocation & Subject Selection step should be completed in advance.
# Note: All the above admissions would be done in current academic year only.

School Management Information System
Page 5
Student Management
Following are menus under Student Management:
Student Attendance: Attendance can be marked for a section of a class over a range of date. Only
students who are on leave and absent are to be entered. It is implied that rest are present for the day.

School Management Information System
Page 6
Fresh Admission
It is an admission process for students who do not have Student Registration Number (SRN) and whose records will be entered in the system for the first time.
In Fresh Admission, students’ personal details, parent/guardian details, sibling details, address details, contact details, photo details, reservation details, disabilities/genetic disorder etc. are captured. It is advised that the duly filled student admission form of particular student should be with the user along with scanned copy of student photo and relevant certificate.
Once all the relevant details of the student are entered by the user in the system, Admission Review menu allows the user to revise the entered information of the student. Once the duly filled information is confirmed by the user, SRN Generation menu generates unique 10 digit number.
How to go to Fresh Admission?
- Student Admission >> Fresh Admission
The duly filled student admission form of particular student should be with the user along with scanned copy of student photo and relevant
certificate.

School Management Information System
Page 7
Class Selection

School Management Information System
Page 8
Please follow below mentioned steps for class selection screen:
1. Select ‘class’ in which student is to be admitted. Only wing wise classes will be shown to the user. E.g.
For a primary school, only First to Fifth classes will be shown.
2. Select the ‘Date of Birth’ of student from calendar icon button. Age appropriateness criteria must be
complied. To view the age appropriateness criteria, click on ‘Click here to view Age Appropriateness
Criteria’.
3. ‘Student’s Age as on date of admission’ will automatically be calculated once Date of Birth of student
is entered.
4. Enter unique ‘Admission Number’ maintained in Admission Register at School level.
5. Select the ‘Date of Admission’. The default date is today. User can select any date between Academic
year start Date and today’s Date on the basis of his/her admission in the class.
Do not enter future date.
6. Enter ‘Aadhaar number’ of student if available.
7. Select the ‘Title’. E.g., Mr., Ms.
8. Enter Student’s ‘Full name as on Aadhaar card’.
9. Enter student’s ‘Name in local language’. Please press ‘Space’ after typing each word which will
convert the word in English to local language automatically.
10. Select the ‘Gender’.
11. Click on ‘Save and Proceed’ button to save above entered information. ‘Record added successfully’
message will be displayed. Please verify before submission that the information is correct.
12. To clear the entered information, click on ‘Clear’ button.
School Management Information System
Page 9
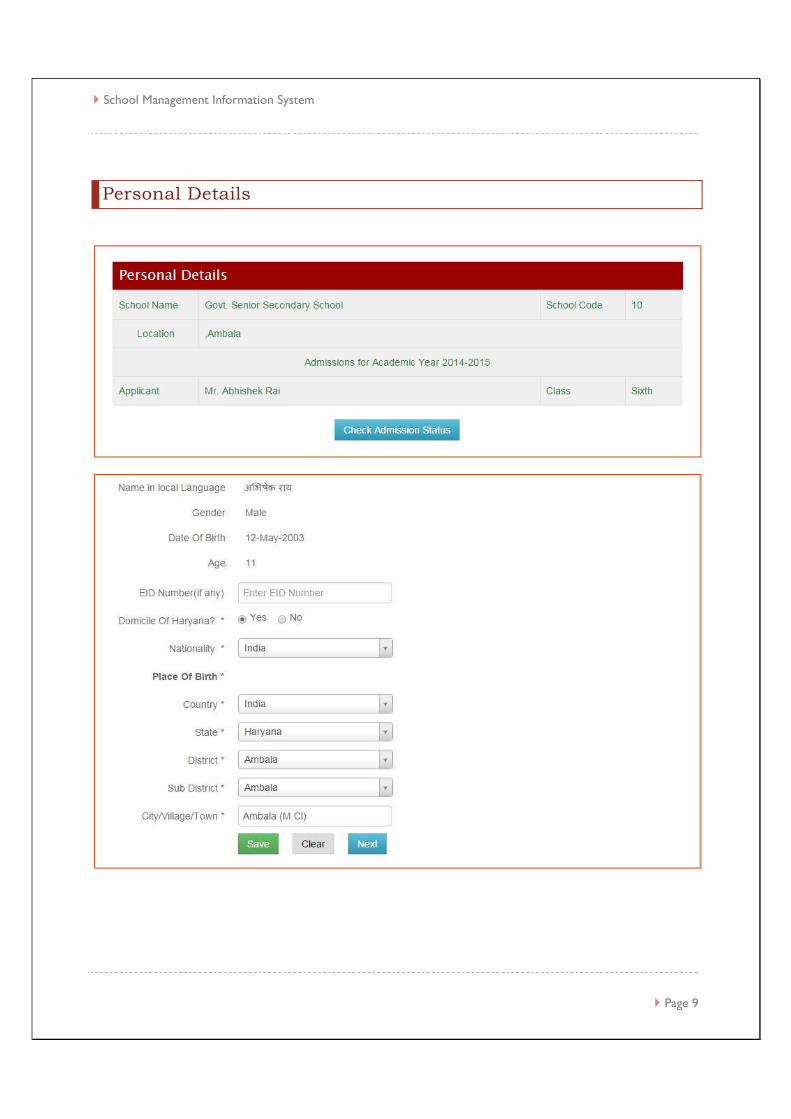
Personal Details
School Management Information System
Page 10
Please follow below mentioned steps for filling Personal Details:
1. Enter student’s ‘EID number’ if available (only in case student is enrolled for aadhaar and his/her
Aadhaar No. is not allotted yet, in that case EID is to be entered).
# Note: Enrolment Identification Number (EID) is a 28 digit numeric character. The format of the
same is EA Code - 4 digit, Station Code - 5 digit, Sequence - 5 digit, YYYYMMDD - 8 digit and
HH:MM:SS - 6 digit.
2. Select whether the student is ‘Domicile of Haryana’ or not.
3. Select the ‘Nationality’ of the Student from dropdown. Default is India.
4. Select the ‘Place of birth’ details:
4.1. Select ‘Country’. Default is India. If selected other than India, then only ‘City/Village/Town’ is to
be entered.
4.2. Select ‘State’. Default is Haryana.
4.3. Select ‘District’ from the list which is populated according to the State selected above.
4.4. Select ‘Sub District’ from the list which is populated according to the District selected above.
Sub District means Tehsil.
4.5. Select the Birth ‘City/ Village/ Town’.
5. Review again that the information filled in is correct.
6. Click on ‘Save’ button to save above entered information. ‘Record added successfully’ message will be
displayed.
7. Click on ‘Next’ button to go to next page.
8. If ‘Next’ button is clicked before Saving, system will give a message, ‘Information not Saved. Would
you like to go to next page?’. If user clicks OK, user will be redirected to the next page without
saving the information on the current page.
9. To clear the entered information, click on ‘Clear’ button.

School Management Information System
Page 11
Parent / Guardian Details

School Management Information System
Page 12

School Management Information System
Page 13
Please follow below mentioned steps for filling Parent/Guardian Details.
Father’s / Mother’s Details:
1. Enter Father’s/Mother’s full name as on Aadhaar card.
2. Enter Father’s/Mother’s Aadhaar number if any.
3. Select whether Father/Mother is involved in unclean occupation or not.
4. Select Father’s/Mother’s Occupation.
5. Select Father’s/Mother’s Highest Educational Qualification.
6. Enter Father’s/Mother’s Permanent Account Number issued by Income Tax Department.
7. Select whether Father/Mother is Income tax payee or not.
Guardian Details (if applicable):
8. Select if Local Guardian of student is other than parents.
9. Enter Guardian’s full name as on Aadhaar card.
10. Enter Guardian’s Aadhaar number if any.
11. Select Relation of Guardian with the student.
12. Select Guardian’s Occupation.
Annual Income Details:
13. Enter annual income of the family (parents together or guardian).

School Management Information System
Page 14
14. If annual income is less than Rs.2 lakhs, then only user can enter ‘below poverty line’ details of the
student.
15. Select whether the student belong to Below Poverty Line family.
BPL Certificate Details (if applicable)
16. Enter ‘Below Poverty Line Certificate number’.
17. Enter the name of ‘Certificate Issuing Authority’.
18. Enter ‘Certificate Issuing Date’.
19. Review again that the information filled in is correct.
20. Click on ‘Save’ button to save above entered information. ‘Record added successfully’ message will be
displayed.
21. Click on ‘Prev’ (Previous page) button to go back to the previous page.
22. Click on ‘Next’ button to go to next page.
23. To clear the entered information, click on ‘Clear’ button.
School Management Information System
Page 15
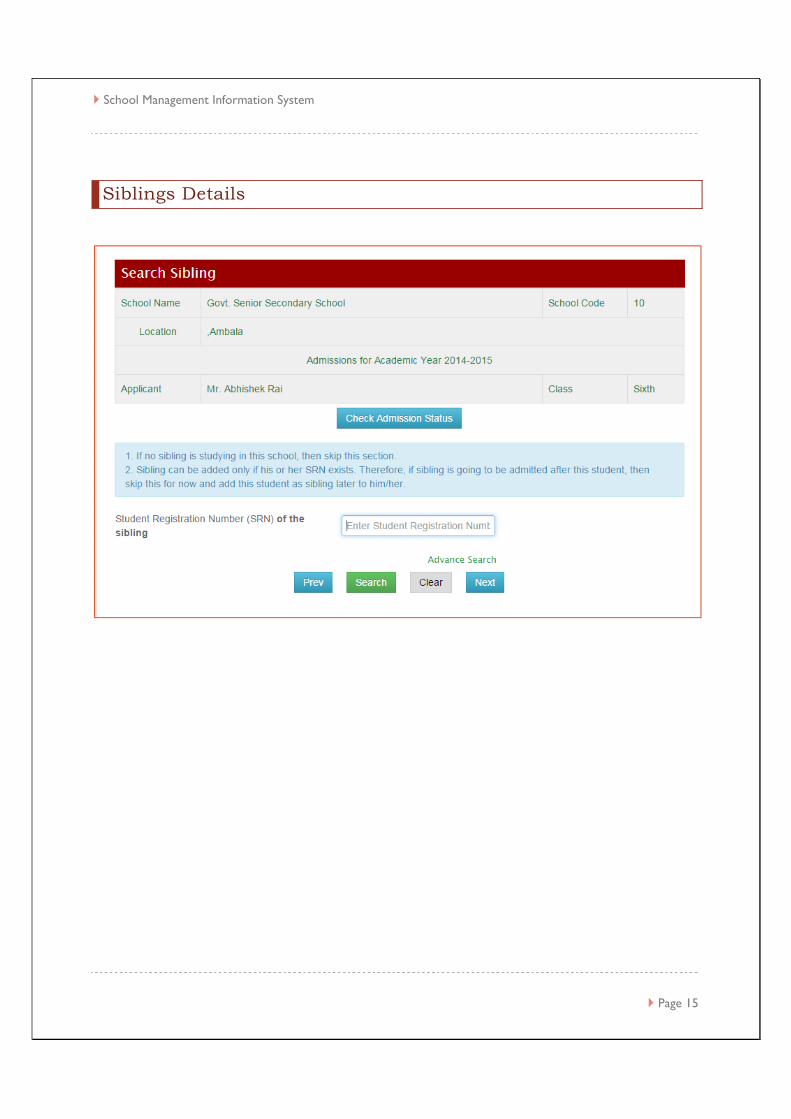
Siblings Details

School Management Information System
Page 16
Please follow below mentioned steps for Sibling Details.
1. If no sibling is studying in this school, then skip this section
2. Sibling can only be assigned to a student if sibling’s SRN (Student Registration Number) is generated
(i.e. sibling’s admission is complete)
3. User can find a sibling by searching either by SRN (if known) or by Aadhaar
number/Class/Section/Name. Then user can assign him/her as sibling to a student.
4. Review again that the information filled in is correct.
5. Click on ‘Save’ button to save above entered information. ‘Record added successfully’ message will be
displayed.
6. Click on ‘Prev’ (Previous page) button to go back to the previous page.
7. Click on ‘Next’ button to go to next page.
8. To clear the entered information, click on ‘Clear’ button.
School Management Information System
Page 17
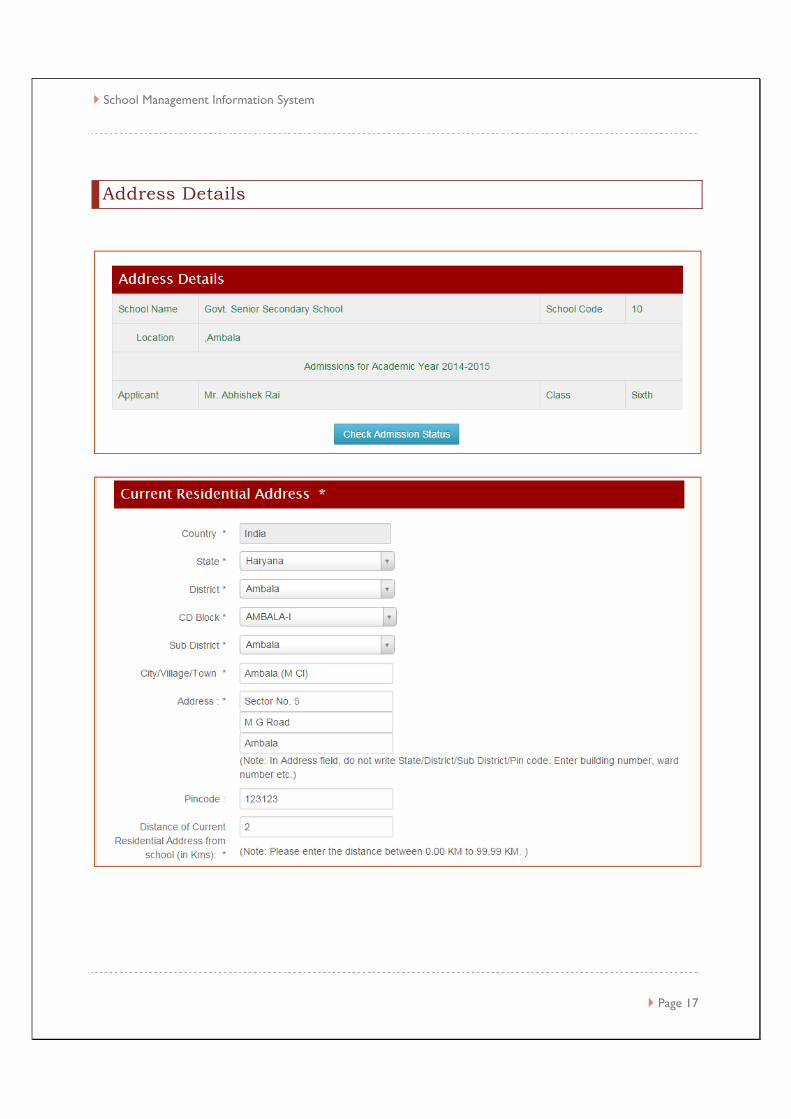
Address Details

School Management Information System
Page 18
School Management Information System
Page 19
Please follow below mentioned steps for filling Address Details of student.
1. Enter current residential address of student
2. Country and State are selected as India and Haryana respectively by default
3. Select ‘District’ from the list which is populated according to the State that the user has selected
earlier.
4. Select ‘Community Development Block’ from the list which is populated according to the District
that the user has selected earlier.
5. Select ‘Sub District’ from the list which is populated according to the District that the user has
selected earlier. (Sub-District means Tehsil for this purpose).
6. Select ‘City/Village/Town’ from the list which is populated according to the Sub District that the user
has selected earlier.
7. Enter Address. In Address field, do not write State/District/Sub District/Pin code. Enter building
number, ward number etc.
8. Enter ‘Pin Code’.
9. Enter the distance between the current residential address of student and school in Kilometers. Do
not enter distance more than 99.99 kms.
10. If Permanent address same as current address then select ‘Yes’ Button, Otherwise Select ‘No’ button.
11. If No is selected then, enter the Permanent address details separately by following similar steps given
as above.
12. Review again that the information filled in is correct.
13. Click on ‘Save’ button to save above entered information. ‘Record added successfully’ message will be
displayed.
14. Click on ‘Prev’ (Previous page) button to go back to the previous page.
15. Click on ‘Next’ button to go to next page.
16. To clear the entered information, click on ‘Clear’ button.

School Management Information System
Page 20
Contact Details

School Management Information System
Page 21
Please follow below mentioned steps for filling Contact Details of student.
1. Enter Area STD code and residential landline number of the student (if any). Do not enter STD code
which is less than 2 digits or more than 5 digits. Do not enter landline number more than 8 digits.
2. Enter Email ID and Mobile No. of Student/Father/Mother/Guardian (if any). Do not enter mobile
number more than 10 digits.
3. Review again that the information filled in is correct.
4. Click on ‘Save’ button to save above entered information. ‘Record added successfully’ message will be
displayed.
5. Click on ‘Prev’ (Previous page) button to go back to the previous page.
6. Click on ‘Next’ button to go to next page.
7. To clear the entered information, click on ‘Clear’ button.

School Management Information System
Page 22
Photo Details

School Management Information System
Page 23
Please follow below guidelines for uploading a photo of student.
1. Click on ‘Choose File’ Button.
2. Browse the Photograph from folder.
3. Click on ‘Upload’ Button.
4. Click on ‘Prev’ (Previous page) button to go back to the previous page.
5. Click on ‘Next’ button to go to next page.
6. To remove the uploaded photo, click on ‘Remove’ button.
7. To change the uploaded photo, click ‘Change’ and upload a new photo.
The guidelines for the photograph are as follows:
1. File should be in *.jpeg, *.jpg and *.png format only. 2. Size of the file should not exceed 50 KB. 3. Image size should be 100 pixel by 128 pixel with tolerance of Plus Minus 2 pixels.

School Management Information System
Page 24
Reservation Details
School Management Information System
Page 25
Please follow below mentioned steps for filling reservation details of student.
1. Select ‘Religion’ of the student from the dropdown.
2. Select ‘Category’.
3. Select ‘Caste’ from the list which is populated according to the Category that the user has selected
earlier.
4. Enter ‘Caste Certificate Number’ if student belongs to reserved category.
5. Enter the name of ‘Caste Certificate Issuing Authority’.
6. Enter ‘Caste Certificate Issued Date’.
7. Review again that the information filled in is correct.
8. Click on ‘Save’ button to save above entered information. ‘Record added successfully’ message will be
displayed.
9. Click on ‘Prev’ (Previous page) button to go back to the previous page.
10. Click on ‘Next’ button to go to next page.
11. To clear the entered information, click on ‘Clear’ button.
# Note: If the caste is not found in the dropdown, please contact the administrator through email
given on the portal.

School Management Information System
Page 26
Disabilities
School Management Information System
Page 27
Please follow below mentioned steps for entering disability details of student (if any).
1. If student is disabled, select Yes and click ‘Proceed’.
2. If student is not disabled, select No and click ‘Next’.
3. If student is disabled, select ‘Disability’ from the dropdown.
4. Enter the ‘Percentage of impairment’ that student has. E.g., 10.0
5. Select whether the student has ‘Disability certificate issued by the district civil surgeon’.
6. If yes, browse and upload the scanned copy of the certificate.
7. Review again that the information filled in is correct.
8. Click on ‘Save’ button to save above entered information. ‘Record added successfully’ message will be
displayed.
9. Click on ‘Prev’ (Previous page) button to go back to the previous page.
10. Click on ‘Next’ button to go to next page.
11. To clear the entered information, click on ‘Clear’ button.
Guidelines for Scanned Disability Certificate:-
Note: File should be in *.jpeg, *.jpg, *.pdf format only. Size of the file should be exceed 100KB.

School Management Information System
Page 28
Genetic Disorder
School Management Information System
Page 29
Please follow below mentioned guidelines for entering Genetic Disorder details (if any).
1. If student has genetic disorder, select Yes and click ‘Proceed’.
2. If student does not have genetic disorder, select No and click ‘Next’.
3. If student has genetic disorder, select the ‘Genetic Disorder’ from the list.
4. Review again that the information filled in is correct.
5. Click on ‘Save’ button to save above entered information. ‘Record added successfully’ message will be
displayed.
6. Click on ‘Prev’ (Previous page) button to go back to the previous page.
7. Click on ‘Next’ button to go to next page.
8. To clear the entered information, click on ‘Clear’ button.
School Management Information System
Page 30
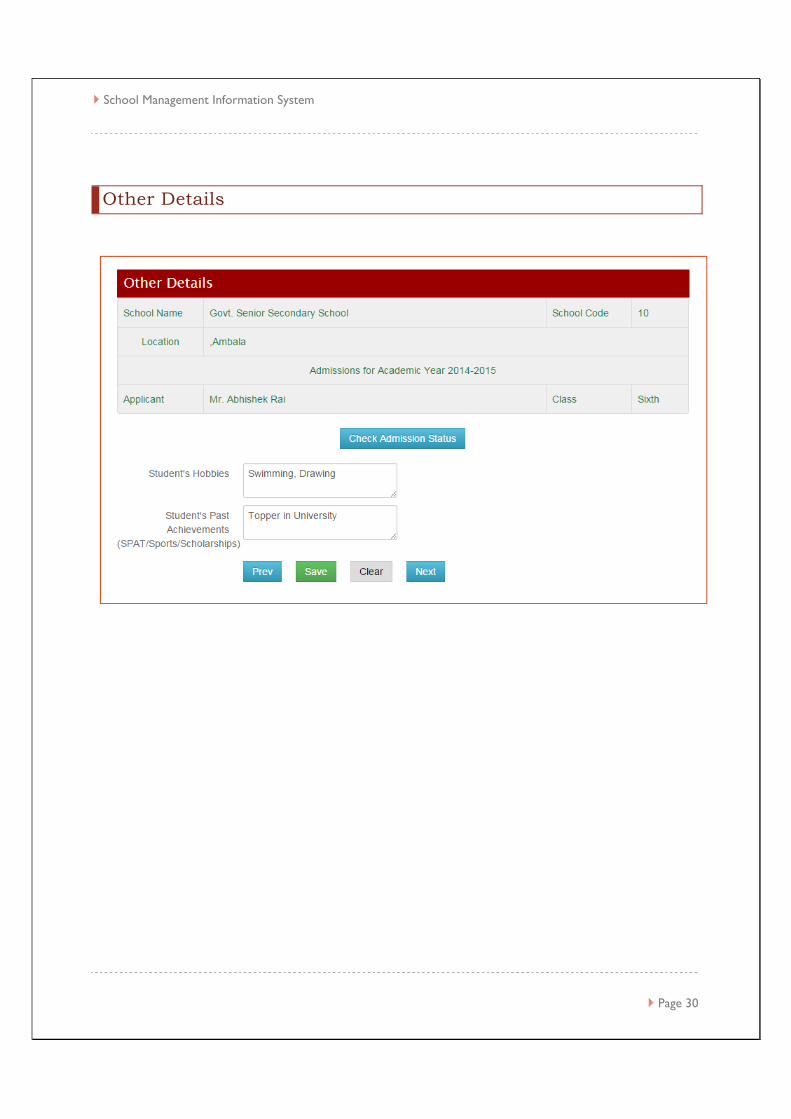
Other Details

School Management Information System
Page 31
Please follow below mentioned steps for filling other details of the student.
1. Enter ‘Student’s hobbies’ if any in the text box.
2. Enter ‘Student’s Past Achievements (SPAT/Sports/Scholarships)’ if any.
3. Review again that the information filled in is correct.
4. Click on ‘Save’ button to save above entered information. ‘Record added successfully’ message will be
displayed.
5. Click on ‘Prev’ (Previous page) button to go back to the previous page.
6. Click on ‘Next’ button to go to next page.
7. To clear the entered information, click on ‘Clear’ button.

School Management Information System
Page 32
Student Bank Details
School Management Information System
Page 33
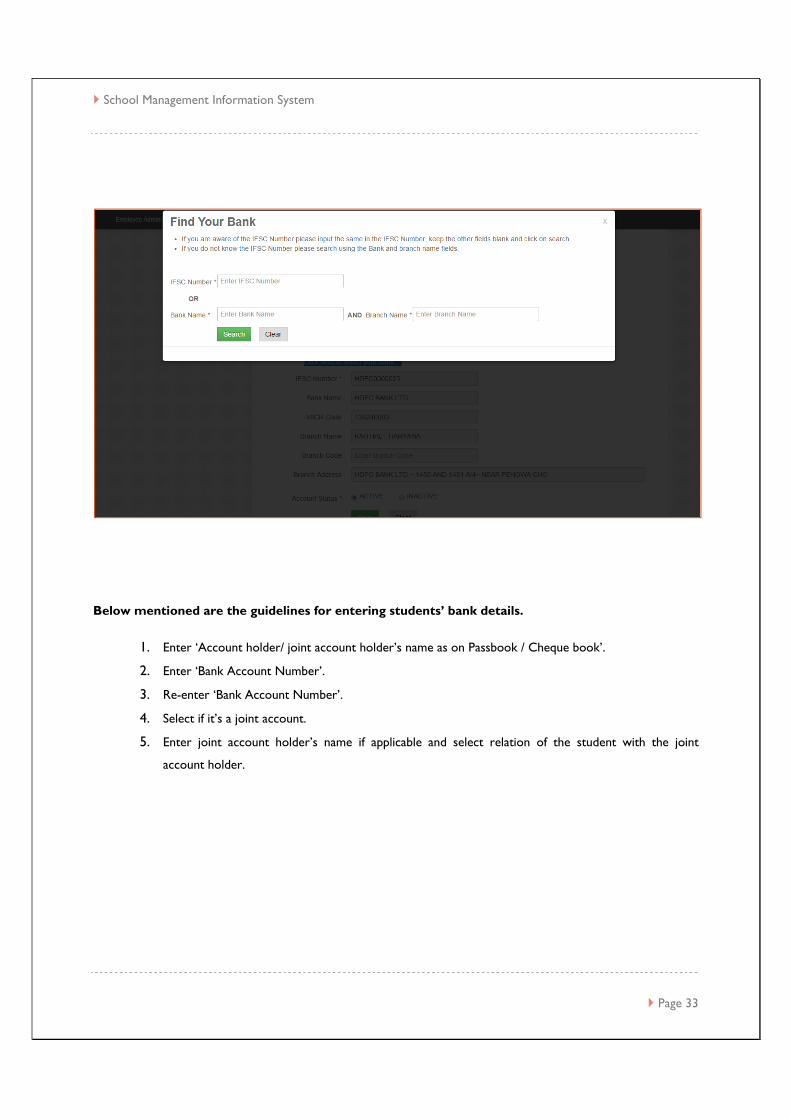
Below mentioned are the guidelines for entering students’ bank details.
1. Enter ‘Account holder/ joint account holder’s name as on Passbook / Cheque book’.
2. Enter ‘Bank Account Number’.
3. Re-enter ‘Bank Account Number’.
4. Select if it’s a joint account.
5. Enter joint account holder’s name if applicable and select relation of the student with the joint
account holder.

School Management Information System
Page 34
6. Select ‘Account type’ e.g. savings account.
7. Click on the hyper link ‘Click here to select your Bank’. A pop up ‘Find your bank’ will appear.
8. Enter ‘IFSC number’ OR enter ‘bank name and branch name’. Click on search.
9. Select your bank from the list.
10. Select the account status.
11. Click on ‘Save and Proceed.'

School Management Information System
Page 35
Admission Review

School Management Information System
Page 36
Below mentioned are the guidelines for entering details in Admission Review:
1. You can review all the details of the student against each section that has been entered by clicking
“Edit Button’’.
2. Review the details by expanding the menus and edit the required once by clicking on ‘Edit’ button
against each menu.
3. Click on ‘Submit student for SRN Generation’. The record will be saved in SRN Generation
menu which is only accessible to the Principal.
4. Principal then can review the data of the student and will complete the admission by clicking Admit
Student & Generate SRN.
5. Allocate section and subjects to the admitted student from ‘Section Allocation and Subject Selection’
menu.

School Management Information System
Page 37
Pending Admission
It is an admission process for students who do not have Student Registration Number (SRN) but their partial /
complete records are entered in the system.
The student can be found in pending admissions if at least the
student’s ‘Class Selection’ details are saved successfully but the
Student registration Number (SRN) is not generated. If the student’s
mandatory information is not filled completely, student’s admission
shall remain incomplete.
Pending Admission menu is designed to overcome below possible
circumstances:
Power cut in the midst of admitting a student
If student’s complete data is not available with the user etc.
How to go to Pending Admission?
- Student Admission >> Pending Admission
If complete information of a student is not available, user can save the available data and update it later
from Pending Admission menu.

School Management Information System
Page 38

School Management Information System
Page 39
Please follow below mentioned steps to complete pending admissions:
1. Select ‘Class’ from which student’s pending admission is to be completed.
2. Click on ‘Proceed’ button. Students from the selected class whose admission is pending will be listed
in a tabular format.
3. Completed information is shown with ‘ ’ mark in the corresponding menu for that student and
incomplete information is shown with a link ‘Edit’ in the corresponding menu.
4. In order to edit a particular menu, click on corresponding ‘Edit’ link. The particular details will be
shown. Enter the details and click on ‘Save’ button. Fill in all the applicable details and Generate
Student Registration number.
5. Once the Student Registration number is generated, the Student’s details can be edited from Edit
Student Profile menu.
6. If all the details are filled then only ‘Generate SRN’ button will be in active mode. The user can click on
‘Generate SRN’ button and generate SRN.
7. If the user wants to delete a record of particular student whose SRN is not generated then click on
‘Delete’ button.

School Management Information System
Page 40
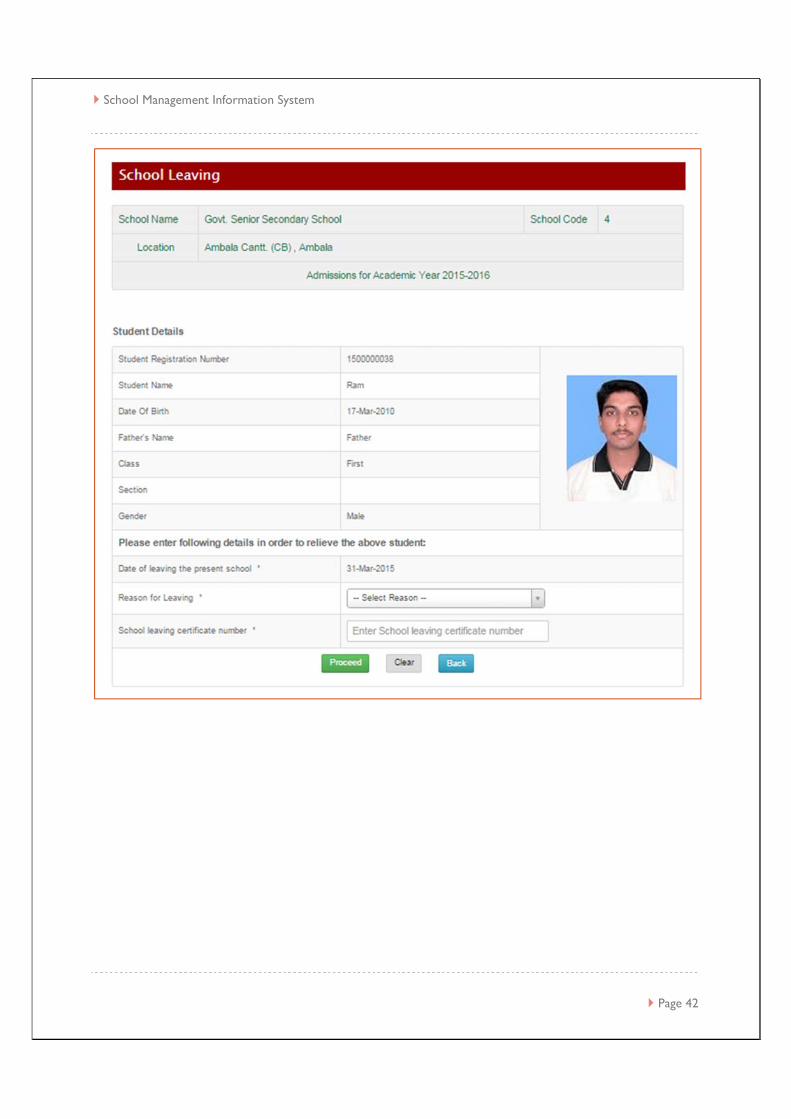
School Leaving
With the help of this menu, a student can be relieved from the school. The reason for the same can be one of the following:
• Name struck off due to absence. • Name struck off due to punishment. • On student’s request.
How to go to School Leaving?
- Student Admission >> School Leaving

School Management Information System
Page 41
School Management Information System
Page 42

School Management Information System
Page 43

School Management Information System
Page 44
Please follow below mentioned steps for school leaving:
1. Search Student by ‘Student Registration Number’. If Student Registration Number is not available, click on
‘Advance Search’. You can search by Aadhaar Card Number, Class, Section, or Student Name.
2. Click on ‘Search’ button. A table showing Student Registration Number, Student Name, Gender, Class,
and Section shall appear. Select the student.
3. Student’s basic details will be shown.
4. Select the reason for leaving.
5. Enter the school leaving certificate number.
6. Click on ‘Proceed’ button.
7. Attach scanned copy of school leaving certificate.
8. Review the scanned copy after uploading on clicking ‘Click here to review’.
9. Please check to confirm.
10. Click on ‘Save’ button.
11. Success message will be shown.

School Management Information System
Page 45
Re Admission
Re admission is a mode of admission in which an already admitted student can be transferred from one school to
another.
How to go to Re Admission?
- Student Admission >> Re Admission >> Student Details

School Management Information System
Page 46

School Management Information System
Page 47

School Management Information System
Page 48
Please follow below mentioned steps to re admit a student:
1. Enter SRN of the student who is to be re admitted in this school.
2. Click on ‘Get Information’.
3. Student’s information and previous school information will appear. This includes previous school’s
address details, contact details, past year in which student attended the school, the past class in which
student attended the school, date of leaving the previous school, reason for leaving, school leaving
certificate number and certificate attachment etc.
4. If the student has not left the previous school yet, user cannot readmit the student in this school.
User will get a message from the system suggesting that this school should contact the previous
school to relieve the student.
5. Select class, stream (for 11th and 12th only) in which the student is to be admitted in this school. User
can only admit student in the same class (class in which the student left the previous school) or
higher class (if applicable according to age – class appropriateness criteria). The stream in which
student left the previous school, will be shown default selected.
6. Allocate section and subjects to the admitted student from ‘Section Allocation and Subject Selection’
menu.

School Management Information System
Page 49
Student Transition In student transition, students are shifted to next higher class. The student must have ‘Student Registration Number for this process. Note that the class and sections must be already defined before performing the Student Transitions.
How to go to Student Transition?
- Student Admission >> Student Transition

School Management Information System
Page 50

School Management Information System
Page 51

School Management Information System
Page 52
Please follow below mentioned steps for student Transition:
1. Select ‘Class’ from which the students are to be transited to next higher class.
2. Click on ‘Proceed’ button.
3. Select section form which the students are to be transited.
4. Click on ‘Proceed’ button.
5. Select student/s which are to be transited. You can only select student/s whose profile is complete. First
complete the profiles of students whose profile is not complete, by going to edit student profile.
6. Click on ‘Transit’ button after selecting students.
7. Please check to confirm.
8. Success message is shown.
9. Repeat functionality is only applicable for 9th and onwards standards. Select student/s and click on Repeat.
School Management Information System
Page 53
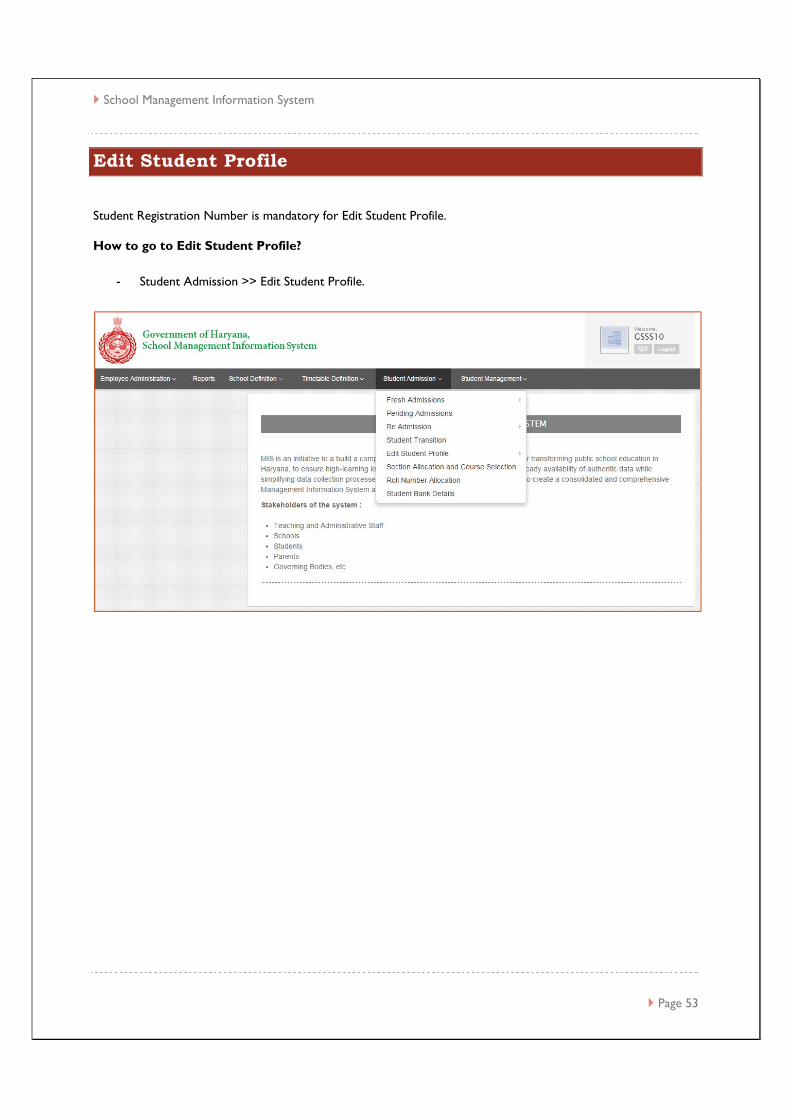
Edit Student Profile
Student Registration Number is mandatory for Edit Student Profile.
How to go to Edit Student Profile?
- Student Admission >> Edit Student Profile.

School Management Information System
Page 54
School Management Information System
Page 55
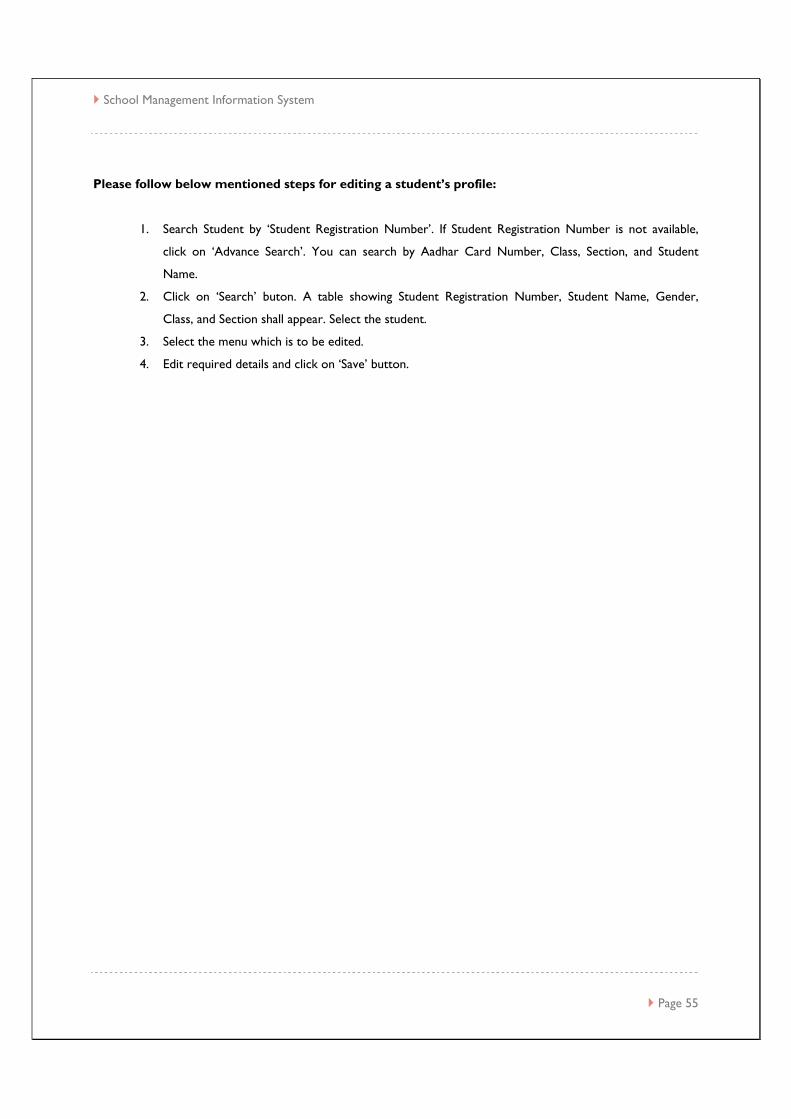
Please follow below mentioned steps for editing a student’s profile:
1. Search Student by ‘Student Registration Number’. If Student Registration Number is not available,
click on ‘Advance Search’. You can search by Aadhar Card Number, Class, Section, and Student
Name.
2. Click on ‘Search’ buton. A table showing Student Registration Number, Student Name, Gender,
Class, and Section shall appear. Select the student.
3. Select the menu which is to be edited.
4. Edit required details and click on ‘Save’ button.

School Management Information System
Page 56
Section Allocation and Subject Selection
Subjects and section can be allocated to a student once the Student Registration Number (SRN) is generated.
Ensure that sections are already defined for particular class of which the student’s section allocation is to be done.
How to go to Section Allocation and Subject Selection?
- Student Admission >> Section allocation and Subject Selection
School Management Information System
Page 57

School Management Information System
Page 58

School Management Information System
Page 59
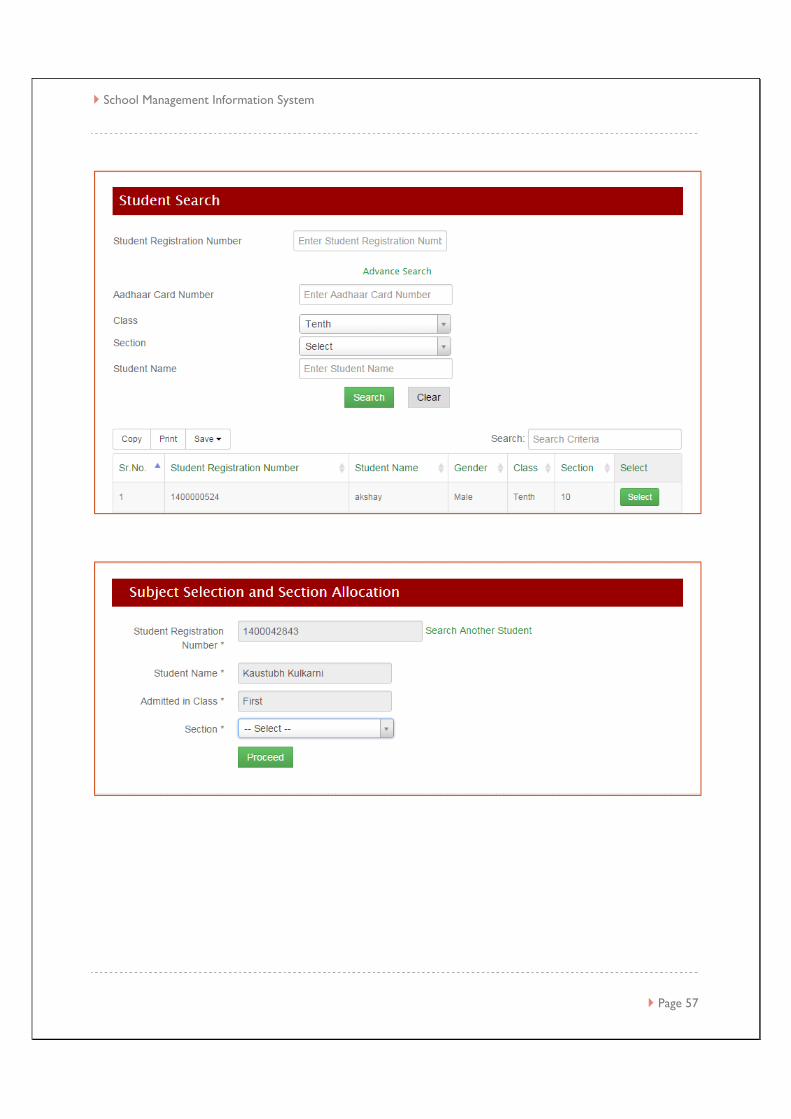
Please follow below mentioned steps for allocating section and selecting subjects:
1. Search Student by ‘Student Registration Number’. If Student Registration Number is not available,
click on ‘Advance Search’. You can search by Aadhaar Card Number, Class, Section, and Student
Name.
2. Click on ‘Search’ button. A table showing Student Registration Number, Student Name, Gender,
Class, and Section shall appear. Select the student.
3. Student Registration Number, Student Name and Admitted in Class, Stream (Only for 11th and 12th
class) will appear. To search another student, click on ‘Search Another Student’.
4. Select ‘Section’ in which the student is to be admitted.
5. Click on ‘Proceed’ button.
6. Compulsory subjects will come preselected and auto expanded.
7. To expand/collapse the Compulsory subjects, click on ‘(+) Expand All’ / ’(-) Collapse All’ button
shown at the right side of the page.
8. To expand/collapse the Optional subjects (for Classes 6th to 12th), click on ‘(+) Expand All’ / ’(-)
Collapse All’ button shown at the right side of the page.
9. Allocate the subjects to the student by selecting the check box against each subject. Take into
consideration the minimum and maximum subject selection criteria.
10. Click on ‘Save’. Section and Subjects will be assigned to the student.
School Management Information System
Page 60
Roll Number Allocation
In order to allocate roll numbers, Section Allocation & Subject Selection step should be completed in advance.
How to go to Roll Number Allocation?
- Student Admission >> Roll Number Allocation

School Management Information System
Page 61

School Management Information System
Page 62

School Management Information System
Page 63
Please follow below mentioned steps for allocating roll numbers to students:
1. Select ‘Class’ of which students are to be allocated roll numbers.
2. Once Class is selected, sections defined for that class will appear. Select ‘Section’.
3. Click on ‘Proceed’ button.
4. All the students admitted in that class in that section will appear. Roll numbers will be allocated
according to alphabetical order of the name of the students.
5. Review again that the information filled in is correct.
6. Click on ‘Proceed’ button.
7. Click ‘Confirm Roll Number Allocation’ to confirm the roll number allocation or ‘Back’ to change the
allocation criteria by sorting the student according to Name, Gender and SRN etc.
8. View allocated roll numbers by clicking ‘View Allocated Roll Numbers’ after selecting class and
section.

School Management Information System
Page 64
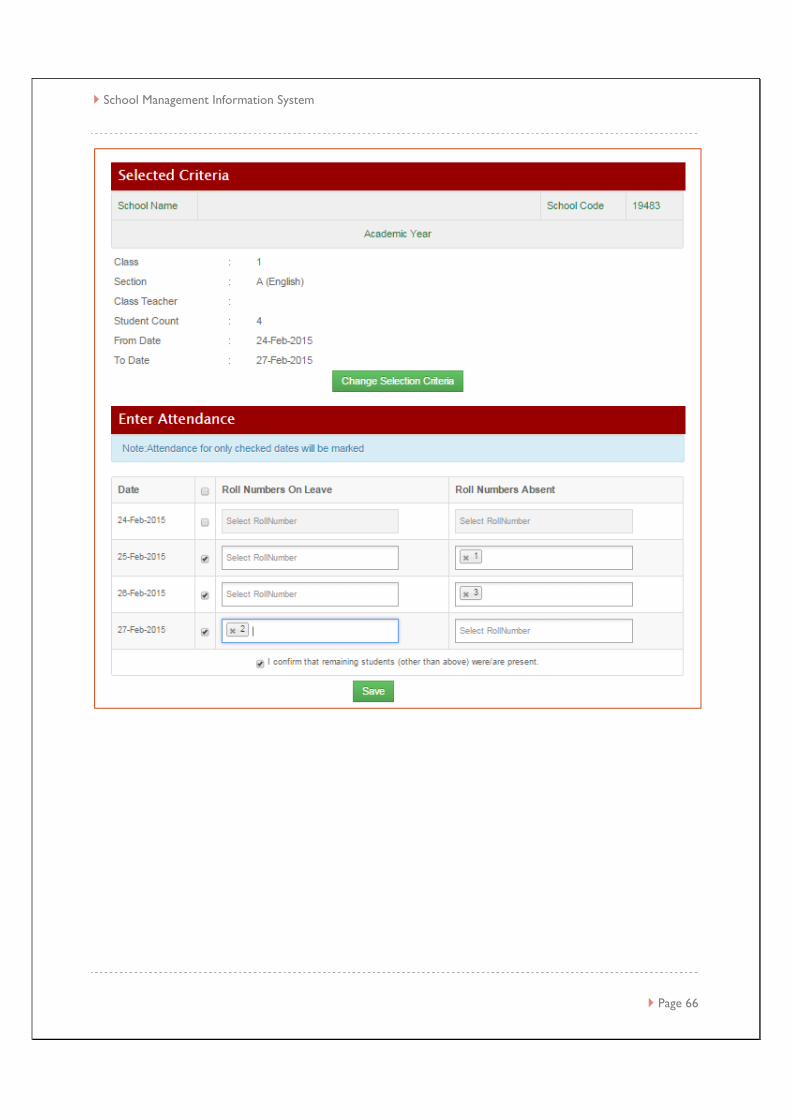
Student Attendance
Attendance can be marked for a section of a class over a range of date. Only students who are on leave and absent are to be entered. It is implied that rest are present for the day.
How to go to Student Attendance?
- Student Management >> Student Attendance.

School Management Information System
Page 65
School Management Information System
Page 66

School Management Information System
Page 67
Please follow below mentioned steps for student attendance entry:
1. Select ‘Class’.
2. Select ‘Stream’ if applicable (shown if 11th /12th class is selected).
3. Select ‘Section’.
4. Select the dates for which attendance is to be marked.
# Note: Attendance can only be marked for a period of one month at the max.
5. Click on ‘Proceed’ button.
6. ‘Selected Criteria’ screen will appear. To change the selected criteria, click on ‘Change Selection
Criteria’ button.
7. Click on checkbox against the date of which attendance is to be entered.
# Note: Attendance for only checked dates will be marked
8. Enter the roll number on leave / absent. Then press ‘Enter’ button on keyboard.
9. Check to confirm ‘I confirm that remaining students (other than above) were/are present’.
10. Click on ‘Save’ button.