schoolblog guide 2.0-working - epals.comimages.epals.com/downloads/epals_schoolblog_guide.pdf ·...
TRANSCRIPT
ePals SchoolBlog Teacher’s Guide DOCUMENT VERSION 2.0 • JUNE 2007
Copyright 2007 ePals, Inc. All rights reserved. ePals, ePals SchoolBlog,and the ePals SchoolBlog logo are trademarks or registered trademarks of
ePals, Inc. in the United States and Foreign Countries.
ePALS SchoolBlog Teacher’s Guide • 2
Table of Contents
WELCOME TO EPALS SCHOOLBLOG...................................................................................................................3
SITE OVERVIEW...................................................................................................................................................4
GETTING STARTED ..............................................................................................................................................5
ADDING CONTENT TO YOUR SITE......................................................................................................................6
MODERATING CONTENT ...................................................................................................................................15
ADDITIONAL CONTENT CONTROLS ..................................................................................................................17
ADDING USERS..................................................................................................................................................19
LOGS AND STATISTICS ......................................................................................................................................23
GETTING THE MOST FROM YOUR SITE............................................................................................................25
OTHER EPALS SCHOOLBLOG FEATURES..........................................................................................................27
GETTING HELP ..................................................................................................................................................27

ePALS SchoolBlog Teacher’s Guide • 3
Welcome to ePals SchoolBlog
Thank you for choosing ePals SchoolBlog! “Blogging” is short for “web logging”. Blogs are a great way for teachers to provide parents with a window into classroom activities and for students to post messages on the teacher’s blog regarding lessons they have learned. Most blogs on the Internet today are not permission-based; that is, they can be viewed and commented on by anyone with access to the Internet, anonymously. While this could be a great form of expression, it may not be consistent with your curriculum. Therefore, ePals recommends an educationally relevant approach to blogging to restrict access and user functionality and keep the blog focused on classroom activities. We call this our “walled garden” approach which gives the teacher the control to “moderate” what content appears on the site. These “moderation” functions are built in to each of our services. This guide is designed to walk you through the process of setting up and updating your ePals SchoolBlog site to make it an invaluable learning tool for your classroom. Throughout this guide, we will refer to your blog as your “site” because many teachers use ePals SchoolBlog as their classroom web site. Finally, ePals SchoolBlog was designed with the help of educators and students, and ePals depends upon the feedback from educators and students to continuously improve our products and services. If you have any suggestions, comments, or helpful hints on using ePals SchoolBlog, please feel free to email your comments to [email protected]

ePALS SchoolBlog Teacher’s Guide • 4
Site Overview
Below is a detailed “map” and description of each of the areas of your ePals SchoolBlog site.
1 Logo: Choose to use the ePals SchoolBlog logo or your own.
7 Personal Navigation: List of links to the administration sections of your site as well as to sections to add content such as blog entries.
2 Web Site Title: You can enter a title for your ePals SchoolBlog site.
8 Home Page Content: Content visible on the home page of your site.
3 Search: Find any content and any user on your site. Advanced search is also available.
9 Student and Teacher Postings: This area shows the postings made by you and your students in reverse-chronological order.
4 Main Navigation: Access the pages of your site through these links.
10 Events and Assignments: List of all events and assignments at a glance.
5 Moderation: Access content and user accounts waiting to be approved.
11 Recent Blog Postings: List of the ten most recent blog postings made to your site.
6 Event Calendar: Calendar view with linked days that have events scheduled.
12 Syndicate: Easily share content and podcasts through RSS.

ePALS SchoolBlog Teacher’s Guide • 5
Getting Started
Along with your order, you should have received a username and password for your ePals SchoolBlog site. Simply go to the URL specified in your activation notice, and enter your username and password in the login form located in the left-hand navigation bar. Once logged in, you’ll be able to configure and add content to your site. If you do not see the login form in the navigation bar, or if you have disabled it, you and your users can access a login screen by adding “/user” to the end of your site url. (EG: http://sites.epals.com/yoursitename/user) If you’re familiar with blogging, we also encourage you to jump in and start experimenting with your new ePals SchoolBlog site. If ePals SchoolBlog is your first use of blogging technologies, then please keep this guide handy.
Site Settings To change the name of your website, add a site slogan, update the administrator’s email address, and other site-specific settings, click the “Settings” link in the site “Administration” menu.
ePALS SchoolBlog Teacher’s Guide • 6
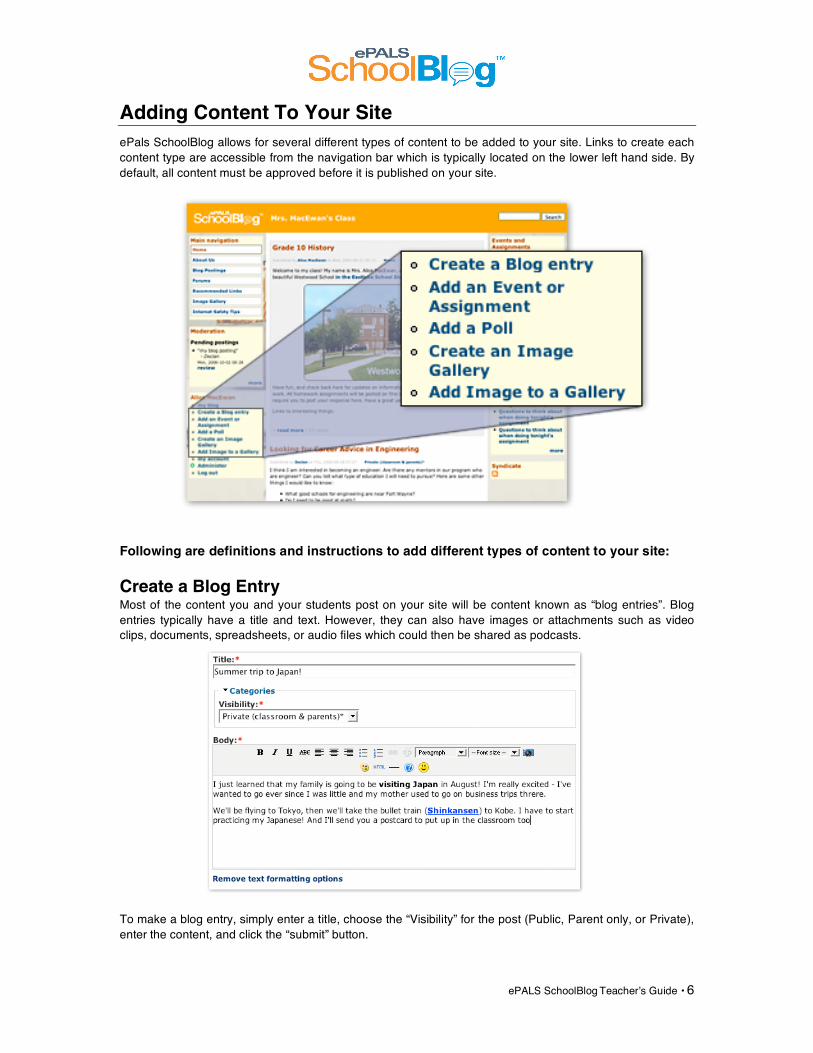
Adding Content To Your Site
ePals SchoolBlog allows for several different types of content to be added to your site. Links to create each content type are accessible from the navigation bar which is typically located on the lower left hand side. By default, all content must be approved before it is published on your site.
Following are definitions and instructions to add different types of content to your site:
Create a Blog Entry Most of the content you and your students post on your site will be content known as “blog entries”. Blog entries typically have a title and text. However, they can also have images or attachments such as video clips, documents, spreadsheets, or audio files which could then be shared as podcasts.
To make a blog entry, simply enter a title, choose the “Visibility” for the post (Public, Parent only, or Private), enter the content, and click the “submit” button.

ePALS SchoolBlog Teacher’s Guide • 7
Public postings are available to anyone visiting the site, without the need to log in to view the content. Postings marked as “Parent only” will only be visible by you and users logging in using parent accounts. The postings marked as “Private” are available to you, your students and parents. ePals SchoolBlog includes a rich text editor similar to a word processing program. If you would like to format the blog entry with bold or italics to add emphasis, simply use the text-formatting controls above the message body area to format your text and insert images (see “Text-Formatting Options” on page 14). If you do not wish to use the text-formatting options, just click the “Remove text formatting options” link and the message will appear as plain text. By default, postings are trimmed when displayed with other posts. “Trimmed” means that instead of the entire blog entry appearing, only the beginning of the entry will appear, with a link to the rest of the content. This function is useful, for instance, if you or one of your students has a lengthy post and you wish to “trim” what appears on the site to save room for other entries. You can control where the post is trimmed by entering:
<!--break--> …where you would like the entry to end. If, however, you want to make sure that the entire entry is shown, you can prevent it from being trimmed by adding <!--break--> to the end of your entry. Here are some examples:

ePALS SchoolBlog Teacher’s Guide • 8
Home Page Content To add content to your Home Page, create a blog entry and check the following checkboxes in the “Moderation” section at the bottom of the page when submitting the entry:
1. “Published” - This will make the content “live” on your site. 2. “Feature on Home Page” - The entry will be displayed on your home page as well as the author’s
blog page. 3. “Sticky at top of lists” - This will force the content to stay at the top of the pages which it is published
on. This option combined with “Feature on Home Page” will create a permanent post that greets visitors on the top of your home page.
For more information on available content options, see page 16. Typically, home pages contain general information about the teacher, their school, and the use of ePals SchoolBlog in the classroom. In addition, home pages contain special content that you may wish to promote such as a class field trip. Below is an example of an untrimmed blog entry that is featured on the home page and sticky to the top.

ePALS SchoolBlog Teacher’s Guide • 9
Add an Event or Assignment Teachers regularly enter events or assignments to their site. To enter a notice about an upcoming event or homework assignment, click the “Add an Event or Assignment” link. This will create a new posting that will automatically be added to your Events calendar. Each Event or Assignment has a title, description, and a start and end date and time. If you wish to have only a start time, be sure to leave the end time at the same value as the start time. As with blog postings, select the “Visibility” setting. Here’s an example:
If you enable the “Upcoming Events” area to be seen on your site (see “Configuring Blocks” on page 26), a list of upcoming events and assignments will be displayed on the site for visitors to see. Once entered, your event or assignment will be accessible from the calendar located in your site’s navigation bar.

ePALS SchoolBlog Teacher’s Guide • 10
Add a Poll A Poll is a short survey, which allows you to gather feedback from your site visitors on a topic. ePals SchoolBlog’s poll function allows you to enter a question for your poll as well as multiple-choice answers for visitors to choose from. You can also set the duration that the poll will remain “open” and ready to receive responses. Here’s an example:

ePALS SchoolBlog Teacher’s Guide • 11
By default, polls will be displayed in the left-hand navigation bar, within the “Most recent poll” area. Within ePals SchoolBlog, these areas are called “blocks”. See “Configuring Blocks” on page 26 for information on block locations and configurations. ePals SchoolBlog polls allow one-time participation by “remembering” the IP address from which the vote came and this IP address will be shown in your Poll results report. Poll results are also displayed for users who have already voted.
Create an Image Gallery Create an image gallery to arrange images in a logical grouping. For example, some teachers create a gallery for student pictures, and another gallery to showcase a particular event such as a science fair. ePals SchoolBlog comes with two default galleries: Public and Private. Only users who have logged in will be able to access “Private” images.
New galleries must have one of the default galleries as the “parent” gallery, and will inherit the privacy setting applied to the parent. For example, if you create an image gallery for “Field Trip Photos” and make the “Private” gallery it’s parent, then only logged in users will be able to view the “Field Trip Photos”.

ePALS SchoolBlog Teacher’s Guide • 12
Add Image to a Gallery If you wish to add an image on its own (instead of as part of a blog entry), use this option. Images are arranged in galleries such as a photo album. To add an image, or several images within a gallery, locate the image on your computer and upload it using the form given.
To insert an image into your blog entry or other content, see “Text-Formatting Options” on page 14.
Comments Comments can be added to other content. ePals SchoolBlog supports threaded comments, allowing for lively discussions to happen around any posting. Comments allow your site to become more of a conversation with users, encouraging peer-editing and collaboration. See “Permission for users to comment on this content” on page 17 for details on comment settings.

ePALS SchoolBlog Teacher’s Guide • 13
Forums and Forum Topics Another type of content that can be added to your site are Forum Topics within Forums. Forum Topics are like blog entries, but are kept with other forum topics instead of with your blog allowing for threaded discussions on a particular topic. Users can read a topic and post follow-ups to it in a discussion board format, or create their own Forum Topics for new topics, by clicking on the "Post new forum topic" link within the Forums area of your site. Forums can be placed inside “containers” in order to group related topics. For example, you may have a container entitled “Extra Help” with holds forums for “History help”, “Math help”, and so on, although if you do not have a lot of Forums then you may only need one container. Here’s an example:
You can create new Forums and containers by clicking the "Administer" link in the navigation bar and then the "Forums" link that appears below it.

ePALS SchoolBlog Teacher’s Guide • 14
Text-Formatting Options ePals SchoolBlog features a rich text editor similar to those found in popular word processors. You can use the controls provided by the editor to style your posts and comments.
Explanation of Formatting Options
Bold
Select text and click to embolden.
Italic
Select text and click to italicize.
Underline
Select text and click to underline.
Strikethrough
Select text and click to apply strikethrough
Left align
Aligns selected content to the left.
Center align
Centers selected content.
Justify
Justifies selected text.
Right align
Aligns selected content to the right.
Emoticons
Click to reflect your mood in your posting with a range of “emoticons”. Select the face to insert from the popup window.
Insert Image
Choose from previously added images or upload a new one into your content. You can add a title and description, and select a size (“preview” for full size or “thumbnail” for a smaller version).
Text Color
Choose a text color from the popup palette.
Text-Highlight Color
Choose a text-highlight color from the popup palette.
Unordered list
Create a bullet list from selected content.
Ordered list
Create a numbered list from selected content.
Indent
Click to indent selected content. Click again to increase the indented content.
Decrease Indent
Click to decrease indentation of selected content.
Text Style menu: Select a format style for selected text.
Font Size menu: Select a font size for the selected text.
Font select menu: Select a font family for selected text.

ePALS SchoolBlog Teacher’s Guide • 15
Moderating Content
ePals SchoolBlog provides you with complete control over what gets posted on your site. By default, all postings and comments are “not published”, and must be approved by you before they will appear on your site. When student content requires your approval it will appear in the “Moderation” section of your navigation bar.
Just click the “review” link under the posting to access the moderation controls. The “Moderation” controls are located below the area where you write your posting.

ePALS SchoolBlog Teacher’s Guide • 16
Moderation Options
Published Select this option to publish content to your site. Published content is accessible from the author’s blog page.
Feature on Home page Selecting this option will publish a posting to the home page as well as the author’s blog. You can use this to feature important content. To remove it from the home page, edit the posting and deselect this option. Note
that the content must also be “Published” to feature it on the home page.
Not Published All submissions are “Not Published” by default. Deselect this option and select the “Published” option to publish content. You can use this for drafts or to remove content from your site. In order to provide safety and content control, whenever a student edits one of their postings, it will revert to “Not Published” and appear in your Moderation section in the navigation bar. If you would like to give your users the ability to publish their posts without your having to moderate them, you can assign them the “unmoderated” role. See “Activating Users And Choosing Their Role” on page 21 for details.
Sticky at top of lists When this option is selected, the post will appear at the top of the pages to which it is published, regardless of the date of the post. You can use this combined with “Feature on Home page” to create a welcome message that will always appear at the top of your home page.
Create new revision If you select this option, you can maintain different versions of your post and refer to previous versions.

ePALS SchoolBlog Teacher’s Guide • 17
Additional Content Controls
ePals SchoolBlog allows additional options for every posting made. When editing or writing a post, you will see these options within the content creation screens.
Permission for users to comment on this content If you wish, you can turn on or off commenting on a posting-by-posting basis. By default, users can read and write comments on posts.
Attach files to this content You can attach a file to any posting using the provided form. You can use attachments to add audio or video files to your posting (eg: podcasts).
ePALS SchoolBlog Teacher’s Guide • 18
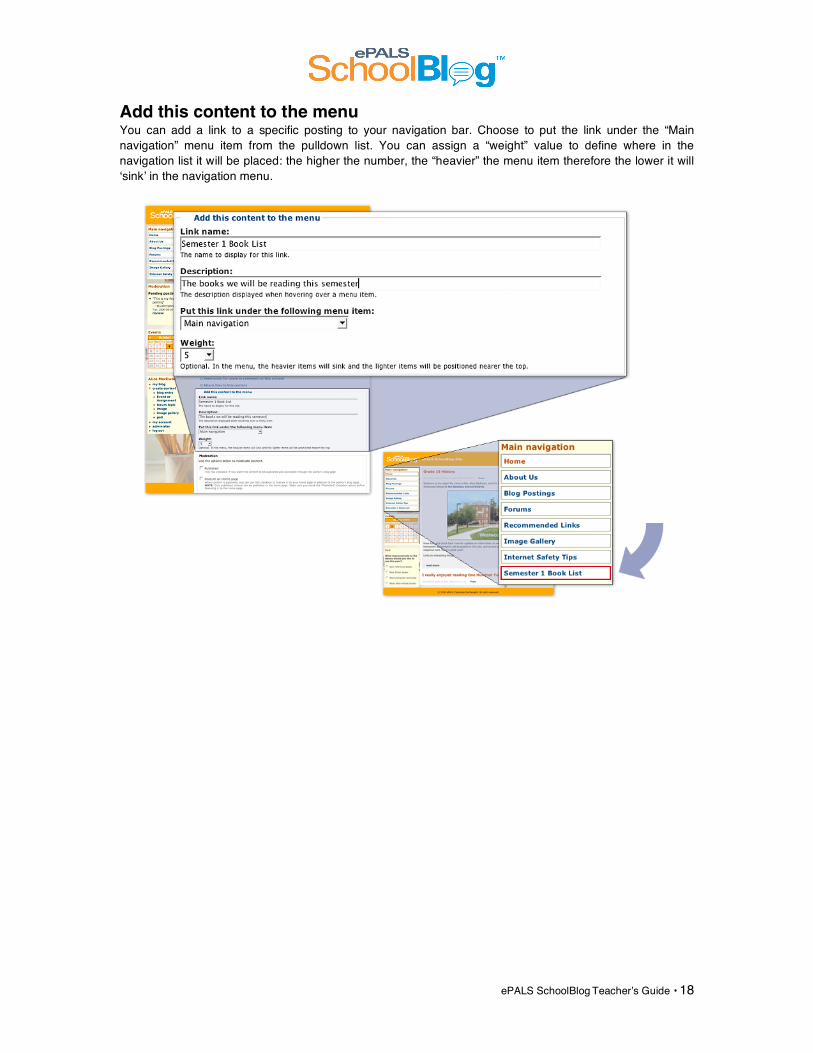
Add this content to the menu You can add a link to a specific posting to your navigation bar. Choose to put the link under the “Main navigation” menu item from the pulldown list. You can assign a “weight” value to define where in the navigation list it will be placed: the higher the number, the “heavier” the menu item therefore the lower it will ‘sink’ in the navigation menu.

ePALS SchoolBlog Teacher’s Guide • 19
Adding Users
Depending on your license, you may be able to add additional users to your ePals SchoolBlog site. Users can register themselves, or be added manually by you.
Adding Users Manually To add users manually, click the “Administer” link in the navigation bar then click “Users” in the sub-menu that appears. You will see a list of all users currently registered on your site, along with their status (active or blocked), how long they have been registered, and the time they last accessed the site:
To add users to your site, click the “add/edit users” tab. You will have the opportunity to enter basic information about the users you’re adding: For each new user, enter a unique username and email address, choose a password they can use to access the site, and select their role (see below). After submitting, the new accounts will be created and will be active. An email address associated with each user is required, even if they will not be receiving any
email messages. After creating the accounts you can distribute the usernames and passwords to your users.

ePALS SchoolBlog Teacher’s Guide • 20
Allowing Users to Register Some schools and school districts purchase ePals SchoolBlog licenses that allow users to self-register. In order to register an account for themselves, users will need to have a valid email address. This is important because the initial registration details will be emailed to them using the email address they provide with their request for an ePals SchoolBlog account. To register, users should go to the URL given for your site. Under the login form, there is a link entitled, “Create new account.” After clicking that link, users will be able to enter their desired username, email address, first and last names, and notes about why they would like an account. After filling in the information and submitting the form, the registering user will receive an email containing their username and a password they will be able to use to access their account once it has been activated. This is the form visitors will use to register for an account on your site:
Editing, Blocking and Deleting Users You can edit, block or delete users at any time. To do so, click the “Administer” link in the navigation bar, then click “Users” in the sub-menu that appears. Click “Edit” beside a user to access block and delete options, as well as areas for information such as first and last name. If you edit or block a user, their postings will remain online, and any corresponding information that has been edited will be updated. If you delete a user, their postings also remain online, but the author attribute is removed.
To delete or change roles for a group of users, you can click “add/edit users” then click either “assign user roles” or “delete multiple users” from the sub-menu that will appear.
ePALS SchoolBlog Teacher’s Guide • 21
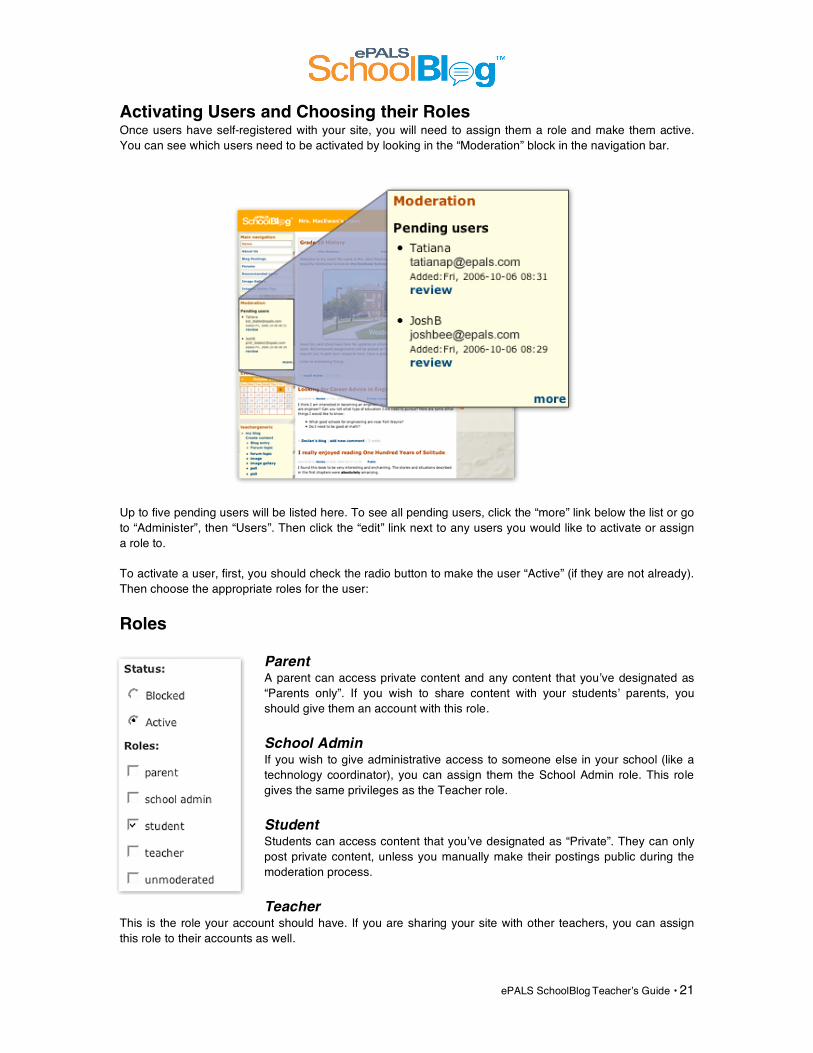
Activating Users and Choosing their Roles Once users have self-registered with your site, you will need to assign them a role and make them active. You can see which users need to be activated by looking in the “Moderation” block in the navigation bar. Up to five pending users will be listed here. To see all pending users, click the “more” link below the list or go to “Administer”, then “Users”. Then click the “edit” link next to any users you would like to activate or assign a role to. To activate a user, first, you should check the radio button to make the user “Active” (if they are not already). Then choose the appropriate roles for the user:
Roles
Parent A parent can access private content and any content that you’ve designated as “Parents only”. If you wish to share content with your students’ parents, you should give them an account with this role.
School Admin If you wish to give administrative access to someone else in your school (like a technology coordinator), you can assign them the School Admin role. This role gives the same privileges as the Teacher role.
Student Students can access content that you’ve designated as “Private”. They can only post private content, unless you manually make their postings public during the moderation process.
Teacher This is the role your account should have. If you are sharing your site with other teachers, you can assign this role to their accounts as well.

ePALS SchoolBlog Teacher’s Guide • 22
Unmoderated If you wish to allow students or parents to publish content without having to moderate, you can assign them the “Unmoderated” role. This gives the users the same control over publishing and unpublishing their content as you have. Note however that unmoderated users still don’t have permission to push content to the front page of your site – only Teachers or School Admins can do that. Once satisfied with the user and their configuration, you can save your changes and see the updated results in your user list.
User Passwords Users who have forgotten their password can request a new one by either clicking the "Request new password" link in the login block or on the login screen and filling out the form presented. An email will be sent to the site administrator, who can then create a new password for the user through the User Administration "Edit" interface (see “Editing, Blocking and Deleting Users” on page 20). Administrators who have forgotten their passwords can contact ePals SchoolBlog Support at [email protected]. Note that all passwords are case-sensitive and cannot contain spaces or special characters.

ePALS SchoolBlog Teacher’s Guide • 23
Logs and Statistics
Logs and statistics are reports that contain detailed information about the activity that takes place on your ePals SchoolBlog site. These reports are accessible from within the administration menu.
Available Reports
User logins Date and time of login/logout events per user.
1. Click the “Administer” link in your navigation bar 2. Select “user messages” from the “Filter by message type” and click the button labeled “Filter”
Access denied Date, time and content users were denied access to.
1. Click the “Administer” link in your navigation bar 2. Select “access denied messages” from the “Filter by message type” and click the button labeled
“Filter”
Pages not found Date, time and URL of the page that could not be found.
1. Click the “Administer” link in your navigation bar 2. Select “page not found messages” from the “Filter by message type” and click the button labeled
“Filter”
Created and edited content Date, time and content created or edited per user.

ePALS SchoolBlog Teacher’s Guide • 24
1. Click the “Administer” link in your navigation bar 2. Select “content messages” from the “Filter by message type” and click the button labeled “Filter”
What searches users are performing on the site Date, time and terms searched for per user.
1. Click the “Administer” link in your navigation bar 2. Select “search messages” from the “Filter by message type” and click the button labeled “Filter”
Referrers Where visitors that access your site are coming from (referrer), how many times that referrer send visitors to your site and the date and time of the last visit coming from that referrer.
1. Click the “Administer” link in your navigation bar, click “Logs” to unveil more links underneath it. 2. Click “referrers” from those links.
Top pages List of pages on your site sorted by most popular, number of hits per page, average time spent per page and total cumulative time spent per page.
1. Click the “Administer” link in your navigation bar, click “Logs” to unveil more links underneath it. 2. Click “top pages” from those links.
Top visitors List of visitors sorted by number of visits. This report includes IP addresses of visitors and total time spent on your site. Note that this report allows you to ban access to your site from certain IP addresses.
1. Click the “Administer” link in your navigation bar, click “Logs” to unveil more links underneath it. 2. Click “top visitors” from those links.
Recent hits Recent access to your site sorted by date. This report includes accessed pages, the user that accessed those pages and details for each hit such as referrer and IP address.
1. Click the “Administer” link in your navigation bar, click “Logs” to unveil more links underneath it. 2. Click “recent hits” from those links.

ePALS SchoolBlog Teacher’s Guide • 25
Getting The Most From Your Site
Choosing a Theme ePals SchoolBlog comes with a number of themes you can apply to your site. To view them, click “administer,” then “themes.” Just click the radio button next to the theme you wish to use and apply the change by clicking on “Save configuration” below the theme list – the site will be immediately updated with the new look.
Note that blocks can be configured on a per-theme basis (see “Configuring Blocks” on page 26) so you may need to reactivate blocks upon switching themes.

ePALS SchoolBlog Teacher’s Guide • 26
Configuring Blocks If you wish to configure what blocks of information appear in the navigation bars, click “Administer,” then “Blocks”.
The event calendar, the main navigation, and other items such as a random picture are displayed as “blocks.” You can activate or deactivate any block, determine where it should appear on your site, and determine its position in relation to the other blocks using the controls given. The “Weight” pulldown refers to how high on the page it will appear. The higher the number, the “heavier” the block therefore the lower it will “sink” on the page. You can click the “configure” link to specify block options including on what pages the block will appear if you do not want it on every page. Note that blocks and be activated or deactivated on a per-theme basis.
ePALS SchoolBlog Teacher’s Guide • 27
Other ePals SchoolBlog Features
RSS Feeds ePals SchoolBlog will automatically create an RSS feed for any public posts on the site. Typically, that feed can be accessed at http://sites.epals.com/yoursitename/node/feed. RSS is a technology that summarizes the content of your site into one file that can be accessed by other applications. This makes it easy for other people to keep up to date with what’s happening on your site.
Podcasting ePals SchoolBlog allows you to add an attachment to any post. If you attach an MP3 file, then that file will be added to the RSS feed for your site. The result is a podcast that can be accessed by any podcast client (such as Apple’s iTunes).
Search You can find content, users and posts with the ability to search the site by keywords.
Getting Help
Site owners and administrators can access ePals SchoolBlog support at any time by emailing [email protected] or clicking the link in the “Help” block which appears in the right-hand sidebar by default. The ePals SchoolBlog User Guide is available to site owners and administrators from the “Help” block as well. Students and other users of your site will be able to contact the site owner for help via the “Help” block. These emails will be directed to the email address entered in your site’s “General Settings” area, which is available by clicking the “Administer” link in the navigation bar, then clicking “Settings” in the links that will appear below it, and expanding the “General Settings” area on the Settings page that will appear.

ePALS SchoolBlog Teacher’s Guide • 28
Copyright 2007 ePals, Inc. All rights reserved. ePals, ePals SchoolBlog,and the ePals SchoolBlog logo are trademarks or registered trademarks of ePals Inc.
in the United States and Foreign Countries.