science circus pacific extraordinary science with ordinary
TRANSCRIPT
1
This booklet is compiled using the resources of:
Australian National Centre for the Public Awareness of Science (CPAS), The Australian National University
Questacon – The National Science and Technology Centre, Australia
Compiled and written by Graham Walker, Joe Duggan and Laura Shevlin at
The Australian National University.
Inquiries: [email protected]
For educational use only. Please feel free to make copies for educational, non-commercial use in the Pacific
and email [email protected] to let us know what you are doing – we may be able to help! Copyright Australian National University, 2020.
Science Circus Pacific is supported by the
Australian Government Department of Foreign Affairs and Trade (DFAT).
We proudly acknowledge our Pacific partners across the region.
Science Circus Pacific Extraordinary Science with Ordinary Stuff
WORKSHOP BOOKLET
2
Get in touch! We want to hear from you - you can contact us here. Please feel free to share photos, written comments, questions, anything!
@ANUScienceCircus @SciCircPacific
[email protected] +61 438 640733
We would appreciate hearing how you use this book with your students, or if you share it with other teachers. We would also welcome your suggestions for future content. If you need an activity for a particular curriculum area not contained here then please contact us – we are happy to assist.
Resources for STEM learning for students with disabilities If you are teaching students with physical and/or mental disabilities we can provide tailored resources to support students to explore the science curriculum, develop skills, and help make hands-on learning even more fun.
Science shows and hands-on workshops in Samoa Science Circus Pacific partners Imagine Samoa provide exciting, interactive curriculum linked science shows and hands-on workshops in Samoa. If you are interested in having the team visit your school, please contact Ruth Moghbelpour on [email protected].
PARTNER WITH US! If you or your organisation are interested in creating and delivering your own science programs for Samoan schools and communities – or any science communication initiatives – ANU can provide resources, training and much more. Please contact us.
Extra resources and videos Follow us on FaceBook (https://www.facebook.com/ANUScienceCircus/) for videos, news and more –
and we’d love to hear from you too! For more videos of activities you can do with simple items, please
visit https://science.anu.edu.au/engagement/science-home.
If you’d like to dig a little deeper into any of the topics covered here, or to inspire your own experiments, we’ve compiled a list of internet resources you may like – but a Google search will find lots more. You can also contact us for more ideas.
o https://www.thenakedscientists.com/kitchenscience o https://www.stevespanglerscience.com/lab/experiments/ o https://sciencebob.com/category/experiments/ o https://www.exploratorium.edu/snacks o https://www.questacon.edu.au/outreach/programs/science-circus/activities
3
Introduction Many students think science is something that happens in textbooks, which is sad because textbooks aren’t much fun. The result is bored unmotivated students who don’t learn as well – learning works best when it is fun and hands-on.
The aim of these activities is to provide an enjoyable, interactive way for students to discover science. Rather than just remembering things out of a book, the activities allow students to experience science themselves. Students learn and remember best when they actually do things themselves, rather than just reading or being told about them.
The activities here can be used directly with students as class activities, or used as demonstrations by teachers. Please note though, that some of these activities are more dangerous than others. Take extra care where CAUTION is noted. Some activities are not suitable for students to try themselves.
This book contains a huge range of fun, curriculum-related science activities that can be done with everyday items – things that are either low-cost or free. Wherever we could, we selected activities that reuse the same materials so with the same collection of everyday items, there might be 5, 10 or even more different activities you can try.
As you will discover, you do not need a lab and fancy equipment to do engaging practical science.
How to use this book / linking to the curriculum
We’ve tried to make this book as easy to use as possible. We’ve divided the book into four sections: Chemistry, Physics, Engineering and Critical thinking/problem solving. In each section, you’ll find sub-topics that align with the curriculum.
Each sub-topic has a heading like this:
In compiling these references, standard curriculum guides from Samoa have been used:
• Ministry of Education, Sports and Culture. (2013). Science, Years 1–8, Primary School Curriculum.
• Ministry of Education, Sports and Culture. (2013). Science, Years 9 – 12, Science Curriculum.
• Ministry of Education, Sports and Culture. (2013). Mathematics, Years 1-8, Primary School Curriculum.
With this information, you should be able to quickly find how the experiments in this sub-topic relate to your curriculum. When you’re planning lessons, you’ll be able to come back to this and quickly find activities to use in the classroom.
Each experiment has a heading like this:
What fuels a candle?_________________________________________________________________
STATES OF MATTER
The name of the experiment is first, and immediately below you will find the particular concept(s) that it demonstrates – this is another way you can connect to the curriculum. Where possible, the experiments have been presented in a logical order, progressing in difficulty of concept.
Following this are sub-headings of: Materials, What to do, and What’s happening? This contains both how to complete the experiment, and how to explain it to the class.
Acids and Bases WM5.2, WM10.3, WM12.1, CHEMISTRY 12 STRAND 3
4
Table of Contents
CHEMISTRY .....................................................................................................................................................................5
Acids and Bases ............................................................................................................................................................ 5
Combustion .................................................................................................................................................................. 6
Gases ............................................................................................................................................................................ 7
Heat .............................................................................................................................................................................. 2
Water ............................................................................................................................................................................ 2
PHYSICS ...........................................................................................................................................................................3
Energy ........................................................................................................................................................................... 3
Electricity ...................................................................................................................................................................... 3
Force ............................................................................................................................................................................. 4
Motion .......................................................................................................................................................................... 4
Pressure ........................................................................................................................................................................ 5
Sound and Waves ........................................................................................................................................................ 7
ENGINEERING ................................................................................................................................................................ 16
CRITICAL THINKING / PROBLEM SOLVING ....................................................................................................................... 10
5
CHEMISTRY Acids and Bases
WM5.2, WM10.3, WM12.1, CHEMISTRY 12 STRAND 3
Canister Rocket – CAUTION Flying Projectile______________________________________________ ACID-BASE REACTIONS, CHEMICAL REACTIONS, NEWTON’S 3RD LAW, PRESSURE
Materials:
• Film canister, medicine tube, OR lolly tube with pop-top lid (a thin container with a pop-off lid)
• Sodium bicarbonate / baking soda
• Vinegar
• Plate
• Eye protection
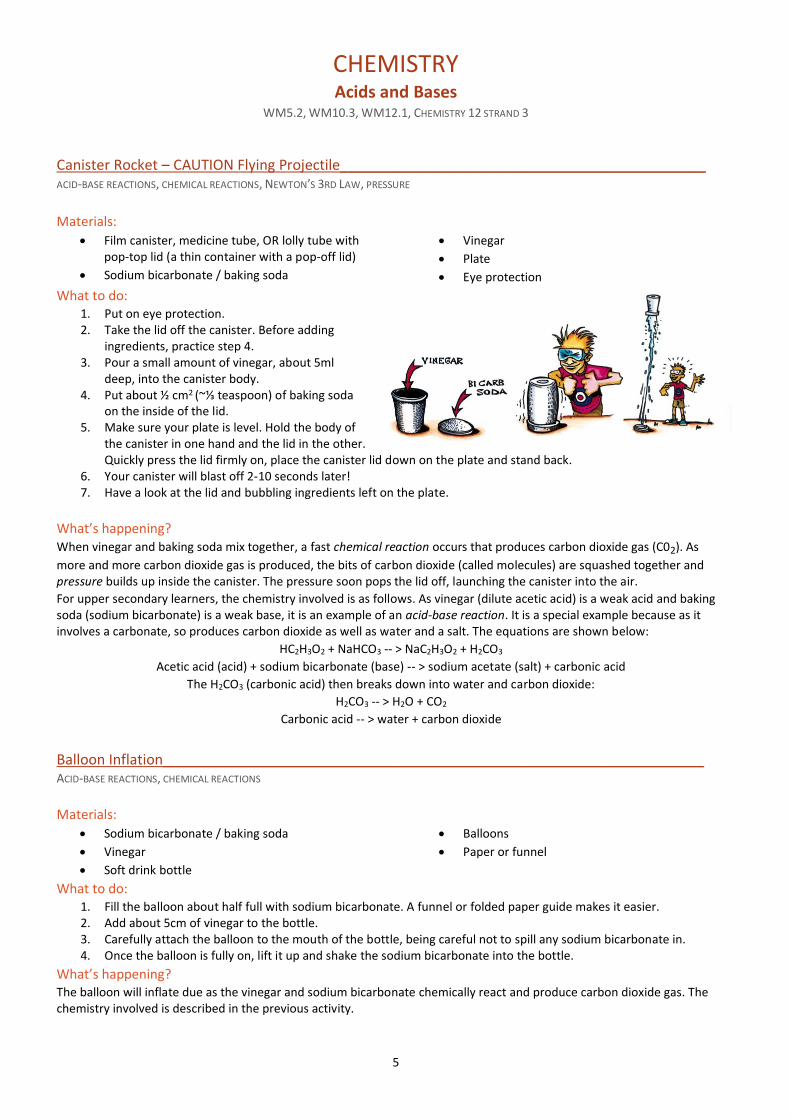
What to do: 1. Put on eye protection. 2. Take the lid off the canister. Before adding
ingredients, practice step 4. 3. Pour a small amount of vinegar, about 5ml
deep, into the canister body. 4. Put about ½ cm2 (~⅓ teaspoon) of baking soda
on the inside of the lid. 5. Make sure your plate is level. Hold the body of
the canister in one hand and the lid in the other. Quickly press the lid firmly on, place the canister lid down on the plate and stand back.
6. Your canister will blast off 2-10 seconds later! 7. Have a look at the lid and bubbling ingredients left on the plate.
What’s happening? When vinegar and baking soda mix together, a fast chemical reaction occurs that produces carbon dioxide gas (C02). As
more and more carbon dioxide gas is produced, the bits of carbon dioxide (called molecules) are squashed together and pressure builds up inside the canister. The pressure soon pops the lid off, launching the canister into the air.
For upper secondary learners, the chemistry involved is as follows. As vinegar (dilute acetic acid) is a weak acid and baking soda (sodium bicarbonate) is a weak base, it is an example of an acid-base reaction. It is a special example because as it involves a carbonate, so produces carbon dioxide as well as water and a salt. The equations are shown below:
HC2H3O2 + NaHCO3 -- > NaC2H3O2 + H2CO3
Acetic acid (acid) + sodium bicarbonate (base) -- > sodium acetate (salt) + carbonic acid
The H2CO3 (carbonic acid) then breaks down into water and carbon dioxide:
H2CO3 -- > H2O + CO2
Carbonic acid -- > water + carbon dioxide
Balloon Inflation____________________________________________________________________ ACID-BASE REACTIONS, CHEMICAL REACTIONS
Materials:
• Sodium bicarbonate / baking soda
• Vinegar
• Soft drink bottle
• Balloons
• Paper or funnel
What to do: 1. Fill the balloon about half full with sodium bicarbonate. A funnel or folded paper guide makes it easier. 2. Add about 5cm of vinegar to the bottle. 3. Carefully attach the balloon to the mouth of the bottle, being careful not to spill any sodium bicarbonate in. 4. Once the balloon is fully on, lift it up and shake the sodium bicarbonate into the bottle.
What’s happening? The balloon will inflate due as the vinegar and sodium bicarbonate chemically react and produce carbon dioxide gas. The chemistry involved is described in the previous activity.
6
Combustion WM5.1, WM5.2, WM5.3, WM8.1, WM9.1, WM9.2, WM9.3, PHYSICS 12 STRAND 3
What fuels a candle?_________________________________________________________________ STATES OF MATTER
Materials:
• Candle
• Matches/lighter
What to do: 1. The candle is a marvelous way to see all three states of matter at once! Once a candle is burning well you see solid
and liquid wax very easily – two states of matter at the same time. But where is the wax gas? 2. Extinguish the candle quickly between finger and thumb – you will notice a trail of vapour coming from the candle.
Quickly bring a burning match over the candle about two centimetres above the wick in the vapour trail. The candle should immediately relight even though the match did not touch the wick.
What’s happening? Although the candle’s wick burns, the main fuel in a candle is the wax. The heat of the flame causes the wax to melt – solid to liquid – and then boil – liquid to gas. It is wax gas that is the main thing burning in the candle flame. When you put out the flame, a trail of the hot wax vapour is still present in the air above the wick and it is this vapour that reignites.
This phenomenon is frequently responsible for bad accidents with petrol. A flame does not have to touch liquid petrol – if it touches the petrol vapour the whole lot can ignite. This is why smoking at a petrol station where we can smell the petrol vapour is very dangerous.
Homemade Fire Extinguisher___________________________________________________________ COMBUSTION, CHEMICAL REACTIONS
Materials: • Tall glass or plastic jug
• Bicarbonate of Soda
• Vinegar
• Candles
• Matches/lighter
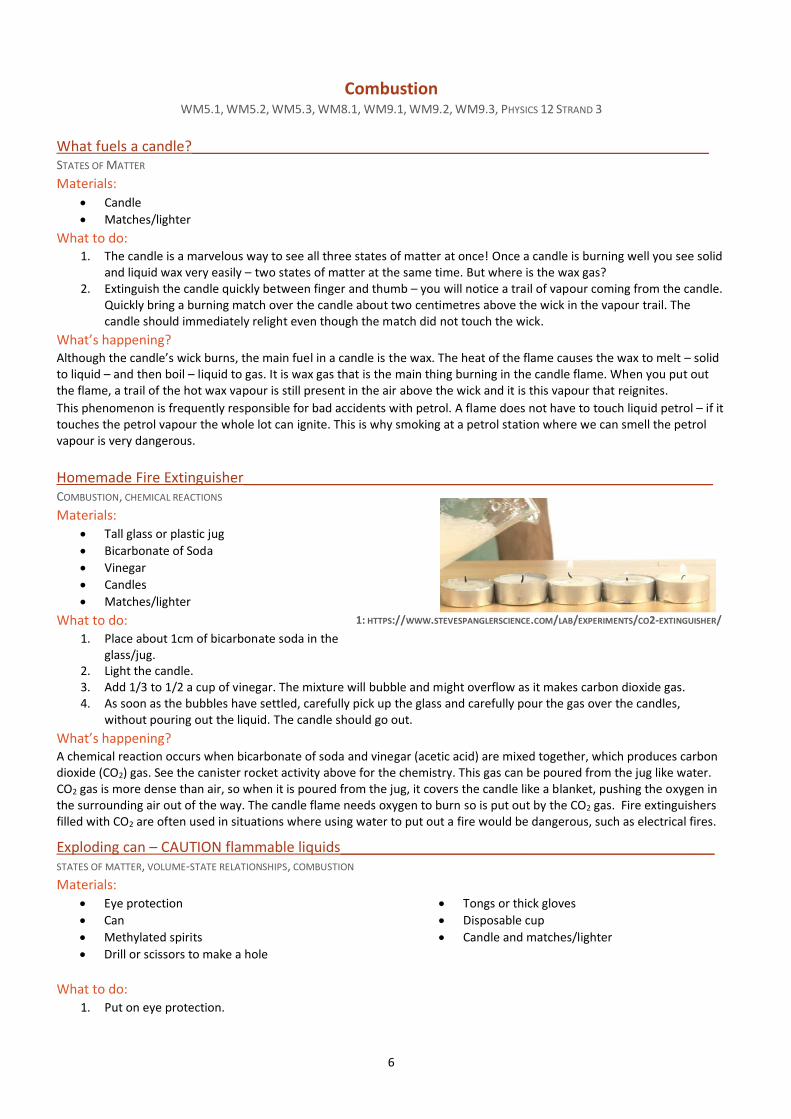
What to do: 1. Place about 1cm of bicarbonate soda in the
glass/jug. 2. Light the candle. 3. Add 1/3 to 1/2 a cup of vinegar. The mixture will bubble and might overflow as it makes carbon dioxide gas. 4. As soon as the bubbles have settled, carefully pick up the glass and carefully pour the gas over the candles,
without pouring out the liquid. The candle should go out.
What’s happening? A chemical reaction occurs when bicarbonate of soda and vinegar (acetic acid) are mixed together, which produces carbon dioxide (CO2) gas. See the canister rocket activity above for the chemistry. This gas can be poured from the jug like water. CO2 gas is more dense than air, so when it is poured from the jug, it covers the candle like a blanket, pushing the oxygen in the surrounding air out of the way. The candle flame needs oxygen to burn so is put out by the CO2 gas. Fire extinguishers filled with CO2 are often used in situations where using water to put out a fire would be dangerous, such as electrical fires.
Exploding can – CAUTION flammable liquids_______________________________________________ STATES OF MATTER, VOLUME-STATE RELATIONSHIPS, COMBUSTION
Materials: • Eye protection
• Can
• Methylated spirits
• Drill or scissors to make a hole
• Tongs or thick gloves
• Disposable cup
• Candle and matches/lighter
What to do: 1. Put on eye protection.
1: HTTPS://WWW.STEVESPANGLERSCIENCE.COM/LAB/EXPERIMENTS/CO2-EXTINGUISHER/
7
2. Make a small 5mm hole in the bottom of the can. 3. Pour a small amount of methylated spirits into the can, swirl it all around the sides, shake it a little (don’t spill),
then pour all the methylated spirits out the small hole or the top. Make sure there is no puddle of methylated spirits left.
4. Place a plastic cup upside down on top of the can 5. Ignite the methylated spirit vapour inside the can from the small hole underneath ensuring that the can is away
from your body and the cup on top is pointing away from your face as it will shoot upwards.
What’s happening? When you rinse and shake the methylated spirits, which is about 95% ethanol, lots of it evaporates and fills the bottle with ethanol vapour. The ethanol vapour is very flammable because it is mixed with air/oxygen. When you ignite it, the ethanol burns rapidly creating hot gases in the chemical reaction. The hot gases produced have a greater volume than the ethanol gas you started with so the pressure inside the bottle increases, causing gas to shoot out of the opening at the top and push the cup into the air.
Gases WP3.2, WM8.1, WM8.2, WM10.2, WP10.3, PHYSICS 12 STRAND 2, PHYSICS 12 STRAND 3
Raising water____________________________________________________________________ GAS TEMPERATURE/PRESSURE RELATIONSHIP
Materials:
• Tea light candle
• Plate
• Water
• Glass jar, or soft-drink bottle with top cut off
What to do: 1. Pour water onto the plate so that it is close to the rim 2. Light the candle and float it in the middle of the plate. 3. Hold a jar or cut off soft-drink bottle over the candle so the air inside heats up, then put it all the way down into
the water (you may need to hold the soft-drink bottle down to help create seal). What happens to the water?
What’s happening? The air inside the jar heats up over the candle. Once you put the jar all the way down, the candle extinguishes as it runs out of oxygen. The air inside the jar then cools down, contracts and creates a lower air pressure inside the bottle than outside. The comparatively high air pressure outside the jar then pushes water inside, causing the water level to rise (it is NOT due to oxygen being used up – it is replaced by CO2).
Egg in a bottle_______________________________________________________________________ GAS TEMPERATURE/PRESSURE RELATIONSHIP
Materials
• Peeled boiled egg (or egg-sized water balloon)
• Glass bottle with an opening slightly smaller than the egg (e.g. 600mL juice bottle)
• Small piece of paper • Matches
• Margarine/oil
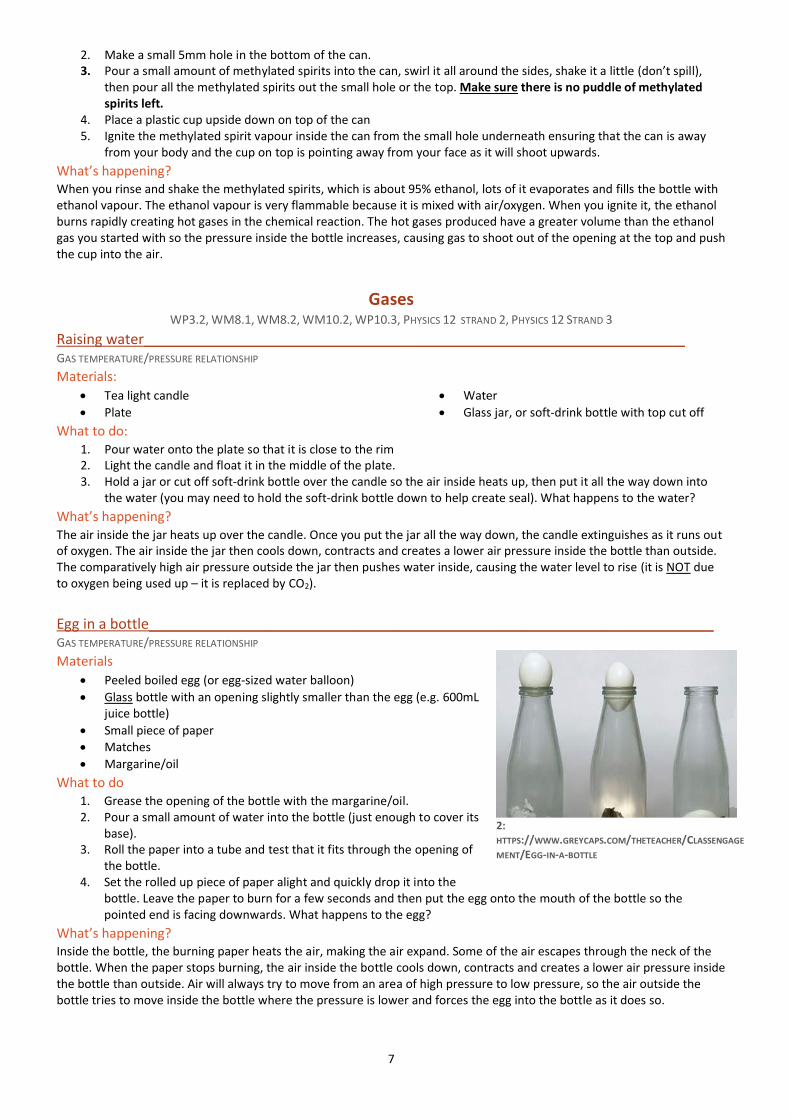
What to do 1. Grease the opening of the bottle with the margarine/oil. 2. Pour a small amount of water into the bottle (just enough to cover its
base). 3. Roll the paper into a tube and test that it fits through the opening of
the bottle. 4. Set the rolled up piece of paper alight and quickly drop it into the
bottle. Leave the paper to burn for a few seconds and then put the egg onto the mouth of the bottle so the pointed end is facing downwards. What happens to the egg?
What’s happening? Inside the bottle, the burning paper heats the air, making the air expand. Some of the air escapes through the neck of the bottle. When the paper stops burning, the air inside the bottle cools down, contracts and creates a lower air pressure inside the bottle than outside. Air will always try to move from an area of high pressure to low pressure, so the air outside the bottle tries to move inside the bottle where the pressure is lower and forces the egg into the bottle as it does so.
2:
HTTPS://WWW.GREYCAPS.COM/THETEACHER/CLASSENGAGE
MENT/EGG-IN-A-BOTTLE
1
Imploding can – CAUTION heat_________________________________________________________ STATES OF MATTER, VOLUME-STATE RELATIONSHIPS
Materials:
• Camping stove, hotplate or fire
• Empty aluminium cans
• Tongs or thick gloves/oven mitt
• Water
• Shallow dish or bowl
• Eye protection
What to do:
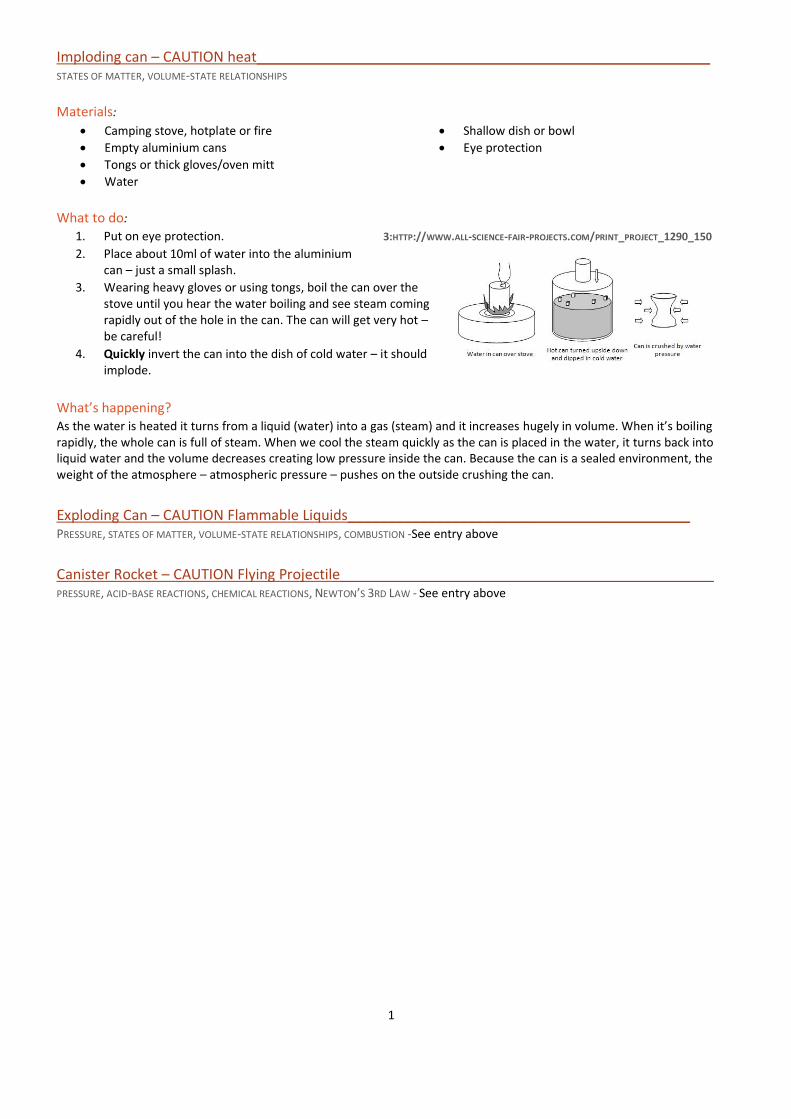
1. Put on eye protection.
2. Place about 10ml of water into the aluminium can – just a small splash.
3. Wearing heavy gloves or using tongs, boil the can over the stove until you hear the water boiling and see steam coming rapidly out of the hole in the can. The can will get very hot – be careful!
4. Quickly invert the can into the dish of cold water – it should implode.
What’s happening? As the water is heated it turns from a liquid (water) into a gas (steam) and it increases hugely in volume. When it’s boiling rapidly, the whole can is full of steam. When we cool the steam quickly as the can is placed in the water, it turns back into liquid water and the volume decreases creating low pressure inside the can. Because the can is a sealed environment, the weight of the atmosphere – atmospheric pressure – pushes on the outside crushing the can.
Exploding Can – CAUTION Flammable Liquids___________________________________________ PRESSURE, STATES OF MATTER, VOLUME-STATE RELATIONSHIPS, COMBUSTION -See entry above
Canister Rocket – CAUTION Flying Projectile_______________________________________________ PRESSURE, ACID-BASE REACTIONS, CHEMICAL REACTIONS, NEWTON’S 3RD LAW - See entry above
3:HTTP://WWW.ALL-SCIENCE-FAIR-PROJECTS.COM/PRINT_PROJECT_1290_150
2
Heat WP6.3, WP10.1, PHYSICS 12 STRAND 3
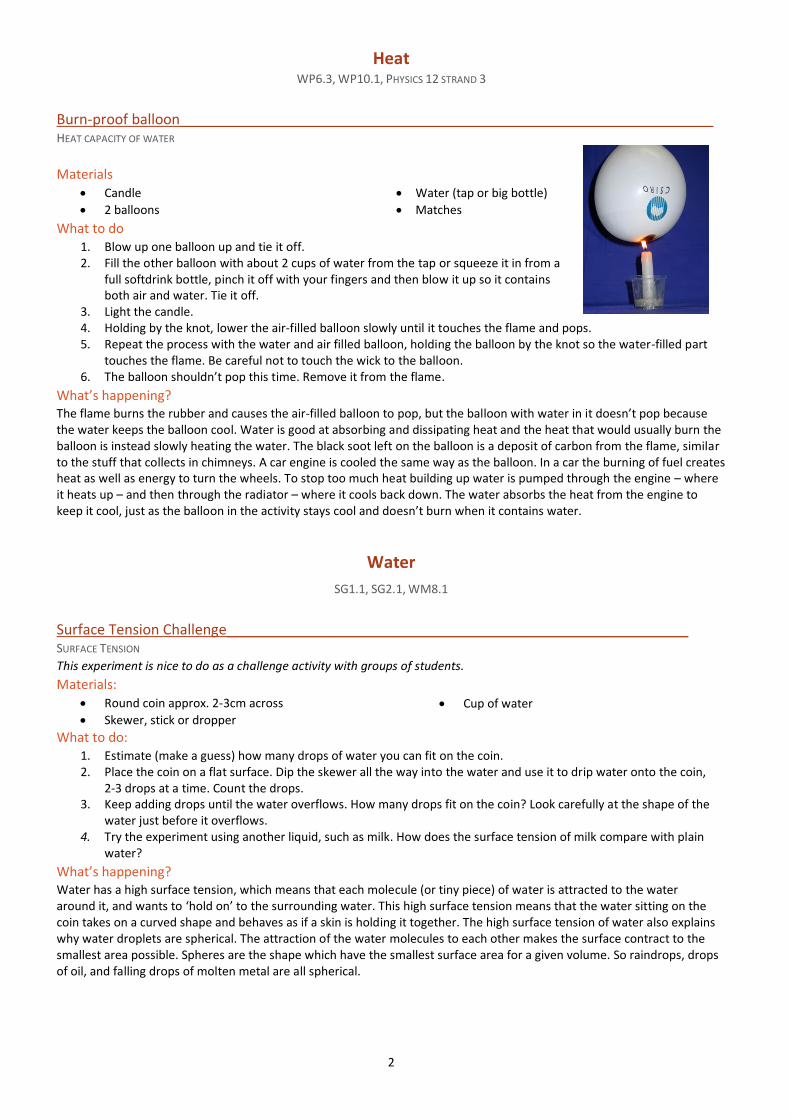
Burn-proof balloon___________________________________________________________________ HEAT CAPACITY OF WATER
Materials • Candle
• 2 balloons
• Water (tap or big bottle)
• Matches
What to do 1. Blow up one balloon up and tie it off. 2. Fill the other balloon with about 2 cups of water from the tap or squeeze it in from a
full softdrink bottle, pinch it off with your fingers and then blow it up so it contains both air and water. Tie it off.
3. Light the candle. 4. Holding by the knot, lower the air-filled balloon slowly until it touches the flame and pops. 5. Repeat the process with the water and air filled balloon, holding the balloon by the knot so the water-filled part
touches the flame. Be careful not to touch the wick to the balloon. 6. The balloon shouldn’t pop this time. Remove it from the flame.
What’s happening? The flame burns the rubber and causes the air-filled balloon to pop, but the balloon with water in it doesn’t pop because the water keeps the balloon cool. Water is good at absorbing and dissipating heat and the heat that would usually burn the balloon is instead slowly heating the water. The black soot left on the balloon is a deposit of carbon from the flame, similar to the stuff that collects in chimneys. A car engine is cooled the same way as the balloon. In a car the burning of fuel creates heat as well as energy to turn the wheels. To stop too much heat building up water is pumped through the engine – where it heats up – and then through the radiator – where it cools back down. The water absorbs the heat from the engine to keep it cool, just as the balloon in the activity stays cool and doesn’t burn when it contains water.
Water
SG1.1, SG2.1, WM8.1
Surface Tension Challenge__________________________________________________________ SURFACE TENSION
This experiment is nice to do as a challenge activity with groups of students.
Materials: • Round coin approx. 2-3cm across
• Skewer, stick or dropper • Cup of water
What to do: 1. Estimate (make a guess) how many drops of water you can fit on the coin. 2. Place the coin on a flat surface. Dip the skewer all the way into the water and use it to drip water onto the coin,
2-3 drops at a time. Count the drops. 3. Keep adding drops until the water overflows. How many drops fit on the coin? Look carefully at the shape of the
water just before it overflows. 4. Try the experiment using another liquid, such as milk. How does the surface tension of milk compare with plain
water?
What’s happening? Water has a high surface tension, which means that each molecule (or tiny piece) of water is attracted to the water around it, and wants to ‘hold on’ to the surrounding water. This high surface tension means that the water sitting on the coin takes on a curved shape and behaves as if a skin is holding it together. The high surface tension of water also explains why water droplets are spherical. The attraction of the water molecules to each other makes the surface contract to the smallest area possible. Spheres are the shape which have the smallest surface area for a given volume. So raindrops, drops of oil, and falling drops of molten metal are all spherical.
3
PHYSICS Energy
WP1.1, WP3.1, WP5.1, WP7.1, WP7.3, WP12.1
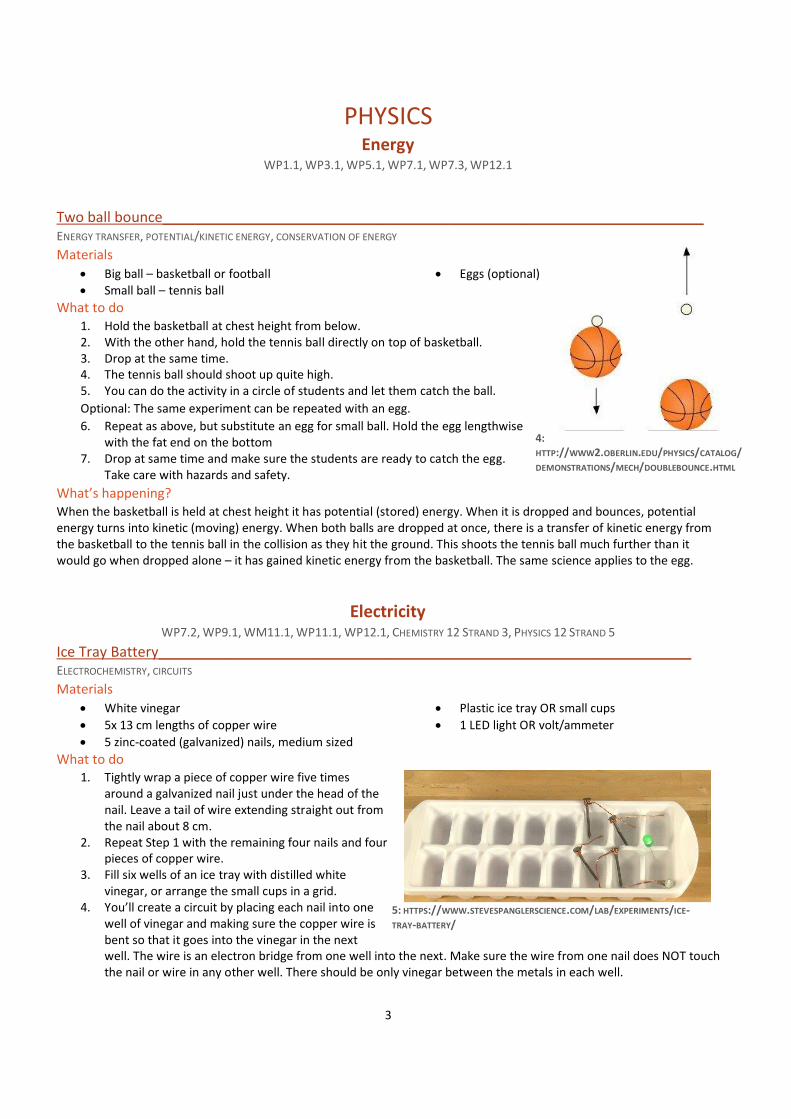
Two ball bounce____________________________________________________________________ ENERGY TRANSFER, POTENTIAL/KINETIC ENERGY, CONSERVATION OF ENERGY
Materials
• Big ball – basketball or football • Small ball – tennis ball
• Eggs (optional)
What to do 1. Hold the basketball at chest height from below. 2. With the other hand, hold the tennis ball directly on top of basketball. 3. Drop at the same time. 4. The tennis ball should shoot up quite high. 5. You can do the activity in a circle of students and let them catch the ball.
Optional: The same experiment can be repeated with an egg.
6. Repeat as above, but substitute an egg for small ball. Hold the egg lengthwise with the fat end on the bottom
7. Drop at same time and make sure the students are ready to catch the egg. Take care with hazards and safety.
What’s happening? When the basketball is held at chest height it has potential (stored) energy. When it is dropped and bounces, potential energy turns into kinetic (moving) energy. When both balls are dropped at once, there is a transfer of kinetic energy from the basketball to the tennis ball in the collision as they hit the ground. This shoots the tennis ball much further than it would go when dropped alone – it has gained kinetic energy from the basketball. The same science applies to the egg.
Electricity WP7.2, WP9.1, WM11.1, WP11.1, WP12.1, CHEMISTRY 12 STRAND 3, PHYSICS 12 STRAND 5
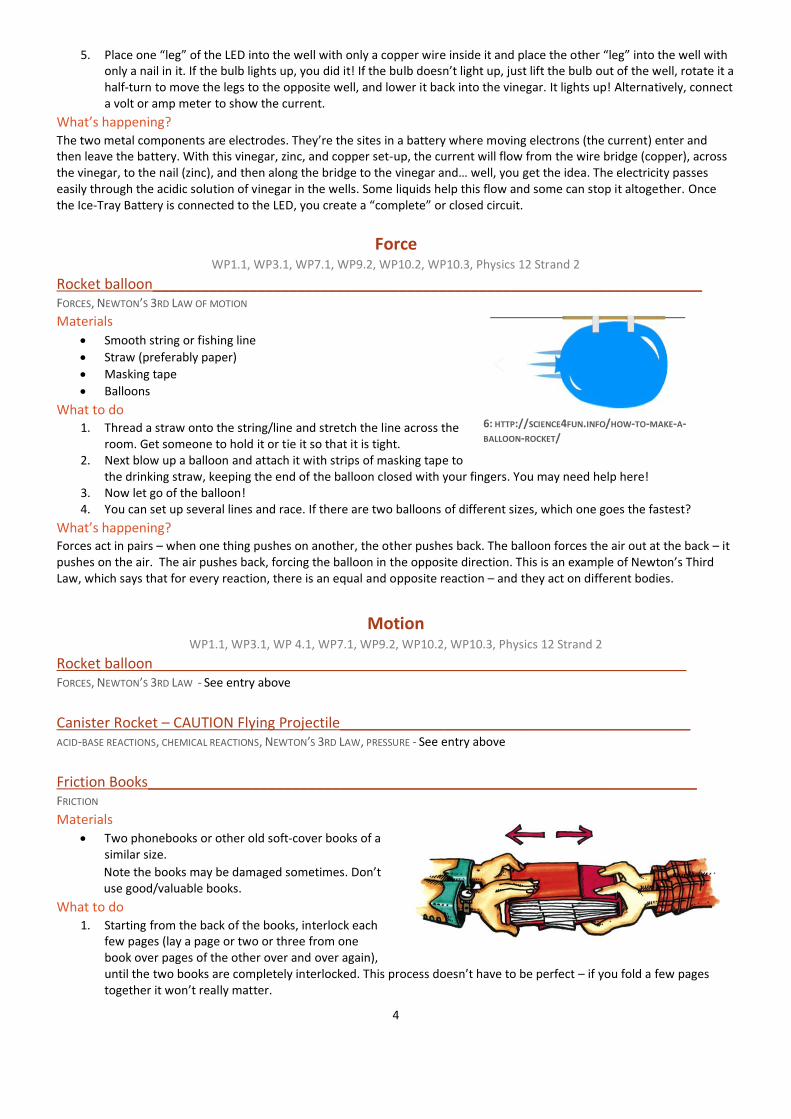
Ice Tray Battery___________________________________________________________________ ELECTROCHEMISTRY, CIRCUITS
Materials
• White vinegar
• 5x 13 cm lengths of copper wire
• 5 zinc-coated (galvanized) nails, medium sized
• Plastic ice tray OR small cups
• 1 LED light OR volt/ammeter
What to do 1. Tightly wrap a piece of copper wire five times
around a galvanized nail just under the head of the nail. Leave a tail of wire extending straight out from the nail about 8 cm.
2. Repeat Step 1 with the remaining four nails and four pieces of copper wire.
3. Fill six wells of an ice tray with distilled white vinegar, or arrange the small cups in a grid.
4. You’ll create a circuit by placing each nail into one well of vinegar and making sure the copper wire is bent so that it goes into the vinegar in the next well. The wire is an electron bridge from one well into the next. Make sure the wire from one nail does NOT touch the nail or wire in any other well. There should be only vinegar between the metals in each well.
5: HTTPS://WWW.STEVESPANGLERSCIENCE.COM/LAB/EXPERIMENTS/ICE-TRAY-BATTERY/
4:
HTTP://WWW2.OBERLIN.EDU/PHYSICS/CATALOG/DEMONSTRATIONS/MECH/DOUBLEBOUNCE.HTML
4
5. Place one “leg” of the LED into the well with only a copper wire inside it and place the other “leg” into the well with only a nail in it. If the bulb lights up, you did it! If the bulb doesn’t light up, just lift the bulb out of the well, rotate it a half-turn to move the legs to the opposite well, and lower it back into the vinegar. It lights up! Alternatively, connect a volt or amp meter to show the current.
What’s happening? The two metal components are electrodes. They’re the sites in a battery where moving electrons (the current) enter and then leave the battery. With this vinegar, zinc, and copper set-up, the current will flow from the wire bridge (copper), across the vinegar, to the nail (zinc), and then along the bridge to the vinegar and… well, you get the idea. The electricity passes easily through the acidic solution of vinegar in the wells. Some liquids help this flow and some can stop it altogether. Once the Ice-Tray Battery is connected to the LED, you create a “complete” or closed circuit.
Force WP1.1, WP3.1, WP7.1, WP9.2, WP10.2, WP10.3, Physics 12 Strand 2
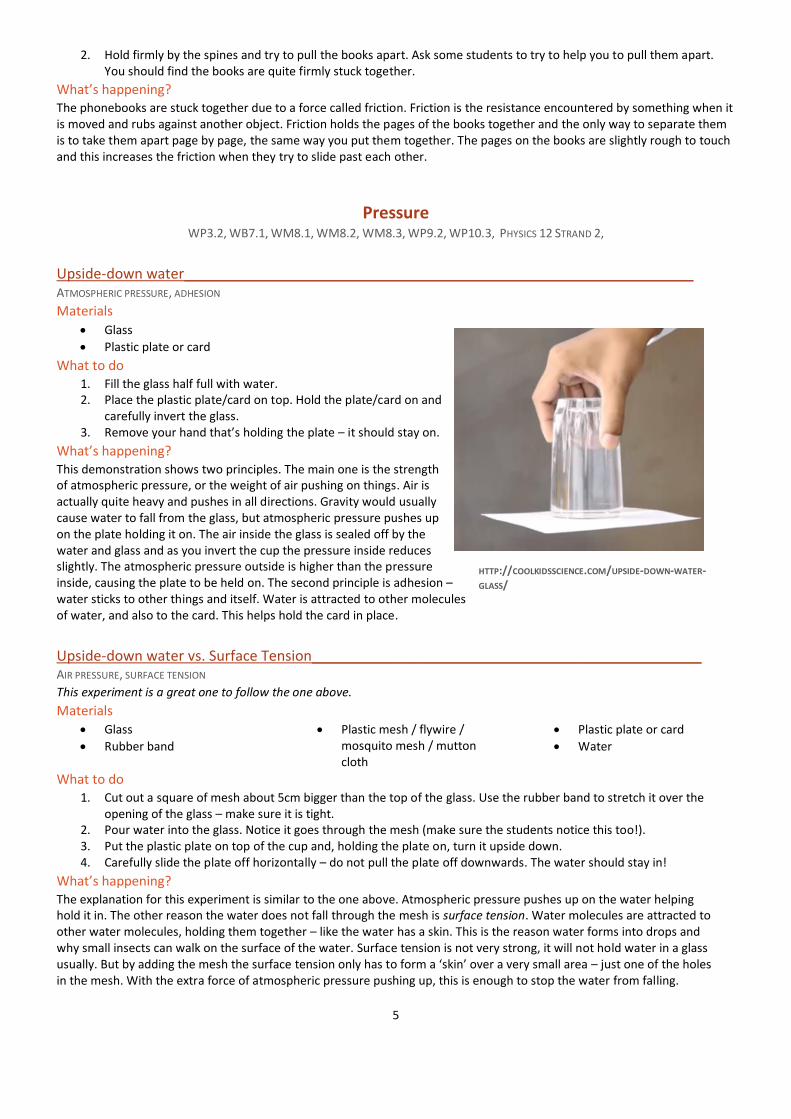
Rocket balloon_____________________________________________________________________ FORCES, NEWTON’S 3RD LAW OF MOTION
Materials
• Smooth string or fishing line
• Straw (preferably paper)
• Masking tape
• Balloons
What to do 1. Thread a straw onto the string/line and stretch the line across the
room. Get someone to hold it or tie it so that it is tight. 2. Next blow up a balloon and attach it with strips of masking tape to
the drinking straw, keeping the end of the balloon closed with your fingers. You may need help here! 3. Now let go of the balloon! 4. You can set up several lines and race. If there are two balloons of different sizes, which one goes the fastest?
What’s happening? Forces act in pairs – when one thing pushes on another, the other pushes back. The balloon forces the air out at the back – it pushes on the air. The air pushes back, forcing the balloon in the opposite direction. This is an example of Newton’s Third Law, which says that for every reaction, there is an equal and opposite reaction – and they act on different bodies.
Motion WP1.1, WP3.1, WP 4.1, WP7.1, WP9.2, WP10.2, WP10.3, Physics 12 Strand 2
Rocket balloon___________________________________________________________________ FORCES, NEWTON’S 3RD LAW - See entry above
Canister Rocket – CAUTION Flying Projectile____________________________________________ ACID-BASE REACTIONS, CHEMICAL REACTIONS, NEWTON’S 3RD LAW, PRESSURE - See entry above
Friction Books_____________________________________________________________________ FRICTION
Materials
• Two phonebooks or other old soft-cover books of a similar size.
Note the books may be damaged sometimes. Don’t use good/valuable books.
What to do 1. Starting from the back of the books, interlock each
few pages (lay a page or two or three from one book over pages of the other over and over again), until the two books are completely interlocked. This process doesn’t have to be perfect – if you fold a few pages together it won’t really matter.
6: HTTP://SCIENCE4FUN.INFO/HOW-TO-MAKE-A-BALLOON-ROCKET/
5
2. Hold firmly by the spines and try to pull the books apart. Ask some students to try to help you to pull them apart. You should find the books are quite firmly stuck together.
What’s happening? The phonebooks are stuck together due to a force called friction. Friction is the resistance encountered by something when it is moved and rubs against another object. Friction holds the pages of the books together and the only way to separate them is to take them apart page by page, the same way you put them together. The pages on the books are slightly rough to touch and this increases the friction when they try to slide past each other.
Pressure WP3.2, WB7.1, WM8.1, WM8.2, WM8.3, WP9.2, WP10.3, PHYSICS 12 STRAND 2,
Upside-down water________________________________________________________________ ATMOSPHERIC PRESSURE, ADHESION
Materials
• Glass
• Plastic plate or card
What to do 1. Fill the glass half full with water. 2. Place the plastic plate/card on top. Hold the plate/card on and
carefully invert the glass. 3. Remove your hand that’s holding the plate – it should stay on.
What’s happening? This demonstration shows two principles. The main one is the strength of atmospheric pressure, or the weight of air pushing on things. Air is actually quite heavy and pushes in all directions. Gravity would usually cause water to fall from the glass, but atmospheric pressure pushes up on the plate holding it on. The air inside the glass is sealed off by the water and glass and as you invert the cup the pressure inside reduces slightly. The atmospheric pressure outside is higher than the pressure inside, causing the plate to be held on. The second principle is adhesion – water sticks to other things and itself. Water is attracted to other molecules of water, and also to the card. This helps hold the card in place.
Upside-down water vs. Surface Tension_________________________________________________ AIR PRESSURE, SURFACE TENSION
This experiment is a great one to follow the one above.
Materials
• Glass
• Rubber band
• Plastic mesh / flywire / mosquito mesh / mutton cloth
• Plastic plate or card
• Water
What to do 1. Cut out a square of mesh about 5cm bigger than the top of the glass. Use the rubber band to stretch it over the
opening of the glass – make sure it is tight. 2. Pour water into the glass. Notice it goes through the mesh (make sure the students notice this too!). 3. Put the plastic plate on top of the cup and, holding the plate on, turn it upside down. 4. Carefully slide the plate off horizontally – do not pull the plate off downwards. The water should stay in!
What’s happening? The explanation for this experiment is similar to the one above. Atmospheric pressure pushes up on the water helping hold it in. The other reason the water does not fall through the mesh is surface tension. Water molecules are attracted to other water molecules, holding them together – like the water has a skin. This is the reason water forms into drops and why small insects can walk on the surface of the water. Surface tension is not very strong, it will not hold water in a glass usually. But by adding the mesh the surface tension only has to form a ‘skin’ over a very small area – just one of the holes in the mesh. With the extra force of atmospheric pressure pushing up, this is enough to stop the water from falling.
HTTP://COOLKIDSSCIENCE.COM/UPSIDE-DOWN-WATER-GLASS/
6
Cloud in a bottle___________________________________________________________________ PRESSURE, TEMPERATURE, CLOUDS
Materials • Large soft-drink bottle
• Matches
• Water
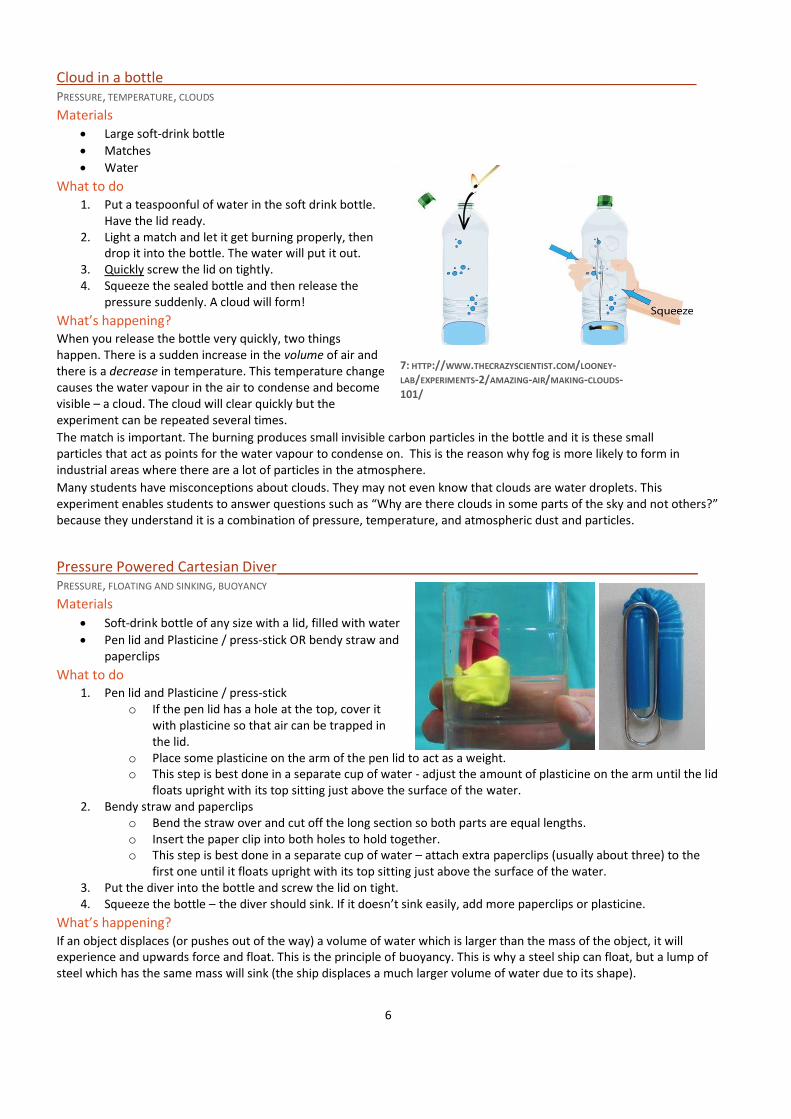
What to do 1. Put a teaspoonful of water in the soft drink bottle.
Have the lid ready. 2. Light a match and let it get burning properly, then
drop it into the bottle. The water will put it out. 3. Quickly screw the lid on tightly. 4. Squeeze the sealed bottle and then release the
pressure suddenly. A cloud will form!
What’s happening? When you release the bottle very quickly, two things happen. There is a sudden increase in the volume of air and there is a decrease in temperature. This temperature change causes the water vapour in the air to condense and become visible – a cloud. The cloud will clear quickly but the experiment can be repeated several times.
The match is important. The burning produces small invisible carbon particles in the bottle and it is these small particles that act as points for the water vapour to condense on. This is the reason why fog is more likely to form in industrial areas where there are a lot of particles in the atmosphere.
Many students have misconceptions about clouds. They may not even know that clouds are water droplets. This experiment enables students to answer questions such as “Why are there clouds in some parts of the sky and not others?” because they understand it is a combination of pressure, temperature, and atmospheric dust and particles.
Pressure Powered Cartesian Diver_____________________________________________________ PRESSURE, FLOATING AND SINKING, BUOYANCY
Materials
• Soft-drink bottle of any size with a lid, filled with water
• Pen lid and Plasticine / press-stick OR bendy straw and paperclips
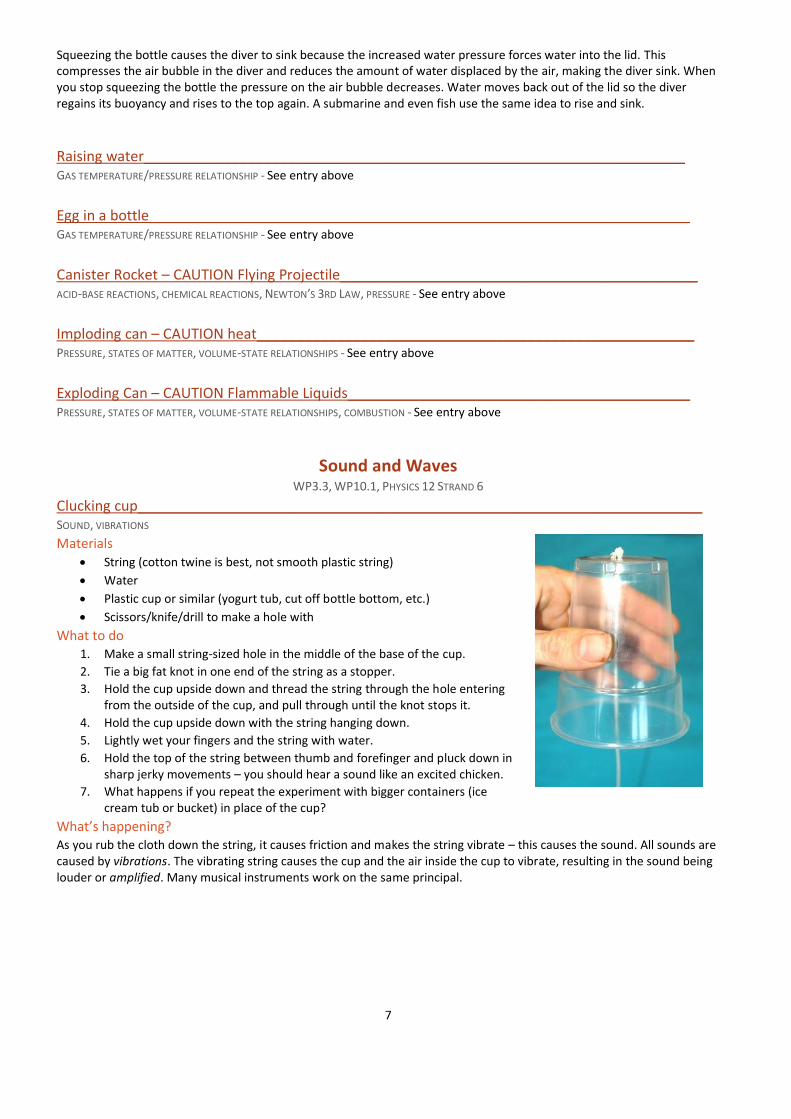
What to do 1. Pen lid and Plasticine / press-stick
o If the pen lid has a hole at the top, cover it with plasticine so that air can be trapped in the lid.
o Place some plasticine on the arm of the pen lid to act as a weight. o This step is best done in a separate cup of water - adjust the amount of plasticine on the arm until the lid
floats upright with its top sitting just above the surface of the water. 2. Bendy straw and paperclips
o Bend the straw over and cut off the long section so both parts are equal lengths. o Insert the paper clip into both holes to hold together. o This step is best done in a separate cup of water – attach extra paperclips (usually about three) to the
first one until it floats upright with its top sitting just above the surface of the water. 3. Put the diver into the bottle and screw the lid on tight. 4. Squeeze the bottle – the diver should sink. If it doesn’t sink easily, add more paperclips or plasticine.
What’s happening? If an object displaces (or pushes out of the way) a volume of water which is larger than the mass of the object, it will experience and upwards force and float. This is the principle of buoyancy. This is why a steel ship can float, but a lump of steel which has the same mass will sink (the ship displaces a much larger volume of water due to its shape).
7: HTTP://WWW.THECRAZYSCIENTIST.COM/LOONEY-LAB/EXPERIMENTS-2/AMAZING-AIR/MAKING-CLOUDS-101/
7
Squeezing the bottle causes the diver to sink because the increased water pressure forces water into the lid. This compresses the air bubble in the diver and reduces the amount of water displaced by the air, making the diver sink. When you stop squeezing the bottle the pressure on the air bubble decreases. Water moves back out of the lid so the diver regains its buoyancy and rises to the top again. A submarine and even fish use the same idea to rise and sink.
Raising water____________________________________________________________________ GAS TEMPERATURE/PRESSURE RELATIONSHIP - See entry above
Egg in a bottle____________________________________________________________________ GAS TEMPERATURE/PRESSURE RELATIONSHIP - See entry above
Canister Rocket – CAUTION Flying Projectile_____________________________________________ ACID-BASE REACTIONS, CHEMICAL REACTIONS, NEWTON’S 3RD LAW, PRESSURE - See entry above
Imploding can – CAUTION heat_______________________________________________________ PRESSURE, STATES OF MATTER, VOLUME-STATE RELATIONSHIPS - See entry above
Exploding Can – CAUTION Flammable Liquids___________________________________________ PRESSURE, STATES OF MATTER, VOLUME-STATE RELATIONSHIPS, COMBUSTION - See entry above
Sound and Waves WP3.3, WP10.1, PHYSICS 12 STRAND 6
Clucking cup_______________________________________________________________________ SOUND, VIBRATIONS
Materials • String (cotton twine is best, not smooth plastic string)
• Water
• Plastic cup or similar (yogurt tub, cut off bottle bottom, etc.)
• Scissors/knife/drill to make a hole with
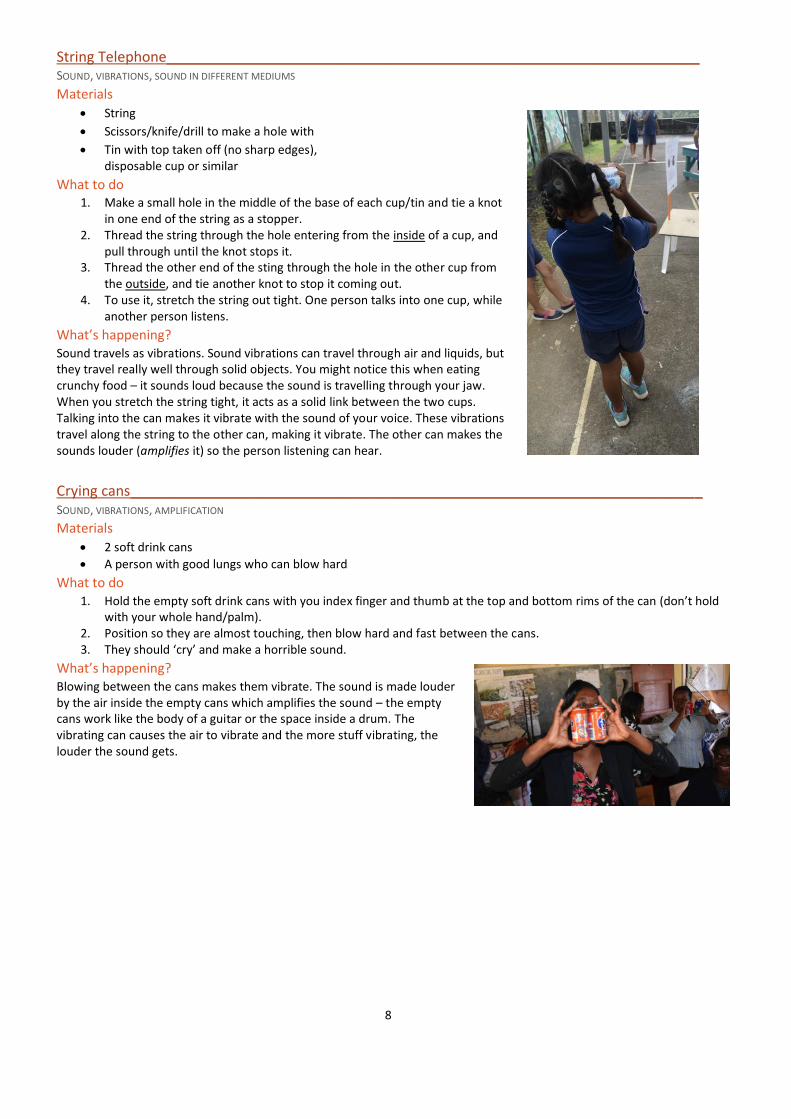
What to do 1. Make a small string-sized hole in the middle of the base of the cup.
2. Tie a big fat knot in one end of the string as a stopper.
3. Hold the cup upside down and thread the string through the hole entering from the outside of the cup, and pull through until the knot stops it.
4. Hold the cup upside down with the string hanging down.
5. Lightly wet your fingers and the string with water.
6. Hold the top of the string between thumb and forefinger and pluck down in sharp jerky movements – you should hear a sound like an excited chicken.
7. What happens if you repeat the experiment with bigger containers (ice cream tub or bucket) in place of the cup?
What’s happening? As you rub the cloth down the string, it causes friction and makes the string vibrate – this causes the sound. All sounds are caused by vibrations. The vibrating string causes the cup and the air inside the cup to vibrate, resulting in the sound being louder or amplified. Many musical instruments work on the same principal.
8
String Telephone___________________________________________________________________ SOUND, VIBRATIONS, SOUND IN DIFFERENT MEDIUMS
Materials
• String
• Scissors/knife/drill to make a hole with
• Tin with top taken off (no sharp edges), disposable cup or similar
What to do 1. Make a small hole in the middle of the base of each cup/tin and tie a knot
in one end of the string as a stopper. 2. Thread the string through the hole entering from the inside of a cup, and
pull through until the knot stops it. 3. Thread the other end of the sting through the hole in the other cup from
the outside, and tie another knot to stop it coming out. 4. To use it, stretch the string out tight. One person talks into one cup, while
another person listens.
What’s happening? Sound travels as vibrations. Sound vibrations can travel through air and liquids, but they travel really well through solid objects. You might notice this when eating crunchy food – it sounds loud because the sound is travelling through your jaw. When you stretch the string tight, it acts as a solid link between the two cups. Talking into the can makes it vibrate with the sound of your voice. These vibrations travel along the string to the other can, making it vibrate. The other can makes the sounds louder (amplifies it) so the person listening can hear.
Crying cans________________________________________________________________________ SOUND, VIBRATIONS, AMPLIFICATION
Materials
• 2 soft drink cans
• A person with good lungs who can blow hard
What to do 1. Hold the empty soft drink cans with you index finger and thumb at the top and bottom rims of the can (don’t hold
with your whole hand/palm). 2. Position so they are almost touching, then blow hard and fast between the cans. 3. They should ‘cry’ and make a horrible sound.
What’s happening? Blowing between the cans makes them vibrate. The sound is made louder by the air inside the empty cans which amplifies the sound – the empty cans work like the body of a guitar or the space inside a drum. The vibrating can causes the air to vibrate and the more stuff vibrating, the louder the sound gets.
9
ENGINEERING NS3.2, NS4.3, WP5.1, WP9.2, WP11.2, Physics 12 Strand 2
Strong structures___________________________________________________________________ STRUCTURES, DISTRIBUTION OF FORCES
Materials
• A4 paper
• Tape
• Weights (books, more paper, etc.)
What to do 1. Roll up four paper cylinders and tape to secure. Make sure they
are the same size all the way along. 2. Fold up another four sheets of paper to make four square prism
columns. To do this make a small fold about 1cm from the long edge, then fold the remaining big section in half, then fold these two halves in half again (make sure the folds will make it wrap up).
3. Carefully stack books, weights, etc. on top
What’s happening? Cylinders are stronger than square columns because they have no folds. The folds in the square columns are a weak point where the force of the weight is concentrated. The cylinders have no folds so distribute the weight evenly, making them much stronger.
Balancing Nails_____________________________________________________________________ BALANCE, CENTRE OF MASS, TEAMWORK
Materials
• 6 flat head nails
• 1 flat head nail hammered into a piece of wood/plasticine as a stand
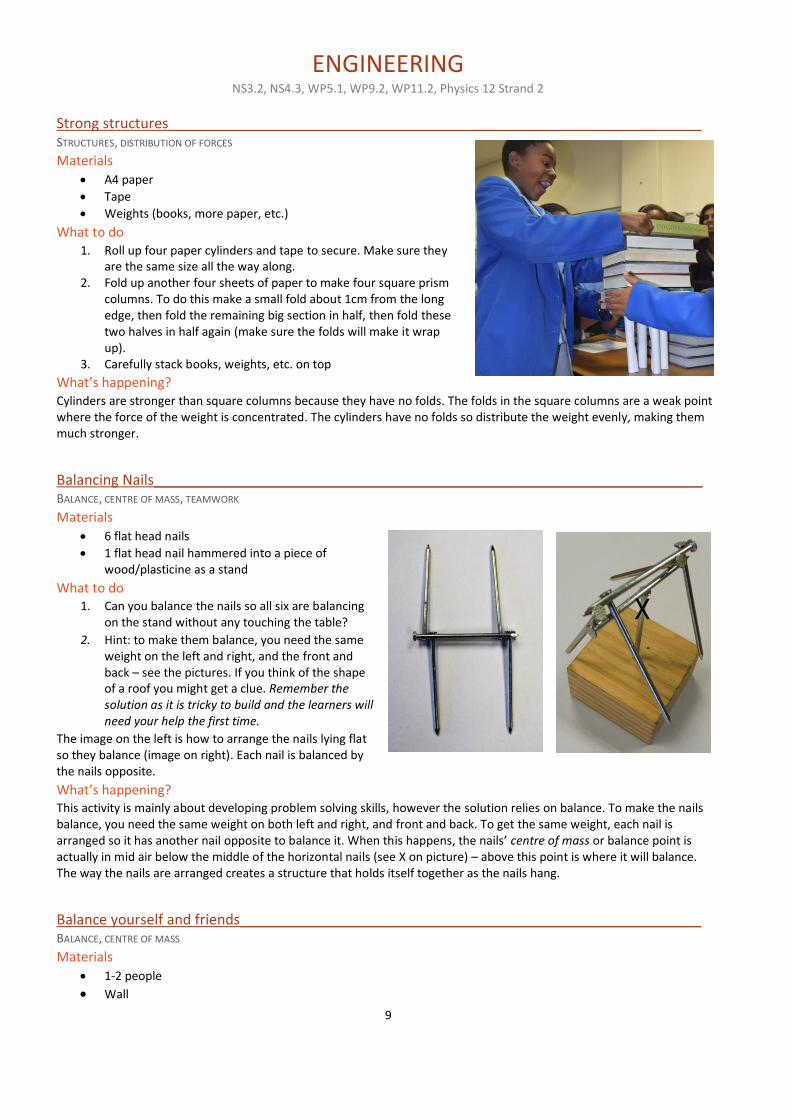
What to do 1. Can you balance the nails so all six are balancing
on the stand without any touching the table?
2. Hint: to make them balance, you need the same weight on the left and right, and the front and back – see the pictures. If you think of the shape of a roof you might get a clue. Remember the solution as it is tricky to build and the learners will need your help the first time.
The image on the left is how to arrange the nails lying flat so they balance (image on right). Each nail is balanced by the nails opposite.
What’s happening? This activity is mainly about developing problem solving skills, however the solution relies on balance. To make the nails balance, you need the same weight on both left and right, and front and back. To get the same weight, each nail is arranged so it has another nail opposite to balance it. When this happens, the nails’ centre of mass or balance point is actually in mid air below the middle of the horizontal nails (see X on picture) – above this point is where it will balance. The way the nails are arranged creates a structure that holds itself together as the nails hang.
Balance yourself and friends__________________________________________________________ BALANCE, CENTRE OF MASS
Materials
• 1-2 people
• Wall
10
What to do 1. Stand against a wall with your heels touching the wall. Now touch your toes. 2. Repeat standing back to back with a friend with your heels touching. Both touch your toes on the count of
three. 3. Why doesn’t it work? Observe someone touching their toes normally. What happens?
What’s happening? For something to balance, its centre of mass or balance point needs to be above its base. In a person that means the centre of mass – usually in line with the belly button halfway between belly and back – must be above the feet. When we touch our toes, our bottom sticks out one way to balance our head and shoulders going out the other way. In these experiments, your bottom couldn’t move to balance the rest of the body, meaning your centre of mass wasn’t above your base, so you can’t balance.
CRITICAL THINKING / PROBLEM SOLVING NS3.2, NS4.3, SG4, SG5
Handcuffs___________________________________________________________________________ PROBLEM SOLVING, TEAMWORK SKILLS, MATHEMATICS – TOPOLOGY (PART OF GEOMETRY)
Materials
• Two 2m pieces of rope or string
• Two people
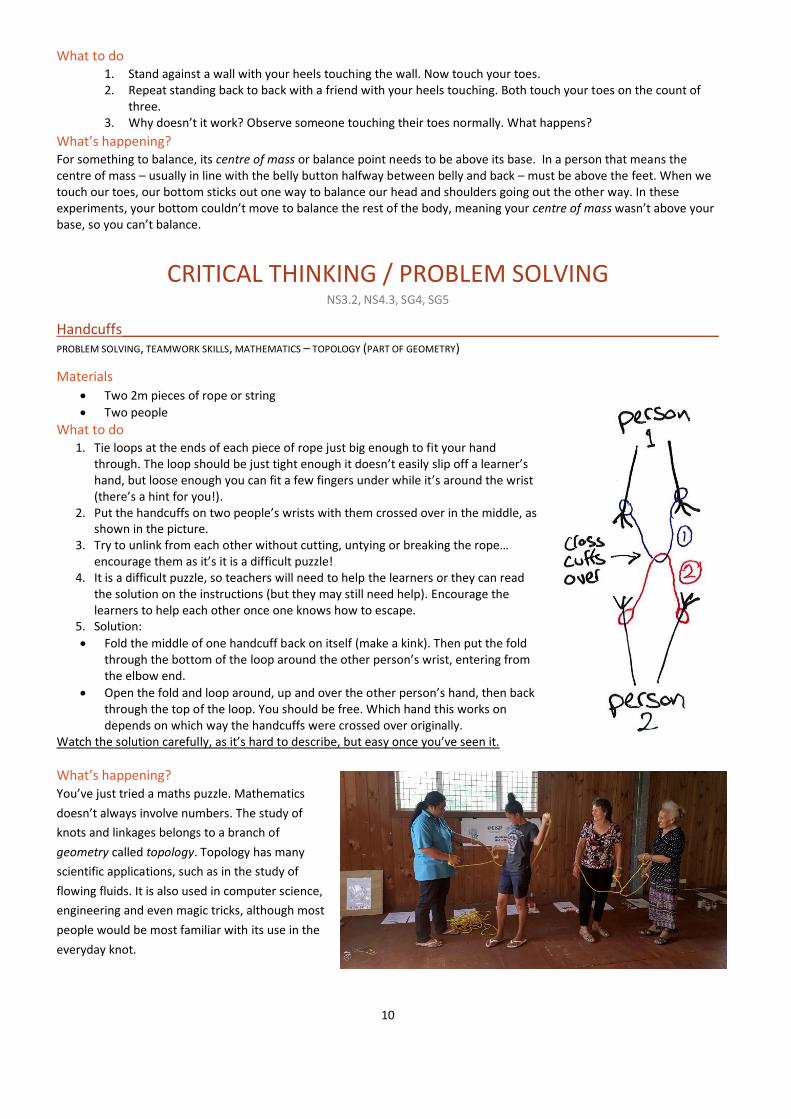
What to do 1. Tie loops at the ends of each piece of rope just big enough to fit your hand
through. The loop should be just tight enough it doesn’t easily slip off a learner’s hand, but loose enough you can fit a few fingers under while it’s around the wrist (there’s a hint for you!).
2. Put the handcuffs on two people’s wrists with them crossed over in the middle, as shown in the picture.
3. Try to unlink from each other without cutting, untying or breaking the rope… encourage them as it’s it is a difficult puzzle!
4. It is a difficult puzzle, so teachers will need to help the learners or they can read the solution on the instructions (but they may still need help). Encourage the learners to help each other once one knows how to escape.
5. Solution:
• Fold the middle of one handcuff back on itself (make a kink). Then put the fold through the bottom of the loop around the other person’s wrist, entering from the elbow end.
• Open the fold and loop around, up and over the other person’s hand, then back through the top of the loop. You should be free. Which hand this works on depends on which way the handcuffs were crossed over originally.
Watch the solution carefully, as it’s hard to describe, but easy once you’ve seen it.
What’s happening? You’ve just tried a maths puzzle. Mathematics
doesn’t always involve numbers. The study of
knots and linkages belongs to a branch of
geometry called topology. Topology has many
scientific applications, such as in the study of
flowing fluids. It is also used in computer science,
engineering and even magic tricks, although most
people would be most familiar with its use in the
everyday knot.
11
Hexaflexagons_______________________________________________________________________ This activity requires building a unique shape with more sides than you expect
Materials
• Hexaflexagon template
• Scissors
• Glue or Tape
• Coloured pencils
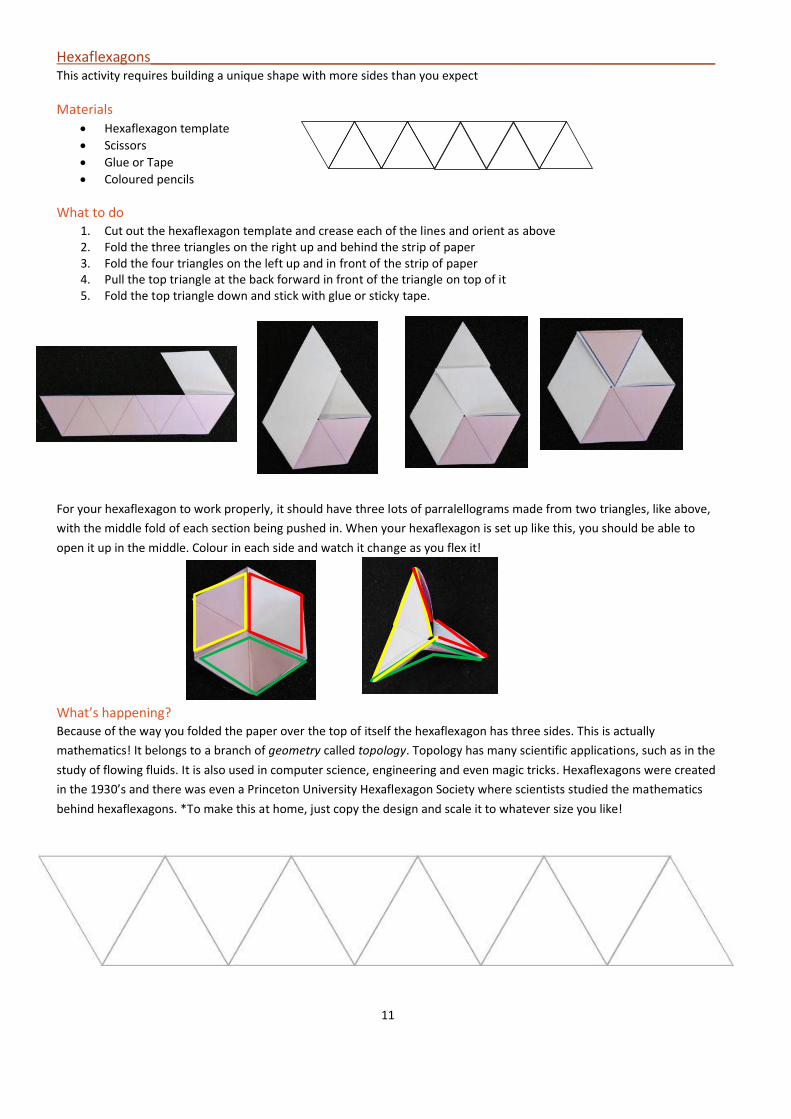
What to do 1. Cut out the hexaflexagon template and crease each of the lines and orient as above 2. Fold the three triangles on the right up and behind the strip of paper 3. Fold the four triangles on the left up and in front of the strip of paper 4. Pull the top triangle at the back forward in front of the triangle on top of it 5. Fold the top triangle down and stick with glue or sticky tape.
For your hexaflexagon to work properly, it should have three lots of parralellograms made from two triangles, like above,
with the middle fold of each section being pushed in. When your hexaflexagon is set up like this, you should be able to
open it up in the middle. Colour in each side and watch it change as you flex it!
What’s happening? Because of the way you folded the paper over the top of itself the hexaflexagon has three sides. This is actually
mathematics! It belongs to a branch of geometry called topology. Topology has many scientific applications, such as in the
study of flowing fluids. It is also used in computer science, engineering and even magic tricks. Hexaflexagons were created
in the 1930’s and there was even a Princeton University Hexaflexagon Society where scientists studied the mathematics
behind hexaflexagons. *To make this at home, just copy the design and scale it to whatever size you like!