science olympiad robots
TRANSCRIPT
Charles's Semi-Definitive Guide
to Science Olympiad
RobotsVolume I, 1st Edition, 05 March 2006, team test bot laboratories co. ltd. inc. llc.

Table of Contents
I. Robots A. What is a robot? B. Am I smart enough to build one?II. The Science Olympiad challenge A. The challenge B. Designs C. ExamplesIII. Construction and parts of a Science Olympiad robot A. Electronics B. Mechanics C. Other stuffIV. On the cheapV. Where to buy
Okay, so what is a robot?Per definition of en.wikipedia.org, the Holder of All Human Knowledge, a robot is:
a mechanical device that can perform physical tasks. A robot may act under the direct control of a human (eg. the robotic arm of the space shuttle) or autonomously under the control of a pre-programmed computer.
In the context of Science Olympiad and other small engineering competitions, we are looking at the first type, human control. There are plenty of opportunities to put autonomous features into a Science Olympiad robot, but if you are reading this for content, it is likely beyond your scope and unnecessary. Therefore, for the purposes of this text only, a robot will be defined as:
A mechanical device, operated under the direct control of a human, that is engineered to perform a specific task or accomplish a goal.
In this case, the goal is to compete in Science Olympiad's Robot Ramble event.
And win. More on that later.
I'm not smart enough to build a robot!Yes you are. Modern technology has developed to the point at which it permeates our lives.
One side effect of this is that it is much easier to learn and try out than in years past. The hobby robotics market is only increasing, and there are a number of companies that specifically make products catered to robots and their builders. Full directions and kits are available to build or program small robots. In some cases, they're even premade, and all you have to do is mess with them. This is often the best way to go about learning.
However, even those go beyond the scope of what we need. The robot in question for us will be simpler and require no programming or advanced electronics knowledge. We will not be messing with premade kits or microcontrollers. Instead, the robot will touch more on the realm of R/C vehicles and toys. You know how to drive an R/C car, right?
In the end, If you can read this, you can build this robot. Since you have already read this far, you can build this robot. Case closed.
The Science Olympiad ChallengeComparatively speaking, the Science Olympiad Robot Ramble event is relatively simple in
contrast to other (usually larger and significantly more financially involved) events, such as US FIRST(www.usfirst.org) or the DARPA Grand Challenge (www.grandchallenge.com). This is a fortunate thing, because the whole goal of the program is to get people involved in the sciences, not bombard them with advanced theory and masters-level tasks. The SO challenge has consistently been centered around two things.
1. Picking up, hoarding, or otherwise collecting small items, such as golf balls, paper towel tubes, and corks.2. Dropping them into a box or putting them in a specified zone of the playing field.
In the 2005 tournaments, an extra bonus was added if the robot was able to pop a balloon inserted into the goal box. In 2006, this was increased to 3 balloons. Furthermore, a standard sized compact disc(CD) was added in the middle.
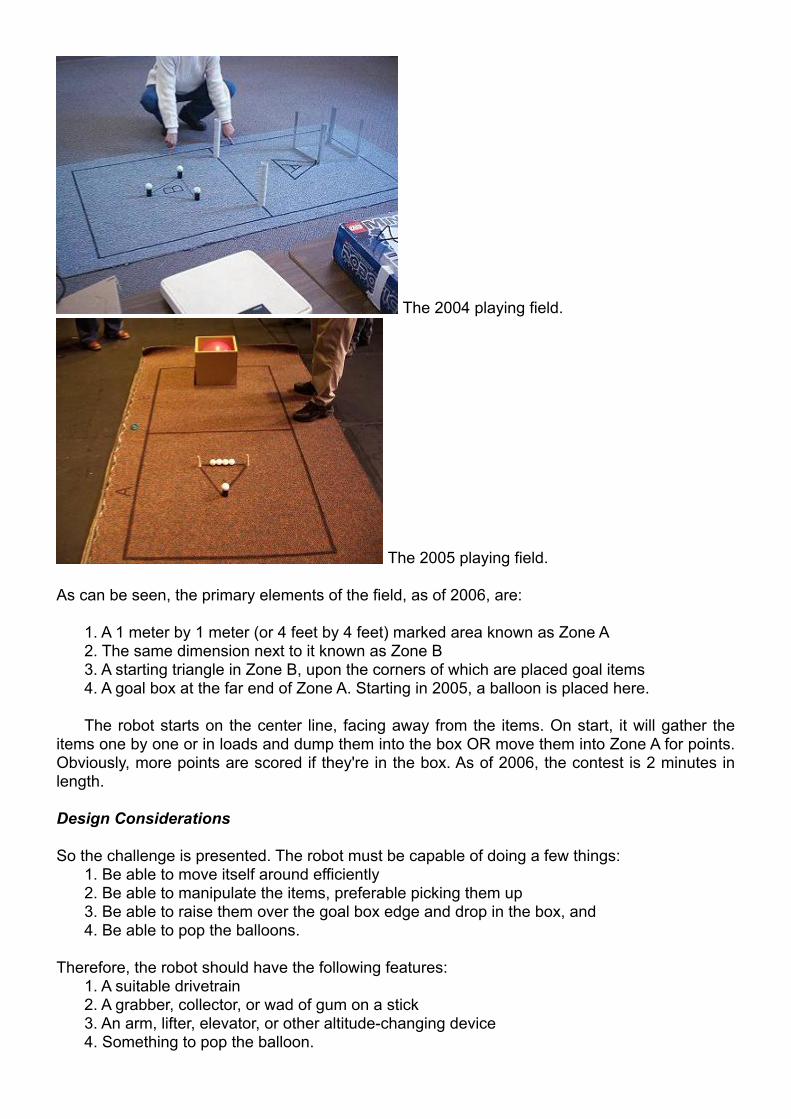
The 2004 playing field.
The 2005 playing field.
As can be seen, the primary elements of the field, as of 2006, are:
1. A 1 meter by 1 meter (or 4 feet by 4 feet) marked area known as Zone A2. The same dimension next to it known as Zone B3. A starting triangle in Zone B, upon the corners of which are placed goal items4. A goal box at the far end of Zone A. Starting in 2005, a balloon is placed here.
The robot starts on the center line, facing away from the items. On start, it will gather the items one by one or in loads and dump them into the box OR move them into Zone A for points. Obviously, more points are scored if they're in the box. As of 2006, the contest is 2 minutes in length.
Design Considerations
So the challenge is presented. The robot must be capable of doing a few things: 1. Be able to move itself around efficiently 2. Be able to manipulate the items, preferable picking them up 3. Be able to raise them over the goal box edge and drop in the box, and 4. Be able to pop the balloons.
Therefore, the robot should have the following features: 1. A suitable drivetrain 2. A grabber, collector, or wad of gum on a stick 3. An arm, lifter, elevator, or other altitude-changing device 4. Something to pop the balloon.

The easiest goal to accomplish is number one. Any moving platform will qualify. After that, it isn't hard to add an additional appendage that can shuffle the items. More on this later.
Pulling off number three was the essence of the original challenge. The goal box, as defined in the 2006 rules, is 30 centimeters on a side. This goal box is also a robot qualifying box. What does this mean? The robot is limited to 30 centimeters maximum in any of the three common spatial dimensions(30cm long, wide, and tall). 30 centimeters for the non-metric astute is just under 1 foot. In fact, it's right around 11.75 inches. The challenge: How do you make a robot appendage go over 30cm when the entire robot can only be 30cm?
There are a few ways. The succeeding list is in no way comprehensive, even remotely. There is no right way to perform the task. It's really up to your imagination, but there exist several "categories" of designs that most robots follow.
1. The Hypotenuse
As we all know, or should know, Pythagoras' little equation a²+b²=c² gives the length of the longest leg of a right triangle. This is advantageous in making a robot arm. By elevating the arm hinge above the horizontal plane of the robot, you can make it longer. How much longer depends on how high you mount it. The optimal arm length by calculating with 30cm as a and b would be something like 43cm. However, the robot is not a picture of a shape with three sides. But it can function like one. This design is by far the most common as it is the simplest.
2. The Elevator
The principle of operation behind the elevator is that of some lift machines that repairmen use to work on tall things such as electrical lines and gym lighting. In this design, a series of links that can move up and down are all ganged together with cables so they move at once. This type of design can get really tall. Typically, if the 30cm limit is used on link neight, only two are needed, because otherwise the robot might become a meter tall and tip over. Usually, a winch runs a cable that actuates the links.
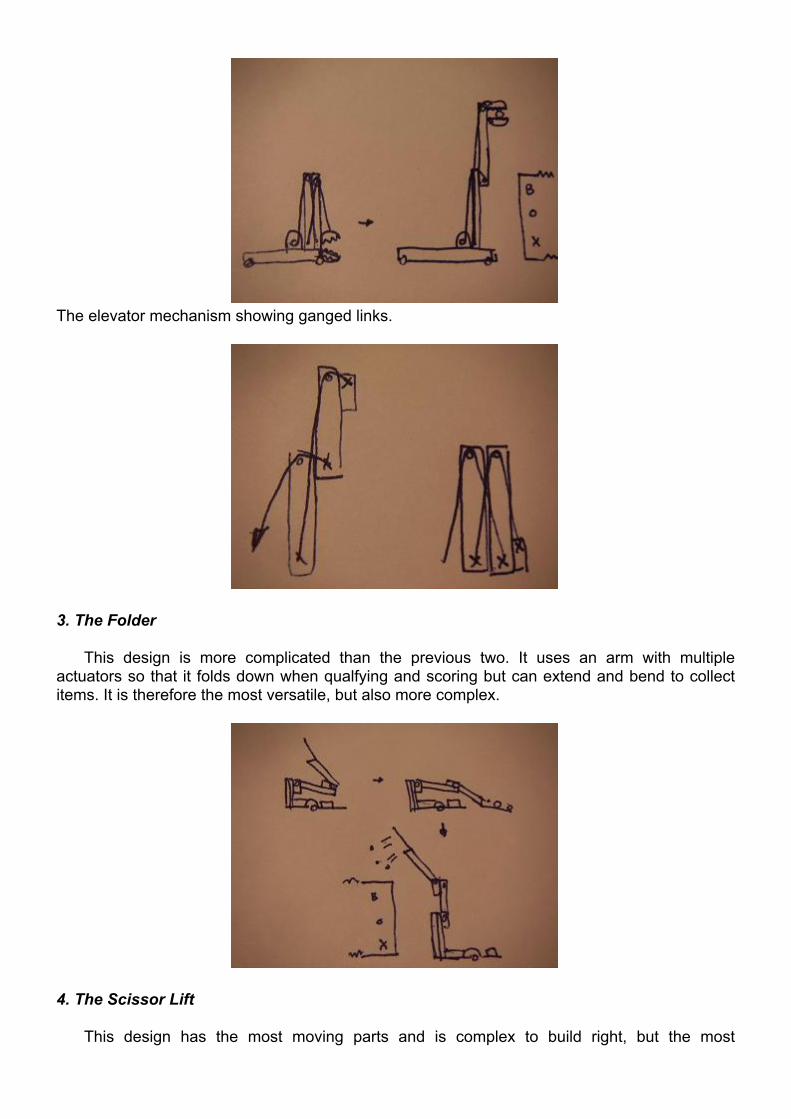
The elevator mechanism showing ganged links.
3. The Folder
This design is more complicated than the previous two. It uses an arm with multiple actuators so that it folds down when qualfying and scoring but can extend and bend to collect items. It is therefore the most versatile, but also more complex.
4. The Scissor Lift
This design has the most moving parts and is complex to build right, but the most
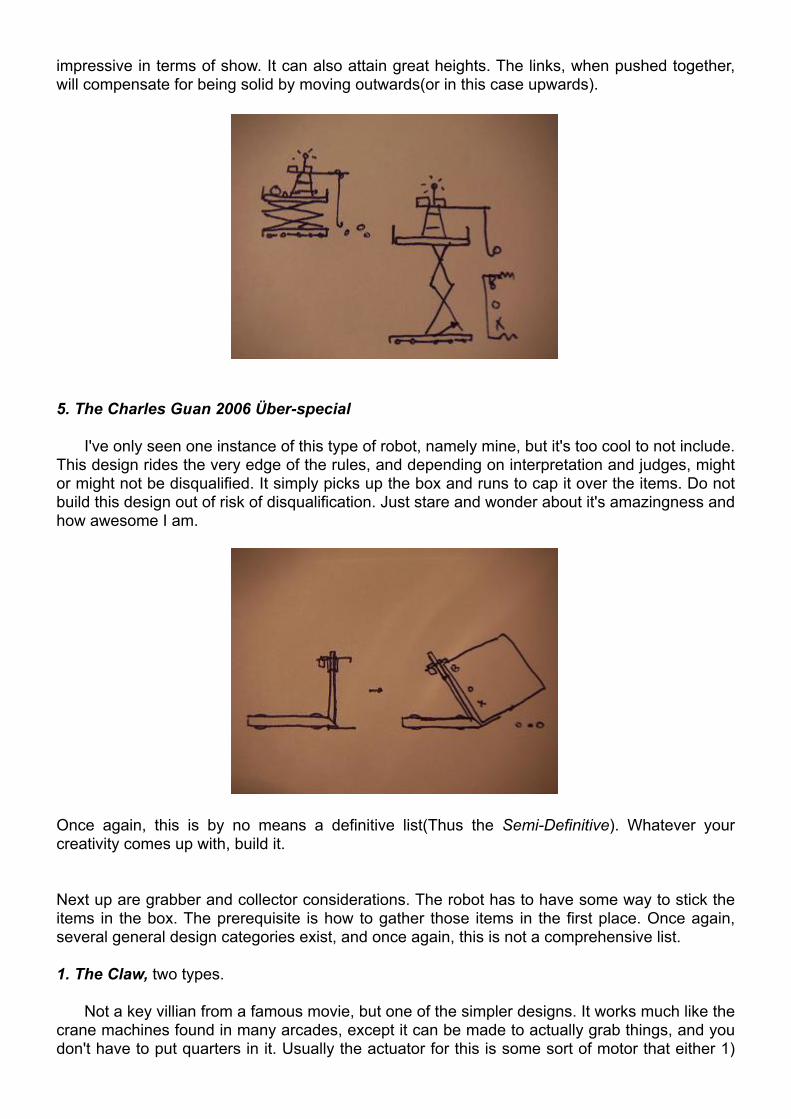
impressive in terms of show. It can also attain great heights. The links, when pushed together, will compensate for being solid by moving outwards(or in this case upwards).
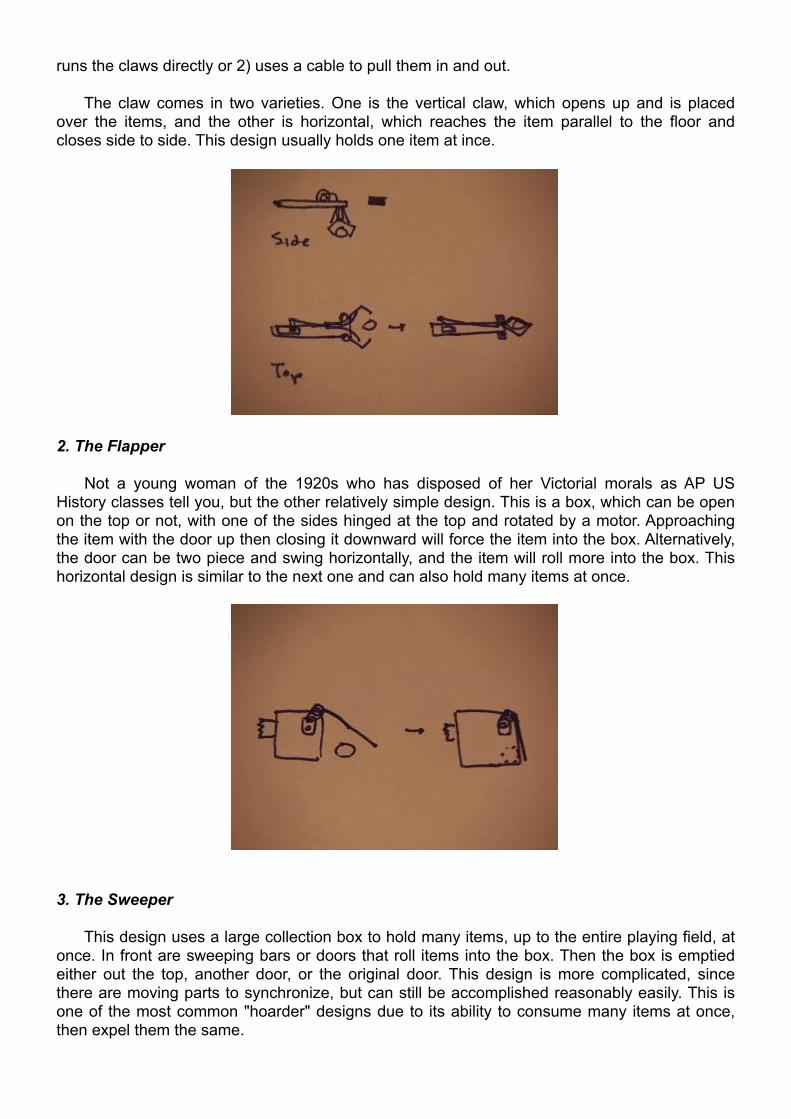
5. The Charles Guan 2006 Über-special
I've only seen one instance of this type of robot, namely mine, but it's too cool to not include. This design rides the very edge of the rules, and depending on interpretation and judges, might or might not be disqualified. It simply picks up the box and runs to cap it over the items. Do not build this design out of risk of disqualification. Just stare and wonder about it's amazingness and how awesome I am.
Once again, this is by no means a definitive list(Thus the Semi-Definitive). Whatever your creativity comes up with, build it.
Next up are grabber and collector considerations. The robot has to have some way to stick the items in the box. The prerequisite is how to gather those items in the first place. Once again, several general design categories exist, and once again, this is not a comprehensive list.
1. The Claw, two types.
Not a key villian from a famous movie, but one of the simpler designs. It works much like the crane machines found in many arcades, except it can be made to actually grab things, and you don't have to put quarters in it. Usually the actuator for this is some sort of motor that either 1)
runs the claws directly or 2) uses a cable to pull them in and out.
The claw comes in two varieties. One is the vertical claw, which opens up and is placed over the items, and the other is horizontal, which reaches the item parallel to the floor and closes side to side. This design usually holds one item at ince.
2. The Flapper
Not a young woman of the 1920s who has disposed of her Victorial morals as AP US History classes tell you, but the other relatively simple design. This is a box, which can be open on the top or not, with one of the sides hinged at the top and rotated by a motor. Approaching the item with the door up then closing it downward will force the item into the box. Alternatively, the door can be two piece and swing horizontally, and the item will roll more into the box. This horizontal design is similar to the next one and can also hold many items at once.
3. The Sweeper
This design uses a large collection box to hold many items, up to the entire playing field, at once. In front are sweeping bars or doors that roll items into the box. Then the box is emptied either out the top, another door, or the original door. This design is more complicated, since there are moving parts to synchronize, but can still be accomplished reasonably easily. This is one of the most common "hoarder" designs due to its ability to consume many items at once, then expel them the same.
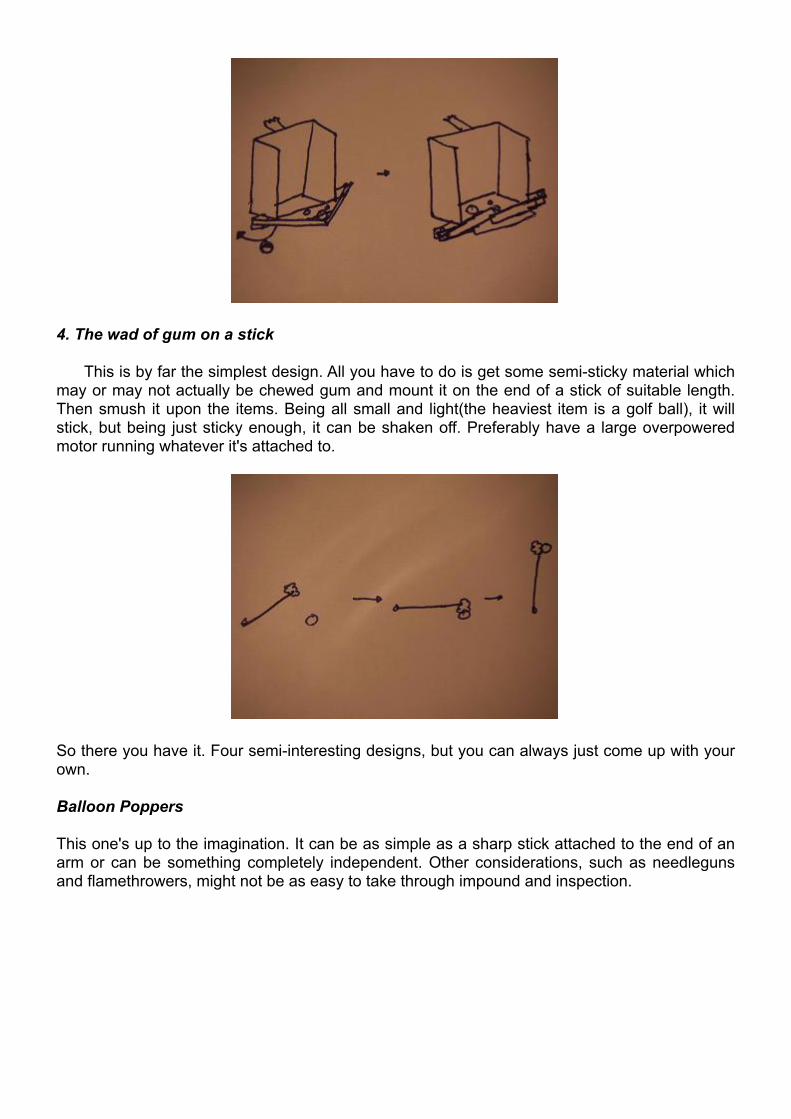
4. The wad of gum on a stick
This is by far the simplest design. All you have to do is get some semi-sticky material which may or may not actually be chewed gum and mount it on the end of a stick of suitable length. Then smush it upon the items. Being all small and light(the heaviest item is a golf ball), it will stick, but being just sticky enough, it can be shaken off. Preferably have a large overpowered motor running whatever it's attached to.
So there you have it. Four semi-interesting designs, but you can always just come up with your own.
Balloon Poppers
This one's up to the imagination. It can be as simple as a sharp stick attached to the end of an arm or can be something completely independent. Other considerations, such as needleguns and flamethrowers, might not be as easy to take through impound and inspection.
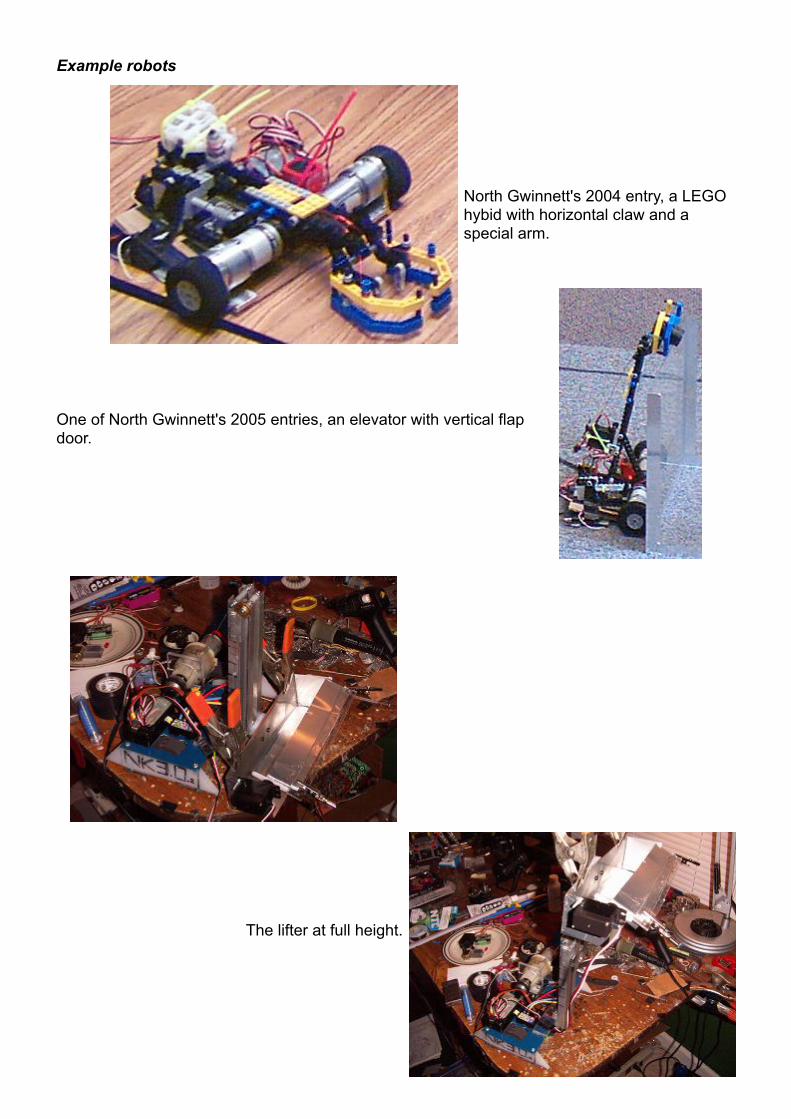
Example robots
North Gwinnett's 2004 entry, a LEGO hybid with horizontal claw and a special arm.
One of North Gwinnett's 2005 entries, an elevator with vertical flap door.
The lifter at full height.
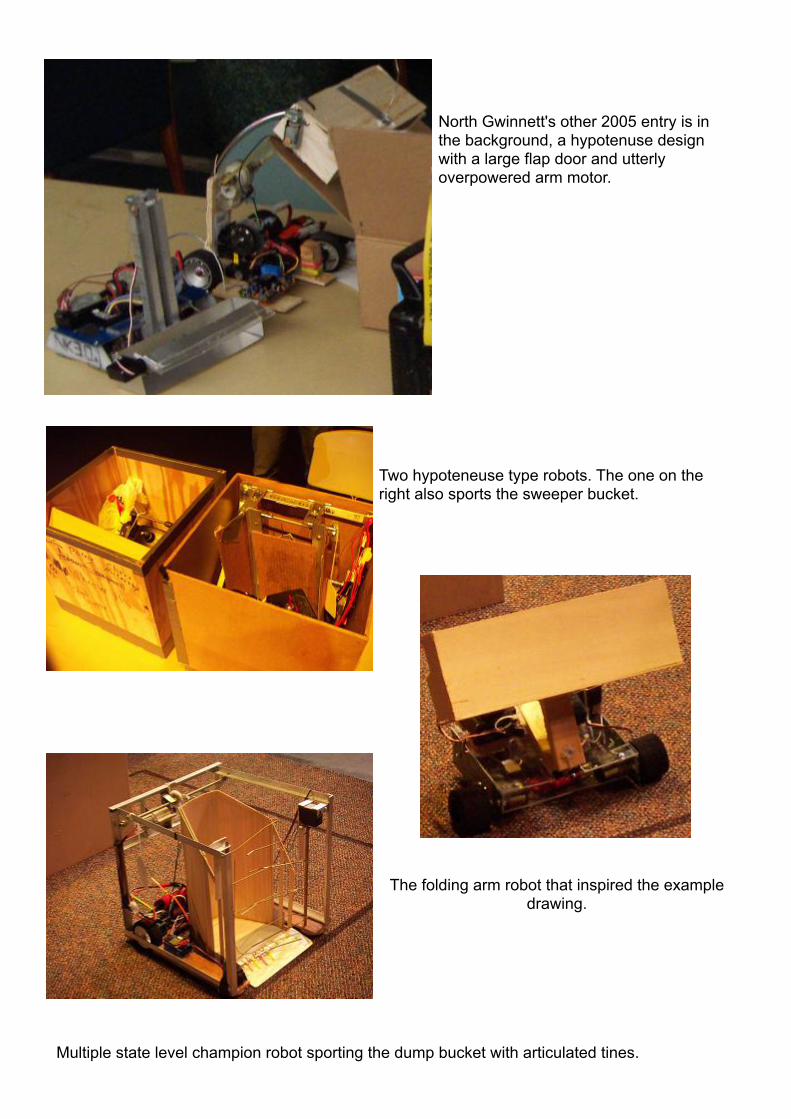
North Gwinnett's other 2005 entry is in the background, a hypotenuse design with a large flap door and utterly overpowered arm motor.
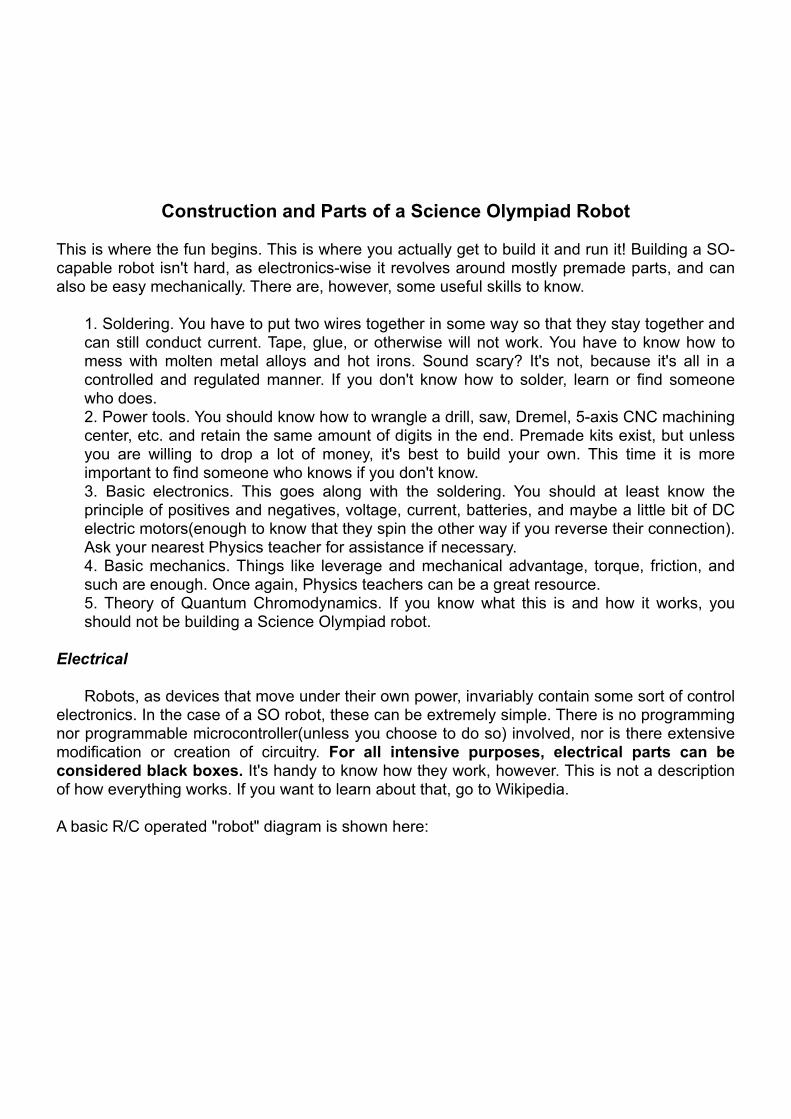
Two hypoteneuse type robots. The one on the right also sports the sweeper bucket.
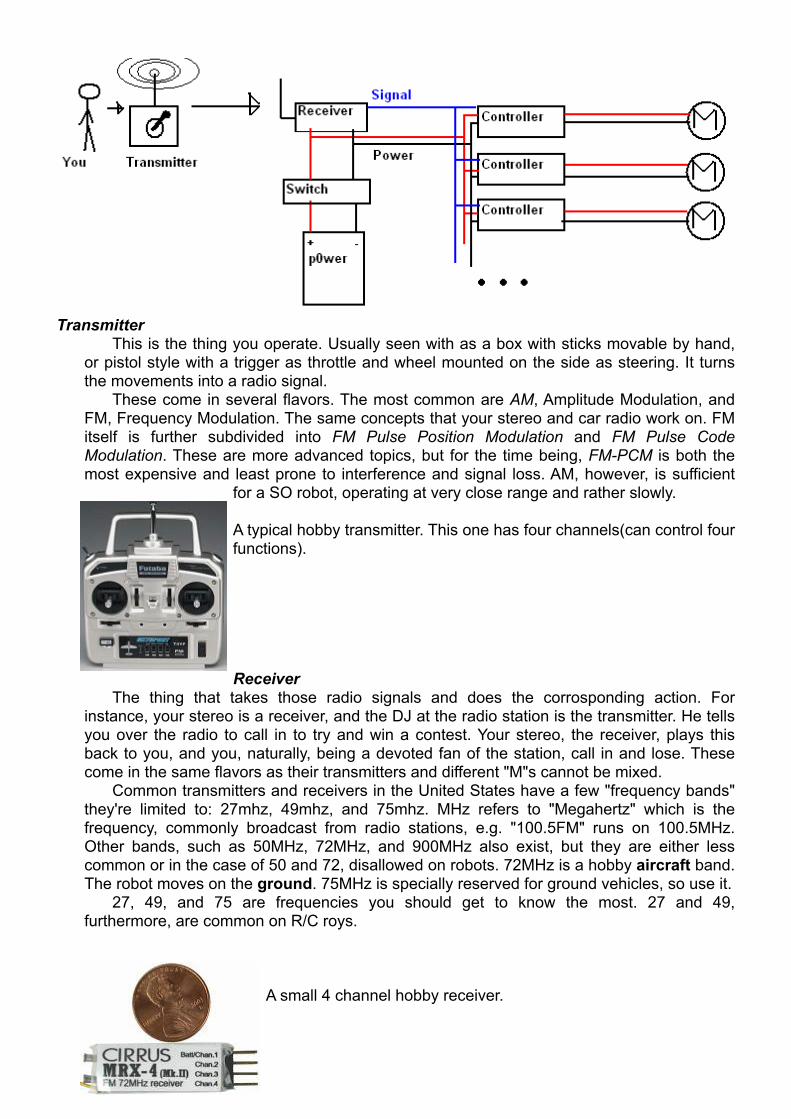
The folding arm robot that inspired the example drawing.
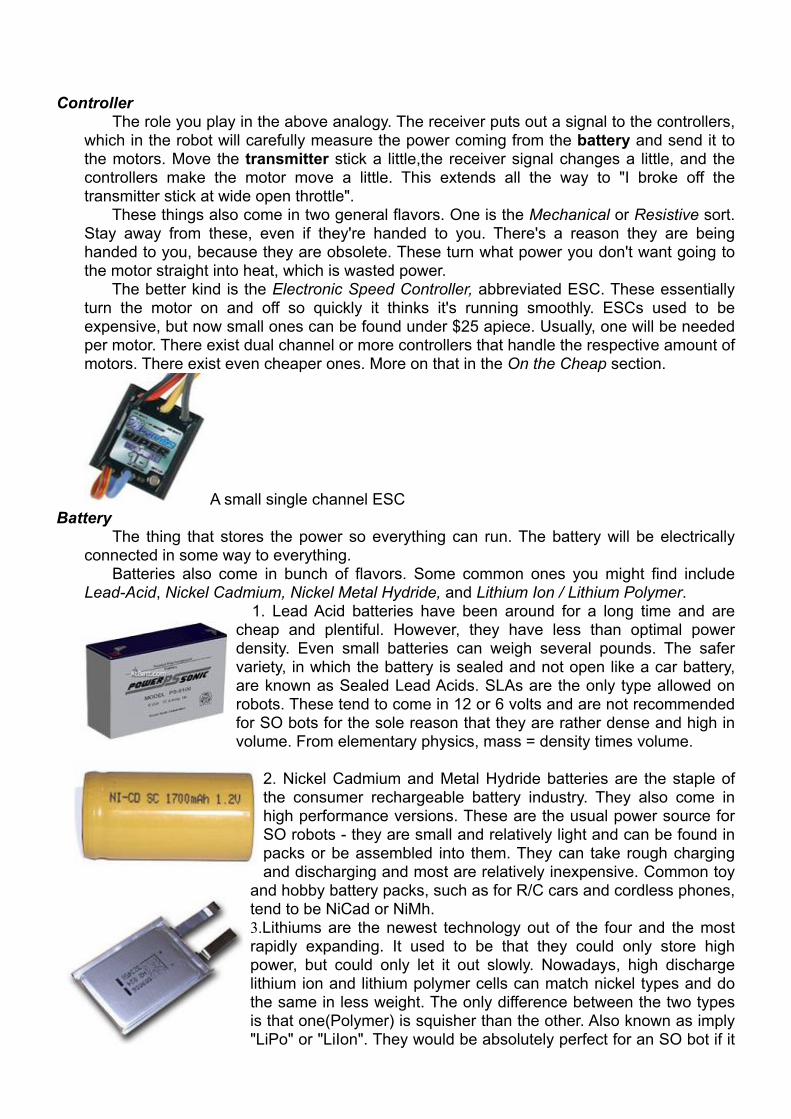
Multiple state level champion robot sporting the dump bucket with articulated tines.
Construction and Parts of a Science Olympiad Robot
This is where the fun begins. This is where you actually get to build it and run it! Building a SO-capable robot isn't hard, as electronics-wise it revolves around mostly premade parts, and can also be easy mechanically. There are, however, some useful skills to know.
1. Soldering. You have to put two wires together in some way so that they stay together and can still conduct current. Tape, glue, or otherwise will not work. You have to know how to mess with molten metal alloys and hot irons. Sound scary? It's not, because it's all in a controlled and regulated manner. If you don't know how to solder, learn or find someone who does. 2. Power tools. You should know how to wrangle a drill, saw, Dremel, 5-axis CNC machining center, etc. and retain the same amount of digits in the end. Premade kits exist, but unless you are willing to drop a lot of money, it's best to build your own. This time it is more important to find someone who knows if you don't know.3. Basic electronics. This goes along with the soldering. You should at least know the principle of positives and negatives, voltage, current, batteries, and maybe a little bit of DC electric motors(enough to know that they spin the other way if you reverse their connection). Ask your nearest Physics teacher for assistance if necessary.4. Basic mechanics. Things like leverage and mechanical advantage, torque, friction, and such are enough. Once again, Physics teachers can be a great resource.5. Theory of Quantum Chromodynamics. If you know what this is and how it works, you should not be building a Science Olympiad robot.
Electrical
Robots, as devices that move under their own power, invariably contain some sort of control electronics. In the case of a SO robot, these can be extremely simple. There is no programming nor programmable microcontroller(unless you choose to do so) involved, nor is there extensive modification or creation of circuitry. For all intensive purposes, electrical parts can be considered black boxes. It's handy to know how they work, however. This is not a description of how everything works. If you want to learn about that, go to Wikipedia.
A basic R/C operated "robot" diagram is shown here:
TransmitterThis is the thing you operate. Usually seen with as a box with sticks movable by hand,
or pistol style with a trigger as throttle and wheel mounted on the side as steering. It turns the movements into a radio signal.
These come in several flavors. The most common are AM, Amplitude Modulation, and FM, Frequency Modulation. The same concepts that your stereo and car radio work on. FM itself is further subdivided into FM Pulse Position Modulation and FM Pulse Code Modulation. These are more advanced topics, but for the time being, FM-PCM is both the most expensive and least prone to interference and signal loss. AM, however, is sufficient
for a SO robot, operating at very close range and rather slowly.
A typical hobby transmitter. This one has four channels(can control four functions).
ReceiverThe thing that takes those radio signals and does the corrosponding action. For
instance, your stereo is a receiver, and the DJ at the radio station is the transmitter. He tells you over the radio to call in to try and win a contest. Your stereo, the receiver, plays this back to you, and you, naturally, being a devoted fan of the station, call in and lose. These come in the same flavors as their transmitters and different "M"s cannot be mixed.
Common transmitters and receivers in the United States have a few "frequency bands" they're limited to: 27mhz, 49mhz, and 75mhz. MHz refers to "Megahertz" which is the frequency, commonly broadcast from radio stations, e.g. "100.5FM" runs on 100.5MHz. Other bands, such as 50MHz, 72MHz, and 900MHz also exist, but they are either less common or in the case of 50 and 72, disallowed on robots. 72MHz is a hobby aircraft band. The robot moves on the ground. 75MHz is specially reserved for ground vehicles, so use it.
27, 49, and 75 are frequencies you should get to know the most. 27 and 49, furthermore, are common on R/C roys.
A small 4 channel hobby receiver.
ControllerThe role you play in the above analogy. The receiver puts out a signal to the controllers,
which in the robot will carefully measure the power coming from the battery and send it to the motors. Move the transmitter stick a little,the receiver signal changes a little, and the controllers make the motor move a little. This extends all the way to "I broke off the transmitter stick at wide open throttle". These things also come in two general flavors. One is the Mechanical or Resistive sort. Stay away from these, even if they're handed to you. There's a reason they are being handed to you, because they are obsolete. These turn what power you don't want going to the motor straight into heat, which is wasted power. The better kind is the Electronic Speed Controller, abbreviated ESC. These essentially turn the motor on and off so quickly it thinks it's running smoothly. ESCs used to be expensive, but now small ones can be found under $25 apiece. Usually, one will be needed per motor. There exist dual channel or more controllers that handle the respective amount of motors. There exist even cheaper ones. More on that in the On the Cheap section.
A small single channel ESCBattery
The thing that stores the power so everything can run. The battery will be electrically connected in some way to everything. Batteries also come in bunch of flavors. Some common ones you might find include Lead-Acid, Nickel Cadmium, Nickel Metal Hydride, and Lithium Ion / Lithium Polymer.
1. Lead Acid batteries have been around for a long time and are cheap and plentiful. However, they have less than optimal power density. Even small batteries can weigh several pounds. The safer variety, in which the battery is sealed and not open like a car battery, are known as Sealed Lead Acids. SLAs are the only type allowed on robots. These tend to come in 12 or 6 volts and are not recommended for SO bots for the sole reason that they are rather dense and high in volume. From elementary physics, mass = density times volume.
2. Nickel Cadmium and Metal Hydride batteries are the staple of the consumer rechargeable battery industry. They also come in high performance versions. These are the usual power source for SO robots - they are small and relatively light and can be found in packs or be assembled into them. They can take rough charging and discharging and most are relatively inexpensive. Common toy
and hobby battery packs, such as for R/C cars and cordless phones, tend to be NiCad or NiMh.3.Lithiums are the newest technology out of the four and the most rapidly expanding. It used to be that they could only store high power, but could only let it out slowly. Nowadays, high discharge lithium ion and lithium polymer cells can match nickel types and do the same in less weight. The only difference between the two types is that one(Polymer) is squisher than the other. Also known as imply "LiPo" or "LiIon". They would be absolutely perfect for an SO bot if it
weren't for the fact that they are 1) expensive and 2) require special equally expensive charging equipment.
You might be wondering why the common Alkaline battery isn't on the list. First, they are not (easily) rechargeable. You will be replacing a set every run, or if you're unlucky, during a (unpleasantly halted) run. Except for D cells, they don't put out much current to run you rmotors. D cells are very heavy. Do not under any circumstances pull out 9-volts and run the robot on them. You can, but it won't work well at all.
More about buying all this stuff in a little while.
Switches, wiring, etc.This should be self-explanatory. Silver is the best conductor. If you have silver wires on
your robot, stop reading.
Motors and actuatorsThe large M in the above diagram, motors and related family are what make the wheels
on the robot go round and round. These types can run straight off a battery, hence the direct current. They come in geared (already have some sort of gearbox on it so that they can be managed easier) and direct (just a motor). For a related type of power source, a straight gasoline engine isn't of too much use on a car. They spin too quickly to be directly hooked to the wheels. Through a gearbox, their speed is reduced and their torque, turning force, is increased. This is the only reason cars can wheelie.
In addition to driving wheels, motors will also drive any grabbers, lifters, or large spinning death blades on the robot. More on motors in a little while.
Mechanical
Now that a basic path has been laid out for electrons to flow, it's time to make them useful. The robot, having been previously defined as a mechanical device, implies that it has mechanisms on it! In fact, it can have a bunch, or it can have a few. A SO robot will only have a few relatively simple things, such as motors and gears and perhaps a linkage or two if you feel ambitious.
The DrivetrainMany drivetrain layouts are possible. In fact, there are so many it would be hard
pressed to name them all. Most drivetrain layouts found on robots and SO robots specifically will fall under a few categories, however.
Two wheel driveIn the realm of tank-style or "skid" steering, two wheel drive is one of the simplest and
most common designs found on robots. Due to its aforementioned simplicity it is desirable for a SO robot. In this design, each wheel has its independent drive motor. The direction and speed of the robot is controlled by moving each motor at varying speeds. The technical term for this type of drivetrain, differential steering, comes about because of the difference in motor speed causing one side to move faster or slower relative to another.Two wheel drive comes in rear drive, front drive, and "centerline" configurations.

In the rear drive configuration, the motors push the center of mass of the robot forward. The overhanging parts of the robot rest on a caster or skid. This is the same as the front drive layout, except the bot is pulled along. These two layouts are the simplest and one of the more space-efficient, since it leaves the most contiguous space to mount other components. However, the overhanging mass is also its biggest disadvantage. Often, robots of this type will have trouble turning precisely unless the wheels are of high traction and the motors strong enough to pull the robot in the desired direction.
In the centerline drive configuration, the center of mass of the robot lies over or almost over the wheels. This means as a percentage of weight the wheels will have the most possible weight over them, resulting in high traction and maneuverability. The downside is not less space to mount components, but less open space. This can be overcome by careful design.
Four wheel drive Although "four wheel drive" does not necessarily imply four independent motors, this is the easiest way to go. A four wheel drive platform places 100% of the weight of the robot on the wheels. The result is a highly maneuverable platform that is stable in turning. Methods used to create four driving wheels from two include belts and pulleys, chains and sprockets, or shaft drive. For the purposes of SO, it will be wisest to avoid overcomplication, however. If you feel like exploring the
subject more, plenty of websites and books exist that detail the coupling of wheels. For an SO robot, if four wheel drive is pursued, it might be the wisest to consider four motors.
The downside of four wheels is increased expense and weight from more active components.
Other drive configurationsTwo and four wheel drive make up a high percentage of robot drivetrains. However,
others exist that may be of interest for use in Science Olympiad.
Car steeringQuick trivia: the technical term for "car steering" is actually "Ackerman steering", named
the method's inventor. This is the most familiar type of steering to many people, and it can be made surprisingly maneuverable. The advantage of car steering is the ability to maneuver and follow a precise path. However, this design does not have the zero turning radius or "spin on the spot" ability of the tank-style drivetrains. Unless, of course, the robot is powerful to do donuts on the carpet playing field. Usually, the front wheels will be controlled by a servomechanism or "servo" motor. Basically, it is a motor that stays where you want it.
The turning radius is determined by some strange function of the angle that the wheel is deviating from straight ahead. Deriving this formula is left as an exercise to the bored reader.
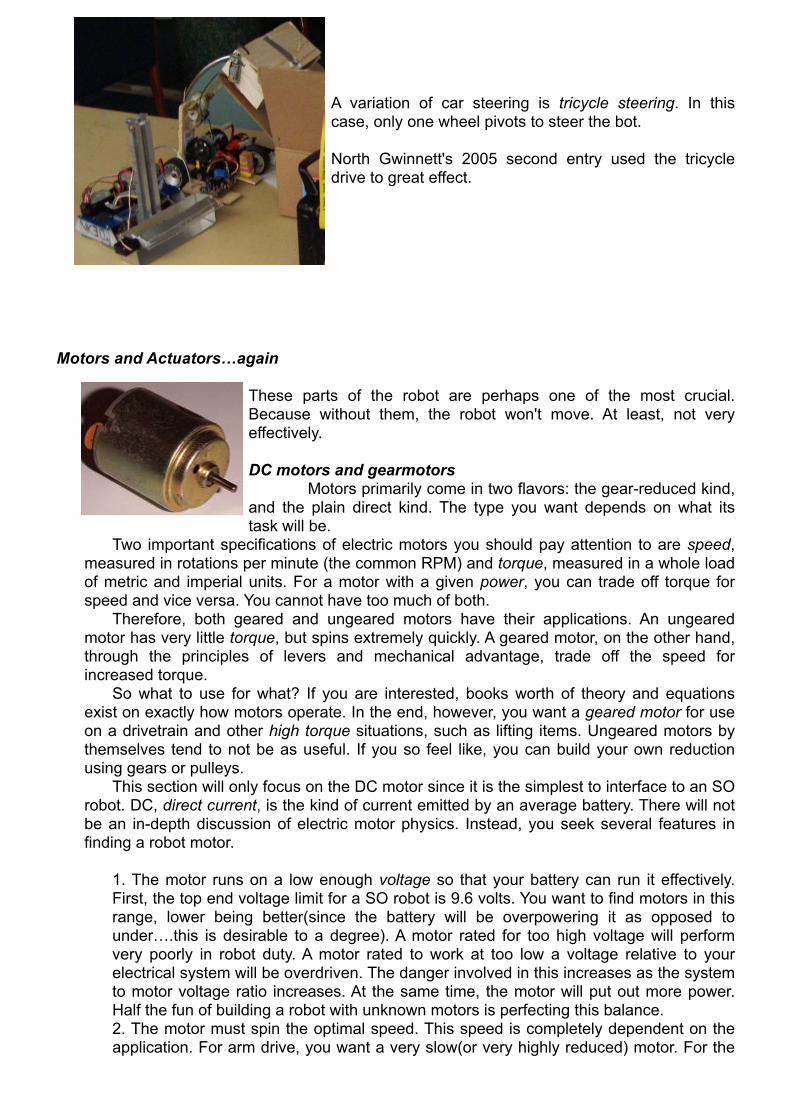
A variation of car steering is tricycle steering. In this case, only one wheel pivots to steer the bot.
North Gwinnett's 2005 second entry used the tricycle drive to great effect.
Motors and Actuators…again
These parts of the robot are perhaps one of the most crucial. Because without them, the robot won't move. At least, not very effectively.
DC motors and gearmotors Motors primarily come in two flavors: the gear-reduced kind, and the plain direct kind. The type you want depends on what its task will be.
Two important specifications of electric motors you should pay attention to are speed, measured in rotations per minute (the common RPM) and torque, measured in a whole load of metric and imperial units. For a motor with a given power, you can trade off torque for speed and vice versa. You cannot have too much of both.
Therefore, both geared and ungeared motors have their applications. An ungeared motor has very little torque, but spins extremely quickly. A geared motor, on the other hand, through the principles of levers and mechanical advantage, trade off the speed for increased torque.
So what to use for what? If you are interested, books worth of theory and equations exist on exactly how motors operate. In the end, however, you want a geared motor for use on a drivetrain and other high torque situations, such as lifting items. Ungeared motors by themselves tend to not be as useful. If you so feel like, you can build your own reduction using gears or pulleys.
This section will only focus on the DC motor since it is the simplest to interface to an SO robot. DC, direct current, is the kind of current emitted by an average battery. There will not be an in-depth discussion of electric motor physics. Instead, you seek several features in finding a robot motor.
1. The motor runs on a low enough voltage so that your battery can run it effectively. First, the top end voltage limit for a SO robot is 9.6 volts. You want to find motors in this range, lower being better(since the battery will be overpowering it as opposed to under….this is desirable to a degree). A motor rated for too high voltage will perform very poorly in robot duty. A motor rated to work at too low a voltage relative to your electrical system will be overdriven. The danger involved in this increases as the system to motor voltage ratio increases. At the same time, the motor will put out more power. Half the fun of building a robot with unknown motors is perfecting this balance.2. The motor must spin the optimal speed. This speed is completely dependent on the application. For arm drive, you want a very slow(or very highly reduced) motor. For the

drivetrain, you might want something faster. 3. If the motor does not spin at the best speed, it should have an easy way to interface external gears or pulleys to slow it down. 4. If the motor is a geared type, the output shaft should be easily adapted to a wheel.
A variety of small DC geared motors. More on purchasing later.
Wheels and tractionWhile on the subject of wheels, these also form an important part of your robot. Without
wheels, how does it move? Or, without good wheels, how will it move in a reasonable, controllable manner?
There is, once again, choice in the matter. What type of wheel or what softness of the wheel will depend on your desired performance on a surface. For Science Olympiad, this surface is a low-height indoor-outdoor carpet, the kind found in classrooms and offices.
Several factors influence your wheel decision.
1. How large in diameter? The larger the wheel for the same rotational speed, the faster the robot will go. This can be a good or a bad thing. A large wheel on will compensate for a very slow motor, just like small wheels will give lower ground speed on fast motors.
The speed equation: vmph = (2πdω) * 60 / 12 / 5280or, (2πdω) / 1056, where d is wheel diameter, π is a neverending number, and ω is motor speed in RPM.
For SO, you want a low enough speed so that it would not dive off the playing field and attempt to drill a hole through the wall. This is usually less than 3 miles per hour.
2. What is the wheel's profile? A thin wheel is lighter, but has a much smaller ground-contacting patch and may suffer from traction losses as a result. However, a wide wheel may have too much drag on turns. If a tire is very tall in profile, there will be extra drag from the tire bending or rolling sideways. Drivetrain layout also matters here. Four wheels will always have more drag for the same wheels than two.
3. How easy is it to interface to my motor? This is a paramount question. If it isn't going to go on the motor, you are out of luck. The best way is to find a matching set from the same manufacturer, like…
More about buying stuff later.
4. Other considerations include weight and price. A wheel that weighs too much will be
harder on the motors, since they would have to fight the stored energy of the wheel in addition to an entire moving robot. It also increases total weight. And a final crucial aspect is price. You may find a wheel of the right stiffness and profile that directly interfaces with your motor, but if it was built for use on military equipment, you may be out of luck.
5. Are miniature chromed spinners really necessary?
The ChassisThis is the thing that holds your entire robot together! The chassis is one of the areas
that you can completely let loose on. There are many things a robot can be made out of. The most common materials:
1. Metals compose at least part of the chassis of most mobile robots. For something as small as a SO robot, very light metals are needed. For this reason, aluminum remains popular as a frame material. It is versatile, easy to work with, and comes in a bunch of shapes. These shapes, ranging from flat sheets and bars to various letters of the alphabet, can be put together to build many types of robots.
2. Plastics are just as important. In many cases, weight for weight they are stronger than a metal chassis. Expensive engineering plastics and composite materials aside, easily available material such as clear window glazing (polycarbonate) and plastic cutting boards (polyethylene) form starting points for small robots. They tend to be much easier to cut and work with than metals.
3. Wood can never be left out of a robot frame equation. Some engineered woods such as particle boards make good frame pieces for small robots. Also, thin plywood and balsa wood are also commonly seen materials.
Remember, whatever you end up building has to carry its weight, the weight of a lifter or grabber mechanism, items(or the box), and hold together while moving.
FastenersTo be the most specific, fasteners are the things that actually hold the robot together. If
you do not use fasteners that are strong enough, well placed, and of sufficient number, there's a good chance your robot's structural integrity is sacrificed. This does not mean go all out and insert ship rivets into your robot. It means knowing what to use and how to use it.
1. The usual nuts and bolts are indispensable for building robots. Besides just holding the frame together, they can also mount wheels, act as pivot points, or as balloon stabbers if sufficiently sharpened.2. Glues and adhesives. Make sure you use a high strength type. White school glue won't work at all. And make sure the surface you glue to can hold the pressure - many failures don't result from the glue bond breaking, but the glued surfaces failing. Reinforce sharp corners and try to remain level headed as the fumes fill up your immediate vicinity.3. Velcro, double sided tapes. These are more suited to holding electronics on than a frame together. 4. The "roving duct tape ball" is a common sight in robotics, and Science Olympiad is likely no exception.
So, now you have a basic rundown of the electronics of a robot, including parts, their functions, and even a little diagram, as well as the mechanical side, including wheels, motors, the frame, how to put it all together, and comma splices. In addition, you know some basic

design strategies and have even seen some examples of robots. So you're ready to go about your own build, right? Skip down to the "Where to buy" section for a list of places where you can… well, buy stuff.
But wait…
Doesn't this stuff cost money, the mythical substance that is traded in return for goods and services? Don't high schoolers often suffer from a lack of this material? Well, okay, some of us.
That's why there's the…
Doing it on the cheapsection. In this section, the almighty Charles will show you how to find parts for and build a
Science Olympiad robot in under $50. Less if you're good.
IF you plan to pursue this route, you should get to know this little guy.
If you don't know what it is, you should try to be five years old again so you can play with one. It's a radio controlled toy. Otherwise known as a raw uncooked imitation robot. Like crab meat or duck, but even more plastic.
A radio controlled toy is essentially everything the Electronics and Mechanics section described, compacted into a small mass produced children's toy. Of course, it will have less features than specialized equipment, but in a Science Olympiad robot, how many bells and whistles are really necessary?
Commonly available toys have in them the following useful items:
1. A battery, rechargeable, of the nickel chemistry. Often a rudimentary charger is included.2. A two channel, AM, on-off transmitter. Depending on vehicle type, such as tank or car, the transmitter will be set up with vertical or horizontal sticks. 27 or 49 mhz with other frequencies such as 35 and 45mhz found on bootleg ones.3. A combination receiver and dual motor controller, also on-off, that can handle a decent amount of power.4. Two or more DC motors. Depending on vehicle type, they can be
a. One large and one small motor for a car. The large motor will propel the vehicle while the small will run the steering wheels.b. Two equally sized ones in identical gearboxes for a tank type vehicle. These are the best.
5. The accompanying gears for the motor.6. A set of high traction wheels. At least two for a car, and at least four for a tank type, if it
isn't a tank to begin with, i.e. it has treads.7. The good ones come with random flashing lights and whistles.
What is the above but the description of a very simple robot?
Think you can handle it?
If your confidence level suddenly got a lot higher because you realized you have a will-be robot sitting in the closet, go for it. It's not hard at all. Or, if you don't, here's some places to get some.
1. Your garage, closet, junk box, sibling's room. There is a good chance that you might have an old but functional R/C vehicle lying around. 2. Your neighbor's garage, closet, etc. If you don't have it, someone else might. And they might think you're cute enough asking for a toy that they will simply hand it off to you.3. A garage sale, yard sale, or other small informal mercantile gathering. R/C vehicles can be found for less than a few dollars here.4. A flea market or other large informal mercantile gathering. Often, dealers will have shelves full of them, fully functional with support equipment.5. A secondhand shop, such as Goodwill. They often run around a few dollars or even in the high cents.
Wherever you find one, make sure it has a matching transmitter. If you get more than one(You will have to for robots with moving arms and such), make sure they are on different frequencies. Such as 27 or 49MHz but not both on one or the other.
So, with that settled, it's time to move on to the actual gory details.
The Controllers
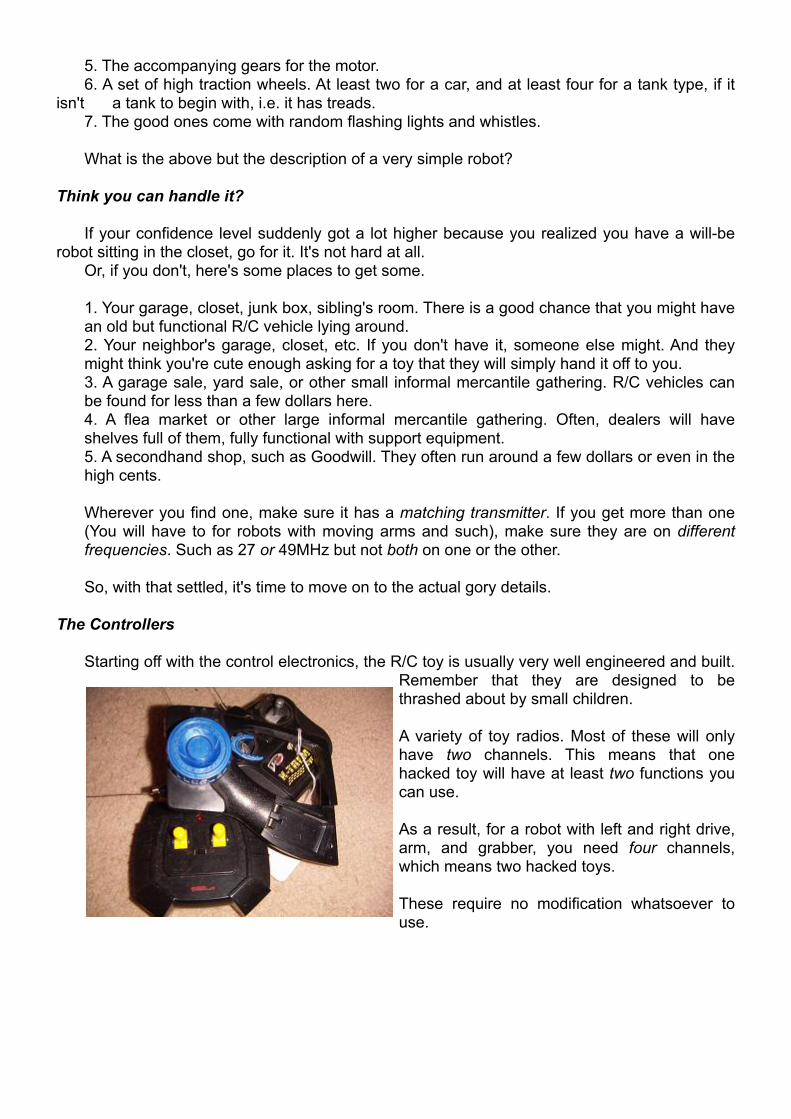
Starting off with the control electronics, the R/C toy is usually very well engineered and built. Remember that they are designed to be thrashed about by small children. A variety of toy radios. Most of these will only have two channels. This means that one hacked toy will have at least two functions you can use.
As a result, for a robot with left and right drive, arm, and grabber, you need four channels, which means two hacked toys.
These require no modification whatsoever to use.
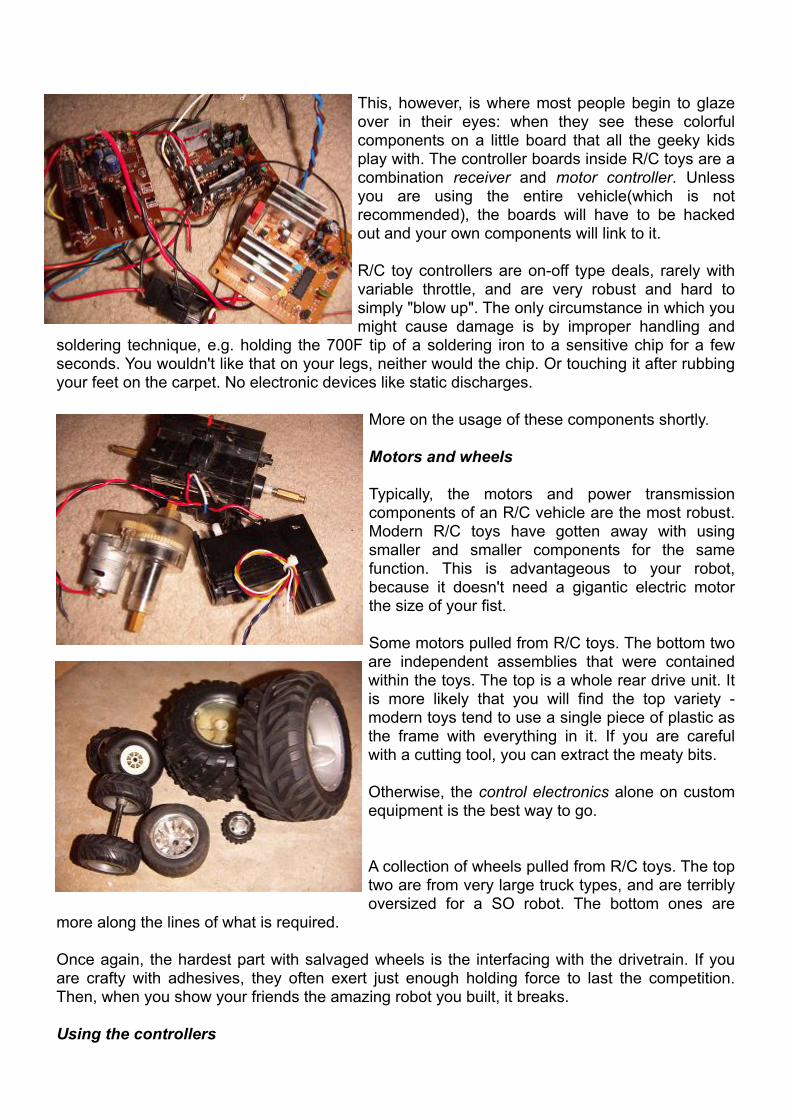
This, however, is where most people begin to glaze over in their eyes: when they see these colorful components on a little board that all the geeky kids play with. The controller boards inside R/C toys are a combination receiver and motor controller. Unless you are using the entire vehicle(which is not recommended), the boards will have to be hacked out and your own components will link to it.
R/C toy controllers are on-off type deals, rarely with variable throttle, and are very robust and hard to simply "blow up". The only circumstance in which you might cause damage is by improper handling and
soldering technique, e.g. holding the 700F tip of a soldering iron to a sensitive chip for a few seconds. You wouldn't like that on your legs, neither would the chip. Or touching it after rubbing your feet on the carpet. No electronic devices like static discharges.
More on the usage of these components shortly.
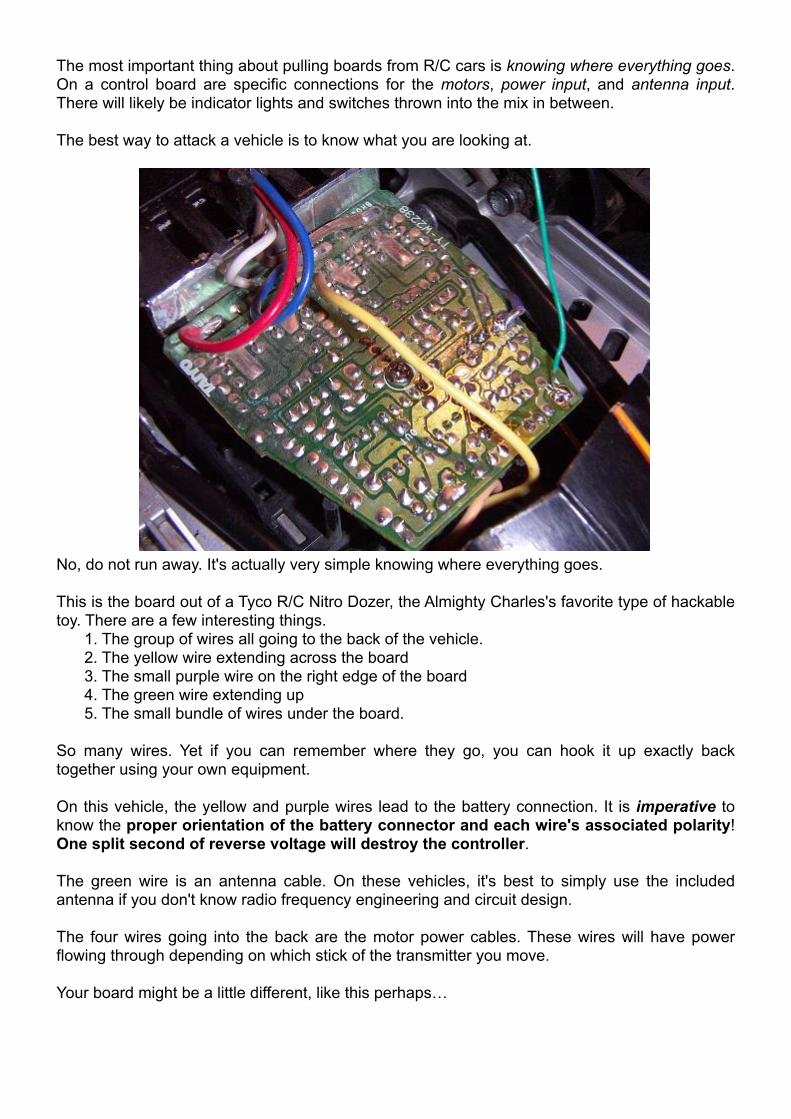
Motors and wheels
Typically, the motors and power transmission components of an R/C vehicle are the most robust. Modern R/C toys have gotten away with using smaller and smaller components for the same function. This is advantageous to your robot, because it doesn't need a gigantic electric motor the size of your fist.
Some motors pulled from R/C toys. The bottom two are independent assemblies that were contained within the toys. The top is a whole rear drive unit. It is more likely that you will find the top variety - modern toys tend to use a single piece of plastic as the frame with everything in it. If you are careful with a cutting tool, you can extract the meaty bits.
Otherwise, the control electronics alone on custom equipment is the best way to go.
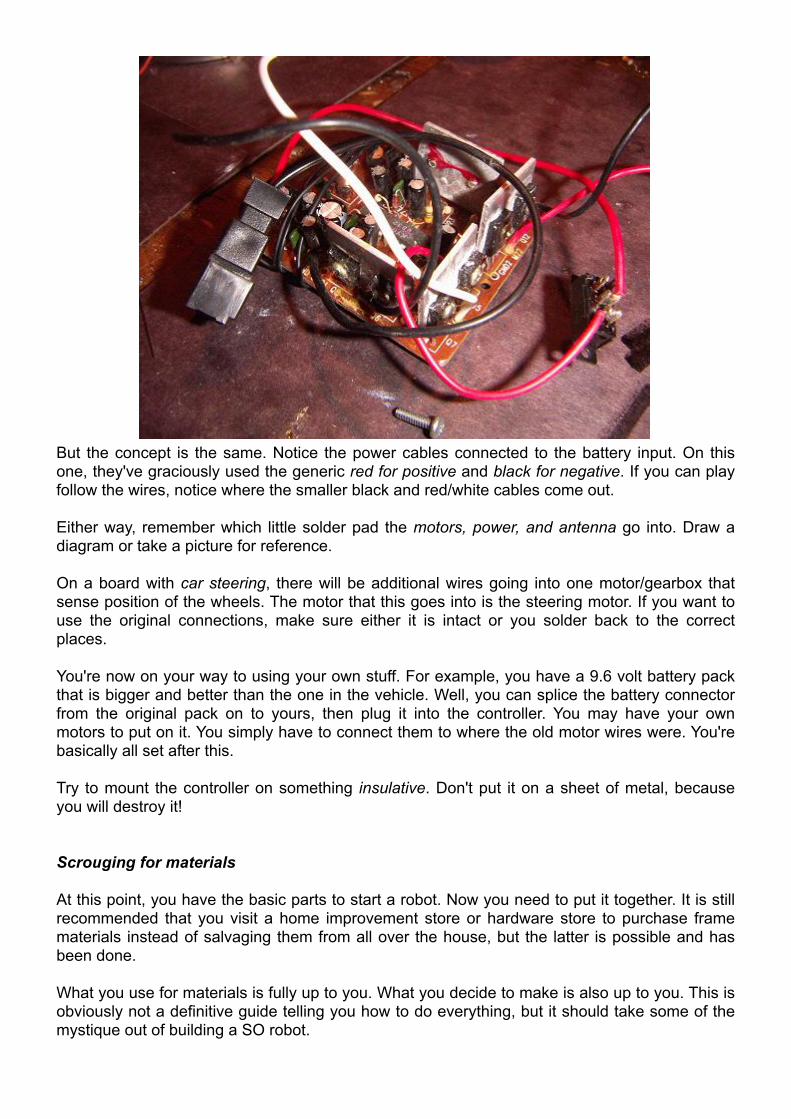
A collection of wheels pulled from R/C toys. The top two are from very large truck types, and are terribly oversized for a SO robot. The bottom ones are
more along the lines of what is required.
Once again, the hardest part with salvaged wheels is the interfacing with the drivetrain. If you are crafty with adhesives, they often exert just enough holding force to last the competition. Then, when you show your friends the amazing robot you built, it breaks.
Using the controllers
The most important thing about pulling boards from R/C cars is knowing where everything goes. On a control board are specific connections for the motors, power input, and antenna input. There will likely be indicator lights and switches thrown into the mix in between.
The best way to attack a vehicle is to know what you are looking at.
No, do not run away. It's actually very simple knowing where everything goes.
This is the board out of a Tyco R/C Nitro Dozer, the Almighty Charles's favorite type of hackable toy. There are a few interesting things. 1. The group of wires all going to the back of the vehicle. 2. The yellow wire extending across the board 3. The small purple wire on the right edge of the board 4. The green wire extending up 5. The small bundle of wires under the board.
So many wires. Yet if you can remember where they go, you can hook it up exactly back together using your own equipment.
On this vehicle, the yellow and purple wires lead to the battery connection. It is imperative to know the proper orientation of the battery connector and each wire's associated polarity! One split second of reverse voltage will destroy the controller.
The green wire is an antenna cable. On these vehicles, it's best to simply use the included antenna if you don't know radio frequency engineering and circuit design.
The four wires going into the back are the motor power cables. These wires will have power flowing through depending on which stick of the transmitter you move.
Your board might be a little different, like this perhaps…
But the concept is the same. Notice the power cables connected to the battery input. On this one, they've graciously used the generic red for positive and black for negative. If you can play follow the wires, notice where the smaller black and red/white cables come out.
Either way, remember which little solder pad the motors, power, and antenna go into. Draw a diagram or take a picture for reference.
On a board with car steering, there will be additional wires going into one motor/gearbox that sense position of the wheels. The motor that this goes into is the steering motor. If you want to use the original connections, make sure either it is intact or you solder back to the correct places.
You're now on your way to using your own stuff. For example, you have a 9.6 volt battery pack that is bigger and better than the one in the vehicle. Well, you can splice the battery connector from the original pack on to yours, then plug it into the controller. You may have your own motors to put on it. You simply have to connect them to where the old motor wires were. You're basically all set after this.
Try to mount the controller on something insulative. Don't put it on a sheet of metal, because you will destroy it!
Scrouging for materials
At this point, you have the basic parts to start a robot. Now you need to put it together. It is still recommended that you visit a home improvement store or hardware store to purchase frame materials instead of salvaging them from all over the house, but the latter is possible and has been done.
What you use for materials is fully up to you. What you decide to make is also up to you. This is obviously not a definitive guide telling you how to do everything, but it should take some of the mystique out of building a SO robot.
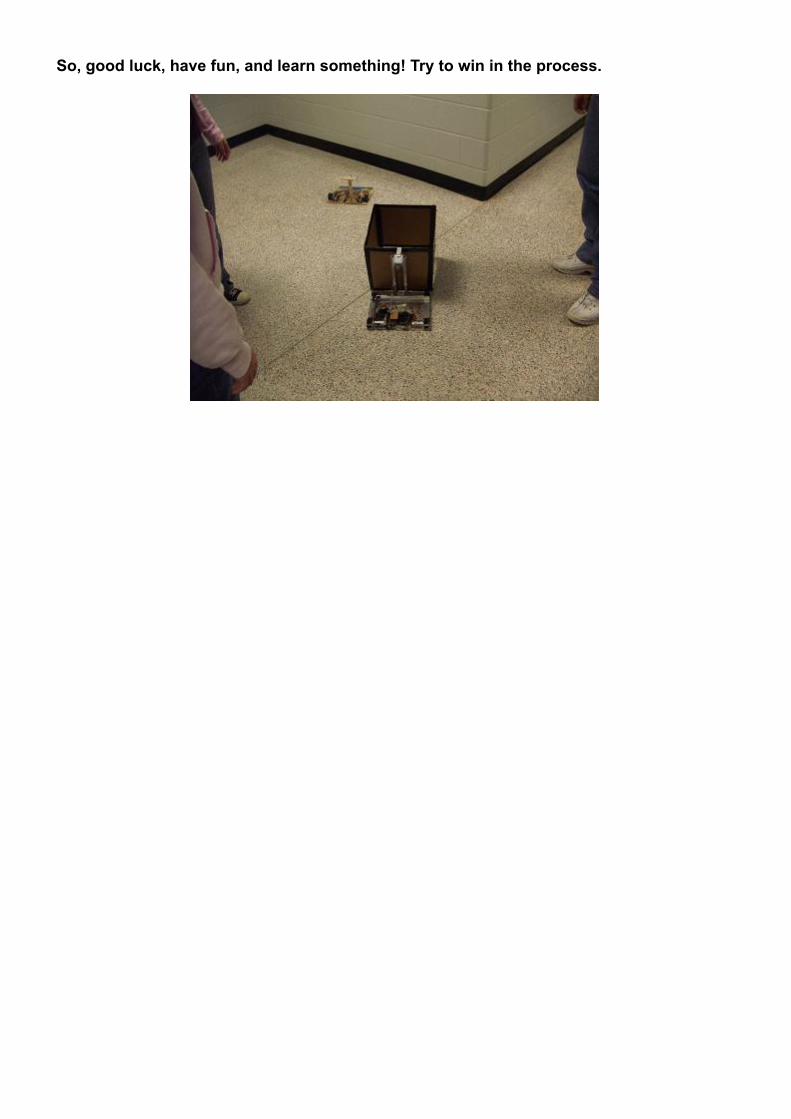
So, good luck, have fun, and learn something! Try to win in the process.
Where to find and buy stuffGood online retailers http://www.towerhobbies.com Tower Hobbies: many parts and accessories, such as radio equipment. Radio packages include Transmitter, receiver, servomotors, and other goodies. http://www.robotmarketplace.com RobotMarketPlace, THE robot part source. Has most everything catered specially for robot builders! http://www.mcmaster.com McMaster-Carr Industrial Supply has almost every type of mechanical part known to man.Franchises, chains, and storefronts Home Depot Carries a variet of useful small items, such as plastic sheeting, hardware, and metal shapes. Has a decent selection of tools. Lowes Home Improvement Same as Home Depot. ACE® Hardware Or your local hardware store. Should have much more hardware than either Home Depot or Lowes as well as metal shapes and other materials. Your local hobby shop stocks small hobby motors, wheels, small metal parts, all sorts of miscellanea. Look for Tamiya brand equipment: they are a maker of small geared motors and matching wheels as well as other bot accessories. GoodWill, Pawn shops, other secondhand stores have all sorts of things you can take apart for use or for fun. RadioShack has wiring accessories, soldering tools, small electronics components, and new R/C vehicles.