scrap angels oversized stocking - tilda · 2019-10-01 · 2 stocking layout 1 the stocking is made...
TRANSCRIPT
Soft Star QuiltBrave Tin Soldier Quilt Scrap Angels Quilt
2 COLORWAYS3 COLORWAYS
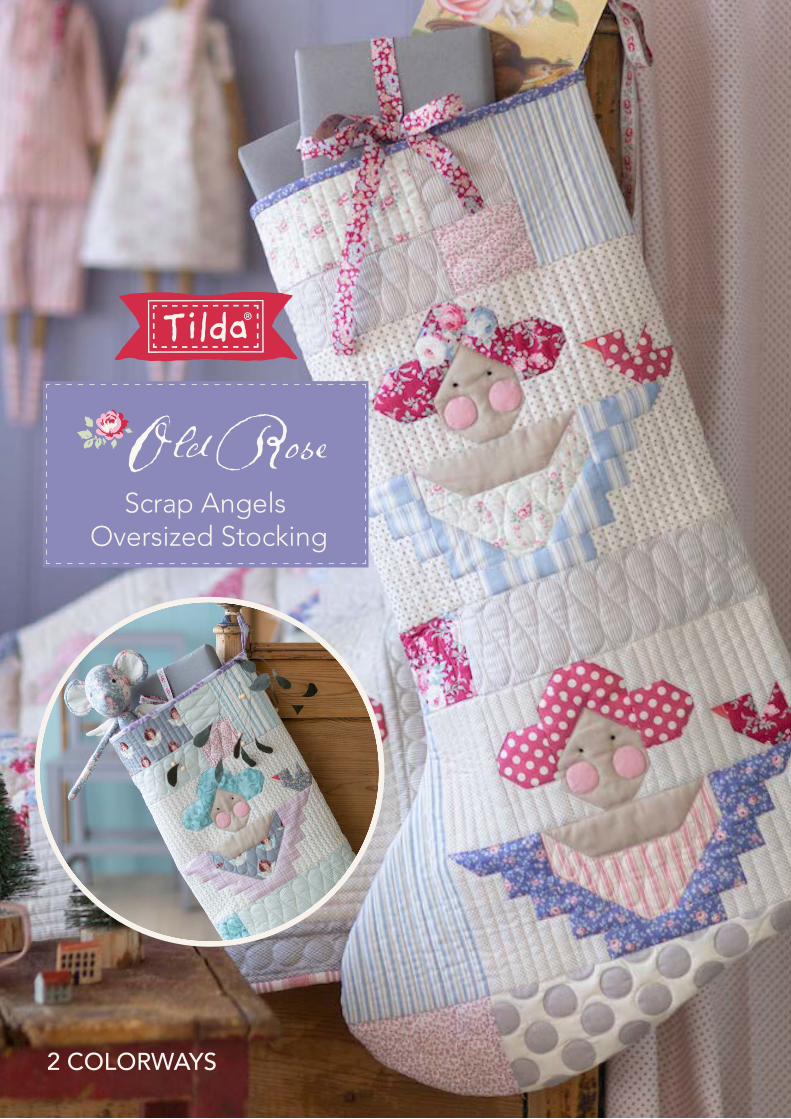
Scrap Angels Oversized Stocking
2 COLORWAYS
Mrs. Santa = Autumn Angel
Height 48 cmHeight 62 cm
1
Scrap Angels Stocking (Blue and red colourway) This luxury, oversized stocking filled with gifts would be every child’s dream on Christmas morning – plenty of room for all sorts of delightful presents! Another version of the stocking is available from www.tildasworld.com, in soft teal and lilac colours. Materials • Fabric 1: 9in (23cm) square – Lucy red rose (100201) • Fabric 2: 12in (30.5cm) square – Pen Stripe grey (130033) • Fabric 3: 9in (23cm) square – Sophie pink (130080) • Fabric 4: 12in (30.5cm) square – Cookie Stripe blue (130062) • Fabric 5: ⅜yd (40cm) – Tiny Star grey (130039) • Fabric 6: 12in (30.5cm) square – Lydia raspberry (100202) • Fabric 7: 12in (30.5cm) square – Solid warm sand (120002) • Fabric 8: 4½in (12cm) square – Solid dusty rose (120009) • Fabric 9: scrap 2in (5cm) square – Solid salmon (120027) • Fabric 10: 12in (30.5cm) square – Medium Dots red (130027) • Fabric 11: 9in (23cm) square – Biscuit Stripe blue (130061) • Fabric 12: ⅜yd (40cm) – Tiny Dots light grey (130048) • Fabric 13: 9in (23cm) square – Eliza blue (100211) • Fabric 14: 9in (23cm) square – Apple Cake Stripe red (130068) • Fabric 15: use spare fabric from stocking back – Dottie Dots grey (130045) • Fabric for back of stocking (and patchwork): ⅝yd (60cm) – Dottie Dots grey (130045) • Lining fabric 1yd (1m) – Sophie blue (130078) • Binding and hanging loop fabric ⅛yd (15cm) – Eliza blue (100211) • Wadding (batting) 40in x 34in (101.6cm x 86.4cm) • Piecing and quilting threads • Quilter’s ruler, rotary cutter and mat • Removable fabric marker • Thick card for cheek appliqué templates • Black embroidery cotton (floss) for embroidering eyes • Paper copy of the stocking foot pattern Finished Size 19in x 32in (48.3cm x 81.3cm) approximately Notes • Fabric quantities given are based on a usable width of 42in (107cm). • Measurements are in imperial inches with metric conversions in brackets – use only one
system throughout (preferably inches). • Press all fabrics before cutting. • Use ¼in (6mm) seams unless otherwise instructed. • Read all the instructions through before you start.
2
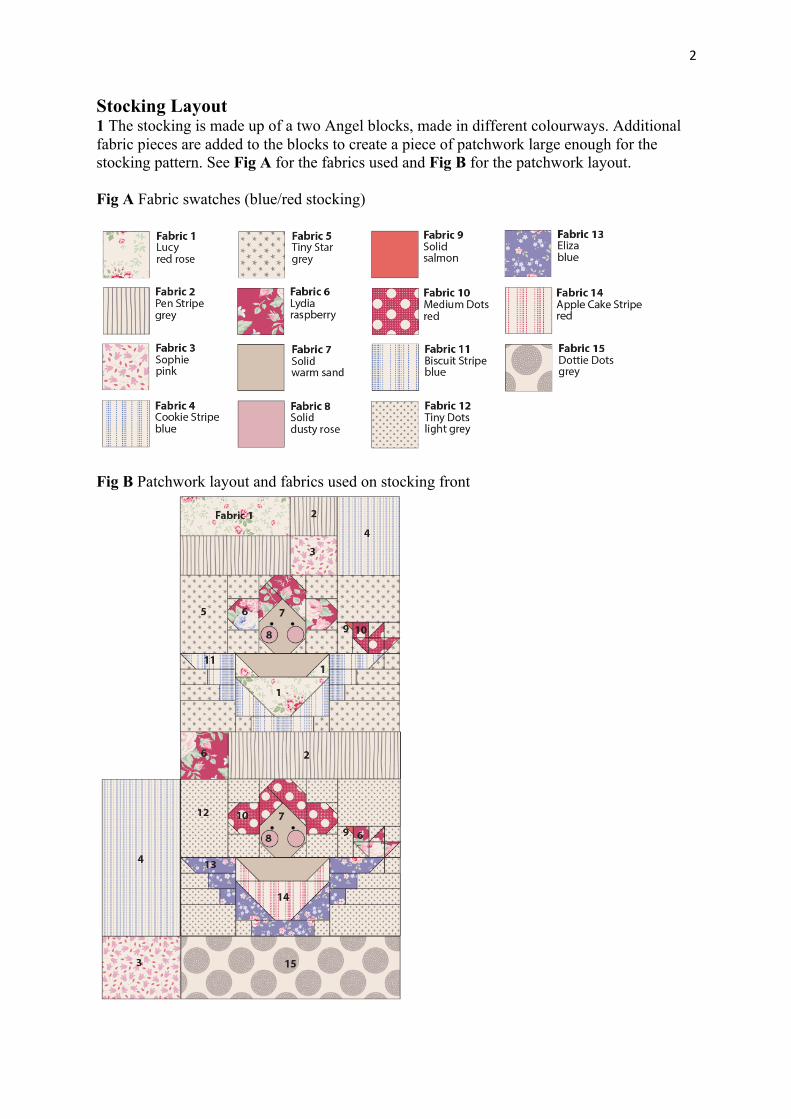
Stocking Layout 1 The stocking is made up of a two Angel blocks, made in different colourways. Additional fabric pieces are added to the blocks to create a piece of patchwork large enough for the stocking pattern. See Fig A for the fabrics used and Fig B for the patchwork layout. Fig A Fabric swatches (blue/red stocking)
Fig B Patchwork layout and fabrics used on stocking front
3
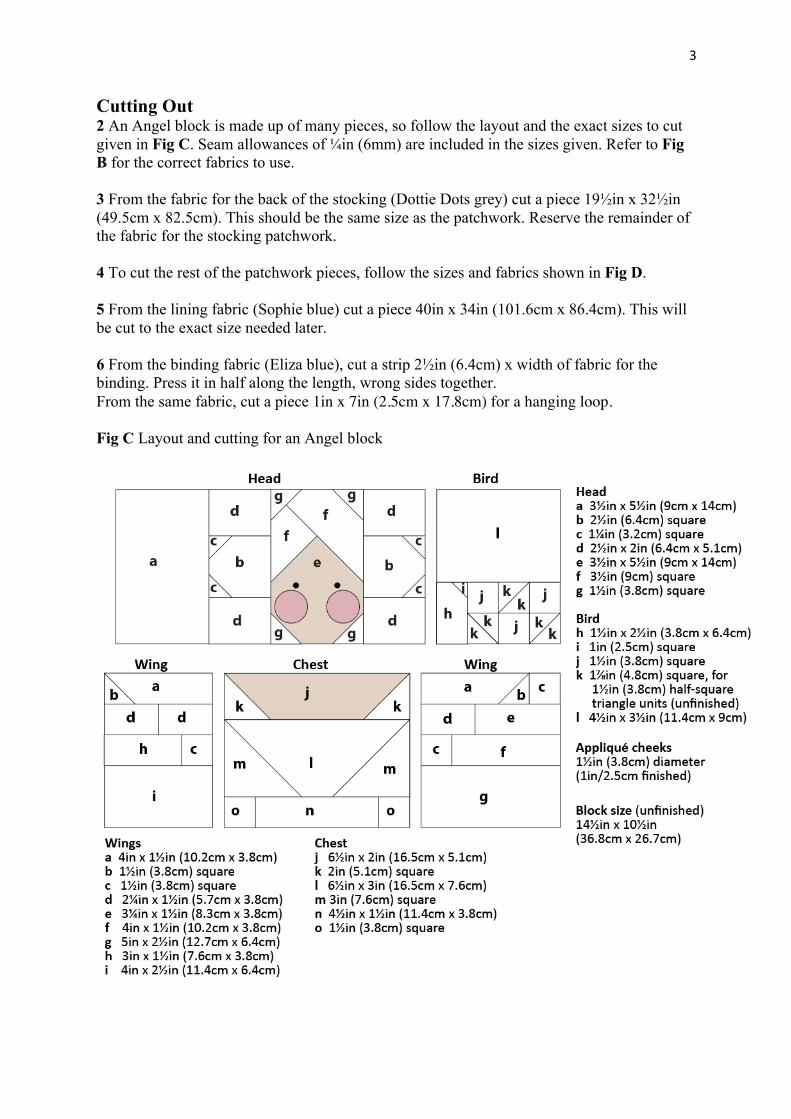
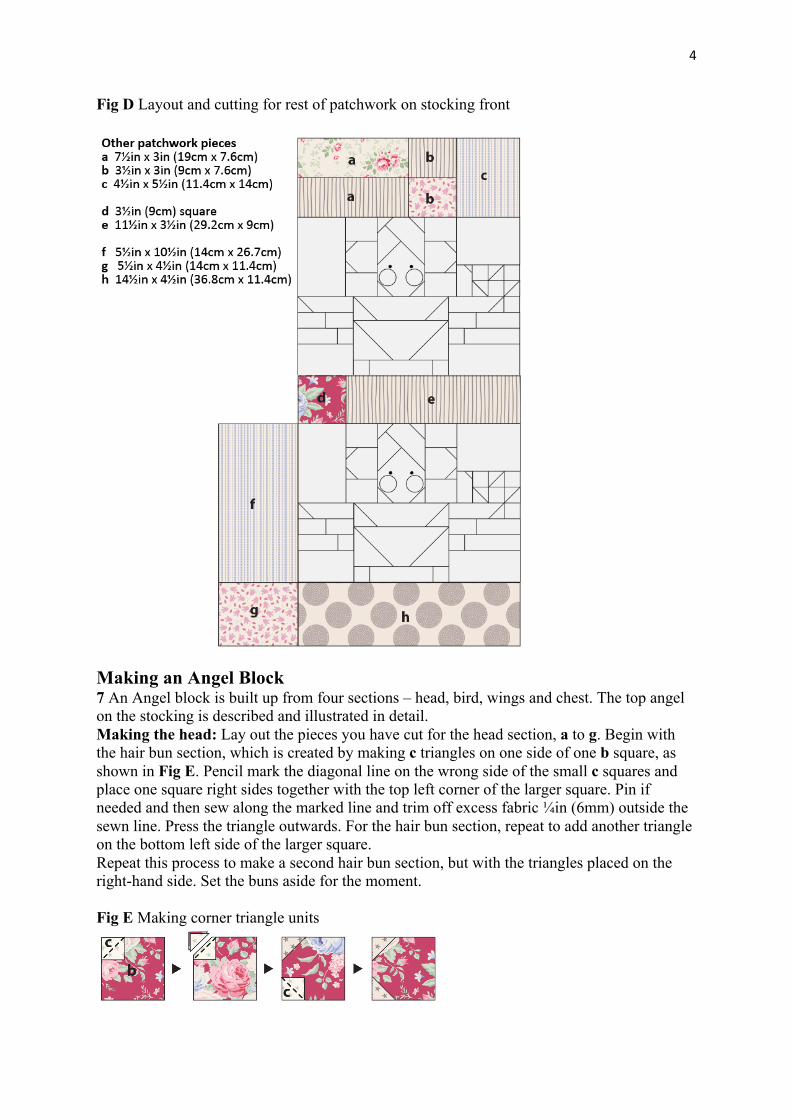
Cutting Out 2 An Angel block is made up of many pieces, so follow the layout and the exact sizes to cut given in Fig C. Seam allowances of ¼in (6mm) are included in the sizes given. Refer to Fig B for the correct fabrics to use. 3 From the fabric for the back of the stocking (Dottie Dots grey) cut a piece 19½in x 32½in (49.5cm x 82.5cm). This should be the same size as the patchwork. Reserve the remainder of the fabric for the stocking patchwork. 4 To cut the rest of the patchwork pieces, follow the sizes and fabrics shown in Fig D. 5 From the lining fabric (Sophie blue) cut a piece 40in x 34in (101.6cm x 86.4cm). This will be cut to the exact size needed later. 6 From the binding fabric (Eliza blue), cut a strip 2½in (6.4cm) x width of fabric for the binding. Press it in half along the length, wrong sides together. From the same fabric, cut a piece 1in x 7in (2.5cm x 17.8cm) for a hanging loop. Fig C Layout and cutting for an Angel block
4
Fig D Layout and cutting for rest of patchwork on stocking front
Making an Angel Block 7 An Angel block is built up from four sections – head, bird, wings and chest. The top angel on the stocking is described and illustrated in detail. Making the head: Lay out the pieces you have cut for the head section, a to g. Begin with the hair bun section, which is created by making c triangles on one side of one b square, as shown in Fig E. Pencil mark the diagonal line on the wrong side of the small c squares and place one square right sides together with the top left corner of the larger square. Pin if needed and then sew along the marked line and trim off excess fabric ¼in (6mm) outside the sewn line. Press the triangle outwards. For the hair bun section, repeat to add another triangle on the bottom left side of the larger square. Repeat this process to make a second hair bun section, but with the triangles placed on the right-hand side. Set the buns aside for the moment. Fig E Making corner triangle units
5
8 To make the face, this triangle corner technique is used again, as shown in the stages of Fig F. Begin with an e rectangle and make a triangle in the top left corner with an f square. Repeat on the other side of the rectangle. Now take four small g squares and create triangles on all four corners of the head. Fig F Making the face
9 To assemble the head follow Fig G, sewing a d rectangle to the top and bottom of each of the hair bun sections and then sewing the three units together with piece a on the left-hand side, and then press. Fig G Assembling the head
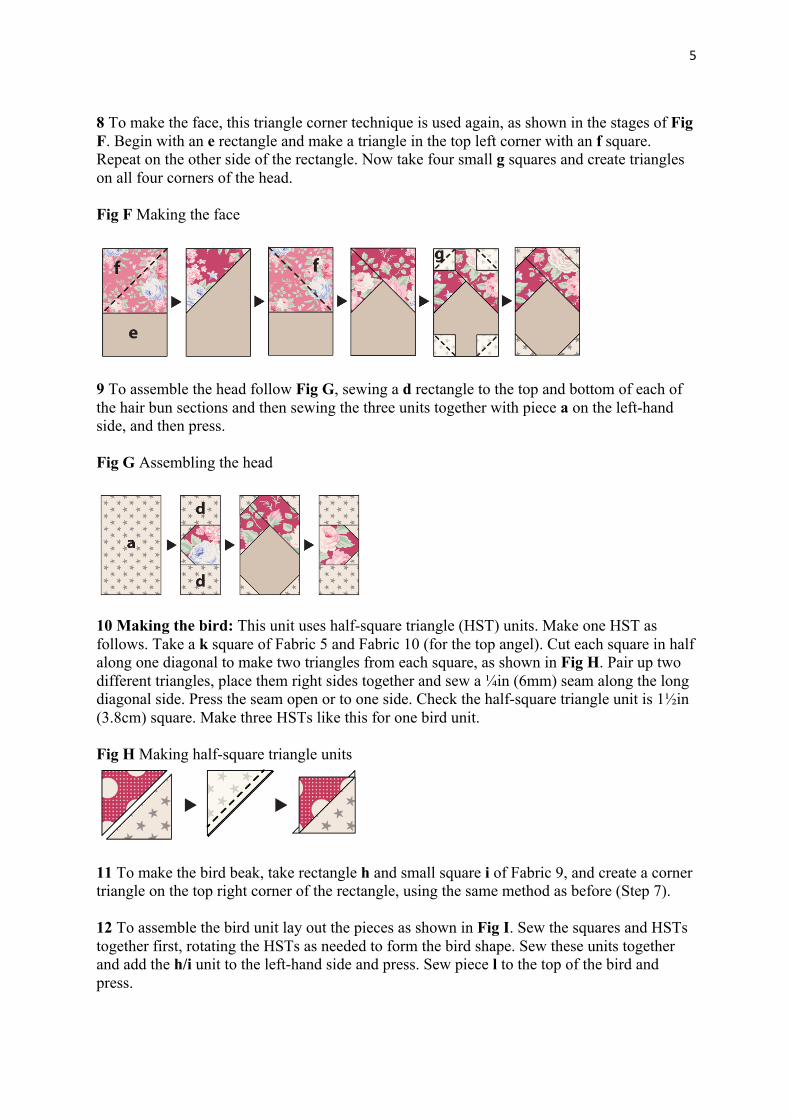
10 Making the bird: This unit uses half-square triangle (HST) units. Make one HST as follows. Take a k square of Fabric 5 and Fabric 10 (for the top angel). Cut each square in half along one diagonal to make two triangles from each square, as shown in Fig H. Pair up two different triangles, place them right sides together and sew a ¼in (6mm) seam along the long diagonal side. Press the seam open or to one side. Check the half-square triangle unit is 1½in (3.8cm) square. Make three HSTs like this for one bird unit. Fig H Making half-square triangle units
11 To make the bird beak, take rectangle h and small square i of Fabric 9, and create a corner triangle on the top right corner of the rectangle, using the same method as before (Step 7). 12 To assemble the bird unit lay out the pieces as shown in Fig I. Sew the squares and HSTs together first, rotating the HSTs as needed to form the bird shape. Sew these units together and add the h/i unit to the left-hand side and press. Sew piece l to the top of the bird and press.

6
Fig I Making the bird
13 Making the wings: Both wings are made using the same principle but the right-hand wing is wider than the left-hand one. Make the right wing as follows. Take rectangle a and small square b, and create a corner triangle on the bottom right side of the rectangle, using the same method as before. Lay out unit a/b with pieces c, d, e, c and f, as shown in Fig J. Sew them together in rows as shown and press. Sew the rows together, add piece g to the bottom and press. Fig J Making the right wing
14 Make the left wing in a similar way but using the correct fabric sizes and following Fig K. Fig K Making the left wing
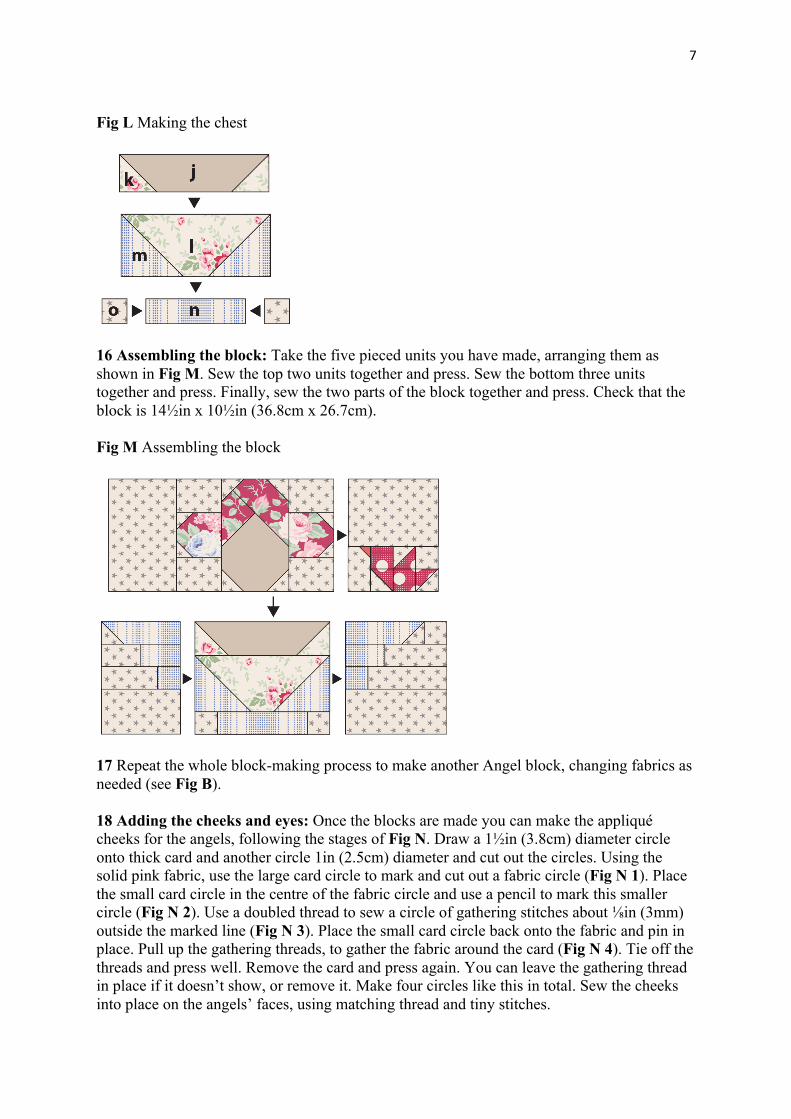
15 Making the chest: Lay out the pieces for the chest (see Fig L). Taking rectangle j and two k squares, create corner triangles on the lower edges of the rectangle, using the same method as before. Press the triangles downwards. Repeat this with rectangle l and two m squares. Take the n rectangle and sew an o square to each side. Now sew all three units together and press.
7
Fig L Making the chest
16 Assembling the block: Take the five pieced units you have made, arranging them as shown in Fig M. Sew the top two units together and press. Sew the bottom three units together and press. Finally, sew the two parts of the block together and press. Check that the block is 14½in x 10½in (36.8cm x 26.7cm). Fig M Assembling the block
17 Repeat the whole block-making process to make another Angel block, changing fabrics as needed (see Fig B). 18 Adding the cheeks and eyes: Once the blocks are made you can make the appliqué cheeks for the angels, following the stages of Fig N. Draw a 1½in (3.8cm) diameter circle onto thick card and another circle 1in (2.5cm) diameter and cut out the circles. Using the solid pink fabric, use the large card circle to mark and cut out a fabric circle (Fig N 1). Place the small card circle in the centre of the fabric circle and use a pencil to mark this smaller circle (Fig N 2). Use a doubled thread to sew a circle of gathering stitches about ⅛in (3mm) outside the marked line (Fig N 3). Place the small card circle back onto the fabric and pin in place. Pull up the gathering threads, to gather the fabric around the card (Fig N 4). Tie off the threads and press well. Remove the card and press again. You can leave the gathering thread in place if it doesn’t show, or remove it. Make four circles like this in total. Sew the cheeks into place on the angels’ faces, using matching thread and tiny stitches.
8
Fig N Making an appliqué circle
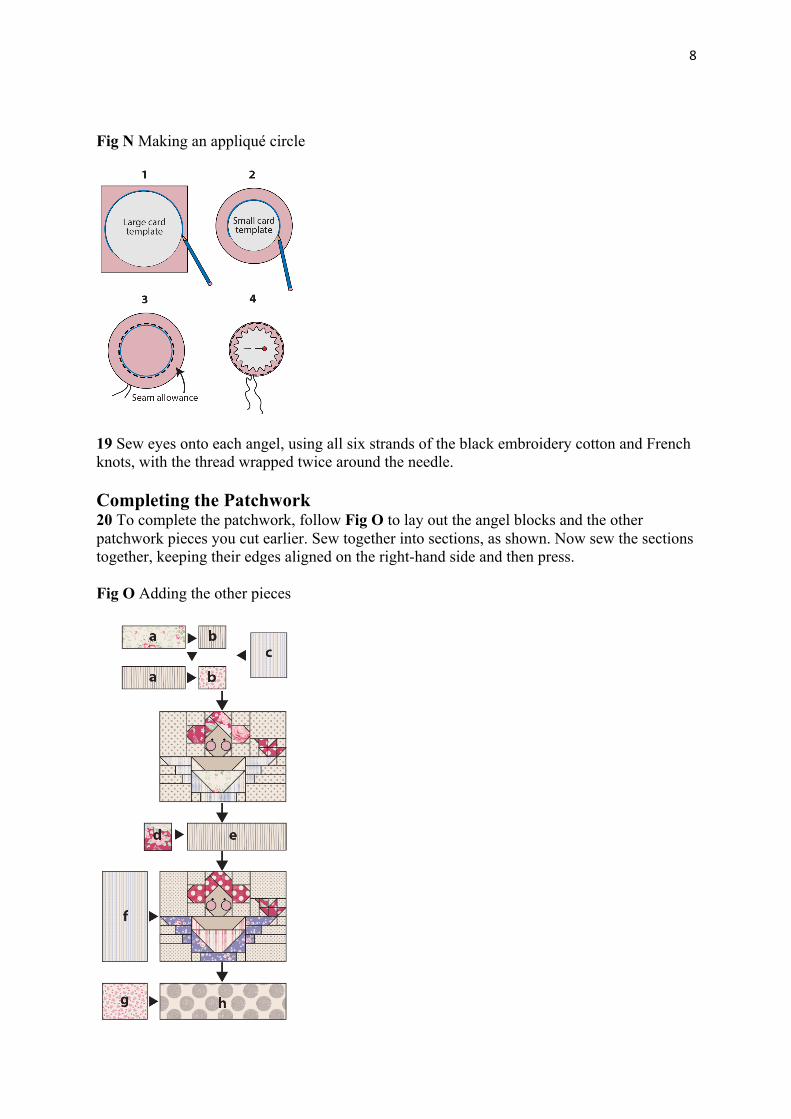
19 Sew eyes onto each angel, using all six strands of the black embroidery cotton and French knots, with the thread wrapped twice around the needle. Completing the Patchwork 20 To complete the patchwork, follow Fig O to lay out the angel blocks and the other patchwork pieces you cut earlier. Sew together into sections, as shown. Now sew the sections together, keeping their edges aligned on the right-hand side and then press. Fig O Adding the other pieces
9
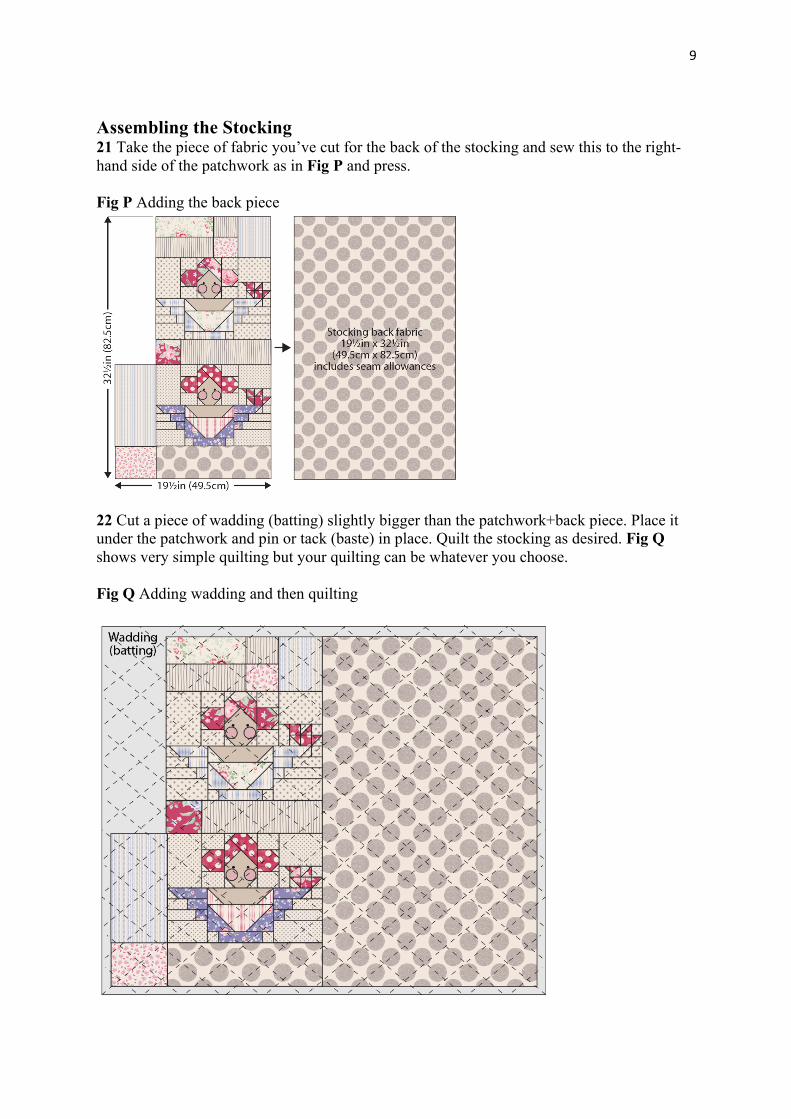
Assembling the Stocking 21 Take the piece of fabric you’ve cut for the back of the stocking and sew this to the right-hand side of the patchwork as in Fig P and press. Fig P Adding the back piece
22 Cut a piece of wadding (batting) slightly bigger than the patchwork+back piece. Place it under the patchwork and pin or tack (baste) in place. Quilt the stocking as desired. Fig Q shows very simple quilting but your quilting can be whatever you choose. Fig Q Adding wadding and then quilting
10
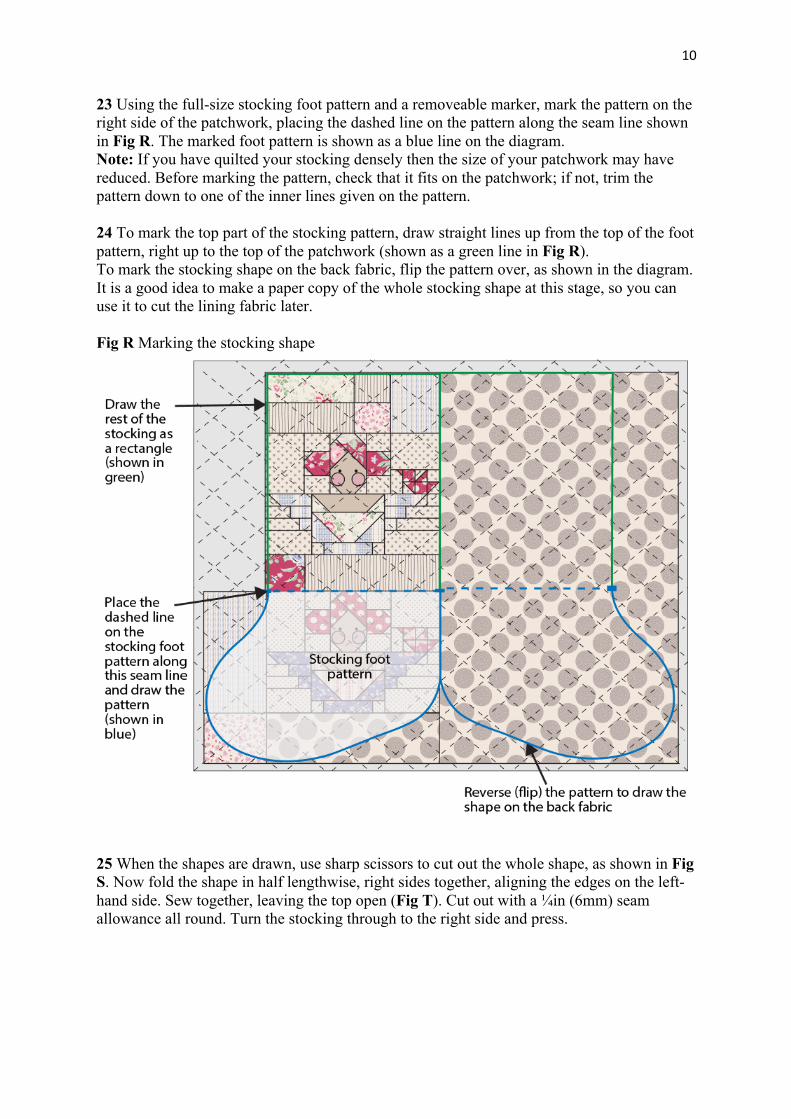
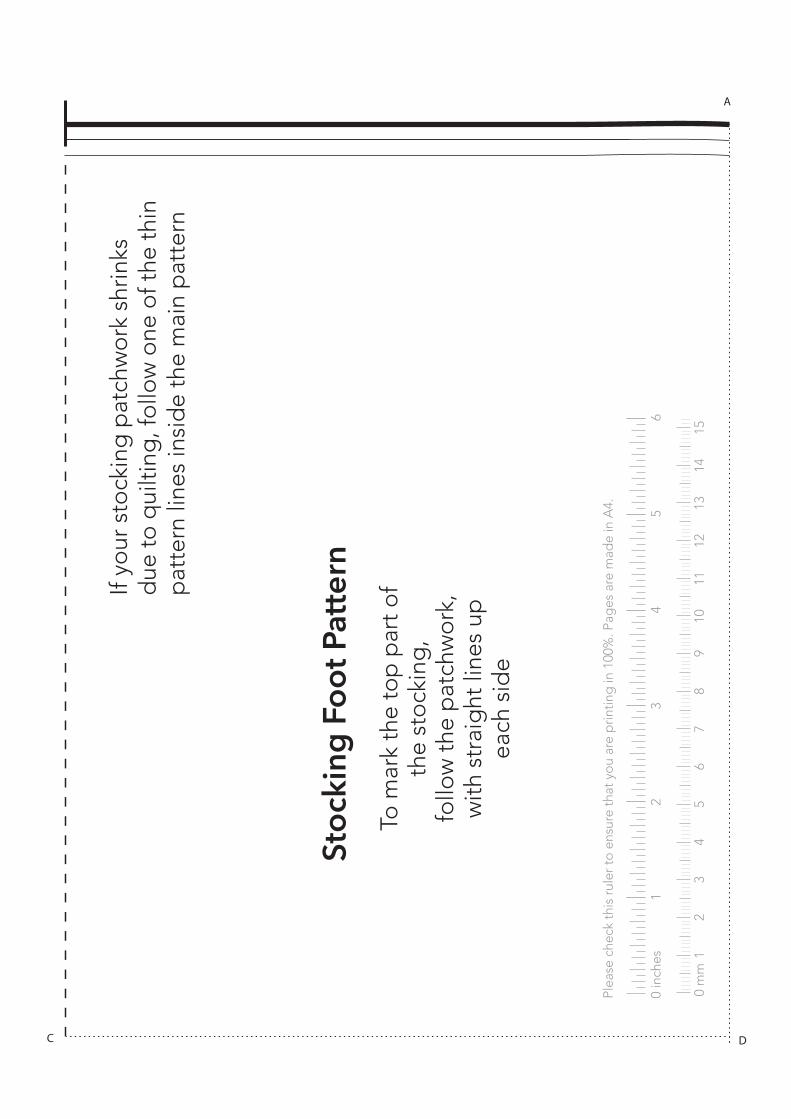
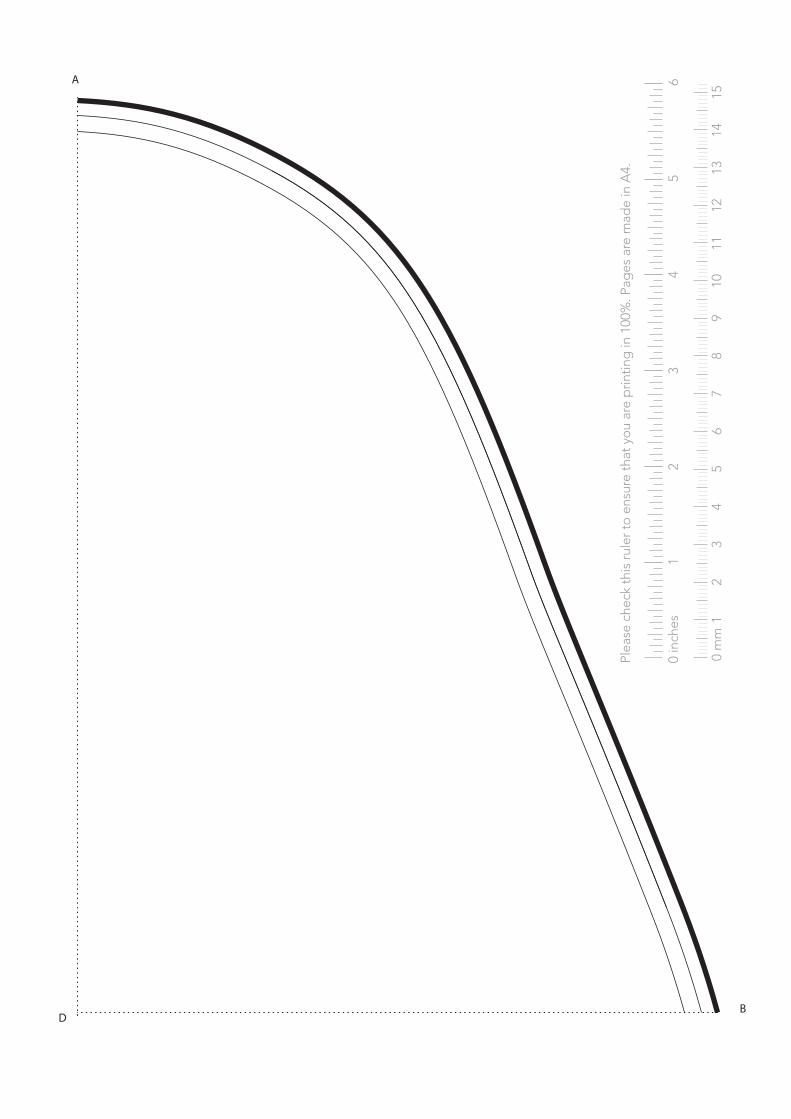
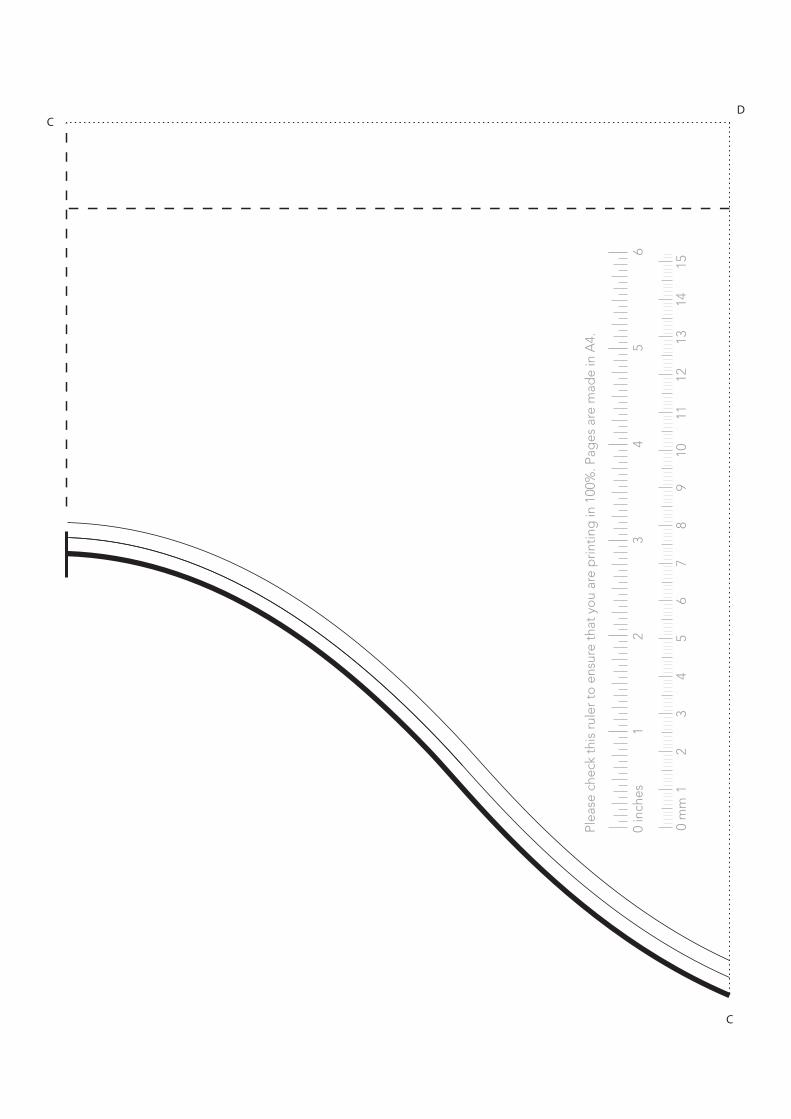
23 Using the full-size stocking foot pattern and a removeable marker, mark the pattern on the right side of the patchwork, placing the dashed line on the pattern along the seam line shown in Fig R. The marked foot pattern is shown as a blue line on the diagram. Note: If you have quilted your stocking densely then the size of your patchwork may have reduced. Before marking the pattern, check that it fits on the patchwork; if not, trim the pattern down to one of the inner lines given on the pattern. 24 To mark the top part of the stocking pattern, draw straight lines up from the top of the foot pattern, right up to the top of the patchwork (shown as a green line in Fig R). To mark the stocking shape on the back fabric, flip the pattern over, as shown in the diagram. It is a good idea to make a paper copy of the whole stocking shape at this stage, so you can use it to cut the lining fabric later. Fig R Marking the stocking shape
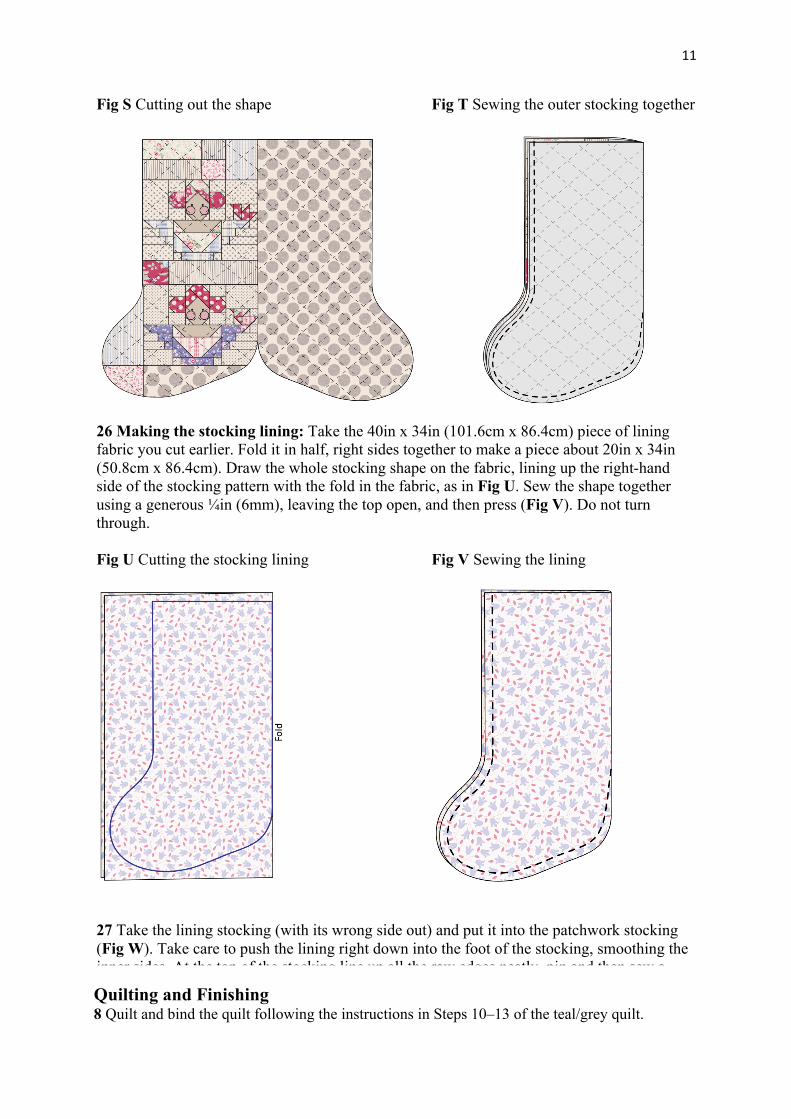
25 When the shapes are drawn, use sharp scissors to cut out the whole shape, as shown in Fig S. Now fold the shape in half lengthwise, right sides together, aligning the edges on the left-hand side. Sew together, leaving the top open (Fig T). Cut out with a ¼in (6mm) seam allowance all round. Turn the stocking through to the right side and press.
11
Fig S Cutting out the shape Fig T Sewing the outer stocking together
26 Making the stocking lining: Take the 40in x 34in (101.6cm x 86.4cm) piece of lining fabric you cut earlier. Fold it in half, right sides together to make a piece about 20in x 34in (50.8cm x 86.4cm). Draw the whole stocking shape on the fabric, lining up the right-hand side of the stocking pattern with the fold in the fabric, as in Fig U. Sew the shape together using a generous ¼in (6mm), leaving the top open, and then press (Fig V). Do not turn through. Fig U Cutting the stocking lining Fig V Sewing the lining
27 Take the lining stocking (with its wrong side out) and put it into the patchwork stocking (Fig W). Take care to push the lining right down into the foot of the stocking, smoothing the inner sides. At the top of the stocking line up all the raw edges neatly, pin and then sew a zigzag seam to secure them together.
5Quilting and Finishing 8 Quilt and bind the quilt following the instructions in Steps 10–13 of the teal/grey quilt.

12
Fig W Pushing the lining into the stocking
28 Bind the top of the stocking using the binding strip you prepared earlier. Leaving a tail of about 4in (10.2cm), place the raw edge of the binding against the raw edge of the top of the stocking (right sides together). Sew together with a ¼in (6mm) seam all around the top (Fig X). Stop about 4in (10.2cm) from where you started, join the binding ends together neatly and then finish sewing the binding in place. Turn the binding over to the inside of the stocking, slipstitch in place all round and then press. Fig X Adding the binding
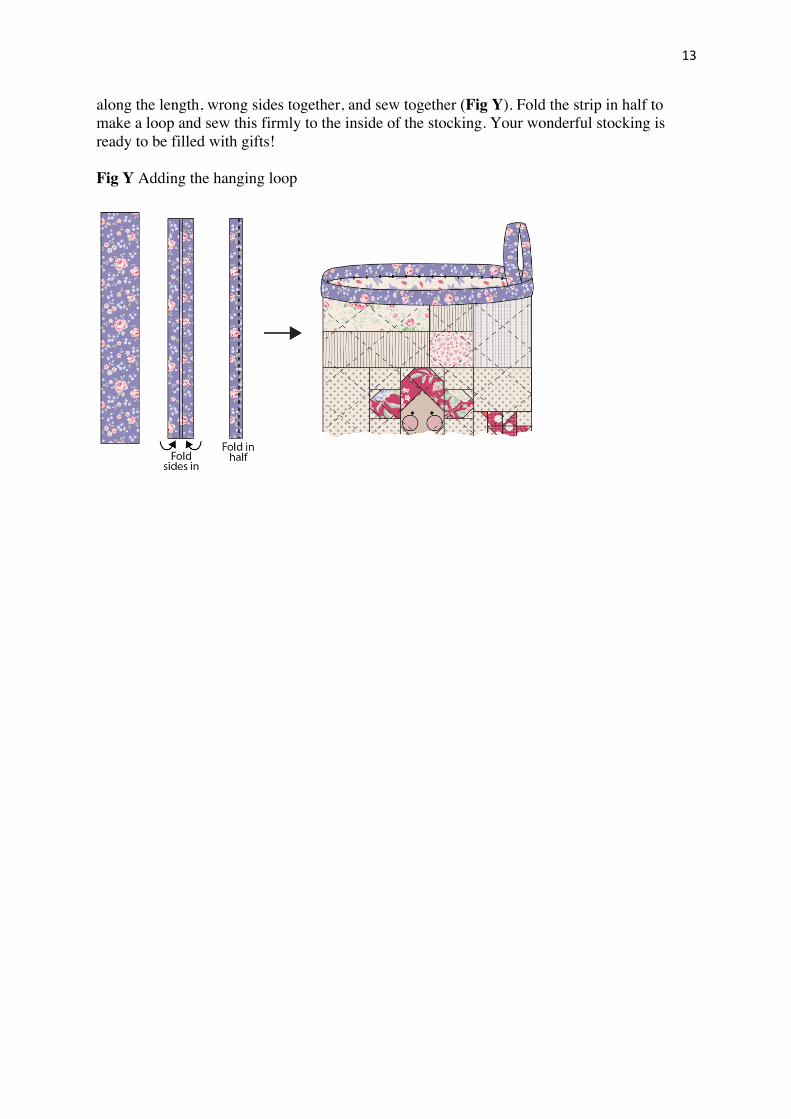
29 Making a hanging loop: Take the hanging loop strip, fold over and press a ¼in (6mm) seam allowance along the two short sides and then down each long side. Fold the strip in half
13
along the length, wrong sides together, and sew together (Fig Y). Fold the strip in half to make a loop and sew this firmly to the inside of the stocking. Your wonderful stocking is ready to be filled with gifts! Fig Y Adding the hanging loop
1
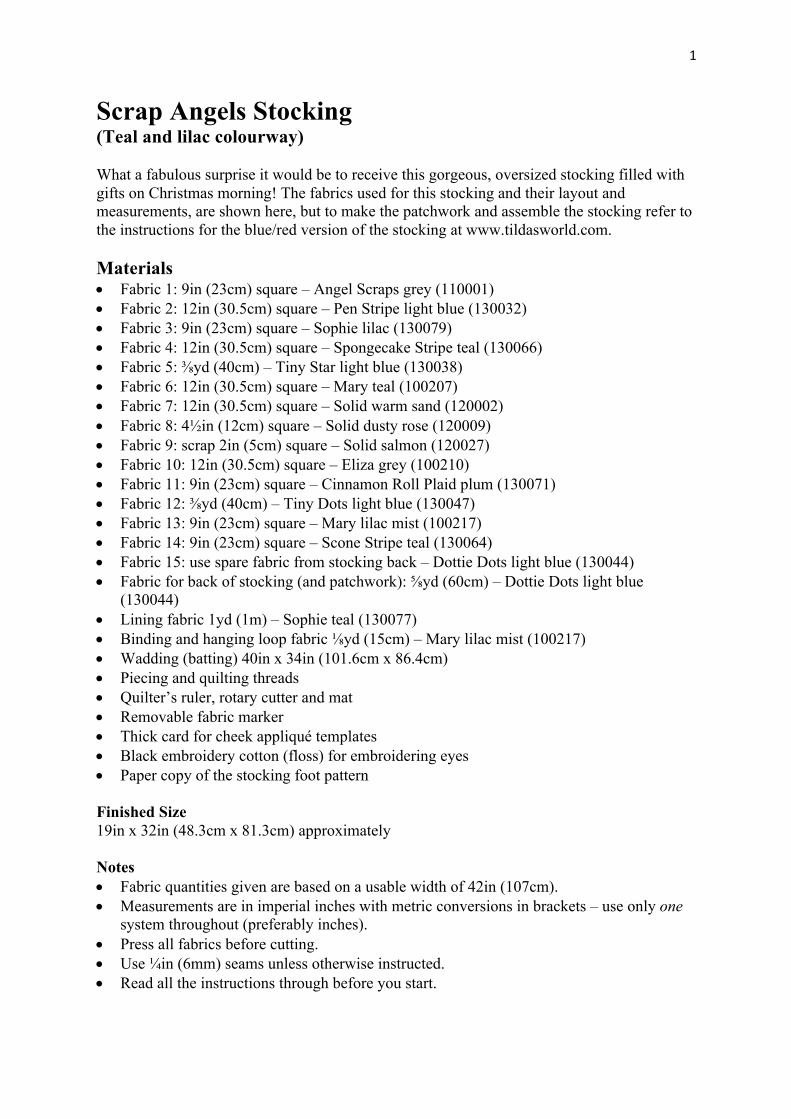
Scrap Angels Stocking (Teal and lilac colourway) What a fabulous surprise it would be to receive this gorgeous, oversized stocking filled with gifts on Christmas morning! The fabrics used for this stocking and their layout and measurements, are shown here, but to make the patchwork and assemble the stocking refer to the instructions for the blue/red version of the stocking at www.tildasworld.com. Materials • Fabric 1: 9in (23cm) square – Angel Scraps grey (110001) • Fabric 2: 12in (30.5cm) square – Pen Stripe light blue (130032) • Fabric 3: 9in (23cm) square – Sophie lilac (130079) • Fabric 4: 12in (30.5cm) square – Spongecake Stripe teal (130066) • Fabric 5: ⅜yd (40cm) – Tiny Star light blue (130038) • Fabric 6: 12in (30.5cm) square – Mary teal (100207) • Fabric 7: 12in (30.5cm) square – Solid warm sand (120002) • Fabric 8: 4½in (12cm) square – Solid dusty rose (120009) • Fabric 9: scrap 2in (5cm) square – Solid salmon (120027) • Fabric 10: 12in (30.5cm) square – Eliza grey (100210) • Fabric 11: 9in (23cm) square – Cinnamon Roll Plaid plum (130071) • Fabric 12: ⅜yd (40cm) – Tiny Dots light blue (130047) • Fabric 13: 9in (23cm) square – Mary lilac mist (100217) • Fabric 14: 9in (23cm) square – Scone Stripe teal (130064) • Fabric 15: use spare fabric from stocking back – Dottie Dots light blue (130044) • Fabric for back of stocking (and patchwork): ⅝yd (60cm) – Dottie Dots light blue
(130044) • Lining fabric 1yd (1m) – Sophie teal (130077) • Binding and hanging loop fabric ⅛yd (15cm) – Mary lilac mist (100217) • Wadding (batting) 40in x 34in (101.6cm x 86.4cm) • Piecing and quilting threads • Quilter’s ruler, rotary cutter and mat • Removable fabric marker • Thick card for cheek appliqué templates • Black embroidery cotton (floss) for embroidering eyes • Paper copy of the stocking foot pattern Finished Size 19in x 32in (48.3cm x 81.3cm) approximately Notes • Fabric quantities given are based on a usable width of 42in (107cm). • Measurements are in imperial inches with metric conversions in brackets – use only one
system throughout (preferably inches). • Press all fabrics before cutting. • Use ¼in (6mm) seams unless otherwise instructed. • Read all the instructions through before you start.
2
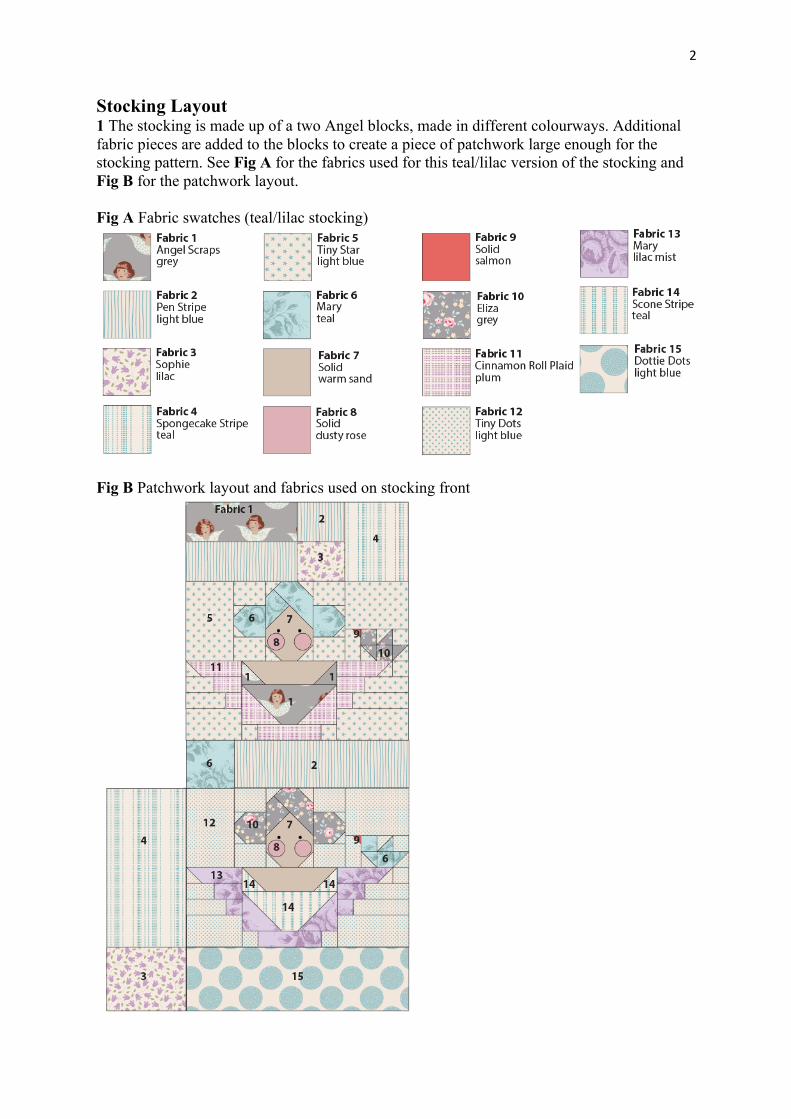
Stocking Layout 1 The stocking is made up of a two Angel blocks, made in different colourways. Additional fabric pieces are added to the blocks to create a piece of patchwork large enough for the stocking pattern. See Fig A for the fabrics used for this teal/lilac version of the stocking and Fig B for the patchwork layout. Fig A Fabric swatches (teal/lilac stocking)
Fig B Patchwork layout and fabrics used on stocking front
3
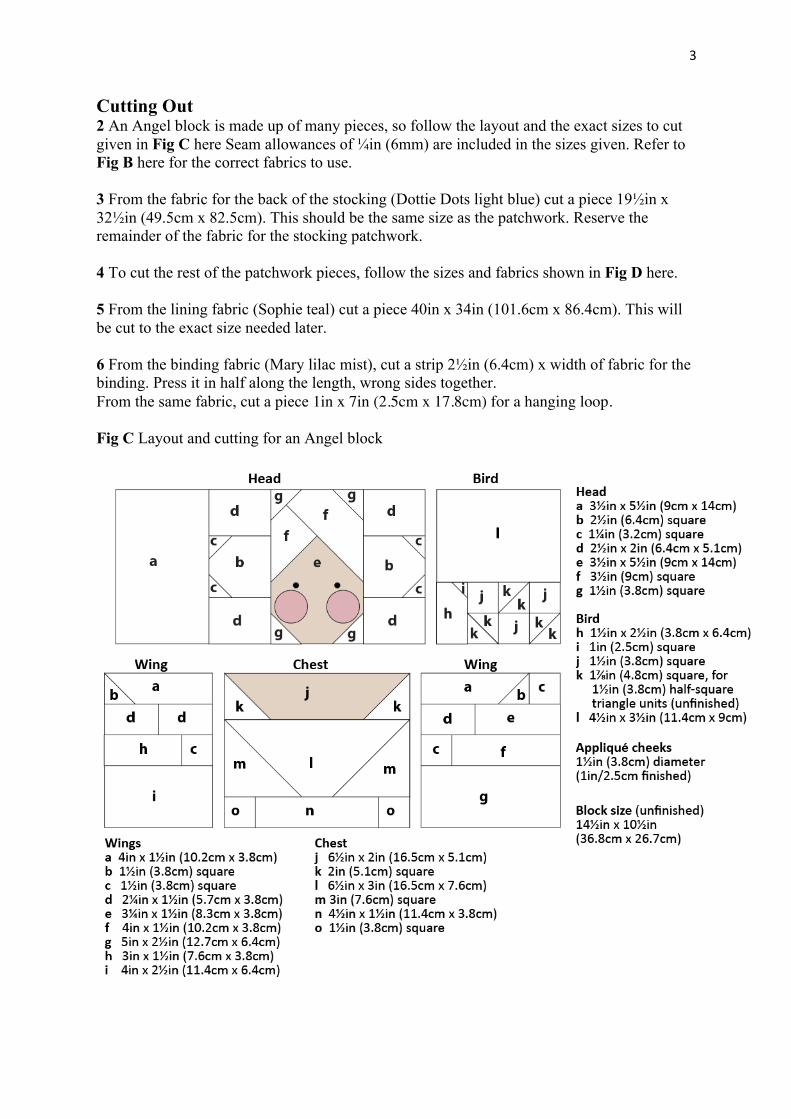
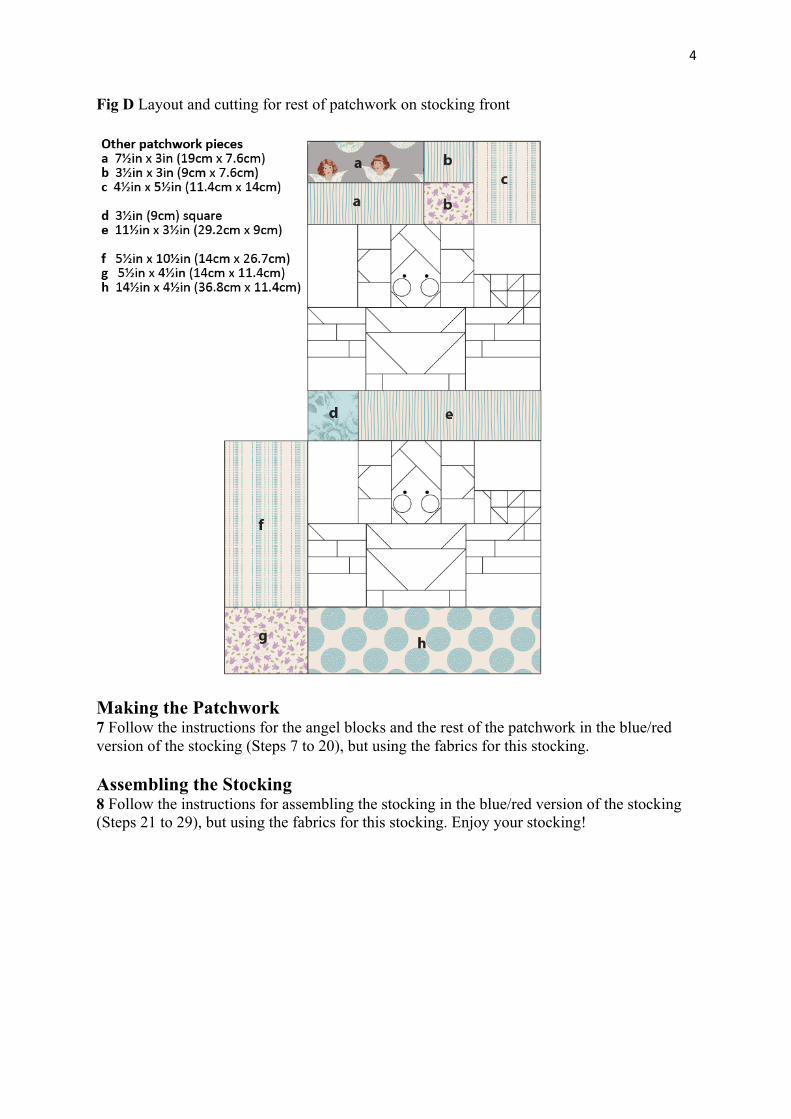
Cutting Out 2 An Angel block is made up of many pieces, so follow the layout and the exact sizes to cut given in Fig C here Seam allowances of ¼in (6mm) are included in the sizes given. Refer to Fig B here for the correct fabrics to use. 3 From the fabric for the back of the stocking (Dottie Dots light blue) cut a piece 19½in x 32½in (49.5cm x 82.5cm). This should be the same size as the patchwork. Reserve the remainder of the fabric for the stocking patchwork. 4 To cut the rest of the patchwork pieces, follow the sizes and fabrics shown in Fig D here. 5 From the lining fabric (Sophie teal) cut a piece 40in x 34in (101.6cm x 86.4cm). This will be cut to the exact size needed later. 6 From the binding fabric (Mary lilac mist), cut a strip 2½in (6.4cm) x width of fabric for the binding. Press it in half along the length, wrong sides together. From the same fabric, cut a piece 1in x 7in (2.5cm x 17.8cm) for a hanging loop. Fig C Layout and cutting for an Angel block
4
Fig D Layout and cutting for rest of patchwork on stocking front
Making the Patchwork 7 Follow the instructions for the angel blocks and the rest of the patchwork in the blue/red version of the stocking (Steps 7 to 20), but using the fabrics for this stocking. Assembling the Stocking 8 Follow the instructions for assembling the stocking in the blue/red version of the stocking (Steps 21 to 29), but using the fabrics for this stocking. Enjoy your stocking!
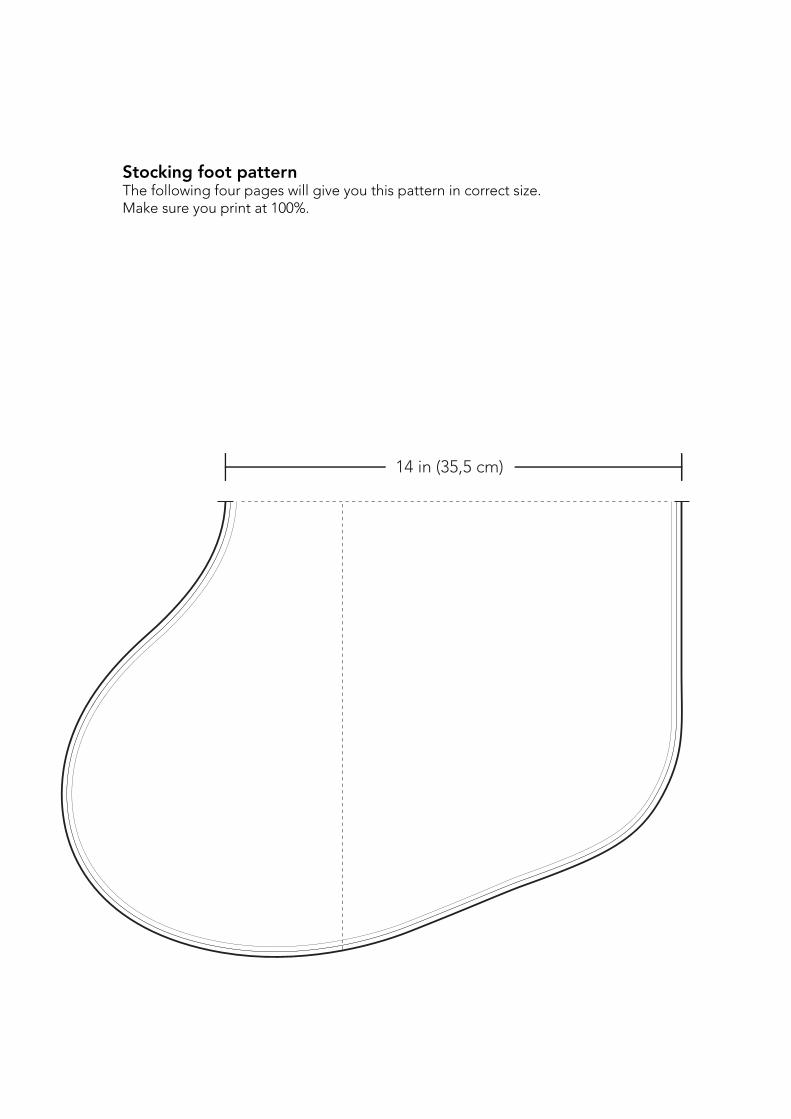
14 in (35,5 cm)
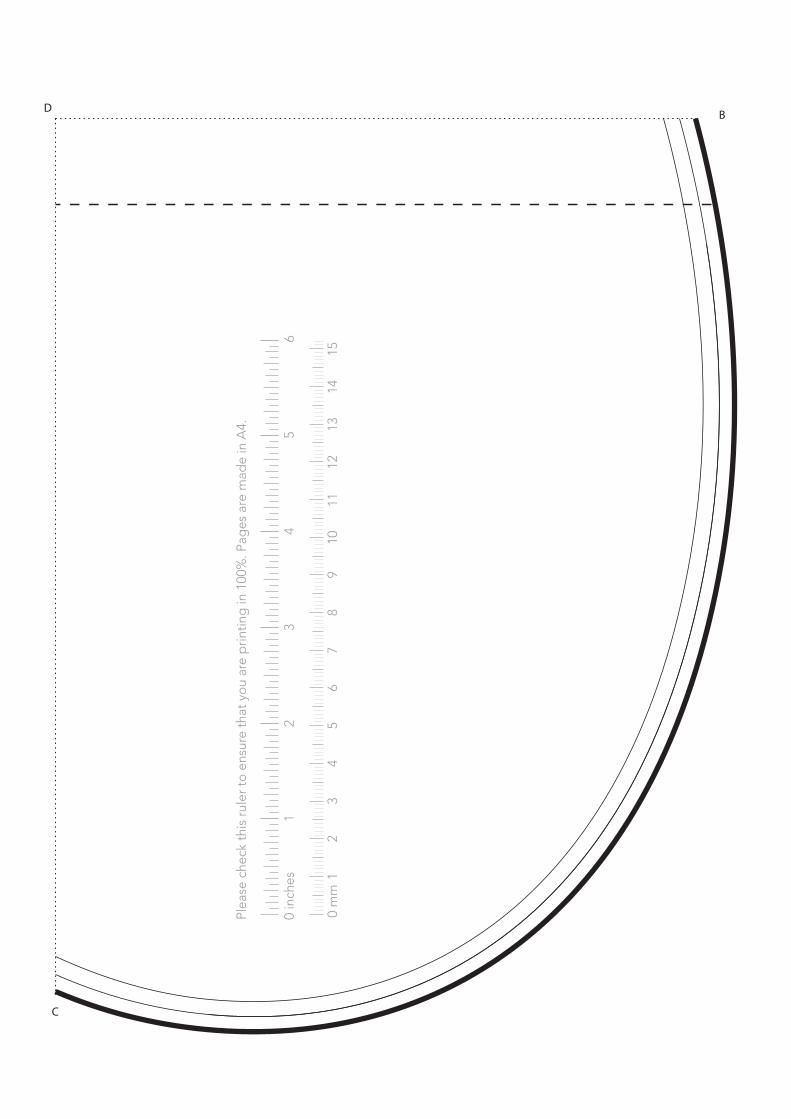
Stocking foot patternThe following four pages will give you this pattern in correct size. Make sure you print at 100%.
To m
ark
the
top
par
t o
f th
e st
ock
ing
, fo
llow
the
pat
chw
ork
, w
ith s
trai
ght
line
s up
ea
ch s
ide
If yo
ur s
tock
ing
pat
chw
ork
shr
inks
d
ue t
o q
uilti
ng, f
ollo
w o
ne o
f the
thi
n p
atte
rn li
nes
insi
de
the
mai
n p
atte
rn
Stoc
king
Foo
t Pat
tern
A
A
B
B
CC
C
C D
D
DD
12
34
56
0 in
ches
Plea
se c
heck
thi
s ru
ler t
o e
nsur
e th
at y
ou
are
prin
ting
in 1
00%
. Pag
es a
re m
ade
in A
4.
0 m
m1
23
45
67
89
1011
1213
1415
12
34
56
0 in
ches
Plea
se c
heck
thi
s ru
ler t
o e
nsur
e th
at y
ou
are
prin
ting
in 1
00%
. Pag
es a
re m
ade
in A
4.
0 m
m1
23
45
67
89
1011
1213
1415
12
34
56
0 in
ches
Plea
se c
heck
thi
s ru
ler t
o e
nsur
e th
at y
ou
are
prin
ting
in 1
00%
. Pag
es a
re m
ade
in A
4.
0 m
m1
23
45
67
89
1011
1213
1415
12
34
56
0 in
ches
Plea
se c
heck
thi
s ru
ler t
o e
nsur
e th
at y
ou
are
prin
ting
in 1
00%
. Pag
es a
re m
ade
in A
4.
0 m
m1
23
45
67
89
1011
1213
1415