scrapoxy documentation - readthedocs.org
TRANSCRIPT

Scrapoxy DocumentationRelease 3.1.1
Fabien Vauchelles
Aug 17, 2018

Get Started
1 What is Scrapoxy ? 3
2 Documentation 5
3 Prerequisite 87
4 Contribute 89
5 License 91
i

ii

Scrapoxy Documentation, Release 3.1.1
Get Started 1

Scrapoxy Documentation, Release 3.1.1
2 Get Started
CHAPTER 1
What is Scrapoxy ?
http://scrapoxy.io
Scrapoxy hides your scraper behind a cloud.
It starts a pool of proxies to send your requests.
Now, you can crawl without thinking about blacklisting!
It is written in Javascript (ES6) with Node.js & AngularJS and it is open source!
1.1 How does Scrapoxy work ?
1. When Scrapoxy starts, it creates and manages a pool of proxies.
2. Your scraper uses Scrapoxy as a normal proxy.
3. Scrapoxy routes all requests through a pool of proxies.
1.2 What Scrapoxy does ?
• Create your own proxies
• Use multiple cloud providers (AWS, DigitalOcean, OVH, Vscale)
• Rotate IP addresses
• Impersonate known browsers
• Exclude blacklisted instances
• Monitor the requests
• Detect bottleneck
3
Scrapoxy Documentation, Release 3.1.1
• Optimize the scraping
1.3 Why Scrapoxy doesn’t support anti-blacklisting ?
Anti-blacklisting is a job for the scraper.
When the scraper detects blacklisting, it asks Scrapoxy to remove the proxy from the proxies pool (through a RESTAPI).
1.4 What is the best scraper framework to use with Scrapoxy ?
You could use the open source Scrapy framework (Python).
1.5 Does Scrapoxy have a SaaS mode or a support plan ?
Scrapoxy is an open source tool. Source code is highly maintained. You are very welcome to open an issue for featuresor bugs.
If you are looking for a commercial product in SaaS mode or with a support plan, we recommend you to check theScrapingHub products (ScrapingHub is the company which maintains the Scrapy framework).
4 Chapter 1. What is Scrapoxy ?
CHAPTER 2
Documentation
You can begin with the Quick Start or look at the Changelog.
Now, you can continue with Standard, and become an expert with Advanced.
And complete with Tutorials.
2.1 Quick Start
This tutorials works on AWS / EC2, with region eu-west-1.
See the AWS / EC2 - Copy an AMI from a region to another if you want to change region.
2.1.1 Step 1: Get AWS credentials
See Get AWS credentials.
2.1.2 Step 2: Create a security group
See Create a security group.
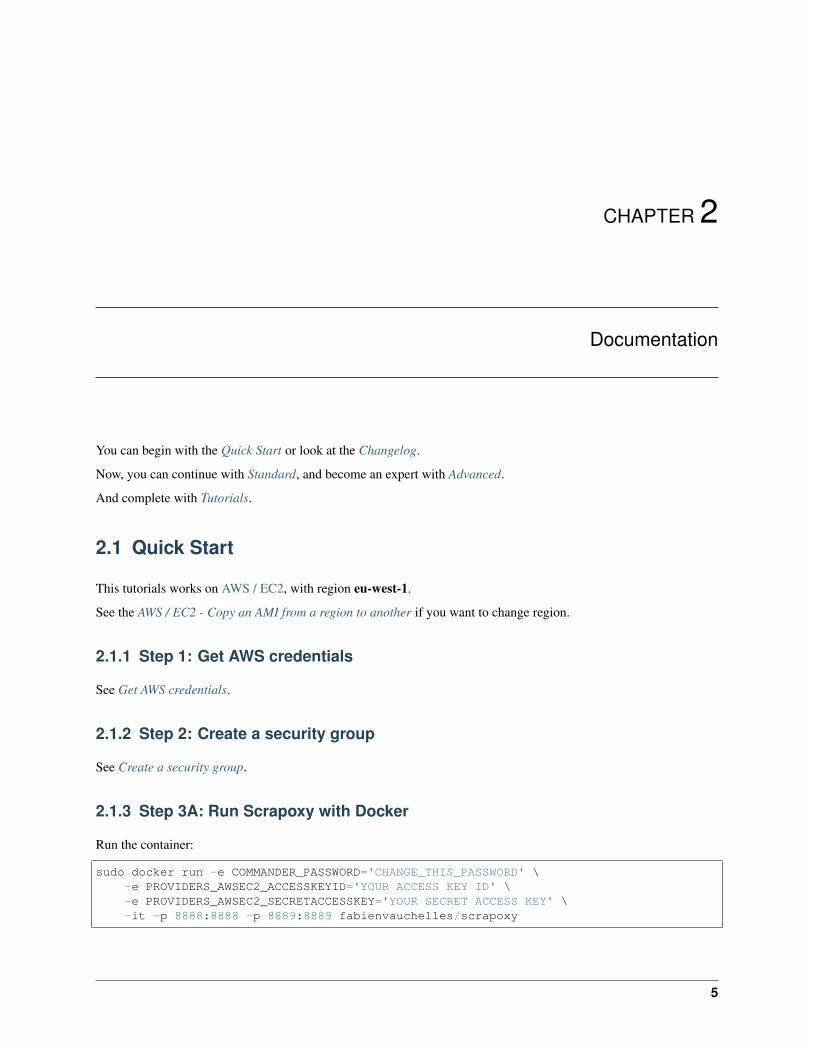
2.1.3 Step 3A: Run Scrapoxy with Docker
Run the container:
sudo docker run -e COMMANDER_PASSWORD='CHANGE_THIS_PASSWORD' \-e PROVIDERS_AWSEC2_ACCESSKEYID='YOUR ACCESS KEY ID' \-e PROVIDERS_AWSEC2_SECRETACCESSKEY='YOUR SECRET ACCESS KEY' \-it -p 8888:8888 -p 8889:8889 fabienvauchelles/scrapoxy
5
Scrapoxy Documentation, Release 3.1.1
Warning: Replace PROVIDERS_AWSEC2_ACCESSKEYID and PROVIDERS_AWSEC2_SECRETACCESSKEYby your AWS credentials and parameters.
2.1.4 Step 3B: Run Scrapoxy without Docker
Install Node.js
See the Node Installation Manual.
The minimum required version is 4.2.1.
Install Scrapoxy from NPM
Install make:
sudo apt-get install build-essential
And Scrapoxy:
sudo npm install -g scrapoxy
Generate configuration
scrapoxy init conf.json
Edit configuration
1. Edit conf.json
2. In the commander section, replace password by a password of your choice
3. In the providers/awsec2 section, replace accessKeyId, secretAccessKey and region by your AWS credentials andparameters.
Start Scrapoxy
scrapoxy start conf.json -d
2.1.5 Step 4: Open Scrapoxy GUI
Scrapoxy GUI is reachable at http://localhost:8889
2.1.6 Step 5: Connect Scrapoxy to your scraper
Scrapoxy is reachable at http://localhost:8888
6 Chapter 2. Documentation
Scrapoxy Documentation, Release 3.1.1
2.1.7 Step 6: Test Scrapoxy
1. Wait 3 minutes
2. Test Scrapoxy in a new terminal with:
scrapoxy test http://localhost:8888
3. Or with cURL:
curl --proxy http://127.0.0.1:8888 http://api.ipify.org
2.2 Changelog
2.2.1 3.1.1
Bug fixes
• master: use correctly writeEnd in socket and request (thanks to Ben Lavalley)
2.2.2 3.1.0
Features
• mitm: decrypt & encrypt SSL requests to add headers (like x-cache-proxyname). Compatible with HTTPSrequests in PhantomJS.
• domains: manage whitelist or blacklist for urls (idea from Jonathan Wiklund)
• docs: add ami-485fbba5 with type t2.micro
Bug fixes
• logs: correct export path of logs
• docs: correct documentation
• ssl: add servername in the TLS connect (bug with HELLO)
• pinger: use reject instead of throw error (crash program). Thanks to Anis Gandoura !!!
2.2.3 3.0.1
Features
• digitalocean: support Digital Ocean tags on Droplets. Thanks to Ben Lavalley !!!
Bug fixes
• digitalocean: use new image size (s-1vcpu-1gb instead of 512mb)
2.2. Changelog 7
Scrapoxy Documentation, Release 3.1.1
2.2.4 3.0.0
Features
Warning: BREAKING CHANGE! The configuration of providers changes. See documentation here.
• providers: uses multiple providers at a time
• awsec2: provider removes instances in batch every second (and no longer makes thousands of queries)
• ovhcloud: provider creates instances in batch (new API route used)
Bug fixes
• maxRunningInstances: remove blocking parameters maxRunningInstances
2.2.5 2.4.3
Bug fixes
• node: change minimum version of Node.js to 8
• dependencies: upgrade dependencies to latest version
2.2.6 2.4.2
Bug fixes
• useragent: set useragent at instance creation, not at startup
• instance: force crashed instance to be removed
2.2.7 2.4.1
Bug fixes
• instance: correctly remove instance when instance is removed. Thanks to Étienne Corbillé!!!
2.2.8 2.4.0
Features
• provider: add VScale.io provider. Thanks to Hotrush!!!
Bug fixes
• proxy: use a valid startup script for init.d. Thanks to Hotrush!!!
• useragent: change useragents with a fresh list for 2017
8 Chapter 2. Documentation
Scrapoxy Documentation, Release 3.1.1
2.2.9 2.3.10
Features
• docs: add ami-06220275 with type t2.nano
Bug fixes
• instance: remove listeners on instance alive status on instance removal. Thanks to Étienne Corbillé!!!
2.2.10 2.3.9
Features
• digitalocean: update Digital Ocean documentation
• digitalocean: view only instances from selected region
• instances: remove random instances instead of the last ones
• pm2: add kill_timeout option for PM2 (thanks to cp2587)
Bug fixes
• digitalocean: limit the number of created instances at each API request
• digitalocean: don’t remove locked instances
2.2.11 2.3.8
Features
• docker: create the Docker image fabienvauchelles/scrapoxy
Bug fixes
• template: limit max instances to 2
2.2.12 2.3.7
Features
• connect: scrapoxy accepts now full HTTPS CONNECT method. It is useful for browser like PhantomJS.Thanks to Anis Gandoura!!!
2.2.13 2.3.6
Bug fixes
• template: replace old AWS AMI by ami-c74d0db4
2.2. Changelog 9
Scrapoxy Documentation, Release 3.1.1
2.2.14 2.3.5
Features
• instance: change Node.js version to 6.x
• ping: use an HTTP ping instead a TCP ping.
Please rebuild instance image.
2.2.15 2.3.4
Features
• stats: monitor stop count history
• stats: add 3 more scales: 5m, 10m and 1h
• logs: normalize logs and add more informations
• scaling: pop a message when maximum number of instances is reached in a provider
• scaling: add quick scaling buttons
• docs: explain why Scrapoxy doesn’t accept CONNECT mode
• docs: explain how User Agent is overwritten
Bug fixes
• dependencies: upgrade dependencies
• ovh: monitor DELETED status
• docs: add example to test scrapoxy with credentials
• commander: manage twice instance remove
2.2.16 2.3.3
Bug fixes
• master: sanitize bad request headers
• proxy: catch all socket errors in the proxy instance
2.2.17 2.3.2
Bug fixes
• docs: fallback to markdown for README (because npmjs doesn’t like retext)
10 Chapter 2. Documentation
Scrapoxy Documentation, Release 3.1.1
2.2.18 2.3.1
Features
• docs: add tutorials for Scrapy and Node.js
Bug fixes
• digitalocean: convert Droplet id to string
2.2.19 2.3.0
Features
• digitalocean: add support for DigitalOcean provider
2.2.20 2.2.1
Misc
• config: rename my-config.json to conf.json
• doc: migrate documentation to ReadTheDocs
• doc: link to the new website Scrapoxy.io
2.2.21 2.2.0
Breaking changes
• node: node minimum version is now 4.2.1, to support JS class
Features
• all: migrate core and gui to ES6, with all best practices
• api: replace Express by Koa
Bug fixes
• test: correct core e2e test
2.2.22 2.1.2
Bug fixes
• gui: correct token encoding for GUI
2.2. Changelog 11

Scrapoxy Documentation, Release 3.1.1
2.2.23 2.1.1
Bug fixes
• main: add message when all instances are stopped (at end)
• doc: correct misc stuff in doc
2.2.24 2.1.0
Features
• ovh: add OVH provider with documentation
• security: add basic auth to Scrapoxy (RFC2617)
• stats: add flow stats
• stats: add scale for stats (1m/1h/1d)
• stats: store stats on server
• stats: add globals stats
• doc: split of the documentation in 3 parts: quick start, standard usage and advanced usage
• doc: add tutorials for AWS / EC2
• gui: add a scaling popup instead of direct edit (with integrity check)
• gui: add update popup when the status of an instance changes.
• gui: add error popup when GUI cannot retrieve data
• logs: write logs to disk
• instance: add cloud name
• instance: show instance IP
• instance: always terminate an instance when stopping (prefer terminate instead of stop/start)
• test: allow more than 8 requests (max 1000)
• ec2: force to terminate/recreate instance instead of stop/restart
Bug fixes
• gui: emit event when scaling is changed by engine (before, event was triggered by GUI)
• stability: correct a lot of behavior to prevent instance cycling
• ec2: use status name instead of status code
2.2.25 2.0.1
Features
• test: specify the count of requests with the test command
• test: count the requests by IP in the test command
12 Chapter 2. Documentation
Scrapoxy Documentation, Release 3.1.1
• doc: add GUI documentation
• doc: add API documentation
• doc: explain awake/asleep mode in user manual
• log: add human readable message at startup
2.2.26 2.0.0
Breaking changes
• commander: API routes are prefixed with /api
Features
• gui: add GUI to control Scrapoxy
• gui: add statistics to the GUI (count of requests / minute, average delay of requests / minute)
• doc: add doc about HTTP headers
2.2.27 1.1.0
Features
• commander: stopping an instance returns the new count of instances
• commander: password is hashed with base64
• commander: read/write config with command (and live update of the scaling)
Misc
• chore: force global install with NPM
2.2.28 1.0.2
Features
• doc: add 2 AWS / EC2 tutorials
Bug fixes
• template: correct template mechanism
• config: correct absolute path for configuration
2.2. Changelog 13
Scrapoxy Documentation, Release 3.1.1
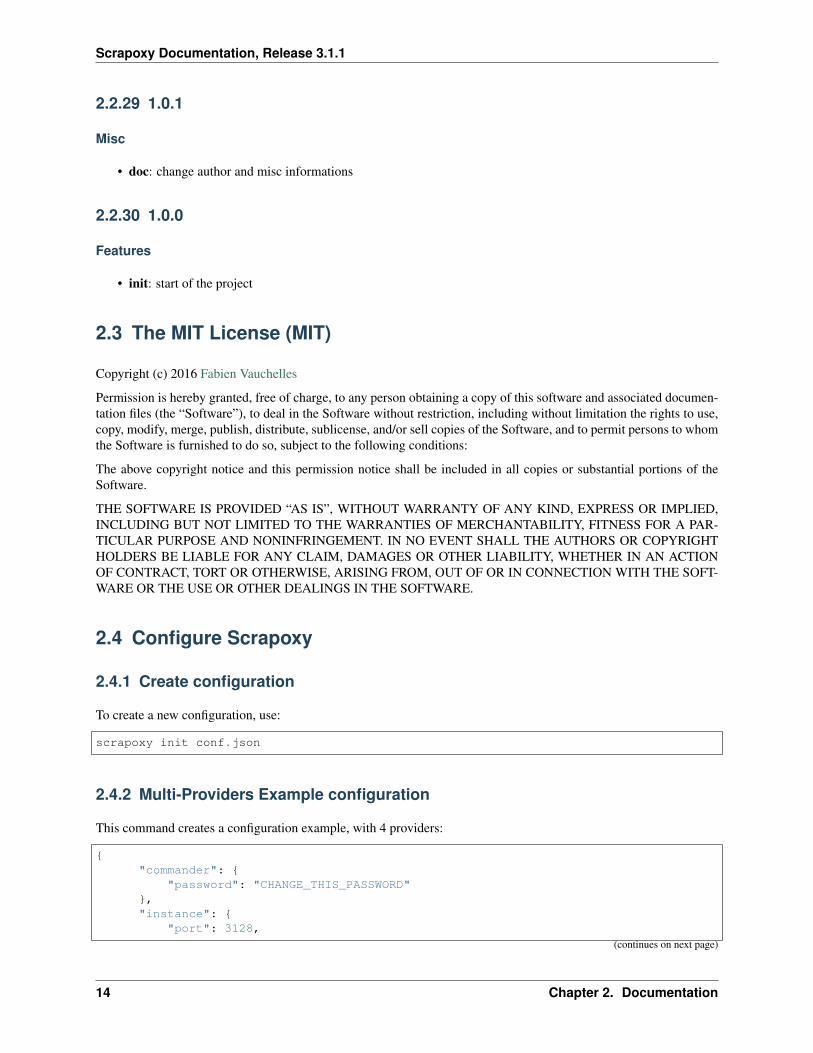
2.2.29 1.0.1
Misc
• doc: change author and misc informations
2.2.30 1.0.0
Features
• init: start of the project
2.3 The MIT License (MIT)
Copyright (c) 2016 Fabien Vauchelles
Permission is hereby granted, free of charge, to any person obtaining a copy of this software and associated documen-tation files (the “Software”), to deal in the Software without restriction, including without limitation the rights to use,copy, modify, merge, publish, distribute, sublicense, and/or sell copies of the Software, and to permit persons to whomthe Software is furnished to do so, subject to the following conditions:
The above copyright notice and this permission notice shall be included in all copies or substantial portions of theSoftware.
THE SOFTWARE IS PROVIDED “AS IS”, WITHOUT WARRANTY OF ANY KIND, EXPRESS OR IMPLIED,INCLUDING BUT NOT LIMITED TO THE WARRANTIES OF MERCHANTABILITY, FITNESS FOR A PAR-TICULAR PURPOSE AND NONINFRINGEMENT. IN NO EVENT SHALL THE AUTHORS OR COPYRIGHTHOLDERS BE LIABLE FOR ANY CLAIM, DAMAGES OR OTHER LIABILITY, WHETHER IN AN ACTIONOF CONTRACT, TORT OR OTHERWISE, ARISING FROM, OUT OF OR IN CONNECTION WITH THE SOFT-WARE OR THE USE OR OTHER DEALINGS IN THE SOFTWARE.
2.4 Configure Scrapoxy
2.4.1 Create configuration
To create a new configuration, use:
scrapoxy init conf.json
2.4.2 Multi-Providers Example configuration
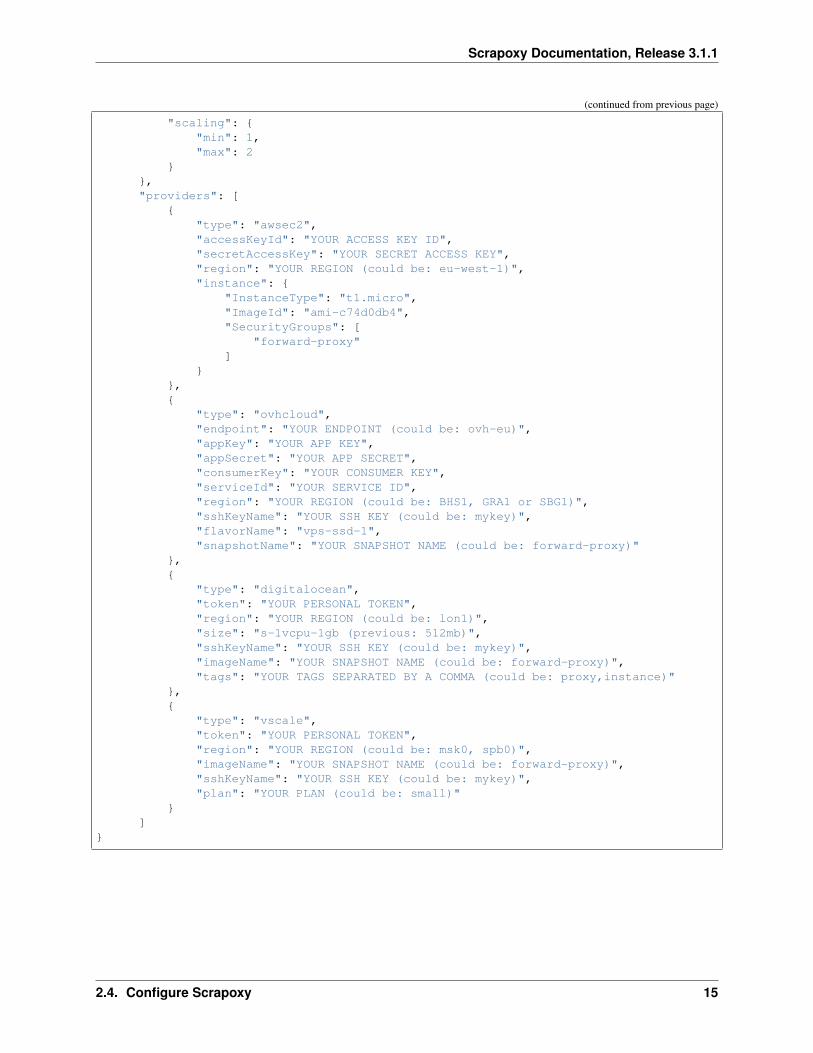
This command creates a configuration example, with 4 providers:
{"commander": {
"password": "CHANGE_THIS_PASSWORD"},"instance": {
"port": 3128,
(continues on next page)
14 Chapter 2. Documentation
Scrapoxy Documentation, Release 3.1.1
(continued from previous page)
"scaling": {"min": 1,"max": 2
}},"providers": [
{"type": "awsec2","accessKeyId": "YOUR ACCESS KEY ID","secretAccessKey": "YOUR SECRET ACCESS KEY","region": "YOUR REGION (could be: eu-west-1)","instance": {
"InstanceType": "t1.micro","ImageId": "ami-c74d0db4","SecurityGroups": [
"forward-proxy"]
}},{
"type": "ovhcloud","endpoint": "YOUR ENDPOINT (could be: ovh-eu)","appKey": "YOUR APP KEY","appSecret": "YOUR APP SECRET","consumerKey": "YOUR CONSUMER KEY","serviceId": "YOUR SERVICE ID","region": "YOUR REGION (could be: BHS1, GRA1 or SBG1)","sshKeyName": "YOUR SSH KEY (could be: mykey)","flavorName": "vps-ssd-1","snapshotName": "YOUR SNAPSHOT NAME (could be: forward-proxy)"
},{
"type": "digitalocean","token": "YOUR PERSONAL TOKEN","region": "YOUR REGION (could be: lon1)","size": "s-1vcpu-1gb (previous: 512mb)","sshKeyName": "YOUR SSH KEY (could be: mykey)","imageName": "YOUR SNAPSHOT NAME (could be: forward-proxy)","tags": "YOUR TAGS SEPARATED BY A COMMA (could be: proxy,instance)"
},{
"type": "vscale","token": "YOUR PERSONAL TOKEN","region": "YOUR REGION (could be: msk0, spb0)","imageName": "YOUR SNAPSHOT NAME (could be: forward-proxy)","sshKeyName": "YOUR SSH KEY (could be: mykey)","plan": "YOUR PLAN (could be: small)"
}]
}
2.4. Configure Scrapoxy 15
Scrapoxy Documentation, Release 3.1.1
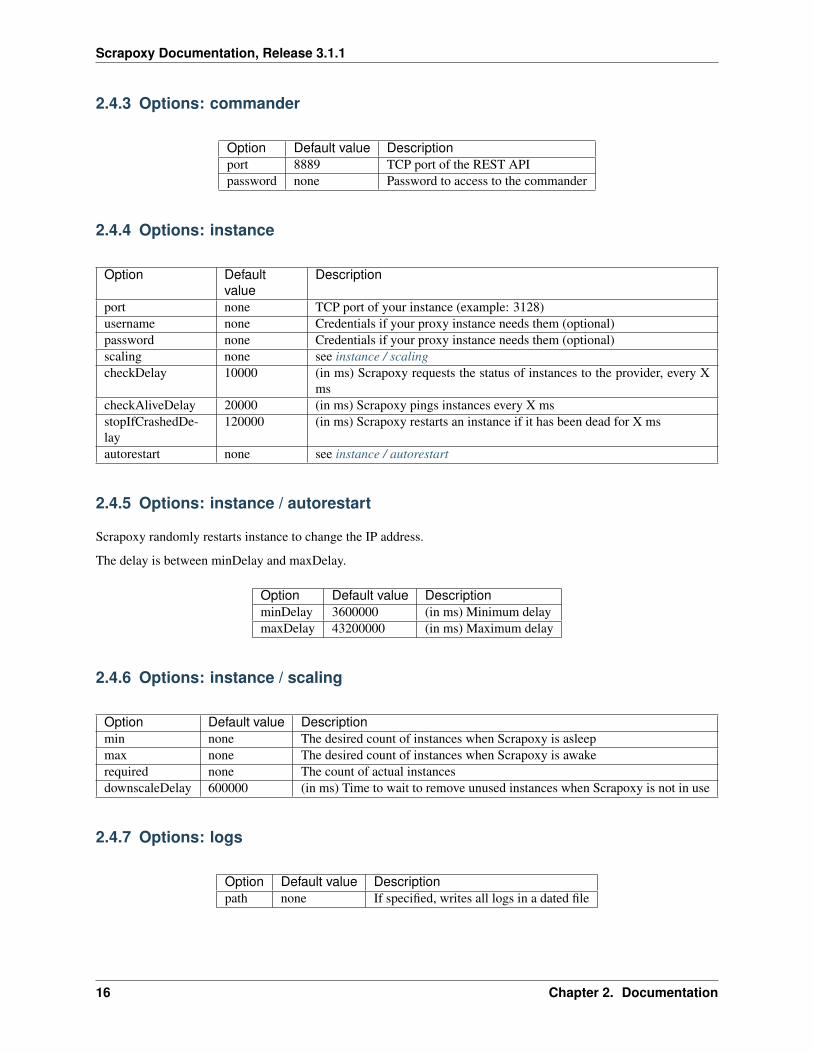
2.4.3 Options: commander
Option Default value Descriptionport 8889 TCP port of the REST APIpassword none Password to access to the commander
2.4.4 Options: instance
Option Defaultvalue
Description
port none TCP port of your instance (example: 3128)username none Credentials if your proxy instance needs them (optional)password none Credentials if your proxy instance needs them (optional)scaling none see instance / scalingcheckDelay 10000 (in ms) Scrapoxy requests the status of instances to the provider, every X
mscheckAliveDelay 20000 (in ms) Scrapoxy pings instances every X msstopIfCrashedDe-lay
120000 (in ms) Scrapoxy restarts an instance if it has been dead for X ms
autorestart none see instance / autorestart
2.4.5 Options: instance / autorestart
Scrapoxy randomly restarts instance to change the IP address.
The delay is between minDelay and maxDelay.
Option Default value DescriptionminDelay 3600000 (in ms) Minimum delaymaxDelay 43200000 (in ms) Maximum delay
2.4.6 Options: instance / scaling
Option Default value Descriptionmin none The desired count of instances when Scrapoxy is asleepmax none The desired count of instances when Scrapoxy is awakerequired none The count of actual instancesdownscaleDelay 600000 (in ms) Time to wait to remove unused instances when Scrapoxy is not in use
2.4.7 Options: logs
Option Default value Descriptionpath none If specified, writes all logs in a dated file
16 Chapter 2. Documentation
Scrapoxy Documentation, Release 3.1.1
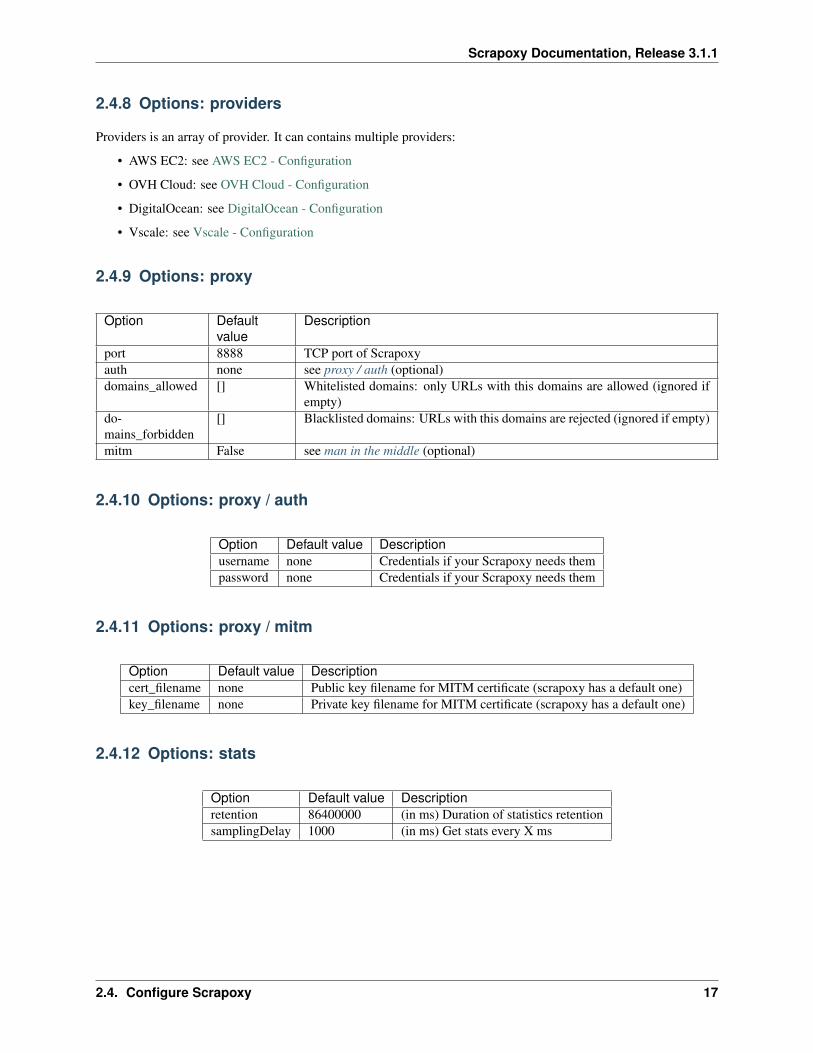
2.4.8 Options: providers
Providers is an array of provider. It can contains multiple providers:
• AWS EC2: see AWS EC2 - Configuration
• OVH Cloud: see OVH Cloud - Configuration
• DigitalOcean: see DigitalOcean - Configuration
• Vscale: see Vscale - Configuration
2.4.9 Options: proxy
Option Defaultvalue
Description
port 8888 TCP port of Scrapoxyauth none see proxy / auth (optional)domains_allowed [] Whitelisted domains: only URLs with this domains are allowed (ignored if
empty)do-mains_forbidden
[] Blacklisted domains: URLs with this domains are rejected (ignored if empty)
mitm False see man in the middle (optional)
2.4.10 Options: proxy / auth
Option Default value Descriptionusername none Credentials if your Scrapoxy needs thempassword none Credentials if your Scrapoxy needs them
2.4.11 Options: proxy / mitm
Option Default value Descriptioncert_filename none Public key filename for MITM certificate (scrapoxy has a default one)key_filename none Private key filename for MITM certificate (scrapoxy has a default one)
2.4.12 Options: stats
Option Default value Descriptionretention 86400000 (in ms) Duration of statistics retentionsamplingDelay 1000 (in ms) Get stats every X ms
2.4. Configure Scrapoxy 17
Scrapoxy Documentation, Release 3.1.1
2.5 AWS / EC2
2.5.1 Get started
Step 1: Get your AWS credentials
See Get credentials.
Remember your Access Key and Secret Access Key.
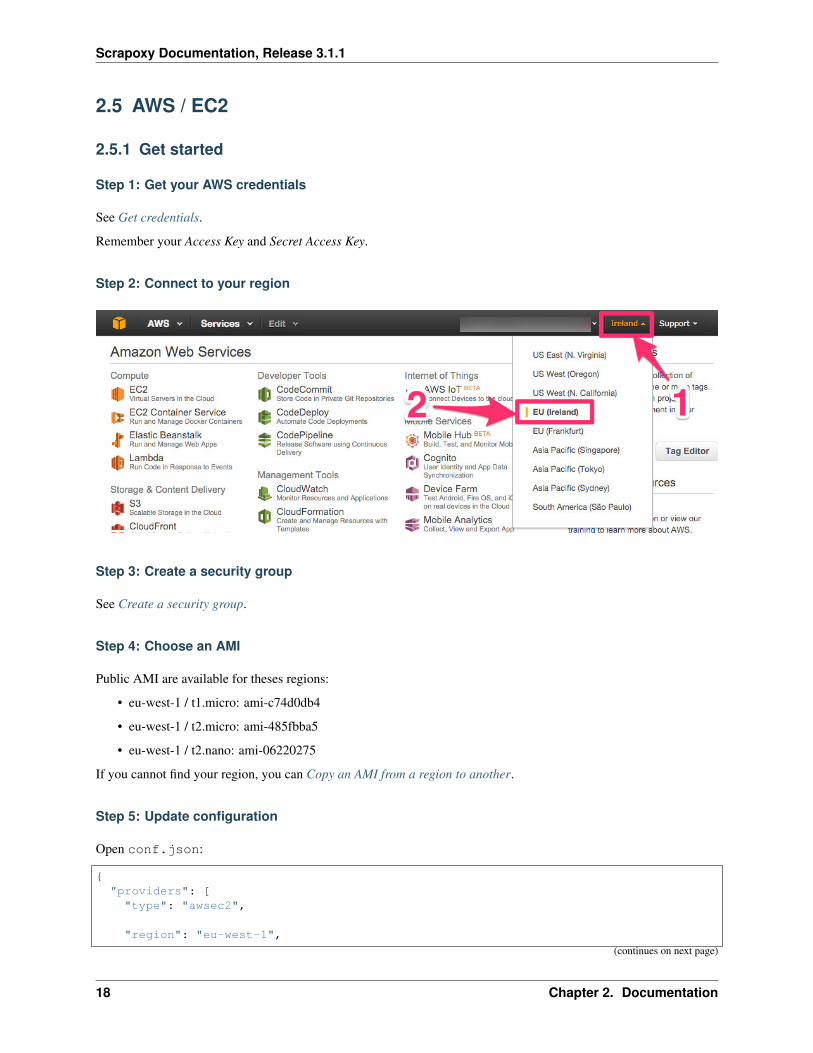
Step 2: Connect to your region
Step 3: Create a security group
See Create a security group.
Step 4: Choose an AMI
Public AMI are available for theses regions:
• eu-west-1 / t1.micro: ami-c74d0db4
• eu-west-1 / t2.micro: ami-485fbba5
• eu-west-1 / t2.nano: ami-06220275
If you cannot find your region, you can Copy an AMI from a region to another.
Step 5: Update configuration
Open conf.json:
{"providers": ["type": "awsec2",
"region": "eu-west-1",
(continues on next page)
18 Chapter 2. Documentation
Scrapoxy Documentation, Release 3.1.1
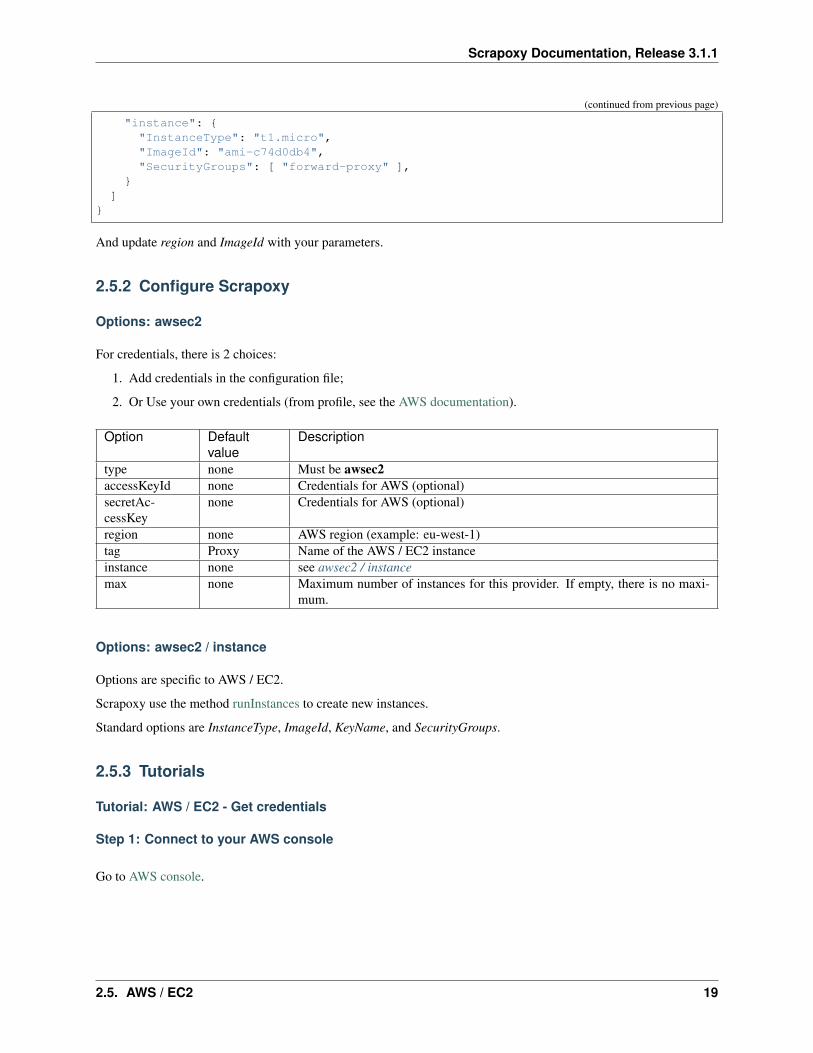
(continued from previous page)
"instance": {"InstanceType": "t1.micro","ImageId": "ami-c74d0db4","SecurityGroups": [ "forward-proxy" ],
}]
}
And update region and ImageId with your parameters.
2.5.2 Configure Scrapoxy
Options: awsec2
For credentials, there is 2 choices:
1. Add credentials in the configuration file;
2. Or Use your own credentials (from profile, see the AWS documentation).
Option Defaultvalue
Description
type none Must be awsec2accessKeyId none Credentials for AWS (optional)secretAc-cessKey
none Credentials for AWS (optional)
region none AWS region (example: eu-west-1)tag Proxy Name of the AWS / EC2 instanceinstance none see awsec2 / instancemax none Maximum number of instances for this provider. If empty, there is no maxi-
mum.
Options: awsec2 / instance
Options are specific to AWS / EC2.
Scrapoxy use the method runInstances to create new instances.
Standard options are InstanceType, ImageId, KeyName, and SecurityGroups.
2.5.3 Tutorials
Tutorial: AWS / EC2 - Get credentials
Step 1: Connect to your AWS console
Go to AWS console.
2.5. AWS / EC2 19
Scrapoxy Documentation, Release 3.1.1
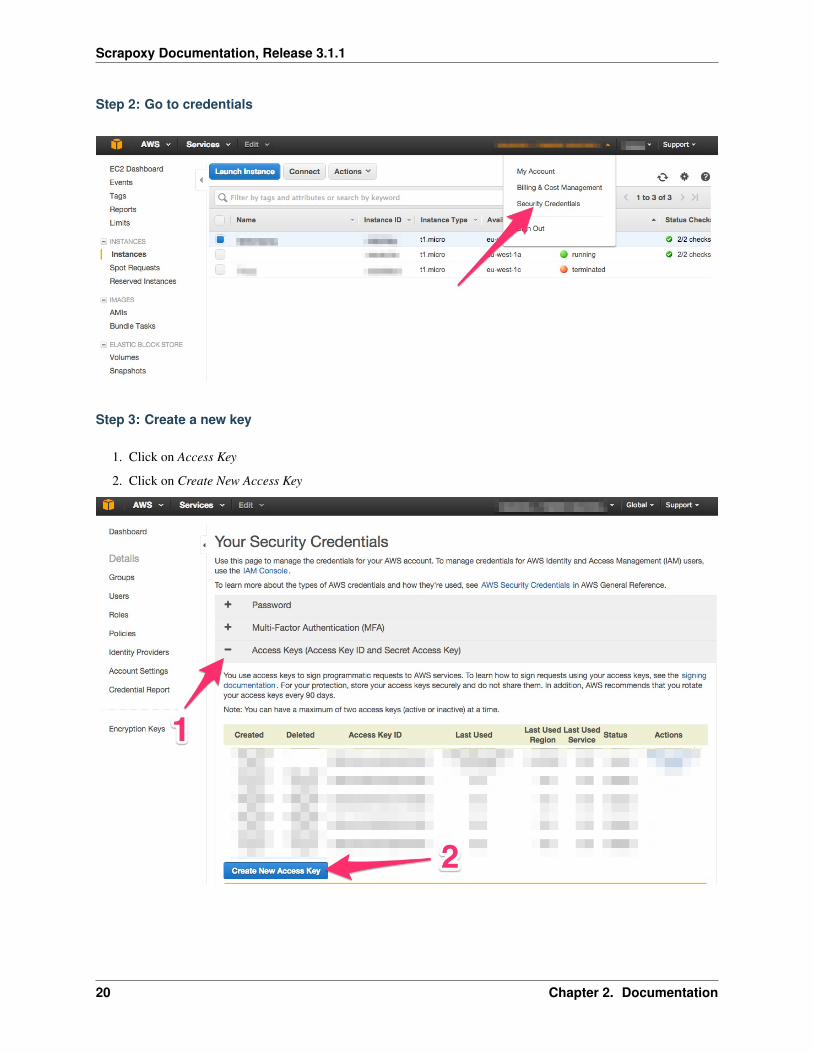
Step 2: Go to credentials
Step 3: Create a new key
1. Click on Access Key
2. Click on Create New Access Key
20 Chapter 2. Documentation
Scrapoxy Documentation, Release 3.1.1
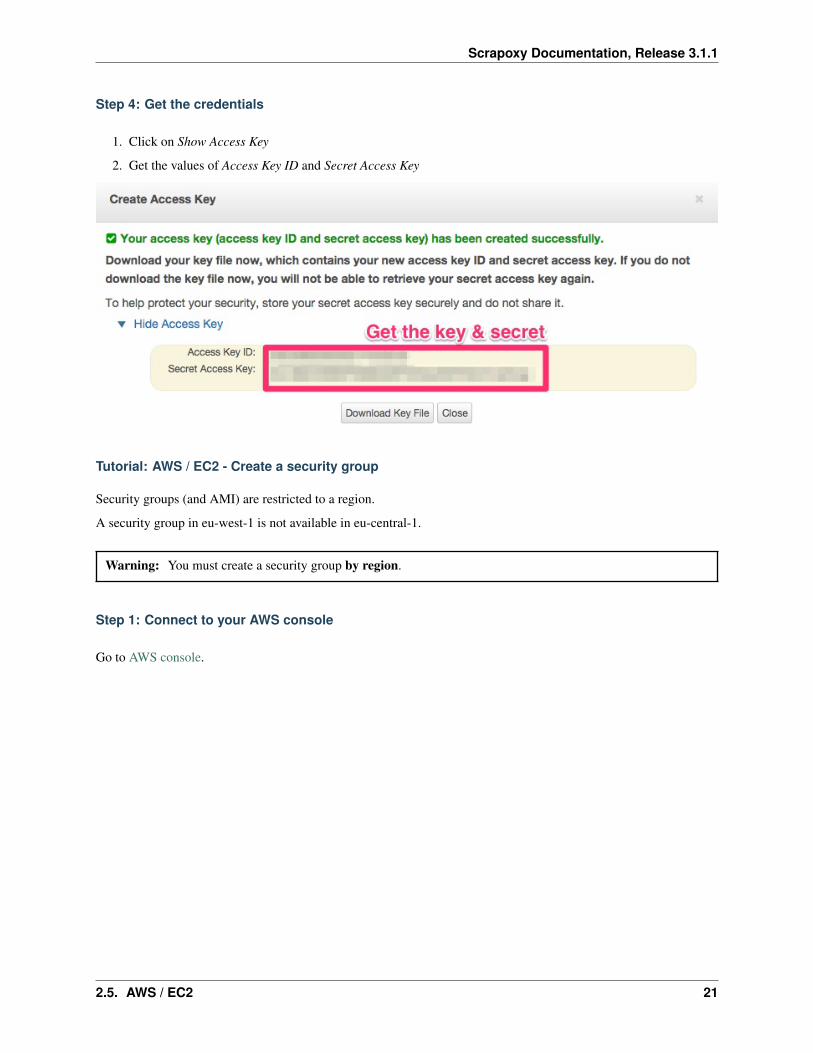
Step 4: Get the credentials
1. Click on Show Access Key
2. Get the values of Access Key ID and Secret Access Key
Tutorial: AWS / EC2 - Create a security group
Security groups (and AMI) are restricted to a region.
A security group in eu-west-1 is not available in eu-central-1.
Warning: You must create a security group by region.
Step 1: Connect to your AWS console
Go to AWS console.
2.5. AWS / EC2 21
Scrapoxy Documentation, Release 3.1.1
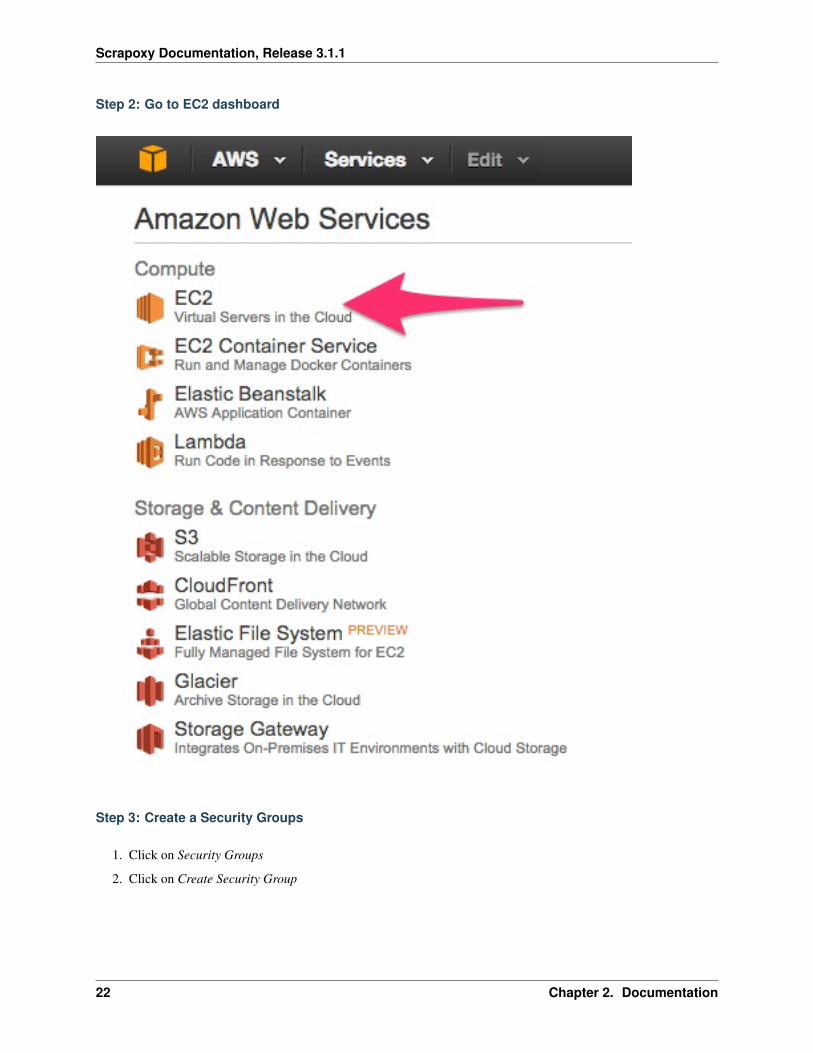
Step 2: Go to EC2 dashboard
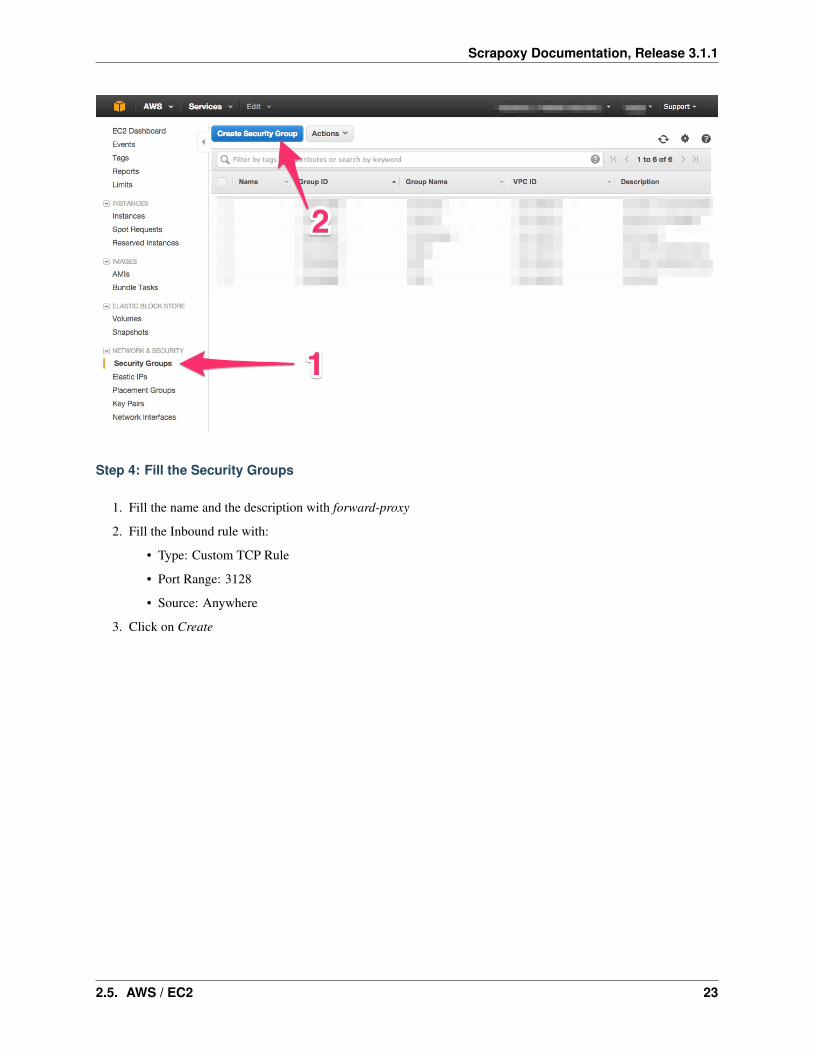
Step 3: Create a Security Groups
1. Click on Security Groups
2. Click on Create Security Group
22 Chapter 2. Documentation
Scrapoxy Documentation, Release 3.1.1
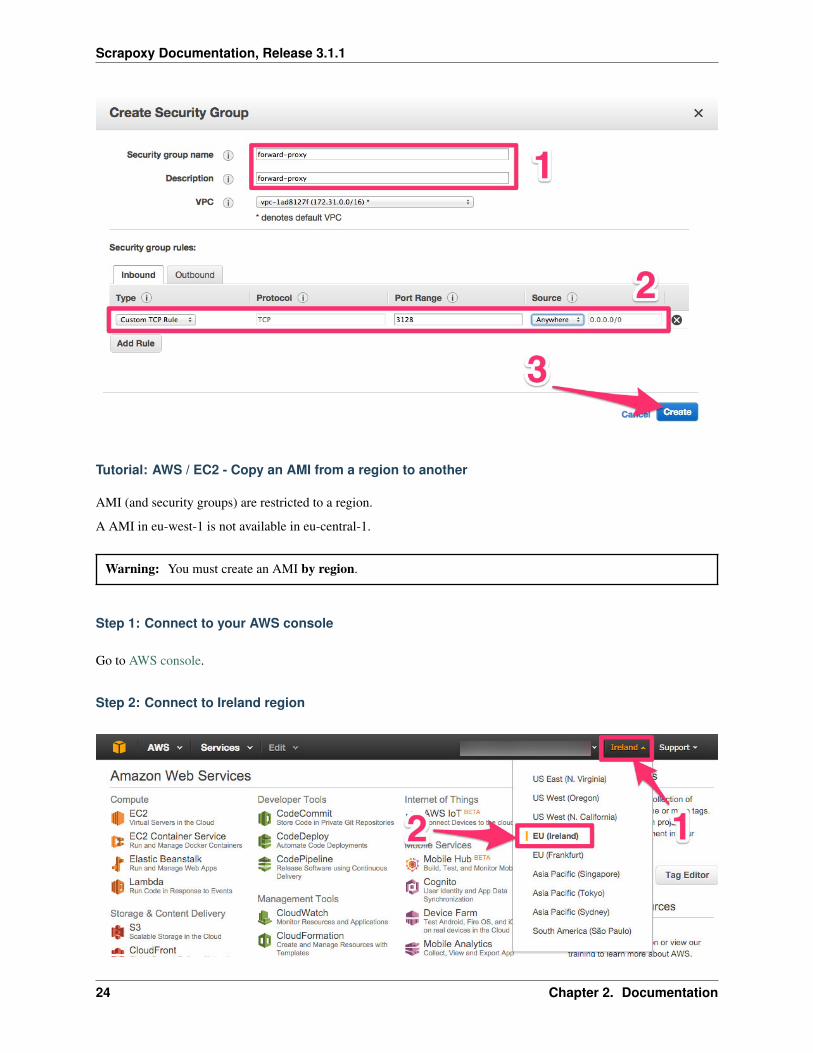
Step 4: Fill the Security Groups
1. Fill the name and the description with forward-proxy
2. Fill the Inbound rule with:
• Type: Custom TCP Rule
• Port Range: 3128
• Source: Anywhere
3. Click on Create
2.5. AWS / EC2 23
Scrapoxy Documentation, Release 3.1.1
Tutorial: AWS / EC2 - Copy an AMI from a region to another
AMI (and security groups) are restricted to a region.
A AMI in eu-west-1 is not available in eu-central-1.
Warning: You must create an AMI by region.
Step 1: Connect to your AWS console
Go to AWS console.
Step 2: Connect to Ireland region
24 Chapter 2. Documentation
Scrapoxy Documentation, Release 3.1.1
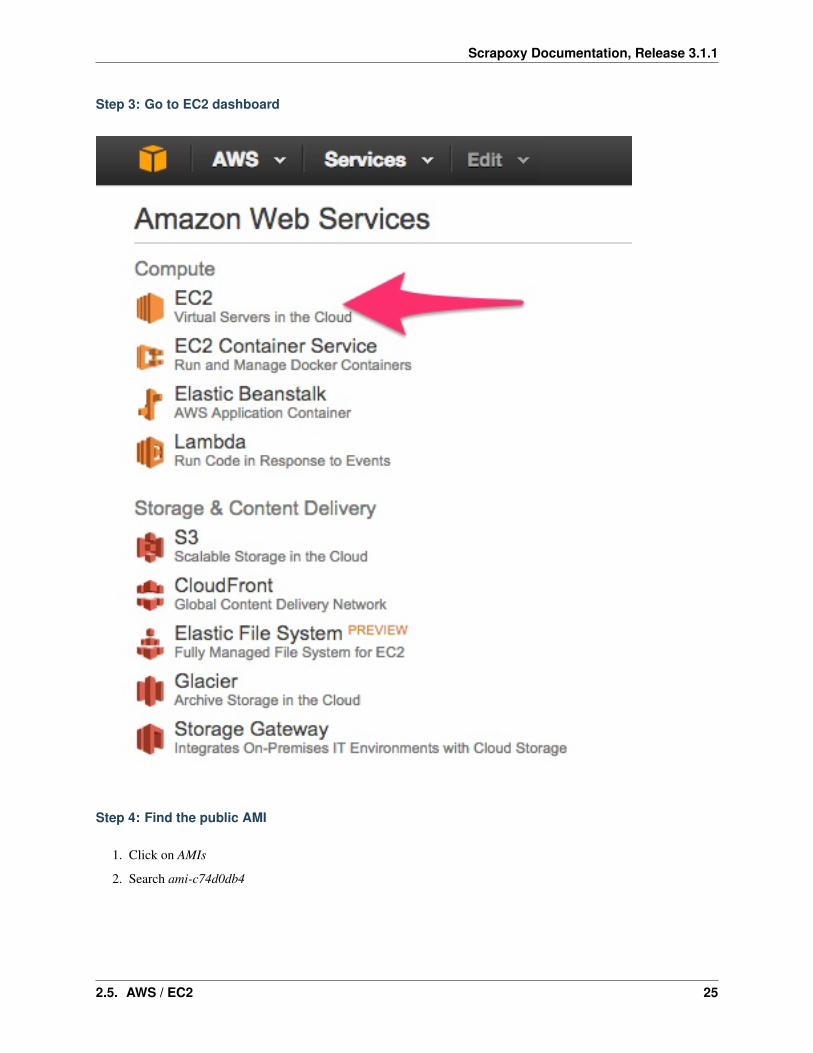
Step 3: Go to EC2 dashboard
Step 4: Find the public AMI
1. Click on AMIs
2. Search ami-c74d0db4
2.5. AWS / EC2 25
Scrapoxy Documentation, Release 3.1.1
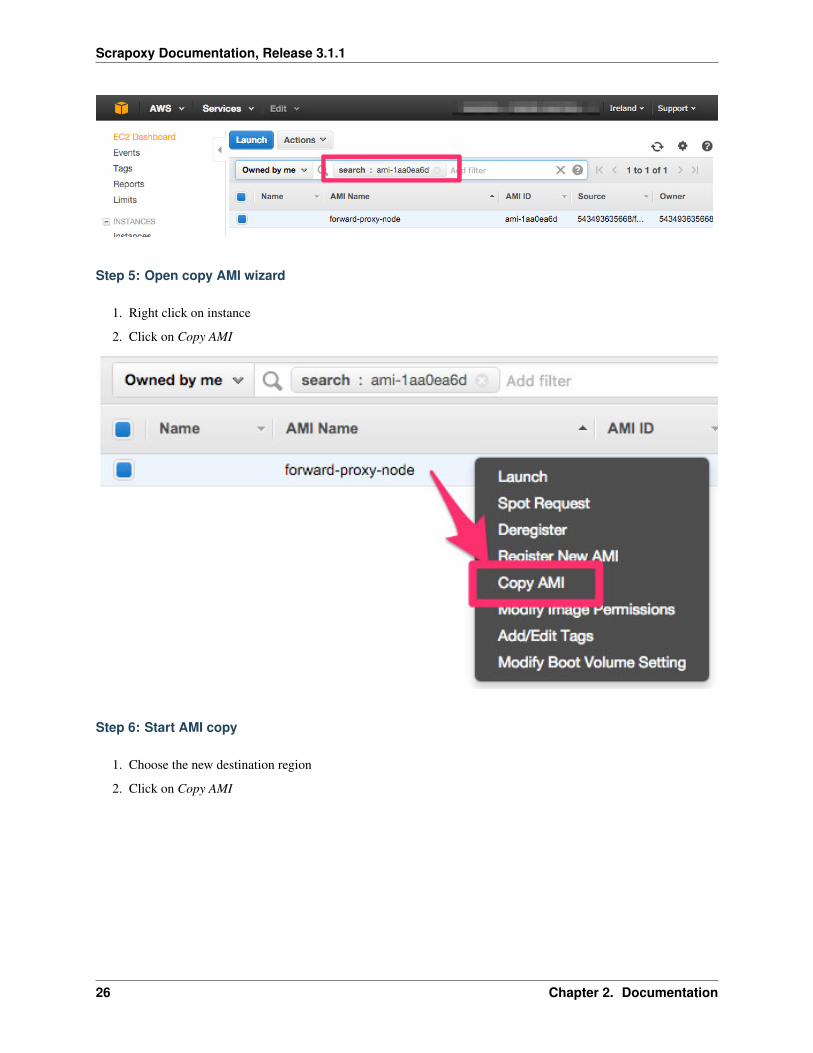
Step 5: Open copy AMI wizard
1. Right click on instance
2. Click on Copy AMI
Step 6: Start AMI copy
1. Choose the new destination region
2. Click on Copy AMI
26 Chapter 2. Documentation
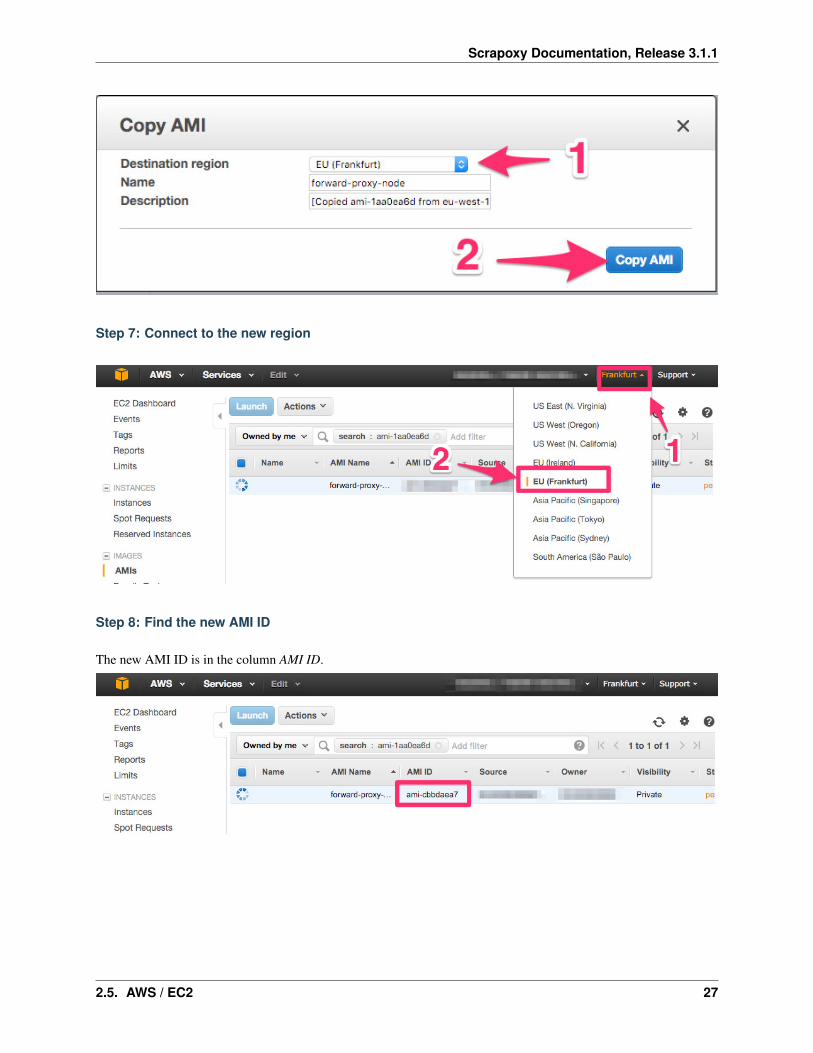
Scrapoxy Documentation, Release 3.1.1
Step 7: Connect to the new region
Step 8: Find the new AMI ID
The new AMI ID is in the column AMI ID.
2.5. AWS / EC2 27

Scrapoxy Documentation, Release 3.1.1
2.6 DigitalOcean
2.6.1 Get started
Step 1: Get your DigitalOcean credentials
See Get DigitalOcean credentials.
Remember your token.
Step 2: Create a SSH key for the project
See Create a SSH key.
Remember your SSH key name (mykey).
Step 3: Create an image
See Create an image.
Remember your image name (forward-proxy).
Step 4: Update configuration
Open conf.json:
{"providers": ["type": "digitalocean",
"token": "YOUR PERSONAL TOKEN","region": "YOUR REGION (could be: lon1)","size": "s-1vcpu-1gb (previous: 512mb)","sshKeyName": "YOUR SSH KEY (could be: mykey)","imageName": "YOUR SNAPSHOT NAME (could be: forward-proxy)","tags": "YOUR TAGS SEPARATED BY A COMMA (could be: proxy,instance)"
]},
And update config with your parameters.
28 Chapter 2. Documentation
Scrapoxy Documentation, Release 3.1.1
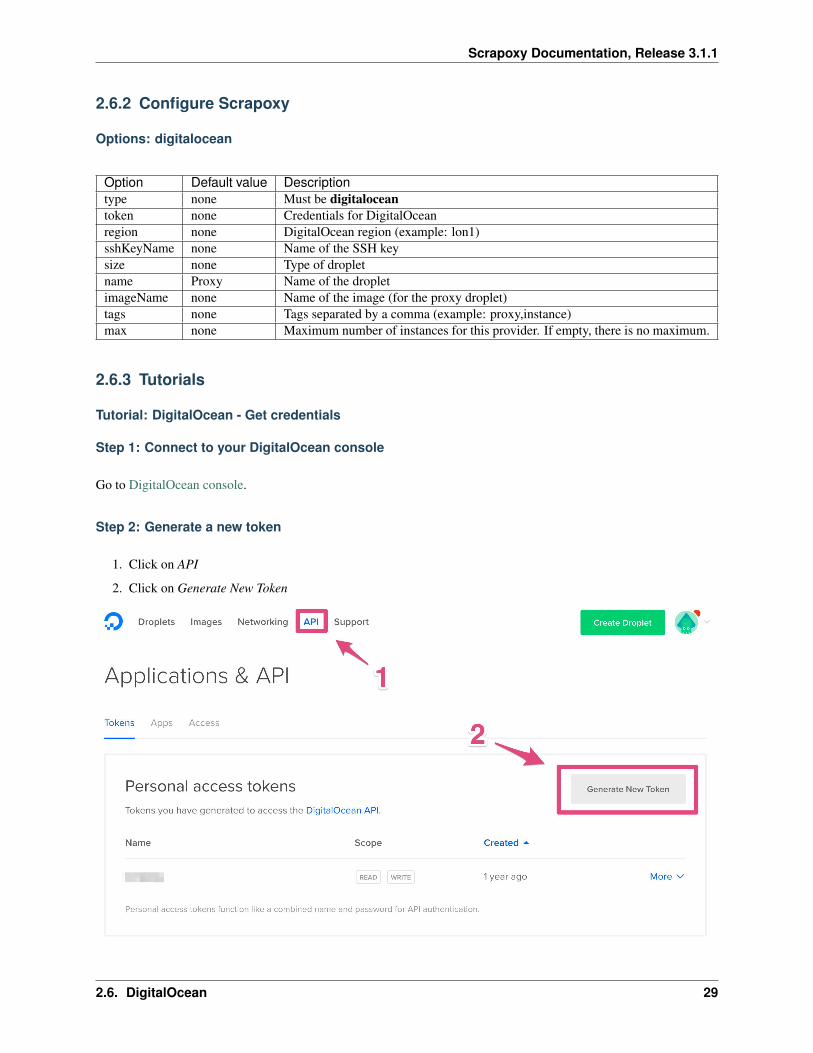
2.6.2 Configure Scrapoxy
Options: digitalocean
Option Default value Descriptiontype none Must be digitaloceantoken none Credentials for DigitalOceanregion none DigitalOcean region (example: lon1)sshKeyName none Name of the SSH keysize none Type of dropletname Proxy Name of the dropletimageName none Name of the image (for the proxy droplet)tags none Tags separated by a comma (example: proxy,instance)max none Maximum number of instances for this provider. If empty, there is no maximum.
2.6.3 Tutorials
Tutorial: DigitalOcean - Get credentials
Step 1: Connect to your DigitalOcean console
Go to DigitalOcean console.
Step 2: Generate a new token
1. Click on API
2. Click on Generate New Token
2.6. DigitalOcean 29
Scrapoxy Documentation, Release 3.1.1
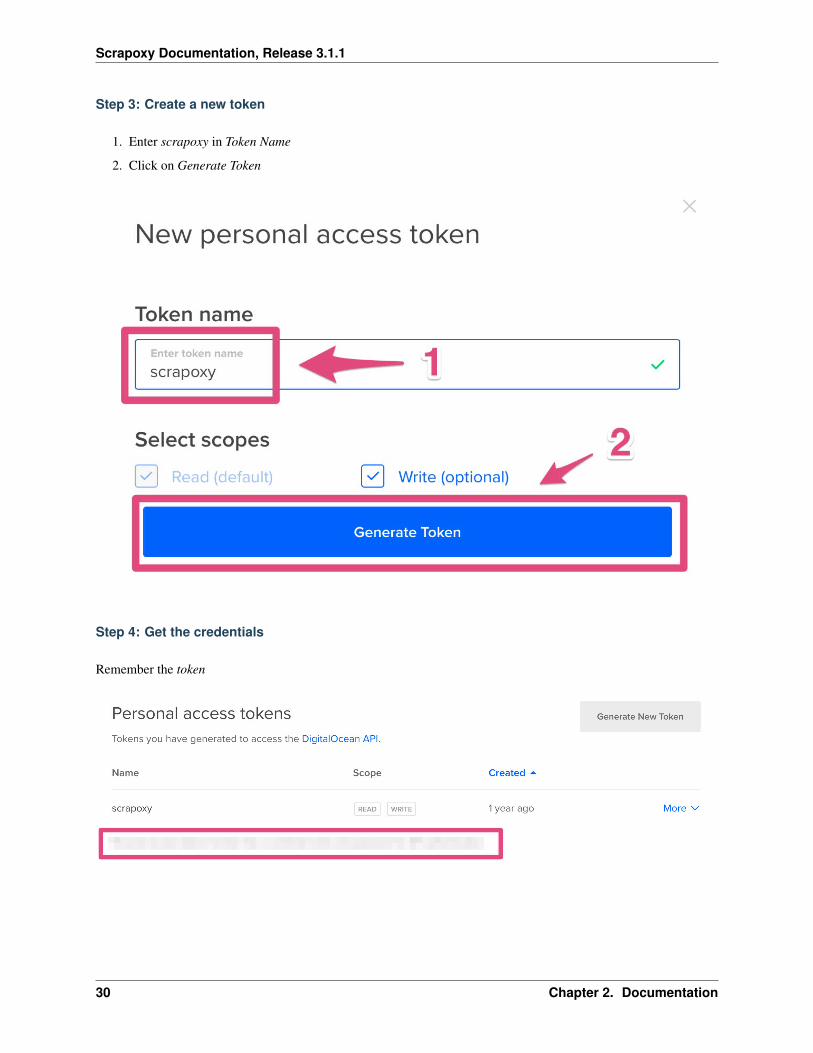
Step 3: Create a new token
1. Enter scrapoxy in Token Name
2. Click on Generate Token
Step 4: Get the credentials
Remember the token
30 Chapter 2. Documentation
Scrapoxy Documentation, Release 3.1.1
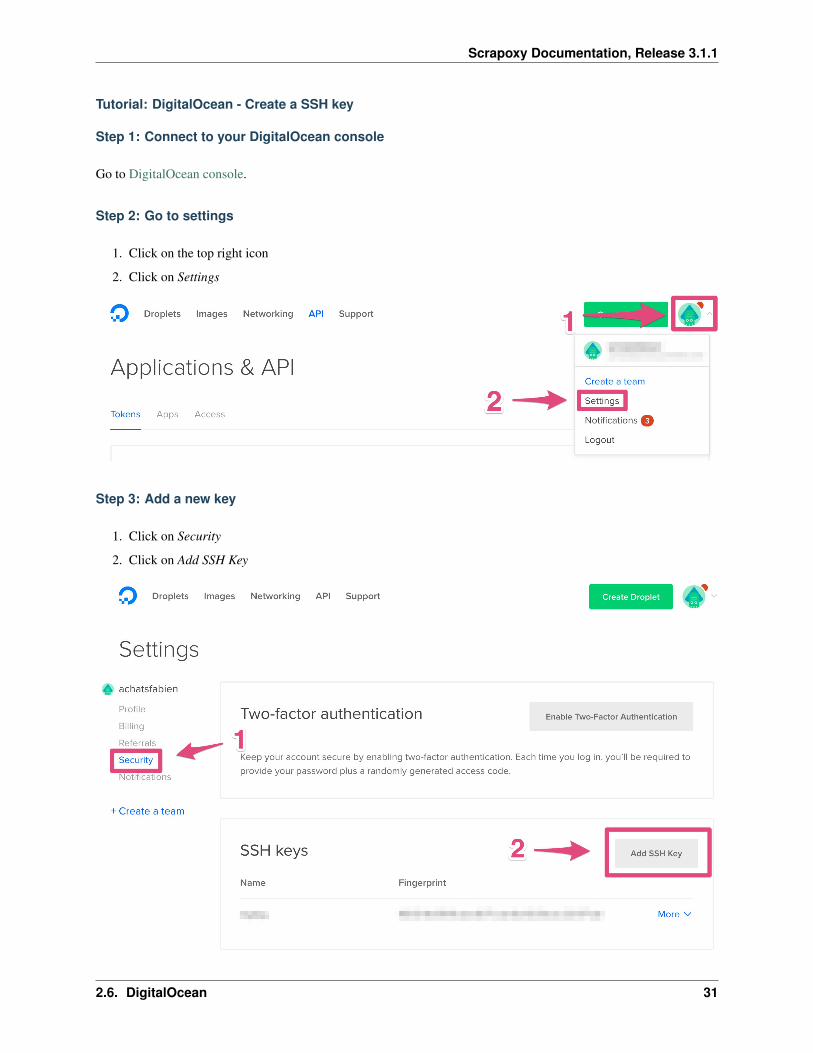
Tutorial: DigitalOcean - Create a SSH key
Step 1: Connect to your DigitalOcean console
Go to DigitalOcean console.
Step 2: Go to settings
1. Click on the top right icon
2. Click on Settings
Step 3: Add a new key
1. Click on Security
2. Click on Add SSH Key
2.6. DigitalOcean 31
Scrapoxy Documentation, Release 3.1.1
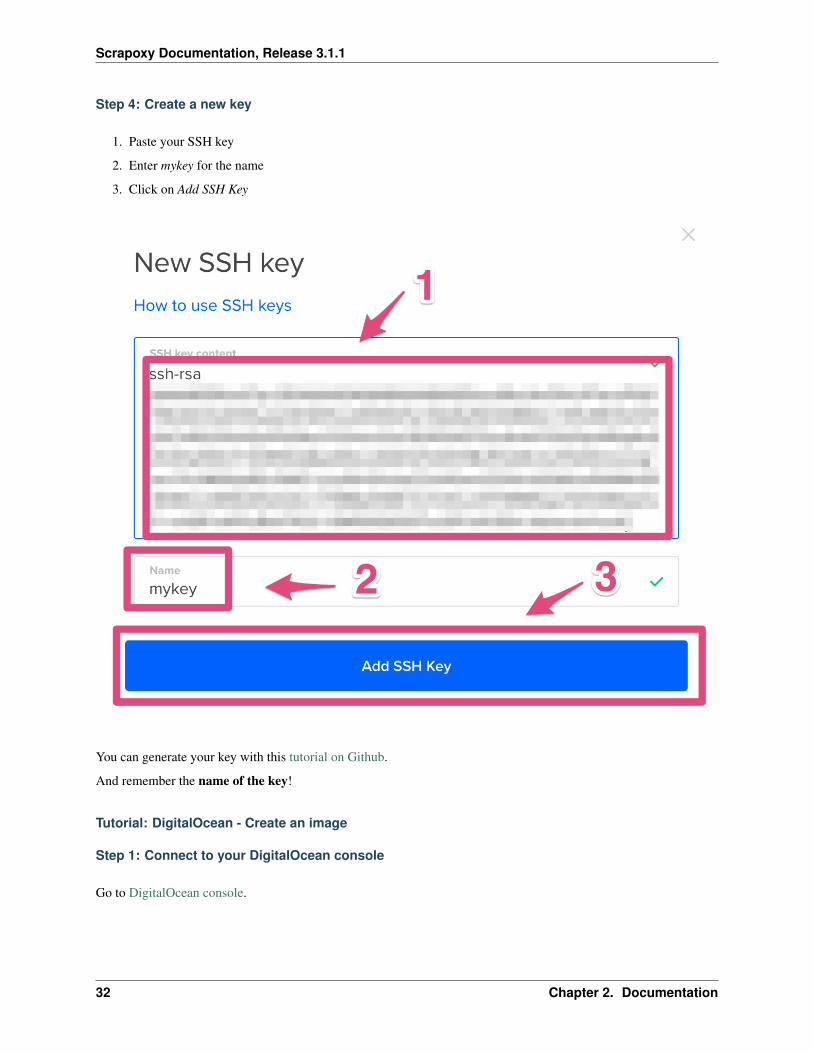
Step 4: Create a new key
1. Paste your SSH key
2. Enter mykey for the name
3. Click on Add SSH Key
You can generate your key with this tutorial on Github.
And remember the name of the key!
Tutorial: DigitalOcean - Create an image
Step 1: Connect to your DigitalOcean console
Go to DigitalOcean console.
32 Chapter 2. Documentation
Scrapoxy Documentation, Release 3.1.1
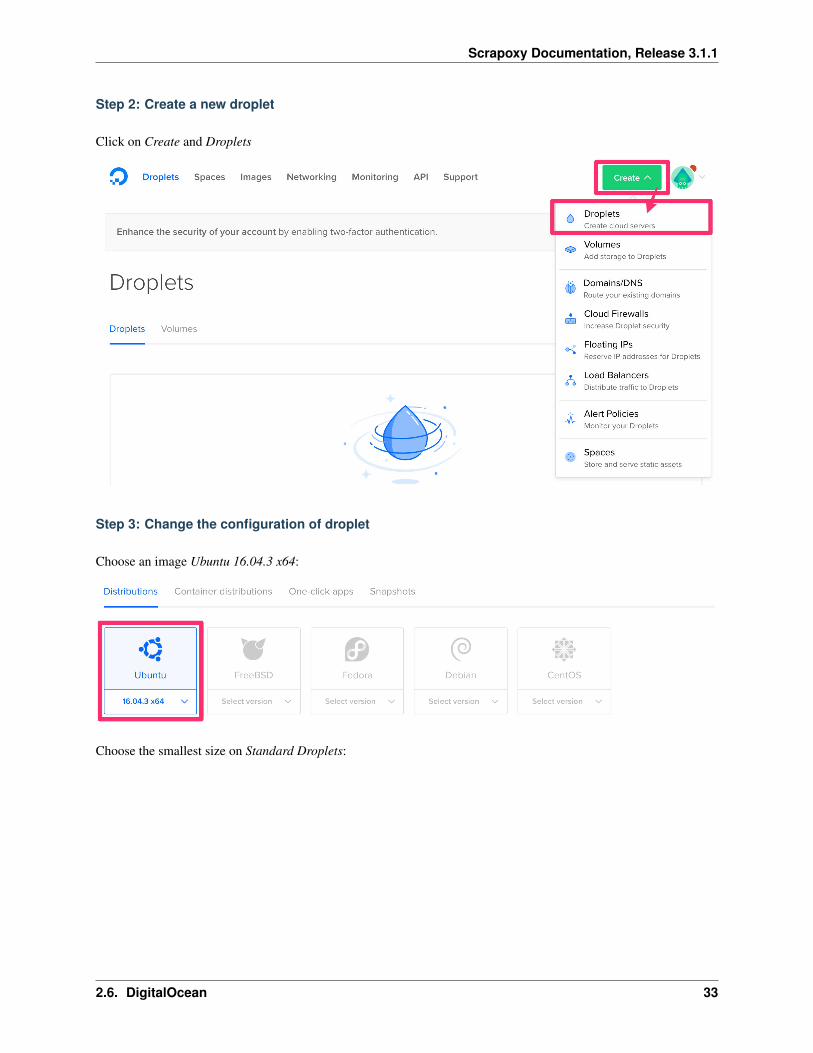
Step 2: Create a new droplet
Click on Create and Droplets
Step 3: Change the configuration of droplet
Choose an image Ubuntu 16.04.3 x64:
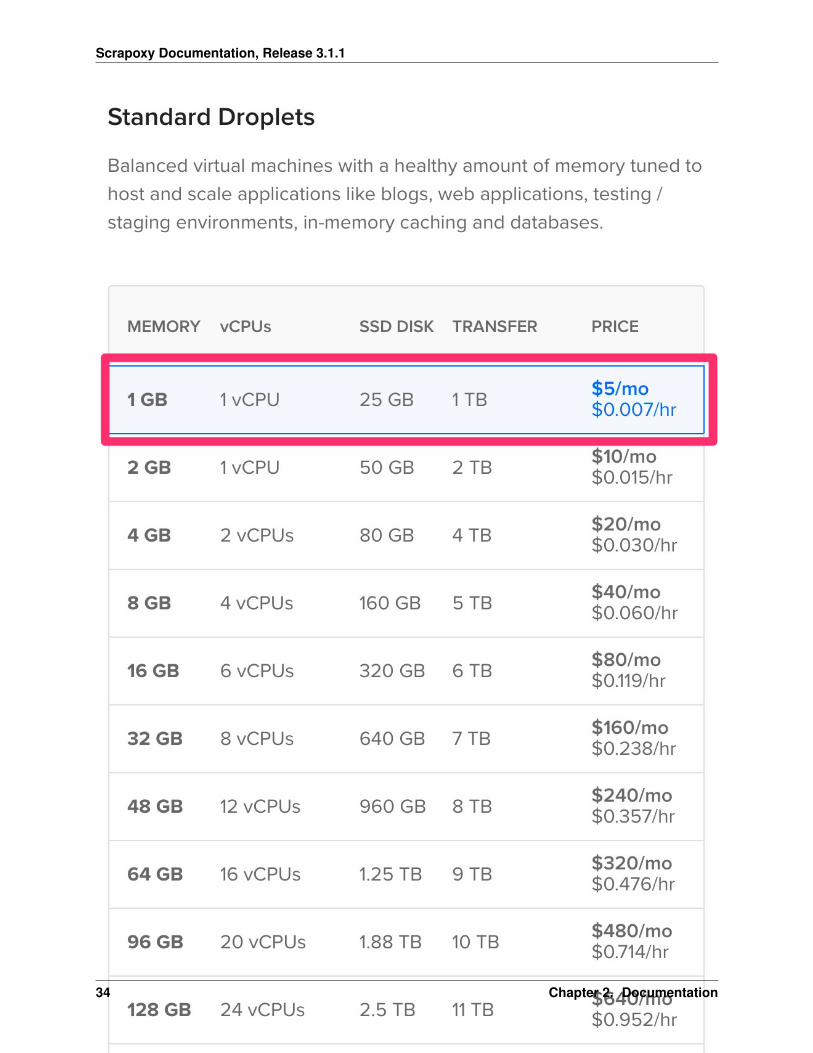
Choose the smallest size on Standard Droplets:
2.6. DigitalOcean 33
Scrapoxy Documentation, Release 3.1.1
34 Chapter 2. Documentation
Scrapoxy Documentation, Release 3.1.1
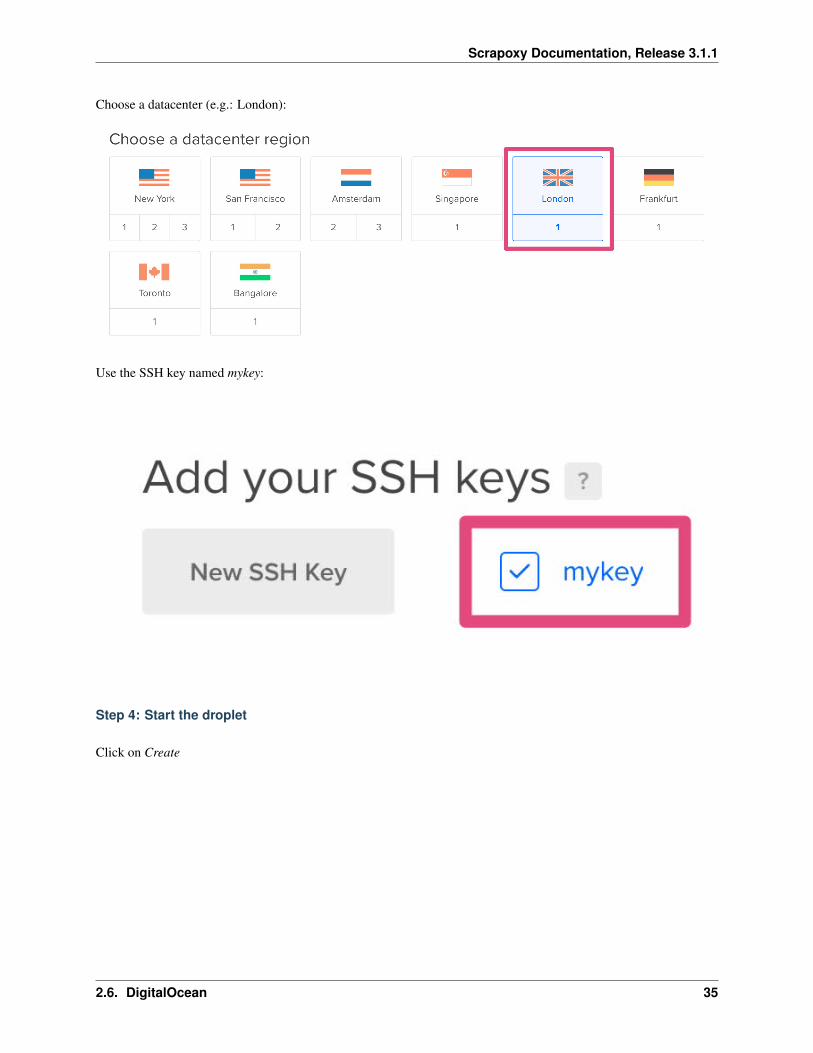
Choose a datacenter (e.g.: London):
Use the SSH key named mykey:
Step 4: Start the droplet
Click on Create
2.6. DigitalOcean 35
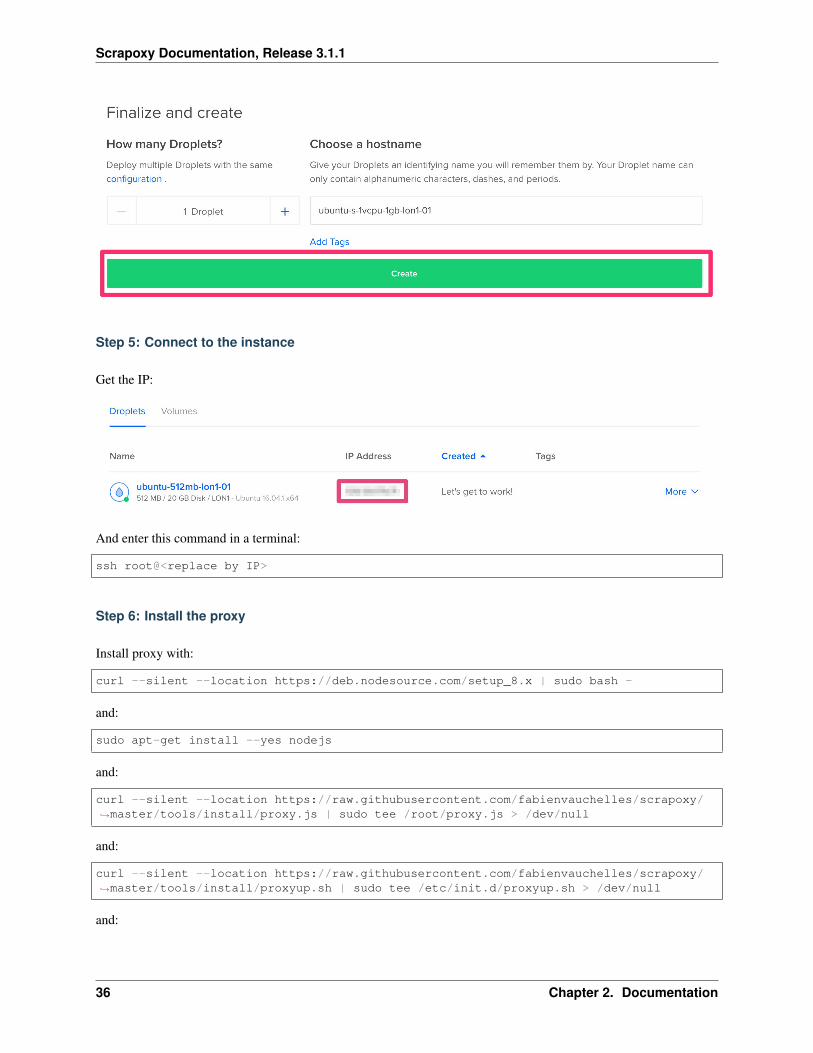
Scrapoxy Documentation, Release 3.1.1
Step 5: Connect to the instance
Get the IP:
And enter this command in a terminal:
ssh root@<replace by IP>
Step 6: Install the proxy
Install proxy with:
curl --silent --location https://deb.nodesource.com/setup_8.x | sudo bash -
and:
sudo apt-get install --yes nodejs
and:
curl --silent --location https://raw.githubusercontent.com/fabienvauchelles/scrapoxy/→˓master/tools/install/proxy.js | sudo tee /root/proxy.js > /dev/null
and:
curl --silent --location https://raw.githubusercontent.com/fabienvauchelles/scrapoxy/→˓master/tools/install/proxyup.sh | sudo tee /etc/init.d/proxyup.sh > /dev/null
and:
36 Chapter 2. Documentation

Scrapoxy Documentation, Release 3.1.1
sudo chmod a+x /etc/init.d/proxyup.sh
and:
sudo update-rc.d proxyup.sh defaults
and:
sudo /etc/init.d/proxyup.sh start
Step 7: Poweroff the droplet
1. Stop the last command (CTRL-C)
2. Power off the droplet:
sudo poweroff
The green icon disappears when the droplet is off:
Step 8: Create a backup
1. Click on Images
2. Select your droplet
3. Enter forward-proxy in Image Name
4. Click on Take Snapshot
2.6. DigitalOcean 37
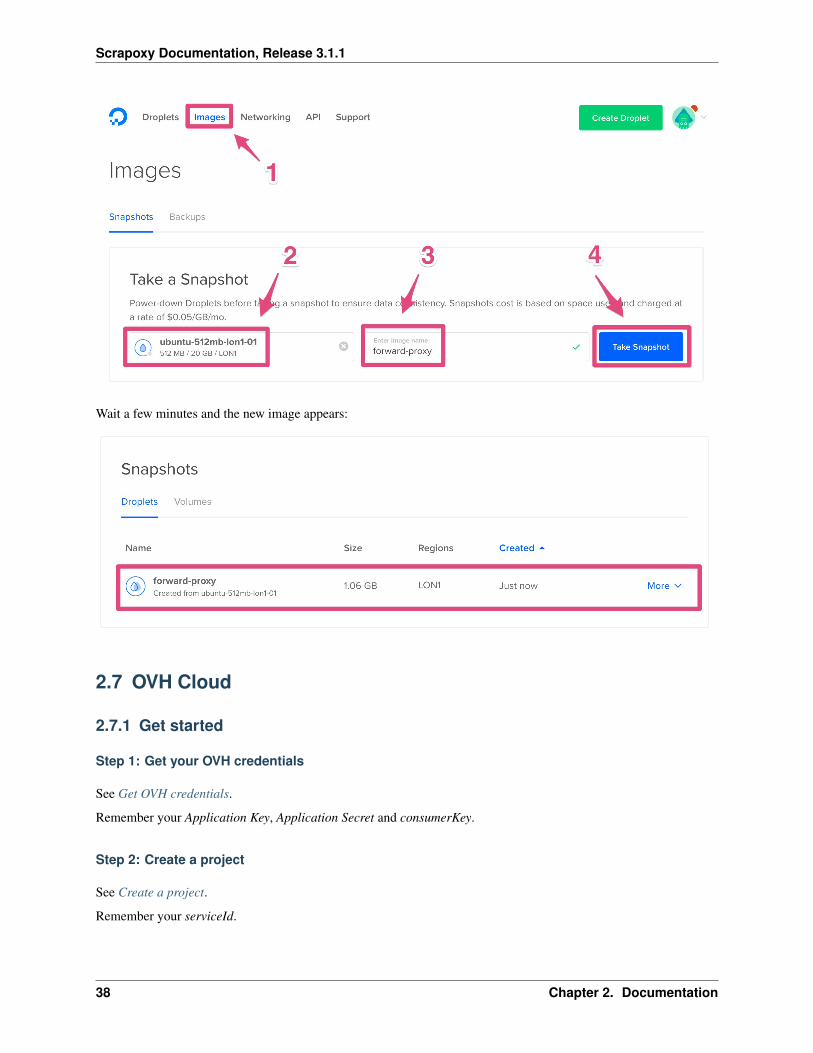
Scrapoxy Documentation, Release 3.1.1
Wait a few minutes and the new image appears:
2.7 OVH Cloud
2.7.1 Get started
Step 1: Get your OVH credentials
See Get OVH credentials.
Remember your Application Key, Application Secret and consumerKey.
Step 2: Create a project
See Create a project.
Remember your serviceId.
38 Chapter 2. Documentation
Scrapoxy Documentation, Release 3.1.1
Step 3: Create a SSH key for the project
See Create a SSH key.
Remember your SSH key name (mykey).
Step 4: Create a proxy image
See Create a proxy image.
Remember your image name (forward-proxy).
Step 5: Update configuration
Open conf.json:
{"providers": ["type": "ovhcloud",
"endpoint": "YOUR ENDPOINT (could be: ovh-eu)","appKey": "YOUR APP KEY","appSecret": "YOUR APP SECRET","consumerKey": "YOUR CONSUMERKEY","serviceId": "YOUR SERVICEID","region": "YOUR REGION (could be: BHS1, GRA1 or SBG1)","sshKeyName": "YOUR SSH KEY (could be: mykey)","flavorName": "vps-ssd-1","snapshotName": "YOUR SNAPSHOT NAME (could be: forward-proxy)"
]},
And update config with your parameters.
2.7.2 Configure Scrapoxy
Options: ovhcloud
Option Defaultvalue
Description
type none Must be ovhcloudendpoint none OVH subdivision (ovh-eu or ovh-ca)appKey none Credentials for OVHappSecret none Credentials for OVHconsumerKey none Credentials for OVHserviceId none Project IDregion none OVH region (example: GRA1)sshKeyName none Name of the SSH keyflavorName none Type of instancename Proxy Name of the instancesnapshot-Name
none Name of the backup image (for the proxy instance)
max none Maximum number of instances for this provider. If empty, there is no maximum.
2.7. OVH Cloud 39
Scrapoxy Documentation, Release 3.1.1
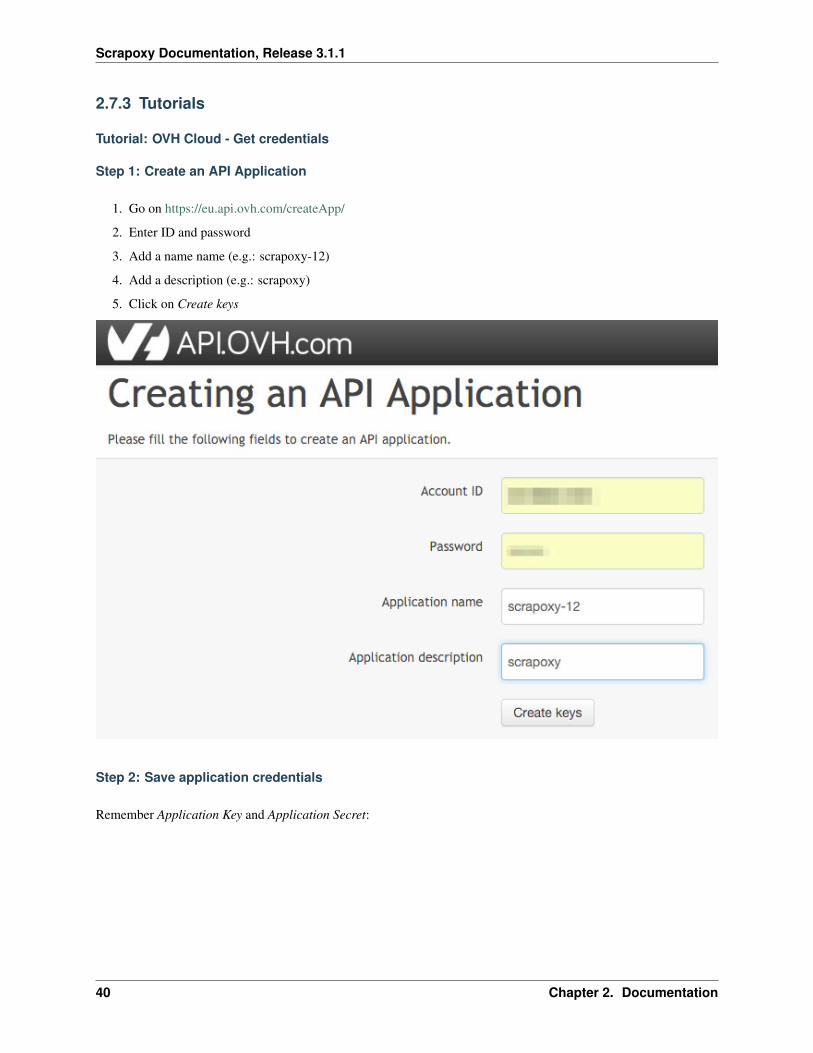
2.7.3 Tutorials
Tutorial: OVH Cloud - Get credentials
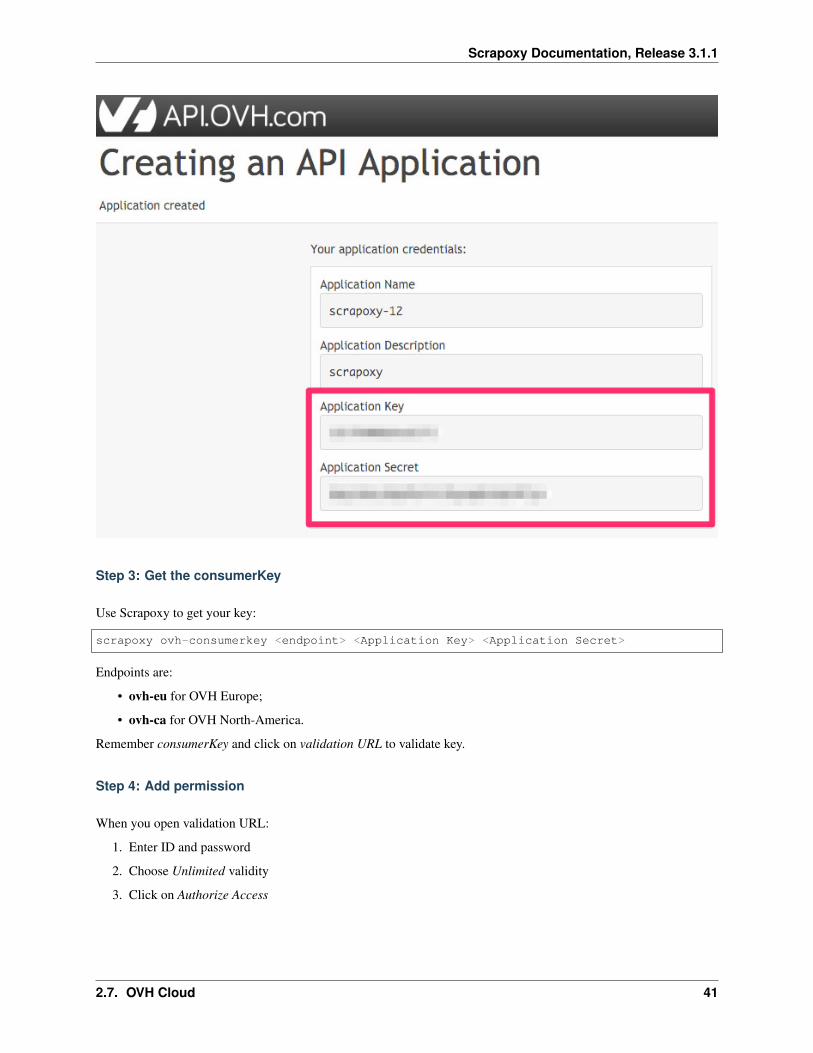
Step 1: Create an API Application
1. Go on https://eu.api.ovh.com/createApp/
2. Enter ID and password
3. Add a name name (e.g.: scrapoxy-12)
4. Add a description (e.g.: scrapoxy)
5. Click on Create keys
Step 2: Save application credentials
Remember Application Key and Application Secret:
40 Chapter 2. Documentation
Scrapoxy Documentation, Release 3.1.1
Step 3: Get the consumerKey
Use Scrapoxy to get your key:
scrapoxy ovh-consumerkey <endpoint> <Application Key> <Application Secret>
Endpoints are:
• ovh-eu for OVH Europe;
• ovh-ca for OVH North-America.
Remember consumerKey and click on validation URL to validate key.
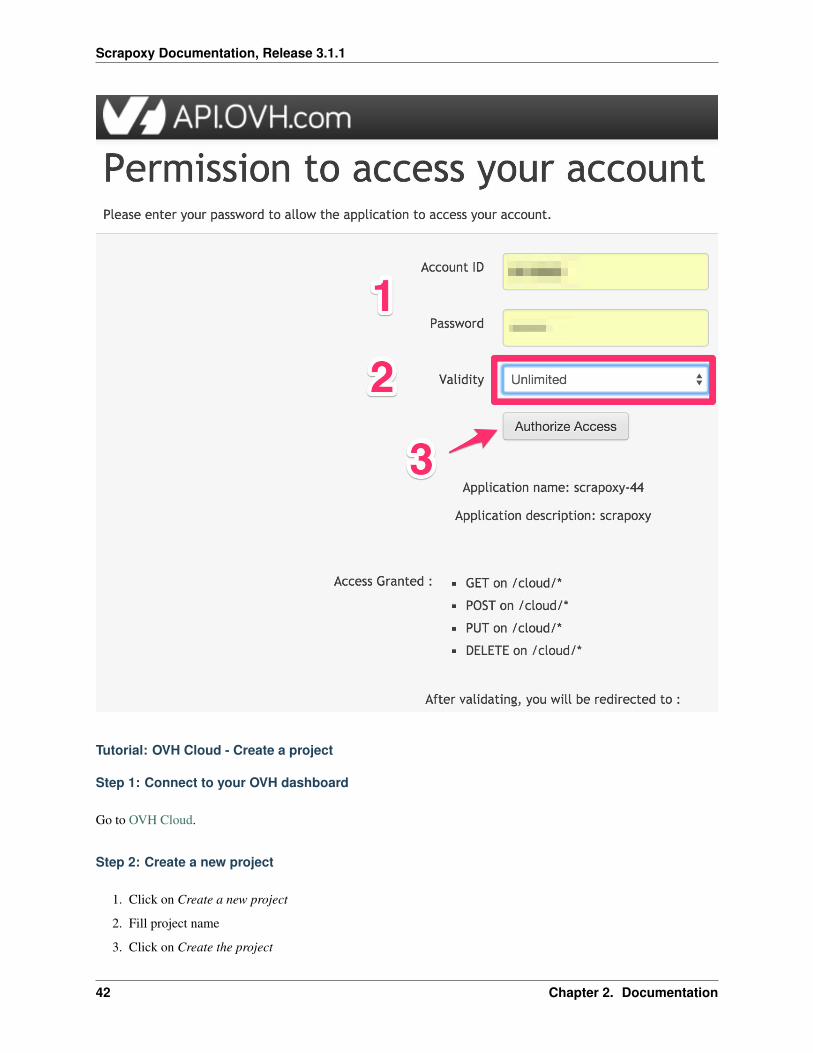
Step 4: Add permission
When you open validation URL:
1. Enter ID and password
2. Choose Unlimited validity
3. Click on Authorize Access
2.7. OVH Cloud 41
Scrapoxy Documentation, Release 3.1.1
Tutorial: OVH Cloud - Create a project
Step 1: Connect to your OVH dashboard
Go to OVH Cloud.
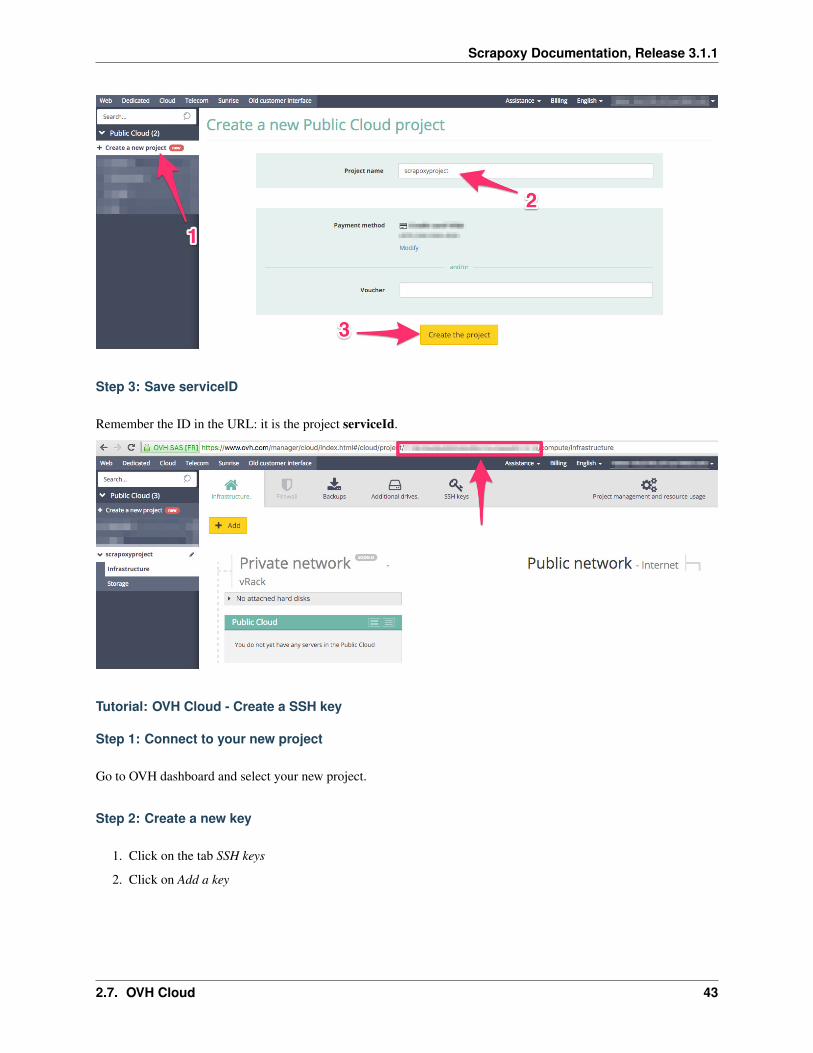
Step 2: Create a new project
1. Click on Create a new project
2. Fill project name
3. Click on Create the project
42 Chapter 2. Documentation
Scrapoxy Documentation, Release 3.1.1
Step 3: Save serviceID
Remember the ID in the URL: it is the project serviceId.
Tutorial: OVH Cloud - Create a SSH key
Step 1: Connect to your new project
Go to OVH dashboard and select your new project.
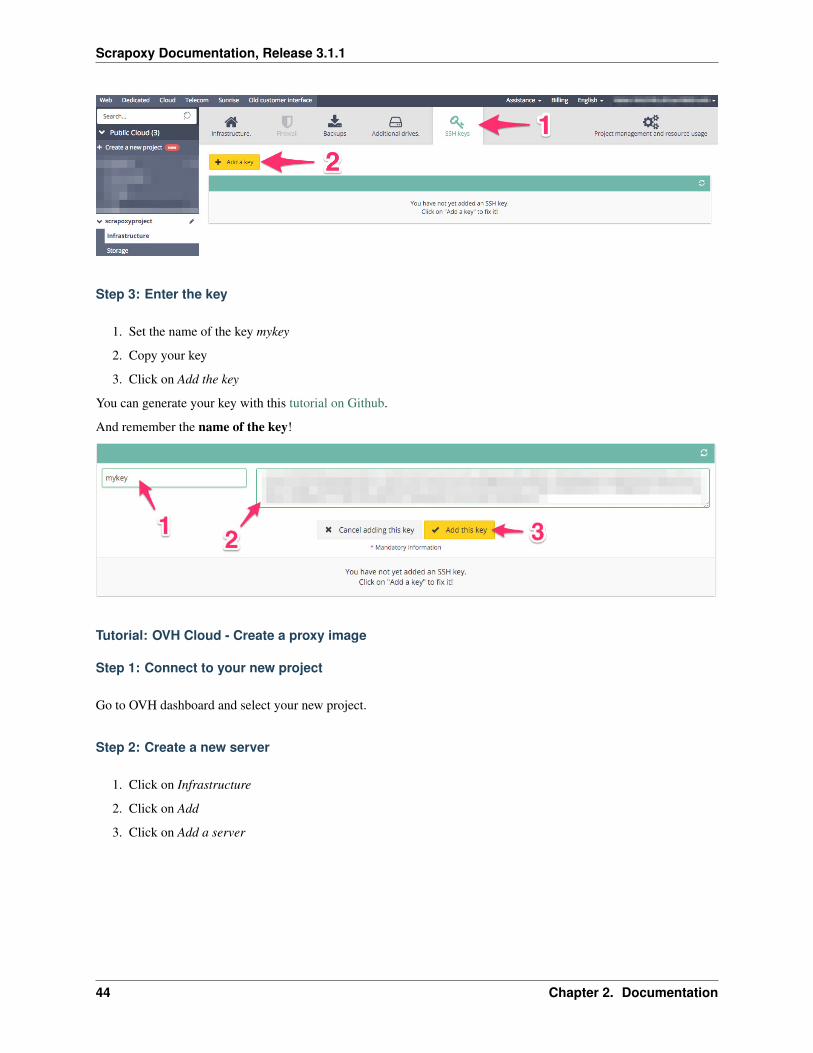
Step 2: Create a new key
1. Click on the tab SSH keys
2. Click on Add a key
2.7. OVH Cloud 43
Scrapoxy Documentation, Release 3.1.1
Step 3: Enter the key
1. Set the name of the key mykey
2. Copy your key
3. Click on Add the key
You can generate your key with this tutorial on Github.
And remember the name of the key!
Tutorial: OVH Cloud - Create a proxy image
Step 1: Connect to your new project
Go to OVH dashboard and select your new project.
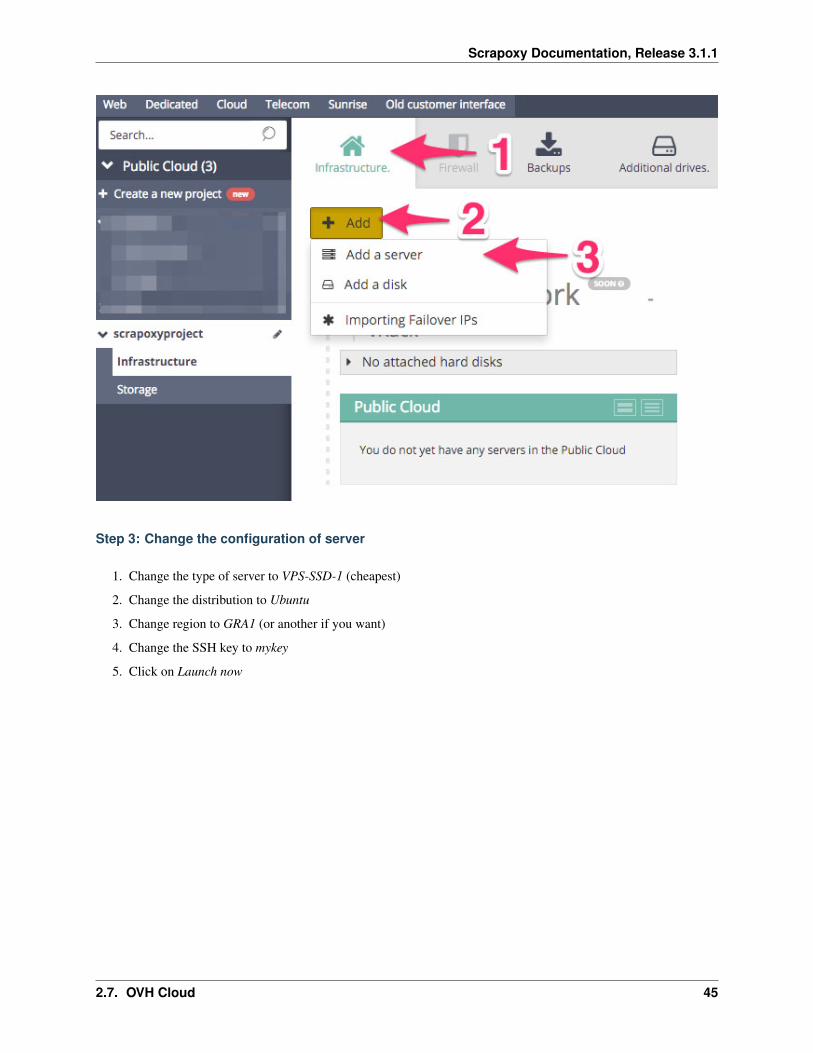
Step 2: Create a new server
1. Click on Infrastructure
2. Click on Add
3. Click on Add a server
44 Chapter 2. Documentation
Scrapoxy Documentation, Release 3.1.1
Step 3: Change the configuration of server
1. Change the type of server to VPS-SSD-1 (cheapest)
2. Change the distribution to Ubuntu
3. Change region to GRA1 (or another if you want)
4. Change the SSH key to mykey
5. Click on Launch now
2.7. OVH Cloud 45

Scrapoxy Documentation, Release 3.1.1
46 Chapter 2. Documentation
Scrapoxy Documentation, Release 3.1.1
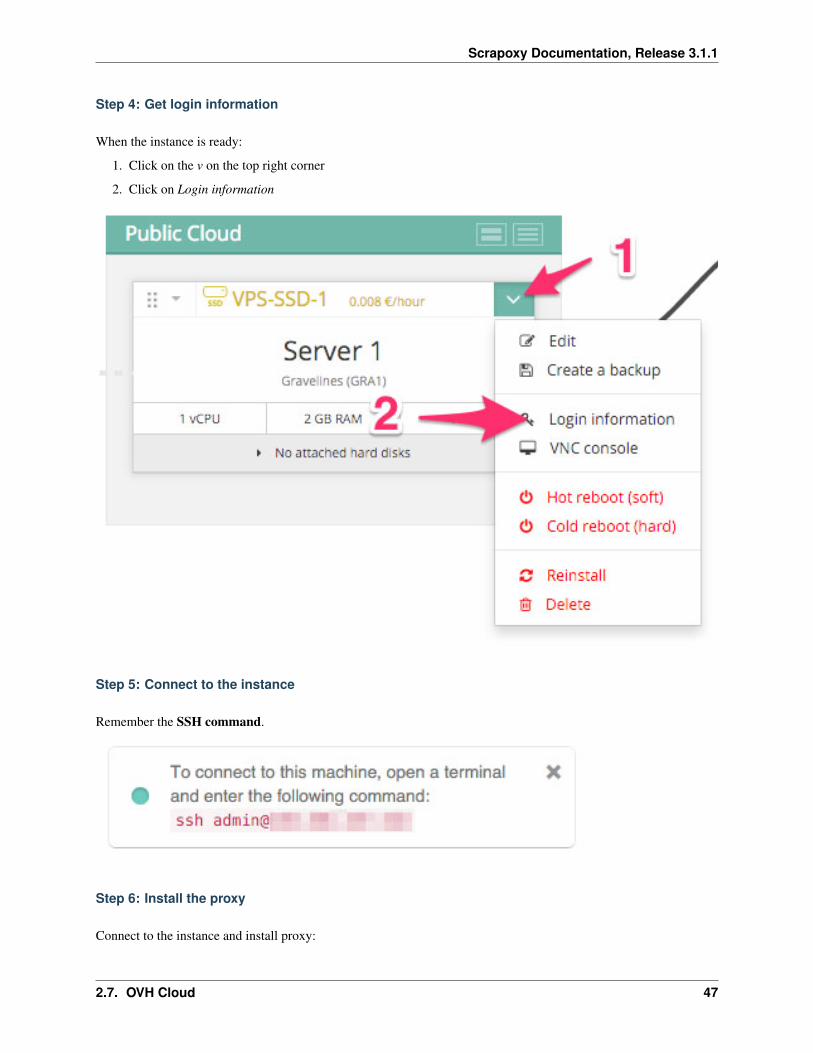
Step 4: Get login information
When the instance is ready:
1. Click on the v on the top right corner
2. Click on Login information
Step 5: Connect to the instance
Remember the SSH command.
Step 6: Install the proxy
Connect to the instance and install proxy:
2.7. OVH Cloud 47
Scrapoxy Documentation, Release 3.1.1
sudo apt-get install curl
and:
curl --silent --location https://deb.nodesource.com/setup_8.x | sudo bash -
and:
sudo apt-get install --yes nodejs
and:
curl --silent --location https://raw.githubusercontent.com/fabienvauchelles/scrapoxy/→˓master/tools/install/proxy.js | sudo tee /root/proxy.js > /dev/null
and:
curl --silent --location https://raw.githubusercontent.com/fabienvauchelles/scrapoxy/→˓master/tools/install/proxyup.sh | sudo tee /etc/init.d/proxyup.sh > /dev/null
and:
sudo chmod a+x /etc/init.d/proxyup.sh
and:
sudo update-rc.d proxyup.sh defaults
and:
sudo /etc/init.d/proxyup.sh start
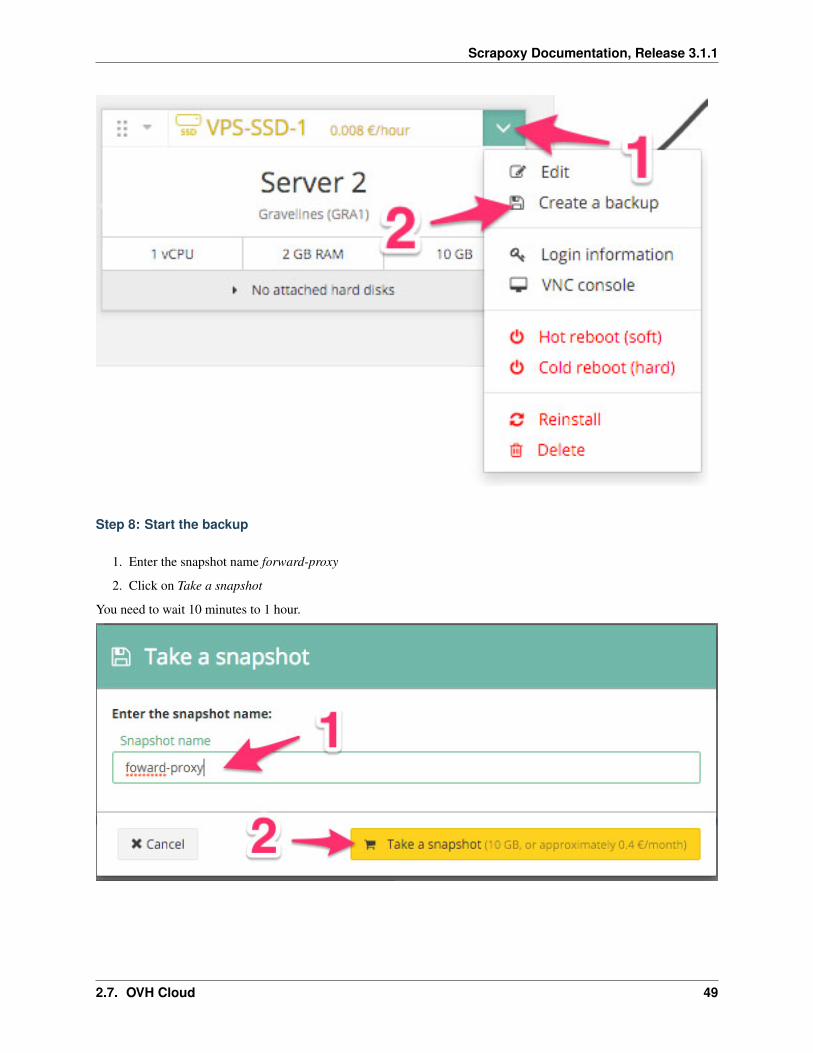
Step 7: Create a backup
Go back on the OVH project dashboard:
1. Click on the v on the top right corner
2. Click on Create a backup
48 Chapter 2. Documentation
Scrapoxy Documentation, Release 3.1.1
Step 8: Start the backup
1. Enter the snapshot name forward-proxy
2. Click on Take a snapshot
You need to wait 10 minutes to 1 hour.
2.7. OVH Cloud 49

Scrapoxy Documentation, Release 3.1.1
2.8 Vscale
Vscale is a russian cloud platform, like DigitalOcean.
Note: IP addresses are updated every hour. If the instances are restarted too quickly, they will have the same IPaddress.
2.8.1 Get started
Step 1: Get your Vscale credentials
See Get Vscale credentials.
Remember your token.
Step 2: Create a SSH key for the project
See Create a SSH key.
Remember your SSH key name (mykey).
Step 3: Create an image
See Create an image.
Remember your image name (forward-proxy).
Step 4: Update configuration
Open conf.json:
{"providers": ["type": "vscale","token": "YOUR PERSONAL TOKEN","region": "YOUR REGION (could be: msk0, spb0)","name": "YOUR SERVER NAME","sshKeyName": "YOUR SSH KEY (could be: mykey)","plan": "YOUR PLAN (could be: small)"
]},
And update config with your parameters.
50 Chapter 2. Documentation
Scrapoxy Documentation, Release 3.1.1
2.8.2 Configure Scrapoxy
Options: vscale
Option Default value Descriptiontype none Must be vscaletoken none Credentials for Vscaleregion none Vscale region (example: msk0, spb0)sshKeyName none Name of the SSH keyplan none Type of plan (example: small)name Proxy Name of the scaletimageName none Name of the image (for the proxy scalet)max none Maximum number of instances for this provider. If empty, there is no maximum.
2.8.3 Tutorials
Tutorial: Vscale - Get credentials
Step 1: Connect to your Vscale console
Go to Vscale console.
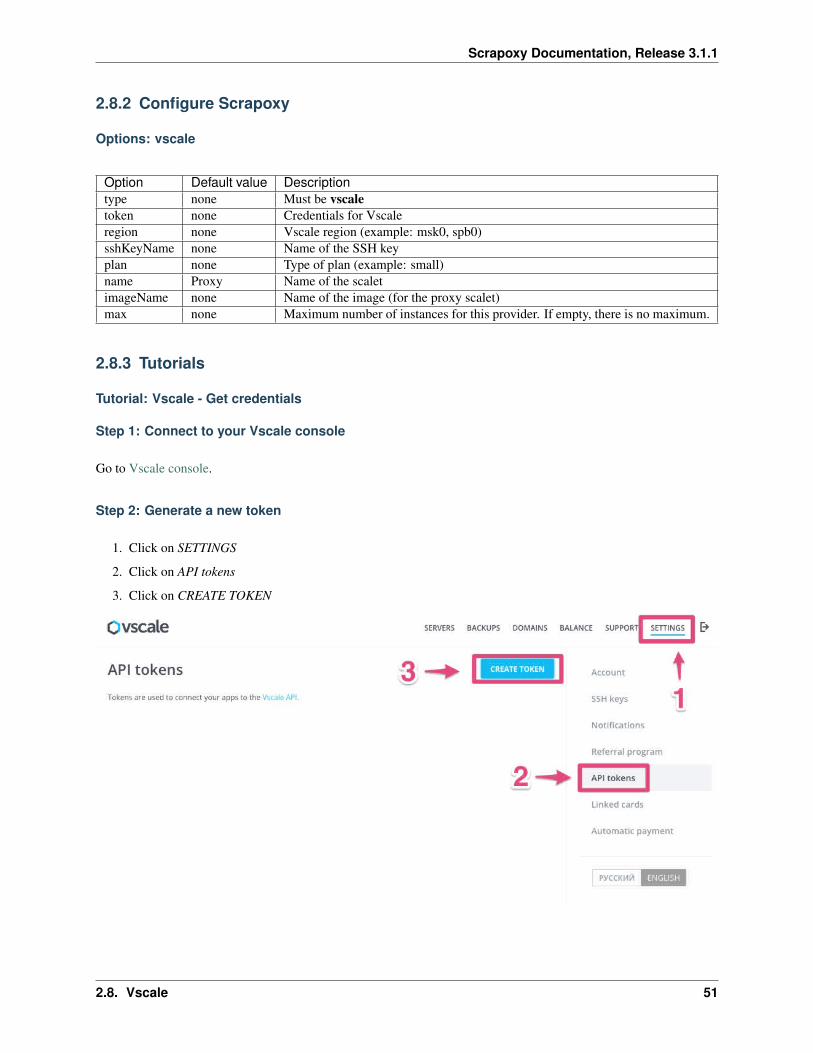
Step 2: Generate a new token
1. Click on SETTINGS
2. Click on API tokens
3. Click on CREATE TOKEN
2.8. Vscale 51
Scrapoxy Documentation, Release 3.1.1
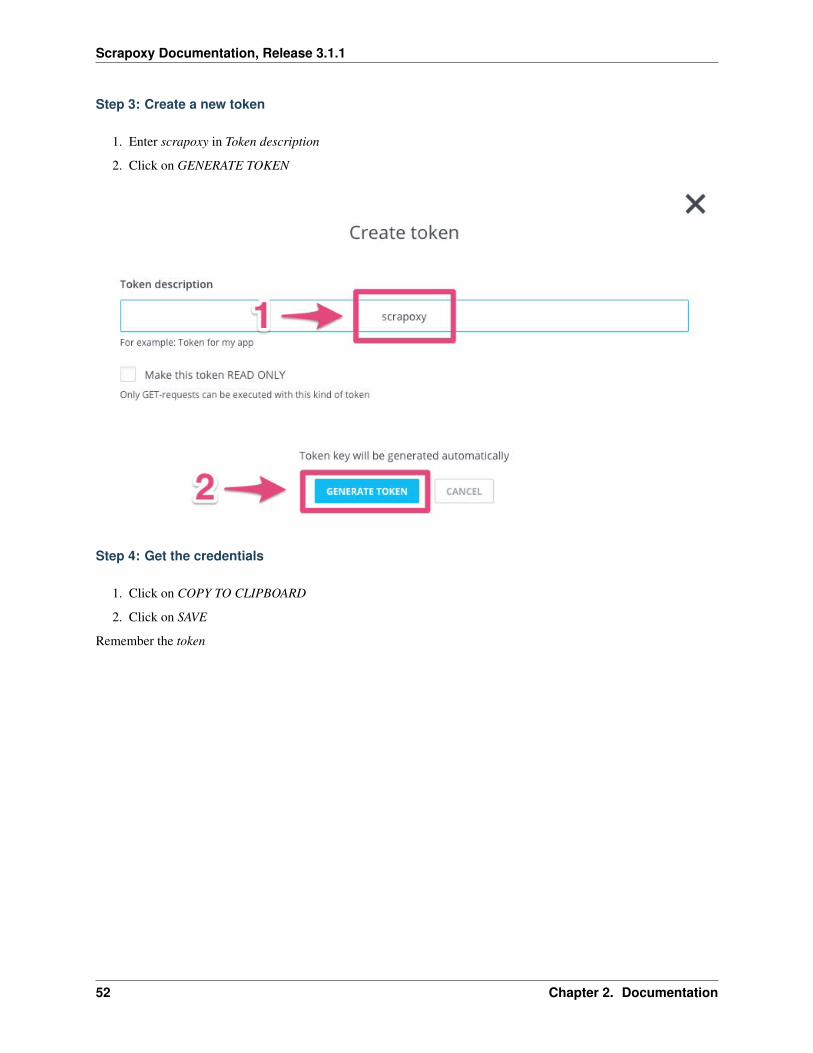
Step 3: Create a new token
1. Enter scrapoxy in Token description
2. Click on GENERATE TOKEN
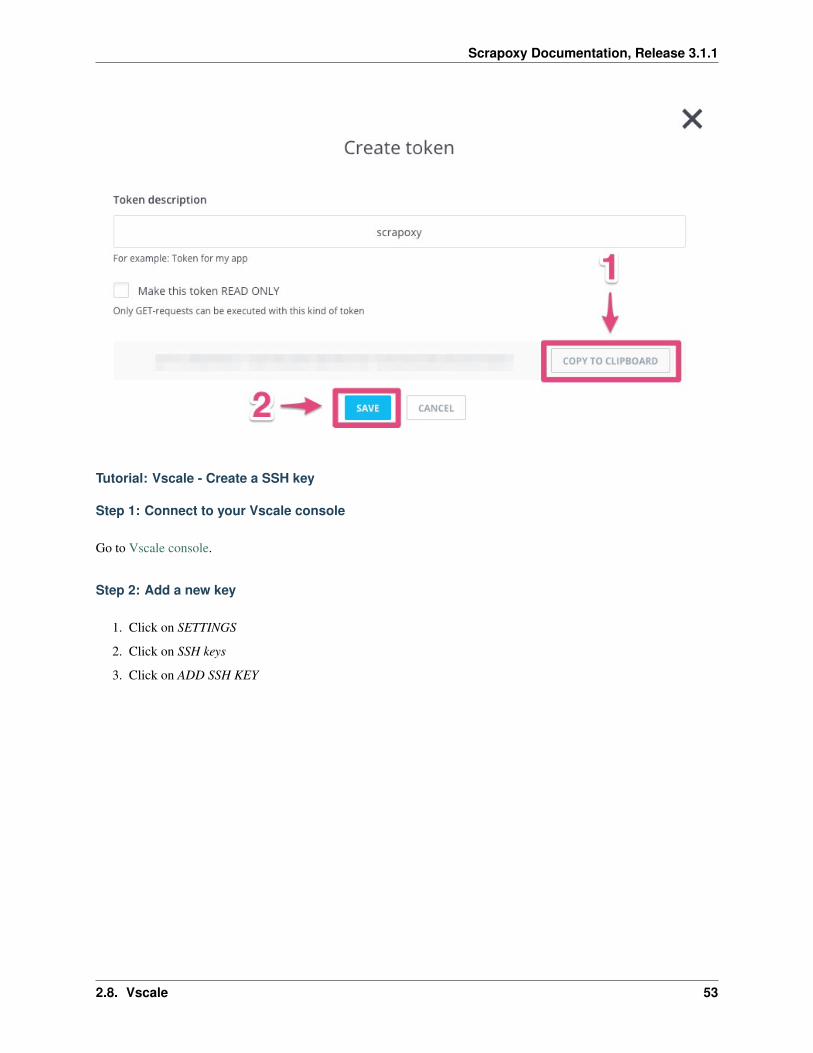
Step 4: Get the credentials
1. Click on COPY TO CLIPBOARD
2. Click on SAVE
Remember the token
52 Chapter 2. Documentation
Scrapoxy Documentation, Release 3.1.1
Tutorial: Vscale - Create a SSH key
Step 1: Connect to your Vscale console
Go to Vscale console.
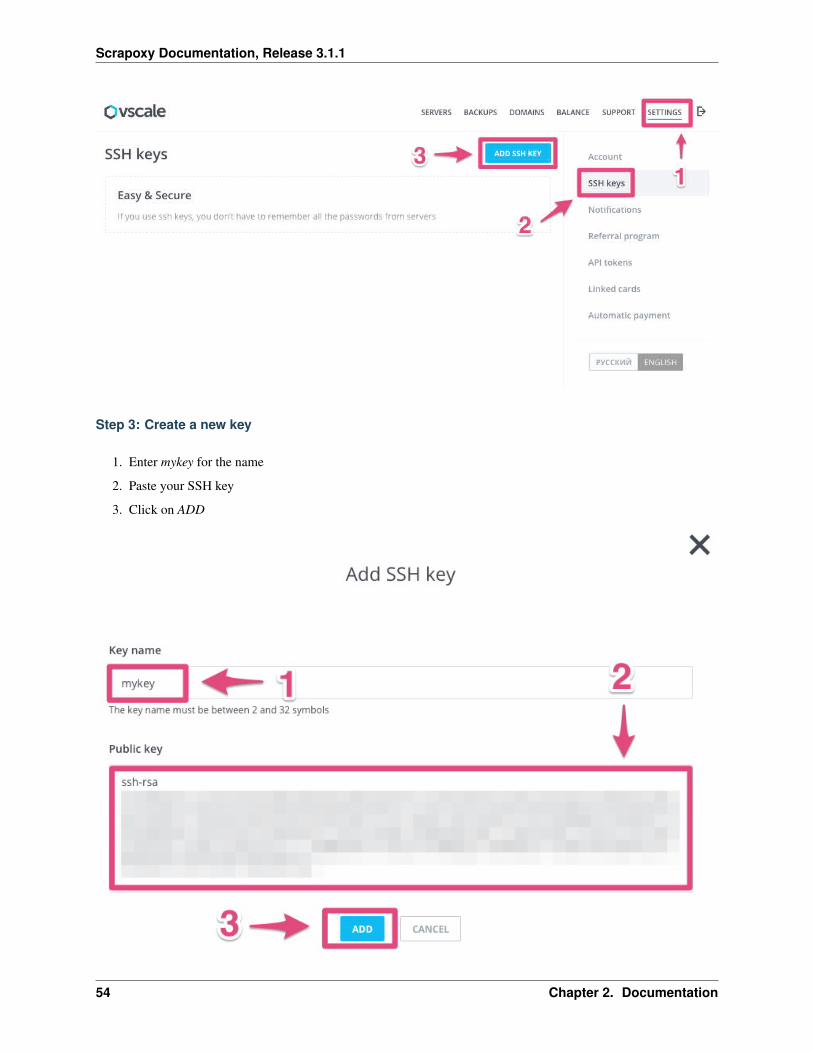
Step 2: Add a new key
1. Click on SETTINGS
2. Click on SSH keys
3. Click on ADD SSH KEY
2.8. Vscale 53
Scrapoxy Documentation, Release 3.1.1
Step 3: Create a new key
1. Enter mykey for the name
2. Paste your SSH key
3. Click on ADD
54 Chapter 2. Documentation

Scrapoxy Documentation, Release 3.1.1
You can generate your key with this tutorial on Github.
And remember the name of the key!
Tutorial: Vscale - Create an image
Step 1: Connect to your Vscale console
Go to Vscale console.
Step 2: Create a new scalet
1. Click on SERVERS
2. Click on CREATE SERVER
Step 3: Change the configuration of scalet
Choose an image Ubuntu 16.04 64bit:
2.8. Vscale 55
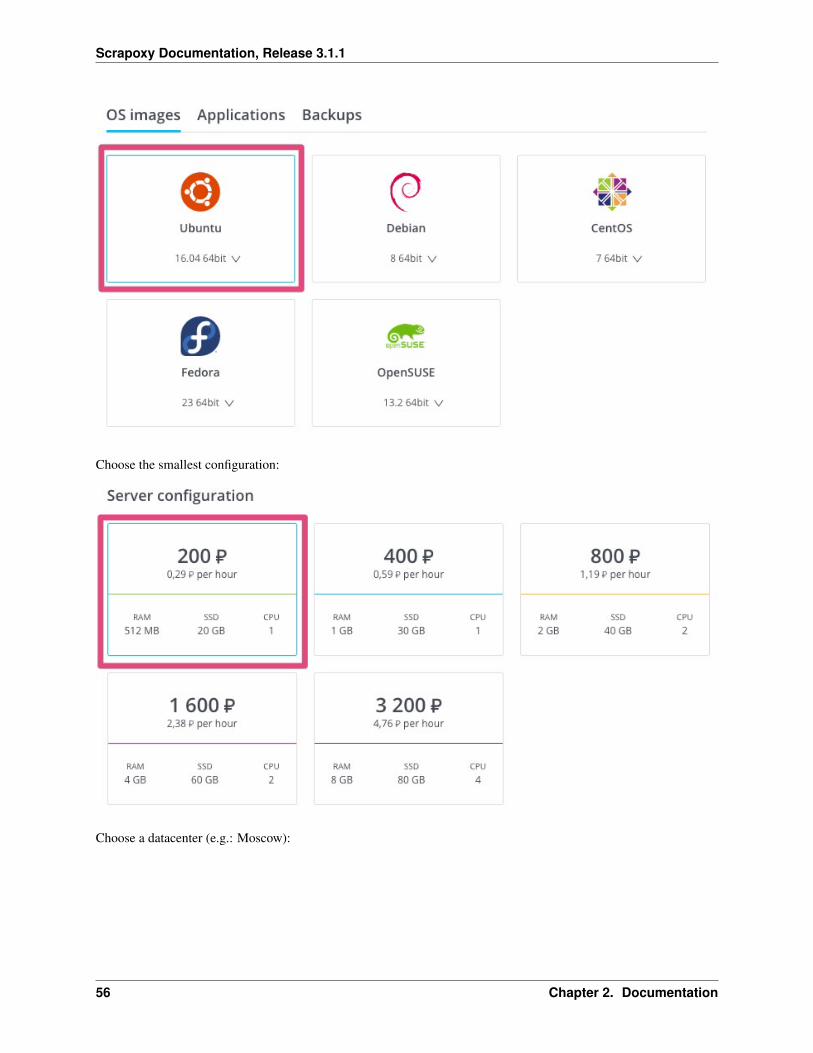
Scrapoxy Documentation, Release 3.1.1
Choose the smallest configuration:
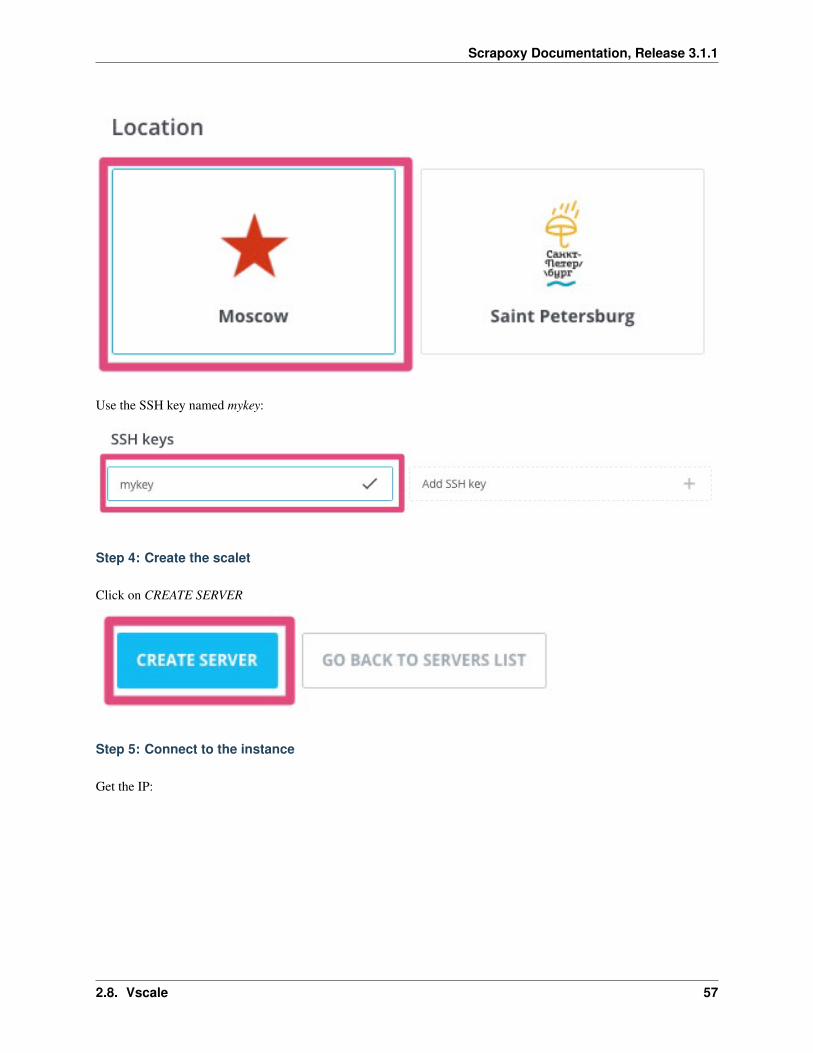
Choose a datacenter (e.g.: Moscow):
56 Chapter 2. Documentation
Scrapoxy Documentation, Release 3.1.1
Use the SSH key named mykey:
Step 4: Create the scalet
Click on CREATE SERVER
Step 5: Connect to the instance
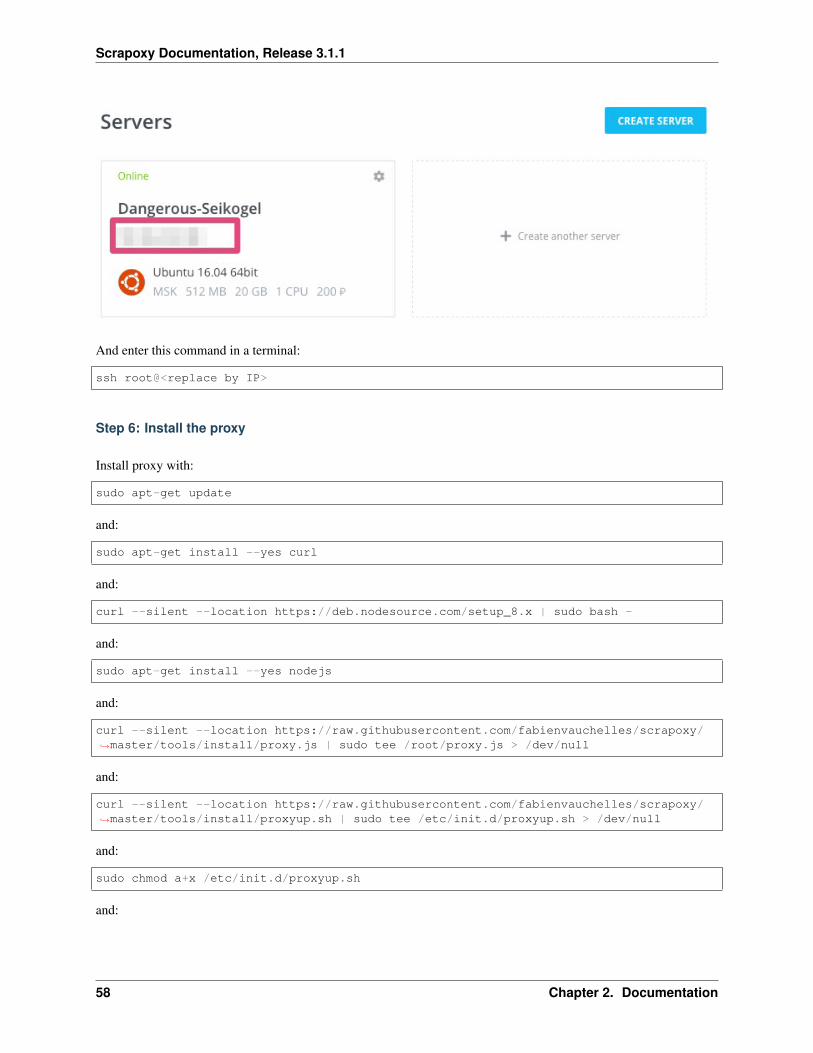
Get the IP:
2.8. Vscale 57
Scrapoxy Documentation, Release 3.1.1
And enter this command in a terminal:
ssh root@<replace by IP>
Step 6: Install the proxy
Install proxy with:
sudo apt-get update
and:
sudo apt-get install --yes curl
and:
curl --silent --location https://deb.nodesource.com/setup_8.x | sudo bash -
and:
sudo apt-get install --yes nodejs
and:
curl --silent --location https://raw.githubusercontent.com/fabienvauchelles/scrapoxy/→˓master/tools/install/proxy.js | sudo tee /root/proxy.js > /dev/null
and:
curl --silent --location https://raw.githubusercontent.com/fabienvauchelles/scrapoxy/→˓master/tools/install/proxyup.sh | sudo tee /etc/init.d/proxyup.sh > /dev/null
and:
sudo chmod a+x /etc/init.d/proxyup.sh
and:
58 Chapter 2. Documentation
Scrapoxy Documentation, Release 3.1.1
sudo update-rc.d proxyup.sh defaults
and:
sudo /etc/init.d/proxyup.sh start
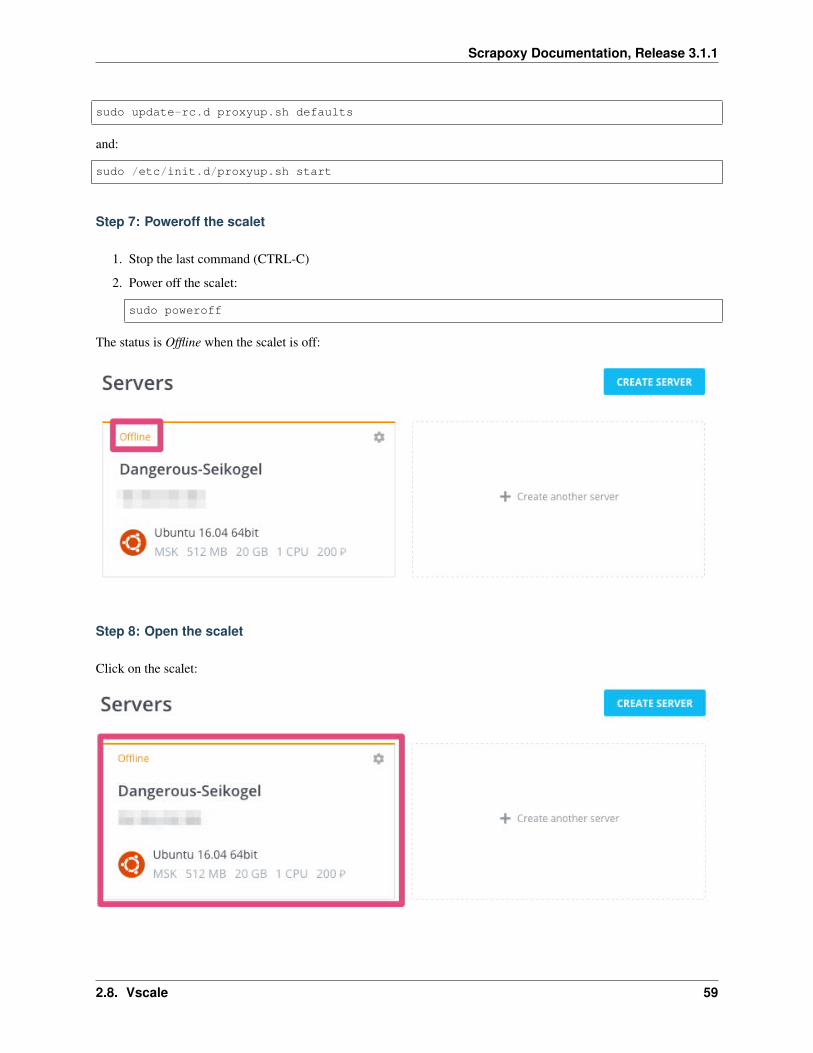
Step 7: Poweroff the scalet
1. Stop the last command (CTRL-C)
2. Power off the scalet:
sudo poweroff
The status is Offline when the scalet is off:
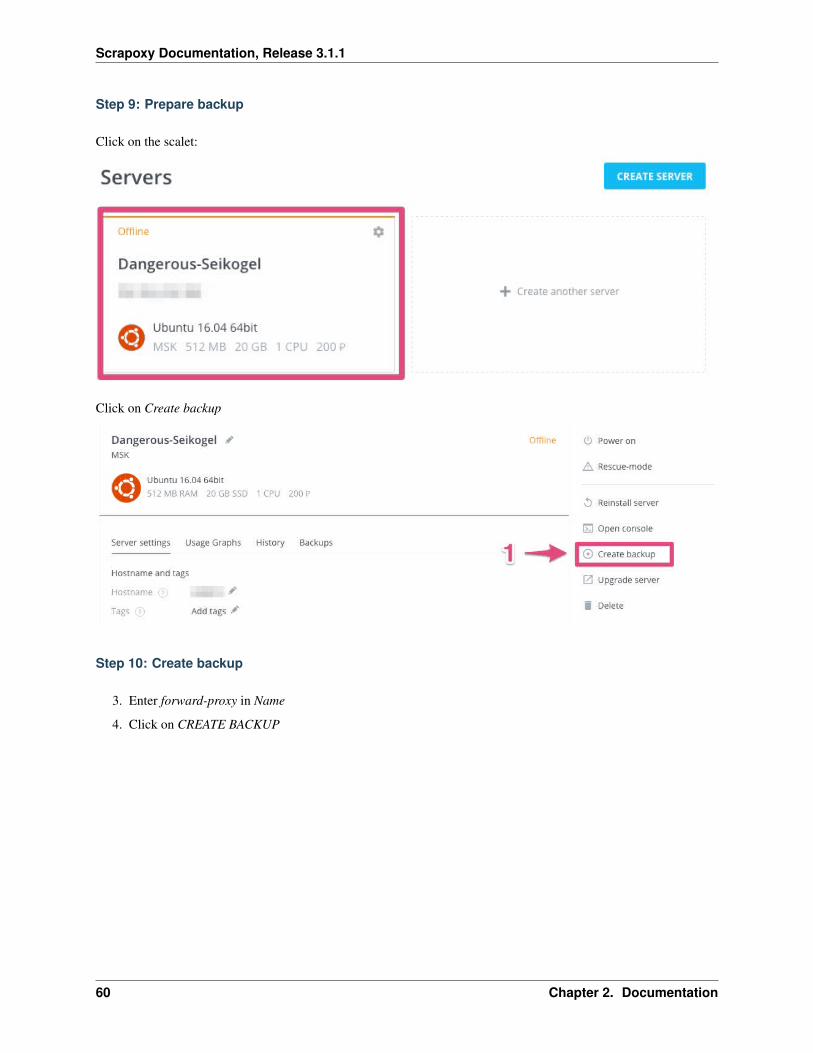
Step 8: Open the scalet
Click on the scalet:
2.8. Vscale 59
Scrapoxy Documentation, Release 3.1.1
Step 9: Prepare backup
Click on the scalet:
Click on Create backup
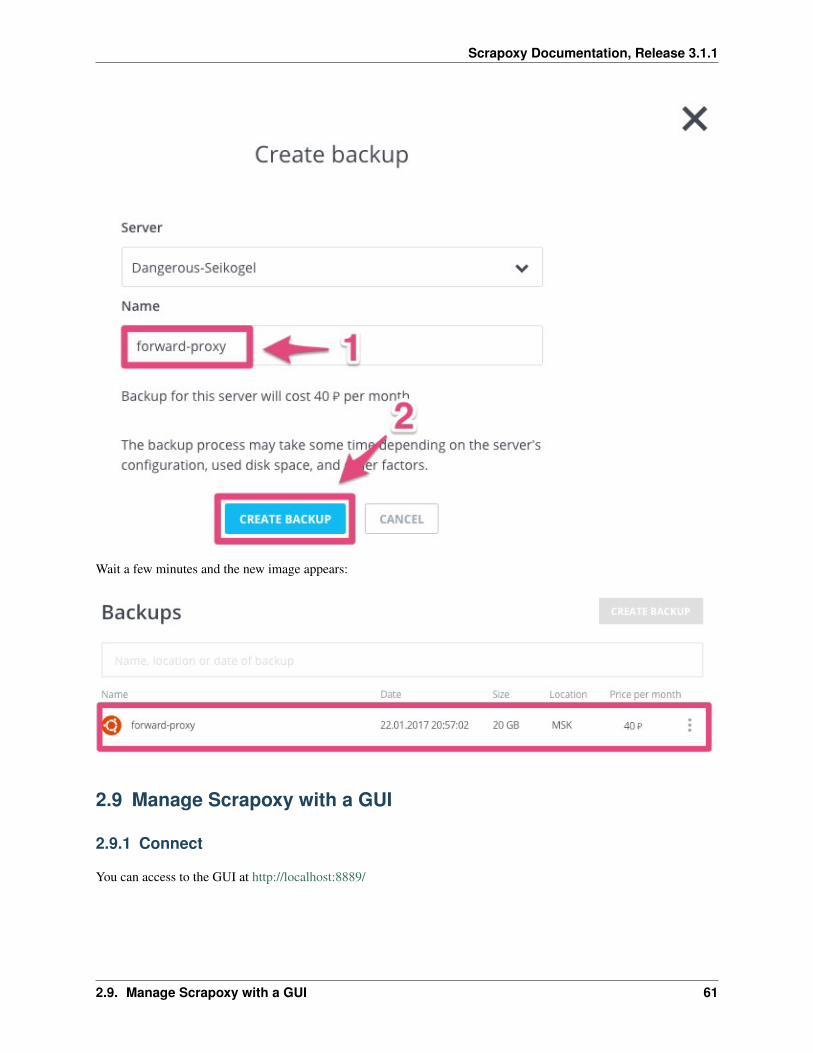
Step 10: Create backup
3. Enter forward-proxy in Name
4. Click on CREATE BACKUP
60 Chapter 2. Documentation
Scrapoxy Documentation, Release 3.1.1
Wait a few minutes and the new image appears:
2.9 Manage Scrapoxy with a GUI
2.9.1 Connect
You can access to the GUI at http://localhost:8889/
2.9. Manage Scrapoxy with a GUI 61
Scrapoxy Documentation, Release 3.1.1
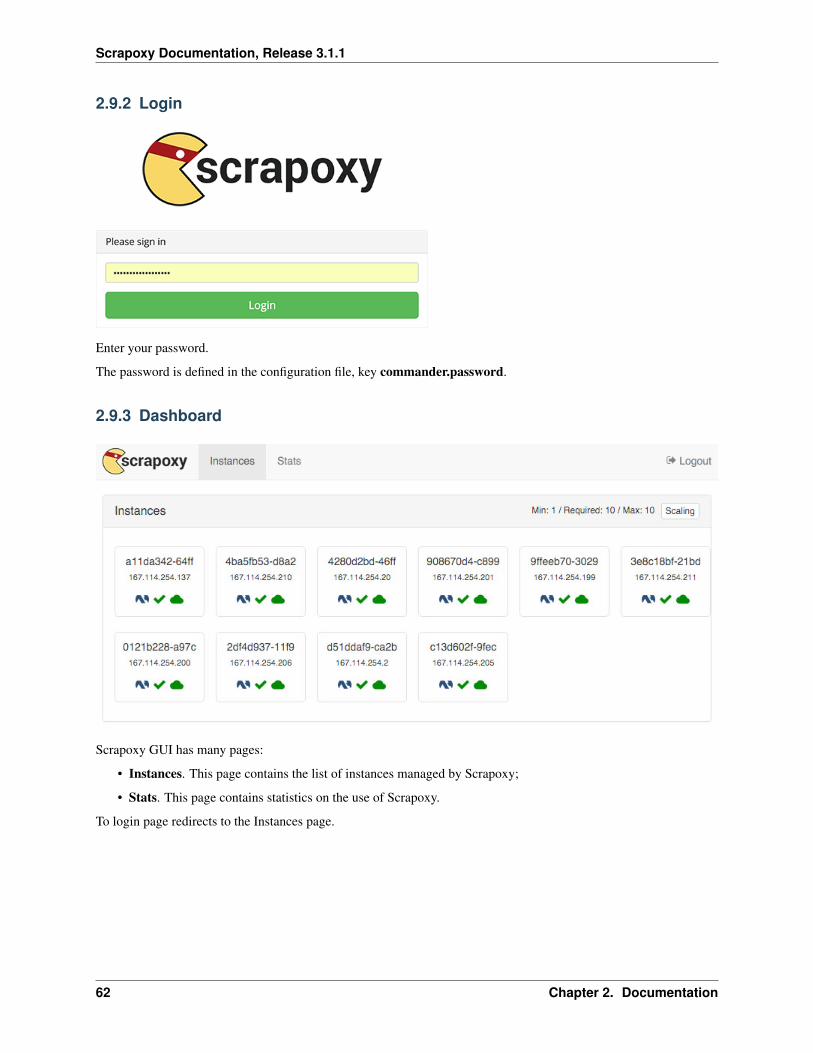
2.9.2 Login
Enter your password.
The password is defined in the configuration file, key commander.password.
2.9.3 Dashboard
Scrapoxy GUI has many pages:
• Instances. This page contains the list of instances managed by Scrapoxy;
• Stats. This page contains statistics on the use of Scrapoxy.
To login page redirects to the Instances page.
62 Chapter 2. Documentation
Scrapoxy Documentation, Release 3.1.1
2.9.4 Page: Instances
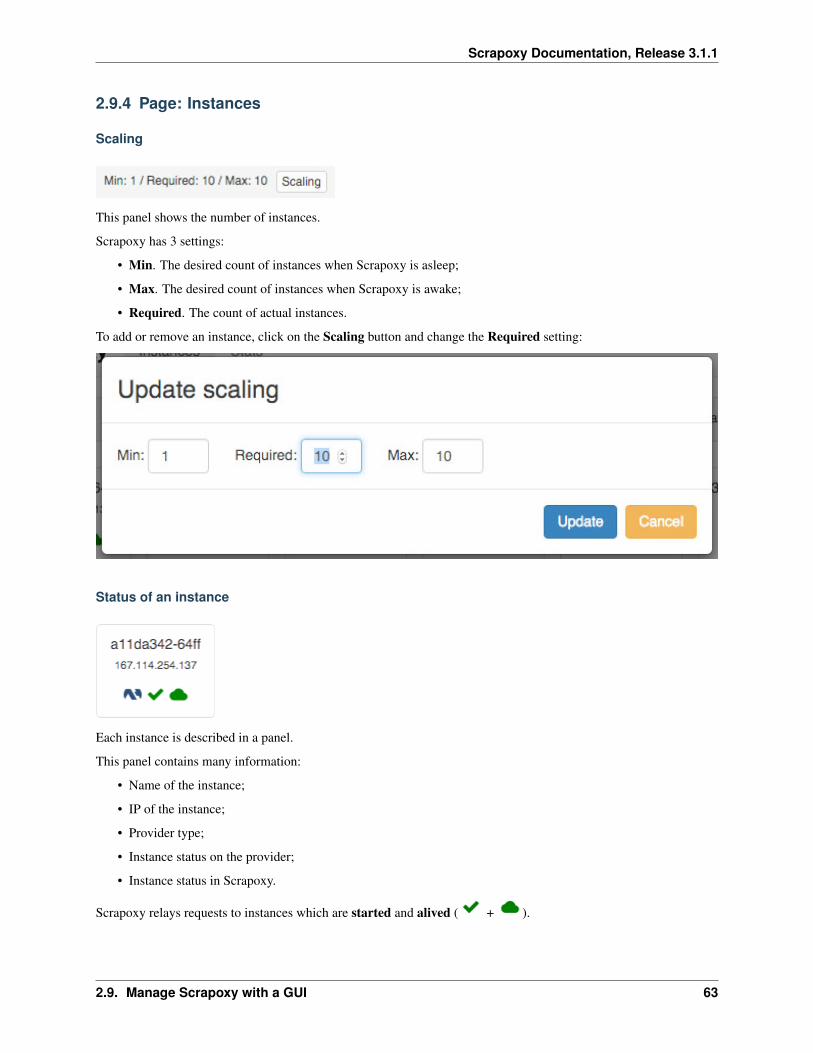
Scaling
This panel shows the number of instances.
Scrapoxy has 3 settings:
• Min. The desired count of instances when Scrapoxy is asleep;
• Max. The desired count of instances when Scrapoxy is awake;
• Required. The count of actual instances.
To add or remove an instance, click on the Scaling button and change the Required setting:
Status of an instance
Each instance is described in a panel.
This panel contains many information:
• Name of the instance;
• IP of the instance;
• Provider type;
• Instance status on the provider;
• Instance status in Scrapoxy.
Scrapoxy relays requests to instances which are started and alived ( + ).
2.9. Manage Scrapoxy with a GUI 63
Scrapoxy Documentation, Release 3.1.1
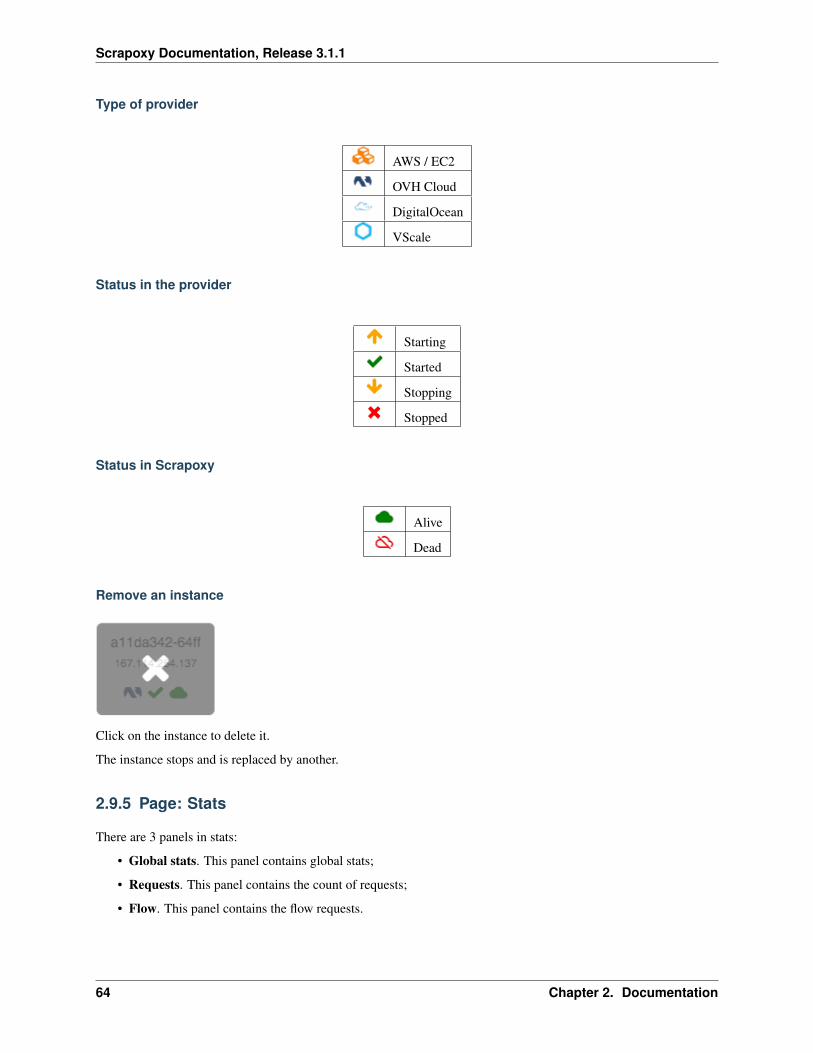
Type of provider
AWS / EC2
OVH Cloud
DigitalOcean
VScale
Status in the provider
Starting
Started
Stopping
Stopped
Status in Scrapoxy
Alive
Dead
Remove an instance
Click on the instance to delete it.
The instance stops and is replaced by another.
2.9.5 Page: Stats
There are 3 panels in stats:
• Global stats. This panel contains global stats;
• Requests. This panel contains the count of requests;
• Flow. This panel contains the flow requests.
64 Chapter 2. Documentation

Scrapoxy Documentation, Release 3.1.1
Global
This panel has 4 indicators:
• the total count of requests to monitor performance;
• the total count of received and sent data to control the volume of data;
• the total of stop instance orders, to monitor anti-blacklisting;
• the count of requests received by an instance (minimum, average, maximum) to check anti-blacklisting per-formance.
Requests
This panel combines 2 statistics on 1 chart.
It measures:
• the count of requests per minute;
• the average execution time of a request (round trip), per minute.
2.9. Manage Scrapoxy with a GUI 65

Scrapoxy Documentation, Release 3.1.1
Flow
This panel combines 2 statistics on 1 chart.
It measures:
• the flow received by Scrapoxy;
• the flow sent by Scrapoxy.
How to increase the number of requests per minute ?
You add new instances (or new scrapers).
Do you increase the number of requests par minute ?
• Yes: Perfect!
• No: You pay instances for nothing.
Do I overload the target website ?
You add new instances (or new scrapers).
Did the time of response increase ?
• Yes: The target website is overloaded.
• No: Perfect!
2.10 Understand Scrapoxy
2.10.1 Architecture
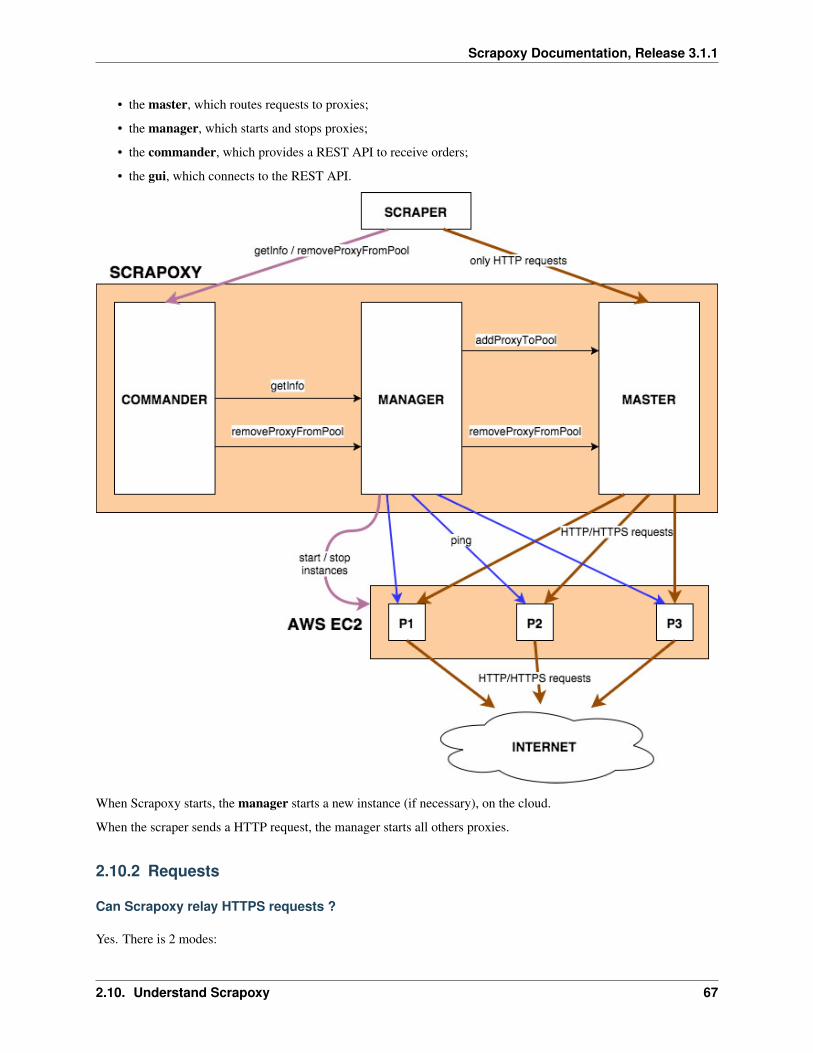
Scrapoxy consists of 4 parts:
66 Chapter 2. Documentation
Scrapoxy Documentation, Release 3.1.1
• the master, which routes requests to proxies;
• the manager, which starts and stops proxies;
• the commander, which provides a REST API to receive orders;
• the gui, which connects to the REST API.
When Scrapoxy starts, the manager starts a new instance (if necessary), on the cloud.
When the scraper sends a HTTP request, the manager starts all others proxies.
2.10.2 Requests
Can Scrapoxy relay HTTPS requests ?
Yes. There is 2 modes:
2.10. Understand Scrapoxy 67
Scrapoxy Documentation, Release 3.1.1
Mode A: HTTPS CONNECT with MITM (Man-In-The-Middle)
This mode is for unsecure browser like PhantomJS. It allow Scrapoxy to decrypt SSL and override HTTP headers(like User-Agent).
This solution can trigger some SSL alerts.
Mode B: HTTPS CONNECT without MITM
This mode is for secure browser. It doesn’t allow Scrapoxy to override HTTP headers (like User-Agent). You mustmanually set the User-Agent.
The best solution is to use only 1 User-Agent (it would be strange to have multiple User-Agents coming from 1 IP,isn’t it?).
Mode C: HTTPS over HTTP (or *no tunnel* mode)
This mode is for scraper. It allows Scrapoxy to override HTTP headers (like User-Agent).
The scraper must send a HTTP request with an HTTPS URL in the Location header.
Example:
GET /index.htmlHost: localhost:8888Location: https://www.google.com/index.htmlAccept: text/html
Scrapers accept a GET (or POST) method instead of CONNECT for proxy.
With Scrapy (Python), add /?noconnect to the proxy URL:
PROXY='http://localhost:8888/?noconnect
With Request (Node.js), add tunnel:false to options:
request({method: 'GET',url: 'https://api.ipify.org/',tunnel: false,proxy: 'http://localhost:8888',
}, (err, response, body) => {...});
What is the proxy that returned the response ?
Scrapoxy adds to the response an HTTP header x-cache-proxyname.
This header contains the name of the proxy.
If you are using HTTPS in HTTPS CONNECT without MITM, Scrapoxy is unable to add this header since the trafficis encrypted.
Can the scraper force the request to go through a specific proxy?
Yes. The scraper adds the proxy name in the header x-cache-proxyname.
When the scraper receives a response, this header is extracted. The scraper adds this header to the next request.
68 Chapter 2. Documentation
Scrapoxy Documentation, Release 3.1.1
Does Scrapoxy override User Agent ?
Yes. When an instance starts (or restarts), it gets a random User Agent (from the User Agent list).
When the instance receives a request, it overrides the User Agent.
2.10.3 Blacklisting
How can you manage blacklisted response ?
Remember, Scrapoxy cannot detect blacklisted response because it is too specific to a scraping usecase. It can be a503 HTTP response, a captcha, a longer response, etc.
Anti-blacklisting is a job for the scraper:
1. The scraper must detect a blacklisted response;
2. The scraper extracts the name of the instance from the HTTP response header (see here);
3. The scraper asks to Scrapoxy to remove the instance with the API (see here).
When the blacklisted response is detected, Scrapoxy will replace the instance with a valid one (new IP address).
There is a tutorial: Manage blacklisted request with Scrapy.
2.10.4 Instances management
How does multi-providers work ?
In the configuration file, you can specify multiple providers (the providers field is an array).
You can also specify the maximum number of instances by provider, with the max parameter (for example: 2 instancesmaximum for AWSEC2 and unlimited for DigitalOcean).
When several instances are requested, the algorithm randomly asks the instances at the providers, within the specifiedcapacities.
How does the monitoring mechanism ?
1. the manager asks the cloud how many instances are alive. It is the initial state;
2. the manager creates a target state, with the new count of instance;
3. the manager generates the commands to reach target state from the initial state;
4. the manager sends the commands to the cloud.
These steps are very important because you cannot guess which is the initial state. Because an instance may bedead!
Scrapoxy can restart an instance if:
• the instance is dead (stop status or no ping);
• the living limit is reached: Scrapoxy regulary restarts the instance to change the IP address.
2.10. Understand Scrapoxy 69

Scrapoxy Documentation, Release 3.1.1
Do you need to create a VM image ?
By default, we provide you an AMI proxy instance on AWS / EC2. This is a CONNECT proxy opened on TCP port3128.
But you can use every software which accept the CONNECT method (Squid, Tinyproxy, etc.).
Can you leave Scrapoxy started ?
Yes. Scrapoxy has 2 modes: an awake mode and an asleep mode.
When Scrapoxy receives no request after a while, he falls asleep. It sets the count of instances to minimum(instance.scaling.min).
When Scrapoxy receives a request, it wakes up. It fixes the count of instances to maximum (instance.scaling.max).
Scrapoxy needs at least 1 instance to receive the awake request.
2.11 Control Scrapoxy with a REST API
2.11.1 Endpoint
You can access to the commander API at http://localhost:8889/api
2.11.2 Authentication
Every requests must have an Authorization header.
The value is the hash base64 of the password set in the configuration (commander/password).
70 Chapter 2. Documentation

Scrapoxy Documentation, Release 3.1.1
2.11.3 Instances
Get all instances
Request
GET http://localhost:8889/api/instances
Response (JSON)
Status: 200
The body contains all informations about instances.
Example:
const request = require('request');
const password = 'YOUR_COMMANDER_PASSWORD';
const opts = {method: 'GET',url: 'http://localhost:8889/api/instances',headers: {
'Authorization': new Buffer(password).toString('base64'),},
};
request(opts, (err, res, body) => {if (err) return console.log('Error: ', err);
console.log('Status: %d\n\n', res.statusCode);
const bodyParsed = JSON.parse(body);
console.log(bodyParsed);});
Stop an instance
Request
POST http://localhost:8889/api/instances/stop
JSON payload:
{"name": "<name of the proxy>"
}
2.11. Control Scrapoxy with a REST API 71
Scrapoxy Documentation, Release 3.1.1
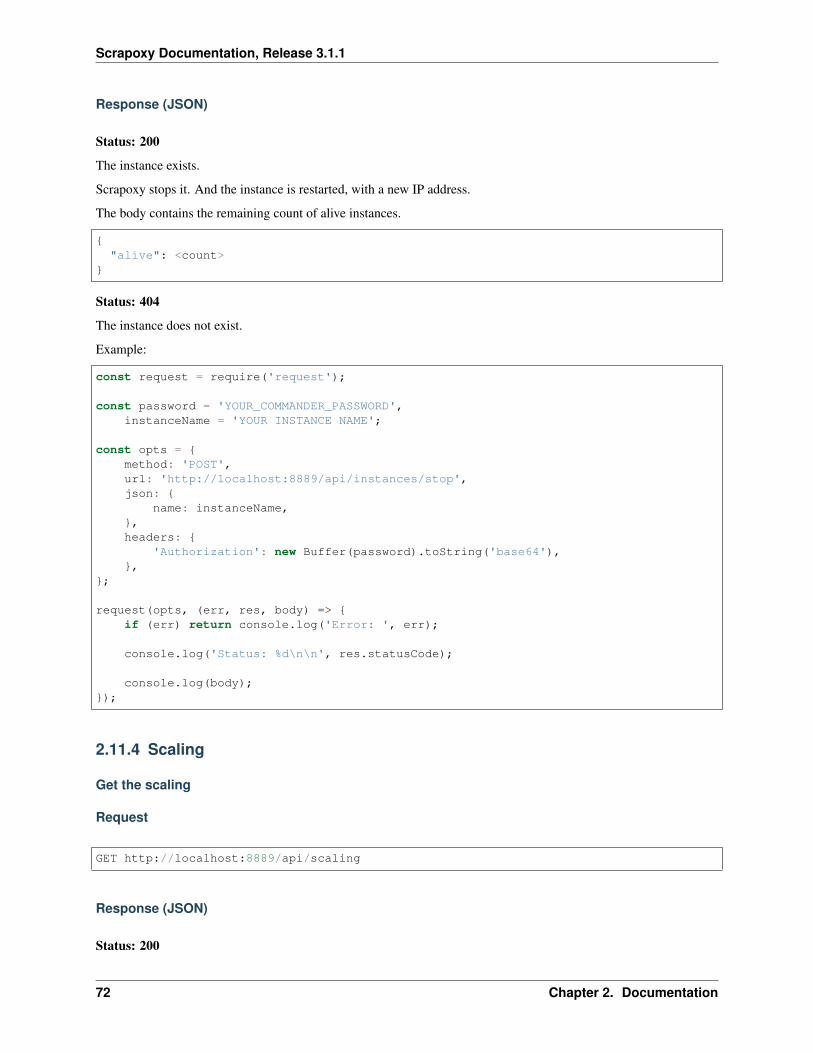
Response (JSON)
Status: 200
The instance exists.
Scrapoxy stops it. And the instance is restarted, with a new IP address.
The body contains the remaining count of alive instances.
{"alive": <count>
}
Status: 404
The instance does not exist.
Example:
const request = require('request');
const password = 'YOUR_COMMANDER_PASSWORD',instanceName = 'YOUR INSTANCE NAME';
const opts = {method: 'POST',url: 'http://localhost:8889/api/instances/stop',json: {
name: instanceName,},headers: {
'Authorization': new Buffer(password).toString('base64'),},
};
request(opts, (err, res, body) => {if (err) return console.log('Error: ', err);
console.log('Status: %d\n\n', res.statusCode);
console.log(body);});
2.11.4 Scaling
Get the scaling
Request
GET http://localhost:8889/api/scaling
Response (JSON)
Status: 200
72 Chapter 2. Documentation
Scrapoxy Documentation, Release 3.1.1
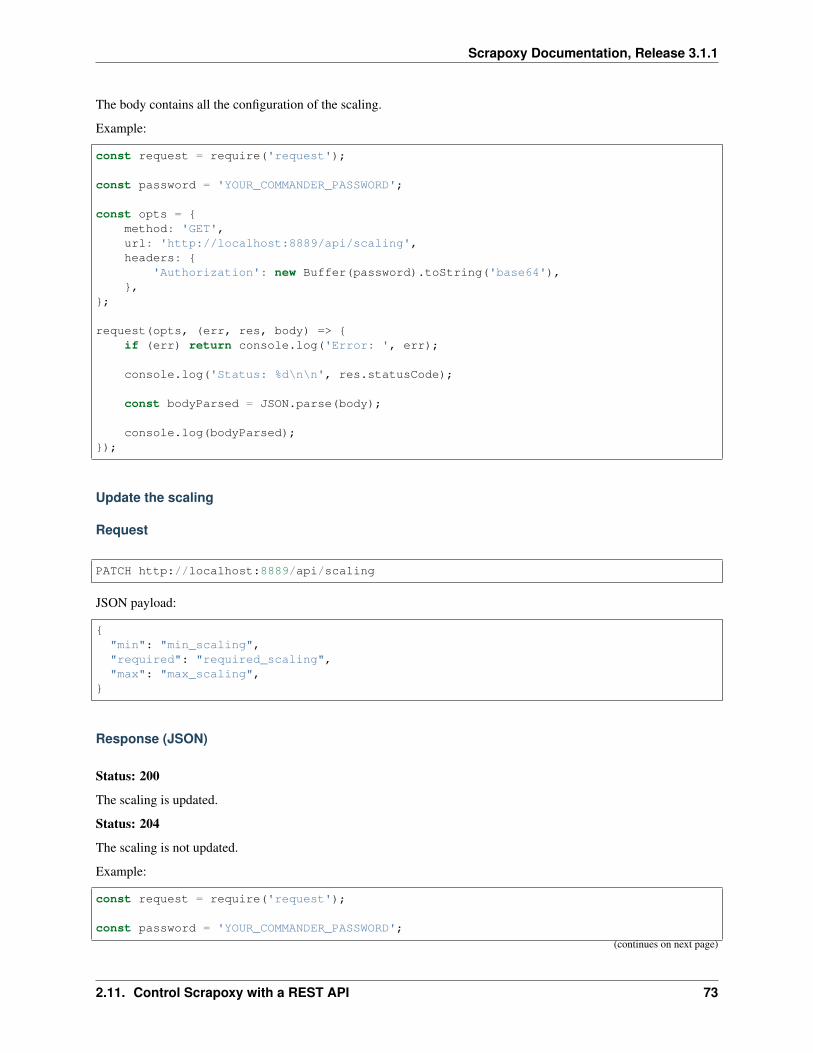
The body contains all the configuration of the scaling.
Example:
const request = require('request');
const password = 'YOUR_COMMANDER_PASSWORD';
const opts = {method: 'GET',url: 'http://localhost:8889/api/scaling',headers: {
'Authorization': new Buffer(password).toString('base64'),},
};
request(opts, (err, res, body) => {if (err) return console.log('Error: ', err);
console.log('Status: %d\n\n', res.statusCode);
const bodyParsed = JSON.parse(body);
console.log(bodyParsed);});
Update the scaling
Request
PATCH http://localhost:8889/api/scaling
JSON payload:
{"min": "min_scaling","required": "required_scaling","max": "max_scaling",
}
Response (JSON)
Status: 200
The scaling is updated.
Status: 204
The scaling is not updated.
Example:
const request = require('request');
const password = 'YOUR_COMMANDER_PASSWORD';
(continues on next page)
2.11. Control Scrapoxy with a REST API 73
Scrapoxy Documentation, Release 3.1.1
(continued from previous page)
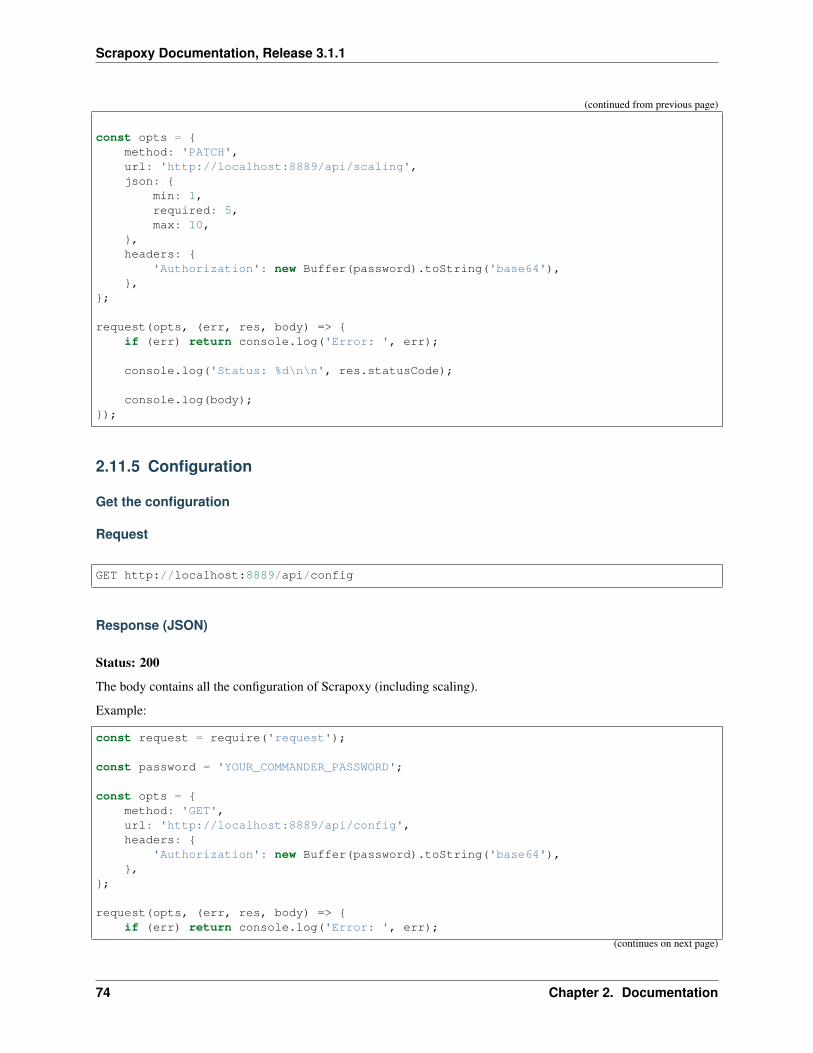
const opts = {method: 'PATCH',url: 'http://localhost:8889/api/scaling',json: {
min: 1,required: 5,max: 10,
},headers: {
'Authorization': new Buffer(password).toString('base64'),},
};
request(opts, (err, res, body) => {if (err) return console.log('Error: ', err);
console.log('Status: %d\n\n', res.statusCode);
console.log(body);});
2.11.5 Configuration
Get the configuration
Request
GET http://localhost:8889/api/config
Response (JSON)
Status: 200
The body contains all the configuration of Scrapoxy (including scaling).
Example:
const request = require('request');
const password = 'YOUR_COMMANDER_PASSWORD';
const opts = {method: 'GET',url: 'http://localhost:8889/api/config',headers: {
'Authorization': new Buffer(password).toString('base64'),},
};
request(opts, (err, res, body) => {if (err) return console.log('Error: ', err);
(continues on next page)
74 Chapter 2. Documentation

Scrapoxy Documentation, Release 3.1.1
(continued from previous page)
console.log('Status: %d\n\n', res.statusCode);
const bodyParsed = JSON.parse(body);
console.log(bodyParsed);});
Update the configuration
Request
PATCH http://localhost:8889/api/config
JSON payload:
{"key_to_override": "<new_value>","section": {"key2_to_override": "<new value>"
}}
Response (JSON)
Status: 200
The configuration is updated.
Status: 204
The configuration is not updated.
Example:
const request = require('request');
const password = 'YOUR_COMMANDER_PASSWORD';
const opts = {method: 'PATCH',url: 'http://localhost:8889/api/config',json: {
instance: {scaling: {
max: 300,},
},},headers: {
'Authorization': new Buffer(password).toString('base64'),},
};
(continues on next page)
2.11. Control Scrapoxy with a REST API 75
Scrapoxy Documentation, Release 3.1.1
(continued from previous page)
request(opts, (err, res, body) => {if (err) return console.log('Error: ', err);
console.log('Status: %d\n\n', res.statusCode);
console.log(body);});
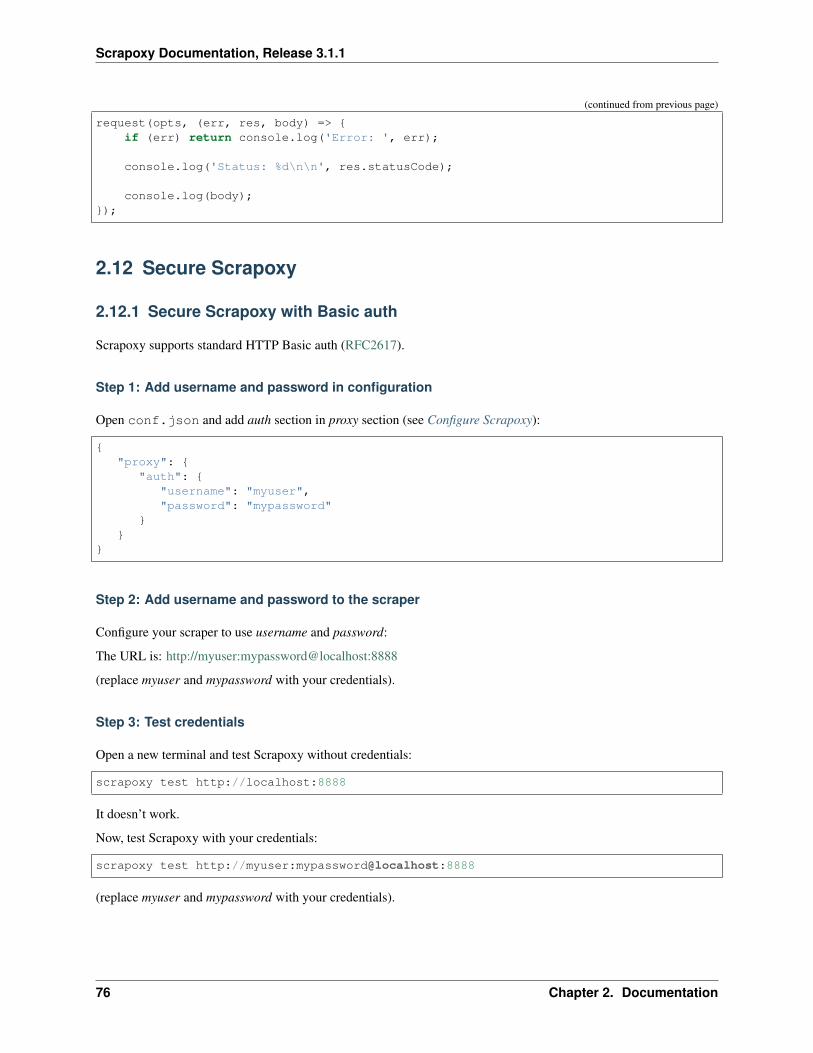
2.12 Secure Scrapoxy
2.12.1 Secure Scrapoxy with Basic auth
Scrapoxy supports standard HTTP Basic auth (RFC2617).
Step 1: Add username and password in configuration
Open conf.json and add auth section in proxy section (see Configure Scrapoxy):
{"proxy": {
"auth": {"username": "myuser","password": "mypassword"
}}
}
Step 2: Add username and password to the scraper
Configure your scraper to use username and password:
The URL is: http://myuser:mypassword@localhost:8888
(replace myuser and mypassword with your credentials).
Step 3: Test credentials
Open a new terminal and test Scrapoxy without credentials:
scrapoxy test http://localhost:8888
It doesn’t work.
Now, test Scrapoxy with your credentials:
scrapoxy test http://myuser:mypassword@localhost:8888
(replace myuser and mypassword with your credentials).
76 Chapter 2. Documentation
Scrapoxy Documentation, Release 3.1.1
2.12.2 Secure Scrapoxy with a firewall on Ubuntu
UFW simplifies IPTables on Ubuntu (>14.04).
Step 1: Allow SSH
sudo ufw allow ssh
Step 2: Allow Scrapoxy
sudo ufw allow 8888/tcpsudo ufw allow 8889/tcp
Step 3: Enable UFW
sudo ufw enable
Enter y.
Step 4: Check UFW status and rules
sudo ufw status
2.13 Launch Scrapoxy at startup
2.13.1 Prerequise
Scrapoxy is installed with a valid configuration (see Quick Start).
2.13.2 Step 1: Install PM2
sudo npm install -g pm2
2.13.3 Step 2: Launch PM2 at instance startup
sudo pm2 startup ubuntu -u <YOUR USERNAME>
1. Replace ubuntu by your distribution name (see PM2 documentation).
2. Replace YOUR USERNAME by your Linux username
2.13. Launch Scrapoxy at startup 77
Scrapoxy Documentation, Release 3.1.1
2.13.4 Step 3: Create a PM2 configuration
Create a PM2 configuration file scrapoxy.json5 for Scrapoxy:
{apps : [{
name : "scrapoxy",script : "/usr/bin/scrapoxy",args : ["start", "<ABSOLUTE PATH TO CONFIG>/conf.json", "-d"],kill_timeout : 30000,
},],
}
2.13.5 Step 4: Start configuration
pm2 start scrapoxy.json5
2.13.6 Step 5: Save configuration
pm2 save
2.13.7 Step 6: Stop PM2 (optional)
If you need to stop Scrapoxy in PM2:
pm2 stop scrapoxy.json5
2.14 Integrate Scrapoxy to Scrapy
2.14.1 Goal
Is it easy to find a good Python developer on Paris ? No!
So, it’s time to build a scraper with Scrapy to find our perfect profile.
The site Scraping Challenge indexes a lot of profiles (fake, for demo purposes). We want to grab them and create aCSV file.
However, the site is protected against scraping ! We must use Scrapoxy to bypass the protection.
2.14.2 Step 1: Install Scrapy
Install Python 2.7
Scrapy works with Python 2.7
78 Chapter 2. Documentation
Scrapoxy Documentation, Release 3.1.1
Install dependencies
On Ubuntu:
apt-get install python-dev libxml2-dev libxslt1-dev libffi-dev
On Windows (with Babun):
wget https://bootstrap.pypa.io/ez_setup.py -O - | pythoneasy_install pippact install libffi-devel libxml2-devel libxslt-devel
Install Scrapy and Scrapoxy connector
pip install scrapy scrapoxy
2.14.3 Step 2: Create the scraper myscraper
Create a new project
Bootstrap the skeleton of the project:
scrapy startproject myscrapercd myscraper
Add a new spider
Add this content to myscraper/spiders/scraper.py:
# -*- coding: utf-8 -*-
from scrapy import Request, Spider
class Scraper(Spider):name = u'scraper'
def start_requests(self):"""This is our first request to grab all the urls of the profiles."""yield Request(
url=u'http://scraping-challenge-2.herokuapp.com',callback=self.parse,
)
def parse(self, response):"""We have all the urls of the profiles. Let's make a request for each
→˓profile."""urls = response.xpath(u'//a/@href').extract()for url in urls:
yield Request(url=response.urljoin(url),
(continues on next page)
2.14. Integrate Scrapoxy to Scrapy 79
Scrapoxy Documentation, Release 3.1.1
(continued from previous page)
callback=self.parse_profile,)
def parse_profile(self, response):"""We have a profile. Let's extract the name"""name_el = response.css(u'.profile-info-name::text').extract()if len(name_el) > 0:
yield {'name': name_el[0]
}
If you want to learn more about Scrapy, check on this Tutorial.
Run the spider
Let’s try our new scraper!
Run this command:
scrapy crawl scraper -o profiles.csv
Scrapy scraps the site and extract profiles to profiles.csv.
However, Scraping Challenge is protected! profiles.csv is empty. . .
We will integrate Scrapoxy to bypass the protection.
2.14.4 Step 3: Integrate Scrapoxy to the Scrapy
Install Scrapoxy
See Quick Start to install Scrapoxy.
Start Scrapoxy
Set the maximum of instances to 6, and start Scrapoxy (see Change scaling with GUI).
Warning: Don’t forget to set the maximum of instances!
Edit settings of the Scraper
Add this content to myscraper/settings.py:
CONCURRENT_REQUESTS_PER_DOMAIN = 1RETRY_TIMES = 0
# PROXYPROXY = 'http://127.0.0.1:8888/?noconnect'
# SCRAPOXY
(continues on next page)
80 Chapter 2. Documentation
Scrapoxy Documentation, Release 3.1.1
(continued from previous page)
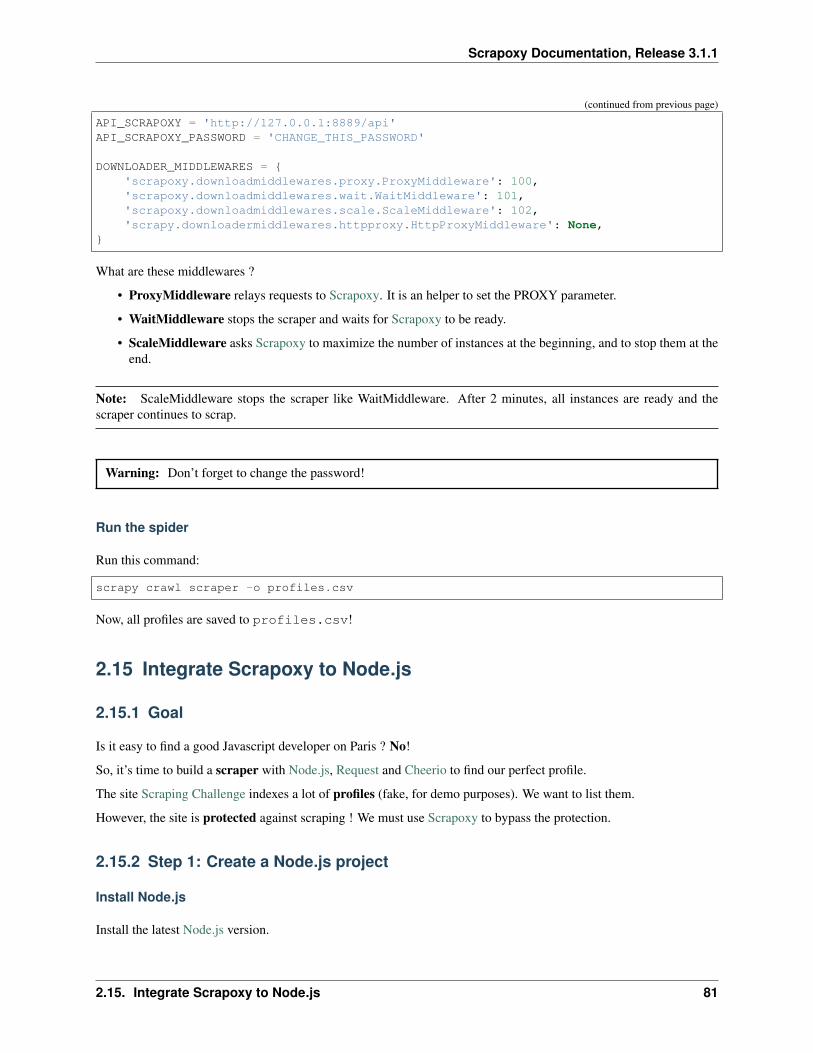
API_SCRAPOXY = 'http://127.0.0.1:8889/api'API_SCRAPOXY_PASSWORD = 'CHANGE_THIS_PASSWORD'
DOWNLOADER_MIDDLEWARES = {'scrapoxy.downloadmiddlewares.proxy.ProxyMiddleware': 100,'scrapoxy.downloadmiddlewares.wait.WaitMiddleware': 101,'scrapoxy.downloadmiddlewares.scale.ScaleMiddleware': 102,'scrapy.downloadermiddlewares.httpproxy.HttpProxyMiddleware': None,
}
What are these middlewares ?
• ProxyMiddleware relays requests to Scrapoxy. It is an helper to set the PROXY parameter.
• WaitMiddleware stops the scraper and waits for Scrapoxy to be ready.
• ScaleMiddleware asks Scrapoxy to maximize the number of instances at the beginning, and to stop them at theend.
Note: ScaleMiddleware stops the scraper like WaitMiddleware. After 2 minutes, all instances are ready and thescraper continues to scrap.
Warning: Don’t forget to change the password!
Run the spider
Run this command:
scrapy crawl scraper -o profiles.csv
Now, all profiles are saved to profiles.csv!
2.15 Integrate Scrapoxy to Node.js
2.15.1 Goal
Is it easy to find a good Javascript developer on Paris ? No!
So, it’s time to build a scraper with Node.js, Request and Cheerio to find our perfect profile.
The site Scraping Challenge indexes a lot of profiles (fake, for demo purposes). We want to list them.
However, the site is protected against scraping ! We must use Scrapoxy to bypass the protection.
2.15.2 Step 1: Create a Node.js project
Install Node.js
Install the latest Node.js version.
2.15. Integrate Scrapoxy to Node.js 81

Scrapoxy Documentation, Release 3.1.1
Create a new project
Create a directory for the project:
mkdir nodejs-requestcd nodejs-request
Create the package.json:
npm init --yes
Add dependencies:
npm install lodash bluebird cheerio request [email protected] --save
What are these dependencies ?
• lodash is a javascript helper,
• bluebird is a promise library,
• cheerio is a JQuery parser,
• requests makes HTTP requests,
• winston is a logger.
Add a scraper
Add this content to index.js
const _ = require('lodash'),Promise = require('bluebird'),cheerio = require('cheerio'),request = require('request'),winston = require('winston');
winston.level = 'debug';
const config = {// URL of the sitesource: 'http://scraping-challenge-2.herokuapp.com',
opts: {},
};
// Get all URLsgetProfilesUrls(config.source, config.opts)
.then((urls) => {winston.info('Found %d profiles', urls.length);
winston.info('Wait 120 seconds to scale instances');
return urls;})
(continues on next page)
82 Chapter 2. Documentation
Scrapoxy Documentation, Release 3.1.1
(continued from previous page)
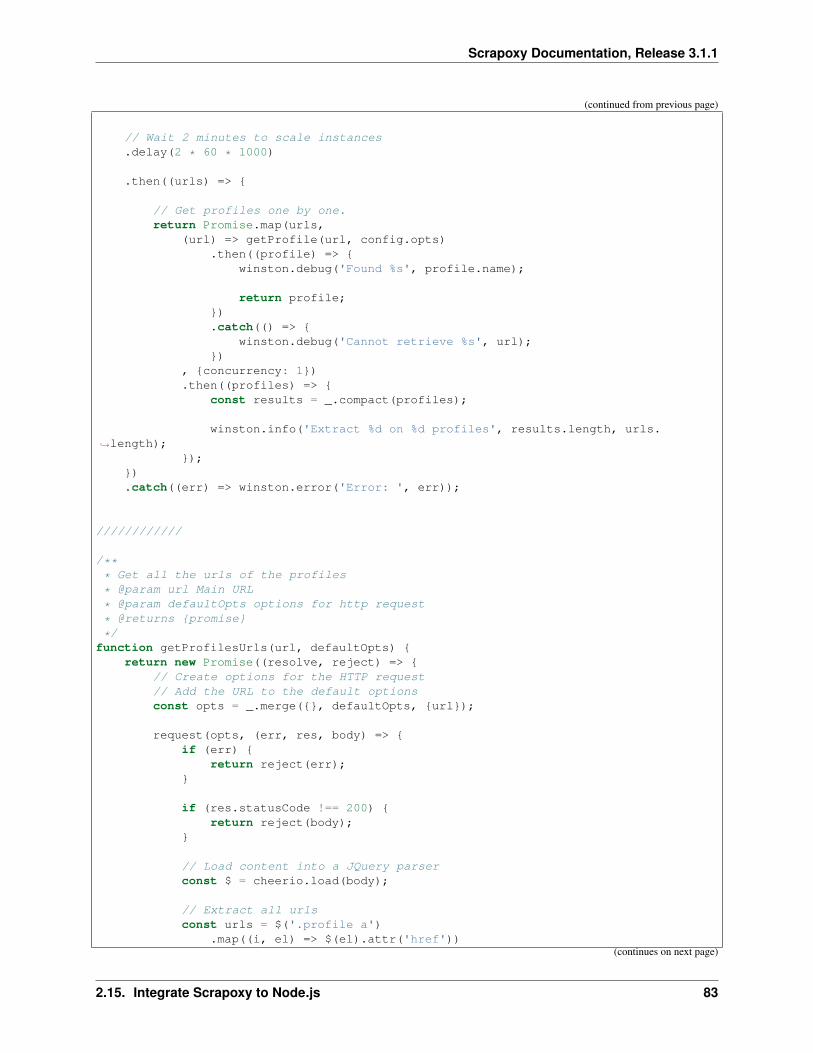
// Wait 2 minutes to scale instances.delay(2 * 60 * 1000)
.then((urls) => {
// Get profiles one by one.return Promise.map(urls,
(url) => getProfile(url, config.opts).then((profile) => {
winston.debug('Found %s', profile.name);
return profile;}).catch(() => {
winston.debug('Cannot retrieve %s', url);})
, {concurrency: 1}).then((profiles) => {
const results = _.compact(profiles);
winston.info('Extract %d on %d profiles', results.length, urls.→˓length);
});}).catch((err) => winston.error('Error: ', err));
////////////
/*** Get all the urls of the profiles
* @param url Main URL
* @param defaultOpts options for http request
* @returns {promise}
*/function getProfilesUrls(url, defaultOpts) {
return new Promise((resolve, reject) => {// Create options for the HTTP request// Add the URL to the default optionsconst opts = _.merge({}, defaultOpts, {url});
request(opts, (err, res, body) => {if (err) {
return reject(err);}
if (res.statusCode !== 200) {return reject(body);
}
// Load content into a JQuery parserconst $ = cheerio.load(body);
// Extract all urlsconst urls = $('.profile a')
.map((i, el) => $(el).attr('href'))(continues on next page)
2.15. Integrate Scrapoxy to Node.js 83

Scrapoxy Documentation, Release 3.1.1
(continued from previous page)
.get()
.map((url) => `${config.source}${url}`);
resolve(urls);});
});}
/*** Get the profile and extract the name
* @param url URL of the profile
* @param defaultOpts options for http request
* @returns {promise}
*/function getProfile(url, defaultOpts) {
return new Promise((resolve, reject) => {// Create options for the HTTP request// Add the URL to the default optionsconst opts = _.merge({}, defaultOpts, {url});
request(opts, (err, res, body) => {if (err) {
return reject(err);}
if (res.statusCode !== 200) {return reject(body);
}
// Load content into a JQuery parserconst $ = cheerio.load(body);
// Extract the namesconst name = $('.profile-info-name').text();
resolve({name});});
});}
Run the script
Let’s try our new scraper!
Run this command:
node index.js
The script scraps the site and list profiles.
However, Scraping Challenge is protected! All requests fail. . .
We will integrate Scrapoxy to bypass the protection.
84 Chapter 2. Documentation

Scrapoxy Documentation, Release 3.1.1
2.15.3 Step 2: Integrate Scrapoxy to the script
Install Scrapoxy
See Quick Start to install Scrapoxy.
Start Scrapoxy
Set the maximum of instances to 6, and start Scrapoxy (see Change scaling with GUI).
Warning: Don’t forget to set the maximum of instances!
Edit the script
Open index.js and modify the config value
const config = {// URL of the sitesource: 'http://scraping-challenge-2.herokuapp.com',
opts: {// URL of Scrapoxyproxy: 'http://localhost:8888',
// HTTPS over HTTPtunnel: false,
}};
Run the script
Run this command:
node index.js
Now, all profiles are listed!
2.16 Manage blacklisted request with Scrapy
2.16.1 Goal
A scraper is downloading pages of a website.
However, the website has a rate limit by IP. When the scraper downloads 10 pages, the website returns only an emptypage with a HTTP 429 status.
Does the scraper must wait when the limit is reached ? No!
The scraper has to ask Scrapoxy to replace the instance.
2.16. Manage blacklisted request with Scrapy 85
Scrapoxy Documentation, Release 3.1.1
2.16.2 Step 1: Create a Scraper
See Integrate Scrapoxy to Scrapy to create the scraper.
Edit settings of Scrapoxy
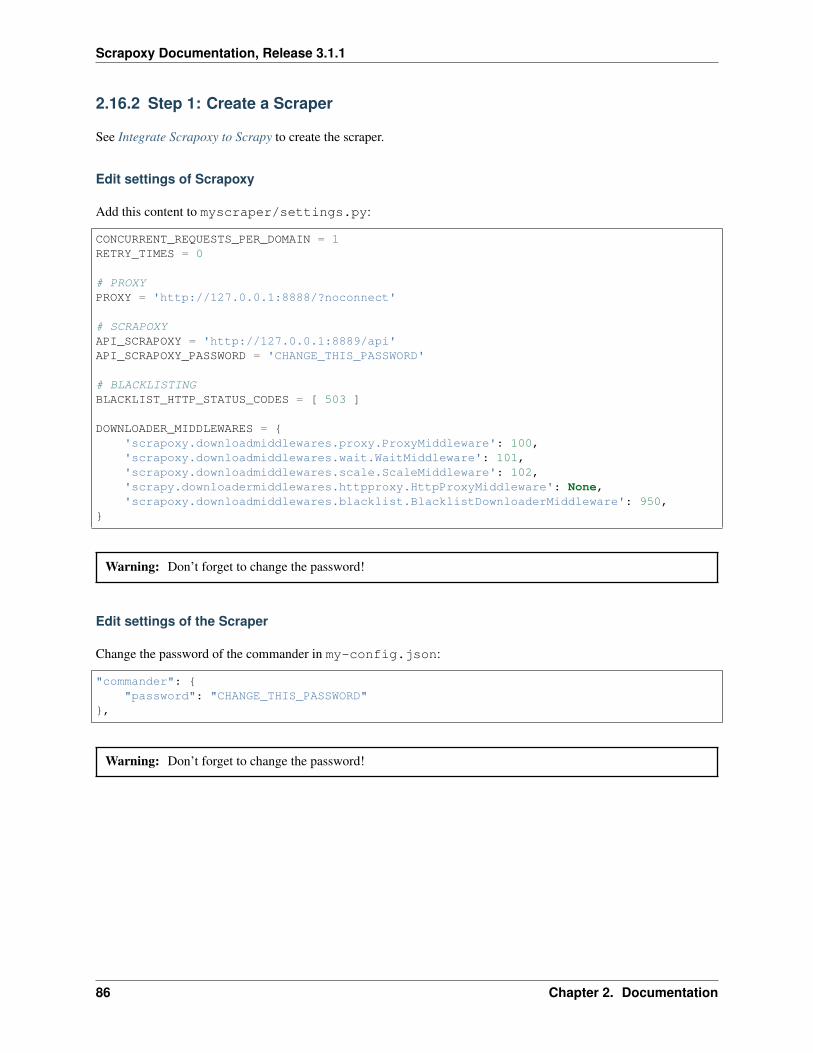
Add this content to myscraper/settings.py:
CONCURRENT_REQUESTS_PER_DOMAIN = 1RETRY_TIMES = 0
# PROXYPROXY = 'http://127.0.0.1:8888/?noconnect'
# SCRAPOXYAPI_SCRAPOXY = 'http://127.0.0.1:8889/api'API_SCRAPOXY_PASSWORD = 'CHANGE_THIS_PASSWORD'
# BLACKLISTINGBLACKLIST_HTTP_STATUS_CODES = [ 503 ]
DOWNLOADER_MIDDLEWARES = {'scrapoxy.downloadmiddlewares.proxy.ProxyMiddleware': 100,'scrapoxy.downloadmiddlewares.wait.WaitMiddleware': 101,'scrapoxy.downloadmiddlewares.scale.ScaleMiddleware': 102,'scrapy.downloadermiddlewares.httpproxy.HttpProxyMiddleware': None,'scrapoxy.downloadmiddlewares.blacklist.BlacklistDownloaderMiddleware': 950,
}
Warning: Don’t forget to change the password!
Edit settings of the Scraper
Change the password of the commander in my-config.json:
"commander": {"password": "CHANGE_THIS_PASSWORD"
},
Warning: Don’t forget to change the password!
86 Chapter 2. Documentation


Scrapoxy Documentation, Release 3.1.1
88 Chapter 3. Prerequisite

CHAPTER 4
Contribute
You can open an issue on this repository for any feedback (bug, question, request, pull request, etc.).
89

Scrapoxy Documentation, Release 3.1.1
90 Chapter 4. Contribute
CHAPTER 5
License
See the License.
And don’t forget to be POLITE when you write your scrapers!
91