screening manual v2 - ophthalmology screening manual version 2.0: march 2004 . 2 contents page...
TRANSCRIPT

Head Start Vision Screening
Manual
Version 2.0: March 2004

2
Contents
Page Section 3 Introduction 5 Overview of the Vision Screening
Procedure 6 Vision Screening Flow Chart 7 Keratometry: Measuring the Eye for
Astigmatism 9 Visual Acuity: The Patti Pics™ Test 11 Appendix A: Equipment Maintenance,
Repair and Replacement 12 Appendix B: Screening Instructions and
Recording Sheets

3
Introduction Vision Problems Among Tohono O’Odham Children Many Tohono O’Odham people, and people of other Native American Tribes, have an eye condition called astigmatism. Approximately one child in three requires glasses for astigmatism. We do not know why so many Tohono O’Odham children have astigmatism. However, doctors believe that if children do not get glasses for astigmatism when they are young (before age 8), they can develop a vision problem called amblyopia.
To understand astigmatism and amblyopia, it is important to understand that your visual system is much more than just your eyes. Your brain is also very important in determining what you can see. Your eyes work much like a movie projector. Light enters your eyes, and an image of what you are looking at is projected on the back of your eye (the retina), like a movie screen. The lens in your eye adjusts to try to focus the image on the back of your eye. Once the image is focused on the back of your eye, the brain takes over in the process of seeing. Nerves take the information from the back of your eye to the brain (the visual cortex), and your brain works to organize what you are seeing. Children with astigmatism have trouble focusing images on the back of their eye. What is Astigmatism? Astigmatism is a condition in which the front of the eye is more steeply curved in one direction than another. Instead of the front of the eye being round like a basketball, it is shaped like a football. A child with astigmatism does not see clearly at any distance – up close or far away. The image that the front of the eye projects on the back of the eye (the retina) is not in focus. If children with astigmatism do not wear glasses when they are young, they can develop amblyopia. What is Amblyopia? Amblyopia (sometimes called “lazy eye”) is poor vision that cannot be corrected with eyeglasses. For vision to develop correctly, young children need to see clearly. The image of what they are looking at must be focused clearly on the back of their eye. If the images are not focused clearly, the visual part of the brain does not develop the way it should. Children with poor vision who do not wear glasses while their vision is still developing can develop amblyopia, or poor vision that cannot be corrected with eyeglasses. Children with astigmatism cannot focus things clearly. They are at risk for developing amblyopia.

4
What can we do to assure that the children do not develop amblyopia? If children with astigmatism get eyeglasses when they are young, and wear them, there is a good chance that they will not develop amblyopia. It is important to determine if any of the young children have astigmatism, so that they can be referred to an eye doctor, and get eyeglasses if necessary. The Tohono O’Odham Vision Screening Program. From 1997 to 2001, the Tohono O’Odham Nation and the University of Arizona sponsored The Tohono O’Odham Vision Screening Program. All children enrolled in the Tohono O’Odham Head Start program were eligible to receive free eye examinations and free eyeglasses (if they required them) through the program. One of the goals of the program was to determine the best screening method for determining which children were likely to require eyeglasses and therefore should receive an eye examination. Once an effective method was determined, the plan was to implement a screening program that would allow Head Start staff to screen all of the children, and to refer for eye examinations only the children who “failed” the screening.
5
Overview of the Vision Screening Procedure The screening method described in this manual is recommended by the Tohono
O’Odham Vision Screening Program for screening of Tohono O’Odham Head Start children. The screening consists of two components: Keratometry and Visual Acuity Screening. Keratometry measures the curvature of the surface of the eye (without touching the eye) and provides a measure of amount of astigmatism. Visual acuity screening measures how well the child can see fine detail.
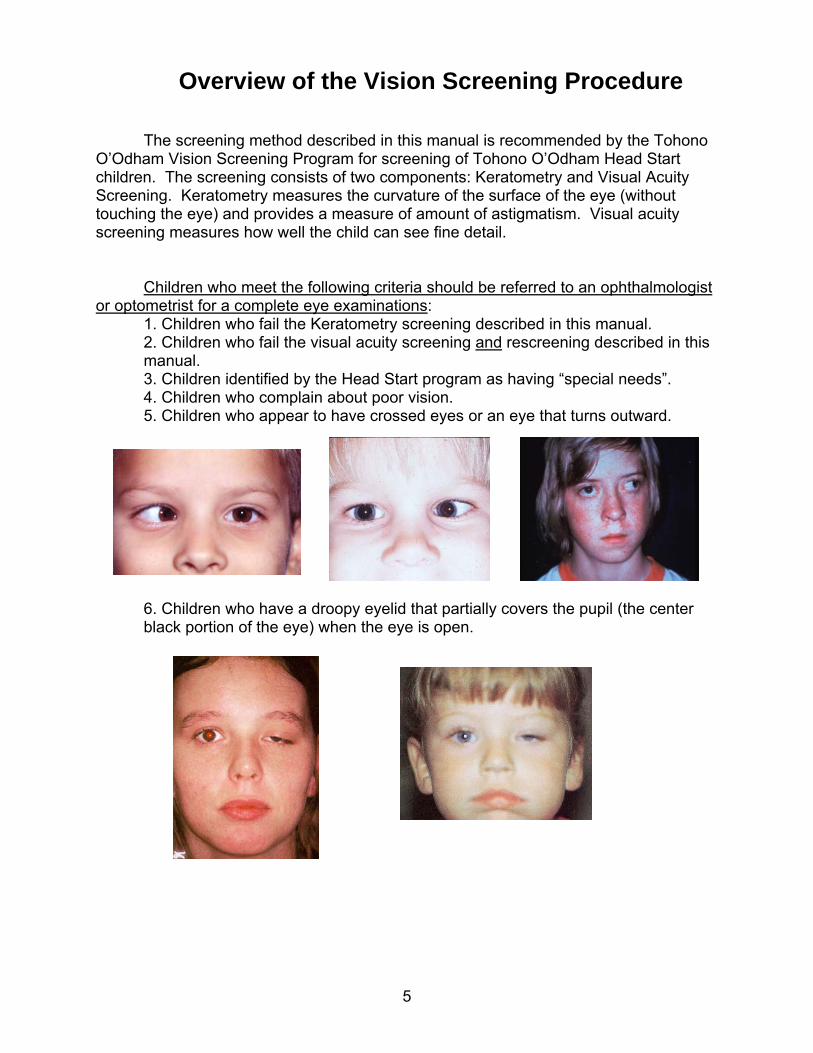
Children who meet the following criteria should be referred to an ophthalmologist
or optometrist for a complete eye examinations: 1. Children who fail the Keratometry screening described in this manual. 2. Children who fail the visual acuity screening and rescreening described in this manual. 3. Children identified by the Head Start program as having “special needs”. 4. Children who complain about poor vision. 5. Children who appear to have crossed eyes or an eye that turns outward.
6. Children who have a droopy eyelid that partially covers the pupil (the center black portion of the eye) when the eye is open.

6
Vision Screening Flow Chart Begin with Keratometry Screening
Pass Keratometry Continue with Visual Acuity
Screening
Fail Keratometry STOP, Refer to eye doctor for exam. Screening completed
Pass Acuity Screening No referral necessary Screening completed
Fail Acuity Screening Re-screen later
Fail Acuity Re-screening Refer to eye doctor for exam.
Screening completed.
Pass Acuity Re-screening No referral necessary Screening completed

7
Keratometry: Measuring the Eye for Astigmatism a. Equipment • Nidek KM-500 Keratometer • A chair for the tester and a chair for the child • A darkened quiet room b. Setting Up • Set up the instrument on a table near an electrical outlet. The instrument setup is illustrated to the right. Please note that the cables should be set up specifically as illustrated, or the instrument will not work. • Set up two chairs facing each other, one for the tester and one for the child, next to the table. c. Procedure (1) Have the child sit in a chair with his/her back against the backrest. (2) The tester should sit in a chair in front of and facing the child. (3) To turn on the Keratometer, press ‘R’. This also sets the instrument for measurement of the right eye. (4) Tell the child that all they have to do is to look in the little hole in front of the Keratometer and look right at the red dot. (5) Align the Keratometer in front of the child’s right eye, and then look through the viewer. Center the red ring over the pupil (the center black portion of the eye) and adjust the distance so that the target ring is clear and in focus. As the ring is brought closer to focus, it will blink more rapidly. After a measurement has been successfully made, the instrument will make a chirping sound. It may help to place your free hand on top of the child’s head, to reduce movement. (6) Encourage the child to keep looking in the red dot. It may help to tell them ‘if you keep looking at the dot, the machine will make a chirping sound, like a little bird.. so see if you can make the machine chirp’.

8
(7) When right eye measurement is complete, press the “L” to set the instrument left eye measurement. Proceed with measurement of the left eye. (8) Once you have measured both eyes, aim the keratometer at the printer (with the buttons toward you, and the measurement side facing the printer), and press the button to print the child’s results (the print button is the oval shaped button on the left). Note: the part of the keratometer that sends the measurement to the printer is on the bottom portion of the instrument handle, just above the four silver bars. Be sure that you are not covering this part of the instrument when you send the measurement to the printer. (9) Turn off the Nidek to clear the measurements for the next child (the off button is the oval shaped button on the right. c. Data Sheet (Appendix B) Attach the Keratometer printout with tape to the child’s Keratometry score sheet. Note: When taping the printout, be sure that the tape does not cover any of the numbers. The paper used is heat sensitive, and placing tape over the numbers will make them disappear. d. Keratometer maintenance and battery charging See Manufacturer’s Manual.

9
Visual Acuity: The Patti Pics™ Test a. Equipment • Patti Pics™ test book (20/80 and 20/63) • Patti Pics™ lap card • Patti Pics™ pretest flip cards • Measuring tape that is at least 10 feet long. • Chair for the child and a chair for the tester. • Eye patching tape • Well lit quiet room for testing b. Setting Up • Set up the chairs so that the tester’s and child’s chairs are 10 feet apart, facing each other. The chairs should be set up so that, when the child and the testers are each sitting in their chairs, the test card is held 10 feet from the child’s eyes. c. Conducting the Test (1) Have the child sit in the chair facing the tester’s chair. (2) If children come to the test session wearing glasses, test their acuity with the glasses on, and make a notation on the scoring sheet that the child was tested “with glasses on”. (3) Place the lap card on the child’s lap, or have an assistant (teacher/parent) hold the card in front of the child. (4) Explain to the child that they will be playing a matching game. You will show them a picture, and their job is to point the same picture on the card. (5) Pretest: The tester will hold the flip card 1-2 feet in front of the child, and present each of the 4 symbols. For each symbol, the tester will ask the child to point to the picture on their card that looks like that picture. For older and more verbal children, the tester may ask the child what the picture looks like. If the child is able to identify each picture easily and consistently, the test may be done without the lap card. However, sometimes children who can identify large symbols verbally do better if they use the lap card when the symbols get smaller. If the child is unable to identify the symbols on the pretest, testing is completed and the tester should record “unable to test” on the child’s acuity score sheet.
10
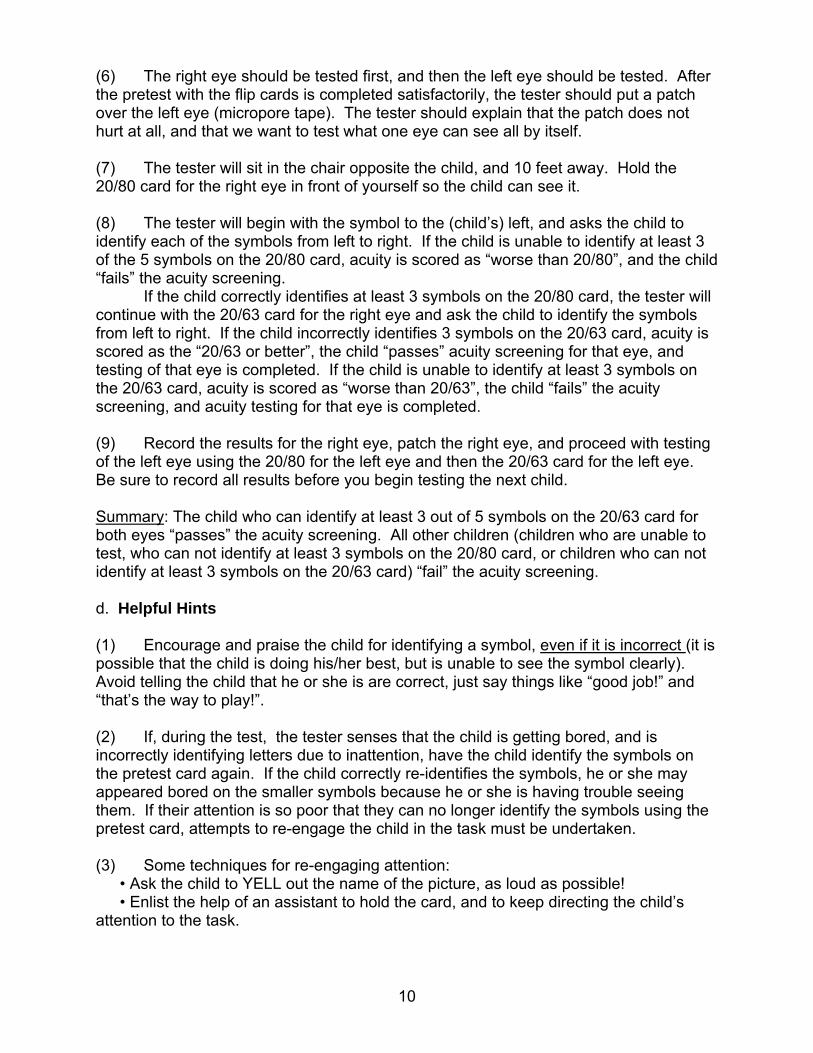
(6) The right eye should be tested first, and then the left eye should be tested. After the pretest with the flip cards is completed satisfactorily, the tester should put a patch over the left eye (micropore tape). The tester should explain that the patch does not hurt at all, and that we want to test what one eye can see all by itself. (7) The tester will sit in the chair opposite the child, and 10 feet away. Hold the 20/80 card for the right eye in front of yourself so the child can see it. (8) The tester will begin with the symbol to the (child’s) left, and asks the child to identify each of the symbols from left to right. If the child is unable to identify at least 3 of the 5 symbols on the 20/80 card, acuity is scored as “worse than 20/80”, and the child “fails” the acuity screening. If the child correctly identifies at least 3 symbols on the 20/80 card, the tester will continue with the 20/63 card for the right eye and ask the child to identify the symbols from left to right. If the child incorrectly identifies 3 symbols on the 20/63 card, acuity is scored as the “20/63 or better”, the child “passes” acuity screening for that eye, and testing of that eye is completed. If the child is unable to identify at least 3 symbols on the 20/63 card, acuity is scored as “worse than 20/63”, the child “fails” the acuity screening, and acuity testing for that eye is completed. (9) Record the results for the right eye, patch the right eye, and proceed with testing of the left eye using the 20/80 for the left eye and then the 20/63 card for the left eye. Be sure to record all results before you begin testing the next child. Summary: The child who can identify at least 3 out of 5 symbols on the 20/63 card for both eyes “passes” the acuity screening. All other children (children who are unable to test, who can not identify at least 3 symbols on the 20/80 card, or children who can not identify at least 3 symbols on the 20/63 card) “fail” the acuity screening. d. Helpful Hints (1) Encourage and praise the child for identifying a symbol, even if it is incorrect (it is possible that the child is doing his/her best, but is unable to see the symbol clearly). Avoid telling the child that he or she is are correct, just say things like “good job!” and “that’s the way to play!”. (2) If, during the test, the tester senses that the child is getting bored, and is incorrectly identifying letters due to inattention, have the child identify the symbols on the pretest card again. If the child correctly re-identifies the symbols, he or she may appeared bored on the smaller symbols because he or she is having trouble seeing them. If their attention is so poor that they can no longer identify the symbols using the pretest card, attempts to re-engage the child in the task must be undertaken. (3) Some techniques for re-engaging attention: • Ask the child to YELL out the name of the picture, as loud as possible! • Enlist the help of an assistant to hold the card, and to keep directing the child’s attention to the task.

11
Appendix A: Equipment Maintenance, Repair and Replacement
Visual Acuity Testing Equipment • Acuity cards should be cleaned with non-abrasive sponges, towels, or wet wipes (Wet-Ones, or Wash ‘n Dry). If the lettering on the 20/50 or 20/80 cards becomes scratched or damaged, the cards should be replaced. Patti Pics™ Equipment can be purchased from the manufacturer:
Precision Vision, Inc.
944 First Street La Salle, IL 61301
800-772-9211 [email protected]
www.precision-vision.com
Item # Name Description 2590 MassVAT Visual Acuity Test Patti Pics™ Distance screening test book
Training card replacements Patti Pics™ Pre-test cards Response Key replacements Patti Pics™ Child’s lap card
• Tape measure can be purchased from any hardware store. Be sure to purchase one that is at least 10 feel long. • The tape that we use for eye patching is 3M micropore hypoallergenic surgical tape, 2 inches x 10 yards. This tape is sticky enough to stay on the child’s skin during testing, but not so sticky that it will hurt when it is pulled off. • The Keratometer (Marco/Nidek KM500) and printer can be purchased from Opthalmic Instrument Companies. Information on companies that sell the KM500 can be obtained by contacting the manufacturer at :
Marco 1-800-874-5274
11825 Central Parkway Jacksonville, Florida 32224
www.marcooph.com
• Replacement printer paper for the Keratometer can be purchased from office supply stores. You should purchase thermal calculator rolls, size 2 & 1/4 inch x 85 feet.

12
Appendix B: Screening Instruction and Recording Sheets
The following pages contain sheets for recording and scoring screening results. These sheets should be photocopied, and a new sheet should be used for each child screened. (1) Keratometry Screening (2) Visual Acuity Screening (3) Visual Acuity Re-Screening

13
First Name:_______________________ Classroom:_______________________
Last Name:_______________________ Date Screened: ___________________
Date of Birth:_________________ Screener’s Name: __________________
Tohono O’Odham Head Start Vision Screening - Keratometry
Is right eye CYL 2.25 or greater?
Yes ► STOP, refer to eye doctor.
No ► Continue with left eye keratometry evaluation.
Unable to measure right eye ► STOP, refer to eye doctor.
Is left eye CYL 2.25 or greater?
Yes ► STOP, refer to eye doctor.
No ► Continue with acuity evaluation.
Unable to measure left eye ► STOP, refer to eye doctor.
Keratometry
(Tape Printout Here)

14
First Name:_______________________ Classroom:_______________________
Last Name:_______________________ Date Screened: ___________________
Date of Birth:_________________ Screener’s Name: __________________
Tohono O’Odham Head Start Vision Screening – Visual Acuity
Right Eye Acuity
Was child able to identify 3 or more symbols on the 20/63 line?
Yes ► Pass, do not re-screen.
No ► Re-screen later
Unable to test ► Re-screen later
Left Eye Acuity Was child able to identify at least 3 symbols on the 20/63 line?
Yes ► Pass, do not re-screen.
No ► Re-screen later
Unable to test ► Re-screen later
Is the child wearing eyeglasses? (circle one) Yes ► Test with glasses on No►Continue Pretest (do not use patch) (1) Can the child identify all 4 symbols? Yes ► Continue No ► Re-screen later Right Eye (patch left eye) (2) 20/80 line: Number of symbols correct:
1 2 3 4 5 (3) 20/63 line: Number of symbols correct:
1 2 3 4 5 Left Eye (patch right eye) (4) 20/80 line: Number of symbols correct:
1 2 3 4 5 (5) 20/63 line: Number of symbols correct:
1 2 3 4 5

15
First Name:_______________________ Classroom:_______________________
Last Name:_______________________ Date Screened: ___________________
Date of Birth:_________________ Screener’s Name: __________________
Tohono O’Odham Head Start Vision Screening – Visual Acuity Re-Screen
Right Eye Acuity
Was child able to identify 3 or more symbols on the 20/63 line?
Yes ► Pass .
No ► STOP, refer to eye doctor.
Left Eye Acuity Was child able to identify 3 or more symbols on the 20/63 line?
Yes ► Pass.
No ► STOP, refer to eye doctor.
Is the child wearing eyeglasses? (circle one) Yes ► Test with glasses on No►Continue Pretest (do not use patch) (1) Can the child identify all 4 symbols? Yes ► Continue No ► Re-screen later Right Eye (patch left eye) (2) 20/80 line: Number of symbols correct:
1 2 3 4 5 (3) 20/63 line: Number of symbols correct:
1 2 3 4 5 Left Eye (patch right eye) (4) 20/80 line: Number of symbols correct:
1 2 3 4 5 (5) 20/63 line: Number of symbols correct:
16
For more information, please contact:
The Tohono O’Odham Vision Screening Program
The University of Arizona Department of Ophthalmology and Vision Science
655 N. Alvernon Way, Suite 108 Tucson, AZ 85711
In Sells: 520/383-6207
In Tucson: 520/324-3162
Joseph M. Miller, M.D., M.P.H., Medical Director Erin Harvey, Ph.D., Director
Velma Dobson, Ph.D., Co-Director Frances Lopez, Registrar
Irene Adams, Vision Screening Technician Candice Clifford, Vision Screening Technician
Pat Broyles, Administrative Assistant
Sponsored by: The Tohono O’odham Nation
and
Funded by: