scrib us tutorial
TRANSCRIPT
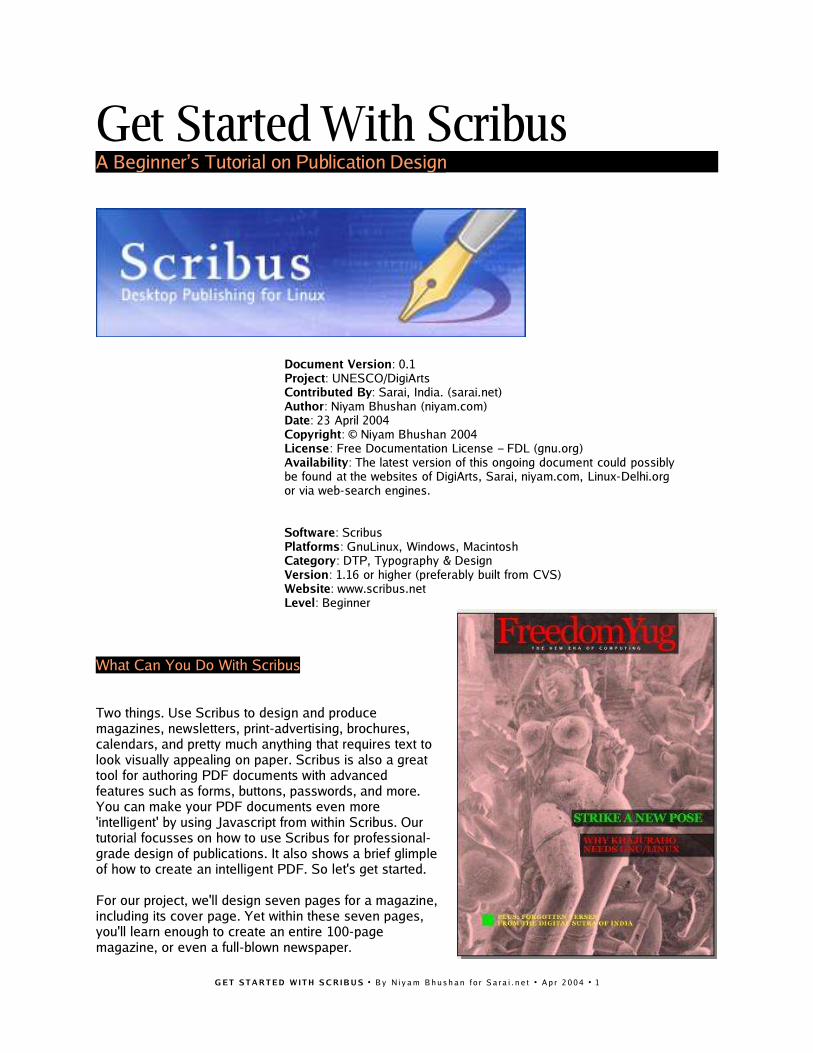
Get Started With ScribusA Beginner’s Tutorial on Publication Design
Document Version: 0.1Project: UNESCO/DigiArtsContributed By: Sarai, India. (sarai.net)Author: Niyam Bhushan (niyam.com)Date: 23 April 2004Copyright: © Niyam Bhushan 2004License: Free Documentation License − FDL (gnu.org)Availability: The latest version of this ongoing document could possiblybe found at the websites of DigiArts, Sarai, niyam.com, Linux-Delhi.orgor via web-search engines.
Software: ScribusPlatforms: GnuLinux, Windows, Macintosh Category: DTP, Typography & DesignVersion: 1.16 or higher (preferably built from CVS)Website: www.scribus.netLevel: Beginner
What Can You Do With Scribus
Two things. Use Scribus to design and producemagazines, newsletters, print-advertising, brochures,calendars, and pretty much anything that requires text tolook visually appealing on paper. Scribus is also a greattool for authoring PDF documents with advancedfeatures such as forms, buttons, passwords, and more.You can make your PDF documents even more'intelligent' by using Javascript from within Scribus. Ourtutorial focusses on how to use Scribus for professional-grade design of publications. It also shows a brief glimpleof how to create an intelligent PDF. So let's get started.
For our project, we'll design seven pages for a magazine,including its cover page. Yet within these seven pages,you'll learn enough to create an entire 100-pagemagazine, or even a full-blown newspaper.
G E T S T A R T E D W I T H S C R I B U S • B y N i y a m B h u s h a n f o r S a r a i . n e t • A p r 2 0 0 4 • 1
Scribus And Its Sisters
[Download Yesterday Night's Version] Visit www.scribus.net and headto the downloads section. Please read the instructions in thedocumentation section on how to install Scribus for your platform (mac,win, linux, *bsd). You could start with the stable download available. Asyour skills grow, may I strongly recommend you discard the stableversion, and click on the 'changelogs' or 'CVS' button instead. This,because Scribus evolves rapidly on an almost nightly basis. The CVSversion is equally stable, and quite often, more stable than the officialstable version. It is also significantly ahead of the stable version in itsfeatures and capabilities. Every two or three days, I tend to issue thesimple two-line commands from my PC, and get hold of a freshly-bakedScribus with a slew of new features added. Try it. You'll love it. Justfollow the simple instructions on the Scribus site on how-to install fromCVS. For those who don't know, CVS stands for Concurrent VersioningSystem, a clever way for several programmers from diveresegeographical locations to store their software at a central repository asthey dynamically work on it.
Do read the requirements page on the site. This because Scribus needssome rather important files installed on your system. For GnuLinuxusers, I specially recommend just installing the latest release of yourfavourite distribution. As an example, I spent nearly three weeks trying toinstall Scribus 1.1.6 under RedHat8. Each time I added a required file,another dependency would crop up. Finally, I just installed the latestFedora in a separate partition, and Scribus installed within 20 minuteswithout a murmur.
[Get Acrobat Reader, even for GnuLinux] Scribus is a great tool forcreating PDFs. Yet not all PDF viewers are created equal. Especiallyunder GnuLinux. So, head to adobe.com and download and install thelatest, native version of Acrobat Reader for your platform, even forGnuLinux. Should you find a newer release of Acrobat Reader forWindows, say Version 6 for Windows, while you have Version 5 forGnuLinux, download the Version 6 for Windows, under GnuLinux. Thedevelopers of Scribus recommend you run this version using aWindows-emulator software under GnuLinux, such as WINE orCrossOver, to run this native Windows application under GnuLinux.However, this is not mandatory. You could still work with the olderversion, or view your files under Windows if dual-booting, or on anothermachine.
[Match Colors That Print] Finally, if you wish to design publications, youneed to ensure colors you see on screen match colors that print. Forthis, you need to install a special and separate piece of software, calleda Color Management System, or CMS. Windows and Macintosh comewith a CMS built-in, called ICM and ColorSync, respectively. UnderGnuLinux, you need to install a free CMS, called LittleCMS. Downloadand follow the instructions at littlecms.com. You can also install versionsof this under Windows and Macintosh. For this tutorial, LittleCMS is notnecessary, though quite helpful.
G E T S T A R T E D W I T H S C R I B U S • B y N i y a m B h u s h a n f o r S a r a i . n e t • A p r 2 0 0 4 • 2
[You Can Use Your Existing Fonts Collection] Do you have acollection of fonts that you wish to use under GnuLinux? Install yourexisting TrueType, Postscript, or OpenType format fonts underGnuLinux. You'll find the simple steps mentioned in the documentationsection of the Scribus site. For our tutorial, we don't need to install anyspecial fonts. So you can start right away with your first samplepublication.
[Sane Workflows] Our magazine is called 'FreedomYug' and it containsa lot of pictures and text. A magazine with a few hundred pages couldalso have several Scribus files, each with eight to 20 pages. So, it is bestto create a folder for each publication. I've created one called 'Fyug'.Inside this, create atleast two distinct folders, 'Text,' and 'Images'. Usinga wordprocessor, such as OpenOffice.org, author your articles and savethem in the Text folder. For the moment save a version in simple textformat, with the extension .txt. While I write this tutorial, the developersat Scribus assure me that soon you can save your text as Rich TextFormat (.rtf) and import it into Scribus, with all your typesetting, such asbold, italic, and bold-italic text and other formatting intact.
Similarly, scan or enhance photographs and store them in the 'Images'folder, mostly as *.JPG files.
Empty, White Spaces
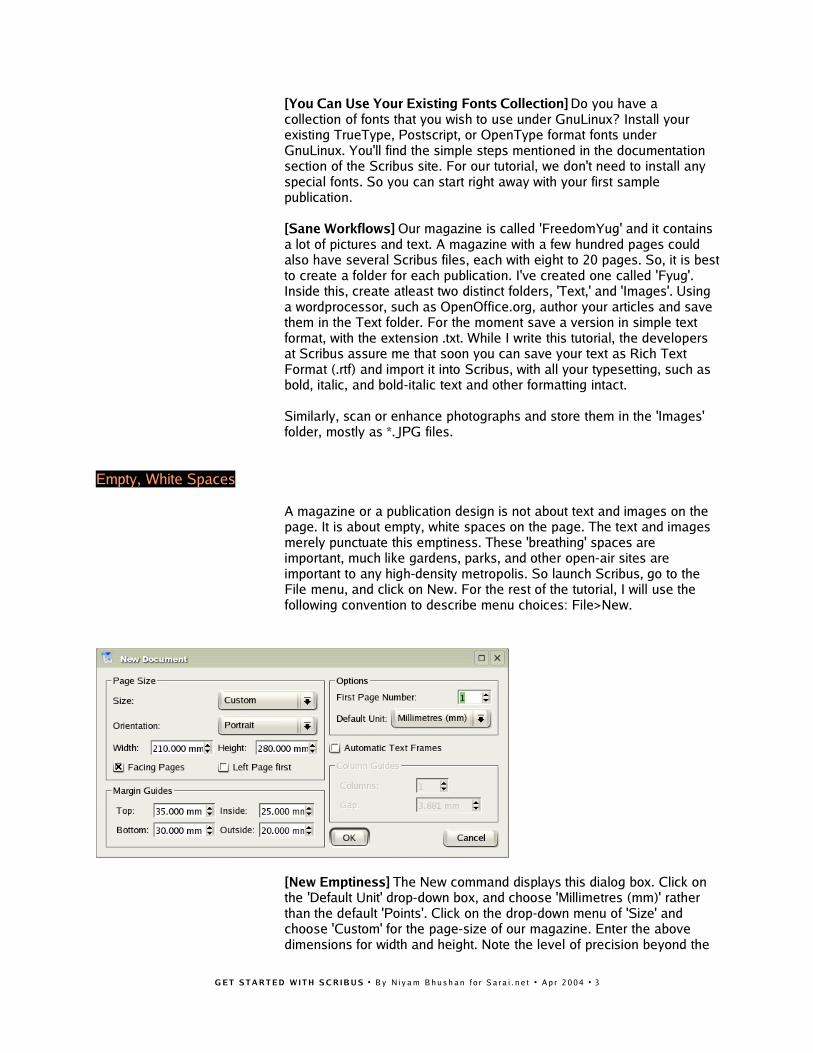
A magazine or a publication design is not about text and images on thepage. It is about empty, white spaces on the page. The text and imagesmerely punctuate this emptiness. These 'breathing' spaces areimportant, much like gardens, parks, and other open-air sites areimportant to any high-density metropolis. So launch Scribus, go to theFile menu, and click on New. For the rest of the tutorial, I will use thefollowing convention to describe menu choices: File>New.
[New Emptiness] The New command displays this dialog box. Click onthe 'Default Unit' drop-down box, and choose 'Millimetres (mm)' ratherthan the default 'Points'. Click on the drop-down menu of 'Size' andchoose 'Custom' for the page-size of our magazine. Enter the abovedimensions for width and height. Note the level of precision beyond the
G E T S T A R T E D W I T H S C R I B U S • B y N i y a m B h u s h a n f o r S a r a i . n e t • A p r 2 0 0 4 • 3
decimal-point to the right, offered by Scribus. Click on 'Facing Pages' soyou can view pages side-by-side, as in a realworld magazine. Enter theabove margin area, that marks off the actual printing area, inside thephysical paper. Click 'OK' to view your first blank page in Scribus.
Cover Page
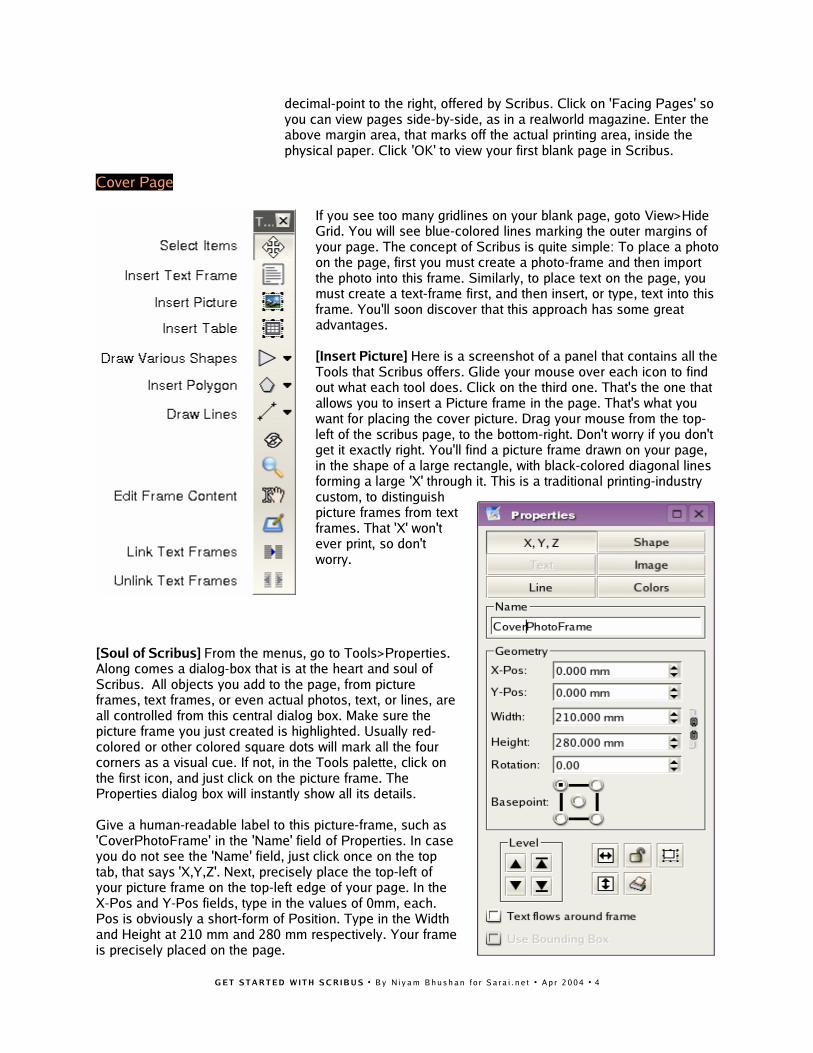
If you see too many gridlines on your blank page, goto View>HideGrid. You will see blue-colored lines marking the outer margins ofyour page. The concept of Scribus is quite simple: To place a photoon the page, first you must create a photo-frame and then importthe photo into this frame. Similarly, to place text on the page, youmust create a text-frame first, and then insert, or type, text into thisframe. You'll soon discover that this approach has some greatadvantages.
[Insert Picture] Here is a screenshot of a panel that contains all theTools that Scribus offers. Glide your mouse over each icon to findout what each tool does. Click on the third one. That's the one thatallows you to insert a Picture frame in the page. That's what youwant for placing the cover picture. Drag your mouse from the top-left of the scribus page, to the bottom-right. Don't worry if you don'tget it exactly right. You'll find a picture frame drawn on your page,in the shape of a large rectangle, with black-colored diagonal linesforming a large 'X' through it. This is a traditional printing-industrycustom, to distinguishpicture frames from textframes. That 'X' won'tever print, so don'tworry.
[Soul of Scribus] From the menus, go to Tools>Properties.Along comes a dialog-box that is at the heart and soul ofScribus. All objects you add to the page, from pictureframes, text frames, or even actual photos, text, or lines, areall controlled from this central dialog box. Make sure thepicture frame you just created is highlighted. Usually red-colored or other colored square dots will mark all the fourcorners as a visual cue. If not, in the Tools palette, click onthe first icon, and just click on the picture frame. TheProperties dialog box will instantly show all its details.
Give a human-readable label to this picture-frame, such as'CoverPhotoFrame' in the 'Name' field of Properties. In caseyou do not see the 'Name' field, just click once on the toptab, that says 'X,Y,Z'. Next, precisely place the top-left ofyour picture frame on the top-left edge of your page. In theX-Pos and Y-Pos fields, type in the values of 0mm, each.Pos is obviously a short-form of Position. Type in the Widthand Height at 210 mm and 280 mm respectively. Your frameis precisely placed on the page.
G E T S T A R T E D W I T H S C R I B U S • B y N i y a m B h u s h a n f o r S a r a i . n e t • A p r 2 0 0 4 • 4
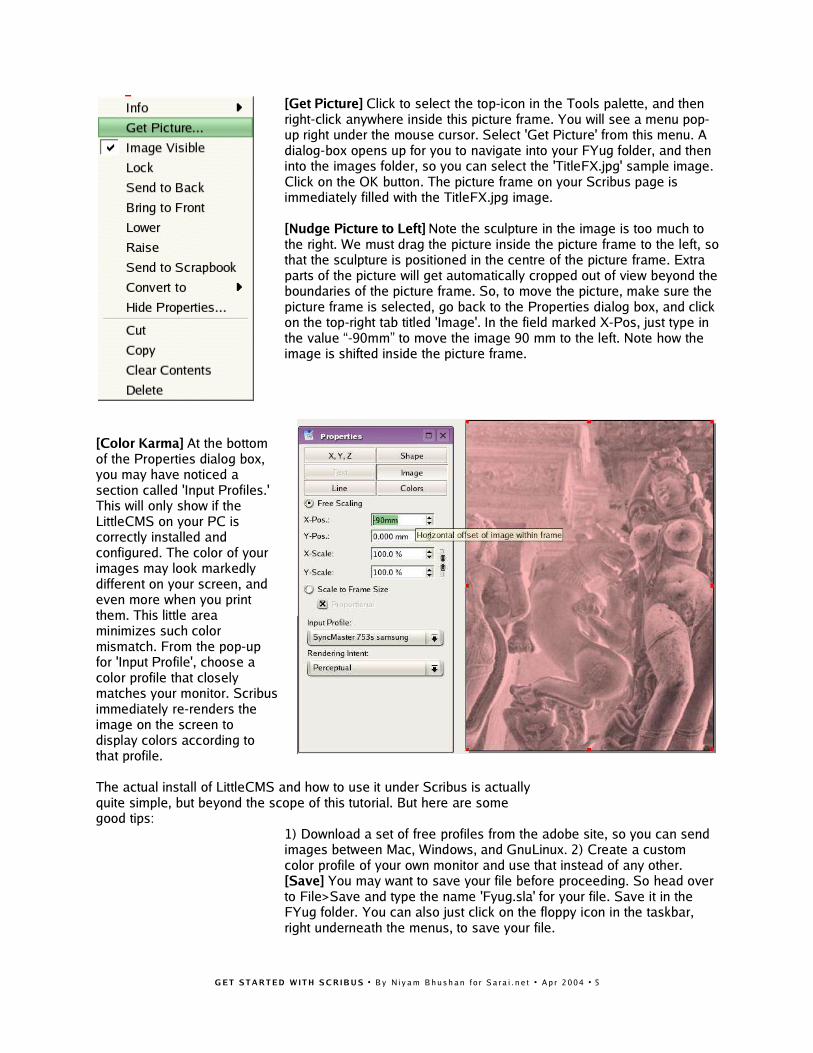
[Get Picture] Click to select the top-icon in the Tools palette, and thenright-click anywhere inside this picture frame. You will see a menu pop-up right under the mouse cursor. Select 'Get Picture' from this menu. Adialog-box opens up for you to navigate into your FYug folder, and theninto the images folder, so you can select the 'TitleFX.jpg' sample image.Click on the OK button. The picture frame on your Scribus page isimmediately filled with the TitleFX.jpg image.
[Nudge Picture to Left] Note the sculpture in the image is too much tothe right. We must drag the picture inside the picture frame to the left, sothat the sculpture is positioned in the centre of the picture frame. Extraparts of the picture will get automatically cropped out of view beyond theboundaries of the picture frame. So, to move the picture, make sure thepicture frame is selected, go back to the Properties dialog box, and clickon the top-right tab titled 'Image'. In the field marked X-Pos, just type inthe value “-90mm” to move the image 90 mm to the left. Note how theimage is shifted inside the picture frame.
[Color Karma] At the bottomof the Properties dialog box,you may have noticed asection called 'Input Profiles.'This will only show if theLittleCMS on your PC iscorrectly installed andconfigured. The color of yourimages may look markedlydifferent on your screen, andeven more when you printthem. This little areaminimizes such colormismatch. From the pop-upfor 'Input Profile', choose acolor profile that closelymatches your monitor. Scribusimmediately re-renders theimage on the screen todisplay colors according tothat profile.
The actual install of LittleCMS and how to use it under Scribus is actuallyquite simple, but beyond the scope of this tutorial. But here are somegood tips:
1) Download a set of free profiles from the adobe site, so you can sendimages between Mac, Windows, and GnuLinux. 2) Create a customcolor profile of your own monitor and use that instead of any other.[Save] You may want to save your file before proceeding. So head overto File>Save and type the name 'Fyug.sla' for your file. Save it in theFYug folder. You can also just click on the floppy icon in the taskbar,right underneath the menus, to save your file.
G E T S T A R T E D W I T H S C R I B U S • B y N i y a m B h u s h a n f o r S a r a i . n e t • A p r 2 0 0 4 • 5
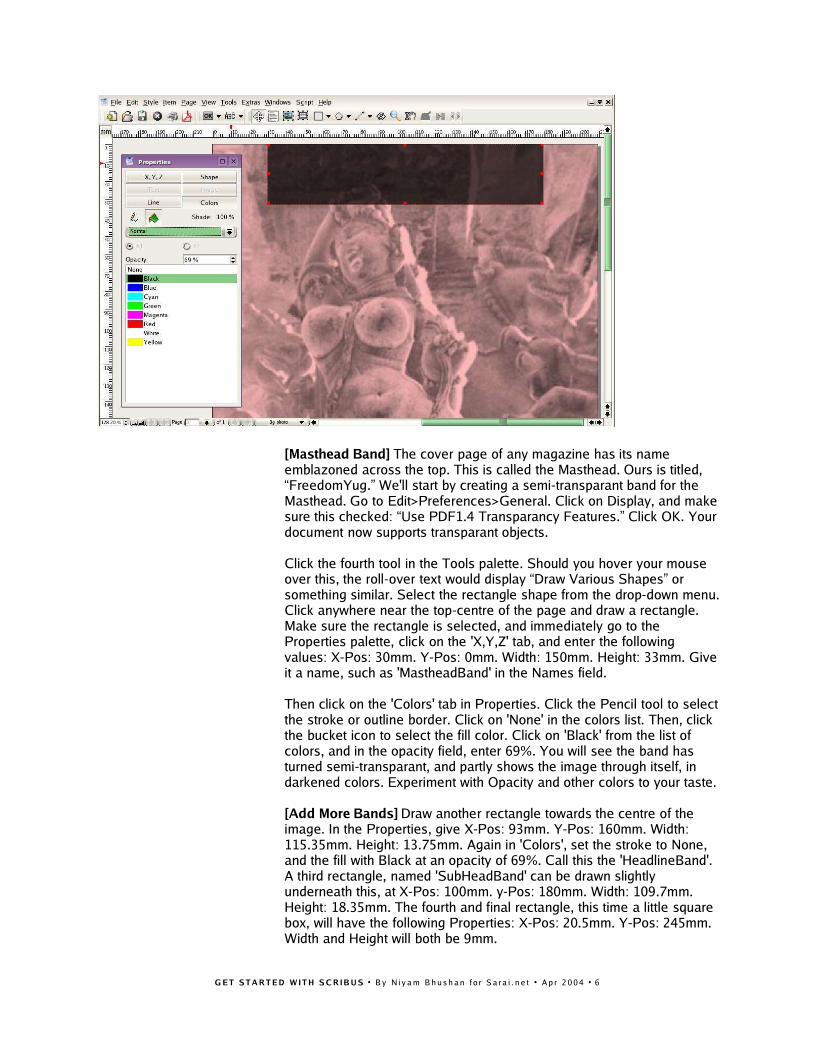
[Masthead Band] The cover page of any magazine has its nameemblazoned across the top. This is called the Masthead. Ours is titled,“FreedomYug.” We'll start by creating a semi-transparant band for theMasthead. Go to Edit>Preferences>General. Click on Display, and makesure this checked: “Use PDF1.4 Transparancy Features.” Click OK. Yourdocument now supports transparant objects.
Click the fourth tool in the Tools palette. Should you hover your mouseover this, the roll-over text would display “Draw Various Shapes” orsomething similar. Select the rectangle shape from the drop-down menu.Click anywhere near the top-centre of the page and draw a rectangle.Make sure the rectangle is selected, and immediately go to theProperties palette, click on the 'X,Y,Z' tab, and enter the followingvalues: X-Pos: 30mm. Y-Pos: 0mm. Width: 150mm. Height: 33mm. Giveit a name, such as 'MastheadBand' in the Names field.
Then click on the 'Colors' tab in Properties. Click the Pencil tool to selectthe stroke or outline border. Click on 'None' in the colors list. Then, clickthe bucket icon to select the fill color. Click on 'Black' from the list ofcolors, and in the opacity field, enter 69%. You will see the band hasturned semi-transparant, and partly shows the image through itself, indarkened colors. Experiment with Opacity and other colors to your taste.
[Add More Bands] Draw another rectangle towards the centre of theimage. In the Properties, give X-Pos: 93mm. Y-Pos: 160mm. Width:115.35mm. Height: 13.75mm. Again in 'Colors', set the stroke to None,and the fill with Black at an opacity of 69%. Call this the 'HeadlineBand'.A third rectangle, named 'SubHeadBand' can be drawn slightlyunderneath this, at X-Pos: 100mm. y-Pos: 180mm. Width: 109.7mm.Height: 18.35mm. The fourth and final rectangle, this time a little squarebox, will have the following Properties: X-Pos: 20.5mm. Y-Pos: 245mm.Width and Height will both be 9mm.
G E T S T A R T E D W I T H S C R I B U S • B y N i y a m B h u s h a n f o r S a r a i . n e t • A p r 2 0 0 4 • 6
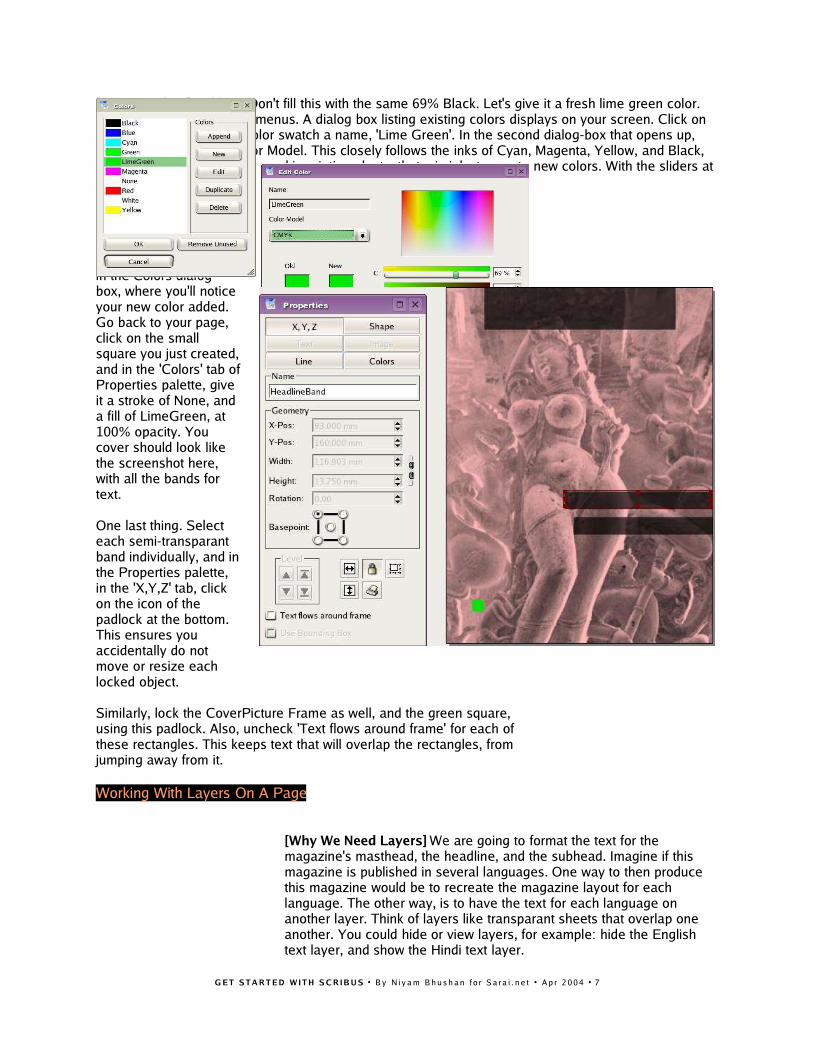
[Create Colors] Hold on! Don't fill this with the same 69% Black. Let's give it a fresh lime green color.Go to Edit>Colors... in the menus. A dialog box listing existing colors displays on your screen. Click on'New' and give your new color swatch a name, 'Lime Green'. In the second dialog-box that opens up,choose 'CMYK' as the Color Model. This closely follows the inks of Cyan, Magenta, Yellow, and Black,used in your desktop printer and in printing plants, that mix inks to create new colors. With the sliders atthe bottom, give C:69%, M: 10%, Y:100%, and K: 0%.
[Locked Bands] ClickOK in this dialog box,and then click OK againin the Colors dialogbox, where you'll noticeyour new color added.Go back to your page,click on the smallsquare you just created,and in the 'Colors' tab ofProperties palette, giveit a stroke of None, anda fill of LimeGreen, at100% opacity. Youcover should look likethe screenshot here,with all the bands fortext.
One last thing. Selecteach semi-transparantband individually, and inthe Properties palette,in the 'X,Y,Z' tab, clickon the icon of thepadlock at the bottom.This ensures youaccidentally do notmove or resize eachlocked object.
Similarly, lock the CoverPicture Frame as well, and the green square,using this padlock. Also, uncheck 'Text flows around frame' for each ofthese rectangles. This keeps text that will overlap the rectangles, fromjumping away from it.
Working With Layers On A Page
[Why We Need Layers] We are going to format the text for themagazine's masthead, the headline, and the subhead. Imagine if thismagazine is published in several languages. One way to then producethis magazine would be to recreate the magazine layout for eachlanguage. The other way, is to have the text for each language onanother layer. Think of layers like transparant sheets that overlap oneanother. You could hide or view layers, for example: hide the Englishtext layer, and show the Hindi text layer.
G E T S T A R T E D W I T H S C R I B U S • B y N i y a m B h u s h a n f o r S a r a i . n e t • A p r 2 0 0 4 • 7
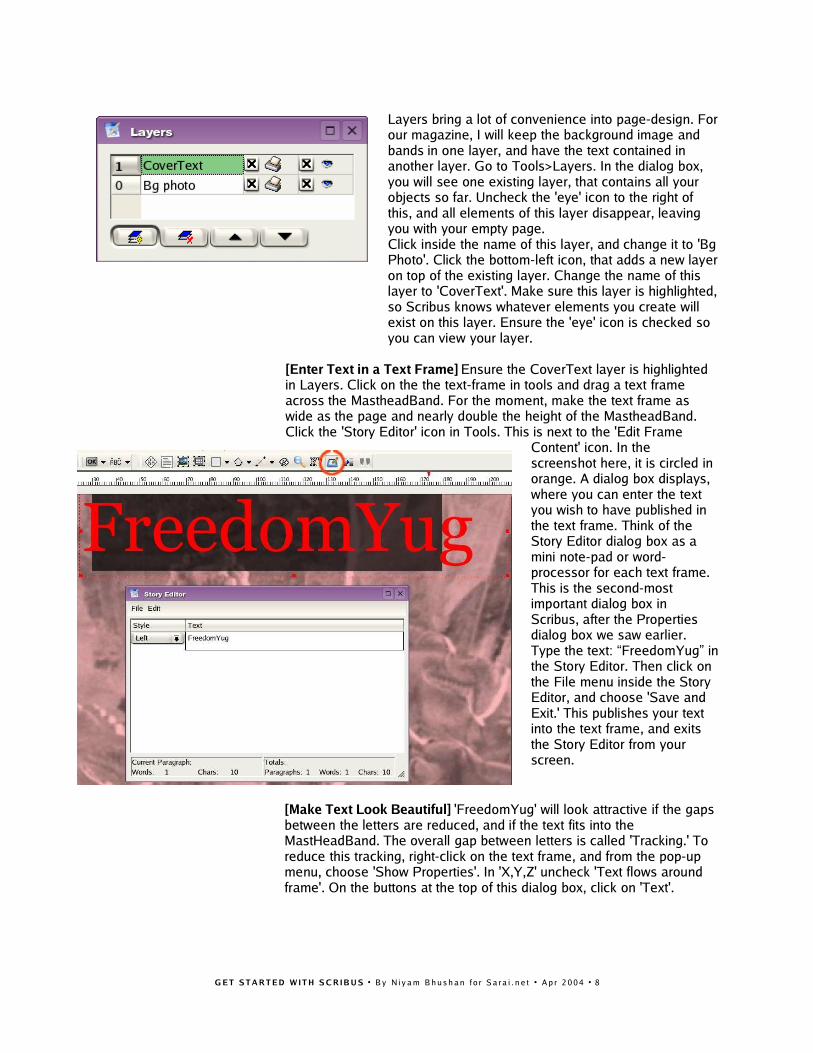
Layers bring a lot of convenience into page-design. Forour magazine, I will keep the background image andbands in one layer, and have the text contained inanother layer. Go to Tools>Layers. In the dialog box,you will see one existing layer, that contains all yourobjects so far. Uncheck the 'eye' icon to the right ofthis, and all elements of this layer disappear, leavingyou with your empty page. Click inside the name of this layer, and change it to 'BgPhoto'. Click the bottom-left icon, that adds a new layeron top of the existing layer. Change the name of thislayer to 'CoverText'. Make sure this layer is highlighted,so Scribus knows whatever elements you create willexist on this layer. Ensure the 'eye' icon is checked soyou can view your layer.
[Enter Text in a Text Frame] Ensure the CoverText layer is highlightedin Layers. Click on the the text-frame in tools and drag a text frameacross the MastheadBand. For the moment, make the text frame aswide as the page and nearly double the height of the MastheadBand.Click the 'Story Editor' icon in Tools. This is next to the 'Edit Frame
Content' icon. In thescreenshot here, it is circled inorange. A dialog box displays,where you can enter the textyou wish to have published inthe text frame. Think of theStory Editor dialog box as amini note-pad or word-processor for each text frame.This is the second-mostimportant dialog box inScribus, after the Propertiesdialog box we saw earlier.Type the text: “FreedomYug” inthe Story Editor. Then click onthe File menu inside the StoryEditor, and choose 'Save andExit.' This publishes your textinto the text frame, and exitsthe Story Editor from yourscreen.
[Make Text Look Beautiful] 'FreedomYug' will look attractive if the gapsbetween the letters are reduced, and if the text fits into theMastHeadBand. The overall gap between letters is called 'Tracking.' Toreduce this tracking, right-click on the text frame, and from the pop-upmenu, choose 'Show Properties'. In 'X,Y,Z' uncheck 'Text flows aroundframe'. On the buttons at the top of this dialog box, click on 'Text'.
G E T S T A R T E D W I T H S C R I B U S • B y N i y a m B h u s h a n f o r S a r a i . n e t • A p r 2 0 0 4 • 8
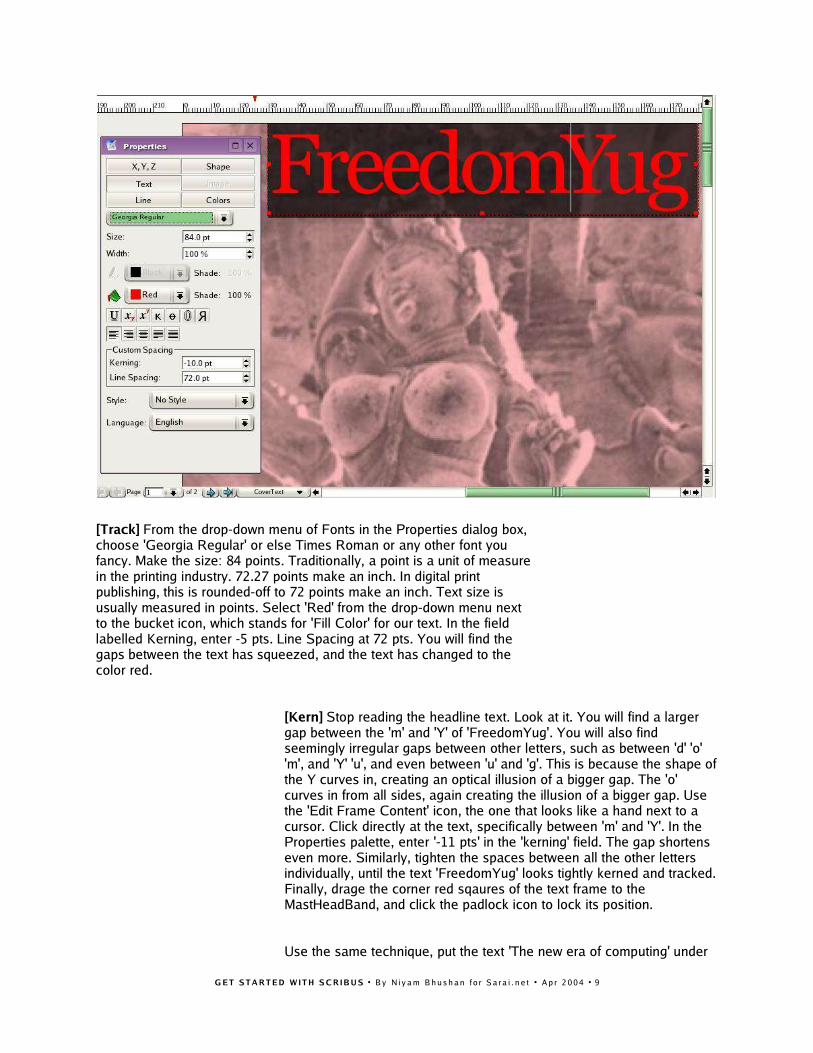
[Track] From the drop-down menu of Fonts in the Properties dialog box,choose 'Georgia Regular' or else Times Roman or any other font youfancy. Make the size: 84 points. Traditionally, a point is a unit of measurein the printing industry. 72.27 points make an inch. In digital printpublishing, this is rounded-off to 72 points make an inch. Text size isusually measured in points. Select 'Red' from the drop-down menu nextto the bucket icon, which stands for 'Fill Color' for our text. In the fieldlabelled Kerning, enter -5 pts. Line Spacing at 72 pts. You will find thegaps between the text has squeezed, and the text has changed to thecolor red.
[Kern] Stop reading the headline text. Look at it. You will find a largergap between the 'm' and 'Y' of 'FreedomYug'. You will also findseemingly irregular gaps between other letters, such as between 'd' 'o''m', and 'Y' 'u', and even between 'u' and 'g'. This is because the shape ofthe Y curves in, creating an optical illusion of a bigger gap. The 'o'curves in from all sides, again creating the illusion of a bigger gap. Usethe 'Edit Frame Content' icon, the one that looks like a hand next to acursor. Click directly at the text, specifically between 'm' and 'Y'. In theProperties palette, enter '-11 pts' in the 'kerning' field. The gap shortenseven more. Similarly, tighten the spaces between all the other lettersindividually, until the text 'FreedomYug' looks tightly kerned and tracked.Finally, drage the corner red sqaures of the text frame to theMastHeadBand, and click the padlock icon to lock its position.
Use the same technique, put the text 'The new era of computing' under
G E T S T A R T E D W I T H S C R I B U S • B y N i y a m B h u s h a n f o r S a r a i . n e t • A p r 2 0 0 4 • 9
'FreedomYug' taking care to uncheck 'Text flows around frame'. Here,the text is actually set to loose tracking. I entered '+5pts' in the kerningfield. For 'Why Khajuraho Needs Gnu/Linux' you need to press the returnkey after the word 'Khajuraho' in the Story Editor. Similarly, draw a textframe next to the green box, and enter the yellow-colored text. Use theimage on Page 1 of this tutorial as a reference for all text elements. Orcheck the PDF file or the Scribus file of this sample magazine.
Design Multiple Pages
[Many Unique Page Designs] This mag's pages are 210mm x 280 mm.However, not all pages will have the same look. I need three pages witha layout meant for a Features article, with perhaps two columns, and agenerous white space on the outer left or outer right edge of the page.Another page could look like a feedback form, which could have onlyrows and tables. Still another page could be the Contents page.
Interestingly, once I decide that a Features pageneeds two columns, and a half-column of empty whitespace on the outer-left or outer-right, with a sectionname on the band on top, I want every page that runsa Feature story to look consistently the same. Thus, Ineed a 'Template Page' for Features, that defines allthe columns and other common graphic elements forthe Feature pages. I can then add as many pages as Iwish into the actual Scribus file, from this templatepage, and add the actual text and photos to thesepages.
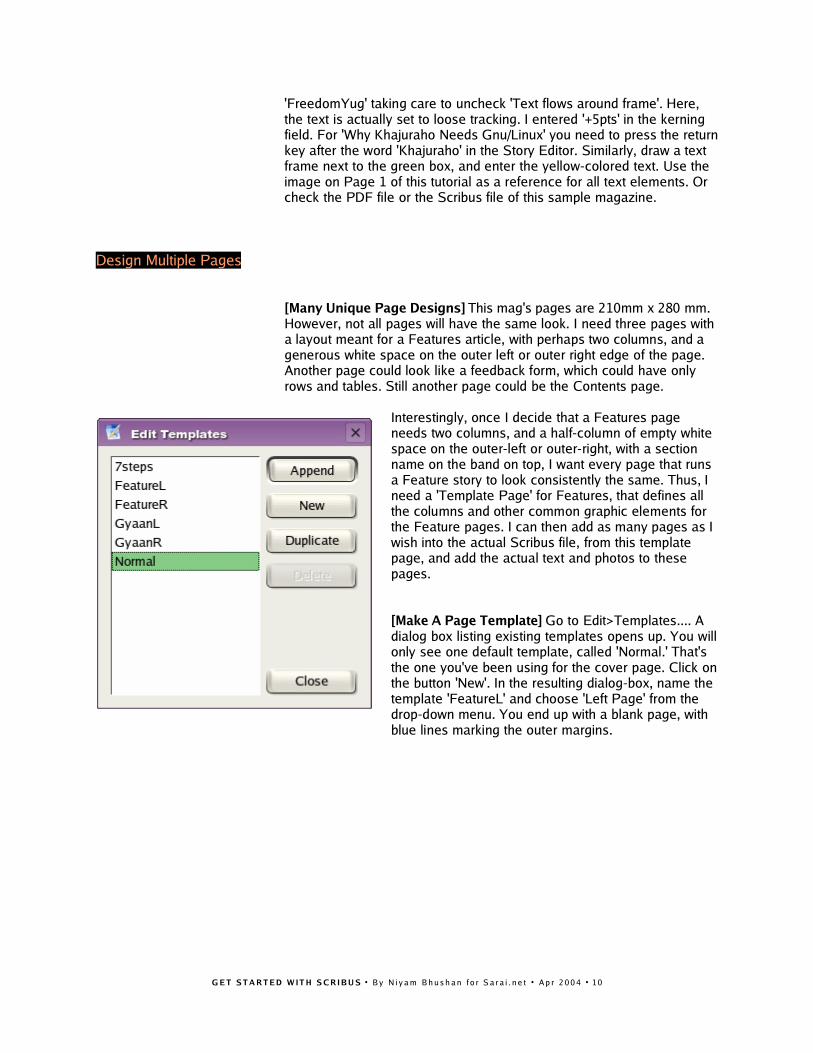
[Make A Page Template] Go to Edit>Templates.... Adialog box listing existing templates opens up. You willonly see one default template, called 'Normal.' That'sthe one you've been using for the cover page. Click onthe button 'New'. In the resulting dialog-box, name thetemplate 'FeatureL' and choose 'Left Page' from thedrop-down menu. You end up with a blank page, withblue lines marking the outer margins.
G E T S T A R T E D W I T H S C R I B U S • B y N i y a m B h u s h a n f o r S a r a i . n e t • A p r 2 0 0 4 • 1 0
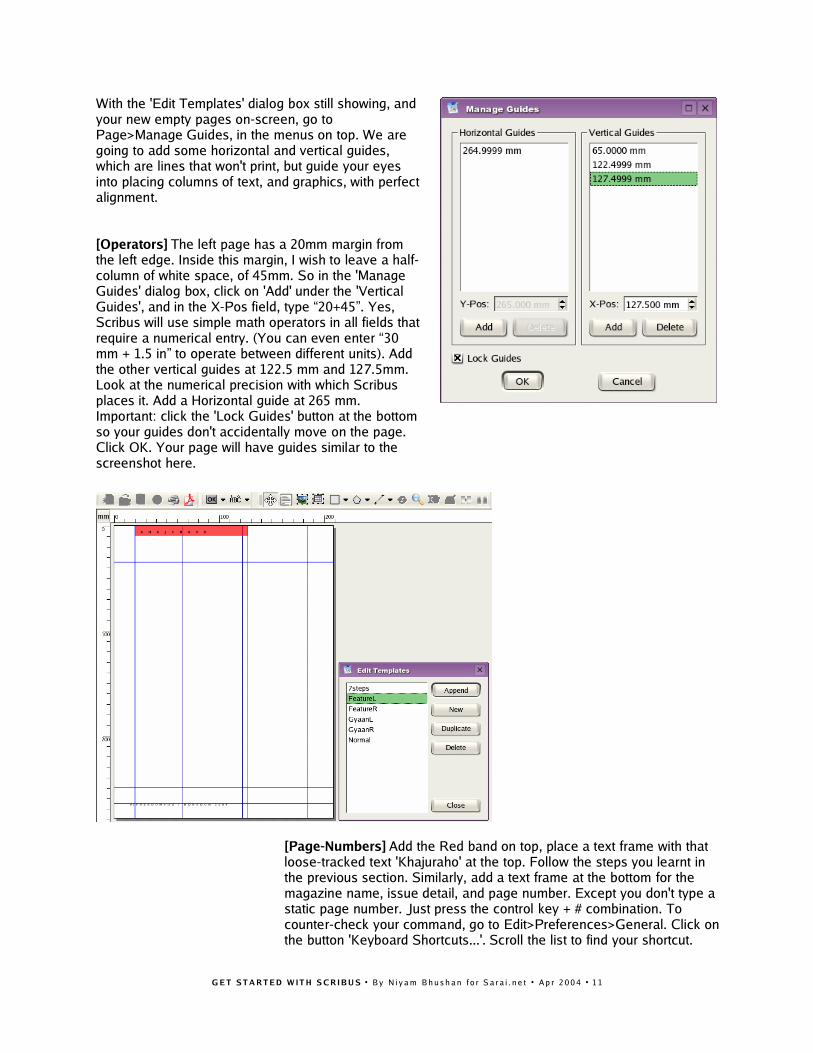
With the 'Edit Templates' dialog box still showing, andyour new empty pages on-screen, go toPage>Manage Guides, in the menus on top. We aregoing to add some horizontal and vertical guides,which are lines that won't print, but guide your eyesinto placing columns of text, and graphics, with perfectalignment.
[Operators] The left page has a 20mm margin fromthe left edge. Inside this margin, I wish to leave a half-column of white space, of 45mm. So in the 'ManageGuides' dialog box, click on 'Add' under the 'VerticalGuides', and in the X-Pos field, type “20+45”. Yes,Scribus will use simple math operators in all fields thatrequire a numerical entry. (You can even enter “30mm + 1.5 in” to operate between different units). Addthe other vertical guides at 122.5 mm and 127.5mm.Look at the numerical precision with which Scribusplaces it. Add a Horizontal guide at 265 mm.Important: click the 'Lock Guides' button at the bottomso your guides don't accidentally move on the page.Click OK. Your page will have guides similar to thescreenshot here.
[Page-Numbers] Add the Red band on top, place a text frame with thatloose-tracked text 'Khajuraho' at the top. Follow the steps you learnt inthe previous section. Similarly, add a text frame at the bottom for themagazine name, issue detail, and page number. Except you don't type astatic page number. Just press the control key + # combination. Tocounter-check your command, go to Edit>Preferences>General. Click onthe button 'Keyboard Shortcuts...'. Scroll the list to find your shortcut.
G E T S T A R T E D W I T H S C R I B U S • B y N i y a m B h u s h a n f o r S a r a i . n e t • A p r 2 0 0 4 • 1 1
[Right Page] To create the Features page for the right hand side, clickon New in Templates, choose 'Right Page' from the drop-down menu,name the template 'FeaturesR'. Bring up Page>Manage Guides, andenter the following for adding Vertical guides: 82.5mm, 87.5mm,145mm. Add a Horizontal guide at 265mm. Like with FeaturesL, add thered band on top with text, and the page number details at the bottom.Click the 'Close' button on the Templates dialog box. You find yourselfback in your Scribus document's regular pages.
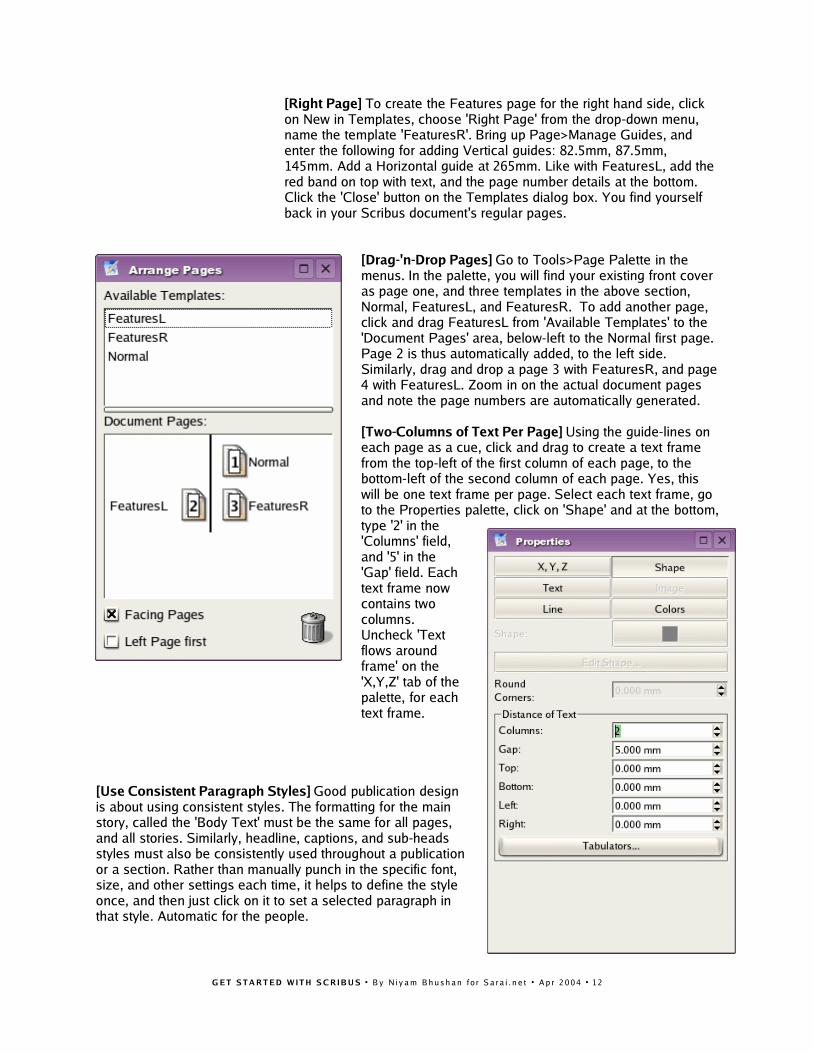
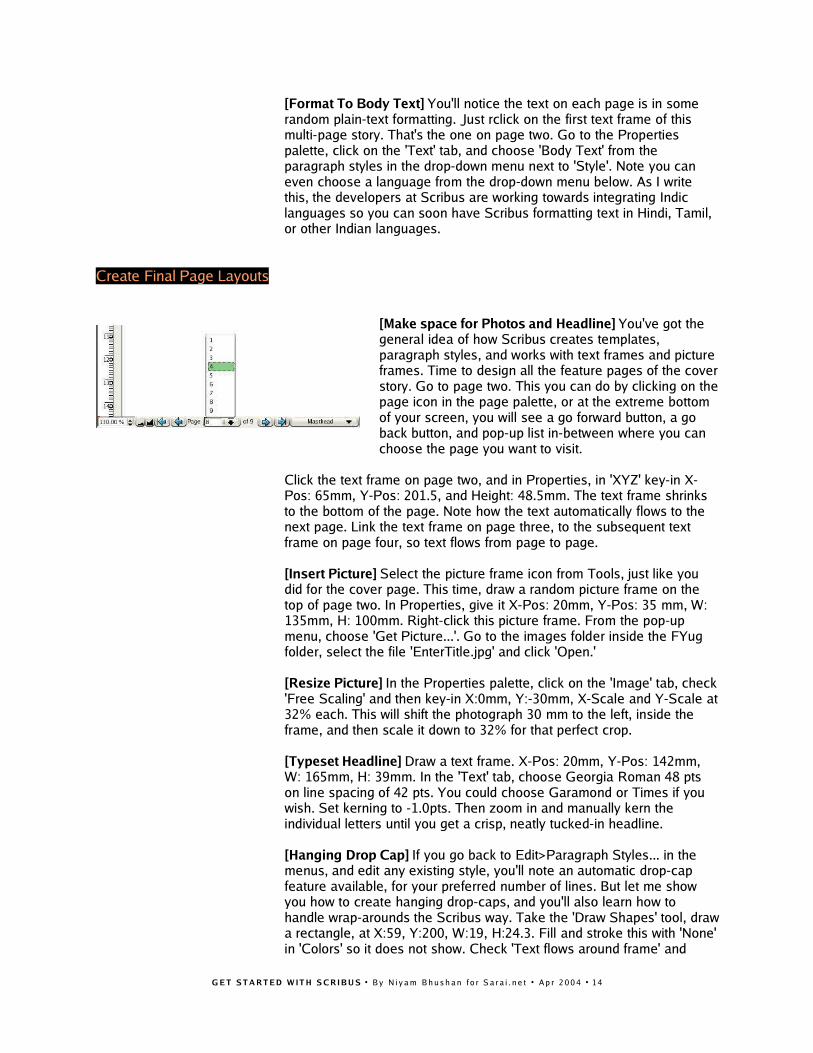
[Drag-'n-Drop Pages] Go to Tools>Page Palette in themenus. In the palette, you will find your existing front coveras page one, and three templates in the above section,Normal, FeaturesL, and FeaturesR. To add another page,click and drag FeaturesL from 'Available Templates' to the'Document Pages' area, below-left to the Normal first page.Page 2 is thus automatically added, to the left side.Similarly, drag and drop a page 3 with FeaturesR, and page4 with FeaturesL. Zoom in on the actual document pagesand note the page numbers are automatically generated.
[Two-Columns of Text Per Page] Using the guide-lines oneach page as a cue, click and drag to create a text framefrom the top-left of the first column of each page, to thebottom-left of the second column of each page. Yes, thiswill be one text frame per page. Select each text frame, goto the Properties palette, click on 'Shape' and at the bottom,type '2' in the'Columns' field,and '5' in the'Gap' field. Eachtext frame nowcontains twocolumns.Uncheck 'Textflows aroundframe' on the'X,Y,Z' tab of thepalette, for eachtext frame.
[Use Consistent Paragraph Styles] Good publication designis about using consistent styles. The formatting for the mainstory, called the 'Body Text' must be the same for all pages,and all stories. Similarly, headline, captions, and sub-headsstyles must also be consistently used throughout a publicationor a section. Rather than manually punch in the specific font,size, and other settings each time, it helps to define the styleonce, and then just click on it to set a selected paragraph inthat style. Automatic for the people.
G E T S T A R T E D W I T H S C R I B U S • B y N i y a m B h u s h a n f o r S a r a i . n e t • A p r 2 0 0 4 • 1 2
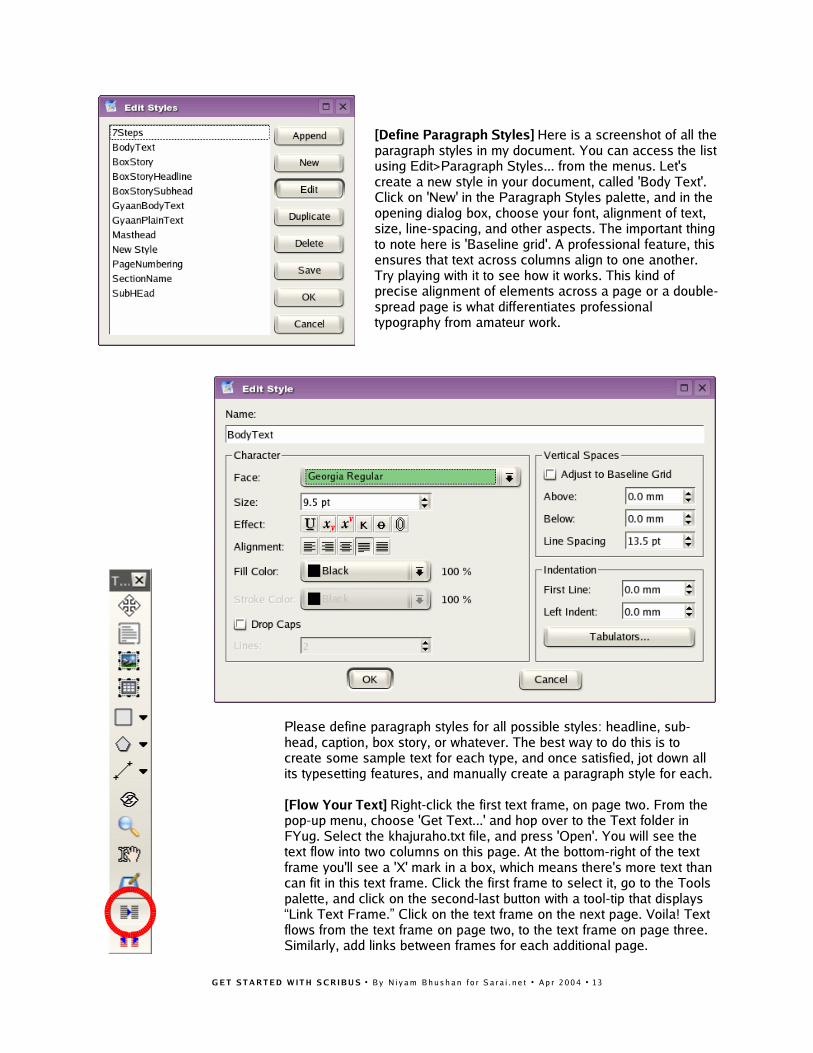
[Define Paragraph Styles] Here is a screenshot of all theparagraph styles in my document. You can access the listusing Edit>Paragraph Styles... from the menus. Let'screate a new style in your document, called 'Body Text'.Click on 'New' in the Paragraph Styles palette, and in theopening dialog box, choose your font, alignment of text,size, line-spacing, and other aspects. The important thingto note here is 'Baseline grid'. A professional feature, thisensures that text across columns align to one another.Try playing with it to see how it works. This kind ofprecise alignment of elements across a page or a double-spread page is what differentiates professionaltypography from amateur work.
Please define paragraph styles for all possible styles: headline, sub-head, caption, box story, or whatever. The best way to do this is tocreate some sample text for each type, and once satisfied, jot down allits typesetting features, and manually create a paragraph style for each.
[Flow Your Text] Right-click the first text frame, on page two. From thepop-up menu, choose 'Get Text...' and hop over to the Text folder inFYug. Select the khajuraho.txt file, and press 'Open'. You will see thetext flow into two columns on this page. At the bottom-right of the textframe you'll see a 'X' mark in a box, which means there's more text thancan fit in this text frame. Click the first frame to select it, go to the Toolspalette, and click on the second-last button with a tool-tip that displays“Link Text Frame.” Click on the text frame on the next page. Voila! Textflows from the text frame on page two, to the text frame on page three.Similarly, add links between frames for each additional page.
G E T S T A R T E D W I T H S C R I B U S • B y N i y a m B h u s h a n f o r S a r a i . n e t • A p r 2 0 0 4 • 1 3
[Format To Body Text] You'll notice the text on each page is in somerandom plain-text formatting. Just rclick on the first text frame of thismulti-page story. That's the one on page two. Go to the Propertiespalette, click on the 'Text' tab, and choose 'Body Text' from theparagraph styles in the drop-down menu next to 'Style'. Note you caneven choose a language from the drop-down menu below. As I writethis, the developers at Scribus are working towards integrating Indiclanguages so you can soon have Scribus formatting text in Hindi, Tamil,or other Indian languages.
Create Final Page Layouts
[Make space for Photos and Headline] You've got thegeneral idea of how Scribus creates templates,paragraph styles, and works with text frames and pictureframes. Time to design all the feature pages of the coverstory. Go to page two. This you can do by clicking on thepage icon in the page palette, or at the extreme bottomof your screen, you will see a go forward button, a goback button, and pop-up list in-between where you canchoose the page you want to visit.
Click the text frame on page two, and in Properties, in 'XYZ' key-in X-Pos: 65mm, Y-Pos: 201.5, and Height: 48.5mm. The text frame shrinksto the bottom of the page. Note how the text automatically flows to thenext page. Link the text frame on page three, to the subsequent textframe on page four, so text flows from page to page.
[Insert Picture] Select the picture frame icon from Tools, just like youdid for the cover page. This time, draw a random picture frame on thetop of page two. In Properties, give it X-Pos: 20mm, Y-Pos: 35 mm, W:135mm, H: 100mm. Right-click this picture frame. From the pop-upmenu, choose 'Get Picture...'. Go to the images folder inside the FYugfolder, select the file 'EnterTitle.jpg' and click 'Open.'
[Resize Picture] In the Properties palette, click on the 'Image' tab, check'Free Scaling' and then key-in X:0mm, Y:-30mm, X-Scale and Y-Scale at32% each. This will shift the photograph 30 mm to the left, inside theframe, and then scale it down to 32% for that perfect crop.
[Typeset Headline] Draw a text frame. X-Pos: 20mm, Y-Pos: 142mm,W: 165mm, H: 39mm. In the 'Text' tab, choose Georgia Roman 48 ptson line spacing of 42 pts. You could choose Garamond or Times if youwish. Set kerning to -1.0pts. Then zoom in and manually kern theindividual letters until you get a crisp, neatly tucked-in headline.
[Hanging Drop Cap] If you go back to Edit>Paragraph Styles... in themenus, and edit any existing style, you'll note an automatic drop-capfeature available, for your preferred number of lines. But let me showyou how to create hanging drop-caps, and you'll also learn how tohandle wrap-arounds the Scribus way. Take the 'Draw Shapes' tool, drawa rectangle, at X:59, Y:200, W:19, H:24.3. Fill and stroke this with 'None'in 'Colors' so it does not show. Check 'Text flows around frame' and
G E T S T A R T E D W I T H S C R I B U S • B y N i y a m B h u s h a n f o r S a r a i . n e t • A p r 2 0 0 4 • 1 4
you'll see the first para of your article flowing around this “empty” space.Next, draw a text frame at X;52, Y: 195, W: 24.5, H: 36. Uncheck 'Flowtext around frame' for this. Using either the story-editor or the hand-cursor icon, enter the letter 'D' in this text frame. In Properties, set this toGeorgia Roman, 87 point, with leading at 104 points. Fill this with Black.Click on 'Shade' choose 'Other' from the drop-down manu, and type69%. Your drop-cap is done. Should you want to select the invisiblerectangle used for wrapping text, and end up selecting this text framestacked on top of it, press control+shift click and repeatedly press untilyou select the correct object in the stack.
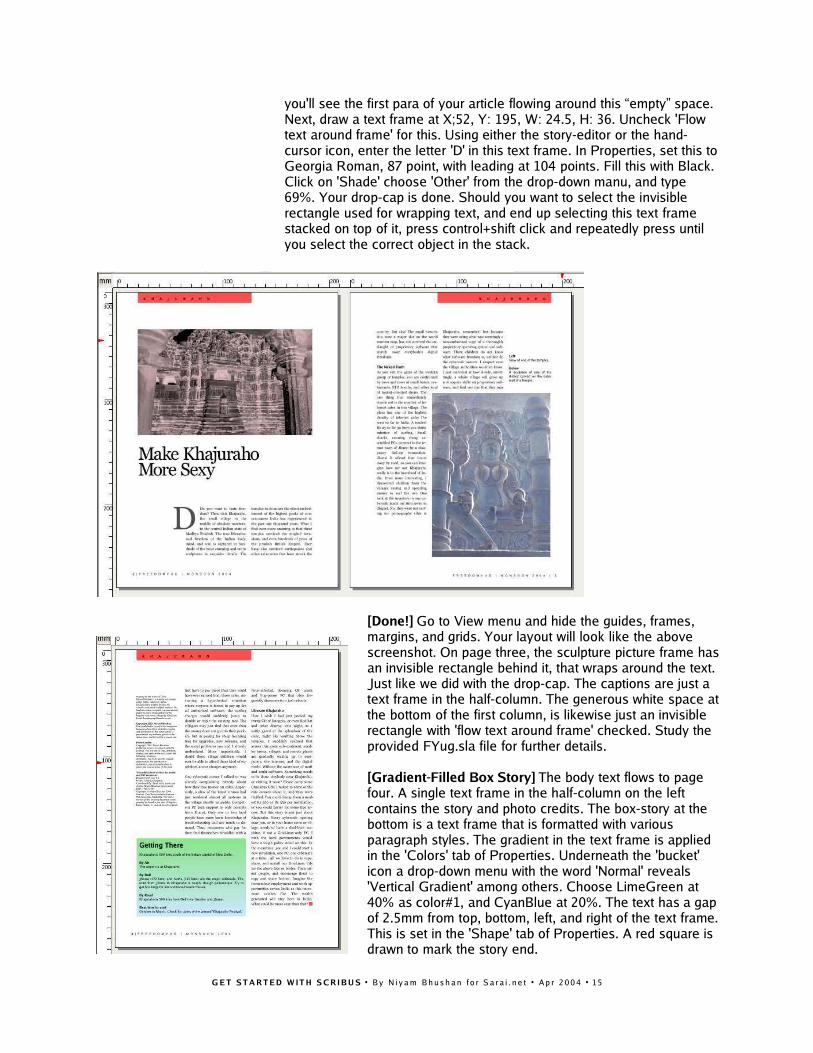
[Done!] Go to View menu and hide the guides, frames,margins, and grids. Your layout will look like the abovescreenshot. On page three, the sculpture picture frame hasan invisible rectangle behind it, that wraps around the text.Just like we did with the drop-cap. The captions are just atext frame in the half-column. The generous white space atthe bottom of the first column, is likewise just an invisiblerectangle with 'flow text around frame' checked. Study theprovided FYug.sla file for further details.
[Gradient-Filled Box Story] The body text flows to pagefour. A single text frame in the half-column on the leftcontains the story and photo credits. The box-story at thebottom is a text frame that is formatted with variousparagraph styles. The gradient in the text frame is appliedin the 'Colors' tab of Properties. Underneath the 'bucket'icon a drop-down menu with the word 'Normal' reveals'Vertical Gradient' among others. Choose LimeGreen at40% as color#1, and CyanBlue at 20%. The text has a gapof 2.5mm from top, bottom, left, and right of the text frame.This is set in the 'Shape' tab of Properties. A red square isdrawn to mark the story end.
G E T S T A R T E D W I T H S C R I B U S • B y N i y a m B h u s h a n f o r S a r a i . n e t • A p r 2 0 0 4 • 1 5
Design With Graphics and Freedom
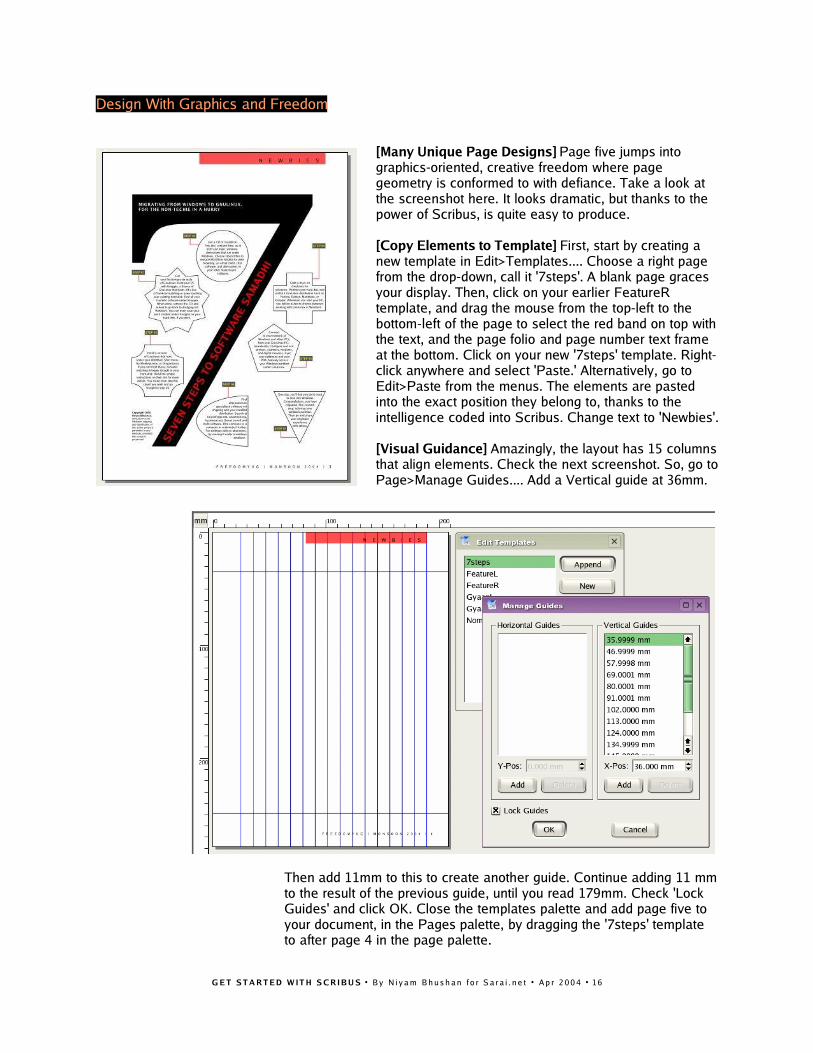
[Many Unique Page Designs] Page five jumps intographics-oriented, creative freedom where pagegeometry is conformed to with defiance. Take a look atthe screenshot here. It looks dramatic, but thanks to thepower of Scribus, is quite easy to produce.
[Copy Elements to Template] First, start by creating anew template in Edit>Templates.... Choose a right pagefrom the drop-down, call it '7steps'. A blank page gracesyour display. Then, click on your earlier FeatureRtemplate, and drag the mouse from the top-left to thebottom-left of the page to select the red band on top withthe text, and the page folio and page number text frameat the bottom. Click on your new '7steps' template. Right-click anywhere and select 'Paste.' Alternatively, go toEdit>Paste from the menus. The elements are pastedinto the exact position they belong to, thanks to theintelligence coded into Scribus. Change text to 'Newbies'.
[Visual Guidance] Amazingly, the layout has 15 columnsthat align elements. Check the next screenshot. So, go toPage>Manage Guides.... Add a Vertical guide at 36mm.
Then add 11mm to this to create another guide. Continue adding 11 mmto the result of the previous guide, until you read 179mm. Check 'LockGuides' and click OK. Close the templates palette and add page five toyour document, in the Pages palette, by dragging the '7steps' templateto after page 4 in the page palette.
G E T S T A R T E D W I T H S C R I B U S • B y N i y a m B h u s h a n f o r S a r a i . n e t • A p r 2 0 0 4 • 1 6
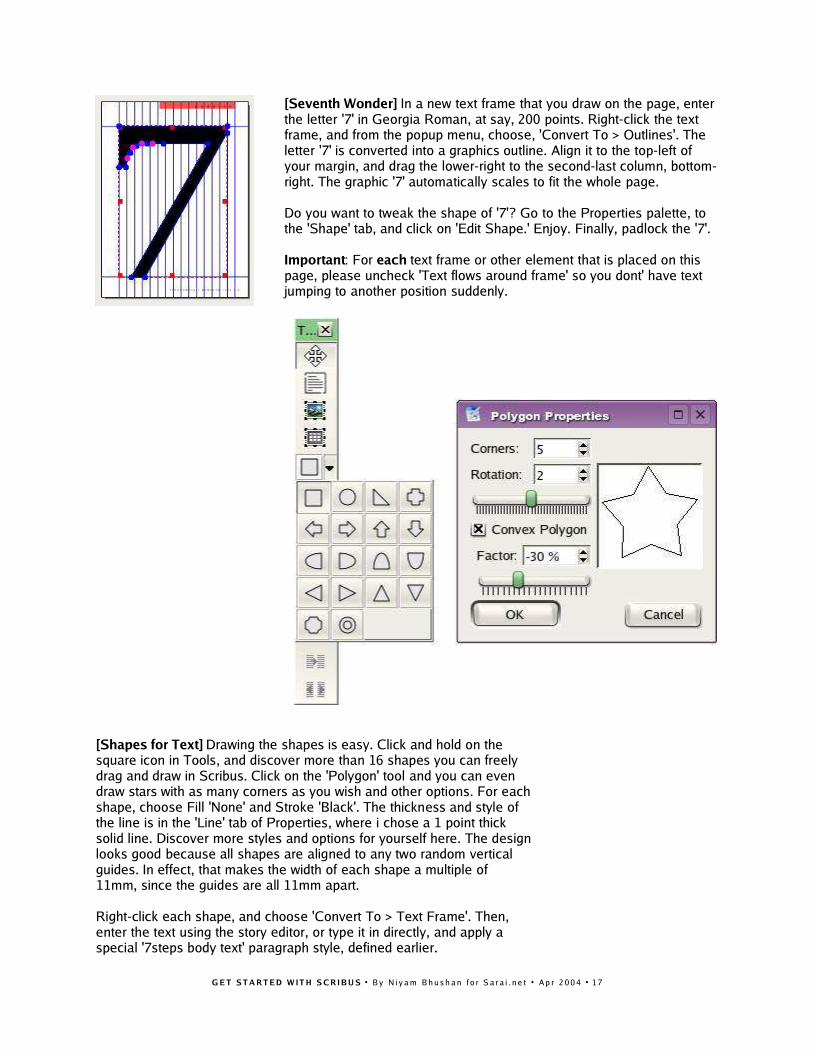
[Seventh Wonder] In a new text frame that you draw on the page, enterthe letter '7' in Georgia Roman, at say, 200 points. Right-click the textframe, and from the popup menu, choose, 'Convert To > Outlines'. Theletter '7' is converted into a graphics outline. Align it to the top-left ofyour margin, and drag the lower-right to the second-last column, bottom-right. The graphic '7' automatically scales to fit the whole page.
Do you want to tweak the shape of '7'? Go to the Properties palette, tothe 'Shape' tab, and click on 'Edit Shape.' Enjoy. Finally, padlock the '7'.
Important: For each text frame or other element that is placed on thispage, please uncheck 'Text flows around frame' so you dont' have textjumping to another position suddenly.
[Shapes for Text] Drawing the shapes is easy. Click and hold on thesquare icon in Tools, and discover more than 16 shapes you can freelydrag and draw in Scribus. Click on the 'Polygon' tool and you can evendraw stars with as many corners as you wish and other options. For eachshape, choose Fill 'None' and Stroke 'Black'. The thickness and style ofthe line is in the 'Line' tab of Properties, where i chose a 1 point thicksolid line. Discover more styles and options for yourself here. The designlooks good because all shapes are aligned to any two random verticalguides. In effect, that makes the width of each shape a multiple of11mm, since the guides are all 11mm apart.
Right-click each shape, and choose 'Convert To > Text Frame'. Then,enter the text using the story editor, or type it in directly, and apply aspecial '7steps body text' paragraph style, defined earlier.
G E T S T A R T E D W I T H S C R I B U S • B y N i y a m B h u s h a n f o r S a r a i . n e t • A p r 2 0 0 4 • 1 7
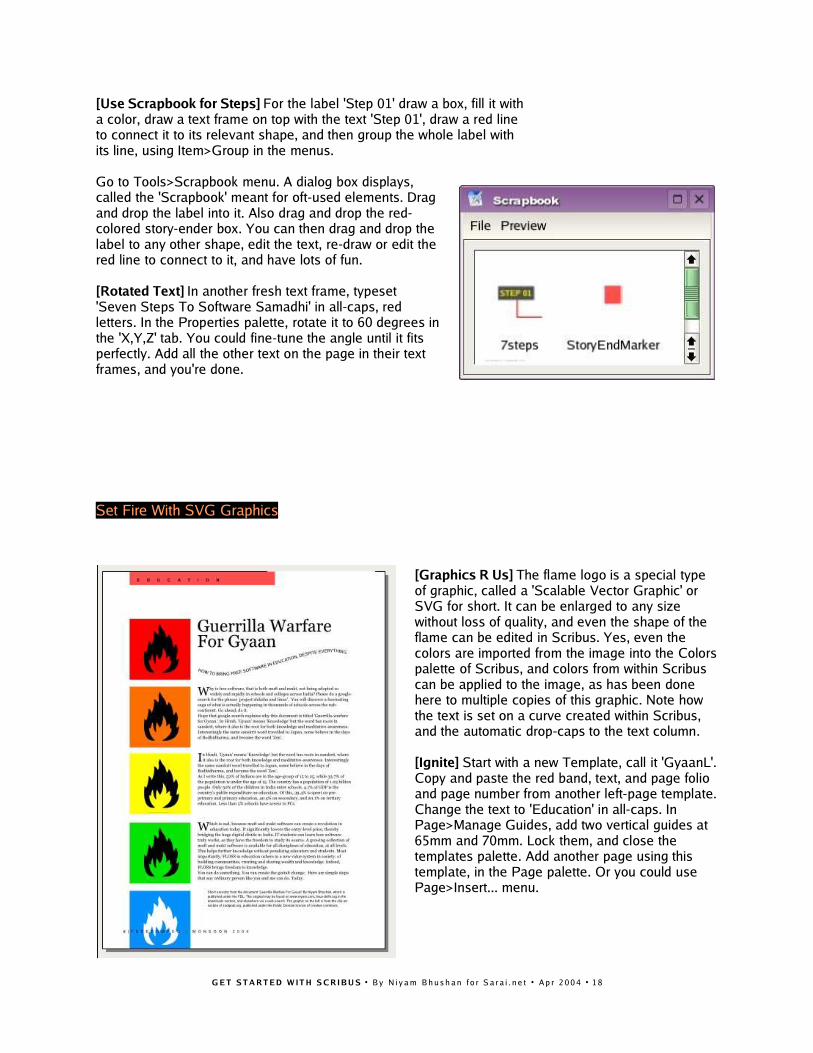
[Use Scrapbook for Steps] For the label 'Step 01' draw a box, fill it witha color, draw a text frame on top with the text 'Step 01', draw a red lineto connect it to its relevant shape, and then group the whole label withits line, using Item>Group in the menus.
Go to Tools>Scrapbook menu. A dialog box displays,called the 'Scrapbook' meant for oft-used elements. Dragand drop the label into it. Also drag and drop the red-colored story-ender box. You can then drag and drop thelabel to any other shape, edit the text, re-draw or edit thered line to connect to it, and have lots of fun.
[Rotated Text] In another fresh text frame, typeset'Seven Steps To Software Samadhi' in all-caps, redletters. In the Properties palette, rotate it to 60 degrees inthe 'X,Y,Z' tab. You could fine-tune the angle until it fitsperfectly. Add all the other text on the page in their textframes, and you're done.
Set Fire With SVG Graphics
[Graphics R Us] The flame logo is a special typeof graphic, called a 'Scalable Vector Graphic' orSVG for short. It can be enlarged to any sizewithout loss of quality, and even the shape of theflame can be edited in Scribus. Yes, even thecolors are imported from the image into the Colorspalette of Scribus, and colors from within Scribuscan be applied to the image, as has been donehere to multiple copies of this graphic. Note howthe text is set on a curve created within Scribus,and the automatic drop-caps to the text column.
[Ignite] Start with a new Template, call it 'GyaanL'.Copy and paste the red band, text, and page folioand page number from another left-page template.Change the text to 'Education' in all-caps. InPage>Manage Guides, add two vertical guides at65mm and 70mm. Lock them, and close thetemplates palette. Add another page using thistemplate, in the Page palette. Or you could usePage>Insert... menu.
G E T S T A R T E D W I T H S C R I B U S • B y N i y a m B h u s h a n f o r S a r a i . n e t • A p r 2 0 0 4 • 1 8
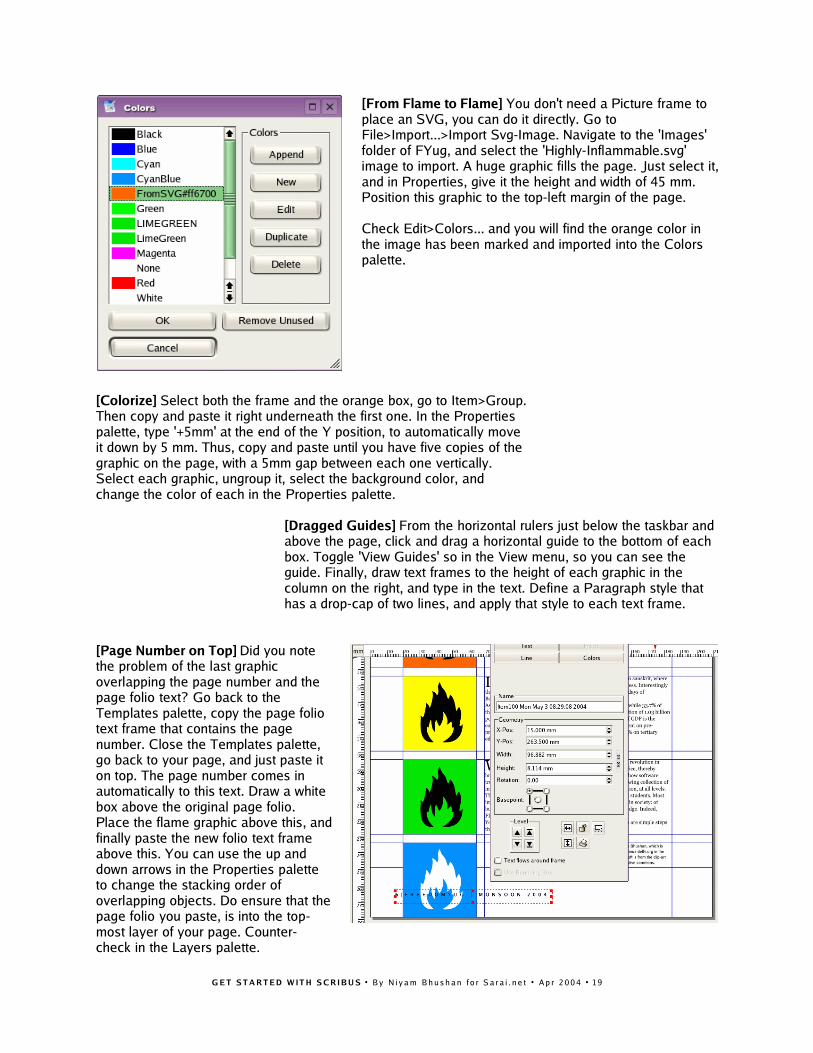
[From Flame to Flame] You don't need a Picture frame toplace an SVG, you can do it directly. Go toFile>Import...>Import Svg-Image. Navigate to the 'Images'folder of FYug, and select the 'Highly-Inflammable.svg'image to import. A huge graphic fills the page. Just select it,and in Properties, give it the height and width of 45 mm.Position this graphic to the top-left margin of the page.
Check Edit>Colors... and you will find the orange color inthe image has been marked and imported into the Colorspalette.
[Colorize] Select both the frame and the orange box, go to Item>Group.Then copy and paste it right underneath the first one. In the Propertiespalette, type '+5mm' at the end of the Y position, to automatically moveit down by 5 mm. Thus, copy and paste until you have five copies of thegraphic on the page, with a 5mm gap between each one vertically.Select each graphic, ungroup it, select the background color, andchange the color of each in the Properties palette.
[Dragged Guides] From the horizontal rulers just below the taskbar andabove the page, click and drag a horizontal guide to the bottom of eachbox. Toggle 'View Guides' so in the View menu, so you can see theguide. Finally, draw text frames to the height of each graphic in thecolumn on the right, and type in the text. Define a Paragraph style thathas a drop-cap of two lines, and apply that style to each text frame.
[Page Number on Top] Did you notethe problem of the last graphicoverlapping the page number and thepage folio text? Go back to theTemplates palette, copy the page foliotext frame that contains the pagenumber. Close the Templates palette,go back to your page, and just paste iton top. The page number comes inautomatically to this text. Draw a whitebox above the original page folio.Place the flame graphic above this, andfinally paste the new folio text frameabove this. You can use the up anddown arrows in the Properties paletteto change the stacking order ofoverlapping objects. Do ensure that thepage folio you paste, is into the top-most layer of your page. Counter-check in the Layers palette.
G E T S T A R T E D W I T H S C R I B U S • B y N i y a m B h u s h a n f o r S a r a i . n e t • A p r 2 0 0 4 • 1 9

[Text on Path] The text on the curve is prettyeasy. Write the text in a text frame. Draw acurve using the 'Insert lines' tool. Use thetool that has a pencil with a line shaped likean 'S' around it. To draw the curve, just clickonce at the starting point of the curve, anddrag briefly to the top-right. Then release thebutton, click at the end position of the curve,
and drag briefly to the bottom-left. Once you are satisfied with thecurve shape, just right-click the mouse and your curve is done.Select both the text frame and the curve, and select Item>AttachText to Path. The text will follow the curve. You can play withalignment and other settings in the Properties palette. Rotate thewhole curve slightly for a better fit.
Publishing Demands Freedom. PDF.
[PDF-authoring] The screenshotshows the GnuLinux version ofAcrobat Reader. Yes, a freeversion is available from theAdobe site for GnuLinux as well.The document you see inside it, isa scoreboard created from Scribus,the free desktop publishingsoftware. The background is anSVG graphic with a tint, and thefields, check boxes, and even the'Click to Submit' button has beenauthored inside Scribus. Yes, thePDF elements contain Javascriptembedded from within Scribus.
You guessed it. Scribus is amature PDF-authoring software.Use it to create PDF forms, PDFdocuments, and you can evendigitally sign your PDF documentswith Scribus.
Look carefully. The headline bandsare semi-transparant. The flameshows through. Scribus supportsPDF 1.4 transparancy too. Foryour convenience, this is aseparate file: FyugScoreCard.sla.Also check out its PDF version.
G E T S T A R T E D W I T H S C R I B U S • B y N i y a m B h u s h a n f o r S a r a i . n e t • A p r 2 0 0 4 • 2 0
[Design The PDF Layout] The design looks dramatic, but the layout isquite simple. It has only one column, which contains all the questions, inone text frame, on the left. The half-column on the right contains someinformation in a text frame. The headline and the Name, Address, etc,are in a text frame that spans the entire width of the page. The coloredbands to mark the sections are obviously colored rectangles drawnbehind the section sub-heads. The logo in the background is just theflame from the 'inflammable' SVG graphic. This time it is colored to Redat 20% shade. It is kept on another Layer stacked at the back.
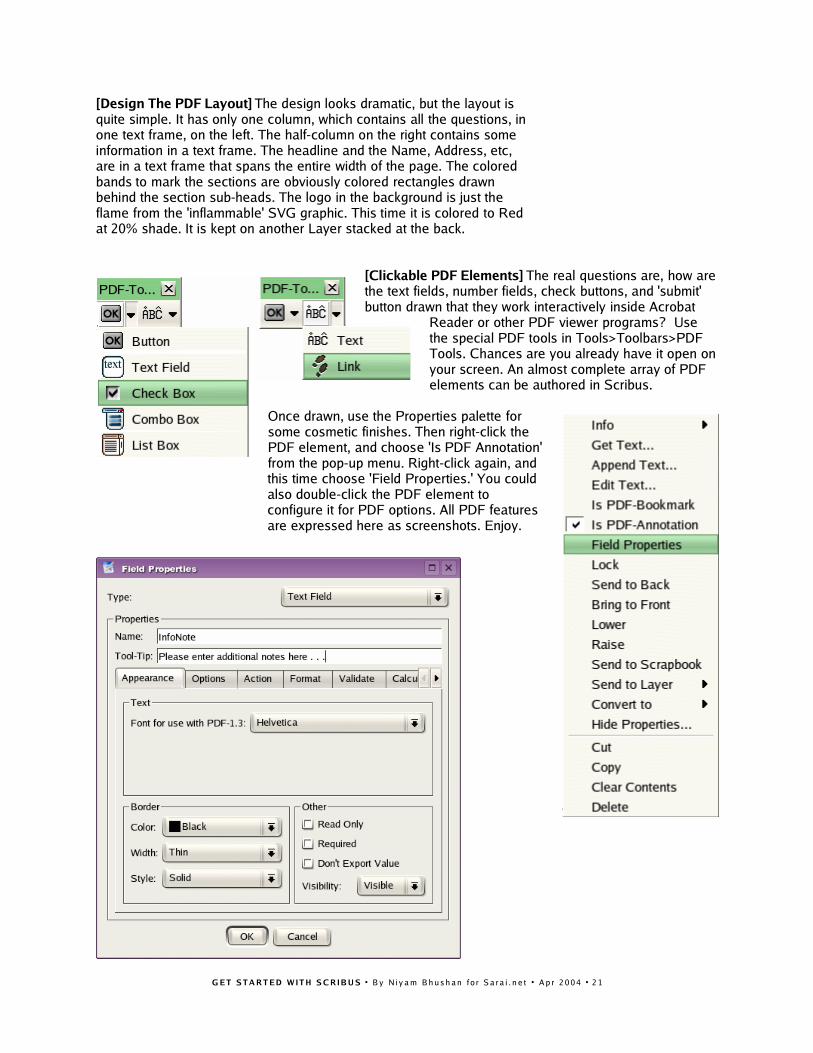
[Clickable PDF Elements] The real questions are, how arethe text fields, number fields, check buttons, and 'submit'button drawn that they work interactively inside Acrobat
Reader or other PDF viewer programs? Usethe special PDF tools in Tools>Toolbars>PDFTools. Chances are you already have it open onyour screen. An almost complete array of PDFelements can be authored in Scribus.
Once drawn, use the Properties palette forsome cosmetic finishes. Then right-click thePDF element, and choose 'Is PDF Annotation'from the pop-up menu. Right-click again, andthis time choose 'Field Properties.' You couldalso double-click the PDF element toconfigure it for PDF options. All PDF featuresare expressed here as screenshots. Enjoy.
G E T S T A R T E D W I T H S C R I B U S • B y N i y a m B h u s h a n f o r S a r a i . n e t • A p r 2 0 0 4 • 2 1
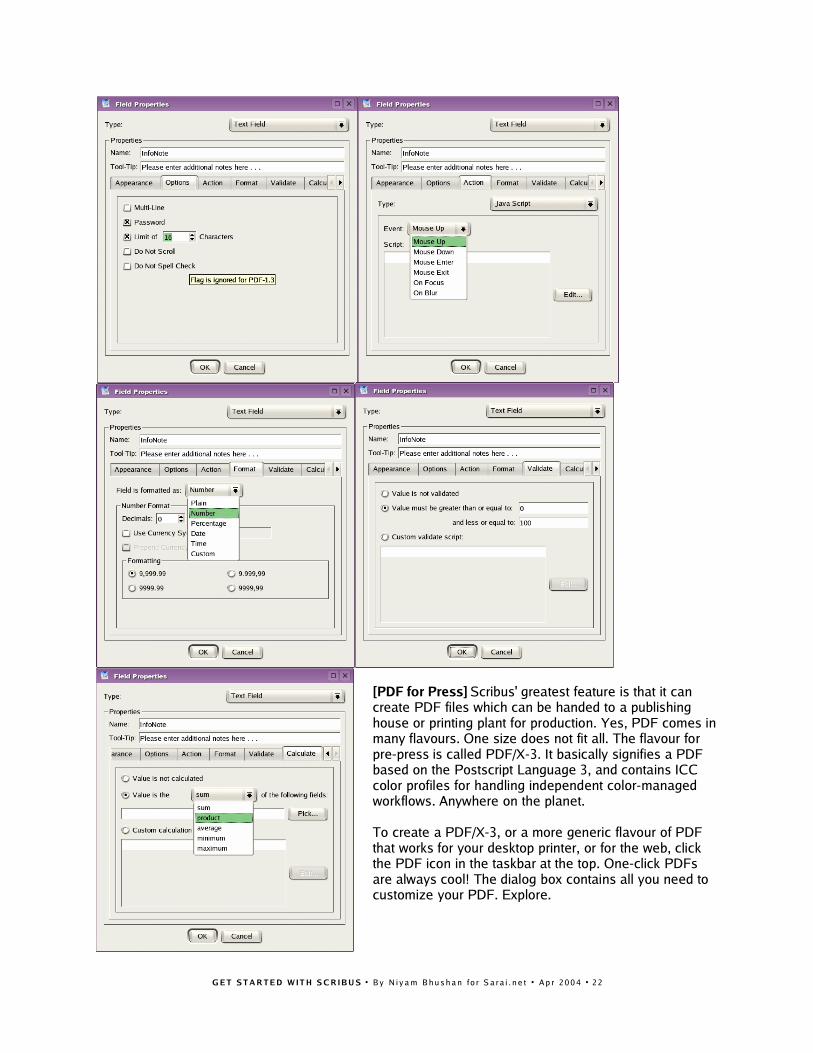
[PDF for Press] Scribus' greatest feature is that it cancreate PDF files which can be handed to a publishinghouse or printing plant for production. Yes, PDF comes inmany flavours. One size does not fit all. The flavour forpre-press is called PDF/X-3. It basically signifies a PDFbased on the Postscript Language 3, and contains ICCcolor profiles for handling independent color-managedworkflows. Anywhere on the planet.
To create a PDF/X-3, or a more generic flavour of PDFthat works for your desktop printer, or for the web, clickthe PDF icon in the taskbar at the top. One-click PDFsare always cool! The dialog box contains all you need tocustomize your PDF. Explore.
G E T S T A R T E D W I T H S C R I B U S • B y N i y a m B h u s h a n f o r S a r a i . n e t • A p r 2 0 0 4 • 2 2

[Choose Your Flavour] In the dialog-box, start by clickingon the 'General' tab, and selecting PDF/X-3 from thedrop-down menu for 'Compatibility.' It's a good idea toDownsample images to 300 dpi, at the bottom left here.
[Color Management] In the 'Fonts' tab, choose to embedall fonts and 100% of all characters. Then click on the'Color' tab. Note you can use a source ICC profile for thefile, choose its rendering intent, and also choose whetherto use the source profile of the Images, or to discard itand choose your own. If you don't understand this, don'tworry. It is quite simple.
Head out to littlecms.com and read the documentation available there.Also read the documents on the Scribus website, and check out the linksto the excellent reference material on Scribus' page.
[Press Inks] Finally, click on the 'PDF/X-3' tab. You haveto choose the output profile, which is basically selectingthe kind of ink and paper you are printing your magazineon, and giving the job a mandatory 'Info String'. Give thename of your file here. You can also handle someamount of trimming, which is changing an existing paper-size in a document to a slightly smaller size toaccommodate a print-job.
Before sending your job to the press, please go toExtras> Print Preview. You can see a soft-preview of yourfile in the inks of Cyan, Magenta, Yellow, and Black, andeven simulate a progressive proof on-screen.
[Native Scribus File To Press] If you are blessed to havea Scribus-savvy printing plant, and wish to deliver a nativeScribus file, go to File>Collect For Output. Select a folderand Scribus will copy your file, as well as put copies of allgraphics and images, and even font files, in this directory.Transfer this folder to your press. May I recommend youthrow in a copy of Scribus in this folder too. A cluelessperson can discover the joys of Scribus. Go ahead, this isperfectly legal, thanks to the power of GPL.
G E T S T A R T E D W I T H S C R I B U S • B y N i y a m B h u s h a n f o r S a r a i . n e t • A p r 2 0 0 4 • 2 3
Travel At The Speed Of Scribus
[Advanced Features] Scribus has some pretty advanced and maturefeatures that you will appreciate as you grow familiar with its interface.For instance, Once you have dozens of pictures linked into a Scribusdocument, managing such links can be a nightmare, unless you use theManage Pictures feature under the Extras menu. Broken links can thenbe repaired or newer versions of images can be used without having tomanually delete and replace images.
For special accents, diacritical marks, and special glyphs, edit text in atext frame, and click on Insert Special under the Extras menu. Thecomplete collection of characters of a chosen font are displayed, so youcan just point and click. Try it.
Do you wish to quickly navigate through your pages to find a particularelement? Go to the Tools menu, and select Outline. A structured viewof your document, with all items per-page in a collapsible list, shows up.
Scribus supports the Python language, so lots of people have writtenamazing scripts that automate several tasks for you, from creatingcustom calendars to printing out font families, all with a single click.That's what the Script menu on top does for you. If you know Python,you could create some pretty sophisticated scripts to assist your work,while you design your publication.
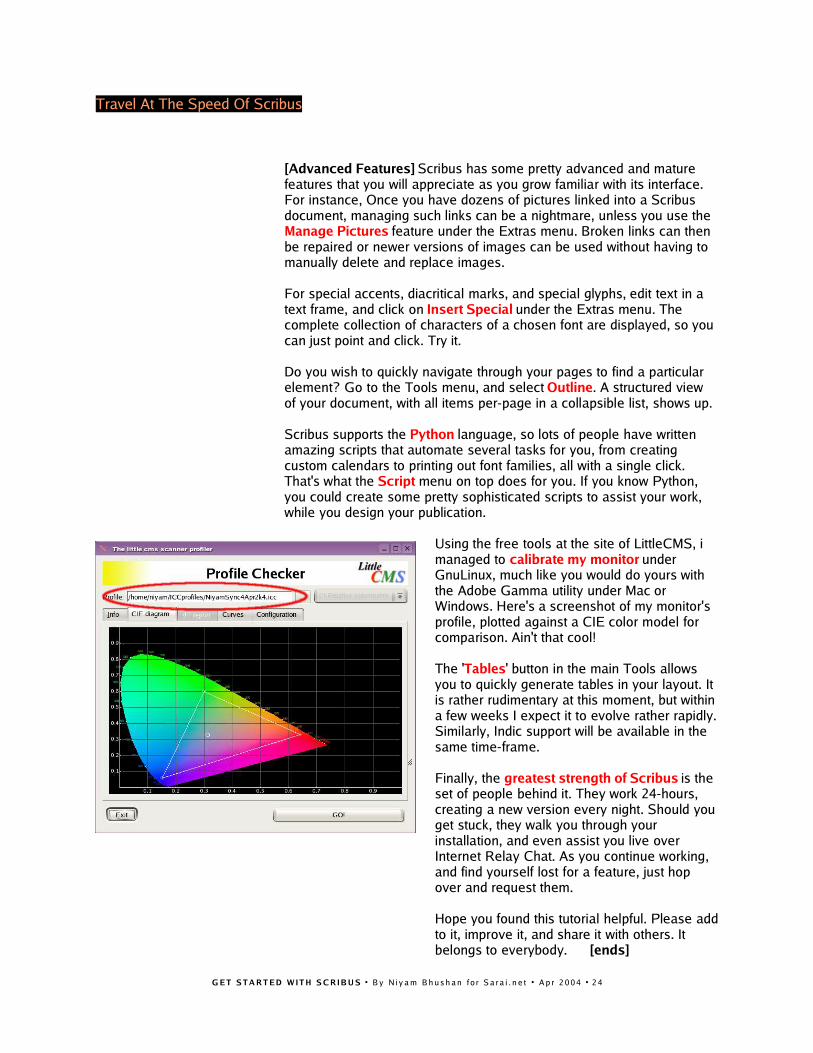
Using the free tools at the site of LittleCMS, imanaged to calibrate my monitor underGnuLinux, much like you would do yours withthe Adobe Gamma utility under Mac orWindows. Here's a screenshot of my monitor'sprofile, plotted against a CIE color model forcomparison. Ain't that cool!
The 'Tables' button in the main Tools allowsyou to quickly generate tables in your layout. Itis rather rudimentary at this moment, but withina few weeks I expect it to evolve rather rapidly.Similarly, Indic support will be available in thesame time-frame.
Finally, the greatest strength of Scribus is theset of people behind it. They work 24-hours,creating a new version every night. Should youget stuck, they walk you through yourinstallation, and even assist you live overInternet Relay Chat. As you continue working,and find yourself lost for a feature, just hopover and request them.
Hope you found this tutorial helpful. Please addto it, improve it, and share it with others. Itbelongs to everybody. [ends]
G E T S T A R T E D W I T H S C R I B U S • B y N i y a m B h u s h a n f o r S a r a i . n e t • A p r 2 0 0 4 • 2 4