scta documentation
TRANSCRIPT
SCTA DocumentationRelease 1.0
J.L. Perez, D.M. Hu
Jan 29, 2018


Contents
1 Installation & Network Setup 31.1 VISA Drivers . . . . . . . . . . . . . . . . . . . . . . . . . . . . . . . . . . . . . . . . . . . . . . . 31.2 SNMP Drivers . . . . . . . . . . . . . . . . . . . . . . . . . . . . . . . . . . . . . . . . . . . . . . 81.3 Git Version Control . . . . . . . . . . . . . . . . . . . . . . . . . . . . . . . . . . . . . . . . . . . . 81.4 Anaconda v.s. Python . . . . . . . . . . . . . . . . . . . . . . . . . . . . . . . . . . . . . . . . . . 12
2 Getting Started 19
3 User’s Guide to SCTA 213.1 Summary . . . . . . . . . . . . . . . . . . . . . . . . . . . . . . . . . . . . . . . . . . . . . . . . . 213.2 Specification Libraries . . . . . . . . . . . . . . . . . . . . . . . . . . . . . . . . . . . . . . . . . . 233.3 Transponders . . . . . . . . . . . . . . . . . . . . . . . . . . . . . . . . . . . . . . . . . . . . . . . 253.4 Equipment Classes . . . . . . . . . . . . . . . . . . . . . . . . . . . . . . . . . . . . . . . . . . . . 313.5 Test Templates . . . . . . . . . . . . . . . . . . . . . . . . . . . . . . . . . . . . . . . . . . . . . . 423.6 Logging Measurements & Debug Messages . . . . . . . . . . . . . . . . . . . . . . . . . . . . . . . 44
4 Developer’s Guide to Maintaining/ Extending SCTA 474.1 Unit Testing . . . . . . . . . . . . . . . . . . . . . . . . . . . . . . . . . . . . . . . . . . . . . . . 474.2 Simulating Instruments . . . . . . . . . . . . . . . . . . . . . . . . . . . . . . . . . . . . . . . . . . 484.3 Sphinx Documentation . . . . . . . . . . . . . . . . . . . . . . . . . . . . . . . . . . . . . . . . . . 484.4 Advice from Previous Developers . . . . . . . . . . . . . . . . . . . . . . . . . . . . . . . . . . . . 48
5 Motivational Quotes 51
6 Indices and tables 53
i

ii

SCTA Documentation, Release 1.0
Warning: This documentation is under construction. Please check regularly for updates.
Imagine all the manual configuration it takes to accurately measure something as simple as channel power on a spec-trum analyzer like the Rhode & Schwarz FSW:
Now you don’t have to! In the time it takes to make one manual measurement, this automation script can make 20:
With these automation libraries you can spend less time making repetitive signal measurements and more time ana-lyzing the data. You can even automate trivial monitoring tasks anytime, anywhere.
Contents
Contents 1

SCTA Documentation, Release 1.0
2 Contents

CHAPTER 1
Installation & Network Setup
Note: You must have Administrator priveleges to do the following installations.
Warning: Most of the installation can be done on either Linux or Windows. However, the SNMP driverswe use only support Windows machines. So, if you want to interact with any equipment over SNMP, youmust use a Windows machine. Our sincerest apologies.
Prerequisites We expect some familiarity with using your computer’s command prompt/ terminal utility.
Hardware Requirements The SCTA libraries have only been tested with the following environment:
• Intel i5-4590 CPU @ 3.30GHz
• 8GB RAM
• 64-bit OS
• Windows 7 Professional
Tips
• none
Contents
1.1 VISA Drivers
The SCTA libraries use the Virtual Instrument Software Architecture (VISA) standard I/O commands tocontrol our lab equipment. The VISA standard is widely accepted by the Test & Measurement Industry,such as National Instruments, Rhode & Schwarz, and Keysight Technologies. We will be installing VISAequipment drivers provided by National Instruments.
3

SCTA Documentation, Release 1.0
1.1.1 Installing NI-VISA
Hint: Search your programs for NI-VISA. If you already have NI-VISA installed, skip this section.
If you do not have NI-VISA installed, go to the downloads page at the National Instruments website.
You may have to login with an existing National Instruments account. Download the latest NI-VISARun-Time Engine.
Note: The SCTA libraries have been tested with NI-VISA version 16.0
1.1.2 Updating NI-VISA
In programs, open the NI Update Service.
If you see a red banner telling you to update the NI Update Service, click the Update button.
Click Yes when asking to allow changes to the computer. When prompted, accept all license agreements.When the update is complete, you will be prompted to restart the computer.
4 Chapter 1. Installation & Network Setup

SCTA Documentation, Release 1.0
After restarting, open NI Update Service again. The red banner should be gone. The CriticalUpdates section should already be expanded, but also expand the Upgrades and Service Packssection. Check anything related to NI-VISA under the Driver Software sections.
1.1. VISA Drivers 5

SCTA Documentation, Release 1.0
When prompted, accept all license agreements. When the drivers are installed, you will be prompted torestart the computer.
6 Chapter 1. Installation & Network Setup

SCTA Documentation, Release 1.0
1.1.3 Installing GPIB drivers
Warning: Please ask Luis to fill out this section!
1.1.4 VISA Interactive Control
In programs, open the VISA Interactive Control.
Any equipment connected to the network should be listed under the Devices section.
1.1. VISA Drivers 7

SCTA Documentation, Release 1.0
1.2 SNMP Drivers
Simple Network Management Protocol (SNMP) is an Internet-standard protocol for collecting and orga-nizing information about managed devices on IP networks and for modifying that information to changedevice behavior. SNMP exposes management data in the form of variables called management informa-tion base (MIB) objects which describe the system status and configuration. These variables can then beremotely queried and manipulated.
Some RF equipment, like the DM240XR, VTM, and VTR strictly use SNMP for remote interaction.
Instead of using proper Python libraries for interacting over SNMP, we use Windows batch files that im-plement the SNMP set and get commands. Unfortunately, this restricts our automation libraries to Win-dows only if you want to interact with equipment over SNMP. The batch files SnmpSet and SnmpGetcan be found under SCTA_repo\install\. Copy the batch files to the C: drive on your Windowsmachine.
1.3 Git Version Control
The SCTA libraries are stored on the AMCLAB server in the form of a Git repository. Git is a VersionControl System that developers use to store historical snapshots of code throughout its lifetime. We use
8 Chapter 1. Installation & Network Setup

SCTA Documentation, Release 1.0
Git to store the most updated version of the SCTA libraries as well as previous working versions. In thistutorial, you will be downloading the most recent version of SCTA through Git.
Note: The following installation instructions are for Windows PCs only! Installing Git on Ubuntu shouldbe as simple as an apt-get install git command.
1.3.1 Installing Git
Go to the downloads page at the Git website.
Choose the appropriate installer for your OS. For Windows, it should download an executable. Run it, andclick Yes when asking to allow changes to the computer.
In the Git Setup service, use the default installation destination, components, start menu shortcuts, PATHenvironment, line ending conversions, terminal emulator, and extra options. The installation should bequick.
1.3.2 Cloning the SCTA Libraries
In programs, open Git Bash.
Use Git Bash like any other Command Prompt or Terminal application. It defaults to the computer’s rootdirectory, but you can change directories using cd and list directory contents using dir. For example,change to your Documents directory:
cd ~\Documents\
1.3. Git Version Control 9

SCTA Documentation, Release 1.0
Beyond the default shell commands, Git Bash also has Git commands built-in. To see a list of all availablecommands run:
git --help
Note: To run the following commands, you must be on the same network as the AMCLAB server. Youmust also know the AMCLAB server password. Ask someone from the lab for access.
To “download” the SCTA libraries, we will use Git to clone the SCTA repository from the AMCLABserver to our local machine:
git clone [email protected]:~/amclab-git/SCTA_repo.git
If prompted to trust the authenticity of amclab, enter “yes”. When prompted for a password, enter thepassword. After doing the clone, you should see a new directory called SCTA_repo.
10 Chapter 1. Installation & Network Setup

SCTA Documentation, Release 1.0
If you change into the SCTA_repo directory, you should see a README file that explains the contents ofthe repository. You should also see the prompt is “decorated” with (master). This refers to the currentGit branch any of your commit s will be saved to. However, this is beyond the scope of this tutorial.
Hint: However, we highly recommend you come back to this later and use Git Version Control utilitieswhen working on any serious programming project. There are several Git tutorials that show you how toview historical changes.
To be safe, remove the AMCLAB server’s original repository address so that you won’t ever accidentallywrite changes to the master copy of our SCTA libraries:
git remote rm origin
If you run the git remote command, nothing should be printed to the prompt.
1.3. Git Version Control 11

SCTA Documentation, Release 1.0
1.4 Anaconda v.s. Python
No, this is not an epic battle between the two largest snakes in the world.
The SCTA libraries form a Python package that you run using the Python programming language. Pythonis powerful for its wealth of open-source packages and support from the online community. However,managing these packages and their dependencies can be tedious and prone to error, especially on Windowsmachines. Our solution to this is the Anaconda package manager. Anaconda has servers dedicated tohosting Python packages, including PyVISA, which is a Python API to the VISA Drivers. Anaconda alsoprovides command line tools for organizing our packages into environments that save the state of ourpackages for easy redeployment onto a new machine. All of this is explained in the following tutorial.
1.4.1 Installing Anaconda
Go to the downloads page at the Anaconda website.
Choose Anaconda2-4.2.0-Windows-x86_64.exe (Python 3.5 version, 64-bit installer). If itprompts you with an advertisement to email you more materials, click “No Thanks”. For Windows, itshould download an executable. Run it, and click Yes when asking to allow changes to the computer.
12 Chapter 1. Installation & Network Setup

SCTA Documentation, Release 1.0
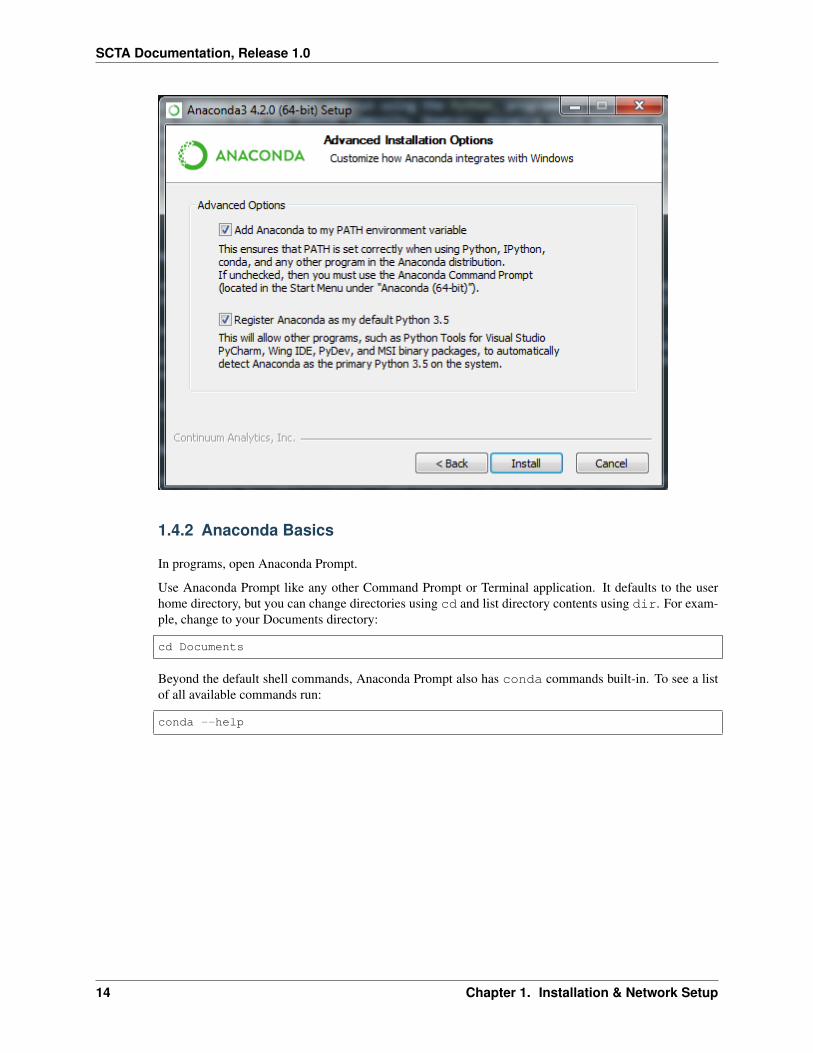
In the Anaconda Setup service, agree to the license agreement and use the default installation destination.In the “Advanced Installation Options”, use the default options if you don’t already have Python installedon your machine. If you already have Python installed, you can check or uncheck the options based onyour preference. The installation should be quick.
1.4. Anaconda v.s. Python 13
SCTA Documentation, Release 1.0
1.4.2 Anaconda Basics
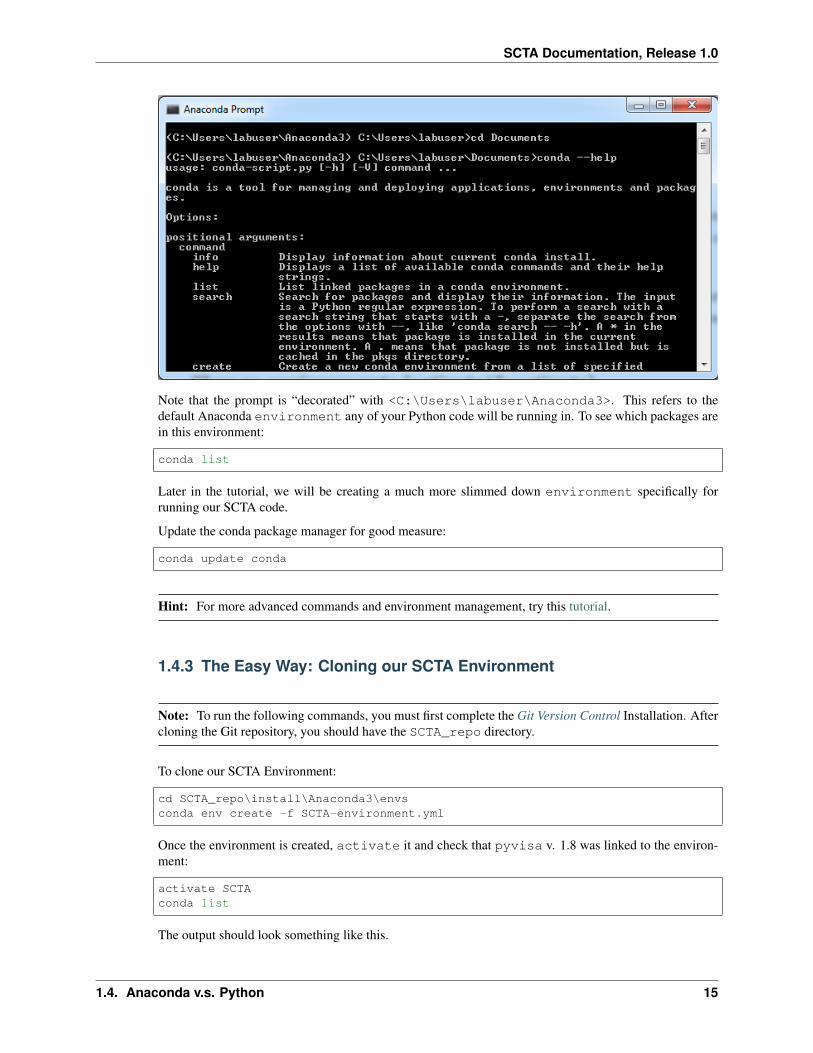
In programs, open Anaconda Prompt.
Use Anaconda Prompt like any other Command Prompt or Terminal application. It defaults to the userhome directory, but you can change directories using cd and list directory contents using dir. For exam-ple, change to your Documents directory:
cd Documents
Beyond the default shell commands, Anaconda Prompt also has conda commands built-in. To see a listof all available commands run:
conda --help
14 Chapter 1. Installation & Network Setup
SCTA Documentation, Release 1.0
Note that the prompt is “decorated” with <C:\Users\labuser\Anaconda3>. This refers to thedefault Anaconda environment any of your Python code will be running in. To see which packages arein this environment:
conda list
Later in the tutorial, we will be creating a much more slimmed down environment specifically forrunning our SCTA code.
Update the conda package manager for good measure:
conda update conda
Hint: For more advanced commands and environment management, try this tutorial.
1.4.3 The Easy Way: Cloning our SCTA Environment
Note: To run the following commands, you must first complete the Git Version Control Installation. Aftercloning the Git repository, you should have the SCTA_repo directory.
To clone our SCTA Environment:
cd SCTA_repo\install\Anaconda3\envsconda env create -f SCTA-environment.yml
Once the environment is created, activate it and check that pyvisa v. 1.8 was linked to the environ-ment:
activate SCTAconda list
The output should look something like this.
1.4. Anaconda v.s. Python 15

SCTA Documentation, Release 1.0
Note: To run any SCTA code, you MUST REMEMBER to activate SCTA. This is how you “link”the pyvisa package that we use extensively in the SCTA libraries.
1.4.4 The Hard Way: Creating your own SCTA Environment
If you wish to create your own SCTA environment, first create an environment with Python 3:
conda create --name SCTA python=3
This will include Python 3’s package manager and other base Python 3 packages. When prompted toproceed, enter “y”. After it is complete, activate the environment:
activate SCTA
You should see that the prompt is now “decorated” with <SCTA>.
16 Chapter 1. Installation & Network Setup
SCTA Documentation, Release 1.0
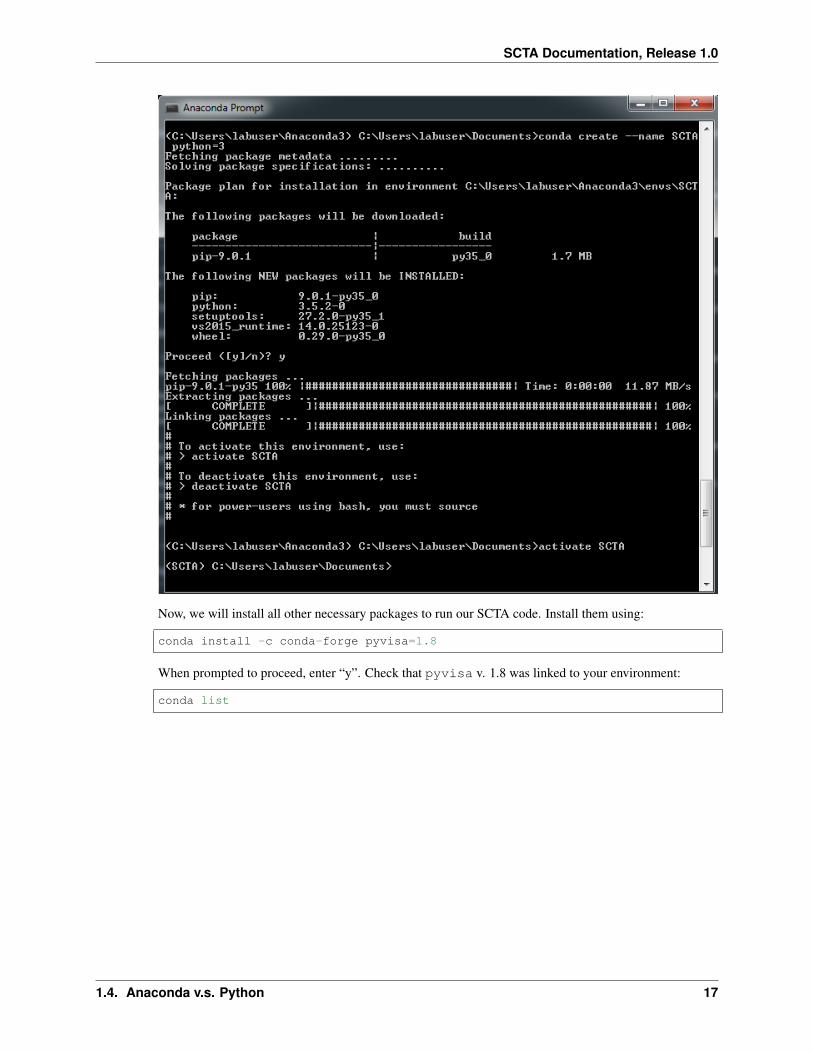
Now, we will install all other necessary packages to run our SCTA code. Install them using:
conda install -c conda-forge pyvisa=1.8
When prompted to proceed, enter “y”. Check that pyvisa v. 1.8 was linked to your environment:
conda list
1.4. Anaconda v.s. Python 17

SCTA Documentation, Release 1.0
Repeat the procedure for paramiko and scipy packages.
Note: You can follow a similar process to install pyvisa, paramiko, and scipy into a Pythonvirtualenv using pip install commands.
1.4.5 Adding SCTA to your PYTHONPATH Environment Variable
If you want import SCTA to work in your Python scripts out-of-the-box, you will need to modifyyour PYTHONPATH environment variable. This is because Python searches the PYTHONPATH for anylibraries you import.
One way to do this is to configure Anaconda to modify PYTHONPATH for you ev-ery time you activate SCTA. To do this, you need to add special batch filesto your Anaconda installation directories. The batch files env_vars can befound under SCTA_repo\install\Anaconda3\etc\conda\activate.d\ andSCTA_repo\install\Anaconda3\etc\conda\deactivate.d\.
Follow this guide to place these batch files in the appropriate Anaconda installation directories, and modifythe SCTA_repo\install\Anaconda3\etc\conda\activate.d\env_vars batch file to addthe correct path to SCTA_repo\src on your own machine.
Hint: For me, the location of my Anaconda environment wasC:\Users\labuser\Anaconda3\envs\SCTA. It may not be the same for you.
18 Chapter 1. Installation & Network Setup

CHAPTER 2
Getting Started
Prerequisites Basic knowledge of how to run python scripts through commandline
I recommend running the interactive Jupyter Notebook tutorials:
cd SCTA_repo\src\tutorialsjupyter notebook
Note: You need to install jupyter in your SCTA environment to run the interactive tutorials.
If you are new to scripting in Python, walk through the Python-Basics.ipynb to get a quick intro toconcepts important for using the SCTA libraries.
Walk through the SCTA-Basics.ipynb to help you start writing a simple automation script.
If you do not have jupyter installed or do not want an interactive tutorial, there are equivalent tutorials aspython scripts in SCTA_repo\src\tutorials\. The Python-Basics.py script introduces Pythonprogramming and SCTA-Basics.py script introduces the SCTA libraries. You can run the scripts to see theoutput:
cd SCTA_repo\src\tutorialspython SCTA-Basics.py
After walking through the tutorials, browse SCTA_repo\src\examples\ for real examples of automationscripts. You can use these as templates for your own scripts. For example, check out NetAnDemo.py for acommon frequency sweep test.
19

SCTA Documentation, Release 1.0
20 Chapter 2. Getting Started

CHAPTER 3
User’s Guide to SCTA
Prerequisites People reading this document should have an understanding of basic Python objects:
• lists
• dictionaries
• classes
Contents
3.1 Summary
The Space & Communications Test Automation (SCTA) libraries form a general purpose satellite testAPI. It can be used for any kind of Communications Lab/ ODU testing, monitoring and evaluation.
Our goal is to build reusable, modular code that makes any kind of testing or monitoring easy to do incode that satellite communications engineers can understand.
3.1.1 Simple test script
Imagine you want to measure the signal-to-noise ratio (SNR) of a satellite transponder generated by aRhode & Schwarz RF modulator (BTC) across all operating frequencies of a coaxial cable (L-band).Perhaps your lab setup might look like this.
Here is an example of an automation script that is very easy to read, understand, and modify for your owncustom tests.
# Initialize equipment and output filemod = BTC()dut = VTR()csv = DataLogger("measurements.csv")
# Test DUT on a DVB-S2 MODCOD 13 transponder, i.e. 8PSK 2/3
21

SCTA Documentation, Release 1.0
Fig. 3.1: Block diagram of a SNR measurement setup. The DUT is tuned to a noisy transponder generated by theBTC. The SNR is measured across L-band frequencies.
txpdr = Transponder(mode=13)mod.setTransponder(txpdr)dut.setTransponder(txpdr)
# Test performance across L-band frequencies, i.e. 250 - 2150 MHzLband = list(range(250e6, 2150e6, 10e6))
# Take SNR measurement at each frequencyfor freq in Lband:
mod.setFrequency(freq)dut.setFrequency(freq)snr = dut.getSNR()csv.push(snr)
3.1.2 Software architecture
This is a basic breakdown of the software modules. At the highest level, the user will interact with testtemplates that automate common calibration and measurement routines. The user can specify what to logand where to save it. At the lowest level are the equipment specific functions to control the most commontest instruments.
22 Chapter 3. User’s Guide to SCTA

SCTA Documentation, Release 1.0
3.2 Specification Libraries
Warning: This must be updated regularly! Always read through these libraries before writingany test script. Make sure they contain the most updated specifications relevant to your test.
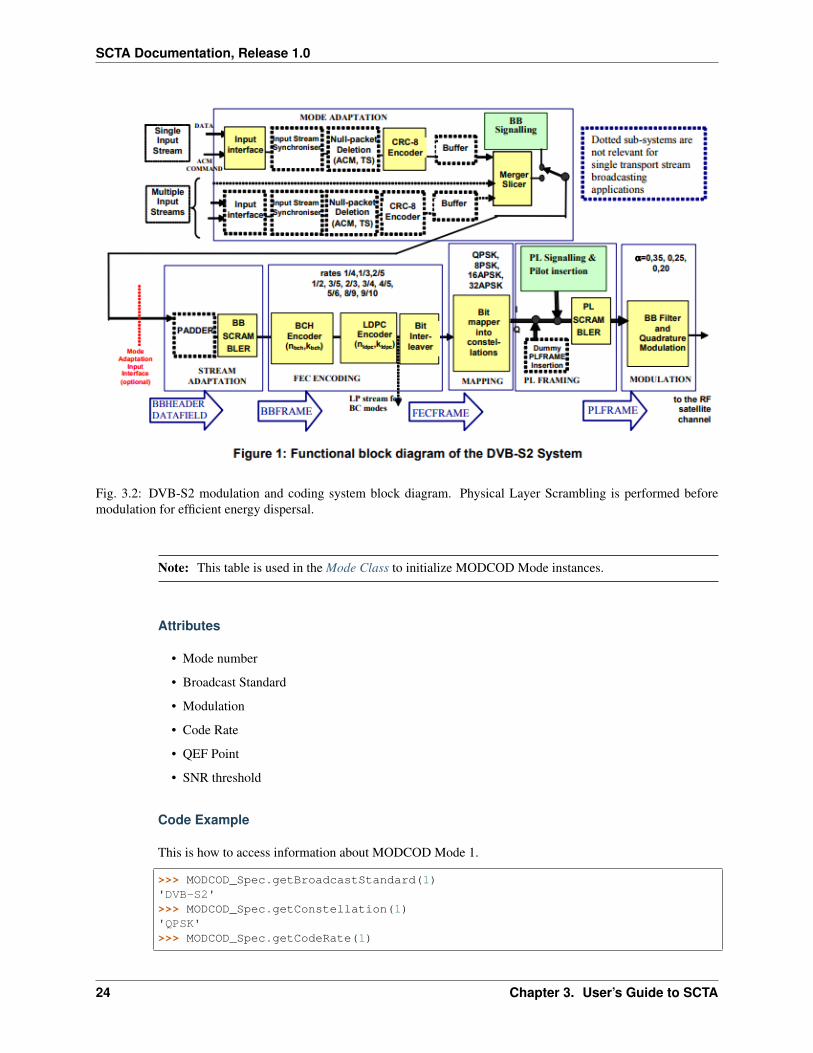
The Specification Libraries contain all the up-to-date specifications and pass/fail criteria. This includesthe MODCOD Specification Table , Scrambling Code Table , and ODU Specification Table . All testprocedures use these libraries to determine the correct test conditions and evaluation, so it is imperativethat all updates to the DVB-S2 Specification are reflected here.
More importantly, the Specification Libraries provide one simple interface to reconfigure all existing au-tomation scripts for your own test spec. Adapting these libraries is as simple as modifying or adding aCSV file. Feel free to modify or add specifications that are relevant to your own tests.
3.2.1 MODCOD Specification Table
The MODCOD Specification Table stores the C/N Threshold for Quasi-Error Free (QEF) performancefor each MODCOD specified in the DVB-S2 Specification (EN 302 307-1). It is implemented as adictionary of MODCOD Spec Entries addressed by mode number. These values are extracted fromthe raw/DVBS2_Spec.csv file, and thus the values can be easily modified by making changes to thisfile.
All values are sourced from EN 302 307-1 V1.4.1 Table 12 (p.32) and Table 13 (p.36). Also see theDVB-S2 Implementation Guidelines (ETSI TR 102 376) for typical transponder settings.
3.2. Specification Libraries 23
SCTA Documentation, Release 1.0
Fig. 3.2: DVB-S2 modulation and coding system block diagram. Physical Layer Scrambling is performed beforemodulation for efficient energy dispersal.
Note: This table is used in the Mode Class to initialize MODCOD Mode instances.
Attributes
• Mode number
• Broadcast Standard
• Modulation
• Code Rate
• QEF Point
• SNR threshold
Code Example
This is how to access information about MODCOD Mode 1.
>>> MODCOD_Spec.getBroadcastStandard(1)'DVB-S2'>>> MODCOD_Spec.getConstellation(1)'QPSK'>>> MODCOD_Spec.getCodeRate(1)
24 Chapter 3. User’s Guide to SCTA

SCTA Documentation, Release 1.0
'1/4'>>> MODCOD_Spec.getCNRThresh(1)-2.35>>> MODCOD_Spec.getQEFpoint(1)1e-7
3.2.2 Scrambling Code Table
The Scrambling Code Table is a dictionary of Physical Layer (PL) Header Scrambling Sequences,Sequence IDs, and Gold Codes specified in the DVB-S2 Specification. There are 262,142 entries addressedby sequence ID.
All values are sourced from EN 302 307-1 V1.4.1 Section 5.5.4 Physical Layer Scrambling (p.34). Alsosee this ETRI Journal article for an algorithm for scrambling code estimation.
Attributes
• Sequence ID (decimal)
• PL Header Scrambling Sequence (octal)
• Gold Code index (decimal)
• Gold Code seed (hex)
• Concatenated Header + Gold Code (hex)
Code Example
Here is how to access information about Scrambling Code 0.
>>> Scrambling_Spec.getPLHeader(0)'000000000000000000000000000000'>>> Scrambling_Spec.getGoldCode(0)['index']'0'>>> Scrambling_Spec.getGoldCode(0)['seed']'0x00001'>>> Scrambling_Spec.getConcatenated(0)'0x000000000000000000000000001'
3.2.3 ODU Specification Table
Warning: unimplemented
3.3 Transponders
What is a Transponder? Wikipedia says, “it is a device that gathers signals over a range of uplink fre-quencies and re-transmits them on a different set of downlink frequencies.”
However, in the SCTA Libraries, a Transponder is certainly not a device, or even a class that representsa device. It is an interface between the RF modulated signal and the lab equipment. It is a class that
3.3. Transponders 25
SCTA Documentation, Release 1.0
stores only the signal characteristics necessary for the equipment to generate, frequency translate, tune,and measure the signal.
There are many important signal characteristics to define, so the Transponder Class is broken down intosublasses: the Mode Class and Local Oscillator Class. There are also convenient ways to group togethersimilar transponders using Transponder Sets.
Hint: For a quick example of creating a Transponder, jump to the Transponder Constructor method.
3.3.1 Mode Class
The Mode class stores the parameters associated with a mode in the MODCOD Specification. The MOD-COD Specification Table uses Modes to define the 32 DVB-S2 operational mode configurations and theircorresponding SNR and PWR thresholds required to close the satellite link. The Transponder Class definestransponders using modes, including, but not limited to, the ones defined in the MODCOD Spec.
Hint: You can easily create a custom mode or a predefined mode from the MODCOD Spec. See theMode Constructor method for an example.
Attributes
• Broadcast Standard
• Modulation
• Code Rate
Methods
Contructor Description: A mode object can be initialized 2 different ways. One way is to individuallyspecify broadcast standard, modulation, and code rate. The other way is to specify the MODCODmode index as an integer in {1, 2, . . . , 24}.
Inputs: all attributes
Outputs: instance of the Mode class
# Option 1mode1 = Mode(bcstd="DTV", mod="QPSK", fec="1/2")
# Option 2mode1 = Mode.fromMODCOD(1)
# Both definitions are equivalent
Class definition
class Mode(object):
def __init__(self, bcstd='DTV', mod='QPSK', fec='1/2'):"""Constructor.
26 Chapter 3. User’s Guide to SCTA

SCTA Documentation, Release 1.0
Default values create a MODCOD Mode 1
~~~~~ Possibilities ~~~~~bcstd: "DTV", "DVB-S", "DVB-S2"mod: "QPSK", "8PSK"fec: "1/2", "3/5", "2/3", "3/4", "4/5",
"5/6", "6/7", "7/8", "8/9", "9/10"
"""self.bcstd = bcstd # BroadCast STandarDself.mod = mod # Modulationself.fec = fec # FEC Rate
@classmethoddef fromMODCOD(cls, index):
bcstd = MODCOD_spec[index]["bcstd"]mod = MODCOD_spec[index]["mod"]fec = MODCOD_spec[index]["fec"]return cls(bcstd, mod, fec)
3.3.2 Local Oscillator Class
In a satellite broadcast system, a transponder goes through many frequency translations in its lifetime. The3 main stages are upconversion at the broadcast center, translation at the satellite, and downconversionat the LNB. Each stage has its own local oscillator (LO) frequency. Furthermore, these LO frequenciesare different depending on band: Ku, Ka, etc. The Local Oscillator Class stores this metadata for eachtransponder and provides convenient methods for calculating the transponder’s uplink and downlink fre-quencies.
Attributes
• Band
• Upconverter LO frequency
• Satellite LO frequency
• Downconverter LO frequency
Methods
getDownconversion(inputFreq) Description: Calculates the down-converted frequency based on the in-put frequency and LO frequency.
Inputs: input frequency [MHz] (float)
Outputs: down-converted frequency [MHz] (float)
getUpconversion(inputFreq) Description: Calculates the up-converted frequency based on the input fre-quency and LO frequency.
Inputs: input frequency [MHz] (float)
Outputs: up-converted frequency [MHz] (float)
3.3. Transponders 27

SCTA Documentation, Release 1.0
Class Definition
class LocalOsc(object):
def __init__(self, id='LO', freq=0):"""Constructor.
~~~~~ Possibilities ~~~~~id: stringfreq: positive (float) [MHz]
"""self.id = id # identifier stringself.freq = freq # LO freq
3.3.3 Transponder Class
The Transponder class is defined by a mode, a local oscillator, and all the downlink signal parametersassociated with a transponder.
Note: All of the Equipment Classes use transponders to generate lab signals and tune demodulators.
Hint: There is a useful predefined list of all DVB-S2 transponders, which you can pick and choose fromusing Transponder Sets.
Attributes
• ID
• Mode
• Frequency
• Symbol Rate
• Roll-off
• Scrambling ID
• Pilot Symbols
• Antenna Polarization
• Local Oscillator
Methods
Constructor Description: The transponder must be initialized with all of the above attributes. The modecan be either an integer Mode number or an instance of the Mode Class.
Inputs: all attributes
Outputs: instance of the Transponder class
28 Chapter 3. User’s Guide to SCTA

SCTA Documentation, Release 1.0
# Create MODCOD Mode 1mode1 = Mode.fromMODCOD(1)
# Input downlink parameterstxpdr1 = Transponder(id="anything-you-want", mode=mode1, freq=974e6,→˓symb=20e6, roll=20, scramb=0, pilot=True)
# Equivalent transpondertxpdr1 = Transponder(id="anything-you-want", mode=1, freq=974e6,→˓symb=20e6, roll=20, scramb=0, pilot=True)
Class definition
class Transponder(object):
def __init__(self, id='txp', mode=1, freq=1074e6, symb=20e6, roll=20,→˓scramb=0, pilot=True, pol=None, LO=None):
"""Constructor.
Default values Create a MODCOD Mode 1 Transponder @ 1074 MHz
~~~~~ Possibilities ~~~~~mode: integer Mode number or Mode class instancefreq: float in Hzsymb: float in Baudroll: [0, 100] %scramb: [0, 2^18-1]pilot: False, True (off, on)pol: "LHCP", "RHCP", "horizontal", "vertical"
"""self.id = id # human-readable identifierself.mode = mode # Mode class instanceself.freq = freq # Center frequencyself.symb = symb # Symbol rateself.roll = roll # roll-offself.scramb = scramb # Scrambling codeself.pilot = pilot # Pilot symbolsself.pol = pol # Antenna polarizationself.LO = LO # Local Oscillator class instance
3.3.4 Transponder Sets
Sometimes you might want to group together several transponders that are related. Some predefined groupsof transponders are subdivided by:
1. Orbital Slot
2. Satellite
3. Bands
4. Market (CONUS/ spot)
5. HD/ SD
3.3. Transponders 29

SCTA Documentation, Release 1.0
Fig. 3.3: Cartoon of satellite spot beams in Ku and Ka Bands. We can easily group transponders based on orbital slot,bands, market, etc.
For example, suppose we are given a group of all transponders from one satellite and a group of all spot-beam transponders across all satellites. Suppose we want only the spot-beam transponders from that onesatellite. What we want is the intersection of these two groups. To accomplish this, we use python sets.
set In Python, a set is an unordered collection with no duplicate elements.
Hint: For example, say we have a list of transponders, and some of them are identical in mode anddownlink parameters. If we create a set from this list, all the duplicate transponders would be filteredout, and the list’s original order is not guaranteed.
set operations Python supports set operations like union, intersection, difference, and exclusive or.
For example, we might want to test only the LHCP transponders from satellites in Orbital Slot 101W. Wecould make a custom set of all LHCP transponders and intersect that with the predefined set of 101Wtransponders. The possibilities are endless.
Here is the corresponding pseudocode:
# Create 3 hypothetical transponderstxpdr1 = Transponder(id='101W-txpdr1', mode=1, freq=250e6, pol="RHCP")txpdr2 = Transponder(id='101W-txpdr2', mode=1, freq=950e6, pol="LHCP")txpdr3 = Transponder(id='99W-txpdr5', mode=1, freq=2150e6, pol="LHCP")
# Group the transponders into hypothetical setsslot101 = set([txpdr1, txpdr2])lhcp = set([txpdr2, txpdr3])
# I want all slot 101 W, LHCP transpondersintersect = slot101 & lhcp
30 Chapter 3. User’s Guide to SCTA

SCTA Documentation, Release 1.0
3.4 Equipment Classes
3.4.1 Comm Class
The comm class will obtain the protocol to communicate with the instruments (GPIB, IP, serial) and willalso pass the resource manager which will be common to all instruments.
Additional methods will be needed to write and read using this class.
class Comm(object)
def __init__(self, protocol, port, config={}, rm)"""Constructor.
~~~ Valid ranges ~~~protocol: GPIB, serial, IPport: String of port of IP address
"""self.protocol=protocolself.port=port
if protocol=GPIB thenport=GPIB::'+port+"::'INSTR'
if protocol = IP thenport="TCPIP0::"+port+"::INSTR"
self.instrument=rm.open_resource(port, kwargs=config)
Usage
comm = Comm_Class("IP","192.0.0.0")mod1 = Modulator(comm)mod2 = Modulator(comm)mod_list = [mod1, mod2]btc = BTC(mod_list)
3.4.2 Modulator Class
class Modulator(Transponder):
def __init__(self, id="mod"):"""Constructor.
~~~ Valid ranges ~~~ip: IP addresspower: [-80, -10] dBmfreq: [250, 2150] MHzsymrate: [20, 45] MBaudpilots: True, False
"""
3.4. Equipment Classes 31

SCTA Documentation, Release 1.0
super(Modulator, self).__init__( id=id)self.power = -30
SFU Class
Warning: We have found that different SFUs use different commands for Broadcast Standard andCode Rate related functions. We have determined this to be caused by two different firmware versions:fill in here and have implemented a solution that works for both. We try our best to fix the bugs wefind, but there may be more. If an SFU script is buggy, please contact us. If you are a developer, usethe VISA Interactive Control to verify that the commands the script sends actually changesthe settings correctly.
class SFU(Modulator):
def __init__(self, id="SFU", type="GPIB", port="28", config={}):"""Constructor.
~~~ Valid ranges ~~~type: [GPIB, IP]port: [28 or 192.10.10.10]cnr: [0, 20] dB
"""super (SFU, self).__init__(id=id)self.comm = Comm(protocol=type, port=port, config=config)self.cnr=None
setTransponder(self, transponder) Description: This will set all the parameters of the transponder to theSFU.
inputs: Transponder attributes
outputs: none
setBroadcastStandard(self, bcstd) Description: Sets the desired broadcast standard
Inputs: (bcstd): DVB-S2, DVBS
Outupts: None
getBroadcastStandard(self): Description: Queries the current broacast standard set on the SFU.
Inputs: none
ouputs: Returns the broadcast standard as: DVB-S2, DVBS
setPower(self, double) Description: This function will set the SFU power level or it can also be set to thepower level inherited.
inputs: power[double]: power level value in dB.
outputs: (none)
getPower(self) Description: This function will obtain the current power levelon the SFU.
inputs: (none)
32 Chapter 3. User’s Guide to SCTA

SCTA Documentation, Release 1.0
outputs: SFU power
setFrequency(self, double) Description: This functions will set the SFU frequency in Hz.
inputs: freq(double): Frequency in Hz.
outputs: (none)
getFrequency(self) Description: This function will obtain the current frequency from the SFU.
inputs: (none)
outputs: (freq in Hz)
setAlpha(self, double) Description: This function will set the SFU symbol rate in S/s.
inputs: symrate(double): Symbol Rate in kS/s.
outputs: (none)
getAlpha(self) Description: This function will obtain the current symbol rate from the SFU.
inputs: (none) outputs: (symbol Rate in S/s)
setNoiseLevel(self, double) Description: This function will set the CNR level on the SFU, once set, theSFU automatically adjusts its noise level to obtained the input CNR desired.
Inputs: noiseLeveldB[double]: value of CNR level in dB. Range 0 - 20 dB.
Ouput: (none)
getNoiseLevel(self) Description: Queries the current noise level set on the SFU.
Inputs: none
outputs: returns the noise level in dB.
enableNoise(self, boolean) Description: This function will enable or disable noise output.
Inputs: Boolean
Outputs: none
Test code:
>>> import SFU from Equipment_Lib>>> sfu = SFU(ip=10.23.121.1)>>> sfu.setNoise(20)(0/2) setNoise: method called(1/2) setNoise: turned on bandwidth coupling(2/2) setNoise: set CNR level
getNoise(self) Description: This function will get the current CNR level on the SFU
Inputs: (none)
Ouput: returns SFU SNR level (double)
setPilots(self, boolean) Description: Sets the Pilots on when True, pilots off when false. inputs: (boolean)
outputs: (none)
getPilots(self) Description: Queries the pilots status
inputs: none
outputs: (boolean) ON:true; OFF;false
3.4. Equipment Classes 33
SCTA Documentation, Release 1.0
setCW(self, boolean) Description: Enables, disables CW, based on boolean:
inputs: (boolean) True: Modulation off, False, Modulation ON
outputs: None
getCW(self) Description: Queries instrument whether CW is enabled or disabled
inputs none
outputs: True; CW enabled, False; CW disabled
setAlpha(self, alpha) Description: Sets roll off for the modulated signal.
inputs: (int) roll off 20, 30, 35
outputs: none
setPhaseNoise(self, boolean) Description: Sets Phase noise for Phase Noise Shape 1, magnitude 13
inputs (boolean): Enables or disables phase noise
outputs: none
getPhaseNoise(self) Description: Determines if Phase Noise is enabled or disabled:
inputs None
outputs:
setModulation(self, modulation) Description: Sets the Modulation type on the SFU for the desired tran-ponder
inputs DVB-S2, DVBS
outputs: none
getModulation(self) Description: Obtains the current modulation set on the SFU.
inputs: none
outputs: current modulation set on SFU.
setCodeRate(self, coderate) Description: Sets the desired code rate on the SFU
inputs: code rate, 2/3, 3/5, 6/7, 1/2, etc..
outputs: none
setScramblingCode(self, scramb) Description: Sets the scrambling code on the SFU.
input: (int): scrambling code ID
output: none
getScramblingCode(self) Description: Gets the scrambling code ID from the SFU.
inputs none
outputs: Scrambling code ID
BTC Class
class BTC(object):
def __init__(self, id="BTC", type=GPIB, port=port, numMods=2):"""Constructor.
34 Chapter 3. User’s Guide to SCTA

SCTA Documentation, Release 1.0
~~~ Valid ranges ~~~cnr: [0, 20] dBpilots: True, False
"""self.modulator_list = []self.id=idself.cnr = 20for i in range(numMods):
mod=Modulator(id=id+"-output-"+str(i+1)self.modulator_list.append(mod)
getCodeRate(self) Description: Sets the FEC code rate on the SFU.
Inputs: code rate 1/2, 2/3, 6/7, etc. . .
outputs: none
setPower(self, pwr, modNumber) Description: This function will set the BTC power level on the cor-responding output. inputs: pwr (double): power level value in dB. modNumber (int): correspondingoutput port outputs: (none)
getPower(self, modNumber) Description: This function will obtain the current power level on the BTCfrom the output indicated.
inputs: modNumber (int)- corresponding output port
outputs: BTC power from specified port
setFrequency(self, freq, modNumber) Description: This functions will set the BTC frequency in Hz inthe appropriate output port.
inputs: freq (double): Frequency in Hz. modNumber (int): specified output port
outputs: (none)
getFrequency(self, modNumber) Description: This function will obtain the current frequency from theBTC.
inputs: modNumber (int): specified output port
outputs: frequency in Hz
setAlpha(self, symb, modNumber) Description: This function will set the BTC symbol rate in MS/s.
inputs: symb(double): Symbol Rate in MS/s. modNumber (int): specified output port
outputs: (none)
getAlpha(self, modNumber) Description: This function will obtain the current symbol rate from theBTC on the specified port.
inputs: modNumber (int): specified output port
outputs: symbol Rate in MS/s from the specified port
setNoise(self, cnr, modNumber) Description: This function will set the CNR level on the BTC, once set,the BTC automatically adjusts its noise level to obtained the input CNR desired. Note: this need toset the bandwidth coupling ON to obtain an accurate measurement.
Inputs: cnr (double): value of CNR level in dB. Range 0 - 25 dB. modNumber (int): specified outputport
Ouput: (none)
3.4. Equipment Classes 35

SCTA Documentation, Release 1.0
Test code:
>>> import BTC from Equipment_Lib>>> btc = BTC(ip=10.23.121.1)>>> btc.setNoise(20)(0/2) setNoise: method called(1/2) setNoise: turned on bandwidth coupling(2/2) setNoise: set CNR level
getNoise(self, modNumber) Description: This function will get the current CNR level on the BTC
Inputs: modNumber (int): specifies output port to get noise from.
Ouput: returns BTC SNR level (double)
setPilots(self, boolean, modNumber) Description: Sets the Pilots on when True, pilots off when false.
inputs: (boolean): True; pilots ON, False; Pilots OFF modNumber (int):specifies output port to setpilots status.
outputs: (none)
getPilots(self, modNumber) Description: Queries the pilots status from the specified port.
inputs: modNumber (int): specifies output port to get pilots status.
outputs: (boolean) ON:true; OFF;false
SLG Class
class SLG(object):def __init__(self, id="SLG", type="IP", port=port, numMods=32)
"""Constructor.
~~~ Valid ranges ~~~
"""self.modulator_list = []self.id=idfor i in range(numMods):
mod=Modulator(id=id+"-output-"+str(i+1)self.modulator_list.append(mod)
loadScenario(self, Scen) Description: Loads the scenario specified
inputs: Scen[string]: Scenario name which needs to be available in the SLG
outputs: (none)
setPower(self, power, modNumber) Description: Description: This function will set the SFU powerlevel. inputs: power[double]: power level value in dB.
outputs: (none)
getPower(self, modNumber) Description: This function will obtain the current power levelon the SFU.
inputs: (none)
outputs: SFU power
36 Chapter 3. User’s Guide to SCTA

SCTA Documentation, Release 1.0
setFrequency(self, freq, modNumber) Description: This functions will set the SFU frequency in Hz.
inputs: freq(double): Frequency in Hz modNumber (int): specific output port
outputs: (none)
getFrequency(self, modNumber) Description: This function will obtain the current frequency from theSFU.
inputs: modNumber (int): specific output port
outputs: (freq in Hz)
setAlpha(self, symb, modNumber) Description: This function will set the SFU symbol rate in MS/s.
inputs: symb (double): Symbol Rate in MS/s. modNumber (int): specific output port
outputs: (none)
getAlpha(self, modNumber) Description: This function will obtain the current symbol rate from theSFU.
inputs: modNumber(int): specific output port
outputs: (symbol Rate in S/s)
setPilots(self, boolean, modNumber) Description: Sets the Pilots on when True, pilots off when false.inputs: (boolean) modNumber (int): specific output port
outputs: (none)
getPilots(self, modNumber) Description: Queries the pilots status
inputs: modNumber (int): specific output port
outputs: (boolean) ON:true; OFF;false
setAlpha(self, roll, modNumber): Description: Sets the roll-off value on the specified SLG modulator
inputs: roll: roll-off value as integer modNumber: SLG modulator number to set
outputs: none
getAlpha(self, modNumber): Description: Obtains thed current modulator roll-off/Alpha value:
Inputs: modNumber: SLG modulator number to query roll-off value set
outputs: returns roll off value on specified modulator output
setScramblingCode(self, scramb, modNumber) Description: Sets the scrambling code on the device.
inputs: scramb (int): Scrambing code number to set modNumber (int): specific output port
outputs: (none)
getScramblingCode(self, modNumber) Description: Queries the current scrambling code set on deviceon the indicated output modulator
inputs: modNumber (int): specific output port
outputs (int) returns the current scrambling code
setModulatorState(self, boolean, modNumber) Description: Enables or disables the desired modulatoroutput
inputs: (boolean): True; enable output. False; disable output (modNumber): which modulator to turnon/off on the current SLG.
outputs: none
3.4. Equipment Classes 37

SCTA Documentation, Release 1.0
getModulatorState(self, modNumber) Description: Queries modulator status on SLG.
inputs: (modNumber) Modulator output to check
outputs: (boolean): True; modulator is on. False; modulator is off.
selectBand(self, band): Description: Selects band range based on the following
3.4.3 Demodulator Class
class Demodulator(Transponder):
def __init__(self, id):"""Constructor.
~~~ Valid ranges ~~~id: string
"""super(Demodulator, self).__init__(id=id)
FSW Class
class FSW(Demodulator)
def __init__(self, id, protocol, port, config)"""Constructor.
~~~ Valid Ranges ~~~protocol: GPIB, ethernet, serialfreq: [20, 26.5] GHz
"""super (FSW, self).__init__(id=id)self.comm = Comm(protocol=type, port=port, config=config)
config(self, Transponder) Description: Configures the FSW to measure either Channel Power or MERand power using the Transponder objects.
Inputs: (Transponder): Uses the tranponder objects to configure the FSW
Outputs: none
getAllMeasurements(self) Description: Obtains all measurements from the VSA window.
inputs: (none)
outputs Returns MER, power, phase error, carrier frequency error from VSA.
getSpectrumChannelPower(self, freq, symrate) Description: Measures channel power and returnsmeasurement
inputs: (double) frequency (double) symrate
outputs: (double) channel power measurement
FSW.getchpwr(Demodulator)
setfreq(freq)
38 Chapter 3. User’s Guide to SCTA

SCTA Documentation, Release 1.0
bw=symrate*1.2setsymrate(bw)
#set RBW and VBW#set sweep time#getmeasurement
return chpwr
setFrequency(self, freq) Description: Sets the input frequency in Hz
inputs: (double) frequency
outputs: (none)
getFrequency(self, freq) Description: obtains the frequency setting for the specified tuner.
inputs: (int): Tuner index
outputs: (double): frequency setting on current tuner
setBroadcastStandard(self) Description: Obtains the modulation and code rate for the tuner indicated.
inputs: (int): TunerIndex
outputs: (string): tuner modulcation and code rate
setAlpha(self, double) Description: This function will set the VTR symbol rate in MS/s.
inputs: (double): Symbol Rate in MS/s.
outputs: (none)
getAlpha(self) Description: This function will obtain the current symbol rate from the VTR.
inputs: (none) outputs: (symbol Rate in MS/s)
VTR Class
class VTR(Demodulator):
def __init__(self, comm, power, freq, symrate, pilots):"""Constructor.
~~~ Valid ranges ~~~comm: GPIB, ethernet, serial...numTuners: number of tuners availablepower: [-80, -10] dBmfreq: [250, 2150] MHzsymrate: [20, 45] MBaudpilots: True, False
"""
super (VTR, self).__init__(id=id)self.comm = Comm(protocol=type, port=port, config=config)
setFrequency(freq, TunerIndex) Description: Sets the input frequency
inputs: (double) frequency (int): Tuner index
outputs: (none)
3.4. Equipment Classes 39

SCTA Documentation, Release 1.0
getFrequency(TunerIndex) Description: obtains the frequency setting for the specified tuner.
inputs: (int): Tuner index
outputs: (double): frequency setting on current tuner
setPower(pwr, TunerIndex) Description: Sets the power level on the appropriate tuner.
inputs: (double): frequency (int): tuner
getPower(TunerIndex) Description: Obtains the power level for the appropriate tuner.
inputs: (int): tuner number
getMode(TunerIndex) Description: Obtains the modulation and code rate for the tuner indicated.
inputs: (int): TunerIndex
outputs: (string): tuner modulcation and code rate
setAlpha(double) Description: This function will set the VTR symbol rate in MS/s.
inputs: (double): Symbol Rate in MS/s.
outputs: (none)
getAlpha() Description: This function will obtain the current symbol rate from the VTR.
inputs: (none) outputs: (symbol Rate in MS/s)
setPilots(boolean) Description: Sets the Pilots on when True, pilots off when false. inputs: (boolean)
outputs: (none)
getPilots() Description: Queries the pilots status
inputs: none
outputs: (boolean) ON:true; OFF;false
setScramblingCode(int, TunerIndex) Description: Sets the scrambling code on the device on the desiredtuner.
inputs: (int): Scrambing code number to set
outputs: (none)
getScramblingCode(TunerIndex) Description: Queries the current scrambling code set on device.
inputs: (none)
outputs (int) returns the current scrambling code
DM240XR Class
Warning: This class is not being updated right now!!!
class DM240(Modulator):
def __init__(self, ip, power):"""Constructor.
~~~ Valid ranges ~~~ip: IP address
40 Chapter 3. User’s Guide to SCTA

SCTA Documentation, Release 1.0
power: [-80, -10] dBmfreq: [250, 2150] MHzsymrate: [20, 45] MBaudpilots: True, False
"""Modulator.__init__(self, ip, power, freq, symb, pilots)self.power=power
setPower(power) Description: This function will set the DM240 power level. inputs: power[double]:power level value in dB. [0dBm to -20 dBm]
outputs: (none)
getPower() Description: This function will obtain the current power level on the DM240.
inputs: (none)
outputs: DM240 power
setFrequency(double) Description: This functions will set the DM240 frequency in Hz.
inputs: freq(double): Frequency in Hz. [950e6 Hz to 2050e6 Hz]
outputs: (none)
getFrequency() Description: This function will obtain the current frequency from the DM240.
inputs: (none)
outputs: (freq in Hz)
setAlpha(double) Description: This function will set the DM240 symbol rate in S/s.
inputs: symrate(double): Symbol Rate in S/s.
outputs: (none)
getAlpha() Description: This function will obtain the current symbol rate from the DM240.
inputs: (none) outputs: (symbol Rate in MS/s)
setPilots(boolean) Description: Sets the Pilots on when True, pilots off when false. inputs: (boolean)
outputs: (none)
getPilots() Description: Queries the pilots status
inputs: none
outputs: (boolean) ON:true; OFF;false
setScramblingCode(int) Description: Sets the scrambling code on the device.
inputs: (int): Scrambing code number to set
outputs: (none)
getScramblingCode() Description: Queries the current scrambling code set on device.
inputs: (none)
outputs (int) returns the current scrambling code
3.4. Equipment Classes 41

SCTA Documentation, Release 1.0
3.5 Test Templates
3.5.1 Frequency Sweep Test Template
Imagine you want to measure the Power or SNR measurement accuracy of a satellite receiver compared toa vetted RF test instrument like the Rhode & Schwarz FSW. Perhaps your lab setup might look like this.
Fig. 3.4: Block diagram of a power accuracy test setup. Both the FSW and DUT are tuned to a transponder generatedby the SFU. Since the input signal is split into different paths, the individual path losses to the FSW and the DUTshould be properly accounted for in the data analysis.
This automation script will perform a frequency sweep and measure MER/CNR and powerat both the FSW and the DUT. An analysis of the measurement data can be found inSCTA_repo\src\examples\RF-Validation-Presentation.ipynb.
from SCTA.Instrumentation import SFU, VTR, FSWfrom SCTA.System import Transponderfrom SCTA.DataLogging import DataLogger
# Initialize equipmentsfu = SFU(type="IP", port="192.10.10.7")fsw = FSW(type="IP", port="192.10.10.8")dut = VTR(type="IP", port="192.10.10.9")
# Format output fileheader=['Frequency (Hz)', 'VTR SNR (dB)', VTR Power (dBm)', 'FSW SNR (dB)',→˓FSW Power (dBm)']csv = Log(filename="FrequencySweep", format="csv", csv_header=header)
# Test DUT on a DVB-S2 MODCOD 13 transponder, i.e. 8PSK 2/3txp = Transponder(id="101-txp1", mode=13, freq=974e6, symb=20e6, roll=20,→˓scramb=0, pilots=False)
42 Chapter 3. User’s Guide to SCTA

SCTA Documentation, Release 1.0
sfu.setTransponder(txp)fsw.setTransponder(txp)dut.setTransponder(txp)
# Test performance across L-band frequencies, i.e. 250 - 2150 MHzfor freq in range(250e6, 2150e6, 10e6):sfu.setFrequency(freq)dut.setFrequency(freq)fsw.setFrequency(freq)
# Take measurements and write them to the output filefsw_meas = fsw.getAllMeasurements()vtr_meas = vtr.getAllMeasurements()sample = [freq, vtr_meas['mer'], vtr_meas['power'], fsw_meas['mer'], fsw_
→˓meas['power']]csv.push(sample)
3.5.2 BER Test Template
Imagine you want to test the frequency sensitivity of a satellite receiver to low power conditions near thespecified QEF point. Perhaps your lab setup might look like this.
Fig. 3.5: Block diagram of a frequency sensitivity test setup. The DUT is tuned to a low-power transponder generatedby the BTC. The DUT does not lock to the signal at first, so the BTC power is increased until the DUT locks andmeasures no bit errors. This QEF point is measured across frequency.
This automation will perform a frequency sweep and find the QEF pointfor the DUT. An analysis of the measurement data can be found inSCTA_repo\src\examples\RF-Validation-Presentation.ipynb.
from SCTA.Instrumentation import BTC, VTRfrom SCTA.System import Transponderfrom SCTA.DataLogging import DataLoggerfrom time import sleep
# Initialize equipmentbtc = BTC(type="IP", port="192.10.10.7")dut = VTR(type="IP", port="192.10.10.9")
# Format output fileheader = ['Frequency (Hz)', 'BTC Power (dBm)', 'Bert Lock', 'Bit Error Rate']csv = Log(filename="FrequencySweep", format="csv", csv_header=header)
3.5. Test Templates 43

SCTA Documentation, Release 1.0
# Test DUT on a DVB-S2 MODCOD 13 transponder, i.e. 8PSK 2/3txp = Transponder(id="101-txp1", mode=13, freq=974e6, symb=20e6, roll=20,→˓scramb=0, pilots=False)btc.setTransponder(txp)dut.setTransponder(txp)
# Test performance across L-band frequencies, i.e. 250 - 2150 MHzfor freq in range(250e6, 2150e6, 10e6):
btc.setFrequency(freq)dut.setFrequency(freq)
# Reset power level on the BTCpower = -85btc.setPower(power)
# Run BERT for 5 seconds and check if the BERT is locked AND has no errorsdut.restartBERT()sleep(5)dut_meas = dut.getMeasurements()
# If not, then increase BTC input power by 0.1 dBwhile (dut_meas['Bert Total Bit Error'] != 0) or (dut_meas['Bert Lock'] !=
→˓True):power = power + 0.1btc.setPower(power)dut.restartBERT()sleep(5)dut_meas = dut.getMeasurements()
# Else, stop the test and log the BERT statisticssample = [freq, power, aim_meas['Bert Lock'], aim_meas['Bit Error Rate']]csv.push(sample)
3.6 Logging Measurements & Debug Messages
This page contains all you need to know about how to log measurements and debug messages in yourscripts. It follows the life of a measurement from when you first take it using the equipment get methodsto when you store it in your log file.
Note: Typically, logging debug messages is unnecessary unless you are developing low-level functionsor need low-level information about equipment state.
Hint: For an example of typical measurement logging, jump to Log Class.
3.6.1 Measurement Object
The output of an equipment get measurement method should always be a Python dictionary. Themeasurement object stores the measurement value itself along with context about how the measurementwas taken.
Attributes:
44 Chapter 3. User’s Guide to SCTA

SCTA Documentation, Release 1.0
• Equipment ID
• Transponder tuning parameters
• Measurement ID, e.g. snr, pwr, etc.
• Measurement value
Here is an example measurement object:
{"timestamp": "2016-09-26T14:30:04","equip_id": "fsw-1","txpdr": {
"id": "txpdr-1","mode": {
"bcstd": "DVB-S2","mod": "8psk","fec": "6/7"
},"freq": 974,"symb": 20000,"roll": 20,"scramb": 1000,"pilot": "True","pol": "None","LO": "None"
},"meas_id": "snr","meas_val": 9.5
}
3.6.2 Log Class
The Log Class is an object used to configure what data to store and how to format the output.
Here is an example of typical configuration and use of the Log Class.
snr_log = Log(filename='FSW_SNR', format='csv')measurement = fsw.getMeas()snr_meas = measurement['snr']snr_log.push(snr_meas)
Hint: Try creating a Log object specific to each equipment, and push measurements of that equipment toits individual Log. That way, you can save different equipment measurements to different files.
There are 2 possible formats for the output log file: CSV and JSON. If csv is selected, then a list ofmeasurement values and time stamps are stored and written to separate column in a CSV file. If json isselected, then a list of Measurement Object s with time stamps are stored in the JSON file format.
Note: JSON stands for JavaScript Object Notation. It uses JavaScript syntax, but the format is text only.So, it can be read and used as a data format by any programming language. Python dictionaries lendthemselves to JSON formatting due to structure similarities.
3.6. Logging Measurements & Debug Messages 45

SCTA Documentation, Release 1.0
Attributes
Each Log includes a timestamp for each measurement object.
• List of time stamp
• List of corresponding measurement objects
Methods
Constructor Description: Configures where the measurements will be written to and what format. If nofilename is specified, samples are not written to a file. If a filename is specified and the format iscsv, then only the measurement value and timestamp will be written to a CSV file. If a filename isspecified and the format is json, then the timestamp will be included in the Measurement Object andwritten to a JSON file.
Inputs: filename and format
Outputs: instance of the Log Class
Push(sample) Description: pushes measurement to the list of samples and writes sample to output file
Inputs: instance of Measurement Object
Outputs: Success/ Failure
Class Definition
class Log(object):
def __init__(self, filename=None, format=None):"""Constructor.
~~~~~ Possibilities ~~~~~filename: string with no '.'format: 'csv', 'json'
"""self.filename = filenameself.format = formatself.sample = []self.time_stamp = []
3.6.3 Debug Messages
Error Codes
Debug Class (Parent of all classes to set debug flag and print debug messages)
46 Chapter 3. User’s Guide to SCTA

CHAPTER 4
Developer’s Guide to Maintaining/ Extending SCTA
Prerequisites We recommend a development environment that includes package control and version control:
• git
• anaconda
• You should clone the SCTA-dev Anaconda environment. Follow The Easy Way: Cloning our SCTAEnvironment tutorial, but use the SCTA-dev-environment.yml file instead.
To contribute to the source code, you need a basic understanding of Python packages, debug tools, and testframeworks:
• import
• logging
• unittest
• nosetests
Most importantly, you need VERY GOOD documentation practices and naming conventions:
• docstrings
• naming
Contents
4.1 Unit Testing
4.1.1 Makefile
For Windows developers, make commands are stored in make.bat. For Linux developers, make com-mands are stored in Makefile.
To see available commands run:
47

SCTA Documentation, Release 1.0
cd SCTA_repo\srcmake help
For example:
make SFU_Test
will run the SFU unit tests and output debug statements to the prompt, while:
make SFU_Progress
will output SFU unit test results to a SFU_Test-log.txt without any debug statements.
4.2 Simulating Instruments
Warning: This will not mimic real instrument output by any means. All instrument output will be thestring “1”.
4.2.1 Import Simulation Configuration
Simply add this import statement at the beginning of your automation script.
from SCTA.Simulation import RunAsSimulation
Run your script. You should notice that each instrument module will print logging.INFO statementssimulating each command sent to the instrument, and each simulated query output received by the instru-ment.
4.3 Sphinx Documentation
4.3.1 Compiling HTML Documentation
Remember to always clean any existing build before recompiling (or else you might see broken links):
cd SCTA_repo\docsmake cleanmake html
Then, open the _build\html\index.html to see the compiled HTML Documentation.
4.4 Advice from Previous Developers
4.4.1 Tips
• Update your __init__.py files whenever you add a new module
• Watch out for those Indent Errors
48 Chapter 4. Developer’s Guide to Maintaining/ Extending SCTA
SCTA Documentation, Release 1.0
• Always check your import statements
• Be careful about querying instruments too quickly. Remember to always wait for operations to com-plete (OPC)
• If you see a pyvisa error about an “invalid resource handle” or “accessing a resource after it isclosed”, make sure you’ve implemented the __del__() function in your instrument class to closethe pyvisa resource.
• If some data isn’t being pushed properly to the DataLogger, check if your csv header and sample areequal length. . . Don’t forget any commas between list entries. . .
• Be careful when operating on input lists by reference. . . Sometimes you only need a copy of it
• To enable Jupyter Notebook hide_cell extension, see https://github.com/kirbs-/hide_code/issues/23
4.4.2 Wishlist
• Please fix our import statements DDDD:
• Please figure out how to close our pyvisa resources gracefully during our unittests - Perhaps createanother Manager with a __del__ that closes all of pyvisa ResourceManager’s resources
4.4. Advice from Previous Developers 49

SCTA Documentation, Release 1.0
50 Chapter 4. Developer’s Guide to Maintaining/ Extending SCTA

CHAPTER 5
Motivational Quotes
51

SCTA Documentation, Release 1.0
52 Chapter 5. Motivational Quotes

CHAPTER 6
Indices and tables
• genindex
• modindex
• search
53