sd-pocket user manual - vf servisvfservis.cz/files/000720_0000024369_sd_pocket_manual_aj.pdf · abb...
TRANSCRIPT
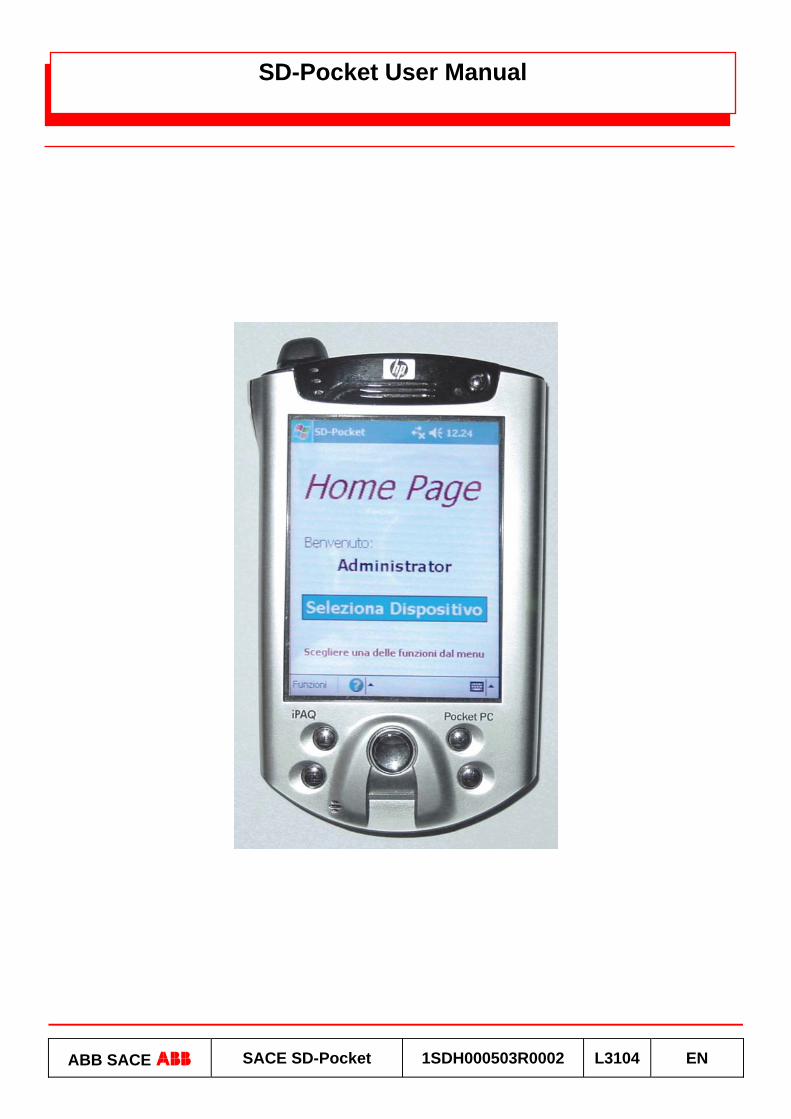
ABB SACE ABB SACE SD-Pocket 1SDH000503R0002 L3104 EN
SD-Pocket User Manual
ABB SACE ABB SACE SD-Pocket 1SDH000503R0002 L3104 1/25
Index PAG.
1. INTRODUCTION................................................................................................................................................................ 4 1.1 SYSTEM REQUIREMENTS ...................................................................................................................................................... 4
1.1.1 Hardware ................................................................................................................................................................... 4 1.1.2 Software..................................................................................................................................................................... 4 1.1.3 PDA models .............................................................................................................................................................. 4
2. INSTALLATION AND UNINSTALLATION ................................................................................................................... 5 2.1 INSTALLATION ....................................................................................................................................................................... 5 2.2 UNINSTALLATION .................................................................................................................................................................. 6
3. PROGRAM START-UP .................................................................................................................................................... 7 4. LOG-IN PROCEDURE...................................................................................................................................................... 9 5. HOME PAGE.................................................................................................................................................................... 10
5.1 FUNCTIONS MENÙ............................................................................................................................................................... 12 5.1.1 User management.................................................................................................................................................. 12 5.1.2 Password management......................................................................................................................................... 15 5.1.3 Help .......................................................................................................................................................................... 15
6. SELECT DEVICE ............................................................................................................................................................ 18 7. CONNECTION ................................................................................................................................................................. 20
7.1 DISCONNECTION................................................................................................................................................................. 20 8. BROWSING THE DEVICE............................................................................................................................................. 21
8.1 ARCHITECTURE OF PAGES ................................................................................................................................................. 21 8.2 WRITE ACCESS PASSWORD................................................................................................................................................ 23
9. SD-DATA VIEWER ......................................................................................................................................................... 24 9.1 SOFTWARE REQUIREMENTS ............................................................................................................................................... 24 9.2 INSTALLAZIONE ................................................................................................................................................................... 24 9.3 UNINSTALLATION ................................................................................................................................................................ 24 9.4 PROGRAM USE.................................................................................................................................................................... 24

ABB SACE ABB SACE SD-Pocket 1SDH000503R0002 L3104 2/25
Index of figures Pag. FIGURE 1. SELECTION OF THE PROGRAM TO BE INSTALLED.............................................................................................................. 5 FIGURE 2. LANGUAGE SELECTION...................................................................................................................................................... 5 FIGURE 3. PDA UNINSTALLATION ...................................................................................................................................................... 6 FIGURE 4. PROGRAM START-UP......................................................................................................................................................... 7 FIGURE 5. SD-POCKET ICON IN THE “PROGRAM” PAGE .................................................................................................................... 7 FIGURE 6. SPLASH SCREEN................................................................................................................................................................ 8 FIGURE 7. LOG-IN PAGE ..................................................................................................................................................................... 8 FIGURE 8. HOME PAGE ..................................................................................................................................................................... 10 FIGURE 9. “FUNCTIONS” MENÙ......................................................................................................................................................... 10 FIGURE 10. “HELP” MENÙ................................................................................................................................................................. 11 FIGURE 11. "USER MANAGER" PAGE................................................................................................................................................ 12 FIGURE 12. “USER SETTINGS” PAGE ................................................................................................................................................ 13 FIGURE 13. "ENABLE DEVICES" PAGE .............................................................................................................................................. 14 FIGURE 14. “PASSWORD MANAGEMENT” PAGE ............................................................................................................................... 15 FIGURE 15. “HELP” ICON .................................................................................................................................................................. 15 FIGURE 16. “CURRENT USER” WINDOW ........................................................................................................................................... 16 FIGURE 17. “HELP ON LINE” PAGE.................................................................................................................................................... 16 FIGURE 18. “ABOUT SD-POCKET” WINDOW .................................................................................................................................... 17 FIGURE 19. CONNECTED DEVICE ..................................................................................................................................................... 17 FIGURE 20. "DEVICE LIST" PAGE ...................................................................................................................................................... 18 FIGURE 21. LIST OF FOUND DEVICES ............................................................................................................................................... 18 FIGURE 22. DEVICE DESCRIPTION.................................................................................................................................................... 20 FIGURE 23. ARCHITECTURE OF PAGES ............................................................................................................................................ 21 FIGURE 24. “ALARMS” MENÙ ............................................................................................................................................................ 22 FIGURE 25. “MEASURE” PAGE AND RELATED SECONDARY PAGES .................................................................................................. 22 FIGURE 26: WRITE-ENABLE PASSWORD .......................................................................................................................................... 23 FIGURE 27. SELECTION OF THE PROGRAM TO BE INSTALLED – SD-DATAVIEWER......................................................................... 24
ABB SACE ABB SACE SD-Pocket 1SDH000503R0002 L3104 3/25
Index of tables Pag. TABLE 1. SUPPORTED DEVICES.......................................................................................................................................................... 4 TABLE 2. USER PROFILES................................................................................................................................................................... 9 TABLE 3. ALARM/TRIP SIGNALLING .................................................................................................................................................. 21 TABLE 4. WRITE PASSWORD ............................................................................................................................................................ 23
ABB SACE ABB SACE SD-Pocket 1SDH000503R0002 L3104 4/25
1. Introduction SD-Pocket permits wireless connection to the ABB SACE SpA trip units supplied with the Bluetooth communication module. Two versions of this module are available: • internal module (PR120/D-BT WL) • external module (BT030) connected to the trip unit to the front test socket SD-Pocket can communicate with the following trip units:
Trip unit PR120/D-BT WL BT030 PR121/P NO YES PR122/P YES YES (*) PR123/P YES YES (*)
PR222DS/P NO YES PR222DS/PD NO YES
PR223EF NO YES PR223DS NO YES PR232/P NO YES PR331/P NO YES PR332/P NO YES PR333/P NO YES
Table 1. Supported devices
(*) without PR120/D-BT
1.1 System requirements This software is available for installation on pocket PCs (PDA: Personal Digital Assistant).
1.1.1 Hardware • Integrated Bluetooth module with a minimum range of 10 meters (see the PDA technical characteristics) • RAM: 64 MB • ROM: 32 MB • 30 MB free space • PDA screen size: 240 x 320 pixels
1.1.2 Software • Windows Mobile 2003 or Windows Mobile 5.0. • Verify on the producer’s website if firmware updates are available. • Bluetooth Widcomm driver (see the PDA instruction manual) For the installation software: • PC operated by Windows 2000 e Windows XP • Active Sync 3.8 and following (supplied with the PDA)
1.1.3 PDA models This software has been tested on the following PDA devices: 1. iPAQ Compaq 5550 2. iPAQ Compaq 3970 3. iPAQ Compaq 5450 4. iPAQ Compaq 2110
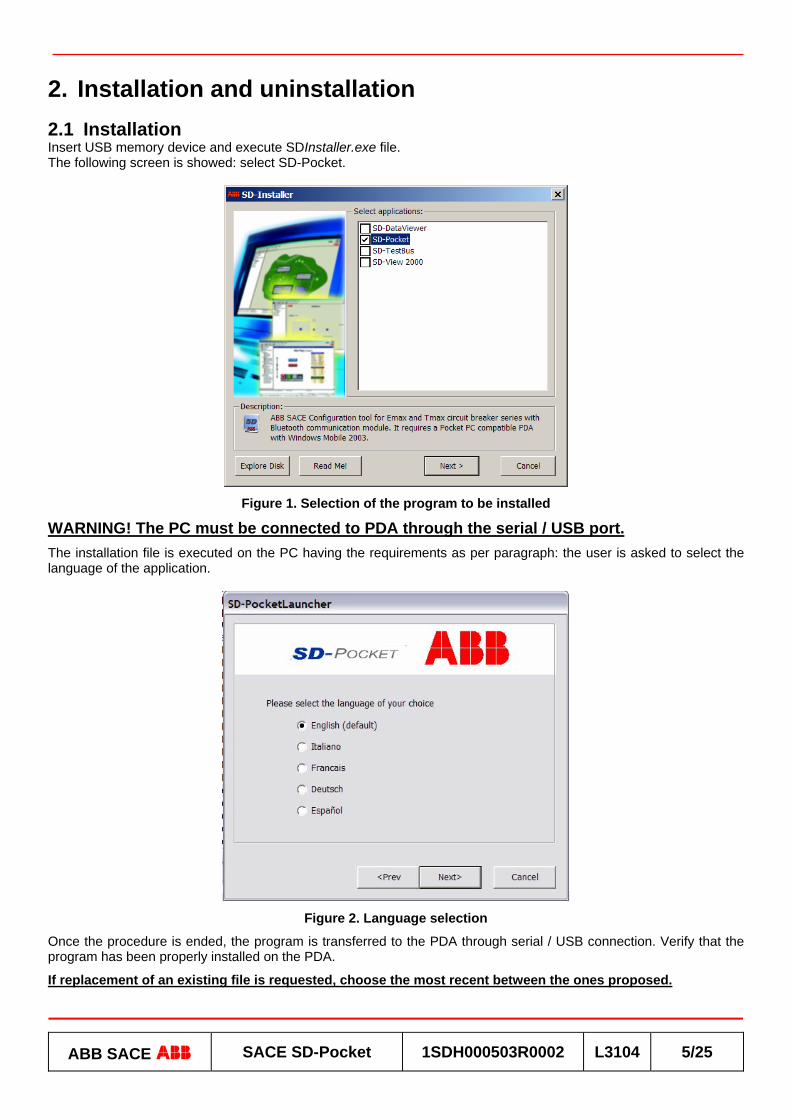
ABB SACE ABB SACE SD-Pocket 1SDH000503R0002 L3104 5/25
2. Installation and uninstallation 2.1 Installation Insert USB memory device and execute SDInstaller.exe file. The following screen is showed: select SD-Pocket.
Figure 1. Selection of the program to be installed
WARNING! The PC must be connected to PDA through the serial / USB port. The installation file is executed on the PC having the requirements as per paragraph: the user is asked to select the language of the application.
Figure 2. Language selection
Once the procedure is ended, the program is transferred to the PDA through serial / USB connection. Verify that the program has been properly installed on the PDA.
If replacement of an existing file is requested, choose the most recent between the ones proposed.
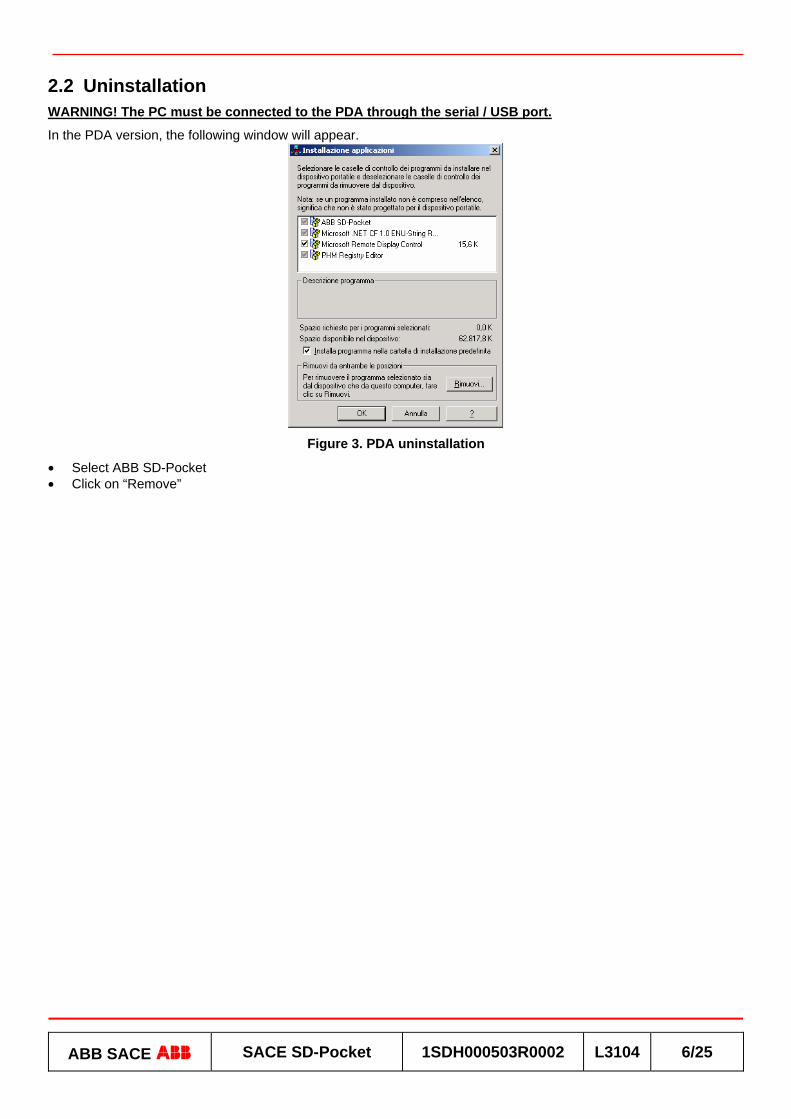
ABB SACE ABB SACE SD-Pocket 1SDH000503R0002 L3104 6/25
2.2 Uninstallation WARNING! The PC must be connected to the PDA through the serial / USB port.
In the PDA version, the following window will appear.
Figure 3. PDA uninstallation
• Select ABB SD-Pocket • Click on “Remove”

ABB SACE ABB SACE SD-Pocket 1SDH000503R0002 L3104 7/25
3. Program start-up From the “Start” menu of Windows Mobile 2003 select “Programs”.
Figure 4. Program start-up
Click the “SD-Pocket” icon.
Figure 5. SD-Pocket icon in the “Program” page
The program starts up and the following splash screen will appear for few seconds, necessary for the program loading.
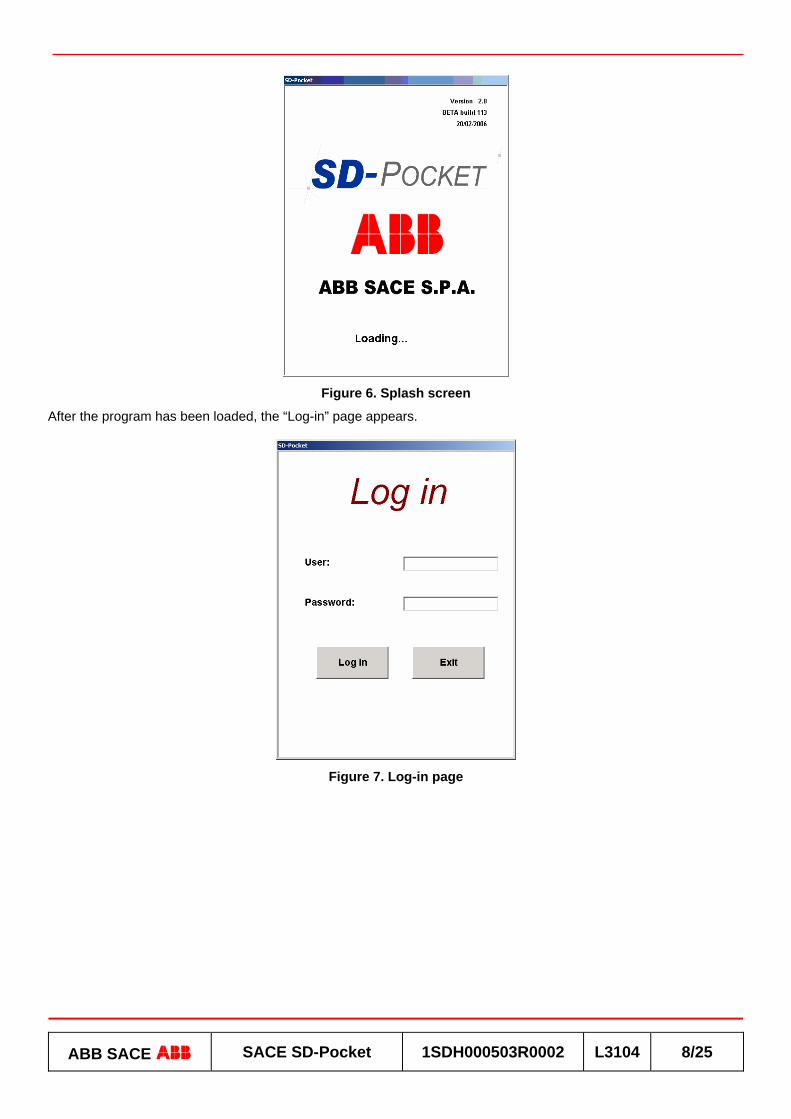
ABB SACE ABB SACE SD-Pocket 1SDH000503R0002 L3104 8/25
Figure 6. Splash screen
After the program has been loaded, the “Log-in” page appears.
Figure 7. Log-in page
ABB SACE ABB SACE SD-Pocket 1SDH000503R0002 L3104 9/25
4. Log-in procedure To enter the program it is necessary to insert the user name and the password. Two types of user are defined:
User type User name Password Description Administrator Administrator
0002
• He is the user with the highest rights • He can access all functionalities. • He can modify the rights of the users. • He can modify his password. • He cannot modify his user name.
User1 User2 User User3
0001 • He can access all the functionalities permitted by the Administrator • He can modify his user name and password. • His standard access is in read-mode.
Table 2. User profiles
A maximum number of three errors (user name or password) is permitted during log in: after the third error the program is shut down.

ABB SACE ABB SACE SD-Pocket 1SDH000503R0002 L3104 10/25
5. Home page After the log in procedure, the user enters the home page (home page):
Figure 8. Home page
The user can choose between the following actions available within the toolbar:
Figure 9. “Functions” menù
• Functions: the user can select between the following actions (for more details see paragraph § 5.1): o Log-out: user disconnection and return to the log in page. o User manager (for Administrator only): other users’ access rights modification. o Password manager: current user’s password modification o Exit: program shut-down
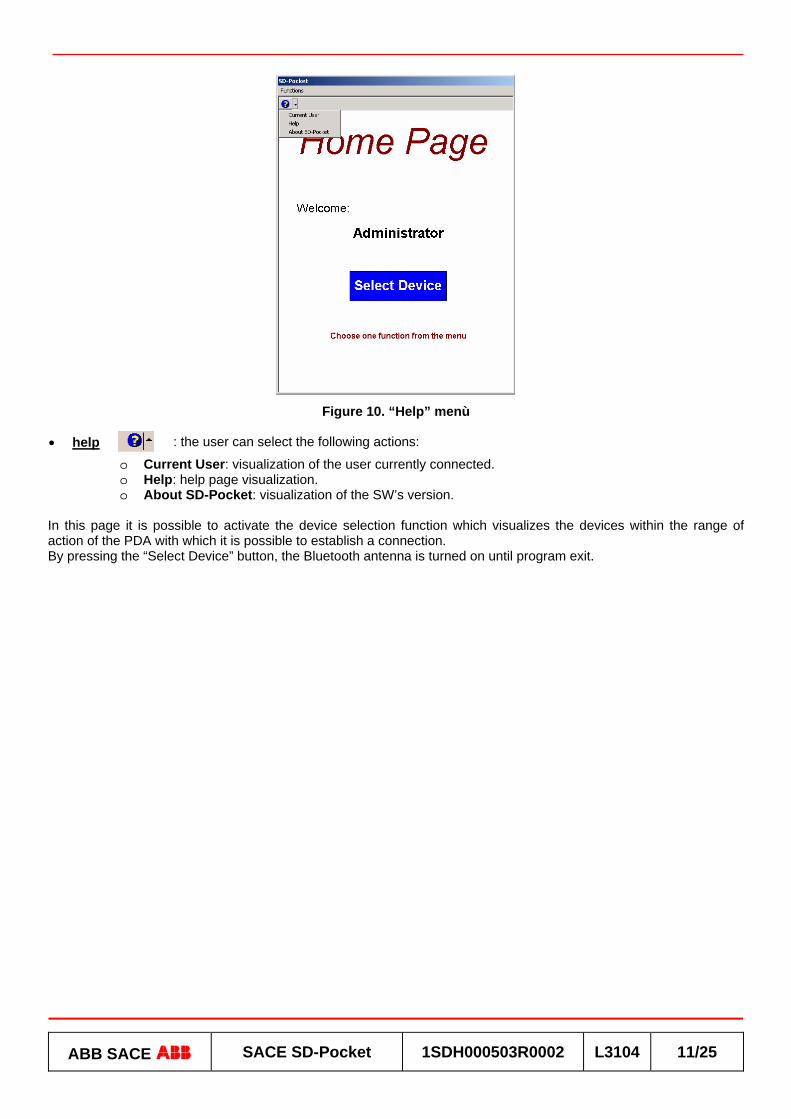
ABB SACE ABB SACE SD-Pocket 1SDH000503R0002 L3104 11/25
Figure 10. “Help” menù
• help : the user can select the following actions:
o Current User: visualization of the user currently connected. o Help: help page visualization. o About SD-Pocket: visualization of the SW’s version.
In this page it is possible to activate the device selection function which visualizes the devices within the range of action of the PDA with which it is possible to establish a connection. By pressing the “Select Device” button, the Bluetooth antenna is turned on until program exit.

ABB SACE ABB SACE SD-Pocket 1SDH000503R0002 L3104 12/25
5.1 Functions menù
5.1.1 User management This function can be accessed by the Administrator only. To modify the users’ access rights select “Functions User Manager”: the following page will appear:
Figure 11. "User manager" page
Through the combo-box select the user name whose rights have to be modified. Set the check-boxes below accordingly to the user’s access rights. By default, all check-boxes are unselected and all the users have read only access rights. The users can be enabled to the following functions: • Write Access: modification of the parameters of connected device. • Commands: commands to the connected device. • Test: test operations to the connected device. • Disable device: selection of the devices that can be accessed by the user. From the toolbar the following actions can be selected: • Back
: the previous page is returned without saving any changes; the user is warned the changes have not been saved and is given the chance to save them.
• Save
: the changes are saved.
• Cancel
: the changes are canceled. • Aiuto
The “Change user settings” button is available to modify the user name.

ABB SACE ABB SACE SD-Pocket 1SDH000503R0002 L3104 13/25
5.1.1.1 User settings
Figure 12. “User settings” page
The administrator has to insert the new user name (different from those already present) and the new password. It is possible to avoid the input of the new password. Selecting “OK” the new data are temporarily saved and the “User management” page is returned. The data are permanently saved only after pressing the “Save” button in the “User management” page. In the “User settings” page a window appears that explains this procedure. By selecting “Cancel” the old data are reestablished and the “User management” page is returned. From the toolbar the following actions can be selected: • Help

ABB SACE ABB SACE SD-Pocket 1SDH000503R0002 L3104 14/25
5.1.1.2 Disable devices The administrator can choose which devices the user can get in connection with: the user cannot detect new devices. By pressing the “Disable devices” button the “Personalize” button appears that, if selected, opens a page with the following options:
Figure 13. "Enable devices" page
• Enable All: access to all of the devices available in the database is enabled. • Disable All: access to all of the devices available in the database is disabled. • Device List: list of the devices available in the database. In the devices list it is possible to select each device for which the user will be enabled: From the toolbar it is possible to select the following actions: • Back
: the “User management” page is returned without saving any changes; the user is warned the changes have not been saved and is given the chance to save them.
• Cancel : the changes are cancelled. • Help The administrator makes the changes and then confirms through the “Confirm” button: the new data will be saved. The data are permanently saved only after pressing the “Save” button in the “User management” page. In the “Disable devices” page a window appears that explains this procedure.
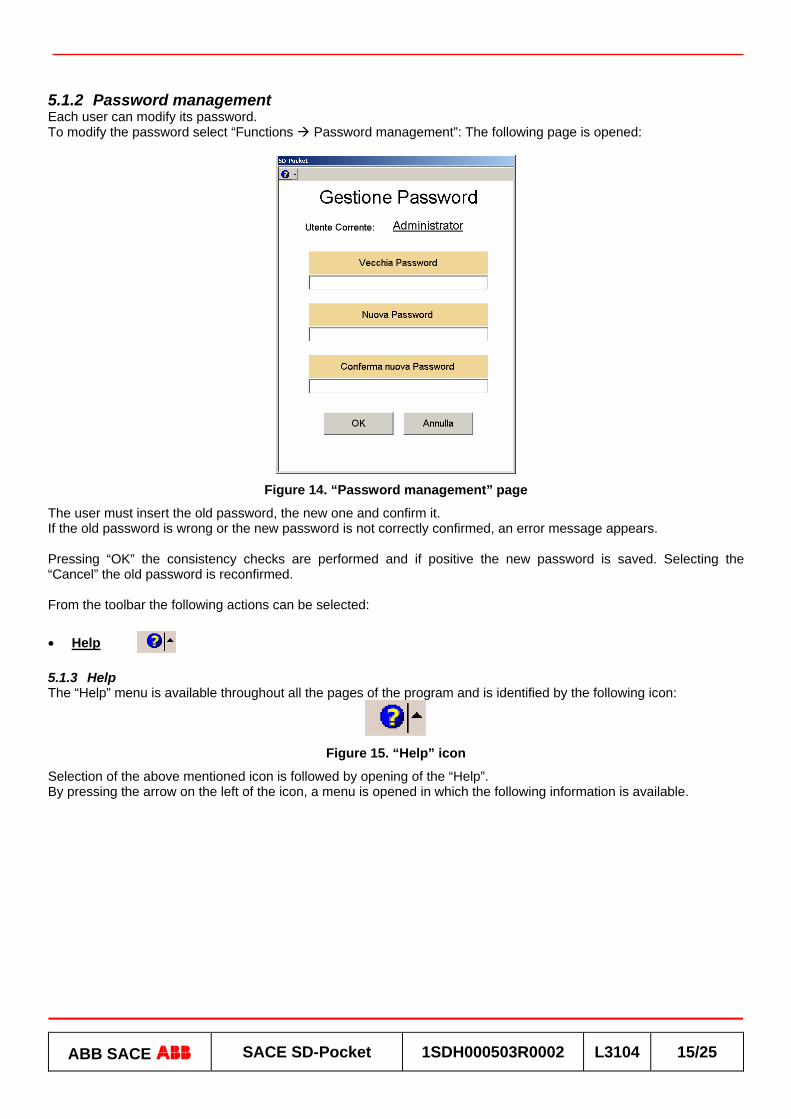
ABB SACE ABB SACE SD-Pocket 1SDH000503R0002 L3104 15/25
5.1.2 Password management Each user can modify its password. To modify the password select “Functions Password management”: The following page is opened:
Figure 14. “Password management” page
The user must insert the old password, the new one and confirm it. If the old password is wrong or the new password is not correctly confirmed, an error message appears. Pressing “OK” the consistency checks are performed and if positive the new password is saved. Selecting the “Cancel” the old password is reconfirmed. From the toolbar the following actions can be selected: • Help
5.1.3 Help The “Help” menu is available throughout all the pages of the program and is identified by the following icon:
Figure 15. “Help” icon
Selection of the above mentioned icon is followed by opening of the “Help”. By pressing the arrow on the left of the icon, a menu is opened in which the following information is available.
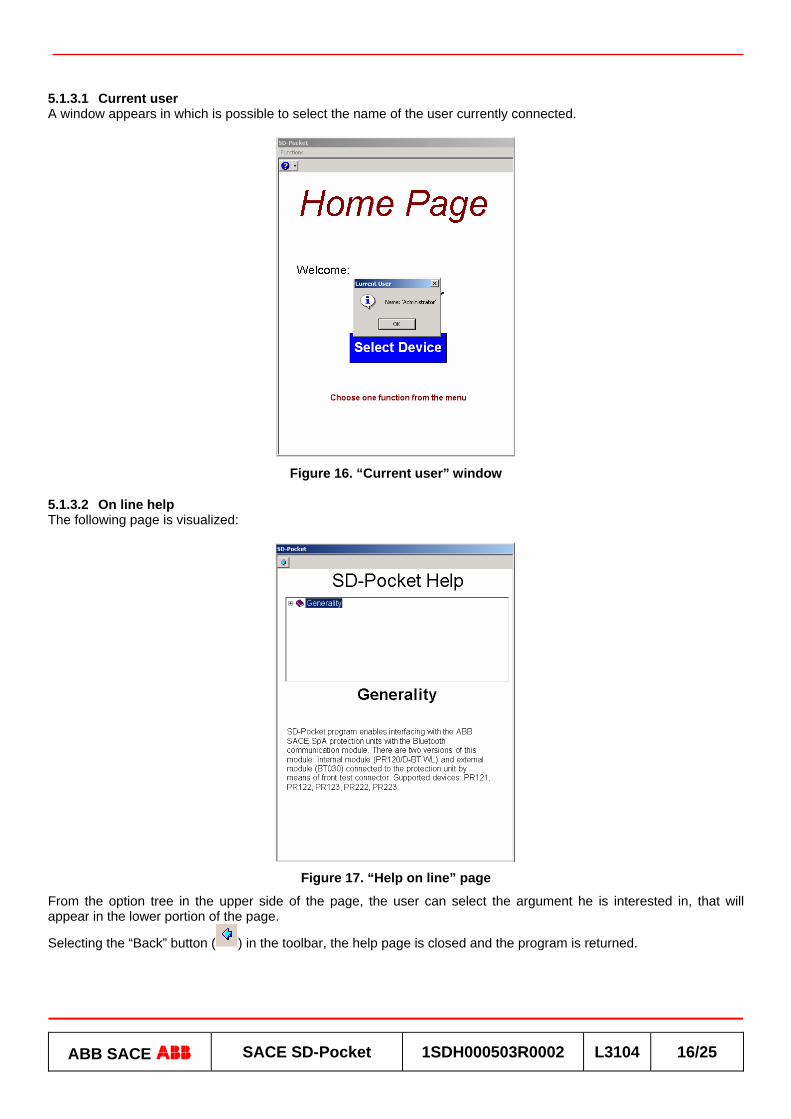
ABB SACE ABB SACE SD-Pocket 1SDH000503R0002 L3104 16/25
5.1.3.1 Current user A window appears in which is possible to select the name of the user currently connected.
Figure 16. “Current user” window
5.1.3.2 On line help The following page is visualized:
Figure 17. “Help on line” page
From the option tree in the upper side of the page, the user can select the argument he is interested in, that will appear in the lower portion of the page.
Selecting the “Back” button ( ) in the toolbar, the help page is closed and the program is returned.
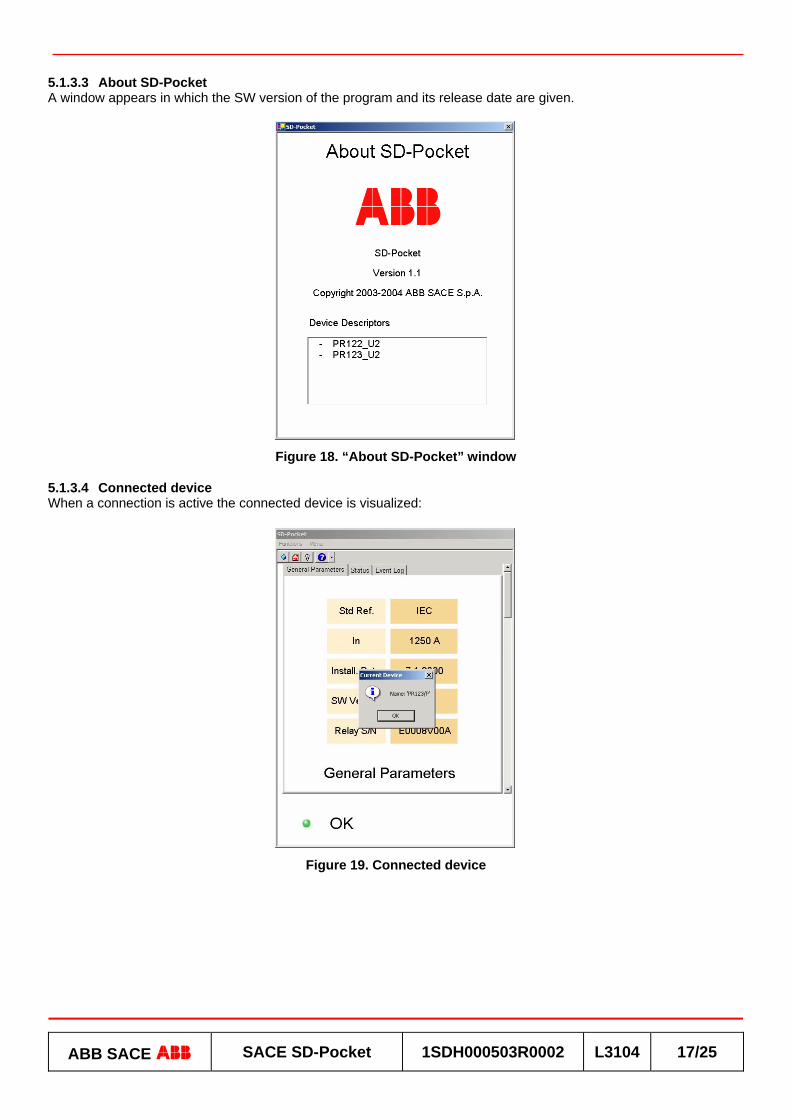
ABB SACE ABB SACE SD-Pocket 1SDH000503R0002 L3104 17/25
5.1.3.3 About SD-Pocket A window appears in which the SW version of the program and its release date are given.
Figure 18. “About SD-Pocket” window
5.1.3.4 Connected device When a connection is active the connected device is visualized:
Figure 19. Connected device
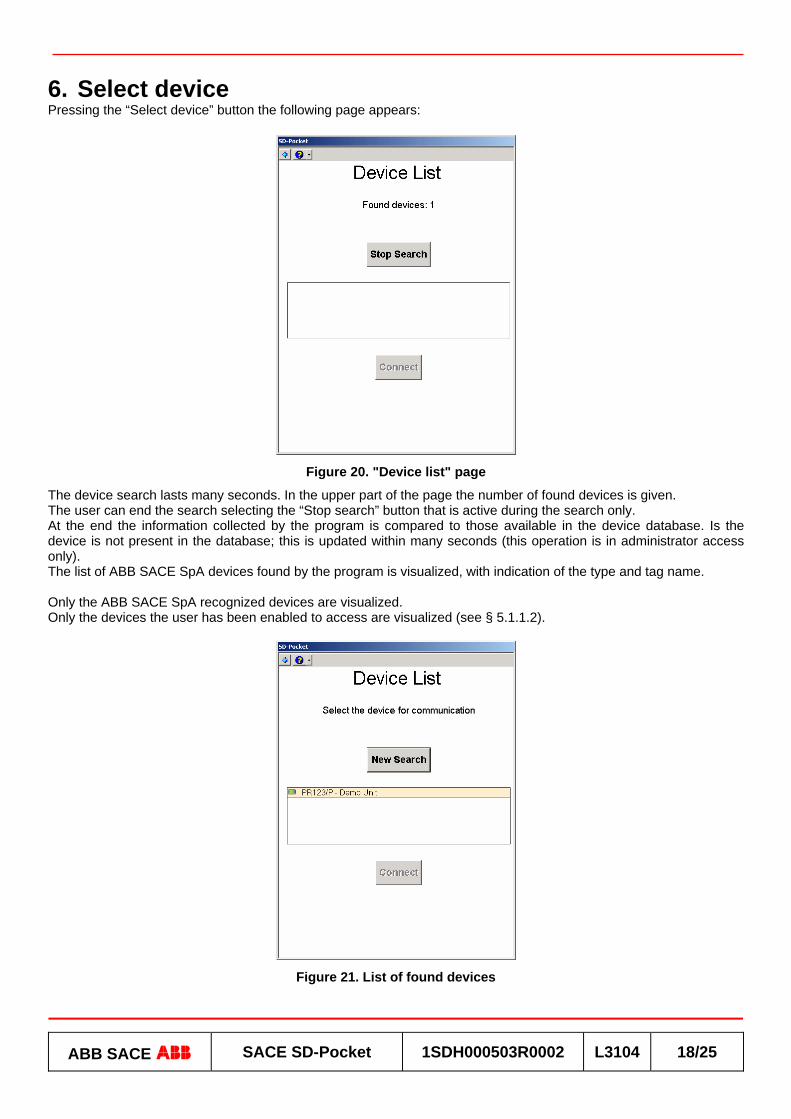
ABB SACE ABB SACE SD-Pocket 1SDH000503R0002 L3104 18/25
6. Select device Pressing the “Select device” button the following page appears:
Figure 20. "Device list" page
The device search lasts many seconds. In the upper part of the page the number of found devices is given. The user can end the search selecting the “Stop search” button that is active during the search only. At the end the information collected by the program is compared to those available in the device database. Is the device is not present in the database; this is updated within many seconds (this operation is in administrator access only). The list of ABB SACE SpA devices found by the program is visualized, with indication of the type and tag name. Only the ABB SACE SpA recognized devices are visualized. Only the devices the user has been enabled to access are visualized (see § 5.1.1.2).
Figure 21. List of found devices
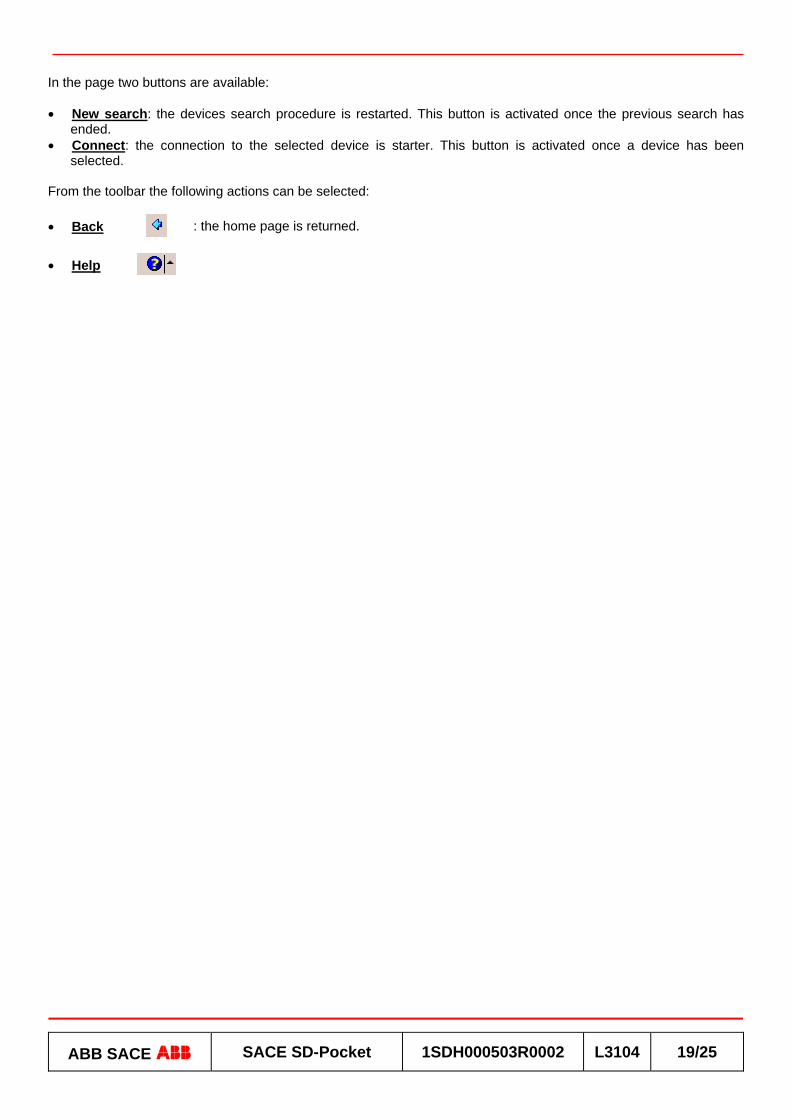
ABB SACE ABB SACE SD-Pocket 1SDH000503R0002 L3104 19/25
In the page two buttons are available: • New search: the devices search procedure is restarted. This button is activated once the previous search has
ended. • Connect: the connection to the selected device is starter. This button is activated once a device has been
selected. From the toolbar the following actions can be selected: • Back : the home page is returned. • Help

ABB SACE ABB SACE SD-Pocket 1SDH000503R0002 L3104 20/25
7. Connection By selecting “Connect” the resume page appears, that contains the main information of the selected device.
Figure 22. Device description
The tag name and the type of device are compared with those available in the device database: if there are any differences a pop-up page appears to inform the user that the database will be updated. From the toolbar the following actions can be selected: • New device : a new search starts.
• Wink
: it activates the blinking of the display or of one LED of the device (depending on the type of connected device). The icon changes according to the wink condition.
• Home page : the homepage is returned. • Help In the page the “Enter” button can be selected to start surfing into the pages of the device; for all the devices the “Information – Protection device” is the initial page. The following pages are specific for each device.
7.1 Disconnection Being a wireless connection, it can happen that the communication between the PDA/PC and the device goes downs; in this case an interrupted connection message appears and the home page is loaded. The device is thus disconnected.
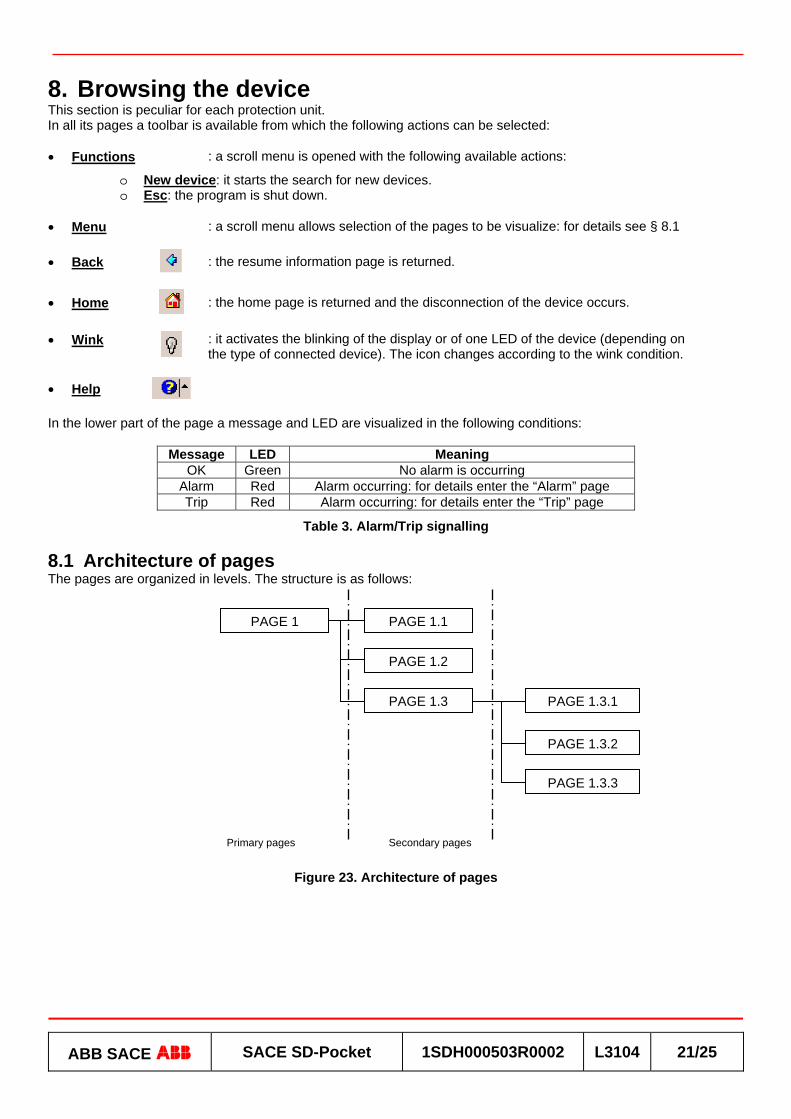
ABB SACE ABB SACE SD-Pocket 1SDH000503R0002 L3104 21/25
8. Browsing the device This section is peculiar for each protection unit. In all its pages a toolbar is available from which the following actions can be selected: • Functions : a scroll menu is opened with the following available actions:
o New device: it starts the search for new devices. o Esc: the program is shut down.
• Menu : a scroll menu allows selection of the pages to be visualize: for details see § 8.1
• Back : the resume information page is returned.
• Home : the home page is returned and the disconnection of the device occurs.
• Wink
: it activates the blinking of the display or of one LED of the device (depending on the type of connected device). The icon changes according to the wink condition.
• Help In the lower part of the page a message and LED are visualized in the following conditions:
Message LED Meaning OK Green No alarm is occurring
Alarm Red Alarm occurring: for details enter the “Alarm” page Trip Red Alarm occurring: for details enter the “Trip” page
Table 3. Alarm/Trip signalling
8.1 Architecture of pages The pages are organized in levels. The structure is as follows:
Figure 23. Architecture of pages
PAGE 1 PAGE 1.1
PAGE 1.2
PAGE 1.3 PAGE 1.3.1
PAGE 1.3.2
PAGE 1.3.3
Primary pages Secondary pages
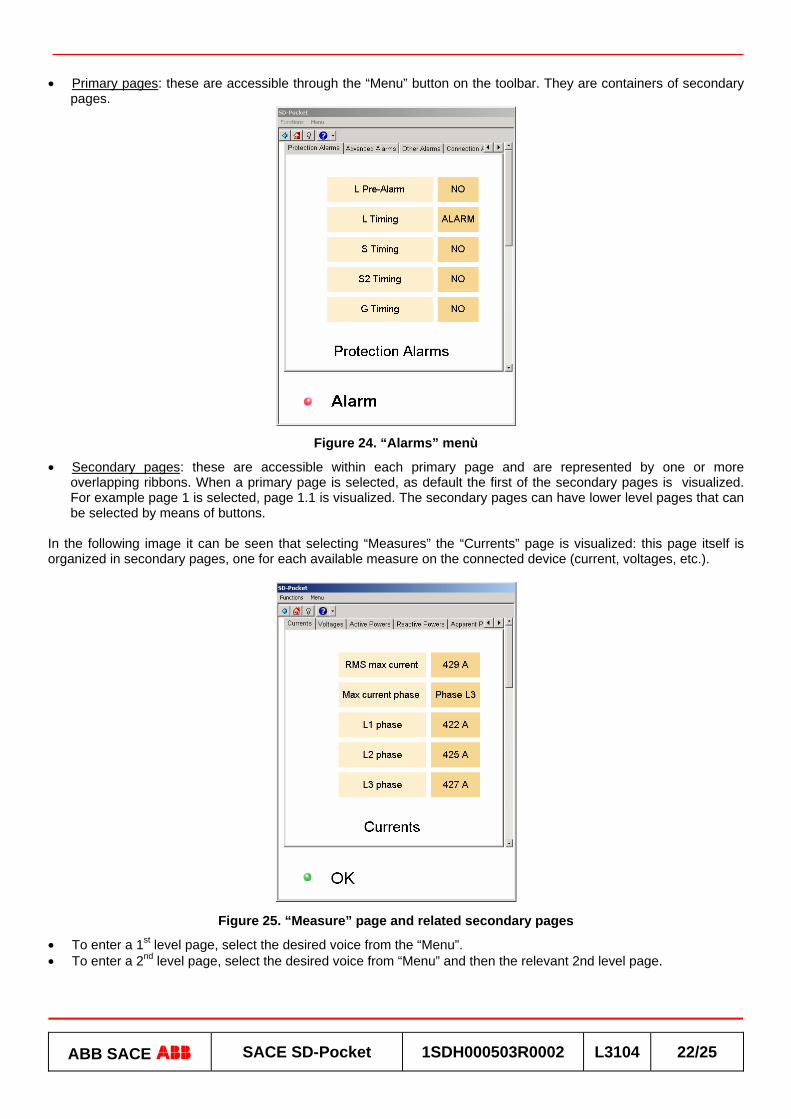
ABB SACE ABB SACE SD-Pocket 1SDH000503R0002 L3104 22/25
• Primary pages: these are accessible through the “Menu” button on the toolbar. They are containers of secondary pages.
Figure 24. “Alarms” menù
• Secondary pages: these are accessible within each primary page and are represented by one or more overlapping ribbons. When a primary page is selected, as default the first of the secondary pages is visualized. For example page 1 is selected, page 1.1 is visualized. The secondary pages can have lower level pages that can be selected by means of buttons.
In the following image it can be seen that selecting “Measures” the “Currents” page is visualized: this page itself is organized in secondary pages, one for each available measure on the connected device (current, voltages, etc.).
Figure 25. “Measure” page and related secondary pages
• To enter a 1st level page, select the desired voice from the “Menu”. • To enter a 2nd level page, select the desired voice from “Menu” and then the relevant 2nd level page.

ABB SACE ABB SACE SD-Pocket 1SDH000503R0002 L3104 23/25
8.2 Write access password To prevent unauthorized access to the programming session of the device, a device write password is required:
Figure 26: Write-enable password
In the following table the passwords to access the programming session of each device can be found:
Trip unit Write password PR121/P 0001 PR122/P Device password PR123/P Device password
PR222DS/P 0001 PR222DS/PD 0001
PR223EF 0001 PR223DS 0001 PR232/P 0001 PR331/P 0001 PR332/P Device password PR333/P Device password
Table 4. Write password
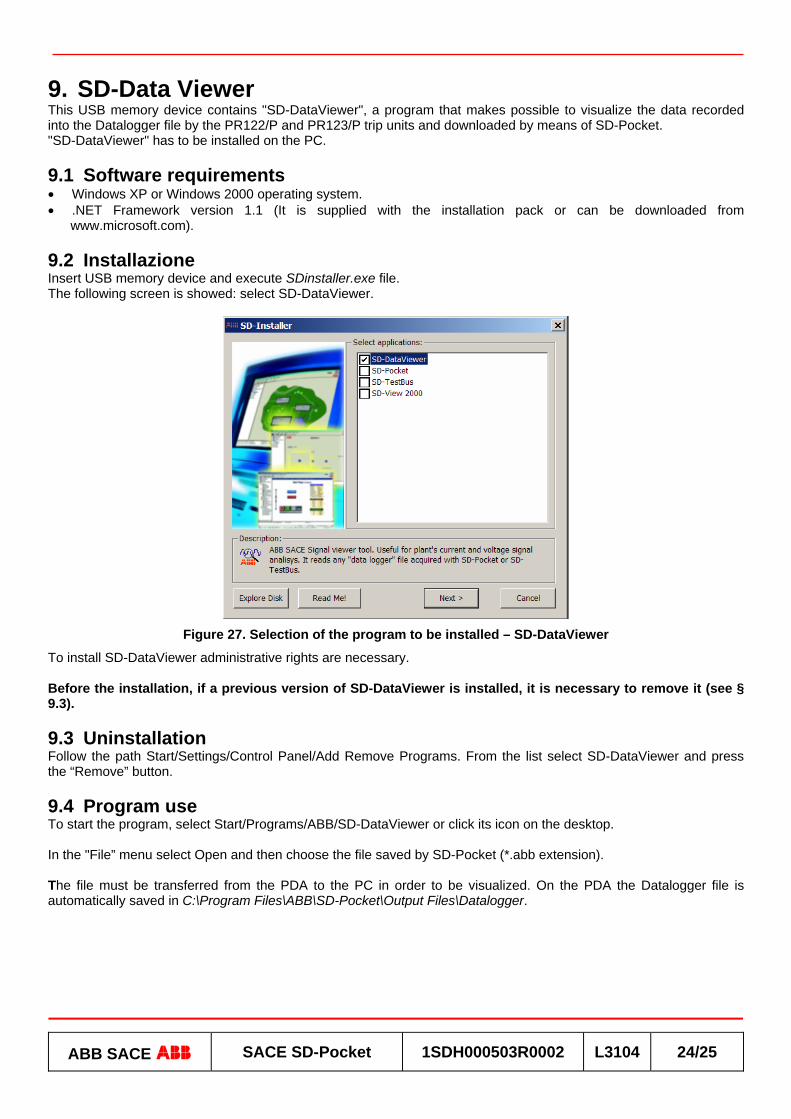
ABB SACE ABB SACE SD-Pocket 1SDH000503R0002 L3104 24/25
9. SD-Data Viewer This USB memory device contains "SD-DataViewer", a program that makes possible to visualize the data recorded into the Datalogger file by the PR122/P and PR123/P trip units and downloaded by means of SD-Pocket. "SD-DataViewer" has to be installed on the PC.
9.1 Software requirements • Windows XP or Windows 2000 operating system. • .NET Framework version 1.1 (It is supplied with the installation pack or can be downloaded from
www.microsoft.com).
9.2 Installazione Insert USB memory device and execute SDinstaller.exe file. The following screen is showed: select SD-DataViewer.
Figure 27. Selection of the program to be installed – SD-DataViewer
To install SD-DataViewer administrative rights are necessary. Before the installation, if a previous version of SD-DataViewer is installed, it is necessary to remove it (see § 9.3).
9.3 Uninstallation Follow the path Start/Settings/Control Panel/Add Remove Programs. From the list select SD-DataViewer and press the “Remove” button.
9.4 Program use To start the program, select Start/Programs/ABB/SD-DataViewer or click its icon on the desktop. In the "File” menu select Open and then choose the file saved by SD-Pocket (*.abb extension). The file must be transferred from the PDA to the PC in order to be visualized. On the PDA the Datalogger file is automatically saved in C:\Program Files\ABB\SD-Pocket\Output Files\Datalogger.