seahorse xf glycolysis stress test kit user guide agilent seahorse xf glycolysis stress test kit...
TRANSCRIPT
Agilent Seahorse XF Glycolysis Stress Test Kit
User GuideKit 103020-100
Agilent Technologies
Notices© Agilent Technologies, Inc. 2017
No part of this manual may be reproduced in any form or by any means (including electronic storage and retrieval or transla-tion into a foreign language) without prior agreement and written consent from Agilent Technologies, Inc. as governed by United States and international copyright laws.
Manual Part Number
103020-400
Kit Part Number
103020-100
Edition
First edition, March 2017Revision C0
Printed in USA
Agilent Technologies, Inc.2850 Centerville Road Wilmington, DE 19808-1610 USA
Warranty
The material contained in this docu-ment is provided “as is,” and is sub-ject to being changed, without notice, in future editions. Further, to the max-imum extent permitted by applicable law, Agilent disclaims all warranties, either express or implied, with regard to this manual and any information contained herein, including but not limited to the implied warranties of merchantability and fitness for a par-ticular purpose. Agilent shall not be liable for errors or for incidental or consequential damages in connection with the furnishing, use, or perfor-mance of this document or of any information contained herein. Should Agilent and the user have a separate written agreement with warranty terms covering the material in this document that conflict with these terms, the warranty terms in the sep-arate agreement shall control.
Technology Licenses
The hardware and/or software described in this document are furnished under a license and may be used or copied only in accordance with the terms of such license.
Restricted Rights Legend
If software is for use in the performance of a U.S. Government prime contract or sub-contract, Software is delivered and licensed as “Commercial computer soft-ware” as defined in DFAR 252.227-7014 (June 1995), or as a “commercial item” as defined in FAR 2.101(a) or as “Restricted computer software” as defined in FAR 52.227-19 (June 1987) or any equivalent agency regulation or contract clause. Use, duplication or disclosure of Software is subject to Agilent Technologies’ standard commercial license terms, and non-DOD Departments and Agencies of the U.S. Government will receive no greater than Restricted Rights as defined in FAR 52.227-19(c)(1-2) (June 1987). U.S. Govern-ment users will receive no greater than Limited Rights as defined in FAR 52.227-14
(June 1987) or DFAR 252.227-7015 (b)(2) (November 1995), as applicable in any technical data.
Safety Notices
CAUTION
A CAUTION notice denotes a hazard. It calls attention to an oper-ating procedure, practice, or the like that, if not correctly performed or adhered to, could result in damage to the product or loss of important data. Do not proceed beyond a CAUTION notice until the indicated conditions are fully understood and met.
WARNING
A WARNING notice denotes a hazard. It calls attention to an operating procedure, practice, or the like that, if not correctly per-formed or adhered to, could result in personal injury or death. Do not proceed beyond a WARNING notice until the indicated condi-tions are fully understood and met.
Contents
Introduction
Agilent Seahorse XF Glycolysis Stress T
Introduction 6
Glossary 9
Kit Information
Kit Contents 12
Kit Storage 13
Assay
Day Prior to Assay 16
Day of Assay 17
Data Analysis 22
est Kit User Guide 3

4
Agilent Seahorse XF Glycolysis Stress Test Kit User Guide
Agilent Seahorse XF Glycolysis Stress Test KitUser Guide
1Introduction
Introduction 6
Glossary 9
The Agilent Seahorse XF Glycolysis Stress Test is the standard assay for measuring glycolytic function in cells. By directly measuring the extracellular acidification rate, (ECAR), see Figure 1 on page 7. The Seahorse XF Glycolysis Stress Test provides a standard and comprehensive method to assess the key parameters of glycolytic flux: Glycolysis, Glycolytic Capacity, Glycolytic Reserve, as well as nonglycolytic acidification. (Refer to the “Glossary” on page 9 for more details.)
5Agilent Technologies
Introduction
Introduction
6
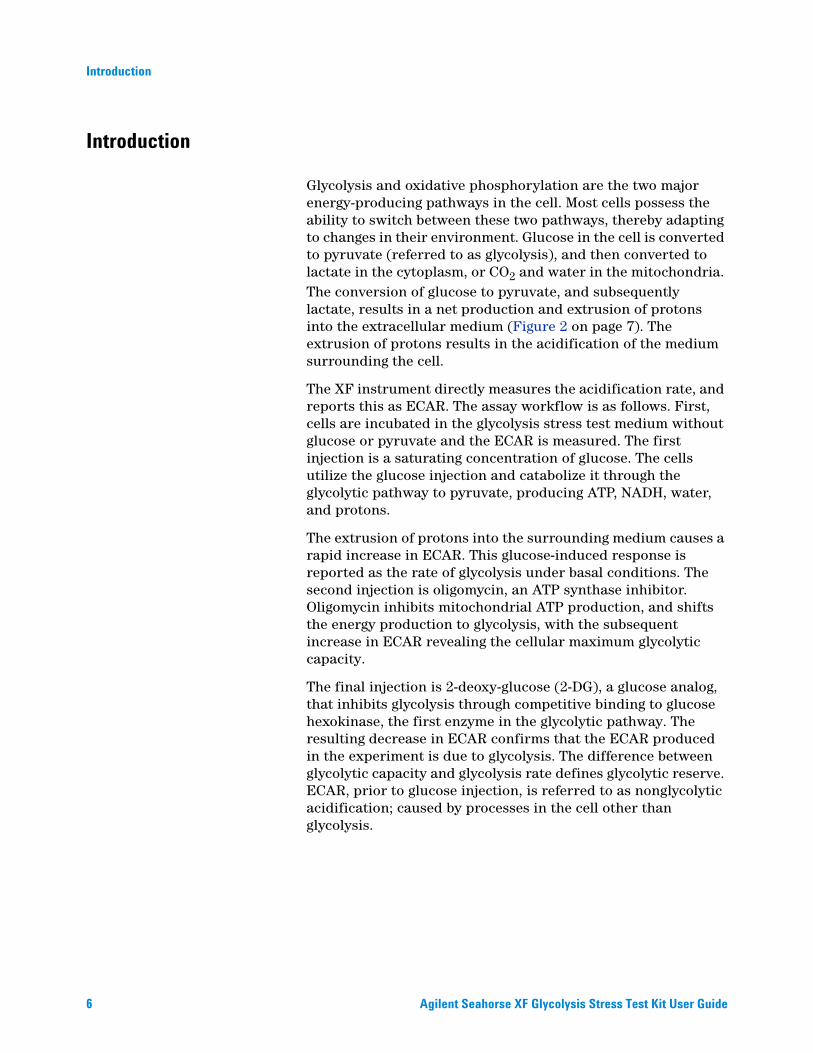
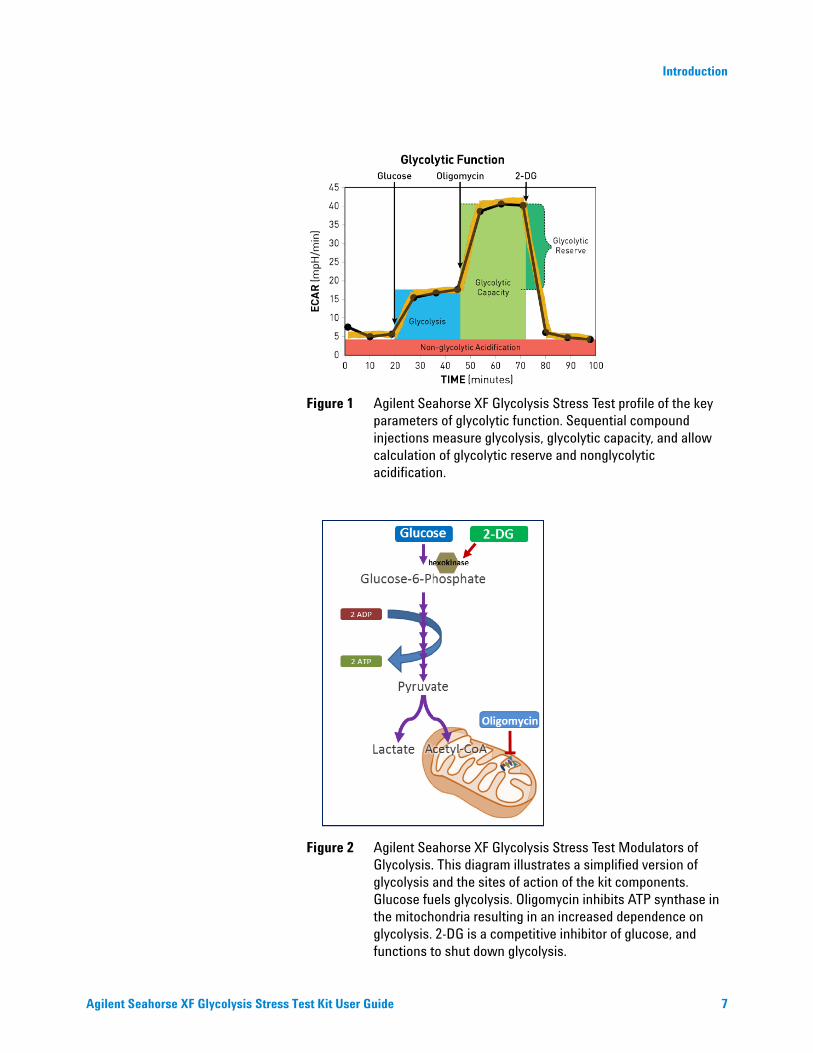
Glycolysis and oxidative phosphorylation are the two major energy-producing pathways in the cell. Most cells possess the ability to switch between these two pathways, thereby adapting to changes in their environment. Glucose in the cell is converted to pyruvate (referred to as glycolysis), and then converted to lactate in the cytoplasm, or CO2 and water in the mitochondria. The conversion of glucose to pyruvate, and subsequently lactate, results in a net production and extrusion of protons into the extracellular medium (Figure 2 on page 7). The extrusion of protons results in the acidification of the medium surrounding the cell.
The XF instrument directly measures the acidification rate, and reports this as ECAR. The assay workflow is as follows. First, cells are incubated in the glycolysis stress test medium without glucose or pyruvate and the ECAR is measured. The first injection is a saturating concentration of glucose. The cells utilize the glucose injection and catabolize it through the glycolytic pathway to pyruvate, producing ATP, NADH, water, and protons.
The extrusion of protons into the surrounding medium causes a rapid increase in ECAR. This glucose-induced response is reported as the rate of glycolysis under basal conditions. The second injection is oligomycin, an ATP synthase inhibitor. Oligomycin inhibits mitochondrial ATP production, and shifts the energy production to glycolysis, with the subsequent increase in ECAR revealing the cellular maximum glycolytic capacity.
The final injection is 2-deoxy-glucose (2-DG), a glucose analog, that inhibits glycolysis through competitive binding to glucose hexokinase, the first enzyme in the glycolytic pathway. The resulting decrease in ECAR confirms that the ECAR produced in the experiment is due to glycolysis. The difference between glycolytic capacity and glycolysis rate defines glycolytic reserve. ECAR, prior to glucose injection, is referred to as nonglycolytic acidification; caused by processes in the cell other than glycolysis.
Agilent Seahorse XF Glycolysis Stress Test Kit User Guide
Introduction
Agilent Seahorse XF Glycolysis Stress T
Figure 1 Agilent Seahorse XF Glycolysis Stress Test profile of the key parameters of glycolytic function. Sequential compound injections measure glycolysis, glycolytic capacity, and allow calculation of glycolytic reserve and nonglycolytic acidification.
Figure 2 Agilent Seahorse XF Glycolysis Stress Test Modulators of Glycolysis. This diagram illustrates a simplified version of glycolysis and the sites of action of the kit components. Glucose fuels glycolysis. Oligomycin inhibits ATP synthase in the mitochondria resulting in an increased dependence on glycolysis. 2-DG is a competitive inhibitor of glucose, and functions to shut down glycolysis.
est Kit User Guide 7
8
Introduction
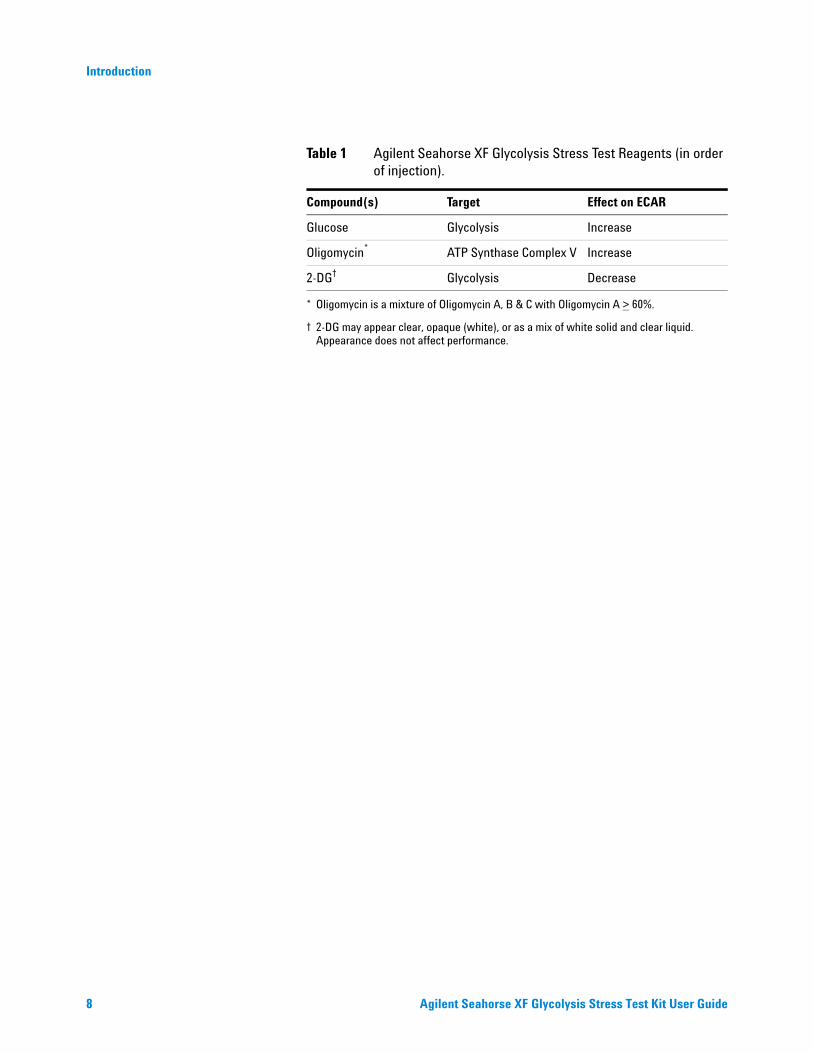
Table 1 Agilent Seahorse XF Glycolysis Stress Test Reagents (in order of injection).
Compound(s) Target Effect on ECAR
Glucose Glycolysis Increase
Oligomycin*
* Oligomycin is a mixture of Oligomycin A, B & C with Oligomycin A > 60%.
ATP Synthase Complex V Increase
2-DG†
† 2-DG may appear clear, opaque (white), or as a mix of white solid and clear liquid. Appearance does not affect performance.
Glycolysis Decrease
Agilent Seahorse XF Glycolysis Stress Test Kit User Guide
Introduction
Glossary
Agilent Seahorse XF Glycolysis Stress T
• Glycolysis: The process of converting glucose to pyruvate. The XF Glycolysis Stress Test presents the measure of glycolysis as the ECAR rate reached by a given cell after the addition of saturating amounts of glucose.
• Glycolytic capacity: This measurement is the maximum ECAR rate reached by a cell following the addition of oligomycin, effectively shutting down oxidative phosphorylation and driving the cell to use glycolysis to its maximum capacity.
• Glycolytic reserve: This measure indicates the capability of a cell to respond to an energetic demand as well as how close the glycolytic function is to the cell’s theoretical maximum.
• Nonglycolytic acidification: This measures other sources of extracellular acidification that are not attributed to glycolysis.
est Kit User Guide 9
10
Introduction
Agilent Seahorse XF Glycolysis Stress Test Kit User Guide
Agilent Seahorse XF Glycolysis Stress Test KitUser Guide
2Kit Information
Kit Contents 12
Kit Storage 13
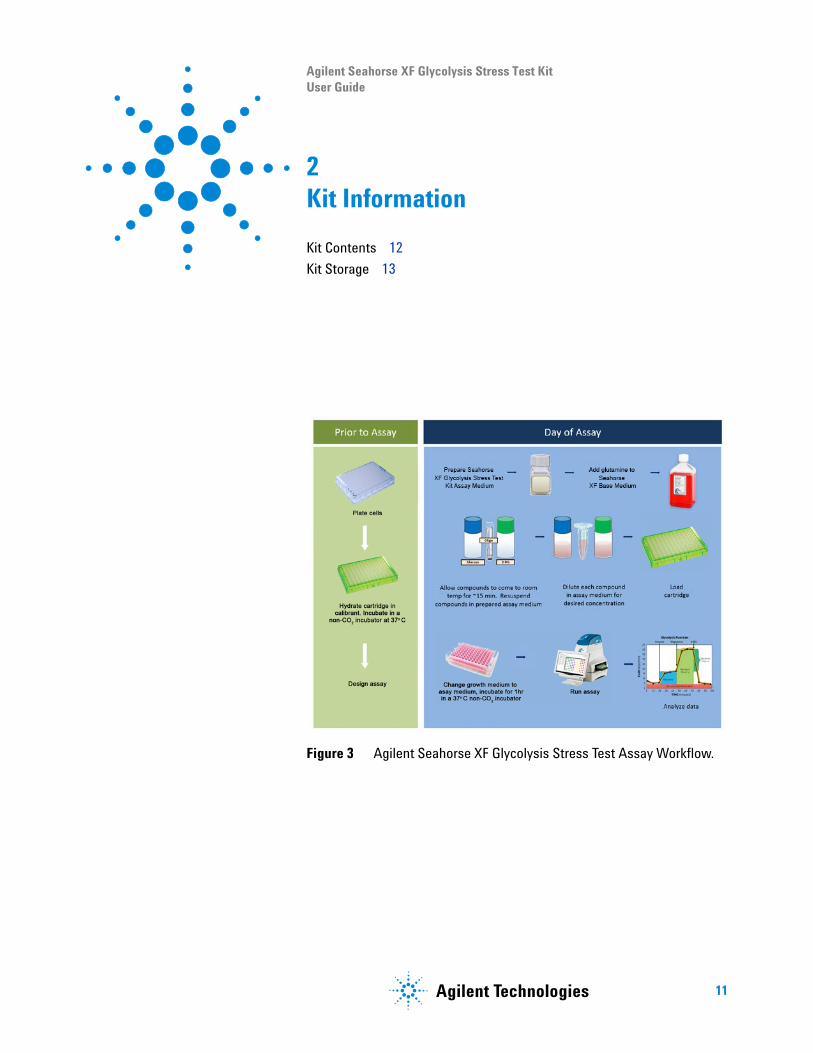
Figure 3 Agilent Seahorse XF Glycolysis Stress Test Assay Workflow.
11Agilent Technologies
Kit Information
Kit Contents
12
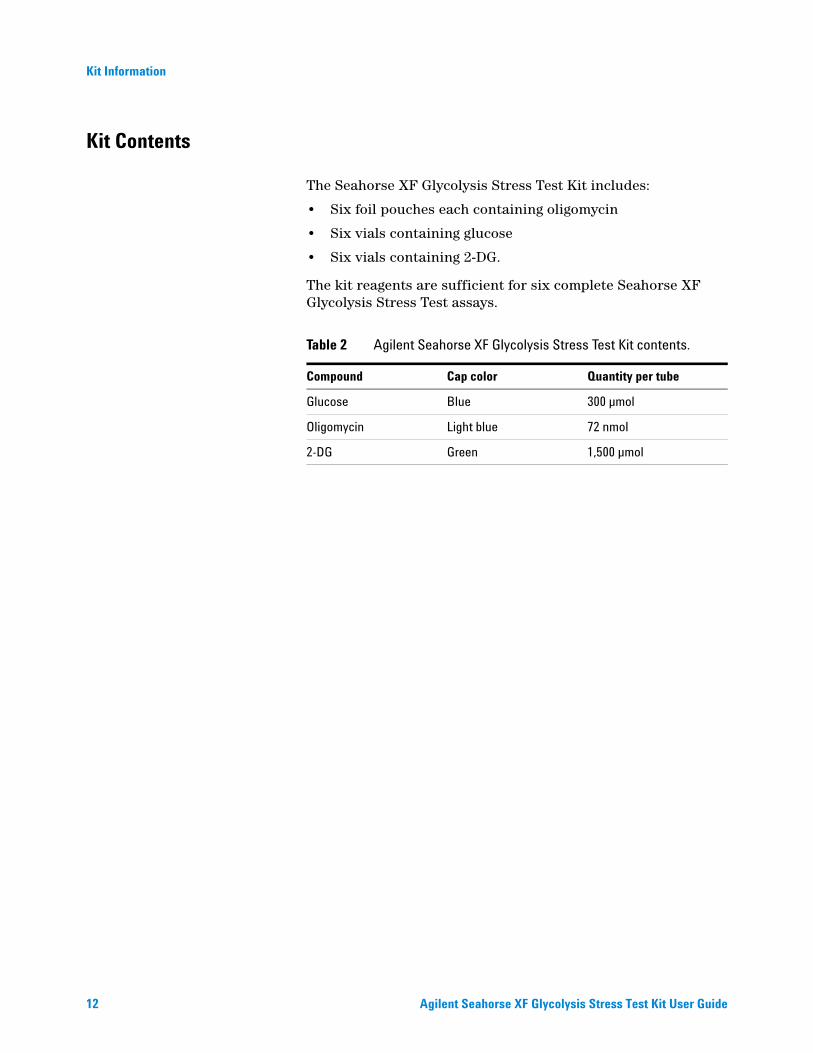
The Seahorse XF Glycolysis Stress Test Kit includes:
• Six foil pouches each containing oligomycin
• Six vials containing glucose
• Six vials containing 2-DG.
The kit reagents are sufficient for six complete Seahorse XF Glycolysis Stress Test assays.
Table 2 Agilent Seahorse XF Glycolysis Stress Test Kit contents.
Compound Cap color Quantity per tube
Glucose Blue 300 µmol
Oligomycin Light blue 72 nmol
2-DG Green 1,500 µmol
Agilent Seahorse XF Glycolysis Stress Test Kit User Guide
Kit Information
Kit Storage
Agilent Seahorse XF Glycolysis Stress T
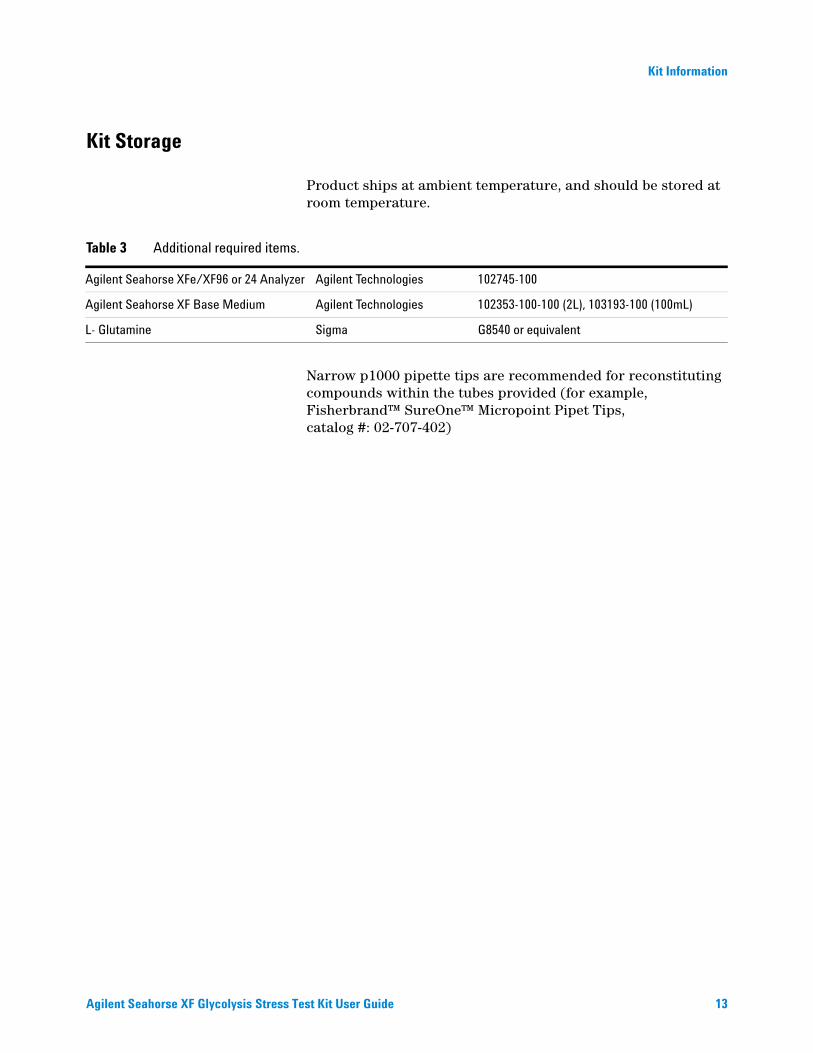
Product ships at ambient temperature, and should be stored at room temperature.
Table 3 Additional required items.
Agilent Seahorse XFe/XF96 or 24 Analyzer Agilent Technologies 102745-100
Agilent Seahorse XF Base Medium Agilent Technologies 102353-100-100 (2L), 103193-100 (100mL)
L- Glutamine Sigma G8540 or equivalent
Narrow p1000 pipette tips are recommended for reconstituting compounds within the tubes provided (for example, Fisherbrand™ SureOne™ Micropoint Pipet Tips, catalog #: 02-707-402)
est Kit User Guide 13

14
Kit Information
Agilent Seahorse XF Glycolysis Stress Test Kit User Guide
Agilent Seahorse XF Glycolysis Stress Test KitUser Guide
3Assay
Day Prior to Assay 16
Day of Assay 17
Data Analysis 22
15Agilent Technologies
Assay
Day Prior to Assay
16
1 Turn on the Seahorse XFe/XF Analyzer, and let it warm up to stabilize.
2 Plate cells at a previously determined density in the Seahorse XF Microplate using the appropriate cell culture growth medium. (Refer to Basic Procedure: Seeding Cells in Seahorse XF Culture Microplates available at www.agilent.com/en-us/products/cell-analysis-(seahorse)/seahorse-analyzers/seahorse-xfp-analyzer/basic-procedures-to-run-an-xfp-assay).
3 Hydrate a sensor cartridge in Seahorse XF Calibrant at 37 °C in a non-CO2 incubator overnight. (Refer to Basic Procedure: Hydrating the Sensor Cartridge available at www.agilent.com/en-us/products/cell-analysis-(seahorse)/seahorse-analyzers/seahorse-xfp-analyzer/basic-procedures-to-run-an-xfp-assay).
4 Design experiment in Wave. Visit www.agilent.com/en-us/support/cell-analysis-(seahorse)/seahorse-xf-software.
Agilent Seahorse XF Glycolysis Stress Test Kit User Guide
Assay
Day of Assay
Prepare assay medium
Agilent Seahorse XF Glycolysis Stress T
1 Prepare the assay medium by supplementing Seahorse XF Base Medium. Agilent Seahorse recommends 1 mM glutamine, as a starting point; however, desired medium composition can be varied depending on cell type or in vitro culture conditions.
2 Warm the assay medium to 37 °C.
3 Adjust the pH to 7.4 with 0.1 N NaOH (Note: Agilent Seahorse recommends sterile filtration following pH adjustment).
4 Keep at 37 °C until ready to use.
Prepare stock compounds
Use compounds the same day they are reconstituted. Do not refreeze.
NOTEDiscard any remaining compound.1 The Seahorse XF Glycolysis Stress Test Kit includes:
• Six foil pouches each containing oligomycin
• Six vials containing glucose
• Six vials containing 2-DG
The kit reagents are sufficient for six complete XF Glycolysis Stress Test assays in a 96 or 24-well Seahorse XF Cell Culture Microplate.
2 Open a foil pouch containing oligomycin (light blue cap) and remove one vial containing glucose (blue cap) and one vial containing 2-DG (green cap) from the kit box.
3 Using a p1000 pipette, resuspend each component with prepared assay medium in volumes described in Table 4 on page 18. Gently pipette up and down (~10 times) to solubilize the compounds. Vortex the 2-DG to ensure that it goes into solution.
est Kit User Guide 17
18
Assay
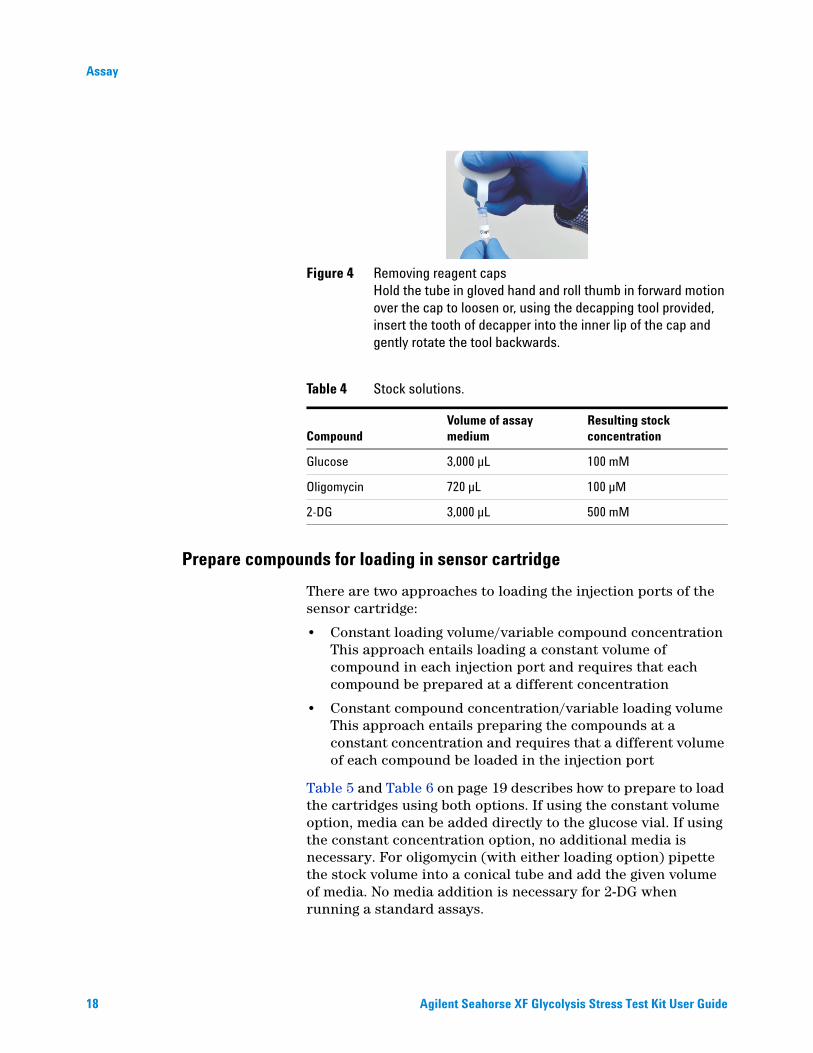
Figure 4 Removing reagent capsHold the tube in gloved hand and roll thumb in forward motion over the cap to loosen or, using the decapping tool provided, insert the tooth of decapper into the inner lip of the cap and gently rotate the tool backwards.
Table 4 Stock solutions.
Compound
Volume of assay medium
Resulting stock concentration
Glucose 3,000 µL 100 mM
Oligomycin 720 µL 100 µM
2-DG 3,000 µL 500 mM
Prepare compounds for loading in sensor cartridge
There are two approaches to loading the injection ports of the sensor cartridge:
• Constant loading volume/variable compound concentrationThis approach entails loading a constant volume of compound in each injection port and requires that each compound be prepared at a different concentration
• Constant compound concentration/variable loading volumeThis approach entails preparing the compounds at a constant concentration and requires that a different volume of each compound be loaded in the injection port
Table 5 and Table 6 on page 19 describes how to prepare to load the cartridges using both options. If using the constant volume option, media can be added directly to the glucose vial. If using the constant concentration option, no additional media is necessary. For oligomycin (with either loading option) pipette the stock volume into a conical tube and add the given volume of media. No media addition is necessary for 2-DG when running a standard assays.
Agilent Seahorse XF Glycolysis Stress Test Kit User Guide
Assay
Agilent Seahorse XF Glycolysis Stress T
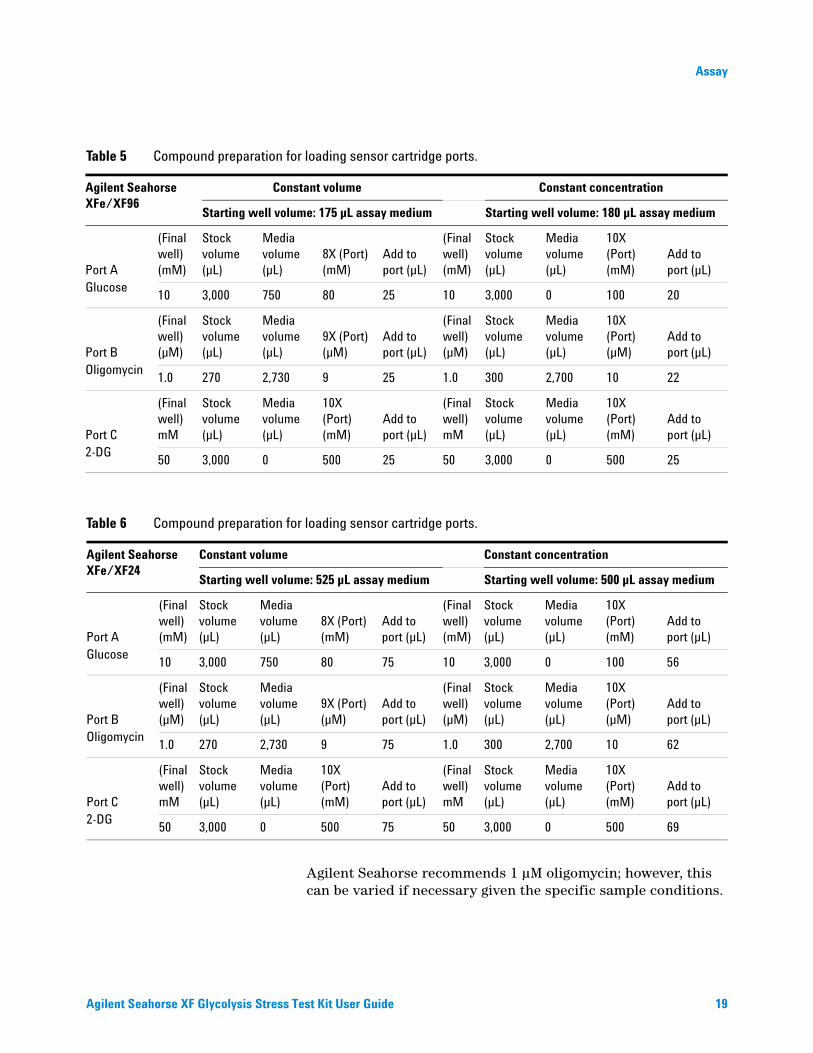
Table 5 Compound preparation for loading sensor cartridge ports.
Agilent Seahorse XFe/XF96
Constant volume Constant concentration
Starting well volume: 175 µL assay medium Starting well volume: 180 µL assay medium
Port AGlucose
(Final well) (mM)
Stock volume (µL)
Media volume (µL)
8X (Port) (mM)
Add to port (µL)
(Final well) (mM)
Stock volume (µL)
Media volume (µL)
10X (Port) (mM)
Add to port (µL)
10 3,000 750 80 25 10 3,000 0 100 20
Port BOligomycin
(Final well) (µM)
Stock volume (µL)
Media volume (µL)
9X (Port) (µM)
Add to port (µL)
(Final well) (µM)
Stock volume (µL)
Media volume (µL)
10X (Port) (µM)
Add to port (µL)
1.0 270 2,730 9 25 1.0 300 2,700 10 22
Port C2-DG
(Final well) mM
Stock volume (µL)
Media volume (µL)
10X (Port) (mM)
Add to port (µL)
(Final well) mM
Stock volume (µL)
Media volume (µL)
10X (Port) (mM)
Add to port (µL)
50 3,000 0 500 25 50 3,000 0 500 25
Table 6 Compound preparation for loading sensor cartridge ports.
Agilent Seahorse XFe/XF24
Constant volume Constant concentration
Starting well volume: 525 µL assay medium Starting well volume: 500 µL assay medium
Port AGlucose
(Final well) (mM)
Stock volume (µL)
Media volume (µL)
8X (Port) (mM)
Add to port (µL)
(Final well) (mM)
Stock volume (µL)
Media volume (µL)
10X (Port) (mM)
Add to port (µL)
10 3,000 750 80 75 10 3,000 0 100 56
Port BOligomycin
(Final well) (µM)
Stock volume (µL)
Media volume (µL)
9X (Port) (µM)
Add to port (µL)
(Final well) (µM)
Stock volume (µL)
Media volume (µL)
10X (Port) (µM)
Add to port (µL)
1.0 270 2,730 9 75 1.0 300 2,700 10 62
Port C2-DG
(Final well) mM
Stock volume (µL)
Media volume (µL)
10X (Port) (mM)
Add to port (µL)
(Final well) mM
Stock volume (µL)
Media volume (µL)
10X (Port) (mM)
Add to port (µL)
50 3,000 0 500 75 50 3,000 0 500 69
Agilent Seahorse recommends 1 µM oligomycin; however, this can be varied if necessary given the specific sample conditions.
est Kit User Guide 19
Assay
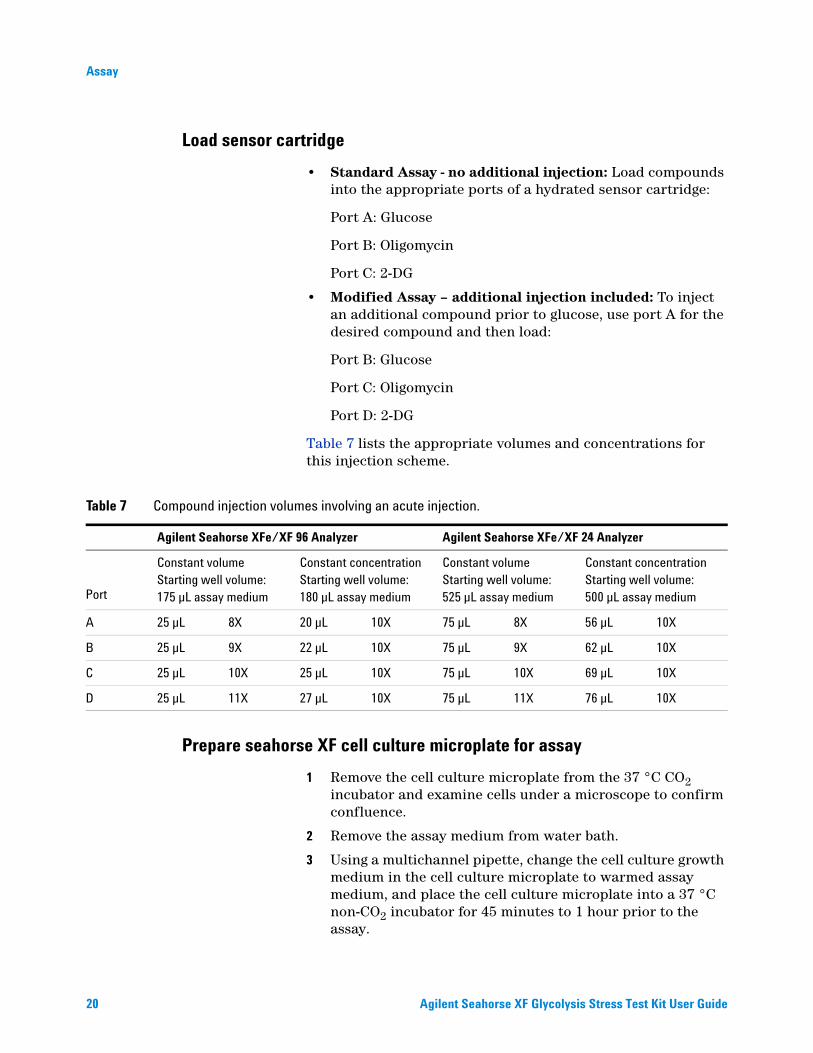
Load sensor cartridge
20
• Standard Assay - no additional injection: Load compounds into the appropriate ports of a hydrated sensor cartridge:
Port A: Glucose
Port B: Oligomycin
Port C: 2-DG
• Modified Assay – additional injection included: To inject an additional compound prior to glucose, use port A for the desired compound and then load:
Port B: Glucose
Port C: Oligomycin
Port D: 2-DG
Table 7 lists the appropriate volumes and concentrations for this injection scheme.
Prepare seahorse XF cell culture microplate for assay
Table 7 Compound injection volumes involving an acute injection.
Agilent Seahorse XFe/XF 96 Analyzer Agilent Seahorse XFe/XF 24 Analyzer
Port
Constant volumeStarting well volume:175 µL assay medium
Constant concentrationStarting well volume:180 µL assay medium
Constant volumeStarting well volume:525 µL assay medium
Constant concentrationStarting well volume:500 µL assay medium
A 25 µL 8X 20 µL 10X 75 µL 8X 56 µL 10X
B 25 µL 9X 22 µL 10X 75 µL 9X 62 µL 10X
C 25 µL 10X 25 µL 10X 75 µL 10X 69 µL 10X
D 25 µL 11X 27 µL 10X 75 µL 11X 76 µL 10X
1 Remove the cell culture microplate from the 37 °C CO2 incubator and examine cells under a microscope to confirm confluence.
2 Remove the assay medium from water bath.
3 Using a multichannel pipette, change the cell culture growth medium in the cell culture microplate to warmed assay medium, and place the cell culture microplate into a 37 °C non-CO2 incubator for 45 minutes to 1 hour prior to the assay.
Agilent Seahorse XF Glycolysis Stress Test Kit User Guide
Assay
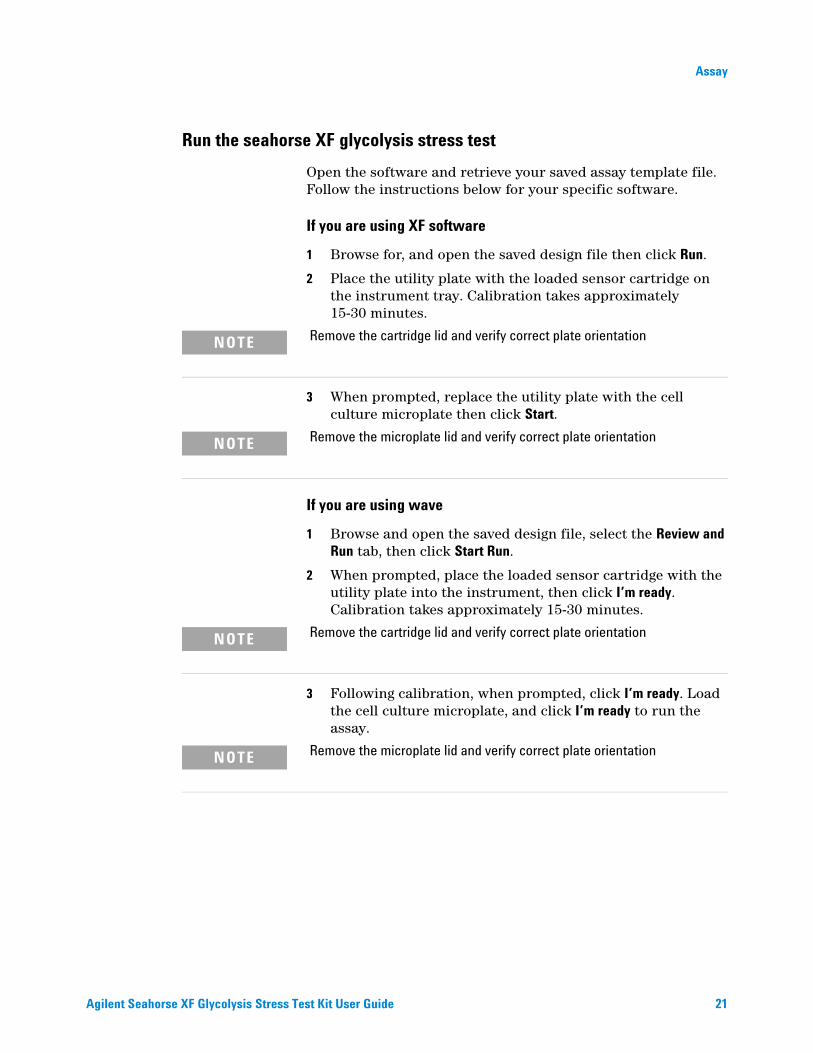
Run the seahorse XF glycolysis stress test
Agilent Seahorse XF Glycolysis Stress T
Open the software and retrieve your saved assay template file. Follow the instructions below for your specific software.
If you are using XF software
1 Browse for, and open the saved design file then click Run.
2 Place the utility plate with the loaded sensor cartridge on the instrument tray. Calibration takes approximately 15-30 minutes.
Remove the cartridge lid and verify correct plate orientation
NOTE3 When prompted, replace the utility plate with the cell culture microplate then click Start.
Remove the microplate lid and verify correct plate orientation
NOTEIf you are using wave
1 Browse and open the saved design file, select the Review and Run tab, then click Start Run.
2 When prompted, place the loaded sensor cartridge with the utility plate into the instrument, then click I’m ready. Calibration takes approximately 15-30 minutes.
Remove the cartridge lid and verify correct plate orientation
NOTE3 Following calibration, when prompted, click I’m ready. Load the cell culture microplate, and click I’m ready to run the assay.
Remove the microplate lid and verify correct plate orientation
NOTEest Kit User Guide 21
Assay
Data Analysis
22
The Seahorse XF Glycolysis Stress Test Report Generator automatically calculates the Seahorse XF Glycolysis Stress Test parameters from the Wave data that has been exported to Excel. The Seahorse XF Stress Test Report Generator can be used with either a standard or modified stress test protocol, and provides a convenient, customizable, one-page assay summary.
The Seahorse XF Report Generator can be installed either alongside Wave or directly from the Seahorse Bioscience website. Visit www.agilent.com/en-us/support/cell-analysis-(seahorse)/seahorse-xf-report-generators to learn more about the Seahorse XF Stress Test Report Generators and download the User Guide.
Agilent Seahorse XF Glycolysis Stress Test Kit User Guide

Agilent Technologies
© Agilent Technologies, Inc.
Printed in USA, March 2017Revision C0
For Research Use Only.
Not for use in diagnostic procedures.*103020-400*
103020-400