section 06: axis drive systems - fadalcnc.com...192 section 06: axis drive systems march 2003 fadal...
TRANSCRIPT

Fadal Maintenance Manual
Section 06: Axis Drive Systems
Axis Drive Systems
DANGER! Hazardous voltages in this enclosure can kill. Use extreme caution when working in this area!
Amplifier ChassisOperation
All of the amplifier chassis that Fadal uses have the same basic operation.
The inputs to the chassis consist of Power input, which is either 86 VAC 3phase or 120 VAC single phase, for DC machine and 230 VAC 3 phase, for ACmachines, 120 VAC Fan (1100-1 TB2-1 & TB2-2) and a Control Signal 120VAC (1100-1 TB1-8 & TB1-9). The Fan input is a 120 VAC to run the fans onthe chassis and will be on whenever the machine is powered up. This input isfused on the 1100-1 Power Distribution Board with F23. The Control Signal is120 VAC that activates the chassis’ solid-state relays to allow the Power inputto flow to the Bridge Rectifiers to convert the AC input to DC voltage forAmplifier power. This control signal comes from the 1100-1 TB1-8 and TB1-9(this is the E-stop circuit amplifier controller enable signal from K2). From therectifiers, the voltage is filtered by the large blue capacitor or bank of capacitorswith a bleeder resistor. On the AC Brushless amplifier chassis, the Regen Regulator or VoltageComparator and a regen resistor provide the motor braking. The AC amplifierand chassis operate similar to the spindle drive. This circuit is connected to theDC busbus for the amplifier power and if the busbus power exceeds 400 or 420Volts DC, the regen circuit turns on and dumps the excess power into the regenresistor.
The amplifier chassis bus voltage is measured across the blue capacitor orbank of capacitors and should about 120 VDC for 3 phase input DC amps, 160VDC for single phase input and 320 VDC for AC amps.
!
March 2003 Section 06: Axis Drive Systems 185

Fadal Maintenance Manual
Troubleshooting theAmplifier Chassis
If the amplifier chassis bus voltage is too low or zero, then check:
1. The power voltage input.2. The control voltage input.3. The fuses on the inputs to the chassis.4. Disconnect the amplifiers (caution, do not allow the wires to touch any
metal) and measure the bus voltage. If the voltage is good then one of the amplifiers is pulling the voltage down.
5. The solid state relays (see instructions).6. The bridge rectifier (see instructions).7. The capacitor(s).
If the AC Brushless chassis is not braking (stopping) the axis motors:1. Check the regen resistor2. Check the wire connections.3. Replace the Regen regulator or voltage comparator.
Testing Instructions:
All the measurements performed in this instruction will be using the black lead(negative lead) in the common input. The red lead (positive lead) is the Volt,Ohm, Diode input.
Note: All readings are approximate.
Solid State Relay With the relay disconnected from the circuit and the multimeter set to the Diodeposition, the contact side will read 6 to 8 Megohms and the control side willread an open, or OL on the meter, with the leads measuring one way. Swap theleads and about 1.5 Megohms will be read.
Check the circuit and verify that the control input is about 120 VAC and thencheck the output side, which connects to the bridge rectifier for the 3 phasepower voltage. Both readings will be approximately the same.
Bridge Rectifier The rectifiers have two AC inputs, and two DC outputs (+DC and –DC). They aremarked by the terminals or they have a cutoff corner by the +DC output. Withthe rectifier removed from the circuit and the multimeter set to read Ohms,place the black lead on the +DC and the red lead on the AC input or the blacklead on the AC input and the red lead on the –DC. The meter will read 1 to 2Megohms. With the Red lead on the +DC and the black lead on the AC input orthe black lead on the -DC and the red lead on the AC input, an open will beread.
186 Section 06: Axis Drive Systems March 2003

Fadal Maintenance Manual
The next three pages have the wiring diagrams for the chassis that are installedin the Fadal VMCs.
March 2003 Section 06: Axis Drive Systems 187

Fadal Maintenance Manual
AC BrushlessChassis Diagram
Location Description Manufacturer Mfg. Part #
Fuse A,B,C Fast acting, 30 A, 600 VAC Dimension (13/32” x 1 ½”)
Littlefuse KLK30
Fuse 1,2,3,4,5 Fast acting, 20 A, 600 VACDimension (13/32”x1½”)
Littlefuse KLK20
C10,11,12 .1 µ F,1000 V 20% ceramiccapacitor
Cera-mite 10GAP10
C1,2,3,4,5 .330 µ F,450 V electrolyticcapacitor
Illinois Capacitor
337LBA450M2EF
SSR1, SSR2 solid state relay Gordos G240A45
DB1,DB2,DB3 35A, 400V bridge rectifier General Instruments
BBPC35-04
R1 20 K Ω 10W bleeder resistor Various 20K,5%
R2 30 Ω 50W dumping resistor Dale RH5030
188 Section 06: Axis Drive Systems March 2003

Fadal Maintenance Manual
March 2003 Section 06: Axis Drive Systems 189

Fadal Maintenance Manual
Amplifiers
Both DC and AC axis drive amplifiers are Pulse Width Modulation (PWM) type. PWM is a method to output high current efficiently.
For the DC drives this is achieved by turning the power transistor on to fullvoltage output and then turning them off for no voltage output. The width of thepulse will determine the output average current that drives the motor. Theprocess is done very fast to eliminate audible noise but the speed creates moreelectrical noise. When the amount of time the pulse is turned on is increasedthe average current is increased. If the time that the pulse is turned on isdecreased the average current is decreased. The width of each pulse is thesame so that a DC output is obtained. The output current is filtered to removethe electrical noise. Then the signal is outputted to the motor, through chokecoils on some chassis. A DC tachometer is used to monitor the motor velocity.The tach outputs a DC voltage to represent a speed in RPMs that is 7 VDC per1000 RPM. A resolver is used to feedback the position. The resolver has twoinput signals generated by the Clock Board, they are called SIN and COS andare 10 VAC peak to peak (about 3.54 VAC on a meter). The resolver uses thesetwo to generate a third signal. Resolver signal is 5 VAC peak to peak (about1.77 VAC on a meter). Each Axis Controller board receives the resolver signalat J2 bullet connector. This voltage can be checked at this point. The voltagemust very close or there may be a problem with it. The controller compares theSIN and resolver signals to determine the position.
For the AC drives, this is achieved by turning the power transistors on to fullvoltage output and then turning them off for no voltage output. The width of thepulse will determine the output average current that drives the motor.
By varying the pulse slightly from pulse to pulse and using both positive andnegative voltage an AC signal can be obtained. The process is done on threelines, each 120 degrees out of phase with each other. The axis motors arethree phase motors. The frequency of the three phase input signal determinesthe RPM of the motor, the current determines the torque and the phasingdetermines the direction of rotation. An incremental encoder provides positioninformation from the motor. It operates with light source through a focus lensthrough rotating glass disk with precision etched lines through a light mask totwo photoelectric cells offset 90 degrees from each other. This creates 5 voltsquare waves A,/A,B,/B. A and /A are 180 degrees out of phase as well as Band /B are 180 degrees out of phase. A and B are 90 degrees out of phase, bycounting the pulses the position can be determined and the direction isdetermined by is A or B the first signal. This information is sent to the controllerboard. The 3 phase input from the hall effect (U,V,W) returns the rotor positionfeedback for the amplifier to compensate the magnetic fields to optimize the
190 Section 06: Axis Drive Systems March 2003

Fadal Maintenance Manual
motor operation. The motor has a temperature sensor to detect overtemperature in the motor, and information is returned in the hall effect cable.The amplifier sends a Absolute Current signal to J3 on the controller board.This signal is 1 volt for every 4 amperes output by the amplifier. The amplifierprovides test points, they are: Signal – is a 1:2 output of the differential signal =& - input, Tach – a scaling output of 4 volts per 1000 RPM created by the ampfrom the encoder information, ABS – the current output to all 3 phases. Scalingis 1 volt per 4 amperes.
Both amps have a output of 10 VDC used for the fault signal in the E-stopcircuit. They all also have inputs from the controller commanding speed anddirection.
DC Axis Drive Systems
Note: Set the master feedrate clock before beginning this procedure. The PositionLoop Gain and Master Feedrate Clock are interrelated.
DC AmplifierAdjustment
1) Enter the following program:
a. X-4. Y-4. Z-4. G1 F150. M49,M91.b. X4.Y4.Z4. c. M99P1
2) Press Auto, to start the program running.
3) At the amplifier to be adjusted, use a small screwdriver and turn the SIG2potentiometer until the monitor’s display of the appropriate axis reads thefollowing error: 595 - inch ballscrew / 302 - metric ballscrew.
4) Press the SLIDE HOLD button on the keypad and adjust the balance of theamplifier to read between 0 - 1.
5) Press the START button on the keypad and the program will start again.Verify that the following error is still 595 or 302.
6) Press the SLIDE HOLD key to stop the machine. Press the MANUAL key andthen type SETCS and HO, to send the machine home. Adjustment of theamplifier is complete. Repeat the procedure for all axes.
March 2003 Section 06: Axis Drive Systems 191

Fadal Maintenance Manual
Axis SoftwareVersion AC0017-5for AC Drive VMCs
To improve the floor finish using G8 command, the default Contouring Gain hasbeen changed. The Position Loop Gain #5911 program now requires differentamplifier settings than previous axis software. VMC 6535 and 8535 also areset at different values from the other machines.
The Rapid Gain for the VMC6535 and 8535 is different from other 900 IPMmachines. The Following Error will be around 3200 for X and Y axes in G0.
Procedure forSetting Loop Gain
This procedure has been changed from earlier versions and is applicable whenAC0017-5 is installed on the Controller Cards. While amplifier adjustments maynot require any changes when removing earlier software and installingAC0017, the adjustments should be verified.
The Balance program #5811 is not changed, and should be as follows:
N1 L100N2 X-6. Y-6. Z-6. F150. G1 G91N3 X6. Y6. Z6.N4 M17N5 M30N6 M49 M91 (M91 sets the Normal Gain, and is important with AC0017-5)N7 L101.1N8 M2
192 Section 06: Axis Drive Systems March 2003

Fadal Maintenance Manual
Following the procedure for POSITION LOOP GAIN, please note the changesbelow. The Following Error displayed will not be the same as earlier versions ofAC axis software when the AXIS DISPLAY Parameter in SETP is set to ERR.
M91 can be used to restore DEFAULT gain. This is identical to M90P50.
M92 can be used to increase gain for crisper performance. This is identical toM90P150.
M90Pxxx can be used to MODIFY gain where xxx represents the GAINMODIFICATION FACTOR. The value used may range from 50 to 200, and ismodal until POWER OFF, or until changed with another M90Pxxx, M91, or M92command. This allows the user to freely select any appropriate gain value, andrestore to the DEFAULT gain with M91, assuring flexibility over the performanceof the machine.
When M91 is active then Following Error:
AC Drive Machines with INCH Ballscrews: VMC 2016L, 3016L, 6030, 8030
600
AC Drive Machines with METRIC Ballscrews: VMC EMC, 2016L, 3016L, 4020, 4020A,
5020, 3020, 4525, 6535, 8535
600
AC Drive Machines with METRIC Ballscrews:VMC TRM
1200
AC Drive Rotary Tables-A-Axis 680
AC Drive Rotary Tables-A-Axis 680
March 2003 Section 06: Axis Drive Systems 193

Fadal Maintenance Manual
Setting Cold StartPosition
Cold start the VMC. The axis motors are now at their index marks. The VMCcold start indicators may be misaligned. The following procedure will measurethe offset value.
X-Axis1) Use a tape measure to measure the length of the table. Mark the center
point with a marker or pen. Measure the table again, except, this time startmeasuring from the other end of the table. Mark that point.
2) Remove the cover from the X axis motor. Loosen the three screws that aresecuring the resolver.
3) Put a small drill into the spindle and jog the head down until the drill isapproximately .100”[2.54mm] above the table. Move the X axis in eitherdirection, by turning the resolver, until the drill is centered between the twomarks that were made in step #1.
4) Tighten the three screws on the resolver and replace the motor cover.
Y-Axis 1) Press the MANUAL button until ENTER NEXT COMMAND is displayed. Type
Ho, press the ENTER button, and then press the START button. This willsend the machine back to the original cold start position.
2) Put a .0005”[.001mm] indicator into a tool holder and insert the tool holderinto the spindle. Jog the Z axis and the Y axis until the indicator is centeredinside the center T-SLOT, while rotating the tool holder.
3) Remove the cover from the Y axis motor and loosen the three screws thatare securing the resolver.
4) Turn the resolver on the Y axis as needed, to position the indicator so that itreads the same value on both sides of the T-SLOT, while rotating the toolholder.
5) Tighten the three screws on the resolver and replace the motor cover.
Z-AxisRefer to the Automatic Tool Changers Section for procedures on setting the Zaxis cold start.
Replacing A ServoAmplifier
1) Power off the VMC.
2) Lock out/tag out the machine.
194 Section 06: Axis Drive Systems March 2003

Fadal Maintenance Manual
3) Remove the orange connector or disconnect signal wires on the front of thefaulty card.
4) Disconnect the power and motor wires.
5) Using a long phillips screw driver, loosen the two screws securing theamplifier to the chassis. Slide the amp to the other side and remove.
6) Replace the amplifier.
7) Reconnect the orange connector or signal wires on the front of the newcard making sure that they are installed on the correct terminals.
8) Connect the Power and Motor wires, insuring their correct position.
9) Turn the Loop Gain and Current Limit potentiometers fully clockwise.
A axis amplifier slot #1 (far left when installed) X axis amplifier slot #2 Y axis amplifier slot #3 Z axis amplifier slot #4After replacing one or more of the servo amplifiers or if an axis motor has beenreplaced, you must adjust the position loop gain.
Setting Gain For The1010-5
Using software to set the gain enables the user to change gain setting on thefly in their part program.
We recommend that the gain be set to normal at all times in the SV and if highgain is desired use the M codes described below in the part program.
M90 = Default to gain set in the SVM90 P# = Programmable gainM91 = Normal gainM92 = Intermediate gainM93 = Maximum gain
Verify The GainSetting In The SV
1) Return the machine to its COLD START position.
2) At the prompt “ENTER NEXT COMMAND”, type SV, which will start thesurvey program.
3) Next select the X axis, and when the menu appears select #2 from themenu. This will read the current settings on the axis controller.
4) After reading the axis controller settings, the CNC will display the currentgain setting. Menu selection #6 should read “CURRENTLY = NORMAL.”
March 2003 Section 06: Axis Drive Systems 195

Fadal Maintenance Manual
5) If the gain setting is not set to NORMAL select #6 from the menu and thenpress 0 to select normal gain. After selecting the gain, press selection #3 towrite the setting back to the axis controller.
IMPORTANTChanges to the setting must be written back to the axis controller or theywill not be permanent.
6) Once the X axis has been verified do the same for all the other axes.
7) Verify that all axes have the same gain settings.
Troubleshooting DCAmplifiers
If errors occur or an axis is inoperative, go to the Troubleshooting Section. Flowchart number 4 is for axis control problems.
AC Drive Systems
Information andConnections
MotorCont. Torque @ 20 deg C . . . . . . . . . . . 75 in.-lbs. (.864 newtons)Peak Torque . . . . . . . . . . . . . . . . . . . . . 240 in.-lbs. (2.77 newtons)Resistance . . . . . . . . . . . . . . . . . . . . . . 1.9 ohmsInductance . . . . . . . . . . . . . . . . . . . . . . 10.0 mHBack EMF . . . . . . . . . . . . . . . . . . . . . . . 78 V/k RPMWeight . . . . . . . . . . . . . . . . . . . . . . . . . 39 lbs. (17.69 kg)Motor leads. . . . . . . . . . . . . . . . . . . . . . ØR red, ØS blue, ØT blackEncoder . . . . . . . . . . . . . . . . . . . . . . . . Heidenhain ROD426 encoder . . . . . . . . . . . . . . . . . . . . . . . . . . . . . . 8192 lines (32,768 counts) . . . . . . . . . . . . . . . . . . . . . . . . . . . . . . 14 pin connectorHall Signals and Temp Switch . . . . . . . . 10 pin connector
Amplifier ChassisWago connector on bottom . . . . . . . . . . (L1,L2,L3, 4,5 (120VAC for SSR), 6,7
(120VAC fans)Amplifier sequence . . . . . . . . . . . . . . . . X, Y, Z, A, B (from top)Fuse sequence on power supply . . . . . . X, Y, Z, A, B (from front to back)
!
196 Section 06: Axis Drive Systems March 2003

Fadal Maintenance Manual
AmplifierSupply voltage. . . . . . . . . . . . . . . . . . . .230 VAC 3phaseBus voltage . . . . . . . . . . . . . . . . . . . . . .325 VDCCurrent . . . . . . . . . . . . . . . . . . . . . . . . .30A peak (3 sec.) 19A continuous. . . . . . . . . . . . . . . . . . . . . . . . . . . . . . .LSECB trips for anything above 9A for
longer than 3 sec.Bus Capacitor . . . . . . . . . . . . . . . . . . . .1500 uF 450 VRegen (if equipped):. . . . . . . . . . . . . . . . . . . . . . . . . . . . . . .On 400 VDC. . . . . . . . . . . . . . . . . . . . . . . . . . . . . . .Off 350 VDC. . . . . . . . . . . . . . . . . . . . . . . . . . . . . . .Fault 450 VDC
Load Percentage to Amperage Conversion100% = 19. Amps50% = 9.5 Amps10% = 1.9 Amps5% = .95 Amps1% = .19 Amps
Physical Layout
Figure 6-1 Glentek Amplifier
*For the TRM, test points are replaced with RJ45 connector for communication.
** There is no Comp Pot on the TRM amp. 3 or 4 pots: Not all amplifiers have Loop Gain PotLoop Gain single turn pot CW to increase gainBalance 12 turn potSignal Gain 12 turn pot CW to increase gainCompensation 12 turn pot CCW to increase
Three Surface Mount LEDs:Hall Error Red (invalid Hall state or illegal encoder transition)
R S T B+ B- feedbackfrom motor
encoderto 1010 Signals Speed
Command Test Points*
Comp. Pot**
Signal Pot
ResetHallError
EncoderError
IndexMark
Balance Pot
OT OV LSECB HSECB RUN
March 2003 Section 06: Axis Drive Systems 197
Fadal Maintenance Manual
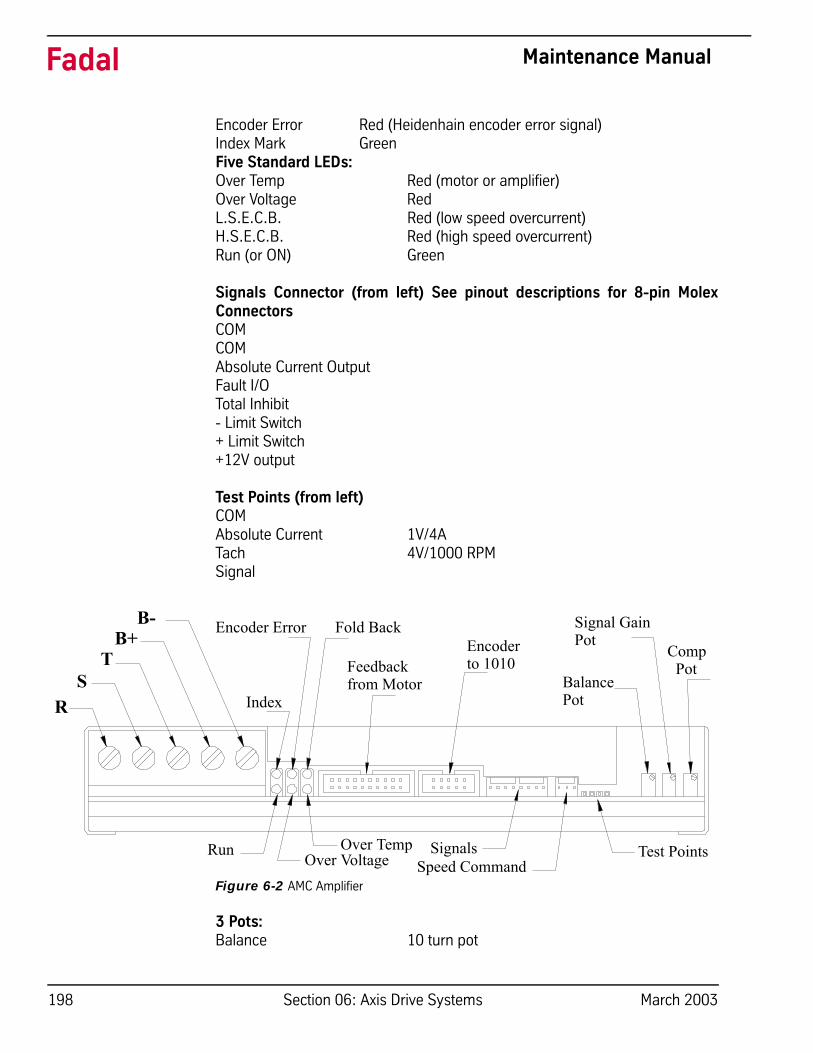
Encoder Error Red (Heidenhain encoder error signal)Index Mark GreenFive Standard LEDs:Over Temp Red (motor or amplifier)Over Voltage RedL.S.E.C.B. Red (low speed overcurrent)H.S.E.C.B. Red (high speed overcurrent)Run (or ON) Green
Signals Connector (from left) See pinout descriptions for 8-pin MolexConnectorsCOMCOMAbsolute Current OutputFault I/OTotal Inhibit- Limit Switch+ Limit Switch+12V output
Test Points (from left)COMAbsolute Current 1V/4ATach 4V/1000 RPMSignal
Figure 6-2 AMC Amplifier
3 Pots:Balance 10 turn pot
RS
TB+
B-
Index
Encoder Error Fold Back
Feedbackfrom Motor
Encoderto 1010
Signal GainPot
BalancePot
CompPot
Run Over VoltageOver Temp Signals
Speed CommandTest Points
198 Section 06: Axis Drive Systems March 2003

Fadal Maintenance Manual
Signal Gain 10 turn potCW to increase sig gainCompensation 10 turn potCCW to increase amp gain6 LEDs:
Top Row:Foldback Red(OC folds back to continuous after 2 secs.)Enc. Error Red(solid red for encoder error;
blinking if amp returns to trap mode)Index Mark Green
Bottom Row:Over Temp Red(motor or amplifier)Over Voltage Red(high speed overcurrent or bus over-
voltage)Run (or ON) Green
Signals Connector (from left) See pinout descriptions for 8-pin Molex ConnectorsCOMCOMAbsolute Current OutputFault I/OTotal Inhibit- Limit Switch+ Limit Switch+12V output
Test Points (from left)COMAbsolute Current 1V/4ATach 4V/1000 RPMSignal
Amplifier PowerConnectors
S. . . . . . . . . . . . . . . . . . . . . . . . . . . . . .white wireT . . . . . . . . . . . . . . . . . . . . . . . . . . . . . .black wireB+. . . . . . . . . . . . . . . . . . . . . . . . . . . . .red wireB- . . . . . . . . . . . . . . . . . . . . . . . . . . . . .black wire
20-pin IDC on amp to1. . . . . . . . . . . . . A+. . . . . . . . . . . . . . .green2. . . . . . . . . . . . . A- . . . . . . . . . . . . . . .red3. . . . . . . . . . . . . +5V. . . . . . . . . . . . . .light blue4. . . . . . . . . . . . . +5V. . . . . . . . . . . . . .light blue5. . . . . . . . . . . . . M+ . . . . . . . . . . . . . .white6. . . . . . . . . . . . . M- . . . . . . . . . . . . . . .orange
March 2003 Section 06: Axis Drive Systems 199

Fadal Maintenance Manual
7 . . . . . . . . . . . . COM. . . . . . . . . . . . . black8 . . . . . . . . . . . . . . . . . . COM . . . . . . . . . . . . .black9 . . . . . . . . . . . . . . . . . . B+. . . . . . . . . . . . . . .brown10 . . . . . . . . . . . . . . . . . B- . . . . . . . . . . . . . . .yellow11 . . . . . . . . . . . . . . . . . ENC.ERR. . . . . . . . . . purple12 . . . . . . . . . . . . . . . . . nc13 . . . . . . . . . . . . . . . . . nc14 . . . . . . . . . . . . . . . . . U. . . . . . . . . . . . . . . .gray15 . . . . . . . . . . . . . . . . . V. . . . . . . . . . . . . . . .tan16 . . . . . . . . . . . . . . . . . W . . . . . . . . . . . . . . .brown17 . . . . . . . . . . . . . . . . . TEMP . . . . . . . . . . . .dark blue18 . . . . . . . . . . . . . . . . . +5V. . . . . . . . . . . . . .pink19 . . . . . . . . . . . . . . . . . COM . . . . . . . . . . . . .black20 . . . . . . . . . . . . . . . . . SHIELD
10-pin IDC on amp to1 . . . . . . . . . . . . . . . . . . A+. . . . . . . . . . . . . . .green2 . . . . . . . . . . . . . . . . . . A- . . . . . . . . . . . . . . .red3 . . . . . . . . . . . . . . . . . . +5V. . . . . . . . . . . . . .blue4 . . . . . . . . . . . . . . . . . . +5V. . . . . . . . . . . . . .blue5 . . . . . . . . . . . . . . . . . . M+ . . . . . . . . . . . . . .white6 . . . . . . . . . . . . . . . . . . M- . . . . . . . . . . . . . . .orange7 . . . . . . . . . . . . . . . . . . COM . . . . . . . . . . . . .black8 . . . . . . . . . . . . . . . . . . COM . . . . . . . . . . . . .black9 . . . . . . . . . . . . . . . . . . B+. . . . . . . . . . . . . . .brown10 . . . . . . . . . . . . . . . . . B- . . . . . . . . . . . . . . .yellow
8-pin Molex on amp1 . . . . . . .+12V . . . . . . . . . . . . . . . . . for Limit switches (unused at this time)2 . . . . . . .+Limit . . . . . . . . . . . . . . . . . . . . to +Limit switch for axis (unused)3 . . . . . . .-Limit. . . . . . . . . . . . . . . . . . . . . .to -Limit switch for axis (unused)4 . . . . . . .Inhibit . . . . . . . . . . . . . . . . . . . . . . . . . . . . . . .unused at this time5 . . . . . . .Fault . . . . . . . . . . . . . to axis fault line (1100-1 TB1 2-5) active low6 . . . . . . .Abs Current . . . . . . . . . . . Absolute current (1V/4A) to J3 on 10107 . . . . . . .Common . . . . . . . . . . . . . . . . . . . . . . . . . . . . . . . for axis fault line8 . . . . . . .Common . . . . . . . . . . . . . . . . . . . . . . . for Limit switches (unused)
3-pin Molex on amp to1 . . . . Command Signal + . . . . red. . . . . . 1010 . . . . J11-1 X&Y J11-2 Z2 . . . . Command Signal - . . . . . black . . . . 1010 . . . . J11-2 X&Y J11-1 Z3 . . . . Shield . . . . . . . . . . . . . . shield. . . . 1010 . . . . J11-3
Test Points:
200 Section 06: Axis Drive Systems March 2003

Fadal Maintenance Manual
• SIGNAL is a 1:2 output of the differential Signal+&- input.• TACH scaling is 4V/1000 RPM.• ABS is the current output to all 3 phases. Scaling is 1V/4A.
It is the peak value (but not showing all the spikes).It is an absolute value; it does not show direction.
• COM is common (logic ground for the above signals).
Features Axis Controller Card 1010-5B/CEncoder feedback (J5)Able to work with scalesJ1 and J2 no longer usedJ3 current sensor (input)J11 differential outputBrushless software labeled AC-______Position Loop Gain adjusted by LED, 25ipm
AC Axis Adjustments Before adjusting any amplifiers, verify that scale cables (if applicable) aredisconnected. If they are not disconnected, power down the machine,disconnect the cables, and then power up the machine.
Potentiometer Adjustments (Axis Amplifier)1) Turn the Loop Gain, or Current, Potentiometer all the way clockwise (a
clicking sound will be heard when the pot has reached the limit).
2) Slowly turn the Compensation Potentiometer counter clockwise until theaxis motor produces a high frequency vibration, then turn thepotentiometer clockwise 1-1/2 turns.
3) To adjust the Gain and Balance, the following program will be used:
N1 M91 M49 G91 F150.N2 X-3.Y-3.Z-3.N3 X3.Y3.Z3.N4 MPP P2
The Signal gain and Balance can be set for either metric or inch pitchballscrews.
Metric1) Use a Multimeter set for VDC. Attach the black lead to the signal - (COM)
and the red lead to the signal +.
2) Start the program and adjust the Signal Gain potentiometer until themultimeter reads 1.470VDC.
March 2003 Section 06: Axis Drive Systems 201

Fadal Maintenance Manual
3) Adjust the balance potentiometer until the multimeter reads 1.470VDC inboth directions.
4) When the above steps have been completed, the monitor will read 302 forthe following error.
5) Repeat steps 1-4 for the remaining axis amplifiers.
Inch 1) Use a Multimeter set for VDC. Attach the black lead to the signal - (COM)
and the red lead to the signal +.
2) Start the program and adjust the Signal Gain potentiometer until themultimeter reads 2.880VDC.
3) Adjust the balance potentiometer until the multimeter reads 2.880VDC inboth directions.
4) When the above steps have been completed, the monitor will read 595 forthe following error.
5) Repeat steps 1-4 for the remaining axis amplifiers.
Note: The following amplifier adjustments are made with the VMC set to INCH.Use the parameters page (SETP) to verify or change modes.
Axis CardAdjustments
Adjusting the amplifiers with the axis cards is done by using the red LightEmitting Diodes (LEDs) while adjusting the potentiometers. In order to use thismethod, the axis cards must have software version AC0003-5 or higher.
Balance1) Press the MANUAL button until the ENTER NEXT COMMAND screen is
displayed.
2) Type DI and press the ENTER button. Type DL, and press the ENTERbutton. This will display the percentage of load, instead of the axis followingerror, in 1% increments. This command prepares the axis card forbalancing the amplifiers.
3) Press the MANUAL button to return to the ENTER NEXT COMMAND mode.Observe the red LED on the axis card. If the light is on or is blinking, theamplifier is not properly balanced.
4) Turn the Balance potentiometer, on the amplifier, until the LED goes out.The slower the light blinks, the closer the amp is to the balance point. If theLED starts blinking faster, the potentiometer is being turned the wrong way.
202 Section 06: Axis Drive Systems March 2003

Fadal Maintenance Manual
Signal Gain1) After the balance has been adjusted, the Signal Gain must be adjusted.
Change the program that was entered on the previous page to read asfollows:
N2 M91 M49 G91 F25.N3 X-2.Y-2.Z-2. G1N4 X2.Y2.Z2.
2) Start the program. With the program running, observe the red LED on theaxis card The red LED should not be on. When the axis changes directionthe LED will come on for a brief interval and go out until the next change ofdirection. Adjust the Signal Gain on the axis amplifier, until the light goesout. If the light goes out in one direction, but not the other, the balance willhave to be adjusted again.
3) Perform the Balance and Signal Gain adjustments on the remaining axes. Ifthe desired feed rate for adjustment purposes is 25 ipm (F25), mm pitchballscrews will have a following error of 50 and Inch pitch ballscrews willhave a following error of 100. Rotary tables will always have a 2000ipmfeed rate for 90:1 ratios and 1000ipm for 180:1 ratio and a 680 followingerror. If the VMC is being adjusted for rotary dies, using a feed rate of 150ipm, the following error for the X,Y, and Z axes is 465. The following errorfor 25 ipm is 78. The A and B axis still use a 2000 ipm feed rate. Thefollowing error is 540.
Troubleshooting ACAmplifiers
If errors occur or an axis is inoperative, refer to the Troubleshooting Section.Flow chart number 4 is for axis control problems.
SV Command The survey command (SV) is a utility that manages the axis compensationdata. Each axis controller card stores the screw compensation, the zero offset,and the servo gain settings. To view or edit data, you must use the SVcommand.
Using SV The previously used SV utility program was replaced in System 98 with a moreadvanced and easier to use editing utility screen. When entering the surveymenu (type SV at the ENTER NEXT COMMAND prompt), the survey menu nowautomatically loads the survey into memory, starting with the default X Axissurvey. If no survey exists, a new empty survey will be created. The survey isthen automatically displayed on the screen in groups of 40 values at a time. Ifmore than 40 values in any given survey exists, there will be an additionaloption located at the bottom of the first column called SURVEY VALUES. Thisoption will allow the user to toggle between Page 1 (the first 40 values) andPage 2 (the remaining values), of the survey. The zero offset and gain optionsare also displayed on the bottom of the first column.
March 2003 Section 06: Axis Drive Systems 203

Fadal Maintenance Manual
Review or ChangeSurvey
To edit any values, the user must move a cursor, defined by an asterisk (*)symbol, around the screen. This cursor may be moved up, down, left, or rightby pressing the U, ENTER, D, BACKSPACE or the L and R keys respectively. Tochange the axis that is currently being displayed, the user must move theselector cursor to the currently selected axis located at the top of the firstcolumn. At this point, the user will be prompted with an ENTER AXIS ID prompt.The user may now type in the desired axis (X, Y, Z, A, or B).
The actual survey values may be altered by moving the selector cursor to thedesired index location and then typing in the corresponding value. The editorwill then place the value in the correct location and will check for errors. Errorswill occur if the difference in the values of two adjacent indexes is greater than9. If errors are found, the brackets around the index value will change fromsquare brackets,[ ], to round brackets, ( ). All of the numerical errors must becorrected before the user is enabled to exit the menu.The menu may be exitedby pressing the MANUAL key, or by selecting another axis in the survey menu.
Two new editing features have been added to help speed up the process ofentering similar index values. The first feature, called the ALL command, isinvoked by pressing the A button while the selector cursor is located on anyindex value. This command will give all of the indexes following the currentlyselected index the same value as that index. If, for example, the last 10 surveyvalues all had the value of 1, the user may type the first 1, move the selectorcursor back up to that value, and press the A button. The last 9 indexes willnow have the same value as the selected index.
The second feature is used if a currently selected index has the same value asthe previous index, then the user may press the space bar to copy the previoussurvey value into the current index. This feature may be used when adjacentindex values have the same value.
Determining the ZeroOffset
Cold start the VMC. With the Zero Offset set to 0, the axis motors are now attheir index marks. The VMC cold start indicators may be misaligned. Thefollowing procedure will measure the offset value.
X-Axis1) Use a tape measure to measure the length of the table, with the end covers
removed. Mark the center point with a marker or pen. Measure the tableagain, except, this time start measuring from the other end of the table.Mark that point.
2) Put a small drill into the spindle and jog the head down until the drill isapproximately .100” (2.54 mm.) above the table. Move the X axis in either
204 Section 06: Axis Drive Systems March 2003

Fadal Maintenance Manual
direction, by turning the resolver, until the drill is centered between the twomarks that were made in step #1.
3) The number on the monitor, in the X axis display, is the offset amount.Record the value on a sheet of paper.
Y-Axis 1) Press the MANUAL button until ENTER NEXT COMMAND is displayed. Type
HO, press the ENTER button, and then press the START button. This willsend the machine back to the cold start position.
2) Put a .0005” indicator into a tool holder and insert the tool holder into thespindle. Jog the Z axis and the Y axis until the indicator is located in thecenter of the T-SLOT of the table.
3) Jog the Y axis as needed to position the indicator so that it reads the samevalue on both sides of the T-SLOT, while rotating the tool holder.
4) Record the value on a sheet of paper.
Z-AxisRefer to Section One of this maintenance manual for procedures on Z axis coldstart.
Changing the ZeroOffset
The zero offset is used for scales and AC drives. The zero offset will move theaxis in 0.0001 of an inch (0.00254mm) increments from the cold start position.To reset the zero offset, follow these steps:
1) In the SV program, move the selector cursor to the Zero Offset Indexposition, and enter the value of 0 (zero).
2) Press Manual to save the survey and exit.
3) Determine the proper offset value:
AC-Drive Systems: Cold Start all 3 axes, and then Jog from the Cold Start position to themeasured position (section 2.2.3). After moving to the measured point, insertthe value, displayed on the monitor, into the SV program at the Zero OffsetIndex selection. When entering offsets, use the following examples as aguideline:
If the position recorded was .0105, enter 105.If the position recorded was -.1350, enter -1350.
Scale Systems:Use the SVT-0081 Encoder Tester (1000 line). Disconnect the scale feedbackcable from the Axis Controller card and connect it to the Encoder Tester.
March 2003 Section 06: Axis Drive Systems 205

Fadal Maintenance Manual
Connect the Encoder Tester to the spindle controller card for 5-volt power. ColdStart the axes, and Jog the axis until the closest green index light is seen.Insert the position value, displayed on the screen, into the SV program at theZero Offset Index selection, and change the sign from + to - or from - to +.
Changing Gain The default gain option may be changed by moving the selecting cursor to thechange gain index. Select either normal, intermediate, or maximum gain.
Saving a Survey tothe Axis Control Card
A survey may be saved by either exiting out of the survey menu by pressing theManual key, or by selecting another survey to edit. On exiting, the CNC willautomatically cold start to enable the changes. If a survey has not been alteredbefore exiting, the CNC will not require a cold start. This new feature allows theuser to go into the survey menu just to look at the current settings, withouthaving to wait for a cold start when exiting.
If a mistake has been made and a user wants to reload an axis without savingthe changes, move the selector cursor to display the Enter Axis ID prompt. Atthis prompt, re-enter the axis that is currently being edited. The message “DoYou Want To Save Survey Before Re-Loading (Y/N)” will appear. Press “N” toreload the survey without saving the changes.
Copying a Survey ToA New Axis Control
Card
If an axis card needs to be replaced, copying the survey to a new axis card canbe accomplished by using two new features called the SVREAD and SVWRITEcommands. To replace an axis card, follow these steps:
1) Type SVREAD at the Enter Next Command prompt. All of the surveys willautomatically be loaded into memory.
2) Shut off the machine and exchange the axis card to be replaced.
3) Turn the machine back on and type SVWRITE at the ENTER NEXTCOMMAND prompt.
4) When prompted, type in which axis is to be replaced.
5) The survey will be automatically saved and a “survey successfully saved”message will be displayed.
Another method of copying axis surveys is to save them to disk using the PU,5command. This option may also be used to prevent any accidental losses ofsurveys. To load a saved survey from a disk, the user must enter thediagnostics option (option 7) in the Functions menu. A submenu will appearwith the option, 5-LOAD CONFIGURATION. If this option is invoked, the user willbe asked for the filename of the survey. The survey will now be automaticallyloaded and saved. Note that any previously stored survey will be destroyed. To
206 Section 06: Axis Drive Systems March 2003

Fadal Maintenance Manual
prevent a user from accidentally loading in a survey, the survey may not beloaded in through the disk command in the functions menu.
Axis Motors (XYZ)
Motor Wiring When installing an axis motor, it is important to wire the motor the same waythat the one before it was wired. If the motor is from a different manufacturer,use the table below correctly wire that particular model or brand. Each motorhas four wires, two wires for the power and two wires for the tachometerfeedback. Connecting these wires the wrong way will result in axis motorrunaways.
March 2003 Section 06: Axis Drive Systems 207

Fadal Maintenance Manual
Removal1) With the machine at the cold start position, depress the Emergency Stop
button and power off the VMC.
2) Remove the four 3/8 hex head bolts holding the axis motor in place.
3) Remove the axis motor.
4) For DC motors, remove the end cap of the motor. For AC motors, removethe Rose Box cover or disconnect the cannon plugs. If the motor hascannon plugs, go to section 5.3 for installation instructions.
5) For DC motors, disconnect the two power wires and the two tachometerwires. For AC motors, disconnect the three wires of the power cable and thesignal cable.
6) Loosen the 45 degree connector and pull all of the wires out of the motor.
Installation1) Verify that the Emergency Stop button is pressed in.
2) For DC motors, remove the end cap of the motor. For AC motors, Removethe Rose Box cover.
3) Run the machine wires into the new motor. Tighten the 45 degreeconnector. For the motors with the cannon plugs, connect the power andsignal cables to the new motor and proceed to step number 5.
4) For DC motors, connect the two power wires and the two tachometer wiresusing the DC chart in table 1. For AC motors, connect the three power wirestogether (red-red, blue-blue, and black-black or black-white, then connectthe signal cable.
5) Reinstall the axis motor using the four 3/8” hex head screws. Center themotor during installation.
6) Power on the machine. Release the Emergency Stop button and observethe motor. If there is any malfunction or axis runaway, depress theEmergency Stop button.
7) Type CS, to cold start the machine.
8) Adjust the axis amplifier (section 1.1 for DC motors and 2.5 for AC motors)
9) Reset the cold start position (DC motors only, see section 1.2).
Resolvers Before proceeding with the following instruction, verify that the VMC is at thecold start position and the Emergency Stop button is depressed.
208 Section 06: Axis Drive Systems March 2003

Fadal Maintenance Manual
Removal 1) With the machine at the cold start position, press the Emergency Stop
button and power off the VMC.
2) Remove the four 3/8 hex head bolts holding the axis motor in place.
3) Remove the axis motor.
4) Remove the end cap of the motor.
5) Loosen the three screws that are holding the resolver in place.
6) Remove the two screws that are holding the resolver circuit board to themotor.
7) Rotate the motor shaft so that a 3/32” hex wrench can be inserted into thetop screw on the resolver coupler
8) Loosen the screw and remove the resolver.
Installation1) Insert the resolver into the coupler and hold the resolver flush to the
mounting surface as the coupler screw is tightened.
2) Tighten the three screws that hold the resolver in place.
3) Install and tighten the two screws that hold the resolver circuit board to themotor.
4) Release the Emergency Stop button and cold start the machine. If theapplicable axis is not aligned with the cold start mark after the machine hasbeen cold started, then refer to section 1.2.
March 2003 Section 06: Axis Drive Systems 209

Fadal Maintenance Manual
EMC and TRM Way Lubrication
The EMC and TRM model VMC’s must be manually lubed by the ownerevery 3-6 months depending on use:
a. Remove X, Y, and Z way covers.
b. Wipe off old grease and accumulated foreign objects.
c. Use MOBILTEMP SHC 32 grease.
d. Grease every lubrication port at the saddle, table, and head. Supplygrease until it comes out from the ball slide or ball nut area.
e. Move saddle, table, and head a few times through full travel to spreadthe grease throughout the system.
f. Wipe off excess grease that accumulates at the end of the rails and ballscrew shafts.
g. Re-install X, Y, and Z way covers.
210 Section 06: Axis Drive Systems March 2003

Fadal Maintenance Manual
m
Axis & Way Systems
Waylube System
USE RECOMENDED WAYLUBE TYPE Castrol Magna BD68, Shell Tonna 68V orMobil Vactra Oil #
Operation Note: Frequently clogging components indicate that the wrong waylube isbeing used. The recommended waylubes are Castrol Magna BD68, ShellTonna 68V or Mobil Vactra Oil #2. Two waylube systems have been used, the motor-driven piston pump and thePositive Displacement Injection (PDI). The early linear way VMC 15 modelsused hand pumped grease. For these machines use Mobil SHC32 grease andBi-weekly grease with 3 to 4 strokes to the ballscrews and 2 strokes to theways. Caution: Pump slowly to avoid damaging the lines.
The System Software determines the waylube cycles so both systems willoperate correctly. The operation is as follows:
• One cycle is defined as: ON for 3 minutes 50 seconds and OFF for 10seconds for a total cycle time of 4 minutes.
• After power on: two 4 minute cycles• In Auto and not waiting mode: continuously run 4 minute cycles• Just after exiting Auto: one 4 minute cycle.• Enter Jog mode: one 4 minute cycle.
The CPU board issues the command to activate waylube. This command goesto the Computer Interface (1030) and then to the Mill Interface board (1040).The Mill Interface activates relay K19 on the 1100-2 board which outputs 110VAC (TB1-11 & RET TB1-12) to the waylube pump.
New Relief port (Arrow points away frovalve) Outlet to filter (No arrow) Choke inlet from pump(Arrow points toward valve)
March 2003 Section 06: Axis Drive Systems 211

Fadal Maintenance Manual
The Motor-Driven Piston Pump type operates with the 110 VAC input runninga 3 RPM motor. The motor drives some gears which move an arm up and downto pump the pump. This pump can be pumped manually by pulling up on thehandle and released. The pump then pumps oil through a filter and then on tothe line. The line goes to two junction blocks that output the oil through metersthat restrict the amount of oil to each line to the ways and ballscrews.
The Positive Displacement Injection (PDI) lube system is a solenoidcontrolled pneumatic system. When the solenoid is activated by the 110 VACinput, it turns the air supply off and when the solenoid is deactivated the airsupply is on to activate the pump. This is done so that both systems can usethe same control program.
The pump is activated for 10 seconds, within the 4 minute cycle, during whichoil is distributed to all of the valves on the junction block assemblies. The pumpsends oil to the filter and then to the junction block assembles, which maycontain several different size valves, at a pressure ratio of 5:1. The valves injecta measured amount of oil to their respected lines. When the solenoid isdeactivated the pressure is released through a relief valve. When the pressuredrops below 50 psi, a spring inside the valve returns the valve to its at restposition. This position allows the injector cavity to refill with oil.
PDI Waylube Troubleshooting Observations and Tests
Observe the operation of the PDI Waylube pump throughout a 4-minute cyclewith axes moving. Proper operation would include 120VAC power ON to theVLV-0028 Air Valve on top of the Lubrication Pump for 3 minutes and 50seconds. This is then followed by a 10 second power OFF to the Air Valve,during which time the gauge pressure increases to 200-350 PSI (14-24 bar).Again, the 3 minute 50 second power ON cycle repeats, and the gaugepressure reduces to 0.
Air Valve Operation If the air valve does not operate, inspect F13 fuse and K19 relay on the 1100-2board. Use SVT-0104 Test Relay as substitution for K19. If Test Relay shows no5VDC, then trace 5VDC circuit back to motherboard through 1100-2 / J1-7,1100-1 / J2-7, 1100-1 / J1-23, and 1060-0 / J7-23 to the 1040-2 card.Remember that 5VDC relative to ground is present on BOTH legs of the K19relay until it is energized by the 1040 card pulling one leg to ground. Test for120VAC at valve coil when energized. If power is OK, then test mechanically bypressing white button on end of air valve when not energized. Air line outputfrom valve can be disconnected to check for air flow.
212 Section 06: Axis Drive Systems March 2003

Fadal Maintenance Manual
Pump Operation Disconnect output oil lines from gauge, and using a short piece of 5/32 air line,close output Y fitting by inserting the tubing, one end into each side of the Y.Cycle pump until pressure builds.
Does pressure now rise and fall from 200-350 PSI and return to 0 as describedabove over a 4-minute cycle? If so, then pump operates OK.
If not, is pressure at maximum constantly? Then replace LUB-0051 ChokeValve inside reservoir of pump, as it may not be releasing pressure from outputwhen Air Valve stops air flow.
Is pressure at or near zero constantly? Then the pump piston may not bereturning to top of the stroke. Disconnect the air supply, and then remove thethreaded stop rod with the plastic cap on it from the top of the pump assembly.Insert a screwdriver to measure how far down the piston is. It should be at thetop of the stroke).
If stuck in lowest position, then replace LUB-0038 assembly.
If piston was not stuck or does not stick at lowest position, then LUB-0051Choke Valve may have a ruptured diaphragm. Replace LUB-0051.
The newer version of the LUB-0051 Choke Valve releases pressure when themachine is powered off. This device restricts the strong impulse from the highpressure of the pump to protect the individual injectors, but also is the reliefvalve when the pump is turned off, so that the pressure drops to zero to resetthe injectors.
The problem is that the pressure rises to the maximum when the machine ispowered off, and the constant pressure damages the valve diaphragm whenthe machine is not being used. If the valve is damaged, the result then is thatthe pressure never climbs to the maximum because the diaphragm leaks, andno lube flows, or, the pressure never declines below the 50 PSI minimumbecause the relief valve is blocked, and the injectors cannot reset.
The newer version has an extra port on it, as shown below, and allows thepressure to bleed off when the machine is powered off. Installation of the newChoke Valve is simple. Note that two of the ports are similar, except that amarked arrow points into the valve on one, or away from the valve on the other.Thread the port that has the arrow pointing INTO the new Choke Valve onto thepump’s piston housing. Install the port tube that feeds the lube into the filterunit onto the ¼ inch compression fitting, (it is different from the other two). The
March 2003 Section 06: Axis Drive Systems 213

Fadal Maintenance Manual
third port has the arrow pointing AWAY from the Choke Valve and is notconnected to anything at all.
If Waylube Pump is operating OK, and system cannot develop greater than 200PSI (14 bar), then inspect system for a leak. Inspect under table for rupturedhose and replace with LUB-0071 or LUB-0073 Waylube Carrier Update kit.
If OK, then one of the PDI Injectors may be leaking. Determine which manifoldis leaking by isolating each section separately. Inspect Injectors for one that isnot seating. Replace LUB-0083, LUB-0084, or LUB-0085 Injector or completeManifold assembly.
Checking Ways for Oil (Both)1) Look under the head on the Z-axis ways for a thin film of oil flowing down
the column ways.
2) Look behind the rear y-axis chip tray for oil on the base ways.
3) Remove either the left or right way cover on the table to check for oil on theX axis ways.
Replacing Way Wipers (Both)1) If the way wipers are damaged, they will need to be replaced.
2) Replace damaged way wipers with identical parts only.
Replacing Valve Manifold Assemblies (Both)1) To ensure a valve assembly is replaced with the correct part, use the valve
assembly listed in the Fadal Parts Manual, only.
2) Loosen each line attached to the manifold. Remove the two attaching boltsof the manifold. Remove the old manifold and install the new manifoldusing the existing attaching bolts. Insert each line and tighten.
Waylube Pump Pump Assembly Replacement1) Verify that the machine is in the cold start position. (Both)
2) Power off the machine and lock out the main disconnect. (Both)
3) Disconnect the air supply line from the machine. (PDI)
4) Remove the air fitting from the solenoid. (PDI)
5) Remove the oil lines and “Y” fitting from the filter element. (Both)
6) Disconnect the wiring to the solenoid and the float switch. (PDI)
214 Section 06: Axis Drive Systems March 2003

Fadal Maintenance Manual
7) Disconnect the wiring to the motor and the float switch. (Motor)
8) Remove the four screws that attach the tank. (Both)
Caution! Tank will come off.
9) Remove the waylube pump assembly. (Both)
10) Install a new waylube pump assembly and reattach the fitting, “Y” fitting,and oil lines.
11) Install tank and fill the oil reservoir with Fadal recommended way lube.
12) Connect the wiring to the float switch and solenoid or motor using insulatedcrimps.
13) Reconnect the air supply line. (PDI)
14) Manually activate the solenoid to fill the oil lines and filter elementassembly. (PDI)
15) Manually pump the pump to fill oil lines. (Motor)
16) Check for oil and air leaks. (Both)
Pump Electrical ComponentsThe electrical components consist of relays, fuses, float switch wiring, andsolenoid wiring.
1) The relay and fuse are located on the 1100-2 power distribution board.(Both)
2) The float and solenoid wiring are located on the top of pump. (PDI)
3) The float and motor wiring are located on top of the pump.
Filter ReplacementLUB-0049 Filter Element, PDI B6 8891) Disconnect the air supply line from the VMC. (PDI)
2) Unscrew the filter element bowl (LUB-0049) and remove the filter. (Both)
3) Unscrew the filter. (Motor)
4) Install a new filter in the bowl. Fill filter with Fadal recommended way lubeoil and reattach the filter element assembly.
!
March 2003 Section 06: Axis Drive Systems 215

Fadal Maintenance Manual
5) Reconnect the air supply line to the VMC. (PDI)
6) Manually activate the system. (Both)
7) Check for oil and air leaks. (Both)
Procedure For Flushing Way Lube SystemFlushing the way lube system is necessary when the incorrect waylube isinstalled in the machine. Non-approved waylubes may contain paraffin wax orsilicone that cause clogging.
Note: Place plastic bags over the drains of the coolant tank to keep keroseneout of tank.
1) Replace the external filter on the Bijur way lube pump. (Both)
2) Remove the oil line between the way lube pump and the three port junctionT located near the pump mount.
3) Verify the flush pump air regulator is fully counterclockwise.
4) Flush each line individually. Do not try to flush through PDI injection value.This will destroy them and the motor meter can be flushed through.
5) Attach an air line to the flush pump.
WARNINGVerify that the air regulator is closed.
6) Insert the 3/8" hose from the flush pump into a container of grade Akerosene.
7) Slowly open the air regulator clockwise to start the flush pump.
8) Increase the air pressure; use caution and verify that the output pressuredoes not exceed 180 psi at the gauge. The pump ratio is 4:1. An input airpressure of 45 psi will produce an output air pressure of 180 psi.
9) Enter a program that will exercise all axes to their limits. Start the programrunning.
10) Maintain a constant flow of kerosene through the way lube system.
11) If kerosene is found dripping down the column from underneath the Z axishead, the manifold filters are probably clogged. Replace the 8 port junctionblock located on the Z axis head. Start over at step 4.
!
216 Section 06: Axis Drive Systems March 2003

Fadal Maintenance Manual
12) Remove the 3/8" hose from the kerosene and place the hose in a can ofclean fresh waylube.
13) Slowly open the regulator clockwise on the flush pump. Pump oil throughthe lines, until the system is well lubricated.
14) Stop the machine and return it to the COLD START position.
15) Turn the flush pump air regulator fully counterclockwise and remove the airline.
16) Remove the flush pump and reattach the oil line from the Bijur pump to the3 port junction.
Cool Power – Ballscrew / Spindle Cooling System
The purpose of the Cool Power system is to control thermal expansion. This isaccomplished by pumping coolant continuously through the ballscrews andspindle. Different models have different cooling configurations.Note: All temperatures are in Fahrenheit unless stated otherwise.
Electrical Operation The electrical portion consists of: Chiller Controller board (1550-2, PCB-0209)Chiller Overload / Relay board (1560, PCB-0046)Two or three Temperature Sensors (CNT-0022)120 VAC input from the transformer
March 2003 Section 06: Axis Drive Systems 217

Fadal Maintenance Manual
A double 120 VAC outlet (must have the bridge between outlets removed seenote)Chiller Unit Coolant Pump Motor
Note: 120 VAC output must have the bridge between the brass screwsremoved. Bridge between silver screws is present.
When the machine is powered on, the coolant pump remains on all the timeand the coolant temperature is monitored by a coolant sensor and compared toan ambient sensor. When a difference of one or two degrees is detected thechiller is activated to cool the coolant.
The sensors have three wires, a ground, a reference (REF) voltage and a signaloutput (ambient or coolant). The sensor circuits on the controller consist of +12VDC through a resistor to the REF line and signal (ambient or coolant) input lineto a resistor and a OP AMP. These circuits compare the ambient to the coolantto determine when the temperatures are different.
If a difference is detected, the chiller controller then activates a solid state relayon the chiller overload / relay board to turn on the chiller. This is accomplishedby the controller outputting the +5VDC on pin 1 to the 1560 board pin 4 andconnecting to the Solid State Relay (SSR) + control. On pin 2 the controller willpull the line to about zero volts to activate the chiller relay. On the 1560 boardthe wire is connected to pin 5 of 1560 which is connected to the control on theSSR.
The 120VAC input to the 1560 is on pin 11 and the RET is on pin 10. Both areconnected to the transformer. The 120 VAC is routed through a fuse (F1) to twocircuit breakers, one (CB1) outputs 120 VAC to the pump motor on pin 1 andthe other (CB2) outputs 120 VAC to the contacts of the SSR and when activatedoutputs to pin 9 which connects to the chiller. The chiller consumes about2,000 watts for start up and about 500 watts during normal operation.
The current chiller controller is a dual controller; it can operate one or twochillers. On this board J2 is a 8 pin connector and the pins are connected asfollows: 1 - +5VDC, 2 – SSR, 3 – Gnd, 4 – Coolant, 5 – REF, 6 – Gnd, 7 –Ambient & 8 – REF.
With the dual chiller configuration, J1 on the controller board is connected to asecond 1560 board. The connections are 1550-J1-1 to 1560(2) pin (5 VDC),1550-J1-2 to 1560(2) pin 5 (SSR), 1550-J1-3 to sensor ground, 1550-J1-4 tosensor signal (coolant) and 1550-J1-5 to sensor REF. Note: J2 on the 1550 isCH-1; connect here for a single coolant system and J1 is CH-2; connect herefor the second.
218 Section 06: Axis Drive Systems March 2003
Fadal Maintenance Manual
The chiller controller board is normally in slot three in the control card cage. Itreceives the + 5 VDC and + 12 VDC from the backplane but does notcommunicate to the other boards.
The controller has a heart beat LED to indicate that the board is operational. Italso has a test button for each chiller. When the test button is pressed thechiller will run for one minute. There is an LED for each chiller to indicate that itis turned on. There is also an LED for the timer to indicate that the timer isrunning, a 2.5 minute delay between power up and when the chiller can beactivated. This allows the pressure in the chiller unit to decrease to the pointwhere the compressor is able to restart after turned off and immediately poweron. A timer button deactivates the timers. If the coolant temperature exceeds100 degrees, the chiller unit is activated regardless of the ambienttemperature. If the coolant temperature falls below 60 degrees the chiller isinhibited.
Older ControllerBoards
For older controller boards with adjustable temperature control, the spindle /head must be the same temperature as the base of machine before adjusting.The chiller must be off. Adjust R17 CCW until TEMP LED is off. Turn CW until itcomes ON. Find midpoint between on and off.
Coolant flow paths Different models of the VMC have different coolant configurations.
The configuration, the coolant and the amount of coolant will affect the coolingprocess. If the tank is full the temperature swings are larger then if the tank islow because more fluid is required to cool and larger temperatures range fromtop to bottom of the tank.
VMC 15 7,500 RPM Spindle ConfigurationNo cooling system.
VMC 15 10,000 RPM Spindle or VMC 4020A / 5020A 7,500 RPM SpindleConfigurationSpindle is cooled by flood coolant pumped through the spindle and returned onthe base under the saddle.
VMC 2216 / 3016 / 4020 Metric ballscrews, 10,000 RPM SpindleConfigurationThe coolant flow path is coolant tank to pump to coolant sensor to X axisballscrew to Z axis ballscrew to spindle to Y axis ballscrew to chiller and back tocoolant tank.
VMC 2216 / 3016 / 4020 Metric ballscrews, 10,000 RPM Spindle, SealedCabinet Configuration
March 2003 Section 06: Axis Drive Systems 219

Fadal Maintenance Manual
The coolant flow path is coolant tank to pump to coolant sensor to X axisballscrew to Z axis ballscrew to spindle to Y axis ballscrew to cabinet cooler tochiller and back to coolant tank.
VMC 6030 / 8030 10,000 RPM Spindle ConfigurationThe coolant flow path is coolant tank to pump to spindle to Y axis ballscrew tocoolant sensor to chiller and back to coolant tank.
VMC 6030 / 8030 10,000 RPM Spindle, Sealed Cabinet ConfigurationThe coolant flow path is coolant tank to pump to spindle to Y axis ballscrew tocoolant sensor to cabinet cooler to chiller and back to coolant tank.
220 Section 06: Axis Drive Systems March 2003

Fadal Maintenance Manual
Motor Couplers The motor couplers are the connection between the motor and the ballscrew.When replacing the motor or the ballscrew measure the distance from the endof the coupler and the motor or ballscrew. Install the coupler on the new motoror ballscrew and place the coupler back to the same dimension as before. Thefirst couplers were three pronged with a insert disk between them.
A problem when milling a circle was found, the center was off specification asmuch as .0005 inch (.0127mm) in both X and Y axis. Larger machines may beoff more than smaller machines. This has to do with the MTR-0071 CouplerInsert Disk, manufactured of Delrin, deflecting on axis direction change andyielding a small amount of backlash as the castings are reversed in direction.
Couplers, MTR-0154 and MTR-0155, were put in to production to reduce errorin backlash. This is a precision coupler with an Aluminum Bronze insertmanufactured to within .0001 inch (.0025mm) of tolerance. The AluminumBronze material will not deflect nor collapse under these loads, and it providesa bearing to the coupler yokes. These will be shipped as a set of three parts:the ballscrew coupler, the motor coupler, and the Aluminum Bronze insert. MTR-0154COUPLER SET, ALM BRZ; 5/8MTR-0155COUPLER SET, ALM BRZ; 7/8MTR-0154 is intended to fit all machines that use GTK GM4050 or Reliancemotors, and MTR-0155 is intended to fit all machines with the larger GTKGM6000, and AC drive motors. No lubrication is necessary on these couplers, but the installation procedure isimportant. Use caution to prevent any nicks or bumps to the Aluminum BronzeDisk.
1) Remove old coupler components.
2) Install new coupler onto ballscrew, measuring from face of BallscrewBearing mount to coupler pocket.
3) Install coupler onto motor, measuring from face of motor flange to couplerpocket.
4) Insert Aluminum Bronze Disk onto Ballscrew Coupler, making certain not togouge or burr the edges, and aligning the two lobes horizontally to retainthe disk.
5) Install the motor, using SVT-0122 Motor Alignment Guides, and bolt inplace.
6) Check to be certain that the maximum gap between the Coupler lobe andthe Disk pocket is .070 inch (1.8mm), and the minimum is .050 inch(1.27mm).
March 2003 Section 06: Axis Drive Systems 221

Fadal Maintenance Manual
7) Operate the machine and check for Motor axis to Ballscrew axis alignment.Re-center motor under the 4 bolts to reduce Coupler Insert Disk runout, toprevent premature wear.
Figure 6-3 These couplers will provide an audible “click” if the axis is jogged back and forth. This is normal.
Report clanking noise in axis, vibrations and slamming in G0 moves, ballbaranalysis discrepancies, backlash problems, misposition problems, andpremature wear of couplers.
Aluminum Bronze disk style couplers wear down, and clearances betweencomponents result in one or more of the symptoms described above.
A new type of Bellows Coupler, made with a stainless steel bellows and bondedbetween two aluminum mounts is currently being installed. The Bellowsenables the Motor shaft centerline to drive the Ballscrew and flex slightly if anymismatch in alignment exists, thus eliminating moving components.
Installation may be required:1) For VMCs 6535, 4525 and 3020 on X-Axis, remove the 3 screws mounting
the first way cover section to the table, and slide it back to view the motorand coupler. Remove Motor Cover.
2) For VMCs 6535, 4525 and 3020 Y-Axis, remove the rear hood from the Y-Axis cover, and slide forward when Y is at positive limit.
3) Remove motor and old coupler.
4) Install the new Bellows Coupler tight against the Ballscrew jam nut.
5) Using a 5 mm Allen wrench, tighten the Coupler bolt to 20 Foot-Pounds (15N-M).
222 Section 06: Axis Drive Systems March 2003

Fadal Maintenance Manual
6) Using SVT-0122 Motor Alignment Guide Rods, slide the Motor into theMount and Coupler.
7) Tighten the Coupler Bolt as above.
Figure 6-4 MTR-0189 Coupler, Bellows; 7/8 Shaft. MTR-0190 Coupler, Bellows; Siemens.
March 2003 Section 06: Axis Drive Systems 223

Fadal Maintenance Manual
Gib AdjustmentIMPORTANT
DO NOT rush gib adjustments—they are critical! Do not adjust any gibsunless the machine is leveled properly.
Figure 6-5 Gib Adjustments
There are two gibs at the front of the table and from 4 to 6 Gib/Strapassemblies on the underside of the table (depending on the VMC model, seeFigure 6-1). The following procedure covers adjustment of the front table gibs.There are two front gibs, one on the left and one on the right. This adjustmentprocedure is applicable for all VMC models.
!
Table gibsTable strap
Gib adjuster screw
224 Section 06: Axis Drive Systems March 2003

Fadal Maintenance Manual
1) Center the table at the X-axis cold start position. Attach a magnetic baseand an indicator just below the gib, as shown in Figure 6-7. Adjust and setat a zero reading.
Figure 6-6 Attach Magnetic Base and Indicator
2) Place a pry bar between the front table gib/strap assembly and the saddle.
3) With the pry bar, move the table forward so the solid rear way of the table isagainst the saddle.
4) Zero the indicator.
5) Place the pry bar between the rear table gib/strap assembly and thesaddle.
6) Gently pry the table the opposite way.
7) The indicator reading is the adjustment that needs to be made. A properlyadjusted set of gibs will have a front to back motion of .0003”.
8) If the gib needs adjusting, there is a gib adjuster screw located at the endof the gib. Turning this screw clockwise will loosen the gib and turning itcounter clockwise will tighten the gib.
9) Repeat the above steps until a .0003” indicator motion is achieved. Then,perform the procedure over again for the gib at the opposite end.
After both gibs have been completely adjusted, run the table to its extremes atthe plus and minus ends and then return the table back to center. Then, repeatthe above gib adjustment procedure for verification.
March 2003 Section 06: Axis Drive Systems 225

Fadal Maintenance Manual
Table Gib/StrapAssembly When adjusting gibs with shim stock, use extreme care to prevent ripping the
shim and leaving pieces of it between the gib and way surfaces.
There are gib/strap assemblies on the underside of the table at the front andrear. Depending on the model of VMC there will be from one to three gib/strapassemblies at the front and at the rear.
Adjust the gib/strap assembly as follows:
1) Jog the table in the X-axis to clear the cold start indicator.
2) Loosen the three hex head bolts. The slot for the bolt is tapered. When thegib is moved, the head of the bolt may bind. Verify that the bolt is loosenedenough to allow the gib to slide from left to right.
3) Slide the gib to the right to loosen the gib. The gib must be loosened firstbefore it can be tightened. To move the gib, use an open end wrench or ahex head and tap with a mallet.
4) To adjust, slide the gib to the left (operator orientation is facing the strap)until it contacts the underside of the saddle. Use finger pressure to pushthe gib.
5) Verify that each of the three hex head bolts are not caught in the taperedslot. If the bolts are binding on the slot, loosen and re-adjust the bolts.
6) Tighten the three hex head bolts.
7) Repeat the above steps for the opposite table gib/strap assembly.
226 Section 06: Axis Drive Systems March 2003

Fadal Maintenance Manual
Saddle Gibs There are two gibs to the right of the center base rail and two gib/strapassemblies on the underside of the saddle. The following procedure coversadjustment of the center saddle gibs only. The following adjustments apply toall VMC models. It may be necessary to remove the rear Y-axis tray to adjustthe saddle gibs.
1) Center the saddle to the Y-axis cold start position. Attach the magneticbase and indicator to the saddle. Position the indicator as shown in Figure6-8. Set the indicator to zero.
Figure 6-7 Position Indicator
2) Standard machines: Place a pry bar between the right saddle gib/strapassembly and the base.
2) Performance Models: Place a pry bar between the X axis ballscrew mountand the table.
3) With the pry bar, move the saddle so the solid way of the saddle makescontact with the center base rail.
4) Zero the indicator.
5) Standard machines: Place the pry bar between the left saddle gib/strapassembly and base.
5) Performance models: Place the pry bar between the other side of the X axisballscrew mount of the table.
6) Gently pry the saddle the opposite way.
7) The indicator reading specifies the amount that the gib should be adjusted.A properly adjusted set of gibs will have a side to side motion of .0003”.
March 2003 Section 06: Axis Drive Systems 227

Fadal Maintenance Manual
8) If the gibs need adjusting, there is a gib adjuster screw located at the endof each gib. Turning this screw clockwise will loosen the gib and counterclockwise will tighten the gib.
9) Repeat the above steps, until .0003” indicator motion is achieved, thenadjust the gib at the opposite side.
After the gib adjustments are complete, run the saddle to its extremes at theplus and minus end and then back to center again. Then, repeat the above gibadjustment procedure for verification.
Saddle Gib/StrapAssembly When adjusting gibs with shim stock, use extreme care to prevent ripping the
shim and leaving pieces of it between the gib and way surfaces.
There is one gib/strap assembly on the left side of the saddle and one on theright. Each gib/strap assembly has two gibs that require adjustment. Adjust thesaddle gib/strap assembly as follows:
1) Loosen both the front and back gibs on the strap by turning the gib adjusterscrew clockwise.
2) Insert a .001" shim about three to four inches between the gib and theway. Place shims in both the front and rear at the same time.
3) Tighten the gib to pinch the shim between the gib and way by turning thegib adjuster screw counter clockwise. Tighten the screw enough to preventthe shim from moving.
4) Slowly turn the gib adjuster screw clockwise while pulling on the shim.
WARNINGShim stock is very sharp!
5) When the shim starts pulling out, stop turning the gib adjuster screw andremove the shim completely.
6) Turn the gib adjuster screw 3/4 turn counter-clockwise.
7) Repeat the above steps for the front, rear, left, and right gibs.
!
228 Section 06: Axis Drive Systems March 2003
Fadal Maintenance Manual
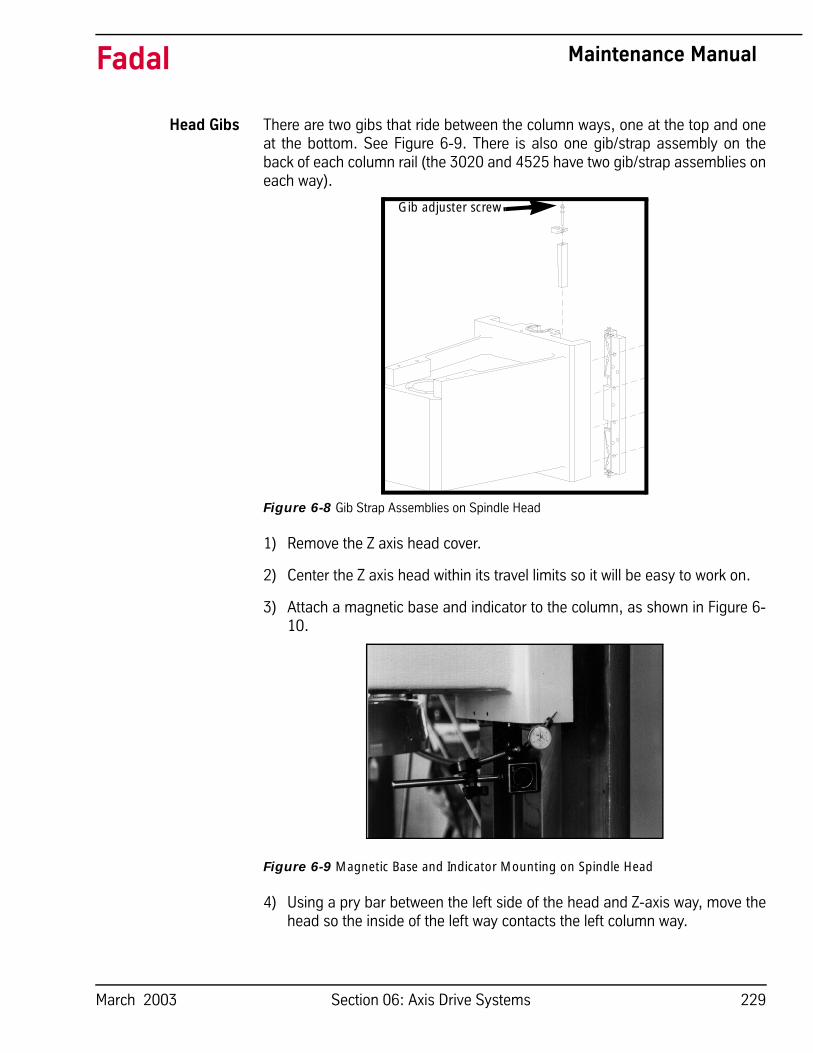
Head Gibs There are two gibs that ride between the column ways, one at the top and oneat the bottom. See Figure 6-9. There is also one gib/strap assembly on theback of each column rail (the 3020 and 4525 have two gib/strap assemblies oneach way).
Figure 6-8 Gib Strap Assemblies on Spindle Head
1) Remove the Z axis head cover.
2) Center the Z axis head within its travel limits so it will be easy to work on.
3) Attach a magnetic base and indicator to the column, as shown in Figure 6-10.
Figure 6-9 Magnetic Base and Indicator Mounting on Spindle Head
4) Using a pry bar between the left side of the head and Z-axis way, move thehead so the inside of the left way contacts the left column way.
Gib adjuster screw
March 2003 Section 06: Axis Drive Systems 229

Fadal Maintenance Manual
5) Zero the indicator.
6) Place the pry bar between the right side of the head and Z-axis way.
7) Gently pry the head the opposite way.
8) Make adjustments according to the indicator reading. A properly adjustedZ-axis head gib is .0002’ to .0003” motion side to side.
9) If the gibs need adjusting, there is a gib adjuster screw located at the endof each gib. Turning this screw clockwise loosens the gib and counterclockwise tightens the gib.
10) Repeat the above steps, until indicator motion is .0002” to .0003”, thenadjust the gib at the opposite side.
After both gib adjustments are complete, run the head to its extremes at theplus and minus end and then back to center again. Then, repeat the above gibadjustment procedure for verification.
Head Gib/StrapAssembly When adjusting gibs with shim stock, use extreme care to prevent ripping the
shim and leaving pieces of it between the gib and way surfaces.
There is one gib/strap assembly at the left and right side of the head. Each gib/strap assembly has a top and bottom gib that requires adjusting. Adjust thehead gib/strap assembly as follows:
Top Gibs 1) Loosen all four gibs by turning the gib adjuster screws clockwise.
2) Insert a .001" shim, approximately 3” to 4" long, between the column andthe Z-axis head. Do both the left and right sides.
3) Tighten the gib, to pinch the shim between the head and way, by turningthe gib adjuster screw counter clockwise. Tighten the gib enough to preventthe shim from moving.
4) Slowly turn the gib adjuster screw clockwise while pulling on the shim.
WARNINGShim stock is very sharp!
5) When the shim starts to pull out, stop turning the gib adjuster screw andremove the shim, completely.
6) Do the same for the other side.
!
230 Section 06: Axis Drive Systems March 2003

Fadal Maintenance Manual
7) Turn both gib adjuster screws one turn counter-clockwise after the shimshave been removed from the left and right sides.
Bottom Gibs 8) Insert a .001" shim about 3” to 4" long between the rear of the column wayand the bottom gib. Do the same for left and right sides.
9) Tighten the gib to pinch the shim between the gib and way by turning to thegib adjuster screw counter clockwise. Tighten the gib enough to prevent theshim from moving.
10) Slowly turn the gib adjuster screw clockwise while pulling on the shim.
WARNINGShim stock is very sharp!
11) When the shim starts pulling out, stop turning the gib adjuster screw andremove the shim completely.
12) Do the same for the other side.
13) Turn both gib adjuster screws one turn counter clockwise after the shimshave been removed from the left and right sides.
!
March 2003 Section 06: Axis Drive Systems 231
Fadal Maintenance Manual
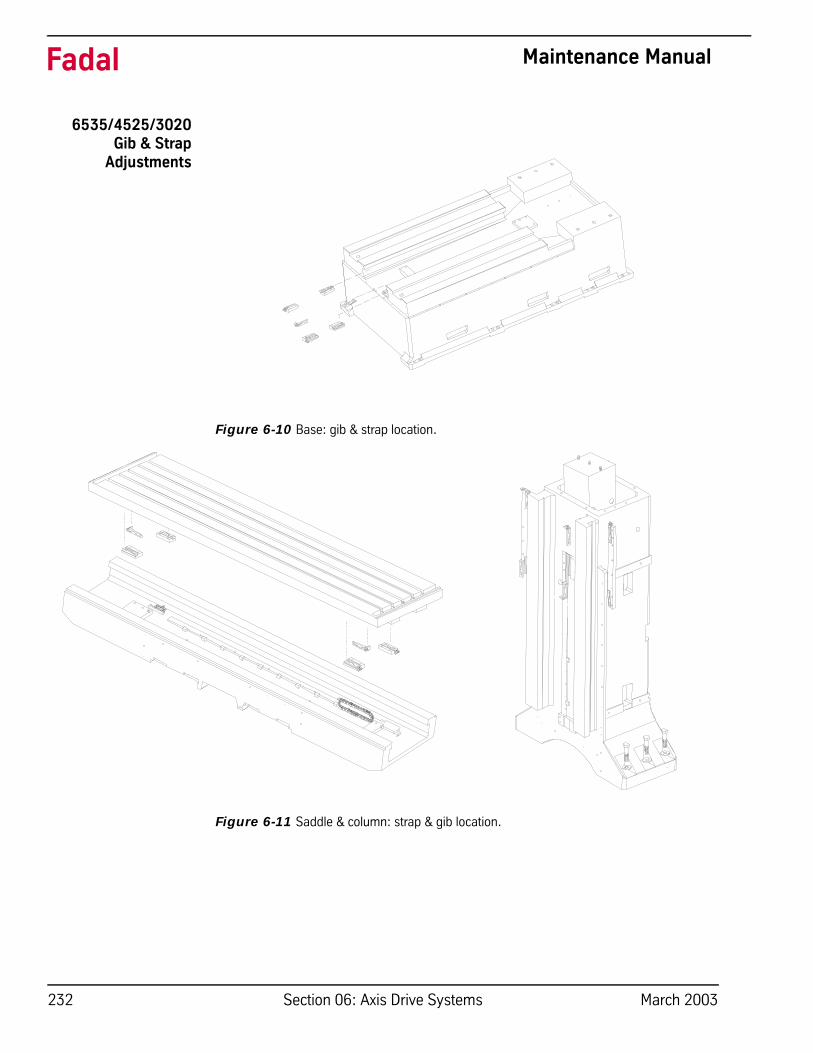
6535/4525/3020Gib & Strap
Adjustments
Figure 6-10 Base: gib & strap location.
Figure 6-11 Saddle & column: strap & gib location.
232 Section 06: Axis Drive Systems March 2003

Fadal Maintenance Manual
Table GibsThere are two (2) gibs at the front of the table and four (4) GIB/STRAPassemblies on the underside of the table. The following steps describe how toadjust the front table gibs. There is one at the left and one at the right.
1) With the table centered at the X axis cold start position:
a. Attach a magnetic base and indicator just below the gib to be adjusted,and set a zero reading.
Figure 6-12 Set Zero Reading
b. Place a pry bar between the X axis ballscrew mount and the table.c. With the pry bar, move the table forward so the solid rear way of the
table is up against the table.d. Zero the indicator.e. Now place the pry bar between the other side of the X axis ballscrew
mount and the table.f. Gently pry the table the opposite way.g. The indicator reading is the adjustment that needs to be made. A prop-
erly adjusted set of gibs will have front to back motion of .0003 (+/-.0001).
h. If the gibs need adjusting, there is a gib adjuster screw located at theend of each gib. Turning this screw clockwise will loosen the gib andcounter clockwise tighten the gib.
Figure 6-13 Gib Adjustment
i. Repeat the above steps until you get .0003 indicator motion, and thengo to the other gib at the opposite end. Note: If the gibs are more thana .0010” out of adjustment, then adjust one side to about .0009” and
gib bracket Gib
gib adjuster
March 2003 Section 06: Axis Drive Systems 233

234
Fadal Maintenance Manual
repeat on the opposite end. Repeat the steps to .0003”. This is to avoidmaladjustment due to binding.
After both gibs have been completely adjusted run the table to its extremes atthe plus and minus end and then back to center again. Then repeat the abovegib adjustment procedure for verification.
Table Gib/StrapAssembly
WARNINGShim Stock is very sharp. Handle with care.
When adjusting gibs with shim shock be very careful not to cause the shim torip and leave a piece between the gib and way surface. There are GIB/STRAPassemblies on the underside of the table at the front and rear. There will be two(2) GIB/STRAP assemblies at the front and rear. The front straps are wider thanthe rear straps.Adjust the table GIB/STRAP assembly as follows:
1) Loosen both the front and back gibs on the strap by turning the gib adjusterscrew clockwise.
2) Insert a .001" shim about 3-4" between the gib and the way. Place shims inboth the front and rear at the same.
3) Tighten the gib to pinch the shim between the gib and the way by turningthe gib adjuster screw counter clockwise. Tighten the gib enough to preventthe shim from moving.
4) Slowly turn the gib adjuster screw clockwise while pulling on the shim.
5) When the shim begins to pull out, stop turning the gib adjustment screwand remove the shim completely.
6) Turn the gib adjuster screw 3/4 turn counterclockwise.
7) Repeat the above steps for the front, rear, left and right gibs.
Saddle Gibs
WARNINGShim Stock is very sharp. Handle with care.
There are two (2) gibs on the inside of the right rail on the base and two (2)GIB/STRAP assemblies on the underside of the saddle on each side to theinside of the rails. The GIB/STRAP assemblies are wider on the right side to
!
!
Section 06: Axis Drive Systems March 2003

Fadal Maintenance Manual
allow space for the gibs. It will be necessary to remove the way covers to adjustthe gibs.
1) With the saddle centered at the Y axis cold start position, attach a magneticbase and indicator to the saddle and place the indicator near the gib to beadjusted.
2) Place a pry bar between the saddle and the outside of the base rail.
3) With the pry bar, move the saddle so the solid way of the saddle contactsthe inside of the left base rail.
4) Zero the indicator.
5) Now place the pry bar between the saddle and the outside of the base rail.
6) Gently pry the saddle the opposite way.
7) The indicator reading is the adjustment that needs to be made. A properlyadjusted set of gibs will have a side to side motion of .0003”.
8) If the gibs need adjusting, there is a adjuster screw located at the end ofeach gib. Turning this screw clockwise will loosen the gib and counterclockwise will tighten the gib.
9) Repeat the above steps until you get .0003” indicator motion, then adjustthe other gib on the opposite side.
After both gibs have been completely adjusted run the saddle to its extremes atthe plus and minus end and then back to center again. Then repeat the abovegib adjustment procedure for verification.
When adjusting gibs with shim stock be very careful not to cause the shim torip and leave a piece between the gib and way surface. There are GIB/STRAPassemblies on the underside of the saddle at the front and back of both sides.The right side straps are wider than the left side straps.
Adjust the saddle GIB/STRAP assembly as follows:
1) Loosen both the front and back gibs on the straps by turning the gibadjustment screw clockwise.
2) Insert a .001" shim about 3-4" between the gib and the way. Place shims inboth the front and back at the same time.
3) Tighten the gib to pinch the shim between the gib and the way by turningthe gib adjuster screw counter clockwise. Tighten the gib enough to preventthe shim from moving.
March 2003 Section 06: Axis Drive Systems 235

Fadal Maintenance Manual
4) Slowly turn the gib adjuster screw clockwise while pulling on the shim.
5) When the shim begins to pull out, stop turning the gib adjuster screw andremove the shim completely.
6) Turn the gib adjuster screw 3/4 turn counterclockwise.
7) Repeat the above steps for the front, rear, left and right gibs.
236 Section 06: Axis Drive Systems March 2003

Fadal Maintenance Manual
Head Gibs
WARNINGShim Stock is very sharp. Handle with care.
There are two (2) gibs that ride between column ways on the right side, one atthe top and on at the bottom. There is also two (2) GIB/STRAP assemblies onthe back of each column rail. The center gibs are adjusted in this section. Eithergib can be adjusted first.
1) Remove the Z axis head cover.
2) Center the Z axis head within its travel limits so it will be easy to work on.
3) Attach a magnetic base and indicator to the column, as shown in Figure 6-13.
Figure 6-14 Attach Magnetic Base and Indicator to Column
4) Using a pry bar between the left side of the head and Z-axis way, move thehead so the inside of the left way contacts the left column way.
5) Zero the indicator.
6) Place the pry bar between the right side of the head and Z-axis way.
7) Gently pry the head the opposite way.
8) Make adjustments according to the indicator reading. A properly adjustedZ-axis head gib is .0002’ to .0003” motion side to side.
9) If the gibs need adjusting, there is a gib adjuster screw located at the endof each gib. Turning this screw clockwise loosens the gib and counterclockwise tightens the gib.
!
March 2003 Section 06: Axis Drive Systems 237

Fadal Maintenance Manual
10) Repeat the above steps, until indicator motion is .0002” to .0003”, thenadjust the gib at the opposite side.
After both gib adjustments are complete, run the head to its extremes at theplus and minus end and then back to center again. Then, repeat the above gibadjustment procedure for verification.
Head Gib/Strap
WARNINGShim Stock is very sharp. Handle with care.
When adjusting gibs with shim stock be very careful not to cause the shim torip and leave a piece between the gib and way surface. There are two (2) GIB/STRAP assemblies top and bottom on both sides, left and right. The two (2) topand the two (2) bottom must be adjusted together.
Top Gib/Strap 1) Loosen all four (4) gibs by turning the gib adjuster screws clockwise .
2) Insert a .001" shim about 3-4" long between the column and the Z axishead, be sure the shim is in the center of the way. Do the same for the leftand right side.
3) Tighten the gib to pinch the shim between the head and way by turning thegib adjuster screw counterclockwise. Tighten enough to prevent the shimfrom moving.
4) Slowly turn the gib adjuster screw clockwise while pulling on the shim.
5) When the shim begins to pull out, stop turning the gib adjuster screw andremove the shim completely.
6) Do the same for the other side.
7) Turn both gib adjuster screws one (1) turn counterclockwise after the shimshave been removed from the left and the right.
Bottom Gib/Strap 8) Insert a .001" shim about 3-4" long between the rear of the column wayand the bottom gib. Do the same for the left and right side.
9) Tighten the gib to pinch the shim between the gib and the way by turningthe gib adjuster screw counterclockwise. Tighten enough to prevent theshim from moving.
10) Slowly turn the gib adjuster screw clockwise while pulling on the shim.
!
238 Section 06: Axis Drive Systems March 2003

Fadal Maintenance Manual
11) When the shim begins to pull out, stop turning the gib adjuster screw andremove the shim completely.
12) Do the same for the other side.
13) Turn both gib adjuster screws one (1) turn counterclockwise after the shimshave been removed from the left and the right side.
SQUARENESS TEST: (Measures Squareness from X to Y)
1) Level Machine.
2) Adjust TABLE, SADDLE and HEAD GIBS. Set for Turcite gibs: .0003” Non-Turcite gibs: .0005”.
3) Adjust TABLE, SADDLE and HEAD STRAP GIBS.
4) The above items must be properly set or the SQUARENESS TEST may beinvalid.
5) Using a granite plate, zero indicator at point A (front left position on plate)and make a 10.000 inch move in X axis from point A to point B (front rightposition on plate). Using MDI mode enter “X10.0 F50. G1.”
6) Take a reading at point B. If not zero, adjust the granite plate for a zeroreading.
7) Repeat steps 5 and 6 until both A and B positions read zero.
8) Zero indicator at point C (front of right side position on plate) and make a10.000 inch move in Y axis from point C to point D (back of the right side ofthe plate). Using MDI enter “Y10.0 F50. G1.”
9) Record reading at D. This is the squareness value, and it should be within.0006 inch.
Figure 6-15 Granite Plate (top view)
D
A
C
B
March 2003 Section 06: Axis Drive Systems 239

Fadal Maintenance Manual
Installing VMCLinear Way Saddle
1) Level machine ways.
2) Clean way mounting pads.
3) Position mounting pads for saddle.
4) Position grease line couplers upward.
5) Install safety stop to rail.
6) Stone saddle at mounting pad areas and clean.
7) Install saddle assembly to mounting pads, slowly lower and check padposition and grease line couplers as installing.
Note: Check several times when lowering the saddle.
8) Install mounting pad bolts (5/16-18 X 1” long so-cap) and leave loose.
9) Tighten set screws, double check for tightness.
10) Tighten mounting pads.
11) Install Y axis ball screw assembly.
12) Install Y axis limit stop assembly.
13) Remove table teleflex covers.
14) Jog table to the left and Install Y axis grease lines.
15) Jog table to the right and Install Y axis grease lines.
16) Install table teleflex covers.
Mounting pad areas
240 Section 06: Axis Drive Systems March 2003

Fadal Maintenance Manual
Procedure for Correcting the Saddle Squareness
1) Shim size is error size. Example .0007 - .0012 = .001 shim .0013 - .0017= .0015 shim2) Loosen mounting bolts.
3) Loosen set screws.
4) Loosen Y axis ball screw at column.
5) Pry saddle away from mounting pad area (hard stop).
6) Install shim (between pad and hard stop) and pry saddle to mounting pad.
7) Tighten set screws, double check tightness.
8) Tighten mounting pad bolts.
9) Align Y axis ball screw and tighten.
10) Check plate reading.
Procedure for Correcting the Table Squareness
1) Shim size is error divided by 1.7.
2) Remove front and rear table covers.
3) Loosen mounting pad bolts to table.
-10
0
00
+10
0
00
Positive reading:
Negative reading:
Shim here
Shim here
Front
Front
FrontFront
Shim herePositive reading: Negative reading:
March 2003 Section 06: Axis Drive Systems 241

Fadal Maintenance Manual
4) Loosen set screws.
5) Loosen X axis ball screw nut at table block.
6) Pry table away from mounting pad area (hard stop).
7) Install shim (between pad and hard stop) and pry table to mounting pad.
8) Tighten set screws, double check tightness.
9) Tighten mounting pad bolts.
10) Align X axis ball screw nut and tighten.
11) Install front and rear table covers.
12) Check T-slot reading.
Axis Limit Stops
TRM & EMC X, Y, Z Axis
Figure 6-16 EMC ballscrew with limit stops.
No adjustment is needed for the EMC or TRM ballscrew limit stops. Each iscreated to the exact dimension needed to prevent an axis from travelingbeyond it’s intended range.
Mechanical Y Axis1) Position the saddle to its positive limit.
EMC ballscrew limit stops
242 Section 06: Axis Drive Systems March 2003

Fadal Maintenance Manual
2) Go to the rear of the column and locate the limit bar.
Figure 6-17 Locate Limit Bar at Rear of Column
3) Tighten the adjustment nut until there is no play between the Bellevillesprings, but loose enough so the springs will rotate.
4) After adjusting, use blue Locktite on the nut.
5) Position the saddle to its negative extreme.
6) Go to the front of the column and locate the limit bar.
Figure 6-18 Locate Limit Bar at Front of Column7) Tighten the adjustment nut until there is .25 gap between the Belleville
springs and the column.
8) After adjusting, use blue Locktite on the nut.
Backlash For VMCs equipped with the PDI waylube pump, turn the power to the pump offand on. JOG the axis that is being inspected a few inches back and forth toensure the ways of the machine are riding on a film of oil.
March 2003 Section 06: Axis Drive Systems 243

Fadal Maintenance Manual
Backlash Parameter DescriptionBacklash parameter values allow the control to compensate for the physicallimitations of the ball screw when changing tool direction. Values are entered intenths (ten-thousandths of an inch). The control stores three values for the X-axis and the Y-axis (at center, at negative limit, at positive limit) and one valuefor each of the Z, A, and B axes (at center).
Note: Values are NOT stored for axes not installed on a given machine.
Entering BacklashValues
Backlash values are entered into the control using the BL command. Theformat of the command is:
BL, a, b, c, d
where a = axis number (X=1, Y=2, Z=3, A=4, B=5)b = compensation (in tenths) at centerc = compensation (in tenths) at negative limit (X and Y axes only)d = compensation (in tenths) at positive limit (X and Y axes only)
Typing BL <ENTER> (that is, without values) will display currently stored values.
Determining ProperBacklash Values
There are several methods for determining the correct value(s) of each axis.The programmatic method described here is the most reliable.
The following is an example of a programmatic method for determining thethree backlash values for the X-axis. The same applies to Y-axis, just substituteY for X. For Z-axis replace Z values with X and X values with Z. The valuedetermined (i.e., center, negative limit, or positive limit) depends on the toollocation on the axis (see STEP 3).
1) Enter the cold start command CS <ENTER>. After the cold start, DO NOTreturn to the last home position.
244 Section 06: Axis Drive Systems March 2003

Fadal Maintenance Manual
2) From the command mode, clear the current backlash values for the X axisby typing BL,1,0,0,0 and pressing the ENTER button.
Figure 6-19 Establish a Zero Reading
3) Place a surface indicator in a tool holder and JOG the needle to Z-.1 andX.1 from the X-positive side of a block in the center of the table. The face ofthe indicator should be toward the right side (X-positive) side of themachine. From the command mode, type SETH and press the ENTERbutton.
4) Insert the following program into memory:
N1 G91 G1 X-.1 F (See note below)N2 G4 P66000N3 Z.25 G5N4 X-.1N5 X.1N6 Z-.25N7 G4 P66000N8 X.1N9 M2
Note: For part programs requiring close tolerances, setting the feed rate in lineN1 to match the feed rate of the part program to be run will maximize theaccuracy of the backlash values.
March 2003 Section 06: Axis Drive Systems 245

Fadal Maintenance Manual
5) Run the program in the following manner:
a. At line N2 the control will be in the waiting state. Adjust the dial of thesurface indicator to zero on the needle, then press the START button tocontinue.
b. At line N7 the control will be in the waiting state. Read the indicator dialto see how many tenths the needle is away from zero.
c. Press the START button followed by the MANUAL button.d. Enter the number determined in step b as the backlash value (see
ENTERING BACKLASH VALUES above).e. Repeat steps a through c and verify that the indicator now reads zero
after step c. If not, adjust the backlash value entered in step d. Con-tinue this process until the indicator consistently reads zero after step c.
6) Repeat step 4, placing the block at the negative limit of the X axis. Repeatstep 5 to determine the negative limit value.
7) Repeat step 4, placing the block at the positive limit of the X axis. Repeatstep 5 to determine the negative limit value.
Note: When entering the value for the negative limit, you MUST enter at least acomma for the at-center value; when entering the value for the positivelimit, you MUST enter at least a comma for both the at-center and thenegative-limit values. For example, to set a value of 5 tenths (.0005) for thenegative limit of the Y axis without affecting the current value for the center,type BL,2,,5, ENTER ; to set a value of 3 tenths (.0003) for the center and 2tenths (.0002) for the positive limit on the X axis without affecting thecurrent value for the negative limit, type BL,1,3,,2, ENTER.
8) The home position was set with the indicator tip close to an edge. Beforecontinuing with other operations, the home position must be reset.
a. From the command mode, type SETCS and press the ENTER button.b. Type HO and press the ENTER button, followed by the START button.c. After the axes return to the cold start position, type SETH and press the
ENTER button.
246 Section 06: Axis Drive Systems March 2003