section 1: fission yeast
TRANSCRIPT
Fission Yeast Handbook Welcome to the Lab
Contents: Section 1: Fission Yeast Growth, Maintenance and Classical Genetics 1.1 Facts about S. pombe 5 1.2 Storage & Re-isolation of frozen cultures 5 1.3 Testing the phenotype of a strain 6 1. ploidy 6 2. mating type 6 3. testing the genotype by PCR 7 4. temperature/ cold sensitivity 8 5. auxotrophy 8 6. adenine mutants 9 1.4 Growing cells generation time 9 liquid cultures 10 1.5 Fission Yeast Classical Genetic Techniques genetic crosses 11 genetic analysis of products of meiosis 12 tests for allelism 13 construction of double mutants 13 tests for dominance/recessiveness 14 isolation of diploid strains 15 protoplast fusion 17 protoplast fusion2 18 1.6 Mapping 17 1.7 Mutagenesis of yeast strains 19

1.8 Table of media ingredients 21
Section 2: S. pombe Molecular Genetics 2.1 Plasmids: Markers, Expression vectors S. pombe markers 23 Autonomous replication sequences 23 Expression vectors 24 Promoters 25 2.2 Transformations Lithium Acetate methods, I and II 26 Electroporation 28 Protoplasting 28 Lithium Chloride 30 2.3 Integration of a plasmid into the genome. 30 2.4 Gene Disruption and replacement 31 2.5. Stability 33 2.6 Cloning mutant alleles by gap-repair 33 2.7 Plasmid Recovery 34 2.8 Screening for mutants and overexpression screens. 36
Section 3: Physiology Introduction to the cell cycle and cell growth. 37 3.1 Measuring cell number and volume - The Coulter Counter 39 - The Sysmex- 40 - Haemocytometer 41 - Measuring cell size for individual cells. 41 3.2 Transition Point 42 3.3 Synchronising cultures with respect to the cell cycle -Elutriation 43 -Arresting cells with ts-mutants: 44
-Arresting the cells with drugs 44 -Arresting cells in G1 by Nitrogen starvation. 45 -Arresting cells with pheromone 46 -Synchronous meiosis 46 3.4 Measuring DNA content of cells - Fixing cells for flow cytometry 47 - Using the BD FACScan 48 - The diphenylamine reaction 50
Section 4: Microscopy 4.1 Quick staining - DAPI staining nuclei 53 - Staining the cell wall and septum with calcofluor 54 4.2 Indirect Immunofluorescence - Guide 55 - Anti- tubulin immunofluorescence : formaldehyde 65 - Anti- tubulin immunofluorescence : methanol 67 - Actin rhodamine-phalloidin staining 68 - Actin immunofluorescence : methanol 69 4.3 ß-galactosidase detection 70 4.4 GFP 72 4.5 FISH 74 Section 5:S.pombe molecular biology 5.1 DNA preparation a. Nuclear isolation procedure 77 b. Preparing S. pombe chromosomal DNA 78 c. Chromatin extracts 81 d. Pulse Field Gel Electrophoresis 83 e. Genomic Digests 84 f. Southern blotting 84 g. Reprobing of Southern blots 86 5.2 Preparing probes by random priming 86 5.3 RNA preparation 4 ways to prepare S. pombe RNA 87 Northern blotting 89 5.4 Nuclear run on 89 5.5 Protein preparation Large scale extracts 91 Small scale extracts 92 A. Native extracts 92 B. Denatured extracts 92
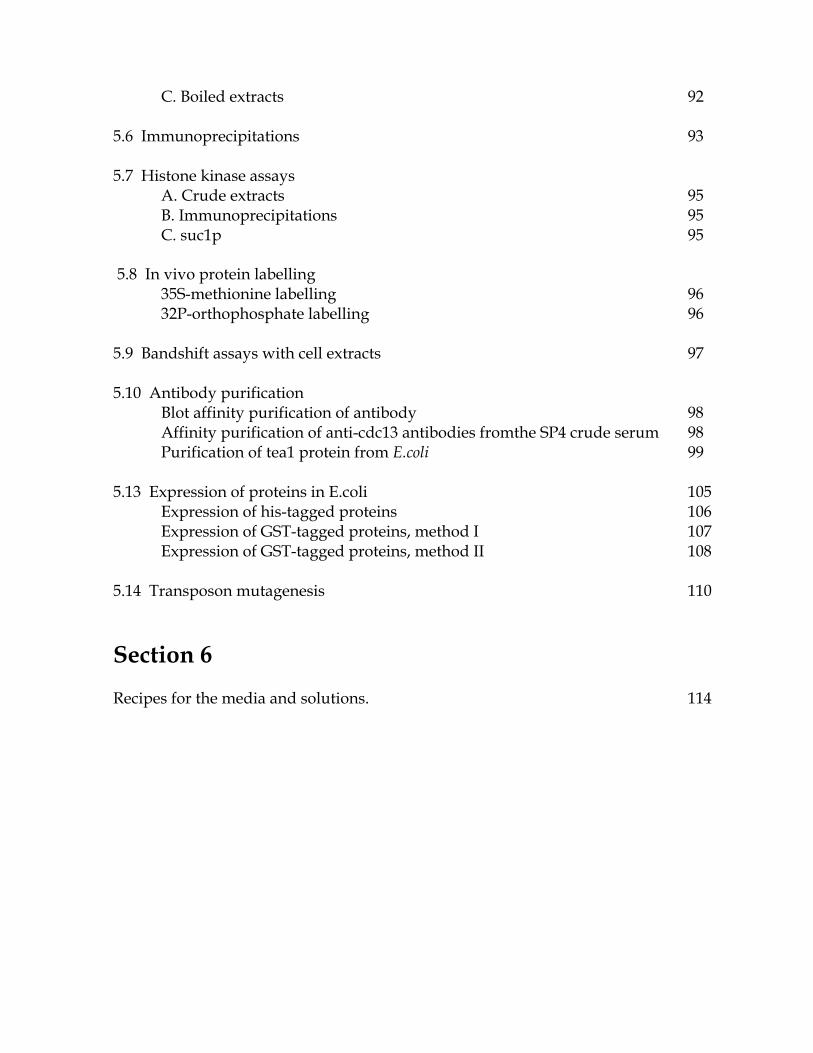
C. Boiled extracts 92 5.6 Immunoprecipitations 93 5.7 Histone kinase assays A. Crude extracts 95 B. Immunoprecipitations 95 C. suc1p 95 5.8 In vivo protein labelling 35S-methionine labelling 96 32P-orthophosphate labelling 96 5.9 Bandshift assays with cell extracts 97 5.10 Antibody purification Blot affinity purification of antibody 98 Affinity purification of anti-cdc13 antibodies fromthe SP4 crude serum 98 Purification of tea1 protein from E.coli 99 5.13 Expression of proteins in E.coli 105 Expression of his-tagged proteins 106 Expression of GST-tagged proteins, method I 107 Expression of GST-tagged proteins, method II 108 5.14 Transposon mutagenesis 110
Section 6 Recipes for the media and solutions. 114

1
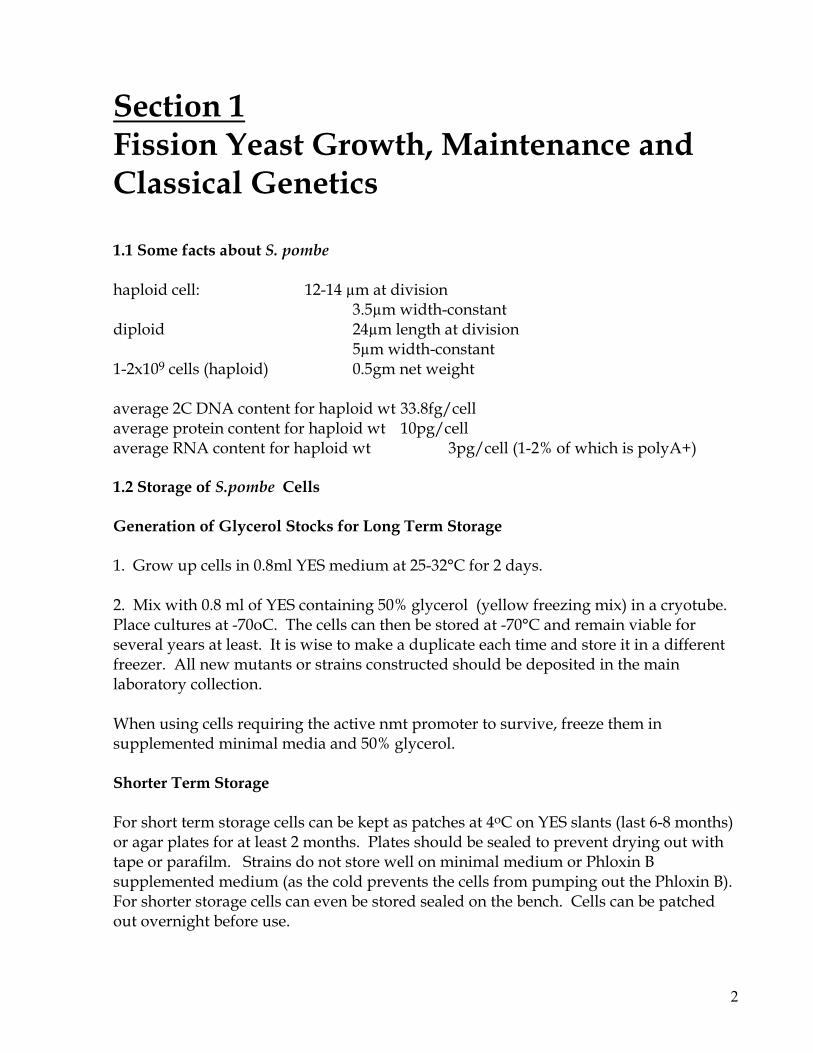
Section 1 Fission Yeast Growth, Maintenance and Classical Genetics 1.1 Some facts about S. pombe haploid cell: 12-14 µm at division 3.5µm width-constant diploid 24µm length at division 5µm width-constant 1-2x10⁹ cells (haploid) 0.5gm net weight average 2C DNA content for haploid wt 33.8fg/cell average protein content for haploid wt 10pg/cell average RNA content for haploid wt 3pg/cell (1-2% of which is polyA+) 1.2 Storage of S.pombe Cells Generation of Glycerol Stocks for Long Term Storage 1. Grow up cells in 0.8ml YES medium at 25-32°C for 2 days. 2. Mix with 0.8 ml of YES containing 50% glycerol (yellow freezing mix) in a cryotube. Place cultures at -70oC. The cells can then be stored at -70°C and remain viable for several years at least. It is wise to make a duplicate each time and store it in a different freezer. All new mutants or strains constructed should be deposited in the main laboratory collection. When using cells requiring the active nmt promoter to survive, freeze them in supplemented minimal media and 50% glycerol. Shorter Term Storage For short term storage cells can be kept as patches at 4oC on YES slants (last 6-8 months) or agar plates for at least 2 months. Plates should be sealed to prevent drying out with tape or parafilm. Strains do not store well on minimal medium or Phloxin B supplemented medium (as the cold prevents the cells from pumping out the Phloxin B). For shorter storage cells can even be stored sealed on the bench. Cells can be patched out overnight before use.
2
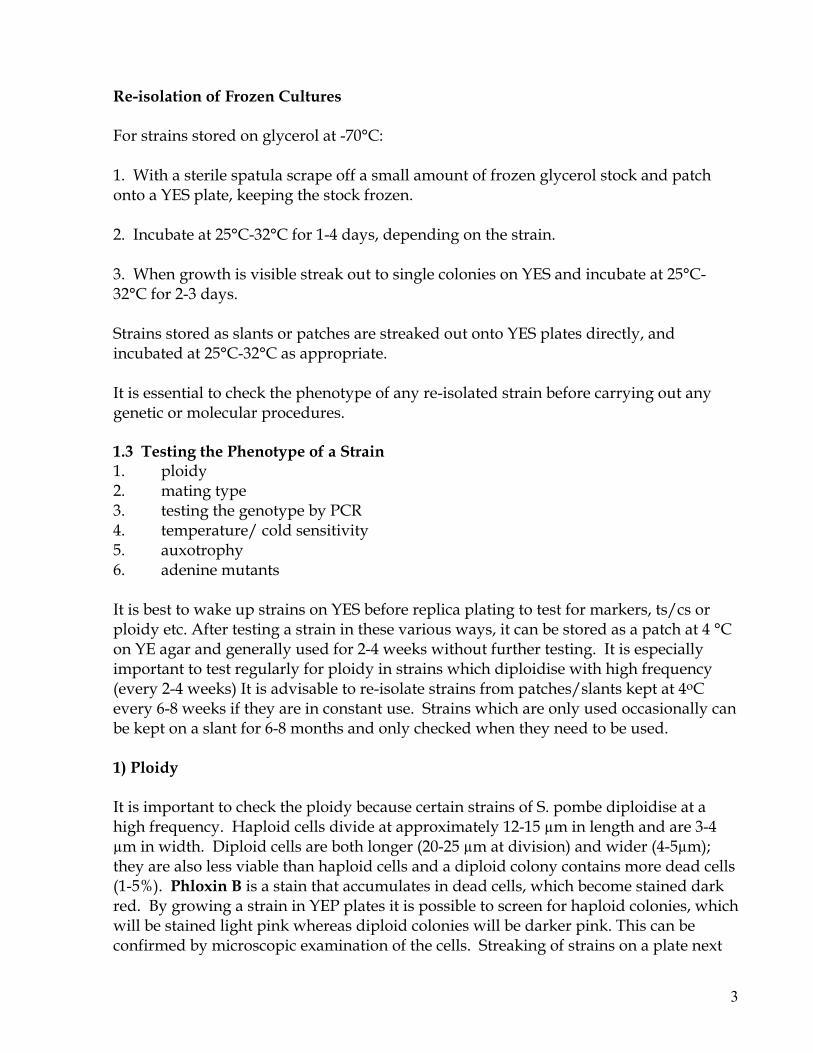
Re-isolation of Frozen Cultures For strains stored on glycerol at -70°C: 1. With a sterile spatula scrape off a small amount of frozen glycerol stock and patch onto a YES plate, keeping the stock frozen. 2. Incubate at 25°C-32°C for 1-4 days, depending on the strain. 3. When growth is visible streak out to single colonies on YES and incubate at 25°C-32°C for 2-3 days. Strains stored as slants or patches are streaked out onto YES plates directly, and incubated at 25°C-32°C as appropriate. It is essential to check the phenotype of any re-isolated strain before carrying out any genetic or molecular procedures. 1.3 Testing the Phenotype of a Strain 1. ploidy 2. mating type 3. testing the genotype by PCR 4. temperature/ cold sensitivity 5. auxotrophy 6. adenine mutants It is best to wake up strains on YES before replica plating to test for markers, ts/cs or ploidy etc. After testing a strain in these various ways, it can be stored as a patch at 4 °C on YE agar and generally used for 2-4 weeks without further testing. It is especially important to test regularly for ploidy in strains which diploidise with high frequency (every 2-4 weeks) It is advisable to re-isolate strains from patches/slants kept at 4oC every 6-8 weeks if they are in constant use. Strains which are only used occasionally can be kept on a slant for 6-8 months and only checked when they need to be used. 1) Ploidy It is important to check the ploidy because certain strains of S. pombe diploidise at a high frequency. Haploid cells divide at approximately 12-15 µm in length and are 3-4 µm in width. Diploid cells are both longer (20-25 µm at division) and wider (4-5µm); they are also less viable than haploid cells and a diploid colony contains more dead cells (1-5%). Phloxin B is a stain that accumulates in dead cells, which become stained dark red. By growing a strain in YEP plates it is possible to screen for haploid colonies, which will be stained light pink whereas diploid colonies will be darker pink. This can be confirmed by microscopic examination of the cells. Streaking of strains on a plate next
3
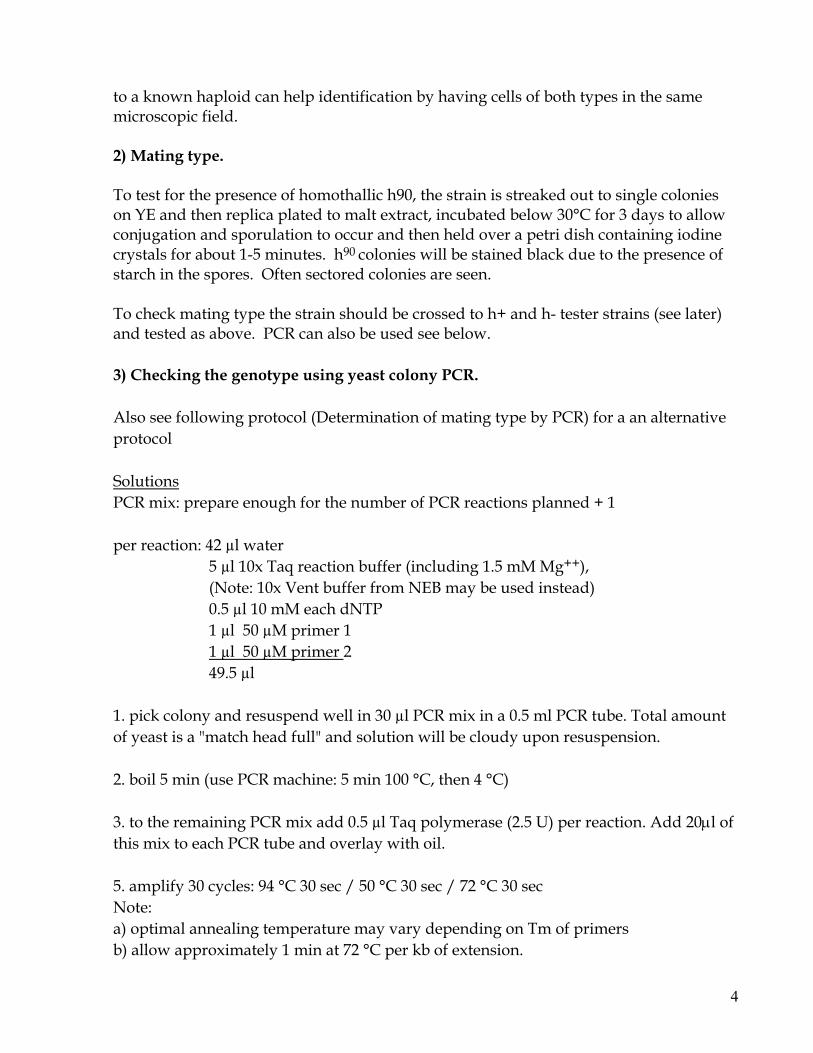
to a known haploid can help identification by having cells of both types in the same microscopic field. 2) Mating type. To test for the presence of homothallic h90, the strain is streaked out to single colonies on YE and then replica plated to malt extract, incubated below 30°C for 3 days to allow conjugation and sporulation to occur and then held over a petri dish containing iodine crystals for about 1-5 minutes. h90 colonies will be stained black due to the presence of starch in the spores. Often sectored colonies are seen. To check mating type the strain should be crossed to h+ and h- tester strains (see later) and tested as above. PCR can also be used see below. 3) Checking the genotype using yeast colony PCR. Also see following protocol (Determination of mating type by PCR) for a an alternative protocol Solutions PCR mix: prepare enough for the number of PCR reactions planned + 1 per reaction: 42 µl water 5 µl 10x Taq reaction buffer (including 1.5 mM Mg++), (Note: 10x Vent buffer from NEB may be used instead) 0.5 µl 10 mM each dNTP 1 µl 50 µM primer 1 1 µl 50 µM primer 2 49.5 µl
1. pick colony and resuspend well in 30 µl PCR mix in a 0.5 ml PCR tube. Total amount of yeast is a "match head full" and solution will be cloudy upon resuspension. 2. boil 5 min (use PCR machine: 5 min 100 °C, then 4 °C) 3. to the remaining PCR mix add 0.5 µl Taq polymerase (2.5 U) per reaction. Add 20µl of this mix to each PCR tube and overlay with oil. 5. amplify 30 cycles: 94 °C 30 sec / 50 °C 30 sec / 72 °C 30 sec Note: a) optimal annealing temperature may vary depending on Tm of primers b) allow approximately 1 min at 72 °C per kb of extension.
4
6. extend final cycle at 72°C for 10 min to ensure complete extension of products, then 4 °C. 7. remove 10 - 15 µl and check on a gel. Gel purified band can be directly sequenced. (This protocol doesn't work with Vent polymerase) Determination of the mating type by PCR Using mat1-P and mat1-M specific primers, it is possible to determine the mating type of a strain even if it is sterile. With common primer MT1, the mat1-P specific primer MP or mat1-M specific primer MM produces a characteristic PCR product, 987bp or 729bp respectively. h+/h- diploid cells or h90 cells give both bands. The sequence of the primers are MT1:AGAAGAGAGAGTAGTTGAAG , MP:ACGGTAGTCATCGGTCTTCC, and MM:TACGTTCAGTAGACGTAGTG. Use 20ul for each tube and add 1ul of template DNA prepared from pombe colony or culture. Instead of preparing DNA, picked fresh colony can be used if it is denatured in a small amount (~5ul) of water at 95C for 10min. Add 10ul mineral oil on top of each reaction. Reaction mixture H2O........................76ul X10 buffer..............10ul 2mM dNTPs..........10ul 50uMMT1primer....1ul 50uMMPprimer......1ul 50uMMMprimer.....1ul Ampli Taq Pol.........1ul -------------------------------- total ..........100ul PCR cycle step1 94C 4min step2 94C 30sec step3 52C 30sec step4 72C 2min repeat step2~step4 for 30cycles step5 72C 5min After the reaction, add 2ul of loading buffer and ~20ul of chloroform. Analyze in an agarose gel.
5
4) Temperature/cold sensitivity. Many temperature sensitive (ts) and cold sensitive (cs) mutants have been isolated in S. pombe. They can be checked by replica plating onto YEP (YES + phloxin B) and incubating at the restrictive temperature. Phloxin B will stain the dead cells and these can be examined under the light microscope for checking the ts /cs phenotype. 5) Auxotrophy. The auxotrophic markers most commonly used in S. pombe require adenine, glutamic acid, histidine, leucine, lysine and uracil, although others are available. We use 225mg/L (12ml of 7.5mg/ml stock solution per 400ml medium, or, for uracil, 24ml of a 3.75mg/ml stock per 400ml medium) although it is OK to go down to 75mg/L except when growing leu- strains, which are slow to get going under these conditions. To test for auxotrophy the strain is grown up to single colonies on YES and then replica plated to minimal medium with and without the appropriate supplement. The plates are incubated for 1-2 days and then examined for growth under these conditions. Strains marked with auxotrophic markers are often compromised for growth even in the presence of the appropriate supplement.. e.g. leu- cells are slow to exit from starvation and ura- cells have some cell wall defects. For this reason it is best to cross out all unnecessary markers when carrying out physiological experiments. 6) Adenine mutants Certain alleles of ade6 turn pink when grown on low adenine medium (10mg/L, or 0.5ml of a 7.5mg/ml stock solution per 400ml medium), due to the accumulation of a metabolic precursor. Ade6-M210 turns darker than ade6-M216, ade6-704 is the darkest of all. 1.4 Growing S.pombe Haploid strains of S. pombe grow with the following generation times: (Diploid strains grow similarly) Medium Temperature (oC) Generation time YE 25 3h 29 2h 30min 32 2h 10min 35.5 2h
6
minimal 25 4h 29 3h 32 2h 30min 35.5 2h 20min For mutant strains the generation times may be longer. If you have an exponentially growing culture of a particular strain you can calculate the generation time by measuring the OD595 at 2 known time points. Simply stated, this is the time required for the population to double. This can be calculated using the following equation: T = log (2t2-t1) T = generation time ---------- y = cells/ml at time t2 log (y/x) x = cells/ml at time t1 Temperature sensitive strains are generally grown at 25oC where 35.5-36.5oC is the restrictive temperature. The restrictive temperature for cold sensitive strains is 20oC. Wildtype cells grown above 36.5°C are sick, and below 18°C wildtype cells grow very slowly and are not healthy. The media used can also effect the temperature sensitivity of a mutant. Wild type strains are generally grown at 29-32oC. As S. pombe cells enter stationary phase the cells generally accumulate in G1 or G2, depending on whether they are deprived of nitrogen or glucose, respectively, and the cells become rounder and more refractile under phase microscopy. In supplemented yeast extract medium and minimal medium, (EMM2 is the one we use) glucose is usually limiting and cells accumulate in G2. Liquid Cultures For physiological experiments it is important that cultures are maintained in mid-exponential growth between 2 x 10⁶ and 1 x 10⁷ cells/ml. The optical density (OD) of a culture can be used to measure the concentration of cells, where OD595 = 0.1 for approximately 2 x 10⁶ cells/ml (this wavelength measures light scattering ). Note: this relationship has been calculated for the Pharmacia LKB Ultrospec III, in use in the lab, but it may differ with different spectrophotometers and changes when cells much larger or smaller than wild type are used. It should, therefore, be calculated again for other types of spectrophotometers The relationship between OD and cell number is linear up to about OD 1. To generate cultures in mid-exponential growth use a fresh colony or overnight patch of a strain of checked phenotype to inoculate 10 ml YES (or minimal medium if the strain carries a plasmid with selectable marker) and incubate for 1-2 days at the appropriate temperature until cells are in early stationary phase. ( See note at the end of the
7
page)This pre-culture can then be used to inoculate a larger culture, taking into consideration the generation times . The following formula can be used to calculate the volume of preculture from which to generate a larger, overnight culture, which is grown up with shaking: (Y x 0.4) / 2n _________________ OD where Y is the volume of large culture required, OD is the OD595 of the preculture, n is the expected number of generations -1 (to allow the cells to recover from stationary phase) and 0.4 refers to a suitable O.D. for an exponential culture. Flask size should be selected according to the required volume of culture: 25ml flasks for up to 10ml culture, 100ml flasks for up to 50ml, 200ml for 100ml cultures, 250ml for 125ml cultures and 500ml for 250ml cultures. It is important not to inoculate stationary cultures at an O.D. of less than about 0.05, because S. pombe cells grow better together or in conditioned media and are often reluctant to get going when alone in liquid culture. The media for growing S. pombe strains are given in Table I. YES liquid or agar containing solid medium is used for vegetative growth. Yeast extract from most sources when used in YES inhibits conjugation and sporulation. EMM2 minimal media is synthetic and therefore highly reproducible. For this reason it is recommended for physiological experiments with the required supplements added. YES is however prefered for certain application: for actin staining, branching experiment and certain blocks (eg nda3). Note: Certain strains have difficulty in exiting from stationary phase (cdc25, ura-)therefore it is best to inoculate from mid-exponential phase. Not shaking the cells in preculture could also help because it stops cells entering late stationary phase. When inoculating into EMM from mid exponential YE culture, it might be better to spin the cells from the preculture down, in order to reduce the amount of YE carried over. 1.5 Fission Yeast Classical Genetic Techniques. Genetic Crosses Conjugation and sporulation cannot take place in S. pombe except under conditions of nutrient starvation. EMM lacking nitrogen and containing 1g/l sodium glutamate is generally used for genetic crosses. See note for alternative media.
8

Several crosses can be carried out on a 9 cm ME plate. To cross two strains a loopful of freshly growing h- and a loopful of freshly growing h+ are mixed together on a ME plate. A loopful or two of sterile distilled water is then used to thoroughly mix the cells on the agar plate to an area of about l cm2. The cross is left to dry and is then incubated below 30°C, as conjugation is severely reduced above this temperature. Fully formed four spore asci can be seen after 2-3 days incubation Zygotic asci (those produced by conjugation between 2 different mating types) can be distinguished from azygotic asci (those produced by sporulation of a diploid strain which is heterozygous at the mating type locus) by their appearance, thus: Zygotic ascus Azygotic ascus
When carrying out genetic crosses for recombination mapping it is useful to have unlinked markers to ensure that recombination has occurred. For sporulation or crosses in liquid medium, use minimal glutamate (1g/L Na glutamate) instead of NH4Cl as the nitrogen source. It is especially important to test ploidy of "high risk" strains - e.g. wee1.50 before crossing. A cross between a homothallic and a heterothallic strain mostly generates asci of the homothallic parent. This is because yeast cells prefer to mate with sister cells which are of different mating type due to homothallic switching. Mixing cells in a 10:1 ratio of the heterothallic:homothallic strain will increase the likelyhood of a cross between the two strains and is usually sufficient for strain construction. If conjugation is very poor then it is preferable to first select a diploid hybrid between these strains (see below) and then subject this to tetrad or random spore analysis. Note: Other media that can be used for crosses are malt extract, even cells which are not fresh can be mated on this medium, or YEPD (1% Yeast extract, 2% peptone, 2% glucose). Strains will also mate on minimal medium and media including thiamine, but it takes longer (3-4 days at 25oC, 2-3 days at 29oC). SPA is also an alternative which gives rapid and efficient mating, SPA-Ca2+ gives even better mating efficiencies. Genetic Analysis of Products of Meiosis A) Tetrad analysis. A two day old cross is usually used for tetrad analysis. At this stage the ascus wall has not yet started to break down. It is possible to keep a plate at 4oC before pulling tetrads.
9

Asci are placed in a line about 3mm apart on a YES plate using a micromanipulator (we have two: one from Singer-MSM which uses an inverted plate and is automated and one from Zeiss Jena which uses upright plates and spores are dragged across the plate rather than lifter off the plate). The asci walls are then left to breakdown at 37°C for about 3-5 hours, or at 20°C overnight. It is usually a good idea to isolate more asci than you will need to dissect at the end, as some may not breakdown their cell wall or do so very slowly. Each ascus is then micromanipulated to give a line of four isolated spores, separated by about 3-5mm. The spores are incubated until colonies form at the appropriate temperature for the cross. Digestion of the ascus wall with enzymatic treatment is not necessary since the spores easily fall apart giving free spores. Also, unlike S. cerevisiae spores, S. pombe spores do not stick to each other. This means the technique of tetrad dissection is generally easier than with S. cerevisiae. B) Random spore analysis. Using a three day old cross check for the presence of asci under the light microscope. Random spore analysis allows many more spores to be examined than in tetrad analysis and in this way recombination mapping and strain construction can be carried out. However, it is important that all the classes of spores are viable when studying recombination frequencies, otherwise tetrad analysis becomes necessary. 1 ml of sterile distilled water is inoculated with a loopful of the cross, 20ul of a 1 in 10 dilution of Helicase (Helix pomatia juice) is added and the mixture incubated overnight at 25-29°C or for at least 6 hours at 29°C. Helicase is a crude snail gut enzyme that breaks down the ascus wall and kills vegetative cells. 5ul of glusulase in 1 ml of sterile distilled water can be substituted for the Helicase. The spore number/ml is counted using a haemocytometer. Between 200-1000 spores/plate can be plated out on YES Agar or selective medium. The plates are then incubated until colonies form. NB: if the cross works reasonably well 100uL of a 1:1000 dilution will give approx. 200 colonies per plate if you inoculate the 1ml culture with a generous loopful of cross. Easier than counting, especially if you are doing large numbers of crosses. Tests for Allelism A). Recombination Frequency (looking for linkage) Pairwise crosses are carried out between the mutants to be mapped; resulting asci are treated with helicase as normal and approx. 103 spores plated out. If no wild type progeny are produced, and therefore linkage is suspected, this should be confirmed by looking at large numbers of spores. It is helpful to have unlinked markers present in at
10
least one of the parental strains to ensure that colonies which result are the products of crossing, and not simply cells which have survived the helicase treatment. The presence of wild type progeny in a cross between two temperature sensitive strains indicates that the two mutations under observation are in different genes, as recombination has taken place. In this case Mendelian segregation will result in 25% of the spores being wild type, assuming the two genes are un-linked. The degree of linkage between two genes can be examined by calculating recombination frequencies based on the results from many individual crosses, as described above. B) Complementation Tests A diploid is constructed (see below) from 2 recessive mutations. If the diploid is wild type, genetic complementation is taking place and it can usually be assumed that the two mutations are in different genes. It should be borne in mind when doing these types of studies that it is possible to get intragenic recombination in large genes where several protein subunits are involved. Construction of Double Mutants These can usually be made by free spore analysis and selecting microscopically for the required phenotype (or by replica plating where suitable nutritional markers are involved). Where the double mutant cannot be distinguished so easily (or where it is not known what the phenotype of the double mutant will be),tetrad analysis is carried out on the meiotic progeny of a cross between the two strains of interest. Three types of tetrad are normally produced: the parental ditype (PD) if there is no recombination, the tetratype (TT) if there is single crossing -over (i.e. two recombinants are produced per ascus) and the non-parental ditype (NPD) if there is double crossing-over (ie. all recombinants are produced), or if the two genes are on different chromosomes, (by random assortment on the metaphase plate). It is usually possible to determine the types of tetrads produced, in say a cross between two ts strains, by examining the phenotype after replica plating to phloxin B at the restrictive temperature. Where non-parental ditypes are produced, two spores will normally be wild-type, and two will be the double mutant, and thus the double mutant can easily be identified in this type of tetrad. In parental ditypes, none of the progeny will be double mutants, and in tetratypes 1 out of the 4 will be the double mutant (3 will be ts assuming the double mutant is ts) and 1 will be wild-type). It will sometimes be possible to determine which is the double mutant by microscopic examination at the restrictive temperature. Tetrad types are normally produced in the proportions 1PD: 1 NPD: 4TT for markers that are unlinked but on the same chromosome. If they are on different chromosomes the number of tetratypes depends on the distance of the loci from the centromere. A predominance of parental ditypes suggests linkage.. The presence of a double mutant can be confirmed by back-crossing if the single mutants are
11
phenotypically different. A double mutant backcross will give a 3:1 segregation of mutant:WT. If a single mutant is backcrossed, there will be a 2:2 segregation. Tests for Dominance/Recessiveness This is achieved by the construction of diploids containing both a mutant and a wild type copy of the gene to be tested; if the mutant phenotype is not expressed in the diploid , then it is usually assumed that the mutation is recessive, whilst expression suggests the presence of a dominant mutation; however, unless very large numbers of diploids are tested in this way, it is wise to check that growth/lack of growth is not due to the presence of a homozygous diploid possessing 2/0 copies of a wild type/ mutant gene - such events occur in S.pombe at low frequency by recombination between replicated chromosomes in the zygote. The frequency with which such events occur is affected by map position - recombination frequency decreases with increasing distance from the centromere, and also at certain recombination "hotspots", for example near the mating type locus on chromosome II. This could easily be sorted out by pulling tetrads on the diploid under study. In addition, the diploid may be subjected to random spore analysis to check that 50% of the spores have the wild type phenotype and the remaining 50% have the mutant phenotype. Another important use of this approach is if 2 mutants are very closely linked and you want to know whether or not they are in the same gene. A diploid is made from the 2 strains and complementation tested under restrictive conditions. Growth indicates close linkage but different genes. Again, tetrads on such a diploid would confirm that the genotype is as predicted. Isolation of Diploid Strains Diploid cells arise spontaneously in most S. pombe strains probably as a result of endoreplication. This characteristic can be used to isolate homozygous diploids of any strain. The strain is streaked out to single colonies on YEP (YE + Phloxin B) agar and incubated until colonies form. Diploids can be identified as clones that stain dark red with Phloxin B and which contain large cells upon microscopic examination. These diploids can undergo a diploid mitotic cycle and when starved of nutrients can conjugate with diploid cells of the opposite mating type to form a tetraploid zygote. This can be sporulated to generate four diploid spores, although aberrant segregation of chromosomes can occur during the tetraploid meiosis. Homothallic strains also generate diploid cells which can switch mating type and therefore be induced to undergo meiosis. The cells can directly produce azygotic asci
12
without mating and thus can be unambiguously identified. (They can also mate with each other) Sporulating diploids can be isolated by crossing h- and h+ haploids with complementary growth requirements, for example using strains with the markers leu1-32 h- and a ura4-d18 h+. At various time-points after crossing (e.g. 8, 12, 24 hours), when conjugation has occurred, a loopful of the cross is streaked out onto minimal medium which will only allow growth of a conjugated diploid. However, since mating is rapidly followed by meiosis and sporulation, many of the colonies growing on selective media will be prototrophic haploid segregants. To circumvent this problem, ade6-M210 and ade6-M216 mutations are commonly used. ade6-M216 colonies are light pink and ade6-M210 dark pink on plates of YE medium or EMM containing 10mg/L adenine because of accumulation of a red adenine precursor. On media containing adenine in excess of 10mg/L the red colour is not observed. Diploid cells containing both mutations grow in the absence of adenine and the colonies formed are white due to intragenic complementation between the two ade6 alleles. Because the alleles are tightly linked and there is infrequent gene conversion, spores generated by meiosis are unlikely to be adenine prototrophs and will not form colonies on the selective media. Sporulating diploids are very unstable and will generate spores if they enter stationary phase from minimal medium. They can be maintained on yeast extract medium which inhibits sporulation. Alternatively, non sporulating diploids can be derived by crossing over at the mating type locus which leads to homozygosis at the mating type locus. These arise fairly frequently and can be screened for by replica plating onto malt extract and looking for non iodine positive colonies which are not undergoing sporulation. Alternatively, Mat1-B102 can be used. This strain is defective in the Mat1+ gene required for meiosis, but functions normally as an h- . So, you can cross it to an h+ strain and sporulate, then you can cross to an h- strain if you want stable diploids. Sometimes it is required to cross a diploid and a haploid strain. Such a cross yields less than 10% spore viability and most of the segregants are slow growing because of aneuploidy. Since S. pombe has only three linkage groups, normal haploid and diploid segregants can be obtained at a reasonable frequency from random spores; they are easily identified since they grow well. Protocol for generating an h+/h- sporulating diploid 1) cross an ade6-M210 strain to an ade6-M216 strain on EMM-Glutamate. Put plate 29 oC. 2) 8h, 12h and 24h after mixing the cells, take a loop-full and streak on minimal medium lacking adenine (EMM -ade). Incubate this plate at 32 oC. 3) Pick colonies as soon as they appear on the EMM -ade plate (typically after 2-4 days, If diploids are left too long on the EMM -ade plate they will undergo sporulation) and streak on YE (no supplements). Put the YE plate to grow at 32 oC for two days.
13
4) There will usually be two types of colonies on the YE plate: larger, white colonies (these are diploids) and smaller, red colonies (these are haploid colonies ade-which grew from spores generated when the diploid reached stationary phase on the EMM -ade plate and underwent sporulation, they are red because YE contains low levels of adenine and ade- cells will grow but accumulate a red metabolic precursor ). Check under the microscope to make sure that cells in the darker colonies have a larger size. Patch the diploids on YES and replica plate the YE plate on EMM-glutamate. Check after 2-3 days that the diploids picked are sporulating. Remember to propagate the diploid on YES, which inhibites sporulation. If the diploid is to be used for deletion or tagging of a gene it is a good idea to dissect a couple of tetrads beforehand to make sure that no recessive mutation is present in the diploid. Protoplast Fusion This technique is required if crosses between two strains will not occur and a diploid is desired. Solutions: 0.65 M Kcl 1M sorbitol 30% PEG6000 100mM CaCl2 Novozyme Procedure Grow cells to mid-log phase in minimal medium (nb MIN with low glucose is supposed to make the cell wall weaker but in my experience it is not necessary and some strains don't like it) Harvest cells, wash twice with water and once with 0.65M KCl. Resuspend pellet in 0.65M KCl containing 1 mg/ml Novozyme, at about 108 cell/ml. Incubate at 30oC. Check after about 15 min, you should see spheroplasts. If not, you can increase the enzyme concentration, but it's advisable to start slowly with unknown strains. Continue incubation in Novozyme until protoplasts are formed. It's not enough to have spheroplasts!
14
Wash protoplasts three times with 1M sorbitol. Note: spin them at 2000 RPM, 8 min. Do NOT vortex to resuspend, it can be done with a loop in a small volume first and then by gently shaking the tube in a larger volume. Resuspend pellet in 2ml of 1:9 CaCl2 : PEG mixture. You do not have to resuspend completely. Note: mix it just before use, do NOT autoclave together, because it precipitates. Incubate at room temperature for 20min. Plate onto selective medium containing 1M sorbitol. Note: plating in top agar (same as selective, with 1% agar) increases regeneration frequency, although makes it impossible to replicaplate colonies. Protoplast fusion2 1. Grow cells in MML (0.5% Glucose + thiamine) to late log-phase. Since total 1-5 * 107 cells are required, more than 10 ml should be cultured. 2. Measure OD at 595 nm. 3. Spin down and wash once with H2O and then suspend with 0.5 ml bufferA (1.2M sorbitol, 50 mM citrate phosphate (pH 5.6), 50mM β-ME). β -ME can be omitted. 4. Mix cells with equal cell number and total 1ml. 5. Add 0.2 ml Novozyme234soln (bufferA + 5 mg/ml Novozyme) You can increase Novozyme concentration to 5 mg/ml as final. 6. Incubate 25-30˙C for 1hr with rotating. After incubation, you should check whether Novozyme works well under microscopy and confirm that most of the cells are round after addition of equal amount of H2O. Usually 20-70% of the cells were round. 7. Spin down at 2000rpm for 15 sec. If the pellet is not visible or soft, change the angle of the tube and spin down again. 8. Discard the sup and add 1 ml of bufferB (1.2 M sorbitol, 30mM Tris-HCl pH7.6) to the tube. 9. Spin sown again and discard the sup and add 1 ml of bufferB. 10. Spin sown again and discard the sup and add 0.3 ml PEG buffer (30% PEG4000, 10 mM Tris-HCl pH7.6, 10mM CaCl2). Be careful not to suspend the pellet.
15
11. Incubate at 25-30 ˙C with standing for 30 min. 12. Discard the 0.15ml of sup and plate the cells on SD sorbitol plate (0.67% SD, 1% glucose) and incubate 25-30˙C for 5-14 days. 1.2 M sorbitol (H2O 830 ml + sorbitol 220g) 1.6 Mapping your gene Why bother putting your gene on the genetic map? There are several reasons. 1) First of all if a gene cannot be isolated by classical complementation of a mutant phenotype, it is possible to clone it by physical mapping. Initially by crude mapping and then by the use of ordered cosmids to rescue the function and to locate the gene. The mutated gene responsible for a subtle phenotype can be isolated in this way. 2) In addition, a mutation with an interesting phenotype may have already been identified that lies in the same locus as your gene and which sheads light on its function. 3) Mapping completes the genetic characterisation of your gene. However, there is admittedly limited information gained, and most people now seem to map their gene by accident, because it shows linkage to some other locus present when strain constructions are carried out. The first step to mapping your gene is to assign it to a chromosome. There are several ways to do this. The older way requires chromosome loss expts. You construct a non-sporulating diploid with differently marked chromosomes. You treat it with fluorophenylalanine (FPA) , a drug which promotes chromosome loss. If using minimal, use 0.04% of m-FPA, and if using YEA, use 0.1% p-FPA. Some workers consider that m-FPA is less toxic, and therefore the agent of choice. Because pombe rapidly haploidises when one chromosome is lost, you end up associating your gene with the presence or absence of one of those marked chromosomes. Another option is to use a swi5 strain. A swi5 mutant is not only defective in switching (hence the name) but has a general reduction in recombination frequency. That is, with a five fold reduction in recombination frequency, distant linkage that would otherwise be invisible can be seen. Thus with just a few markers in the background, the gene of interest is likely to show linkage to at least one. Practically, this means crossing the gene of interest into a swi5 background, and mapping against a swi5 strain with markers on all chromosomes. The most straightforward way of assigning a cloned gene to a chromosome is getting a strip of a chromosome blot and probing it by standard Southern methods. Since pombe has only 3 chromosomes, this gives an unambiguous result.
16
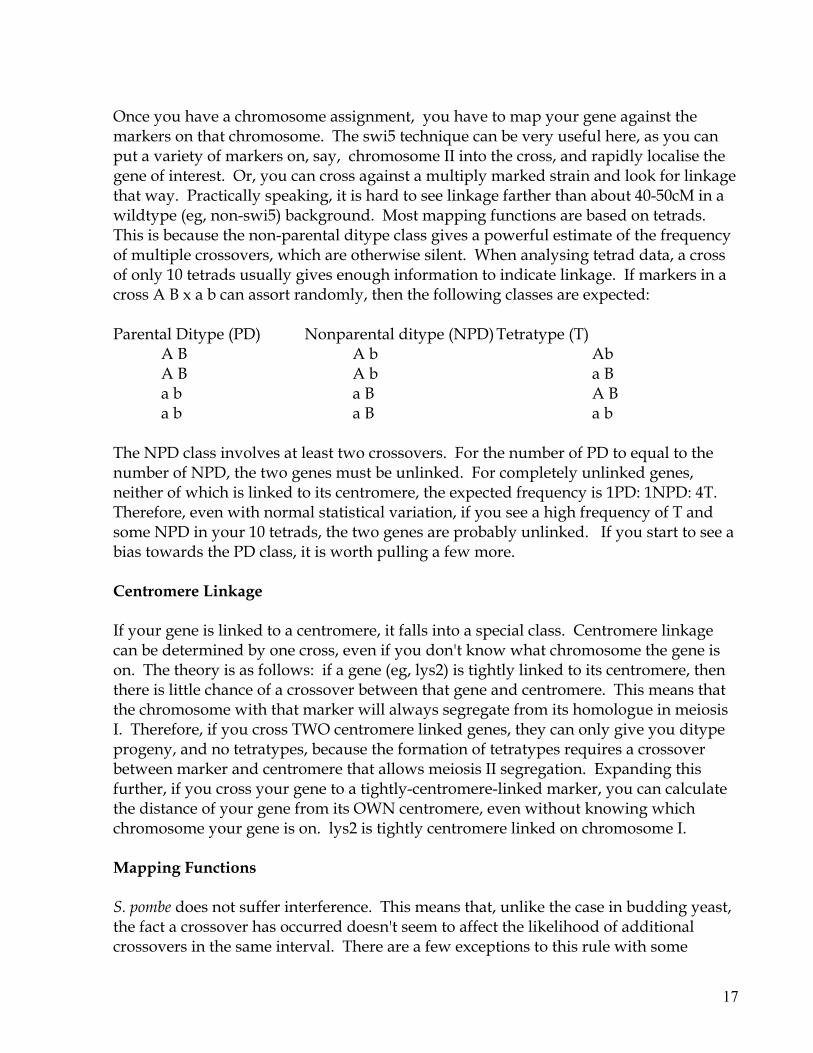
Once you have a chromosome assignment, you have to map your gene against the markers on that chromosome. The swi5 technique can be very useful here, as you can put a variety of markers on, say, chromosome II into the cross, and rapidly localise the gene of interest. Or, you can cross against a multiply marked strain and look for linkage that way. Practically speaking, it is hard to see linkage farther than about 40-50cM in a wildtype (eg, non-swi5) background. Most mapping functions are based on tetrads. This is because the non-parental ditype class gives a powerful estimate of the frequency of multiple crossovers, which are otherwise silent. When analysing tetrad data, a cross of only 10 tetrads usually gives enough information to indicate linkage. If markers in a cross A B x a b can assort randomly, then the following classes are expected: Parental Ditype (PD) Nonparental ditype (NPD) Tetratype (T) A B A b Ab A B A b a B a b a B A B a b a B a b The NPD class involves at least two crossovers. For the number of PD to equal to the number of NPD, the two genes must be unlinked. For completely unlinked genes, neither of which is linked to its centromere, the expected frequency is 1PD: 1NPD: 4T. Therefore, even with normal statistical variation, if you see a high frequency of T and some NPD in your 10 tetrads, the two genes are probably unlinked. If you start to see a bias towards the PD class, it is worth pulling a few more. Centromere Linkage If your gene is linked to a centromere, it falls into a special class. Centromere linkage can be determined by one cross, even if you don't know what chromosome the gene is on. The theory is as follows: if a gene (eg, lys2) is tightly linked to its centromere, then there is little chance of a crossover between that gene and centromere. This means that the chromosome with that marker will always segregate from its homologue in meiosis I. Therefore, if you cross TWO centromere linked genes, they can only give you ditype progeny, and no tetratypes, because the formation of tetratypes requires a crossover between marker and centromere that allows meiosis II segregation. Expanding this further, if you cross your gene to a tightly-centromere-linked marker, you can calculate the distance of your gene from its OWN centromere, even without knowing which chromosome your gene is on. lys2 is tightly centromere linked on chromosome I. Mapping Functions S. pombe does not suffer interference. This means that, unlike the case in budding yeast, the fact a crossover has occurred doesn't seem to affect the likelihood of additional crossovers in the same interval. There are a few exceptions to this rule with some
17
recombinational hotspots, but basically it means that the usual mapping functions give a reasonable approximation of distance. The standard formula is the Perkins formula: (T + 6NPD) distance in cM = ---------------------- (PD + NPD + T) This formula tends to under estimate the actual distance, because of multiple crossovers. In practise, anything greater than 60cM is unreliable. It is useful to compare the Perkins answer with the Papazian answer, which uses the Poisson distribution to estimate the number of multiple crossovers: (PD - NPD) distance in cM = 100 X -0.5 ln ---------------------- (PD + NPD + T) The answers should be fairly comparable. Now that cosmid and P1 libraries are available physical mapping is also possible. 1.7 Mutagenesis of Yeast Strains Both EMS and nitrosoguanidine can be used for mutagenesis, the former is safer to use but nitrosoguanidine is a more effective mutagen. Nitrosoguanidine tends to be the agent of choice. Nitrosoguanidine mutagenesis. 1) First do a survival curve 50% survival is often used for mutagenesis as there is approximately one hit per gene 2) grow 50ml cells in EMM2 to OD595 0.4 (approx), wash the cells in TM (50mM Tris Maleate buffer pH6) 3) Resuspend the cells at 3.5X10⁸/ml 4) Take 350ml (X ml) and add 150ml (X/2.3ml) 1mg/ml NG in TM so the cells are at 2.5X10⁸/ml 5) Incubate the cells at the permissive temperature in fume hood for 0, 20, 40, 60, 90min. Remove 50ml (1.25X10⁷) at each time point and wash 1X in TM and 2X in saline. You may need to spin the cells from 2-4min to ensure a good pellet. 6) Resuspend the cells in 1ml EMM2 and leave to recover for one cell cycle shaking occasionally, dilute to 104 and 103/ml and plate
18
100ml of each on min medium and incubate at the permissive temperature until colonies appear. 7) Count the colonies from each time point and estimate the % survival ( No colonies at Time point/No colonies at T0 X 100) The percentage of survivors is usually approximately 40%, 15% and 3% for 30, 60 and 90 minutes, respectively (these percentages are strain dependent). A survival curve can be plotted by plating 100 and 1000 cells/plate and plotting % survivors as a function of exposure time to the mutagen. The length of exposure required to produce the desired level of lethality can the be determined and used in subsequent experiments 8) Using the appropriate time point repeat the mutagenesis using 5X10⁸ cells. After washing the mutagenised cells resuspend at 1X10⁷
cells/ml and incubate for one cell cycle in the fume hood at the permissive temperature (about 3h). Harvest the cells and resuspend in 1ml EMM2 and plate 100ml (1X10⁷ cells) on to 50 plates and incubate at the restrictive conditions. 9) To save repeating the mutagenesis you can take sufficient cells at what you think will be the right time point(s) and keep them in 1ml EMM2 at +4°C until you have done the survival curve. Cells lose viability but keep for a week or so. I do the survival curve after leaving the cells in the cold room overnight. 10) After mutagenesis it is advisable to backcross the strains at least three times to check for the presence of double mutants etc., especially if the mutagenesis has been heavy (>40% lethality). 11) NG is inactivated by soaking any contaminated materials in 0.1M HCl overnight. ALL MANIPULATIONS WITH NITROSOGUANIDINE (INCLUDING INACTIVATION) MUST BE CARRIED OUT IN A FUME HOOD !! 1.8 Media for the fission yeast Schizosaccharomyces pombe. Edinburgh Minimal Medium (EMM 2) (Used for vegetative growth)
19
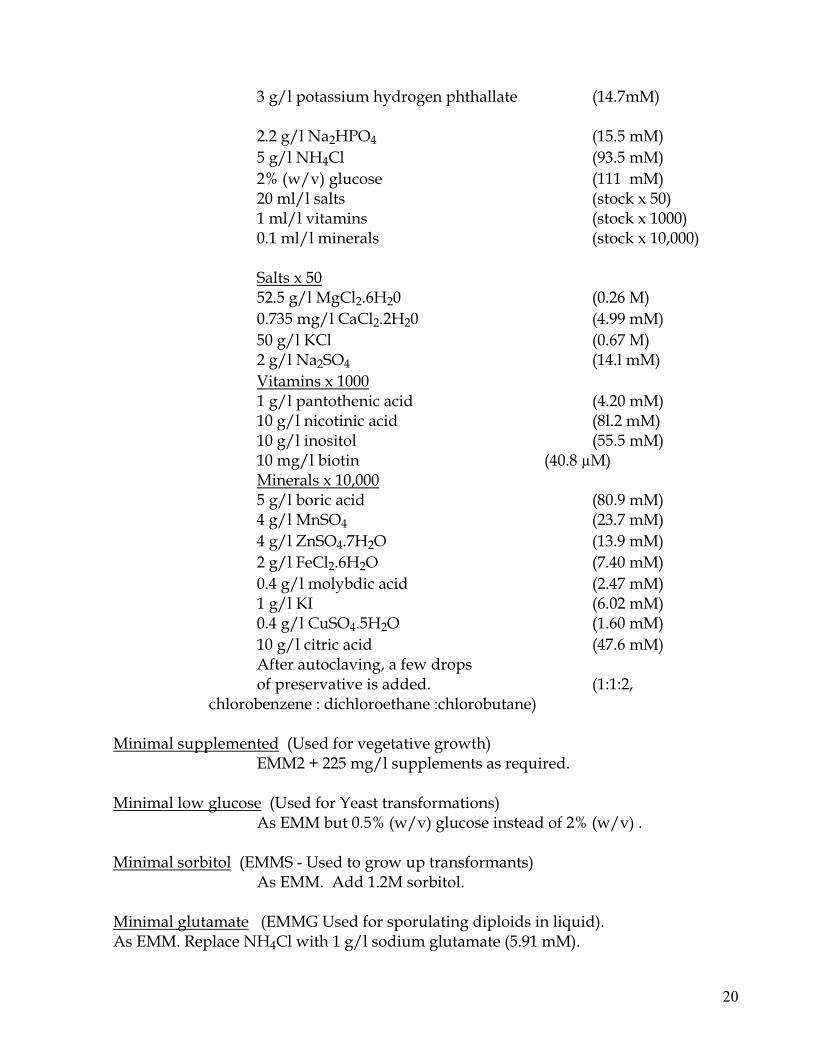
3 g/l potassium hydrogen phthallate (14.7mM) 2.2 g/l Na2HPO4 (15.5 mM) 5 g/l NH4Cl (93.5 mM) 2% (w/v) glucose (111 mM) 20 ml/l salts (stock x 50) 1 ml/l vitamins (stock x 1000) 0.1 ml/l minerals (stock x 10,000) Salts x 50 52.5 g/l MgCl2.6H20 (0.26 M) 0.735 mg/l CaCl2.2H20 (4.99 mM) 50 g/l KCl (0.67 M) 2 g/l Na2SO4 (14.l mM) Vitamins x 1000 1 g/l pantothenic acid (4.20 mM) 10 g/l nicotinic acid (8l.2 mM) 10 g/l inositol (55.5 mM) 10 mg/l biotin (40.8 µM) Minerals x 10,000 5 g/l boric acid (80.9 mM) 4 g/l MnSO4 (23.7 mM) 4 g/l ZnSO4.7H2O (13.9 mM) 2 g/l FeCl2.6H2O (7.40 mM) 0.4 g/l molybdic acid (2.47 mM) 1 g/l KI (6.02 mM) 0.4 g/l CuSO4.5H2O (1.60 mM) 10 g/l citric acid (47.6 mM) After autoclaving, a few drops of preservative is added. (1:1:2, chlorobenzene : dichloroethane :chlorobutane) Minimal supplemented (Used for vegetative growth) EMM2 + 225 mg/l supplements as required. Minimal low glucose (Used for Yeast transformations) As EMM but 0.5% (w/v) glucose instead of 2% (w/v) . Minimal sorbitol (EMMS - Used to grow up transformants) As EMM. Add 1.2M sorbitol. Minimal glutamate (EMMG Used for sporulating diploids in liquid). As EMM. Replace NH4Cl with 1 g/l sodium glutamate (5.91 mM).
20
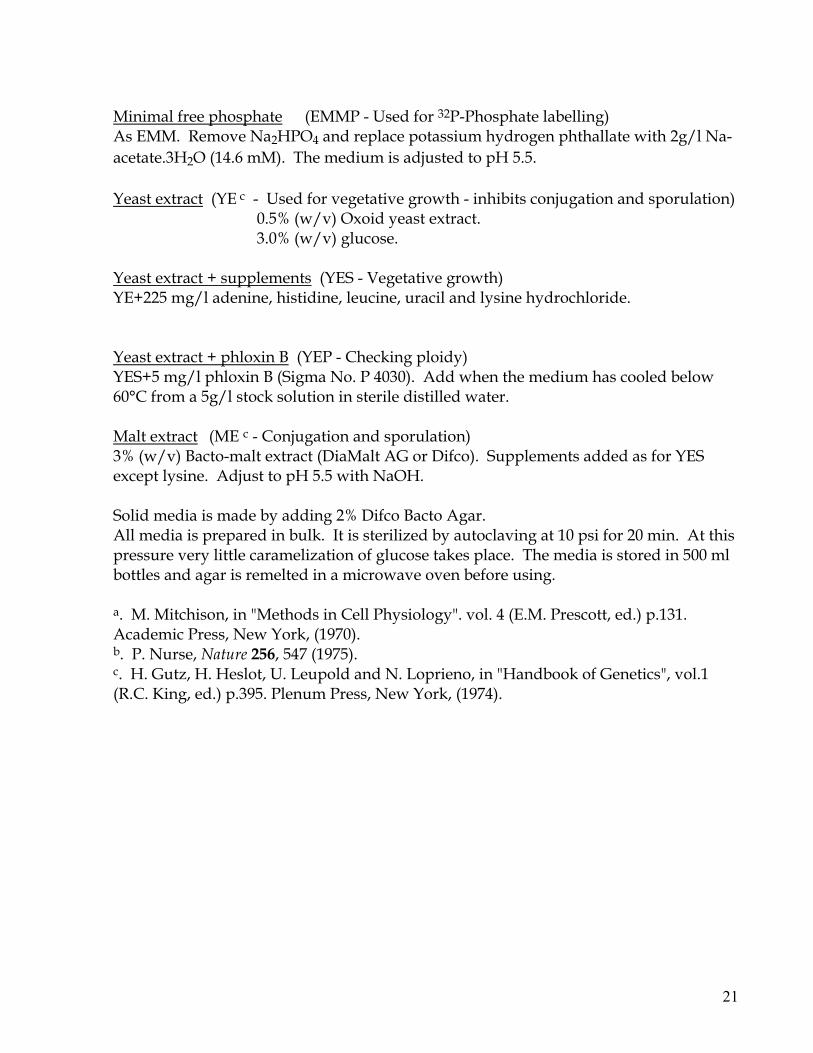
Minimal free phosphate (EMMP - Used for 32P-Phosphate labelling) As EMM. Remove Na2HPO4 and replace potassium hydrogen phthallate with 2g/l Na-acetate.3H2O (14.6 mM). The medium is adjusted to pH 5.5. Yeast extract (YE c - Used for vegetative growth - inhibits conjugation and sporulation) 0.5% (w/v) Oxoid yeast extract. 3.0% (w/v) glucose. Yeast extract + supplements (YES - Vegetative growth) YE+225 mg/l adenine, histidine, leucine, uracil and lysine hydrochloride. Yeast extract + phloxin B (YEP - Checking ploidy) YES+5 mg/l phloxin B (Sigma No. P 4030). Add when the medium has cooled below 60°C from a 5g/l stock solution in sterile distilled water. Malt extract (ME c - Conjugation and sporulation) 3% (w/v) Bacto-malt extract (DiaMalt AG or Difco). Supplements added as for YES except lysine. Adjust to pH 5.5 with NaOH. Solid media is made by adding 2% Difco Bacto Agar. All media is prepared in bulk. It is sterilized by autoclaving at 10 psi for 20 min. At this pressure very little caramelization of glucose takes place. The media is stored in 500 ml bottles and agar is remelted in a microwave oven before using. a. M. Mitchison, in "Methods in Cell Physiology". vol. 4 (E.M. Prescott, ed.) p.131. Academic Press, New York, (1970). b. P. Nurse, Nature 256, 547 (1975). c. H. Gutz, H. Heslot, U. Leupold and N. Loprieno, in "Handbook of Genetics", vol.1 (R.C. King, ed.) p.395. Plenum Press, New York, (1974).
21
Section 2 Molecular Genetics 2.1 S. pombe plasmids. S. pombe plasmids consist of a bacterial origin of replication and selectable marker, a yeast selectable marker and an equivalent to an autonomous replication sequence (ars) which is responsible for high frequency of transformation. Yeast markers. Budding yeast markers used in S. pombe are the LEU2 and URA3 genes. Plasmids containing these markers complement the S. pombe mutations leu1- and ura 4-. The URA3 gene is expressed very poorly in S. pombe and does not rescue the ura 4- mutation when it is present as a single copy or even at moderate levels. S. pombe markers commonly used are ura 4+, sup3-5., leu1, his3, and his7. Autonomous replication sequences (ars) In contrast to S.cerevisiae, in S. pombe a bacterial plasmid such as pBR322 carrying a marker gene such as LEU2 is able to replicate often to high copy number. However, the transformation frequency obtained when using such plasmids is very low. The addition of S. pombe ars1+ sequences or the S.cerevisiae 2 µm origin leads to high frequency of transformation and reduction in the copy number. So it seems that in S. pombe high frequency of transformation and effective replication capacity are to some extent independent phenomena. Plasmid vectors based on 2 µm (pDB248, YEp13) are mitotically unstable, their copy number is low, they are much more prone to rearrangements (tandem duplications or deletions) and they are more difficult to recover from fission yeast than plasmids carrying S. pombe ars1+. Plasmids containing ars1+ are also very unstable (with the exception of pFL20 and pMB332); their copy number is higher and they tend to produce polymers with various numbers of repeats units. pFL20 and pMB332 yield rather stable transformants both mitotically and meiotically, due to the presence of a stb (stable) element . This element is not an ars sequence nor it is a centromeric sequence. Plasmids containing this element still segregated asymmetrically ten times more frequently during mitosis than S.cerevisiae CEN plasmids.
22
Expression vectors. Plasmids derived from the ones described above have been used to increase the expression of certain gene products. pSM1 and pSM2 are derivates from pDB248, made by inserting the SV40 early promoter . Genes linked to this promoter are expressed at moderate levels. pEVP11 contains the S. pombe adh+ promoter inserted into YEp13 S.cerevisiae vector. pART1 and pMB332 also have the S. pombe adh+ promoter inserted into pIRT2 and pFL20, respectively. The adh1 promoter is very active - about 5-20 x greater than the SV40 early promoter. pIRT2 is based on pUC118 and has S.pombe ars1 and S.cerevisiae LEU2 inserted. Recently, plasmids containing inducible promoters have been developed. These include various plasmids containing the thiamine repressible promoter, as developed by Maundrell (1990). Several versions are available in which the promoter sequences have been mutated to different degrees to give lower levels of expression (see Forsburg ref). pREP1 contains the wild type promoter. There is a significant background expression level ie with thiamine. The induced level is about 80X greater than the repressed level and about 6X greater than the level produced by the adh1 promoter. pREP41 has a 6X lower induced level and a 15X lower repressed level than the wildtype promoter. pREP81 has an induced level about 80X lower than the wildtype promoter (comparable to the repressed level of the wildtype promoter), whilst in the absence of thiamine the level is reduced a further 250 fold.
23
The glucose repressible promoter Reference Hoffman & Winston 1989, Gene 84 473-479 This is a URA3 (S. cerevisiae) based vector pCHY21. It has the glucose repressible promoter of the fbp (fructose bisphosphase) gene upstream of a polylinker with 4 unique sites, Xho1, BamH1, PvuII and Nhe1. The promoter is OFF in 8% glucose and ON in 0.1% glucose +3% maltose. The vector has been tested with the cdc13∆90 gene and worked well. All the cells became blocked in mitosis with a cut phenotype by 5 hours after shifting to 0.1% glucose 3% maltose The average induction of fbp::lacZ is repressed derepressed 30 +/- 3 4405 +/-417 Intermediate expression can be obtained using b gal expression 3.0% maltose 523 +/-78 0.2% glucose 289 +/- 37 0.5% glucose 88 +/- 12 1% glucose 55 +/- 6 Problems 1) Promoter is derepressed in stationary phase 2) URA3 is not well expressed when integrated in S. pombe 3 Wild type cells do not grow well in 0.1% glucose+3% maltose Method 1) Grow cells to an appropriate OD in minimal medium +8% glucose. 2) Wash the cells X2 with 0.1% glucose + 3% maltose minimal medium. 3) Resuspend the cells in 0.1% glucose + 3% maltose minimal medium and follow induction. The promoter is derepressed 30 fold by about 5h. 4) The cells should not be allowed to enter stationary phase
24
2.2 Transformations S. pombe transformation is very straightforward and because most laboratory S. pombe strains are isogenic the frequencies are generally high regardless of the strain used. The lithium acetate method supposedly gives higher transformation frequencies although frequently far below the 106 reported; while electroporation is quick, convenient and gives higher transformation frequencies but is not always reproducible. Protoplasting is reproducible, gives a reasonably high transformation frequency but may not be so good for knocking out genes and is not frequently used; Lithium chloride is not used much due to the lower frequencies of transformation. Lithium Acetate procedure I (not used very often) 1. Grow 150 ml culture in MB medium to a density of 0.5 -1 x 10⁷ cells/ml ( OD595 = 0.2-0.5). 2. Harvest the cells at 3000 rpm for 5 minutes at room temperature. 3. Wash cells in 40 ml of H2O and spin them down as before. 4. Resuspend the cells at 1 x 10⁹ cells/ml in 0.1 M lithium acetate (adjusted to pH 4.9 with acetic acid) and dispense 100 µl aliquots into Eppendorf tubes. Incubate at 30°C (25°C for ts mutants) for 60 - 120 minutes. Cells will sediment at this stage. 5. Add 1 µg of plasmid DNA in 15 µl TE (pH 7.5) to each tube and mix by gentle vortexing, completely resuspending cells sedimented during the incubation. Do not allow the tubes to cool down at this stage. Add 290 µl of 50 % (w/v) PEG 4000 prewarmed at 30°C (25°C for ts mutants). Mix by gentle vortexing and incubate at 30°C (25°C for ts mutants) for 60 minutes. 6. Heat shock at 43°C for 15 minutes. Cool the tubes to room temperature for 10 minutes. 7. Centrifuge at 5000 rpm for 2 minutes in an Eppendorf centrifuge. Carefully remove the supernatant by aspiration. 8. Resuspend the cells in 1 ml of 1/2 YE5S by pipetting up and down with a pipetman P1000. 9. Transfer the suspension to a 50 ml flask and dilute with 9 ml of 1/2 YE5S. Incubate with shaking at 32 °C (25°C for ts mutants) for 60 minutes or longer.
25

11. Plate aliquots of less than 0.3 ml onto minimal plates. If necessary, centrifuge the cells at this stage and resuspend in 1ml of media to spread more cells on a plate. Expected transformation frequency is 104 to 105 /µg. Some strains may grow poorly or not at all in MB medium; URA 4 strains in combination with a temperature sensitive CDC allele seem to be particularly intractable. It is possible in some cases to overcome this by the following procedure: 1. From a preculture in YE5S inoculate a 25ml culture of YE5S and grow until in early exponential phase. 2. Harvest cells and resuspend in 200ml minimal medium (with appropriate supplements); grow again till early exponential phase. 3. Harvest cells and resuspend in MB medium for the last 1-2 cell divisions. Lithium acetate procedure II: 1. Grow fission yeast cells in MM to 1x10⁷ cells/ml. 2. Pellet 50ml of cells per transformation. 3. Wash cells in 50ml sterile water. Transfer to eppis in 1ml water. Wash in 1ml of LiAc-TE. 4. Resuspend in LiAc-TE at 2x10⁹ cells/ml (1/200 original volume). 5. Mix 100µl cells with 2µl carrier DNA at 10mg/ml and up to 10µl of DNA; mix gently. 6. Incubate at RT for 10 min. 7. Add 260µl of 40% PEG/LiAc-TE; mix gently. 8. Incubate 30-60 min at 29°C-30°C, or lower for temp. sensitive strains. 9. Add 43µl pre-warmed DMSO; mix gently. 10. Heat shock at 42°C for 5 min. 11. Pellet and wash once with 1ml water. 12. Pellet and resuspend in 500µl water and plate 250µl in duplicate.
26
Solutions: LiAc-TE: 0.1M lithium acetate, 10mM Tris pH 7.5, 1 mM EDTA Carrier DNA: boiled sperm DNA 10mg/ml LiAc-TE-PEG: LiAc-TE plus 40% PEG4000 Electroporation 1. Grow cells to a density of 1 x 10⁷/ml (OD595 = 0.5) in minimal medium. Transformation frequency is not harmed by growth until early stationary phase ( OD595 = 1.5 ). 2. Harvest cells by spinning at 3000 rpm (J 2-21) for 5 minutes at 20oC . Wash once by resuspending in ice-cold water and harvesting; a second time by resuspending in ice-cold 1M sorbitol and harvesting. 3. The final resuspension is in ice-cold 1M sorbitol at a density of 1 - 5 x 10⁹ / ml. 4. 40-100 µl of the cell suspension are added to chilled cuvettes containing the DNA for transformation ( 100 ng ) and incubated on ice for 5 minutes. 5. Dry bottom of cuvette and pulse cells. The electroporator (Jensen) is set to 1.5 kV, 132 Ω, 40 µF. For a BioRad electroporator the settings are 1.5kV, 200 Ω, 25µF. 6. Cells and DNA are transferred to a pre-chilled cuvette and pulsed; 0.9 ml of ice-cold 1M sorbitol is then immediately added to the cuvette; the cell suspension is then returned to the Eppendorf and placed on ice while other electroporations are carried out. 7. Cells are plated as soon as possible onto minimal + sorbitol or minimal medium. Transformants appear in 4 - 6 days at 30oC Transformation efficiencies of between 105/µg DNA and 106 /µg DNA are expected. Note: This method does not seem to work very well with the sup 3-5 marker. Protoplast procedure. 1. Grow 200 ml culture to OD595 of 0.2-0.5 (4 x 10⁶-1 x 10⁷ cells/ml) in minimal medium containing 0.5% glucose and supplements. 2. Harvest cells (at 2000rpm, 5 minutes, J-6), decant supernatant and resuspend the pellet in 10 ml of:
27
20mM Citrate/ phosphate pH 5.6 ( 2.82g/l Na2HPO4, 4.2 g/l citric acid) 40mM EDTA pH 8.0 transfer to 50 ml round bottom tube, e.g. Oakridge tubes. 3. Harvest cells and resuspend each tube in 5 ml of: 50 mM Citrate/ Phosphate pH 5.6 ( 7.1 g/l Na2HPO4, 11.5 g/l citric acid) 1.2M Sorbitol. Adjust to pH 5.6 with 5M NaOH. and add 25 mg NovoZymTM 234 (added after autoclaving). Incubate at 37°C for 15-30 minutes (check under the microscope) until spheroplasts have formed. 4. Add 35 ml of: 10mM Tris-HCl pH 7.6 1.2M sorbitol and divide between 2-4 round bottom tubes ( there should be no more than 3 x 10⁸
spheroplasts/ tube). Spin gently at 2000 rpm for 5 minutes. 5. Wash twice more in 20 ml each time resuspending gently in 1ml first. At the last resuspension take a sample and count the number of protoplasts with a haemocytometer. 6. Resuspend gently first in 1ml then adjust to 2-5 x 10⁸ protoplasts/ ml in: 10mM Tris HCl pH 7.6 10mM CaCl2 1.2M Sorbitol and combine the tubes. 7. Using 100 µl protoplast/ transformation add 1-10 µg of transforming plasmid in up to 1/10 total volume. Incubate at room temperature for up to 60 minutes. 8. Add 1ml of: 10mM Tris-HCl pH 7.6 10mM CaCl2 20% PEG 4000 and incubate at room temperature for 15 minutes.
28
9. Spin at 2000 rpm for 5 minutes, drain well and resuspend the protoplast in 0.2-0.5 ml of: 10mM Tris-HCl pH 7.6 10mM CaCl2 1.2M sorbitol 0.5mg/ml Yeast extract 5µg/ml supplements ( leu, ura, ade, his) Incubate at 30°C for 30-60 minutes. 10. Plate out 0.2 ml aliquots onto well dried minimal sorbitol plates. Transformants appear in 2-5 days at 29-32°C. Transformation frequency is about 1 x 10⁴- 5 x 10⁴ transformants/ µg DNA. Protoplasts can be aliquotted out, stored at -70°C in 10 mM Tris-HCl pH 7.6, 10mM CaCl2, 1.2 M sorbitol (stage 6) and used for at least 2 months. The frequency of transformation is 1 x10³ transformants/µg DNA for protoplasts stored in this way. Lithium Chloride procedure. 1. Grow 50 ml culture to stationary phase in YEPD medium ( 1% yeast extract, 2% peptone, 2% glucose) with shaking at 25-35°C for 24-48 hours. 2. Use 10 ml of this culture to inoculate 40 ml of fresh YEPD medium and incubate for 4-5 hours. 3. Harvest cells at 3000 rpm for 5 minutes. Wash once in sterile distilled water and resuspend in 0.6 ml of buffer I (20 mM Tris-HCl pH 7.5, 2 mM EDTA, 0.2 M LiCl) to give a total volume of about 1.2 ml and a final concentration of 2 x 10⁹ cells/ml. 4. Incubate at 30°C for 1 hour with gentle shaking. 5. In an Eppendorf tube mix: 200 µl of competent yeast cells (4 x 10⁸ cells) with 0.1-1µg plasmid DNA and incubate at 30°C for 30 minutes without shaking. 6. Add 700 µl of buffer II (40% PEG 4000, 0.1M Li-Cl in TE buffer, sterilised with 0.2 µm filters). Mix by inverting the tube gently. Incubate at 30°C for 30 minutes. 7. Heat shock at 46°C for 25 minutes. 8. Spread the cell suspension directly into YNB (0.67% yeast nitrogen base without aminoacids, 2% glucose, 1,5% agar). Colonies appear after four to six days at 30°C. Transformation frequency is 4 x 10³-9 x 10³ transformants/µg of plasmid DNA.
29
2.3 Integration of a plasmid into the genome. In S. pombe integration by homologous recombination is usually more frequent than non-homologous recombination; but for certain loci homologous recombination may only represent about 5-10% of the integration events. On average about 0.1% of the transformants obtained after transformation with an ars plasmid will have an integrated copy of the plasmid at the homologous locus. The frequency of integration can be enhanced up to ten fold by a single cut of the plasmid in the region of interest to facilitate the recombination event. There can be problems concerning the selective markers used that may complicate the integration of a plasmid in S. pombe. The S.cerevisiae URA3 gene on a multicopy plasmid complements S. pombe ura 4- mutations, but is poorly expressed in S. pombe and most of the integrated versions of URA3 fail to complement ura 4- mutations. Therefore LEU2 (does not always work), ura 4+, his3, leu1 or sup3-5 markers should be used. The latter marker is an opal nonsense suppressing tRNA gene which suppresses ade6-704. This marker has a deleterious effect for the cell when present in several copies. On minimal medium supplemented with 10 µg/ml adenine or yeast extract medium ade6-704 mutant colonies are red but when suppressed by sup3-5 they are white. If a sup3-5 containing plasmid is not integrated into the genome then instability leads to cells lacking sup3-5 and hence to the formation of pink colonies. This contrasts with clones containing one copy of the integrated plasmid which are white, and enables a rapid distinction to be made between integrated and non integrated clones. Alternatively, ade6 itself can be transformed into an ade 6 deleted strain. For ura 4+ plasmids the best strain to use is ura 4-D18 that contains a complete deletion of the S. pombe ura 4+ gene and integration by homologous recombination at the ura 4 locus is thus avoided. Recently, the kanMX6 module has been widely used as a heterologous dominant marker that allows selection of G418-resistant cells in S.pombe (see Gene Disruption and Replacement Method II). To isolate an integrant: A 1. Transform a yeast strain with the plasmid of interest. 2. Isolate a transformant colony and grow up in 100 ml of YES medium (i.e. non selective conditions) for about 20 generations (re-inoculate 1ml of this culture into 100 ml of fresh YES medium 2-3 times). 3. Plate out about 1000 cells/plate onto selective medium and incubate until colonies form. These colonies should be stable due to integration of the plasmid into the genome. This can be tested by replica plating to YES medium twice and then back to selective medium.
30
4. Confirm the integration by Southern blotting B 1. Transform with the plasmid and plate out in the absence of adenine. 2. Replica plate to minmal plates with 10µg / ml adenine. 3. After 2-3 days look for white fast growing colonies which are putative integrants. The pink colonies still have free plasmid. 2.4 Gene disruption and gene replacement. Method I (not used as often now) 1. Make a disruption of the gene of interest by inserting the ura 4+ marker or the LEU2 marker gene in the ORF. If possible delete as much of the ORF as possible and conserve at least 1kb either side. 2. Purify this linear fragment. It is then possible to delete the native gene by integrating the marker flanked by flanking sequences of the gene of interest. This integration is performed by transformation of a diploid strain, as below. Homologous integration with a double crossover will result in excision of the native gene. 3. Transform either a h-/h+ura 4-D18/ura 4-D18 ade6-M210/ade6-M216 or a h-/h+leu1-32/leu1-32/ ade6-M210/ade6-M216 diploid strain, depending on the marker used, with 100ng, 300ng, 1µg of the fragment (less DNA is necessary if transforming using the Okayama or electroporation methods) . Select diploid transformants expressing the ura 4+ or LEU2 gene.
31
The transformant diploid can be sporulated in minimal glutamate or malt extract and the spores plated out to see whether the gene deleted is essential or not. If the gene is not essential the deletion strain can be maintained as a haploid. A non-sporulating diploid h+/h+ or h-/h- generated by endomitosis can also be used to make the deletion. This can be mated to a homozygous diploid of the opposite mating type to produce a tetraploid zygote which can sporulate and form four diploid spores. Some of these diploids will be heterozygous at the mating type locus and have one chromosome with a deleted copy of the gene of interest. These can be selected for and then sporulated to generate haploid spores which can be plated out as above. This approach is useful when it is necessary to analyse the effect of the deletion in different genetic backgrounds. Alternatively, h90 strains can be generated spontaneously from an h+/h+ diploid and identified by replica plating onto malt extract medium followed by iodine staining. Tetrad analysis can now be carried out using this strain. Gene replacements in S. pombe can be carried out using the same approach. A gene replacement event can be selected using a diploid strain in which one copy of the gene is disrupted with the ura 4+ gene, because ura 4- cells generated when the disrupted gene is replaced will be resistant to the drug 5-fluororotic acid (5-FOA). Thus, replacement of the ura 4+ disrupted gene with a linear DNA fragment containing the in vitro altered gene will convert the cells to a 5-FOA-resistant phenotype. It is necessary to maintain the presence of 5-FOA in the medium, as the effect is reversible. 5-FOA is used at 1 mg / ml in plates. NB - this is an expensive chemical. It is always wise to check for the occurrence of the event by Southern blotting of the genomic DNA of the new construct. Method II: Gene replacement using PCR-based gene targetting plasmids containing ura4+ or kan module 1. Design primers: 100mer oligos with 80nt to gene of interest and 20nt to ura4/kan module; primers should be HPLC purified. 2. Do 2-5 independent PCR reactions. Pool reactions Purify the DNA by phenol/chloroform extraction and concentrate by ethanol precipitation. Resuspend in 10µl of TE. 3. Follow lithium acetate method II (see section 2.1) for transforming PCR products, with the following modifications: Grow cells in YE5S instead of MM. Plate on YE5S with NO kanamycin. Incubate overnight at 30°C. Replica plate the resultant lawn onto YE5S with 100µg/ml kanamycin. Incubate at 30°C. You will have large and small colonies- pick the large ones and restreak, etc.
32
2.5 Stability test. This test is used to check the stability of a transformed plasmid. If the plasmid is replicating autonomously it will be lost in the absence of selection; on the other hand, if the plasmid has integrated or there has been a reversion or gene conversion event the phenotype is maintained after relaxing the selection. The procedure is as follow: 1. Take transformant colony and streak out to single colonies on YES agar with no selection for about 3 days until colonies form. 2. Replica plate to selective medium e.g. 35°C on YES for a ts strain , 25°C on minimal for the auxotrophic marker and check for the stability of the prototrophic (and / or other plasmid-borne) phenotypes. The sup3-5/ade6-704 system (described above) is particularly useful for this purpose. 2.6 Cloning mutant alleles by gap repair. This technique is designed to clone chromosomal mutant alleles of previously cloned genes. 1. Construct a plasmid containing a selectable marker (LEU 2) and the wild type copy of the entire chromosomal region of interest. 2. Digest the plasmid with a restriction enzyme to completely remove the ORF. Purify the linear fragment containing the plasmid with the upstream and downstream flanking DNA sequences . 3. Transform 1 µg of this fragment into the strain containing the allele of interest. Identify transformants expressing the selectable marker. The gap in the plasmid is repaired using the mutant chromosomal sequences as a template. 4. Recover the plasmid from yeast as described below. The efficiency of recovery of "repaired" plasmids versus "recircularised" plasmids appears to depend on the size of the flanking sequences, 1kb either side is recommended. On average 25 % of the plasmids obtained are "repaired". If overexpression of the mutant allele is deleterious to the cell it may not be possible to recover the repaired plasmid.
33
An alternative procedure we have used involves integrating a sup3-5 containing plasmid adjacent to the mutant allele and then cutting out this plasmid with the mutant allele to recover it in E. coli. It is also simple to obtain the chromosomal mutations by PCR using the flanking sequences as oligonucleotide primers, although care is necessary since PCR is mutagenic (approx 3 x 10 -5/ base ). 2.7 Recovering plasmids from S. pombe. Plasmid recovery from S. pombe is difficult as 2 µm based plasmids often seem to form multimers, and rearrangements (tandem duplication or deletions) are frequent. This problem can be avoided by using the plasmid pFL20 or derivatives that contain the stb element and remain as monomers. Furthermore, ars1 plasmids, which comprise many of those currently in use, do not tend to rearrange and are easy to recover. It is worth noting also that yeast material in the final preparation appears to inhibit E. coli transformation and thus using more of the preparation may not be a good idea To recover a plasmid from a transformant there are two procedures which are routinely used: A. 1. Grow up 10 ml of cells under selective conditions to OD595= 1 ( 2 x 10⁷ cells/ml). 2. Spin down the cells 3000 rpm 5 minutes. 3. Resuspend in 1.5 ml: 50mM Citrate/ Phosphate pH 5.6 ( 7.1 g/l Na2HPO4, 11.5 g/l citric acid) .2M Sorbitol (Adjust to pH 5.6 with 5M NaOH.) 2 mg/ml Zymolyase-20T (added after autoclaving). transfer to an Eppendorf tube and incubate at 37°C for 1hour. 4. Pellet the cells in an Eppendorf centrifuge for 30 seconds. Resuspend in 300 µl TE. 5. Add 35 µl 10% SDS, mix and incubate at 65°C for 5 minutes. 6. Add 100 µl 5M potassium acetate, mix and leave on ice for 30 minutes. 7. Spin down at 4°C for 10 minutes.
34
8. Add 50 µl of supernatant to 100 µl NaI solution (Geneclean Kit, Stratech Scientific Ltd.) with 5 µl glassmilk (Geneclean Kit, Stratech Scientific Ltd.). 9. Incubate for 5 minutes at room temperature. 10. Spin for 5 seconds (maximum) at room temperature, discard the supernatant and wash the pellet three times with 400 µl of ice-cold NEW wash (Geneclean Kit, Stratech Scientific Ltd.). 11. Elute DNA twice with 10 µl of TE at 55°C for 3 minutes each time. 12. Spin out the glass milk and keep the supernatant. 13. Transform 5 µl of the supernatant into 100 µl of competent E.coli JA226 cells. The use of the Geneclean or Qiagen kits improves the transformation frequency by at least 10 fold; also it is very important to use a recBC E.coli strain such as JA226 when using 2 µm or non-ars containing plasmids. For ars1 based plasmids recA strains like E. coli DH5 can be used. A second method is also used; this has been less well tried in this lab but is quicker and reportedly gives good results, as follows: B. 1. Grow small cultures (at least 1.4 ml) with selection. 2. Collect the cells by a 5 second spin in a microfuge. 3. Decant away the supernatant and briefly vortex the tube to resuspend the pellet in the residual medium. 4. Add 0.2 ml of 2 % Triton X-100 1 % SDS 100mM NaCl 10mM Tris HCl (pH 8.0) 1mM Na2EDTA 5. Add 0.2 ml phenol:chloroform:IAA and 0.3 g acid washed glass beads. 6. Vortex for 2 minutes and then microfuge for 5 minutes. 7. Take upper aqueous layer to a fresh Eppendorf and extract with 200µl phenol:chloroform:IAA.
35
8. Precipitate the DNA , wash with 70% EtOH, dry and resuspend in 10µl TE. 9. Use 1-5 µl for transformations of competent E.coli or yeast . Note: This method also works well for isolating genomic DNA. 2.8 Multicopy overexpression of genes under the control of the nmt promoter The standard Thiamine concentration for repression of gene expression from the nmt-1,-41 and -81 promoters is 15µM (200µl per 400ml medium of a 10mg/ml stock solution stored in the dark at 4°C), although 2µM Thiamine is usually sufficient for repression of the promoter in most cases, and may aid induction. Certain "toxic" gene products require extra suppression and growth can be aided by increasing the concentration up to 60µM especially when using nmt1 which is the strongest and leakiest of these promoters. Despite the above, it is not really possible to partially induce the promoter in a population by using low thiamine concentrations. If overexpression of a gene product is toxic to the cells, they will quickly be selected for containing recombinant plasmids that are less toxic. These cells may rapidly overgrow the other cells. Addition of Thiamine during the experiment may help to keep concentrations topped up! A Thiamine concentration of 2nM in minimal medium plates is sufficient for cells overexpressing prep3x-nmt1-rum1, to grow to a colony size of 0.1-1mm in three days at 32°C, before running out of Thiamine. Such colonies consist of cells showing the rum1 overexpression phenotype (which ran out of Thiamine before running out of nutrition - at the border of the colony) and of starved wild-type cells (which ran out of nutrition before running out of Thiamine - in the centre of the colony). Although the rum1 overexpression phenotype is lethal the strains can be recovered very easily by transferring the starved cells to +Thiamine medium. This method has been used in a screen designed to isolate cDNAs whose products alter cell morphology when overexpressed. It has the advantage that no replica plating from +Thiamine to -Thiamine plates is required. The minimal Thiamine concentration mentioned above might have to be increased or further decreased to give similar results when overexpressing other genes and/or when using another promoter. Promoter strength (and leakiness): nmt1 > nmt41 > nmt81
36

If a strain is used for a screen containing ectopic expression of a gene from the nmt promoter, mutations frequently affect the activity of the nmt promoter. These should be screened out in a secondary screen, e.g. by Northern Analysis.
37
Section 3 Fission yeast physiology Introduction The cell cycle and cell growth. S. pombe cells coordinate cell growth and the cell cycle. Exponentially growing wildtype cells are born at a similar cell size and double their mass before entering the next round of cell division. This is the result of a size control coupling growth and the cell cycle. They grow by tip elongation, therefore cell length is a measure of the cell cycle stage of a cell. For this reason if you size select cells for instance by elutriation, they will all be at the same stage in the cell cycle. To achieve this, exponentially growing wildtype S. pombe cells use a size control in G2 which controls the size requirement for entry into mitosis. However, if this size control is eliminated by mutation or an environmental change, then a cryptic G1 size control comes into play. Rapidly growing wildtype cells are born at a cell size that exceeds this G1 size control so it does not delay S-phase. However, small S. pombe cells spend a larger portion of the cell cycle in G1 and use this control to coordinate growth and cell division. The existence of a size control, means that blocking cell growth leads to cell cycle arrest. TECHNIQUES Use O.D. to assess mass accumulation. Cell number to assess cell division. FACS analysis to measure DNA content per cell. In addition the cell counters and the forward scatter on the FACScan give an approximate measure of cell mass. Cell length is usually calculated microscopically. Practically this means that for rapidly growing wildtype cells: Cell number and O.D. will increase exponentially and in step with each other. In smaller cells such as wee mutants, the same will be true but cells will now spend a greater proportion of their time in G1 as visible by FACS analysis. In fact both small cells and large cells have the same generation time: the time for one cell to double its mass to become two cells. This means that the O.D. and cell number will increase at the same rate. However for the same O.D., populations of large cells will contain less cells than populations of small cells. So a small cell accumulates less actual
38
mass than a large cell in the same time, but the small cell's percentage increase in mass is the same as that of the large cell. The coupling of cell mass increase and cell division can be uncoupled by certain mutations and environmental conditions. Under conditions of nitrogen starvation for instance, wildtype cells undergo mitosis at a reduced cell size and complete several rounds of the cell cycle, with little increase in cell mass, and as a result become smaller. This leads to an increase in the proportion of cells in G1, as the G1 size control comes into play. This effect can be accentuated by the addition of pheromone to responsive cells. Practically this will be observed by: Cells becoming smaller. Cell number increasing to a greater extent than the O.D.. A larger G1 peak will be seen by FACS analysis. Cell cycle blocks also uncouple growth from cell division, this is how they were defined. If the cell division cycle is blocked, then cells continue to accumulate mass. Practically you will observe: Cells will become longer. O.D. will increase exponentially (until cells lyze). Cell number will remain constant. (see transition point for discussion of the time at which cell number will stop increasing). Re-replicating cells will show increasing DNA content.
39
3.1 Measuring cell number and volume Cell number/ml can be estimated simply by measuring the OD595 of an exponentially growing culture. An OD595 of 1 is equivalent to 2x10⁷ cells/ml in our spectrophotometer, this will vary between different machines and should be calibrated for each one. The relationship remains approximately linear for OD's below 1.0. There are two accurate means of determining cell number, a haemocytometer or electronic cell counters. The Coulter counter Samples are fixed in formal saline and then the number of cells in a fixed volume is counted (together with the mean cell volume) as they pass into a probe with either a 70µm or a 100µm aperture. The fluid circulating through the Coulter counter is ISOTON. 1. Fix cells by adding 400µl of culture to 1.6mls formal saline (0.9% saline, 3.7% formaldehyde) in a 30ml Universal tube. Vortex and store at 4°C (samples keep for months). 2. Dilute with an appropriate volume of ISOTON. You want to aim to have roughly 1-3 x 10⁵ cells in each 500µl aliquot that is counted, to ensure that the count is well above background. The machine cannot count greater than 6 x 10⁵ cells / 500µl aliquot. The exact number is not crucial and typically you can dilute your 2mls of fixed cells by adding 18mls ISOTON (assuming the samples were from a mid-log culture). 3. Preparing the Coulter counter: - Turn on (3 switches including the mean cell volume unit) - Set 'Corrected Count' to Auto - Set 'Current' to 200 - Set 'Full Scale' to 10 mA - Set 'Polarity' to Auto - Set 'Lower Threshold' to 070 (for cells) or 050 (for spores) - Set 'Upper Threshold' to 999 - Set 'Alarm Threshold' to OFF - Set 'Attenuation' to 8 (100µm probe) or 16 (70µm probe) - Set 'Preset Gain' to 4 (100µm probe) or 2 (70µm probe) 4. Open the door and insert a Universal containing ISOTON. Focus the aperture - you will be able to see fluid moving in. If there is anything blocking the hole then simply wipe it with you finger. You now need to clean out the probe (and so bring the background down) by taking a series of 'counts', each of which will wash ISOTON
40
through the system. To do this turn the 'Reset/Count' knob clockwise to 'Count'. At the end of each count you will get a reading of the background counts. Turn the knob to 'Reset' and continue the washes (only ever turning the knob in a clockwise direction) until the background is down to about 300 or less. If you have problems then try the 'Fill / Drain' knob once and continue the 'counts'. 5. Once the background is down then you're ready to go. Each sample should be sonicated (30-60 seconds on setting 6) before counting. Count each sample 3 times and take the mean. Note the mean cell volume. It is important to take each count at the same position (the 'Reset / Count' knob has 2 count positions - either can be used but stick to the same one for all the counts). It is important to keep an eye on the probe during the counts (you'll be able to see it) to ensure that the aperture is clear. If it blocks then simply wipe it clean and repeat the count. 6. Once you've finished, put a Universal containing ISOTON back in the machine and repeat the washing counts until the background is low once again. Immerse the probe in the ISOTON bath and switch off. Notes : - If you have a series of samples that relate to each other (e.g. a time course) it is important to count them all at a single sitting. Counts taken on different occasions (when the background will be different) are not directly comparable. - Don't let the probe dry out at any time - always keep it immersed in ISOTON. - Calculating cell no. / ml : for 2mls fixed cells containing 0.4mls culture, diluted with 18mls ISOTON, multilply mean count by 100 to get the actual cells / ml of your culture (remember that the mean count represents 500µl of your 20mls of diluted cells). Using the Sysmex 1) Check the waste is empty if not empty it. 2) Switch the machine on and wait for the front page to appear 3) Put your sample into the plastic container and put onto the WBC probe, press Count 4) The number of cells/ml will be displayed on the screen. To get the actual cell number multiply by 100 (assuming that you have 400µl of sample in 20ml), if you want a printout press Print. Do two counts for each sample. 5) When you have finished clean the probe 3x with Isoton by pressing Count. Leave the probe in Isoton and press Clean for 10sec. Switch off still pressing Clean. 6) Empty the waste. Troubleshooting
41
1) Very long cells will not be counted. If your cells are very elongated then you should use the Coulter Counter. 2) If the machine becomes clogged it will automatically recount. If it remains clogged then try cleaning it (press Clean for a few secs) and Flush and Fill. If it is still clogged then repeat everything, if you still cannot unclog it then go and have a cup of tea and try again later. 3) Nitrogen starved cells or spores may not count accurately as the lower discriminator which is set automatically, is in the wrong place (I don’t know why). To change it go to the Menu page and press 4 (Manual Discrimination) and enter, press 1(WBC) and enter. You should now be on the Manual Discrimination page. Press enter to select the lower discriminator which will become a solid line when it is selected, move it with the arrow keys and then press enter and the new reading will be displayed. The upper discriminator does NOT affect the cell number, it is used to discriminate between different populations. To go back to the Front page press Select (X3). Unfortunately you have to reset the lower discriminator for each new sample. The haemocytometer The haemocytometer is a specialised microscope slide on which 2 grids have been engraved, in a central region that is 0.1mm lower than the rest of the slide. Each grid comprises 25 large squares, each containing 16 smaller squares of area 1/400mm2. This creates a region of known volume (0.1mm3) when a special coverslip is correctly placed over the central region (get someone to show you how to do this - and take care as the coverslips are easily broken!). A few µl's of culture are then pipetted under the coverslip and cells counted in a proportion of the gridsquares (count as many as is convenient). Multiplying the total number of cells in the entire grid by 104 gives the number of cells / ml. For more accurate measurements of cell number the Coulter Counter or Sysmex can be used. These have the additional advantage that samples can be taken quickly during an experiment then processed at leisure. They also give a measure of mean cell volume. Measuring cell size of individual cells 1. Scan picture of the cell(s) containing a calibration bar taken at the same resolution. 2. Open the programme NIH Image 1.59 ppc and import image(s).
42
3. Use broken line in Tools Box and make a line from one end of the cell to the antipodal end. 4. Use "measurement" command under "Analyse" in Menu to measure cell length; measurements are stored and can be visualised by "Show Results" command; measurements can be undone with "Undo Measurement" under "Edit" Menu.. 4. Calibrate by measuring calibration bar in a likewise fashion. 3.2 Transition point The execution point of a cell cycle gene is that point in the cell cycle at which the gene function is required. One way of estimating the execution point of a gene is to measure the transition point of a conditional mutant of that gene. The transition point of a particular mutant is that point in the cell cycle at which a defective gene product will block progression through the cell division cycle. In an asynchronously growing culture shifted to restrictive conditions, only those cells at points in the cycle beyond the transition point will go on to divide before blocking at the transition point in the next cycle. The transition point is therefore calculated from the fractional increase in cell number when an asynchronous culture is shifted to the restrictive condition. It is given by the following formula : T.P. = 1 - ln (1+A) T.P. = transition point ln 2 A = fractional increase in cell number The transition point can more simply be estimated as follows :
43
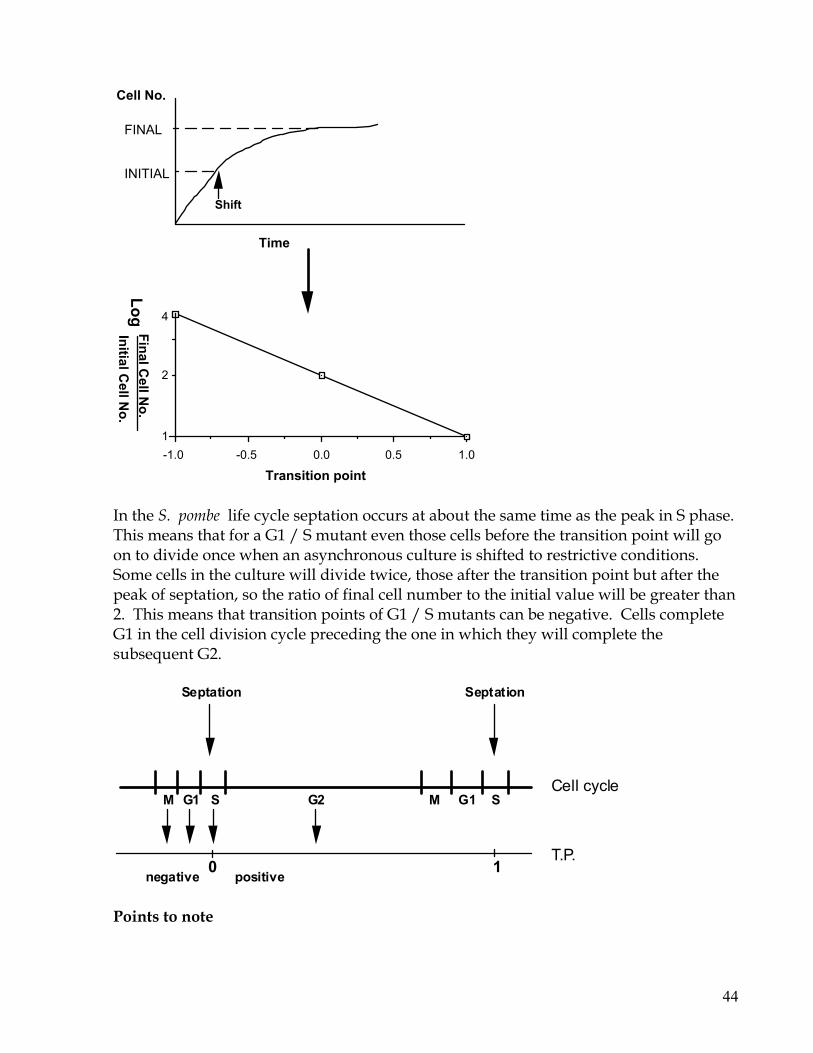
1.00.50.0-0.5-1.0
Transition point
1
2
4
Shift
Cell No.
FINAL
INITIAL
Time
Initial Cell N
o.Final C
ell No.
Log
In the S. pombe life cycle septation occurs at about the same time as the peak in S phase. This means that for a G1 / S mutant even those cells before the transition point will go on to divide once when an asynchronous culture is shifted to restrictive conditions. Some cells in the culture will divide twice, those after the transition point but after the peak of septation, so the ratio of final cell number to the initial value will be greater than 2. This means that transition points of G1 / S mutants can be negative. Cells complete G1 in the cell division cycle preceding the one in which they will complete the subsequent G2.
Septation Septation
SG1M G2 M G1 S
0 1negative positive
Cell cycle
T.P.
Points to note
44
1. In order to be confident that the transition point actually reflects the execution point of your gene it is necessary to show that the same value is obtained with a number of alleles. Differing values can result from such factors as a particular allele taking a long time to inactivate at the restrictive temperature, or being partially inactive even at the permissive temperature. 2. If your gene has more than one execution point in the cell cycle the transition point will only reflect the latest one with respect to septation. 3.3 Synchronising cultures with respect to the cell cycle Synchronous cultures can be useful both for the study of cell cycle mutants and also for preparing protein or RNA samples to study the expression of a gene during the different stages of the cycle. The most physiological way to prepare such a culture is by elutriation. This method selects cells of a uniform size which will therefore be at the same stage of the cell cycle. In practice the smallest cells are taken, representing cells in early G2 (because septation corresponds to the peak of S phase). Elutriation Using the elutriator rotor for the Beckman J6 centrifuge. A culture of suitable size is first grown in minimal medium, YE cannot be used as cells produce too much gas which disturbs the elutriation, although the addition of 0.005% YE (1:400 dilution of 2%YE medium) may help recovery. The synchronous culture obtained will represent about 5% of the cells in the starting culture. Therefore you need to grow up about 20X more cells than you want to end up with. For the preparation of protein / RNA samples about 4 litres of an OD595 of 0.4 - 0.5 is sufficient. This would result in a synchronous culture (small G2 cells) of up to 2 litres of OD595 0.06. For other purposes a smaller culture will suffice. There is a manual for the elutriator rotor (which is worth reading) but elutriation is only really learnt by demonstration and experience. Caution: If too many cells are loaded on to the rotor they starve during elutriation and do not recover synchronously. If there are dead cells in the starting culture these will come off with the small cells! Cells are eluted into conditioned media into which some fresh media has been added, which should be kept at the elutriation temperature after it is generated by loading cells onto the rotor. The first few hundred mls of culture should then be discarded as this usually contains many dead cells.
45
After elutriation cells take up to 1 hour to recover, before this the cells are not growing exponentially. The first peak of septation occurs approximately within the next hour, depending on the temperature at which point sampling should begin. The septation index is usually monitored every 20 minutes and should reach a maximum of about 20% and a minimum of 0%. Cells can be followed for up to 2 cell cycles. As the culture will be growing and dividing, progressively smaller samples will need to be taken if each sample is to contain the same number of cells. Cell cycle mutants Alternatively cell cycle mutants can be used to block the cell cycle at a particular point. On return to the permissive temperature cells will then proceed synchronously through the subsequent phases of the cycle. Leaky mutants are not suitable for this method, some mutants do not recover well on return to the permissive temperature. This approach has been used successfully to study mitotic onset (via cdc25-22 block and release experiments) and can also be used to study exit from mitosis (Yanagida's lab uses dis2 block and release - nda3 can also be used). cdc10-129 can be used to study passage through 'Start' and S phase, however cells are slow to enter the subsequent mitosis. Such experiments have the disadvantage of being rather unphysiological, due to the effects of blocking the cell cycle for at least one generation. Arresting the cell cycle with drugs Drugs provide another way of blocking the cell cycle, allowing the generation of synchronous cultures after washing the drug away. Again the physiological nature of such cultures is questionable and there is a paucity of drugs suitable for use with S. pombe. 11mM hydroxyurea is used to arrest cells at the beginning of S-phase. As most cells in an exponentially growing culture are in G2 it takes about a generation time to arrest the population with HU. The arrest is not maintained for long and cells will typically begin to leak through the block after about 4 - 5 hours, depending on the temperature and medium (leak through is faster in rich medium and at higher temperatures). It is possible to add a second dose of 11mM HU after 4 hours which will hold cells in the block for several more hours. Release from hydroxyurea by 2 washes in HU free media enables cells to synchronously pass through S-phase. The subsequent mitosis however lacks synchrony, and occurs only 1.5 hours after the release. This suggests a DNA damage checkpoint may come into play. Unlike S. cerevisiae it is not possible to block S. pombe in mitosis with microtubule binding drugs.
46
Thiabendazole is very effective at depolymerising microtubules in S. pombe but does not cause a good cell cycle arrest, although there have been reports that it can be used to block entry into mitosis. Benomyl, MBC and nocodazole are not effective at blocking cells in the cycle. Arresting cells in G1 by Nitrogen starvation Nitrogen starvation and pheromone induced arrest are more physiologically relevant methods of arresting the cell cycle in G1, but in these cases many aspects of cellular metabolism are altered. Nitrogen starvation provides a simple means of synchronising cells in G1. This gives one way of testing whether a particular gene function is required for 'Start', as a conditional mutant can be starved under permissive conditions and then re-fed under restrictive conditions. The proportion of cells apparently in G1 differs depending on the method used to assay DNA content. Flow cytometry shows >70% at 25°C and less at higher temperatures. The diphenylamine reaction shows closer to 100% cells arresting in G1 at 25°C, again reduced at higher temperatures. It is possible that the flow cytometry result may be artefactual, because if PI stained N2 starved cells are examined microscopically they often show non-specific staining at the cell tip. This may cause some cells to have an apparent DNA content that is higher than it is in reality. The proportion of cells arresting in G1 can also vary for different cell cycle mutants and is reduced for cdc2 mutants. Leucine auxotrophs have trouble leaving nitrogen starvation. Protocol 1. Spin down (or filter) cells from an exponentially growing culture and wash 3X in dH20 (or -N2 medium). 2. Resuspend in Minimal medium lacking a N2 source (Min -N2 on the shelf) at 2x10⁶ cells / ml. 3. Incubate in shaking water bath for about 4 generation times (e.g. overnight). Wild type cells will start to starve within 4hrs, depending on the temperature. Physiological experiments with P-factor Pheromone effects on exponentially growing fission cells can be studied in a mutant background that mimics aspects of nitrogen starvation and reduces pheromone
47
proteolysis. Elimination of the adenylate cyclase gene cyr1 lowers the intracellular cAMP level and leads to constitutive expression of genes under nutritional control thus mimicking nitrogen starvation, whilst elimination of the P-factor degrading protease gene sxa2 enhances the effects of P-factor addition. The sxa2∆ura4 strain has a growth rate that is 50% lower than that of the wildtype cells. Therefore exponentially growing cells of a cyr1∆sxa2∆ double mutant respond to the addition of P-factor by undergoing G1 arrest within 6h which is the generation time of this strain at 25°C in minimal medium. Later adaptation occurs and cells re-enter S-phase. Our P-factor batch was synthesised by a solid phase method using an automated synthesiser (N. O'Reilly, personal communication). The peptide is stored in methanol at a concentration of 5 mg/ml and is used at a concentration of 1.5µg/ml in liquid culture and at a concentration of 3µg/ml on minimal agar plates. For experiments in liquid culture using the cyr1∆::LEU2sxa2∆ura4 strain minimal medium should be supplemented with leucine since LEU2 at the cyr1 locus does not fully complement the leu1-32 allele. The strain grows much better if 2-5% YE5S is carried over from the preculture. The presence of YE does not interfere with the ability to arrest in G1. To construct strains that carry the cyr1∆sxa2∆ background, random spore analysis can be used: candidate colonies with the appropriate selectable markers and mutations are tested for formation of conjugation tubes on agar plates containing 3µg/ml P-factor. Only h-cyr1∆sxa2∆ mutant cells will respond to P-factor and grow conjugation tubes (for details see Material and Methods in Bodo's thesis). Synchronous and efficient meiosis Nutrient deprivation induces sexual development (conjugation in haploid cells, meiosis and sporulation in diploid cells). Glucose and nitrogen influence the efficiency of this development and can be manipulated using minimal medium. Thiamine inhibits sexual development, so it should not be added at any steps in this experiment. High temperature is also inhibitory and so the temperature should remain between 25°C and 30°C. Diploid cells in liquid culture In general nitrogen deprivation induces synchronous sexual development. Induction is more synchronous and efficient when lower glucose concentrations are used, 1% is better than the standard of 2%. Add supplements, if required, to EMM+N or EMM-N. Adenine can be used as a nitrogen source and inhibits conjugation and meiosis, so should only be added to EMM+N. Ade- strains can induce and complete sexual development properly in EMM-N without adenine. The following method for achieving
48
the synchronous meiosis of diploid can also be used to induce conjugation of haploid cells in liquid. 1. Grow a culture in EMM+N(1%Glc) to about OD=0.5. 2. Centrifuge and wash the pellet twice with 0.5 vol of EMM-N (1%Glc). 3. Suspend in equal vol of EMM-N(1%Glc) and shake overnight. Diploid cells arrest at G1 about 2h and produce visible spores about 10h at 30C. After 24h more than 90% cell complete sporulation. Conjugation in haploid cells processes more asynchronously but zygotes start to appear about 4h and finally more than half make zygotes. If you use 2% Glc medium the time course will delay about 50% and less is the final sporulation efficiency. Haploid cells on agar plate Above method is available for conjugation but less synchronous, because exchange of mating factor between opposite cell types is less efficient in liquid. In the best synchronous induction of conjugation cells are grown in liquid culture and then plated out. 1. Grow a culture in EMM+N(1%Glc) to about OD=0.5. 2. Centrifuge and discard the sup by decanting. 3. Suspend the pellet in the remaining medium. (pellet : sup=~1 : 3). 4. Spot the suspension on the SPA plate and incubate at 25C~30C. Zygotes appear after ~5h but sometime the time varies. If the strain is leucine-, suspend it in leucine stock solution instead of the sup. Do not add adenine. No information about other supplements. 3.4 Measuring DNA content of cells DNA content can be conveniently determined by flow cytometry, using the Becton Dickinson FACScan. On rare occasions when an alternative means of determining DNA content is required to confirm the flow cytometry result (if your cells have a particularly bizarre DNA content), the diphenylamine reaction can be used (but this is not for the faint hearted). Fixing cells for flow cytometry Reagents Cold absolute ethanol. 0.5M Na citrate stock (filtered). 10mg/ml RN'ase A (Boil 10mins, cool to R.T., filter and store at -20°C).
49
4mg/ml Propidium Iodide (filter and store in dark at -20°C) Protocol 1. Spin down 107 cells from an exponentially growing culture - 2k 5'. Pour off S/N. 2. Resuspend in 1ml dH20, spin 15s in µfuge, take off supernatant and resuspend in 1ml cold 70% ethanol. Vortex well. These methods have the advantage of washing away the medium before fixation. 3. Transfer to an Eppendorf and store at 4°C (cells keep ~indefinitely). 4. When you want to process the cells, take 0.3mls (this will be 2-3 x 10⁶ cells, assuming a little loss in the washing) and... a) Add to 3mls 50mM Na citrate in a 5ml Falcon tube. Mix and spin 2000rpm for 5mins. or b) Spin for 10s in a µfuge. Take off the ethanol and rehydrate the cells by resuspending in 1ml 50mM Na citrate. Spin again in µfuge for 10s. 5. Discard S/N (can quickly pour off most liquid) and resuspend pellet in 0.5ml 50mM Na citrate containing 0.1mg/ml RN'ase A. Leave in 5ml Falcon tube and put in 37°C room for at least 2h. 6. Add 0.5ml 50mM Na citrate containing 4µg/ml PI, so that final concentration is 2µg/ml (PI can be added together with the RN'ase). Cells can be processed immediately or conveniently stored O/N at 4°C in the dark before processing the next day. If necessary cells can be stored at this stage for a maximum of a week (4°C in the dark). 7. Just before processing the cells, sonicate for 45s on setting no.6, again leaving cells in the 5ml Falcon tubes. Sonication prevents doublets of cells which give spurious peaks and is particularly important if your cells have varying DNA contents. 8. The hard work's over - enjoy the results! Points to bear in mind -You can fix more than 107 cells, but don't process many more than 5x10⁶ fixed cells. Using too many cells can lead to incomplete staining and artefactual results. -You can make controls representing 1, 2 and 4N DNA contents. Use nitrogen starved haploid cells, exponentially growing haploids and exponentially growing diploid cells respectively. You can fix large numbers of cells and make enough for the rest of your time in the lab.
50
-Ethanol fixed cells can be sent in the post at room temperature without coming to any harm. Stained cells can be FedEx'd without coming to any harm. Using the Becton Dickinson FACScan Details of how to use the FACScan are best learnt by demonstration and reading the manuals. Basically cells are pumped through the path of a laser. Forward scatter of the laser light is measured by a photo diode and varies in proportion to cell length (mass). Fluorescence from the DNA binding stain is measured by photo multiplier tubes, the signals from which give a measure of DNA content. For cells stained with PI the FL-2 channel is used. Samples that relate to each other (e.g. a time course) should be processed together, as measurements taken on different occasions are not directly comparable (for the same reason it is good practice to run control samples each time). Elongated cells can give a spurious drift towards higher DNA contents. A 2D dot plot of forward scatter against DNA content should make it clear whether cells are actually increasing their DNA content. Switching on the FACScan 1 switch on FACScan, check that reservoir is full and waste is empty if OK then pressurise system by flicking switch UP. The FACScan is in Standby mode 2 restart computer ( in Special menu) 3 open Cell Quest 4 open acquisition templates in pom1 Go to Acquire menu 5 click on connect to cytometer. If you cannot connect you will need to restart the computer again Go to cytometer menu 6 open instrument settings 7 open setting file in Cell cycle lab choose lin or log 8 click on set and then done 9 open everything else in cytometer menu ie Detector Amps, Status, Compensation, Threshold (FSC should be about 40) Go to Acquire menu 10 open acquisition and storage, check 10,000 cells counted and no gate etc. click on parameters saved and switch off FL1, FL3, SSC 11 open parameter description and direct data to your own folder. To do this go to folder, desktop, cell cycle lab, you, select folder, name folder, click on select folder. 12 give name to data start at Data001 if you need to change this do it in file 13 open counters
51
You are now ready to collect data 14 switch FACScan from Standby to Run and Fluid Control to Low 14 click acquire in Acquisition Control, which is in set-up, and test large/ small cells for size and different ploidy, so that everything can be seen. In lin it is convenient to have 2C at about 200 and for log about 101. Adjust the settings in Detector Amps. 15 come out of set-up by clicking on abort then set-up, collect and save data by clicking on acquire. 16 it is possible to change individual windows, no of events, scale etc by going to plots choose Format histogram/dot plot and modify as you wish To analyse your data 17 close everything except Cell Quest, there is no need to save anything as it already saved in your folder. 18 go to file menu and click on New 19 go to plot menu click on histogram/dot plot etc select file and open, chose parameters eg FL2 (DNA content ) or FSC (cell size) 20 when you have finished the analysis save in your folder. There is no need to save the Cell Quest document. 21 to print out check the printer in Chooser Before Switching off the FASCan 22 disconnect the cytometer in Acquire menu and clean it by running H2O through for 5min and 7X detergent for 10min. This can be done whilst you are analysing your data 23 Leave the probe in 7X detergent and turn to Standby. 24 Depressurise (switch DOWN), fill up the reservoir with Isoton and empty the waste. Switch off the machine. The diphenylamine reaction Collecting cells The assay requires between 2 x 10⁸ and 4 x 10⁸ cells. The top of the range is preferable. A rough guide is 100 ml of OD595 0.2, 75 ml of OD595 0.3 or 50 ml of OD595 0.4. The cell concentration should be measured accurately using a Coulter counter. 0.4 ml of cells are added to 1. 6 ml of Formal saline (0.9 % saline, 10 % formaldehyde solution which gives approximately 3 % formaldehyde). This is then made up to 15 ml with Isoton before sonication and counting. The cells are spun down at 4°C (or filtered using Millipore type RA size 1.2 µM) and snap frozen in a Falcon 2059 (14ml polypropylene snap cap). The cells can be stored at -20°C. The exact sample volume should be noted.
52

The actual biochemistry should be carried out in the afternoon after a light lunch ! Solutions N.B. Lab coat and gloves are strongly recommended Prepare the following solutions using chemicals of the highest grade available: Perchloric acid:5% v/v in H2O. (N.B. stock solution is usually 70%) store at 4°C Diphenylamine reagent : Prepare immediately prior to use at room temp. 0.8g diphenylamine 20 ml glacial acetic acid 50 µl acetaldehyde 2% v/v in H2O. (stock is 0.78 g/ml \ dilute 1.0 ml to 50 ml with H2O. Smaller volumes are difficult to prepare because acetaldehyde can't be micropipetted with a Gilson) 2' Deoxyadenosine standards : 2' Deoxyadenosine can be made up as 800 µg/ml stock in H2O and stored indefinitely at 4°C. Prepare standards of 2, 4, 6, 8, 10, 12, 16, 20, 24, and 30 µg/ml by making 5, 10, 15, 20, 25, 30, 40, 50, 60 and 75 µl of stock respectively up to 2 ml in PCA. Assay All centrifugation should be performed at 4°C Uniformity of treatment of samples is most important. 1. Resuspend cells in 1.5 ml of PCA (Perchloric acid, 5%, ICE COLD) and leave on ice for 30 minutes with occasional vortexing. 2. Remove filter, if used, and spin down cells, remove supernatant and resuspend in a further 1.5 ml of PCA. 3. Spin down and quantitatively remove supernatant. 4. Resuspend in 0.5 ml of PCA and incubate at 70°C for 20 minutes. Tubes should be vortexed for 10 seconds, in rotation, throughout the incubation period. The frequent and regular mixing is very important and should not be neglected. 5. Spin down debris and transfer 400 µl of supernatant to a clean falcon 2059. (A further 25 µl can be added to 2.5 ml PCA and read at 260 nm for RNA. )
53
6. Add 500 µl of Diphenylamine reagent to each tube as well as to 400 µl of each of the standards. Incubate at 50°C for 3 hours or at 37°C for 16 hours. If necessary, the samples can be left for up to 45 minutes before reading O.D. 7. Spin briefly and read O.D. at 595 nm and 720 nm against a PCA blank. Calculations A standard curve is prepared using the 2' deoxyadenosine standards, plotting µg 2' deoxyadenosine against (OD595 - OD720). The sample values are read from the graph and subjected to the following calculation: 2C DNA content per cell =33.8fg (Sample value x 0.5(a) x 2.605(b) x 109 (c) / (Cell conc. x Volume filtered) (d) Notes: (a) This converts µg/ml to µg/sample (0.5 ml) (b) 1 µg of 2' deoxyadenosine ∫ 2.605 µg DNA. (c) This converts micrograms (10-6) to femtograms (10-15). A haploid 1C cell has approx. 15 fg of DNA. (d) This divides by the number of cells to give fg/cell The following is a typical example of a standard curve
54
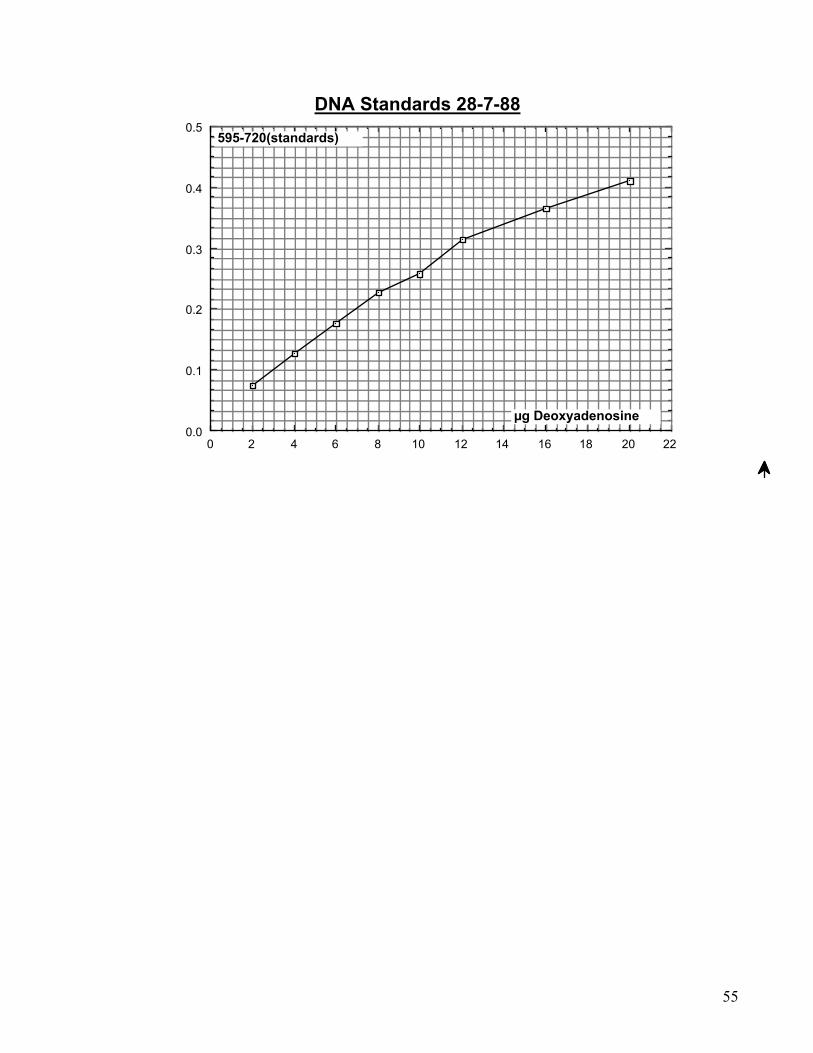
22201816141210864200.0
0.1
0.2
0.3
0.4
0.5
DNA Standards 28-7-88
µg Deoxyadenosine
595-720(standards)
55
Section4 Microscopy 4.1 Quick staining DAPI staining nuclei DAPI staining is very quick and easy and can be extremely informative. It is very simple to monitor cells during the course of an experiment or alternatively fixed samples can be examined at your leisure. For ease of viewing (and especially for photography) it is best to have the cells in a monolayer on a slide. A 10x DAPI stock is kept in aliquots in the -35°C freezer. Take a 20µl aliquot and add 180µl 50% glycerol (100% can be used). This gives a 1X working stock (1µg/ml DAPI, 1mg/ml p-phenylenediamine which acts as antifade, 50% glycerol) which should be kept at -20°C in the dark. Note that DAPI staining of S. pombe is not as nice in very high glycerol concentrations (i.e. 90% final). The 'Quick DAPI' method This is a highly swift and satisfactory way of preparing slides, although nuclear morphology is not always well preserved. The method is based on heat fixation. Cells can be taken from an agar plate colony, a growing culture or a tube of fixed cells. The whole process takes about 2 minutes and the end result is a monolayer of stained cells. It is therefore very easy to monitor cells during the course of an experiment. The quality of the slides is perfectly satisfactory for photography. They can be kept at room temperature in the dark for up to several weeks, without needing to seal the coverslips with nail varnish. From a colony on a plate 1. Take a little of a colony with a sterile loop and mix in 3-7µl of dH20 in a small area on a slide. 2. Heat fix the cells at 70°C by putting the slide on a hot plate for 1 minute (setting no.6). 3. Cool the slide for a few seconds before adding 3-4µl of 1X DAPI stock (see above) and a 13mm coverslip. View. Up to 5 samples can easily be accommodated on a single slide. When putting many samples on a single slide, an alternative approach is to use a single 22 x 64mm coverslip. From liquid culture
56
Pipette 3µl of culture onto a slide and proceed as from (2. ) above. Alternatively : 1. Spin down 1ml cells in Eppendorf for 15s. 2. Wash with 1ml dH2O, discard the liquid and resuspend in the last few µl's. 3. Pipette 3-7µl onto a slide and proceed as in (2. ) above. The second method may be necessary when using cells from a yeast extract culture, as the medium can obscure the cells as a result of heat fixation. From fixed cells If an experiment involves flow cytometry then it is very convenient to use the same ethanol fixed samples for DAPI staining (see 'Measuring DNA content of cells'). 1. Rehydrate cells by adding 30µl fixed cells (any small volume will do) to 1ml dH2O in Eppendorf. Vortex 1s and spin down 15s. 2. Take off almost all the water and resuspend in the last few µl's. 3. Pipette 3µl's to a slide and proceed as above. In this case the heat step is unnecessary for fixation but serves to provide a monolayer of cells adhered to the slide. This is much quicker than using poly-L-lysine. Note : 1. The final volumes of cell suspension added to the slide can be scaled up to allow the use of larger coverslips so that more extensive fields can be viewed. 2. Using ethanol or formaldehyde or methanol fixed cells gives a higher quality result than the more immediate approaches and would be the method of choice if you want to photograph cells from an experiment. The quality of slides prepared from colonies or direct from liquid culture is however perfectly satisfactory for photography. Staining the cell wall and septum with Calcofluor Calcofluor can be used to stain live or fixed cells just as described above for DAPI. A 1mg/ml stock is made up in 50mM sodium citrate, 100mM sodium phosphate pH 6.0. and stored in the dark at 4°C. This is then diluted to 50µg/ml with 50% glycerol containing 0.3 mg/ml p-phenylenediamine and used as a 1X working stock. The actual material in the wall that is stained by calcofluor is not known.
57
For the best results stain living cells. If fixed cells are used (for example in a time series) a light formaldehyde fixation is significantly better than methanol fixation (e.g. Add 4% formaldehyde to medium, fixed for 15-30 minutes, followed by washing cells to remove excess fixative). 4.2 Indirect Immunofluorescence S.pombe immunofluorescence is far from trivial. Success comes largely through trial and error. Fixation is the key step. The method used must preserve the antigen against destruction during digestion of the cell wall and in a fit state for recognition by the antibody. The fixation method of choice will therefore vary depending on the antigen that you wish to detect. Protocols that have been found to work are available for tubulin, actin, cdc13 and cdc2. A comprehensive introduction to the perils and pitfalls of S.pombe immunofluorescence is given at the end of this section. It explains what the purpose of each of the many different steps is and is essential reading before you begin. It is very much in the spirit of doing immunofluorescence that you should ask around to pick up useful tips as to which methods have proven most useful in recent experience. Guide to immunofluorescence The following is an expanded version of the procedure first described in J Cell SCI 89 343-357. The procedure has since been used in a number of laboratories and the latest gossip should be tapped for any hints or hindrances. S. pombe behaves very differently to S. cerevisiae with regards to fixation. It is a much tougher nut to crack. Growth No major effects of media upon the relative quality of fixation have been seen beyond the fact that the staining is marginally better when cells are grown in a medium with low glucose content (0.5% in EMM2) in order to weaken the cell walls (and presumably increase fixative penetration), although it has been noted that it can affect phenotype expression in some cases (Pagan et al 1988 J Cell SCI 91 587-595). Different strains seem to have markedly different cell wall structures so care must be taken at the cell wall digestion stage the first time a new strain is used and the protocol adjusted accordingly. Buffers The buffer that is recommended as a starting point is the PEM buffer used in the original paper. In theory a general buffer should be sufficient to preserve cellular structures after fixation. PEM is a microtubule stabilising buffer and was used in the original
58
procedures when all possible steps were been taken to avoid any artefacts. BS has been substituted (Moreno et al 1991 Meths in Enz). On the few occasions I have done side by side microtubule staining with BS and PEM the PEM staining was slightly better with less background, but many factors influence the quality of staining, even between samples, so I have found no unequivocal answer. I am sure all manner of buffers will work well, but for the first attempt I would recommend PEM and once that is established and working branch out from there. PEM 100mM Pipes, 1mM EGTA, 1mM MgSO4 pH 6.9 PEMS PEM + 1.2 M Sorbitol PEMBAL PEM + 1% BSA (essentially FA + globulin free Sigma) 0.1% NaN3 100 mM lysine hydrochloride. Unless it is ultra pure, and thus more expensive, Pipes does not dissolve until the pH is adjusted with 5N NaOH. It is not necessary to use the highest grade of Pipes available. After the addition of lysine to PEM to make PEMBAL the Pipes crashes out of solution and so it is necessary to readjust the pH to 6.9. Preparing the cells Cells can be fixed either in culture by the addition of 10X concentrated aldehyde fix, or after harvesting by centrifugation or filtering, when lX aldehyde or cold solvent may be used as a reagent. Harvesting It has been noted in S.cerevisiae that spinning cells can disrupt the site of bud emergence, and thus is probably affecting cellular structures. Indeed Khar and Mitchison (J Cell SCI 92 345-348) have noted that the nuclear position in some cdc arrested strains can be affected by strong centrifugal forces. This may argue against spinning, however, once a filter pad starts to accumulate many cells, similar arguments may be made about the forces generated when filtering is used to harvest cells. If solvent fixation is to be used harvesting by filtration onto glass fibre filters, such as the Whatman GFC series is recommended. Mitchison (Meths in Cell Physiol 4 131) describes a filter apparatus which is perfect for harvesting pombe. Commercial versions of this filtering funnel are available. If filtering is employed, do not try to filter too many cells at once as this may induce the kind of detrimental external forces described above. 30mls of a log phase culture is around the maximum I use at a time, numerous filters can be placed into the same tube of solvent so it presents no problem. Fixation
59
The aim of the fixation step is to "freeze" the cells permanently in their in vivo state. For immunofluorescence the additional problem of antigen preservation becomes important. That is to say that in addition to maintaining the spatial order it is necessary to maintain the native state of the antigenic site on the protein in order for the antibody to recognise it. The site should not become obscured by reaction with the fixative during the cross linking reactions. Two approaches can be used to fix cells. One is rapid dehydration, thus precipitation and chilling, as achieved by solvent fixation, the other is cross linking cellular components by a glue in order to "stick" everything in place. There are inherent disadvantages with both techniques. Solvent fixation Solvent fixation has the disadvantage of artefactual shrinking due to rapid dehydration and I have had no more than marginal success in trying to regress this with 10 min serial rehydration steps although others have found otherwise (Enoch and Nurse, Cell 60 665-673), possibly through the use of long rehydration steps. The second problem, and one shared with aldehyde fixation is that of the size of the cells. This manifests itself with excellent preservation of the cytoplasm but poor preservation of elements of the nucleus. The theory being that the cooling process takes time and further from the cold a particular structure is the more chance it has of being destroyed by the other changes in the cell before the protein in this region is precipitated. The ways around this include the use of extremely cold liquids, such as liquid helium and liquid propane, but this technique becomes so technical that it is not recommended for routine fluorescence microscopy, rather for electron microscopy where precise preservation is a necessity (Tanaka and Kanbe 1986 J Cell SCI 80 253-268, Kanbe, Kobayashi and Tanaka J Cell SCI 94 647-656). It should therefore always be borne in mind whenever analysing cells that have been fixed by solvent techniques that most of the nuclear structures including the mitotic spindle are often not as they were prior to fixation. This is not usually important as the qualitative answer is the one that is sought (eg is my protein nuclear or not). Generally speaking solvent fixation does not affect antigenicity as badly as aldehyde fixation. Aldehyde fixation Aldehyde fixation fixes cells by the molecular glue approach. The exact method of fixation by either formaldehyde or glutaraldehyde is not known although it certainly involves the formation of long cross linking polymers. One thing that is known about aldehyde solutions is that their chemistry is complex and that the longer they are kept
60
the greater the number of polymers. This means that for electron microscopy ultra pure fresh glutaraldehyde is used as it avoids strange artefactual staining, however I have generally found the opposite for immunofluorescence and get the best results with the cheapest, least pure solutions which have been kept in the fridge for anything up to three years. Presumably this is because of the weird polymers that are formed. Credence is added to this hypothesis by the description of how to make up Bouins solution, a fixative that used to be in common use for histology. This solution is a mixture of numerous aldehydes and catalysts, but requires 6 months at room temperature to mature to a usable state! Cytoplasmic microtubules have rarely been seen in S. pombe by electron microscopy when fixed by glutaraldehyde. The first problem with aldehyde fixation is that of penetration. The fixative needs to be good, ie give good levels of cross linking, but it must not be so good that the resistance of the cytoplasm to the penetration of the further aldehyde increase to unacceptable levels. This problem is overcome in the technique used with pombe by the use of dual fixatives. The theory is that the formaldehyde rapidly penetrates the cell, roughly fixing it whilst the glutaraldehyde slowly penetrates and finishes the job off. If glutaraldehyde alone were to be used the outside of the cell would be beautifully fixed whilst the nucleus would start to loose structures. This is why the glutaraldehyde is added after the formaldehyde. The reason only 0.2% is used is that for anti-tubulin immunofluorescence this provides sufficient cross linking without impeding antibody penetration or the antigenicity of the tubulin molecule. When higher levels are used these problems are encountered along with that of aldehyde induced auto-fluorescence. It should be stressed that glutaraldehyde does "destroy" the antigenicity of many antigens. Both anti-actin staining using the Amersham anti-actin monoclonal and MPM1 and MPM2 staining are abolished if glutaraldehyde is included, whereas the structures they stain are apparently perfectly preserved by 4% formaldehyde fixation alone (which does not preserve cytoplasmic microtubules). So I hope I have given the impression of a swings and roundabouts situation for the choice of fixative. By solvent fixation you see between 6 and 8 cytoplasmic microtubular arrays, but poor spindle preservation, whilst with aldehydes you only see 4 - 6 but see excellent spindle preservation. In future the introduction of other cross linking reagents may help to overcome these difficulties. Solvent fixation is much faster and easier than the aldehyde alternative. Aldehyde fixation The required final concentration of fixatives is 3.7% formaldehyde and 0.2% glutaraldehyde. The formaldehyde is added around 30 secs - 1 min prior to the glutaraldehyde and should be made up fresh every time. This is the most crucial aspect
61
of the anti-tubulin immunofluorescence technique and so will be explained in some detail. Fresh formaldehyde is made up by dissolving paraformaldehyde in PEM buffer to a final concentration of 37%. Place the suspension in a water bath at 65°C for 5 minutes and then add sodium hydroxide to dissolve the solid. If formaldehyde pellets are used the addition of NaOH pellets one by one until the formaldehyde is almost dissolved is preferred. With powdered formaldehyde dropwise addition of a 5N solution is sufficient . The use of powdered formaldehyde is preferred over that of pellets as so much alkali is needed to dissolve the pellets that it causes a precipitate to form when it is added to the culture. Whichever formaldehyde is used it seems to be important to stop adding the alkali just before all of the formaldehyde has gone into solution. A possible explanation for this may be that in this state the formaldehyde starts to polymerise the minute it is diluted and, given that formaldehyde rapidly penetrates the cell, this fixative thus affords quick fixation. Alternative hypothesis include the fact that the formaldehyde may be buffering out the alkali and once it is all dissolved the pH shock upon adding it to the media is detrimental. Feel free to invent your own hypothesis but remember to stop adding alkali when the solution is still grey and has a precipitate of solid formaldehyde in the bottom of the tube. Fix anywhere between 10 and 50 mls for anything between 30 and 90 minutes. The exact duration does not seem to be important (but time permitting longer periods seem to give slightly better results). Therefore, if a temperature shift, or synchronous culture experiment is being done, samples from different time points can be washed at the same time. Fixation is stopped by spinning, resuspending cells in l ml of PEM, transferring to a microfuge tube and washing 3 times with PEM. Solvent fixation Alternative modes of fixation which have all proved effective are, after harvesting by centrifugation or filtration: 5-20 minutes in -20°C methanol; 8 minutes in -20°C acetone: 8 minutes in -20°C 95% ethanol/5% acetic acid. With all of these treatments there is a reproducible 33% reduction in cell diameter but not in length. Upon rehydration the cells skate around on the surface of the solution as they resuspend. This is probably detrimental and can be avoided by one wash in 60% fixative/buffer solution. In the case of methanol fixed cells can be stored for several months at - 20°C. Do not forget to halve the concentration of enzymes used for cell wall digestion and remove the cells from enzyme early when processing solvent fixed cells (see below). Cell wall digestion
62
1-1.5 mls of cells in PEMS at a cell density of 5 x 10⁷ are digested by the addition of Zymolyase to a final concentration of equivalent to 0.5 mg ml-1 100T. See the makers nomenclature on the bottle for the particular strength of the Zymolyase. It is generally sold either as a 100T or 20T mixture (100 or 20 x 103T) An alternative enzyme for cell wall digestion is Novozyme 234 0.l mg ml-1. I have no experience of staining varying when recent batches of Novozyme have been used, suggesting that if protease contamination is a problem it is not a significant one. This was considered a problem in the past. Digestion can be carried out with either of these enzymes alone, or with lyticase but a mixture may be preferred to standardise the protocol for use with some mutants, whose cell wall composition vary considerably. Novozyme and zymolyase break different sugar bonds in the cell wall and result in different methods of cell wall removal. With zymolyase wholes are made in the cell wall whilst with mutanase the cell wall comes off as a complete jacket. One important point, repeated below is that for solvent fixation these enzyme concentrations should be halved. The inclusion of Sorbitol in the buffer whilst cells are being digested is not essential but is included as an extra protective measure. Digestion can be monitored in two ways. The first, and one to come acquainted with if a lot of immunofluorescence is to be done, is assaying by phase contrast. Cells lose their phase contrast halo and get visibly darker as digestion progresses. Internal structures also become visible when digestion is almost complete. Using this method only experience can tell when digestion is complete. An alternative approach is to assay the resistance to lysine (Moreno et al. 1991 Meths in Enzym.). Using this approach 10 µl of digestion mix are added to 1µ1 of 10% SDS on a slide. It has been recommended that digestion is stopped before all of the cells lyse. The digestion state of the cells is not crucial. It is possible to punch holes in the cell wall large enough to allow antibodies in for immunofluorescence without any apparent effect on cell wall staining by calcofluor. If, instead of mixed aldehyde fixation a solvent or 4% formaldehyde fixation is used the concentration of the enzymes should be halved and the cells should be watched carefully as it is often complete within 10 minutes because the fixation is not so strong with these techniques. As a rough guide, using the concentrations described above wild type cells fixed by mixed aldehydes are ready after 70 minutes.
63
After cell wall digestion the cells are pelletted, resuspended in 1% Triton in PEMS for 30 seconds - 10 minutes (depending on how many samples one is processing at one time) and then washed 1-2 times in PEM. Quenching Because glutaraldehyde is a dialdehyde there are many free aldehyde groups available to react with the incoming antibodies. These can be reduced by 3 x 5 minute washes with 1mg ml-1 sodium borohydride in PEM. This solution should be made up for each wash just before use. During this procedure cells fill up with hydrogen and are difficult to pellet so great care should be taken not to loose cells at this stage. One easy was to do this is to spin in a microfuge with all of the cap hinges pointing outwards then repeat the spin having turned the tubes so that the hinges face the axel. This approach is recommended for all washes in the entire procedure as it virtually eliminates all cell loss. After quenching (which can be omitted if glutaraldehyde has not been used ) cells are washed three times in PEM and resuspended in PEMBAL and mixed, either by rotation or rocking at room temperature for half an hour. In actual fact quenching makes little difference to the quality of the final image and has been omitted when there is little material to work with (Pagan et al 1988 J Cell SCI 91 587-595). However in marginal cases it may make the difference between a photographable result and repeating the procedure and so is routinely included in the protocol. Antibody application The greatest problem encountered in the adaption of the immunofluorescence technique to pombe was the high level of background staining. This is apparently due to non-specific interaction of the antibodies with cellular components. Attempts to overcome this by incubation with excess non-specific antibody, of the same species as the secondary antibody prior to the application of primary antibody failed. However, the inclusion of lysine in the antibody Buffer totally overcomes the problem. Apparently the stickiest residues on immunoglobulins are the basic ones and this treatment wipes out such interactions. Hence the pre-incubation with PEMBAL prior to application of the primary antibody. Chappell and Warren used Fish Skin Gelatin instead of lysine in the antibody buffer (Chappell and Warren 1990 JCB 109 2693) The minimum number of cells it is possible to use and salvage after 8 subsequent washes should be used for staining as it reduces the amount of primary antibody that is required and you will still get a huge surplus of stained cells anyway (around 20µl of a thick sludge is sufficient), from 1ml of digest it should be possible to stain 8 separate samples if the double spin microfuge trick is used.
64
Antibody incubation is generally done overnight at room temperature. If this is reduced to four hours the spindles stain with an incomplete, string of diamonds, appearance suggesting that diffusion of the antibody within the strata of the fixed cells is rate limiting and takes a long time. For tubulin staining, of the many antibodies I have tested to date only some batches of YOLI/34 and YLI/2 and recently TAT1 work reproducibly. YOLI/34 and YL1/2 are both rat monoclonal antibodies that were raised against budding yeast tubulin (Kilmartin, Wright and Milstein 1982 J.Cell Biol. 93 576-582). None of the commercially available stocks of these antisera available in the UK have worked when tested on pombe. TAT1 is a mouse monoclonal antibody raised against Trypanasome cytoskeletal preparations (Woods, Sherwin, Sasse, McRae, Baines and Gull J.Cell SCI. 93 541-500) and recognises the microtubules of several filamentous fungi and yeast. TAT1 culture supernatant can be used at between 1 in 10 and 1 in 100. I prefer to use 1 in 10 and reuse the sera exhaustively after spinning the cells out. It stores perfectly at 4°C for an apparently indefinite period. The primary antibody is washed out three times with PEMBAL before the secondary antibody is applied. For secondary antisera it is best to try as many as you can get your hands on. Different batches from different labs stain differently. Secondary antibodies are routinely used at a l in 50 dilution. In recent years Fab2 fragments have been preferred as secondary antibodies over whole IgG, as they seem to penetrate cells faster. When immunofluorescence was first adapted to pombe it was necessary to pre absorb the antisera with 0.l% pombe protein extract as most of the commercial anti-sera tested recognised four to eight bands on a western blot of pombe protein extracts. This may no longer be the case for some affinity purified sera. If pre absorption is required protein is made by vortexing the cells with glass beads, washing the residue with a pombe protein extraction buffer, adding SDS, boiling for two minutes and finally spinning out any cell debris. The extract can be stored at -20°C. To pre absorb a secondary antibody two approaches can be used. The preferable one is to add the protein extract to a final concentration of 1-2% to the neat antibody solution. This mixture is then mixed in the dark by inversion for 1/2 hour, spun and frozen until use. If the anitsera has already been aliquoted upon arrival, add PEMBAL to give the final working concentration, spin for 10 minutes before adding to the cells. Another variable with secondary anti-sera is the type of fluorochrome. If you only have access to the old style fluorescence microscopes, such as the Zeiss photomic III you may prefer to use a Rhodamine conjugated secondary antibody as although its fluorescence is dimmer than fluorescein, it does not fade so quickly, an important consideration
65
when taking pictures with long exposure times. In addition Rhodamine staining seems to be better preserved upon storage of the cells in the fridge for anything up to two-three years. With the advent of the pyramidal microscopes many of these considerations have become obsolete as exposure times have dropped from two minutes to 10 seconds so fluorochrome choice is no longer so important. Once staining is complete cells can either be stored or mounted for viewing immediately. If cells are to be examined immediately, wash 3x with PEM and resuspend in PEMBAL. Storing the cells in PEMBAL for several days at 4°C will considerably reduce background. Wash the cells once more before mounting. In general it is recommended to store cells at least over night or better for 48h before imaging (see “storage” below). Mounting Cells are mounted on poly-L-lysine coated coverslips. To clean the coverslips wash once in detergent solution, then water then acetone before drying on filter paper. The coverslips should be totally transparent. If you find that you are getting a white precipitate on the coverslips actively dry them by pushing them around on the filter paper and the precipitate will no longer be a problem. After cleaning the cover glasses are coated with poly-L-lysine (1mg m1-1) by simply putting the solution on the coverslip and then taking it off. A syringe is used for poly lysine coating. After air drying the coverslips are ready for use. A thick sludge of cells is applied to the coverslip which is then held at a 45º angle to remove as much of the sludge as possible. The result is a monolayer of stained cells stuck to the coverslip. The coverslip is then inverted and dropped onto 5 µl of mounting medium. Some laboratories prefer to use high quality microscope slides that have a very smooth surface. The surface of the slide is not however a problem as the observed light has does not reach the slide, rather, it enters the coverslip through the objective, strikes the subject and it is the excitation light that is detected after passing once more through the coverslip. The mounting medium is 50% glycerol, 1µg/ml DAPI, 0.1mg/ml paraphenylene diamine (=a few flakes) in 0.1M Tris pH8. Para phenylene diamine works as an antifade by absorbing free radicals. When it is fresh it is a slightly brown solution after it has been in the light for some time it goes a dark purple and should not be used any more. Mounting medium can be stored at -20°C for several months but should be aliquoted into 10-50µl aliquots. Microscopy When using non pyramidal microscopes the brightness of the sample can be a real problem. One way around this is to push the ASA rating of the film used during developing. This increases the graininess of the final result, but this is not so much of a
66
problem if Kodak TMX-400 is used. The second approach is to take full advantage of the range of lenses often found on these microscopes. For a detailed explanation consult one of the useful handbooks Zeiss produce about the principals of light and fluorescence microscopy (free). Briefly a rough idea of the amount of light that passes through the lens can be gauged from its numerical aperture. This is the number after the magnification in lens nomenclature (eg 63/1.25 - 1.25 is the numerical aperture). The higher the numerical aperture the more light is allowed through. For Zeiss microscopes the 63/1.4 planapo (see their book for the description of planapo etc, all of which refer to correction for the presentation of a flat field) is an excellent lens for immunofluorescence microscopy. The only disadvantage being that it does not transmit the DAPI wavelength, so pictures must be taken of the immunofluorescence and the lens changed for DAPI/phase contrast. Although tiresome this approach works effectively (Hagan and Hyams 1988). If you have a dim specimen be careful of not falling into the common trap of trying to magnify it as much as possible. The greater the magnification the less light is transmitted to the film. Best results are obtained by increasing the magnification at the final step, ie the printing. For this reason a 100 X lens should be used with caution when a dim sample is being recorded. Cell storage Stained cells can be stored in the fridge in PEMBAL for over 3 years. However, for methanol fixed cells it has been reported that the nuclear DNA has degraded such that DAPI staining is no longer possible. Stopping and starting The procedure can be broken off at any stage as long as the cells are stored in the fridge in the prescience of 0.1% sodium azide to discourage bacterial growth. I generally fix one day and aim to get the cells in antibody by the next evening. The longer the gap between fixation and the application of the primary antibody the poorer the results, but essentially if the gap is only two days it is not significant. Words of Caution As suggested by their use as fixatives the aldehydes used are toxic. Formaldehyde has been implicated as a causative agent of brain tumours and glutaraldehyde of other tumours so these reagents should be used in a fume cupboard. Be particularly careful of
67
formaldehyde vapours when handling hot formaldehyde during the dissolving step. Consult your safety officer about local procedures for the disposal of aldehyde waste. Sodium Borohydride is very reactive and should be treated with extreme caution. Sodium azide is as toxic as sodium cyanide and is a good tumour promotor. In addition it can react with a number of metals to form metal azide salts which are highly explosive so dispose of it in plenty of water in a frequently used sink. Paraphenylene diamine is carcinogenic. Looking for the localisation of proteins using novel antibodies When looking for new proteins, as many different approaches as possible should be tried. Cells should be fixed with both aldehydes, 4% formaldehyde and solvents and a range of antibody dilutions should be used. Fluorescein will give better results at the early stages of the investigations as its signal is considerably brighter than rhodamine. If sensitivity is a problem Streptavidin/Biotin coupled antibodies and fluorochromes work well as an amplification system (for example in the staining of gamma tubulin Horio et al 1990, Cell ). When doing such screening Amersham's anti-actin antibody (1 in 200) should be used as a control for both formaldehyde and solvent fixation procedures. TAT1 (anti-tubulin) can serve as an extra control for solvent fixation. Trouble Shooting The following is a list of tips that may be worth trying when looking for a new antigen, if the standard procedures fail. If no staining is obtained protease inhibitors could be included from the first wash in PEM. Some antisera have been known only to stain cells when 0.1% SDS is in the anti-body buffer as the antibodies were assayed by western blotting prior to their use in immunofluorescence. If your antigen is fairly basic try omitting the lysine from the antibody buffer. Low levels of digestion with commercially available proteases can uncover hidden epitopes. For example if your protein is a component of a multimolecular insoluble complex it may well lie hidden in that complex. Care should be taken when raising anti-sera to make sure that high quality, high titre antisera are generated. (See the note of caution on too frequent injection p 114 of Antibodies; A Laboratory Manual by Ed Harlow and David Lane. CSH press).
68
Additional fixatives such as carbodiimides may be worth trying. It has been suggested that optimising conditions for a new antibody in a more user friendly organism such as S japonicus could be a good approach to take (Alfa and Hyams J Cell SCI 96 71-77). α-Tubulin immunofluorescence: formaldehyde fixation This is a well used method. 1. Grow up a mid-log culture. Use 10-15 mls / sample (OD595 0.5). 2. Make fresh 30% formaldehyde (see below). 3. Fix cells by adding 1/10th vol of 30% formaldehyde to the culture with agitation (leave cells in conical flask). 30s later add glutaraldehyde solution, so that the final concentration is 0.2% (w/v). Put flask back in water bath at culture temperature and agitate for 90mins. Popular wisdom says it's important to use fresh formaldehyde. Glutaraldehyde may work better than the ultra pure fresh reagent (buy a bottle and leave it lying around for a while). This is in contrast to fixation for electron microscopy. 4. Spin cells 2k 5'. 5. Transfer to eppendorf tubes with 1ml of PEM and wash 2X more. 6. Resuspend in 1ml PEMS with 1mg Novozym + 0.5 mg Zymolyase. Incubate at 37°C until ~ 80% cells digested (you can judge by fact that digested cells lyse if 0.5µl 20% SDS is added to 9.5µl cells). 7. Wash 3 X 1ml PEMS. 8. Resuspend in 1ml 1% Triton in PEM for 2min. 9. Wash 1 X 1ml PEM. 10. Resuspend in 1ml 1 mg/ml fresh sodium borohydride in PEM. Incubate 5mins and spin. 11. Repeat step (10) twice more. 12. Wash 3 X 1ml PEM.
69
13. Roughly assess the volume of the final pellet. Resuspend in 2ml PEMBAL and transfer a volume which will give a 20-30µl pellet upon a subsequent spin, to each of 2 Eppendorfs. Put on rotating wheel for 30' at R.T. 14. Spin 10s microfuge. Resuspend in 100µl primary Ab (1/10 TAT1 in PEMBAL). 15. Incubate 16h at R.T. on rotating wheel. 16. Wash 3X 1ml PEMBAL. 17. Resuspend in 1ml PEMBAL and rotate on a wheel for 30 minutes. 18. Resuspend in 50µl Goat a-mouse Texas Red secondary antibody (supplied by Jackson Immunoresearch Laboratories) at 20 mg/ml in PEMBAL (1/50 dilution). Repeat steps 15+16. 19. Resuspend pellet in 100µl PEMBAL and mount on PolyL-Lysine coated coverslips. Dry with hairdryer and invert on 1µg/ml DAPI, 1mg/ml para-phenylenediamine in 100% glycerol. View soon. Materials : 30% formaldehyde : For 10mls, add 3g p-formaldehyde to 5mls PEM, mix and heat to 70°C. Add 4M NaOH dropwise until the almost all of the formaldehyde has dissolved, but the solution is still a little cloudy. Make up to 10mls with PEM. An alternative to making up fresh paraformaldehyde is to buy EM grade formaldehyde sealed in 10 ml ampoules (from Polysciences in the States, and TAAB in UK), which is just as pure, not too expensive (even for relatively large volumes) and incredibly time- and aggravation-saving. PEM : 100mM PIPES, pH6.9, 1mM EGTA, 1mM MgSO4. PEMS : PEM, 1M Sorbitol. PEMBAL : PEM, 0.1M L-Lysine, 1% BSA (globulin free), 0.1% Na azide. Notes: - BS may work as well as PEM (see below).
70
α-Tubulin immunofluorescence: Methanol fixation
1. Use a 10-50 ml culture. Pellet cells by centrifuging 2' at 6000 rpm in a bench top centrifuge. 2. Remove supernatant. Add 1 ml of -20°C methanol. Resuspend cells. Add ~9 ml of -20°C methanol. Fix for at least 8' or store samples at -20°C (they can be kept this way for days). 3. Pellet cells by centrifuging 2' at 6000 rpm in a bench top centrifuge. Resuspend in 1 ml of PEM buffer and transfer to an Eppendorf tube. Wash 3x with 1 ml of PEM (to pellet cells centrifuge 2' at 6000 rpm in an Eppendorf centrifuge). 4. Digest cells: Use 1 ml of sample containing ~5•107 cells/ml. Resuspend in 0.05mg/ml zymolyase and 0.1 mg/ml Novozym. Incubate at 37°C until ~60% of the cells are digested.1 5. Wash 3x with 1 ml of PEMS. 6. Permeabilise cells with a 30 sec. incubation in 1ml of 1% Triton X-100 in PEMS. 7. Wash 1x with 1 ml of PEM. 8. Resuspend cells in 1 ml of PEMBAL. Incubate on a rotary inverter for at least 30' at RT. 9. Resuspend cells in 30µl of a 1 in 15 dilution of TAT1 in PEMBAL. Incubate on a rotary inverter for 16 h at RT. 10.Wash 3x with 1 ml of PEM. 11. Resuspend in 100µl of secondary antibody in PEMBAL 12. Wash 3x with 1 ml of PEM. Resuspend cells in 100 µl of PEMBAL.
1Follow digestion by adding 0.5 µl of 20% SDS to 9.5 µl of sample and look for lysis under the phase-contrast microscope. Digestion of solvent-fixed cells is very fast, and it is often completed in 10'. Start checking after 5'.
71

13. Mount 0.5µl of cells in 2.5µl of mounting medium (50% glycerol, 1µg/ml DAPI, 0.1mg/ml paraphenylene diamine (=a few flakes) in 0.1M Tris pH8.) onto Lysine coated slides for microscopy.
72
BUFFERS: PEM 100 mM PIPES 1 mM EGTA 1 mM Mg2SO4 pH 6.9 PEMS PEM + 1.2 M sorbitol PEMBAL PEM + 100mM lysine hydrochloride + 0.1% NaN3 + 1% BSA (Sigma, FA+globulin-free) COMMENTS: 1. It has been reported that methanol fixation preserves spindles less well than aldehyde fixation. 2. Aldehyde fixation does not work at 4°C.
ACTIN
Rhodamine-phalloidin staining of actin Ken Sawin May 1997 Rhodamine-phalloidin staining of actin is done using a modification of a previous method of Marks and Hyams (Marks, J. and Hyams, J. S. (1985). Localisation of F-actin through the cell-division cycle of Schizosaccharomyces pombe. Eur. J. Cell Biol. 39, 27-32.). The affinity of rhodamine-phalloidin for S. pombe actin does not appear to be as strong as for mammalian actin (perhaps not surprisingly, as phalloidin is a fungal toxin), and therefore it is important to follow procedures carefully for reproducible results. For a long time that lab did not use rhodamine-phalloidin staining because it was thought not to work. To prepare rhodamine-phalloidin stocks, 300 U rhodamine-phalloidin (Molecular Probes) is resuspended in 1.5 ml methanol, divided into 15 µl aliquots, evaporated in a speed-vac and stored at -20°C. 1. Mid-log cultures in YE5S are added directly to one-third volume pre-warmed 16% EM-grade formaldehyde, and fixed for one hour. 30-90 minutes is usually okay, and
73
perhaps shorter times as well, but is is important to be relatively consistent in case fixation times affect subtle aspects of actin organization. 2. Cells are washed 3 times in one culture volume of 0.1 M Na PIPES pH 6.8, 1 mM EGTA, 1 mM MgCl2 (PEM), extracted for 30 seconds with PEM/1% Triton X-100, and washed 3 additional times in PEM. 3. For staining, one aliquot of rhodamine phalloidin is resuspended in 50 µl PEM. This takes a while to dissolve as rhodamine phalloidin is essentially insoluble--make sure it doesn't stick to the pipet tip, and work the end of the tip against the tube wall to suspend the phalloidin. 7 µl of the rhodamine phalloidin is added to no more than 1µl of a pellet of fixed, extracted cells. Too many cells may give less good staining, because the volume of the cell suspension will alter the final rhodamine-phalloidin concentration. Cells stained in this manner can be stored for several days at 4°C. Letting the cells sit for a few hours to overnight before taking photographs can also help but this is not essential. Any unused rhodamine phalloidin can be kept at 4°C for at least a few days and used later. 4. For mounting, 0.5 µl of stained cells are spotted onto a glass slide (in some cases pre-coated with 10 mg/ml polylysine; Sigma P-1524), followed by 2.5 µl of a mounting medium of PEM containing 1 mg/ml phenylene diamine as antifade and in some cases also 50 µg/ml Calcofluor (Sigma F-6259). The slight dilution upon mounting seems to improve contrast . IMPORTANT NOTES: The presence of glycerol in the mounting medium results in relatively poor staining of actin, probably because the rhodamine-phalloidin partitions into the glycerol phase. Slides should not be coated with polylysine when Calcofluor is used, as polylysine seems to interfere with good Calcofluor staining. These procedures give excellent, reproducible staining of actin, and with careful through-focusing one can see actin cables in essentially all cells, although may generate very little contrast. Small changes from this procedure, including growing cells in minimal medium, produce poorer results especially for visualizing cables. Recently (10/98), where rhodamine-phalloidin has not penetrated cells well even after Triton X-100 treatment, a light digestion of cell wall using 0.5mg Zymolyase /ml PEM has helped. The original Marks and Hyams protocol involves buffering the medium with phosphate; see the Cold Spring Harbor lab manual for this method.
α-Actin immunofluorescence: Methanol fixation 1. Use a 10-50 ml culture. Pellet cells by centrifuging 5' at 3000 rpm in a bench-top centrifuge (or filter cells).
74
2. Remove supernatant. Add 1 ml of -20°C methanol. Resuspend cells. Add ~9 ml of -20°C methanol. Fix for at least 8' or store samples at -20°C (they can be kept for days). 3. Pellet cells by centrifuging 5' at 3000 rpm in a bench-top centrifuge. Resuspend in 1 ml of PEM buffer and transfer to an Eppendorf tube. Wash 3x with 1 ml of PEM (to pellet cells centrifuge 1' at ~9000 rpm in an centrifuge). 4. Digest cells: Use 1 ml of sample containing ~5•107 cells/ml. Resuspend in 0.1 mg/ml zymolyase and 0.1 mg/ml Novozym in PEMS (1 ml) Incubate at 37°C until ~10% of the cells are digested. 5. Wash 3x with 1 ml of PEMS (cold). 6. Permeabilise cells with a 30 sec. incubation in 1ml of 1% Triton X-100 in PEM. 7. Wash 3x with 1 ml of PEM. 8. Resuspend cells in 1 ml of PEMBAL. Incubate on a rotary inverter for at least 30' at RT. 9. Resuspend cells in 50 ml of a 1 in 150 dilution of α-actin antibody in PEMBAL. Incubate on a rotary inverter for 16 h at RT. 10.Wash 3x with 0.5 ml of PEMBAL. 11. Resuspend in 50 ml of secondary antibody. 12. Wash 3x with 0.5 ml of PEMBAL. Resuspend cells in 50-100 ml of PEMBAL. 13. Spread ~0.5-1 ml of cells on a slide with a yellow tips. Let them dry for ~5', add a drop of DAPI and a coverslip. 4.3 ß-galactosidase detection LacZ constructs can be used in S.pombe and expression detected on X-Gal plates. ß-galactosidase assays can be performed for cells in culture. S.Pombe X-GAL plates: KXG Minimal
75
Solutions etc. XG1 10x: KH2PO4 - 136g, (NH4)SO4 - 20g, KOH - 42g, H2O to 1 litre 40ml XG2 1000x: MgSO4 .7H2O 40g or MgSO4 19.5g, Fe(SO4)3.6 H2O 200mg or FeCl3.6H2O 106mg, H2O to 200ml 0.4ml H2O 310ml Agar (Bitek - optional) 8g Glucose (20% sterile) 40ml Salts (50x sterile) 8ml Vitamins (1000x sterile) 0.4ml Minerals (10,000x sterile) 40µl X-GAL (20mg/ml in DMF) 2ml Method Mix XG1 with XG2 and autoclave. Mix Agar with H2O and autoclave. Cool both to 55˚C and mix with everything else. Pour immediately. For best results replica plate from non-XGAL plates. Store in the dark at 4˚C and use within a month. Buy Kevin a beer (optional!). References XG1 and XG2 are from Guarente, L. (1983) Meth Enz 101:181-191 Salts, Vitamins and Minerals as for EMM2 as modified by Nurse, P. (1975) Nature 256:547-551 Alternatively, cells grown on normal plates can be placed on a filter. The filter is then placed in liquid nitrogen for 5 seconds to permeabilise cells, thawed and then the filter is submerged in Z-buffer and 1mg/ml of X-Gal and placed at 37°C until blue. Liquid assays for β-galactosidase Solutions: Z buffer (make up a litre, store at 4°C indefinitely, take aliquots for use) 0.06M Na2HPO4 (Mw of -12H2O is 358.14) 0.04M NaH2PO4 (Mw of -2H2O is 156.01 0.01M KCl
76
0.001M MgSO4 Before use, add fresh 0.03M beta-mercaptoethanol; e.g. 0.27mls BME / 100mls Z buffer 1M Na2CO3, store at room temperature indefinitely ONPG, 4mg / ml in water. Filter, store at 4°C until it starts to go yellow. Protocol 1. Grow up selectively a 2ml yeast culture. Record the OD595, which should be mid-log (0.1-0.5). 2. Spin down 1ml and wash with 1ml cold Z buffer. 3. Resuspend in 1ml cold Z buffer. Add 1-2 drops of 0.1% SDS from a Pasteur pipette and 1-2 drops of chloroform and vortex vigorously to permeabilise the cells. 4. Equilibrate for 5 mins at 30°C. 5. Add 200µl ONPG to each tube. Record the time of addition. Allow the reaction to run until the solution has turned yellow. This is done by eye-- so not so yellow as a sharps container, but as yellow as a 'Post-it' note. High activity constructs will change colour VERY rapidly. Lower activity ones will take longer. If you have exceeded 10 mins, stop it as soon as you see any colour. 6. Stop the reaction with 0.5mls of 1M Na2 CO3. Record the time; calculate the elapsed time in mins. 7. Spin out the cell debris and read the OD420 of the supernatant. 8. Calculate "Miller units": Units = 1000 x OD420____________________ vol cells x time of x OD595 assayed reaction of starting (usually 1ml) (min) culture 4.4 Using GFP fusion proteins Making fusion proteins with Green Fluorescent Protein is gaining wide currency, as looking at living cells can allow one to avoid any potential artifacts of fixation, and also
77
observe protein localization in a dynamic context. There are no real "methods" to follow when making GFP fusion proteins, but some general rules to follow may be useful: 1. Tagging with GFP at both N- and C-termini of proteins has worked in S. pombe, but most important is how the fusion affects protein function. In our experience GFP fusions may not act exactly like their wild-type counterparts, and thus determining a protein's localization purely by the localization of a GFP fusion protein may be misleading, even with functional rescue. 2. Fixing cells expressing GFP fusions has varied results, and this seems to depend on the specific protein being used. Methanol fixation is generally safer, but it is worth trying aldehyde fixations if other reasons necessitate. In the presence of formaldehyde, the GFP signal is quenched considerably, but it does recover to some extent when fixative is washed away. I have had worse luck using glutaraldehyde fixation with GFP fusion proteins, although low doses of glutaraldehyde (e.g., 0.1%) may be tolerated. 3. In terms of how much protein is needed to see a signal with a conventional fluorescence microscope, wild-type GFP expressed from REP3X (nmt1 promoter, leu2 marker) gives an easily visible signal. From a medium strength nmt1 promoter (e.g., REP41X) GFP can also be seen, more faintly. With the newer "red-shifted" bright mutants that are efficiently excited by 488 nm light, REP41X levels of expression are seen easily (and roughly comparable to what is seen from REP3X with wild-type GFP). Very little signal is obtained with GFP in REP81X, even with the brighter mutants. It has been reported that if cells are grown in the dark at 25°C the GFP signal considerably enhanced possibly because of oxygen requirements (shake well). 4. GFP photobleaching is not much of a problem. 5. If observing a GFP fusion protein in living cells different media will give different contrast. 6. Extreme care has to be taken if looking for colocalisation of a GFP-tagged protein with a protein detected by immunofluorescence in the red spectrum. The reason is that, especially in the absence of oxygen, GFP can convert to a red-fluorescent form very quickly after illumination with blue light (there is some kind of photoconversion of the protein that is not understood) Sawin and Nurse 1997 Curr Biol 7:R606-607. Be aware and if this presents a problem always photograph the red image first, before illuminating with blue light.
4.5 Fixation, indirect immunofluorescence and FISH protocol
78
Per 10 ml culture of ~5x10⁶ cells/ml; however it also works for cells obtained from plates: 1. Spin down cells and resuspend in 10 ml PEM (cells can be resuspended in smaller volumes with success if desired). Add para-formaldehyde (from freshly-opened ampule, stock solution 16%) to 3%, mix and wait 30 seconds, then add glutaraldehyde to 0.25% (does NOT need to be freshly opened; stock solution is 70% but extremely viscous so a diluted stock of 7 to 25% is handy). Incubate 10-15 minutes @room temp. 2. Wash cells 3X with PEM (bring volume down to ~1ml for the washes and use a microfuge @12K rpm). Resuspend in PEMS (to ~5x10⁷ cells/ml). 3. Add Zymolyase-100T to 1mg/ml and Novozyme to 0.2mg/ml (useful to have 10X stocks of each in PEMS). Incubate 90 minutes @37°. 4. Wash 3X with PEMS, resuspend in PEMS + 1% triton-X100. Wait 30sec. (or up to 5min). Spin down and wash 3X with PEM. **Can start reducing volumes (to 50-500µl, depending on sample conc.) to avoid losing material. Also may want to perform spins for 2 entire minutes in microfuge to produce tight cell pellet. 5. Resuspend in PEMBAL + 0.2mg/ml RNase, incubate at 37° 2 hours. If proceeding directly with FISH, go to probe preparation (step 10) below. 6. If carrying out indirect immunofluorescence before FISH, rotate fixed cells in PEMBAL @ room temp. for 30 min. (this and next step can be combined with RNase treatment above!). Spin down and resuspend in PEMBAL + antibody (25-fold dilution if using anti-Sad1, 10-fold if using anti-tubulin TAT1 monoclonal). Rotate O/N @ room temp. 7. Wash 3X with PEMBAL. Rotate 30 min. in PEMBAL. Suspend in PEMBAL + secondary antibody (200-fold dilution of Cy3-conjugated sheep anti-rabbit for anti-Sad1; 1000-fold dilution of Cy3-conjugated sheep anti-mouse for TAT1) 8. Rotate @ room temp. until signal is visible, probably 0.5-2 hours. Wash 3X in PEMBAL, store in PBS-azide. 9. To proceed with FISH, cells must be re-fixed following indirect immunofluorescence: resuspend in PEM + 3% para-formaldehyde, inc. 30 sec., add glutaraldehyde to 0.25%, incubate ~1 hour @ room temp., wash 3X with PEM.
79
10. Prepare probe. Boil DIG-labeled probe for 5 minutes, place on ice. Meanwhile, pre-warm hybridization buffer @65° for 15 min. Mix boiled probe with pre-warmed hyb buffer and leave @65°. 11. Denature cells. Suspend in 0.1M NaOH and wait 2 minutes (including spin time), spin down and remove NaOH, add warmed hyb buffer + probe, incubate @37°O/N (in the dark if immunofluorescence has been performed). 12. Add 2X volume of 2xSSC+0.1%NaN4 to cells in hyb buffer. Spin down, resuspend in 2xSSC+0.1%NaN4, incubate @37°for 30 min. Repeat twice. 13. Suspend cells in PBS-BAG, rotate 30 minutes @ room temp. Spin down and resuspend in PBS-BAG + fluorescein-conjugated anti-DIG Fab fragments (stock is 200µg/ml in H20; use stock @5-fold dilution). Rotate @ room temp ~1 hour to O/N. 14. Wash 3X in PBS-BAG. Store in PBS+0.1%NaN4- can add DAPI to 1µg/ml (or can add DAPI later, e.g. to the Vectashield). Spread on poly-L-lysine-coated coverslips, overlay with Vectashield. Preparation of probe Solutions PBS-BAG PBS + 1% BSA 0.1% Sodium azide
0.5% Cold water fish gelatin (Sigma) 20XSSC (it’s used as 2X) Dissolve 175.3 g of NaCl and 88.2 g of sodium citrate in 800 ml H2O pH to 7.0 with drops of 10N NaOH, bring to 1l autoclave 50XDenhardts (used at 5X) 5g Ficoll (Type 400, Pharmacia) 5g polyvinylpyrrolidone 5g BSA (Fraction V, Sigma) H2O to 500ml
80
Hyb buffer 10% Dextran sulphate (Pharmacia) 50% deionized formamide 2XSSC 5X Denhardts 0.5 mg/ml denatured salmon sperm DNA (place in 5N NaOH to denature
and then EtOH precipitate) α-rabbit IgG Cy3 conjugate F(ab’)2 fragment of sheep Ab = Sigma 064H-8980 Novozyme 234 poly-L-lysine (Sigma P1274)(use at 1mg/ml)
81
Section 5 S. pombe molecular biology 5.1 DNA preparation and analysis a. Nuclear isolation procedure (Note: not done routinely) [based mainly on the protocol of M. Shimizu, S.Y. Roth, C. Szent-Gyorgyi, and R.T. Simpson, EMBO J . 10, 3033-3041, (1991); and somewhat on Expt 18 from Experiments with fission yeast, a laboratory course manual , from Cold Spring Harbor Laboratory press (1993)] 1. Grow 1 litre of S. pombe cells to ~1X10⁷ cells/ml. 2. Harvest by centrifugation 5K 5 minutes. 3. Wash cells in 50 ml S buffer. Centrifuge 5K 5 min. 4. Resuspend cells in 25ml (S + 10mM β-mercap. + 1mM PMSF). Incubate with gentle shaking @ 30°C for 10 min. 5. Transfer cells to pre-weighed tube (SS-34 tube or equivalent), spin 5K 5 min. 6. Drain pellet and weigh. Add volume of (S+1mM PMSF) ~equal to 4X weight of pellet. Add Zymolyase 100T (DON'T USE NOVOZYME!!!); I use ~20 mg per gram cell pellet. Incubate with gentle shaking @ 30°C for ~40 min. I have read that you should see under the microscope a conversion from the rod shape to a more spherical shape; however, my results have been much better if I do not wait until most of the cells look spherical. ***Remaining steps performed on ice. Buffers must be pre-chilled. 7. Dilute to ~30 ml with S buffer + 1mM PMSF. Spin 5 min., 3.5K in Sorvall HB4 rotor or equivalent (2000g in swinging bucket rotor), 4°C. Wash 2X more in 30 ml cold S + 1mM PMSF.
82
8. After second wash, resuspend cell pellet in 20 ml (F-buffer + 1mM PMSF). Lyse cells using a tight-fitting dounce homogenizer, 7-10 strokes, on ice. Confirm lysis in microscope. 9. Pipet 20 ml GF-buffer to bottom of tube. Layer lysate on top. Spin 11.5K in HB4 rotor (20,000g), 4°C, 30 min. 10. Discard supernatant. Resuspend pellet in 20 ml F-buffer. Vortex 5 min. (pellet at this point is hard to resuspend just by pipetting) in cold room. Spin 15 min, 4.5K in HB4 (3000g). 11. Transfer supernatant to fresh tube. Spin 11.5K in HB4 (20,000g), 25 min. Pellet is nuclei. At this point I treat the nuclei with micrococcal nuclease (for chromatin mapping), then treat with NaCl/proteinase K/sarcosyl and then RNase and phenol/chloroform extract etc. Solutions: S-buffer 1.4M sorbitol 40mM HEPES 0.5mM MgCl2 Adjust pH to 6.5, autoclave. F-buffer 18% Ficoll 400, wt/vol 20mM PIPES (from 100mM PIPES stock @ pH 6.5) 0.5mM MgCl2 pH should be ~6.5. GF-buffer 7% Ficoll 400, wt/vol 20% glycerol, vol/vol 20mM PIPES 0.5mM MgCl2 PMSF stock is 100mM in isopropanol. b. Preparing S. pombe chromosomal DNA.
83
Large scale preparations: Method I
1. Grow 100 ml cells in YE to OD595 of 2-3 (late stationary phase) with shaking at 25-35°C. 2. Spin down at 3000 rpm for 5 minutes and resuspend in 5ml of: 50mM Citrate/ Phosphate pH 5.6 ( 7.1 g/l Na2HPO4, 11.5 g/l citric acid) 40mM EDTA pH 8.0 1.2M Sorbitol 3. Add 15 mg Zymolyase-20T and incubate at 37°C for 30-60 minutes. 4. Check digestion of cell walls using a phase contrast microscope on a 10 µl sample to which 1 µl of 10 % SDS has been added (the cells loose their characteristic refringence and become black). 5. Spin down at 3000 rpm for 5 minutes. 6. Resuspend in 15 ml of 5x TE (50 mM Tris-HCl pH7.5, 5mM EDTA). Add 1.5 ml 10% SDS, mix well. Recheck the lysis ( if necessary cells can be incubated at 65°C for 5 minutes). 7. Add 5ml of 5M potassium acetate and keep on ice for 30 minutes. Centrifuge at 5000 rpm for 15 minutes. Pass the supernatant through a gauze and add 20 ml ice cold isopropanol and leave for 5 minutes at -20°C. 8. Centrifuge at 10000 rpm for 10 minutes, drain well and dry the pellet. 9. Resuspend in 3 ml 5 x TE and add RNAse to a final concentration of 20 µg/ml and incubate for 2 hours at 37°C. 10. Add 3 ml of phenol/chloroform 1:1, mix well and transfer to a 15 ml Corex tube . Spin down at 10000 rpm for 10 minutes. 11. Transfer the upper aqueous phase to another 15 ml Corex tube, add 0.3 ml of 3M sodium acetate and 7.5 ml of ethanol, mix and incubate on dry ice for 1 hour or -20°C for 4-5 hours . Precipitate the DNA by spinning at 10000 rpm for 10 minutes. Wash the pellet with 5 ml of cold 70% ethanol and dry under vacuum. 12. Finally, resuspend the DNA in 0.2 ml of TE. Read the OD260/280. A ratio of 1.6 indicates pure RNA, 1.8 pure DNA. The DNA can be quantified by running an aliquot on a gel alongside a previously determined sample.
84
1 haploid cell contain 14000 kb size genome = 1.53 x 10⁻¹⁴ g of DNA. Typical yields are about 20 µg per starting culture of 100 ml at stationary phase. This DNA can be used for restriction digestion and Southern blotting. For molecular cloning such as library construction the DNA should be further purified by CsCl centrifugation. Small scale preparations (10 ml cultures) 1. Grow a 10 ml culture to stationary phase. 2. Spin down at 3000 rpm for 5 minutes and resuspend in 1ml of: 50mM Citrate/ Phosphate pH 5.6 ( 7.1 g/l Na2HPO4, 11.5 g/l citric acid) 40mM EDTA pH 8.0 1.2M Sorbitol 3. Add 2.5 mg Zymolyase 20T. Incubate at 37 °C for 30 - 60 minutes. Cells should have lost their refractility when examined under the microscope with 2 % SDS. 4. Pellet cells for 10 seconds in a microfuge and remove the supernatant. 5. Resuspend the pellet in 0.55 ml TE, 1% SDS. Incubate at 65°C for 1 hour. 6. Add 175 µl 5M potassium acetate. Keep on ice for 5 minutes. 7. Spin in a microfuge for 15 minutes at 4 °C. 8. Take and retain 0.5 ml of the supernatant, avoiding cell debris. Add 0.5 ml isopropanol (cold). Put at -20°C for 10 minutes. 9. Spin in a microfuge for 15 minutes at 4 °C. Wash with 1ml 70% ethanol. 10. Resuspend pellet in 350 µl of TE containing 50 µg/ml RNaseA and incubate at 65°C for 10 minutes. 11. Add 300 µl of phenol/chloroform 1:1, vortex 20s and spin down for 5 minutes. 12. Transfer the upper aqueous phase to another tube and repeat step 11. 13. Take the aqueous layer to a fresh tube and add 30 µl of 3M sodium acetate and 750 µl of ethanol, mix and incubate on ice for 10 minutes. Precipitate the DNA by microfuging at 10000 rpm for 10 minutes. Wash the pellet with 1 ml of cold 70% ethanol and dry under vacuum.
85
13. Resuspend in 30-50 µl. Run 1/10 on gel to test yield. Digest about 15µl. This DNA is ideal for Southern blotting and is convenient when a large number of samples are to be analysed. The average DNA size obtained in this protocol is about 20 kb. Method II (for Southerns, PCR, etc.; from Hoffman & Winston, Gene 57, 267-272 [1987]) Grow 10 ml culture to saturation. Harvest by centrifugation. Remove supernatant and resuspend cells in 0.5 ml of dH2O. Transfer cells to screw-cap micro centrifuge tube. Spin 5 seconds in microfuge, decant sup, briefly vortex tube to resuspend pellet in residual liquid. Add 0.2 ml of (2% triton X-100, 1% SDS, 100mM NaCl, 10mM Tris-HCl [pH 8.0], 1mM EDTA). Add 0.2 ml of phenol:chloroform:isoamyl alcohol (25:24:1). Add acid-washed glass beads to the level of the meniscus of the solution. Vortex 5 minutes, or longer, until 90% cells are broken. Microfuge 5 minutes. Transfer upper, aqueous layer to fresh tube. Add 1/10 vol 3M NaOAc, pH 5.2, and 2.5 vol 100% ethanol. Microfuge for 5 min. Wash pellet once with 70% ethanol (-20°C), spin again. Air dry. Resuspend in 20-30µl TE (+ RnaseA, or add during subsequent digest). Yield 10-20 µg DNA. c. Preparation of chromatin extract from pombe - Dom’s method • Grow 50ml cells to mid-log in min media • Add 0.3M sodium azide to 1mM final concn (166ul). Harvest cells 3K, 3 min • Wash in 25ml 1x STOP buffer • Wash with 25ml of hH2O. 2.5K, 4 min • Wash with 5ml of 1.2M sorbitol. 2.5K, 4 min • Resuspend in 2.25 ml of soln1 50mM NaCitrate buffer 40mM EDTA 1.2M sorbitol Add BME to 0.2% (30mM) = 5ul 10mg of Sigma lysing enzyme in 250ul of soln1 (ie total 2.5ml)
86
• Incubate room temp. Check lysis every few minutes by mixing equal volumes of 2% SDS
with extract. • When 80-90% lysed by SDS, add an equal volume of soln2: 1.2M sorbitol 10mM tris pH7.5 • Mix gently by inversion and spin 2K, 4min. • Remove s/n and resuspend GENTLY in 2.5ml 1.2M sorbitol • Spin 2K, 4 min. Repeat wash once more (2 washes in all) • Resuspend pellet in 860ul final volume of 1.2M sorbitol. CAN FREEZE HERE AT -80C • (Thaw and) Add 100ul of 10x lysis buffer: 10x lysis buffer 500mM KoAc 20mM Mg(oAc)2 200mM Pipes-KOH pH6.8 + 100x protease inhibitors • Add TritonX-100 from 25% stock to 1% (40ul) • Incubate on ice for 15min. DO NOT VORTEX!! OCCASIONALLY ROCK BY HAND! • Do not remove initial debris • Remove 1ul for Bradford assay. Remove 100ul for ‘TOTAL’ fraction - mix with 2x Laemmli
and bopil 10min. • Spin 15K, 20min, 4C. • Remove 100ul of s/n and add 100ul 2x sample buffer and boil 10min ‘TRITON
SUPERNATENT’. • Discard/freeze remaining s/n. • Wash pellet with 900ul of lysis buffer without triton. Incubate on ice 5min with occasional
rocking. RESUSPEND USING INOCULATING LOOP, DO NOT VORTEX DURING ANY OF THESE STEPS!
• Repellet 15K, 10min. Boil 100ul of wash in 2x Sample buffer ‘WASH’ • Add 900ul of high-salt extraction buffer 10mM HEPES pH 7.9 1mM EDTA 0.5M NaCl + protease inhibitors • Resuspend as above and rock gently on ice for 10 min and then spin 15K, 20min. • Remove s/n boil 100ul with 2x Sbuffer ‘SALT EXTRACTED’ • resuspend pellet in 900ul of high salt buffer . Boil 100ul in 2x Sbuffer - ‘PELLET’ • Remove 100ul and boil in 2x sample buffer as before. • Load equal amounts on 10% SDS gel (35-50ug of protein and equivalent for 10 lane gel;
25ug for 15 lane gel).
87
CONSIDERATIONS: • The spheroplasting is critical!! If you do not get decent lysis, or too much lysis - forget it and
start again. You should get between 5-10mg/ml protein concentration from this - dont forget to blank with lysis buffer, since triton affects Bradford reagent.
• If you dont get 100% lysis, you will tend to get some of your protein in the pellet at the final
step - I presume that this is due to the boiling lysing remaining cells that have been unlysed during the procedure. The more unlysed cells there are, the higher the ‘background’ in each fraction of your protein that probably shouldnt be there! I normally use tubulin as a loading control and as a marker for good fractionation - there should be no tubulin in the salt extracted or pellet fractions, if lysis has been good. This is also the reason why I analyse the salt bump as the chromatin bound proteins (as opposed to Triton soluble vs. pellet), since protein released from intact cells during boiling can obviously be misleading and does not represent necessarily chromatin association!!
• DNAse treatment is proably the best way of determining if your protein really is chromatin
bound. To test this, I have found adding NaCl to the initial lysis to 100mM and then adding 1ul of DNAse (16units/ul from Sigma) and leaving at 25C for 30min blitzes the DNA. Spinning your extract now should result in little or none of your protein in the pellet vs. a control containing 100mM NaCl and 0 DNAse that has been treated identically (since 100mM salt will remove some of the proteins from the chromatin).
• I use a 500mM NaCl bump - this seems to remove all of the Spp1, Cdc19 and Orp1 from
chromatin. This is entirely emprical, and should be determined for each protein being studied. Since in a 1ml assay, I only ever remove 100ul for each step, obviously 1 sample can be split for up to 9 individual treatments (i.e salt titration/DNAse sensitivity etc)
• If you want to check the fractionation is actually working, then you can look at the DNA by
phenol extraction, phenol:chloroform and chloroform extraction of the supernatent and pellet fractions. Phenol is important for this - phenol:chloro alone does not clean the DNA sufficiently! Also, you may need to dilute the samples 2x with water, since too much salt in the sample will cause the phases to invert!
• Good luck!! d. Pulse Field Gel Electrophoresis S. pombe has 3 chromosomes of 3.5,4.6 and 5.7Mb which can be separated by PFGE. Cells are embedded in agarose plugs which can be stored at 4°C indefinitely. A
88
number of different types of apparatus are available for PFGE. Our experience in the lab so far is limited to that of Southern et al (1987). Plugs are prepared as follows, from cells grown in Minimal Medium. Use about 150ml of a mid log culture, depending on the number of plugs required. 1. Wash cells twice in CSE (20mM citrate/phosphate pH 5.6, 40 mM EDTA, 1.2 M Sorbitol) and then resuspend in 10 ml CSE with 15 mg Zymolyase-20T. 2. Digest for 1h at 37°C, pellet cells and resuspend at 6x10⁸ cells/ml in TSE (10 mM Tris HCl pH 7.5, 45 mM EDTA, 0.9 M Sorbitol). 3. Warm to 37°C and add an equal volume of 1% LGT agarose in TSE. Dispense 100µl aliquots to a plug mould. 4. Lyse cells by incubating plugs in 0.25 M EDTA, 50 mM Tris HCl pH 7.5, 1% SDS for 90 minutes at 55°C. 5. Transfer the plugs to 1% lauryl sarcosine, 0.5 M EDTA pH 9.5,0.5 mg/ml Proteinase K and digest at 55°C for 48h (add fresh Pr.K after 24h). 6. Store plugs at 4°C. 7. Equilibrate plugs before loading, by giving three 10 minute washes in TE. 8. For the Southern apparatus gels are run at a voltage gradient of 1V/cm for 7 days and the buffer is changed on the fourth day. If a CHEF apparatus is used then a 3 day run is sufficient. Ethidium bromide is used to stain the gels after running. e. Genomic DNA Digests
S. pombe DNA is apparently non methylated and therefore may be cut by restriction enzymes which would not cut that particular sequence in bacterial DNA. For instance, S.pombe cdc2 has an upstream ClaI site which would not normally be cut. Different restriction enzymes have differing abilities to restrict genomic DNA, which tends to be more aggregated and contain more protein. Partial digestion can then become a problem. Complete digestion of the DNA will produce a banding pattern characteristic of the restriction enzyme being used, due to multiple copies of the mitochondrial rRNA genes. Patterns for digestion with Bam HI, Hind III, Cla I, EcoRI and and Eco RV are shown below. Some guidelines for improving the completeness of the digestion include: 1. After dilution with restriction enzyme buffer, leave the DNA on ice for several hours, stirring periodically with a sealed capillary tube, before adding the enzyme.
89
2. Use more enzyme than the required amount anticipated from the listed enzyme activity for the given time of digestion (1 unit =1µg l DNA hydrolysed / hr). Some people digest 1 µg genomic DNA with 5 units of enzyme overnight (use the 37°C warm room), followed by a further addition of 5 units for several hours. Others digest 2µg DNA with 15 units of enzyme in a 20µl reaction at 37°C overnight. Include acetylated BSA at 40 µg / ml in the reaction mix to stabilise the restriction enzyme. f. Southern blotting GeneScreen plus paper is usually the membrane of choice; it is non-sided; and charged so that nucleic acids bind after drying, without baking or UV crosslinking. This means that it is difficult to strip off the probe, so if rehybridisation is anticipated it may be better to use GeneScreen. 1. Digest 2-10 µg DNA and run on a 0.6-0.8 % agarose gel at about 1-2V/ cm 2. Photograph the gel alongside a ruler, at the usual UV wavelength. 3. Soak gel in 5 gel volumes of 0.25N HCl with agitation for 20-30 min to depurinate the DNA. This allows easier transfer of large molecules but is not recommended for fragments less than 1 kb in size. 4. Rinse gel in distilled water then soak in 5 volumes of 0.4 N NaOH - 0.6 M NaCl for 30 minutes at room temperature, with constant agitation, to denature the DNA. 5. Neutralise gel by incubating in 5 volumes 1.5 M NaCl - 0.5M Tris-HCL, pH 7.5, for 30 minutes at room temperature with gentle agitation. 6. Cut the membrane (GeneScreen plus paper) to the exact size of the gel (any larger may allow "short circuiting" of the transfer buffer); cut two pieces of 3 MM filter paper as well as a stack of paper towels (approx. 5 cm) to the same size. 7. Wet the membrane by placing on the surface of a tray of deionized water; transfer to a 10 X SSC solution ( 10 X SSC : 1.5 M Sodium chloride, 0.15 M sodium citrate) and soak for 15 minutes. 8. For the transfer (capillary blotting ) place 2 sheets of 3 MM paper on a glass plate supported above a tray of 10 X SSC so that the ends of the paper are in contact with the solution, to act as a wick. Lay the gel on top (wear gloves). Place the membrane on top of the gel, followed by the two pieces of 3 MM paper which have been cut to the same size. Place Saran Wrap or Parafilm around the edges of the gel to prevent short circuiting. Add the paper towels on top to make a stack and weigh down with
90
approximately 500g. Cover whole setup with Saran Wrap to prevent evaporation and leave overnight to transfer. An alternative arrangement is to form a pad from three sheets of Whatman 3MM, quartered and saturated in 10 X SSC, placed on Saran Wrap. Put the gel on top and fold the Saran Wrap around the edges of the gel, thus avoiding any short circuiting, place the membrane on top followed by paper towels and the weight. An alternative to capillary transfer is to use the Posiblot apparatus which allows efficient transfer within one hour. This uses pressure to transfer the DNA from the gel to the membrane. For best results, run DNA in a gel as thin as possible and with the lowest possible concentration of agarose. Also, remember not to load samples in the two outermost lanes because they will not transfer well with this system. 8. Carefully remove membrane away from gel. Soak the gel in 2X SSC. Soak a new piece of Whatman paper in the 2X SSC briefly then lay membrane on the Whatman paper and crosslink. For large membranes, let the membrane dry, DNA side up, on bench before beginning hybridisation. Roll the membrane up with the DNA side towards the inside, and place inside a hybridisation bottle. Unwind the membrane by shaking and rotating the bottle. 9. Prepare the prehybridisation solution of 10 % dextran sulphate, 1 M NaCl, 1 % SDS ( 10 ml per blot ). Pour away the 2 X SSC from the cylinder and replace with the prehybridisation solution. Prehybridise at 65 °C for at least 15 minutes. 10. Add the probe and hybridise overnight ( For making the probe see below ). Alternatively, use QuickHyb solution from Stratagene. Prehybridise for 15 min at 68°C, then add heat-denatured probe and hybridise for one hour. 11. Washing: Pour away the probe solution and perform the following washes: a. Twice with 2 X SSC for 5 minutes at room temperature with agitation. b. Twice with a solution of 2 X SSC, 0.1 % SDS for 20 minutes at 65 °C with agitation. Monitor signal with Geiger counter. If membrane is still very hot, continue with more stringent washes. c. Twice with a solution of 0.1 X SSC, 0.1% SDS for 20 minutes at 65 °C with agitation. 12. Remove excess liquid from the membrane, seal in a hybridisation bag or Saran Wrap and autoradiograph. Do not allow the membrane to dry if reprobing is planned, as this can result in permanent binding of the probe.
91
g. Reprobing of Southern blots Several techniques are available for stripping the first probe from the blot, these are as follows: Method 1: Incubate blot with 0.4 N Na OH at 42 °C for 30 minutes, followed by 30 minutes with a solution of 0.1 X SSC, 0.1 % SDS, 0.2 M TRIS pH 7.5 at 42 °C , both with agitation. Method 2: Boil a solution of 1 % SDS, 0.1 % SSC, then pour over membrane. Repeat until signal is no longer detected with Geiger counter. Soak membrane in 2X SSC with agitation before rehybridising. The blot is then prehybridised and hybridised as above. 5.2 Making a probe by random-priming using the Stratagene "prime it" kit This method uses the technique of random priming to radioactively label probe DNA. Short oligonucleotides hybridise to single stranded DNA made by denaturing the piece of DNA with the desired sequence, and primer extending with T7 polymerase using a radioactively labelled precursor dNTP with 32P at the a-phosphate position. The procedure is as follows: Note: The protocol below can be used with half the amounts shown. This gives sufficient probe for two blots!! 1. Take 50 ng of the DNA of the desired sequence and make up with water to 23µl. (DNA concentration may be increased if incorporation is low: UV crosslinking can reduce labelling). It may be useful to include DNA size markers corresponding to those used on the gel, if applicable, for ease of interpretation of the migration pattern. 2. Add 10 µl of random oligonucleotide mix. Heat at 95° C for 5 minutes to denature the DNA , then add 10 µl of 5 x primer buffer, 5 µl of 32P dNTP and 1µl of Klenow. 3. Incubate for 10 minutes at 37 °C. Stop the reaction by adding 2 µl of "Stop mix" or 1x TE. 4. Remove unincorporated nucleotides from the probe using ProbeQuant micro columns from Amersham, following manufacturer’s instructions. To measure the incorporation, pipet 2µl of probe onto a thin strip of Whatman paper and add to approx. 3 mls of scintillation fluid in a vial. This will give the number of counts per volume of probe. Typically, 1-2 x 10⁶ cpm are added per ml of hybridisation solution. Before using
92
probe, boil with 100µl of salmon sperm DNA (10mg/ml) for 2 min then add to hybridisation solution. 5.3 RNA preparation 1) Preparing S. pombe total RNA. Several methods exist for the preparation of RNA from S. pombe. 10µg is needed for each Northern and 100µg can be obtained from 30mls of log phase cells. Notes on these procedures:- 1. Many people are nervous of RNA preparation because of its increased lability relative to DNA. Its easy!! Some very simple precautions will make it reliable. First, always wear gloves. Second, avoid glass--use freshly sterilised tips and tubes. Sterile plastics straight from the package are also safe. Third, mark your RNA solutions and stocks "RNA" and ONLY USE THEM when preparing RNA. That way you know that only clean tips have touched your Tris. If these precautions are followed, DEPC treatment of water etc is unnecessary, and you will get good RNA every time. 2. You can check the quality of your RNA on a standard TBE or TAE minigel with ethidium. SCRUB OUT THE GEL BOX with detergent and rinse thoroughly first. Use freshly prepared loading buffer, filtered. You should see the ribosomal bands (running about 1.8 and 3.5kb). If the bands are clean, distinct, and not smeared, then you have good RNA. 3. Plasmid DNA can contaminate the RNA sample (not with Trizol). 4. PolyA+ RNA can easily be isolated using kits containing poly(dT) attached to magnetic beads. 2) Trizol Trizol can be purchased from GIBCOBRL. It is a monophasic solution of phenol and guanidine isothiocianate, this is very efficient at disrupting cellular components. On the addition of chloroform it separates into an aqueous an organic phase. Break cells in the presence of Trizol with glass beads at room temperature. A protocol is provided with the product. 3) RNA preparation taken from Schmitt, M.E., Brown, T.A. and Trumpower, B.L., Nucleic Acids Res. 18, 3091 [1990]) - Quick, easy, and reliable. Grow 10 ml culture to stationary phase. Harvest by centrifugation and resuspend in 400µl of (50mM Na acetate, pH 5.3, 10 mM EDTA; 'AE' buffer). Transfer to 1.5 ml microfuge tube (*use a tube with a screw-on cap).
93
Add 40ul of 10% SDS, vortex. Add equal volume (440ul) phenol (Schmitt et al. say phenol should be pre-equilibrated with AE buffer but I have found that it works fine with regular tris-pH 8-equilibrated phenol). Vortex, incubate at 65° for 4 minutes. Chill rapidly in a dry ice/ethanol bath until phenol crystals appear, centrifuge for 2 minutes at max speed. Transfer upper aqueous phase to fresh microfuge tube, extract with phenol/chloroform at room temp for 5 minutes. To extracted aqueous phase add 3M Na-acetate, pH 5.3, to conc. of 0.3M (i.e. add 40ul) and 2.5 volumes of ethanol to precipitate the RNA. Wash the pellet with 80% ethanol, dry and resuspend in 20ul of sterile water. Store at -70°. 4) Standard method adapted for use with Eppendorf shakers to break cells. A. Growth of culture: grow up 30mls cells to a O.D. 0.5 B. Collect the cells by centrifugation in the cold. Resuspend in 1ml of cold water and centrifuge in a screw-cap or possibly snap-cap tube. Snap freeze the pellet in dry ice and store at -70°. Can be stored for long periods of time as pellets. C. Extraction of RNA (required solutions) DEPC treatment is not required but all solutions should be freshly autoclaved, and reserved for RNA preparation; only newly opened sterile plastics should be used. RNA extraction buffer: 0.1M EDTA pH 8.0 0.1M NaCl 0.05M Tris pH 8.0 1. Thaw pellet on ice. Add 100µl ice cold RNA extraction buffer, 100µl cold phenol chloroform, and 2.5µl 20% SDS. Resuspend pellet and add 500ul acid washed glass beads (425-600µl, Sigma No G9268) (Use a 250ug PCR tube to measure out beads). Keep everything cold, on ice. 2. Vortex VIGOROUSLY on shaker in cold for a total of 5min, tubes should be well labelled because phenol leaking from the tubes can wipe clean the identity of the sample. Spin epindorfs briefly to allow opening of the tube. Add another 200µl of buffer and 300µl of phenol/chloroform vortex on shaker at low speed for 30". 3. Spin tubes (e.g., 13000 rpm for 5' at 4° C) the phenol/chlm should cover the glass beads and a white precipitate should separate the aqueous layer from the organic phase. Removed supernatant to tube with 250µl phenol and make up to 300ul with lysis buffer. Extract the aqueous phase at least 2x with cold phenol/chloroform.
94

4. Adjust the final solution to 2.5M NH4OAc (add 100ul of 10M stock) and add 2.5 vol (1ml) cold EtOH. precipitate at 20°C overnight and resuspend in RNase free water (30-50µl) and determine OD260/280; store at -70° C.
95
Northern blotting (formaldehyde gel) Solutions required:
10 X MOPS buffer Deionised formamide Formaldehyde, 37% 800mls dH2O see genescreen manual use either a fresh bottle 41.8g MOPS for preparation or one with an airtight seal; pH to 7, then add ie, not one with a leaky 16.6mls 3M NaOAc lid that has been under the 20mls 0.5M EDTA hood since 1989. Adjust volume to 1 litre filter, store dark at room temp
1. Scrub out the gel box, comb, and casting tray with detergent and rinse thoroughly to get rid of all the RNAse in those minipreps you've been running. 2. Cast the gel (in the HOOD! Formaldehyde is very unpleasant) Microwave (for 100mls final) 84mls dH2O and 1 g agarose. Allow to cool to hand-hot, then add 6mls formaldehyde and 10mls 10X MOPS buffer. Cast gel. Also make up your 1X MOPS running buffer. 3. Samples: use 5-10µg RNA in 3µl; for each sample, add (from a master stock) 3µl formaldehyde 10µl deionized formamide 2µl 10X MOPS heat to 65° for 10min, then put on ice; add 2µl gel dye 1µl 1mg/ml Ethidium Bromide (OPTIONAL) 4. Load gel and run IN HOOD at 100-150V, depending on the size (a big gel in a large box should run at 120-140V) until the bromphenol blue has run to the bottom. It needs to be run fairly hot to keep the RNA denatured. MOPS buffer will become exhausted, so either replenish it, or mix the two tanks by sloshing it gently once or twice during the run. Briefly wash the gel in RN'ase free water because formaldehyde inhibits the binding to the membrane. 5. Transfer by capillary blotting in 10XSSC as described in the genescreen book (Note--unlike Southerns, Northern gels need no pretreatment prior to transfer.) You can photograph the gel first if you added Ethidium; you will see the ribosomal bands at approximately 1.8 and 3.5 kb.
96
6. REMEMBER to bake the filter after transfer for 2H at 80° to reverse the formaldehyde reaction. 7. Prehybridise the membrane in 1M NaCl, 10% Dextran Sulphate, 1% SDS at 60°C, add probe and hybridise O/N. Rinse then wash in 2X in 2XSSC 1%SDS for 30' at 60°C. The stringency can be increased by a second wash in 0.1XSSC at room temperature for 30 minutes. Northern Blotting 2 Alternative procedure. 1) Glyoxyl (&DMSO) are deionised and stored in aliquots at -70°C. Glyoxyl is a pain to deionize, use approximately 15 passages through deionising beads, then freeze. 2) Before use glyoxyl should be re-deionised with beads a few times. 3) Prepare a mix for samples. 40% glyoxyl (6.6M) nx2.5µl DMSO nx8.0µl 0.1M Na(PO4) (pH6.5) nx1.6µl Add 12µl of mix to each 5µl (5µg) sample of RNA 4) Incubate at @50°C for 15' 5) Prepare 1.2% agarose gel in 15mM PO4 buffer(pH6.5) NO EtBr in Gel. 6) Cool denatured RNA sample, add 4µl of loading buffer & load immediately. Loading buffer: 50% glycerol 0.01M PO4 0.4% Bromophenol blue 7) Run gel at @ 4V/cm with constant circulation. For a 20cm gel the running time at 80V will be about 4h. Can run on bench as there's no formaldehyde. 8) Blot gel in 25mM PO4 buffer(pH6.5) Alternatively the gel can first be stained with EtBr. 5.4 Nuclear Run On
97

This is a procedure that enables the rate of ongoing transcription of genes to be measured by the incorporation of radioactive rUTP into nascent transcripts. Note that the detergent removes most proteins from the DNA but transcribing RNA polymerase molecules remain bound and actively transcribe in the presence of nucleotides. The signal gives a measure of their density on a gene. 1. Filter and wash 2x10⁸ cells with 5mls of ice cold TMN buffer. Resuspend in TMN and allowed to equilibrate for 10 minutes on ice then remove TMN and resuspend in 950ul of cold H2O and add 50µL of 10% sarcosyl and incubate cells on ice for an additional 20 minutes. Remove detergent and resuspend the permeabilized cells in 120uL of ‘run on’ buffer (50mM TrisHCl pH7.9; 80mM MgCl; 500mMKCL; 1mMDTT; 1mMrATP, 0.5mMrGTP and rCTP; 100 units of RNase inhibitor (Sigma) and 100uCi rUTP-αP32). 2. Incubate at 30°C for 10 minutes. Wash cells once in TMN buffer and break immediately with glass beads to isolate labelled RNA. Use the procedure outlined in the section for RNA isolation. Use screw capped tubes to prevent leakage of radioactive material. 3. Isolated RNA is then precipitated in the presence of 200ug tRNA as a competitive RN'ase inhibitor and wash in 75% EtOH before dissolving in 100ul 1xTE. 4. Denature RNA for 3 minutes at 95°C and add to the prehybridised membrane in 3mls of hybridisation buffer and incubate at 6%°C for 2 days. The pre-hybridisation buffer and the hybridisation buffer are identical; 10mM Tris-HCl pH 7.5, 250µg tRNA, 10X Denhardt's Solution (0.2% BSA/ 0.2% Polyvinylpyrrolidone (MW 40,000)/ 0.2% Ficoll 400), 0.5% non-fat dry milk, 0.3M NaCl, 1%SDS, 10mM EDTA. Rinse and then wash twice with 2XSSC, 1% SDS for 30 minutes at 60°C followed by 0.1SSC for 30 minutes at room temperature. Membrane preparation. Soak a Gene Screen plus membrane in 1xSSC and use a slot blot to apply the DNA. Add 10µg of ssDNA in 400ul of 1xSSC into each slot and absorb onto the membrane . Vector control and/or non-complementary DNA should be used to assess background. Also dsDNA may be used, although it must be denatured before application to the membrane. A potential problem is that the non-coding strand frequently gives some signal, which varies according to the sequence resulting in a variable background. 5.5 Protein Preparation Large scale extracts
98
This procedure is used when it is necessary to make an extract from 1 x 10¹⁰ cells or more. 1. Harvest a culture in mid-log phase at 3000 rpm for 5 minutes at 4°C. 2. Wash once with ice-cold buffer stop buffer (150mM NaCl, 50 mM NaF, 10 mM EDTA , 1mM NaN3 pH 8). 3. Resuspend the cells at 1 x 10¹⁰ cells/ml in ice-cold HB buffer ( 25 mM MOPS pH 7.2, 60 mM ß-glycerophosphate, 15 mM p-nitrophenylphosphate, 15 mM MgC12, 15 mM EGTA , 1 mM DTT, 0.1 mM sodium vanadate, 1% Triton X-100, 1 mM PMSF, 20 µg/ml leupeptin, 40 µg/ml aprotinin). Break open the cells using one of the following procedures: A. French pressure cell press at 18000-20000 psi. Concentrated extract (40-60 mg/ml) can be made by this procedure or, B. Add 2 volumes of acid washed glass beads (0.5mm diameter, Sigma, G-9268) and break for 2-3 minutes using a Braun MSK homogenizer . To check that the cells are broken: mix 1µl of extract with 10 µl of buffer and look under phase-contrast microscope. More than 90% of the cells should loose their characteristic refringence and become black. Small scale extracts. 1. Grow up 50 ml culture to an OD595= 0.25 (5 x 10⁶ cells/ml) in minimal medium. Total cell number=2.5 x10⁸. 2. Harvest the cells at 3000 rpm for 5 minutes (or filter with Millipore filter). Wash once in 5 ml of ice-cold stop buffer (150mM NaCl, 50 mM NaF, 10 mM EDTA, 1mM NaN3 pH 8) and transfer to 15 ml falcon 2058 test tube. Spin down at 5000 rpm for 5 minutes. Drain the pellet well. The pellet can be frozen at - 70 °C. The extract can be made using one of the following protocols: A. Native extract: 1. (Thaw and ) Resuspend in 20 µl of HB buffer . Add 1.5 ml of acid washed glass beads (0.5mm diameter, Sigma, G-9268) and vortex vigorously for 1 minute. 2. Wash the beads with 1 ml of the HB buffer and centrifugate the extract 15 min in an centrifuge at 4oC. Determine the protein concentration - it should be about 1.5 mg / ml.
99
B. Denatured extract: 1. Resuspend in 20 µl of RIPA buffer ( 10 mM sodium phosphate pH 7, 1% Triton X-100, 0.1% SDS, 2mM EDTA, 150mM NaCl, 50mM NaF, 0.1 mM sodium vanadate, 4 µg/ml leupeptin, 1mM PMSF). Add 1.5 ml of acid washed glass beads (0.5mm diameter, Sigma, G-9268) and vortex for 1 minute. Add 100 µl of 1% SDS and boil for 3 minutes. 2. Wash the beads with 1 ml of RIPA buffer and centrifuge the extract for 15 minutes at 4°C in an centrifuge. Alternatively, after breaking the cells open, add 1 ml of SDS-PAGE sample buffer to the extract and boil it directly in the same tube. Collect the extract and spin for 5 minutes in a centrifuge to remove the cell debris. C. Boiled extract : This is a simple protocol for preparing denatured whole cell extracts with little protein degradation. A. Isolate approximately 1x10⁸ cells. Add STOP buffer and spin down in an Eppendorf tube. Resuspend cells in 100ul of lysis buffer (either RIPA or HB without inhibitors) and boil for 6 minutes. B. Cells can be stored at -70°C indefinitely. C. Make up to 200µl with HB or RIPA buffer, add 500µl of glass beads and break cells for 5 minutes on Eppindorf shaker at 4°C. Protease inhibitors and DTT may be added but most cellular enzymatic activities are killed by boiling the cells. Add 250µl buffer. Remove extract with 1000µl tip into a fresh tube. D. Take 2x 2µl samples for protein determination. Boil for 5 minutes in sample buffer without dyes or DTT which interfere with protein determination assays. N.B. also prepare a sample lacking cell extract as a blank. E. Add sample buffer to the boiled extract and boil again for 5 minutes. Spin out debris before loading sample. 5.6 Immunoprecipitations Breaking the cells 1. Collect 25 ODs of cells (by filtering or centrifugation).
100
2. Wash once with 10ml stop buffer 3. Resuspend in 1ml HB buffer and transfer to eppis. Spin down the cells and remove the supernatant. Cell pellets can be frozen at that stage. 4. add 100ul HB and 500ul glass beads 5. vortex with cell braker in CR for 5 min. Check under microscope (more than 60% should be broken) 6. add 200ul HB, make hole with needle at the bottom of the eppendorf, place in clean eppendorf and spin for 1-2 sec to transfer liquid to new epp. 7. spin 13k 15min. Transfer sup to new tube. Keep 20ul extract+10ul HB + 30ul 2xsample buffer to load on gel. Keep 5ul+5ul 2xsample buffer w/o dyes for protein determination. Protein concentration should be around 7-10ug/ul Preparing beads for protein A tagged proteins: use 20ul human IgG agarose bead suspension/IP. wash 3x 1ml HB. resuspend in 100ul HB/IP For anti-HA: prebind antibody to beads, use 3ul 16B antibody (1/100 dilution) and 20ul protein G sepharose beads per IP wash protein G beads 3x 1ml HB, leave 500ul, add antibody, leave rotating for 30min at RT, wash 3x 1ml HB, resuspend in 100ul/IP (check for complete binding to protein G, higher salt might be better) Prepare beads for n+1 samples (eg use 100ul bead suspension for 4 Ips). IPs mix 200ul extract with 100ul bead suspension rotate 2hrs in CR spin 4k 20-30sec. keep sup (30ul+30ul 2xsample buffer for gel) wash 3x with 1ml HB leave around 30ul, add 30ul 2xsample buffer (pellet would be 10x concent.) boil all samples 5min 100oC Notes - If more concentrated IP required, leave around 25ul and add 6ul 5xSB (around 20x) -If IgGs might be a problem for western, use sample buffer w/o DTT or b-mercaptoethanol (will only work when antibodies are coupled to beads) -To estimate IP efficiency, dilute IP sample after boiling (eg 5ul in 45ul 1xSB for equal loading to total)
101
-If background is a problem, try: adding salt to HB (150-500mM KCl), decrease the amount of beads added, preclear extract eg with protein A agarose, precoat the beads eg with BSA Buffers
Stop Buffer 150mM NaCl, 50mM NaF, 10mM EDTA, 1mM NaN3. Prepare fresh before use. HB Buffer 25mM MOPS pH7.2, 15mM MgCl2, 15mM EGTA, 1mM DTT, 1% Triton-X100 phosphatase inhibitors: 60mM b-glycerophosphate, 15mM p-nitrophenylphosphate, 0.1mM sodium vanadate proteinase inhibitors: 1mM PMSF, 20ug/ml leupeptin, 40ug/ml aprotinin Note: proteinase inhibitor and EGTA concentrations are about 10x more than what normally used in other organisms, but S. pombe has high levels of proteinases, eg in nitrogen starved cells.
102
5.7 Histone Kinase assays These may be performed either on crude extracts or by immunoprecipitation of p34cdc2, as follows: A. Crude extracts: (H1 kinase assays are difficult to do with these extracts). 1. Pre incubate 4 µl of the extract with 6 µl of HB buffer at 25°C, 37°C or 40 °C for 5 minutes. 2. Add 10 µl of KIN buffer ( 1 mg / ml H1 Histone - Boehringer, 200 µM g-32P ATP:100 cpm / pmol = 40 µCi / ml, in HB buffer) and incubate for a further 20 minutes at the appropriate temperature. 3. Add 20 µl of 2 x PAGE- sample buffer, boil for 3 minutes and run an 11 % SDS-PAGE minigel. Loading should be only 10 - 20 µl per lane. B Immunoprecipitations:- 1. Add appropriate amount antibody per ml of extract and incubate on ice for 1 hour. 2. Add 30 µl of protein A-Sepharose ( 50% v / v in HB buffer, freshly washed) and incubate for 30 minutes at 4 °C on a rotating wheel. 3. Wash the beads 3+ times with 0.8 ml of HB buffer (spin only for 2-3 seconds in each wash and carefully remove the supernatant ). At the last wash split the sample in two. 4. Resuspend half of the beads in 50 µl of Sample buffer to run a Western blot to determine the amount of cdc2 in each sample. 5. Add 10 µl of KIN buffer ( 1 mg / ml H1 Histone - Boehringer, 200 µM g-32P ATP:100 cpm / pmol = 40 µCi / ml, in HB buffer) to the other half and incubate for a further 20 minutes. 6. Add 20 µl of 2 x PAGE- sample buffer, boil for 3 minutes and run an 11 % SDS-PAGE minigel. Loading should be only 10 - 20 µl per lane. C. Suc1p precipitation
103
Suc1p attached to beads can be used to purify active B-type cyclin/cdc2 kinase activity from cells. 5.8 In vivo protein labelling 35S-methionine. 1. Grow up a 50 ml culture in minimal medium to an OD595=0.2 (4 x 10⁶ cells/ml). 2. Take 10 ml and add 1 mCi of 35S-methionine (Amersham, SJ1015). Incubate for 3-4 hours at 32°C (1.5-2 generations). 3. Harvest the cells and break them open using the conditions described before. Normally from 1ml extract we obtain an incorporation of 2 x 10⁵ cpm/µl with a protein concentration of around 1mg/ml. Pulse chase experiments are very difficult. It seems impossible to chase out the hot methionine. 32P-orthophosphate labelling. 1. Take an inoculum from a pre culture in YES and inoculate 100 ml of phosphate free minimal medium (MMP) + 1 mM phosphate (added from a 0.5 M NaH2PO4 stock solution). 2. Filter the cells when they reach an OD595= 0.2-0.4 (4 x 10⁶-8 x 10⁶ cells/ml). 3. Resuspend them at 2 x 10⁶ cells/ml in fresh phosphate free minimal medium (MMP) containing 50-100 µM phosphate. 4. Take 5 ml of cells and add 1-2 mCi 32P-orthophosphoric acid (NEN, NEX054) and label for 3-4 hours. Add 10 ml of a culture containing 107 cells/ml in 1mM azide. 5. Harvest the cells and break them open using the conditions described above. If larger amounts of labelled proteins or RNA are desired the 32P-orthophosphoric acid can be increased to 5 mCi. For immunoprecipitations of proteins, labelled RNA may contribute to background. To overcome this problem, give a final wash to the protein A-sepharose in 50 mM Tris-HCl pH 8 to get rid of the SDS and then incubate in the same buffer containing 100 µg/ml RNAse for 30 minutes at 4°C. Spin
104

down the protein A-sepharose and resuspend in SDS-PAGE sample buffer and boil for 3 minutes before loading onto the gel.
105
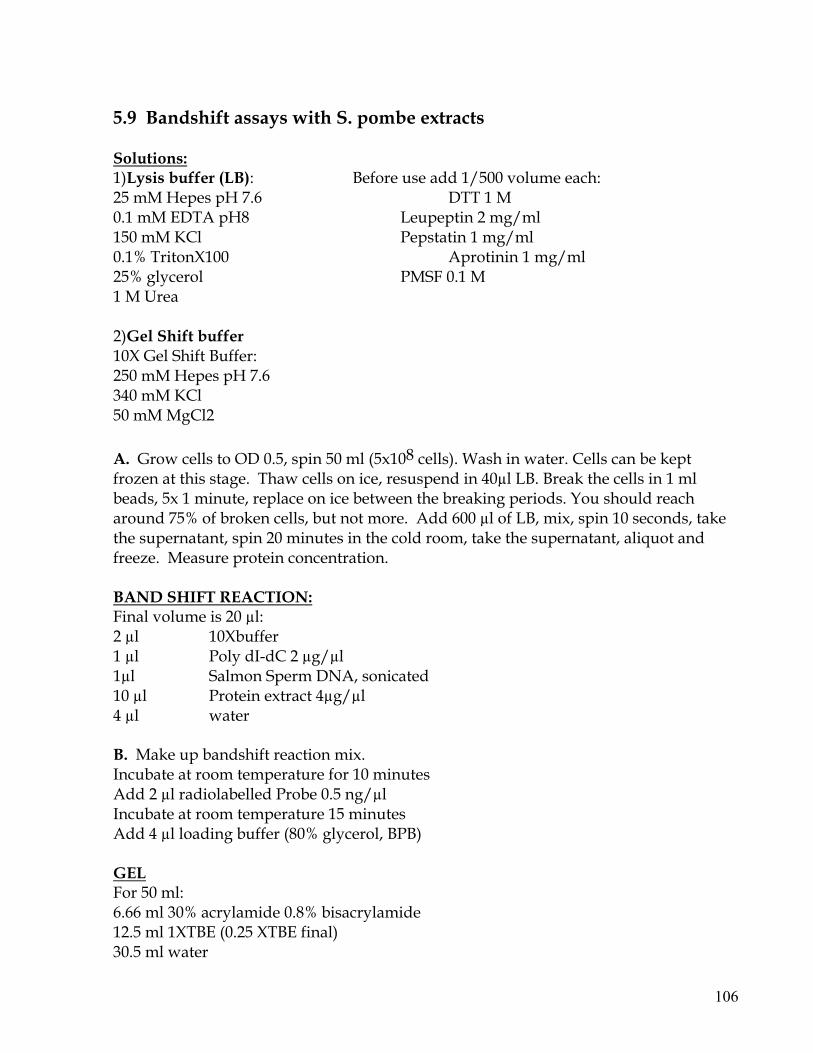
5.9 Bandshift assays with S. pombe extracts Solutions: 1)Lysis buffer (LB): Before use add 1/500 volume each: 25 mM Hepes pH 7.6 DTT 1 M 0.1 mM EDTA pH8 Leupeptin 2 mg/ml 150 mM KCl Pepstatin 1 mg/ml 0.1% TritonX100 Aprotinin 1 mg/ml 25% glycerol PMSF 0.1 M 1 M Urea 2)Gel Shift buffer 10X Gel Shift Buffer: 250 mM Hepes pH 7.6 340 mM KCl 50 mM MgCl2 A. Grow cells to OD 0.5, spin 50 ml (5x10⁸ cells). Wash in water. Cells can be kept frozen at this stage. Thaw cells on ice, resuspend in 40µl LB. Break the cells in 1 ml beads, 5x 1 minute, replace on ice between the breaking periods. You should reach around 75% of broken cells, but not more. Add 600 µl of LB, mix, spin 10 seconds, take the supernatant, spin 20 minutes in the cold room, take the supernatant, aliquot and freeze. Measure protein concentration. BAND SHIFT REACTION: Final volume is 20 µl: 2 µl 10Xbuffer 1 µl Poly dI-dC 2 µg/µl 1µl Salmon Sperm DNA, sonicated 10 µl Protein extract 4µg/µl 4 µl water B. Make up bandshift reaction mix. Incubate at room temperature for 10 minutes Add 2 µl radiolabelled Probe 0.5 ng/µl Incubate at room temperature 15 minutes Add 4 µl loading buffer (80% glycerol, BPB) GEL For 50 ml: 6.66 ml 30% acrylamide 0.8% bisacrylamide 12.5 ml 1XTBE (0.25 XTBE final) 30.5 ml water
106
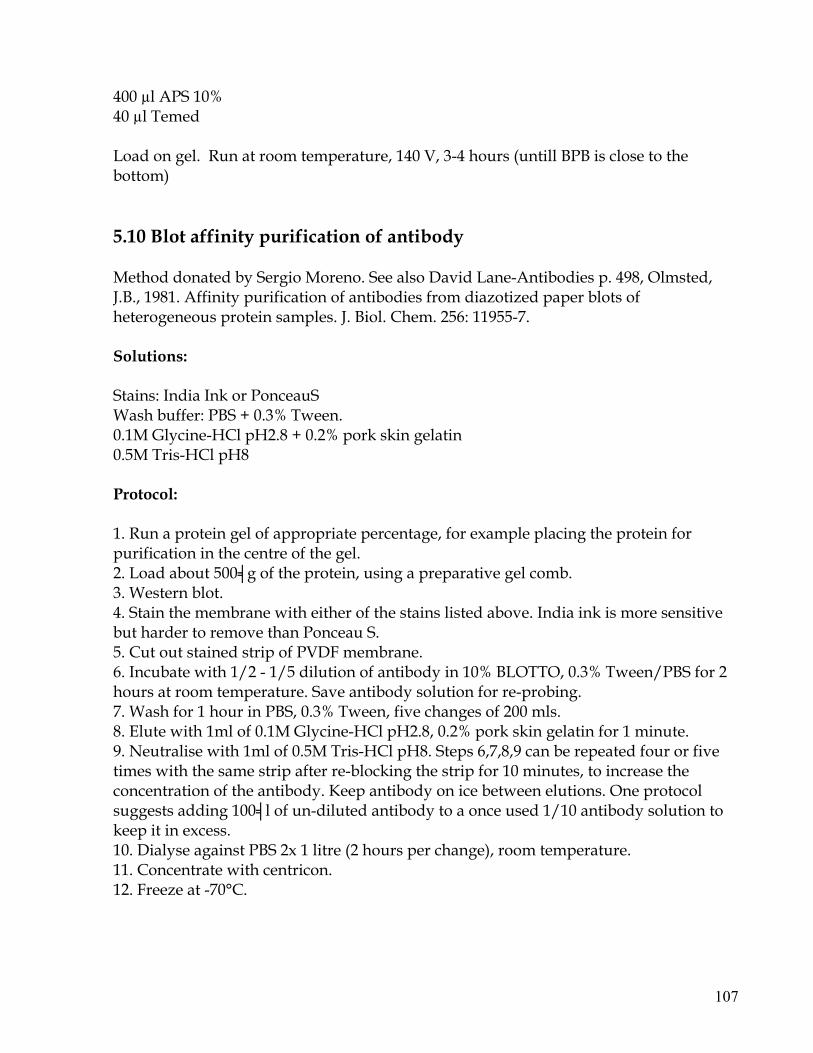
400 µl APS 10% 40 µl Temed Load on gel. Run at room temperature, 140 V, 3-4 hours (untill BPB is close to the bottom) 5.10 Blot affinity purification of antibody Method donated by Sergio Moreno. See also David Lane-Antibodies p. 498, Olmsted, J.B., 1981. Affinity purification of antibodies from diazotized paper blots of heterogeneous protein samples. J. Biol. Chem. 256: 11955-7. Solutions: Stains: India Ink or PonceauS Wash buffer: PBS + 0.3% Tween. 0.1M Glycine-HCl pH2.8 + 0.2% pork skin gelatin 0.5M Tris-HCl pH8 Protocol: 1. Run a protein gel of appropriate percentage, for example placing the protein for purification in the centre of the gel. 2. Load about 500g of the protein, using a preparative gel comb. 3. Western blot. 4. Stain the membrane with either of the stains listed above. India ink is more sensitive but harder to remove than Ponceau S. 5. Cut out stained strip of PVDF membrane. 6. Incubate with 1/2 - 1/5 dilution of antibody in 10% BLOTTO, 0.3% Tween/PBS for 2 hours at room temperature. Save antibody solution for re-probing. 7. Wash for 1 hour in PBS, 0.3% Tween, five changes of 200 mls. 8. Elute with 1ml of 0.1M Glycine-HCl pH2.8, 0.2% pork skin gelatin for 1 minute. 9. Neutralise with 1ml of 0.5M Tris-HCl pH8. Steps 6,7,8,9 can be repeated four or five times with the same strip after re-blocking the strip for 10 minutes, to increase the concentration of the antibody. Keep antibody on ice between elutions. One protocol suggests adding 100l of un-diluted antibody to a once used 1/10 antibody solution to keep it in excess. 10. Dialyse against PBS 2x 1 litre (2 hours per change), room temperature. 11. Concentrate with centricon. 12. Freeze at -70°C.
107
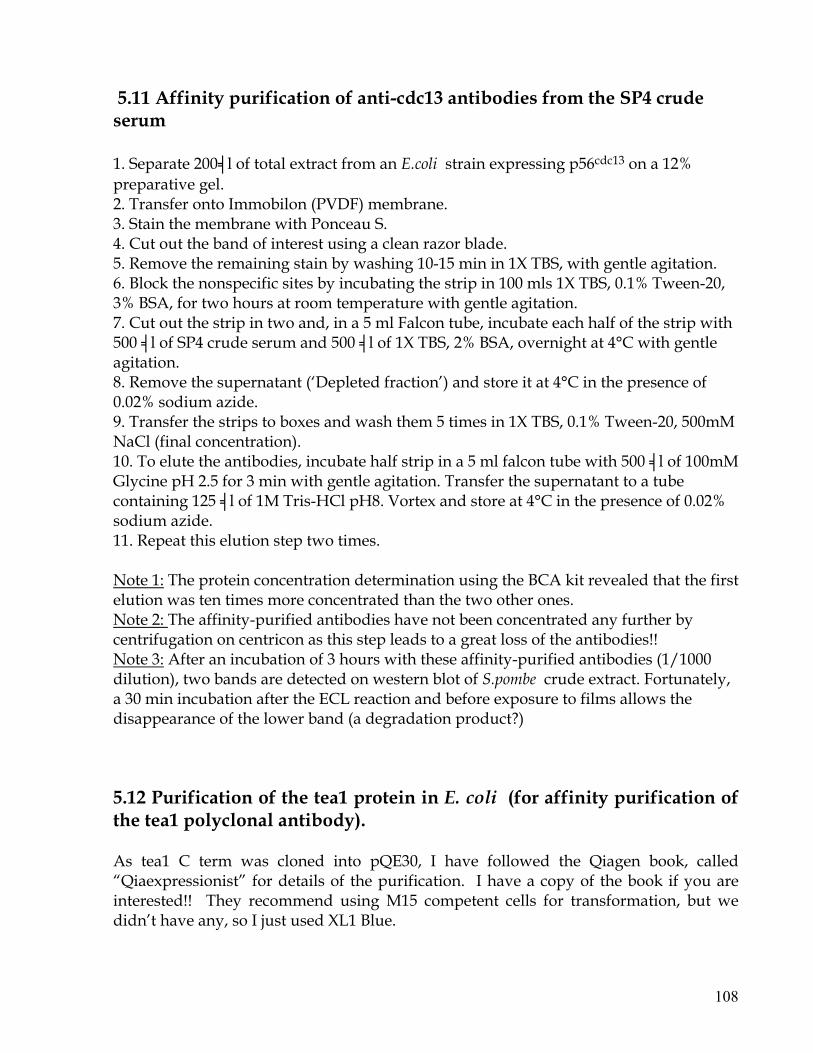
5.11 Affinity purification of anti-cdc13 antibodies from the SP4 crude serum 1. Separate 200l of total extract from an E.coli strain expressing p56cdc13 on a 12% preparative gel. 2. Transfer onto Immobilon (PVDF) membrane. 3. Stain the membrane with Ponceau S. 4. Cut out the band of interest using a clean razor blade. 5. Remove the remaining stain by washing 10-15 min in 1X TBS, with gentle agitation. 6. Block the nonspecific sites by incubating the strip in 100 mls 1X TBS, 0.1% Tween-20, 3% BSA, for two hours at room temperature with gentle agitation. 7. Cut out the strip in two and, in a 5 ml Falcon tube, incubate each half of the strip with 500 l of SP4 crude serum and 500 l of 1X TBS, 2% BSA, overnight at 4°C with gentle agitation. 8. Remove the supernatant (‘Depleted fraction’) and store it at 4°C in the presence of 0.02% sodium azide. 9. Transfer the strips to boxes and wash them 5 times in 1X TBS, 0.1% Tween-20, 500mM NaCl (final concentration). 10. To elute the antibodies, incubate half strip in a 5 ml falcon tube with 500 l of 100mM Glycine pH 2.5 for 3 min with gentle agitation. Transfer the supernatant to a tube containing 125 l of 1M Tris-HCl pH8. Vortex and store at 4°C in the presence of 0.02% sodium azide. 11. Repeat this elution step two times. Note 1: The protein concentration determination using the BCA kit revealed that the first elution was ten times more concentrated than the two other ones. Note 2: The affinity-purified antibodies have not been concentrated any further by centrifugation on centricon as this step leads to a great loss of the antibodies!! Note 3: After an incubation of 3 hours with these affinity-purified antibodies (1/1000 dilution), two bands are detected on western blot of S.pombe crude extract. Fortunately, a 30 min incubation after the ECL reaction and before exposure to films allows the disappearance of the lower band (a degradation product?)
5.12 Purification of the tea1 protein in E. coli (for affinity purification of the tea1 polyclonal antibody). As tea1 C term was cloned into pQE30, I have followed the Qiagen book, called “Qiaexpressionist” for details of the purification. I have a copy of the book if you are interested!! They recommend using M15 competent cells for transformation, but we didn’t have any, so I just used XL1 Blue.
108
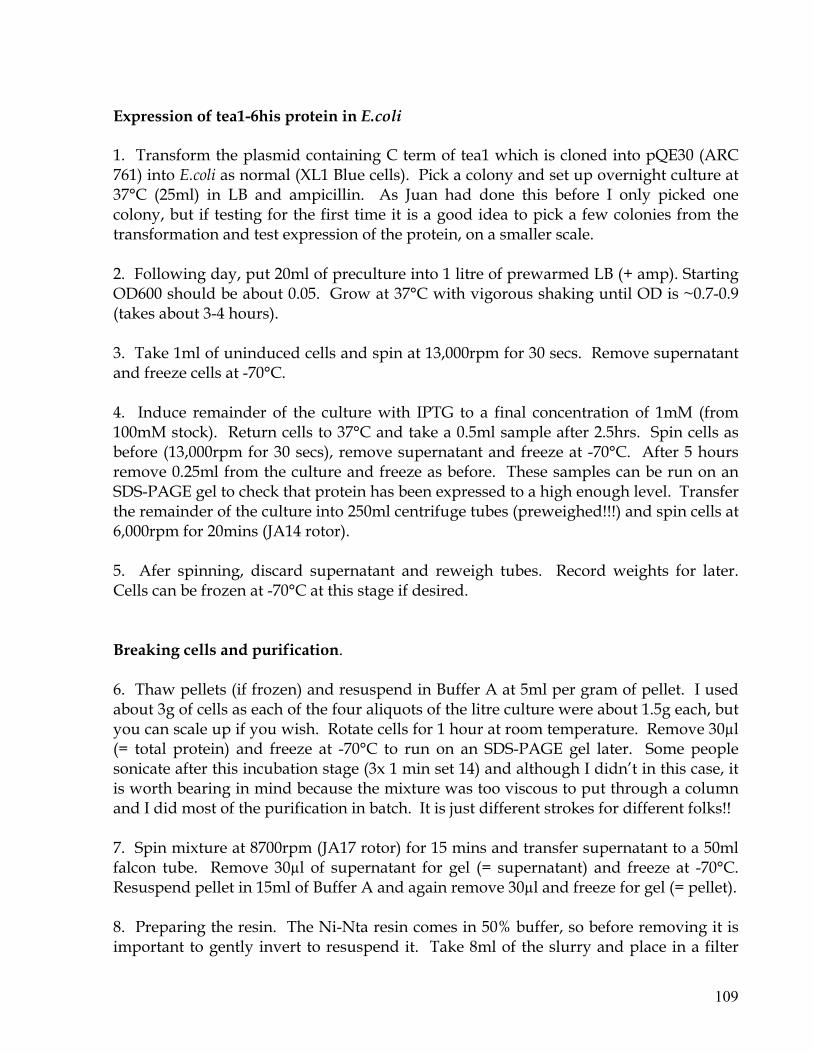
Expression of tea1-6his protein in E.coli 1. Transform the plasmid containing C term of tea1 which is cloned into pQE30 (ARC 761) into E.coli as normal (XL1 Blue cells). Pick a colony and set up overnight culture at 37°C (25ml) in LB and ampicillin. As Juan had done this before I only picked one colony, but if testing for the first time it is a good idea to pick a few colonies from the transformation and test expression of the protein, on a smaller scale. 2. Following day, put 20ml of preculture into 1 litre of prewarmed LB (+ amp). Starting OD600 should be about 0.05. Grow at 37°C with vigorous shaking until OD is ~0.7-0.9 (takes about 3-4 hours). 3. Take 1ml of uninduced cells and spin at 13,000rpm for 30 secs. Remove supernatant and freeze cells at -70°C. 4. Induce remainder of the culture with IPTG to a final concentration of 1mM (from 100mM stock). Return cells to 37°C and take a 0.5ml sample after 2.5hrs. Spin cells as before (13,000rpm for 30 secs), remove supernatant and freeze at -70°C. After 5 hours remove 0.25ml from the culture and freeze as before. These samples can be run on an SDS-PAGE gel to check that protein has been expressed to a high enough level. Transfer the remainder of the culture into 250ml centrifuge tubes (preweighed!!!) and spin cells at 6,000rpm for 20mins (JA14 rotor). 5. Afer spinning, discard supernatant and reweigh tubes. Record weights for later. Cells can be frozen at -70°C at this stage if desired. Breaking cells and purification. 6. Thaw pellets (if frozen) and resuspend in Buffer A at 5ml per gram of pellet. I used about 3g of cells as each of the four aliquots of the litre culture were about 1.5g each, but you can scale up if you wish. Rotate cells for 1 hour at room temperature. Remove 30µl (= total protein) and freeze at -70°C to run on an SDS-PAGE gel later. Some people sonicate after this incubation stage (3x 1 min set 14) and although I didn’t in this case, it is worth bearing in mind because the mixture was too viscous to put through a column and I did most of the purification in batch. It is just different strokes for different folks!! 7. Spin mixture at 8700rpm (JA17 rotor) for 15 mins and transfer supernatant to a 50ml falcon tube. Remove 30µl of supernatant for gel (= supernatant) and freeze at -70°C. Resuspend pellet in 15ml of Buffer A and again remove 30µl and freeze for gel (= pellet). 8. Preparing the resin. The Ni-Nta resin comes in 50% buffer, so before removing it is important to gently invert to resuspend it. Take 8ml of the slurry and place in a filter
109
funnel in a buchner flask. Wash 40ml of dH2O through the resin but do not let it dry out - leave a couple of mls at the top to keep it wet. Then wash the resin with 2 x 30ml of Buffer A. Scoop resin out of funnel carefully and place it into a 50ml falcon tube and make it up to 8ml with Buffer A. There are other ways of preparing the resin but this is straightforward and very quick, as long as you are careful with it and don’t let it dry out. 9. Add the supernatant to the falcon tube with the resin and rotate at room temperature for 45mins. Spin at 500rpm for 5 mins and remove supernatant into a fresh tube, keeping 30µl to run on a gel as before (= flowthrough). Wash pellet with 2 x 30ml of Buffer A and then load onto column. The flow rate was very slow - so I removed the resin and did the rest of the washes in batch. If flow rate is quite fast, it is good to carry on in the column. The rest of the steps are as follows: Washes: 2 x 20ml Buffer B 2 x 20ml Buffer C Elution 5 x 3ml Buffer D 5 x 3ml Buffer E 5 x 3ml Buffer F It is important to load the 5 lots of elution buffer separately, collecting the fractions in separate tubes. Keep fractions at 4°C. I loaded the resin back onto the column after the washes even though the flow rate was quite slow. Samples for SDS-PAGE gel. • Uninduced and Induced cells should be resuspended in 250µl of PBSA (after thawing). Put 20µl into a fresh tube with 20µl of 2 x sample buffer. Boil for 5 mins, spin at max. speed in a microcentrifuge for 2 mins and load supernatant on gel. • For total protein, supernatant, pellet and flowthrough, take 5µl of each together with 25µl of H2O and 25µl of 2 x sample buffer. • For washes and elutions (Buffers B-F), take 10µl of sample and 10µl of 2 x sample buffer. Boil all samples for 5 mins. Total, supernatant, pellet and flowthrough must be loaded directly after boiling and may have to be diluted 20x with sample buffer to load onto the gel, as they have a tendency to become very clumpy!!! Run gel, stain with Coomassie Blue for 30 mins and then destain and dry.
110
After running the gel, it is clear which fractions contain the most protein so you can then run a gel with known concentrations of BSA to estimate the amount of protein present and pool the respective fractions. Buffers. IPTG 100mM stock. Filter sterilize and freeze at -20°C. Buffer A 6M Guanidine Hydrochloride 0.1M NaH2PO4 0.01M Tris (from 1M pH8.0 stock) Adjust to pH 8.0 with NaOH. Guanidine HCL is light sensitive - protect buffer from light. Buffer B 8M Urea 0.1M NaH2PO4 0.01M Tris (from 1M pH8.0 stock) Adjust to pH 8.0 with NaOH. Buffer C 8M Urea 0.1M NaH2PO4 0.01M Tris (from 1M pH8.0 stock) Adjust to pH 6.3 with HCL. Buffer D 8M Urea 0.1M NaH2PO4 0.01M Tris (from 1M pH8.0 stock) Adjust to pH5.9 with HCL Buffer E 8M Urea 0.1M NaH2PO4 0.01M Tris (from 1M pH8.0 stock) Adjust to pH 4.5 with HCL Buffer F 6M Guanidine HCL 0.2M Acetic acid
111
Protect from light - no need to pH this buffer as most of the protein will have eluted in D or E. Note. The pH of buffers is very important - particularly C and D. They can be kept at room temperature but should be prepared fairly freshly (urea is unstable) and the pH should be checked just prior to use. Affinity Purification of tea1 polyclonal antibody (J-MATA 3 C) on a column (NHS activated Hi Trap columns). Although this worked well, I would not recommend using these particular columns which come from Pharmacia. The capacity is only 1m (you can get 5ml aswell) so if you are going to the trouble of purifying your antibody you may aswell do it large scale - it is going to require about the same amount of effort. Buffer compositions are at the end - I have marked all the buffers with a dash (') to avoid confusion with the afore mentioned buffers, for the protein purification. 1. Before the purified protein can be loaded onto the column, it must be in a suitable buffer that will not react with the column. In this particular case (tea1) the protein was in 8M urea - so that needed to be removed because it contains many amine groups that would bind the column preventing the protein from binding. 2. Dialysis tubing. The dialysis tubing used was 1/4 inch in diameter which is preswollen and comes in ethanol. The tubing was cut so that there was sufficient room for expansion and was then washed thoroughly with distilled water. It is a good idea to fill the tubing with the water (using a blue clip to tie the bottom) and check that there aren't any holes in the tubing. 3. The fractions containing the most protein should be pooled (as mentioned earlier) and transferred to the dialysis tubing and the blue clip attached to the top of the tubing. Place the tubing in a 1litre measuring cylinder with some PBSA (later the buffer was changed to the coupling buffer for the column). Put cylinder in the cold room and stir it for maximum exchange. It is important to change the buffer every couple of hours - although in this case the PBSA was changed after 2.5 hours and the coupling buffer was then dialysed against the protein overnight. In some cases the protein can precipitate after coming out of the urea so care must be taken to dialyse with the most suitable buffer, but in this case 0.5% SDS was added to the precipitated protein and it went back into solution. 4. Once happy with the dialysis, remove the protein from the tubing and transfer it into a falcon tube. Add a couple of mls of coupling buffer to the tubing to wash the final remnants of the protein from the bag and also add this to the tube. As the protein had precipitated it was then spun at 4000rpm for 5 mins and the supernatant transferred to a
112
fresh tube. The pellet was resuspended in a total volume of 1ml coupling buffer, by gently pipetting up and down. SDS was added to a final concentration of 0.5% which solubilized most of the protein, but it was still slightly clumpy - so it was sonicated briefly at a setting of 5 - ensuring no foaming was occuring. The soluble protein was then transferred to an eppendorf tube and centrifuged at 13,000rpm for 2 mins to pellet any remaining debris. The pellet was kept in the fridge to run a little on a gel and the supernatant was transferred to a new tube and kept in the fridge until ready to load it onto the column. 5. The column used was a Hi Trap affinity NHS-activated 1ml column from Pharmacia (cat. no 17-0716-01). It comes in isopropanol which is washed out prior to loading. An instruction booklet comes with the columns if you do use them, but details are here anyway. A few drops of ice cold 1mM HCl was added to the top of the column to prevent air bubbles. A luer adaptor that came with the column was attached to the top of the column so that a syringe could be easily attached. The twist off end of the column was removed and 3 x 2ml of 1mM ice cold HCl was injected into the column using a 2ml syringe. It is important to remove the syringe carefully from the column BEFORE removing the plunger as it could create a vacuum disturbing the column bed. 6. Once the HCl has washed through add the protein to the column (~1ml), seal the bottom and let the column stand for about half an hour at room temperature 7. The column must then be washed to remove any excess active groups or any non-specific binding. Inject (using the syringe) 3x 2ml Buffer A' 3x 2ml Buffer B' 3x 2ml Buffer A' Let column stand for 30 mins Inject 3x 2ml Buffer B' 3x 2ml Buffer A' 3x 2ml Buffer A' The column is now ready, although you can leave it in a neutral storage buffer until you are ready for the antibody purification (Neutralisation Buffer: 0.05M Na2HPO4, 0.1% NaN3 pH7.0). I did this to run more gels to ensure my protein had precipitated after dialysing and was not in the supernatant. I also ran some of the washes to check how much of my protein had bound to the Hi Trap column. Buffers. Coupling Buffer 0.2M NaHCO3, 0.5M NaCl, pH8.3
113
Buffer A' 0.5M ethanolamine, 0.5M NaCl, pH8.3 Buffer B' 0.1M acetate, 0.5M NaCl, pH4.0 Neutralisation Buffer 0.05M Na2HPO4, 0.1% NaN3 pH7.0 Antibody purification. The guidelines in the booklet with the columns does not give much info about what buffers to use but Ken had a protocol which I used and details of the buffers are below. I did the antibody purification in the cold room. You can do this with a pump or gravity, I eluted by gravity but did everything else at a flow rate of about 1ml/min. 8. Once happy with binding to the column, the antibody can be purified. Wash the column with 5 column volumes of TBS and 0.5M NaCl. Check for protein using the Biorad assay as you go. 8. Then wash the column with 5 volumes 0.2MNaCl, 0.2M Glycine pH2.0, again checking for protein. Wash the column with 5 volumes of TBS and check pH of the eluent after washes. The pH should be about 7.0 , keep washing the column until the pH reaches about 7.0. 9. It is worth cleaning up the serum before loading it - you can do this by ammonium sulphate precipitation or simply spinning it in a centrifuge. I did spin the serum at 13,000rpm for 40mins, but there was hardly any pellet so I just carried on. Load serum onto the column, allowing it to pass slowly through the column. I put the serum back in the column several times to ensure as much of it as possible could bind to the protein in the column. 10. Wash the column with 10 column volumes of TBS. 11. Wash the column with 10 volumes of TBS with 0.5MNaCl and 0.2% Triton X-100. 12. Then wash column with 10 volumes of TBS. 13. Elute antibody with 2 column volumes of elution buffer (0.2MNaCl, 0.2M Glycine pH2.5) into tubes containing 3M Tris pH8.8 at 1/10 with respect to eluent i.e. 10µl Tris in 100µl of eluent. 14. Do a second elution this time with a slightly different buffer (0.2MNaCl, 0.2M Glycine pH2.0) into Tris as above. You can check for protein during the elution to see where the antibody is coming off - using the Biorad assay. 15. Wash extensively with TBS until no more protein is detected. Column can be stored at 4°C in TBS with 0.2% Azide for future use.
114
You can then measure protein concentration of fractions at OD280 (OD280 of 1.0 = 1mg/ml) and run a coomassie gel to check fraction purity. Buffers. TBS 0.15M NaCl, 20mM Tris pH 7.4 Elution Buffers 0.2M NaCl, 0.2M Glycine pH 2.5 0.2M NaCl, 0.2M Glycine pH 2.0 The washes with TBS and 0.5M NaCl require the NaCl in addition to the 0.15M NaCl already present in the “normal” TBS and not instead!! 5.13 Expression of proteins in E.coli E. coli expression Test strain for expression 1. Use single colonies on LB-amp (either newly transformed with construct or streaked from -80oC stock) 2. Grow small LB+amp culture inoculated with single colony, o/n at 37oC. Test a couple of colonies per strain. 3. Inoculate 2ml of prewarmed LB+amp with o/n culture (1 in 50 dilution), starting OD should be 0.05. Grow at 37oC till OD reaches 0.7-0.9 (around 3-4h). 4. add IPTG to 1mM final (=20ul of 100mM IPTG) except in uninduced control cells. 5. grow for 2.5-5 hrs 6. spin 13k, 5sec. Discard sup. 7. resuspend cells in 300ul PBS. Remove 20ul to check on gel 8. add an equal vol 2x sample buffer to 20ul of cells. Boil for 5 min. Spin. Load on gel. Notes For GST vectors (pGEX), which contain the lacIq, gene, any bacterial host strain can be used (eg BL21 or XL1 blue ). BL21 is protease deficient (it lacks the ompT outer membrane protease and probably also the lon protease). BL21(DE3) contains the T7 RNA polymerase gene under the control of the IPTG inducible lacUV5 promoter . This strain is only required for T7 expression plasmids eg pET but not for pGEX. I however use it with pGEX (as there are competent cells in 3B...). Different strains may give completely different yields, so it is worth testing a few.
115

For pQE vectors, which require lacIq to be encoded by the host strain,use XL1-blue, which should be checked for tetr, as lacIq is on F'. Qiagen also provides strains (M15 or SG13009) transformed with a multi-copy plasmid (pREP4) which is compatible with pQE and encodes lacI (apparently to higher levels than laqIq). Presence of the Rep4 plasmid should be ensured by growth on kanamycin. Use cells transformed with empty vector or uninduced cells as control for expression (the expressed protein may be present (in lower levels) at the uninduced control). Adjust: OD of culture before induction, temperature (25oC versus 37oC) and medium (LB, 2xYT or minimal), amount of IPTG (0.1-1mM), time of induction (2h-overnight), to achieve better yield or more soluble protein. E. coli expression : Large scale prep. His tagged proteins, denaturing conditions Protocol: 1. Grow a 25ml LB+100ug/ml amp culture inoculated with a single colony or from a -80oC glycerol stock, O/N at 37oC. 2. Inoculate 1l of LB+amp pre-warmed to 37oC with 20ml O/N culture (1 in 50 dilution, starting OD should be 0.05). Grow at 37oC till OD reaches 0.7-0.9 (around 3-4h). 3. take 1ml uninduced cells. Spin 13k, 5sec. Discard sup. Put cell pellets at -80oC (uninduced cells). 4. Induce cells by adding IPTG to 1mM (=10ml of a 100mM IPTG stock). Put back to grow at same temperature 6. at 5h: take 250ul cells. Spin 13k, 5sec. Discard sup. Put cell pellets at -80oC (induced cells). collect remaining culture by spinning 2x 500ml at 4000g 30min (5krpm for JS13.1) in preweighted buckets. Discard sup. Weight buckets, calculate gram net weight (should be around 3gr/tube). Put pellets at -80oC. Breaking Cells 1. Thaw one cell pellet and resuspend in 5ml/gram Buffer A (around 15ml). Stir for 1h at room temperature. Transfer to 30ml sorvall tubes. If viscuous, sonicate 3x 1min set 14. Keep 30ul to run on gel (total). 2. spin 10000g 15min. Tranfer the sup to a 50ml falkon tube. Keep 30ul to check on gel (sup). Resuspend pellet in 15ml buffer A, keep 30ul to check on gel (pellet). 5. Prepare resin: 8ml 50% slurry, wash 1x 40ml H2O, 2x30ml buffer A. Spin 500rpm 5min between washes. Leave around 8ml total volume after final wash.
116
6. Add sup to resin. Rotate at RT for 45min. 7. Spin at 500rpm 5min. Remove sup. Keep 30ul to check on gel (Flow through). Wash 2x30ml buffer A. Load resin on a column. 8. Wash with: 20ml buffer A 40ml buffer B 40ml buffer C (collect 2x 20ml) Elute with: 5x3ml buffer D 5x3ml buffer E 5x3ml buffer F Check for the presence of protein on fractions by mixing 5ul fraction with 5ul xxx reagent on a parafilm. Keep fractions at 4oC. 9. Prepare samples to load on gel: no induction, induced: resuspend in 250ul PBS, take 20ul +20ul 2xFSB total, sup, pellet, flowthrough: 5ul + 25ul H2O + 25ul 2xFSB washes-elutions buffers B-F: 10ul+10ul 2xFSB boil all samples 100oC 5min. Total,sup, pel and FT have to be loaded directly from 100oC (Guanidine precipitates otherwise). Buffers Buffer A: 6M GuHCl, 0.1M NaH2PO4, 0.01M Tris. Adjust pH to 8.0 with NaOH Buffer B: 8M Urea, 0.1M NaH2PO4, 0.01M Tris. Adjust pH to 8.0 with NaOH Buffer C: 8M Urea, 0.1M NaH2PO4, 0.01M Tris. Adjust pH to 6.5 with HCl Buffer D: 8M Urea, 0.1M NaH2PO4, 0.01M Tris. Adjust pH to 5.9 with HCl Buffer E: 8M Urea, 0.1M NaH2PO4, 0.01M Tris. Adjust pH to 4.5 with HCl Buffer F: 6M GuHCl, 0.2M Acetic acid Note: -The pH of buffers C and D is very important and should be carefully adjusted. -Buffers containing GuHCl must be protected from light. -Urea is unstable so buffers should be relatively fresh. E. coli expression : Large scale prep. GST tagged proteins, Method I Protocol: 1. Grow a 150ml LB+200ug/ml amp culture inoculated with a single colony O/N at room temperature. 2. Measure the OD600 of the O/N culture. Dilute in 1l of LB+200ug/ to OD 0.05 (around 50ml). Grow at RT till OD reaches 0.5 (around 3-4h).
117
3. take 1ml uninduced cells. Spin 13k, 5sec. Discard sup. Put cell pellet at -80oC (uninduced cells). 4. Induce cells by adding IPTG to 0.1mM (=1ml of a 100mM IPTG stock). Put back to grow at RT. 6. at 5h (or O/N): take 250ul cells. Spin 13k, 5sec. Discard sup. Put cell pellet at -80oC (induced cells). collect remaining culture by spinning 2x 500ml at 4000g 30min (5krpm for JS13.1) Discard sup. Put pellets at -80oC. Breaking Cells Prepare: 50ml lysis buffer: 50ml PBS + 125ul 0.2M PMSF + 200ul 0.5M benzamidin + 25ul aprotinin + 1ml 0.5M EDTA disolve 14mg lysozyme in 1ml lysis buffer glutathione agarose beads 20ml elution buffer: 20mM glutathione (MW307.3), 50mM TrisCl pH8 1. Thaw one cell pellet and resuspend in 13ml lysis buffer. Transfer to 30ml sorvall tubes. Add the lysozyme. Incubate 45min at 4oC 2. Sonicate 3x 1min with big tip. Check under microscope for cell lysis. 3. add 1.4ml 10% Triton. Mix 4. spin 15min at 10000g 5. add sup to 1ml of a 50% suspension of glutathione agarose rotate for 2h at RT. Resuspend the pellet with 14 ml lysis buffer. keep aliquot to check on gel (insoluble) 6. spin the extract+beads 1.5K 5min. Transfer sup to a new tube. Keep aliquot to check on gel. Freeze the rest. 7. wash pellet 3x 50ml PBS 8. Transfer to column. wash with 10ml lysis buffer. Elute with 5x 1ml elution buffer Check for the presence of protein on fractions by mixing 5ul fraction with 5ul xxx reagent on a parafilm. Take aliquots of all fractions to check on gel. Keep fractions at -20oC. 9. Prepare samples to load on gel: no induction, induced: resuspend in 250ul PBS, take 20ul +20ul 2xFSB all other fractions 10ul + 10ul 2xFSB boil all samples 100oC 5min. Notes: 1) In this protocol, induction is done more slowly than in protocol I (lower amounts of IPTG at a lower temperature), in order to maximise the amount of soluble protein. To speed up the procedure, growth to OD 0.5 (step 2) may be performed at 37oC and then the culture cooled down to 25oC before addition of IPTG.
118
2) If a lot of your protein is insoluble, try increasing the salt -DTT consentration of the lysis buffer (eg at step 3, add KCl to 0.25M final and DTT to 15mM final) 3) It may be better to clarify the extract with a higher speed spin (step 4), in order to minimise column clogging. Ken does 60 min at 35K in a beckman 50.2 Ti rotor. GST-tagged proteins, Method II 1. Inoculate 10-20ml of LB Amp. with bacteria (DH5a) transformed with pGEX plasmid of interest. 2. Incubate ON at 37°C with shaking. 3. Following morning add 0.1vol of ON culture to 1vol of LB Amp in sterile flask. LB should start at RT. 4. Incubate for 1 hour at 37°C with shaking. 5. Add 100mM IPTG to100mM final (1000x stock). N.B. Maniatis suggests 1mM final. 6. Incubate for a further 4 hour at 37°C with shaking. 7. Spin at 3600g for 5min. at 4°C (5000rpm in SA600, GS3 and GSA) 8. In cold room, pour off SN and resuspend each pellet in NET-N (1/20 vol. of original bacterial culture) 9. Sonicate on setting 4 for 3x10secs. at 4°C with 10 secs in between each burst. Place tip just below surface of liquid. Whole body of liquid should froth vigourously during sonication (Power output should read almost 40%) 10. Spin at 8500rpm (10000g) in SA-600 rotor, 15min., 4°C. 11. Pour supernatant into a 15ml falcon tube. 12. Load desired amount of SN onto GST beads for 30 min. at 4°C and use directly in GST pulldowns (see pulldown protocol). For purification of GST proteins, load 10ml of sonicated SN onto 200ml of 1:1 GST beads (NET-N + 0.5% milk + 0.02% NaAz) for 30-45 min at 4°C, with mixing. Wash 3x in NET-N. Aspirate beads to dryness with fine needle and add 300ml of elution buffer. Incubate for 30 min. at 4°C. Remove SN and elute with another 300ml of elution buffer for 2 hours to O/N. Pool elutes.
119
NET-N: 20mM Tris pH 8.0 100mM NaCl 1mM EDTA pH 8.0 0.5% NP-40 Elution Buffer: 100mM Tris pH 8.0 120mM NaCl 20mM reduced glutathione (Sigma) (0.032 gm added fresh to 5ml of Tris/NaCl) Purification of insoluble GST Fusion Proteins (Sarcosyl method) Steps 1-7 as above 8. Add 1/20 of original bacterial culture of NET-S. Proceed to steps 9 to 11 as above. 12. Add 1/4 volume of NET-20% TX100 (final conc. 4% TX100). Rock 10min at 4°C. 9. Add glutathione beads in NETN+0.5% milk+0.02%NaAz. Rock 1hour at 4°C. 10. Wash 3x in NET-N. 11. Aspirate NET-N and elute the protein of interest with elution buffer. NET-S 1.5% Sarcosyl 7.5g solid 20mM Tris pH 8 10ml 1M 100mM NaCl 10ml 5M 1mM EDTA pH 8 1ml 0.5M 500ml NET/20% TX100 20% Triton X100 100ml 100% 20mM Tris pH 8 10ml 1M 100mM NaCl 10ml 5M 1mM EDTA pH8 1ml 0.5M 500ml 5.14 Tagged transposons and Tn1000 mutagenesis: The basic idea is to use transposons to deliver commonly used genetic elements into plasmid DNA.
120
Strains required: MH1829 Tnura4 MH1831 Tnura4ARS1 MH1827 Tnhis7 MH1832 Tnhis7ARS1 The recipient strain is HB101, a streptomycin resistant recA mutant of E.coli. Remember that HB101 produces unmodified DNA (See note 1). All of these strains can be grown in regular media. The transposon donor R388 plasmids are stable and do not need selection. Method of Tn1000 Transposition: This example uses an ampicillin resistant plasmid. Other markers are equally usable. Day 1. Make competent cells of the donor strain of E.coli using standard methods and transform in the target plasmid. Plate samples on L agar plates containing ampicillin and methicillin (see note 5) and grow overnight at 37°C. Pick a single colony of the recipient strain, HB101, into 10ml of L broth with no antibiotics and grow overnight at 37°C with shaking for aeration. Day 2. Use a sterile toothpick or bacteriological loop to pick a transformant colony into 5 ml of L broth containing ampicillin and methicillin. Inoculate 50µl of HB101 overnight culture into 5ml of fresh broth with no antibiotics. Culture both at 37°C with aeration until in log phase. Normally a suitable growth phase is reached after approx. 3-4 h by which time the OD at 600nm is around 0.5. Pellet 2mls of the donor culture in bench top centrifuge and wash by resuspending in 10-20mls of fresh L broth with no antibiotics. Pellet again, this time using 1ml of the recipient culture to resuspend the pellet of donor cells. This is the mating mixture. Pour the mating mixture onto a dry L agar plate and put at 37°C. Do not worry if the mating mixture does not soak completely into the agar. After 2h, rinse off the cells with 20ml L broth - no drugs- and pellet. Repeat the wash and resuspend the pellet in 1ml L broth with no drugs. Spread 10-100µl samples of the mating mixture onto selective plates which contain L agar with 50 µg/ml methicillin, 50µg/ml ampicillin and 100µg/ml streptomycin. Methicillin is important, see note 5. Store remaining mixture at 4°C for possible future use. Incubate plates overnight at 37°C. With a tetracyclin resistance plasmid, plates would contain tetracyclin and streptomycin. Day 3. Overnight plates should have 10-1000 single colonies on them. If there are patches of smeary growth, spread fresh selective plates with less mating mixture or increase the amount of ampicillin-methicillin to 100-200µg/ml in the selective plates. If there are not enough colonies, replate with more mixture. It is best to rewash the stored mating mixture before use to reduce carry-over of β-lactamase. Pick single colonies onto fresh selective plates. It is helpful to make a paper template marked into a grid of about
121
50 squares, place the template under the petri dish and make a streak of each colony into each square. Incubate plates overnight. Day 4. The collection of recipients with randomly transposed plasmids is ready for screening. Screening transposed plasmids for Tn1000 insertion: Tn1000 insertion into the plasmid gene of interest can be identified physically or genetically. Physical methods use restriction enzymes or PCR to identify hits in a known target fragment of the plasmid. These methods are best used when the position of the cloned gene in the insert is known approximately (see note 6). A genetic screen can be used wtih plasmids carrying large segments of DNA where the position of the gene of interest is not known. This method allows you to localise the position of the gene and sequence it with no fruther subcloning. Functional screens can be done with either individual transposed plasmids or with pools of transposed plasmids. The choice is determined in part by the size of the target compared to the whole plasmid and by the number of assays you are prepared to do. For the pool approach, colonies may be simply washed off the selective plates and plasmid DNA prepared directly. Alternatively, the pooled colonies may be used to grow a large liquid culture for a maxiprep of plasmid DNA. If you do this, grow in L broth plus streptomycin, ampicillin and methicillin to continue selection against carried over unmated males and females. You now have a mixed preparation of plasmid DNAs randomly transposed with Tn1000. Screen for gene inactivation by transformation of a mutant and failure to complement. This can be transformation of E.coli or mutants of other organisms like yeast, etc, if using shuttle plasmids. Prepare miniprep DNA from non-complementing transformants. If DNA is recovered from yeast, transform back into E.coli to make usable amounts of DNA. Map position of Tn1000 by restriction mapping and/or sequencing from Tn1000 specific primers into flanking DNA (see notes 2,3, and 4). Notes: 1. E.coli HB101 produces unmodified DNA which will not transform cells with active EcoK restriction. This generally will not be a problem as most cloning strains are restriction minus. However, watch out for transformations into dam or dcm strains for making nonmethylated DNA. Most of the dam/dcm strains do have EcoK restriction. Either use restriction minus dam/dcm mutant, or pass your plasmid through an intermediate host such as DH1/DH5 to get EcoK modified plasmid DNA. 2. The final 35 bases at δ and γ end of Tn1000 are inverted repeats that give the following sequence with δ and γ primers before entering the cloned DNA: AACGTACGTTTTCGTTCCATTGGCCCTCAAACCCC.
122
3. When assembling sequences, remember that Tn1000 can insert in either orientation. Sometimes it may be necessary to orientate the transposon to determine which strand is being read, however, this is usually unnecessary as the contigs develop. Also, remember that the transposon creates a five base pair duplication during insertion so that the first five bases of target DNA at either side of the transposon are the same. 4. The wild type Tn1000 sequence can be found under ectn1000. 5. Methicillin maintains the selectivity of ampicillin and is essential for this method. As an aside, we always use methicillin and ampicillin together. In bacterial transformations, methicillin reduces satellite growth on plates. In liquid cultures, methicillin reduces ampicillin destruction of β-lactamase. Thus ampicillin selection is enforced, plasmid copy numbers remain high and yields of plasmid DNA are increased. 6. The recipient cells will contain your transposed plasmid plus one copy of the transposon donor plasmid. Normally you will not see the donor plasmid because there are usually far more copies of commonly used cloning plasmids. However, when you are dealing with particularly large plasmids or cosmids which tend to have low copy numbers, you may see bands coming from the donor plasmid. You can either retransform or more simply identify donor plasmid bands from DNA prepared from non-transformed transposon donor strains. Reference: B.A. Morgan, F.L. Conlon, M. Manzanares, J.B.A. Millar, N. Hanuga, J. Sharpe, R. Krumlauf, J.C. Smith, Steven G. Sedgwick. (1996) PNAS 93: 2801-6.
123
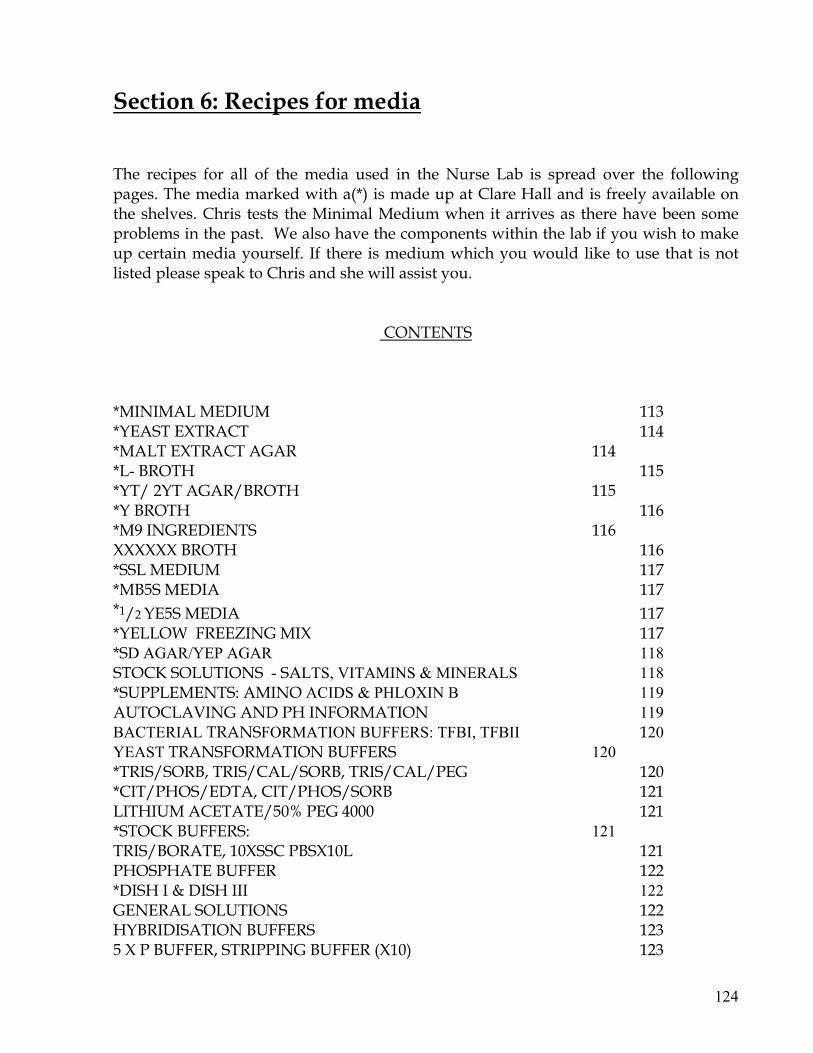
Section 6: Recipes for media
The recipes for all of the media used in the Nurse Lab is spread over the following pages. The media marked with a(*) is made up at Clare Hall and is freely available on the shelves. Chris tests the Minimal Medium when it arrives as there have been some problems in the past. We also have the components within the lab if you wish to make up certain media yourself. If there is medium which you would like to use that is not listed please speak to Chris and she will assist you.
CONTENTS
*MINIMAL MEDIUM 113 *YEAST EXTRACT 114 *MALT EXTRACT AGAR 114 *L- BROTH 115 *YT/ 2YT AGAR/BROTH 115 *Y BROTH 116 *M9 INGREDIENTS 116 XXXXXX BROTH 116 *SSL MEDIUM 117 *MB5S MEDIA 117 *1/2 YE5S MEDIA 117 *YELLOW FREEZING MIX 117 *SD AGAR/YEP AGAR 118 STOCK SOLUTIONS - SALTS, VITAMINS & MINERALS 118 *SUPPLEMENTS: AMINO ACIDS & PHLOXIN B 119 AUTOCLAVING AND PH INFORMATION 119 BACTERIAL TRANSFORMATION BUFFERS: TFBI, TFBII 120 YEAST TRANSFORMATION BUFFERS 120 *TRIS/SORB, TRIS/CAL/SORB, TRIS/CAL/PEG 120 *CIT/PHOS/EDTA, CIT/PHOS/SORB 121 LITHIUM ACETATE/50% PEG 4000 121 *STOCK BUFFERS: 121 TRIS/BORATE, 10XSSC PBSX10L 121 PHOSPHATE BUFFER 122 *DISH I & DISH III 122 GENERAL SOLUTIONS 122 HYBRIDISATION BUFFERS 123 5 X P BUFFER, STRIPPING BUFFER (X10) 123
124
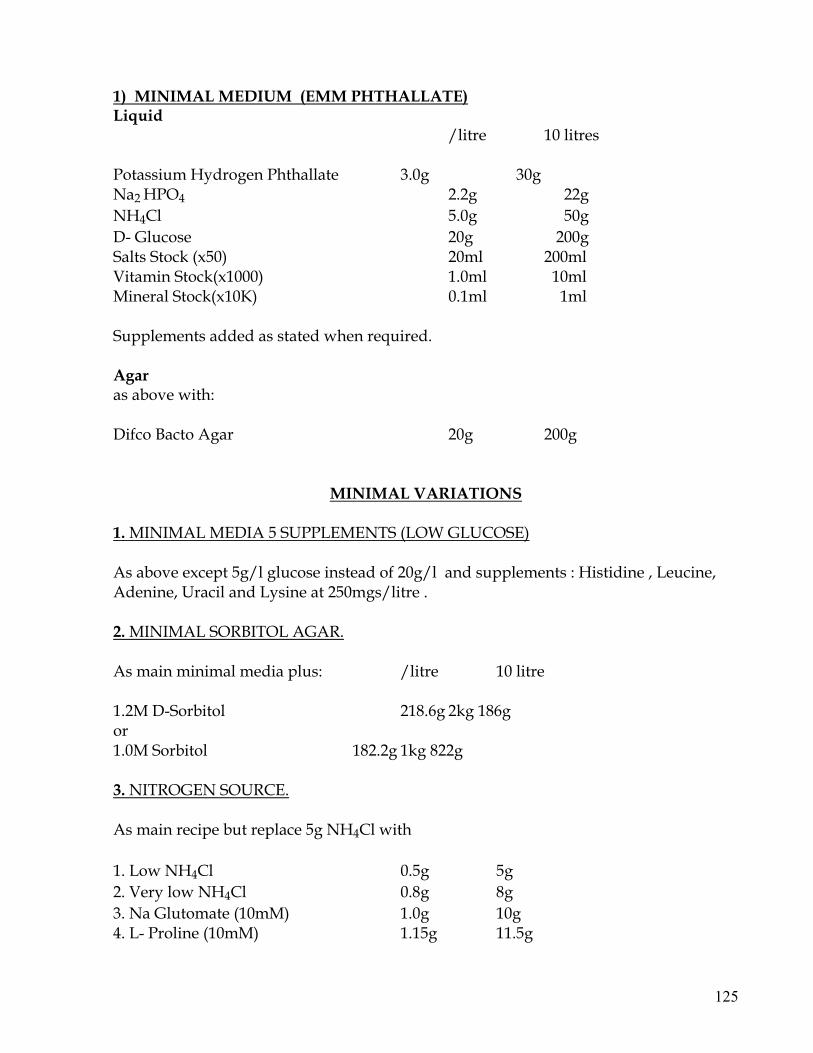
1) MINIMAL MEDIUM (EMM PHTHALLATE) Liquid /litre 10 litres Potassium Hydrogen Phthallate 3.0g 30g Na2 HPO4 2.2g 22g NH4Cl 5.0g 50g D- Glucose 20g 200g Salts Stock (x50) 20ml 200ml Vitamin Stock(x1000) 1.0ml 10ml Mineral Stock(x10K) 0.1ml 1ml Supplements added as stated when required. Agar as above with: Difco Bacto Agar 20g 200g
MINIMAL VARIATIONS 1. MINIMAL MEDIA 5 SUPPLEMENTS (LOW GLUCOSE) As above except 5g/l glucose instead of 20g/l and supplements : Histidine , Leucine, Adenine, Uracil and Lysine at 250mgs/litre . 2. MINIMAL SORBITOL AGAR. As main minimal media plus: /litre 10 litre 1.2M D-Sorbitol 218.6g 2kg 186g or 1.0M Sorbitol 182.2g 1kg 822g 3. NITROGEN SOURCE. As main recipe but replace 5g NH4Cl with 1. Low NH4Cl 0.5g 5g 2. Very low NH4Cl 0.8g 8g 3. Na Glutomate (10mM) 1.0g 10g 4. L- Proline (10mM) 1.15g 11.5g
125
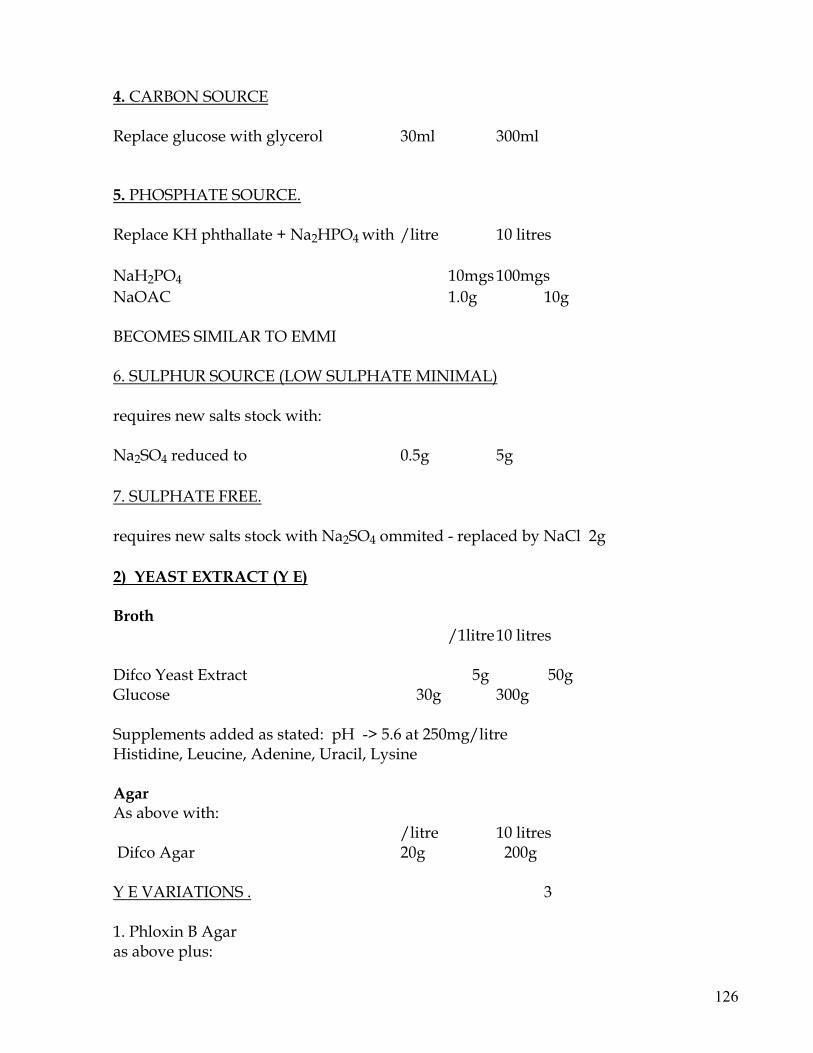
4. CARBON SOURCE Replace glucose with glycerol 30ml 300ml 5. PHOSPHATE SOURCE. Replace KH phthallate + Na2HPO4 with /litre 10 litres NaH2PO4 10mgs 100mgs NaOAC 1.0g 10g BECOMES SIMILAR TO EMMI 6. SULPHUR SOURCE (LOW SULPHATE MINIMAL) requires new salts stock with: Na2SO4 reduced to 0.5g 5g 7. SULPHATE FREE. requires new salts stock with Na2SO4 ommited - replaced by NaCl 2g
2) YEAST EXTRACT (Y E) Broth /1litre 10 litres Difco Yeast Extract 5g 50g Glucose 30g 300g Supplements added as stated: pH -> 5.6 at 250mg/litre Histidine, Leucine, Adenine, Uracil, Lysine Agar As above with: /litre 10 litres Difco Agar 20g 200g Y E VARIATIONS . 3 1. Phloxin B Agar as above plus:
126
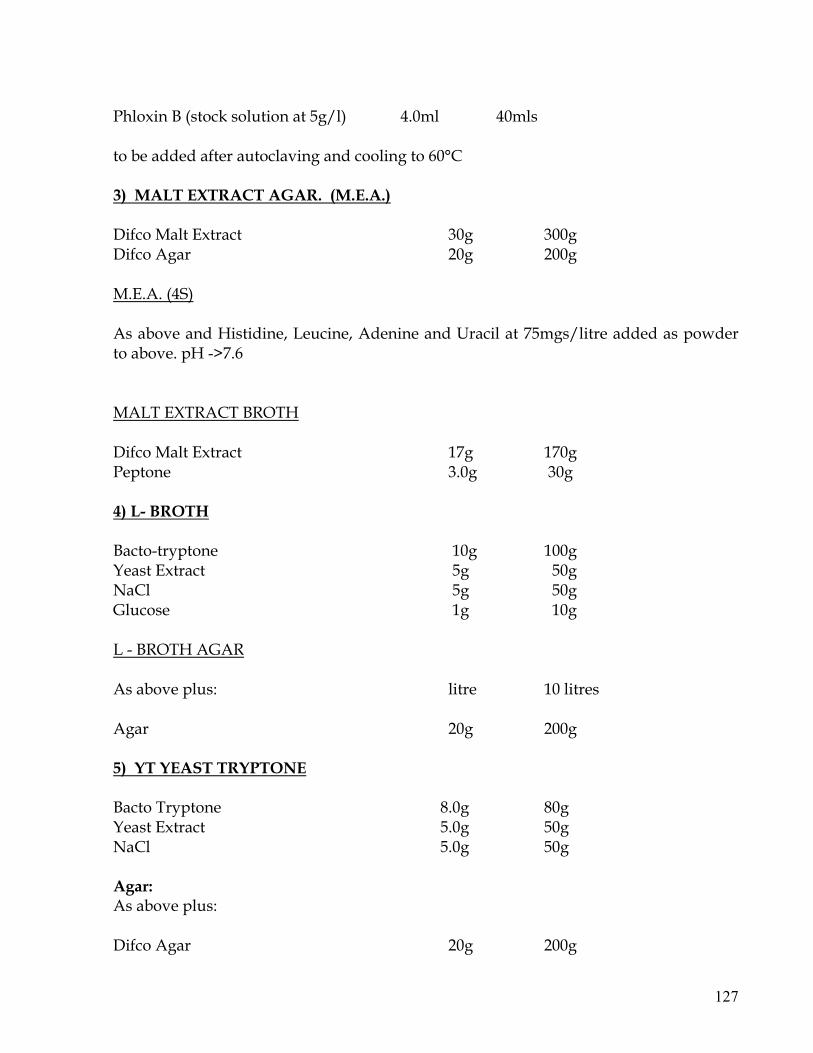
Phloxin B (stock solution at 5g/l) 4.0ml 40mls to be added after autoclaving and cooling to 60°C 3) MALT EXTRACT AGAR. (M.E.A.)
Difco Malt Extract 30g 300g Difco Agar 20g 200g M.E.A. (4S) As above and Histidine, Leucine, Adenine and Uracil at 75mgs/litre added as powder to above. pH ->7.6 MALT EXTRACT BROTH Difco Malt Extract 17g 170g Peptone 3.0g 30g 4) L- BROTH Bacto-tryptone 10g 100g Yeast Extract 5g 50g NaCl 5g 50g Glucose 1g 10g L - BROTH AGAR As above plus: litre 10 litres Agar 20g 200g 5) YT YEAST TRYPTONE Bacto Tryptone 8.0g 80g Yeast Extract 5.0g 50g NaCl 5.0g 50g Agar: As above plus: Difco Agar 20g 200g
127
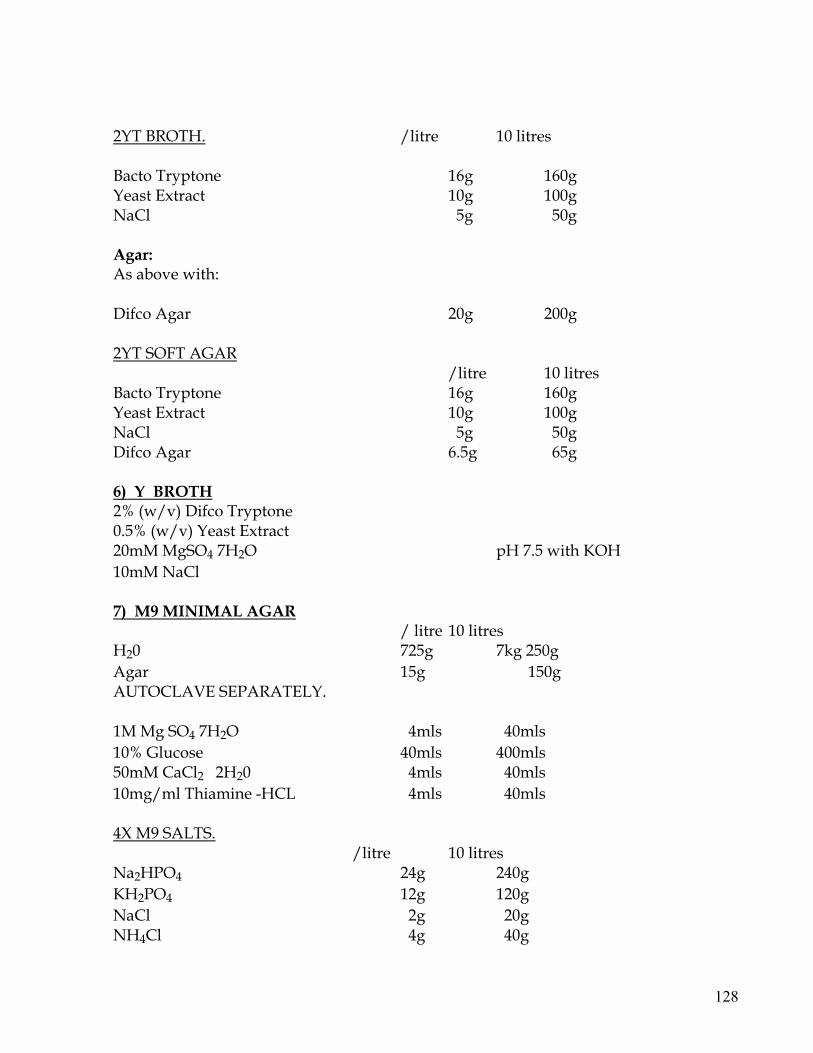
2YT BROTH. /litre 10 litres Bacto Tryptone 16g 160g Yeast Extract 10g 100g NaCl 5g 50g Agar: As above with: Difco Agar 20g 200g 2YT SOFT AGAR /litre 10 litres Bacto Tryptone 16g 160g Yeast Extract 10g 100g NaCl 5g 50g Difco Agar 6.5g 65g 6) Y BROTH 2% (w/v) Difco Tryptone 0.5% (w/v) Yeast Extract 20mM MgSO4 7H2O pH 7.5 with KOH 10mM NaCl 7) M9 MINIMAL AGAR / litre 10 litres H20 725g 7kg 250g Agar 15g 150g AUTOCLAVE SEPARATELY. 1M Mg SO4 7H2O 4mls 40mls 10% Glucose 40mls 400mls 50mM CaCl2 2H20 4mls 40mls 10mg/ml Thiamine -HCL 4mls 40mls 4X M9 SALTS. /litre 10 litres Na2HPO4 24g 240g KH2PO4 12g 120g NaCl 2g 20g NH4Cl 4g 40g
128

8) XXXXXX BROTH 2% Difco Bacto Tryptone 0.5% Difco Bacto Peptone 20mM MgCl2 6H2O 10mM NaCl 10mM KCl ADJUST TO PH WITH KOM
129
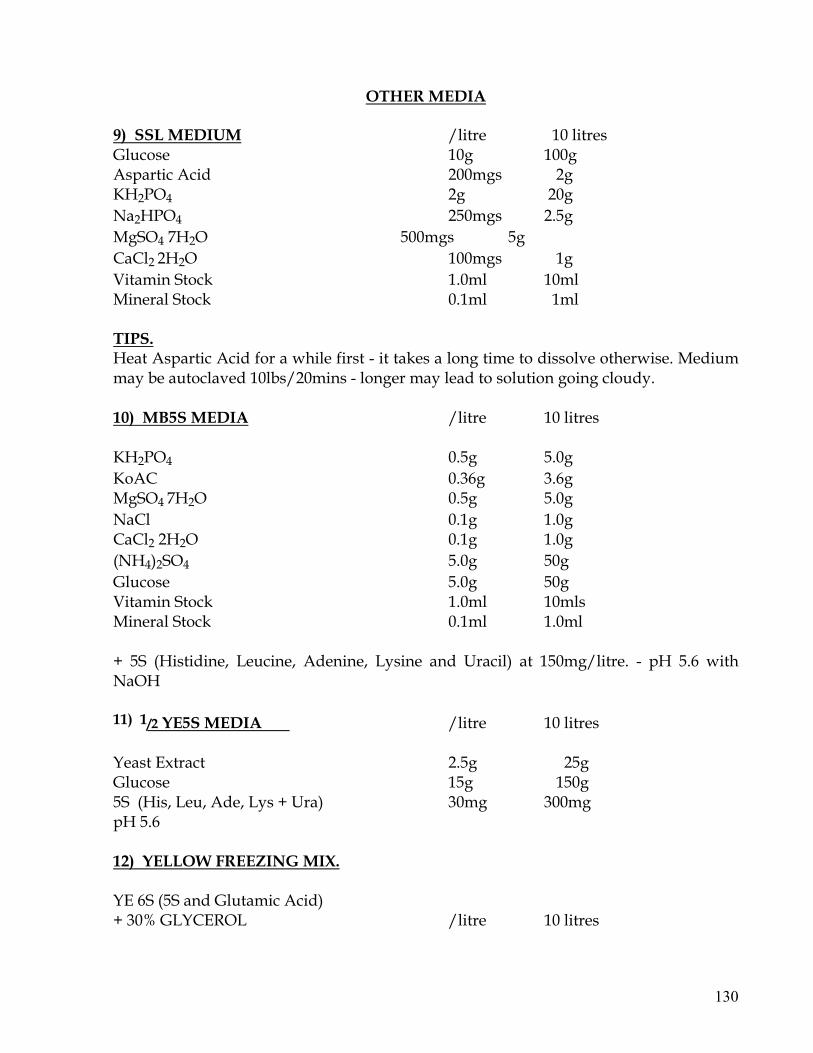
OTHER MEDIA
9) SSL MEDIUM /litre 10 litres Glucose 10g 100g Aspartic Acid 200mgs 2g KH2PO4 2g 20g Na2HPO4 250mgs 2.5g MgSO4 7H2O 500mgs 5g CaCl2 2H2O 100mgs 1g Vitamin Stock 1.0ml 10ml Mineral Stock 0.1ml 1ml TIPS. Heat Aspartic Acid for a while first - it takes a long time to dissolve otherwise. Medium may be autoclaved 10lbs/20mins - longer may lead to solution going cloudy. 10) MB5S MEDIA /litre 10 litres KH2PO4 0.5g 5.0g KoAC 0.36g 3.6g MgSO4 7H2O 0.5g 5.0g NaCl 0.1g 1.0g CaCl2 2H2O 0.1g 1.0g (NH4)2SO4 5.0g 50g Glucose 5.0g 50g Vitamin Stock 1.0ml 10mls Mineral Stock 0.1ml 1.0ml + 5S (Histidine, Leucine, Adenine, Lysine and Uracil) at 150mg/litre. - pH 5.6 with NaOH 11) 1/2 YE5S MEDIA /litre 10 litres Yeast Extract 2.5g 25g Glucose 15g 150g 5S (His, Leu, Ade, Lys + Ura) 30mg 300mg pH 5.6 12) YELLOW FREEZING MIX. YE 6S (5S and Glutamic Acid) + 30% GLYCEROL /litre 10 litres
130
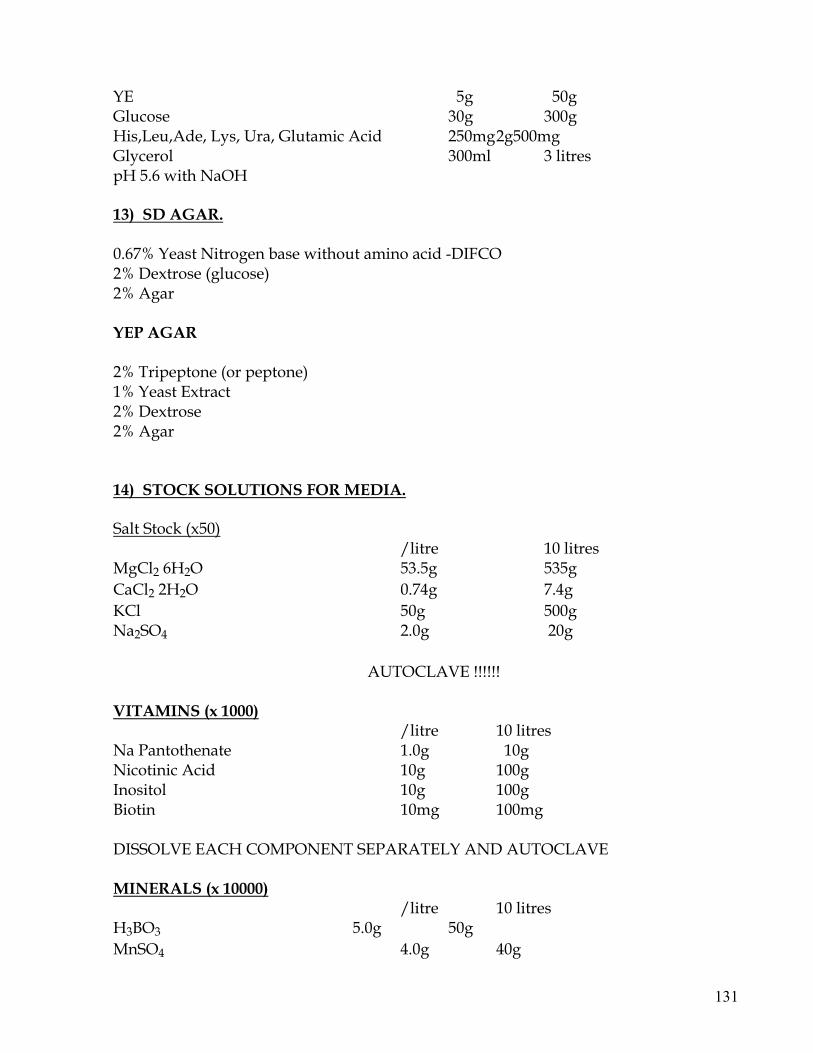
YE 5g 50g Glucose 30g 300g His,Leu,Ade, Lys, Ura, Glutamic Acid 250mg 2g500mg Glycerol 300ml 3 litres pH 5.6 with NaOH 13) SD AGAR. 0.67% Yeast Nitrogen base without amino acid -DIFCO 2% Dextrose (glucose) 2% Agar YEP AGAR 2% Tripeptone (or peptone) 1% Yeast Extract 2% Dextrose 2% Agar 14) STOCK SOLUTIONS FOR MEDIA.
Salt Stock (x50) /litre 10 litres MgCl2 6H2O 53.5g 535g CaCl2 2H2O 0.74g 7.4g KCl 50g 500g Na2SO4 2.0g 20g
AUTOCLAVE !!!!!! VITAMINS (x 1000) /litre 10 litres Na Pantothenate 1.0g 10g Nicotinic Acid 10g 100g Inositol 10g 100g Biotin 10mg 100mg DISSOLVE EACH COMPONENT SEPARATELY AND AUTOCLAVE MINERALS (x 10000) /litre 10 litres H3BO3 5.0g 50g MnSO4 4.0g 40g
131
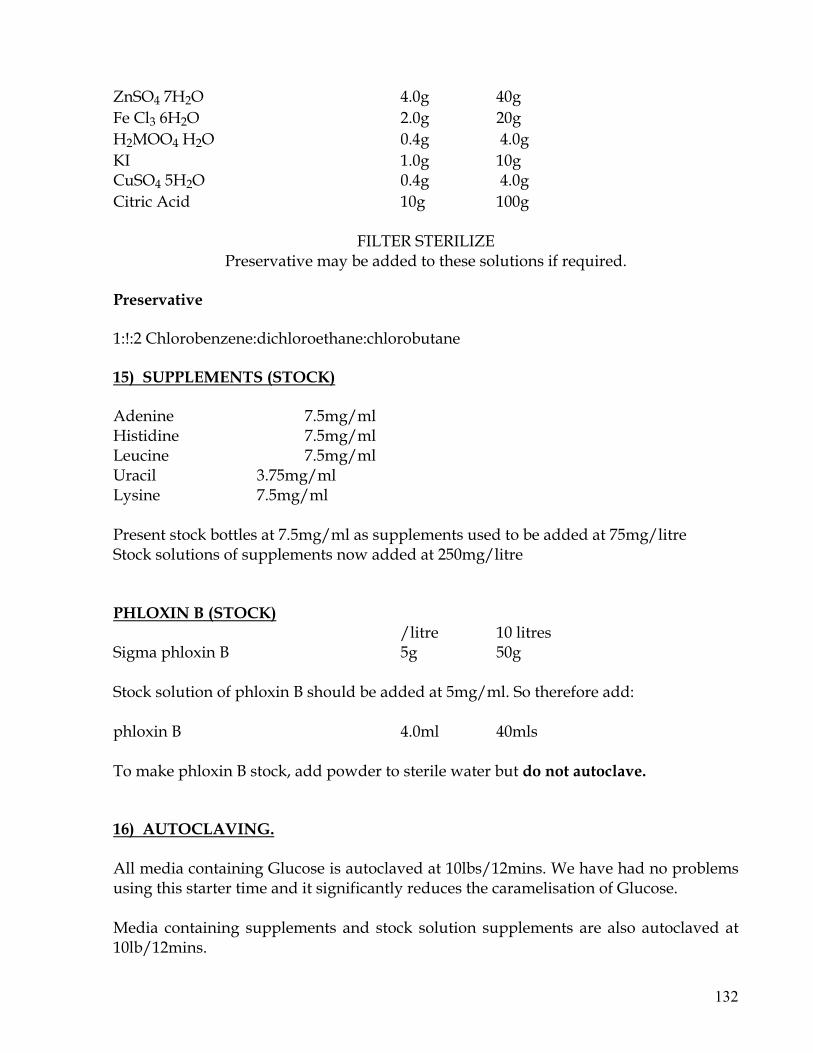
ZnSO4 7H2O 4.0g 40g Fe Cl3 6H2O 2.0g 20g H2MOO4 H2O 0.4g 4.0g KI 1.0g 10g CuSO4 5H2O 0.4g 4.0g Citric Acid 10g 100g
FILTER STERILIZE Preservative may be added to these solutions if required.
Preservative 1:!:2 Chlorobenzene:dichloroethane:chlorobutane 15) SUPPLEMENTS (STOCK) Adenine 7.5mg/ml Histidine 7.5mg/ml Leucine 7.5mg/ml Uracil 3.75mg/ml Lysine 7.5mg/ml Present stock bottles at 7.5mg/ml as supplements used to be added at 75mg/litre Stock solutions of supplements now added at 250mg/litre PHLOXIN B (STOCK) /litre 10 litres Sigma phloxin B 5g 50g Stock solution of phloxin B should be added at 5mg/ml. So therefore add: phloxin B 4.0ml 40mls To make phloxin B stock, add powder to sterile water but do not autoclave. 16) AUTOCLAVING. All media containing Glucose is autoclaved at 10lbs/12mins. We have had no problems using this starter time and it significantly reduces the caramelisation of Glucose. Media containing supplements and stock solution supplements are also autoclaved at 10lb/12mins.
132
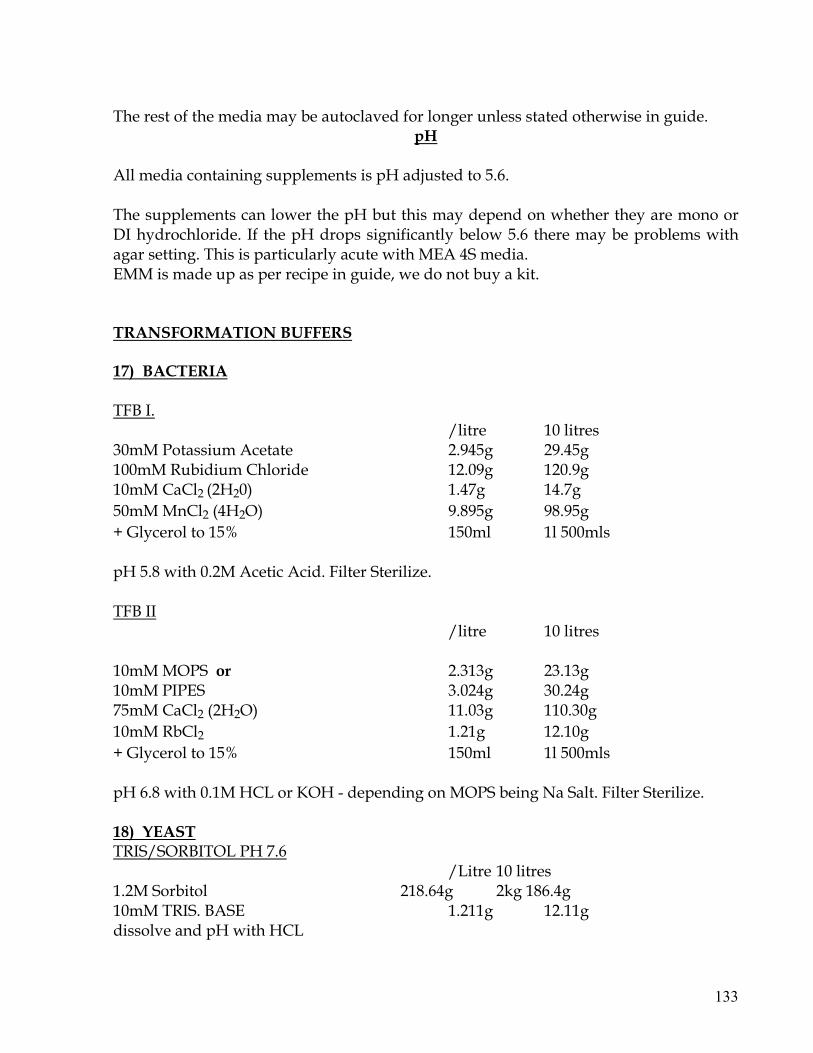
The rest of the media may be autoclaved for longer unless stated otherwise in guide.
pH All media containing supplements is pH adjusted to 5.6. The supplements can lower the pH but this may depend on whether they are mono or DI hydrochloride. If the pH drops significantly below 5.6 there may be problems with agar setting. This is particularly acute with MEA 4S media. EMM is made up as per recipe in guide, we do not buy a kit. TRANSFORMATION BUFFERS 17) BACTERIA TFB I. /litre 10 litres 30mM Potassium Acetate 2.945g 29.45g 100mM Rubidium Chloride 12.09g 120.9g 10mM CaCl2 (2H20) 1.47g 14.7g 50mM MnCl2 (4H2O) 9.895g 98.95g + Glycerol to 15% 150ml 1l 500mls pH 5.8 with 0.2M Acetic Acid. Filter Sterilize. TFB II /litre 10 litres 10mM MOPS or 2.313g 23.13g 10mM PIPES 3.024g 30.24g 75mM CaCl2 (2H2O) 11.03g 110.30g 10mM RbCl2 1.21g 12.10g + Glycerol to 15% 150ml 1l 500mls pH 6.8 with 0.1M HCL or KOH - depending on MOPS being Na Salt. Filter Sterilize. 18) YEAST TRIS/SORBITOL PH 7.6 /Litre 10 litres 1.2M Sorbitol 218.64g 2kg 186.4g 10mM TRIS. BASE 1.211g 12.11g dissolve and pH with HCL
133

TRIS/CAL/SORB /Litre 10 litres 10mM TRIS/HCL pH 7.6 1.211g 12.11g 10mM CaCl2 1.470g 14.7g 1.2M SORBITOL 218.64g 2kg 186.4g TRIS/CAL/PEG /Litre 10 litres 10mM TRIS/HCL pH 7.6 1.211g 12.11g 10mM CaCl2 1.470g 14.7g PEG (4000) 20% 200g 2kg CIT/PHOS/EDTA pH 5.6 20mM CIT/PHOS Buffer: /Litre 10 litres Na2HPO4 2.82g/l 28.2g Citric Acid 4.20g/l 42g 40mM EDTA 14.89g/l 148.9g Dissolve EDTA with NaOH pellets to pH 8.0. Add other ingredients - and pH comes out to 5.6. CIT/PHOS/SORB PH 5.6 10 litres Na2HPO4 7.1g/l 71g Citric Acid 11.5g/l 115g 1.2 M Sorbitol 218.6g/l 2kg 186g pH 5.6 with 5M NaOH 0.1M LITHIUM ACETATE. Molecular weight = 102.02 0.1M = 10.202g in final volume of 1 litre pH 4.9 Weigh out 10.202g and dissolve in 600ml distilled water. Titrate against glacial Acetic acid until pH is 4.9 (approximately 5ml) Make up volume to 1 litre and re-measure pH. Aliquot into 20ml aliquots.
50% PEG 4000 50g /Total volume 100ml 500g Total vol. in a litre.
134
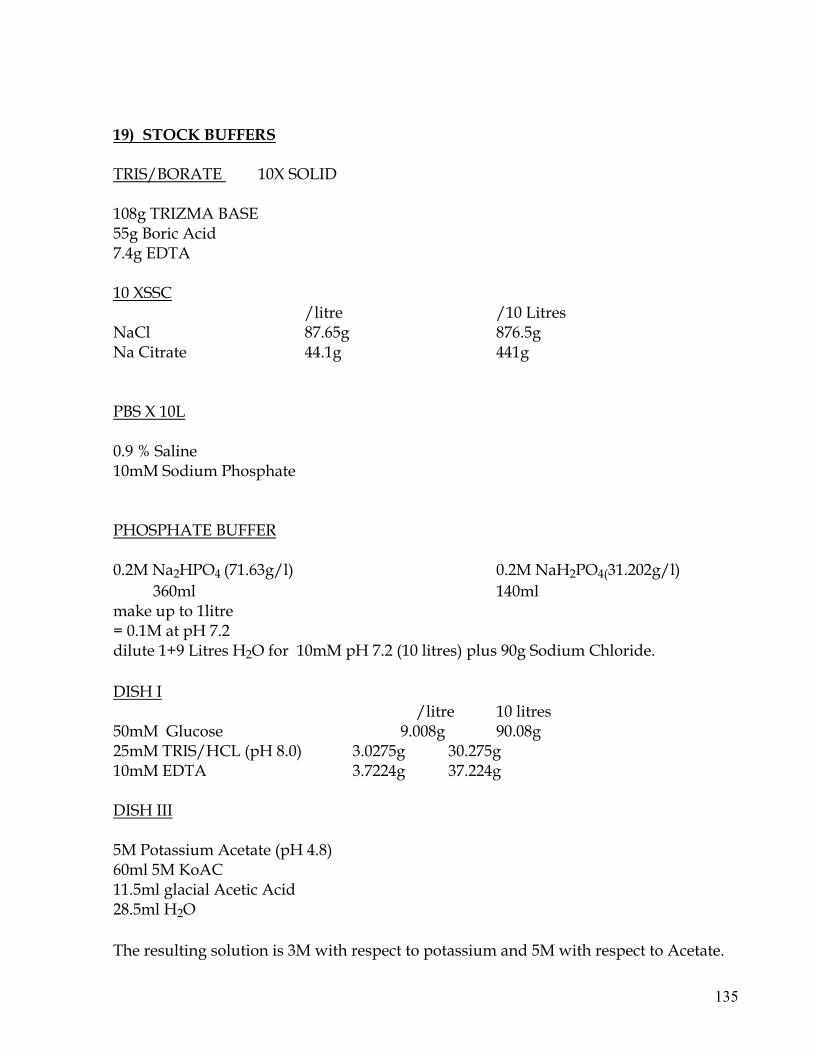
19) STOCK BUFFERS TRIS/BORATE 10X SOLID 108g TRIZMA BASE 55g Boric Acid 7.4g EDTA 10 XSSC /litre /10 Litres NaCl 87.65g 876.5g Na Citrate 44.1g 441g PBS X 10L 0.9 % Saline 10mM Sodium Phosphate PHOSPHATE BUFFER 0.2M Na2HPO4 (71.63g/l) 0.2M NaH2PO4(31.202g/l) 360ml 140ml make up to 1litre = 0.1M at pH 7.2 dilute 1+9 Litres H2O for 10mM pH 7.2 (10 litres) plus 90g Sodium Chloride. DISH I /litre 10 litres 50mM Glucose 9.008g 90.08g 25mM TRIS/HCL (pH 8.0) 3.0275g 30.275g 10mM EDTA 3.7224g 37.224g DISH III 5M Potassium Acetate (pH 4.8) 60ml 5M KoAC 11.5ml glacial Acetic Acid 28.5ml H2O The resulting solution is 3M with respect to potassium and 5M with respect to Acetate.
135
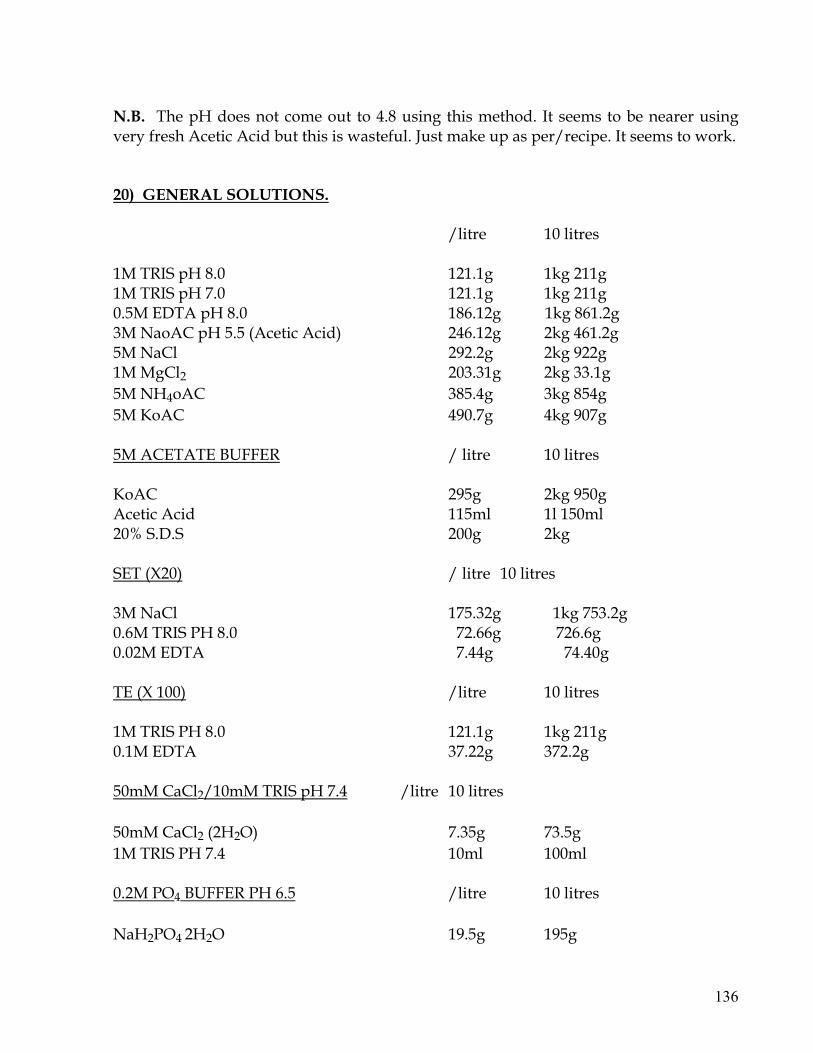
N.B. The pH does not come out to 4.8 using this method. It seems to be nearer using very fresh Acetic Acid but this is wasteful. Just make up as per/recipe. It seems to work. 20) GENERAL SOLUTIONS. /litre 10 litres 1M TRIS pH 8.0 121.1g 1kg 211g 1M TRIS pH 7.0 121.1g 1kg 211g 0.5M EDTA pH 8.0 186.12g 1kg 861.2g 3M NaoAC pH 5.5 (Acetic Acid) 246.12g 2kg 461.2g 5M NaCl 292.2g 2kg 922g 1M MgCl2 203.31g 2kg 33.1g 5M NH4oAC 385.4g 3kg 854g 5M KoAC 490.7g 4kg 907g 5M ACETATE BUFFER / litre 10 litres KoAC 295g 2kg 950g Acetic Acid 115ml 1l 150ml 20% S.D.S 200g 2kg SET (X20) / litre 10 litres 3M NaCl 175.32g 1kg 753.2g 0.6M TRIS PH 8.0 72.66g 726.6g 0.02M EDTA 7.44g 74.40g TE (X 100) /litre 10 litres 1M TRIS PH 8.0 121.1g 1kg 211g 0.1M EDTA 37.22g 372.2g 50mM CaCl2/10mM TRIS pH 7.4 /litre 10 litres 50mM CaCl2 (2H2O) 7.35g 73.5g 1M TRIS PH 7.4 10ml 100ml 0.2M PO4 BUFFER PH 6.5 /litre 10 litres NaH2PO4 2H2O 19.5g 195g
136
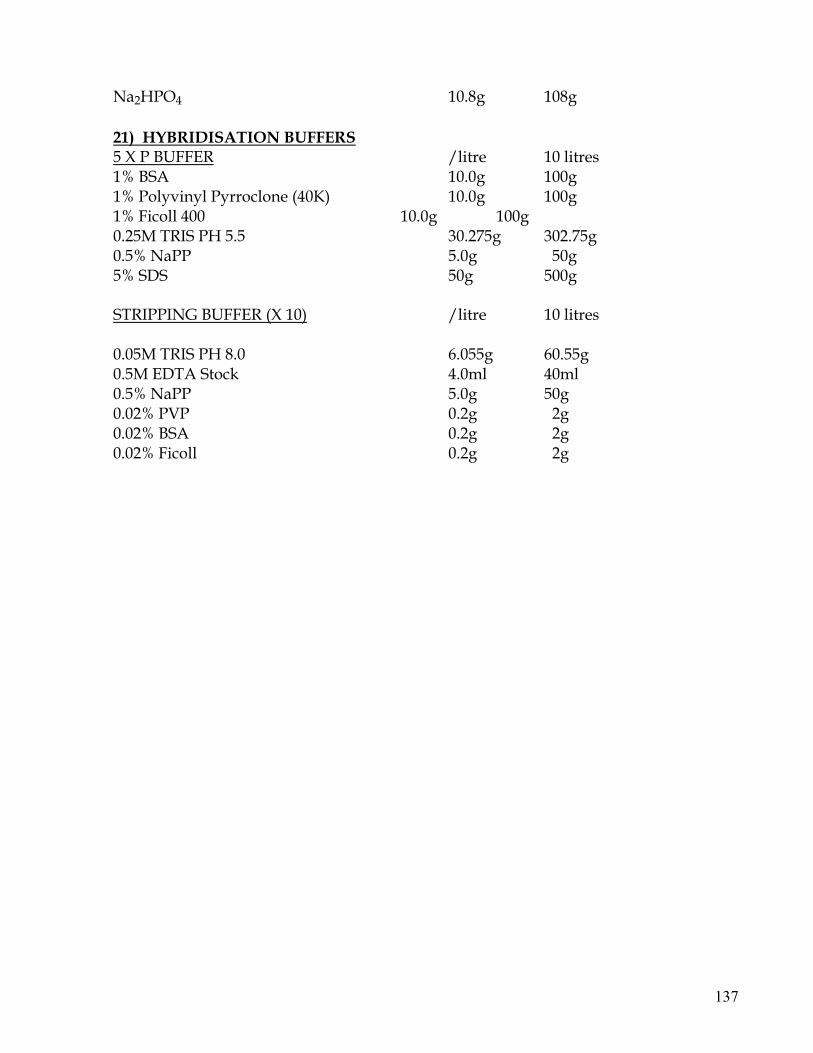
137
Na2HPO4 10.8g 108g 21) HYBRIDISATION BUFFERS 5 X P BUFFER /litre 10 litres 1% BSA 10.0g 100g 1% Polyvinyl Pyrroclone (40K) 10.0g 100g 1% Ficoll 400 10.0g 100g 0.25M TRIS PH 5.5 30.275g 302.75g 0.5% NaPP 5.0g 50g 5% SDS 50g 500g STRIPPING BUFFER (X 10) /litre 10 litres 0.05M TRIS PH 8.0 6.055g 60.55g 0.5M EDTA Stock 4.0ml 40ml 0.5% NaPP 5.0g 50g 0.02% PVP 0.2g 2g 0.02% BSA 0.2g 2g 0.02% Ficoll 0.2g 2g