securent entitlement management solution sharepoint … · ui-based synchronization ... configure...
TRANSCRIPT
Securent Entitlement Management Solution
v 3.1 GA
SharePoint Agent
September 2007
Part No. 31GA-SHAREPOINTAGENT-1
Copyright Copyright © 2006-2007 Securent, Inc. All Rights Reserved.
Restricted Rights This software and documentation is subject to and made available only pursuant to the terms of the Securent Inc. License Agreement and may be used or copied only in accordance with the terms of that agreement. It is against the law to copy the software except as specifically allowed in the agreement. This document may not, in whole or in part, be copied, photocopied, reproduced, translated, or reduced to any electronic medium or machine-readable form without prior consent, in writing, from Securent, Inc.
THE SOFTWARE AND DOCUMENTATION ARE PROVIDED AS IS WITHOUT WARRANTY OF ANY KIND INCLUDING WITHOUT LIMITATION, ANY WARRANTY OF MERCHANTABILITY OR FITNESS FOR A PARTICULAR PURPOSE. FURTHER, Securent DOES NOT WARRANT, GUARANTEE, OR MAKE ANY REPRESENTATIONS REGARDING THE USE, OR THE RESULTS OF THE USE, OF THE SOFTWARE OR WRITTEN MATERIAL IN TERMS OF CORRECTNESS, ACCURACY,RELIABILITY, OR OTHERWISE.
SharePoint Agent
Contents Introduction........................................................................................................... 1
Advantages of integrating SharePoint with Securent EMS ....................................... 1 Product Architecture .............................................................................................. 3
Microsoft Office SharePoint Server 2007 Integration Overview ................................ 3 Installing Securent SharePoint Agent .................................................................... 5
Assumptions and Pre-requisites .......................................................................... 5 Installation Steps ............................................................................................. 6 Uninstallation Steps .......................................................................................... 9
Integration of Securent EMS with MOSS Application ............................................ 12 Update pep_config.xml file............................................................................... 12
<SecurentMOSSAgent> Element ...............................................................................12 Configuring Membership and Role Providers ....................................................... 13
Membership Provider.................................................................................. 13 Role Provider ............................................................................................ 14
Securent EMS Synchronization with MOSS Application.......................................... 14 UI-based synchronization............................................................................ 14 Command-line based synchronization ........................................................... 16
MOSS Application Web Pages ........................................................................... 17 Protecting MOSS Application Web Pages using Securent EMS ........................... 17
MOSS Application Navigation Links.................................................................... 18 Protecting MOSS Application Navigation Links using Securent EMS.................... 19
MOSS Application Webparts ............................................................................. 20 Protecting MOSS Application Webparts using Securent EMS ............................. 20
MOSS Application Documents........................................................................... 21 Protecting MOSS Application Documents and Items using SharePoint Agent ....... 22
Setting up policies from within MOSS................................................................... 24 Troubleshooting ................................................................................................... 26 Appendix 1: Configuring Membership and Role provider ...................................... 27
Creating Web Applications ............................................................................. 27 Creating extranet IIS Web site ......................................................................... 27 Creating internet IIS Web site .......................................................................... 31
Configure Web Application to communicate with Form Authentication Data Store .. 32 Configure web.config file of extranet site ........................................................... 32 Configure web.config file of internet site ............................................................ 33
Configure SharePoint Central Administration .................................................... 33 Enable Form Authentication for Internet site .................................................... 34
iii

SharePoint Agent
Introduction This document provides a step-by-step procedure to install the Securent SharePoint Agent and integrate Securent Policy Administration Point (PAP) with your web-applications running on SharePoint Server 2007.
Advantages of integrating SharePoint with Securent EMS Microsoft Office SharePoint Server (MOSS) 2007 is an integrated suite of server capabilities that can help improve organizational effectiveness by providing comprehensive content management and enterprise search, accelerating shared business processes, and facilitating information-sharing across boundaries for better business insight. Office SharePoint Server 2007 supports all intranet, extranet, and Web applications across an enterprise within one integrated platform, instead of relying on separate fragmented systems. Additionally, this collaboration and content management server provides IT professionals and developers with the platform and tools they need for server administration, application extensibility, and interoperability.
Additionally, MOSS 2007 allows an organization to:
• manage content and processes
• improve business insight
• simplify internal and external collaboration
• empower IT to make a strategic impact
While the process of managing security within Microsoft SharePoint has been improved in MOSS in comparison to prior versions, it is still a painstaking process that will grow in complexity as MOSS-based sites and applications grow over time and proliferate throughout the enterprise. Consider the following issues:
• As application owners and end-users add more sites, one can expect the number of roles and user-groups defined within MOSS to grow.
• Enforcement of enterprise security policies can be a challenge when end-users are managing their own sites.
• Compliance can become an issue when security policies for securable objects have been over-ridden by the site or item owners, and those owners leave the organization or change over time.
• It is difficult to implement business-logic in the MOSS authorization process without the use of custom code; for example, this item should only be editable by users who are authorized by external system of record.
• There is no easy way to enforce segregation of duty rules in MOSS.
• Authorization policies stored within SharePoint are destined to remain encapsulated in infrastructure silos.
The SharePoint EMS agent allows An Administrator the fatally overlooked and flaw of not being to hide a page within a site. Every enterprise portal competing with SharePoint can protect pages, but not SharePoint. In order to do this basic but critical security measure in SharePoint, you need Securent’s SharePoint Agent.
1
SharePoint Agent
In addition, the SharePoint Backdoor Navigation, called All Site Content, exposes all the components of the Site completely ignoring any presentation security. This means if there is a LIST webpart you’re not supposed to see, you’ll still see it and view all the meta-data describing that list. But when you click the link, you’ll get that denied access page, but why show it in the first place? This practice is often referred as Dead End Navigation. With Securent, you can lock this page down and no longer publicly expose the guts of your site possibly revealing the contents of what the site holds.
To help abstract MOSS security onto a service platform that utilizes Securent EMS, Securent provides a shrink-wrapped agent for MOSS. The agent facilitates:
• authorization abstraction
• roles and rules based policy enforcement including business-logic execution
• the ability to utilize user and application data stores beyond SQL Server and Microsoft AD/ADAM
• fine-grained access control (CRUD) that compliments MOSS item-level security for sites, lists, collections, libraries and documents
• application-level security enforcement for custom web-part based applications
• protecting stock webparts with the addition of HTTP handler hook
Securent EMS can thus compliment an enterprise’s investment in Microsoft Office SharePoint Server 2007 by helping to abstract some of the embedded authorization logic from SharePoint, so as to help transition SharePoint onto the enterprise authorization service platform. In doing so, Securent EMS helps alleviate some of the complexity in managing MOSS 2007’s authorization model.
2
SharePoint Agent
Product Architecture Microsoft Office SharePoint Server 2007 Integration Overview
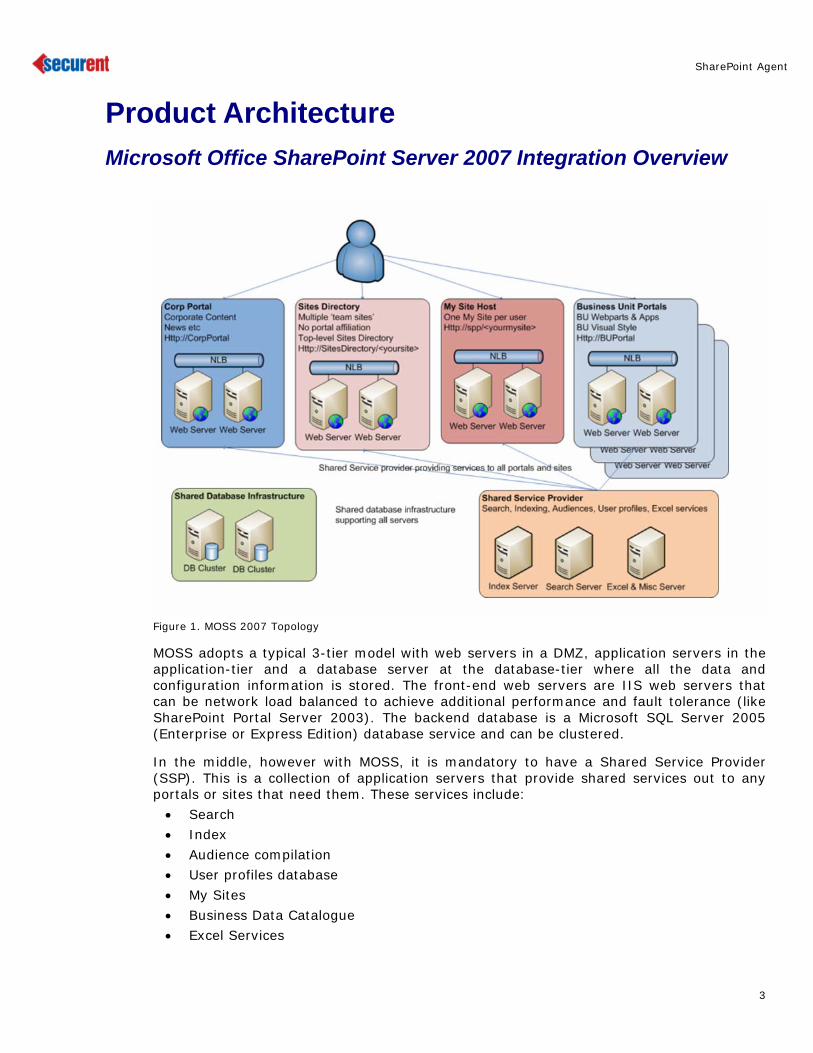
Figure 1. MOSS 2007 Topology
MOSS adopts a typical 3-tier model with web servers in a DMZ, application servers in the application-tier and a database server at the database-tier where all the data and configuration information is stored. The front-end web servers are IIS web servers that can be network load balanced to achieve additional performance and fault tolerance (like SharePoint Portal Server 2003). The backend database is a Microsoft SQL Server 2005 (Enterprise or Express Edition) database service and can be clustered.
In the middle, however with MOSS, it is mandatory to have a Shared Service Provider (SSP). This is a collection of application servers that provide shared services out to any portals or sites that need them. These services include:
• Search
• Index
• Audience compilation
• User profiles database
• My Sites
• Business Data Catalogue
• Excel Services
3

SharePoint Agent
Figure 2. Securent EMS and MOSS 2007 Integration Architecture
The figure above illustrates the integration architecture. The Securent EMS Policy Enforcement Point (or Agent) assemblies are installed on the front-ending MOSS IIS servers in the .NET GAC, with configuration files located in the application’s web.config folder or system path. The Securent EMS policy store database is ideally co-located on the Microsoft SQL Server 2005 cluster utilized by MOSS; although it could be hosted on a distinct RDBMS infrastructure such as Oracle 10g or SQL Server 2000/2005 as required. Securent’s PDPs are hosted on application server clusters such as Tomcat, WebLogic or WebSphere. MOSS components are installed as normal.
End-user or site-administrator managed policies for MOSS resources and the MOSS site-hierarchy is synchronized from MOSS to Securent via a configurable MOSS feature. Policies can then be administered by corporate security administrators via the Securent EMS administration GUI (PAP). Once policies are configured and users make requests for MOSS sites, the PEP is invoked and it makes authorization requests in the form of SOAPified or raw XACML/HTTP(S) messages to the EMS PDP. The PDP can be configured to utilize external attribute sources in the form of LDAP directories, RDBMS databases, Web-services and Business logic (encapsulated into Java classes) in order to obtain additional user and application related information for use in making an authorization decision. Once the PDP has process the requested and formulated a response, it sends back a SOAPified or raw XACML/HTTP(S) message to the PEP encapsulating the authorization decision as well as any pre-configured obligations. The PEP applies the appropriate allow/deny decision to MOSS. Additionally, the Securent PEP acts as a Role Provider for MOSS, so that all role-management can be abstracted to Securent EMS.
4

SharePoint Agent
Securent PDPs may be clustered via the cluster features of the application server that host the PDP web-application. Alternatively, if the PDPs are hosted in stand-alone Tomcat instances, they may be load-balanced via hardware load-balancers (e.g. BigIP F5, Cisco ArrowPoint etc.). If neither application-server cluster or network load-balancers are employed to load-balance PDPs, then the Securent PEPs can be configured to use simple round-robin load-balancing of PDPs as required.
The request and response chain and authorization decisions are all audited by the Securent PDP to configured audit databases for reporting purposes.
Installing Securent SharePoint Agent This section provides a step-by-step procedure for installing and uninstalling the Securent SharePoint Agent.
Assumptions and Pre-requisites • It is assumed that a fully-functional MOSS 2007 infrastructure exists with the
following RTM builds:
NET FX 3.0
Office SharePoint Server 2007 including Excel Services
• Some of the one-time installation components require system administration privileges on the SharePoint host to install.
• It is also assumed that MOSS 2007 and IIS are not hardened prior to the implementation of the integrated solution including Securent EMS.
• It is assumed that DMZ firewall ports will be open to allow point-to-point HTTP(S) traffic between Securent PEPs resident on the MOSS IIS servers and the Securent PDPs located in the internal network segment on a specific port (as configured).
• The use of Securent supported platform is assumed:
Securent EMS v3.0.1 (or more recent)
Sun JDK 1.5 (with most recent minor version)
Windows Server 2003 Enterprise Edition SP1 (or more recent)
SQL Server 2005 (with most recent service pack)
IIS 6
Tomcat 5.5.20 windows service build or WebLogic/WebSphere application server
• An understanding of the Securent EMS and MOSS 2007 solutions are assumed; this document is not meant to replace existing solution guides and other solution-related documentation.
• It is assumed that you have already installed Securent Entitlement Management Solution 3.1.
5
SharePoint Agent
Installation Steps Note: It is assumed in this document that Windows SharePoint Service (WSS) is installed in the c:\ drive. If you have installed it in any other drive such as the d:\ drive, then you should open the following files and change the drive letter present in the first few lines of these documents.
• Install.bat
• InstallSolutionPackage.cmd
• DeploySolutionPackage.cmd
• RetractSolutionPackage.cmd
• DeleteSolutionPackage.cmd
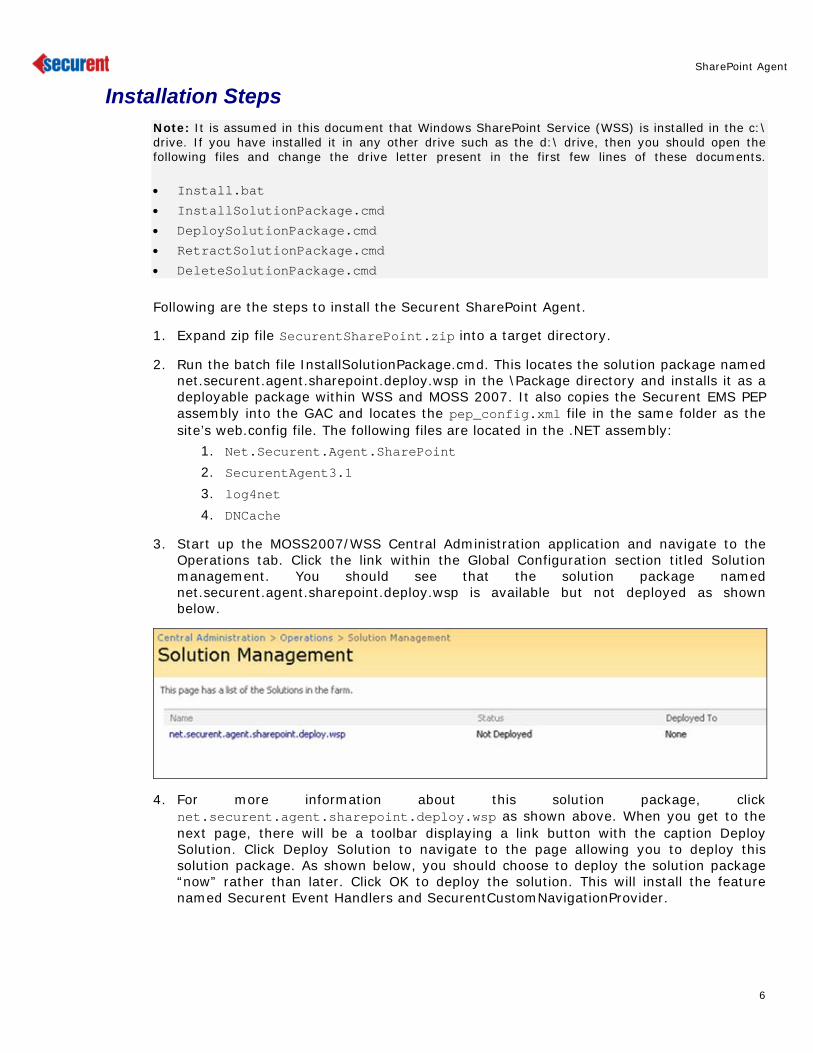
Following are the steps to install the Securent SharePoint Agent.
1. Expand zip file SecurentSharePoint.zip into a target directory.
2. Run the batch file InstallSolutionPackage.cmd. This locates the solution package named net.securent.agent.sharepoint.deploy.wsp in the \Package directory and installs it as a deployable package within WSS and MOSS 2007. It also copies the Securent EMS PEP assembly into the GAC and locates the pep_config.xml file in the same folder as the site’s web.config file. The following files are located in the .NET assembly:
1. Net.Securent.Agent.SharePoint 2. SecurentAgent3.1 3. log4net 4. DNCache
3. Start up the MOSS2007/WSS Central Administration application and navigate to the Operations tab. Click the link within the Global Configuration section titled Solution management. You should see that the solution package named net.securent.agent.sharepoint.deploy.wsp is available but not deployed as shown below.
4. For more information about this solution package, click net.securent.agent.sharepoint.deploy.wsp as shown above. When you get to the next page, there will be a toolbar displaying a link button with the caption Deploy Solution. Click Deploy Solution to navigate to the page allowing you to deploy this solution package. As shown below, you should choose to deploy the solution package “now” rather than later. Click OK to deploy the solution. This will install the feature named Securent Event Handlers and SecurentCustomNavigationProvider.
6

SharePoint Agent
5. Next, you will create or locate a MOSS/WSS site to test the sample. When you are on the site within your browser, go to the desired Site Setting page and click the Site Features link (as opposed to Site Features). Next, locate and activate the Securent Event Handlers and SecurentCustomNavigationProvider Feature as shown below.
6. Note that activating these feature will:
7
SharePoint Agent
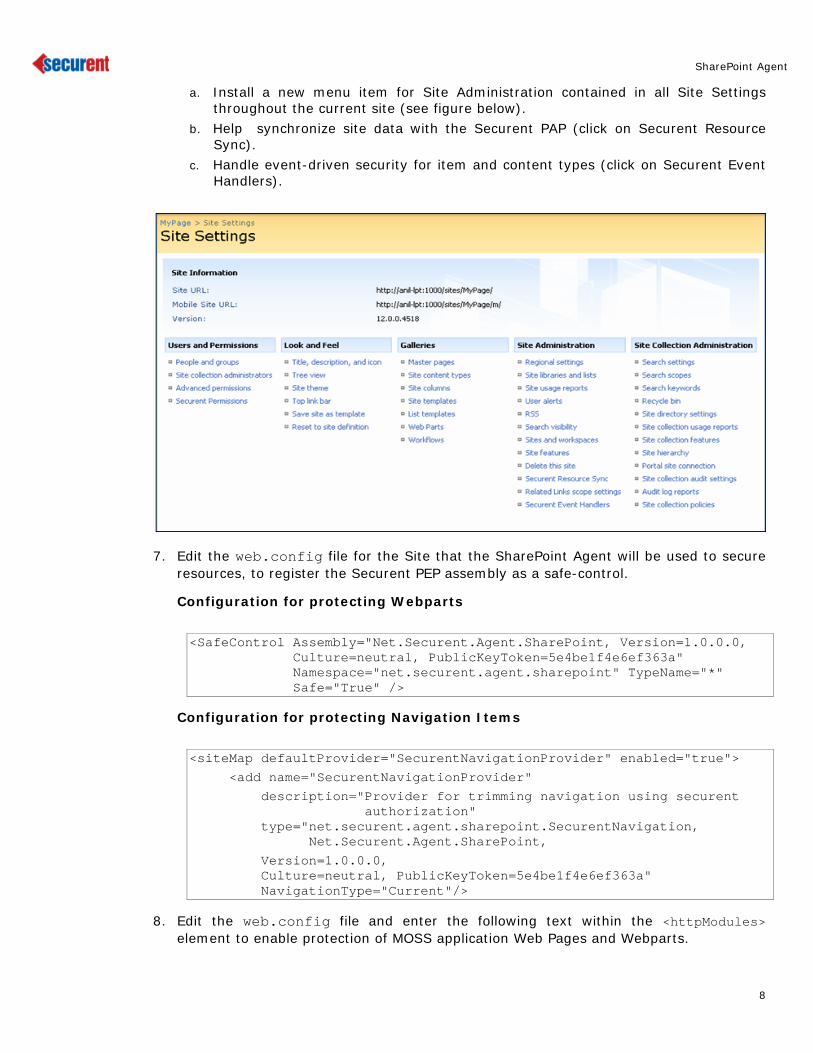
a. Install a new menu item for Site Administration contained in all Site Settings throughout the current site (see figure below).
b. Help synchronize site data with the Securent PAP (click on Securent Resource Sync).
c. Handle event-driven security for item and content types (click on Securent Event Handlers).
7. Edit the web.config file for the Site that the SharePoint Agent will be used to secure resources, to register the Securent PEP assembly as a safe-control.
Configuration for protecting Webparts <SafeControl Assembly="Net.Securent.Agent.SharePoint, Version=1.0.0.0, Culture=neutral, PublicKeyToken=5e4be1f4e6ef363a" Namespace="net.securent.agent.sharepoint" TypeName="*" Safe="True" />
Configuration for protecting Navigation Items <siteMap defaultProvider="SecurentNavigationProvider" enabled="true"> <add name="SecurentNavigationProvider" description="Provider for trimming navigation using securent authorization" type="net.securent.agent.sharepoint.SecurentNavigation, Net.Securent.Agent.SharePoint, Version=1.0.0.0, Culture=neutral, PublicKeyToken=5e4be1f4e6ef363a" NavigationType="Current"/>
8. Edit the web.config file and enter the following text within the <httpModules> element to enable protection of MOSS application Web Pages and Webparts.
8
SharePoint Agent
<add name="EMSIISAgentModule" type="EMSIISAgent.EMSIISAgentModule, Net.Securent.Agent.SharePoint, Version=1.0.0.0, Culture=neutral, PublicKeyToken=5e4be1f4e6ef363a" />
9. Finally, copy the two Securent SharePoint Agent files - pep.config and log.config
- in the SharePoint Server application directory where web.config is present.
Uninstallation Steps If you want to uninstall this SharePoint Agent from your computer, follow these instructions.
1. Go to each site collection in which you have activated the Securent Event Handlers and SecurentCustomNavigationProvider features and deactivate it. You can do this by going to the Site Settings page and then clicking the link to go to the Site features management page.
2. Ensure that the feature has been deactivated on all sites.
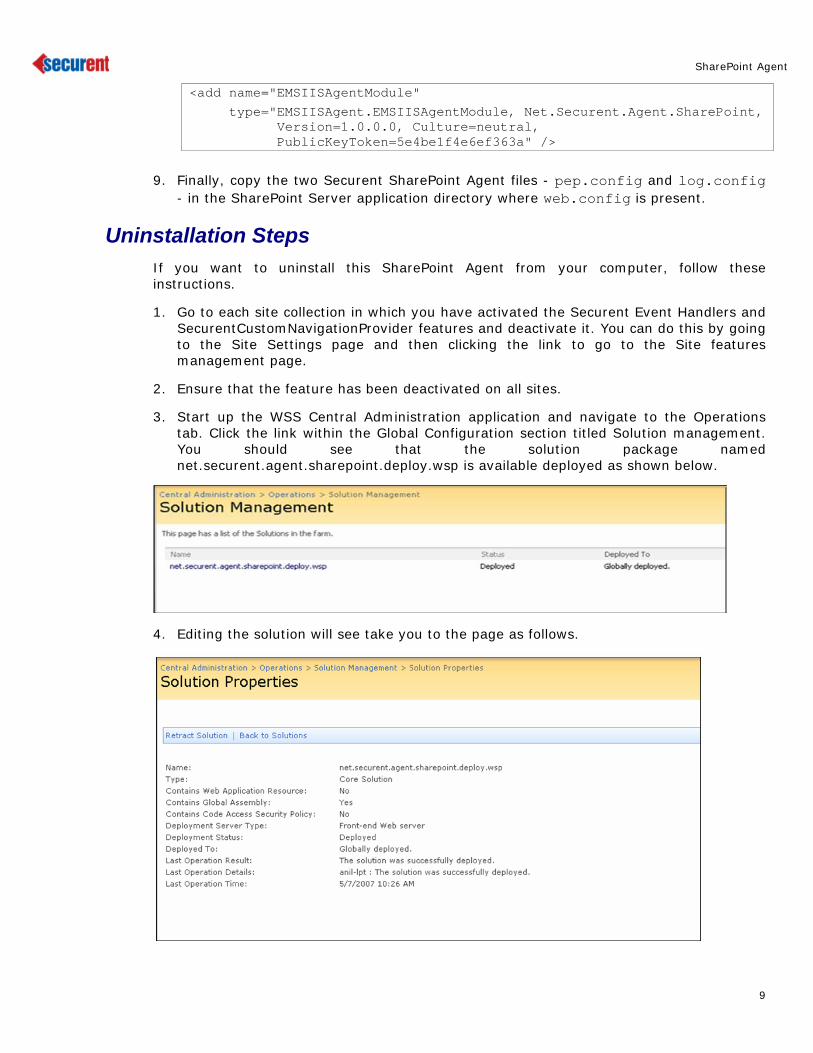
3. Start up the WSS Central Administration application and navigate to the Operations tab. Click the link within the Global Configuration section titled Solution management. You should see that the solution package named net.securent.agent.sharepoint.deploy.wsp is available deployed as shown below.
4. Editing the solution will see take you to the page as follows.
9

SharePoint Agent
5. Click on the Retract Solution to take you to the following page.
6. Click on the ok button to undeploy the solution.
7. Edit the solution by clicking on the Solution name. Following page is displayed.
10
SharePoint Agent
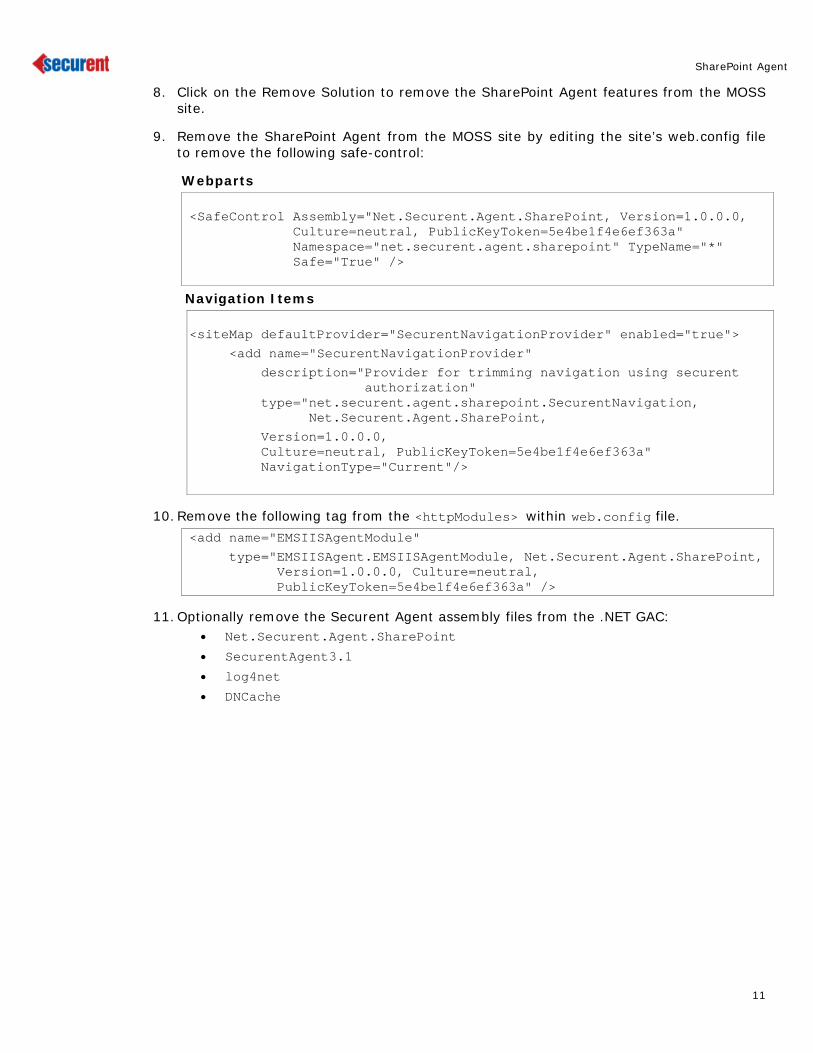
8. Click on the Remove Solution to remove the SharePoint Agent features from the MOSS site.
9. Remove the SharePoint Agent from the MOSS site by editing the site’s web.config file to remove the following safe-control:
Webparts <SafeControl Assembly="Net.Securent.Agent.SharePoint, Version=1.0.0.0, Culture=neutral, PublicKeyToken=5e4be1f4e6ef363a" Namespace="net.securent.agent.sharepoint" TypeName="*" Safe="True" />
Navigation Items <siteMap defaultProvider="SecurentNavigationProvider" enabled="true"> <add name="SecurentNavigationProvider" description="Provider for trimming navigation using securent authorization" type="net.securent.agent.sharepoint.SecurentNavigation, Net.Securent.Agent.SharePoint, Version=1.0.0.0, Culture=neutral, PublicKeyToken=5e4be1f4e6ef363a" NavigationType="Current"/>
10. Remove the following tag from the <httpModules> within web.config file.
<add name="EMSIISAgentModule" type="EMSIISAgent.EMSIISAgentModule, Net.Securent.Agent.SharePoint, Version=1.0.0.0, Culture=neutral, PublicKeyToken=5e4be1f4e6ef363a" />
11. Optionally remove the Securent Agent assembly files from the .NET GAC: • Net.Securent.Agent.SharePoint
• SecurentAgent3.1
• log4net
• DNCache
11
SharePoint Agent
Integration of Securent EMS with MOSS Application
This section explains how Securent SharePoint Agents integrated with the MOSS application for securing its application components.
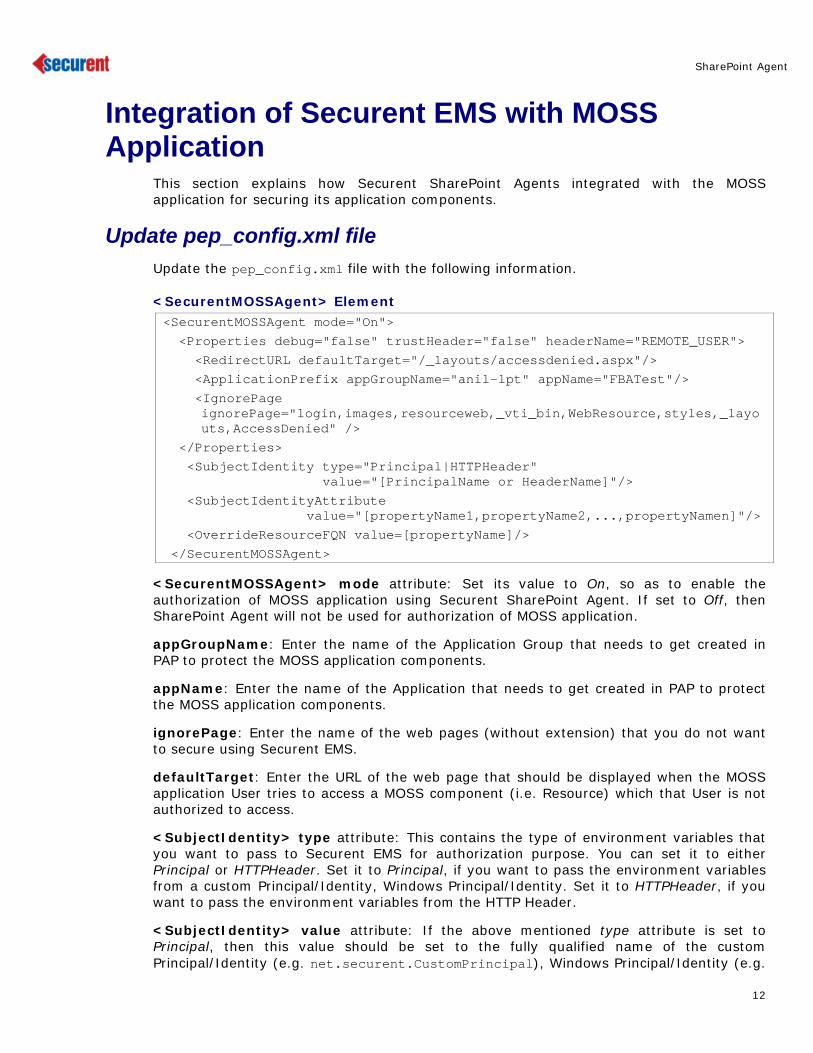
Update pep_config.xml file Update the pep_config.xml file with the following information.
<SecurentMOSSAgent> Element <SecurentMOSSAgent mode="On"> <Properties debug="false" trustHeader="false" headerName="REMOTE_USER"> <RedirectURL defaultTarget="/_layouts/accessdenied.aspx"/> <ApplicationPrefix appGroupName="anil-lpt" appName="FBATest"/> <IgnorePage
ignorePage="login,images,resourceweb,_vti_bin,WebResource,styles,_layouts,AccessDenied" />
</Properties> <SubjectIdentity type="Principal|HTTPHeader" value="[PrincipalName or HeaderName]"/> <SubjectIdentityAttribute value="[propertyName1,propertyName2,...,propertyNamen]"/> <OverrideResourceFQN value=[propertyName]/> </SecurentMOSSAgent>
<SecurentMOSSAgent> mode attribute: Set its value to On, so as to enable the authorization of MOSS application using Securent SharePoint Agent. If set to Off, then SharePoint Agent will not be used for authorization of MOSS application.
appGroupName: Enter the name of the Application Group that needs to get created in PAP to protect the MOSS application components.
appName: Enter the name of the Application that needs to get created in PAP to protect the MOSS application components.
ignorePage: Enter the name of the web pages (without extension) that you do not want to secure using Securent EMS.
defaultTarget: Enter the URL of the web page that should be displayed when the MOSS application User tries to access a MOSS component (i.e. Resource) which that User is not authorized to access.
<SubjectIdentity> type attribute: This contains the type of environment variables that you want to pass to Securent EMS for authorization purpose. You can set it to either Principal or HTTPHeader. Set it to Principal, if you want to pass the environment variables from a custom Principal/Identity, Windows Principal/Identity. Set it to HTTPHeader, if you want to pass the environment variables from the HTTP Header.
<SubjectIdentity> value attribute: If the above mentioned type attribute is set to Principal, then this value should be set to the fully qualified name of the custom Principal/Identity (e.g. net.securent.CustomPrincipal), Windows Principal/Identity (e.g.
12

SharePoint Agent
System.Security.Principle.WindowsPrincipal). If the type attribute is set to HTTPHeader, then set this value to the HTTP Header name.
<SubjectIdentityAttribute> value attribute: Enter the comma separated property names of the custom Principal/Identity or HTTP Header.
Example for configuring Windows Principal
<SubjectIdentity type=”Principal” value=”System.Security.Principal.WindowsPrincipal”/>
<SubjectIdentityAttribute value=”Identity.Name”/>
Example for configuring Custom Principal
<SubjectIdentity type=”Principal” value=”namespace.classname”/>
<SubjectIdentityAttribute value=”classname.propertyname”/>
<OverrideResourceFQN> Value attribute: If you set the value for this tag with a property name, then it reads the resourceFQN from the sharepointwebpart and create the resource within the PAP. The same property file is used while making the decision call to read the resourceFQN. If resourceFQN is not configured within the pep_config file then it will read the title of the webpart as the resource FQN.
Configuring Membership and Role Providers
Membership Provider MOSS model allows the use of forms-based authentication (FBA) to authenticate users as well as groups into the system. If you want your MOSS application to use Securent EMS as the source of users then enter the following text in the web.config file.
<membership defaultProvider="SecurentMembershipProvider"> <providers> <add name="SecurentMembershipProvider" type="net.securent.agent.sharepoint.SecurentMembershipProvider, Net.Securent.Agent.SharePoint, Version=1.0.0.0, Culture=neutral, PublicKeyToken=5e4be1f4e6ef363a" connectionStringName="" enablePasswordRetrieval="false" enablePasswordReset="true" requiresQuestionAndAnswer="true" applicationName="/" requiresUniqueEmail="false" passwordFormat="Hashed" maxInvalidPasswordAttempts="5" minRequiredPasswordLength="7" minRequiredNonalphanumericCharacters="1" passwordAttemptWindow="10" passwordStrengthRegularExpression="" /> </providers> </membership>
Set the defaultProvider attribute value to the SecurentMembershipProvider (its value should be the same as the one set for the name attribute).
13
SharePoint Agent
Set the applicationNameFQN (i.e. application group name:application name) attribute value to the name of the MOSS application that you want to protect. The application group name and application name must be same as entered in the pep_config.xml file.
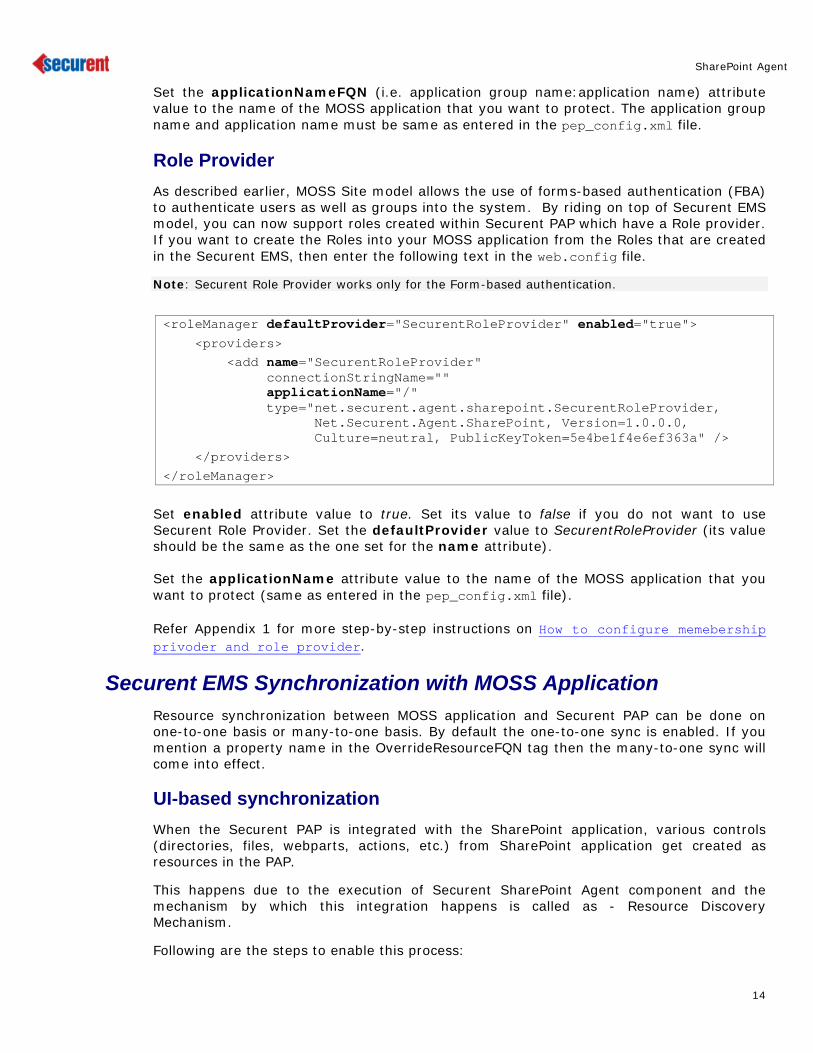
Role Provider As described earlier, MOSS Site model allows the use of forms-based authentication (FBA) to authenticate users as well as groups into the system. By riding on top of Securent EMS model, you can now support roles created within Securent PAP which have a Role provider. If you want to create the Roles into your MOSS application from the Roles that are created in the Securent EMS, then enter the following text in the web.config file.
Note: Securent Role Provider works only for the Form-based authentication.
<roleManager defaultProvider="SecurentRoleProvider" enabled="true"> <providers> <add name="SecurentRoleProvider" connectionStringName="" applicationName="/" type="net.securent.agent.sharepoint.SecurentRoleProvider, Net.Securent.Agent.SharePoint, Version=1.0.0.0, Culture=neutral, PublicKeyToken=5e4be1f4e6ef363a" /> </providers> </roleManager>
Set enabled attribute value to true. Set its value to false if you do not want to use Securent Role Provider. Set the defaultProvider value to SecurentRoleProvider (its value should be the same as the one set for the name attribute). Set the applicationName attribute value to the name of the MOSS application that you want to protect (same as entered in the pep_config.xml file). Refer Appendix 1 for more step-by-step instructions on How to configure memebership privoder and role provider.
Securent EMS Synchronization with MOSS Application Resource synchronization between MOSS application and Securent PAP can be done on one-to-one basis or many-to-one basis. By default the one-to-one sync is enabled. If you mention a property name in the OverrideResourceFQN tag then the many-to-one sync will come into effect.
UI-based synchronization When the Securent PAP is integrated with the SharePoint application, various controls (directories, files, webparts, actions, etc.) from SharePoint application get created as resources in the PAP.
This happens due to the execution of Securent SharePoint Agent component and the mechanism by which this integration happens is called as - Resource Discovery Mechanism.
Following are the steps to enable this process:
14
SharePoint Agent
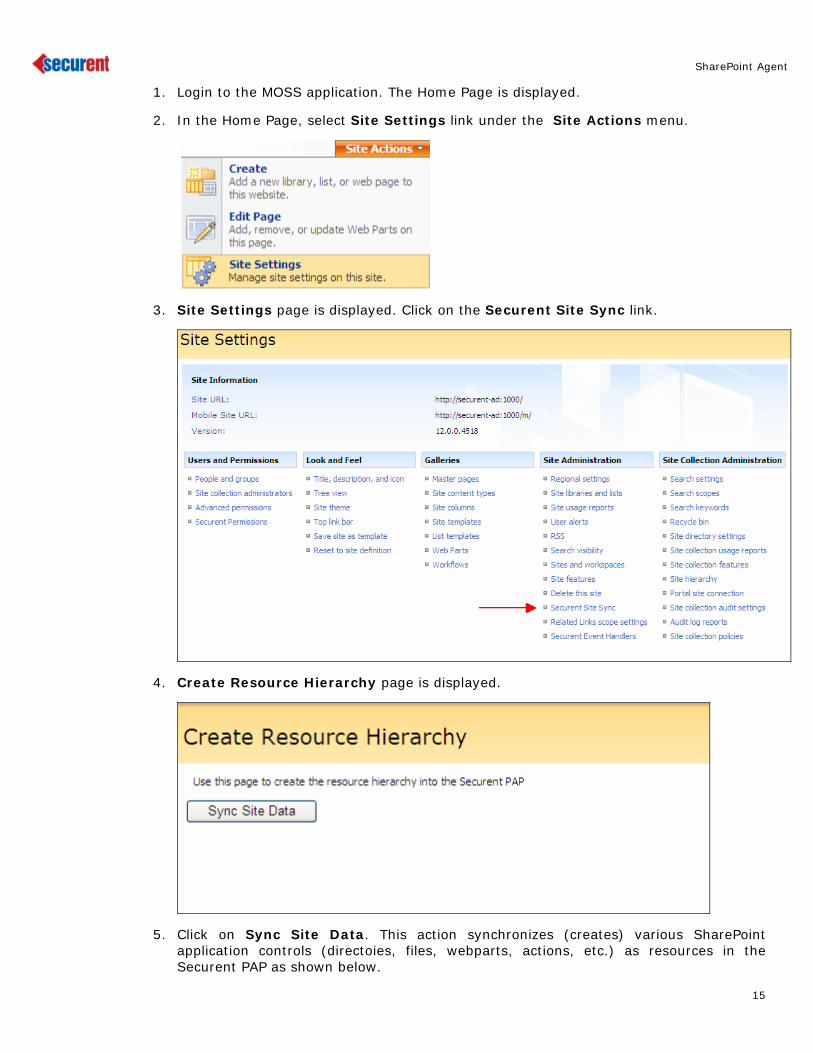
1. Login to the MOSS application. The Home Page is displayed.
2. In the Home Page, select Site Settings link under the Site Actions menu.
3. Site Settings page is displayed. Click on the Securent Site Sync link.
4. Create Resource Hierarchy page is displayed.
5. Click on Sync Site Data. This action synchronizes (creates) various SharePoint application controls (directoies, files, webparts, actions, etc.) as resources in the Securent PAP as shown below.
15
SharePoint Agent
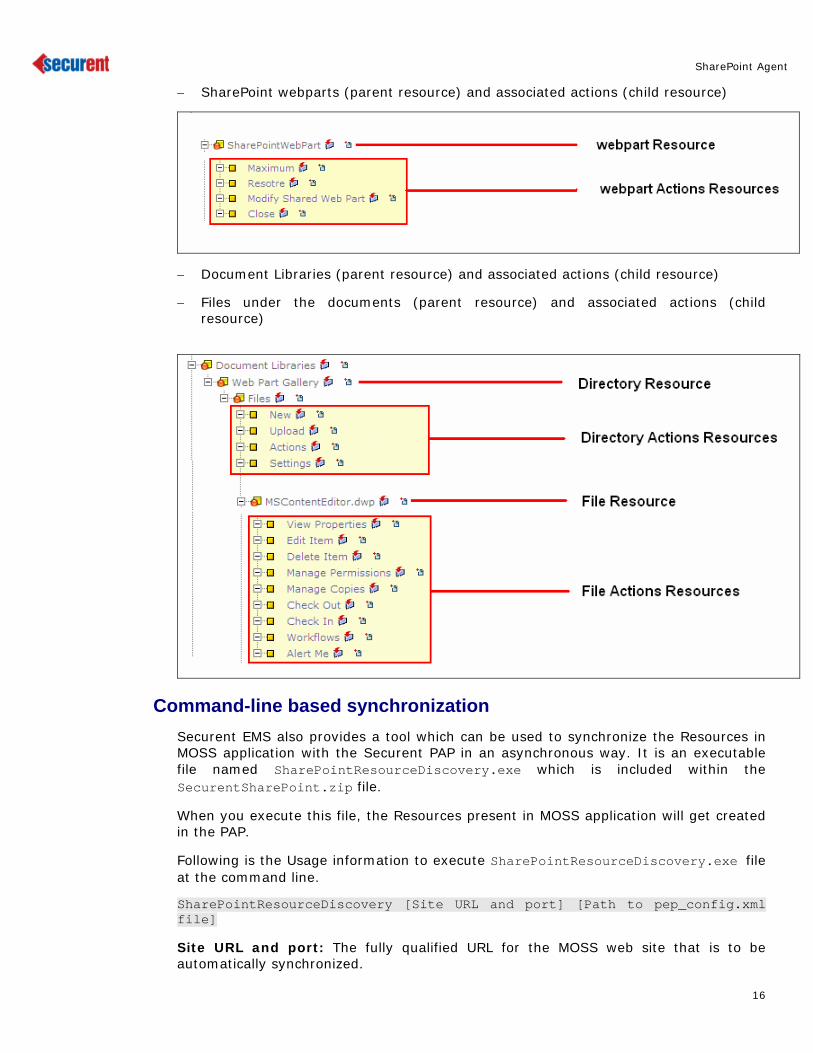
− SharePoint webparts (parent resource) and associated actions (child resource)
− Document Libraries (parent resource) and associated actions (child resource)
− Files under the documents (parent resource) and associated actions (child resource)
Command-line based synchronization Securent EMS also provides a tool which can be used to synchronize the Resources in MOSS application with the Securent PAP in an asynchronous way. It is an executable file named SharePointResourceDiscovery.exe which is included within the SecurentSharePoint.zip file.
When you execute this file, the Resources present in MOSS application will get created in the PAP.
Following is the Usage information to execute SharePointResourceDiscovery.exe file at the command line.
SharePointResourceDiscovery [Site URL and port] [Path to pep_config.xml file]
Site URL and port: The fully qualified URL for the MOSS web site that is to be automatically synchronized.
16

SharePoint Agent
Path to pep_config.xml file: The fully qualified path to the location of the pep_config.xml file.
Example:
SharePointResourceDiscovery http://www.myMOSSSite.com:8080 c:\Securent-v3.01\config\pep_config.xml
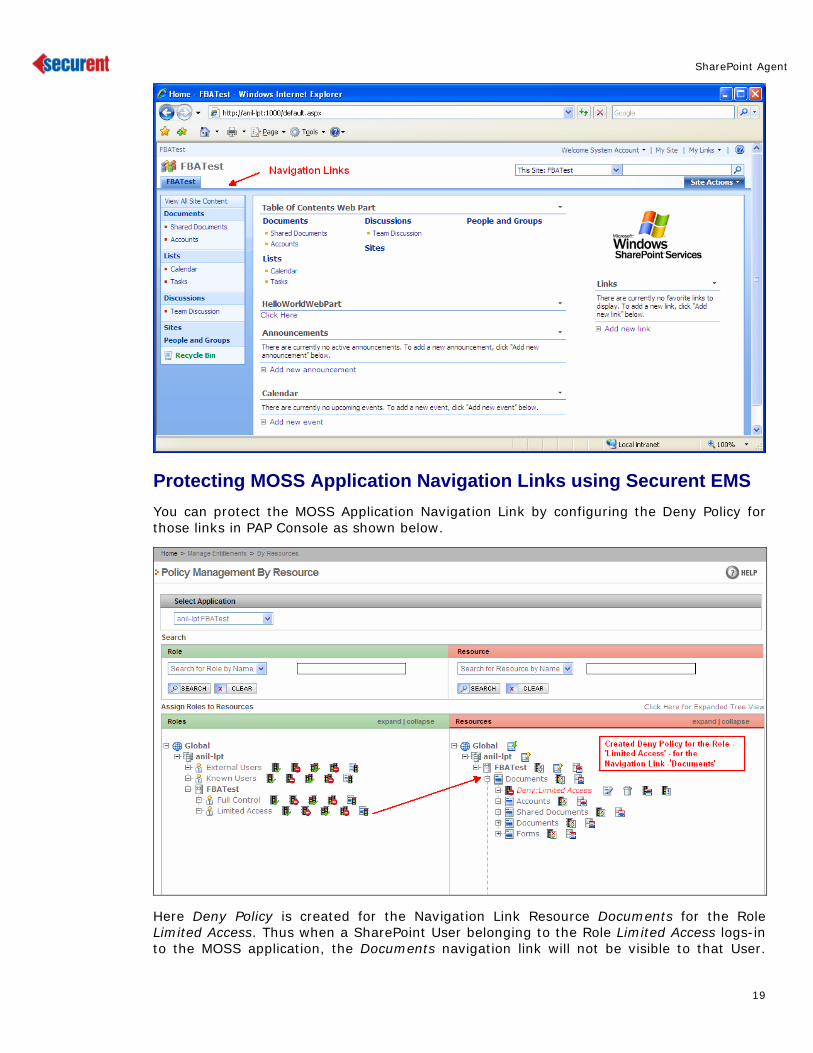
MOSS Application Web Pages MOSS application is a web application and hence consists of numerous web pages. Following screenshot shows the default web page.
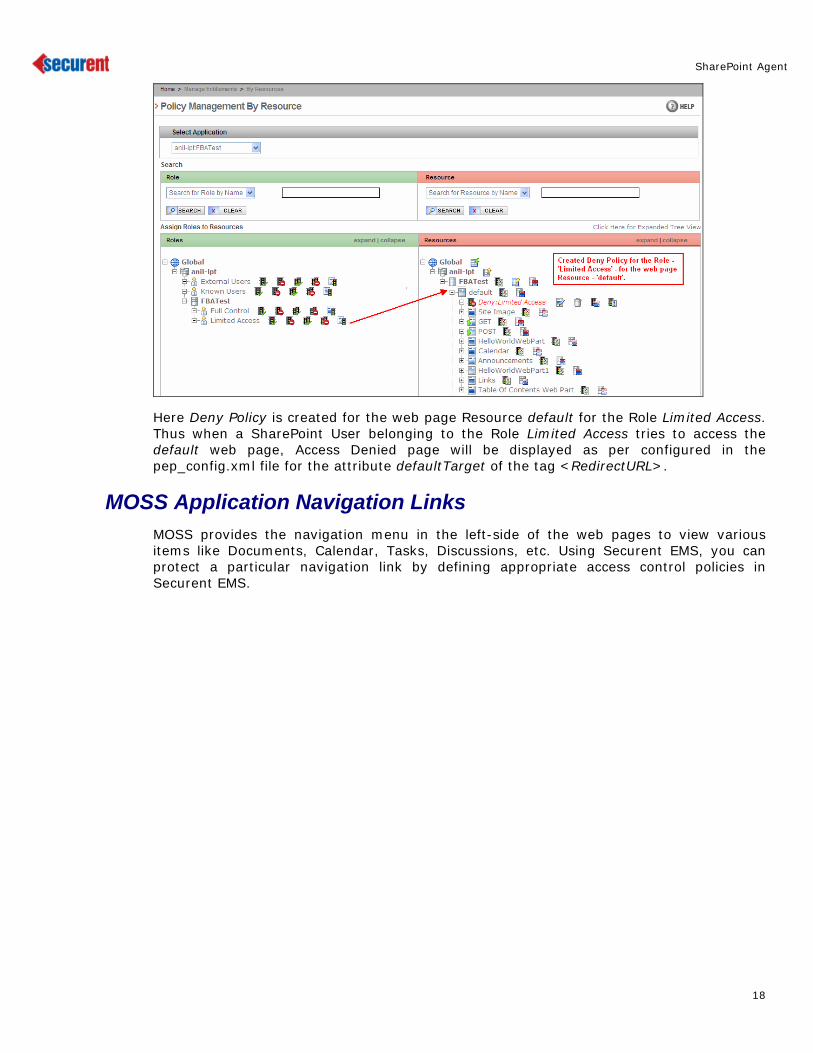
Protecting MOSS Application Web Pages using Securent EMS You can protect the SharePoint Web Pages by configuring the Deny Policy for those web pages in PAP Console as shown below.
17
SharePoint Agent
Here Deny Policy is created for the web page Resource default for the Role Limited Access. Thus when a SharePoint User belonging to the Role Limited Access tries to access the default web page, Access Denied page will be displayed as per configured in the pep_config.xml file for the attribute defaultTarget of the tag <RedirectURL>.
MOSS Application Navigation Links MOSS provides the navigation menu in the left-side of the web pages to view various items like Documents, Calendar, Tasks, Discussions, etc. Using Securent EMS, you can protect a particular navigation link by defining appropriate access control policies in Securent EMS.
18
SharePoint Agent
Protecting MOSS Application Navigation Links using Securent EMS You can protect the MOSS Application Navigation Link by configuring the Deny Policy for those links in PAP Console as shown below.
Here Deny Policy is created for the Navigation Link Resource Documents for the Role Limited Access. Thus when a SharePoint User belonging to the Role Limited Access logs-in to the MOSS application, the Documents navigation link will not be visible to that User.
19

SharePoint Agent
(Note: If it is the child navigation link, then the text for that link will be visible, but there won’t be a link to click on and navigate to that URL).
MOSS Application Webparts Every webpart of your MOSS application is called as a control. Following webparts can be accommodated within your MOSS application:
• Standard controls e.g. text boxes, check boxes, dropdowns etc.
• Documents
When you create a resource of type webpart, few default actions get created for it in the MOSS application. Some such actions are - minimize, maximize, close, etc.
Following screenshot displays a sample webpart with actions.
Securent PAP considers each webpart as a resource. These resources should be of type webpart. So in the PAP resource hierarchy, when you create a resource of type webpart, it will also create the default actions under that webpart as its child resources.
Using Securent’s entitlement management solution, you can protect these resources and actions by defining appropriate access control policies.
Protecting MOSS Application Webparts using Securent EMS You can protect the MOSS application Webpart by configuring the Deny Policy for the Webpart Resource in PAP Console as shown below.
20

SharePoint Agent
Here Deny Policy is created for the Webpart Resource Calendar for the Role Limited Access. Thus when a SharePoint User belonging to the Role Limited Access logs-in to the MOSS application, the Calendar webpart will not be visible to that User.
MOSS Application Documents When a document is created in a SharePoint application, then SharePoint provides the user with various actions for that document like - View/Edit Properties, Manage Permissions, Delete document, etc. (See the following screenshot).
21

SharePoint Agent
In Securent, when a resource of type document is created, then some default actions are also created for that resource in the form child rersources. This enables the user to formulate the access control policies on the SharePoint documents and its actions.
Protecting MOSS Application Documents and Items using SharePoint Agent After successful installation of the Securent SharePoint Agent, you may configure it to protect the required SharePoint Documents and Items.
Following are the configuration steps to protect Documents and Items in MOSS application using Securent SharePoint Agent.
1. Login to MOSS application. Home Page is displayed.
2. In the Home Page, select Site Settings link under the Site Actions menu.
3. Site Settings page is displayed. Click on the Securent Event Handlers link.
22
SharePoint Agent
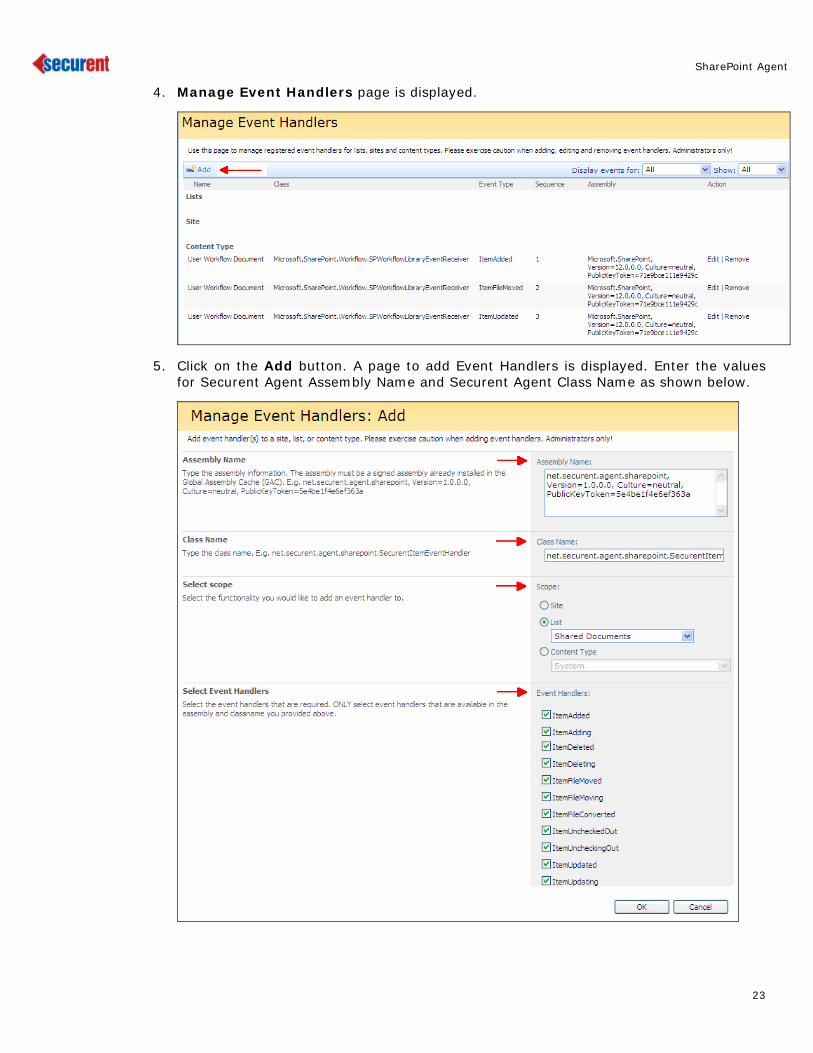
4. Manage Event Handlers page is displayed.
5. Click on the Add button. A page to add Event Handlers is displayed. Enter the values for Securent Agent Assembly Name and Securent Agent Class Name as shown below.
23

SharePoint Agent
Under the Scope section, select appropriate List or Content Type related to Documents and Items that you want to protect, and assign the needed Event Handlers to them (by selecting the appropriate Event Handler check boxes).
6. Click OK.
7. Now create the Deny Policies for the Document Resources in PAP as shown below.
Here Deny Policy is created for the Document Resource MOSS2007Agent.doc for the Role Limited Access. Thus when a SharePoint User belonging to the Role Limited Access logs-in to the MOSS application, the Document MOSS2007Agent.doc will be visible to that User, but when he tries to open it by clicking on it, Access Denied page will be displayed as per configured in the pep_config.xml file for the attribute defaultTarget of the tag <RedirectURL>.
Setting up policies from within MOSS You can set up user/group/role based policies from within the MOSS site only after proper synchronization between Securent PAP and MOSS application is done. Following steps must be taken to set a policy in the MOSS site:
1. Navigate Site Actions > Site Settings > Modify All Settings in the MOSS site. The Site Settings screen appears wherein you can find Securent Permissions in the Users and Permission column (as shown in the below screenshot)
24

SharePoint Agent
2. Clicking Securent Permissions will open Users List where all the users created within Securent PAP are displayed.
From this screen you can create User/Group/Role based entitlements by clicking the corresponding link within the Define Entitlement box located in the right navigation pane.
To create user based entitlement, click User based and the Users List will appear. Click the corresponding Edit Permissions link from the Action column to create the user based policies for that selected user. Likewise you can create group based and role based policies. Keeping into view the importance, this document explains creating the Role based Entitlement only.
3. Click Role Based from the Define Entitlement box. The List Roles page appears.
4. Click the corresponding ‘Edit Permissions’ link of the role for which you want to create policy. This opens the Role Based Entitlement screen.
25

SharePoint Agent
This screen contains three tables with the left one lists all the resources available under the selected application, the top right enlists all the allowed resources and the bottom right enlists all the denied resources.
By default the Resources table enlists resources of type WebPage. In order to view the resources of the other two available types (i.e. WebPart and DocumentLibraries), you can select the type from the Resource Type dropdown located top right of the screen (as marked in the above screenshot).
5. Select and move the appropriate resources to the Allow box using the icon which will create Allow Policies on these resources. Likewise you can create Deny policies on the selected resources by moving them to the Deny box.
To cancel the existing permissions, select the resources from the Allow or deny box and then click the icon to delete the policies.
6. After configuring the necessary policies click Save.
As Synchronization is put into action, you can also view the above created policies in the Securent PAP.
Troubleshooting Please refer to the following logs to troubleshoot the infrastructure:
• The Securent EMS Agent for MOSS 2007 writes out a log file based on its logging configuration (log4net). Please refer to the Securent Deployment Guide for further details on logging.
• MOSS errors and warnings are also written to the Windows Event Log.
26

SharePoint Agent
Appendix 1: Configuring Membership and Role provider
The process goes in the following sequence:
- Creating Web Applications
o Creating extranet IIS Web site
o Creating internet IIS Web site
- Configure Web Application to communicate with Form Authentication Data Store
o Configure web.config file of extranet site
o Configure web.config file of extranet site
- Configure SharePoint Central Administration
- Enable Form Authentication for Internet site
Creating Web Applications This section explains creating web application using Sharepoint Central Administration (one is extranet site which will be used by the content owners and configured to windows authentication and another site is internet site specifically for internet users and configured to form authentication).
Creating extranet IIS Web site Before creating new site, you need to create new web application. Below is the step by step information for creating new web application.
a) Click Start > All Programs > Microsoft Office Server > Central Administration.
b) In the Application Management tab, under Sharepoint Web Application Management section, click Create or extend Web application link.
c) In Create or Extend Web Application page, click Create a new Web Application link. Provide the information to create new web application and click OK button. Please see the image below.
27
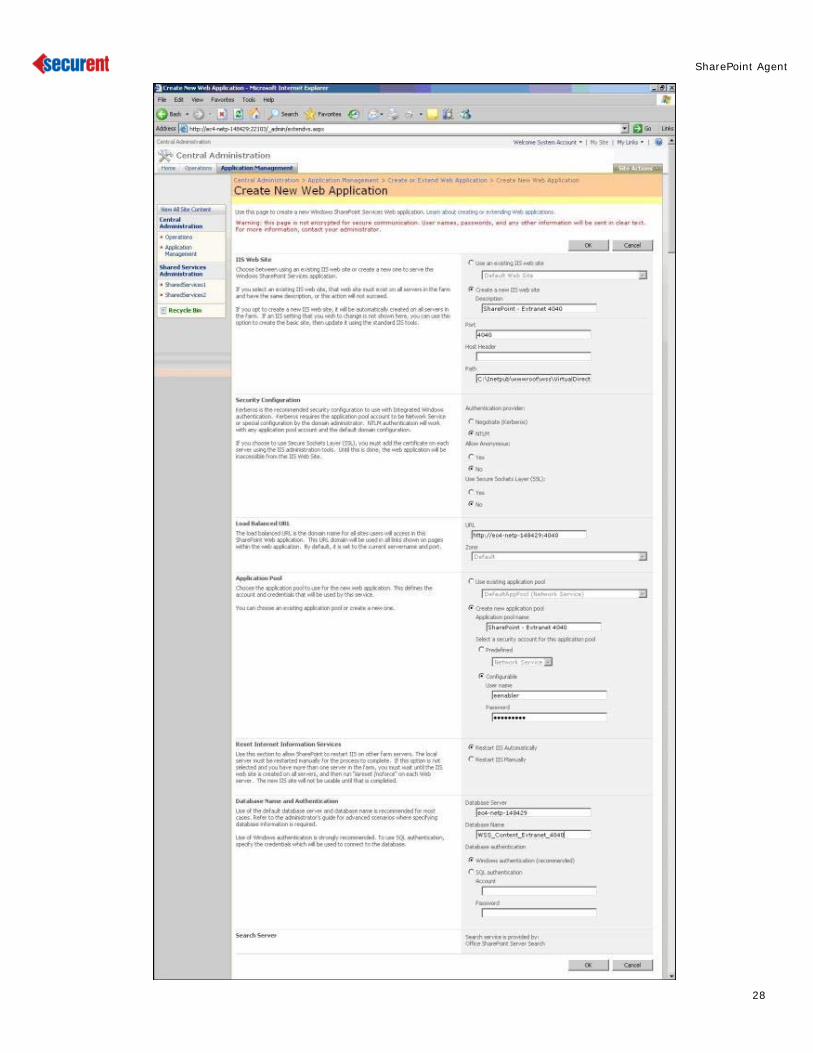
SharePoint Agent
28

SharePoint Agent
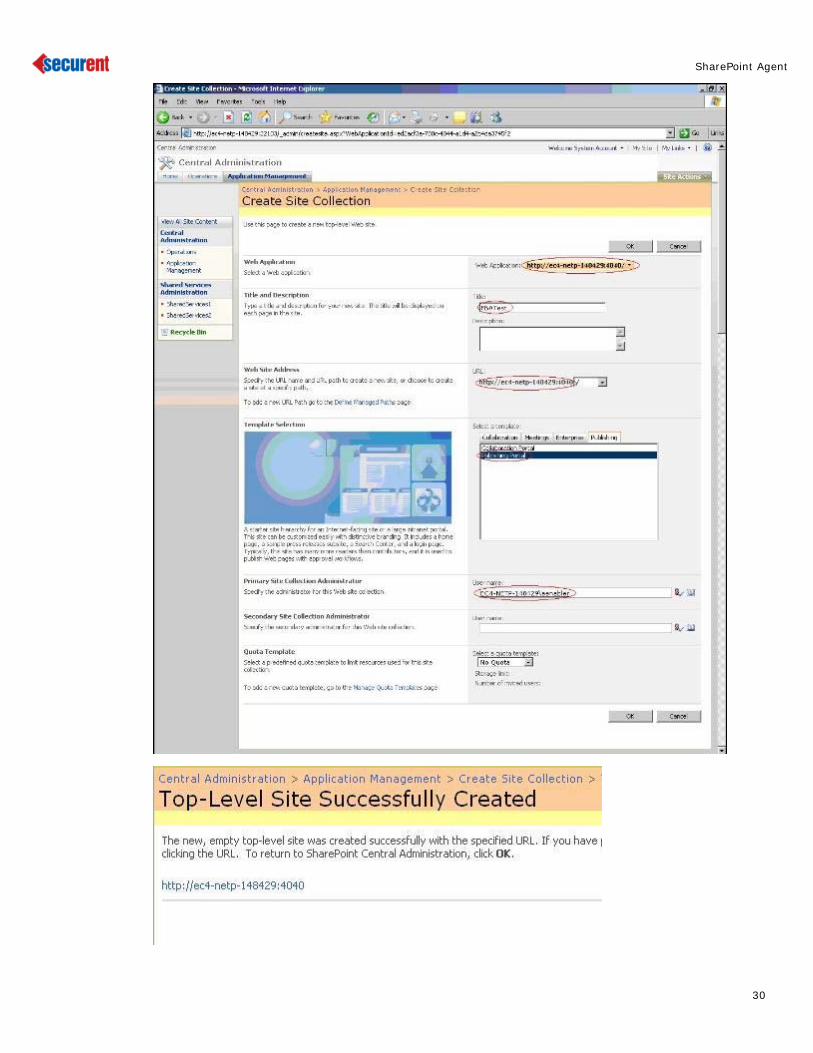
d) Create site under the above web application. To do this, in Application Management tab, under Sharepoint Site Management section, click Create site collection link.
e) In Create Site Collection page, select the web application which have been created in the previous step and provide other information to crate the site and click OK button. Please see the image below.
29
SharePoint Agent
30

SharePoint Agent
Creating internet IIS Web site This section explains extend our web application to another internet site.
a) Click Start > All Programs > Microsoft Office Server > Central Administration.
b) In the Application Management tab, under Sharepoint Web Application Management section, click Create or extend Web application link.
c) In Create or Extend Web Application page, click Extend an existing Web application link. Provide the information to extend the web application and click OK button (see the image below).
31
SharePoint Agent
After creating the extranet and internet site, open the browser and test both the site by typing the URL. But these two sites are asking about windows authentication because these sites are not yet configured to form authentication.
Below section explains configuration of web.config file of each site with providers information.
Configure Web Application to communicate with Form Authentication Data Store
Modifying the web.config file of two sites which resides in the root directory of the site i.e. c:\Inetpub\wwwroot\wss\Virtual Directories. Under this, two folders i.e. 4040 and 4041 are available. Web.config file of specific site is available inside these folders.
Configure web.config file of extranet site The web.config file of extranet site is available in c:\Inetpub\wwwroot\wss\VirtualDirectories\4040 folder.
a) Open web.config file, add the membership and role provider node just after opening the <system.web> tag: MembershipProvider <membership defaultProvider="SecurentMembershipProvider"> <providers> <add name="SecurentMembershipProvider" type="net.securent.agent.sharepoint.SecurentMembershipProvider, Net.Securent.Agent.SharePoint, Version=1.0.0.0, Culture=neutral, PublicKeyToken=5e4be1f4e6ef363a" connectionStringName="" enablePasswordRetrieval="false" enablePasswordReset="true" requiresQuestionAndAnswer="true" applicationName="/" requiresUniqueEmail="false" passwordFormat="Hashed" maxInvalidPasswordAttempts="5" minRequiredPasswordLength="7" minRequiredNonalphanumericCharacters="1" passwordAttemptWindow="10" passwordStrengthRegularExpression="" /> </providers> </membership> RoleProvider <roleManager defaultProvider="SecurentRoleProvider" enabled="true"> <providers> <add name="SecurentRoleProvider" connectionStringName="" applicationName="/" type="net.securent.agent.sharepoint.SecurentRoleProvider, Net.Securent.Agent.SharePoint, Version=1.0.0.0, Culture=neutral, PublicKeyToken=5e4be1f4e6ef363a" /> </providers> </roleManager>
32

SharePoint Agent
c) Save the web.config file. d) Copy the pep_config.xml and log4net.xml files into the same folder where web.config resides.
Configure web.config file of internet site The web.config file of internet site is available in c:\Inetpub\wwwroot\wss\VirtualDirectories\4041 folder. a) Open the web.config file and follow the same step specified in the previos section. b) Copy the pep_config.xml and log4net.xml files into the same folder where web.config resides.
Configure SharePoint Central Administration The web.config file of Central Administration site is available in c:\Inetpub\wwwroot\wss\VirtualDirectories\13035 folder. To find the virtual directory open IIS. Under Web Site folder, find Sharepoint Central Administration v3. Right click to open properties. In the Properties pop up, click Home Directory tab and find the Local Path. a) Open the web.config file and follow the same step specified in the previous section. b) In the Membership attribute, add the following content to the <providers> tag. <add name="SecurentMembershipProvider" type="net.securent.agent.sharepoint.SecurentMembershipProvider, Net.Securent.Agent.SharePoint, Version=1.0.0.0, Culture=neutral, PublicKeyToken=5e4be1f4e6ef363a" connectionStringName="" enablePasswordRetrieval="false" enablePasswordReset="true" requiresQuestionAndAnswer="true" applicationName="/" requiresUniqueEmail="false" passwordFormat="Hashed" maxInvalidPasswordAttempts="5" minRequiredPasswordLength="7" minRequiredNonalphanumericCharacters="1" passwordAttemptWindow="10" passwordStrengthRegularExpression="" />
c) In the RoleManager attribute, add the following content to the <providers> tag. <add name="SecurentRoleProvider" connectionStringName="" applicationName="/" type="net.securent.agent.sharepoint.SecurentRoleProvider, Net.Securent.Agent.SharePoint, Version=1.0.0.0, Culture=neutral, PublicKeyToken=5e4be1f4e6ef363a" />
d) Save the web.config file. e) Copy the pep_config.xml and log4net.xml files into the same folder where web.config resides.
33
SharePoint Agent
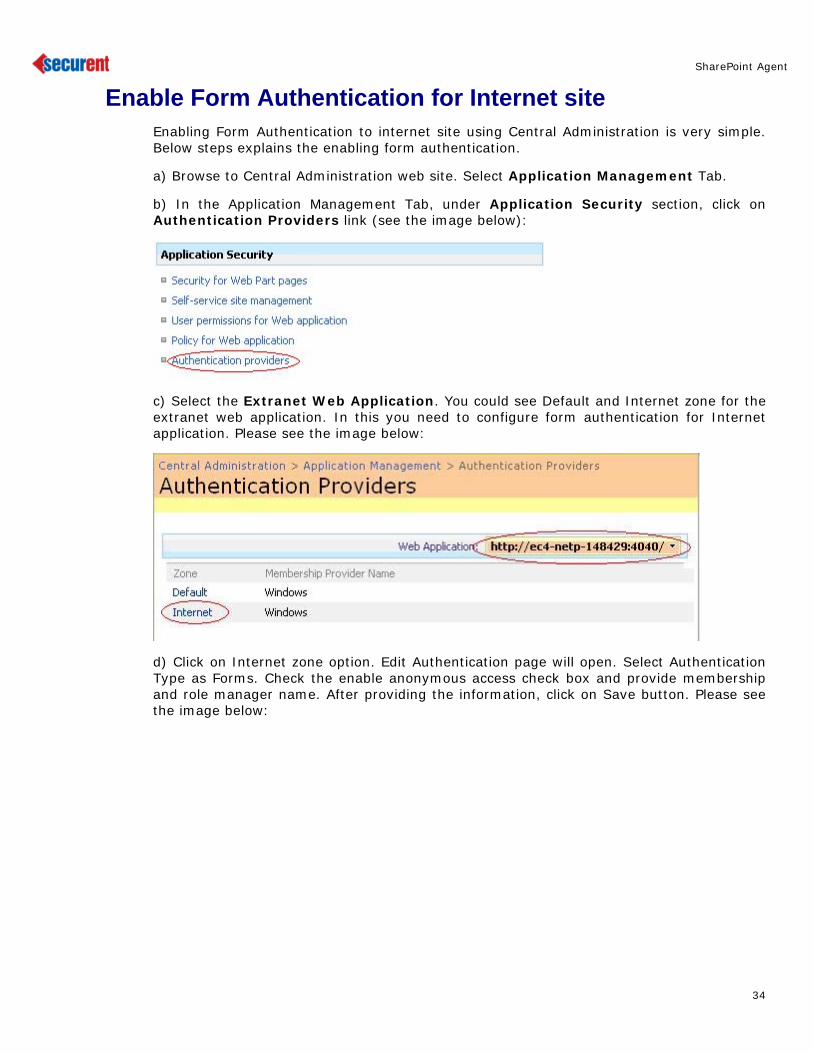
Enable Form Authentication for Internet site Enabling Form Authentication to internet site using Central Administration is very simple. Below steps explains the enabling form authentication.
a) Browse to Central Administration web site. Select Application Management Tab.
b) In the Application Management Tab, under Application Security section, click on Authentication Providers link (see the image below):
c) Select the Extranet Web Application. You could see Default and Internet zone for the extranet web application. In this you need to configure form authentication for Internet application. Please see the image below:
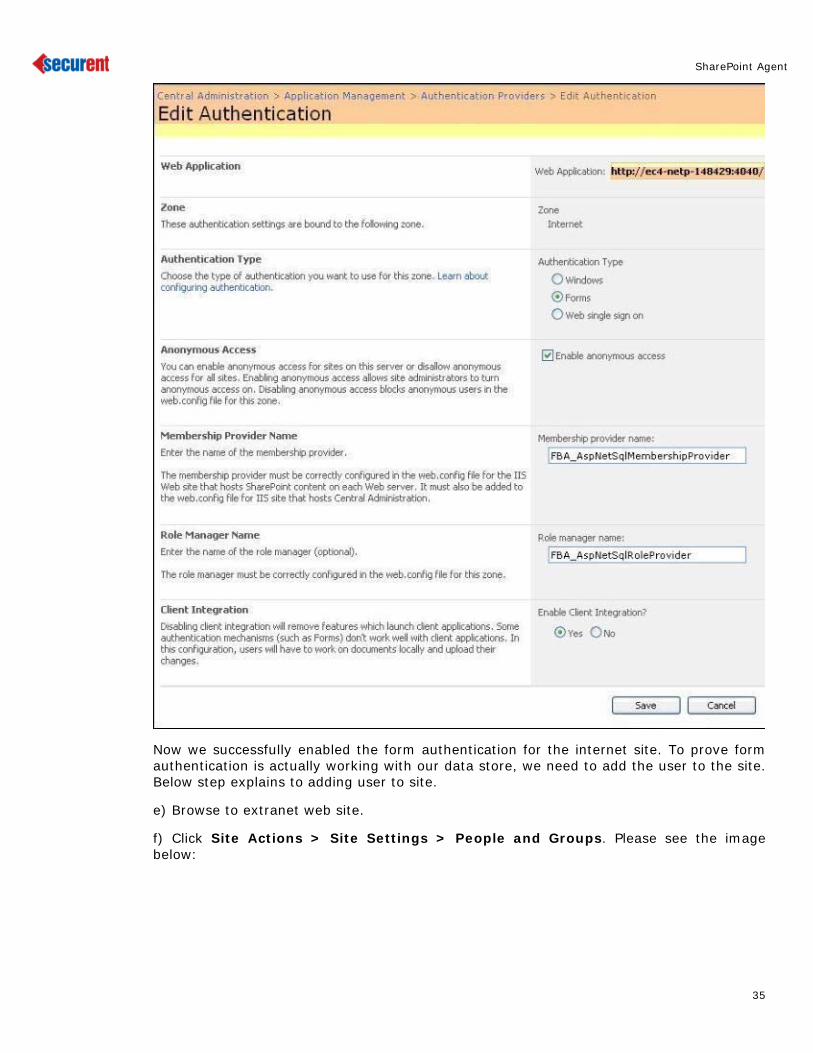
d) Click on Internet zone option. Edit Authentication page will open. Select Authentication Type as Forms. Check the enable anonymous access check box and provide membership and role manager name. After providing the information, click on Save button. Please see the image below:
34
SharePoint Agent
Now we successfully enabled the form authentication for the internet site. To prove form authentication is actually working with our data store, we need to add the user to the site. Below step explains to adding user to site.
e) Browse to extranet web site.
f) Click Site Actions > Site Settings > People and Groups. Please see the image below:
35
SharePoint Agent
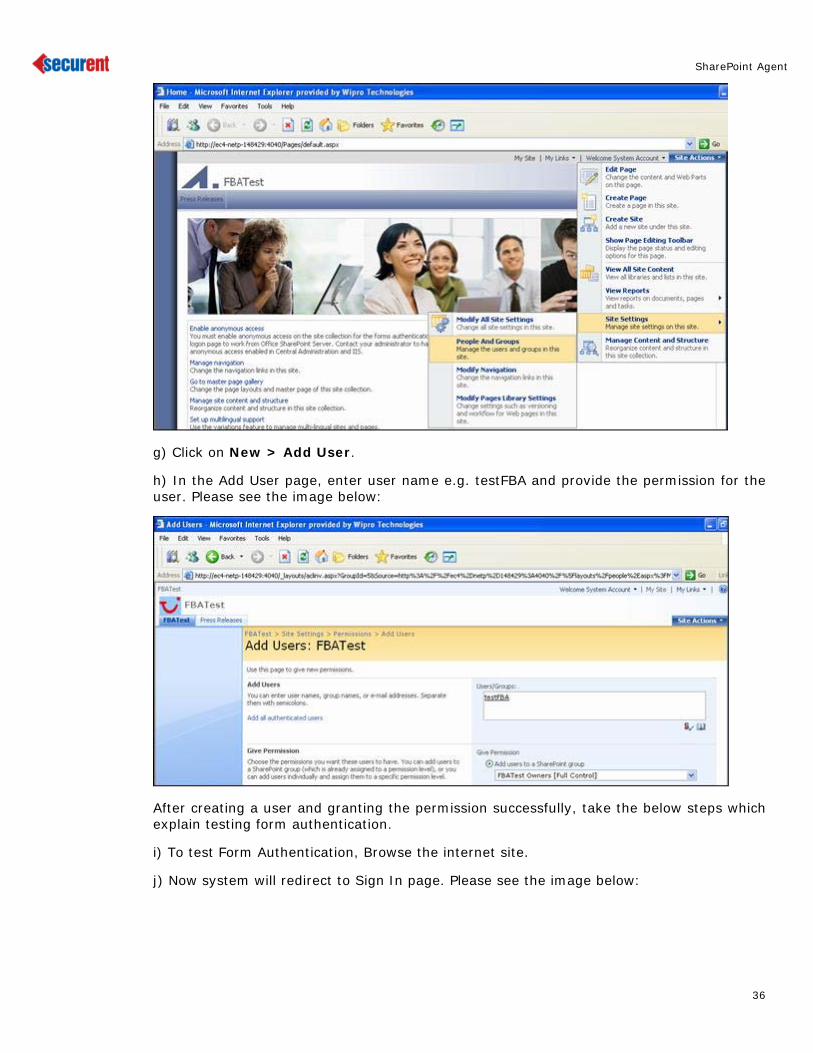
g) Click on New > Add User.
h) In the Add User page, enter user name e.g. testFBA and provide the permission for the user. Please see the image below:
After creating a user and granting the permission successfully, take the below steps which explain testing form authentication.
i) To test Form Authentication, Browse the internet site.
j) Now system will redirect to Sign In page. Please see the image below:
36

SharePoint Agent
k) Enter testFBA as user name and password as password and click on Sign In button. Please see the image below:
Now you are successfully logged in into internet site with form authentication.
37