seed production techniques for cereals and millets
TRANSCRIPT

Seed Production Techniques for
Cereals and Millets
The Revitalizing Rainfed Agriculture Network (RRAN) is a growing network
of civil society organizations, research institutions, policy makers, donors
and individuals engaged in evolving a differentiated agricultural policy with
enhanced public investments and support system for rainfed areas in India. The
Comprehensive Pilots (CPs) are part of the RRA Network’s action research
programme that seeks to establish evidence and experience on the ground, in
support of the various propositions that the Network has developed. In order
to offer support for CPs a set of organizations have been identified as Nodes on specific identified themes such as – seeds, soils, water, millets, fisheries, livestock, credit, markets and institutions.
The Centre for Indian Knowledge Systems (CIKS) has been identified and functioning as the nodal anchor for the theme of seeds. A series of booklets is
being published on various technical and institutional aspects of seed systems
to build the capacity of the CPs as well as various field groups who are involved in the efforts to build community managed seed systems.
This publication on seed production techniques for cereals and millets
describes the procedures and technologies involved in the production of
quality seeds of cereals and millets. Cereals and Millets are the major crops
in India. The technologies involved in the certified and foundation stages of seed production from seed selection to storage including the quality standards
for the seeds and appropriate storage methods are explained in detail in this
publication.
Centre for Indian Knowledge Systems, Chennai
www.ciks.org
Revitalising Rainfed Agriculture Network
www.rainfedindia.org

Seed Production Techniques
for Cereals and Millets
Authors
S. Mahalinga Kannan, R. Abarna Thooyavathy,
Ragul T Kasiyapa, K. Subramanian and K. Vijayalakshmi
Editorial Assistance
R. Abarna Thooyavathy
K. Parimala
Editor
K. Vijayalakshmi, CIKS
Centre for Indian Knowledge Systems, Chennai
Revitalising Rainfed Agriculture Network
December 2013

Title Seed Production Techniques for Cereals and
Millets
Authors S. Mahalinga Kannan, R. Abarna Thooyavathy,
Ragul T Kasiyapa, K. Subramanian and
K. Vijayalakshmi
Editorial Assistance R. Abarna Thooyavathy & K. Parimala
Editor K. Vijayalakshmi
Publication December 2013
Cover Photograph Centre for Indian Knowledge Systems
Cover Design & Typesetting S. Ramesh
Design Consultant Pavithra Sankaran
Published by Centre for Indian Knowledge Systems (CIKS)
Seed Node of the Revitalising Rainfed Agriculture
Network
Financial Support Revitalising Rainfed Agriculture Network
Copies can be had from Centre for Indian Knowledge Systems,
No.30,Gandhi Mandapam Road, Kotturpuram,
Chennai – 600 085
Ph: (044) 24471087, 24475862
Email: [email protected] /[email protected]
Website: www.ciks.org
The RRA Network, Secretariat
WASSAN, House No. 12-13-450
Street No. 1, Tarnaka
Secunderabad - 500 017, Andhra Pradesh.
Email : [email protected]
Website : www.rainfedindia.org
Printed by PM Digital Products
‘Konar Maligai’, 25, Peters Road
Chennai - 600 014.

PREFACE
The Revitalizing Rainfed Agriculture Network (RRAN) is a growing network of
civil society organizations, research institutions, policy makers, donors and individuals
engaged in evolving a differentiated agricultural policy with enhanced public
investments and support system for rainfed areas in India. Based on the vast experience
on the ground and analysis of issues, RRA Network is evolving specific propositions on various aspects of rainfed agriculture such as seeds, soils, water, crop systems,
millets, livestock, fisheries, credit, markets and institutions. The Comprehensive Pilots (CPs) are part of the RRA Network’s action research programme that seeks to establish
evidence and experience on the ground, in support of the various propositions that the
Network has developed. In order to offer support for CPs a set of organizations have
been identified as Nodes on specific identified themes such as – seeds, soils, water, millets, fisheries, livestock, credit, markets and institutions.
The Centre for Indian Knowledge Systems (CIKS) has been identified and functioning as the nodal anchor for the theme of seeds. The CPs started functioning in
the year 2012 and in June 2012 the seed node convened a meeting of representatives
of CPs for an inception workshop in Chennai. During this workshop the CPs shared
their proposals and plans of work as well as their thinking about the work that they plan
to undertake in the area of seeds. Presentations were made during the workshop on
how to undertake a situation analysis with respect to seeds, the elements of designing
a robust seed system for rainfed areas and also about undertaking a planning exercise
through which each CP can proceed towards the establishment of a robust community
managed seed system in its area of work. A part of the workshop was to identify the
specific needs expressed by each of the CPs in terms of the support and help they would need in the area of seeds. A beginning was made in terms of the capacity building
exercise through a series of presentations.
Beginning from the early part of the year 2012 Dr. G. Venkat Raman of the Seed
node had started making a series of visits to various CPs. During the visits he provided
help and assistance to the CPs for performing situation analysis, evolving a plan for a
robust seed system for the area undertaking capacity building exercises and also trying
to create linkages between the groups and scientists and institutions who could provide
technical support. During this process he also identified various needs in the form of topics on which training and capacity building was required.
Subsequently, on two different occasions when the seed node team met the
CPs – in Bagli in Madhya Pradesh in November 2012 and in Tiptur in Karnataka in
December 2012 there were opportunities to review the progress of each CP as well
as provide technical inputs and training. Earlier this year, towards the end of July
2013 a workshop was held by the seed node in the CIKS Technology Resource Centre
in the Kancheepuram district of Tamil Nadu. In this workshop a series of technical
trainings were provided on various aspects of seeds. The training was not only in the
form of lectures and presentations but also included field work, experiments, visits to government and private seed farms and seed production centres as well as meetings
with the officials of the Directorate of Agriculture and Seed Certification departments. During these meetings drafts of some of the technical training modules that were
prepared were circulated and comments and suggestions were sought from the CPs.
Based on these efforts and also building upon discussions that took place during the
visits to CPs a set of topics had been identified to produce training modules. We expect this process to be dynamic and interactive so that changes can be made based on the
suggestions received from the various user groups. A series of reports and books that
have been circulated and discussed as drafts and presentations are now being brought
out as publications.
A.V. Balasubramanian Centre for Indian Knowledge Systems
Coordinator RRA Seed Node Chennai, December 2013
About this Book
This publication on seed production techniques for cereals and millets describes
the procedures and technologies involved in the production of quality seeds of
cereals and millets. The technologies involved in the certified and foundation stages of seed production from seed selection to storage including the quality
standards for the seeds and appropriate storage methods are explained in detail in
this publication.

CONTENTS
Seed Production Techniques for Cereals 1
Paddy (Oryza sativa) 2
Wheat (Triticum aestivum) 6
Seed Production Techniques for Millets 8
Maize (Zea mays) 9
Sorghum (Sorghum bicolor) 11
Pearl Millet (Pennisetum glaucum) 13
Finger Millet (Eleusine coracana) 16
Kodo Millet (Paspalum scrobiculatum) 18
Foxtail Millet / Italian Millet (Setaria italica) 20
Proso Millet (Panicum miliaceum) 22
Little Millet (Panicum sumatrense) 24
Barnyard Millet (Echinochloa frumentacea) 26
References 28
Appendix I Pest and Disease Management in Cereals and Millets 29
Appendix II Preparation Procedures of Botanicals & Animal Products 33
Appendix III Common and Scientific Names of Plants 36
Appendix IV Common and Scientific Names of Insects 38
Appendix V Glossary of Technical Terms 39


1
SEED PRODUCTION TECHNIQUES FOR CEREALS
The land under cereal production in India
was last reported as 9,26,10,000 hectares
in 2010 according to a World Bank report
published in 2012. Cereals have throughout
history been unquestionably the most important
sources of plant food for humans and livestock.
The development of all the major cereals occurred
long before the recorded history for all the oldest
civilizations.
All cereals are members of the grass family,
Gramineae. Wheat, Rye, Rice, Oats and maize
are some of the important cereals in the world
today. Cereals are important because one or more
of them are available in each of the different world
climates. They also have a wide range of soil and
moisture requirements. They can be cultivated
with minimum effort and can give a high yield.
The grains are relatively easy to handle and store
because of their low water content. The food
value of cereals is very high and they contain a
high percentage of carbohydrates than any other
food.
It is becoming very important to increase the
yields of cereals to feed the growing population.
Good quality cereal seeds play a very important
role in increasing yields. This section deals with
the seed production techniques for two important
cereals namely paddy and wheat.

2
PADDY (Oryza sativa)
Paddy (Oryza sativa) is a well known cereal
belonging to the family Gramineae. It is
the second important cereal next to wheat
in Asia. It is a staple food for more than 60%
of the population. Paddy seed production can
be taken up in all the seasons like December -
January, April - May, May - June, June - July,
July – August and September – October.
Method of seed production
Paddy is a self-pollinated crop with cross-
pollination to the extent of 0 – 4%. The crop
should be raised in isolation and seeds are allowed
to set by open-pollination. To maintain the
varietal purity an isolation distance of 3 metres is
maintained in both certified and foundation stage of seed production. If isolation by space is not
possible then the time isolation of 21 days can
be given. Barrier isolation with polythene sheets
of 2 metres height or barrier crops like sesbania,
sugarcane and maize covering a distance of
3 metres would also serve the purpose.
Seed production stages
Breeder seed è Foundation seed è Certified seed
Land selection
The land selected should not be cultivated with
the same crop in the previous season. This
standard requirement is applicable for both
nursery and main field. Land should be free of volunteer plants. Land should be fertile with good irrigation and drainage facilities and with
good sunlight and aeration.
Seed selection and sowing
Seeds used for the seed production should be of
good quality certified seeds from an authentic source. Seeds should be healthy with good
germination percentage. Seed rate is 60 kg/acre
(150 kg/ha). Quality seeds can be separated from
unviable seeds by soaking in water. The unviable
and damaged seeds that float on the water surface
should be removed and the good quality seeds
that sink should be used for cultivation. If there
is excess of chaffy seeds in the selected seed lot,
take some water in a vessel and drop an egg in it
and keep adding salt till the egg reaches surface.
Then add seeds to the water and remove the
chaffy unviable seeds that float on the surface of the water. Then wash the selected seeds in good
water for 2 - 3 times to remove the salt completely.
Otherwise it will interfere with germination.
Selected seeds should be treated in order to
improve the germination potential, vigour and
resistance to pest and diseases.
Selected seeds should be treated with cow • dung and cow’s urine solution (0.5 kg
fresh cow dung + 2 litres of cow’s urine +
5 litres of water). Soak the seeds in water for
10 - 12 hours and then in the cow dung
solution for 5 – 6 hours. Shade dry the seeds
before sowing.
Selected seeds should be tied in small cloth • bags and soaked in cow’s urine solution
(500 ml cow’s urine in 2.5 litres of water) for
30 minutes and shade dried before sowing.
Soak the seeds required for 1 hectare in sweet • flag extract (1.25 kg of sweet flag rhizome powder in 6 litres of water) for 30 minutes
and shade dry before sowing.
Biofertilizers like • Azospirillum / Azotobacter
/ Pseudomonas @ 10 gms / kg of seeds mixed
with 20 ml cooled rice gruel can be used. Mix
this with the sprouted paddy seeds. Shade dry
the seeds for 30 minutes before sowing.
Nursery preparation
To raise seedlings for one hectare of land 800 m2
of nursery bed is required. The nursery bed should
be ploughed for four times and then spread with
neem leaves. Neem leaves should be allowed to
decay in the water for 6 – 7 days. After that the
land should again be ploughed for four times
and leveled. Neem leaves can be substituted

3
with neem cake (8 - 10 kg) or vermicompost
(10 – 15 kg). It has to be added and incorporated
into the soil during the last plough. Then seeds
are sown on a leveled nursery bed. Leaves of Adhatoda vasica can be incorporated into the soil
while preparing the nursery. This will increase
the soil fertility, act as an insecticide and render
the easy uprooting of the seedlings.
Nursery level pest and disease management
Seedlings in the nursery are generally attacked
by green leaf hopper, green horned caterpillar
and diseases like brown leaf spot and blast.
These attacks can be prevented at the appearance
of the first symptom by spraying 10% cow’s urine solution in two doses at 7 days interval.
This should be immediately followed by pest
management techniques.
Before plucking the seedlings the nursery
should be irrigated and applied with
15 – 20 kgs of gypsum to prevent damage to the
rootlets. Biofertiliser Azospirillum @ 1 kg/acre
(2.5 kg/ha) is mixed with 25 kg of farmyard
manure and applied to the nursery 30 minutes
before plucking. The seedlings are kept
submerged in the nursery for 30 minutes and then
transplanted.
Preparation of main field
The main field should be ploughed and irrigated many times and the bunds are plastered to
prevent water leakage. Groundnut or neem cake
@ 6 quintals/acre (15 quintals/ha) should be
applied as basal manure during final plough. Then the field should be leveled before transplanting. At the time of final ploughing dried cow dung and ash mixture can be spread uniformly to facilitate
aeration and to activate microbes in the soil.
Seedling treatment and transplantation
Before transplanting the seedlings are treated
against pest and disease attack.
Treat seedlings with ash and neem seed • mixture. Paddy seedling bundles should be
kept in small plots of standing water mixed
with ash and neem seed powder mixture
(1 kg ash and 500 gms of neem seed powder
for 50 bundles of seedlings) for 30 minutes to
an hour. Seedlings treated with this mixture
produce a crop free from pests and diseases.
Soak the seedlings in groundnut cake and • neem cake solution before transplanting to
make the seedlings less vulnerable to pest
attack.
Paddy seedlings can also be dipped in a • solution of Amirthakaraisal (Amrutpani) /
Panchagavyam / Jeevamrut.
The optimum age of seedlings for transplanting is
18 – 22 days for short, 25 – 30 days for medium
and 35 – 40 days for long duration varieties.
2-3 seedlings per hill are transplanted at a depth
of 3 cm. The spacing between the seedlings will
vary according to the variety cultivated (Short
duration – 15 x 10 cm, Medium duration –
20 x 10 cm and Long duration – 20 x 15 cm). Before transplanting clip off the tips of the
seedlings to facilitate uniform growth.
Nutrient management
During final ploughing cow dung 5 – 6 tonnes/acre (12 – 15 tonnes/ha) / goat dung 5 tonnes/
acre (12.5 tonnes/ha) / poultry waste 2 tonnes/
acre (5 tonnes/ha) / pig dung 1 tonne/acre
(2.5 tonnes/ha) can be applied and incorporated
into the soil. To meet the nitrogen need

4
biofertilizers like Azospirillum / Azotobacter /
Phosphobacteria are also used.
Growth regulators like Panchagavyam @ 3%
can be applied at the tillering and bootling stages
for coarse varieties and at the bootling stage
alone for fine varieties. Amithakaraisal @ 500
litres/acre (1250 litres/ha) should be mixed with
irrigation water.
Green manure crops like sunhemp, daincha,
Indian indigo etc., should be raised in the main
field and incorporated into the soil 45 – 50 days after sowing. The plants should be allowed to
decay in the water for ten days and then ploughed.
The decomposed plants convert the unavailable
forms of calcium, phosphorus and micronutrients
present in the soil into an easily available form.
Application and ploughing of green leaves into
the soil will also increase the nitrogen content of
the soil. Leaves of Neem, Pongamia, Gliricidia
etc., are used as green leaf manure.
Oil seed cakes like neem cake and groundnut cake
can also be applied to meet the nitrogen needs of
the crop. In paddy neem cake is applied as basal
manure @ 60 kg/acre (150 kg/ha) and as top
dressing @ 25 kg/acre (60 kg/ha) or groundnut
cake is applied as basal manure @ 40 kg/acre
(100 kg/ha) and as top dressing @ 10 kg/acre
(25 kg/ha).
Weed management
Weeding should be done manually and the weeds
removed should be trampled into the field for the conservation of nutrients and for organic
matter as mulch. The first weeding should be done at 15 – 20 days after transplanting. After
weeding 50 kg of neem cake should be applied
to the field. Weeding should be done as and when it is required. Weeds can be controlled by the
following methods,
Weeds can be controlled by flooding the field • to a height of 5 – 8 cm at an early vegetative
stage.
Calotropis • (Calotropis gigantea) can be used
as green manure to control the weeds.
During land preparation leaves and twigs of • poison nut (Strychnos nux-vomica) can be
added and incorporated into the soil. This
will suppress the weed growth.
Irrigation
Water is stagnated in the field at a depth of 2 – 5 cm till the transplanted seedlings are well
established. Then 5 cm of water is maintained
upto the dough grain stage of the crop (the stage
when the milky portion of the grain turns into soft
dough). Flooding is not necessary if the field is saturated with rains. In this case irrigation should
be done during initial seedling period covering
about 10 days, during tillering to flowering, a critical stage and panicle initiation stage to
flowering (heading).
Pest and disease management
Paddy is commonly affected by pests and
diseases like leaf eating caterpillars, leaf folders,
case worm, green leaf hopper, yellow stem borer,
blast, brown leaf spot, sheath blight, stem rot,
bacterial leaf blight, tungro virus etc., at different
growth stages. The management techniques
for these pests and diseases are provided in
Appendix – I.

5
Roguing
Roguing should be done from vegetative phase
to harvesting phase. The seed production field should be checked and off-types and diseased
plants should be removed. Major roguing is
done before flowering stage to assure the genetic purity of the seeds. Off-types are identified by plant type, plant height, days taken for flowering, leaf colour, flag leaf shape, panicle shape and colour of glumes etc. Maximum percentage of
off-types permitted at the final inspection is 0.050% for foundation seed production and
0.20% for certified seed production.
Field inspection
A minimum of two field inspections should be done from flowering to harvesting stage by the Seed Certification Officer. During inspection parameters such as isolation requirement, off-
types, volunteer plants, diseased plants etc., are
checked.
Harvesting
Harvest is done soon after the maturation of
the seeds that turns from green to straw yellow
colour. Earheads should be harvested when the
seeds have attained their maximum physiological
maturity i.e., 90% of the seeds are straw yellow
in colour. Irrigation to the seed plot should be
withheld at this point as it delays the drying of
the plants/seeds. Plants should be harvested with
their panicles intact.
Threshing and processing
Harvested plants should be stacked on a clean floor of the threshing yard free from other varieties.
Harvested plants with a moisture content of
15 – 18% should be threshed by hand beating or
by using machineries in bulk quantities. This level
of moisture content is safe for threshing without
any mechanical injury to the seeds. Threshed
grains are winnowed and cleaned. Cleaned seeds
are dried to attain a safe moisture content of
10 – 13% and graded using the preferable size of
sieve to remove chaffy, ill filled, under and over sized seeds.
Drying and storage
The cleaned and graded seeds are dried to attain
10 - 13% of moisture content. Normally paddy
seeds can be stored for 1 – 2 years under ambient
storage conditions without loosing much of
germination potential. Seeds can be stored for
more than 3 years in moisture vapour proof
containers with an initial moisture below 8%.
Seed standards
The percentage of minimum physical purity of
certified and foundation seeds should be 98% with a minimum of 80% of germination capacity
and 8 - 13% of moisture content. The presence
of inert and huskless seeds should not exceed
2.0% and other crop seeds, other distinguishable
varieties and weed seeds should not be more
than 10 Nos/kg for foundation and 20 Nos/kg for
certified seeds.

6
Wheat (Triticum aestivum) is one of the
important food grain crops of India
belonging to the family Gramineae.
Wheat is a primary important cereal in Asia.
Seed production can be taken up during October
– February in rainfed areas and in mid November
– March / April in irrigated areas.
Method of seed production
Wheat is a self-pollinated crop with cross-
pollination to the extent of 0 – 4%. The crop
should be raised in isolation and seeds are allowed
to set by open-pollination. To maintain the
varietal purity an isolation distance of 3 metres
is maintained in both certified and foundation stages of seed production.
Seed production stages
Breeder seed è Foundation seed è Certified seed
Land selection
The land selected should not be cultivated with
the same crop in the previous season. Land should be free of volunteer plants. Land should be fertile with good irrigation and drainage facilities and
with neutral pH.
Seed selection and sowing
Seeds used for seed production should be of good
quality certified seeds from an authentic source. Seeds should be healthy, uniform in size and free
from the insect or disease attack and with good
germination percentage. Seed rate is 35 – 40 kg/
acre (85 - 100 kg/ha).
Selected seeds should be treated in order to improve
the germination potential, vigour and resistance
to pest and diseases. Seeds are treated with a
mixture of beejamrut (150 ml) and Trichoderma
viride (8 gms) for one kilogram of seeds and dried
in shade. Again treat the seeds with a mixture of
Azotobacter and PSB (Phosphate Solubilizing
Biofertilizers) biofertilizer like Pseudomonas /
Bacillus / Aspergillus @ 20 gms of each for one
WHEAT (Triticum aestivum)
kilogram of seeds. Shade dry the seeds and sow
within 6 - 8 hours of treatment.
Treated seeds should be sown in the well
ploughed, softened wet soil at a depth of
5 – 7.5 cm by drilling method or behind the
plough. Spacing between the rows should be
22.5 cm
Nutrient management
During final ploughing farmyard manure @ 5 – 6 tonnes/acre (12 – 15 tonnes/ha) should
be applied and incorporated into the soil. Mix
800 gms/acre (2 kg/ha) of Pseudomonas or
Aspergillus with farmyard manure or compost
@ 325 – 400 kgs/acre (800 – 1000 kg/ha) or
vermicompost @ 200 – 400 kg/acre (500 – 1000
kg/ha) and apply to the soil before sowing.
Apply neem cake / pongam cake / castor cake
/ groundnut cake @ 60 – 80 kg/acre (150 – 200
kg/ha) for increased production. Apply Jeevamrut
@ 200 litres/acre (500 litres/ha) along with
irrigation water during first four irrigations for good crop growth.
Weed management
Weeding is important during early stages of
cultivation. Manual weeding is most preferred
under organic management. For rainfed crops
two manual weeding is enough. For irrigated
crops, a minimum of three weeding during
20 - 25 days, 40 – 45 days and 60 – 65 days after
sowing is essential.
Irrigation
First irrigation is done before sowing since the
seeds should be sown in irrigated wet soil. Crop
should be irrigated at 10 - 20 days interval.
Irrigation during tillering to flowering and panicle initiation stage to heading are very critical. This
determines the quality of the seeds.
Pest and disease management
Wheat is commonly affected by pests and
diseases like termites, army worms, brown wheat

7
mite, aphids, jassids, rust, smut, kernel bunt etc.,
at different growth stages. The management
measures for these pests and diseases are provided
in Appendix – I.
Roguing
Roguing should be done from vegetative phase
to harvesting phase. The seed production field should be checked for off-types and diseased
plants and rogued off. Major roguing is done
before flowering stage to assure the genetic purity of the seeds. Off-types are identified by plant type, plant height, days for flowering, leaf colour, panicle shape and colour of glumes etc.
Maximum percentage of off-types permitted at
the final inspection is 0.050% for foundation seed production and 0.20% for certified seed production.
Field inspection
A minimum of two field inspections should be done between flowering and harvesting stages by the Seed Certification Officer. During inspection parameters such as isolation requirement, off-
types, volunteer plants, diseased plants etc., are
checked.
Harvesting
Harvest is done soon after the maturation of the
seeds that turns from green to straw yellow in
colour. Earheads should be harvested when the
seeds attain maximum physiological maturity.
Irrigation to the seed plot should be withheld
at this point to facilitate the drying of the crop/
seeds. Crop should be harvested with their
panicles intact.
Threshing and processing
Harvested plants should be stacked on a clean
floor of the threshing yard free from other varieties. Harvested plants with a moisture content
of 15% should be threshed by hand beating or
threshers. This level of moisture content is safe
for threshing without any mechanical injury to
the seeds. Threshed grains are winnowed and
cleaned. Cleaned seeds are dried to attain a safe
moisture content of 12 – 13 % and graded using
a suitable sieve to remove chaffy, under and over
sized seeds.
Drying and storage
The cleaned and graded seeds are dried to attain
12 - 13% of moisture content. Normally the
seeds can be stored for one year under ambient
storage conditions without losing much of the
germination potential.
Seed standards
The percentage of minimum physical purity
of the certified and foundation seeds should be 98% with a minimum of 80% of germination
capacity and 8 - 13% of moisture content. The
presence of inert and huskless seeds should not
exceed 2.0%.

8
SEED PRODUCTION TECHNIQUES FOR MILLETS
Millets are small seeded annuals
belonging to the family Poaceae. They
were the first crops to be cultivated prior to plough age. Millets are classified as major and minor based on the size of seeds and
the extent of cultivation. Realizing the excellent
nutritional composition of these grains they are
now called as nutritious grains or nutri cereals.
Millets as a group figure prominently among the rainfed crops. India is the one of the major
producers of millets in the World. They are
often grown in diverse soils, climates and harsh
environments. They have been important food
and feed crops producing more reliable harvest
than many other crops. The annual planting
area under all millets in India put together is
23 – 24 million hectares producing around
20 – 22 million tonnes. However, there has been
a gradual reduction in the cultivated area of
millets in the last five decades and also reduction in yields because of the attention that is given to
these crops.
Millets are often cultivated in diverse soils,
climates and harsh environments. The cultivation
is also done with minimum inputs. By making
minimum interventions it is possible to increase
the yields substantially. One of the important
interventions in millet cultivation is to provide
good quality seeds. This section of the book
provides seed production techniques for nine
millet crops.

9
MAIZE (Zea mays)
Maize (Zea mays) is one of the well
known major millet belonging to the
family Gramineae. The best season for
seed production is November – December. Seed
setting should not coincide with rains for quality
and effective seed setting. The temperature of
37oc is favourable for seed setting.
Method of seed production
Maize is a highly cross-pollinated crop. Seeds are
allowed to set by open pollination in isolation.
The isolation distance maintained between the
varieties is 200 metres for certified and 400 metres for foundation seed production. The spacing
between the plants should be 45 x 10 cm.
Seed production stages
Breeder seed è Foundation seed è Certified seed
Land selection
The selected land should be free from volunteer
plants. The land should not be cultivated with
same crop in the previous season. Land should be fertile with good drainage facility.
Seed selection and sowing
Good quality certified seeds should be obtained from an authentic source. Seeds should be healthy
with good germination percentage. Seed rate is
4 kg/acre (10 kg/ha). Selected seeds should be
treated with Azospirillum @ 60 gms/kg of seeds.
The seeds are sown in ridges and furrows at a
depth of 4 cm as one seed per hole along the sides
of the ridges. The spacing between the plants
should be 45 x 10 cm.
Nutrient management
Before final ploughing compost or farmyard manure @ 5 tonnes/acre (12.5 tonnes/ha) should
be applied and ploughed into the soil. Instead of
this cattle penning can also be practiced. 50 kg
neem cake and 500 kg vermicompost per acre
(125 kg neem cake and 1250 kg vermicompost
per hectare) should be applied as basal manure.
After first weeding at 20 – 25 days after sowing first top dressing should be done using enriched vermicompost (2 kg Azospirillum,
2 kg Phosphobacterium and 2 litres Panchagavya
mixed with 250 kg vermicompost and kept
covered for a week and then used) @ 250 kg/
acre (600 kg/ha) followed by the second top
dressing at 40 – 45 days after sowing using
25 kg neem cake and 250 kg vermicompost per
acre (60 kg neem cake and 600 kg vermicompost
per hectare). During flower initiation stage 10% tender coconut solution (1 litre tender coconut
water + 9 litres of water) should be sprayed.
For rainfed crop, 50 kg pungam cake and 250 kg
vermicompost should be applied as basal manure
just before sowing. First top dressing should
be done at 20 – 25 days after sowing using
250 kg/acre of enriched vermicompost. At 40 – 45
days after sowing apply 25 kg pungam cake and
250 kg vermicompost per acre (60 kg pungam
cake and 600 kg vermicompost per hectare) as
second top dressing. Spray 10% tender coconut
water at the time of flower initiation. All the above mentioned inputs should be applied to the
rainfed crop only when the soil is wet.
Weed management
Hoeing and hand weeding should be done on the
17th or 18th day after sowing.

10
Irrigation
The irrigation should be done once a week
after life irrigation on the third day of sowing.
Irrigation during silk formation stage and milky
stage of cob are very critical.
Pest and disease management
Maize is affected by pests like stem borer, aphids,
corn worm and diseases like leaf spot, charcoal
stalk rot and stem blight at different growth
stages. Detailed management measures for these
pests and diseases are provided in Appendix – I.
Roguing
Roguing should be done to remove the unwanted
plants, off-types and diseased plants from the
seed production field. Roguing is done based on the leaf waveriness, tassel colour, cob
shape, stem and silk colour, number of leaves,
presence and absence of auricle etc. To avoid
genetic contamination detasselling should
be done perfectly without shedding tassel.
Detasselling should be done when the tassel is
well out of the boot leaf but before the anthers
shed their pollen. It should be done daily upto
14 days from anthesis. Maximum percentage of
off-types permitted at the final inspection is 0.01% for foundation seed production and 0.05%
for certified seed production.
Field inspection
In maize a minimum of four field inspections should be conducted between vegetative and
harvesting stages by the Seed Certification Officer. First inspection is done during the vegetative stage before flowering to check the parameters like isolation requirement, off-types,
volunteer plants and diseased plants. Second to
fourth inspection is scheduled between flowering to maturation stage to check off-types, isolation
distance and other relevant factors.
Harvesting
Seeds attain physiological maturation 45 days
after flowering. The physiological maturation can be visually identified by darkening of the silk and the drying up of the husk to yellow. The cobs
of the male plant should be harvested first and removed from the field before the harvesting of the female cobs.
Threshing and processing
Harvested cobs are threshed by removing the
husk either manually or mechanically using
maize dehusker. The dehusked cobs are sorted
out carefully to protect the genetic purity of
the seeds. The sorting is based on the number
of rows, kernel colour and size, pith colour and
arrangement of seeds in the cob. The sorted cobs
are dried further to attain a safe moisture level of
15 – 18%. At this stage the kernels are removed
from the cob by manually or mechanically using
maize sheller. Care should be taken to avoid
mechanical injury to the kernels. Separated
kernels are graded using round perforated metal
sieve of 18/64” size as middle sieve in OSAW
cleaner cum grader.
Drying and storage
The shelled and graded seeds are dried to attain
12% of moisture content for safe storage. Seeds
can be stored upto 12 months in gunny bags or
cloth bags.
Seed standards
The percentage of minimum physical purity
of certified and foundation seeds should be 98% with a minimum of 80% of germination
capacity and 8 - 12% of moisture content. The
presence of inert matter should not exceed 2.0%.

11
SORGHUM (Sorghum bicolor)
Sorghum (Sorghum bicolor) is one of the
important major millet belonging to the
family Gramineae. The best season for
seed production is November – December.
The pollination should not coincide with rains.
Rains prevent quality and effective seed setting.
The temperature of 37oc is favourable for seed
setting.
Method of seed production
Sorghum is often a cross-pollinated crop and
seeds are allowed to set by open-pollination in
isolation. The crop should be raised in isolation
of 200 metres for foundation and 100 metres
for certified seed production to maintain the varietal purity. Time isolation is not permitted.
The spacing between the plants should be
45 x 15 cm.
Seed production stages
Breeder seed è Foundation seed è Certified seed
Land selection
The land selected should be free from volunteer
plants and wild grass varieties like Johnson grass,
sudan grass and other forage types. The land
should not be cultivated with the same crop in
the previous season. Land should be fertile with good drainage facility.
Seed selection and sowing
Seeds used for the seed production should be of
good quality certified seeds from an authentic source. Seeds should be healthy with good
germination percentage. Seed rate is 3 kg/acre
(7.5 kg/ha) for irrigated crop (transplanted) and
for direct sown rainfed and irrigated are 6 kg/acre
(15 kg/ha) and 4 kg/acre (10 kg/ha), respectively.
In cultivation through transplantation, the
duration of the crop is reduced by 10 days
and the seed rate is also reduced by 1 kg/acre
(2.5 kg/ha).
For dryland or summer sowing, selected
seeds should be hardened by soaking them in
1:0.6 volume of 1% Prosopis and Pongamia
leaf extract and further pelleted with Pongamia
leaf powder using 10% maida as the adhesive
material. The seeds are sown in ridges and
furrows at a depth of 2 - 4 cm along the sides of the
ridges. The spacing between the plants should be
45 x 15 cm.
Nutrient management
Before final ploughing compost or farmyard manure @ 5 tonnes/acre (12.5 tonnes/ha) should
be applied and ploughed into the soil. Instead of
this cattle penning can also be practiced. 50 kg
neem cake and 500 kg vermicompost per acre
(125 kg neem cake and 1250 kg vermicompost
per hectare) should be applied as basal manure.
After first weeding at 20 – 25 days after sowing first top dressing should be done using enriched vermicompost (2 kg Azospirillum,
2 kg Phosphobacterium and 2 litres Panchagavya
mixed with 250 kg vermicompost and kept
covered for a week and then used) @ 250 kg/
acre (600 kg/ha) followed by the second top
dressing at 40 – 45 days after sowing using
25 kg neem cake and 250 kg vermicompost per
acre (60 kg neem cake and 600 kg vermicompost
per hectare). During flower initiation stage 10% tender coconut solution (1 litre tender coconut
water + 9 litres of water) should be sprayed.
For rainfed crop, 50 kg pungam cake and 250 kg
vermicompost should be applied as basal manure
just before sowing. First top dressing should be
done at 20 – 25 days after sowing using 250 kg/
acre of enriched vermicompost. At 40 – 45 days
after sowing apply 25 kg pungam cake and 250
kg vermicompost per acre (60 kg pungam cake
and 600 kg vermicompost per hectare) as second
top dressing. Spray 10% tender coconut water
at the time of flower initiation. All the above mentioned inputs should be applied to the rainfed
crop only when the soil is wet.

12
Weed management
Sorghum is slow growing in the early stages and
is adversely affected by weeds. Hence, the field should be maintained weed free upto 45 days. Hoe
or hand weeding on the 10th day of transplanting
is a must. Hoe or hand weeding between
30 – 35 days after transplanting and between
35 – 40 days for a direct sown crop is necessary.
Irrigation
The crop should be irrigated once a week to
increase the percentage of seed setting. Irrigation
during primordial initiation, vegetative, milky
and maturity stages are very critical. When
irrigation during critical stages are withheld that
will result in poor seed setting and reduced size
of the seeds.
Pest and disease management
Sorghum is affected by pests like shoot fly, stem borer, sorghum midge, ear head bug and diseases
like kernel smut, head smut, downy mildew, rust
and grain mold at different growth stages of the
crop. Detailed management measures for these
pests and diseases are provided in Appendix – I.
Roguing
Roguing should be done in the vegetative
phase. Off-types and volunteer plants should be
uprooted and removed before they start shedding
pollen. Off-types are identified based on the plant height, leaf shape, leaf colour, stem pigmentation,
days for flowering etc. Rogue other plants like Johnson grass, sudan grass, forage plants and
diseased plants of kernel smut and head smut.
Maximum percentage of off-types permitted
at the final inspection is 0.01% for foundation seed production and 0.05% for certified seed production.
Field inspection
A minimum of three field inspections should be done between vegetative and harvesting stages
by the Seed Certification Officer. First inspection is done during the vegetative stage to check
isolation requirement, off-types, volunteer plants
and diseased plants. Second inspection is done
during the flowering stage to check off-types, isolation and other relevant factors. The third
inspection should be scheduled at the time of
maturity prior to harvest to check for designated
diseases, true nature of plants, head and seed.
Harvesting
Seeds attain physiological maturity 40 – 45 days
after 50% flowering. A black layer formed over the seeds is a sign to confirm the physiological maturation of the seeds. After confirming the maturity the earheads should be harvested. At
this time the moisture content would be around
20 – 25%.
Threshing and processing
Harvested earheads should be dried further for a
safe moisture level of 15 – 18% before threshing.
After drying, the earheads are beaten with bamboo
stick to separate the seeds. In case of mechanical
thresher care should be taken to prevent the seeds
from mechanical damage. Threshed grains are
winnowed and cleaned. Cleaned seeds are further
dried to attain a safe moisture content of 8% and
graded using round perforated metal sieve of
9/64” size as middle sieve.
Drying and storage
The cleaned and graded seeds are dried to attain
8% of moisture content under the sun. Seeds can
be stored upto 12 months under open storage
conditions and upto 18 months in moisture
vapour proof containers.
Seed standards
The percentage of maximum physical purity
of certified and foundation seeds should be 98% with a minimum of 75% of germination
capacity and 8 - 13% of moisture content. The
presence of inert matter and huskless seeds
should not exceed 2.0% and other distinguishable
varieties and weed seeds should not be more
than 10/kg for foundation and 20/kg for certified seeds.

13
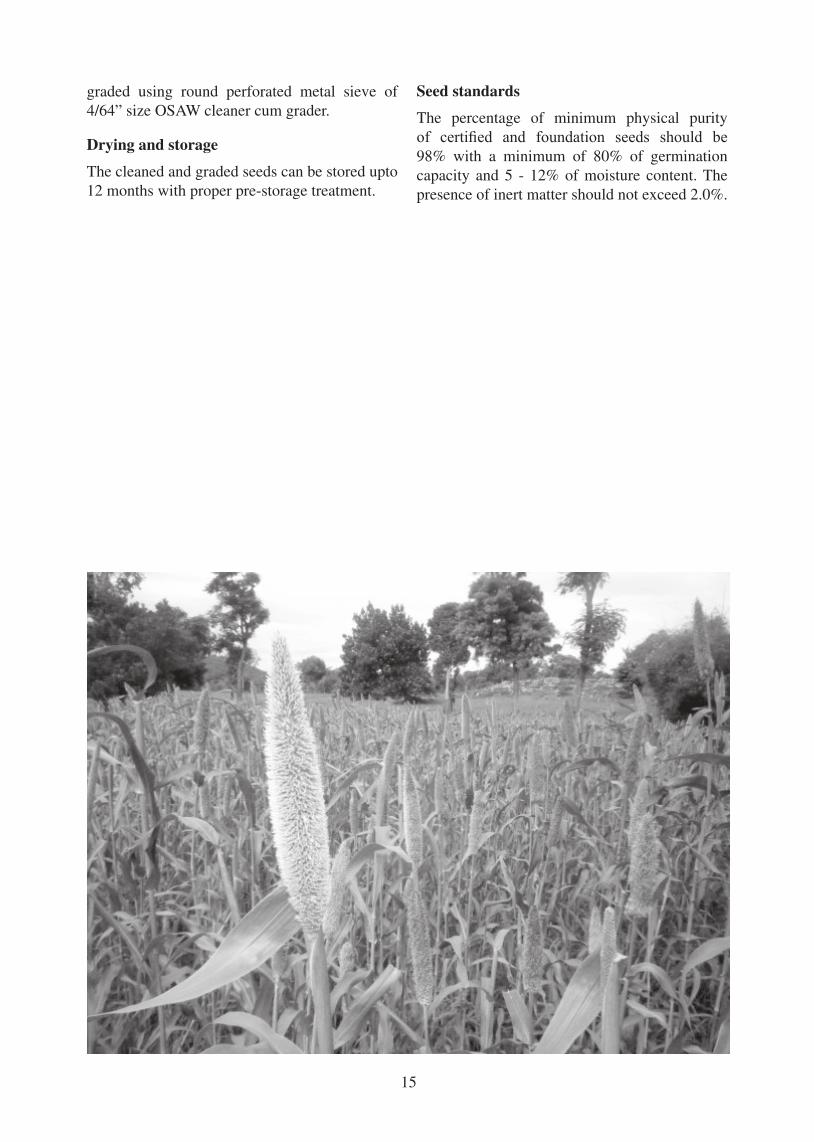
PEARL MILLET (Pennisetum glaucum)
Pearl millet (Pennisetum glaucum) is
widely grown millet variety belonging to
the family Gramineae. The best season
for seed production is October - December. The
temperature favourable for seed setting is 37oc.
The pollination should not coincide with rains.
Rain affect effective seed setting and production
of quality seeds.
Method of seed production
Bajra is a highly cross-pollinated crop with 80%
of cross-pollination. The crop should be raised
in isolation and seeds should be allowed to set
by open-pollination. The isolation distance
maintained between the varieties is 400 metres
for foundation seed and 200 metres for certified seed production.
Seed production stages
Breeder seed è Foundation seed è Certified seed
Land selection
The selected land should be fertile and free from
volunteer plants. The land should not be cultivated
with the same crop in the previous season. If
cultivated, it should be of same variety and duly
certified by the seed certification agency.
Seed selection and sowing
Seeds used for seed production should be of good
quality certified seeds from an authentic source. Seeds should be healthy with good germination
percentage. Use only graded seeds. Remove the
seeds affected with Ergot and Sclerotia to prevent
primary infection. Seed rate is 3 kg/acre (8 kg/
ha).
Add the selected seeds to the salt water
(1 kg salt in 10 litres of water) and remove the
floating seeds affected by Ergot and Sclerotia.
Wash the seeds in fresh water for 2 – 3 times to
remove the salt and shade dry. Selected seeds
should be treated with Azospirillum @ 250 gms /
3 kg of seeds (600 gms / 8 kg of seeds). Seeds can
be sown directly in the main field in ridges and furrows or seedlings can be raised in the nursery
and transplanted to the main field.
Nursery preparation and sowing
Seeds are sown in the nursery and then the
seedlings are transferred to the main field. Select an area of 7.5 cents for raising nursery for one
hectare (3 cents for one acre). Plough the plot
thoroughly and add farmyard manure or compost
@ 750 kg / 7.5 cents (300 kg / 3 cents) and
incorporate it into the soil by ploughing. Seeds
are sown in raised bed nursery in lines. Cover the
seeds with farmyard manure @ 500 kg / 7.5 cents
(200 kg / 3 cents). 20 – 25 days old seedlings are
then transplanted to the main field. The spacing between the plants should be 45 x 20 cm.
Main field preparation
The main field is prepared with series ploughing to make it a fine tilth (Tilth is the physical condition of the soil that is soft, friable and
properly aerated) and formed into ridges and
furrows. Apply compost or farmyard manure
@ 5 tonnes/acre (12.5 tonnes/ha). Seedlings can
be transplanted from the nursery or from the
directly sown hill. The extra seedlings from each
hill should be pulled out at 20 – 25 days after
sowing and transplanted.
Nutrient management
Before final ploughing compost or farmyard manure @ 5 tonnes/acre (12.5 tonnes/ha) should
be applied and ploughed into the soil. Instead of
this cattle penning can also be practiced. 50 kg
neem cake and 500 kg vermicompost per acre
(125 kg neem cake and 1250 kg vermicompost
per hectare) should be applied as basal manure.
After first weeding at 20 – 25 days after sowing first top dressing should be done using enriched vermicompost (2 kg Azospirillum,
2 kg Phosphobacterium and 2 litres Panchagavya
mixed with 250 kg vermicompost and kept
covered for a week and then used) @ 250 kg/

14
acre (600 kg/ha) followed by the second top
dressing at 40 – 45 days after sowing using
25 kg neem cake and 250 kg vermicompost per
acre (60 kg neem cake and 600 kg vermicompost
per hectare). During flower initiation stage 10% tender coconut solution (1 litre tender coconut
water + 9 litres of water) should be sprayed.
For rainfed crop, 50 kg pungam cake and 250 kg
vermicompost should be applied as basal manure
just before sowing. First top dressing should
be done at 20 – 25 days after sowing using
250 kg/acre of enriched vermicompost. At 40 – 45
days after sowing apply 25 kg pungam cake and
250 kg vermicompost per acre (60 kg pungam
cake and 600 kg vermicompost per hectare) as
second top dressing. Spray 10% tender coconut
water at the time of flower initiation. All the above mentioned inputs should be applied to the
rainfed crop only when the soil is wet.
Weed management
The seed production field should be maintained weed free from the initial stage. The first weeding should be done at 30 – 35 days after sowing.
Subsequent weeding can be done depending
upon the intensity of the weeds.
Jerking
Jerking is a process of removing the early formed
earheads of the first formed tillers to facilitate uniform flowering in all the tillers. It is done at 20 – 25 days after transplanting or 30 – 40 days
after sowing.
Irrigation
The field should be irrigated soon after sowing and life irrigation is done on the third day
of sowing. Irrigation should be done once in
10 days. Irrigation during tillering, milky stage
and maturation stage are very critical. Proper
irrigation during critical stages increases the seed
setting and quality of the seeds.
Pest and disease management
Pearl millet is affected by pests like shoot fly, root grub and diseases like downy mildew and ergot
at different growth stages. Detailed management
measures for these pests and disease are provided
in Appendix – I.
Roguing
Intensive roguing should be done at three growth
stages like seedling, tillering and seed setting.
To maintain genetic purity of the crop, off-types
and diseased plants are rogued out periodically
based on the colour and waviness of leaves, plant
height, shape and size of the earhead and colour
of the grains etc. The rogues should be either
pulled out as a whole plant or cut off at the base.
Plants affected by green ear, ergot and grain smut
diseases should be removed and discarded from
time to time.
Field inspection
A minimum of three field inspections should be conducted between pre flowering and harvesting stages by the Seed Certification Officer. First inspection is done before flowering to check isolation, volunteer plants, off-types, downy
mildew etc. The second inspection would be
made during 50% flowering to determine relevant factors. The final inspection would be made at the maturity stage before harvesting to determine the
true nature of the crop and other relevant factors.
Maximum percentage of off-types permitted at
the final inspection is 0.050% for foundation seed production and 0.10% for certified seed production.
Harvesting
Seeds attain physiological maturation 30 - 35
days after 50% flowering. The physiological maturation can be identified by change in the colour of the seeds from green to straw yellow.
A dunken layer also forms at the point of
attachment to the panicle. The moisture content
of the seeds at this stage is 30 – 35%. Harvesting
is done in two pickings since, the maturation
of the earheads are not uniform because of the
tillering habit of the crop.
Threshing and processing
Harvested earheads should be dried for two to
three days to attain a safe moisture content of
15 - 18% for threshing. Threshing is carried out
either manually or mechanically. Normally the
dried earheads are threshed by beating with a
bamboo stick. Threshed grains are cleaned by
winnowing. Threshed and cleaned grains are
15
graded using round perforated metal sieve of
4/64” size OSAW cleaner cum grader.
Drying and storage
The cleaned and graded seeds can be stored upto
12 months with proper pre-storage treatment.
Seed standards
The percentage of minimum physical purity
of certified and foundation seeds should be 98% with a minimum of 80% of germination
capacity and 5 - 12% of moisture content. The
presence of inert matter should not exceed 2.0%.

16
FINGER MILLET (Eleusine coracana)
Finger millet or Ragi (Eleusine coracana)
is one of the important minor millets
belonging to the family Gramineae. This
is widely grown in hilly and rainfed areas. It is a
tropical crop can be grown to an altitude of 2100
metres. The best season for seed production is
December – January. Pollination should not
coincide with rains for quality and effective seed
setting. The temperature of 37°c is favourable for
seed setting.
Method of seed production
Ragi is a self-pollinated crop and should be
raised in isolation. The isolation distance
maintained between the varieties is 3 metres for
both foundation and certified seed production to maintain the varietal purity.
Seed production stages
Breeder seed è Foundation seed è Certified seed
Land selection
Ragi can be grown in poor to fertile soil. The crop
can tolerate salinity better than any other crops.
The selected land should be free from volunteer
plants. The land should not be cultivated with
same crop in the previous season. Land should be ploughed 2 - 3 times to get fine tilth and levelled.
Seed selection and sowing
Ragi is a season bound crop and the best season
to take up sowing is December - January and
June - July. Seeds used for seed production
should be of good quality certified seeds from an authentic source. Seeds should be healthy with
required germination percentage. Recommended
seed rate is 2 kg/acre (5 kg/ha). Selected
seeds should be treated with Azospirillum
@ 125gms/kg of seeds.
Nursery preparation
Nursery should be raised in an area of 500m2 to
plant one hectare of main field (200m2 per acre).
Selected nursery plot should be ploughed for two
to three times to have fine tilth of soil. Raised beds should be formed and shallow rills are formed
over the beds by passing the fingers vertically. Seed should be broadcasted and covered with
a thin layer of farmyard manure @ 500 kg/ha
(200 kg/acre).
Main field preparation
The main field is prepared with 2 – 3 ploughing to make it a fine tilth and formed into ridges and furrows. During final plough apply compost or farmyard manure @ 5 tonnes/acre (12.5 tonnes/
ha) and incorporate into the soil. 20 - 25 days
old seedlings transplanted to the main field. Two seedlings per hill should be planted. Follow a
spacing of 15× 15 cm.
Nutrient management
Before final ploughing compost or farmyard manure @ 5 tonnes/acre (12.5 tonnes/ha) should
be applied and ploughed into the soil. Instead of
this cattle penning can also be practiced. 50 kg
neem cake and 500 kg vermicompost per acre
(125 kg neem cake and 1250 kg vermicompost
per hectare) should be applied as basal manure.
After first weeding at 20 – 25 days after sowing first top dressing should be done using enriched vermicompost (2 kg Azospirillum,

17
2 kg Phosphobacterium and 2 litres
Panchagavya mixed with 250 kg vermicompost
and kept covered for a week and then used)
@ 250 kg/acre (600 kg/ha) followed by the second
top dressing at 40 – 45 days after sowing using
25 kg neem cake and 250 kg vermicompost per
acre (60 kg neem cake and 600 kg vermicompost
per hectare). During flower initiation stage 10% tender coconut solution (1 litre tender coconut
water + 9 litres of water) should be sprayed.
For rainfed crop, 50 kg pungam cake and 250 kg
vermicompost should be applied as basal manure
just before sowing. First top dressing should be
done at 20 – 25 days after sowing using 250 kg/
acre of enriched vermicompost. At 40 – 45 days
after sowing apply 25 kg pungam cake and 250
kg vermicompost per acre (60 kg pungam cake
and 600 kg vermicompost per hectare) as second
top dressing. Spray 10% tender coconut water
at the time of flower initiation. All the above mentioned inputs should be applied to the rainfed
crop only when the soil is wet.
Weed management
The seed production field should be maintained weed free from the initial stage. The first weeding should be done on 15th day after planting and
followed by the second one on 30th day. After
hand weeding allow the weeds to dry for
2 – 3 days.
Irrigation
The irrigation should be done once a week after
life irrigation on the third day of sowing. Irrigation
during flowering and grain setting stages are very critical.
Pest and disease management
Ragi is affected by pests and diseases like
pink stem borer, aphids, root aphids, earhead
caterpillars, blast, brown spot, mottle streak
virus etc., at different growth stages. Detailed
management measures for these pests and
diseases are provided in Appendix- I.
Roguing
Roguing should be done often to remove the off-
types, volunteer plants and diseased plants from
the seed production field to avoid the genetic
contamination. Roguing should be done upto the
flowering stage. Maximum percentage of off-type permitted at the final inspection is 0.05% for foundation and 0.10% for certified seed production.
Field inspection
A minimum of two inspections should be done
between flowering and maturity stages by the Seed Certification Officer. The first inspection is done at the time of flowering to check the isolation and off-types and the second done during
the maturity stage prior to harvest to check the
off-types and to estimate the yield.
Harvesting and processing
Harvest is done once the earheads are
physiologically mature. Physiologically mature
earheads will turn from brown to green colour.
Harvesting is done in two pickings since, the
maturation of the earheads are not uniform
because of the tillering habit of the crop. Second
harvesting should be done seven days after the
first one. Mature earheads should be harvested and threshed with bamboo sticks. Threshed
grains are further cleaned by winnowing.
Drying and storage
The cleaned seeds should be sun dried to attain a
safe moisture level of 12%. Care should be taken
while drying to avoid mechanical injury to the
seeds and contamination. Seeds can be stored
upto 13 months under proper storage conditions.
Seed standards
The percentage of minimum physical purity of
certified and foundation seeds should be 97% with a minimum of 75% of germination capacity
and 12% of moisture content. The presence of
inert matter should not exceed 2.0%.

18
KODO MILLET (Paspalum scrobiculatum)
Kodo millet (Varagu) (Paspalum
scrobiculatum) is a well known
minor millet belonging to the family
Gramineae. This coarse millet is highly resistant
to drought and can also be cultivated in the areas
with 400 - 500 mm annual rainfall. It is grown
in gravelly and stony upland poor soils to loamy
soils. Seed production can be done in June – July
and February – March. The pollination should
not coincide with rains for quality and effective
seed setting.
Method of seed production
Kodo millet is a self-pollinated crop. The crop
should be raised in isolation. The isolation
distance maintained between the varieties is
3 metres for both foundation and certified seed production to maintain the varietal purity.
Seed production stages
Breeder seed è Foundation seed è Certified seed
Land selection
The selected land should be free from volunteer
plants. The land should not be cultivated with the
same crop in the previous season. Land should be fertile with good drainage facility.
Seed selection and sowing
Seeds used for seed production should be of
good quality certified seeds from an authentic
source. Seeds should be healthy with required
germination percentage. In North India, sowing
should be done in mid June to mid July and in
South India during September – December.
Recommended seed rate is 4 kg/acre (10 kg/ha).
Selected seeds should be treated with Azospirillum
@ 60 gms/kg of seeds. Treated seeds should be
sown with a spacing of 30 x 10 cm. Seeds should
be sown at the depth of 3 – 4 cm.
Main field preparation
The main field should be ploughed before the onset of monsoon to enable the soil to hold the
moisture. At the onset of monsoon field should be ploughed for 2 – 3 times to make it a fine tilth and formed into ridges and furrows. During
final plough apply compost or farmyard manure @ 5 tonnes/acre (12.5 tonnes/ha) and incorporate
into the soil. Seeds can be sown in the ridges with
a spacing of 30 × 10 cm.
Nutrient management
Before final ploughing compost or farmyard manure @ 5 tonnes/acre (12.5 tonnes/ha) should
be applied and ploughed into the soil. Instead of
this cattle penning can also be practiced. 50 kg
neem cake and 500 kg vermicompost per acre
(125 kg neem cake and 1250 kg vermicompost
per hectare) should be applied as basal manure.
For rainfed crop, apply 50 kg/acre (125 kg/
hectare) of pungam cake and 250 kg per acre
(600 kg / hectare) of vermicompost as basal manure
just before sowing. After first weeding at 20 – 25 days after sowing top dressing should be done
using enriched vermicompost (2 kg Azospirillum,
2 kg Phosphobacterium and 2 litres Panchagavya
mixed with 250 kg vermicompost and kept
covered for a week and then used) @ 250 kg/acre
(600 kg/ha). During flower initiation stage 10% tender coconut solution (1 litre tender coconut
water + 9 litres of water) should be sprayed. All
the above mentioned inputs should be applied to
the rainfed crop only when the soil is wet.

19
Weed management
The seed production field should be maintained weed free from the initial stage. It is essential to
control the weeds in the initial stages of plant
growth especially upto 35 – 40 days after sowing.
Generally two weedings at an interval of 15 days
is sufficient. Weeding can be done with hand hoe or wheel hoe in line sown crop.
Irrigation
Kharif season crop does not require any
irrigation, it is mostly grown as a rainfed crop. In
the absence of rains one or two irrigation can be
done. During heavy rains the excess water from
the field should be drained out.
Pest and disease management
Kodo millet is affected by shoot fly pest and head smut disease at different growth stages. Detailed
management measures for this pest and disease
are provided in Appendix- I.
Roguing
Roguing should be done often to remove the off-
types, volunteer plants and diseased plants from
the seed production field to avoid the genetic contamination. Roguing should be done upto the
flowering stage. Maximum percentage of off-type permitted at the final inspection is 0.05% for foundation and 0.10% for certified seed production.
Field inspection
A minimum of two inspections should be done
between flowering and maturity stages by the Seed Certification Officer. The first inspection is done at the time of flowering to check the isolation and off-types and the second done during
the maturity stage prior to harvest to check the
off-types and to estimate the yield.
Harvesting and processing
Harvest is done once the earheads are
physiologically mature. Normally crop is ready
for harvest in 100 days. Physiologically mature
earheads will turn from brown to green colour.
Plants are cut close to the ground level, bundled
and stacked for a week before threshing. The
earheads are threshed by trampling under the
feet of bullocks. The threshed grains are further
cleaned by winnowing.
Drying and storage
The cleaned seeds should be sun dried to attain a
safe moisture level of 12%. Care should be taken
while drying to avoid mechanical injury to the
seeds and contamination. Seeds can be stored
upto 13 months under proper storage conditions.
Seed standards
The percentage of minimum physical purity of
certified and foundation seeds should be 97% with a minimum of 75% of germination capacity
and 12% of moisture content. The presence of
inert matter should not exceed 2.0%.

20
FOXTAIL MILLET / ITALIAN MILLET
(Setaria italica)
Foxtail millet (Setaria italica) is a well
known minor millet variety belonging to
the family Gramineae. It is cultivated in
both tropical and temperate regions. The crop
can be grown upto an altitude of 200 meters. The
crop can be grown successfully in areas receiving
750 mm of annual rainfall. Best season for seed
production is June - July and February – March.
The pollination should not coincide with rains
for quality and effective seed setting.
Method of seed production
Foxtail millet is a self-pollinated crop and should
be raised in isolation. The isolation distance
maintained between the varieties is 3 metres for
both foundation and certified seed production to maintain the varietal purity.
Seed production stages
Breeder seed è Foundation seed è Certified seed
Land selection
Foxtail millet needs moderately fertile soil for
good yield. The selected land should be free
from volunteer plants. The land should not be
cultivated with same crop in the previous season.
Land should be ploughed 2 - 3 times to get a fine tilth and levelled.
Seed selection and sowing
Seeds used for seed production should be of
good quality certified seeds from an authentic source. Seeds should be healthy with required
germination percentage. Recommended seed rate
is 2 kg/acre (5 kg/ha).
Selected seeds should be treated with Azospirillum
@ 125 gms/kg of seeds. Treated seeds should
be sown with a spacing of 30 x 10 cm at
a depth of 3 – 4 cm.
Main field preparation
The main field should be ploughed for 2 – 3 times to make it a fine tilth and formed into ridges and
furrows. During final plough apply compost or farmyard manure @ 5 tonnes/acre (12.5 tonnes/
ha) and incorporate into the soil. Seeds can be
sown in the ridges at a depth 3 - 4 cm with a
spacing of 30 × 10 cm.
Nutrient management
Before final ploughing compost or farmyard manure @ 5 tonnes/acre (12.5 tonnes/ha) should
be applied and ploughed into the soil. Instead of
this cattle penning can also be practiced. 50 kg
neem cake and 500 kg vermicompost per acre
(125 kg neem cake and 1250 kg vermicompost
per hectare) should be applied as basal manure.
For rainfed crop, apply 50 kg/acre (125 kg/
hectare) of pungam cake and 250 kg/acre
(600 kg/hectare) of vermicompost as basal
manure just before sowing. After first weeding at 20 – 25 days after sowing top dressing
should be done using enriched vermicompost
(2 kg Azospirillum, 2 kg Phosphobacterium
and 2 litres Panchagavya mixed with 250 kg
vermicompost and kept covered for a week and
then used) @ 250 kg/acre (600 kg/ha). During
flower initiation stage 10% tender coconut solution (1 litre tender coconut water + 9 litres
of water) should be sprayed. All the above
mentioned inputs should be applied to the rainfed
crop only when the soil is wet.
Weed management
The seed production field should be maintained weed free. Weeding can be done with a tyne-
harrow when the crop is 30 days old. Allow the
weeds to dry for 2 - 3 days after hand weeding.
Irrigation
Kharif season crop does not require any irrigation.
It is mostly grown as a rainfed crop. However,
if the dry spell prevails for longer period, then
1 - 2 irrigations should be given to boost the yield.
Summer crop requires 2 - 5 irrigations depending
upon soil type and climatic conditions. During
heavy rains the excess water from the field should be drained out.

21
Pest and disease management
Foxtail millet is affected by pests like army worm,
cut worm, leaf scrapping beetle and shoot fly and diseases like blast and rust at different growth
stages. Detailed management measures for these
pests and diseases are provided in Appendix- I.
Roguing
Roguing should be done often to remove the off-
types, volunteer plants and diseased plants from
the seed production field to avoid the genetic contamination. Roguing should be done upto the
flowering stage. Maximum percentage of off-types permitted at the final inspection is 0.05% for foundation and 0.10% for certified seed production.
Field inspection
A minimum of two inspections should be done
between flowering and maturity stages by the Seed Certification Officer. The first inspection is done at the time of flowering to check the isolation and off-types and the second inspection
is done during the maturity stage prior to harvest
to check the off-types and to estimate the yield.
Harvesting and processing
Harvest is done once the earheads are
physiologically mature. Normally crop is ready
for harvest in 80 - 100 days after sowing.
Physiologically mature earheads will start to dry.
Plants are either harvested intact with earheads
or earheads alone. The earheads are dried before
threshing. The earheads are threshed by stone
roller or trampling under the feet of bullocks.
The threshed grains are further cleaned by
winnowing.
Drying and storage
The cleaned seeds should be dried under the
sun to attain a safe moisture level of 12%. Care
should be taken while drying to avoid mechanical
injury to the seeds and contamination. Seeds can
be stored upto 13 months under proper storage
conditions.
Seed standards
The percentage of minimum physical purity of
certified and foundation seeds should be 97% with a minimum of 75% of germination capacity
and 12% of moisture content. The presence of
inert matter should not exceed 2.0%.

22
PROSO MILLET (Panicum miliaceum)
Proso millet (Pani varagu) (Panicum
miliaceum) is a common and important
minor millet belonging to the family
Gramineae. This short duration millet variety is
widely grown in India. The crop is able to evade
drought by its quick maturity. Best season for
seed production is June - July and February –
March. The pollination should not coincide with
rain for quality and effective seed setting.
Method of seed production
Proso millet is a self-pollinated crop and should
be raised in isolation. The isolation distance
maintained between the varieties is 3 metres for
both foundation and certified seed production to maintain the varietal purity.
Seed production stages
Breeder seed è Foundation seed è Certified seed
Land selection
Proso millet can be cultivated in both rich and
poor soils. Well drained loam or sandy loam soils
rich in organic matter are ideal for cultivation.
The selected land should be free from volunteer
plants. The land should not be cultivated with
same crop in the previous season.
Seed selection and sowing
Seeds used for seed production should be of
good quality certified seeds from an authentic source. Seeds should be healthy with required
germination percentage. Recommended seed rate
is 4 kg/acre (10 kg/ha).
Selected seeds should be treated with Azospirillum
@ 60 gms/kg of seeds. Treated seeds should be
sown with a spacing of 30 x 10 cm. Seeds should
be sown in June – July onset of monsoon rains.
Summer crop should be sown in the month of
February – March. Seeds are broadcast manually
or by seed driller in furrows at a depth of 3 – 4
cm.
Main field preparation
The main field should be harrowed for 2 – 3 times to make it a fine tilth and levelled. The levelled field is formed into ridges and furrows. During final plough apply compost or farmyard manure @ 5 tonnes/acre (12.5 tonnes/ha) and incorporate
into the soil. Seeds can be sown in the ridges at a
depth 3 - 4 cm with a spacing of 30× 10 cm.
Nutrient management
Before final ploughing compost or farmyard manure @ 5 tonnes/acre (12.5 tonnes/ha) should
be applied and ploughed into the soil. Instead of
this cattle penning can also be practiced. 50 kg
neem cake and 500 kg vermicompost per acre
(125 kg neem cake and 1250 kg vermicompost
per hectare) should be applied as basal manure.
For rainfed crop, apply 50 kg/acre (125 kg/
hectare) of pungam cake and 250 kg/acre (600
kg/hectare) of vermicompost as basal manure
just before sowing. After first weeding at 20 – 25 days after sowing top dressing should be done
using enriched vermicompost (2 kg Azospirillum,
2 kg Phosphobacterium and 2 litres Panchagavya
mixed with 250 kg vermicompost and kept
covered for a week and then used) @ 250 kg/acre
(600 kg/ha). During flower initiation stage 10% tender coconut solution (1 litre tender coconut
water + 9 litres of water) should be sprayed. All
the above mentioned inputs should be applied to
the rainfed crop only when the soil is wet.

23
Weed management
The seed production field should be maintained weed free at least upto 35 days after sowing
for retaining the soil moisture and nutrients.
Subsequent weeding should be done at an interval
of 15 – 20 days. Weeding can be done with a
handhoe or wheel hoe.
Irrigation
Kharif season crop does not require any irrigation.
However, if the dry spell prevails for longer period
1 - 2 irrigations should be given at the tillering
stage to boost the yield. First irrigation should be
given 25 - 30 days after sowing followed by the
second one at 40 – 45 days after sowing. Summer
crop requires 2 - 4 irrigations depending upon
soil type and climatic conditions. During heavy
rains the excess water from the field should be drained out.
Pest and disease management
Proso millet is commonly affected by shoot
fly and there is no other remarkable disease incidence. The management measures for this
pest are provided in Appendix- I.
Roguing
Roguing should be done often to remove the off-
types, volunteer plants and diseased plants from
the seed production field to avoid the genetic contamination. Roguing should be done upto the
flowering stage. Maximum percentage of off-types permitted at the final inspection is 0.05%
for foundation and 0.10% for certified seed production.
Field inspection
A minimum of two inspections should be done
between flowering and maturity stages by the Seed Certification Officer. The first inspection is done at the time of flowering to check the isolation and off-types and the second inspection
is done during the maturity stage prior to harvest
to check the off-types and to estimate the yield.
Harvesting and processing
Harvest is done once the earheads are
physiologically mature. Normally crop is ready
for harvest in 65 - 75 days after sowing. The
crop should be harvested when two thirds of
the seeds are ripe. The harvested earheads are
threshed by hand or trampling under the feet of
bullocks. The threshed grains are further cleaned
by winnowing.
Drying and storage
The cleaned seeds should be sun dried to attain a
safe moisture level of 12%. Seeds can be stored
upto 13 months under proper storage conditions.
Seed standards
The percentage of minimum physical purity of
certified and foundation seeds should be 97% with a minimum of 75% of germination capacity
and 12% of moisture content. The presence of
inert matter should not exceed 2.0%.

24
LITTLE MILLET (Panicum sumatrense)
Little millet (Samai) (Panicum sumatrense)
belongs to the family Gramineae.
The crop can grow well in drought
conditions and considered as a good famine
food as it can produce some grain even under
severe drought conditions when all the other
crops fail to produce. It is a typical dryland
crop suitable for the areas with low rainfall and
poor soils. Seed production can be done during
June – July and February – March. The pollination
should not coincide with rains for quality and
effective seed setting.
Method of seed production
Little millet is a self-pollinated crop and should be raised in isolation. The isolation distance
maintained between the varieties is 3 metres for
both foundation and certified seed production to maintain the varietal purity.
Seed production stages
Breeder seed è Foundation seed è Certified seed
Land selection
Little millet can be cultivated in both rich and poor soils. Well drained loam or sandy loam soils
rich in organic matter are ideal for cultivation.
The selected land should be free from volunteer
plants. The land should not be cultivated with
same crop in the previous season.
Seed selection and sowing
Seeds used for seed production should be of
good quality certified seeds from an authentic source. Seeds should be healthy with required
germination percentage. Recommended seed rate
is 4 kg/acre (10 kg/ha).
Selected seeds should be treated with Azospirillum
@ 60 gms/kg of seeds. Treated seeds should be
sown with a spacing of 30 x 10 cm. Seeds should
be sown in June – July at the onset of monsoon
rains. Summer crop should be sown in the
month of February – March. Seeds are broadcast
manually or by seed driller in furrows at a depth
of 3 – 4 cm.
Main field preparation
The main field should be harrowed for 2 – 3 times to make it a fine tilth and levelled. The levelled field is formed into ridges and furrows. During final plough apply compost or farmyard manure @ 5 tonnes/acre (12.5 tonnes/ha) and incorporate
into the soil. Seeds can be sown in the ridges at a
depth 3 - 4 cm with a spacing of 30 × 10 cm.
Nutrient management
Before final ploughing compost or farmyard manure @ 5 tonnes/acre (12.5 tonnes/ha) should
be applied and ploughed into the soil. Instead of
this cattle penning can also be practiced. 50 kg
neem cake and 500 kg vermicompost per acre
(125 kg neem cake and 1250 kg vermicompost
per hectare) should be applied as basal manure.
For rainfed crop, apply 50 kg/acre (125 kg/
hectare) of pungam cake and 250 kg/acre (600
kg/hectare) of vermicompost as basal manure
just before sowing. After first weeding at 20 – 25 days after sowing top dressing should be done
using enriched vermicompost (2 kg Azospirillum,
2 kg Phosphobacterium and 2 litres Panchagavya
mixed with 250 kg vermicompost and kept
covered for a week and then used) @ 250 kg/acre
(600 kg/ha). During flower initiation stage 10% tender coconut solution (1 litre tender coconut

25
water + 9 litres of water) should be sprayed. All
the above mentioned inputs should be applied to
the rainfed crop only when the soil is wet.
Weed management
The seed production field should be maintained weed free at least upto 35 days after sowing
for retaining the soil moisture and nutrients.
Subsequent weeding should be done at an
interval of 15 – 20 days. Weeding can be done
with handhoe or wheel hoe.
Irrigation
Kharif season crop does not require any
irrigation. However, if the dry spell prevails for
longer period at least one irrigation should be
given at the tillering stage to boost the yield.
First irrigation should be given 25 - 30 days
after sowing followed by the second one at
40 – 45 days after sowing. Summer crop requires
2 - 4 irrigations depending upon soil type and
climatic conditions. During heavy rains the excess
water from the field should be drained out.
Pest and disease management
Little millet is commonly affected by shoot fly and there is no other remarkable disease incidence. The management measures for this
pest are provided in Appendix- I.
Roguing
Roguing should be done often to remove the off-
types, volunteer plants and diseased plants from
the seed production field to avoid the genetic contamination. Roguing should be done upto the
flowering stage. Maximum percentage of off-types permitted at the final inspection is 0.05% for foundation and 0.10% for certified seed production.
Field inspection
A minimum of two inspections should be done
between flowering and maturity stages by the Seed Certification Officer. The first inspection is done at the time of flowering to check the isolation and off-types and the second inspection
is done during the maturity stage prior to harvest
to check the off-types and to estimate the yield.
Harvesting and processing
Harvest is done once the earheads are
physiologically mature. Normally crop is ready
for harvest in 80 - 85 days after sowing. The
crop should be harvested when two thirds of
the seeds are ripe. The harvested earheads are
threshed by hand or trampling under the feet of
bullocks. The threshed grains are further cleaned
by winnowing.
Drying and storage
The cleaned seeds should be sun dried to attain a
safe moisture level of 12%. Seeds can be stored
upto 13 months under proper storage conditions.
Seed standards
The percentage of minimum physical purity of
certified and foundation seeds should be 97% with a minimum of 75% of germination capacity
and 12% of moisture content. The presence of
inert matter should not exceed 2.0%.

26
BARNYARD MILLET (Echinochloa frumentacea)
Barnyard millet (Echinochloa frumentacea)
is an important minor millet grown in
India. This millet crop belongs to the
family Gramineae. The crop is able to evade
drought by its quick maturity. Best season for
seed production is September – October and
February – March. The pollination should not
coincide with rains for quality and effective seed
setting.
Method of seed production
Barnyard millet is a self-pollinated crop and
should be raised in isolation. The isolation
distance maintained between the varieties is
3 metres for both foundation and certified seed production to maintain the varietal purity.
Seed production stages
Breeder seed è Foundation seed è Certified seed
Land selection
Barnyard millet can be cultivated in both rich
and poor soils with variable texture. Well drained
loam or sandy loam soils rich in organic matter
are ideal for cultivation. The selected land should
be free from volunteer plants. The land should
not be cultivated with same crop in the previous
season.
Seed selection and sowing
Seeds used for seed production should be of
good quality certified seeds from an authentic source. Seeds should be healthy with required
germination percentage. Recommended seed rate
is 4 kg/acre (10 kg/ha).
Selected seeds should be treated with Azospirillum
@ 60 gms/kg of seeds. Treated seeds should be
sown with a spacing of 30 x 10 cm. Seeds should
be sown in September - October at the onset of
monsoon rains. Summer crop should be sown
in the month of February – March. Seeds are
broadcast manually or by seed driller in furrows
at a depth of 3 – 4 cm.
Main field preparation
The main field should be harrowed for 2 – 3 times to make it a fine tilth and levelled. The levelled field is formed into ridges and furrows. During final plough apply compost or farmyard manure @ 5 tonnes/acre (12.5 tonnes/ha) and incorporate
into the soil. Seeds can be sown in the ridges at a
depth 3 - 4 cm with a spacing of 30× 10 cm.
Nutrient management
Before final ploughing compost or farmyard manure @ 5 tonnes/acre (12.5 tonnes/ha) should
be applied and ploughed into the soil. Instead of
this cattle penning can also be practiced. 50 kg
neem cake and 500 kg vermicompost per acre
(125 kg neem cake and 1250 kg vermicompost
per hectare) should be applied as basal manure.
For rainfed crop, apply 50 kg/acre (125 kg/
hectare) of pungam cake and 250 kg/acre (600
kg/hectare) of vermicompost as basal manure
just before sowing. After first weeding at 20 – 25 days after sowing top dressing should be done
using enriched vermicompost (2 kg Azospirillum,

27
2 kg Phosphobacterium and 2 litres Panchagavya
mixed with 250 kg vermicompost and kept
covered for a week and then used) @ 250 kg/acre
(600 kg/ha). During flower initiation stage 10% tender coconut solution (1 litre tender coconut
water + 9 litres of water) should be sprayed. All
the above mentioned inputs should be applied to
the rainfed crop only when the soil is wet.
Weed management
The seed production field should be maintained weed free at least upto 35 days after sowing
for retaining the soil moisture and to get high
yields. Subsequent weeding should be done at an
interval of 15 – 20 days. Weeding can be done
with a handhoe or wheel hoe.
Irrigation
Kharif season crop does not require any
irrigation. However, if the dry spell prevails for
longer period at least one irrigation should be
given at the tillering stage to boost the yield.
First irrigation should be given 25 - 30 days after
sowing followed by the second one at 40 – 45
days after sowing. Summer crop requires 2 - 4
irrigations depending upon soil type and climatic
conditions. During heavy rains the excess water
from the field should be drained out.
Pest and disease management
Barnyard millet is commonly affected by shoot
fly and three types of smut diseases at different growth stages. The management measures
for these pest and diseases are provided in
Appendix-I.
Roguing
Roguing should be done often to remove the off-
types, volunteer plants and diseased plants from
the seed production field to avoid the genetic contamination. Roguing should be completed
within the flowering stage of the crop. Maximum percentage of off-types permitted at the final inspection is 0.05% for foundation and 0.10% for
certified seed production.
Field inspection
A minimum of two inspections should be done
between flowering and maturity stages by the Seed Certification Officer. The first inspection is done at the time of flowering to check the isolation and off-types and the second inspection
is done during the maturity stage prior to harvest
to check the off-types and to estimate the yield.
Harvesting and processing
Harvest is done once the earheads are
physiologically mature. Normally crop is ready
for harvest in 75 - 90 days after sowing. The
crop should be harvested when two thirds of
the seeds are ripe. The harvested earheads are
threshed by hand or trampling under the feet of
bullocks. The threshed grains are further cleaned
by winnowing.
Drying and storage
The cleaned seeds should be sun dried to attain a
safe moisture level of 12%. Seeds can be stored
upto 13 months under proper storage conditions.
Seed standards
The percentage of minimum physical purity of
certified and foundation seeds should be 97% with a minimum of 75% of germination capacity
and 12% of moisture content. The presence of
inert matter should not exceed 2.0%.

28
Indian Minimum Seed Certification Standards, 2013. The Central Seed Certification Board, Department of Agriculture and Cooperation, Ministry of Agriculture, Government of India, New
Delhi. Compiled by R.K. Trivedi, Deputy Commissioner (Quality Control) and M. Gunasekaran, Asst.
Director (Quality Control), the Department of Agriculture and Cooperation, Ministry of Agriculture,
Government of India.
Hand book of Agriculture, September 2008. Indian Council of Agriculture Research, New Delhi. pp.
1345
Current State of Inputs for Organic Agriculture, June 2006. Thimmaiah .A., Natural Agroconsultants,
Faridabad. pp.122.
Package of Organic Practices from Maharashtra for Cotton, Rice, Red Gram, Sugarcane and Wheat,
June 2006. Maharashtra Organic Farming Federation (MOFF), Pune. pp.112.
Package of Organic Practices from West Bengal for Brinjal, Rice, Sesame and Taro, June 2006.
Development Research Communication and Services Centre, Kolkata. pp.135.
Package of Organic Practices from Tamil Nadu for Rice, Groundnut, Tomato and Okra, September
2006. Centre for Indian Knowledge Systems, Chennai. pp.174.
Principles of Seed Production and Quality Control (Bhaskaran.M., Vanangamudi.K. et al., 2002).
Department of Seed Science and Technology, Tamil Nadu Agriculture University, Coimbatore. pp.
365
IFOAM Training Manual for Seed Saving, Compiled by the Centre for Indian Knowledge Systems,
Chennai for International Federation of Organic Agriculture Movements (IFOAM) Bonn (Germany).
pp. 123
Training manual on Principles of Seed Technology. The Department of Genetics and Plant Breeding,
Tamil Nadu Agriculture University, Coimbatore. pp. 163.
WEBSITES
www.indiaagronet.com
www. sikkimagri.gov.in
www.en.wikipedia.org
www.indianspices.com
www.seedtamilnadu.com
www.tnau.ac.in
www.slideshare.net/Safarnoori/seed-production-technology-of-whea
www.agritech.tnau.ac.in
www.knowledgebank.irri.org
www.angrau.ac.in
REFERENCES

29
Sl.
No.Crop
Common Pests and
DiseasesManagement measures
1. Paddy Leaf folder (Cnaphalocrocis
medinalis) – (attacks at the
vegetative phase)
Spray 3-5% of Andrographis paniculata kashayam or 5% neem kernel extract, release
ducks in the field to feed on the pests, erect bird perches and before transplanting apply two cartloads of well decomposed farmyard manure.
Rice case worm (Nymphula
depunctalis) - (attacks at the
vegetative phase)
Rope method for the control of larvae, spread chopped pieces of Colacasia (taro or
chembu) and Citrus grandis (Pomelo or Pambalimasu) in the field to repel the pest, use light traps, flood and drain water from the field for 3-4 days or apply raw cow dung to the stagnated water to suffocate the larvae.
Green leaf hopper (Nephotettix
virescens) - (attacks at the vegetative
phase)
Treat the seedlings in neem seed kernel extract for 24 hours before transplanting, spray
a mixture of neem oil and pongam oil @ 1:4 ratio and the common egg laying spots of
the pests like wild grasses and weeds should be removed from the field and bunds.
Yellow stem borer (Scirpophaga
incertulas) - (attacks at the
vegetative phase)
Land should be ploughed as soon as the harvest is completed to destroy the eggs and pupae, apply neem cake @ 42 – 50 kg as basal manure, place neem cake bags in the
irrigation channel, use Trichogramma cards, pheromone traps and light traps.
Sheath blight (Rhizoctonia solani),
stem rot (Leptosphaeria salvinii),
bacterial leaf blight (Xanthomonas
campestris pv. Oryzae) - (attacks at
the vegetative phase)
Spray a solution of cow dung slurry 20 kg mixed in 200 litres of water, filtered and diluted with 50 litres of water.
APPENDIX – I PEST AND DISEASE MANAGEMENT IN CEREALS AND MILLETS

30
2. Paddy and
Finger millet
Rice blast (Pyricularia oryzae), Ragi
blast (Pyricularia grisea) Foxtail
millet blast - (attacks at the early
vegetative phase)
Crush and apply the bark of Careya arborea @ 2-3 kg, boil 1 kg wild Tulsi leaves
in 2 litres of water and spray this solution @ 2 ml/litre of water for twice at 15 days
interval.
Rice tungro virus,
Mottle streak virus of ragi – (attacks
at all the growth stages of the crop)
Spray the fermented cow’s urine (fermented for one week) over the crops to control
bacterial and fungal diseases, spray a solution of cow’s urine (1 litre) and buttermilk (1
litre) diluted with 8 litres of water and spray 300 ml of sweet flag extract mixed with 1 litre of cow’s urine and 8.7 litres of water to control the disease spread.
3. Paddy, Finger
millet and
Maize
Brown leaf spot (Helminthosporium
oryzae), Ragi (H.nodulosum),
maize leaf spot (Curvularia lunata)
- (attacks at the early vegetative
phase)
Treat the seeds with 20% mint leaf extract for 24 hours, spread the leaves of Cleistan-
thus collinus @ 25 quintals/ha the field and allow them to decay and irrigate after three days.
4. Wheat Termites- (attacks the field through-
out the cropping period)
Apply neem leaf manure @ 500 kg/ha or neem seed manure @ 100 kg/ha at the time
of sowing.
Brown wheat mite (Petrobia latens)
- (attacks at all the growth stages of
the crop)
Cow’s urine 15 litres, cow dung 2 kg and crushed neem leaves 15 kg mixed with 100
litres of water and fermented for 3 - 5 days. Filter the solution and use as foliar spray.
5. Wheat and
Foxtail millet
Army worms of wheat and
foxtail millet / corn worm of
Maize (Spodoptera frugiperda)
– Infestation is more in lushy
vegetative growth phase)
Spraying of neem leaf extract (5 kg neem leaves grounded in boiled water and diluted
to 100 litres) can reduce the worms attack.
6. Wheat,
Sorghum and
Ragi
Brown rust (Puccinia recondite
tritici), yellow rust (Puccinia
strciformis) and black rust (Puccinia
graminis tritici), Rust of sorghum/
foxtail millet – (attacks the crop in
the later vegetative phase)
Use rust resistant varieties, spray sour butter milk solution (5 litres in 200 litres of
water) or spray dry leaf power extract of mint (Pudhina) or Amaranth green @ 25 – 30
gms per litre of water.
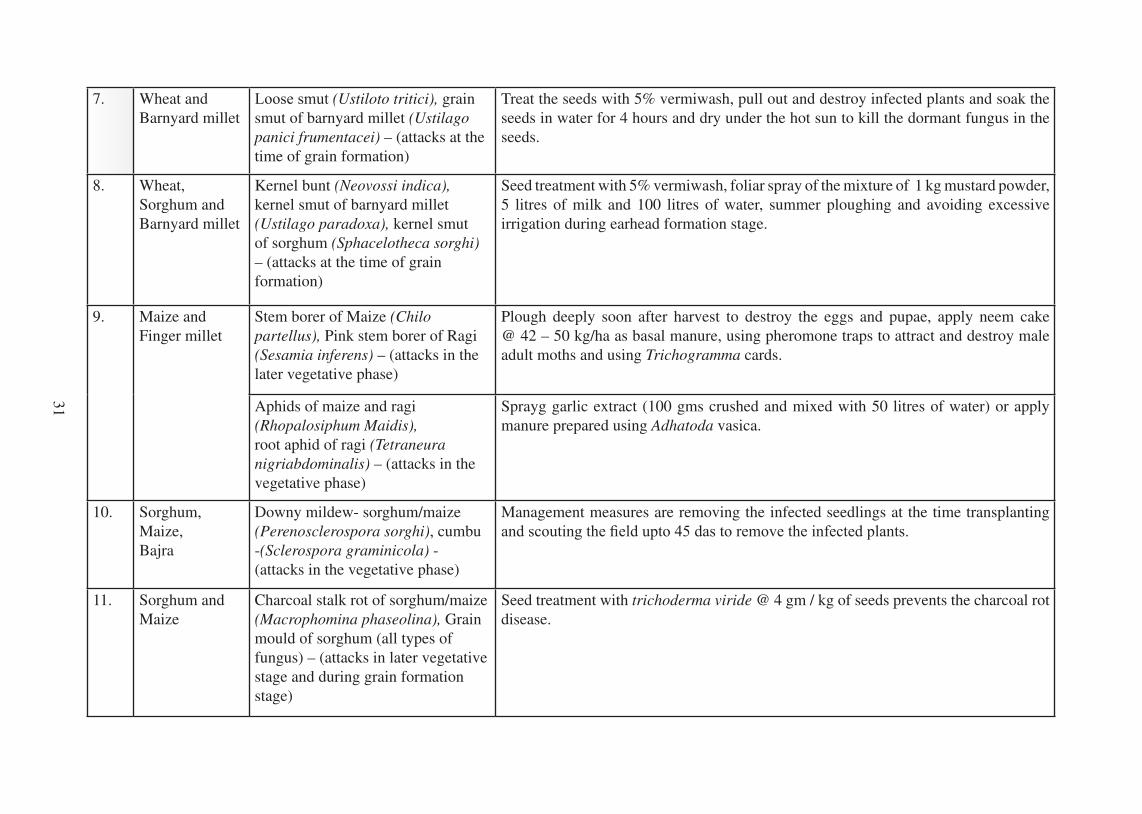
31
7. Wheat and
Barnyard millet
Loose smut (Ustiloto tritici), grain
smut of barnyard millet (Ustilago
panici frumentacei) – (attacks at the
time of grain formation)
Treat the seeds with 5% vermiwash, pull out and destroy infected plants and soak the
seeds in water for 4 hours and dry under the hot sun to kill the dormant fungus in the
seeds.
8. Wheat,
Sorghum and
Barnyard millet
Kernel bunt (Neovossi indica),
kernel smut of barnyard millet
(Ustilago paradoxa), kernel smut
of sorghum (Sphacelotheca sorghi)
– (attacks at the time of grain
formation)
Seed treatment with 5% vermiwash, foliar spray of the mixture of 1 kg mustard powder,
5 litres of milk and 100 litres of water, summer ploughing and avoiding excessive
irrigation during earhead formation stage.
9. Maize and
Finger millet
Stem borer of Maize (Chilo
partellus), Pink stem borer of Ragi
(Sesamia inferens) – (attacks in the
later vegetative phase)
Plough deeply soon after harvest to destroy the eggs and pupae, apply neem cake
@ 42 – 50 kg/ha as basal manure, using pheromone traps to attract and destroy male
adult moths and using Trichogramma cards.
Aphids of maize and ragi
(Rhopalosiphum Maidis),
root aphid of ragi (Tetraneura
nigriabdominalis) – (attacks in the
vegetative phase)
Sprayg garlic extract (100 gms crushed and mixed with 50 litres of water) or apply
manure prepared using Adhatoda vasica.
10. Sorghum,
Maize,
Bajra
Downy mildew- sorghum/maize
(Perenosclerospora sorghi), cumbu
-(Sclerospora graminicola) -
(attacks in the vegetative phase)
Management measures are removing the infected seedlings at the time transplanting
and scouting the field upto 45 das to remove the infected plants.
11. Sorghum and
Maize
Charcoal stalk rot of sorghum/maize
(Macrophomina phaseolina), Grain
mould of sorghum (all types of
fungus) – (attacks in later vegetative
stage and during grain formation
stage)
Seed treatment with trichoderma viride @ 4 gm / kg of seeds prevents the charcoal rot
disease.
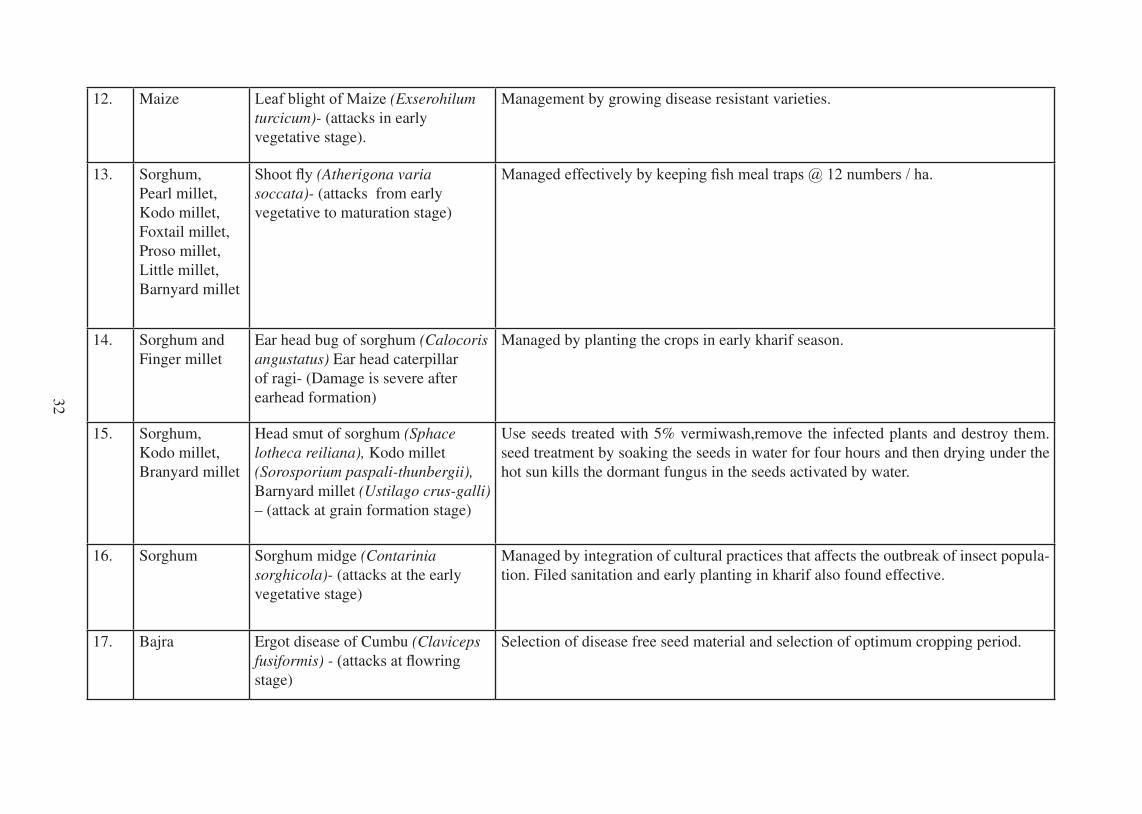
32
12. Maize Leaf blight of Maize (Exserohilum
turcicum)- (attacks in early
vegetative stage).
Management by growing disease resistant varieties.
13. Sorghum,
Pearl millet,
Kodo millet,
Foxtail millet,
Proso millet,
Little millet, Barnyard millet
Shoot fly (Atherigona varia
soccata)- (attacks from early
vegetative to maturation stage)
Managed effectively by keeping fish meal traps @ 12 numbers / ha.
14. Sorghum and
Finger millet
Ear head bug of sorghum (Calocoris
angustatus) Ear head caterpillar
of ragi- (Damage is severe after
earhead formation)
Managed by planting the crops in early kharif season.
15. Sorghum,
Kodo millet,
Branyard millet
Head smut of sorghum (Sphace
lotheca reiliana), Kodo millet
(Sorosporium paspali-thunbergii),
Barnyard millet (Ustilago crus-galli)
– (attack at grain formation stage)
Use seeds treated with 5% vermiwash,remove the infected plants and destroy them.
seed treatment by soaking the seeds in water for four hours and then drying under the
hot sun kills the dormant fungus in the seeds activated by water.
16. Sorghum Sorghum midge (Contarinia
sorghicola)- (attacks at the early
vegetative stage)
Managed by integration of cultural practices that affects the outbreak of insect popula-
tion. Filed sanitation and early planting in kharif also found effective.
17. Bajra Ergot disease of Cumbu (Claviceps
fusiformis) - (attacks at flowring stage)
Selection of disease free seed material and selection of optimum cropping period.

33
1. Sweet flag rhizome extract
Pound 10 gms of sweet flag rhizome to a coarse powder and add 50 ml of water.
Leave the solution undisturbed for one hour and filter the Sweet flag rhizome extract. For seed treatment, boil one litre of water and
add 50 ml each of cow’s urine and sweet flag rhizome extract the next day. Soak the seeds in
water for six hours and then in the above solution
for about 30 minutes. Filter the seeds, shade dry
and sow. This gives protection against a number
of bacterial and fungal diseases.
2. Cow dung extract
Mix one kilogram of cow dung with 10 litres of
water and filter using a gunny cloth. Dilute the solution with 5 litres of water and filter again. This can be used for spraying.
3. Panchagavyam
Panchagavyam is a growth regulator produced
with the combination of five products obtained from the cow along with a few other bioproducts.
Collect fresh cow dung (5 kg), mix it with ghee
(1 litre) and keep it in a plastic barrel separately
for 3 days. On the same day, mix the other
ingredients namely cow’s urine (3 litres), cow’s
milk (2 litres), curd (2 litres), yellow banana
(400 gms, without skin), coconut water (3 litres),
Jaggery (one kilogram dissolved in 3 litres water)
in a plastic barrel separately. Filter the jaggery
solution before adding it to the other ingredients.
On the 3rd day, mix the contents of both the barrels
and leave it aside for 7 days. Stir the contents
with a wooden stick twice a day. After 7 days,
filter the product with a khada cloth / Terracot (TC) cloth and store it in closed containers.
(Pierce small holes in the cap of the containers
to prevent bursting). This is diluted @ 300ml/10
litres water and sprayed.
4. Amirthakaraisal
Take fresh cow dung (10 kg), cow’s urine
(10 litres), country jaggery (1 kg) and water
(100 litres) in a cement tank and mix well. This
can be used the next day. Add this extract to
the irrigation channel or spray directly. This
improves the soil fertility and gives good yield.
5. Bija Amrut
Ingredients: Cow dung – 5kg, cow’s urine –
5 lit, cow’s milk – 1 lit, lime – 250 gms and water
– 100 lit.
Mix all the ingredients and keep it overnight,
sprinkle this formulation on seeds to be sown,
dry in shade before sowing.
6. Jiwa Amrut
Ingredients: Cow dung – 10 kg, cow’s urine –
10 lit, jiggery (old) – 2 kg, flour of gram, pigeon pea, moong dal or cowpea or urad dal – 2 kg, live
soil – 1 kg and water – 200 lit
Take 100 litres of water in barrel and add 10 kg
cow dung + 10 lit cow’s urine. Mix well with the
help of wooden stick, add 2 kg old jaggery and
2 kg flour. Mix this solution well with wooden stick. Keep this solution for fermentation for
2 to 7 days. Shake the solution regularly three
times a day.
7. Amrit Pani
Mix 10 kg of cow dung with 500 gm honey and
mix thoroughly to form a creamy paste. Add 250
gm of ghee and mix at high speed. Dilute with
200 litres of water. Sprinkle this suspension in
one acre over soil or with irrigation water. After
30 days, apply second dose in between the row of
plants or through irrigation water.
8. Ginger, Garlic, Chilli Extract
This extract is made from three plants. For
preparing the extract required for one acre,
1 kg of garlic, ½ kg of ginger and ½ kg of green
chillies are required. Take all the three separately
and make them into a fine paste. Dissolve all the three pastes in 7 litres of water and mix them
well. On filtering this, 6 litres of extract can be obtained. The concentration of the extract can be
APPENDIX – II PREPARATION PROCEDURES OF
BOTANICALS AND ANIMAL PRODUCTS

34
increased or decreased from 500 - 1000 ml/tank
(10 litre capacity) depending on the intensity
of the pest attack. This extract should be used
immediately after preparation. This extract can
be stored for a maximum of 3 days.
9. Five Leaf Extract
This extract is prepared using leaves of five different plants. Leaves with five different characteristics are used for this purpose.
Plants with milky latex - • Calotropis, Nerium,
Cactus and Jatropha.
Plants which are bitter -• Neem, Andrographis,
Tinospora and Leucas.
Plants that are generally avoided by cattle - • Adathoda, Ipomea fistulosa
Aromatic plants – • Vitex, Ocimum, Papaya
Plants that are not affected by pests and • diseases – Morinda, Ipomea fistulosa
One plant in each category should be taken in
equal quantities (1 kg in each) and pound well.
Take them in a mud pot and add twice the quantity
of water. To this, add 1 litre of cow’s urine and
100 g of Asafoetida. Tie the mouth of the pot
tightly with a cloth. This extract should be mixed
well daily in the evening.
This extract should be used after a period of one
week. If this extract is to be used for prophylatic
as a precautionary measure, 500 ml of the
extract should be added for a tank of 10 litre
capacity. This should be diluted with 9½ litres of
water and used. If the pest infestation is severe
1000 ml of extract should be used per tank and
diluted with 9 litres of water. This extract can be
stored and used for a period of 25 - 30 days.
Note : Cow’s urine is used for disease control
and Asafoetida prevents flower dropping and enhances the yield.
10. Neem Kernel Extract
About 3 – 5 kg of neem kernel is required for
an acre. If the seeds are fresh, 3 kg of kernel is
sufficient. If the seeds are old, 5 kg is required. Remove the outer seed coat and use only the
kernel. Pound the kernel gently and place it in
an earthen pot. To this, add 6 - 10 litres of water.
Tie the mouth of the pot securely with a khada
cloth. Leave it as such and filter after 3 days. On filtering, 5 - 9 litres of extract can be obtained. When the pest incidence is more, 1000 ml of this
extract should be used for one tank (a tank of 10
litre capacity). If the pest population is less, it is
enough to use just 500 ml of the extract for one
tank. 500 - 1000 ml of extract should be diluted
with 9½ or 9 litres of water before spraying.
Khadi soap solution @ 10 ml/litre (100 ml/
tank) should be added to help the extract stick
well to the leaf surface. For one acre of the crop,
6-7 tanks of the diluted extract should be used.
Note : The seeds used for preparing this extract
should be at least 3 months old. When they are
less than 3 months or more than 8 months old,
the azadirachtin content in the seeds will be less
and hence the pest control property in these seeds
will also be poor. The extract prepared should
be milky white in colour. If they are prepared
from aged seeds, the extract will be brownish in
colour.
Preparation of Khadi Soap Solution
Khadi soap solution should be added with all
botanicals before spraying. This is a neem based
soap without any detergent. Khadi soap solution
helps the extract to stick well to the plant surface.
It should be soaked overnight in water and used.
The soap solution should be sticky and thick in
nature. Before spraying the botanicals, for every
one litre of the extract, 10 ml of khadi soap
solution should be added.
11. Neem Cake Extract
5 kg of Neem cake is required for an acre of land.
Powder the neem cake well and place it in a khada
cloth and tie it. Soak it in a vessel containing
10 litres of water for 3 days. After 3 days
squeeze the pouch well into the water. About
7 – 8 litres of extract can be obtained. About
500 – 1000 ml of this extract is used for one tank
(a tank of 10 litre capacity). 500 - 1000 ml of
the extract should be diluted with 9½ or 9 litres
of water before spraying. Khadi soap solution
@ 10 ml / litre (100 ml/ tank) should be added to
help the extract stick well to the leaf surface. For
one acre 6-7 tanks of the extract should be used.
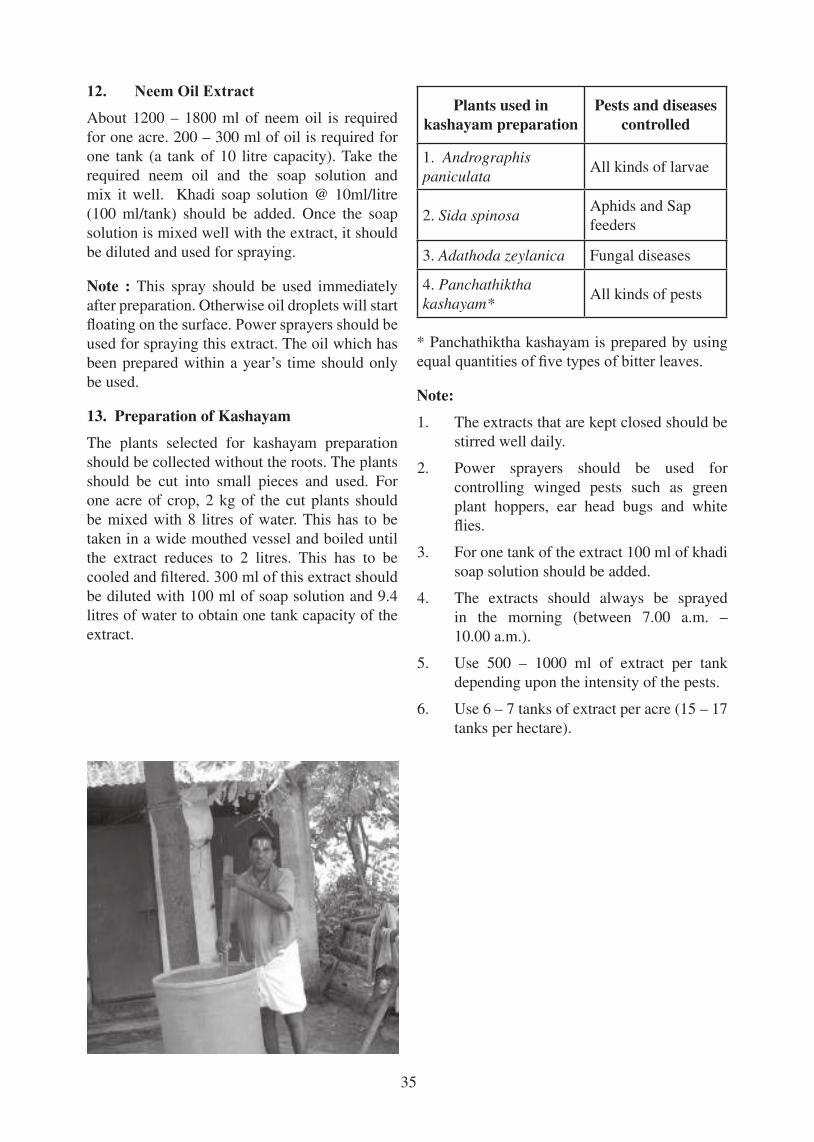
35
12. Neem Oil Extract
About 1200 – 1800 ml of neem oil is required
for one acre. 200 – 300 ml of oil is required for
one tank (a tank of 10 litre capacity). Take the
required neem oil and the soap solution and
mix it well. Khadi soap solution @ 10ml/litre
(100 ml/tank) should be added. Once the soap
solution is mixed well with the extract, it should
be diluted and used for spraying.
Note : This spray should be used immediately
after preparation. Otherwise oil droplets will start
floating on the surface. Power sprayers should be used for spraying this extract. The oil which has
been prepared within a year’s time should only
be used.
13. Preparation of Kashayam
The plants selected for kashayam preparation
should be collected without the roots. The plants
should be cut into small pieces and used. For
one acre of crop, 2 kg of the cut plants should
be mixed with 8 litres of water. This has to be
taken in a wide mouthed vessel and boiled until
the extract reduces to 2 litres. This has to be
cooled and filtered. 300 ml of this extract should be diluted with 100 ml of soap solution and 9.4
litres of water to obtain one tank capacity of the
extract.
Plants used in
kashayam preparation
Pests and diseases
controlled
1. Andrographis
paniculata All kinds of larvae
2. Sida spinosa Aphids and Sap
feeders
3. Adathoda zeylanica Fungal diseases
4. Panchathiktha
kashayam* All kinds of pests
* Panchathiktha kashayam is prepared by using
equal quantities of five types of bitter leaves.
Note:
1. The extracts that are kept closed should be
stirred well daily.
2. Power sprayers should be used for
controlling winged pests such as green
plant hoppers, ear head bugs and white
flies.
3. For one tank of the extract 100 ml of khadi
soap solution should be added.
4. The extracts should always be sprayed
in the morning (between 7.00 a.m. –
10.00 a.m.).
5. Use 500 – 1000 ml of extract per tank
depending upon the intensity of the pests.
6. Use 6 – 7 tanks of extract per acre (15 – 17
tanks per hectare).

36
APPENDIX – III
COMMON AND SCIENTIFIC NAMES OF PLANTS
Sl. No. English Name Scientific Name
1. Amaranth Amaranthus sp.
2. Andrographis Andrographis paniculata
3. Barnyard millet/kudiraivali Echinochloa frumentacea
4. Calotropis Calotropis gigantea
5. Castor Ricinus communis
6. Colocasia (taro/chembu) Colocasia exculenta
7. Dhaincha Sesbania cannabina
8. Finger millet/Ragi Eleusine coracana
9. Foxtail millet/Italian millet/Tenai Setaria italica
10. Garari Cleistanthus collinus
11. Glyricidia Gliricidia sepium
12. Groundnut Arachis hypogaea
13. Indian Indigo Indigofera tinctoria
14. Johnson grass Sorghum halepense
15. Kodo millet/Varagu Paspalum scrobiculatum
16. Little millet/Samai Panicum sumatrense
17. Maize Zea mays
18. Malabur nut Adhatoda vasica
19. Mint/pudhina Mentha piperita
20. Mustard Brassica juncea
21. Neem Azadirachta indica
22. Paddy Oryza sativa
23. Pearl millet Pennisetum glaucum
24. Pongamia Millettia pinnata
25. Poison nut Strychnos nux vomica
26. Pomelo/Pambalimasu Citrus maxima
27. Prosopis Prosopis juliflora
28. Proso millet/PaniVaragu Panicum miliaceum
29. Sorghum Sorghum bicolor
30. Sesbania Sesbania grandiflora

37
31. Sudan grassSorghum bicolor sub
sp.drummondii
32. Sugarcane Saccharum officinarum
33. Sunhemp Crotalaria juncea
34. Sweet flag Acorus calamus
35. Wheat Triticum aestivum
36. Wild Guava Careya arborea
37. Wild tulsi Ocimum tenuiflorum

38
Sl. No. English Name Scientific Name
1. Aphids (Corn aphid) Rhopalosiphum maidis
2. Armyworm Spodoptera frugiperda
3. Brown wheat mite Petrobia latens
4. Green leaf hopper Nephotettix virescens
5. Jassids Pyrilla perpusilla
6. Leaf folder of paddy Cnaphalocrocis mainsails
7. Pink stem borer of ragi Sesamia inferens
8. Rice case worm Nymphula depunctalis
9. Root aphids of ragi Tetraneura nigriabdominalis
10. Shoot fly of sorghum Atherigona varia soccata
11. Shoot fly of little millet Atherigona pulla wiedemann
12. Sorghum midge Contarinia sorghicola
13. Stem borer of sorghum/maize Chilo partellus
14. Yellow stem borer of paddy Scirpophaga incertulas
APPENDIX – IV
COMMON AND SCIENTIFIC NAMES OF INSECTS

39
ALIEN SPECIES: Species that do not
naturally occur within an area and that
have usually arrived in the area as a
result of human intervention. Alien species often
have adverse effects on native species as a result
of competition.
ANTHESIS: The process of dehiscence of
anthers and the period of pollen distribution - See
also Dehiscence.
BREEDER SEED : The seed of a new variety
with highest purity, produced, developed,
controlled and distributed directly by the breeders
or their institution for further multiplication.
CERTIFIED SEED : The progeny of the
foundation seed, registered or certified seeds, handled to maintain sufficient varietal identity and purity, grown by selected farmers under
prescribed conditions of culture and isolation and
subjected to field and seed inspections prior to the approval by the certifying agency.
CROSS POLLINATION: When the pollen
of one flower gets deposited on the stigma of another flower either on the same plant or on a different plant of the same kind.
CULTURAL PRACTICE: The oldest and
effective method of pest suppression. Practices
like, deep ploughing and burning of crop residues,
synchronous planting of crop fields, planting trap crops, intercropping, crop rotation, tillage and
use of pest-free seeds and planting material are
examples of cultural practices.
DAMPING OFF: An infection of the basal
portion of the nursery seedlings and young plants
caused by fungus, resulting in decomposition of
the plants.
DEHISCENCE: Act of anthers becoming ripe
and bursting to discharge the dry pollens. The
time when this takes place is called anthesis.
APPENDIX-V GLOSSARY OF TECHNICAL TERMS
DESICCATE: Process of drying seeds
completely in order to preserve it.
DOUGH GRAIN STAGE: In paddy crop, the
stage in which the milky portion of the grains
turns into soft dough and later into hard dough.
The grains in the panicle will turn from green to
yellow colour.
EXOTIC SPECIES: A species that has been
introduced from another geographic region to an
area outside its natural range.
FOUNDATION SEED : The progeny of the
breeder seed produced by the trained officers of an agricultural station in conformity with regulated
national standards and handled to maintain
genetic purity and identity of the variety.
FUMIGATION: The application of smoke,
vapour or gas for the purpose of disinfecting or
destroying pests or microorganisms.
GENETIC UNIFORMITY / PURITY: A
variety that has all the unique characteristics of
its mother. It can be maintained by isolation of a
crop by a specified distance from other varieties (or) contaminants. See varietal purity.
GINNING: It is the process of removing the
fibres around the seeds of cotton in an authorised seed processing units under close supervision of
the concerned authorities.
GLUME: The two chaffy basal bracts of a paddy
spikelet.
GREEN MANURE CROPS: Plants that can
absorb atmospheric nitrogen with the help of
certain microorganisms found in their root
nodules and convert it into a form, which can be
used by the soil. Eg. Most of the Leguminosae members.
HAULMS: The vegetative shoot portion of the
potato crop is called as haulm.

40
INFLORESCENCE: An inflorescence is a group or cluster of flowers arranged on a stem that is composed of a main branch or a complicated
arrangement of branches.
MONECIOUS: Plants with separate male
flowers and female flowers on the same plant.
OFFTYPES: Plants that are differ in
morphological and agronomical characteristics
from the majority or the representative plants
of a variety. Ex: Admixtures and obvious
contaminants in a field.
OPEN POLLINATION: Pollination occuring by
insects, birds, wind, or other natural mechanisms.
The seeds of open-pollinated plants will produce
new generations of those plants.
PANICLE: When axis of raceme branches and
the flowers are borne not directly on the axis but on its branches then the inflorescence is called a panicle.
PSB (PHOSPHATE SOLUBILIZING
BIOFERTILIZERS): Bio – fertilizers
containing the phosphate solubilizing microbes
like Pseudomonas, Agrobacterium, Rhizobium
etc., are known as phosphate solubilizing
biofertilizers.
PLANKING: In some crops soon after the seed
sowing, the seeds are covered with a layer top
soil using a wooden plank to protect them from
insects, birds etc. Ex: Mustard.
PUBESCENCE: The hairy growth on the surface
of the plant body.
ROUGING: The act of removing undesirable
plants. The removal of individual plants, which
deviate in a significant manner from the normal or average type of a variety. A step in the
maintenance of purity in an established variety
or in the attainment of purity in a new variety.
SEED DORMANCY: A period in the seed
life history where development is temporarily
suspended.
SEED DRILL: An agricultural implement that
makes furrows into which it drops seeds.
SEED VIABILITY: The capacity of a seed to
germinate.
STOLON: A prostrate stem, at or just below the
surface of the ground that produces new plants
from buds at its tips or nodes. Eg: Potato
TASSEL: Tassel is the male flower of the corn plant. The tassel is a group of male flowers that grow at the apex or top of the corn stalk. Tassels
are in the shades of yellow, green and purple.
THINNING: The process of removing additional
seedlings from a pit / plot after germination
to improve the growth rate or health of other
seedlings.
TIME ISOLATION: Separation of varieties /
species / contaminants by adjusting the sowing
date in such a way that both crops do not come
to flowering at the same time. The crossing is prevented and genetic purity is maintained.
UNISEXUAL: Flowers having either stamens
(Androecium) or stigma (gynoecium) are said to
be unisexual. If they have only the androecium,
they are male flowers. If the flowers have only the gynoecium, they are said to be female flowers. Eg. Cucurbit, Castor.
VARIETAL PURITY: Maintenance of true to
type nature of the plant / seed. The plant / seed
resembles it’s mother in all features (i.e.) from
seed to plant to seed.
VIGOUR: Seed vigour is a measure of the quality
of seed, and involves the viability of the seed, the
germination percentage, germination rate and the
strength of the seedlings produced.
VOLUNTEER PLANTS: Unwanted plants
growing from the seeds that remain in the field from a previous crop.
WINNOWING: A method by which the chaff
is wafted away from the seeds after tossing into
the air. By this method the calyxes, stems, old
petals, husks and dead reproductive organs of the
flowers and fruits etc. could be separated from the seeds.

Seed Production Techniques for
Oilseeds and Pulses
The Revitalizing Rainfed Agriculture Network (RRAN) is a growing network
of civil society organizations, research institutions, policy makers, donors
and individuals engaged in evolving a differentiated agricultural policy with
enhanced public investments and support system for rainfed areas in India. The
Comprehensive Pilots (CPs) are part of the RRA Network’s action research
programme that seeks to establish evidence and experience on the ground, in
support of the various propositions that the Network has developed. In order
to offer support for CPs a set of organizations have been identified as Nodes on specific identified themes such as – seeds, soils, water, millets, fisheries, livestock, credit, markets and institutions.
The Centre for Indian Knowledge Systems (CIKS) has been identified and functioning as the nodal anchor for the theme of seeds. A series of booklets is
being published on various technical and institutional aspects of seed systems
to build the capacity of the CPs as well as various field groups who are involved in the efforts to build community managed seed systems.
This publication on seed production for oilseeds and pulses describes the
procedures and technologies involved in the production of quality seeds of
oilseeds and pulses. Next to cereals, oilseeds and pulses are the major crops
in India. The technologies involved in the certified and foundation stages of seed production from seed selection to storage including the quality standards
for the seeds and appropriate storage methods are explained in detail in this
publication.
Centre for Indian Knowledge Systems, Chennai
www.ciks.org
Revitalising Rainfed Agriculture Network
www.rainfedindia.org

Seed Production Techniques
for Oilseeds and Pulses
Authors
R. Abarna Thooyavathy, Subhashini Sridhar,
K. Subramanian and K. Vijayalakshmi
Editorial Assistance
R. Abarna Thooyavathy
K. Parimala
Editor
K. Vijayalakshmi, CIKS
Centre for Indian Knowledge Systems, Chennai
Revitalising Rainfed Agriculture Network
December 2013
Title Seed Production Techniques for Oilseeds and
Pulses
Authors R. Abarna Thooyavathy, Subhashini Sridhar,
K. Subramanian and K. Vijayalakshmi
Editorial Assistance R. Abarna Thooyavathy, K. Parimala
Editor K. Vijayalakshmi
Technical Consultancy S. Mahalinga Kannan, Retd. Asst. Director of
Agriculture, Government of Tamilnadu
Publication December 2013
Cover Photograph Centre for Indian Knowledge Systems
Cover Design & Typesetting S. Ramesh
Design Consultant Pavithra Sankaran
Published by Centre for Indian Knowledge Systems (CIKS)
Seed Node of the Revitalising Rainfed Agriculture
Network
Financial Support Revitalising Rainfed Agriculture Network
Copies can be had from Centre for Indian Knowledge Systems,
No.30,Gandhi Mandapam Road, Kotturpuram,
Chennai – 600 085
Ph: (044) 24471087, 24475862
Email: [email protected] /[email protected]
Website: www.ciks.org
The RRA Network, Secretariat
WASSAN, House No. 12-13-450
Street No. 1, Tarnaka
Secunderabad - 500 017, Andhra Pradesh.
Email : [email protected]
Website : www.rainfedindia.org
Printed by PM Digital Products
‘Konar Maligai’, 25, Peters Road
Chennai - 600 014.

PREFACE
The Revitalizing Rainfed Agriculture Network (RRAN) is a growing network of
civil society organizations, research institutions, policy makers, donors and individuals
engaged in evolving a differentiated agricultural policy with enhanced public
investments and support system for rainfed areas in India. Based on the vast experience
on the ground and analysis of issues, RRA Network is evolving specific propositions on various aspects of rainfed agriculture such as seeds, soils, water, crop systems,
millets, livestock, fisheries, credit, markets and institutions. The Comprehensive Pilots (CPs) are part of the RRA Network’s action research programme that seeks to establish
evidence and experience on the ground, in support of the various propositions that the
Network has developed. In order to offer support for CPs a set of organizations have
been identified as Nodes on specific identified themes such as – seeds, soils, water, millets, fisheries, livestock, credit, markets and institutions.
The Centre for Indian Knowledge Systems (CIKS) has been identified and functioning as the nodal anchor for the theme of seeds. The CPs started functioning in
the year 2012 and in June 2012 the seed node convened a meeting of representatives
of CPs for an inception workshop in Chennai. During this workshop the CPs shared
their proposals and plans of work as well as their thinking about the work that they plan
to undertake in the area of seeds. Presentations were made during the workshop on
how to undertake a situation analysis with respect to seeds, the elements of designing
a robust seed system for rainfed areas and also about undertaking a planning exercise
through which each CP can proceed towards the establishment of a robust community
managed seed system in its area of work. A part of the workshop was to identify the
specific needs expressed by each of the CPs in terms of the support and help they would need in the area of seeds. A beginning was made in terms of the capacity building
exercise through a series of presentations.
Beginning from the early part of the year 2012 Dr. G. Venkat Raman of the Seed
node had started making a series of visits to various CPs. During the visits he provided
help and assistance to the CPs for performing situation analysis, evolving a plan for a
robust seed system for the area undertaking capacity building exercises and also trying
to create linkages between the groups and scientists and institutions who could provide
technical support. During this process he also identified various needs in the form of topics on which training and capacity building was required.
Subsequently, on two different occasions when the seed node team met the
CPs – in Bagli in Madhya Pradesh in November 2012 and in Tiptur in Karnataka in
December 2012 there were opportunities to review the progress of each CP as well
as provide technical inputs and training. Earlier this year, towards the end of July
2013 a workshop was held by the seed node in the CIKS Technology Resource Centre
in the Kancheepuram district of Tamil Nadu. In this workshop a series of technical
trainings were provided on various aspects of seeds. The training was not only in the
form of lectures and presentations but also included field work, experiments, visits to government and private seed farms and seed production centres as well as meetings
with the officials of the Directorate of Agriculture and Seed Certification departments. During these meetings drafts of some of the technical training modules that were
prepared were circulated and comments and suggestions were sought from the CPs.
Based on these efforts and also building upon discussions that took place during the
visits to CPs a set of topics had been identified to produce training modules. We expect this process to be dynamic and interactive so that changes can be made based on the
suggestions received from the various user groups. A series of reports and books that
have been circulated and discussed as drafts and presentations are now being brought
out as publications.
A.V. Balasubramanian Centre for Indian Knowledge Systems
Coordinator RRA Seed Node Chennai, December 2013
About this Book
This publication on seed production for oilseeds and pulses describes the procedures and
technologies involved in the production of quality seeds of oilseeds and pulses. Next to
cereals, oilseeds and pulses are the major crops in India. The technologies involved in the
certified and foundation stages of seed production from seed selection to storage including the quality standards for the seeds and appropriate storage methods are explained in detail in this
publication.

CONTENTS
Seed Producton in Oilseeds 1
Groundnut (Arachis hypogaea) 2
Gingelly (Sesamum orientale) 5
Sunflower (Helianthus annuus) 7
Mustard (Brassica sp.) 9
Seed Production in Pulses 11
Greengram and Blackgram (Vigna radiata and Vigna mungo) 12
Cowpea and Soya bean (Vigna unguiculata and glycine Max) 14
Redgram (Cajanus cajan) 17
Horsegram (Macrotyloma uniflorum) 19
References 21
Appendix I: Pest and Disease Management in Oilseeds and Pulses 22
Appendix II : Preparation Procedures 27
Appendix III : Common and Scientific Names of Plants 30
Appendix IV : Common and Scientific Names of Insects 31
Appendix V : Glossary of Technical Terms 32


1
SEED PRODUCTION IN OILSEEDS
India is one of the largest vegetable oil
economies in the World, next only to USA
and China. Next to food grains in terms of
hectarage, production and value, oilseeds play a
vital role. India accounts for about 13% of world’s
oilseed area, 7% of world’s oilseeds output and
10% of world’s edible oils consumption. The
country’s diverse agroecological conditions
favour the cultivation of all nine annual oilseeds
which include edible and non-edible oilseeds.
The country ranks first in the global production of castor, sesame and niger, second in groundnut
and mustard, third in linseed and fifth in soya bean and sunflower. 13% of the gross cropped area is occupied by oilseeds which accounts for 10% of
the value of all the agricultural commodities.
The oilseeds scenario in the country is presenting
a dismal picture currently. India changed from
net importer in 80s to a net exporters status during
the early 90s. However, it is back to net importer
status, necessitating import of more than 40% of
its annual edible oils.
To achieve good production of oilseeds good
quality seeds are of great importance. The first section of this book provides the seed production
technologies for four important oilseed crops
i.e., groundnut, gingelly, sunflower and mustard. While the standards mentioned here are for
certified seed production farmers are also advised to follow these procedures in general for seed
production. This will ensure good quality seeds
which will in turn lead to good crop yields.

2
Groundnut (Arachis hypogaea) is one of
the important oilseed crops belonging
to the family Fabaceae. The optimum
season for seed production is December –
January for the irrigated crop and June – July for
the rainfed crop. The maturation and harvesting
period should not coincide with the rainy season.
If it coincides with the rains in-situ germination
of the pods, will take place.
Method of seed production
Groundnut is a self pollinated crop with 0 – 5%
of cross pollination. The crop should be raised in
isolation and seeds should be produced by self
pollination. The isolation distance maintained
between the varieties is 3 metres for both certified and foundation seed production.
Seed production stages
Breeder seed è Foundation seed è Certified seed.
Land selection
The land selected should not be cultivated with
groundnut in the previous season. The soil should
be fertile and porous with good drainage facility.
Seed selection and sowing
Certified seeds should be obtained from an authorised source. Healthy kernals free from
disease and pest infection should be used for
GROUNDNUT (Arachis hypogaea)
sowing. Remove the decoated, tip broken,
coloured kernals and use uniformly graded seeds.
Seed rate is 45 kg/acre (110 kg/ ha) for spreading
type and 50 kg/acre (120 kg/ha) for bunch type.
Selected seeds should be treated with asafoetida
solution (1.5 kg in 12 litres of water is sufficient for120 kg of seeds) to prevent the crop from blight
disease. Soak the selected seeds in this solution
for 12 hours and then shade dry for 30 minutes
before sowing. Biofertilizers like Rhizobium
(600 gms for 120 kg of seeds) and Bio-control
agents like Trichoderma viride (480 gms for
120 kg of seeds) can also be used for the seed
treatment. Mix Rhizobium (or) Trichoderma with
500 ml of cooled rice gruel and mix the solution
with seeds. Shade dry the seeds for 30 minutes
before sowing.
Treated seeds are dibbled either manually or
mechanically (using seed drill) at a depth of
7.5 – 10 cm. The spacing for bunch type is
30 x 10 cm and 45 x 20 cm for spreading type.
Nutrient management
Groundnut is a deep rooted plant and hence uses
both moisture and nutrients in the deeper layers
of the soil. Nitrogen requirement in rainfed crop
is 4 kg/acre (10 kg/ha) and in irrigated crop it is
7 kg/acre (17 kg/ha). Phosphorus requirement for
rainfed crop is 4 kg/acre (10 kg/ha) and in irrigated
crop it is 14 kg/acre (35 kg/ha). Although Indian
soils are rich in potassium, the recommended
dose is 18 kg/acre (45 kg/ha) in rainfed and
22 kg/acre (54 kg/ha) in irrigated crop. Based
on this quantity, nitrogen rich vemicompost and
compost need to be applied before and after
20 days of sowing.
Before sowing, apply 4 tonnes of FYM, 16 kg
of neem cake and 80 kg of gypsum per acre
(10 tonnes of farmyard manure, 40 kg of neem
cake and 200 kg of gypsum per hectare) as basal
manure and incorporate into the soil with the
help of a country plough or a blade harrow. FYM
improves the porosity and structure of the soil and

3
supplies the crop with the required micronutrients.
An alternative to FYM is to practice green
manuring with crops like Sunhemp, Daincha and
other legumes. After 15 - 20 DAS first weeding is done and 16 kg/acre (40 kg/ha) of neem cake
and 8 kg/acre (20 kg/ha) of gypsum is applied.
Following this, 2 - 3 weeks after flowering 8 kg/acre (20 kg/ha) of neem cake and 0.8 tonnes/
acre (2 tonnes/ha) of vermicompost is applied.
Spraying 3% panchagavya (300 ml panchagavya
per tank of water) on 30th day and 10% buttermilk
(1litre curd in 9litres of water) on the 45th day
after sowing helps in crop growth.
Weed management
Weeds reduce the yield upto 20 – 45% in
groundnut. Based on the soil type and the extent
of weed infestation two hand hoeing and weeding
should be done. The first hoeing should be done three weeks after sowing. This should be repeated
before the onset of flowering. Weeding should not be done after 45 days as it may interrupt peg
elongation and pod formation.
Pest and disease management
Groundnut is affected by pests like root and pod
feeders (white grubs), red hairy caterpillar, leaf
miner and tobacco caterpillar and diseases like
leaf spot or tikka disease, rust, Alternaria leaf
spot and stem rot at different growth stages.
Detailed management measures for these pests
and diseases are provided in Appendix – I.
Interculture and Earthing up
Inter cultivation operations have to be started
as soon as the rows of groundnut seedlings
are visible and repeated at regular intervals till
45 days. Shallow inter cultivation is adequate.
Earthing up should be done simultaneously with
intercultural operations (40 days). It facilitates
maximum penetration of pegs and provides a
larger spreading area. Apply gypsum @ 80 kg/
acre (200 kg/ha) during earthing up to facilitate
peg penetration and to obtain good oil content.
Irrigation
Depending on soil texture, the frequency of
irrigation varies. However, irrigation should be
given during the critical stages of growth like
flowering, peg formation and pod development / seed filling. The crop should be irrigated once in 10 – 15 days. Irrigation before harvesting will
make the operation easier.
Roguing
Roguing should be done from vegetative phase
upto harvest. Off-types are removed based
on the colour, growth pattern, flowering etc. Maximum percentage of off-types permitted
at final inspection is 0.10% for Foundation seed production and 0.20% for Certified seed production.
Field inspection
A minimum of two inspections will be done, one
at flowering and second at pod maturity stage (15 days prior to harvesting) by the Seed
Certification Officer.
Field standard
Foundation
seed
Certified seed
Isolation
distance3 m 3 m
Off-types 0.10% 0.20%
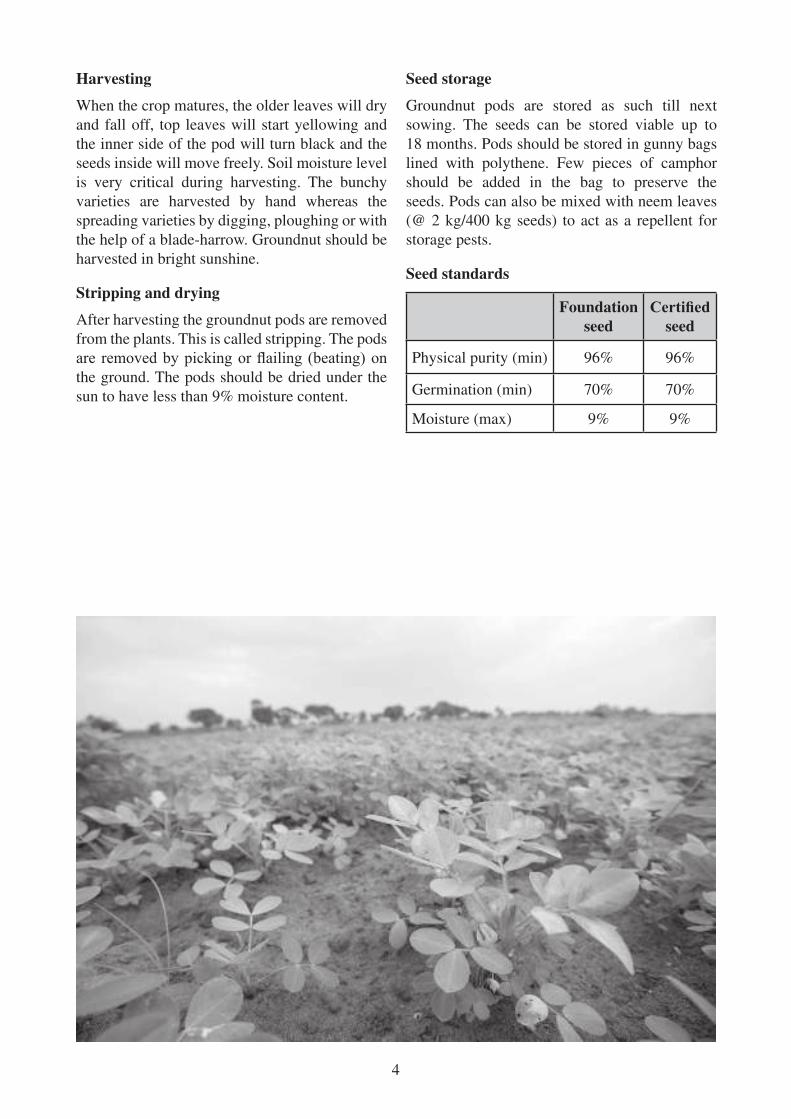
4
Harvesting
When the crop matures, the older leaves will dry
and fall off, top leaves will start yellowing and
the inner side of the pod will turn black and the
seeds inside will move freely. Soil moisture level
is very critical during harvesting. The bunchy
varieties are harvested by hand whereas the
spreading varieties by digging, ploughing or with
the help of a blade-harrow. Groundnut should be
harvested in bright sunshine.
Stripping and drying
After harvesting the groundnut pods are removed
from the plants. This is called stripping. The pods
are removed by picking or flailing (beating) on the ground. The pods should be dried under the
sun to have less than 9% moisture content.
Seed storage
Groundnut pods are stored as such till next
sowing. The seeds can be stored viable up to
18 months. Pods should be stored in gunny bags
lined with polythene. Few pieces of camphor
should be added in the bag to preserve the
seeds. Pods can also be mixed with neem leaves
(@ 2 kg/400 kg seeds) to act as a repellent for
storage pests.
Seed standards
Foundation
seed
Certified seed
Physical purity (min) 96% 96%
Germination (min) 70% 70%
Moisture (max) 9% 9%

5
Gingelly (Sesamum orientale) belonging
to the family Pedaliaceae is one of the
oldest oil seed crops cultivated for
culinary and medicinal needs. Seed production
can be done in all the three seasons - rabi (October
- November), kharif (June - July) and summer
(February - March).
Method of seed production
Gingelly is a cross pollinated crop and seeds
are allowed to set by open pollination and then
multiplied. The seed crop should be raised in
isolation and the isolation distance maintained
between varieties is 50 metres for certified and 100 metres for foundation seed production.
Seed production stages
Breeder seed è Foundation seed è Certified seed
Land selection
The land selected should not be cultivated with
the same crop in the previous season. The land
should be fertile with proper drainage facility.
Seed selection and sowing
Good quality certified seeds should be sourced from an authorised dealer. Seeds should be
healthy with a good germination percentage.
Seed rate is 2 kg/acre (5 kg/ha). Selected seeds
should be treated with bio-control agents like
Trichoderma viride @ 4 g/kg of seeds. Mix
Trichoderma viride in rice gruel and mix the
solution with seeds. Shade dry the seeds for
30 minutes before sowing. Soaking the seeds in
hot water at 52oC for 30 minutes before sowing
will control the bacterial leaf spot disease.
Treated seeds should be mixed with ash or fine sand to increase the volume for easy sowing.
Seeds can be sown in beds and channels or in
ridges and furrows. The spacing maintained is
60 x 30 cm (11 plants / m2).
Nutrient management
FYM or compost @ 4 tonnes/acre (10 tonnes/ha)
is thoroughly incorporated into the soil before the
last plough. This will improve the texture as well
as the nutrient content of the soil. To improve the
nitrogen content of the soil green manuring with
subabul @ 2 tonnes/acre (5 tonnes/ha) should be
done or castor cake or neem cake @ 400 kg/acre
(1 tonne/ha) should be applied.
Trichoderma viride @ 1.5 kg/acre mixed with
300 kg compost and kept as such for one week is
applied to the field as top dressing. It will protect the crop from root rot and pathogens like Pythium
and Phytophthora. In prolonged dry condition
top dressing can be done using vermiwash.
Rainfed sesame requires 17 kg of nitrogen,
13 kg of Phosphorous and 13 kg of Potassium,
whereas the irrigated crop requires 21, 23 and
23 kg respectively. Appropriate biofertilisers can
be used to meet the nutritional need of the crop.
Weed management
Sesame is very sensitive to weed competition
during the first 25 days after sowing. The first weeding is done 20 days after sowing followed
by the second one in 15 days interval. Another
weeding may be done in 15 days gap. Apart from
hand weeding, implements such as hand hoe,
bullock drawn blade harrow, rotary or finger weeders are used for weeding.
Pest and disease management
Gingelly is commonly affected by pest and
diseases like leaf and pod caterpillar, gall fly, sphinx or hawk moth, wilt, phyllody, stem and
GINGELLY (Sesamum orientale)

6
root rot and bacterial leaf spot at different growth
stages. The management measures for these pests
and diseases are provided in Appendix -I.
Interculture practices
Earthing up should be done at the stage of fruit
setting to avoid lodging of the crop.
Irrigation
Irrigation should be done once in 15 days. It is
critical during flowering and pot filling stage.
Roguing
Roguing should be done from vegetative phase
to harvesting phase. Off-types are removed based
on the branching type, capsule size and colour
of the seeds. Maximum percentage of off-types
permitted is 0.10% and 0.20% and permitted
percentage of plants affected by seed borne
diseases is 0.50% and 1.0% for foundation and
certified seed production respectively.
Field inspection
A minimum of three field inspections should be done from pre flowering stage to harvesting stage by the Seed Certification Officer. First inspection is done before flowering followed by the second inspection during flowering stage. The third inspection is scheduled between fruit maturity
and harvest.
Field standards
Foundation
seed
Certified seed
Isolation distance 100 m 100 m
Off-types 0.10% 0.20%
Plants affected
by seed borne
diseases
0.50% 1.00%
Harvesting
Harvesting should be done when 75 – 80% of
the pods become brown in colour and few at the
bottom have dehisced (burst open). At this stage
the moisture content of the pods and seeds will be
50 – 60% and 25 – 30%, respectively. For black
seeded variety, check the colour of the seeds in
the 10th capsule from the bottom of the crop. If
the seeds are black in colour then harvest should
be done. Delaying harvest may result in yield
loss.
Stacking and drying
The harvested plants are stacked upright in the
threshing yard for a period of three days. This
will help the immature pods in the terminal edge
to mature and also help in drying of the pods. The
moisture content of the pods will reduce to 9%.
Threshing and processing
Threshing is carried out manually by beating the
capsules with pliable bamboo sticks. The seeds
removed from the pods are graded using round
perforated metal sieves of 5/64” size.
Seed storage
Seeds are dried under the sun for 3-4 days to
reduce the moisture content to 5.0% before
storage. After proper drying the seeds should
be mixed with activated clay @ 1 kg/100 kg of
seeds. Seeds are then stored in gunny bags or
bins. Seeds can be stored upto one year under
open storage conditions.
Seed standards
The percentage of physical purity of foundation
and certified seeds should be 97% with 80% of germination capacity and 9% of moisture content.
The maximum presence of seeds of other crops
and weeds should be 10/kg for foundation and
20/kg for certified seeds.

7
Sunflower (Helianthus annuus) belonging
to the family Asteraceae was introduced
in India in 1969 and became one of the
important oilseed crops. The oil is used for
culinary purpose, preparation of cosmetics
etc. Seed production can be taken up in all the
three seasons like kharif, rabi and summer. For
rainfed conditions June – July and October –
November and for irrigated conditions April –
May and December – January is suitable for seed
production.
Method of seed production
Sunflower is a cross pollinated crop. Anthesis takes place between 5 – 8 am and the pollen
grains are viable for 12 hours. Honey bees are
the pollinating agents. During pollination if the
insect activity is low, it will result in poor seed
setting and poorly filled seeds. The isolation distance maintained between varieties is
200 metres for certified and 400 metres for foundation seed production. The potential of the
seed storage depends on the oil content of the
seeds. Sowing in September - October result in
seeds with low oil content. Hence the storage
potential of the seed is very high. If sowing took
place in March – April, the resulting seeds will
be high in oil content with less storage potential.
Seed production stages
Breeder seed è Foundation seed è Certified seed
Land selection
The land selected should not be cultivated with
sunflower in the previous season. The soil should be fertile with neutral pH and good drainage
facility.
Seed selection and sowing
Seeds should be obtained from the appropriate
source approved by the seed certification agency. Fresh seeds possess 45 – 60 days of dormancy.
To break the dormancy, the selected seeds should
be soaked in water for 12 – 16 hours and seeds
can also be leached in running water. Seed rate
is 3 – 4 kg/acre (8 - 10 kg/ha). Treated seeds are
sown in the field with a spacing of 45 x 30 cm.
Nutrient management
FYM or compost @ 4 tonnes/acre (10 tonnes/
ha) is thoroughly incorporated into the soil
before the last plough. This will improve the
texture as well as the nutrient content of the soil.
NPK @ 16:8:8 kg/acre (40:20:20 kg/ha) is
recommended for better seed yield. Nitrogen
supply can be split into two halves and applied
as basal dose at the time of sowing and as top
dressing after 30 – 35 DAS just after weeding.
Weed management
Maintaining the seed field free from weeds and unwanted plants is very important for successful
seed production. A total of two hand hoeing and
a weeding should be done. First weeding is done
30 – 35 days after sowing.
Pest and disease management
Sunflower crop is affected by pest and diseases like white fly, jassids, capitulam borer and root rot at different growth stages. The management
measures for these pests and disease are provided
in Appendix -I.
Irrigation
First irrigation is done soon after the seed sowing.
On the third day after sowing field should be again irrigated. After this depending on the
nature of the soil field should be irrigated once a week. Irrigation is very critical during flowering and seed maturation stages. Water scarcity at
these stages will result in ill filled seeds. Proper irrigation will result in high yield of seeds.
Roguing
Roguing should be done from vegetative phase
up to harvest. Off-types are removed based on the
plant height, head size, branching habit, number of
SUNFLOWER (Helianthus annuus)

8
heads and colour of seeds. Maximum percentage
of off-types permitted at and after flowering stage is 0.10% for foundation seed production
and 0.20% for certified seed production. The percentage of plants affected by downy mildew
allowed in foundation stage of seed production
is 0.05% and 0.50% for certified stage of seed production.
Field inspection
A minimum of three inspections will be done
from vegetative to harvesting stage by the Seed
Certification Officer. Normally first inspection is done at the stage when 6 – 7 pairs of leaves
are present to check the isolation, presence of
volunteer plants and designated diseases. Second
inspection will be made during flowering stage to check isolation, off-types and other factors.
Sometimes third inspection will be scheduled
prior to harvest to verify the designated disease,
true nature of plant, flower head and seed and also to estimate the yield of seed crop.
Field standard
Foundation
seed
Certified seed
Isolation distance 400 m 200 m
Off-types 0.10% 0.20%
Plants affected by
downy mildew
diseases
0.05% 0.50%
Supplementary pollination
Supplementary pollination is done when the
insect activity is low. Palm covered with muslin
cloth is used to rub the flower heads to make sure all the flowers are fertilized and increase seed setting.
Harvesting
Sunflowers should be harvested when the backside of the flower heads turns lemon yellow from green. After anthesis in about 40 – 45 days
the heads will mature. Heads are harvested in one
picking.
Threshing and drying
The harvested heads are dried under the sun for a
couple of days to reduce the moisture content to
15 – 18%. After this the seeds are removed from
the heads by hand threshing or mechanically
using sunflower thresher. After threshing seeds are dried under the sun to obtain the moisture
content of 10 – 12%.
Processing
Seeds dried to an optimum moisture content are
graded using 9/64” round perforated sieve as
middle sieve using OSAW cleaner cum grader.
Seed storage
Seeds can be stored in gunny bags for up to
10 months and in 700 gauge polyethylene bags
for about 15 – 18 months.
Seed standards
The percentage of physical purity of foundation
and certified seeds should be 98% with 70% of germination capacity and 9% of moisture
content.
9
Mustard (Brassica sp.) is a well known
condiment and an important oil seed
crop of the family Cruciferae. The
plant is also used as a vegetable, fodder and
medicine. Seed production can be done in rabi
(from September and October) in plains and in
hills during kharif (June - July).
Method of seed production
Mustard is a cross pollinated crop and seeds
are allowed to set by open pollination and then
multiplied. The crop should be raised in isolation
to maintain varietal purity. The isolation
distance maintained between the varieties is
50 metres for self compatible and 100 metres
for self incompatible types for foundation seed
production and for certified seed production it is 25 metres for self compatible and 50 metres for
self incompatible types. The isolation distance
maintained between the varieties not conforming
to the varietal purity requirements for certification is 200 metres for self compatible and 100 metres
for self incompatible types for foundation seed
production. In Certified seed production, it is 50 metres for both self compatible and self
incompatible types.
Seed production stages
Breeder seed è Foundation seed è Certified seed
Land selection
The land selected should be fertile and free from
volunteer plants. It should not be cultivated with
the same crop in the previous season. The land
should be tilled twice to make the soil smooth.
Seed selection and sowing
Good quality certified seeds should be sourced from an authorised dealer. Seeds should be
healthy with a good germination percentage.
Seed rate is 4 – 5 kg/acre (10 - 13 kg/ha). Selected
seeds should be treated with bio-control agents
like Trichoderma viride @ 4 g/kg of seeds. Mix
Trichoderma in rice gruel and mix the solution
with seeds. Shade dry the seeds for 30 minutes
before sowing. This will help in the control of
root rot and Fusarial wilt disease.
Treated seeds should be sown in ridges and
furrows at 4 – 5 cm depth. The spacing maintained
is 45 x 15 cm. After sowing planking is done to
cover the seeds.
Nutrient management
FYM or compost @ 4 tonnes/acre (10 tonnes/
ha) or vermicompost @ 1.6 – 2 tonnes/acre
(4 - 5 tonnes/ha) should be applied and thoroughly
incorporated into the soil before the last tilling.
This will help to improve the texture as well as the
nutrient content of the soil. Green manure crops
like Sunhemp or Sesbania are grown in the field and ploughed into the soil after 40 – 50 days of
sowing. This enhances the nitrogen, phosphorous
and other nutrients in the soil.
Trichoderma viride @ 1.5 kg/acre is mixed with
300 kg compost and kept as such for a week and
then applied to the field as top dressing. It will protect the crop from root rot and pathogens like
Pythium and Phytophthora.
Weed management
In kharif crop harrowing is done 25 – 30 days
after sowing. The first weeding is done 45 – 50 days after sowing. Weeding is repeated before
budding stage followed by harrowing with hand
harrow.
Pest and disease management
Mustard aphid, painted bug, sawfly, Alternaria
blight and white rust are some of the common
pests and diseases affecting mustard crop. The
management techniques for these pests are
provided in Appendix – I.
Irrigation
Irrigation should be done once in 15 days. It is
critical during flowering and pot filling stage.
MUSTARD (Brassica sp.)

10
Roguing
Roguing should be done from the vegetative
phase to the harvesting phase. Off-types are
removed based on the branching type, capsule
size and colour and colour of the seeds. Maximum
percentage of off-types permitted is 0.10%
for foundation seed production and 0.50% for
certified seed production.
Field inspection
A minimum of three field inspections should be done from pre flowering stage to maturity stage by the Seed Certification Officer. First inspection is done before flowering followed by second inspection during flowering. The third inspection is scheduled at maturity stage prior to
harvesting.
Field standard
Foundation
seed
Certified seed
Isolation distance 200 m 100 m
Offtypes 0.10 % 0.50 %
Objectionable weed
seed0.05 % 0.10 %
Harvesting
Harvesting should be done when 75% of the pods
become golden yellow in colour. The moisture
content of the seeds will be 25% in this stage.
Delaying harvest may result in yield loss. The
crop is harvested at the level of lowest pods.
Threshing and drying
The harvested plants are heaped and dried under
the sun for 4 – 5 days to attain 12 – 13% of moisture
level for uniform maturation of seeds. This is
called swathing. During swathing the immature
pods with green seeds mature. Threshing is done
after 10 – 12 days by hand using stick. Threshed
seeds are cleaned by winnowing and sieving
using suitable size of sieve.
Seed storage
Seeds are dried under the sun to attain 8% of
moisture content. This is safe for mustard seeds
and can be stored in gunny or cotton bags upto
one year under open storage conditions.
Seed standards
The minimum percentage of purity of foundation
and certified seeds should be 97% with 85% of minimum germination capacity and 8% of
maximum moisture content. Presence of other
distinguishable variety in foundation seed should
be 0.10% and that of certified seed should be 0.50%.

11
SEED PRODUCTION IN PULSES
Pulses are an important source of dietary
protein. They also have a unique property
of maintaining and restoring soil fertility by
fixing the biological nitrogen. Besides this, they also conserve and improve physical properties
of the soil because of the deep root system and
leaf fall. Pulse crops add nitrogen to the soil @
nearly 30 kgs/ha. According to the Food and
Agricultural Organisation (FAO) the individual
protein requirement per day is 80 gms. However,
the availability today is less than 40 gms/day.
India grows nearly 23 million hectare of pulse
crops and the production of pulse grains is
nearly 14.4 million tonnes. However, for the last
40 years the yield of pulses is rather stagnant. It
is important to increase the yields to twice the
rate at the earliest.
The most important factor in increasing the
yields of pulses is to get access to good quality
seeds. The second section of this book deals with
seed production techniques of important pulses
like greengram, blackgram, cowpea, soya bean,
redgram and horsegram. While the techniques
described here are for certified seed production farmers are advised to follow these procedures
for seed production in general to get good quality
seeds.

12
GREENGRAM AND BLACKGRAM
(Vigna radiata and Vigna mungo)
Greengram and blackgram (Vigna radiata
and Vigna mungo) belong to the family
Leguminosae are widely cultivated pulse
crops. The optimum season for seed production
is June – August, September – November and
February – March for both blackgram and
greengram. Though it can be grown in all the
three seasons, June – July is the best season.
Method of seed production
Greengram and blackgram are highly self
pollinated crops with cross pollination to the
extent of 5 – 10%. The crop should be raised
in isolation and seeds are allowed to set by
self pollination. To maintain the varietal purity
an isolation distance of 5 metres for certified and 10 metres for foundation seed production
is maintained between varieties and of the
same variety not conforming to varietal purity
requirements of certification.
Seed production stages
Breeder seed è Foundation seed è Certified seed
Land selection
The land selected should be free from volunteer
plants. The soil should be fertile with neutral pH
and proper drainage facility. It should be prepared
to fine tilth. Ridges are formed with a gap of 60 – 90 cm.
Seed selection and sowing
Good quality certified seeds should be obtained from an authorised dealer. Seeds should be
healthy with a good germination percentage.
Only graded seeds should be used. Remove the
off colour and out sized seeds. Seed rate is 8 kg/
acre (20 kg/ha). Selected seeds should be treated
with Trichoderma viride @ 4 gm/kg of seeds
or Pseudomonas @ 10 gm/kg of seeds. Mix
Trichoderma or Pseudomonas in rice gruel and
mix the solution with seeds. Shade dry the seeds
for 30 minutes before sowing. Treating the seeds
with Trichoderma or Pseudomonas protects the
crops from disease causing microorganisms.
Seeds should be treated with Rhizobium
@ 250 gm/acre (600 gms / ha) to facilitate natural
nitrogen fixation by plants.
Treated seeds should be dibbled at 3-4 cm
depth at the side of the ridges. Sowing should
be planned in such a way that the maturation
of seeds does not coincide with rains. It will
increase the percentage of off coloured seeds. The
spacing maintained is 25 x 10cm for rainfed and
30 x 10cm for irrigated crop.
Nutrient management
During land preparation, farmyard manure
@ 10 truck loads/acre (25 truck loads/ha) should
be added and incorporated into the soil by
ploughing. To meet the nutritional need of the
crop Panchakavyam @ 300 ml/tank should be
sprayed.NPK @ 10:20:10 kg/acre (25:50:25 kg/
ha) is recommended for irrigated crop, whereas
for rainfed crop it is 5:10:5 kg/acre (12.5:25:12.5
kg/ha) for good seed yield. This will increase the
number flowers and improve the seed setting and quality of the seeds.
Weed management
Hand weeding is done on 15th and 30th day after
sowing.
Pest and disease management
Aphids, army worms, pod borer, white fly, yellow mosaic, leaf curl and leaf crinkle (Virus), root rot
and powdery mildew are the common pests and
diseases that affects the greengram and blackgram
crop. The management measures for these pest
and diseases are provided in Appendix – I.
Irrigation
The first irrigation is done soon after the sowing and life irrigation is done on the third day.
After this, irrigation should be done once in
10 – 15 days depending upon the soil and climatic

13
conditions. Water stagnation should be avoided
at all growth stages. Irrigation during flowering and pod formation stages are very critical.
Roguing
Roguing should be done from vegetative phase to
reproductive phase. Offtypes are removed based
on the leaf colour, plant stature, leaf shape, pod
colour, flower colour and seed colour. Maximum percentage of offtypes permitted at final inspection is 0.10% for foundation seed production and
0.20% for certified seed production. In case of greengram the permitted limits of seed borne
disease like halo blight affected plants is 0.10%
for foundation and 0.20% for certified seed production.
Field inspection
A minimum of two inspections will be done
from flowering to maturity stage by the Seed Certification Officer. The first inspection is done during flowering followed by second in flowering and maturity stage to check the isolation, off-
types, volunteer plants, diseased plants and
estimated yield.
Field standard
Foundation
seed
Certified seed
Isolation distance 10 m 5 m
Off-types 0.10% 0.20%
Greengram seed
borne disease
affected seed
0.10% 0.20%
Harvesting
Harvest is done soon after the maturation of
the seeds. Seeds attain physiological maturity
30 days after 50% flowering. The mature pods of blackgram turns black and greengram pods turns
brown. At this stage the moisture content of the
pods will be 17 – 18%.
Threshing and processing
Harvested pods along with plants are dried to a
moisture content of 12 – 13% and then threshed
using sticks. Threshed grains are cleaned and
dried to attain a moisture content of 8 – 9%. The
seeds are graded using BSS 7 x 7 wire mesh
sieve.
Drying and storage
Processed and graded grains are further dried to
attain 9% of moisture content. Then seeds should
be mixed with 3% neem seed kernel power to
preserve the seeds from storage pests especially
infestations of the bruchid beetle.
Seed standards
The percentage of maximum physical purity of
foundation and certified seeds should be 98% with minimum of 75% of germination capacity
and 9% of moisture content. Presence of other
distinguishable varieties should be 10/kg for
foundation seed and that of certified seed is 20/kg of seed.

14
Cowpea and Soya bean (Vigna unguiculata
and Glycine max) belongs to the family
Leguminosae. The suitable season for
seed production is June – July and September –
October for both cowpea and soya bean. There
should not be rain or high humidity at the time of
harvest as this will hamper the germination.
Method of seed production
Cowpea and Soya bean are self pollinated crops.
In cowpea cross pollination occurs to the extent
of 15 – 20% and mainly through insects. The
crop should be raised in isolation. To maintain
the varietal purity an isolation distance of
5 metres for certified and 10 metres for foundation seed production is maintained between varieties
in cowpea and in soybean an isolation distance
of 3 metres is maintained between varieties for
certified and foundation seed production.
Seed production stages
Breeder seed è Foundation seed è Certified seed
Land selection
The land selected should not be cultivated with
the same crop in the previous season. The land
should be fertile with a pH range of 6 – 7.5 and
proper drainage facility. Land should be ploughed
for 3 – 4 times. During last plough apply FYM
@ 10 truckloads per acre (25 truckloads per
hectare).
Seed selection and sowing
Certified seeds of good quality should be obtained from authenticated source. Seeds should
be healthy with good germination percentage.
Remove the off colour and out sized seeds.
Seed rate is 16 kg/acre (40 kg/ha) for soybean
and for cowpea 8 kg/acre (20 kg/ha). Selected
seeds should be treated with Trichoderma viride
@ 10gm/kg of seeds to control seed borne diseases
like root rot and wilt. Shade dry the seeds for
30 minutes before sowing. Seeds can also be treated
with cow’s urine, cow pat pit, panchagavyam
etc. Seeds should be treated with Rhizobium
@ 250 gms/acre to facilitate natural nitrogen
fixation by plants. Soybean seeds are treated by wet sand method for uniform germination. Take
equal quantity of seeds and sand. Mix water with
sand @ 50 ml/kg and take a broad vessel and
add seeds and sand in alternate layers and cover
the vessel with a cloth. Remove the seeds after
16 hrs using a sieve. This seed treatment improves
the germination capacity of the seeds.
Treated seeds should be dibbled at 2 - 4 cm
depth in seed beds. Sowing should be planned
in such a way that the harvest does not coincide
with rains. It will reduce the seed quality. The
spacing maintained is 45 x 15cm for cowpea and
30 x 10 cm for soya bean.
COWPEA AND SOYA BEAN
(Vigna unguiculata and Glycine max)

15
Nutrient management
The nitrogen, phosphorous and potassium
requirement of soya bean is 8:32:16 kg/acre
(20 : 80 : 40 kg/ha) and for cowpea is 10:20:10
kg/acre (25:50:25 kg/ha). Seed treatment with
Rhizobium meets the nitrogen requirement to the
extent of 8 kg/acre (20 kg/ha). Farmyard manure
@ 5.5 tonnes/acre (14 tonnes/ha) or compost or
biogas slurry @ 5 tonnes/acre (12.5 tonnes/ha) is
applied.
Weed management
Hand weeding is done 25 – 30 days after sowing.
This will control the weeds at the initial stage
itself.
Pest and disease management
Soya bean is affected by pests and diseases like
stem fly, girdle beetle, bacterial blight, yellow mosaic virus whereas cowpea is affected by
aphids, pod borer, yellow mosaic virus and root
rot. The management measures for these pests
and disease are provided in Appendix -I.
Irrigation
The first irrigation is done soon after the sowing and the life irrigation is given on the third day of
sowing. After this, the field is irrigated once in 7 – 10 days. Irrigation during flowering and pod filling stages are very critical.
Important operations
In cowpea the tendrils of the crops should be
nipped off. This will aid in good seed setting.
Rouging
Roguing should be done from vegetative stage
to harvesting stage. During this time off-types
and volunteer plants are removed as and when
they occur. Rouging is done based on the
colour of leaves and stem, growth pattern,
flower colour, pod colour and seed colour etc. Maximum percentage of off-types permitted
at final inspection is 0.10% for foundation seed production and 0.50% for certified seed production.
Field inspection
A minimum of two inspections will be done by
the Seed Certification Officer for both cowpea
and soybean. In cowpea first inspection is done before flowering stage followed by the second one in maturity stage.
Field standard
Foundation
seed
Certified seed
Isolation distance 10 m 5 m
Off-types - Cow pea 0.10% 0.20%
Soya bean 0.10% 0.50%
Plants affected by
seed borne diseases
(for cow pea)
0.10% 0.20%
Harvesting
Harvest is done soon after the maturation of the
pods. In cowpea the matured pods will be straw
yellow in colour and harvested by hand picking.
Since flowering is continuous in cowpea, pod setting is also continuous. Harvesting is done
periodically as and when the pods get mature.
In soya bean, seeds attain physiological maturation
23 – 25 days after anthesis. Maturation can be
confirmed by yellowing of the plant and browning of the pods. This crop should be harvested at
once, pods intact along with the plant.
Threshing and processing
Harvested pods of cowpea and whole plants of
soya bean are dried under the sun light. Dried
pods are beaten with bamboo stick to remove
the seeds. The seeds should then be cleaned by
winnowing. The seeds of soya bean and cowpea
are graded using 14/64” and 10/64” round
perforated metal sieves respectively.
Drying and storage
Processed and graded grains are further dried
to attain 9% and 12% of moisture content for
cowpea and soya bean respectively. Seeds can be
stored for a year under open storage conditions.
The seeds should be mixed with 3% neem seed
kernel power to preserve it from storage pests
especially infestations of the bruchid beetle.
Seeds can also be treated with activated clay
@ 1 kg/100 kg of seeds.
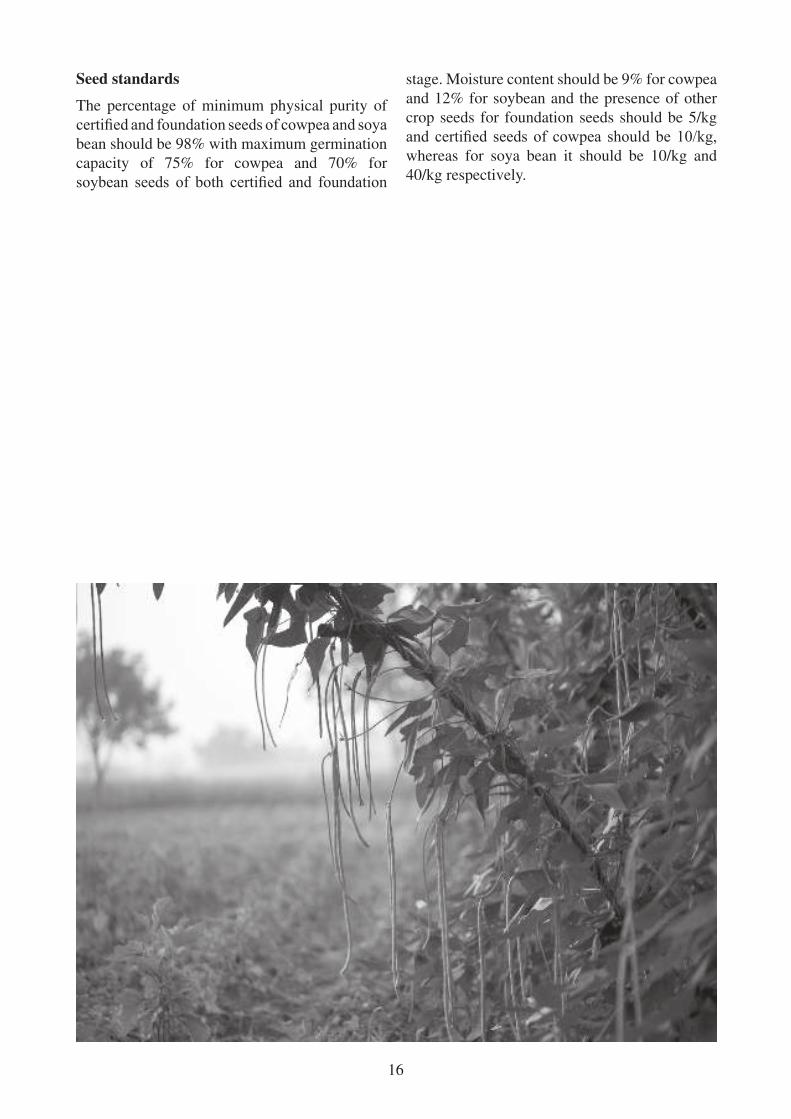
16
Seed standards
The percentage of minimum physical purity of
certified and foundation seeds of cowpea and soya bean should be 98% with maximum germination
capacity of 75% for cowpea and 70% for
soybean seeds of both certified and foundation
stage. Moisture content should be 9% for cowpea
and 12% for soybean and the presence of other
crop seeds for foundation seeds should be 5/kg
and certified seeds of cowpea should be 10/kg, whereas for soya bean it should be 10/kg and
40/kg respectively.

17
Redgram or pigeonpea (Cajanus cajan)
belonging to the family Leguminosae
is commercially known as toor dal. It is
one of the widely used pulse varieties. The seed
production of this crop can be taken up in all
the three seasons June – August, September –
November and February – March.
Method of seed production
Redgram is a cross pollinated crop. Cross
pollination occurs mainly by bees and thrips.
Seeds are allowed to set by open pollination
under isolation. To maintain the varietal purity
an isolation distance of 100 metres for certified and 200 metres for foundation seed production
is necessary from fields of other varieties and of the same variety not conforming to the varietal
purity requirements of certification.
Seed production stages
Breeder seed è Foundation seed è Certified seed
Land selection
The land selected should not be cultivated with
the same crop in the previous season and should
be free of volunteer plants. The land should be
fertile with neutral pH. The soil should be light
with proper drainage facility. A deep tilling up
to 1.5 feet and a shallow tilling should be done
before sowing.
Seed selection and sowing
Certified seeds of good quality should be obtained from authenticated source. Seeds should
be healthy with good germination percentage.
Remove the off colour and out sized seeds. Seed
rate is 10 kg/acre (25 kg/ha) for short duration
varieties and 4 kg/acre (10 kg/ha) for long
duration varieties.
Treat the seeds with powder form of Trichoderma
viride @ 4 gm/kg of seeds or Pseudomonas
@ 10 gm/kg of seeds. Treating the seeds with
Trichoderma or Pseudomonas protect the
crops from disease causing microorganisms.
Seeds can be soaked in diluted panchagavyam
for 20 minutes and dried before treating with
Trichoderma or Pseudomonas. After treating the
seeds with these biocontrol agents treat them with
biofertilizer Rhizobium @ 250 gms/acre seeds
to facilitate natural nitrogen fixation by plants. Mix Rhizobium in rice gruel and then mix it with
seeds. Shade dry the seeds for 15 minutes before
sowing.
Treated seeds are sown in 4 – 6 cm deep by drilling
when the soil is wet. The spacing maintained is
45 x 30 cm and 90 x 30 cm for short and long
duration varieties, respectively.
Nutrient management
The nitrogen, phosphorous and potassium
requirement of redgram is 10:20:10 kg/
acre (25:50:25 kg/ha). Seed treatment with
Rhizobium meets the nitrogen requirement to the
extent of 8 kg/acre (20 kg/ha). Farmyard manure
@ 5.6 tonnes/acre (14 tonnes/ha) or compost or
REDGRAM (Cajanus cajan)

18
biogas slurry @ 5 tonnes/acre (12.5 tonnes/ha) is
applied.
Weed management
The first weeding / hoeing is done 20 – 25 days after sowing. The second weeding is done on 50
– 60 days after sowing. Weeding is not required
after 60 days of sowing. If needed, then manual
weeding should be done.
Pest and disease management
Redgram is affected by aphids, pod borer, yellow
mosaic virus and root rot at different growth
stages from vegetative stage to fruiting. The
management measures for these pest and diseases
are provided in Appendix – I.
Irrigation
The first irrigation is done immediately after sowing and the second irrigation is done 2 – 3
days after sowing. After this, the field is irrigated once in 8 – 10 days. Irrigation during flowering and pod filling stages are very critical.
Important operations
To supplement pollination 5 – 8 beehives • may be placed per hectare.
To ensure pollen availability for longer • duration and to induce continuous flowering, immature pods set in the plants should be
removed from time to time.
Roguing
Roguing should be done at a 7 – 10 days interval
till the completion of the flowering stage. Off- types and diseased plants affected by leaf spot,
stem canker, wilt, yellow mosaic and sterility
virus are removed from the seed field to maintain healthy crops. Plants of early and late flowering types should also be removed.
Field inspection
A minimum of three inspections should be done
from vegetative to maturity stage by the Seed
Certification Officer. The first inspection is done before flowering followed by the second during flowering and maturity stage to determine isolation, off-types, volunteer plants, presence of
designated diseased plants and also to estimate
the yield.
Field standard
Foundation
seed
Certified seed
Isolation distance 200 m 100 m
Off-types 0.10% 0.20%
Harvesting
The crop reaches the physiological maturity in
32 – 38 days after anthesis in winter and summer
respectively. Harvesting takes place soon after
the maturation of seeds. Matured pods should
be harvested in two to three pickings. Harvest
should not coincide with rains, because it will
result in off coloured and dimpled seeds.
Threshing and processing
Harvested pods are dried under the sun light for
a week. The dried pods are beaten with bamboo
stick to separate the seeds. The seeds should
then be cleaned by winnowing. Seeds are graded
using 10/64” (B.S.S 5 x 5) round perforated metal
sieves. Seeds of different colour and sizes should
be removed.
Drying and storage
Processed and graded seeds are further dried
for safe storage. Seeds can be stored for up to
one year under open storage conditions and for
15 months in 700 gauge polyethylene bags. The
seeds should be mixed with a powder of neem
and vitex and rinds of the fruits of Sapindus
laurifolius (Punthikottai) and Acacia concinna
(soap nut) in 1:100 ratio. Seeds can also be treated
with activated clay @ 1kg/100 kg of seeds to
control bruchid infestation.
Seed standards
The percentage of maximum physical purity of
certified and foundation seeds should be 98% with minimum germination capacity of 75%. The
maximum moisture content should be 9%. The
presence of other crop variety should be 10/kg
for foundation and that of certified seed should be 20/kg of seed.

19
Horsegram (Macrotyloma uniflorum) belonging to the family Leguminosae
is a lesser known bean variety and
commonly known as poor man’s pulse. The seed
production of this crop should be taken up in
November. Though the crop is extremely drought
resistant the growth, flowering and fruit setting will be better during the winter season.
Method of seed production
Horsegram is a cross pollinated crop and the
seeds are allowed to set by open pollination
under isolation. To maintain the varietal purity
an isolation distance of 5 metres for certified and 10 metres for foundation seed production is
necessary from the fields of other varieties and of the same variety not conforming to the varietal
purity requirements of certification.
Seed production stages
Breeder seed è Foundation seed è Certified seed
Land selection
The land selected should not be cultivated with
the same crop in the previous season and should
be free of volunteer plants. The land should
be fertile with neutral pH. The soil should be
light with proper drainage facility. One or two
ploughings followed by harrowing is enough to
prepare the land for cultivation.
Seed selection and sowing
Certified seeds of good quality should be obtained from authenticated source. Seeds should
be healthy with good germination percentage.
Remove the off coloured and out sized seeds.
Seed rate is 20 kg/ha.
Treat the seeds with powder form of Trichoderma
viride @ 4 gm/kg of seeds or Pseudomonas
@ 10 gm/kg of seeds. Treating the seeds with
Trichoderma or Pseudomonas will protect the
crops from disease causing microorganisms.
After treating the seeds with these biocontrol
agents treat them with biofertilizer Rhizobium
@ 250 gm/acre (600 gms/ha) of seeds to
facilitate natural nitrogen fixation by plants. Mix Rhizobium in 500 ml of cooled rice gruel and
then mix it with the seeds. Shade dry the seeds
for 3 – 4 hours before sowing.
Treated seeds are sown in lines at 2 cm depth
in the wet soil. The spacing maintained is
30 x 10 cm.
Nutrient management
Farmyard manure @ 6 tonnes/acre (14 tonnes/
ha) or compost or biogas slurry @ 5 tonnes/acre
(12.5 tonnes/ha) is applied before last ploughing
and incorporated into the soil. A basal dose of
4 kg/acre (10 kg/ha) nitrogen and 10 kg/acre
(25 kg/ha) phosphorus promotes good crop
growth and increases the yield of grain and
fodder. The nitrogen, phosphorous and potassium
requirement of horsegram is 10:20:0 kg/acre
(25:50:0 kg/ha). Seed treatment with Rhizobium
meets the nitrogen requirement to the extent of
8 kg/acre (20 kg/ha).
Weed management
The first weeding is done within 10 days after sowing and repeated after 15 days. Hand weeding
is most preferred. Weeding should be repeated as
and when needed.
Pest and disease management
Horsegram is commonly affected by the pests
and diseases like aphids, pod borer, leaf eating
caterpillar, yellow mosaic virus and root rot at
different stages of its growth. The management
techniques for these pests and diseases are
provided in Appendix – I.
Irrigation
The first irrigation is done immediately after sowing and the second irrigation is done 2 – 3
days after sowing. After this, the field is irrigated
HORSEGRAM (Macrotyloma uniflorum)
20
as needed. Irrigation during flowering and pod filling stages are very critical.
Roguing
Roguing should be done from the vegetative
stage to the harvesting stage. Off-types and
diseased plants are removed from the seed field to maintain healthy crops. Roguing is done based
on the height, colour and shape of the plant,
flower colour, size, shape and colour of the pod etc. Maximum percentage of off-types permitted
at the final inspection is 0.10% for foundation seed production and 0.20% for certified seed production.
Field inspection
A minimum of two inspections will be done from
flowering to fruiting stage by the Seed Certification Officer. The first inspection is done during peak flowering stage followed by the second during
fruiting stage to determine isolation, off-types,
volunteer plants and to estimate the yield.
Field standard
Foundation
seed
Certified seed
Isolation distance 10 m 5 m
Off-types 0.10% 0.20%
Harvesting
The crop reaches the physiological maturity in
25 - 30 days after flowering. The maturation can be visually identified by colour change of the pods and the crop from green to straw yellow
colour. The pods are harvested intact with plants
and dried in the threshing yard. Harvest should
not coincide with rains, because it will result in
off coloured and dimpled seeds.
Threshing and processing
Harvested plants are dried under the sun and
threshed by beating with a pliable bamboo stick
to separate the seeds. The seeds should then be
cleaned by winnowing. Seeds are graded using
8/64” or 3.1 mm round perforated metal sieve.
Seeds of different colour and sizes and broken
ones should be removed.
Drying and storage
Processed and graded seeds are further dried for
safe storage. The seeds should have the maximum
moisture content of 8%. Seeds with this moisture
content can be stored for up to one year under
open storage conditions.
Seed standards
The percentage of minimum physical purity
of the certified and foundation seeds should be 98% with minimum germination capacity of
80%. The maximum moisture content should
be 9%. The presence of inert material should
not exceed 2% and other crop seeds should be
5/kg for foundation and 10/kg for certified seeds.

21
Current state of inputs for organic agriculture, June 2006. Thimmaiah . A, Natural Agroconsultants,
Faridabad. pp.122.
Package of organic practices from Maharashtra for Cotton, Rice, Red gram, Sugarcane and Wheat,
June 2006. Maharashtra Organic Farming Federation (MOFF), Pune. pp.112.
Package of organic practices from Uttaranchal for Chilli, Mustard, Potato and Soybean, June 2006.
The Institute of Himalayan Environmental Research and Education, Uttaranchal. pp.102.
Package of organic practices from west Bengal for Brinjal, Rice, Sesame and Taro, June 2006.
Development Research Communication and Services Centre, Kolkata. pp.135.
Package of organic practices from Tamil Nadu for Rice, Groundnut, Tomato and Okra, September
2006. Centre for Indian Knowledge Systems, Chennai. pp.174.
Principles of Seed Production and Quality Control (Bhaskaran.M.,Vanangamudi.K. et al., 2002).
Department of Seed Science and Technology, Tamil Nadu Agriculture University, Coimbatore.
pp. 365
Advances in Horticulture, Vol. 7. Saini, S.S. and Singh, J.P., 1993. Chadha, K.L. and J.S. Grewal
(eds.). Malhotra Publications, New Delhi. pp. 691.
IFOAM Training Manual for Seed Saving, Compiled by the Centre for Indian Knowledge Systems,
ChennaiforInternational Federation of Organic Agriculture Movements (IFOAM) Bonn (Germany).
pp. 123
Training manual on Principles of Seed Technology. The Department of Genetics and Plant Breeding,
Tamil Nadu Agriculture University, Coimbatore. pp. 163.
WEBSITES
www.indiaagronet.com
www. sikkimagri.gov.in
www.en.wikipedia.org
www.indianspices.com
www.seedtamilnadu.com
www.tnau.ac.in
www.slideshare.net/Safarnoori/seed-production-technology-of-whea
www.agritech.tnau.ac.in
www.knowledgebank.irri.org
www.foodcommodities.nl
REFERENCES

22
Sl.
No.Crop
Common Pests and
DiseasesManagement measures
1. Groundnut Root and pod feeders,
White grubs - (affects at the time of
pod formation)
Summer ploughing, good drainage facility, early sowing, using light traps, manual
picking and destroying of affected parts.
Tobacco caterpillar
(Spodoptera litura) - (affects at the
vegetative stage)
Use light trap or pheromone trap @ 5/acre (12/ha) and collect and destroy the egg
masses manually.
Red hairy caterpillar (Amsacta
albistriga) - (affects at the vegetative
stage)
Use egg parasitoids – Telenomous manolus for destroying the eggs and fungal parasitoids
– Aspergillus flavus for the control of larvae.
Groundnut Leaf miner – Aproaerema
modicella - (affects at the vegetative
stage)
Early sowing in rain fed cultivation, use light traps or pheromone traps, mulch in dry
lands and spray neem seed kernel extract 6 litres/acre (15 litres/ha) or neem oil 6 litres/
acre (15 litres/ha) or neem leaf extract 10 kg/acre (25 kg/ha).
Leaf spot or Tikka disease Rust
(Puccinia arachidis) Alternaria
leaf spot (Alternaria helianthi)
Stem rot (Sclerotium rolfsii)
Destroy the diseased plant parts, proper weed management and seed treatment using
asafoetida solution (250 gms in 2 litre of water for 20 kg of seeds).
APPENDIX – I PEST AND DISEASE MANAGEMENT IN OILSEEDS AND PULSES

23
2. Gingelly Leaf and pod caterpillar (Antigastra
catalaunalis dup.)- (affects at early
vegetative stage)
Sesame sphinx or hawk moth
(Acherontia styx) – (affects from
vegetative to maturity stage)
Summer ploughing, good drainage facility, early sowing, using light traps @ 6-9 per
acre (15 – 22 per ha) once in fortnight, manual picking and destroying of affected
parts.
Sesame gall fly(Asphondylia sesami) - (affects at
the flowering stage)
Remove and destroy infested buds, using light traps and spraying neem seed kernel
extract (100 gm in 10 litres of water).
Phyllody (virus) Remove and destroy the affected plants and delaying the sowing three weeks after
onset of the monsoon.
Wilt (Fusarium oxysporum) Destroy the diseased plants, spray Trichoderma viride (10 gms in 1 litre of water) or
5% cow’s urine.
Stem and root rot (Macrophomina
phaseolina)
Proper aeration and drainage, soil application of Pseudomonas fluorescens (@ 1 kg/
acre or 2.5 kg/ha mixed with 20 kg / 50 kg of farmyard manure) on 30 days after sow-
ing or soil application of neem cake @ 60 kg/acre (150 kg/ha) combined with seed
treatment with Trichoderma viride @ 1.5 kg/acre (4 kg/ha).
Bacterial leaf spot (Pseudomonas
syringae, P. sesami)
Seed treatment with hot water (at 52oC for 10 minutes) is best to prevent the disease.

24
3. Sunflower Captiulum borer (Helicoverpa
armigera) - (affects from vegetative
to maturity stage)
Collect and destroy the caterpillars and use pheromone traps to attract adult moths.
White fly (Bemisia tabaci) - (attacks
at all stages of the crop)
Spray 5% neem seed kernel extract or neem oil extract
Jassids (Amrasca biguttula
biguttula) - (attacks at early
vegetative stage)
Spray the following solution - cow’s urine 15 litres, cow dung 2 kg and crushed neem
leaves 15 kg mixed with 100 litres of water and fermented for 3 - 5 days. Filter the
solution and use as foliar spray.
Leaf spot, Rust (Puccinia helianthi)
and Root rot (Sclerotium rolfsii)
Seed treatment with Trichoderma viride @ 4gm/kg of seed or Pseudomonas @ 2g/kg
seeds, spray 10% cow’s urine thrice at 10 days interval and apply 60 – 100 kg of neem
cake as basal manure.
4. Mustard Alternaria blight (Alternaria bras-
sicae)
Seed treatment using cow’s urine and spraying of Trichoderma viride (10 gms/ litre of
water) or cow’s urine @ 5% concentration.
Mustard aphid - (Lipaphis erysimi) -
(attacks at all stages of the crop)
Sprinkle ash @ 500 – 600 kg/acre (1250 – 1500 kg/ha) on the crop in initial stage, ir-
rigate 45 days before sowing to control the pest and use light traps.
Painted bug (Bargrada hilaris) – (at-
tacks young plants)
Mustard sawfly (Athalia lugens
proxima) - (attacks at early vegeta-
tive stage)
Remove and destroy infested plants and bugs, spray 10% neem seed solution, use light
traps and sprinkling Jeevamrut at the initial stage for resistance.
White rust (Albugo candida) Seed treatment using Trichoderma viride @ 4gm / kg, vermiwash mixed with water @
1:13.5 ratio protects the crop from fungal infections.

25
PULSES
5. Greengram
and
Blackgram
White fly (Bemisia tabaci) - (attacks
at early vegetative stage)
Spray neem seed kernel extract or neem oil extract @ 5% concentration.
Powdery mildew (Erysiphe poygoni) Spray butter milk extract (one part of curd in two parts of water) @ 1 litre/tank or spray
Eucalyptus leaf extract @ 10% at the initial stage of disease infestation and repeat after
10 days.
6. Soybean Stem fly (Melanagromyza sojae)
– (attacks from vegetative to
reproductive stage)
Deep summer ploughing, remove and destroy leaves with the eggs, spray cow’s urine
or ash and cow’s urine at seedling stage with 2-3 leaves.
Girdle beetle (Oberea brevis) - (at-
tacks from vegetative to reproduc-
tive stage)
Use healthy seeds, light traps and spray cow’s urine and cow dung solution.
Bacterial blight (Pseudomonas
glycinea)
Mix Trichoderma viride @ 3.2 kg with 25 kg of farmyard manure and apply it to the
field after one week before sowing or seed treatment using Trichoderma @ 10 gm/kg
of seeds.
Yellow mosaic virus Pull out and destroy the infected plants.
7. Greengram
Blackgram
Cowpea
Redgram
Horsegram
Aphids (Aphis craccivora) –
(attacks at all stages of the crop)
Spray neem seed extract or neem cake extract @ 1 litre/tank and maintain proper spac-
ing between the crops.
Army worm (Spodoptera litura) –
(attacks at early vegetative stage)
Pod borer (Helicoverpa armigera)-
(attacks from vegetative stage to
maturity stage)
Use light traps, erect bird perches @ 4 – 5 per acre (10 – 12 per hectare), releasing
Chrysoperla @ 2025 eggs/acre (5000 eggs/ha) at 15 days after sowing and Trichogramma
@ 50,000 eggs (2-3 cards) at 30 days after sowing or spray five leaf extract or ginger, garlic and chilli extract @ 1 litre/tank.
26
8. Greengram
Blackgram
Cowpea
Redgram
Horsegram
Leaf eating caterpillar (Azazia
rubricans) – (attacks at vegetative
stage)
Collect and destroy eggs and larvae and pull out and destroy infected plants.
Yellow mosaic virus
Leaf curl and leaf crinkle (Virus)
Pull out and destroy infected plants
Root rot (Pellicularia filamentosa), Rust (Uromyces appendiculatum)
and Anthracnose (Colletotrichum
lindemuthianum)
Use healthy seeds, seed treatment with talc formulation of Trichoderma viride @ 4
gm/kg of seed or Pseudomonas fluoroscences @ 10 gm/kg seed and application of
neem cake @ 60 kg/acre (150 kg/ha) as basal manure to reduce the root rot and cyst
nematode.

27
1. Cow dung extract
Mix one kilogram of cow dung with 10
litres of water and filter using a gunny cloth. Dilute the solution with 5 litres
of water and filter again. This can be used for spraying.
2. Panchagavyam
Panchagavyam is a growth regulator produced
with the combination of five products obtained from the cow along with a few other bioproducts.
Collect fresh cow dung (5 kg), mix it with ghee
(1 litre) and keep it in a plastic barrel separately
for 3 days. On the same day, mix the other
ingredients namely cow’s urine (3 litres), cow’s
milk (2 litres), curd (2 litres), yellow banana
(400 g, without skin), coconut water (3 litres),
Jaggery (one kilogram dissolved in 3 litres
water) in a plastic barrel separately. Filter the
jaggery solution before adding it to the other
ingredients. On the 3rd day, mix the contents
of both the barrels and leave it aside for 7 days.
Stir the contents with a wooden stick twice a
day. After 7 days, filter the product with a khada cloth / Terracot (TC) cloth and store it in closed
containers. (Pierce small holes in the cap of the
containers to prevent bursting). This is diluted @
300ml / 10 litres water and sprayed.
3. Amirthakaraisal
Take fresh cow dung (10 kg), cow’s urine (10
litres), country jaggery (1 kg) and water (100
litres) in a cement tank and mix well. This can be
used the next day. Add this extract to the irrigation
channel or spray directly. This improves the soil
fertility and gives good yield.
4. Bija Amrut
Ingredients : Cow dung – 5kg, cow’s urine – 5
lit, cow’s milk – 1 lit, lime – 250 gms and water
– 100 lit. Mix all the ingredients and keep it
overnight, sprinkle this formulation on seeds to
be sown, dry in shade before sowing.
5. Jiwa Amrut
Ingredients: Cow dung – 10 kg, cow’s urine –
10 lit, jiggery (old) – 2kg, flour of gram, pigeon pea, moong dal or cowpea or urad dal – 2 kg, live
soil – 1 kg and water – 200 lit
Take 100 litres of water in barrel and add 10 kg
cow dung + 10 lit cow’s urine. Mix well with the
help of wooden stick, add 2 kg old jaggery and
2 kg flour. Mix this solution well with wooden stick. Keep this solution for fermentation for 2 to
7 days. Shake the solution regularly three times
a day.
6. Amritpani
Mix 10 kg of cow dung with 500 gm honey and
mix thoroughly to form a creamy paste. Add 250
gm of ghee and mix at high speed. Dilute with
200 litres of water. Sprinkle this suspension in
one acre over soil or with irrigation water. After
30 days, apply second dose in between the row of
plants or through irrigation water.
7. Ginger, Garlic, Chilli Extract
This extract is made from three plants. For
preparing the extract required for one acre, 1
kg of garlic, ½ kg of ginger and ½ kg of green
chillies are required. Take all the three separately
and make them into a fine paste. Dissolve all the three pastes in 7 litres of water and mix them
well. On filtering this, 6 litres of extract can be obtained. The concentration of the extract can be
increased or decreased from 500-1000 ml/tank
(10 litre capacity) depending on the intensity
of the pest attack. This extract should be used
immediately after preparation. This extract can
be stored for a maximum of 3 days.
8. Five Leaf Extract
This extract is prepared using leaves of five different plants. Leaves with five different characteristics are used for this purpose
APPENDIX – II PREPARATION PROCEDURES

28
Plants with milky latex - • Calotropis, Nerium,
Cactus and Jatropha.
Plants which are bitter - Neem, • Andrographis,
Tinospora and Leucas.
Plants that are generally avoided by cattle - • Adathoda, Ipomeafistulosa
Aromatic plants – • Vitex, Ocimum, Papaya
Plants that are not affected by pests and • diseases – Morinda, Ipomeafistulosa
One plant in each category should be taken in
equal quantities (1 kg in each) and pound well.
Take them in a mud pot and add twice the quantity
of water. To this, add 1 litre of cow’s urine and
100 g of Asafoetida. Tie the mouth of the pot
tightly with a cloth. This extract should be mixed
well daily in the evening.
This extract should be used after a period of one
week. If this extract is to be used for prophylatic
as a precautionary measure, 500 ml of the extract
should be added for a tank of 10 litre capacity.
This should be diluted with 9½ litres of water
and used. If the pest infestation is severe 1000
ml of extract should be used per tank and diluted
with 9 litres of water. This extract can be stored
and used for a period of 25-30 days.
Note : Cow’s urine is used for disease control
and Asafoetida prevents flower dropping and enhances the yield.
9. Neem Kernel Extract
About 3–5 kg of neem kernel is required for
an acre. If the seeds are fresh, 3 kg of kernel is
sufficient. If the seeds are old, 5 kg is required. Remove the outer seed coat and use only the
kernel. Pound the kernel gently and place it in
an earthen pot. To this, add 6-10 litres of water.
Tie the mouth of the pot securely with a khada
cloth. Leave it as such and filter after 3 days. On filtering, 5-9 litres of extract can be obtained. When the pest incidence is more, 1000 ml of this
extract should be used for one tank (a tank of 10
litre capacity). If the pest population is less, it is
enough to use just 500 ml of the extract for one
tank. 500-1000 ml of extract should be diluted
with 9 ½ or 9 litres of water before spraying.
Khadi soap solution @ 10ml/litre (100 ml/tank)
should be added to help the extract stick well to
the leaf surface. For one acre of the crop, 6-7
tanks of the diluted extract should be used.
Note : The seeds used for preparing this extract
should be at least 3 months old. When they are
less than 3 months or more than 8 months old,
the azadirachtin content in the seeds will be less
and hence the pest control property in these seeds
will also be poor. The extract prepared should
be milky white in colour. If they are prepared
from aged seeds, the extract will be brownish in
colour.
Preparation of Khadi Soap Solution
Khadi soap solution should be added with all
botanicals before spraying. This is a neem based
soap without any detergent. Khadi soap solution
helps the extract to stick well to the plant surface.
It should be soaked overnight in water and used.
The soap solution should be sticky and thick in
nature. Before spraying the botanicals, for every
one litre of the extract, 10 ml of khadi soap
solution should be added.
10. Neem Cake Extract
5 kg of Neem cake is required for an acre of land.
Powder the neem cake well and place it in a khada
cloth and tie it. Soak it in a vessel containing 10
litres of water for 3 days. After 3 days squeeze
the pouch well into the water. About 7–8 litres
of extract can be obtained. About 500–1000 ml
of this extract is used for one tank (a tank of 10
litre capacity). 500-1000 ml of the extract should
be diluted with 9½ or 9 litres of water before
spraying. Khadi soap solution @ 10 ml / litre
(100 ml/ tank) should be added to help the extract
stick well to the leaf surface. For one acre 6-7
tanks of the extract should be used.
11. Neem Oil Extract
About 1200–1800 ml of neem oil is required
for one acre. 200–300 ml of oil is required for
one tank (a tank of 10 litre capacity). Take the
required neem oil and the soap solution and mix
it well. Khadi soap solution @ 10ml/litre (100
ml/tank) should be added. Once the soap solution
is mixed well with the extract, it should be diluted
and used for spraying.

29
Note: This spray should be used immediately
after preparation. Otherwise oil droplets will start
floating on the surface. Power sprayers should be used for spraying this extract. The oil which has
been prepared within a year’s time should only
be used.
12. Preparation of Kashayam
The plants selected for kashayam preparation
should be collected without the roots. The plants
should be cut into small pieces and used. For
one acre of crop, 2 kg of the cut plants should
be mixed with 8 litres of water. This has to be
taken in a wide mouthed vessel and boiled until
the extract reduces to 2 litres. This has to be
cooled and filtered. 300 ml of this extract should be diluted with 100 ml of soap solution and 9.4
litres of water to obtain one tank capacity of the
extract.
Plants used in
kashayam preparation
Pests and diseases
controlled
1. Andrographis
paniculataAll kinds of larvae
2. Sida spinosaAphids and Sap
feeders
3. Adathoda zeylanica Fungal diseases
4. Panchathiktha
kashayam* All kinds of pests
* Panchathikthakashayam is prepared by using
equal quantities of five types of bitter leaves.
Note:
1. The extracts that are kept closed should be
stirred well daily.
2. Power sprayers should be used for
controlling winged pests such as green
plant hoppers, ear head bugs and white
flies.
3. For one tank of the extract 100 ml of khadi
soap solution should be added.
4. The extracts should always be sprayed in
the morning (between 7.00 a.m.–10.00
a.m.).
5. Use 500 - 1000 ml of extract per tank
depending upon the intensity of the pests.
6. Use 6 - 7 tanks of extract per acre (15 - 17
tanks/ha

30
APPENDIX – III
COMMON AND SCIENTIFIC NAMES OF PLANTS
Sl. No. English Name Scientific Name
1. Adhatoda Justicia adhatoda
2. Andrographis Andrographis paniculata
3. Blackgram Vigna mungo
4. Chillies Capsicum annuum
5. Cowpea Vigna unguiculata
6. Daincha Sesbania bispinosa
7. Garlic Allium sativum
8. Gingelly Sesamum indicum
9. Ginger Zingiber officinale
10. Greengram Vigna radiata
11. Groundnut Arachis hypogea
12. Guduchi Tinospora cordifolia
13. Holy basil Ocimum tenuiflorum
14. Horsegram Macrotyloma uniflorum
15. Horseshoe vitex Vitex negundo
16. Indian mulberry Morinda citrifolia
17. Ipomoea Ipomoea sp.
18. Milk weed Calotropis procera
19. Mustard Brassica sp.
20. Neem Azadirachta indica
21. Nerium Nerium oleander
22. Papaya Carica papaya
23. Prickly fan plant Sida spinosa
24. Prosopis Prosopis juliflora
25. Purging nut Jatropha curcas
26. Redgram Cajanus cajan
27. Soyabean Glycinia max
28. Sunflower Helianthus annus
29. Sunhemp Crotolaria juncea
30. Thumbai Leucas aspera

31
Sl. No. English Name Scientific Name
1. Aphids Aphis craccivora
2. Army worm Spodoptera litura
3. Capitulum borer / pod borer Helicoverpa armigera
4. Girdle beetle Oberea brevis
5. Groundnut leaf miner Aproaerema modicella
6. Jassids Amrasca biguttula biguttula
7. Leaf eating caterpillar Azazia rubricans
8. Leaf and pod caterpillar Antigastra catalaunalis
9. Mustard aphid Lipaphis erysimi
10. Mustard sawfly Athalia lugens proxima
11. Painted bug Bargrada hilaris
12. Red hairy caterpillar Amsacta albistriga, A. Moorie
13. Sesame sphinx or hawk moth Acherontia styx
14. Sesame gall fly Asphondylia sesame
15. Stem fly of Soyabean Melanagromyza sojae
16. Tobacco caterpillar Spodoptera litura
17. White fly Bemisia tabaci
18. White grub of groundnut Holotrichia consanguinea
APPENDIX – IV
COMMON AND SCIENTIFIC NAMES OF INSECTS

32
ANTHESIS: The process of dehiscence
of anthers and the period of pollen
distribution - See also Dehiscence.
BREEDER SEED - The seed of a new variety
with highest purity, produced, developed,
controlled and distributed directly by the breeders
or their institution for further multiplication.
CERTIFIED SEED - The progeny of the
foundation seed, registered or certified seeds, handled to maintain sufficient varietal identity and purity, grown by selected farmers under
prescribed conditions of culture and isolation and
subjected to field and seed inspections prior to the approval by the certifying agency.
CROSS POLLINATION: When the pollen
of one flower gets deposited on the stigma of another flower either on the same plant or on a different plant of the same kind.
CULTURAL PRACTICE: Practices that
have been followed by farmers for several
generations and found effective. Practices like,
deep ploughing and burning of crop residues,
synchronous planting of crop fields, planting trap crops, intercropping, crop rotation, tillage and
use of pest-free seeds and planting material are
examples of cultural practices.
DAMPING OFF: An infection of the basal
portion of the nursery seedlings and young plants
caused by fungus, resulting in decomposition of
the plants.
DEHISCENCE: Act of anthers becoming ripe
and bursting to discharge the dry pollens. The
time when this takes place is called anthesis.
DESICCATE: Process of drying seeds
completely in order to preserve it.
EXOTIC SPECIES: A species that has been
introduced from another geographic region to an
area outside its natural range.
FOUNDATION SEED - The progeny of the
breeder seed produced by the trained officers of an agricultural station in conformity with regulated
national standards and handled to maintain
genetic purity and identity of the variety.
FUMIGATION: The application of smoke,
vapour or gas for the purpose of disinfecting or
destroying pests or microorganisms.
GENETIC UNIFORMITY / PURITY: A
variety that has all the unique characteristics of
its mother. It can be maintained by isolation of a
crop by a specified distance from other varieties (or) contaminants. See varietal purity.
GREEN MANURE CROPS: Plants that can
absorb atmospheric nitrogen with the help of
certain microorganisms found in their root
nodules and convert it into a form, which can be
used by the soil. Eg. Most of the Leguminosae
members.
INFLORESCENCE: An inflorescence is a group or cluster of flowers arranged on a stem that is composed of a main branch or a complicated
arrangement of branches.
MONECIOUS: Plants with separate male
flowers and female flowers on the same plant.
OFF TYPES: Plants that are differ in
morphological and agronomical characteristics
from the majority or the representative plants
of a variety. Ex: Admixtures and obvious
contaminants in a field.
OPEN POLLINATION: Pollination occuring by
insects, birds, wind, or other natural mechanisms.
The seeds of open-pollinated plants will produce
new generations of those plants.
PLANKING: In some crops soon after the seed
sowing, the seeds are covered with a layer top
soil using a wooden plank to protect them from
insects, birds etc. Ex: Mustard.
APPENDIX – V GLOSSARY OF TECHNICAL TERMS

33
PUBESCENCE: The hairy growth on the surface
of the plant body.
ROUGING: The act of removing undesirable
plants. The removal of individual plants, which
deviate in a significant manner from the normal or average type of a variety. A step in the
maintenance of purity in an established variety
or in the attainment of purity in a new variety.
SEED DORMANCY: A period in the seed
life history where development is temporarily
suspended.
SEED DRILL: An agricultural implement that
makes furrows into which it drops seeds.
SEED VIABILITY: The capacity of a seed to
germinate.
THINNING: The process of removing additional
seedlings from a pit / plot after germination
to improve the growth rate or health of other
seedlings.
TIME ISOLATION: Separation of varieties /
species / contaminants by adjusting the sowing
date in such a way that both crops do not come
to flowering at the same time. The crossing is prevented and genetic purity is maintained.
VARIETAL PURITY: Maintenance of true to
type nature of the plant / seed. The plant / seed
resembles its mother in all features (i.e.) from
seed to plant to seed.
VIGOUR: Seed vigour is a measure of the quality
of seed, and involves the viability of the seed, the
germination percentage, germination rate and the
strength of the seedlings produced.
VOLUNTEER PLANTS: Unwanted plants
growing from the seeds that remain in the field from a previous crop.
WINNOWING: A method by which the chaff
is wafted away from the seeds after tossing into
the air. By this method the calyxes, stems, old
petals, husks and dead reproductive organs of the
flowers and fruits etc. could be separated from the seeds.

Disclaimer: The above contents have been collected / compiled from different sources of internet and may be protected under copyright. If anyone publish/ copy/ transmit with an intention to publish with some modifications in his/her name, then all the liability/ legal offences will be bear by such individual/ individual/ organization/ organization/ entity who have misused the content.
Shiveta Sharma