seiko case servicing guide 1982...seiko has reviewed the existing casin9 guides, for se i ko...
TRANSCRIPT


PREFACE
In recent years, watch cases have become more and more diversif ied, with many new advances in the technology of time
piece manufacturing. Manv improved new case designs have been adopted, which often are very different in the opening
and closing methods required, from what people in the service field are accustomed to. To further complicate the problem,
there has been no casing guide which listed ail of the various constructions and the proper opening and closing techniques
in one volume. This has caused cases to be damaged, at times, through improper opening or closing due to lack of the
required in formation.
SEIKO has reviewed the existing casin9 guides, for SE I KO watches, and has compiled a new guide; using a system which
classifies casing information according to the watch construction mark, which is stamped on the case back.
The methods of servicing (replacement of) the crystal, how to open and/or close the various types of cases (for battery
replacement), contained in this booklet have been simplified as much as possible. The booklet should prove useful to .
people in the serv ice field, particularly to those who may have no watch repair training or experience; but who may be
requ ired to replace a battery from time to time.
New cases are damaged, at times beyond repair, by using improper methods and techniques. This booklet should help you
avoid this unhappy occurrence with SEIKO watches.
Technical Department, New York
April 1982
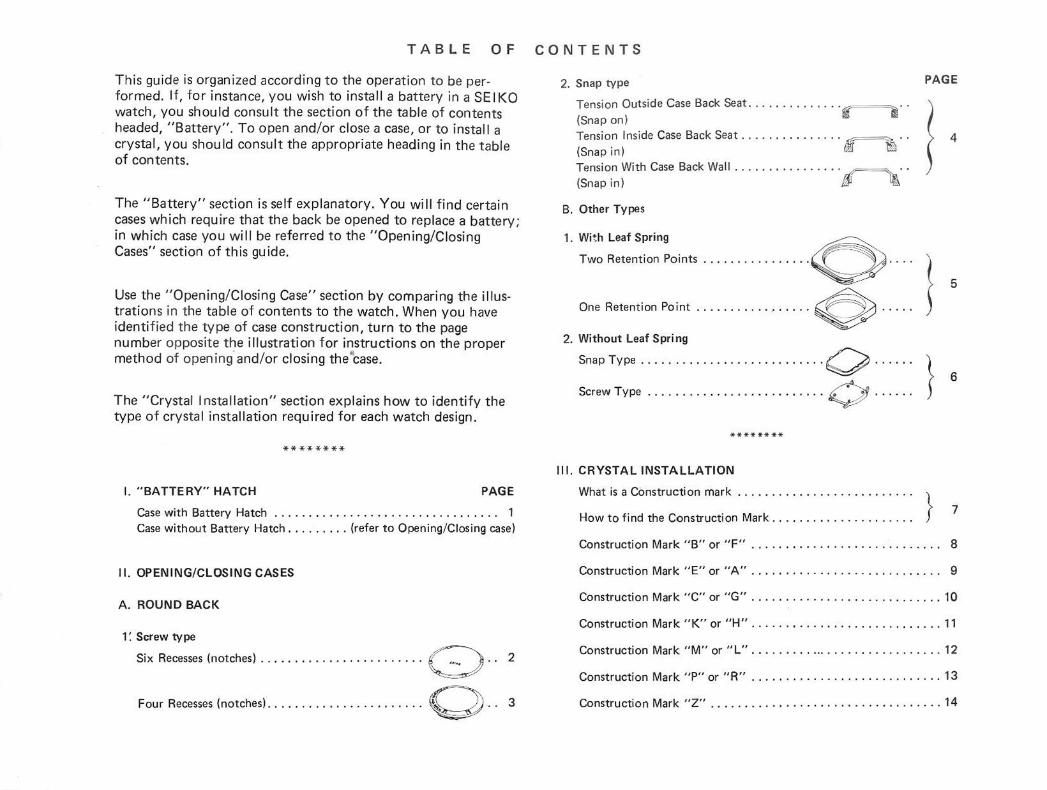
TABLE OF CONTENTS
This guide is organized according to the operation to be performed. If, for instance, you wish to install a battery in a SE I KO watch, you should consult the section of the table of contents headed, "Battery". To open and/or close a case, or to install a crystal, you should consult the appropriate heading in the table of contents.
The "Battery" section is self explanatory. You will find certain cases which require that the back be opened to replace a battery; in which case you will be referred to the "Opening/Closing Cases" section of th is guide.
Use the "Opening/Closing Case" section by comparing the illustrations in the table of contents to the watch. When you have identified the type of case construction, turn to the page number opposite the illustration for instructions on the proper method of opening· and/or closing the c ase.
The "Crystal Installation" section explains how to identify the type of crystal installation required for each watch design.
********
I. "BATTERY" HATCH PAGE
Case with Battery Hatch . . . . . . . . . . . . . . . . . . . . . . . . . . . . . . . . . 1 Case without Battery Hatch ...... ... (refer to Opening/Closing case)
11. OPENING/CLOSING CASES
A. ROUND BACK
1 '. Screw type
Six Recesses (notches) .............. · · · · · · · · · · 0 · · 2
Four Recesses (notches). . . . . . . . . . . . . . . . . . . . . . . 0 · · 3
2. Snap type
Tension Outside Case Back Seat ...... • ... ... ·g-=,·. (Snap on) Tension Inside Case Back Seat ......... . ..... ~ .. (Snap in) Tension With Case Back Wall ......... ...... . ~ .. (Snap in) fJJ %
B. Other Types
PAGE
1. With Leaf Spring ~
Two Reteotion Po;nt, . .............. ·C ·... l 5
One Retent;on Po;nt ..... .. .......... Q . . . . . ) 2. Without Leaf Spring
Snap Type ................. . .. .... . . ·O .. .... } 6
Screw Type ...................... . ... 0 ..... . ** **** **
Ill. CRYSTAL INSTALLATION
What is a Construction mark . . . . . . . . . . . . . . . . . . . . . . . . . . }
How to find the Construction Mark ................. . .. . 7
Construction Mark "B" or "F" . . . . . . . . . . . . . . . . . . . . . . . . . . . . 8
Construction Mark "E" or "A" . . . . . . . . . . . . . . . . . . . . . . . . . . . . 9
Construction Mark "C" or "G" ............................ 10
Construction Mark "K" or "H" .... .... . .. .. ............... 11
Construction Mark "M" or "L" ..... .. ...................... 12
Construction Mark "P" or "R" ....... . .................... 13
Construction Mark "Z" ..... .... ... ........ .............. 14
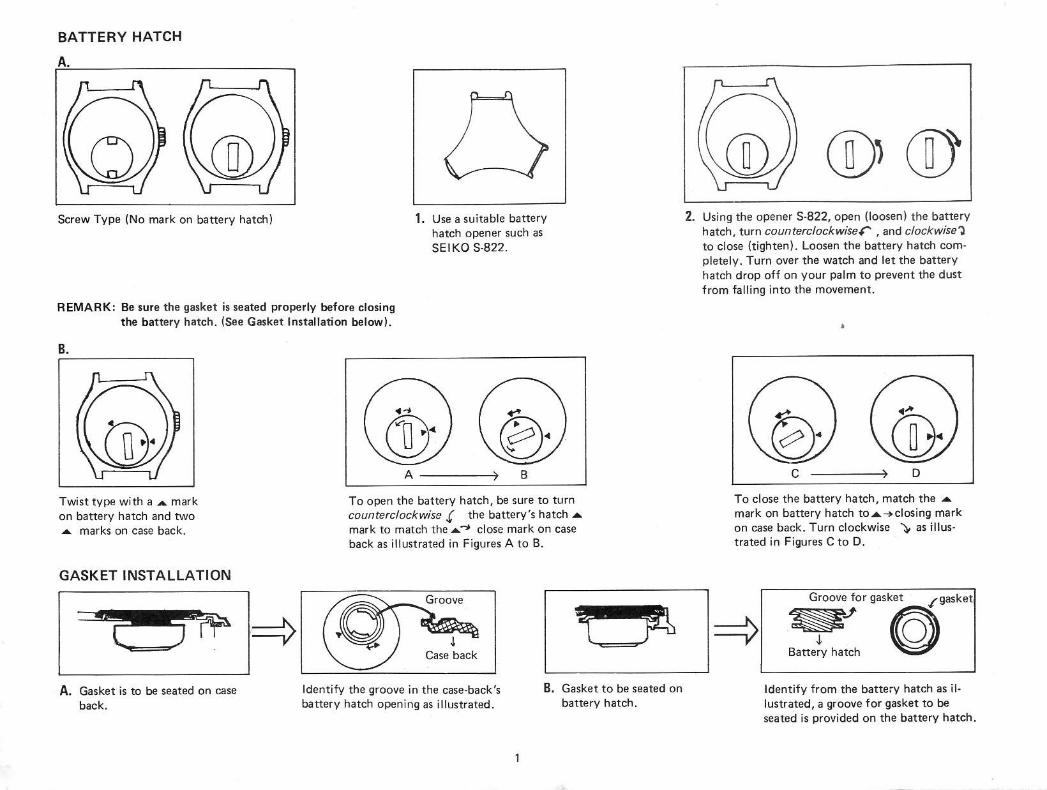
BATTERY HATCH
A.
Screw Type (No mark on battery hatch) 1. Use a suitable battery hatch opener such as SEIKO S-822.
REMARK: Be sure the gasket is seated properly before closing the battery hatch. (See Gasket Installation below) .
B.
Twist type with a .A mark on battery hatch and two .... marks on case back.
GASKET INSTALLATION
A. Gasket is to be seated on case back.
B
To open the battery hatch, be sure to turn counterclockwise.( the battery's hatch• mark to match the•~ close mark on case back as illustrated in Figures A to B.
Case back
Identify the groove in the case-back's battery hatch opening as illustrated .
... . .:~ ·I
B. Gasket to be seated on battery hatch.
2. Using the opener S-822, open (loosen) the battery hatch, turn counterc!ockwiser , and c!ockwise1 to close (tighten) . Loosen the battery hatch completely. Turn over the watch and let the battery hatch drop off on your palm to prevent the dust from falling into the movement.
C D
To close the battery hatch, match the _. mark on battery hatch to_...~ closing mark on case back. Turn clockwise ), as illustrated in Figures C to D.
Groove for gasket ,/gasket
~_,le} Batte;y hatch ~
Identify from the battery hatch as illustrated, a groove for gasket to be seated is provided on the battery hatch.

HOW TO OPEN AND CLOSE SIX NOTCH SCREW-TYPE CASE-BACK
Notch type (screw-type) 1. Brush off any dust on caseback.
REMARK : Hold case in suitable case vise or holder such as SEIKO S-210
3. Wipe cff dust on the gasket and make sure that it is seated properly.
4. Put the case-back o n by hand (2 turns clockwise J ) . Check the gasket to be sure that it is seated properly. No portion of gasket should be seen outside caseback.
2
2. Adjust the size of the case opener (S-194) OR similar adjustable caseback opener according to the distance between two notches which are located opposite each other. Loosen the case-back by turning the opener counterclockwise. t
5. Tighten the case-back with the S-194 OR similar adjustable case-back opener.

HOW TO OPEN AND CLOSE FOUR NOTCH BAYONET TYPE CASE-BACK.
REMARK: Hold case in suitable case vise or holder such as SEIKO S-210.
Four notch bayonet (closed position)
3. Wipe off dust on the gasket and make sure that it is seated properly.
1. Adjust the size of the case opener (S-194) according to the distance between the two notches which are located opposite each other. Using the case opener, turn the caseback counterclockwise .( 450,
4. Put the case-back on by hand. Be sure the "Open" mark matches with the position indicator on the case.
3
closi, mark ' ~ ~ ... /
0 ,,. posi tion indicator on caw
2. Be careful not to turn the caseback excessively, but, be sure the "Open" mark matches with the position indicator on the case.
*Rem.;rk: Opening and/or closing marks may vary on other cases, however, the method to apply is the same as the one mentioned above.
5. Tighten the case-back with S-194. Turn the case-back 45° clockwise.), Be sure the "Close" mark matches with the position indicator "o" on the case .

HOW TO OPEN AND CLOSE SNAP TYPE CASE-BACK (THREE TYPES)
1: Open case-back, using a snap back case opener such as SE I KO S-280 at the notch. (Every case-back has a notch for opening).
A. TENSION ON OUTSIDE (Snap on)
(Carefully read step 1 - 5 preceding operation)
B. TENSION ON INSIDE (Snap in)
C. TENSION ON WALL (Snap in)
2. Carefully identify the case back as type "A", "B" OR "C" as shown on the illustration.
TO JUDGE WHICH TYPE OF CASE BACK, PUT THE CASE BACK ON BENCH TOP AS ILLUSTRATED.
3. Use a crystal press such as SEIKO S-220 to close the case. Be sure to select the closing disk according to the type of tension of the case back. Support the main body of the case (Bezel) with a disk that supports the bezel just outside the glass.
Make sure that the pressure is applied parallel to the suppcrt.
4. If case has a battery hatch, always close the case-back without battery hatch on the case back.
5. For best results, to close "B" OR "C" type of case back, the band on the watch must be removed.
A.
A.
I
i~ ~ Straight
B. ~- ~ outside diameter
~A.~
~c.~
To close the case back use B. an inserting disk whose outside diameter matches the case back. "A" portion should touch the case back as il lustrated.
4
I
~~step {f i}+- Ridge
C.
inside diameter DISK S-173
~¢ ~ ~
[ i "C" = outside caseback
To close the case back use C. Use a flat disk on the cry-an inserting disk whose stal press to close the inside diameter 0 is the case back. same as "Diameter D", as illustrated.

HOW TO OPEN AND CLOSE CASE BACK WITH LEAF SPRING
TWO RETENTION POINTS
ONE RETENTION POINT I. Case with open groove
(on case bezel)
11. Case with open notch (on case back)
1. Adjust the size of the case opener (S-290 ) according to the distance of the groove. Insert the tips of the opener in the groove. Press down the leaf spring to open case back.
1. To open, insert the tip of the opener S-280 to the open notch OR use an opener whose tips are able to get into the case open groove. Press down the leaf spring and open the case back.
5
leaf spring \D ~~ ""case bezel
2. To close the case back, slide one end of the case back into the case bezel. Be sure to push the leaf spring into the side of the case which is open. Snap the case back in completely.
Leaf Spring
ti 2. To close the case back, insert one end of
the case-back into the bezel. Depress the leaf spring on the open end while snapping the case closed.

HOW TO OPEN AND CLOSE CASE BACK WITHOUT LEAF SPRING
1. Insert the tip of the opener S-280 to the case open notch and open the case back. --
0 CAP SCREW TYPE This type of case design applies to gold watches and/or u ltra-thin watches.
A. B. o rnotcv Score Clasp
2. There are two designs of snap:
A. SCORE TYPE: The snap is always located at "12" and "6" o'clock position.
B. CLASP TYPE: The snap can be located at "12 and 6" and/or "3 and 9" o'clock position.
REMARK: Be sure the stem notch faces the crown side.
3. To close the case back, one side of the snap (score OR clasp) must be inserted into the case bezel. Press down the case back from the other side. (By hand as ill ustrated above).
1. To open and close the case back, use a screw driver whose blade matches the cap screw di a meter.
6
Using a screw driver, loosen OR tighten the screws in crossing order. (ie: A to C, and B to Das illustrated above.)

1. OUTLINE OF CASE CONSTRUCTION MARK (CODE)
"A mark indicating the watch case construction is inscribed on the case·back".
A. NEW SYSTEM
Example: Case number
I 7813·8029 []] -··-····· Case construction mark
SEIK.O
• J
The construction mark consists of a framed letter, at times, followed by a number. The framed letter represents
the basic construction of the case, and the number represents a deviation from the basic construction.
Remark 1 : The order of the number is: "O", "1 ", "2", etc.
Remark 2: When the number is "O", only the framed letter is indicated.
Example: B O ··-··--· !]]
B. EXISTING OLD CODING
Case number
1. Example: Water·resist G ....... 0903·8019
I Case construction mark
C. WITHOUT MARKING
Example: 11-3809 ········ Case number
2. Example: A 159-4029 - G
! r Case number Case construction mark
Remark: The case construction mark such as "G"
does not indicate the case color.
Japan-R -······· Factory production code. This is not a case construction mark. Remark: This marking is very common on cases with plastic crystals.
7

HOW TO CHANGE GLASS OF CASE WITH "B" OR "F" CONSTRUCTION MARK
S.220
1. Locate the open notch on the bezel. Insert the tip of the opener S-280 into the notch and pryup the bezel. (Glass and bezel will come out as one unit).
2. Remove the glass by supporting the bottom face of the bezel with a disk whose diameter is slightly larger than the bezel. Using a disk whose diameter is smaller than the glass, press down the glass by using tightening tool S-220 as shown above.
New gasket tor glass
Place the round side down
4. Be sure to install the gasket into the groove of the bez.el properly. This only applies if the gasket fell-off during step 2 and/ or if the gasket is being replaced.
5. Install new glass: I. Place the glass into the bezel.
Be sure the shaded bevel side is facing the gasket for glass.
11. Place the glass fixing ring on the glass.
8
.(J. ~ Inserting disk
~ 6. Push the glass fixing ring by
using inserting disk and tightening tool S-220. The glass fixing ring is flush with the bottom surface of the bezel.
3. Three parts wi ll be pressed down as shown in the above illustration. Please note that the gasket for glass usually remains in the bezel.
Wipe off dust and lint
7. After the bezel is set evenly to the case-band, push it in as shown above. Using the inserting disk and tightening tool, press down the bezel into the case-band.
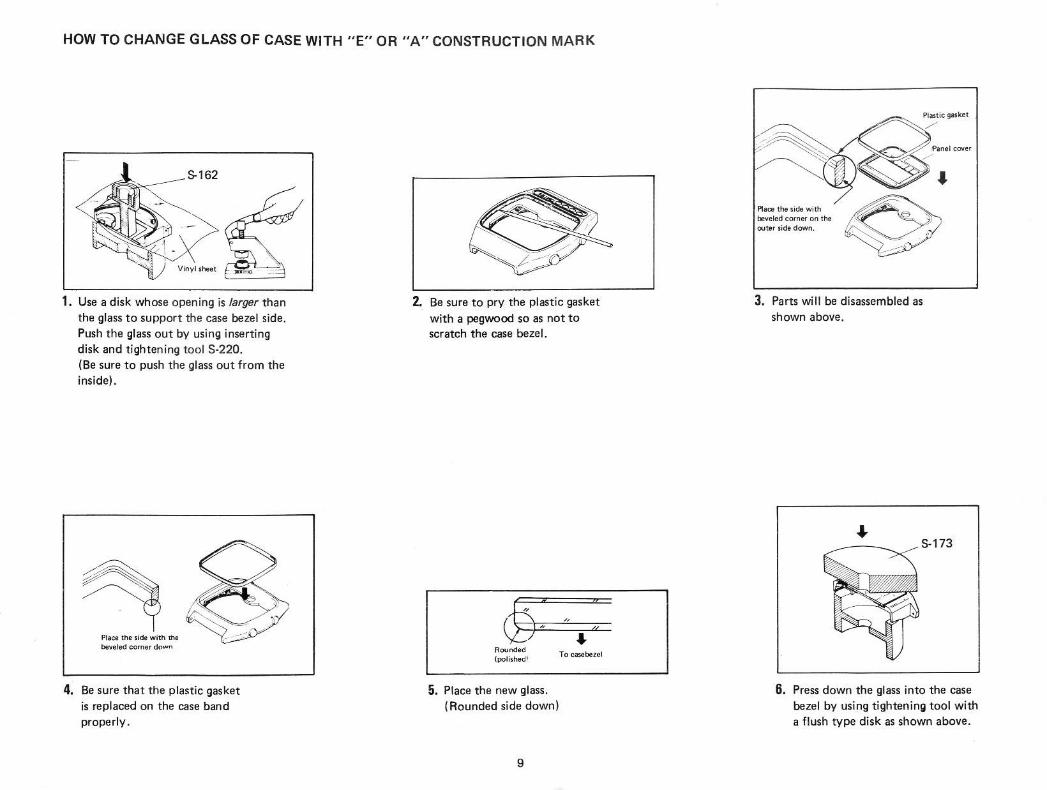
HOW TO CHANGE GLASS OF CASE WITH "E" OR "A" CONSTRUCTION MARK
1. Use a disk whose opening is larger than the glass to support the case bezel side. Push the glass out by using inserting disk and tighteni ng tool S-220. (Be sure to push the glass out from the inside).
Place the side-with me beveled comer down
4. Be sure that the plastic gasket is replaced on the case band properly.
2. Be sure to pry the plastic gasket with a pegwood so as not to scratch the case bezel.
Rounded (polishedt
5. Place the new glass. (Rounded side down)
9
To case bezel
Place the side with beveled comer on the outer side down.
3. Parts will be disassembled as shown above.
,Panel cOYer
•
___.. S-173
6. Press down the glass into the case bezel by using tightening tool with a flush type disk as shown above.
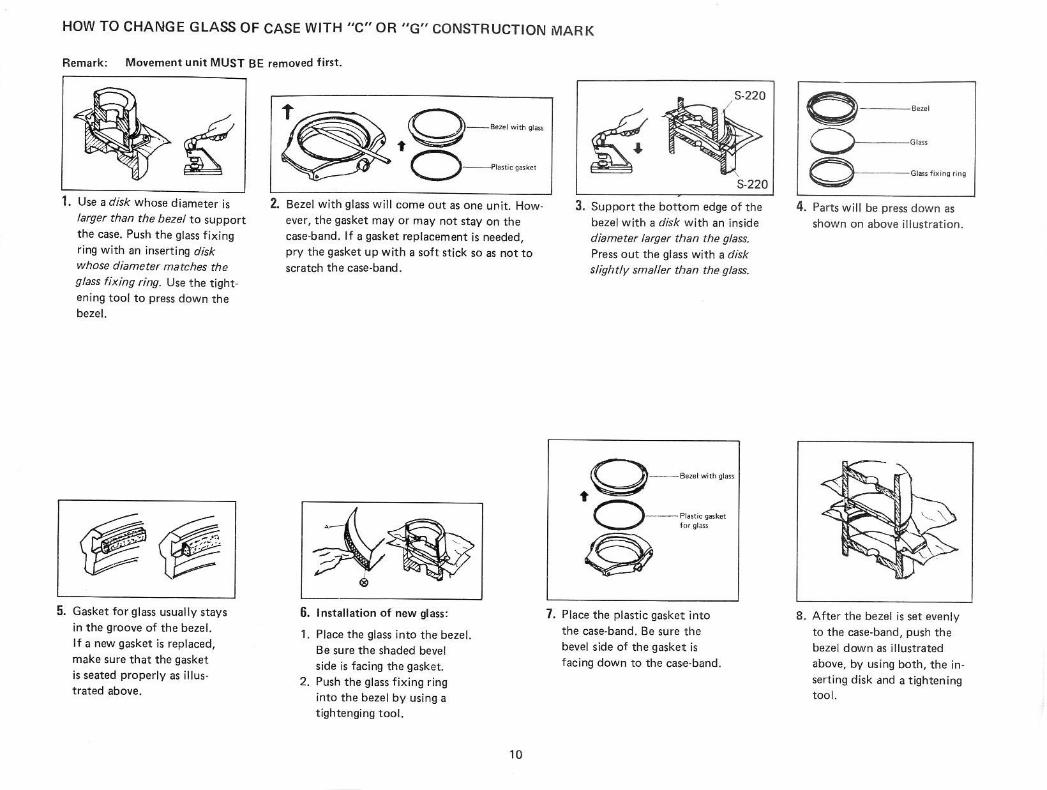
HOW TO CHANGE GLASS OF CASE WITH "C" OR "G" CONSTRUCTION MARK
Remark: Movement unit MUST BE removed first.
1. Use a disk whose diameter is larger than the bezel to support the case. Push the glass fixing ring with an inserting disk whose diameter matches the glass fixing ring. Use t he tightening tool to press down the bezel.
5. Gasket for glass usual ly stays in the groove of the bezel. If a new gasket is replaced, make sure that the gasket is seated properly as il lustrated above.
f 0--Bezel with glass
0 ---f>lastic gasket
2. Bezel with glass will come out as one unit. However, the gasket may or may not stay on the case-band. If a gasket replacement is needed, pry the gasket up with a soft stick so as not to scratch the case-band.
6. Installation of new glass :
1. Place the glass into the bezel. Be sure the shaded bevel side is facing the gasket.
2. Push the glass fixing ring into the bezel by usi ng a tightenging tool.
10
S-220
3. Support the bottom edge of the bezel with a disk with an inside diameter larger than the glass. Press out the glass with a disk slightly smaller than the glass.
t Q - - Bezel with glass
0 - - Plastic gasket f.or glas.s
~ 7. Place the plastic gasket into
t he case-band. Be sure the bevel side of the gasket is facing down to the case-band.
0 --Bezel 0-Glass
0-Glassfixingring
4. Parts will be press down as shown on above illustrat ion.
8. After the bezel is set evenly to the case-band, push the bezel down as illustrated above, by using both, the inserting disk and a tightening tool.

HOW TO CHANGE CRYSTAL OF CASE WITH "K" OR "H" CONSTRUCTION MARK
1. Remove the movement from the case.
Gasket
4. Set the gasket for glass to the case bezel.
Crystal
2. Using the palm of your hand, push the crystal as shown above.
Place the notch in line with the stem pipe.
5. Set the crystal to the case bezel .
6. Place the notch of the crystal fixing ring in line with the stem pipe.
11
o - Gasket for glass
0 - Glass
0--Glass fixing ring
3, Parts are disassembled as shown in the above illustration:
I. Glass fixing ring 11. Glass
111 . Gasket for crystal
Push in the glass fixing ring so as not to 1ouch the stem pipe,
7. Push-in the crystal fixing ring with tightening tool S-220 as shown above.

HOW TO CHANGE GLASS OF CASE-BACK WITH "M" OR "L" CONSTRUCTION MARK
1. Insert the tip of a screwdriver into the opening notch and remove the glass fixing ring.
2. Push the glass out by finger. Above illustration shows the parts being assembled.
3. Place the gasket for glass on the case bezel. Be sure it's seated properly.
4. Place the glass into the case bezel. Be sure the shaded bevel side is face down.
12
5. Reinstal l the glass fixing ring back to the case bezel.
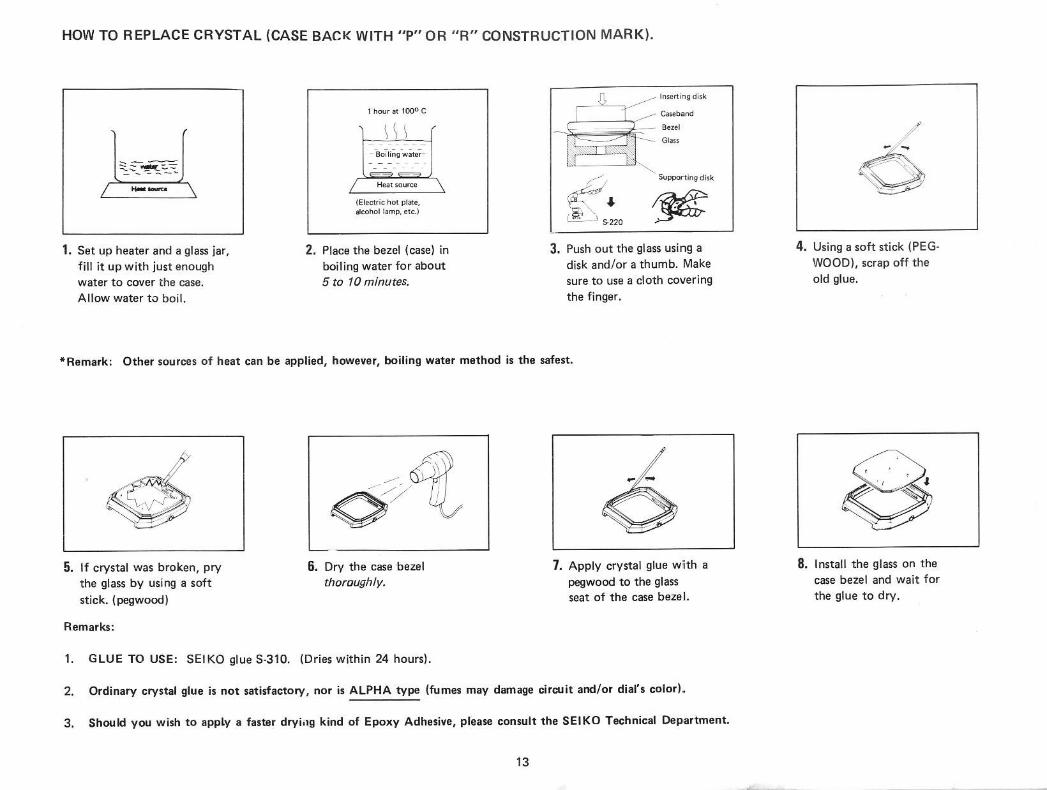
HOW TO REPLACE CRYSTAL {CASE BACK WITH "P" OR " R" CONSTRUCTION MARK).
1. Set up heater and a glass jar, fill it up with just enough water to cover t he case. Allow water to boil.
1 hour at 100° C
- 80T110g ·water-
( Electric hot plate, alcohol lamp, etc.)
2. Place the bezel (case) in boiling water for about 5 to 10 minutes.
r:
~ - -=-
r,i ~~~~· ~ k~'-' _ _ __J='s.
'-, Supporting disk
3. Push out the glass using a disk and/or a thumb. Make sure to use a cloth covering the finger.
*Remark: Other sources of heat can be applied, however, boiling water method is the safest.
5. If crystal was broken, pry the glass by using a soft stick. (pegwood)
Remarks:
6. Ory the case ·bezel thoroughly.
1. GLUE TO USE: SEIKO glue S-310. (Dries within 24 hours).
7. Apply crystal glue with a pegwood to the glass seat of the case bezel.
2. Ordinary crystal glue is not satisfactory, nor is ALPHA type (fumes may damage circuit and/or dial's color).
3. Should you wish to apply a faster dryiilg kind of Epoxy Adhesive, prease consult the SEIKO Technical Department.
13
4. Using a soft stick (PEG· WOOD), scrap off the old glue.
8. Install the glass on the case bezel and wait for the glue to dry.

HOW TO CHANGE GLASS OF CASE WITH "Z" CONSTRUCTION MARK
Remark: "Z" Construction mark applies to all of the cases design which cannot be classified into the general case construction system. Therefore, you may have to refer to the individual casing guide.
EXAMPLE: BRAILLE WATCH
1. Ooen the dial cover
EXAMPLE: DIVER'S WATCH
0 Protective cover screw (4 pcs.} ~
IJ) · Protective cover~\ - -oo··t=<"-R r,-:i!,~ \_
@ Rotating ring 6
·
@ -Gasket for rotatin~ring - . _ _. .. ·:~,.: ::. \
~ 0 .Glass fixing ring ~
@ -Glass fixing ring gasket ~
f) Glass~~~~ ~ - ':.
1. Remove the protective cover, screw, and rotating ring as shown above (1) TO (4)
REMARK : When reassembling the rotating ring, make sure the gasket for rotating ring is placed properly.
2. Push the crystal from inside directly with fingers and remove it.
0
• 2. Remove the glass fixing ring with
a casing instrument S-20R OR S-194 case opener, by turning the opener counterclockwise.
14
3. To install new crystal, press the crystal into the bezel gradually while squeezing it with fingers OR use a squeeze type inserting tool.
3. Remove the glass with the suction pad.
TO INSTALL A NEW GLASS Do not scratch OR stain the back surface of the glass as it is specially coated. If there are any stains, wipe it off with a soft clean cloth.
