self-service hub operator training guide
TRANSCRIPT

1 SRJC Self-Service Hub
Self-Service Hub
Operator Training Guide

2 SRJC Self-Service Hub
Contents Description .................................................................................................................................................................... 4
What is a Ticket? ............................................................................................................................................................ 4
Which tickets needs to be registered? .......................................................................................................................... 5
Process ........................................................................................................................................................................... 5
Register ...................................................................................................................................................................... 7
Classify ...................................................................................................................................................................... 7
Resolve....................................................................................................................................................................... 7
Close ticket ................................................................................................................................................................ 8
E-mail moments ......................................................................................................................................................... 9
Work instruction ............................................................................................................................................................ 9
1. Start in TOPdesk .................................................................................................................................................... 9
Login ...................................................................................................................................................................... 9
Homepage ........................................................................................................................................................... 10
Tasks .................................................................................................................................................................... 10
Adjusting overviews ............................................................................................................................................. 11
2. Search .................................................................................................................................................................. 11
Search for ticket by Ticket number ...................................................................................................................... 11
Search for ticket by Caller .................................................................................................................................... 12
3. Register a ticket ................................................................................................................................................... 12
4. Re-assign a ticket ................................................................................................................................................. 13
5. Add information to existing ticket ....................................................................................................................... 13
6. Assign ticket to resolve yourself .......................................................................................................................... 14
7. Resolving a ticket ................................................................................................................................................. 15

3 SRJC Self-Service Hub
8. Email from a ticket ............................................................................................................................................... 15
13. Transfer call to other process ............................................................................................................................ 15

4 SRJC Self-Service Hub
Ticket management DESCRIPTION
This document is to provide insight into the ticket management process for the SRJC departments using the Self-Service Hub. This document can be used by the operators to get to know the Self-Service Hub and the process.
The goal of ticket management is to facilitate the registration, organization and monitoring of incoming tickets and to assign the tickets to an operator or an operator group. After the tickets are closed, reports can be used to make trend analysis.
1) What is a ticket?
2) Process: this provides insight into the ticket management process.
3) Work instruction: How can / should I work in TOPdesk
WHAT IS A TICKET?
Ticket management is about resolving a ticket as well and quickly as possible. With Ticket management, departments ensure that the service is restored in accordance with the agreed standards. In this way, the continuity, availability and accessibility of the services can be guaranteed.
A ticket meets the following requirements:
- It can be divided into a incident, service request, or question.
A ticket therefore is not:
- Scheduled or recurring task (Operations management) - Different operators (groups) are needed for a standard series of activities (Extensive changes) - Nonstandard changes: which must be checked and handled within an agreed lead time. - Required authorization from, for example, manager or department head is required (Change
management)

5 SRJC Self-Service Hub
WHICH TICKETS NEED TO BE REGISTERED?
The goal is to register all tickets in the Self-Service Hub. When the Request and Action field are filled in correctly and clearly, you immediately build up a knowledge base. In addition, by registering all the tickets, the reports will give a useful overview.
Every incoming ticket: (telephone / in person / Self-Service Portal).
Every (possible) ticket that is prevented by own signaling.
PROCESS
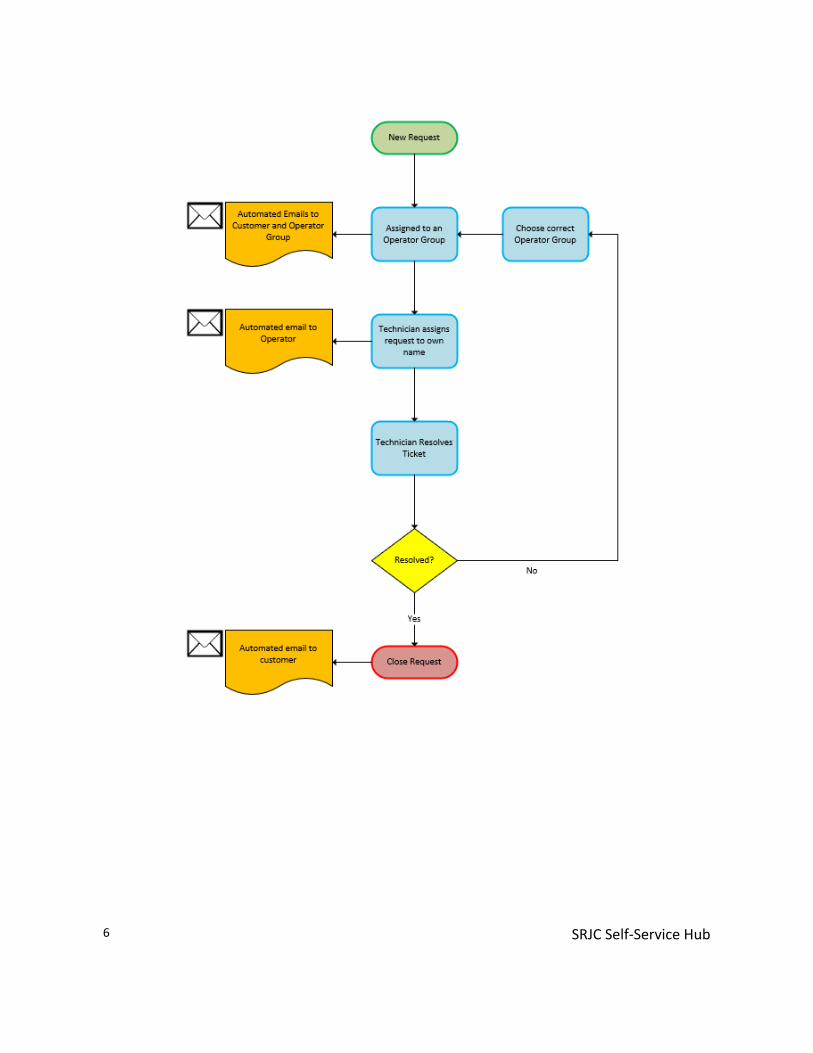
6 SRJC Self-Service Hub

7 SRJC Self-Service Hub
REGISTER
There are different entries for a ticket:
- Telephone - In Person - Email - Self Service Portal
Upon registration, the following information is included in the call:
- Caller & Location of the Caller - Request - Ticket Date (automatically filled in) - Brief description - Object (when applicable)
CLASSIFY
Tickets should be assessed by an operator for clarity and inclusion of important information. When the ticket is registered/assessed, the following information is included in the ticket:
- Entry; - Ticket type; - Category and subcategory; - Priority (Impact x Urgency = Priority = Duration); - Operator group and operator; - Status; - Verify if Request is clear.
Call type: Call type Description Example
Incident Disruption of a service, something doesn’t work that should work
The printer/light is broken/ not working correctly.
Service request A request that usually contains an authorization. Customers don’t mind providing more information for this.
May I have access/permissions for this special software? Can I order a new phone? Can I move to a new office?
Question Request for information How do I install my email on my phone? What are the opening times of the building?
RESOLVE
It is mandatory to fill in the Action field.
8 SRJC Self-Service Hub
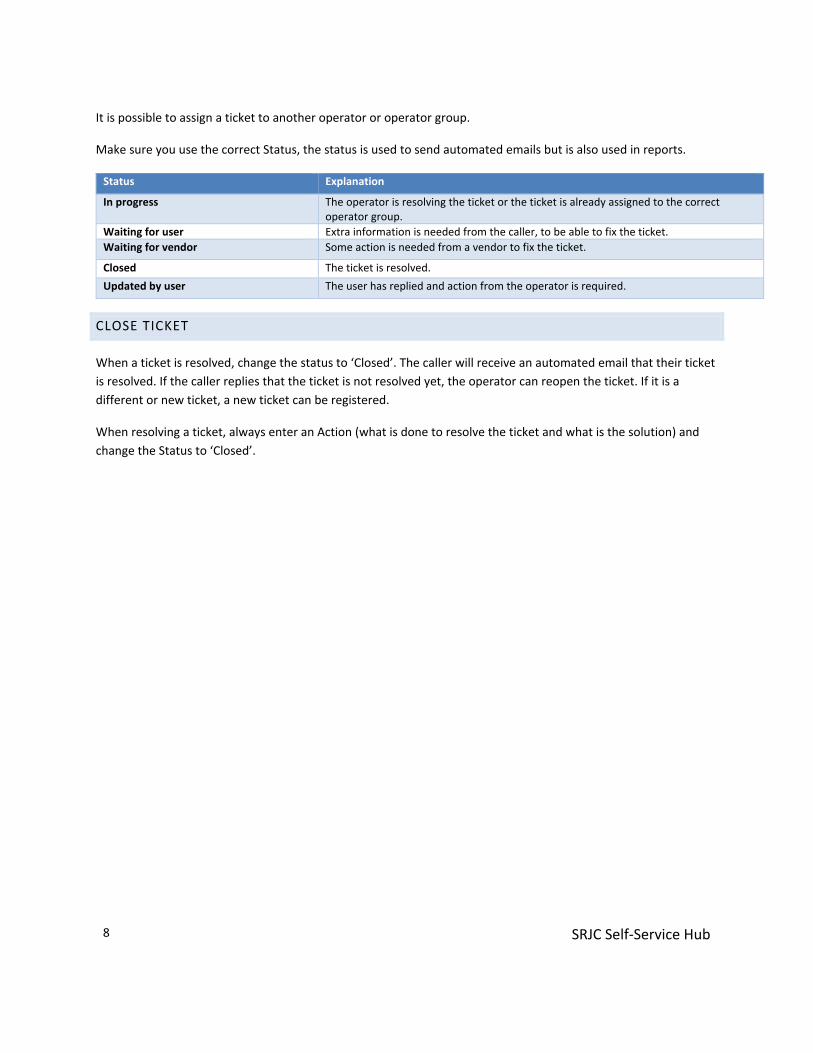
It is possible to assign a ticket to another operator or operator group.
Make sure you use the correct Status, the status is used to send automated emails but is also used in reports.
Status Explanation
In progress The operator is resolving the ticket or the ticket is already assigned to the correct operator group.
Waiting for user Extra information is needed from the caller, to be able to fix the ticket. Waiting for vendor Some action is needed from a vendor to fix the ticket.
Closed The ticket is resolved. Updated by user The user has replied and action from the operator is required.
CLOSE TICKET
When a ticket is resolved, change the status to ‘Closed’. The caller will receive an automated email that their ticket is resolved. If the caller replies that the ticket is not resolved yet, the operator can reopen the ticket. If it is a different or new ticket, a new ticket can be registered.
When resolving a ticket, always enter an Action (what is done to resolve the ticket and what is the solution) and change the Status to ‘Closed’.

9 SRJC Self-Service Hub
E-MAIL MOMENTS
Automated e-mails
1) To Customer a. New ticket registered b. Ticket registered via email c. Change of Operator Group d. Change of Target Date e. Ticket Closure f. Action Updated by Operator g. Waiting for response (after 5 days)
2) Operator a. Change of Operator b. Change of Target Date c. Ticket Overdue d. Updated by Customer
3) Operator Group a. New ticket registered
WORK INSTRUCTION
The work instruction explains how the different parts in Self-Service Hub ticket management work. The instruction is for the operators of ticket management.
1. START IN TOPDESK
LOGIN
Open a browser and go to this link: https://srjc.topdesk.net/tas/secure/
When single sign-on does not automatically log you in, login with your SRJC credentials.

10 SRJC Self-Service Hub
HOMEPAGE
After you have logged in, the Self-Service Hub Homepage is shown. At ‘My settings ’ in the top right corner you can set up that you want to show To Do per Group (if you are in multiple operator groups). On the homepage you will find the following:
Side panel perform frequently occurring actions Tasks overview of open tasks that need to be resolved Latest news news messages Current Major tickets quickly add a new ticket to the major ticket by clicking on the first line ticket Shortcuts links to selections, reports and webpages Main pages open the Plan Board, Task Board, Dashboard or Modules page from here
TASKS
The Tasks widget contains all outstanding tasks, sorted by type: first line tickets, operational activity, change activities etc. In the left column ‘Own’ are the tasks assigned to you. In the right column tasks for ‘Own / Groups / Everyone in groups / Not assigned’ are shown. The display of the task list depends on the settings.

11 SRJC Self-Service Hub
Open tickets from own tasks
1 Click the number behind First Line Tickets in the left column Own. 2 An overview with all first line tickets assigned to you are shown. 3 Double click the specific ticket to open.
ADJUSTING OVERVIEWS
You can adjust the information that is shown in the overviews. Each field that you can find in a ticket can also be added as a column to an overview. You can also hide the columns with irrelevant information to make your overview more readable.
You can adjust the overview by pressing the button in the right-hand corner of the overview.
• A pop-up will appear. Use the horizontal arrows to move fields from the Visible to the Not Visible block (and vice versa). Use the vertical arrows to determine the order of the overview.
• In the left column, select the field that you wish to display in the list as a column. Move it to the Visible block with the right arrow. Save the adjustments.
• Sort the overview for the added column.
2. SEARCH
SEARCH FOR TICKET BY TICKET NUMBER
Click on the search icon in the quick start bar on the left. Enter the exact ticket number, and the ticket then is opened immediately.
You can also enter search terms here, an overview of tickets is shown with tickets containing the search term.
If you want to see all the messages, type a * in the search field and click search. Use advanced search or use the filter to narrow down your search.

12 SRJC Self-Service Hub
SEARCH FOR TICKET BY CALLER
If you don’t know the ticket number, but you do know the caller, use the Caller card and type in the name of the caller. The overview will show all the open tickets from the selected caller. Double click to open the tickets.
3. REGISTER A TICKET
Click on the Caller card in the quick start bar on the left, fill in the name of the caller and insert the Request of the caller in the Notes.
If it is an addition to one of the open tickets, select the logged ticket and choose the button “Update” > “Selected Ticket” in the top right corner. If it is a new ticket, use the button “New First Line Ticket”. The Caller and the Notes will be automatically be entered in the new ticket. Fill in the other (mandatory) fields.

13 SRJC Self-Service Hub
All the red colored fields are mandatory.
4. RE-ASSIGN A TICKET
If you cannot resolve a ticket yourself, or a ticket is accidentally assigned to you, you can assign the ticket to another operator.
Change operator
If the operator you want assign the ticket to works in the same operator group, just change the name of the operator and save the card.
If the ticket cannot be solved within the same operator group, choose the correct operator group. If you know the specific operator within the operator group that will resolve this ticket, assign it to him/her. If not, assign it to the specific operator group and they will pick it up. Save the card after assigning the ticket.
5. ADD INFORMATION TO EXISTING TICKET
If you want to add information to an existing ticket, open the ticket and select the field that you want to change or add information to. Don’t forget to save the card.

14 SRJC Self-Service Hub
Always use the Action field to explain what you have done, even if this not yet led to the desired result.
“Make invisible to caller” is to add a note that is only visible for operators. Use this when you want to add information for your colleague that will only confuse the end user, i.e. really technical information.
The paperclip can be used to add attachments to the ticket.
Defaults texts are a personal setting and can be used to quickly add frequent used notes to memo fields.
6. ASSIGN TICKET TO RESOLVE YOURSELF
On your homepage is the overview ‘Tasks’ visible. It shows the tasks per module. The left column shows the tasks assigned to you, the right column shows the tasks assigned to your operator groups. Use the pencil to change your overview.
Everyone in the operator group is responsible for the tickets assigned to the operator group. Open a ticket, assign the ticket to yourself, change the status to “In progress” and save the ticket. Your co-operators can see you are working on this ticket. If your operator colleague opened the same ticket, this will be shown at the top (Operator X has this card opened).
If you have a question for the caller; do not forget to change the status of the ticket.
15 SRJC Self-Service Hub
Always use the Action field to explain what you have done, even if this not yet led to the desired result.
7. RESOLVING A TICKET
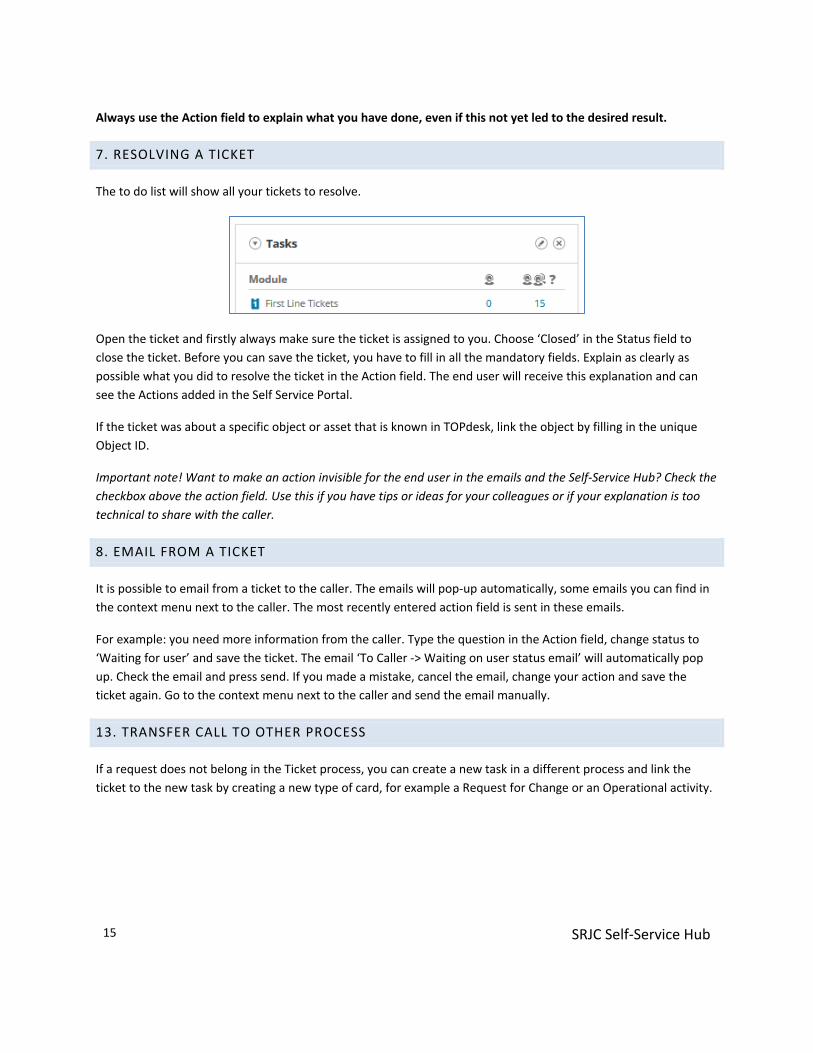
The to do list will show all your tickets to resolve.
Open the ticket and firstly always make sure the ticket is assigned to you. Choose ‘Closed’ in the Status field to close the ticket. Before you can save the ticket, you have to fill in all the mandatory fields. Explain as clearly as possible what you did to resolve the ticket in the Action field. The end user will receive this explanation and can see the Actions added in the Self Service Portal.
If the ticket was about a specific object or asset that is known in TOPdesk, link the object by filling in the unique Object ID.
Important note! Want to make an action invisible for the end user in the emails and the Self-Service Hub? Check the checkbox above the action field. Use this if you have tips or ideas for your colleagues or if your explanation is too technical to share with the caller.
8. EMAIL FROM A TICKET
It is possible to email from a ticket to the caller. The emails will pop-up automatically, some emails you can find in the context menu next to the caller. The most recently entered action field is sent in these emails.
For example: you need more information from the caller. Type the question in the Action field, change status to ‘Waiting for user’ and save the ticket. The email ‘To Caller -> Waiting on user status email’ will automatically pop up. Check the email and press send. If you made a mistake, cancel the email, change your action and save the ticket again. Go to the context menu next to the caller and send the email manually.
13. TRANSFER CALL TO OTHER PROCESS
If a request does not belong in the Ticket process, you can create a new task in a different process and link the ticket to the new task by creating a new type of card, for example a Request for Change or an Operational activity.