selphy beginner’s guidegdlp01.c-wss.com/gds/7/0300001637/01/selphyes2_es... · add borders to an...
TRANSCRIPT

SELPHY Beginner’s Guide
Simple Steps for Basic Operation
Make Everyone Smile “Recipes” for Printing
CDI-E347-010 ©2007CANONINC. PRINTEDINCHINA
ENGLISH

Preserve Your Memories with SELPHYYou can easily edit and print family photos to preserve your precious memories, all with your SELPHY printer.
Initial printingThings to Prepare
Cartridge (Postcard size is used in this section.)
• Compact Power AdapterPower Cord
••
A Memory Card•
�

�
Simple Steps for Basic Operations
Protective paper
Slide the cover lever up to open the cartridge cover
Remove the cleaner unit
Load the cartridge
Close the cartridge cover
Load the cartridge*
The ink and paper integrated cartridges for the SELPHY ES series are called Easy Photo Packs.*
Printing images from the memory card using steps A through E.

�
Connect the printer to a power source and turn on the power
To power outlet
Ensure there is at least 15 cm (6 in.) of free space front and back, and at least 10 cm (4 in.) either side.
Insert the power cord to the compact power adapter and plug the other end into a power outlet
Connect the compact power adapter to the printer
Press until the power lamp lights green to turn on the power
15 cm (6 in.)
15 cm (6 in.)
10 cm (4 in.)

�
Set the display language
Press and select [Printer Setup] with or , and press
Select [Language] and press
Press , , or to select the language you wish to set and press
The selected language is set and the display returns to [Printer Setup].
ES2
ES20

�
Insert the memory card into the printer
Open the card slot cover
Insert a memory card into the appropriate card slotImages saved on the memory card are displayed on the LCD monitor.
Compatible Memory Cards
CF/microdrive Slot SD/miniSD/MMC+ SlotCompactFlash Card• SD Memory Card• microSD Card*•Microdrive• miniSD Card• microSDHC Card*•xD-Picture Card*• SDHC Memory Card• MMCmobile Card*•
miniSDHC Card• MMCmicro Card*•MS/MS Duo Slot MultiMediaCard• RS-MMC Card*•
Memory Stick• MMCplus Card•Memory Stick PRO• HC MMCplus Card•Memory Stick Duo•Memory Stick PRO Duo•Memory Stick micro*• Card adapter required.*
For memory cards requiring an adapter, be sure to first insert the memory card into the adapter before inserting the adapter into the appropriate card slot. If you insert the memory card into a card slot without first inserting into an adapter, you may not be able to remove the memory card from the printer.

�
Press , , or to select the image you wish to print
Press or to select the number of copies to print
Press
Printing starts
ES2
ES20
ES2’s Easy-Scroll Wheel
You can also use the Easy-Scroll Wheel to select an image.

�
Follow the instructions indicated below before selecting images.
Press Date setting with [On] is saved.You can now select an image you wish to print with the date and print it.
Press or to select [Print Settings] and press .
Press or to set [Date] to [On].
Press
Select [Print Settings] in the menu screen and set the date
How to print with the date
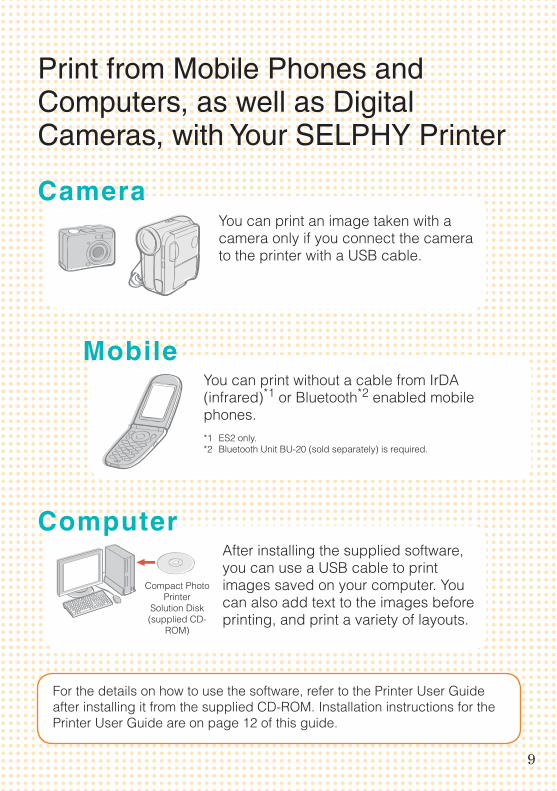
Print from Mobile Phones and Computers, as well as Digital Cameras, with Your SELPHY Printer
You can print an image taken with a camera only if you connect the camera to the printer with a USB cable.
You can print without a cable from IrDA (infrared)*1 or Bluetooth*2 enabled mobile phones.*1 ES2 only.*2 Bluetooth Unit BU-20 (sold separately) is required.
�
Compact Photo Printer
Solution Disk (supplied CD-
ROM)
After installing the supplied software, you can use a USB cable to print images saved on your computer. You can also add text to the images before printing, and print a variety of layouts.
For the details on how to use the software, refer to the Printer User Guide after installing it from the supplied CD-ROM. Installation instructions for the Printer User Guide are on page 12 of this guide.
Camera
Mobile
Computer
10
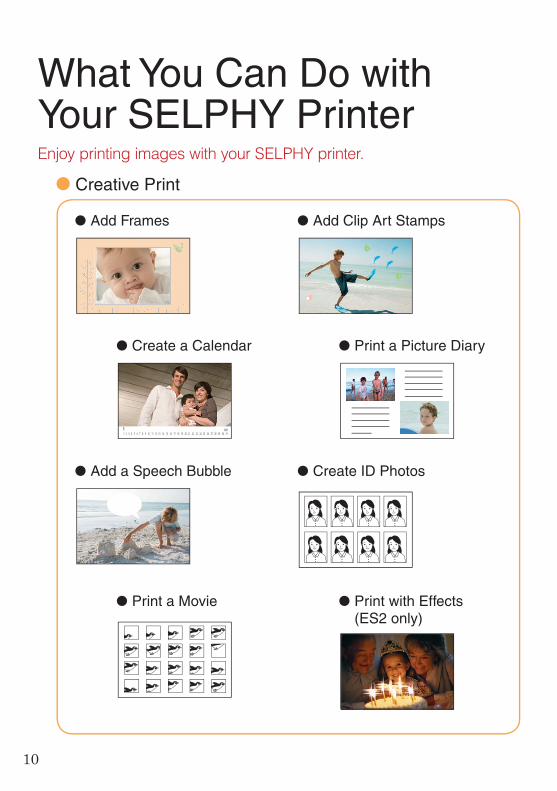
What You Can Do with Your SELPHY Printer
Add Frames Add Clip Art Stamps
Print with Effects (ES2 only)
Create a Calendar Print a Picture Diary
Add a Speech Bubble Create ID Photos
Print a Movie
Enjoy printing images with your SELPHY printer.
Creative Print
11
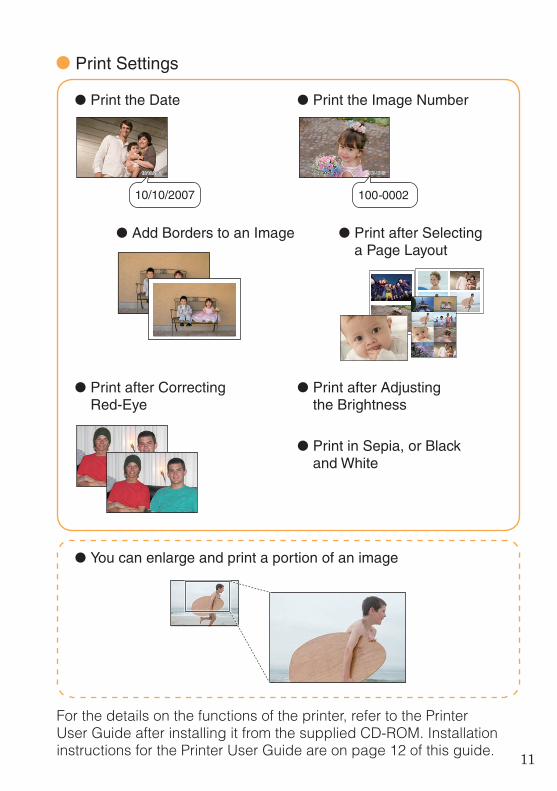
Print Settings
Print the Date Print the Image Number
Print after Correcting Red-Eye
Print in Sepia, or Black and White
Print after Adjusting the Brightness
You can enlarge and print a portion of an image
Add Borders to an Image Print after Selecting a Page Layout
For the details on the functions of the printer, refer to the Printer User Guide after installing it from the supplied CD-ROM. Installation instructions for the Printer User Guide are on page 12 of this guide.

1�
Printer User GuideFor details about the functions introduced in this book, refer to the Printer User Guide that is included in the supplied CD-ROM.The following topics are covered.
Usage detailsUseful functionsSupplied software
---
Adobe Reader is required to view the Printer User Guide.*
Installing the Printer User Guide

1�
Separately Sold Products
Paper Size Ink TypeName
(Product No.)No. of Sheets
Color of Cartridge
Postcard size (100 × 148 mm)
(4 × 6 in.)
ColorEasy Photo Pack E-P100 100
GreenEasy Photo Pack E-P50 50
BW Easy Photo Pack E-P25BW 25 Gray
L size (89 × 119 mm) (3.5 × 4.7 in.)
ColorEasy Photo Pack E-L100 100
BlueEasy Photo Pack E-L50 50
Card size (54 × 86 mm) (2.1 × 3.4 in.)
ColorEasy Photo Pack E-C25 25
OrangeEasy Photo Pack E-C25L* 25
* Card-sized label sheets.
Ink and paper integrated cartridge.The cartridge differs depending on the paper size and ink type. Please refer to the table below.
Cartridge
Battery Pack NB-ES1L
You can print outdoors, or at locations without a power outlet (ES2 only).
You can print wirelessly from a Bluetooth-enabled mobile phone.
Bluetooth Unit BU-20

1�
Safety PrecautionsUse this equipment correctly according to the following precautions to avoid the risk of injury, fire, electrical shock, malfunction or other hazards. Equipment refers to the printer and compact power adapter.The safety precautions noted on the following pages are intended to instruct you in the safe and correct operation of the printer to prevent injuries or damage to yourself or other persons.
WARNING
Do not play the supplied CD-ROM(s) in any CD player that does not support data CD-ROMs.Playing the CD-ROM(s) in an audio CD player (music player) could damage the speakers. It is also possible to suffer from hearing loss from listening with headphones to the loud sounds of a CD-ROM played on a music CD player.
Store the equipment in a place where it cannot be reached by children.
Do not disassemble or modify the equipment.
If the equipment is dropped or the casing becomes damaged, do not continue operation.
Stop operating the equipment immediately if it emits smoke or noxious fumes.
Do not allow water or other liquids to enter the interior of the equipment.If the equipment is subjected to water droplets or damp salty air, gently wipe it with a soft, absorbent cloth.
Do not insert or drop metallic objects or flammable substances into the equipment interior.Immediately switch off the printer power and remove the power cord from the power outlet. (If powering it by battery, remove the battery.)
Do not touch metal parts of devices or the power plug during thunderstorms.Immediately stop using the equipment and distance yourself from it.
Do not use flammable solvents such as alcohol, benzine, or paint thinner to clean the equipment.
Do not rest heavy objects on the power cord or plug, pull on it with excessive force or damage it.
Do not use a power source (compact power adapter, battery) that is not specified for the equipment.
Remove the power cord on a regular periodic basis and wipe away the dust and dirt that collects on the plug, the exterior of the power outlet and the surrounding area.
Equipment
WARNING

1�
Do not handle the power cord if your hands are wet.
CAUTIONS
Do not stick any part of your hand into the printer interior.
Do not use or store the equipment in the following types of places.Humid or dusty areas, places subject to heavy vibrations, places near flames, places subject to strong sunlight, or hot places such as an automobile trunk or dashboard.
Do not attach metallic pins or allow dirt to collect on the power plug or recharging connectors.
Do not excessively pull or bend the power cord.
Do not use the compact power adapter for any other equipment except this printer, use it beyond its rated capacity or voltage, or leave the plug partially inserted into a power outlet.
Do not open the cartridge cover during printing.If you do so, printing will stop.Paper moves back and forth in the printer during printing. Placing your hand in the way of the moving paper may result in injury.
••
Unplug the equipment when you are not using it.Leaving the equipment plugged in during prolonged periods of non-use poses risk of electric shock or fire.

1�
CAUTIONS
RISK OF EXPLOSION IF BATTERY IS REPLACED BY AN INCORRECT TYPE. DISPOSE OF USED BATTERIES ACCORDING TO LOCAL REGULATION.
Battery (ES2 only)
WARNING
Do not place the battery pack near a heat source or expose it to direct flame or heat.
The battery pack should not be immersed in water.
Do not attempt to disassemble, alter or apply heat to the battery pack.
Avoid dropping or subjecting the battery pack to severe impacts that could damage the casing.
Use only recommended battery pack and accessories.There is a risk of the battery exploding or leaking. In the event that a battery leaks and the eyes, mouth, skin or clothing contact these leaked substances, immediately flush with water.
When you are not using the printer, remove the battery and store it properly.
Do not place anything, such as tablecloths, carpets, bedding or cushions, on top of the battery charger while it is charging.
There is a risk of heat generation or deformation if it is left connected for a long period of time.
Before you discard a battery, cover the terminals with tape or other insulators to prevent direct contact with other objects.
Contact with the metallic components of other materials in waste containers may lead to fire or explosions.

1�
Power will not turn onHas the plug come out of the power outlet?•
Is the connector of the compact power adapter securely connected to the printer’s DC IN terminal?
•
Did you try pressing for a long time?•
Battery PackIs the battery sufficiently charged?When installing it, did you press on the battery until it clicked into place?
••
Cannot PrintIs the printer power turned on?•
Is the printer connected to more than one device?Do not simultaneously connect to a camera, memory card or computer.
•
Is the cartridge loaded correctly?•
Is the ink sheet slack?•
Has the printer overheated?The printer will temporarily stop when it exceeds a certain temperature. This is not a malfunction. Wait until the temperature drops and the printer resumes. A message will appear on the computer display if you are connected to a computer when this happens, but you should wait until printing resumes without cancelling the print.
•
Printing from Memory CardsIs the memory card inserted all the way into the slot with the label facing upward?Do the images conform to the Design rule for Camera File system?Some memory cards require a specific adapter. Have you inserted the memory card directly into the card slot without first inserting the card into the adapter?
•••
Printing from CamerasIs the printer connected to the camera correctly?Does the firmware of the Canon-brand camera support the printer?
••
You Think There is a ProblemIf the solutions below do not remedy your problem, contact the retail outlet or a Canon customer support center.
Printer and Power Source
Printing Problems
1�
Cannot Print (continued from previous page)Does the camera battery have sufficient charge?Replace the battery with a fully charged (or new) battery, or use the compact power adapter for the camera.
•
Printing from ComputersDid you install the printer driver according to the correct procedures?Is the printer connected directly to a port on the computer with the USB cable?The printer may not operate correctly if it is connected to a USB hub.
••
Problems Exclusive to WindowsIs the printer set to offline?Right-click the printer icon and use the offline setting.
•
Problems Exclusive to MacintoshIs the printer registered on the Printer List?•
Image Does Not Appear When Memory Card is InsertedIs the memory card inserted all the way into the correct slot with the label facing up? •
Do the images conform to the Design rule for Camera File system?•
Some memory cards require a specific adapter. Have you inserted the memory card directly into the card slot without first inserting the card into the adapter?
•
Cannot Print the DatePrinting from Memory Cards
Is the date imprint option set?If you are using DPOF settings, the date imprint settings are configured on the camera.
•
Printing from mobile phonesWhen using IrDA or Bluetooth, the date will not be printed.•
Printing from CamerasIs the date imprint option set to [Off] on the camera?If the setting is [Default], the printer settings are reflected.
•
Cannot Print CleanlyIs the ink sheet or paper dirty?•
Is dirt lodged within the printer?•
Has condensation formed within the printer?Leave it to dry at room temperature for a while.
•
Is it placed near a device with a strong electromagnetic or magnetic field?Set it at least one meter (3 ft.) apart.
•

1�
Colors on the Computer Display and the Print are DifferentColor generation methods are different for computer displays and printers. Moreover, the variance may be attributable to the environment in which the display is viewed (color and strength of the light), or to the display’s color adjustment settings.
•
After using the computer to cancel a print in progress, an image that had already been printed was printed again when resumed printing.
Are you using a Macintosh computer?When you restart printing on a Macintosh after canceling, an already printed image may print again when printing resumes.
•
Frequent Paper JamsHas too much paper been left in the print receptacle?Do not leave more than 50 sheets in the print receptacle.
•
Has the ejected paper fallen over?Paper jams occur if ejected paper falls over (lean forward). Remove the jammed paper.
•
Cannot Print the Specified No. of Prints.Is the printer’s power being turned on and off repeatedly?The printer initialization consumes ink. There may not be enough ink left for the allotted sheets in the set.
•
Is the ink sheet being pulled?Do not forcefully pull out the ink sheet.
•
Print is not ejected.Has paper jammed inside the printer?Remove the jammed paper.
•
Is the print receptacle cover open?If the print receptacle cover does not open automatically and paper gets jammed, press the print receptacle button on the left side of the operation panel to open the print receptacle cover and remove the jammed paper.
•
Paper Problems

�0
Blinks redAn error (e.g. paper jam) preventing printing from restarting has occurred. Turn the printer off then back on again, and try printing again.
•
There is a problem with the battery and it cannot be charged. Replace with a different battery, or use a compact power adapter for the printer (ES2 only).
•
Blinks orangeBattery pack depleted. Change it with a fully charged battery pack or recharge the current battery pack. You can also use the printer’s compact power adapter.
•
Temperature is not within the operating temperature range for charging (ES2 only). Charge within 5 - 40 °C (41 – 104 °F).
•
Lights redCheck the error message on the LCD monitor.•
Error MessagesThe power button of the printer blinks or lights red and a message is displayed on the LCD monitor if any error occurs during printing. If a problem occurs while the printer is connected to the camera, the camera’s LCD monitor may display an error message.
Power Button
No paper/inkCheck that the cartridge is correctly installed.•
Make sure that the cartridge contains paper/ink.•
If paper is not feeding correctly, remove the cartridge, and manually remove any paper remaining in the printer.
•
Paper jamPress the to eject the paper. If the paper is not ejected, turn the power off and turn it on again. If the printer fails to eject the paper, contact a Canon Customer Support center for assistance.
•
LCD Monitor

�1
Ink ErrorRemove the cartridge from the printer, take up the slack in the ink sheet, and then reload the cartridge. If the cartridge is stuck in the printer, contact a Canon Customer Support center for assistance.
•
Recharge the printer batteryChange it with a fully charged battery pack or recharge the battery pack. You can also use the printer’s compact power adapter.
•
Cannot print! / Could not print XX imagesThe following images cannot be printed.
An image with a data size that is too big. Images larger than 8000 × 8000 pixels cannot be printedAn image that is corruptedAn image other than JPEG
When you want to print an image with the printer connected to the camera, check if the size of the image matches the recording pixels of the image in the camera. If the size is not appropriate, resize the image and convert it as necessary to a JPEG image that the camera can display.
•–
––
•
Limit the size of image files to less than 8000 × 8000 pixels.•
No Image.Check whether there are images recorded on the memory card.•
Check whether readable image data are recorded on the memory card.•
The image file name (folder name) sometimes cannot be recognized if it contains double-byte characters (Japanese, Chinese or Korean). Change double-byte characters to single-byte alphanumeric characters.
•
Print data that has been edited or processed on a personal computer from the personal computer.
•
Hardware ErrorCheck if there are other problems than cartridge problems.•
Turn the printer and camera power off, then turn on again. If the error message does not clear, contact a Canon Customer Support center for assistance.
•
Cartridge cover is openClose the cartridge cover. If the error message does not clear, turn the power off and on again.
•
��
This camera cannot print B/W Insert memory card to print
Black and white printing is not possible when a camera is connected (except when (PictBridge) is displayed on the LCD monitor of the camera). Insert a memory
card to print.
•
Cartridge has been changedThe cartridge was changed for a cartridge of a different size after the print menu was displayed. Insert a cartridge of the same size or change the print settings.
•
Cartridge not compatibleUse a cartridge that is compatible with this printer.•
Communication errorTurn the printer, camera and computer power off, then turn on again.•
Check the Printing Images When Connected with Camera section in the Printer User Guide. If the error message continues to display, contact a Canon Customer Support center for assistance.
•
DisconnectedMake sure that the printer and the sender are in appropriate distance.•
Check the sender’s power supply.•
Print output tray is fullRemove accumulated paper from the print receptacle.•
Cartridge has been changedTrim Setting Adjusted
If the cartridge is changed after the trimming settings have been made, the printer automatically sets the trimming frame again to fit the paper size.
•
��
Image too large.Images larger than 8,000 × 8,000 pixels, or 32 MB or larger files cannot be played back. Select another image.
•
When printing from a mobile phone (wirelessly), the maximum image file size that can be transmitted is 3 MB (maximum file size varies depending on the mobile phone).
•
Incompatible JPEG.You attempted to play back or print an incompatible JPEG image. Select another image.
•
Cartridge incorrectly inserted or not loadedLoad the cartridge.•
Remove the cartridge and insert the cartridge all the way, then close the cartridge cover.
•
Memory card errorMemory card has experienced an anomaly. Use another memory card.•
A memory card adapter without an inserted memory card has been inserted. Be sure to insert a memory card into the adapter before inserting it into the printer. If an empty adapter had been inserted, remove the adapter and turn the printer’s power off and on again.
•
Some memory cards require a specific adapter. You have inserted the memory card directly into the card slot without first inserting the card into the adapter.
•
Unidentified ImageYou attempted to play back or print an image with corrupted data, an image recorded in a foreign camera or data type, or an image that has been edited on a computer. Select another image.
•
Cannot magnify !You attempted to magnify an image with corrupted data, an image recorded with another camera or data type, or an image that has been edited on a computer, or a movie. Select another image.
•

��
Cannot trimYou attempted to trim an image smaller than 640 × 480 pixels or an image with a width-to-height ratio narrower than 16:9. Select another image to trim.
•
Image not compatibleYou attempted to put a speech bubble in an image smaller than 320 × 240 pixels or an image with a width-to-height-ratio narrower than 16:9. Select another image size that allows speech bubbles to be set.
•
Device Not SupportedThis displays when you attempt to connect an unsupported USB device, e.g. USB memory. Disconnect the USB device.
•
This displays when you attempt to transfer an image from a mobile phone using IrSimple. If your mobile phone supports another transfer method, switch to that method and transfer the image.
•
Device Not Supported (HUB)You attempted to connect an unsupported USB connector, e.g. a USB hub. Disconnect the USB hub.
•
Too many marksToo many images have been marked with print settings. Mark 998 or less images.•

Make everyone smile“Recipes” for Printing
For details on the functions used in the following pages, refer to the Printer User Guide after installing it from the supplied CD-ROM. Installation instructions for the Printer User Guide are on page 12 of this guide.
��
Here are some ‘recipes’ to help you create original greeting cards or scrapbooks to preserve those special memories.

Grandma, Grandpa…It’s my birthday!
��
Sends photos as lovely postcards

��
Share your feelings with
Original Greeting Cards
Ingredients
Cartridge (Postcard size is used for this sample.)Marker pen
•
•
The back of the paper is pre-printed for use as a postcard. Simply write an address and stick a stamp on the card.
Decorations
[Frames] in [Creative Print] or Ulead Photo Express LE* (supplied software) *Available for Windows Vista and Windows XP only
•
Instructions
lUsing[CreativePrint]
Press andselect[Frames]
Selecttheimagetowhichyouwishtoaddtheframe
Selectadesiredframe,thenprint
lUsingUleadPhotoExpressLE(suppliedsoftware)
Selectadesiredframeandtheimagetowhichyouwishtoaddtheframe
Typeamessageandprintthegreetingcard

��
Sharing my best recipes
Cooking RecipesIngredients
CartridgeMounting board, color-paperMarker penDecorations
•
•
•
•
Instructions
As an extra touch...Make a hole in the top corner of each finished recipe card, and tie them together with a ring or a ribbon.
Decorations
[Multi Layout] in [Creative Print]
•
Postcard size paper is used in this photo.
Press andselect[MultiLayout]
Selectthepagelayoutandbackgroundcolor
Select2imagesfortherecipeandprintthem
Writedownthemenuorrecipeinthewhitespaceofthephotowithamarkerpen
Mountthephotoonmountingboardandadddecorationstoyourtaste
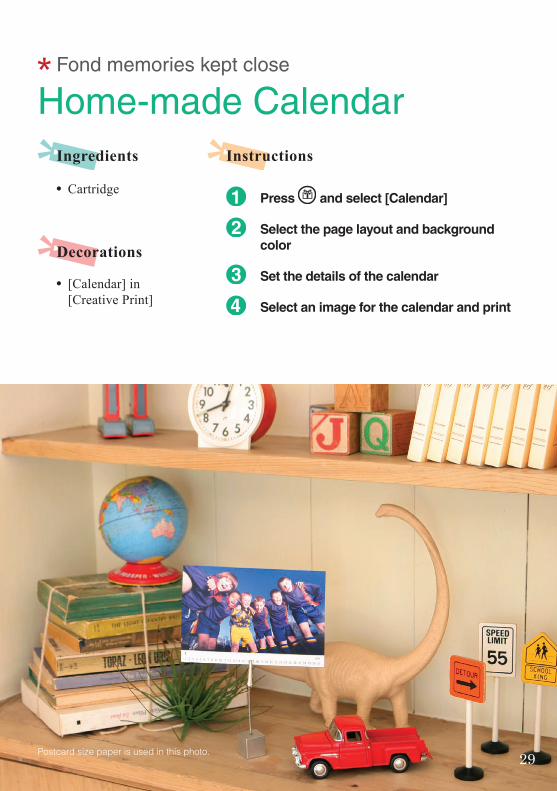
Fond memories kept close
Home-made CalendarIngredients
Cartridge•
Instructions
Decorations
[Calendar] in [Creative Print]
•
��
Press andselect[Calendar]
Selectthepagelayoutandbackgroundcolor
Setthedetailsofthecalendar
Selectanimageforthecalendarandprint
Postcard size paper is used in this photo.
Created by Art&Craft DUO YOKOHAMA-AOBADAI SHOP by KURETAKE Co.,Ltd. (m&k)
�0
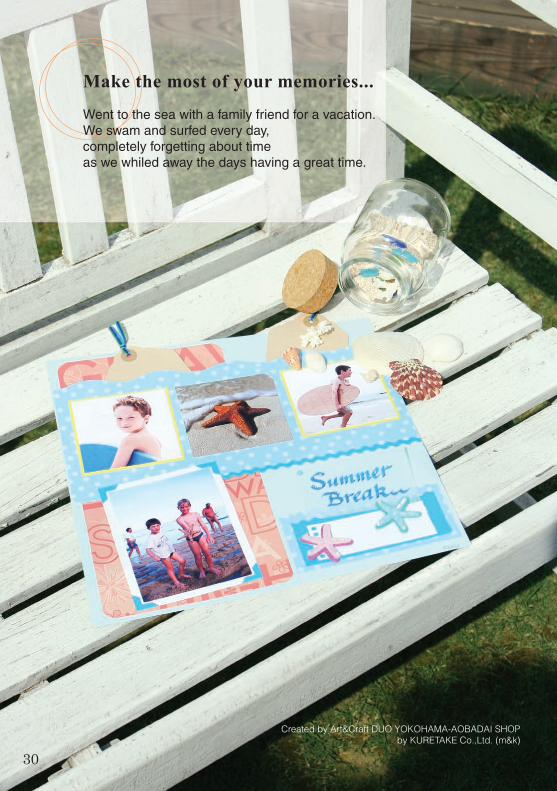
Went to the sea with a family friend for a vacation.We swam and surfed every day, completely forgetting about time as we whiled away the days having a great time.
Make the most of your memories...
�1
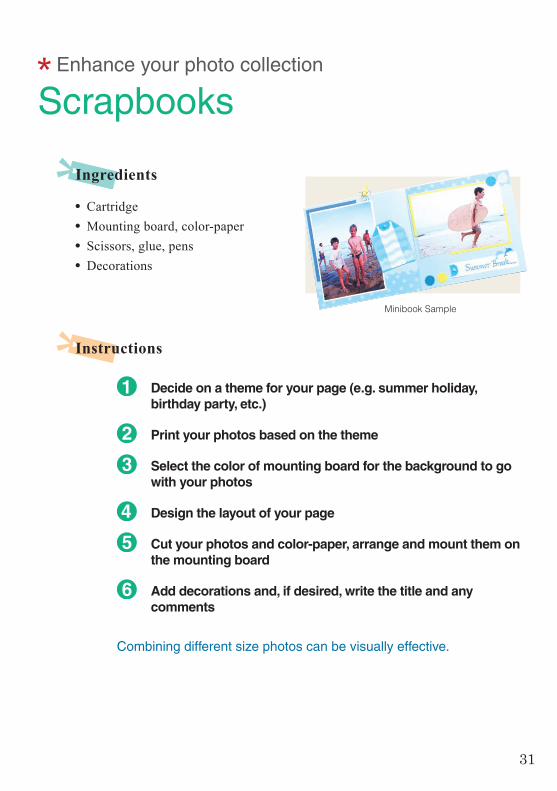
Enhance your photo collection
Scrapbooks
Ingredients
CartridgeMounting board, color-paperScissors, glue, pensDecorations
•
•
•
•
Combining different size photos can be visually effective.
Instructions
Decideonathemeforyourpage(e.g.summerholiday,birthdayparty,etc.)
Printyourphotosbasedonthetheme
Selectthecolorofmountingboardforthebackgroundtogowithyourphotos
Designthelayoutofyourpage
Cutyourphotosandcolor-paper,arrangeandmountthemonthemountingboard
Adddecorationsand,ifdesired,writethetitleandanycomments
Minibook Sample

FCC Notice(Printer, Model CD1030/CD1031 Systems)This device complies with Part 15 of the FCC Rules. Operation is subject to the followingtwo conditions;(1) this device may not cause harmful interference, and(2) this device must accept any interference received, including interference that may
cause undesired operation.Note: This equipment has been tested and found to comply with the limits for Class B digital devices, pursuant to Part 15 of the FCC rules. These limits are designed to provide reasonable protection against harmful interference in a residential installation. This equipment generates, uses and can radiate radio frequency energy and, if not installed and used in accordance with the instructions, may cause harmful interference to radio communications. However, there is no guarantee that interference will not occur in a particular installation. If this equipment does cause harmful interference to radio or television reception, which can be determined by turning the equipment off and on, the user is encouraged to try to correct the interference by one or more of the following measures:
Reorient or relocate the receiving antenna.Increase the separation between the equipment and receiver.Connect the equipment into an outlet on a circuit different from that to which the receiver is connected.Consult the dealer or an experienced radio/TV technician for help.
The cable with the ferrite core provided with the digital camera must be used with this equipment in order to comply with Class B limits in Subpart B of Part 15 of the FCC rules.Do not make any changes or modifications to the equipment unless otherwise specified in the manual. If such changes or modifications should be made, you could be required to stop operation of the equipment.Canon U.S.A., Inc.One Canon Plaza, Lake Success, NY 11042, U.S.A.Tel No. (516) 328-5600
•••
•
Canadian Radio Interference RegulationsThis Class B digital apparatus complies with Canadian ICES-003.
Réglementation canadienne sur les interférences radioCet appareil numérique de la classe B est conforme à la norme NMB-003 du Canada.