serverview suite serverview operations manager v5 -...
TRANSCRIPT
Installation Guide - English
ServerView Suite ServerView Operations Manager V5.0 Installation ServerView Agents for Linux:- Installation ServerView Agents (SuSE, Red Hat and VMware)- Installation ServerView Update Agent
Edition September 2010
Comments… Suggestions… Corrections…The User Documentation Department would like toknow your opinion of this manual. Your feedback helpsus optimize our documentation to suit your individual needs.
Feel free to send us your comments by e-mail to [email protected].
Certified documentation according to DIN EN ISO 9001:2008To ensure a consistently high quality standard anduser-friendliness, this documentation was created tomeet the regulations of a quality management system which complies with the requirements of the standardDIN EN ISO 9001:2008.
cognitas. Gesellschaft für Technik-Dokumentation mbHwww.cognitas.de
Copyright and TrademarksCopyright © 2010 Fujitsu Technology Solutions GmbH.
All rights reserved.Delivery subject to availability; right of technical modifications reserved.
All hardware and software names used are trademarks of their respective manufacturers.

Installation ServerView Agents for Linux
Contents
1 Introduction . . . . . . . . . . . . . . . . . . . . . . . . . . . . 5
1.1 Architecture . . . . . . . . . . . . . . . . . . . . . . . . . . . 6
1.2 Target groups and objectives . . . . . . . . . . . . . . . . . . 7
1.3 Technical requirements . . . . . . . . . . . . . . . . . . . . . 81.3.1 Management console . . . . . . . . . . . . . . . . . . . . . . . 81.3.2 Central management station (CMS) . . . . . . . . . . . . . . . . 91.3.3 ServerView agents . . . . . . . . . . . . . . . . . . . . . . . . 10
1.4 Operating-System-Dependent packages . . . . . . . . . . . 11
1.5 Changes from the previous version . . . . . . . . . . . . . . 13
1.6 Documentation for ServerView Suite . . . . . . . . . . . . . 13
1.7 Notational conventions . . . . . . . . . . . . . . . . . . . . 14
2 Installations on the managed servers . . . . . . . . . . . . 15
2.1 Configuring servers . . . . . . . . . . . . . . . . . . . . . . 172.1.1 Configuring servers via the Server Configuration Manager . . . 182.1.2 Configuring servers via the ServerView Configuration Manager 202.1.3 Overview of the functions . . . . . . . . . . . . . . . . . . . . 23
2.2 ServerView security concept . . . . . . . . . . . . . . . . . 242.2.1 Prohibiting specific SET operations . . . . . . . . . . . . . . . 242.2.2 Prohibiting All SET operations . . . . . . . . . . . . . . . . . . 252.2.3 SET Operations with user authentication . . . . . . . . . . . . 252.2.4 Operating system-specific characteristics of the SNMP agents . 29
2.3 Configuring SNMP services . . . . . . . . . . . . . . . . . . 30
3 Installing ServerView agents . . . . . . . . . . . . . . . . . 33
3.1 Requirements . . . . . . . . . . . . . . . . . . . . . . . . . . 33
3.2 Script-based installation . . . . . . . . . . . . . . . . . . . . 373.2.1 Installation via ServerView Suite DVD 1 . . . . . . . . . . . . . 383.2.2 Installation from a directory . . . . . . . . . . . . . . . . . . . 39
3.3 Installing with the rpm command . . . . . . . . . . . . . . . 40

Installation ServerView Agents for Linux
Contents
3.4 Possible sources of error . . . . . . . . . . . . . . . . . . . . 41
3.5 ServerView agent maintenance after the installation . . . . . 423.5.1 The srvmagt script . . . . . . . . . . . . . . . . . . . . . . . . 423.5.2 Configuring agents . . . . . . . . . . . . . . . . . . . . . . . . 443.5.3 Improved availability of ServerView agents . . . . . . . . . . . . 463.5.4 Uninstalling agents . . . . . . . . . . . . . . . . . . . . . . . . 473.5.5 Starting and stopping agents . . . . . . . . . . . . . . . . . . . 473.5.6 Additional information . . . . . . . . . . . . . . . . . . . . . . 48
3.6 Installing ServerView Update Agent . . . . . . . . . . . . . . 493.6.1 Requirements . . . . . . . . . . . . . . . . . . . . . . . . . . . 493.6.2 Installation . . . . . . . . . . . . . . . . . . . . . . . . . . . . 49
Index . . . . . . . . . . . . . . . . . . . . . . . . . . . . . . . . . . . . 51

Installation ServerView Agents for Linux 5
1 IntroductionWithin the ServerView Suite, you can use the ServerView server management software ServerView Operations Manager (called simply Operations Manager below), for central administration of industry standard servers.
Operations Manager makes the data of the managed PRIMERGY server accessible via Intranet and Internet. You can view all data of the managed servers from a standard PC with Intranet or Internet access and a standard Web browser.
Operations Manager monitors important server functions such as hard drives, ventilation fans, the power supply or the temperature. If the values specified for these parameters are exceeded or an error occurs, then messages are output and corrective measures are initiated, if necessary.
The Operations Manager software is organized into two parts: The "ServerView Manager" is installed on a central management station, and "agents" are available on the servers to be managed to exchange information with the manager.
One requirement for this exchange of information is that the manager and agents are provided with a common information base. This common information base is called the "Management Information Base" (MIB). An MIB is a data model that describes the elements to be administered in an abstract form.
Each agent in the network provides an MIB, and all MIB description files that are provided by the agents in the network are available on the manager system. This ensures that the information exchanged between the manager and the agents is interpreted correctly.

6 Installation ServerView Agents for Linux
Architecture
1.1 Architecture
Figure 1: Architecture overview
Management console
All data of the managed server can be viewed from any standard PC with intranet or Internet access and a Web browser (Web-based console).
Central Management Station (CMS)
The ServerView Operations Manager is installed on a central management station.
Managed node
On the managed servers, ServerView agents are installed, which supply the information to the central management station. ServerView RAID Manager can be optionally installed on the managed servers.

Installation ServerView Agents for Linux 7
Target groups and objectives
1.2 Target groups and objectives
This manual is intended for system administrators, network administrators and service technicians that have a basic knowledge of hardware and software. The manual describes the installation of the ServerView agents for Linux and the ServerView Update Agent for Linux.

8 Installation ServerView Agents for Linux
Technical requirements
1.3 Technical requirements
I Any last-minute changes/corrections of the technical requirements can be found in the Readme file on the ServerView Suite DVD 1. You have the following options:
– On the DVD 1 switch to the directory SVSSoftware – Software –ServerView – Windows – ServerView_S2.
– Start the DVD 1 and select in the Welcome dialog ServerView Software Products – Start; Info under ServerView – Operations Manager.
1.3.1 Management console
– Standard PC, LAN with http access
– Microsoft Windows with Microsoft Explorer V7/V8
– RedHat Linux with Mozilla Firefox 3.5/3.6
– SuSE Linux with Mozilla Firefox 3.5/3.6
– Java Runtime Environment V1.6.0_21
Installation ServerView Agents for Linux 9
Technical requirements
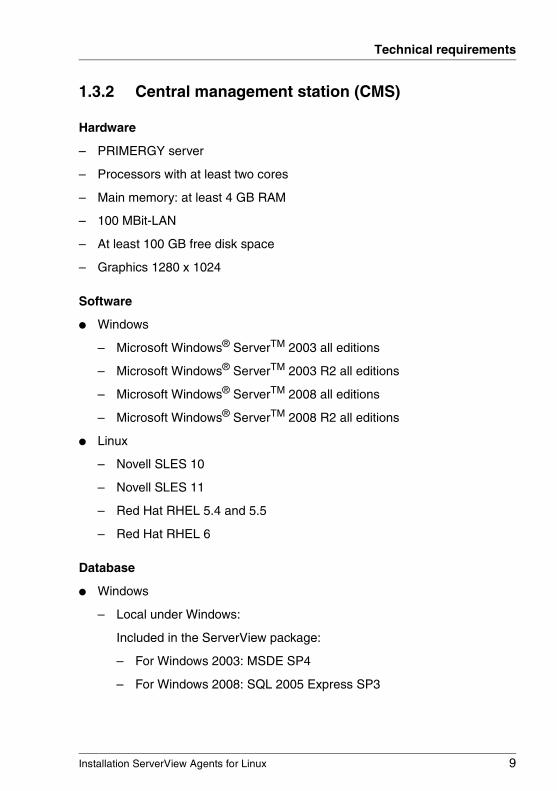
1.3.2 Central management station (CMS)
Hardware
– PRIMERGY server
– Processors with at least two cores
– Main memory: at least 4 GB RAM
– 100 MBit-LAN
– At least 100 GB free disk space
– Graphics 1280 x 1024
Software
● Windows
– Microsoft Windows® ServerTM 2003 all editions
– Microsoft Windows® ServerTM 2003 R2 all editions
– Microsoft Windows® ServerTM 2008 all editions
– Microsoft Windows® ServerTM 2008 R2 all editions
● Linux
– Novell SLES 10
– Novell SLES 11
– Red Hat RHEL 5.4 and 5.5
– Red Hat RHEL 6
Database
● Windows
– Local under Windows:
Included in the ServerView package:
– For Windows 2003: MSDE SP4
– For Windows 2008: SQL 2005 Express SP3

10 Installation ServerView Agents for Linux
Technical requirements
Additional supported:
– SQL Server 2000 Standard, Workgroup, Enterprise, each with SP4
– SQL Server 2005 Standard, Workgroup, Enterprise
– SQL Server 2008 Standard, Workgroup, Enterprise
– Remote under Windows
– SQL Server 2005 Standard, Workgroup, Enterprise
– SQL Server 2008 Standard, Workgroup, Enterprise
● Linux (local and remote)
– PostgreSQL 8.4.3 (Included in the ServerView package)
Java Runtime Environment
– JRE V1.6.0_21
1.3.3 ServerView agents
Installed ServerView agents, available for:
– Windows Server 2003
– Windows Server 2003 x64
– Windows Server 2008
– Windows Server 2008 x64
– Windows Server 2008 R2
– SuSE Linux SLES 10 and 11
– Red Hat Enterprise Linux 4 and 5
– Citrix XenServer as of V5.0
– VMware ESX Server as of V3.5
I It is possible to monitor VMware ESXi Server as of version 4.0. For more information see the manual “VMware ESXi - Monitoring ESXi Systems with ServerView Suite”.

Installation ServerView Agents for Linux 11
Operating-System-Dependent packages
1.4 Operating-System-Dependent packages
Depending on the installed operating system, you must install additional packages for the ServerView agents.
The extra packages required for SuSE SLES 10/SLES 11 and RHEL 5 are described below.
When you update the relevant operating systems, the version specifications of the packages may change.
I The extra packages required for ServerView Operations Manager and ServerView RAID Manager are described in the „Installation under Linux“ user guide.
SLES 10 and SLES 11
SLES 10/SLES 11 64-bit default installation:
For the ServerView agents you also require the following:
net-snmpcompat-libstdc++ / libstdc++33 (32bit)openssl / libopenssl0_9_8 (32bit)curl / libcurl4 (32bit)
SLES 10/SLES 11 32-bit default installation
For the ServerView agents you also require the following:
net-snmpcompat-libstdc++ / libstdc++33 (32bit)openssl / libopenssl0_9_8 (32bit)curl / libcurl4 (32bit)

12 Installation ServerView Agents for Linux
Operating-System-Dependent packages
Red Hat (RHEL5)
Subsequent installation of the required rpm packages can only be done manually, i.e. all dependencies must also be resolved manually.
Installation is from the DVD or the mounted DVD image (mount RHEL5-Server-20070208.0-i386-DVD.iso -t iso9660 -o loop /mnt) with the rpm command.
RHEL 5 32-bit/64-bit minimum installation, i.e. without installation number:
For the ServerView agents you also require the following:
compat-libstdc++-33-<version>.rpmnet-snmp-<version>.rpmnet-snmp-utils-<version>.rpmopensslcurl
VMware ESX as of V3.5
For the ServerView agents you also require the following:
net-snmp-<version>.rpmnet-snmp-utils-<version>.rpmlibstdc++-<version> / compat-libstdc++-33-<version> (32 bit)openssl (32 bit)curl (32 bit)
Citirx XenServer as of 5.0
For the ServerView agents you also require the following:
XenServer Supplementsnet-snmp-<version>.rpmnet-snmp-utils-<version>.rpmcompat-libstdc++-33-<version> (32 bit)openssl (32 bit)curl (32 bit)

Installation ServerView Agents for Linux 13
Changes from the previous version
1.5 Changes from the previous version
This edition is valid for ServerView Operations Manager version 5.0 - Installation ServerView Agents for Linux and replaces the following online manual: “ServerView Operations Manager version 4.92 - Installation ServerView Agents for Linux“, Edition February 2010.
The manual features the following changes and enhancements:
– ServerView agents is available for Citrix XenServer as of version 5.0.
– The overview of the additional packages required has been updated.
– The section „Preparing a PRIMERGY RX800 S2/S3“ has been removed.
– The installation description of the ServerView agents has been updated.
– The description of the operating parameters in section „Configuring agents“ has been updated.
– New: Description of the extra packackes required for the ServerView agents. This description was previously in the manual „Installation under Linux“.
1.6 Documentation for ServerView Suite
The documentation for the ServerView Suite can be found on the ServerView Suite DVD 2 supplied with each server system.
The documentation can also be downloaded free of charge from the Internet. You will find the online documentation at http://manuals.ts.fujitsu.com under the link Industry standard servers.

14 Installation ServerView Agents for Linux
Notational conventions
1.7 Notational conventions
The following notational conventions are used in this manual:
If there are references to text or sections of text in this manual, then the chapter or section heading is placed in the reference, and the page stated refers to the page on which the chapter or section begins.
Screen outputs
Please note that the screen output is dependent in part on the system used and therefore some details may not correspond exactly to the output you will see on your system. You may also see system-dependent differences in the menu items available.
V Caution This symbol points out hazards that can lead to personal injury, loss of data or damage to equipment.
I This symbol highlights important information and tips.
Ê This symbol refers to a step that you must carry out in order to continue with the procedure.
italics Commands, menu items, names of buttons, options, variables, file names and path names are written in italic letters in text.
fixed font System output is written using a fixed font.
semi-bold fixed font
Commands to be entered through the keyboard are written in a semi-bold fixed font.
<abc> Angle brackets are used to enclose variables which are to be replaced by actual values.
[Key symbols] Keys are presented according to their representation on the keyboard. If capital letters are to be entered explicitly, then the Shift key is shown, e.g. [SHIFT] - [A] for A.
If two keys need to be pressed at the same time, then this is shown by placing a hyphen between the two key symbols.
Table 1: Notational conventions

Installation ServerView Agents for Linux 15
2 Installations on the managed servers
Before starting the Operations Manager, the following preparations must be made on the managed server:
● Certain settings must be made in configuration settings on each managed server. This is described in section “Configuring servers” on page 17.
● ServerView offers a sophisticated security concept. Before you install the agent, you should study the information regarding the security concept thoroughly and choose the concept that best suits your security requirements. You may need to make appropriate arrangements prior to installing the agent. This is described in section “ServerView security concept” on page 24.
● You must install and configure the SNMP services of the current operating system on each managed server and the management station. If you do not do this, the management station will be unable to monitor the servers. The SNMP services must be activated either before or after installing the agent, depending on the operating system. This is described in section “Configuring SNMP services” on page 30.
● ServerView agents must be installed on each server to be managed. The description is provided in the chapter “Installing ServerView agents” on page 33.
● ServerView Update Manager requires the ServerView Update Agent to be installed on the managed servers. For how to do this, see section “Installing ServerView Update Agent” on page 49.
● If the ServerView Operations Manager on the central management station is configured to be accessed using a name instead of an IP address, you must ensure that the central management station is accessible from the managed node by this address. This is preferably accomplished by an appropriate entry in DNS. If there is no DNS available, then you must provide an appropriate entry in the hosts file on the managed node. You will find this file in the /etc directory on the Linux system.

16 Installation ServerView Agents for Linux
Installations on the managed servers
Additional installations on the management station
– ServerView RAID Manager ServerView RAID Manager offers standardized administration and management of hard disks for PRIMERGY servers.
Unless the ServerView RAID Manager is installed, no information about RAID drives and their statuses will be available.
The installation is described in the ServerView RAID Manager manual.

Installation ServerView Agents for Linux 17
Configuring servers
2.1 Configuring servers
There are various functions available for configuring servers. Some of these functions are supported for all PRIMERGY servers and others are only available for certain servers, depending on the hardware and software installed in the PRIMERGY server.
You can configure the servers in one of the following ways:
– Locally on the managed server via the Server Configuration Manager.
– Locally on managed Windows-based servers using the Start menu.
I You can only configure servers on which the ServerView agents for Windows are installed.
– Via the ServerView Configuration Manager, which is integrated in the graphical user interface of Operations Manager. This allows you to configure servers from the remote workstation via a Web interface.
I You can only configure servers on which the ServerView agents are installed.
Depending on the system, some of the configured settings are written to the BIOS.
Among other things, you can do the following:
– Read the most important data of the server, the system board and the integrated management controller
– Read and edit the error counter for the memory modules
– Read and set the Boot and Software Watchdog settings

18 Installation ServerView Agents for Linux
Configuring servers
2.1.1 Configuring servers via the Server Configuration Manager
With the Server Configuration Manager you can make settings for the general system behavior of the target system and configure any remote management components (iRMC or iRMC S2) of the target system.
I For further details please see the Installation Manager guide.
You start the Server Configuration Manager via the ServerView Installation Manager, which is started from the ServerView Suite DVD 1.
Ê In the Installation Manager welcome screen, click the Maintenance button or click Maintenance in the menu bar.
This opens the ServerView Installation Manager Maintenance window:
Figure 2: ServerView Installation Manager Maintenance window
Installation ServerView Agents for Linux 19
Configuring servers
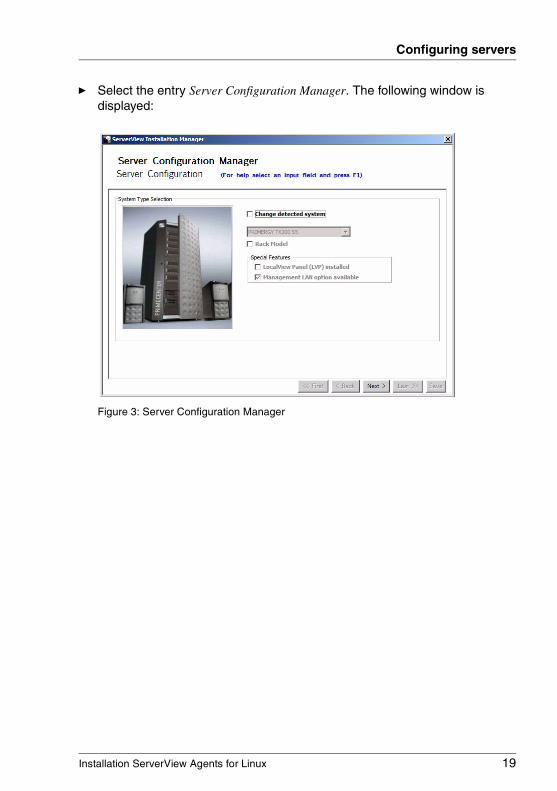
Ê Select the entry Server Configuration Manager. The following window is displayed:
Figure 3: Server Configuration Manager

20 Installation ServerView Agents for Linux
Configuring servers
2.1.2 Configuring servers via the ServerView Configuration Manager
You can also configure servers via the ServerView Configuration Manager, which is integrated in the graphical user interface of Operations Manager. This allows you to configure the server from the remote workstation via a Web interface.
Proceed as follows:
Ê Start the ServerView Configuration Manager on the Operations Manager start page or via the menu bar by selecting Administration – Server Configuration. How to start Operations Manager is described in the ServerView Operations Manager documentation.
This opens the following window:
Figure 4: Operations Manager: Server Configuration window - Server list (1) tab
Ê In the hierarchy tree of the Server list tab, select the server to be configured.

Installation ServerView Agents for Linux 21
Configuring servers
The following window opens if the agents are configured such that SET operations are only allowed after user ID/password authentication.
Ê Enter the user ID and click OK.
Ê The following window opens:
Figure 5: Operations Manager: Server Configuration window - Server list (2) tab
Ê In the right-hand side of the window, specify the details on the selected server and confirm your entries by clicking Go ....

22 Installation ServerView Agents for Linux
Configuring servers
The window shown below appears in which the Configuration tab is activated:
Figure 6: Operations Manager: Server Configuration window - Configuration tab
Ê In the navigation area of the Configuration tab, click the required function. The associated setting options are then offered in the right-hand side of the window.
Ê Configure the settings you require and save them with Save Page or with Save all.
I Activate the configured settings for each server either separately for each function with Save Page or after you have completed the entire configuration with Save all.
I After you have completed configuring a server, you can select further servers for configuration in the Server list tab.
For an overview of the functions offered, see section “Overview of the functions” on page 23.

Installation ServerView Agents for Linux 23
Configuring servers
2.1.3 Overview of the functions
The following table describes only the general functions.
Depending on the PRIMERGY server involved, different subsets of the functions listed below are available:
Boot Watchdog Boot Watchdog monitors the start of the operating system. If the operating system is not started within the specified time period, the Boot Watchdog will initiate the set behavior when the time period has expired.
Software Watchdog Software Watchdog monitors the operation of the operating system. If the operating system doesn’t respond within the set time period the Software Watchdog will initiate the set behavior when the time period has expired.
Table 2: Overview of the functions

24 Installation ServerView Agents for Linux
ServerView security concept
2.2 ServerView security concept
The ServerView SNMP agents together with the ServerView Manager provide a complete security concept to prevent unauthorized SNMP SET operations on a server.
You can restrict access to SNMP SET operations on the managed server. Here you have the following options:
– Prohibit specific SET operations.
– Prohibit all SET operations.
– Protect SET operations with a user authentication.
If you select the user authentication option, the system will run a user authentication routine each time you start a SET operation. If the authentication routine is successful, the system will also check if the user belongs to one of the user groups defined by the administrator.
I The user authentication only operates with ServerView Manager. It does not work with other SNMP tools.
You can also reduce the risk of unauthorized access by changing the default configuration of the SNMP service. For further information see section “Configuring SNMP services” on page 30.
2.2.1 Prohibiting specific SET operations
Some SET operations cause the system to shutdown or restart. You can permit these special SET operations or forbid them.
The specific entries you need to make during the installation in order to prohibit these SET operations depend on the operating system under which the ServerView agent is installed and on the version of the ServerView agent. For a more detailed description see the relevant sections beginning page 30.

Installation ServerView Agents for Linux 25
ServerView security concept
2.2.2 Prohibiting All SET operations
You can prohibit all SET operations for ServerView agents. Enter these specifications during agent installation.
I This option only applies to ServerView agents. SET operations for other SNMP agents are not affected.
The specific entries you need to make during the installation in order to prohibit these SET operations depend on the operating system under which the ServerView agent is installed and on the version of the ServerView agent. For a detailed description see page 30.
2.2.3 SET Operations with user authentication
You can restrict access to SET operations and protect the execution of SET operations with a user authentication. Here you can choose between starting the user authentication routine at the beginning of each session on a managed server or starting the user authentication at the start of each new SET operation.
For user authentication, you must make the following settings on the managed server as well as on the management station.
Entity Settings
managed Server – Define user and user group
– Assign user to specific user group
– State the specified user group during installation of the agent
management station
Specify the user in the Operations Manager Login tab.

26 Installation ServerView Agents for Linux
ServerView security concept
Defining user and user group and assigning users
You must define user and user group on each managed server, using the methods specific to your operating system. You may choose any name for the user or the user group (including Administrator).
You need to decide in advance, whether or not you want to create identical user and group identifications for several servers.
Specifying a user group during the installation of the agent
During the installation of the agent on the server you need to specify the user group to which the user, permitted to execute SET operations, must belong. Installation and configuration of the ServerView agent differs according to operating system and version. For more information about installation and configuration in these cases, see the agent descriptions beginning at page 30.

Installation ServerView Agents for Linux 27
ServerView security concept
Specifying users on the management station
On the management station you must specify the user permitted to execute SET operations on the current server. You define the user in the Login tab in the Setting Properties for <server/blade server/server blade> window. In this example this would be svuser.
Figure 7: Defining a user identification for the user authentication
If you have assigned a password to a user, for reasons of security, we recommend that you enter the password here as well (Set Password). The option Always Ask for Password allows you to specify whether user name and password are required after each change made to the settings, or only after the first alteration made after starting the Operations Manager. You a achieve a higher degree of security, if you activate Always Ask for Password because in this case the password is not saved.
On the right-hand side of the Settings Properties for <server> window you can select those servers to which the settings are to apply. You can also select several servers at once. This allows you to specify settings for each server individually or to apply an identical setting to several servers collectively.

28 Installation ServerView Agents for Linux
ServerView security concept
The following example demonstrates the procedure in the case of an activated user authentication.
Example
In the previous example, the user svuser was set up on the server and specified in Operations Manager in the Login tab on the management station. Executing a SET operation through the management station, the user is prompted to provide identification.
Figure 8: User authentication

Installation ServerView Agents for Linux 29
ServerView security concept
2.2.4 Operating system-specific characteristics of the SNMP agents
The following sections describe the procedures, specific to the operating system and agent versions, involved in realizing the security concept of ServerView.
ServerView security concept
If you want to monitor the server from the management station, then you must set up a user belonging to the bin group after installing the operating system.
You must enter this user name and its corresponding password in the management station to activate the corresponding function.
For further details on installing the agents, see chapter “Installing ServerView agents” on page 33.

30 Installation ServerView Agents for Linux
Configuring SNMP services
2.3 Configuring SNMP services
You must install and configure the SNMP services of the current operating system on each managed server and the management station.
The ServerView Linux agents require configuration parameters in the configuration file of the system’s SNMP service. You will find this file under the name /etc/snmp/snmpd.conf. You must edit this configuration file, e.g. with the help of the vi. Information on the syntax is provided in the manpages for snmpd.conf (call: man snmpd.conf).
Ê Specify the appropriate contact under sysContact and the location of the server under sysLocation ()
Set authtrapenable to 1 (enable). This sends a trap if, during a SET operation, the community of the management station is unknown or the rights required for the SET operation are not present. With 2 (disable), you can disable this function (default).
You will find further information on this in the snmpd.conf manpages.
Ê The following example shows a configuration which you must adapt to suit your network and your server environment:
com2sec svSec localhost publiccom2sec svSec <subnet>/<netmask> publicgroup svGroup v1 svSecview svView included .1 access svGroup "" any noauth exact svView none none
You have to adapt <subnet>/<netmask> accordingly for your environment. By default read-only SNMP access is allowed.
If you are using more than two com2sec definitions, the order is of significance. The first com2sec definition that matches the IP address and the community of an incoming SNMP request is used. Thus the com2sec definitions for specific IP areas, must be set before the definitions for general access (with the same community).
For further information, in particular on the syntax of subnet and netmask refer to the manpages for snmpd.conf.

Installation ServerView Agents for Linux 31
Configuring SNMP services
Ê In the example, the community name is public.
If, for security reasons, you decide to use another community name, replace the community name public used in the example with the chosen name.
You must not forget to enter the chosen community name in the management station on the property page Network/Snmp in the Server Properties property window.
Ê To change values via SNMP access is not permitted by default. If you want to allow the management station to change values on the managed servers or to shut down, you have to permit SNMP SetRequests. To do so, change the last line of the example configuration shown above to:
access svGroup "" any noauth exact svView svView none
You must also check that the values for AgentPermission and AgentStatus are set to "3". For further information on the definition of these values in the file config, see section “Configuring agents” on page 44.
Ê Specify the target address for SNMP traps. For trapsink, enter the IP address or the name of the management station. You can enter more than one management station. Add one line for each management station in snmpd.conf:
trapsink <host> <community name>
For <community name>, enter public or the community name you wish to use.
Ê The GAM agent for LSI/Mylex RAID controller communicates with the SNMP master agent via the SMUX protocol (SNMP Multiplex Protocol).
If the GAM agent is installed, you have to add the following line into the SNMP configuration file:
smuxpeer .1.3.6.1.4.1.1608 mylex
Ê If you have made changes, restart the service snmpd or the server.
I If a firewall is activated on your server, you must make sure that the SNMP ports are open. You must ensure that the following are accepted:
– Incoming packages on port 161 (service name snmp) for the protocol udp,
– Outgoing packages on port 162 (service name snmptrap) for the udp protocol which ensures that traps can be sent.
– Port 3172 (Remote Connector Service) and port 3173 (ServerView RAID Manager) for the tcp protocol.

32 Installation ServerView Agents for Linux
Configuring SNMP services

Installation ServerView Agents for Linux 33
3 Installing ServerView agents
3.1 Requirements
● If RBAC funtionality will be used on the managed server:
Before the ServerView agents are installed, you have to import the SSL certificates of the trusted central management stations (CMS). For details refer to „User management in ServerView“ manual.
For information on when to import the certificates, refer to the description of the individual installation variants below.
● Before the ServerView agents are installed, make sure that the relevant Net-SNMP packages are installed in accordance with the operating system platform:
I To provide current and compatible kernel modules, you can use the programs PLDP (Partner Linux Driver Process (as of SLES 10)) and DUP (Driver Update Process (as of RHEL 5)). For more information on PLDP and DUP, visit:
http://ts.fujitsu.com/products/standard_servers/linux_readmes_popup.html
● If this fails, or on systems that do not support PLDP or DUP,to install the Linux agents, either their loadable modules must already be available in compiled form or they must be compiled from the source code.
To permit compilation, the source code of the kernel (kernel-source package) and the GNU C development system must be installed (not for Citrix Xen Server)
VMware ESX net-snmp and net-snmp-utils
SuSE SLES net-snmp
Red Hat Enterprise Linux net-snmp, net-snmp-libs and net-snmp-utils
Citrix XenServer net-snmp and net-snmp-utilsOn Citrix Xen servers, the installation of all necessary components should be made via the Xen Server Supplement CD.
34 Installation ServerView Agents for Linux
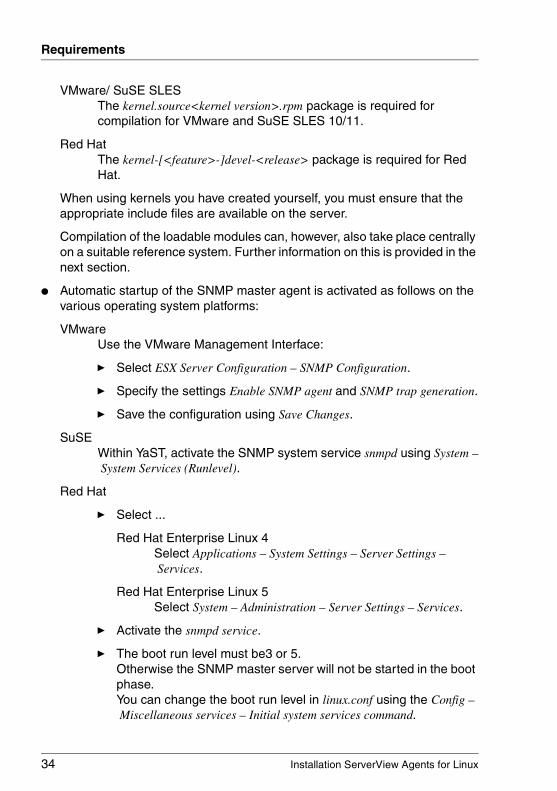
Requirements
VMware/ SuSE SLES The kernel.source<kernel version>.rpm package is required for compilation for VMware and SuSE SLES 10/11.
Red Hat The kernel-[<feature>-]devel-<release> package is required for Red Hat.
When using kernels you have created yourself, you must ensure that the appropriate include files are available on the server.
Compilation of the loadable modules can, however, also take place centrally on a suitable reference system. Further information on this is provided in the next section.
● Automatic startup of the SNMP master agent is activated as follows on the various operating system platforms:
VMwareUse the VMware Management Interface:
Ê Select ESX Server Configuration – SNMP Configuration.
Ê Specify the settings Enable SNMP agent and SNMP trap generation.
Ê Save the configuration using Save Changes.
SuSEWithin YaST, activate the SNMP system service snmpd using System –System Services (Runlevel).
Red Hat
Ê Select ...
Red Hat Enterprise Linux 4Select Applications – System Settings – Server Settings –Services.
Red Hat Enterprise Linux 5Select System – Administration – Server Settings – Services.
Ê Activate the snmpd service.
Ê The boot run level must be3 or 5.Otherwise the SNMP master server will not be started in the boot phase.You can change the boot run level in linux.conf using the Config –Miscellaneous services – Initial system services command.

Installation ServerView Agents for Linux 35
Requirements
● For management of your RAID peripherals you must also install ServerView RAID Manager on your system. To do this, follow the instructions in the ServerView RAID Manager documentation.
● Mount the ServerView Suite DVD 1 and, in the CD’s root directory, open the start.html file in the Web browser. Switch to ServerView – Agents and click the ServerView Agents Linux link in the table.
You will find the list of released PRIMERGY systems under Supported PRIMERGYs.
● The ServerView package for managed servers under SuSE Linux offers three possible procedures for installation:
1. Installation on the target system (without reference system). In this case you must use the programs PLDP (Partner Linux Driver Process (as of SLES 10)) and DUP (Driver Update Process (as of RHEL 5)) or the kernel's the kernel’s source code and the GNU C development system must be available on the system.
2. Installation on a reference system for multiple identical target systems. In this case the kernel’s source code and the GNU C development system must be available on the reference system.
3. Installation on a target system for which there is a reference system. Neither the kernel’s source code nor a GNU C development system is required on the target systems.
● The CMOS clock must be set to local time and not to GMT. Otherwise the automatic Power ON/Power OFF will not start at the configured time.
The local time is set on the different operating systems as follows:
VMware
Ê Assign the local time to the CMOS clock using the hwclock –localtime command.
SuSEAssign the local time to the CMOS clock in YaST – System :
SuSE SLES 11:Observe the following specification:
– The Hardware Clock Set To UTC option must be disabled.
Ê In the Date and Time window, select the Local Time entry from the Hardware Clock Set To selection list.

36 Installation ServerView Agents for Linux
Requirements
Red HatAssign the local time to the CMOS clock in linuxconf:
Ê Select ...
Observe the following specifications:On the Time Zone tab in the Date and Time Properties window
– you can use the System Clock option.
– the System Clock uses UTC option must be disabled.
Red Hat Enterprise Linux 4Select Applications – System Settings – Date & Time.
Red Hat Enterprise Linux 5Select System – Administration – Date & Time.
Use the date command to output the system time, use hwclock --show to output the CMOS time. If the times are different, use the hwclock command to change the CMOS time to match the system time. More information about the hwclock command can be obtained using hwclock --help.

Installation ServerView Agents for Linux 37
Script-based installation
3.2 Script-based installation
You install the ServerView agent via the srvmagt script. It tries to test and verify all the dependencies known from experience, catches all the necessary preparations and finally performs the required actions to establish ServerView Agents Linux on the system.
The script performs the following:
– Identify the Linux distribution (e.g. SuSE, Red Hat).
– Identify the kernel version and architecture (x86, x86-64 or ia64).
– Identify the PRIMERGY server model using BIOS data.
– Identify, whether this is a reference or a target system: If a C development system, other tools, and appropriate kernel source is available, consider this as a reference system otherwise as a target system.
– Verify presence of SNMP packages and other packages for specific models or distributions.

38 Installation ServerView Agents for Linux
Script-based installation
3.2.1 Installation via ServerView Suite DVD 1
The ServerView Suite DVD 1 contains the rpm packages of the ServerView agents and the shell archive srvmagtDVD.sh. You will find the script on the ServerView Suite DVD 1 in the following directory:
SVSSoftware – Software – ServerView – Linux – Agents
To install the agent proceed as follows:
Ê Insert the ServerView Suite DVD 1 and mount it if necessary.
Ê Change to the directory SVSSoftware – Software – ServerView – Linux – Agents.
Ê Save the installation script srvmagtDVD.sh under /tmp.
Ê Open (as root) a terminal.
Ê Change to the /tmp directory.
cd /tmp
Ê If RBAC funtionality will be used on the managed server:
Import the SSL certificates of the trusted central management stations (CMS). For details refer to „User management in ServerView“ manual.
Ê Enter the following command:
sh srvmagtDVD.sh [-R]
-RInstalls the ServerView RAID Manager RPM package if it is supplied together with the other RPM packages.
The script then executes the installation automatically. In the case of installation on a target system, you will be asked for the IP address of the reference system for the compiled loadable modules to be transferred from there.

Installation ServerView Agents for Linux 39
Script-based installation
3.2.2 Installation from a directory
You can also download the script form the Fujitsu Technology Solutions web server in any directory.
To install the agent proceed as follows:
Ê Save the installation RPM packages and the shell archive srvmagt.sh in any directory.
Ê Open (as root) a terminal.
Ê Change to the corresponding directory.
cd <path>
Ê If RBAC funtionality will be used on the managed server:
Import the SSL certificates of the trusted central management stations (CMS). For details refer to „User management in ServerView“ manual.
Ê Enter the following command:
./srvmagt.sh [option] install
The options are described in the following section, see section “The srvmagt script” on page 42.
The script installs all RPM packages. Additional on a target system, the compiled binary ServerView modules are available.

40 Installation ServerView Agents for Linux
Installing with the rpm command
3.3 Installing with the rpm command
When installing with the rpm command, proceed as follows:
Ê Start (as root) a terminal.
Ê Mount the ServerView Suite DVD 1:
mount -t udf -o loop /dev/cdrom /mnt/cdrom
Ê Switch to the directory containing the Linux agents:
cd /mnt/cdrom/SVSSoftware/Software/ServerView/Linux/Agents
Ê If RBAC funtionality will be used on the managed server:
Import the SSL certificates of the trusted central management stations (CMS). For details refer to „User management in ServerView“ manual.
Ê Install the following RPM packages:
rpm -U ServerViewConnectorService-<scs-version>.i386.rpmrpm -U srvmagt-mods_src-<version>.i386.rpm rpm -U srvmagt-eecd-<version>.i386.rpmrpm -U srvmagt-agents-<version>.i386.rpm
Note that the packages must be installed in the above order.
For <scs-version> specify the version and the release number of the Remote Connector Service (e.g. 1.07.03). For <version> specify the version and the release number of the ServerView Linux agent (e.g. 5.00-04).
In the case of a target system, transfer the compiled package srvmagt-mods_bin from the assigned reference system and install it instead of the package srvmagt-mods_src.

Installation ServerView Agents for Linux 41
Possible sources of error
3.4 Possible sources of error
– If errors occur during compilation, this may be because the suitable kernel source code is not available on the server.
– If you want to start compilation of the modules subsequently by hand, you can do this with the command:/etc/init.d/eecd_mods_src start
If you want to have the compiler outputs displayed, you start make directly in directory /etc/srvmagt/sources.
– If errors occur during installation, this may be because the RPM package with the compiled modules does not suit the target system. The reference system selected and the target system may not be of the same type.

42 Installation ServerView Agents for Linux
ServerView agent maintenance after the installation
3.5 ServerView agent maintenance after the installation
3.5.1 The srvmagt script
Once you have installed the ServerView agent for Linux, as described in section section “Installation via ServerView Suite DVD 1” on page 38 or section “Installation from a directory” on page 39, further functions are provided for maintenance via the srvmagt script.
Ê Open a terminal (as root)
Ê Enter the command, see syntax.
Syntax
[/usr/sbin/]srvmagt [option] [action]
For option you can specify:
-fForces the intended action against an issued warning/rejection.
I In that case you act on your own risk and responsibility. The behavior and functionality is undefined.
-h | --helpDisplays the command syntax and exits.
-nDoes not start any ServerView Agents' daemon during installation with the install action.
-p pathHere you can specify the directory containing the RPM packages.
path is a path to a directory in a local or remote file system.
I The path option must not contain spaces or special characters.
-RInstalls the ServerView RAID Manager RPM package, if it is supplied together with the other RPM packages.

Installation ServerView Agents for Linux 43
ServerView agent maintenance after the installation
-v versIndicates the version to handle. Default is the version of the script.
--versionPrints the script version and exits.
-VPrints verbose information.
For action you can specify:
buildIs only possible on a reference systems and builds the ServerView Agents Linux’ kernel modules package srvmagt_mods_bin.
installInstalls (repairs, updates) all ServerView Agents Linux' RPM packages according to the already installed configuration and the version supplied with the -v option. The corresponding services (i.e. daemons) are started afterwards unless the -n option is also given.
startStarts ServerView Agents Linux.
restartRestarts ServerView Agents Linux.
statusShows status of ServerView Agents Linux.
diagCollects diagnostic material by calling PrimeCollect(8).
stopStops ServerView Agents Linux.
removeRemoves all ServerView Agents Linux RPM packages.

44 Installation ServerView Agents for Linux
ServerView agent maintenance after the installation
3.5.2 Configuring agents
The /etc/srvmagt/config file contains information which enables you to restrict access to the managed system and select other operating parameters.
Lines that begin with the “#“ sign are comment lines and the other lines have the following format:
<keyword>=<value>
AgentPermission Basic permission for other systems to set values on the local server with the help of SNMP commands (2: not allowed, 3: allowed, default: 2). If you want to permit SNMP SetRequests you must set the value to “3” here and configure the SNMP services appropriately (see the section “Configuring SNMP services” on page 30).
AgentShut Permission for remote shutdown/reboot of the local server using SNMP commands (2: not allowed, 3: allowed, default: 2, i.e. not allowed).If you want to permit SNMP SetRequests you must set the value to “3” here and configure the SNMP services appropriately (see the section “Configuring SNMP services” on page 30).
ShutdownDelay Indicates the time delay (in minutes) between an SNMP shutdown request and the shutdown.
NoAccountCheck If a value other than 0 is specified for this entry, you are not prompted for a password when you modify settings via ServerView.The default value is 0, i.e. the user group authentication is enabled by default. In this case a user group must be entered under UserGroup, to which the user that wishes to change the SNMP settings must belong.
Please note that a deactivated password query can pose a considerable security risk.
Installation ServerView Agents for Linux 45
ServerView agent maintenance after the installation
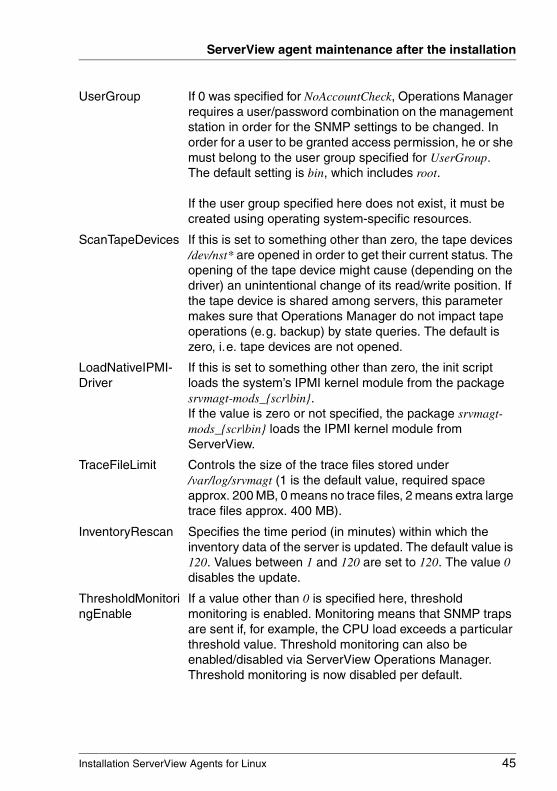
UserGroup If 0 was specified for NoAccountCheck, Operations Manager requires a user/password combination on the management station in order for the SNMP settings to be changed. In order for a user to be granted access permission, he or she must belong to the user group specified for UserGroup. The default setting is bin, which includes root.
If the user group specified here does not exist, it must be created using operating system-specific resources.
ScanTapeDevices If this is set to something other than zero, the tape devices /dev/nst* are opened in order to get their current status. The opening of the tape device might cause (depending on the driver) an unintentional change of its read/write position. If the tape device is shared among servers, this parameter makes sure that Operations Manager do not impact tape operations (e.g. backup) by state queries. The default is zero, i.e. tape devices are not opened.
LoadNativeIPMI-Driver
If this is set to something other than zero, the init script loads the system’s IPMI kernel module from the package srvmagt-mods_{scr|bin}. If the value is zero or not specified, the package srvmagt-mods_{scr|bin} loads the IPMI kernel module from ServerView.
TraceFileLimit Controls the size of the trace files stored under /var/log/srvmagt (1 is the default value, required space approx. 200 MB, 0 means no trace files, 2 means extra large trace files approx. 400 MB).
InventoryRescan Specifies the time period (in minutes) within which the inventory data of the server is updated. The default value is 120. Values between 1 and 120 are set to 120. The value 0 disables the update.
ThresholdMonitoringEnable
If a value other than 0 is specified here, threshold monitoring is enabled. Monitoring means that SNMP traps are sent if, for example, the CPU load exceeds a particular threshold value. Threshold monitoring can also be enabled/disabled via ServerView Operations Manager. Threshold monitoring is now disabled per default.

46 Installation ServerView Agents for Linux
ServerView agent maintenance after the installation
I Note that changes made to the config file will only take effect on restarting the agent. You can do this by restarting the server or by entering the following command as the system administrator:
/usr/sbin/srvmagt restart
VMware ESx
To support the performance and threshold manager for VMware ESX in the ServerView Operation Manager, it is necessary to configure account information for the VMware ESX system within ServerView VME agent. In order to do so, the following steps are necessary:
1. Edit the file /etc/srvmagt/VME/etc/app.config.xml.
2. Search for the section titled <authentication>.
3. Fill in user and password information as necessary (e.g. <User>root</User><Password>wheel</Password>)
4. Save the file.
5. Restart the ServerView agents.
3.5.3 Improved availability of ServerView agents
The start script srvmagt(8) of ServerView Agents invokes the srvmagt cron script srvmagtCron to run every 5 minutes.
srvmagtCron checks the eecd daemon, the ServerView agents, SVRemoteConnector and the SNMP daemon snmpd and restarts them if they are not running. Additionally the script writes the time of each check into the first line of the /var/log/srvmagt/log.srvmagtCron file.
Stopping the ServerView Agents with srvmagt(8) turns this periodical supervision off.
srvmagtCron will not be removed from the root's crontab in order to keep changes of the sensitive crontab to a minimum. Actual execution depends on existence of the srvmagtCronOn file in the srvmagt root directory. This file is created during start of ServerView agents and removed when they are stopped.

Installation ServerView Agents for Linux 47
ServerView agent maintenance after the installation
3.5.4 Uninstalling agents
You uninstall the agents with the following call:
/usr/sbin/srvmagt remove
3.5.5 Starting and stopping agents
After the Linux agent has been installed, the agents are started automatically with each system startup. For diagnostic purposes, it may be meaningful to explicitly stop and then restart the agent.
Starting agents
You start the agents with the following call:
/usr/sbin/srvmagt start
I You must make sure that you start the SNMP master agent snmpd before you start the Linux agent.
Stopping agents
You stop the agents with the following call:
/usr/sbin/srvmagt stop

48 Installation ServerView Agents for Linux
ServerView agent maintenance after the installation
3.5.6 Additional information
– If an S30 or S40 is connected to a server via SCSI (SAF-TE), but not registered by the agents it may be that there are not sufficient device files set up in Linux. These device files are necessary for the communication of SNMP agents and the storage expansion units. By default, Linux sets up 16 device files for the SCSI connections: /dev/sg0 through /dev/sg15. If you wish to connect more than 16 devices via SCSI you will need to add additional device files. The number of SCSI device files can be found in the file /proc/scsi/scsi. Additional device files (/dev/sg) can be added using the following command:
mknod /dev/sg<number> c 21 <number>
In place of <number> enter the numbers in sequence in relation to the last existing entry (for example, 16 and above, if the last entry contains the number 15). After you have created new device files you must restart the server.
– If new hardware (e.g. a remote service board) has been installed or a new storage expansion unit added and not recognized then you will need to carry out a “rescan” of the eecd (environment enclosure control daemon). Restart the eecd using the following commands:
/etc/init.d/srvmagt stop/etc/init.d/eecd stop/etc/init.d/eecd rescan/etc/init.d/srvmagt start

Installation ServerView Agents for Linux 49
Installing ServerView Update Agent
3.6 Installing ServerView Update Agent
3.6.1 Requirements
– Before you install the update agent on the managed server, you must first install the corresponding ServerView agents. How to install the ServerView agents for Linux is described in this chapter. The installation of the ServerView agents for Windows is described in the ServerView Agents Installation Guide for Windows.
– For an update via TFTP server, Update Agent V4.80 must also be installed on the server acting as the TFTP server, or a GlobalFlash Agent V4.71 in PXE mode.
3.6.2 Installation
Update Agent version 4.80 and higher is only installed if the server is online-update-capable, i.e. online tools for updating the firmware are available. On older systems you will need GlobalFlash Agent 4.71. For a description, see the relevant documentation on ServerView Update Manager up to V4.71.
You start the installation via the installation package SMAWgfa-<Release>-<Version>.rpm, which you will find on the ServerView Suite DVD 1 under Firmware – Agent-Lx – SV-Update-Agent.
Install the ServerView Update Agent with the following command:
rpm {-i | -U --nopreun --nopostun} SMAWgfa-<Release>-<Version>.rpm
The options have the following meanings:
-i You use this option to start the initial installation.
-U You use this option to start an update installation.
--nopreun --nopostun (for update installations only)If these options, which must always be specified together, are selected, the uninstallation routines are not run when an update installation takes place. Parameters already set in the Update Manager are retained.

50 Installation ServerView Agents for Linux
Installing ServerView Update Agent
After the command has been executed the parameters are assigned default values in the /opt/SMAW/SMAWgfa/cfg/LinuxFwuAgent.cfg file and you can change these to suit your requirements.
FlashUserGroup=<user_group>Name of the primary user group which is entered in /etc/passwd for the user. All users in this group are authorized to execute the update procedure (default GFUSER).
If it does not yet exist the GFUSER group with the user globalflash and the password globalflash is automatically set up during installation.
This parameter is evaluated only when NoAccountCheck = 0.
NoAccountCheck=<n>n = 0 (password query enabled; default value)n = 1 (password query disabled)
TraceFile=<file>File in which the agent’s actions are logged when TraceLevel > 0.
TraceLevel=<n>n = 0 (no tracing)n = 2 (tracing of errors)n = 3 (tracing of the commands)n = 5 (detailed tracing)
Parameter changes only become effective after the /etc/init.d/globalflash restart command has been executed.
Uninstallation is performed using the rpm -e SMAWgfa command.

Installation ServerView Agents for Linux 51
IndexAagent
starting (SuSE) 47stopping (SuSE) 47
BBoot Watchdog
configure 23
Cconfigure Boot Watchdog 23configure Software Watchdog
menu 23configuring
agents (SúSE) 44
Ddocumentation for ServerView
Suite 13documentation structure 7
Iinstallation
on Managed Servers 15installation procedures
SuSE 35installing
Linux agent (SuSE) 40
Nnotational conventions 14
Ppassword
entering a password for server monitoring under SuSE 29
Sscript-based installation
Linux agent (SuSE) 37security concept
SuSE Linux 29
serversecurity concepts of SuSE
Linux 29ServerView database
Linux 33SNMP agent
installing (SuSE) 35Software Watchdog
configure 23starting
agent (SuSE) 47agents (SuSE) 47
stoppingagent (SuSE) 47agents (SuSE) 47
SuSEconfiguring agent 44entering a password during server
monitoring 29installing agents 35starting agent 47stopping agent 47
SuSE Linuxsecurity concept 29
Ttarget groups 7

52 Installation ServerView Agents for Linux
Index