service bulletin - hyundaiextranet.hyundai.co.nz/hyundai_service_bulletin/cms_resources... ·...
TRANSCRIPT

Page 1 of 18
07014
Service Bulletin TO: Service Managers DATE: 18 May 2007
CC: Dealer Principals, Service Advisors, Technicians
FROM: Maurice Rotherham
RE: GDS Set-up Information
The following pages contain explanations of the Task Bar icons on your GDS as well as the network set-up procedures to maintain or repair your VCI and network communications. There are a number of icons along the GDS Task Bar that will assist you in understanding what the GDS is doing whilst diagnosing vehicles, updating software or just communicating over the internet through your in-house computer network. Explanations are provided for each of these icons as well as the methods to open various set-up and properties menus. The second section (pg.6) covers the property settings for both the LAN and WLAN. LAN stands for Local Area Network and this represents the connection, via cable, to the computer network in your dealership. WLAN stands for Wireless Local Area Network and represents any wireless communication via the GDS. This includes the VCI in wireless mode and, where fitted, an additional wireless link to the computer network in your dealership. GDS requires a permanent internet connection so it can automatically update itself as well as access live vehicle, warranty and parts information directly from Hyundai in Korea. The settings provided in this document are those required by the GDS to establish LAN or WLAN connections without interfering with the VCI communications. They do not cover any specific network security settings within your dealership. If you operate a secure network then contact your network support person to discuss connecting your GDS to the internet. Follow the instructions carefully. If your VCI is working when connected by its USB cable but it will not communicate in wireless mode, it is most likely due to an incorrect network setting which is blocking or interrupting the VCI wireless link. Do not attempt to reconfigure the VCI wireless hardware so it communicates with both the VCI and your wireless network as this will cause the VCI wireless link to fail. If you want GDS to connect to your wireless network you must install a separate wireless card or a USB adaptor. If you have any questions please contact HANZ Service.

Page 2 of 18
GDS Task Bar Icons The Task Bar icons provide very useful information about what the GDS is doing during vehicle diagnostics, software updates and wireless or cabled communication. You can see if and when GDS is communicating with the VCI in wireless mode, if your network connection is on, when GDS is carrying out an internet update and, if you suspect a problem, how to check the various settings to identify a cause. The default setting in GDS is to hide all unused Task Bar icons. We recommend you change this setting to display all of the icons all of the time. To change the setting;
1. Right click a blank part of the Task Bar 2. Select “Properties” 3. Remove the tick next to “Hide inactive icons” by clicking on it 4. Click “Apply” 5. Click “OK” to close the window
The following provides descriptions and user functions of virtually every Task Bar icon you might see on your GDS.
GDS Smart Update – GDS is searching for internet updates. This icon appears each time the GDS program is started, regardless of the internet connection status. A chime sounds when the update process ends.
GDS Communication Checking Program – appears when starting the GDS program. Double click or right click and select “OPEN” to view the VCI, VMI and Internet status.
GSW B-DTC – appears when starting the GDS program. Double click or right click and select “Show Window” to open the GDS Fault Code Searching window.
Windows Update – appears whenever Windows software updates are available for downloading from Microsoft. Click to begin the download. After downloading the updates, a software install notification balloon appears. Click the balloon to begin the software installation.
Windows Security Warning – if the GDS has not been connected to the internet for more than one week the V3Pro Internet Security software will be out of date. Close the associated warning information bubble and manually update V3Pro software via the internet (refer next page).

Page 3 of 18
GDS Task Bar Icons
Wireless Local Area Network (WLAN) connected – the VCI and/or optional wireless card/USB Adaptor is on/connected and in wireless mode. The two radio waves turn green whenever a wireless communication occurs. Refer to the GDS Network Set-up Procedures for further information.
WLAN Not Connected. Refer to the GDS Network Set-up Procedures for further information.
Local Area Network (LAN) connected – GDS is connected by cable to a computer network for internet access. The two monitor screens turn light blue when GDS is communicating over the network. Refer to the GDS Network Set-up Procedures for further information.
LAN Not Connected. Refer to the GDS Network Set-up Procedures for further information.
Remove Hardware – before disconnecting additional hardware that is plugged into a USB port (e.g. USB adaptor), left click this icon and select the hardware name from the list. A small bubble appears a few seconds later to confirm it is safe to disconnect the item.
VCI Wireless Setting – double click or right click and select “OPEN” to view the current VCI wireless settings. This should display the VCI number. If the VCI number is missing, carry out a VCI Firmware Update and reset the VCI number using the Read/Save functions.
Volume – left click to open the speaker volume slider or mute function. Double click to open the Volume Control Panel. Includes a red circle with crossbar when muted.
Power Meter – roll the cursor over this icon to see the remaining battery power level. Double click to open the properties window. If configured correctly in the Power Meter options this will icon change to a mains plug and lead when connected to transformer power.

Page 4 of 18
GDS Task Bar Icons
V3Pro Internet Security – to update the security software manually, right click this icon, select “Smart Update” and then click “Update Now”. Do not interrupt the download/install process and wait until this completes before continuing. Do not change any update or security settings.
Remove Unused Icons – occasionally appears with an information balloon asking if you want to remove any unused Task Bar icons. If you just close the balloon it will keep reminding you. To stop the reminder, click the balloon to open the dialogue box and then click “Cancel”.
Graphics Media Accelerator Driver – shows graphic settings and display modes for the touch screen. DO NOT CHANGE ANY SETTINGS.
Panasonic Handwriting – double click to open the handwriting program (not used with GDS).
Display Rotation Tool – choose rotation angles or open the configuration window and set the default display angles when in normal and tablet modes. You can set the display to automatically turn upside down (180°) when you turn the screen around and fold it down in tablet mode.
Secondary Button – changes the mouse click functions. Leave on “L”.
Display Properties – right click to access a shortcut menu for touch screen calibration and touch point testing as well as the Mouse Properties. Double click to open the Mouse Properties window.
Clock – double click to open the time/date setting window. Do not make large adjustments to the time/date as this will affect the GDS operation.

Page 5 of 18
GDS Network Set-up Procedures Whenever you re-install the GDS software using the GDS Software Master (Recovery Disc) you will need to set-up the GDS network settings in accordance with this document. If you are having problems with your internet connection you will need to check your GDS network settings are set in accordance with this document. Your computer network consists of a Local Area Network known as a LAN. If you have a Wireless Local Area Network this is know as a W-LAN or WLAN. These instructions provide the information you need to configure the LAN/WLAN settings in GDS so they do NOT interfere with the operation of your VCI. The VCI is the wireless device that connects to Hyundai vehicles to run diagnostics. The basic GDS configuration is such that it will easily connect to the internet on an open LAN/WLAN connection. However network security protocols within each dealership will impact on this and these protocols are beyond our control. Depending on security protocols your network may need to be configured to accept communications from the GDS unit and/or a new wireless device. Each computer and wireless device is identified on your network by a unique name. Some LAN networks will accept any new computer connected to it whilst other LAN networks with tighter security protocols will need to be configured to allow a new computer to connect. This usually involves your network support person to make the changes on your server. Basically they are just adding the name of the new computer to the list of allowed computers. WLAN networks are much more secure and will normally always need to be configured to accept a new wireless device. Again your network support person will have to make the changes on your wireless server to add the name of the new wireless device. As the network set-up in each dealership is unique it is not practical for HANZ to provide instructions for connecting to every dealership network, however once your computer network has been configured to accept the GDS and/or an additional wireless device your network support person should not have to make any further changes. All other network settings are done within the GDS unit and you can set these up yourself by following these instructions. If your GDS is already set-up on your LAN/WLAN, access the network settings for each connection and note them down BEFORE you re-install the GDS software. Refer to the following pages to see where these settings are located for each connection. You will need to record all of the network addresses so that you can re-enter them after installing the GDS software. If you have a wireless device you will also need the Network Key. This is a password to access the WLAN and if you don‟t know it your network support person should give it to you. The instructions for setting up each network connection are listed separately on the following pages. If you are installing a wireless device, follow the instructions that came with the device to install its software (device drivers) and then refer to the “Installing a Wireless Card/USB Adaptor” information at the end of this document in conjunction with the “Wireless Network Connection 2” section to configure it so it does NOT interfere with your wireless VCI.

Page 6 of 18
From the Desktop, open the Network Connections window (Start > Connect to… > Show all connections).
The above thumbnails may appear in any order and are designated as follows (depending on your GDS not all thumbnails will be available); Local Area Connection (Realtek RTL8139/810x Family …) – available on all GDS – This is the LAN connection through the network port on the left side of the GDS. For set-up instructions refer to page 7 Local Area Connection 2 (HighSpeed USB-Ethernet Ada…) – available on all GDS – This is the LAN connection through the Port Replicator (the base station on the trolley that the GDS sits on). This thumbnail is not available when the GDS is away from the Port Replicator. For set-up instructions refer to page 9 Wireless Network Connection (Intel(R) PRO/Wireless 2915AB…) – available on all GDS – This is the WLAN connection for the VCI module. For set-up instructions refer to page 11 Wireless Network Connection 2 (shows the name of your Wireless Card/USB Adaptor) – This is an additional WLAN for internet connectivity. This thumbnail is not available when an additional Wireless Card/USB Adaptor is not installed/connected. At HANZ we are using a D-Link Wireless G USB Adaptor, model number DWL-G122 (see page 11 for further info). For set-up instructions refer to page 13 NOTE: If you connect the additional USB Adaptor consecutively into each USB port the GDS will assign a new Wireless Network Connection number for each USB port, i.e. Wireless Network Connection 3, Wireless Network Connection 4, etc. When setting up your WLAN these should all be configured the same way.

Page 7 of 18
Local Area Network (LAN) Set-up For the network port on the left side of the GDS (Local Area Connection - Realtek RTL8139/810x Family …), right-click on the appropriate thumbnail and select “Properties”.
Set the properties in the „General‟ tab as shown. Make sure the two checkboxes at the bottom of this window are ticked. Highlight “Internet Protocol (TCP/IP)” and click the “Properties” button.
Check with your IT support person for the appropriate settings for your network. In this example the computer will obtain an IP address and DNS server address automatically (preferred method). If your network requires a fixed IP address then click on the „Use the following IP address‟ radio button and enter the settings here. If your network requires preferred/alternate DNS server addresses then click on the „Use the following DNS server addresses‟ radio button and enter the settings here. Click on the „Alternate Configuration‟ tab at the top of the window.

Page 8 of 18
If your network requires an alternate configuration then click on the „User configured‟ radio button and enter these settings here. Click “OK” and then click “OK” again to save all settings and return to the Network Connections window.

Page 9 of 18
To connect a LAN cable to the Port Replicator you need to set-up the second LAN port (Local Area Connection 2 - HighSpeed USB-Ethernet Ada…). The GDS must be mounted
on the Port Replicator to configure this port. Right-click the thumbnail for this LAN connection and select “Properties”.
Set the properties in the „General‟ tab as shown. Make sure the two checkboxes at the bottom of this window are ticked. Highlight “Internet Protocol (TCP/IP)” and click the “Properties” button.
Check with your IT support person for the appropriate settings for your network. In this example the computer will obtain an IP address and DNS server address automatically (preferred method). If your network requires a fixed IP address then click on the „Use the following IP address‟ radio button and enter the settings here. If your network requires preferred/alternate DNS server addresses then click on the „Use the following DNS server addresses‟ radio button and enter the settings here. Click on the „Alternate Configuration‟ tab at the top of the window.

Page 10 of 18
If your network requires an alternate configuration then click on the „User configured‟ radio button and enter these settings here. Click “OK” and then click “OK” again to save all settings and return to the Network Connections window.

Page 11 of 18
Wireless Local Area Network (WLAN) Set-up The first WLAN is for your VCI (Wireless Network Connection – Intel(R) PRO/Wireless 2915AB…). Right-click this thumbnail and select “Properties”. This connection should be set as follows;
Make sure the two checkboxes at the bottom of this window are ticked. Highlight “Internet Protocol (TCP/IP)” and click the “Properties” button.
DO NOT CHANGE ANY OF THESE SETTINGS. These settings are created during the VCI Configuration process. The IP address will be slightly different depending on the number you assigned to your VCI during the VCI Configuration process. i.e. 203.251.196.101 = VCI No.1, 203.251.196.102 = VCI No.2, etc Click „Cancel‟ to return to the above window and select the „Wireless Networks‟ tab.
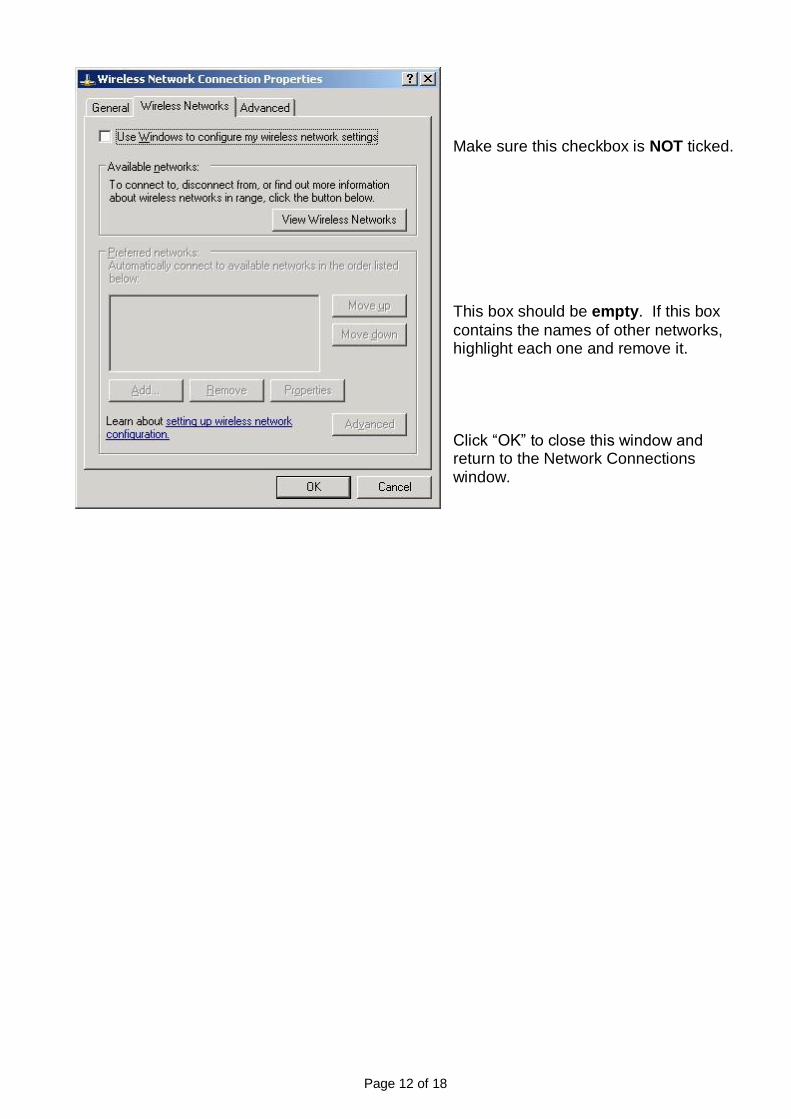
Page 12 of 18
Make sure this checkbox is NOT ticked. This box should be empty. If this box
contains the names of other networks, highlight each one and remove it. Click “OK” to close this window and return to the Network Connections window.

Page 13 of 18
The second WLAN is for your additional Wireless Card/USB Adaptor (Wireless Network Connection 2 – name of your wireless device). Connect your additional wireless device,
right-click this thumbnail and select “Properties”. This connection should be set as follows; Set the properties in the „General‟ tab as shown. The name of your Wireless Card/USB Adaptor will appear here. Make sure the two checkboxes at the bottom of this window are ticked. Highlight “Internet Protocol (TCP/IP)” and click the “Properties” button.
Check with your IT support person for the appropriate wireless settings for your network. In this example the computer will obtain an IP address and DNS server address automatically (preferred method). If your network requires a fixed IP address then click on the „Use the following IP address‟ radio button and enter the settings here. If your network requires preferred/alternate DNS server addresses then click on the „Use the following DNS server addresses‟ radio button and enter the settings here. Click on the „Alternate Configuration‟ tab at the top of the window.

Page 14 of 18
If your network requires an alternate configuration then click on the „User configured‟ radio button and enter these settings here. Click “OK” to return to the WLAN2 Properties window (see image at bottom of page 5) and select the „Wireless Networks‟ tab.
Make sure this checkbox IS TICKED. If you do not tick this checkbox then the GDS program will BLOCK your additional Wireless Card/USB Adaptor. Click “OK” to save these settings and return to the Network Connections window.
If you are using a USB Adaptor and you have set it up as above, when you connect it to a different USB port for the first time the GDS will allocate a different Wireless Network Connection number to it. You will need to configure each port as per the WLAN2 Properties settings above.

Page 15 of 18
At HANZ we are using a D-Link Wireless G USB Adaptor, model number DWL-G122 for each GDS. We procured them from PB Technologies for less than $40 each and they come with a USB extension and cradle. They are also available from Dick Smith Electronics without a cradle. Shop around for the best deal.
We have mounted the cradle using Velcro strips on top of the GDS trolley left rear post. The extension cable is routed through the rear of the trolley to a USB port at the rear of the Port Replicator. This places the USB Adaptor in the best position for obtaining a strong radio signal when it is connected to the cradle. If you do not have a cradle, connect the adaptor directly into the rear of the Port Replicator. NOTE: You will need to configure the network settings on all of the empty USB ports on the Port Replicator.
When the GDS is removed from the trolley and portable internet connectivity is required, connect the USB Adaptor directly into either USB port on the left side of the GDS. NOTE: You will need to configure the network settings on both USB ports.

Page 16 of 18
Installing a Wireless Card/USB Adaptor First of all you will need to get your network support person to configure the wireless network to accept the new Wireless Card/USB Adaptor. Each Wireless Card/USB Adaptor is identified by a unique “MAC ID”. This MAC ID must be entered into the wireless network server so it will accept communications from the Wireless Card/USB Adaptor. After installing the software and connecting the Wireless Card/USB Adaptor the unit searches for available wireless networks. Alternatively you can right-click the appropriate wireless icon on the Taskbar and select “View available wireless networks”. NOTE: There will be two wireless icons on the Taskbar. One is for the VCI and the second is for your recently installed Wireless Card/USB Adaptor. Roll the mouse over each one to identify it. You will normally see this window when the card/adaptor finds available wireless networks.
Click on the network that you want to connect to. DO NOT CONNECT TO THE GDS VCI NETWORK. This is seeing the VCI wireless card inside your GDS unit. Click on “Connect”.

Page 17 of 18
The card/adaptor begins to connect to the wireless network. In this example the GDS is automatically acquiring an IP address. If you have a fixed IP address you will move straight to the next window.
You may be prompted to enter a Network key (password). Click “Connect”
The card/adaptor continues to establish a connection with the wireless network.

Page 18 of 18
When the connection is established you can click on the item to get more information Click “Disconnect” to disconnect from the selected network.
NOTE: DO NOT ATTEMPT TO CONNECT TO THE VCI WIRELESS CARD OR ANY ACTIVE VCI MODULE USING YOUR WIRELESS CARD/USB ADAPTOR.