service gas freestanding big oven - appliance aid · glass, ceramic, earthware, or other glazed...
TRANSCRIPT
RS2310005Revision 0April 2001
This manual is to be used by qualified appliancetechnicians only. Amana does not assume anyresponsibility for property damage or personalinjury for improper service procedures done by anunqualified person.
ServiceGas Freestanding BIG OVEN™
Service Manual forAmana®
This manual covers general information on Freestanding Gas BIG OVEN.
Refer to individual Technical Sheetsfor information on specific models.
RS2310005 Rev. 0 2
Important InformationPride and workmanship go into every product to provide our customers with quality products. It is possible,however, that during its lifetime a product may require service. Products should be serviced only by a qualifiedservice technician who is familiar with the safety procedures required in the repair and who is equipped withthe proper tools, parts, testing instruments and the appropriate service manual. REVIEW ALL SERVICEINFORMATION IN THE APPROPRIATE SERVICE MANUAL BEFORE BEGINNING REPAIRS.
Important Notices for Consumers and Servicers
! WARNINGTo avoid risk of serious injury or death, repairs should not be attempted by an unauthorized personal, dangerousconditions (such as exposure to electrical shock) may result.
CAUTION!Amana will not be responsible for any injury or property damage from improper service procedures. If performingservice on your own product, assume responsibility for any personal injury or property damage which may result.
To locate an authorized servicer, consult your telephone book or the dealer from whom you purchased this product.For further assistance, contact: 1 (800) 628-5782 first, if no answer call number listed below.
CONSUMER AFFAIRS DEPT. OR 1 (800) 843-0304AMANA APPLIANCES CALLAMANA, IOWA 52204
If outside the United States contact:AMANAATTN: CONSUMER AFFAIRS DEPTAMANA, IOWA 52204, USATelephone: (319) 622-5511Facsimile: (319) 622-2180TELEX: 4330076 AMANACABLE: "AMANA", AMANA, IOWA, USA
Recognize Safety Symbols, Words, and Labels
DANGER!DANGER—Immediate hazards which WILL result in severe personal injury or death.
WARNING!WARNING—Hazards or unsafe practices which COULD result in severe personal injury or death.
CAUTION!CAUTION—Hazards or unsafe practices which COULD result in minor personal injury or product or property
damage.
3 RS2310005 Rev. 0
Table of ContentsImportant Information ...................................................2Important Safety Information ........................................4
ALL APPLIANCES .................................................5SURFACE BURNERS ...........................................5OVENS ..................................................................5SELF-CLEANING OVENS .....................................5VENTILATION HOODS .........................................5DELAYED IGNITION .............................................6
General InformationCooking Utensils ....................................................7Pan Bottom Test ....................................................7Oven Rack Placement ...........................................8Pan Placement ......................................................8Removing Oven Door ............................................8Replacing Oven Door.............................................8Replacing Oven Light .............................................9Removing Storage Drawer .....................................9Cleaning .................................................................9Cleaning Stainless Steel ......................................10
Component Testing Information .................................11Troubleshooting Procedures
Sealed Top Burners .............................................15Bake and Broil Burners ........................................16
Disassembly ProceduresOven Door Handle, Outer/Inner Glass, andDoor Hinges .........................................................17Reverse Procedure to Reassemble Oven Door ...18Clock/Timer Mechanism, Spark Module, andHigh Limit Sensor ................................................18Cooktop, Top Burner Gas Valves, Top BurnerBases, Top Burner Venturies, andSpark Electrodes .................................................18Spark Switches ....................................................18Oven Bottom ........................................................18Door Latch Motor, Plunger Light Switch,Latch Switch, Rod, and Door Catch .....................19Oven Door Gasket ...............................................19Storage Drawer Tracks ........................................19Bake Burner Ignitor and Broil Burner Ignitor ........19Sensor, Oven Control ..........................................19Bulb, Oven Light, and Oven Light Socket ............19Pressure Regulator and Low VoltageOven/Broil Gas Valve...........................................20Broil Burner ..........................................................20Bake Burner .........................................................20Flue ......................................................................21Leveling Leg Bracket ...........................................21Front Frame and Oven Liner ...............................21Side Panel ...........................................................21Power Cord ..........................................................21
Appendix ALP/Propane Conversion ..................................... A-2Converting Back to Natural Gas ........................ A-4
Appendix BQuick Start Reference Guide ............................. B-2
Appendix COwner's Manual ................................................. C-2
RS2310005 Rev. 0 4
Important Safety Information
SAVE THESE INSTRUCTIONS
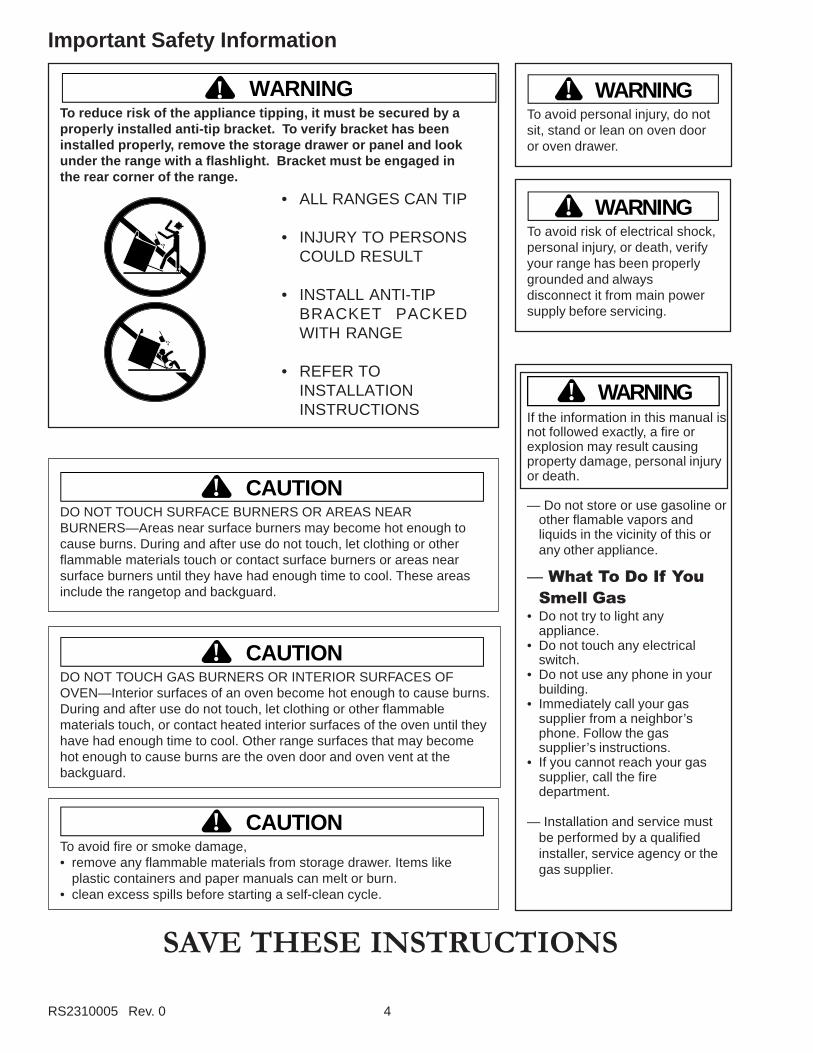
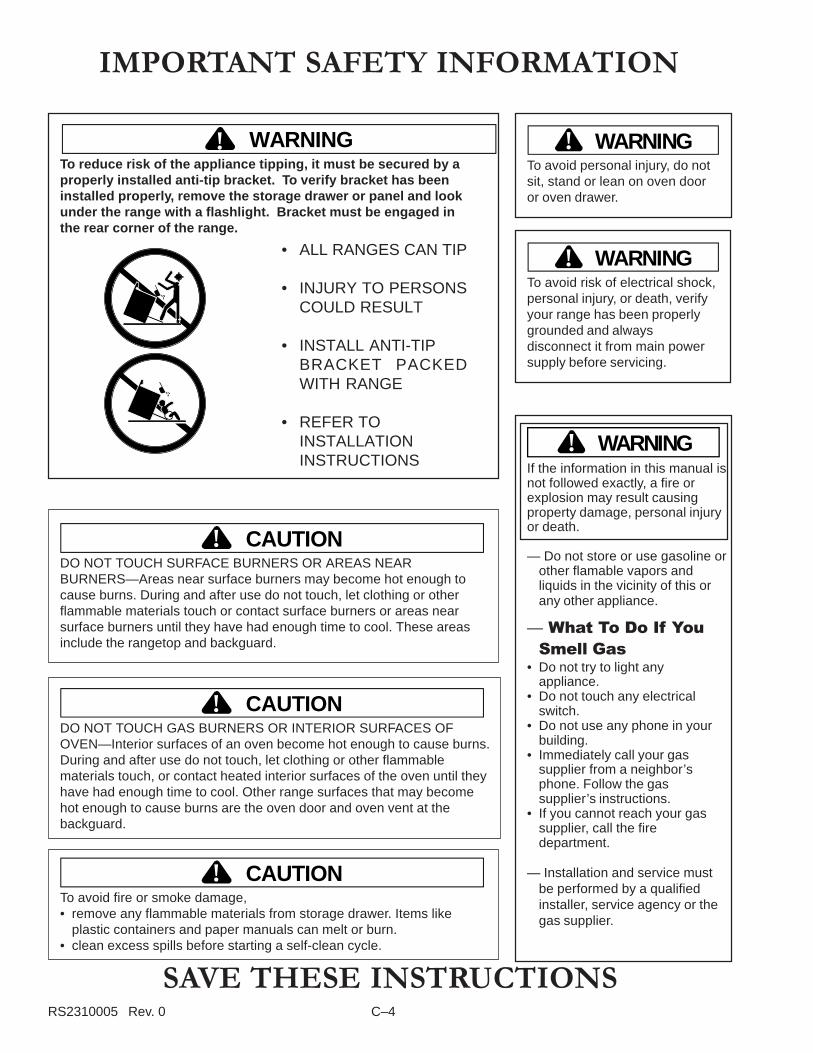
WARNING!To reduce risk of the appliance tipping, it must be secured by aproperly installed anti-tip bracket. To verify bracket has beeninstalled properly, remove the storage drawer or panel and lookunder the range with a flashlight. Bracket must be engaged inthe rear corner of the range.
WARNING!To avoid personal injury, do notsit, stand or lean on oven dooror oven drawer.
WARNING!To avoid risk of electrical shock,personal injury, or death, verifyyour range has been properlygrounded and alwaysdisconnect it from main powersupply before servicing.
• ALL RANGES CAN TIP
• INJURY TO PERSONSCOULD RESULT
• INSTALL ANTI-TIPBRACKET PACKEDWITH RANGE
• REFER TOINSTALLATIONINSTRUCTIONS
WARNING!If the information in this manual isnot followed exactly, a fire orexplosion may result causingproperty damage, personal injuryor death.
— Do not store or use gasoline orother flamable vapors andliquids in the vicinity of this orany other appliance.
— What To Do If YouSmell Gas
• Do not try to light anyappliance.
• Do not touch any electricalswitch.
• Do not use any phone in yourbuilding.
• Immediately call your gassupplier from a neighbor’sphone. Follow the gassupplier’s instructions.
• If you cannot reach your gassupplier, call the firedepartment.
— Installation and service mustbe performed by a qualifiedinstaller, service agency or thegas supplier.
CAUTION!DO NOT TOUCH SURFACE BURNERS OR AREAS NEARBURNERS—Areas near surface burners may become hot enough tocause burns. During and after use do not touch, let clothing or otherflammable materials touch or contact surface burners or areas nearsurface burners until they have had enough time to cool. These areasinclude the rangetop and backguard.
CAUTION!DO NOT TOUCH GAS BURNERS OR INTERIOR SURFACES OFOVEN—Interior surfaces of an oven become hot enough to cause burns.During and after use do not touch, let clothing or other flammablematerials touch, or contact heated interior surfaces of the oven until theyhave had enough time to cool. Other range surfaces that may becomehot enough to cause burns are the oven door and oven vent at thebackguard.
CAUTION!To avoid fire or smoke damage,• remove any flammable materials from storage drawer. Items like
plastic containers and paper manuals can melt or burn.• clean excess spills before starting a self-clean cycle.
5 RS2310005 Rev. 0
Important Safety InformationALL APPLIANCES1. Proper Installation—Be sure your appliance is
properly installed and grounded by a qualifiedtechnician.
2. Never Use Your Appliance for Warming or Heatingthe Room.
3. Do Not Leave Children Alone—Children should notbe alone or unattended in the area where theappliance is in use. They should never be allowedto sit or stand on any part of the appliance.
4. Wear Proper Apparel—Loose fitting or hanginggarments should never be worn while usingappliance.
5. User Servicing—Do not repair or replace any partof the appliance unless specifically recommendedin the manual. All other servicing should be referredto a qualified technician.
6. Storage in or on Appliance—Flammable materialsshould not be stored in an oven or near surface units.
7. Do Not Use Water On Grease Fires—Smother fire orflame, or use dry chemical or foam-type extinguisher.
8. Use Only Dry Potholders—Moist or damp potholderson hot surfaces may result in burns from steam.Do not let potholder touch elements. Do not use atowel or other bulky cloth.
SURFACE BURNERS1. Use Proper Pan Size—This appliance is equipped
with one or more surface burners of different sizes.Select utensils having flat bottoms large enough tocover the surface burner. The use of undersizedutensils will expose a portion of the burner to directcontact and may result in ignition of clothing. Use ofoversized utensils concentrates heat on cookingsurface and can cause damage to range. Properrelationship of utensil to burner improves efficiency.
2. Never Leave Surface Burners Unattended—Boilovercauses smoking and greasy spillovers that mayignite.
3. Make Sure Reflector Pans or Drip Bowls Are inPlace—Absence of these pans or bowls duringcooking may subject wiring or componentsunderneath to damage.
4. Protective Liners—Do not use aluminum foil to linesurface burner drip bowls or oven bottom, except assuggested in the manual. Improper installation ofthese liners may result in a risk of electric shock, orfire.
5. Glazed Cooking Utensils—Only certain types ofglass, ceramic, earthware, or other glazed utensilsare suitable for rangetop service without breakingdue to sudden change in temperature.
6. Utensil Handles Should Be Turned Inward and NotExtended Over Adjacent Surface Burners—Toreduce the risk of burns, ignition of flammablematerials, and spillage due to unintentional contactwith the utensil, the handle of a utensil should bepositioned so that it is turned inward, and does notextend over adjacent surface burners.
OVENS1. Use Care When Opening Door—Let hot air or steam
escape before removing or replacing food.2. Do Not Heat Unopened Food Containers—Build-up of
pressure may cause container to burst andresult in injury.
3. Keep Oven Vent Ducts Unobstructed.4. Placement of Oven Racks—Always place oven
racks in desired location while oven is cool. If rackis removed while oven is hot, do not let potholdercontact hot heating element in oven.
5. Protective Liners—Do not use aluminum foil to linedrip bowls, oven racks or oven bottoms. Improperinstallation of these liners may result in a risk ofelectrical shock, or fire.
SELF-CLEANING OVENS1. Do Not Clean Door Gasket—The door gasket is
essential for a good seal. Care should be takennot to rub, damage, or move the gasket.
2. Do Not Use Oven Cleaners—No commercial ovencleaner or oven liner protective coating of any kindshould be used in or around any part of the liner.
3. Clean Only Parts Listed in Manual.4. Before Self-Cleaning the Oven—Remove broiler pan,
oven racks, and other utensils.5. Remove All Items From Rangetop and Backguard.
VENTILATION HOODS1. Clean Ventilating Hoods Frequently—Grease should
not be allowed to accumulate on hood or filter.2. When flaming foods under the hood, turn the fan on.
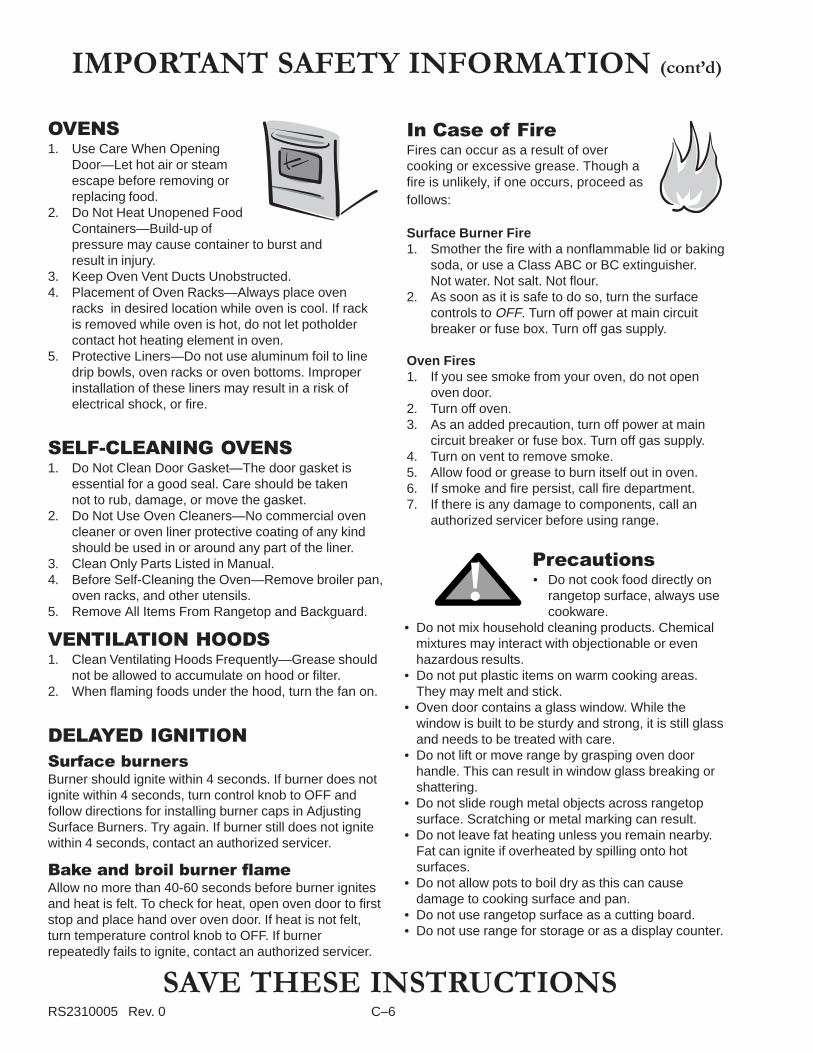
In Case of FireFires can occur as a result of over cooking or excessivegrease. Though a fire is unlikely, if one occurs, proceedas follows:
Surface Burner Fire1. Smother the fire with a nonflammable lid or baking
soda, or use a Class ABC or BC extinguisher.Not water. Not salt. Not flour.
2. As soon as it is safe to do so, turn the surfacecontrols to OFF. Turn off power at main circuitbreaker or fuse box. Turn off gas supply.
Oven Fires1. If you see smoke from your oven, do not open
oven door.2. Turn off oven.3. As an added precaution, turn off power at main circuit
breaker or fuse box. Turn off gas supply.4. Turn on vent to remove smoke.5. Allow food or grease to burn itself out in oven.6. If smoke and fire persist, call fire department.7. If there is any damage to components, call an
authorized servicer before using range.
RS2310005 Rev. 0 6
Precautions• Do not cook food directly on rangetop surface, always
use cookware.• Do not mix household cleaning products. Chemical
mixtures may interact with objectionable or evenhazardous results.
• Do not put plastic items on warm cooking areas.They may melt and stick.
• Oven door contains a glass window. While the windowis built to be sturdy and strong, it is still glass andneeds to be treated with care.
• Do not lift or move range by grasping oven doorhandle. This can result in window glass breaking orshattering.
• Do not slide rough metal objects across rangetopsurface. Scratching or metal marking can result.
• Do not leave fat heating unless you remain nearby. Fatcan ignite if overheated by spilling onto hot surfaces.
• Do not allow pots to boil dry as this can cause damageto cooking surface and pan.
• Do not use rangetop surface as a cutting board.• Do not use range for storage or as a display counter.
DELAYED IGNITIONSurface burnersBurner should ignite within 4 seconds. If burner does notignite within 4 seconds, turn control knob to OFF andfollow directions for installing burner caps in AdjustingSurface Burners. Try again. If burner still does not ignitewithin 4 seconds, contact an authorized servicer.
Bake and broil burner flameAllow no more than 40-60 seconds before burner ignitesand heat is felt. To check for heat, open oven door to firststop and place hand over oven door. If heat is not felt,turn temperature control knob to OFF. If burnerrepeatedly fails to ignite, contact an authorized servicer.
Important Safety Information
7 RS2310005 Rev. 0
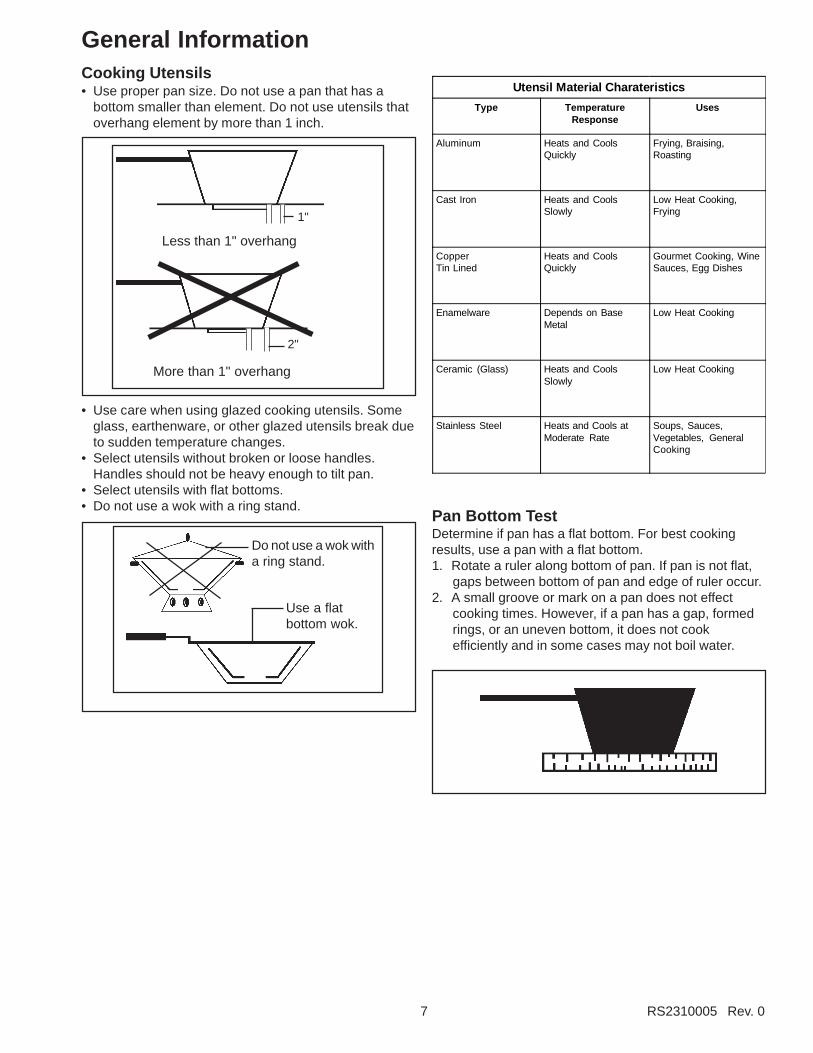
General InformationCooking Utensils• Use proper pan size. Do not use a pan that has a
bottom smaller than element. Do not use utensils thatoverhang element by more than 1 inch.
More than 1" overhang
2"
Less than 1" overhang
1"
• Use care when using glazed cooking utensils. Someglass, earthenware, or other glazed utensils break dueto sudden temperature changes.
• Select utensils without broken or loose handles.Handles should not be heavy enough to tilt pan.
• Select utensils with flat bottoms.• Do not use a wok with a ring stand.
Do not use a wok witha ring stand.
Use a flatbottom wok.
Utensil Material Charateristics
Type TemperatureResponse
Uses
Aluminum Heats and CoolsQuickly
Frying, Braising,Roasting
Cast Iron Heats and CoolsSlowly
Low Heat Cooking,Frying
CopperTin Lined
Heats and CoolsQuickly
Gourmet Cooking, WineSauces, Egg Dishes
Enamelware Depends on BaseMetal
Low Heat Cooking
Ceramic (Glass) Heats and CoolsSlowly
Low Heat Cooking
Stainless Steel Heats and Cools atModerate Rate
Soups, Sauces,Vegetables, GeneralCooking
Pan Bottom TestDetermine if pan has a flat bottom. For best cookingresults, use a pan with a flat bottom.1. Rotate a ruler along bottom of pan. If pan is not flat,
gaps between bottom of pan and edge of ruler occur.2. A small groove or mark on a pan does not effect
cooking times. However, if a pan has a gap, formedrings, or an uneven bottom, it does not cookefficiently and in some cases may not boil water.
RS2310005 Rev. 0 8
General InformationFollow these recommendations only as a guide for timesand temperature. Times, rack position, and temperaturesmay vary depending on conditions and food type. Forbest results, always check food at minimum time. Whenroasting, choose rack position based on size of fooditem.
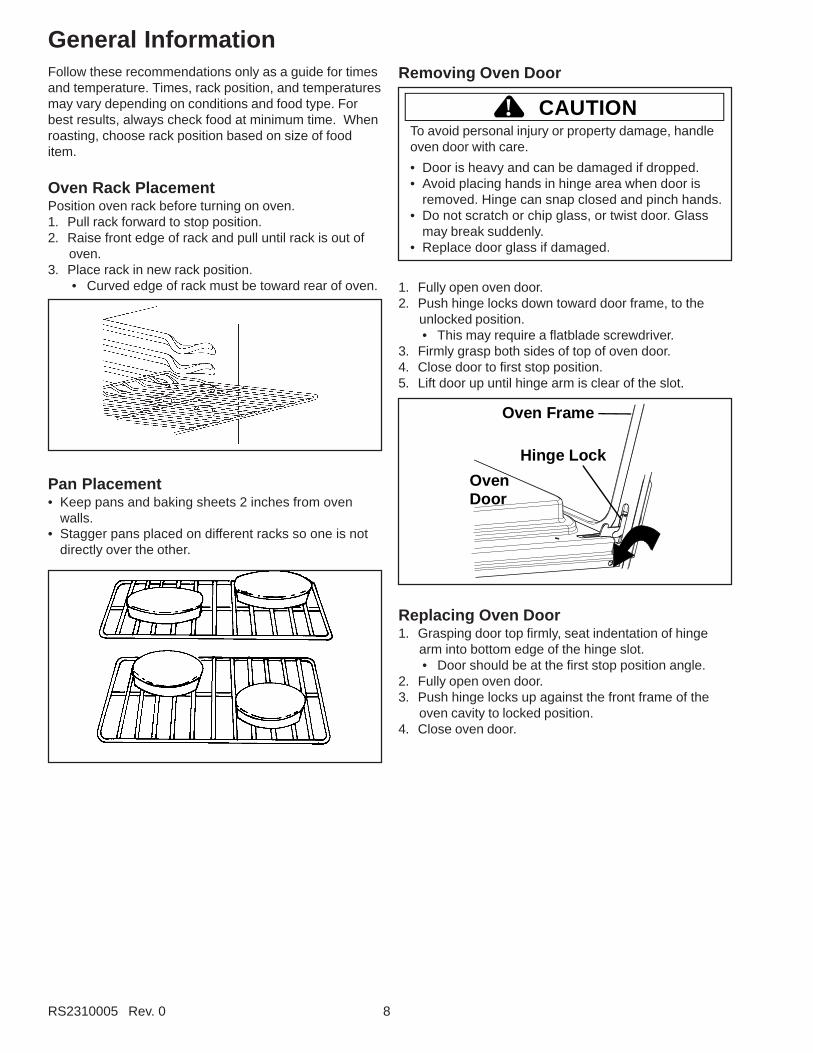
Oven Rack PlacementPosition oven rack before turning on oven.1. Pull rack forward to stop position.2. Raise front edge of rack and pull until rack is out of
oven.3. Place rack in new rack position.
• Curved edge of rack must be toward rear of oven.
Pan Placement• Keep pans and baking sheets 2 inches from oven
walls.• Stagger pans placed on different racks so one is not
directly over the other.
Removing Oven Door
CAUTION!To avoid personal injury or property damage, handleoven door with care.
• Door is heavy and can be damaged if dropped.• Avoid placing hands in hinge area when door is
removed. Hinge can snap closed and pinch hands.• Do not scratch or chip glass, or twist door. Glass
may break suddenly.• Replace door glass if damaged.
1. Fully open oven door.2. Push hinge locks down toward door frame, to the
unlocked position.• This may require a flatblade screwdriver.
3. Firmly grasp both sides of top of oven door.4. Close door to first stop position.5. Lift door up until hinge arm is clear of the slot.
Hinge Lock
OvenDoor
Oven Frame
Replacing Oven Door1. Grasping door top firmly, seat indentation of hinge
arm into bottom edge of the hinge slot.• Door should be at the first stop position angle.
2. Fully open oven door.3. Push hinge locks up against the front frame of the
oven cavity to locked position.4. Close oven door.
9 RS2310005 Rev. 0
General Information
Cleaning
Replacing Oven Light
WARNING!To avoid risk of burns or electrical shock, disconnectelectrical supply to oven before changing light bulb.
• Before replacing light bulb make sure bulb is cool.• Wear protective gloves.• Do not operate oven without bulb and cover in
place.
1. Disconnect electrical supply.2. Remove oven door if desired.3. Unscrew light bulb cover and then light bulb
counterclockwise.4. Replace light bulb with 120 volt, 40 watt appliance
bulb.• Do not overtighten bulb or it may be difficult to
remove later.5. Replace light bulb cover and oven door before use.
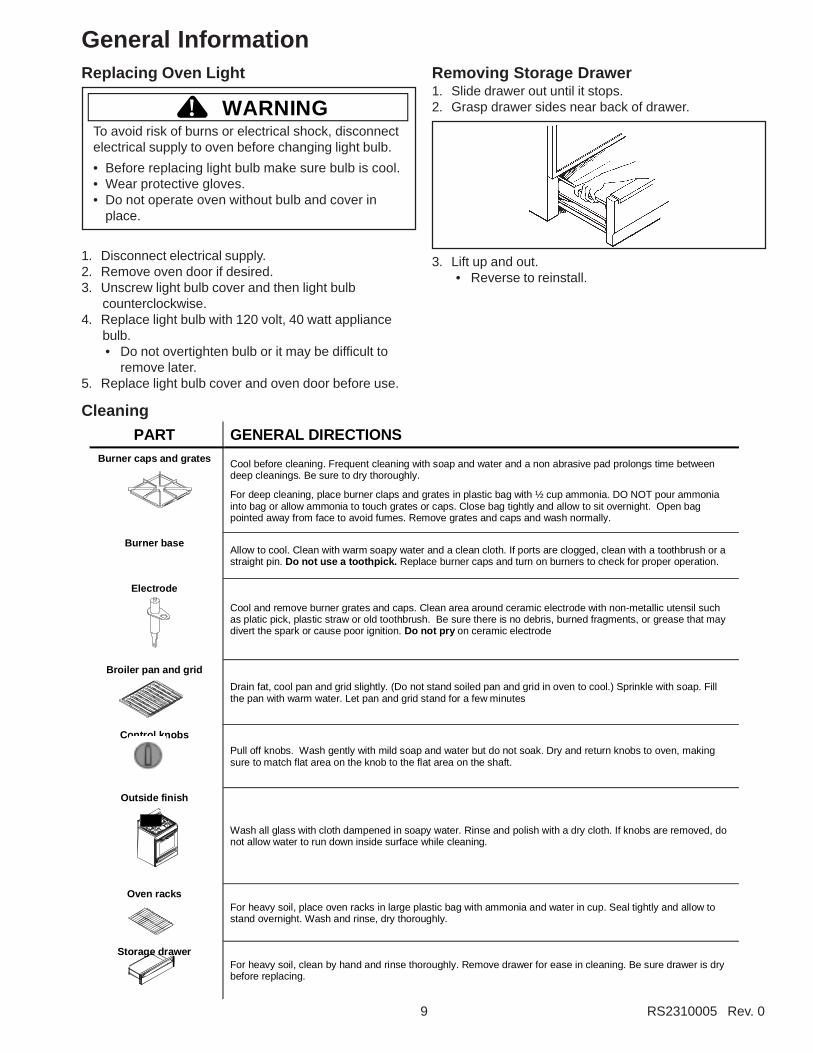
Removing Storage Drawer1. Slide drawer out until it stops.2. Grasp drawer sides near back of drawer.
3. Lift up and out.• Reverse to reinstall.
PART GENERAL DIRECTIONSBurner caps and grates Cool before cleaning. Frequent cleaning with soap and water and a non abrasive pad prolongs time between
deep cleanings. Be sure to dry thoroughly.
For deep cleaning, place burner claps and grates in plastic bag with ½ cup ammonia. DO NOT pour ammoniainto bag or allow ammonia to touch grates or caps. Close bag tightly and allow to sit overnight. Open bagpointed away from face to avoid fumes. Remove grates and caps and wash normally.
Burner baseAllow to cool. Clean with warm soapy water and a clean cloth. If ports are clogged, clean with a toothbrush or astraight pin. Do not use a toothpick. Replace burner caps and turn on burners to check for proper operation.
Electrode
Cool and remove burner grates and caps. Clean area around ceramic electrode with non-metallic utensil suchas platic pick, plastic straw or old toothbrush. Be sure there is no debris, burned fragments, or grease that maydivert the spark or cause poor ignition. Do not pry on ceramic electrode
Broiler pan and grid
Drain fat, cool pan and grid slightly. (Do not stand soiled pan and grid in oven to cool.) Sprinkle with soap. Fillthe pan with warm water. Let pan and grid stand for a few minutes
Control knobs
Pull off knobs. Wash gently with mild soap and water but do not soak. Dry and return knobs to oven, makingsure to match flat area on the knob to the flat area on the shaft.
Outside finish
Wash all glass with cloth dampened in soapy water. Rinse and polish with a dry cloth. If knobs are removed, donot allow water to run down inside surface while cleaning.
Oven racksFor heavy soil, place oven racks in large plastic bag with ammonia and water in cup. Seal tightly and allow tostand overnight. Wash and rinse, dry thoroughly.
Storage drawerFor heavy soil, clean by hand and rinse thoroughly. Remove drawer for ease in cleaning. Be sure drawer is drybefore replacing.
<G
AS
ON
O FF LO M
ED
HI LITE
RS2310005 Rev. 0 10
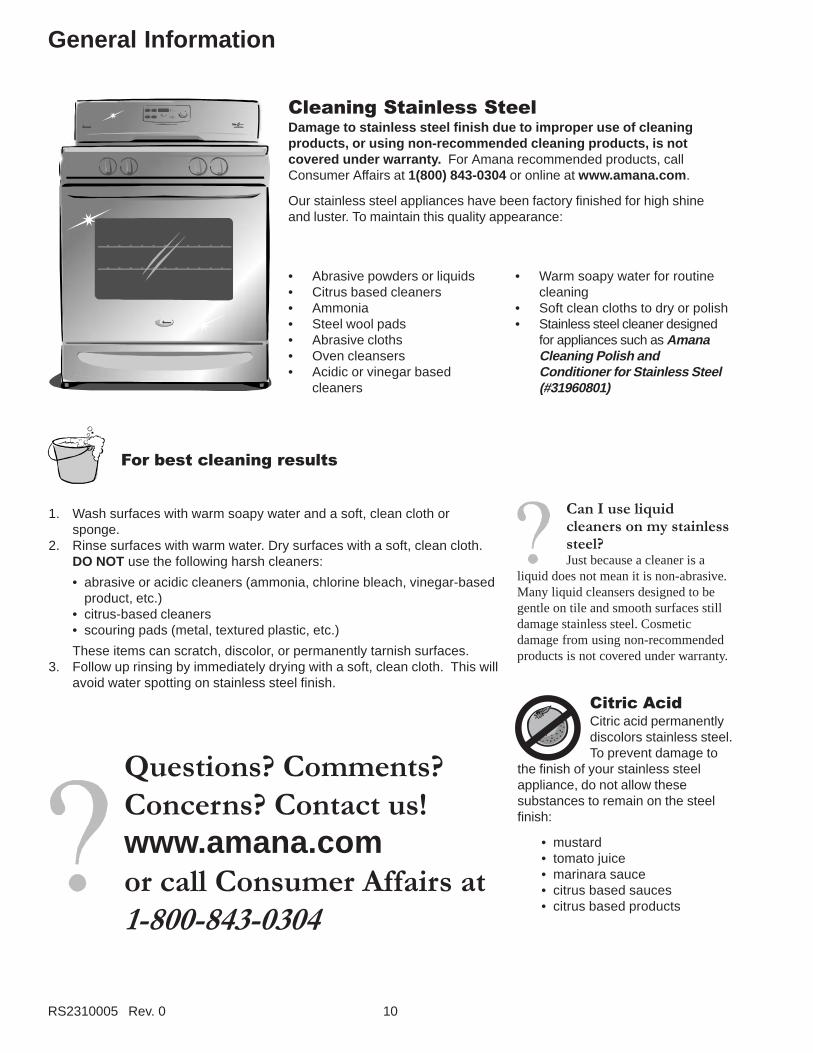
General Information
Cleaning Stainless SteelDamage to stainless steel finish due to improper use of cleaningproducts, or using non-recommended cleaning products, is notcovered under warranty. For Amana recommended products, callConsumer Affairs at 1(800) 843-0304 or online at www.amana.com .
Our stainless steel appliances have been factory finished for high shineand luster. To maintain this quality appearance:
• Abrasive powders or liquids• Citrus based cleaners• Ammonia• Steel wool pads• Abrasive cloths• Oven cleansers• Acidic or vinegar based
cleaners
• Warm soapy water for routinecleaning
• Soft clean cloths to dry or polish• Stainless steel cleaner designed
for appliances such as AmanaCleaning Polish andConditioner for Stainless Steel(#31960801)
Can I use liquidcleaners on my stainlesssteel?Just because a cleaner is a
liquid does not mean it is non-abrasive.Many liquid cleansers designed to begentle on tile and smooth surfaces stilldamage stainless steel. Cosmeticdamage from using non-recommendedproducts is not covered under warranty.
Citric AcidCitric acid permanentlydiscolors stainless steel.To prevent damage to
the finish of your stainless steelappliance, do not allow thesesubstances to remain on the steelfinish:
• mustard• tomato juice• marinara sauce• citrus based sauces• citrus based products
For best cleaning results
1. Wash surfaces with warm soapy water and a soft, clean cloth orsponge.
2. Rinse surfaces with warm water. Dry surfaces with a soft, clean cloth.DO NOT use the following harsh cleaners:
• abrasive or acidic cleaners (ammonia, chlorine bleach, vinegar-basedproduct, etc.)
• citrus-based cleaners• scouring pads (metal, textured plastic, etc.)
These items can scratch, discolor, or permanently tarnish surfaces.3. Follow up rinsing by immediately drying with a soft, clean cloth. This will
avoid water spotting on stainless steel finish.
Questions? Comments?Concerns? Contact us!www.amana.comor call Consumer Affairs at1-800-843-0304

Component Testing Information
! WARNINGTo avoid risk of electrical shock, personal injury, or death, disconnect power to oven before servicing, unlesstesting requires it.
RS2310005 Rev. 011
General Component Test Procedure Results3-wire power cord Check for continuity Verify polarity and grounding.Oven light socket Remove one wire from receptacle
and test resistance of terminals........
Measure voltage at oven light. .........
Indicates continuity with bulb screwed in.
120 VAC, see wiring diagram for terminalidentification.If no voltage is present at oven light,check wiring or light switches.
Auto latch assembly Motor switchUnlocked.....................................Locked ........................................
Door switchDoor closed.................................Door open...................................
COM − N.O. continuityCOM − N.O. open
COM − N.C. continuityCOM − N.C. open
Pressure regulatorwith shut-off valve
Verify gas pressure (WCP).
If on LP service verify proper gassupply conversion.
6" Natural10" LP/propane
WARNING!To avoid risk of fire, always test for leaksafter a gas component repair.
Gas valve Disconnect wiring to valve.Measure resistance on bake circuit.Measure resistance on broil circuit.
Continuity. If not, replace.Continuity. If not, replace.
WARNING! Do not attempt to open valve with 120 VAC.
Ignitor Test for voltage at terminals. ............
Test for the amount of amperage inthe circuit. ........................................(Ignitor may glow but not havesufficient amperage to open valve).
120 VAC
3.2− 3.6 Amps.
270° valve Verify gas is supplied.
Orifice adjusted for Natural or LP.
Adjust set screw for simmer control.Spark 270° switch Test for voltage at terminals. ............
Disconnect wiring and check forcontinuity in LITE position. ...............
120 VAC
Continuity in LITE position.Spark ignitionelectrode
Test for resistance of spark lead. .....
Test ignitor to chassis. .....................
Continuity
No continuity from ignitor to chassis.
Top surface burner Verify gas is supplied.
Verify burner cap is positionedcorrectly, clean and free of debris.
Check for obstructions in burnerports.
Check for continuity to chassis......... Continuity
Component Testing Information
! WARNINGTo avoid risk of electrical shock, personal injury, or death, disconnect power to oven before servicing, unlesstesting requires it.
RS2310005 Rev. 0 12
General Component Test Procedure ResultsBake burner Verify gas is supplied.
Orifice adjusted for Natural or LP.
Check for obstructions orcontamination in ports.
Broil burner assembly Verify gas is supplied.
Orifice adjusted for Natural or LP.
Check for obstructions orcontamination in ports.
Venturi−surfaceburner
Shutter settings: Nominal Tol. ±
.125" 1/8"
.031" 1/32"
L A B
A1 B1N
Spark module 4 + 0 Test for voltage at terminals L and N
Check spark leads.Check for arcing to chassis.
120 VACSee wiring diagram.Continuity in lead, no continuity to chassis.
Temperature sensor Measure resistance.
No Bake/Broil ...................................
Approximately 1090 O at room temperature 75º F, 1650 O at 350º F, 2600 O at 850º F
If sensor is open when range is poweredup the F-3 code will not be displayed.Check sensor resistance and connections.
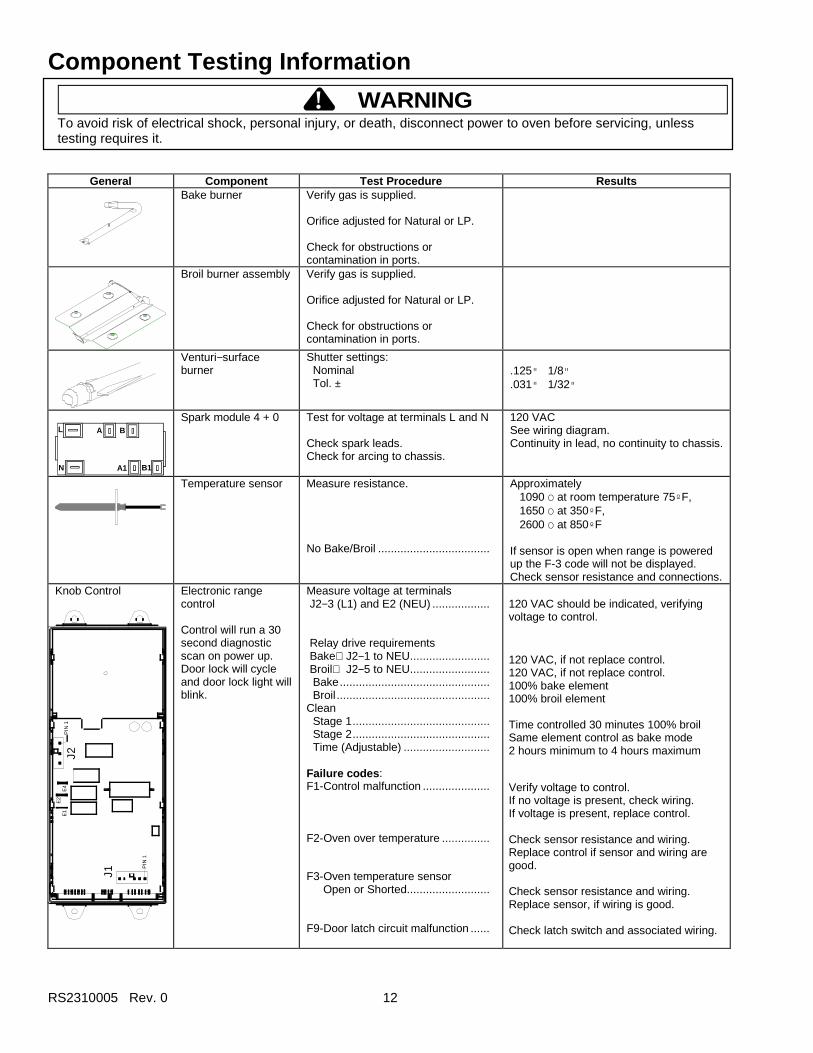
Knob Control
PIN
1
E4
E2
E1
PIN
1J2
J1
Electronic rangecontrol
Control will run a 30second diagnosticscan on power up.Door lock will cycleand door lock light willblink.
Measure voltage at terminals J2−3 (L1) and E2 (NEU) ..................
Relay drive requirements BakeJ2−1 to NEU......................... Broil J2−5 to NEU......................... Bake............................................... Broil ................................................Clean Stage 1........................................... Stage 2........................................... Time (Adjustable) ...........................
Failure codes :F1-Control malfunction .....................
F2-Oven over temperature ...............
F3-Oven temperature sensorOpen or Shorted..........................
F9-Door latch circuit malfunction ......
120 VAC should be indicated, verifyingvoltage to control.
120 VAC, if not replace control.120 VAC, if not replace control.100% bake element100% broil element
Time controlled 30 minutes 100% broilSame element control as bake mode2 hours minimum to 4 hours maximum
Verify voltage to control.If no voltage is present, check wiring.If voltage is present, replace control.
Check sensor resistance and wiring.Replace control if sensor and wiring aregood.
Check sensor resistance and wiring.Replace sensor, if wiring is good.
Check latch switch and associated wiring.
Component Testing Information
! WARNINGTo avoid risk of electrical shock, personal injury, or death, disconnect power to oven before servicing, unlesstesting requires it.
RS2310005 Rev. 013
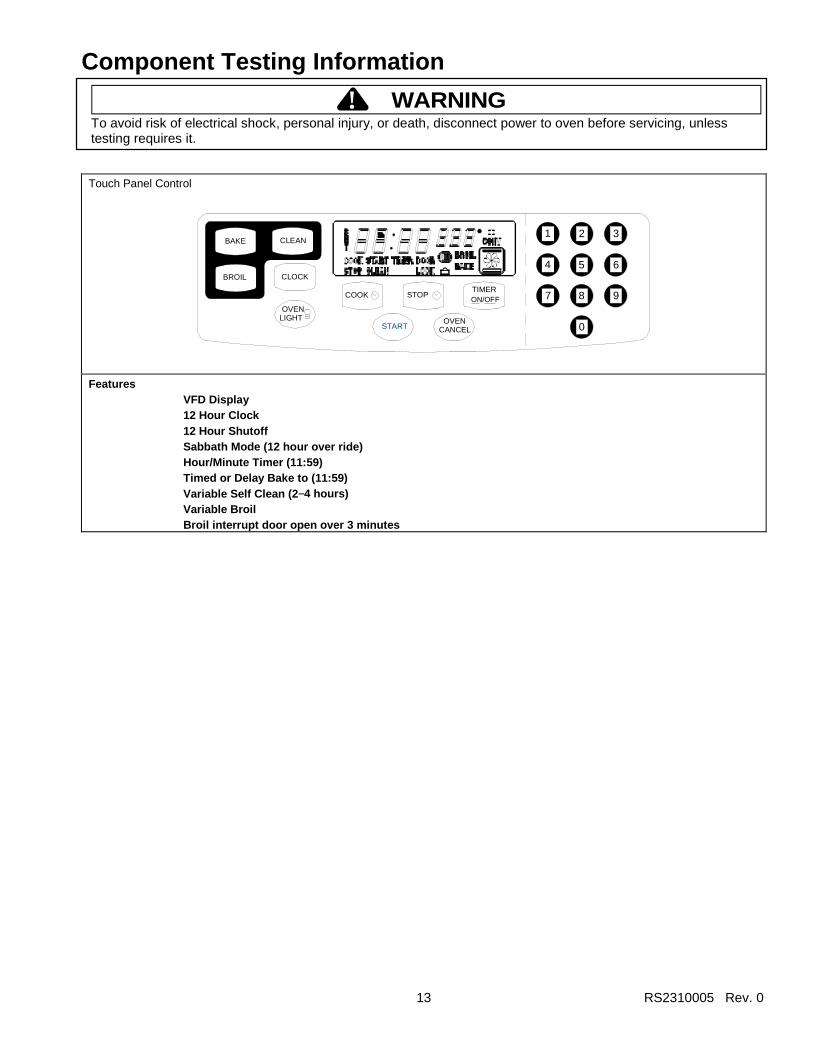
Touch Panel Control
CLOCK
OVENLIGHT
COOK STOPTIMER
STARTOVEN
CANCEL
ON/OFF
BAKE CLEAN
BROIL
1 2 3
4 5 6
7 8 9
0
FeaturesVFD Display12 Hour Clock12 Hour ShutoffSabbath Mode (12 hour over ride)Hour/Minute Timer (11:59)Timed or Delay Bake to (11:59)Variable Self Clean (2 −4 hours)Variable BroilBroil interrupt door open over 3 minutes
Component Testing Information
! WARNINGTo avoid risk of electrical shock, personal injury, or death, disconnect power to oven before servicing, unlesstesting requires it.
RS2310005 Rev. 0 14
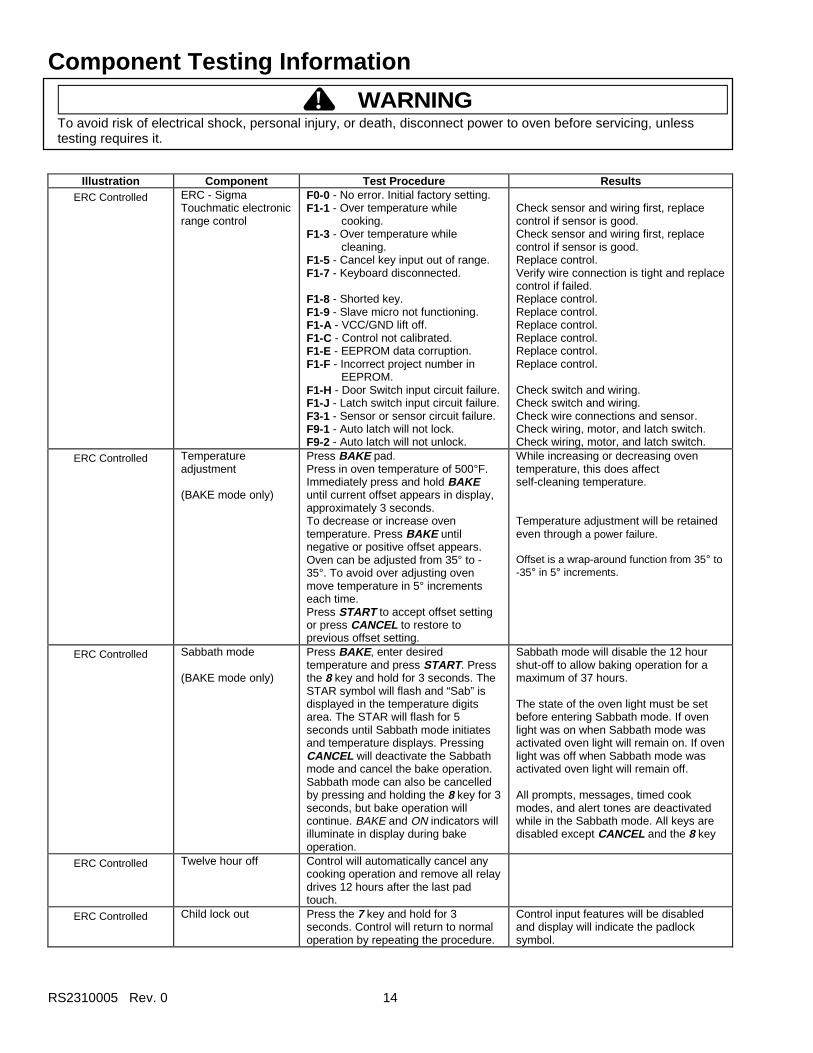
Illustration Component Test Procedure ResultsERC Controlled ERC - Sigma
Touchmatic electronicrange control
F0-0 - No error. Initial factory setting.F1-1 - Over temperature while
cooking.F1-3 - Over temperature while
cleaning.F1-5 - Cancel key input out of range.F1-7 - Keyboard disconnected.
F1-8 - Shorted key.F1-9 - Slave micro not functioning.F1-A - VCC/GND lift off.F1-C - Control not calibrated.F1-E - EEPROM data corruption.F1-F - Incorrect project number in
EEPROM.F1-H - Door Switch input circuit failure.F1-J - Latch switch input circuit failure.F3-1 - Sensor or sensor circuit failure.F9-1 - Auto latch will not lock.F9-2 - Auto latch will not unlock.
Check sensor and wiring first, replacecontrol if sensor is good.Check sensor and wiring first, replacecontrol if sensor is good.Replace control.Verify wire connection is tight and replacecontrol if failed.Replace control.Replace control.Replace control.Replace control.Replace control.Replace control.
Check switch and wiring.Check switch and wiring.Check wire connections and sensor.Check wiring, motor, and latch switch.Check wiring, motor, and latch switch.
ERC Controlled Temperatureadjustment
(BAKE mode only)
Press BAKE pad.Press in oven temperature of 500°F.Immediately press and hold BAKEuntil current offset appears in display,approximately 3 seconds.To decrease or increase oventemperature. Press BAKE untilnegative or positive offset appears.Oven can be adjusted from 35° to -35°. To avoid over adjusting ovenmove temperature in 5° incrementseach time.Press START to accept offset settingor press CANCEL to restore toprevious offset setting.
While increasing or decreasing oventemperature, this does affectself-cleaning temperature.
Temperature adjustment will be retainedeven through a power failure.
Offset is a wrap-around function from 35° to-35° in 5° increments.
ERC Controlled Sabbath mode
(BAKE mode only)
Press BAKE , enter desiredtemperature and press START. Pressthe 8 key and hold for 3 seconds. TheSTAR symbol will flash and “Sab” isdisplayed in the temperature digitsarea. The STAR will flash for 5seconds until Sabbath mode initiatesand temperature displays. PressingCANCEL will deactivate the Sabbathmode and cancel the bake operation.Sabbath mode can also be cancelledby pressing and holding the 8 key for 3seconds, but bake operation willcontinue. BAKE and ON indicators willilluminate in display during bakeoperation.
Sabbath mode will disable the 12 hourshut-off to allow baking operation for amaximum of 37 hours.
The state of the oven light must be setbefore entering Sabbath mode. If ovenlight was on when Sabbath mode wasactivated oven light will remain on. If ovenlight was off when Sabbath mode wasactivated oven light will remain off.
All prompts, messages, timed cookmodes, and alert tones are deactivatedwhile in the Sabbath mode. All keys aredisabled except CANCEL and the 8 key
ERC Controlled Twelve hour off Control will automatically cancel anycooking operation and remove all relaydrives 12 hours after the last padtouch.
ERC Controlled Child lock out Press the 7 key and hold for 3seconds. Control will return to normaloperation by repeating the procedure.
Control input features will be disabledand display will indicate the padlocksymbol.
15 RS2310005 Rev. 0
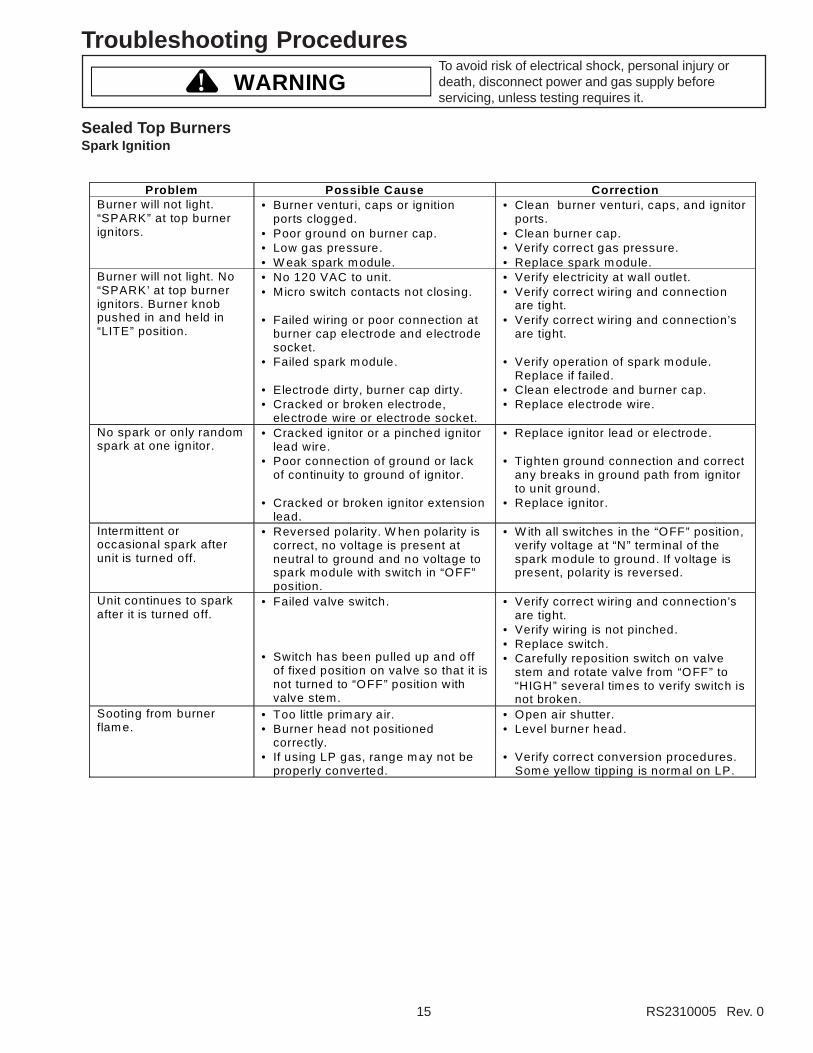
Troubleshooting Procedures
WARNING!To avoid risk of electrical shock, personal injury ordeath, disconnect power and gas supply beforeservicing, unless testing requires it.
Sealed Top BurnersSpark Ignition
Problem Possible Cause CorrectionBurner will not light.“SPARK” at top burnerignitors.
• Burner venturi, caps or ignitionports clogged.
• Poor ground on burner cap.• Low gas pressure.• W eak spark m odule.
• Clean burner venturi, caps, and ignitorports.
• Clean burner cap.• Verify correct gas pressure.• Replace spark m odule.
Burner will not light. No“SPARK’ at top burnerignitors. Burner knobpushed in and held in“LITE” position.
• No 120 VAC to unit.• Micro switch contacts not closing.
• Failed wiring or poor connection atburner cap electrode and electrodesocket.
• Failed spark m odule.
• Electrode dirty, burner cap dirty.• Cracked or broken electrode,
electrode wire or electrode socket.
• Verify electricity at wall outlet.• Verify correct w iring and connection
are tight.• Verify correct w iring and connection’s
are tight.
• Verify operation of spark m odule.Replace if failed.
• Clean electrode and burner cap.• Replace electrode wire.
No spark or only randomspark at one ignitor.
• Cracked ignitor or a pinched ignitorlead wire.
• Poor connection of ground or lackof continuity to ground of ignitor.
• Cracked or broken ignitor extensionlead.
• Replace ignitor lead or electrode.
• Tighten ground connection and correctany breaks in ground path from ignitorto unit ground.
• Replace ignitor.
Interm ittent oroccasional spark afterunit is turned off.
• Reversed polarity. W hen polarity iscorrect, no voltage is present atneutral to ground and no voltage tospark module with switch in “OFF”position.
• W ith all switches in the “OFF” position,verify voltage at “N” term inal of thespark module to ground. If voltage ispresent, polarity is reversed.
Unit continues to sparkafter it is turned off.
• Failed valve switch.
• Switch has been pulled up and offof fixed position on valve so that it isnot turned to “OFF” position withvalve stem.
• Verify correct w iring and connection’sare tight.
• Verify wiring is not pinched.• Replace switch.• Carefully reposition switch on valve
stem and rotate valve from “OFF” to“HIGH” several tim es to verify switch isnot broken.
Sooting from burnerflam e.
• Too little prim ary air.• Burner head not positioned
correctly.• If using LP gas, range m ay not be
properly converted.
• Open air shutter.• Level burner head.
• Verify correct conversion procedures.Som e yellow tipping is norm al on LP.

RS2310005 Rev. 0 16
Troubleshooting Procedures
WARNING!To avoid risk of electrical shock, personal injury ordeath, disconnect power and gas supply beforeservicing, unless testing requires it.
Bake and Broil Burners
Problem Possible Cause CorrectionFlame blows away fromburner.
• Too much air.• Gas pressure too high.• Draft around cooktop area.
• Slightly close air shutter to burner.• Verify correct gas pressure.• Eliminate source of draft.
Flames flash back intomixer head.
• Too much air. • Close air shutter slightly.
Floating flame. • Blocked flue or burner.• Not enough air.
• Check for possible blockage in burner.• Open air shutter.
Gas smell. • Leak in pipe joints.
• Valve leak.• Regulator plug loose.
• Verify gas connections and tighten ifnecessary.
• Check valves and replace if necessary.• Check and tighten regulator plug.
Gas valve opens butbake and broiler burnersdo not ignite. Delayedignition.
• Bake/Broil ignitor positioned too farfrom burner.
• Range is not properly converted forLP gas.
• Low gas pressure.• Misalignment of orifice and burner.• Partial blockage of orifice, burner or
feed tube.
• Reposition Bake/Broil ignitor closer tothe burner.
• Verify correct conversion procedures.
• Verify correct gas pressure.• Check alignment of burner and orifice
and align correctly.• Check for blockage or burr in orifice.• Clean burner.
Oven light does notoperate.
• Failed oven lamp.• Failed light switch.• Failed wiring.
• Failed light socket.
• Check lamp and replace if necessary.• Check switch contacts.• Check for broken wires and loose or
dirty connections.• Check light socket for continuity.
Broil shuts off • Normal • Broil interrupted when door is open formore than 3 minutes.
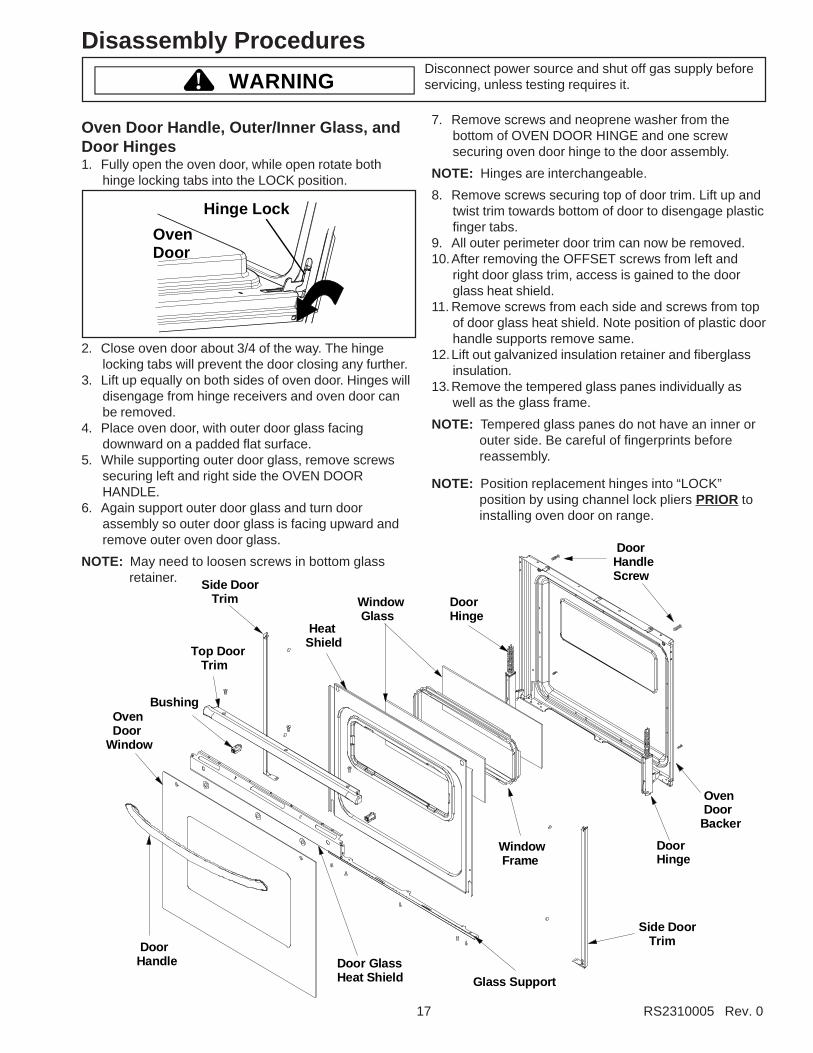
Disassembly ProceduresDisconnect power source and shut off gas supply beforeservicing, unless testing requires it.WARNING!
17 RS2310005 Rev. 0
Oven Door Handle, Outer/Inner Glass, andDoor Hinges1. Fully open the oven door, while open rotate both
hinge locking tabs into the LOCK position.
Hinge Lock
OvenDoor
2. Close oven door about 3/4 of the way. The hingelocking tabs will prevent the door closing any further.
3. Lift up equally on both sides of oven door. Hinges willdisengage from hinge receivers and oven door canbe removed.
4. Place oven door, with outer door glass facingdownward on a padded flat surface.
5. While supporting outer door glass, remove screwssecuring left and right side the OVEN DOORHANDLE.
6. Again support outer door glass and turn doorassembly so outer door glass is facing upward andremove outer oven door glass.
NOTE: May need to loosen screws in bottom glassretainer.
7. Remove screws and neoprene washer from thebottom of OVEN DOOR HINGE and one screwsecuring oven door hinge to the door assembly.
NOTE: Hinges are interchangeable.
8. Remove screws securing top of door trim. Lift up andtwist trim towards bottom of door to disengage plasticfinger tabs.
9. All outer perimeter door trim can now be removed.10.After removing the OFFSET screws from left and
right door glass trim, access is gained to the doorglass heat shield.
11. Remove screws from each side and screws from topof door glass heat shield. Note position of plastic doorhandle supports remove same.
12.Lift out galvanized insulation retainer and fiberglassinsulation.
13.Remove the tempered glass panes individually aswell as the glass frame.
NOTE: Tempered glass panes do not have an inner orouter side. Be careful of fingerprints beforereassembly.
NOTE: Position replacement hinges into “LOCK”position by using channel lock pliers PRIOR toinstalling oven door on range.
DoorHandle
Oven DoorWindow
Door GlassHeat Shield
Top Door Trim
Side Door Trim
Side Door Trim
Glass Support
HeatShield
Window Glass
Window Frame
DoorHinge
DoorHinge
Oven DoorBacker
DoorHandleScrew
Bushing
Disassembly ProceduresDisconnect power source and shut off gas supply beforeservicing, unless testing requires it.WARNING!
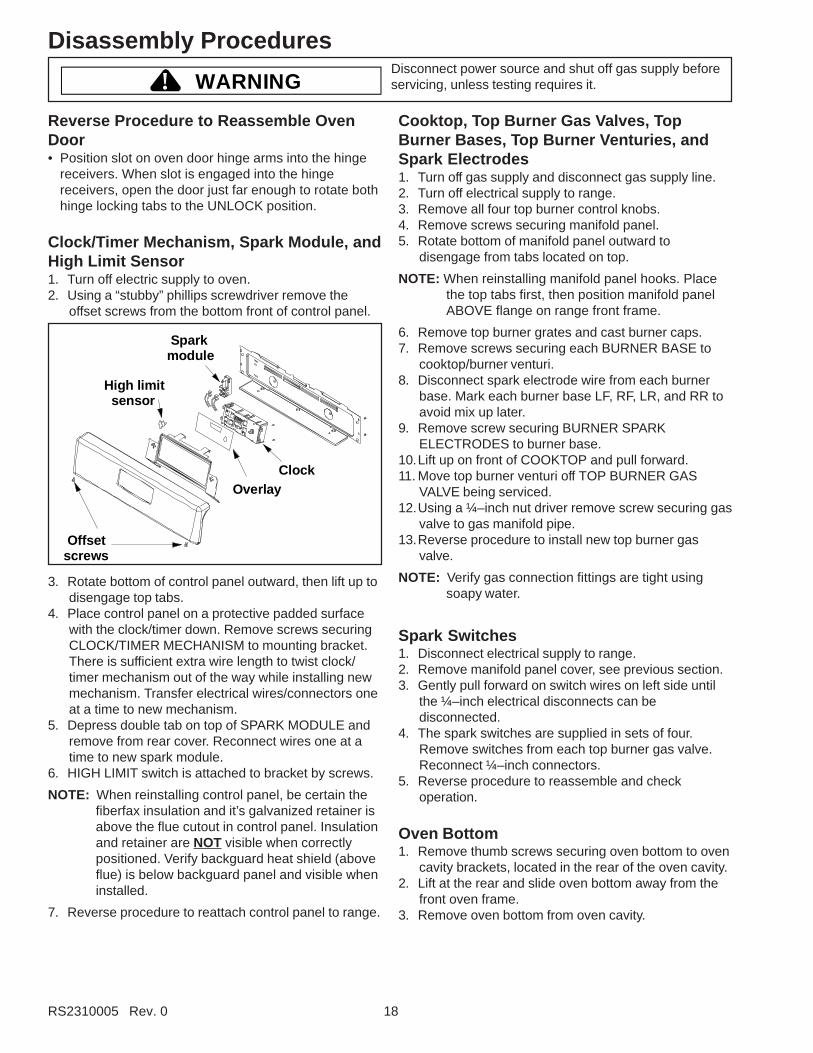
RS2310005 Rev. 0 18
Reverse Procedure to Reassemble OvenDoor• Position slot on oven door hinge arms into the hinge
receivers. When slot is engaged into the hingereceivers, open the door just far enough to rotate bothhinge locking tabs to the UNLOCK position.
Clock/Timer Mechanism, Spark Module, andHigh Limit Sensor1. Turn off electric supply to oven.2. Using a “stubby” phillips screwdriver remove the
offset screws from the bottom front of control panel.
Offsetscrews
OverlayClock
Sparkmodule
High limit sensor
3. Rotate bottom of control panel outward, then lift up todisengage top tabs.
4. Place control panel on a protective padded surfacewith the clock/timer down. Remove screws securingCLOCK/TIMER MECHANISM to mounting bracket.There is sufficient extra wire length to twist clock/timer mechanism out of the way while installing newmechanism. Transfer electrical wires/connectors oneat a time to new mechanism.
5. Depress double tab on top of SPARK MODULE andremove from rear cover. Reconnect wires one at atime to new spark module.
6. HIGH LIMIT switch is attached to bracket by screws.
NOTE: When reinstalling control panel, be certain thefiberfax insulation and it’s galvanized retainer isabove the flue cutout in control panel. Insulationand retainer are NOT visible when correctlypositioned. Verify backguard heat shield (aboveflue) is below backguard panel and visible wheninstalled.
7. Reverse procedure to reattach control panel to range.
Cooktop, Top Burner Gas Valves, TopBurner Bases, Top Burner Venturies, andSpark Electrodes1. Turn off gas supply and disconnect gas supply line.2. Turn off electrical supply to range.3. Remove all four top burner control knobs.4. Remove screws securing manifold panel.5. Rotate bottom of manifold panel outward to
disengage from tabs located on top.
NOTE: When reinstalling manifold panel hooks. Placethe top tabs first, then position manifold panelABOVE flange on range front frame.
6. Remove top burner grates and cast burner caps.7. Remove screws securing each BURNER BASE to
cooktop/burner venturi.8. Disconnect spark electrode wire from each burner
base. Mark each burner base LF, RF, LR, and RR toavoid mix up later.
9. Remove screw securing BURNER SPARKELECTRODES to burner base.
10.Lift up on front of COOKTOP and pull forward.11. Move top burner venturi off TOP BURNER GAS
VALVE being serviced.12.Using a ¼–inch nut driver remove screw securing gas
valve to gas manifold pipe.13.Reverse procedure to install new top burner gas
valve.
NOTE: Verify gas connection fittings are tight usingsoapy water.
Spark Switches1. Disconnect electrical supply to range.2. Remove manifold panel cover, see previous section.3. Gently pull forward on switch wires on left side until
the ¼–inch electrical disconnects can bedisconnected.
4. The spark switches are supplied in sets of four.Remove switches from each top burner gas valve.Reconnect ¼–inch connectors.
5. Reverse procedure to reassemble and checkoperation.
Oven Bottom1. Remove thumb screws securing oven bottom to oven
cavity brackets, located in the rear of the oven cavity.2. Lift at the rear and slide oven bottom away from the
front oven frame.3. Remove oven bottom from oven cavity.
Disassembly ProceduresDisconnect power source and shut off gas supply beforeservicing, unless testing requires it.WARNING!
19 RS2310005 Rev. 0
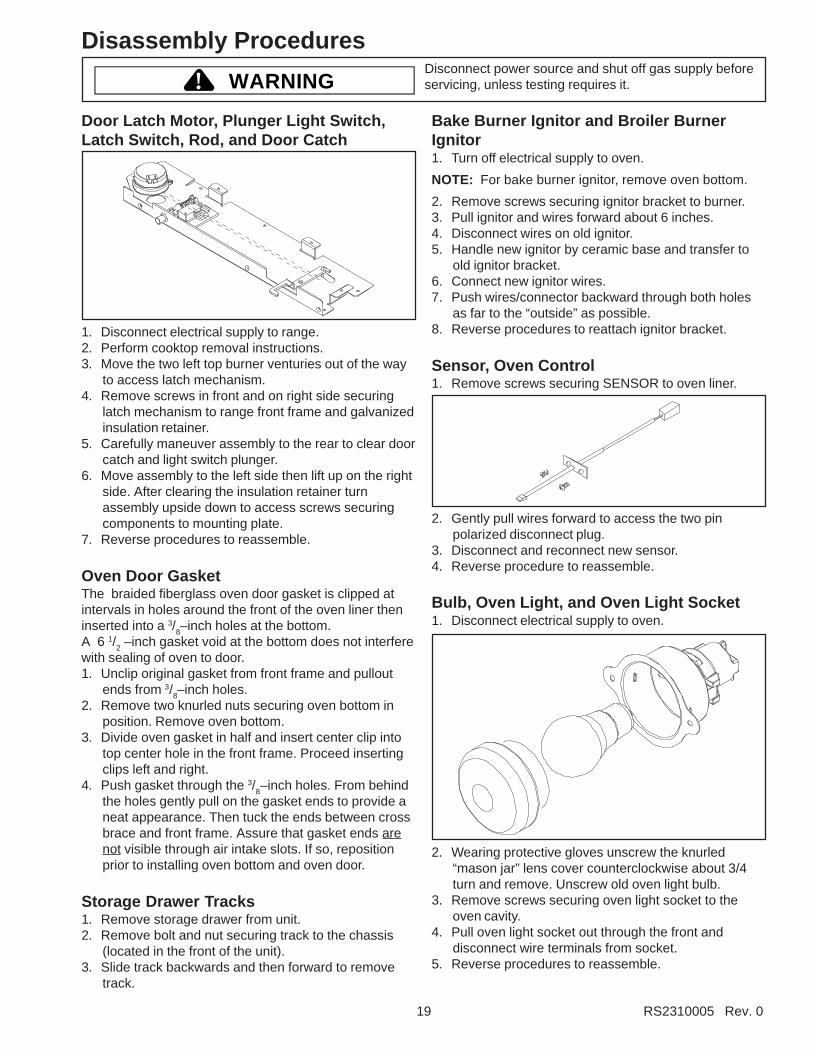
Door Latch Motor, Plunger Light Switch,Latch Switch, Rod, and Door Catch
1. Disconnect electrical supply to range.2. Perform cooktop removal instructions.3. Move the two left top burner venturies out of the way
to access latch mechanism.4. Remove screws in front and on right side securing
latch mechanism to range front frame and galvanizedinsulation retainer.
5. Carefully maneuver assembly to the rear to clear doorcatch and light switch plunger.
6. Move assembly to the left side then lift up on the rightside. After clearing the insulation retainer turnassembly upside down to access screws securingcomponents to mounting plate.
7. Reverse procedures to reassemble.
Oven Door GasketThe braided fiberglass oven door gasket is clipped atintervals in holes around the front of the oven liner theninserted into a 3/
8–inch holes at the bottom.
A 6 1/2 –inch gasket void at the bottom does not interfere
with sealing of oven to door.1. Unclip original gasket from front frame and pullout
ends from 3/8–inch holes.
2. Remove two knurled nuts securing oven bottom inposition. Remove oven bottom.
3. Divide oven gasket in half and insert center clip intotop center hole in the front frame. Proceed insertingclips left and right.
4. Push gasket through the 3/8–inch holes. From behind
the holes gently pull on the gasket ends to provide aneat appearance. Then tuck the ends between crossbrace and front frame. Assure that gasket ends arenot visible through air intake slots. If so, repositionprior to installing oven bottom and oven door.
Storage Drawer Tracks1. Remove storage drawer from unit.2. Remove bolt and nut securing track to the chassis
(located in the front of the unit).3. Slide track backwards and then forward to remove
track.
Bake Burner Ignitor and Broiler BurnerIgnitor1. Turn off electrical supply to oven.
NOTE: For bake burner ignitor, remove oven bottom.
2. Remove screws securing ignitor bracket to burner.3. Pull ignitor and wires forward about 6 inches.4. Disconnect wires on old ignitor.5. Handle new ignitor by ceramic base and transfer to
old ignitor bracket.6. Connect new ignitor wires.7. Push wires/connector backward through both holes
as far to the “outside” as possible.8. Reverse procedures to reattach ignitor bracket.
Sensor, Oven Control1. Remove screws securing SENSOR to oven liner.
2. Gently pull wires forward to access the two pinpolarized disconnect plug.
3. Disconnect and reconnect new sensor.4. Reverse procedure to reassemble.
Bulb, Oven Light, and Oven Light Socket1. Disconnect electrical supply to oven.
2. Wearing protective gloves unscrew the knurled“mason jar” lens cover counterclockwise about 3/4turn and remove. Unscrew old oven light bulb.
3. Remove screws securing oven light socket to theoven cavity.
4. Pull oven light socket out through the front anddisconnect wire terminals from socket.
5. Reverse procedures to reassemble.
Disassembly ProceduresDisconnect power source and shut off gas supply beforeservicing, unless testing requires it.WARNING!
RS2310005 Rev. 0 20
Pressure Regulator and Low Voltage Oven/Broil Gas ValveNOTE: Due to location of Gas and Electrical
connections on the components. Range willhave to be moved forward for access.
1. Disconnect electrical supply to range.2. Turn off or disconnect gas supply to range.3. Using a floor protection pad move range forward. On
solid pipe connection the pipe must be firstdisconnected from pressure regulator inletconnection accessed through storage door area.
4. Remove bottom shield covering gas and electricalconnections.
5. If replacing PRESSURE REGULATOR disconnectgas supply line at the pressure regulator.
6. Using a 9/16
–inch wrench, disconnect both pieces ofgas tubing from the PRESSURE REGULATOR.
7. Remove the screws securing the pressure regulatorto the support bracket.
8. Transfer any adapters/fittings to new pressureregulator using the appropriate pipe sealant anddouble wrenching to assure gas tight connection.
9. Reattach pressure regulator to mounting bracket.Reconnect two pieces of tubing. Reconnect gassupply.
NOTE: Verify shut-off valve lever on pressure regulatoris in the “OPEN” position.
10.Turn gas on and check for gas leaks using soapywater on connections.
11. If replacing LOW VOLTAGE OVEN/BROIL GASVALVE it is not necessary to disconnect gas supply torange.
12.Using a 9/16
–inch wrench, disconnect both pieces ofgas tubing.
13.Remove screws securing gas valve bracket to bottomrear of range.
14.Carefully twist bracket/gas valve assembly todisengage oven burner from burner orifice on gasvalve.
15.Pull assembly outward far enough to access thebracket and gas valve.
16.Remove screws securing gas valve to bracket, thensecure new gas valve in its place.
17.Using a needle nose pliers transfer the PURPLE andWHITE wires to the new gas valve utilizing the3/
16–inch connections. These two wires are for the
BAKE circuit in the gas valve.18.Using a needle nose pliers transfer the BROWN and
WHITE wires to the new gas valve utilizing the1/
4–inch connections. These two wires are for the
BROIL circuit in the gas valve.19.Reposition the bracket/gas valve assembly.
NOTE: Verify oven burner venturi is over the ovenburner orifice on the gas valve.
20.Reattach assembly to the range.21.Using a 9/
16–inch wrench, reconnect both pieces of
tubing to gas valve.22.Turn on gas supply to range and check gas
connections using soapy water solution. The BROILoutlet fitting will have to be checked with gas turnedon, electric turned on, and clock timer set for BROIL.
NOTE: Verify oven door is closed to eliminate the threeminute broil “CANCEL” feature.
Broil Burner1. Remove screws securing broil ignitor to broil burner.2. Remove screws securing broil flame spreader to
oven cavity.3. Remove broil burner and replace broil burner by
reversing procedures.
Bake Burner1. Remove oven bottom, see “Oven Bottom” procedure.2. Remove screws securing bake ignitor to bake burner.3. Remove screws securing bake burner bracket and
the front of the bake burner to oven cavity.4. Remove bake burner and replace bake burner by
reversing procedures.

Disassembly ProceduresDisconnect power source and shut off gas supply beforeservicing, unless testing requires it.WARNING!
21 RS2310005 Rev. 0
Flue1. Disconnect electrical supply to range.2. Turn off or disconnect gas supply to range.3. Using a floor protection pad slide range forward.
On a solid pipe connection the pipe must be firstdisconnected from pressure regulator inletconnection, accessed through storage door area.
4. Remove screws securing top burners to maintop.5. Raise maintop in front and slide maintop forward,
leaving ignitor wires connected.6. Remove first set of screws securing flue, located
under maintop.
7. Remove broil burner, see Broil Burner procedure.8. Remove second set of screws securing flue, located
on the inside of the oven cavity.9. Remove lower access panel on back of unit.10.Remove backguard shield from backguard brackets.11. Drill two holes 5/
16–inch in the back of the rear
insulation retainer to gain access to screws securingflue.
5/16"Holes
12.Remove third set of screws securing flue to exteriorof the oven cavity.
Leveling Leg Bracket• Remove screws securing bracket to chassis.
Front Frame and Oven LinerFront Frame and Oven Liner are NOT field replaceableon these units.
Side Panel1. Remove cooktop, see Cooktop procedure steps 1– 6.2. Remove lower access panel, located on the rear of
unit.3. Remove screws securing backguard bracket to side
panel.4. Remove oven door from unit and slide oven drawer
outward to gain access to screws.5. Remove screws securing side panel to oven chassis.
Screws are located on top, front, and back of unit.6. Remove side panel by pulling outward on the back of
panel and sliding panel forward.7. Reverse procedure to reassemble.
Power Cord1. Slide unit outward to gain access to power cord.2. Unplug power cord from receptacle.3. Remove screw securing power cord to unit chassis.4. Disconnect power cord.5. Reverse procedure to reassemble.
Disassembly ProceduresDisconnect power source and shut off gas supply beforeservicing, unless testing requires it.WARNING!
RS2310005 Rev. 0 22
This page intentionally left blank.

A–1 RS2310005 Rev. 0
Appendix A
RS2310005 Rev. 0 A–2
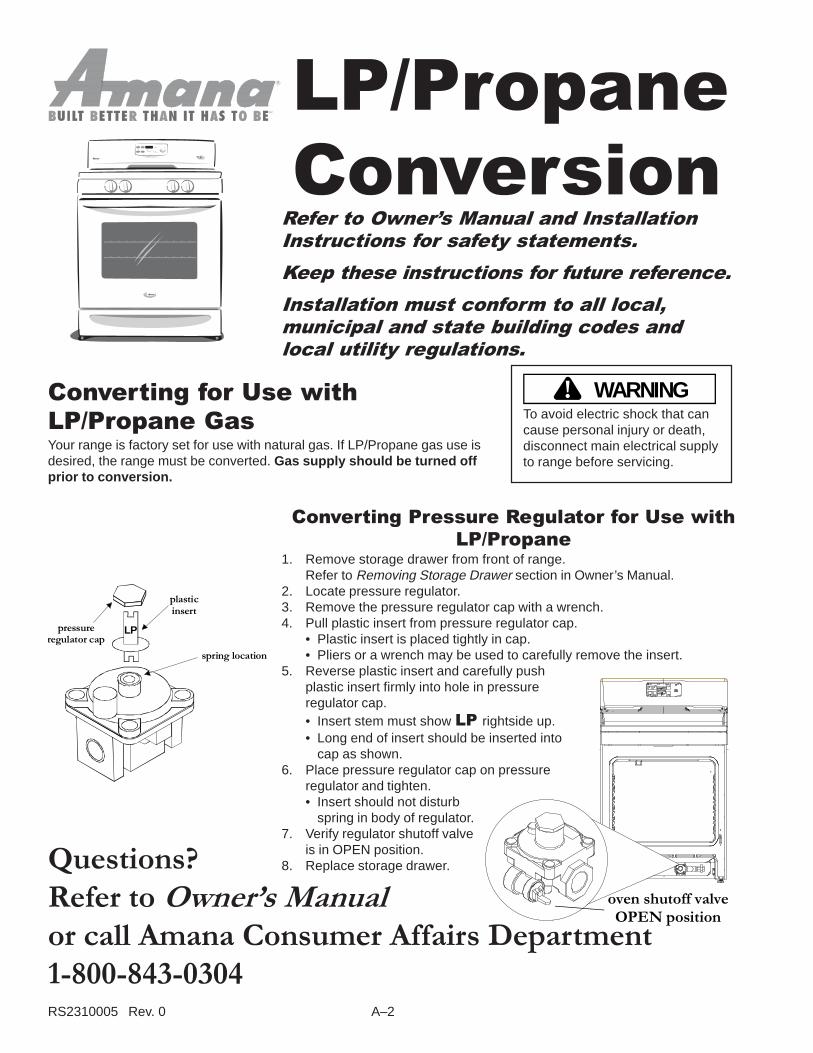
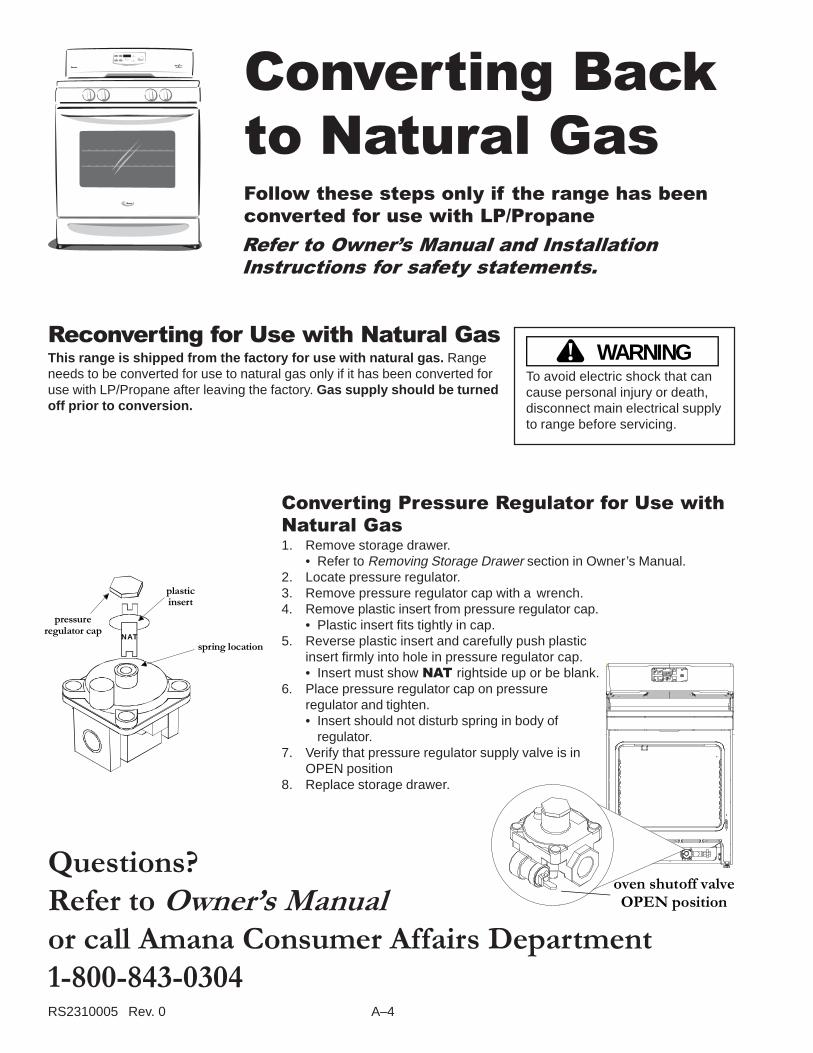
LP/PropaneConversion
Converting for Use withLP/Propane GasYour range is factory set for use with natural gas. If LP/Propane gas use isdesired, the range must be converted. Gas supply should be turned offprior to conversion.
Converting Pressure Regulator for Use withLP/Propane
1. Remove storage drawer from front of range.Refer to Removing Storage Drawer section in Owner’s Manual.
2. Locate pressure regulator.3. Remove the pressure regulator cap with a wrench.4. Pull plastic insert from pressure regulator cap.
• Plastic insert is placed tightly in cap.• Pliers or a wrench may be used to carefully remove the insert.
5. Reverse plastic insert and carefully pushplastic insert firmly into hole in pressureregulator cap.• Insert stem must show LP rightside up.• Long end of insert should be inserted into
cap as shown.6. Place pressure regulator cap on pressure
regulator and tighten.• Insert should not disturb
spring in body of regulator.7. Verify regulator shutoff valve
is in OPEN position.8. Replace storage drawer.
Refer to Owner�s Manual and InstallationInstructions for safety statements.
Keep these instructions for future reference.
Installation must conform to all local,municipal and state building codes andlocal utility regulations.
pressure regulator cap
plastic insert
spring location
LP
Questions?
Refer to Owner�s Manualor call Amana Consumer Affairs Department
1-800-843-0304
oven shutoff valve
OPEN position
WARNING!To avoid electric shock that cancause personal injury or death,disconnect main electrical supplyto range before servicing.
A–3 RS2310005 Rev. 0
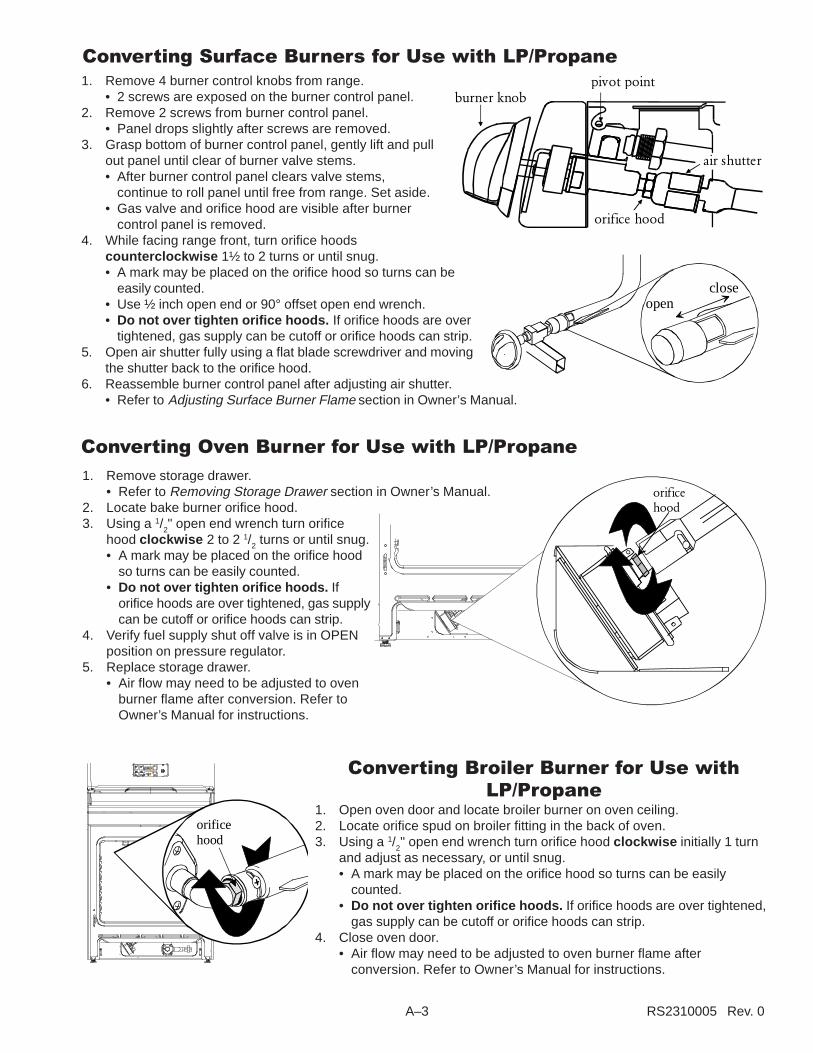
Converting Surface Burners for Use with LP/Propane
Converting Oven Burner for Use with LP/Propane
Converting Broiler Burner for Use withLP/Propane
1. Open oven door and locate broiler burner on oven ceiling.2. Locate orifice spud on broiler fitting in the back of oven.3. Using a 1/
2" open end wrench turn orifice hood clockwise initially 1 turn
and adjust as necessary, or until snug.• A mark may be placed on the orifice hood so turns can be easily
counted.• Do not over tighten orifice hoods. If orifice hoods are over tightened,
gas supply can be cutoff or orifice hoods can strip.4. Close oven door.
• Air flow may need to be adjusted to oven burner flame afterconversion. Refer to Owner’s Manual for instructions.
1. Remove storage drawer.• Refer to Removing Storage Drawer section in Owner’s Manual.
2. Locate bake burner orifice hood.3. Using a 1/
2" open end wrench turn orifice
hood clockwise 2 to 2 1/2 turns or until snug.
• A mark may be placed on the orifice hoodso turns can be easily counted.
• Do not over tighten orifice hoods. Iforifice hoods are over tightened, gas supplycan be cutoff or orifice hoods can strip.
4. Verify fuel supply shut off valve is in OPENposition on pressure regulator.
5. Replace storage drawer.• Air flow may need to be adjusted to oven
burner flame after conversion. Refer toOwner’s Manual for instructions.
burner knobpivot point
orifice hood
air shutter
1. Remove 4 burner control knobs from range.• 2 screws are exposed on the burner control panel.
2. Remove 2 screws from burner control panel.• Panel drops slightly after screws are removed.
3. Grasp bottom of burner control panel, gently lift and pullout panel until clear of burner valve stems.• After burner control panel clears valve stems,
continue to roll panel until free from range. Set aside.• Gas valve and orifice hood are visible after burner
control panel is removed.4. While facing range front, turn orifice hoods
counterclockwise 1½ to 2 turns or until snug.• A mark may be placed on the orifice hood so turns can be
easily counted.• Use ½ inch open end or 90° offset open end wrench.• Do not over tighten orifice hoods. If orifice hoods are over
tightened, gas supply can be cutoff or orifice hoods can strip.5. Open air shutter fully using a flat blade screwdriver and moving
the shutter back to the orifice hood.6. Reassemble burner control panel after adjusting air shutter.
• Refer to Adjusting Surface Burner Flame section in Owner’s Manual.
openclose
orifice hood
orificehood
RS2310005 Rev. 0 A–4
Converting Pressure Regulator for Use withNatural Gas1. Remove storage drawer.
• Refer to Removing Storage Drawer section in Owner’s Manual.2. Locate pressure regulator.3. Remove pressure regulator cap with a wrench.4. Remove plastic insert from pressure regulator cap.
• Plastic insert fits tightly in cap.5. Reverse plastic insert and carefully push plastic
insert firmly into hole in pressure regulator cap.• Insert must show NAT rightside up or be blank.
6. Place pressure regulator cap on pressureregulator and tighten.• Insert should not disturb spring in body of
regulator.7. Verify that pressure regulator supply valve is in
OPEN position8. Replace storage drawer.
Refer to Owner�s Manual and InstallationInstructions for safety statements.
Reconverting for Use with Natural GasThis range is shipped from the factory for use with natural gas. Rangeneeds to be converted for use to natural gas only if it has been converted foruse with LP/Propane after leaving the factory. Gas supply should be turnedoff prior to conversion.
Questions?
Refer to Owner�s Manualor call Amana Consumer Affairs Department
1-800-843-0304
WARNING!To avoid electric shock that cancause personal injury or death,disconnect main electrical supplyto range before servicing.
Converting Backto Natural GasFollow these steps only if the range has beenconverted for use with LP/Propane
oven shutoff valve
OPEN position
pressure regulator cap
plastic insert
spring locationNAT

A–5 RS2310005 Rev. 0
Converting Broiler Burner for Use with Natural Gas
Converting Surface Burners for Use with Natural Gas
1. Remove the 4 burner control knobs from range.• 2 screws are exposed on burner control panel.
2. Remove 2 screws from burner control panel.• Panel drops slightly after screws are removed.
3. Grasp bottom of burner control panel, gently lift and pullout panel until clear of burner valve stems.• After burner control panel clears valve stems, continue
to roll panel until free from range. Set aside.• Gas valve and orifice hood are visible after burner
control panel are removed.4. While facing range front, turn orifice hoods clockwise
1½ to 2 turns.• A mark may be placed on the orifice hood so turns can
be easily counted.• Use ½ inch open end or 90° offset open end wrench.
5. Adjust airflow to burner flame by adjusting air shutterto 1/
4" opening.
• Refer to Adjusting Surface Burner Flame section in Owner’s Manual.6. Reassemble burner control panel after adjusting air flow to surface burner flame.
2000 Amana AppliancesAmana, Iowa 52204
Part No. 36-32025201-0Printed in U.S.A. 11/00
burner knobpivot point
orifice hood
air shutter
orifice hood
airshutter
orificehood
1. Open the oven door and locate the broiler burner on oven ceiling.2. Locate the orifice spud on the broiler fitting in the back of the oven.3. Using a 1/
2" open end wrench turn the orifice hood counterclockwise
1 to 1 1/2 turns.• A mark may be placed on the orifice hood so turns can be easily
counted.• Do not over tighten orifice hoods . If orifice hoods are over
tightened, gas supply can be cutoff or orifice hoods can strip.4. Close the oven door.
• Air flow may need to be adjusted to oven burner flame afterconversion. Refer to Owner’s Manual for instructions.
Converting Oven Burner for Use with Natural Gas
1. Remove storage drawer.• Refer to Removing Storage Drawer section in Owner’s Manual.
2. Locate the bake burner orifice hood.3. Using a 1/
2" open end wrench turn the orifice
hood counterclockwise 2 turns.• A mark may be placed on the orifice
hood so turns can be easily counted.• Do not over tighten orifice hoods. If
orifice hoods are over tightened, gas supplycan be cutoff or orifice hoods can strip.
4. Verify fuel supply shut off valve is in OPENposition.
5. Replace storage drawer.• Air flow may need to be adjusted to oven burner flame after
conversion. Refer to Owner’s Manual for instructions.

RS2310005 Rev. 0 A–6
This page intentionally left blank.

B–1 RS2310005 Rev. 0
Appendix B
RS2310005 Rev. 0 B–2
Getting Ready1. Remove storage drawer and verify that the anti tip bracket has been
installed and is engaged. Refer to Installation Instructions for details.
2. Read important safety instructions in Owner’s Manual.
3. Burner caps and grates must be placed correctly. Burner caps shouldmatch the size of the burner base. Once caps are placed, grate needsto be placed over the burners. Refer to Adjusting Burner Flame sectionin the Owner’s Manual.
4. Remove all hanging tags and papers from the range. Check the insideoven cavity for paper. Remove any residue with non abrasive cleanser.Do not store paper in range, oven or storage drawer, or aroundrange. For more information, refer to Care and Cleaning section in theOwner’s Manual.
Operating Your New RangeIt is normal for all four burner electrodes to spark whenone burner is turned on.
Burners should ignite within 4 seconds. If not, refer toAdjusting Burner Flame section in Owner’s Manual.
Oven may make noise during a heating or cooling cycle,especially during a self-clean. This is normal. It is the sound of the ovencavity expanding and contracting.
Do not allow flames to extend up the sides of the cooking utensil. This maycause burns or damage.
Oven may generate smoke the first few times operated, especially during aself-clean cycle. This is normal. If possible, ventilate odors.
Remove birds and animals from area when using the self-clean cycle.Refer to Self-cleaning section in the Owner’s Manual for more information.
Surface burners should not be used during a self-clean cycle. A self-cleancycle can be set for times when the oven is not in use. Refer to Self-cleaningsection in the Owner’s Manual for more information.
Setting theClockTo set the clock, pressRecall Clock pad. The
light above the button will glow,indicating the clock can be adjusted.Use the arrow keys to set the clockto the correct time of day. The clockis a twelve hour clock and does notdisplay AM, PM, or military time. Toset time, press RECALL CLOCK padagain open.
Using theMinute
TimerThe minute timer is a timer only, anddoes not control baking, broiling orcleaning functions of the oven. To settimer, press TIMER ON/OFF. Thelight above the button will glow,indicating the timer can be set. Usearrow keys to set the timer. Timercan be set up to 11 hours and 59minutes. Timer begins after 5seconds of no further timeadjustment. To cancel the timer,press and hold the TIMER ON/OFFpad for five seconds. Timer signalsonce at the end of the countdown.
Questions?Refer to Owner�s Manual orcall Amana Consumer Affairs Department1-800-843-0304
¸
:
Quick Start Reference Guide
Refer to Installation Instructions and Owner�s Manual for safety statements.
Covering Amana® Distinctions� ACF3315Aand The Big Oven� ACF3335A
B–3 RS2310005 Rev. 0
BakeTo bake in your new oven:
1. Arrange racks to desired position.2. Push and turn temperature knob. Temperature will be displayed in clock area.
• Display reverts to time of day. Press RECALL OVEN TEMP/CLOCK pad toview cooking temperature.
3. Preheat light will glow during preheat cycle. Once oven has reached selectedtemperature, a signal will sound and preheat light will shut off.
4. To shut off oven, turn temperature knob to OFF position.
Timed BakeTo set the oven to perform a timed bake:
1. Arrange racks to desired position.2. Press COOK/CLEAN TIME pad.3. Use arrow keys to enter the selected amount of time.4. Push and turn the oven temperature control knob to desired temperature.
• Temperature will be displayed in clock area.5. Oven will begin to heat.6. When cooking time has elapsed, END displays and a signal will sound four
times and then once approximately every 10 seconds until oven temperatureknob is turned to OFF.
Delayed BakeNOTE: Do not use delayed bake with any dairy, meat, or egg products:
1. Arrange racks to desired position.2. Press START COOK/CLEAN pad.3. Use arrow keys to select the time of day to begin cooking.4. Press COOK/CLEAN TIME pad.5. Use the arrow keys to enter the desired amount of time.6. Push and turn the oven temperature control knob to desired temperature.
Temperature will be displayed in clock area.7. Oven will begin to heat at selected start time.8. When cooking time has elapsed, END displays and a signal will sound four
times and then once approximately every 10 seconds until oven temperatureknob is turned to OFF.
Self-CleanTo set a self-clean cycle inyour oven:
1. Prepare the oven and surroundingarea for self-clean (refer to Self-clean section in Owner’s Manual).
2. Remove all animals from area and,if possible, open a window the firstfew self-clean cycles.
3. Remove all pans, broiler pans, ovenracks and accessories from insideoven, rangetop, backguard andstorage drawer.
4. Push and turn oven control knob toCLEAN. CLN will display.
5. Default cycle time of 3 hours willdisplay. Cycle can be set from 2 to4 hours by adjusting time witharrow buttons.
6. Self-clean will begin. Oven doorwill automatically lock during thecycle.• Surface burners SHOULD
NOT be used during a self-clean cycle.
7. When complete, oven will beep andLOCKED light will shut off. Ovenmay still be warm to touch. DO NOTforce oven door open. Wait for theLOCKED light to turn off to opendoor.
BroilNOTE: Oven door MUST be closed during broiling.
1. Arrange racks to desired position.2. Place food in oven. Preheating is not required.3. Close door.4. Push and turn temperature knob to BROIL.5. BRL will display in clock area.6. When finished cooking, turn temperature knob to OFF position.
B
Your oven temperatures are factoryset for the best performance. However,to provide the flexibility to change thesesettings, a temperature adjustmentfeature has been addedfor your convenience. Refer to yourOwner’s Manual for instructions.
Quick Start Reference Guide
2000 Amana AppliancesAmana, Iowa 52204
Part No.36-32033801-0Printed in U.S.A.11/00
Amana Appliances Online • http://www.amana.com

RS2310005 Rev. 0 B–4
This page intentionally left blank.

C–1 RS2310005 Rev. 0
Appendix C
RS2310005 Rev. 0 C–2
Owner�s Manual
ContentsImportant Safety Information ......... 3Adjusting Burner Flame ................. 6Cookware Suggestions ................. 8Using the Range............................ 9Custom Features ......................... 12Displays and Signals ................... 13Using the Oven Control ............... 14Cooking
Baking ...................................... 19Broiling ..................................... 22Roasting ................................... 23Braising .................................... 24
Care and Cleaning ....................... 25Troubleshooting ........................... 28Amana Warranty ......................... 30Manuel du propriétaire ................. 31
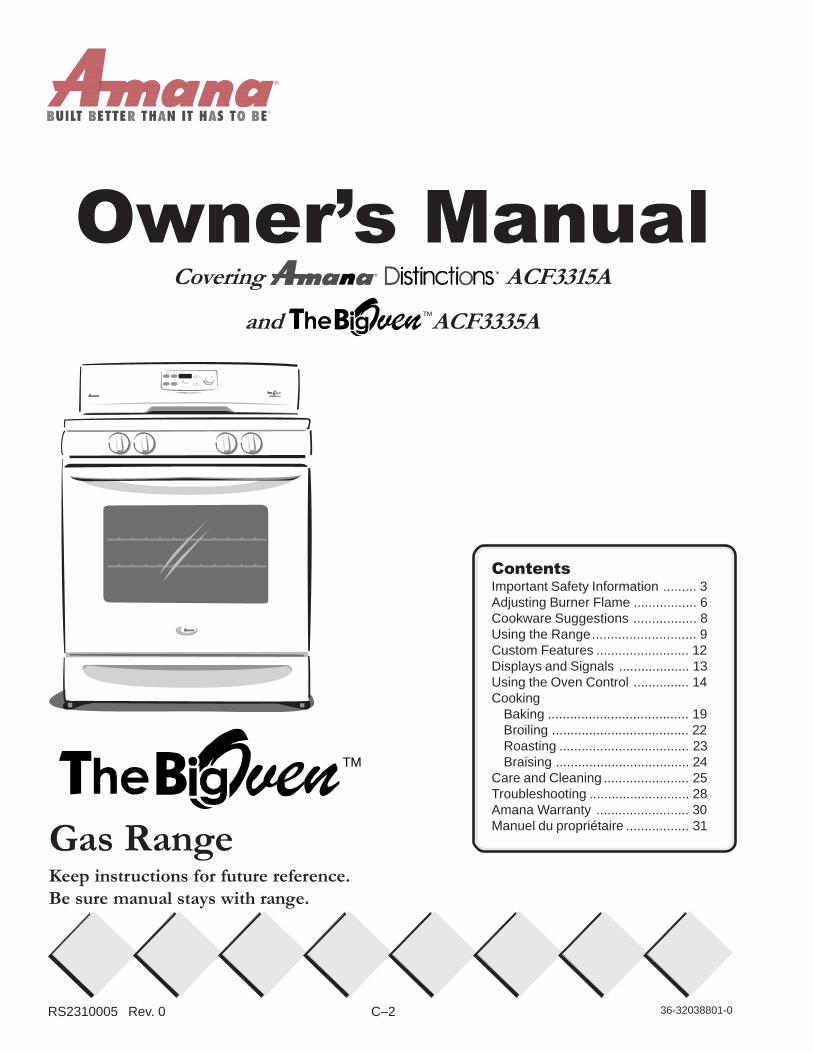
TM
Gas RangeKeep instructions for future reference.Be sure manual stays with range.
36-32038801-0
Covering ACF3315A
and TMACF3335A
C–3 RS2310005 Rev. 0
Recognize Safety Symbols, Words, Labels
DANGER!DANGER—Immediate hazards which WILL result in severe personal
injury or death.
WARNING!WARNING—Hazards or unsafe practices which COULD result in severe
personal injury or death.
CAUTION!CAUTION—Hazards or unsafe practices which COULD result in minor
personal injury or product or property damage.
What You Need to Knowabout Safety InstructionsWarning and Important SafetyInstructions appearing in this manualare not meant to cover all possibleconditions and situations that mayoccur. Common sense, caution, and care must be exercised when installing,maintaining, or operating range.
Always contact your dealer, distributor,service agent, or manufacturer aboutproblems or conditions you do notunderstand.
Please take the time to complete the registration card and return promptly.If registration card is missing, call Amana Consumer Affairs Department.When contacting Amana, provide product information from serial plate foundon right side of storage door opening:
Model Number __________________________________Manufacturing (P) Number _________________________Serial Number (S/N) ______________________________Purchase Date __________________________________Dealer Name ___________________________________Dealer Address _________________________________Dealer Phone ___________________________________
Keep this manual and your sales receipt together in a safe place forfuture reference or if warranty service is required.
For answers to questions or to locate an authorized servicer, call1-800-NAT-LSVC (1-800-628-5782) inside USA or 319-622-5511 outsideUSA. Warranty service must be performed by an authorized servicer.Amana Appliances also recommends contacting an authorized servicer ifservice is required after warranty expires.
To register your product electronically, get moreinformation on your range or other Amana products,
visit our Web site
www.amana.comor
call Consumer Affairs Department at
1-800-843-0304
Asure� ExtendedService PlanAmana Appliances offers long-termservice protection for this new range.Asure™ Extended Service Plan,covering functional parts, labor, andtravel charges, is specially designed tosupplement a strong warranty.Call 1-800-528-2682 for information.
Parts and AccessoriesPurchase replacement parts andadditional accessories such as cleaningsupplies by phone. To order accessoriesfor your Amana product, call1-800-843-0304 inside USA or319-622-5511 outside USA.
Save Time and MoneyIf something seems unusual, pleasecheck “Troubleshooting” section,which is designed to help you solveproblems before calling service.If you have a question, call us at(800) 843-0304 or write us at:
Consumer Affairs DepartmentAmana Appliances2800 - 220th TrailAmana, Iowa 52204
Remember to include model numberof your appliance and your phonenumber.
Thank you for buying an Amana Range!
Rating Plate
RS2310005 Rev. 0 C–4
IMPORTANT SAFETY INFORMATION
SAVE THESE INSTRUCTIONS
WARNING!To reduce risk of the appliance tipping, it must be secured by aproperly installed anti-tip bracket. To verify bracket has beeninstalled properly, remove the storage drawer or panel and lookunder the range with a flashlight. Bracket must be engaged inthe rear corner of the range.
WARNING!To avoid personal injury, do notsit, stand or lean on oven dooror oven drawer.
WARNING!To avoid risk of electrical shock,personal injury, or death, verifyyour range has been properlygrounded and alwaysdisconnect it from main powersupply before servicing.
• ALL RANGES CAN TIP
• INJURY TO PERSONSCOULD RESULT
• INSTALL ANTI-TIPBRACKET PACKEDWITH RANGE
• REFER TOINSTALLATIONINSTRUCTIONS
WARNING!If the information in this manual isnot followed exactly, a fire orexplosion may result causingproperty damage, personal injuryor death.
— Do not store or use gasoline orother flamable vapors andliquids in the vicinity of this orany other appliance.
— What To Do If YouSmell Gas
• Do not try to light anyappliance.
• Do not touch any electricalswitch.
• Do not use any phone in yourbuilding.
• Immediately call your gassupplier from a neighbor’sphone. Follow the gassupplier’s instructions.
• If you cannot reach your gassupplier, call the firedepartment.
— Installation and service mustbe performed by a qualifiedinstaller, service agency or thegas supplier.
CAUTION!DO NOT TOUCH SURFACE BURNERS OR AREAS NEARBURNERS—Areas near surface burners may become hot enough tocause burns. During and after use do not touch, let clothing or otherflammable materials touch or contact surface burners or areas nearsurface burners until they have had enough time to cool. These areasinclude the rangetop and backguard.
CAUTION!DO NOT TOUCH GAS BURNERS OR INTERIOR SURFACES OFOVEN—Interior surfaces of an oven become hot enough to cause burns.During and after use do not touch, let clothing or other flammablematerials touch, or contact heated interior surfaces of the oven until theyhave had enough time to cool. Other range surfaces that may becomehot enough to cause burns are the oven door and oven vent at thebackguard.
CAUTION!To avoid fire or smoke damage,• remove any flammable materials from storage drawer. Items like
plastic containers and paper manuals can melt or burn.• clean excess spills before starting a self-clean cycle.

C–5 RS2310005 Rev. 0
ALL APPLIANCES1. Proper Installation—Be sure your
appliance is properly installed andgrounded by a qualified technician.
2. Never Use Your Appliance forWarming or Heating the Room.
3. Do Not Leave Children Alone—Children should not be alone orunattended in the area where the appliance is inuse. They should never be allowedto sit or stand on any part of the appliance.
4. Wear Proper Apparel—Loose fitting or hanginggarments should never be worn while usingappliance.
5. User Servicing—Do not repair or replace any partof the appliance unless specifically recommendedin the manual. All other servicing should be referredto a qualified technician.
6. Storage in or on Appliance—Flammable materialsshould not be stored in an oven or near surfaceunits.
7. Do Not Use Water On Grease Fires—Smother fireor flame, or use dry chemical or foam-typeextinguisher.
8. Use Only Dry Potholders—Moist or damp potholderson hot surfaces may result in burns from steam.Do not let potholder touch elements. Do not use atowel or other bulky cloth.
SURFACE BURNERS1. Use Proper Pan Size—This
appliance is equipped with oneor more surface burners of different sizes. Selectutensils having flat bottoms large enough to coverthe surface burner. The use of undersized utensilswill expose a portion of the burner to direct contactand may result in ignition of clothing. Use ofoversized utensils concentrates heat on cookingsurface and can cause damage to range. Properrelationship of utensil to burner improves efficiency.
2. Never Leave Surface Burners Unattended—Boilovercauses smoking and greasy spillovers that may ignite.
3. Make Sure Reflector Pans or Drip Bowls Are inPlace—Absence of these pans or bowls duringcooking may subject wiring or componentsunderneath to damage.
4. Protective Liners—Do not use aluminum foil to linesurface burner drip bowls or oven bottom, except assuggested in the manual. Improper installation of theseliners may result in a risk of electric shock, or fire.
5. Glazed Cooking Utensils—Only certain types ofglass, ceramic, earthware, or other glazed utensilsare suitable for rangetop service without breakingdue to sudden change in temperature.
6. Utensil Handles Should Be Turned Inward and NotExtended Over Adjacent Surface Burners—Toreduce the risk of burns, ignition of flammablematerials, and spillage due to unintentional contactwith the utensil, the handle of a utensil should bepositioned so that it is turned inward, and does notextend over adjacent surface burners.
IMPORTANT SAFETY INFORMATION (cont�d)
SAVE THESE INSTRUCTIONS
CAUTION!Do not store items of interest to children incabinets above a range or on the backguard of arange —children climbing on the range to reach itemscould be seriously injured.
California Safe Drinking Waterand Toxic Enforcement Act (Proposition 65)
The Governor of California is required to publish alist of substances known to the state of California tocause cancer or reproductive harm and requiresbusinesses to warn customers of potential exposuresto such substances.
This appliance may contain or produce a chemical orchemicals which can cause death or serious illnessand which are known to the State of California tocause cancer, birth defects, or other reproductiveharm. To reduce the risk from substances in the fuelor from fuel combustion, make sure this appliance isinstalled, operated and maintained according to theinstructions provided.
CAUTION!To avoid delayed or improper ignition, do not obstructthe flow of combustion or ventilation air.
RS2310005 Rev. 0 C–6
OVENS1. Use Care When Opening
Door—Let hot air or steamescape before removing orreplacing food.
2. Do Not Heat Unopened FoodContainers—Build-up ofpressure may cause container to burst andresult in injury.
3. Keep Oven Vent Ducts Unobstructed.4. Placement of Oven Racks—Always place oven
racks in desired location while oven is cool. If rackis removed while oven is hot, do not let potholdercontact hot heating element in oven.
5. Protective Liners—Do not use aluminum foil to linedrip bowls, oven racks or oven bottoms. Improperinstallation of these liners may result in a risk ofelectrical shock, or fire.
SELF-CLEANING OVENS1. Do Not Clean Door Gasket—The door gasket is
essential for a good seal. Care should be takennot to rub, damage, or move the gasket.
2. Do Not Use Oven Cleaners—No commercial ovencleaner or oven liner protective coating of any kindshould be used in or around any part of the liner.
3. Clean Only Parts Listed in Manual.4. Before Self-Cleaning the Oven—Remove broiler pan,
oven racks, and other utensils.5. Remove All Items From Rangetop and Backguard.
VENTILATION HOODS1. Clean Ventilating Hoods Frequently—Grease should
not be allowed to accumulate on hood or filter.2. When flaming foods under the hood, turn the fan on.
In Case of FireFires can occur as a result of overcooking or excessive grease. Though afire is unlikely, if one occurs, proceed asfollows:
Surface Burner Fire1. Smother the fire with a nonflammable lid or baking
soda, or use a Class ABC or BC extinguisher.Not water. Not salt. Not flour.
2. As soon as it is safe to do so, turn the surfacecontrols to OFF. Turn off power at main circuitbreaker or fuse box. Turn off gas supply.
Oven Fires1. If you see smoke from your oven, do not open
oven door.2. Turn off oven.3. As an added precaution, turn off power at main
circuit breaker or fuse box. Turn off gas supply.4. Turn on vent to remove smoke.5. Allow food or grease to burn itself out in oven.6. If smoke and fire persist, call fire department.7. If there is any damage to components, call an
authorized servicer before using range.
IMPORTANT SAFETY INFORMATION (cont�d)
SAVE THESE INSTRUCTIONS
!Precautions• Do not cook food directly on
rangetop surface, always usecookware.
• Do not mix household cleaning products. Chemicalmixtures may interact with objectionable or evenhazardous results.
• Do not put plastic items on warm cooking areas.They may melt and stick.
• Oven door contains a glass window. While thewindow is built to be sturdy and strong, it is still glassand needs to be treated with care.
• Do not lift or move range by grasping oven doorhandle. This can result in window glass breaking orshattering.
• Do not slide rough metal objects across rangetopsurface. Scratching or metal marking can result.
• Do not leave fat heating unless you remain nearby.Fat can ignite if overheated by spilling onto hotsurfaces.
• Do not allow pots to boil dry as this can causedamage to cooking surface and pan.
• Do not use rangetop surface as a cutting board.• Do not use range for storage or as a display counter.
DELAYED IGNITIONSurface burnersBurner should ignite within 4 seconds. If burner does notignite within 4 seconds, turn control knob to OFF andfollow directions for installing burner caps in AdjustingSurface Burners. Try again. If burner still does not ignitewithin 4 seconds, contact an authorized servicer.
Bake and broil burner flameAllow no more than 40-60 seconds before burner ignitesand heat is felt. To check for heat, open oven door to firststop and place hand over oven door. If heat is not felt,turn temperature control knob to OFF. If burnerrepeatedly fails to ignite, contact an authorized servicer.
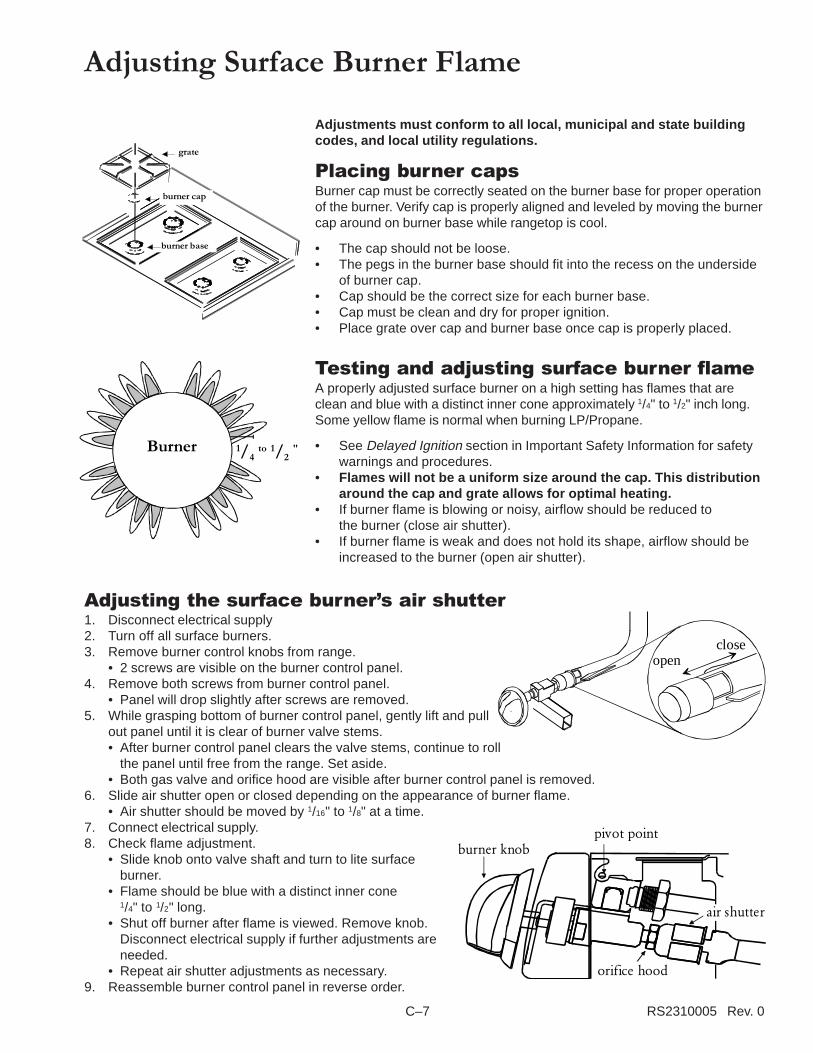
C–7 RS2310005 Rev. 0
Adjusting Surface Burner Flame
Placing burner capsBurner cap must be correctly seated on the burner base for proper operationof the burner. Verify cap is properly aligned and leveled by moving the burnercap around on burner base while rangetop is cool.
• The cap should not be loose.• The pegs in the burner base should fit into the recess on the underside
of burner cap.• Cap should be the correct size for each burner base.• Cap must be clean and dry for proper ignition.• Place grate over cap and burner base once cap is properly placed.
grate
burner base
burner cap
burner knobpivot point
orifice hood
air shutter
Testing and adjusting surface burner flameA properly adjusted surface burner on a high setting has flames that areclean and blue with a distinct inner cone approximately 1/4" to 1/2" inch long.Some yellow flame is normal when burning LP/Propane.
• See Delayed Ignition section in Important Safety Information for safetywarnings and procedures.
• Flames will not be a uniform size around the cap. This distributionaround the cap and grate allows for optimal heating.
• If burner flame is blowing or noisy, airflow should be reduced tothe burner (close air shutter).
• If burner flame is weak and does not hold its shape, airflow should beincreased to the burner (open air shutter).
Adjusting the surface burner�s air shutter1. Disconnect electrical supply2. Turn off all surface burners.3. Remove burner control knobs from range.
• 2 screws are visible on the burner control panel.4. Remove both screws from burner control panel.
• Panel will drop slightly after screws are removed.5. While grasping bottom of burner control panel, gently lift and pull
out panel until it is clear of burner valve stems.• After burner control panel clears the valve stems, continue to roll
the panel until free from the range. Set aside.• Both gas valve and orifice hood are visible after burner control panel is removed.
6. Slide air shutter open or closed depending on the appearance of burner flame.• Air shutter should be moved by 1/16" to 1/8" at a time.
7. Connect electrical supply.8. Check flame adjustment.
• Slide knob onto valve shaft and turn to lite surfaceburner.
• Flame should be blue with a distinct inner cone1/4" to 1/2" long.
• Shut off burner after flame is viewed. Remove knob.Disconnect electrical supply if further adjustments areneeded.
• Repeat air shutter adjustments as necessary.9. Reassemble burner control panel in reverse order.
1/4 to 1/2
"Burner
Adjustments must conform to all local, municipal and state buildingcodes, and local utility regulations.
openclose
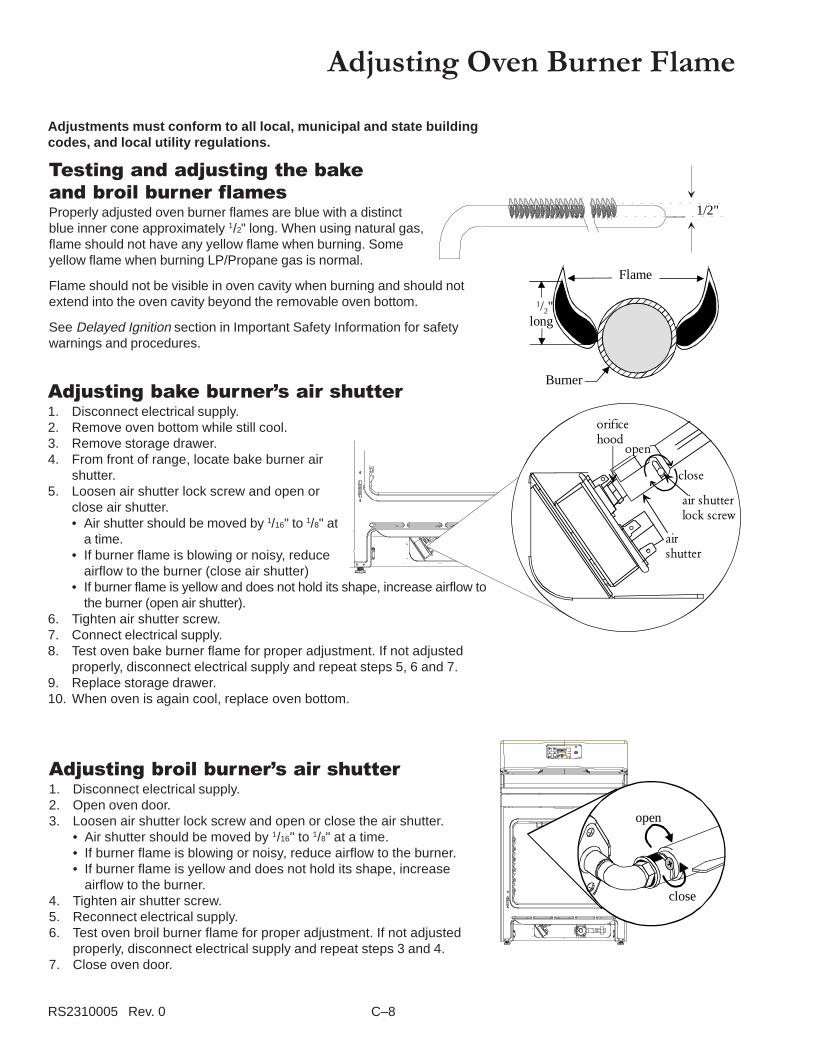
RS2310005 Rev. 0 C–8
Testing and adjusting the bakeand broil burner flamesProperly adjusted oven burner flames are blue with a distinctblue inner cone approximately 1/2" long. When using natural gas,flame should not have any yellow flame when burning. Someyellow flame when burning LP/Propane gas is normal.
Flame should not be visible in oven cavity when burning and should notextend into the oven cavity beyond the removable oven bottom.
See Delayed Ignition section in Important Safety Information for safetywarnings and procedures.
Adjusting Oven Burner Flame
Adjusting bake burner�s air shutter1. Disconnect electrical supply.2. Remove oven bottom while still cool.3. Remove storage drawer.4. From front of range, locate bake burner air
shutter.5. Loosen air shutter lock screw and open or
close air shutter.• Air shutter should be moved by 1/16" to 1/8" at
a time.• If burner flame is blowing or noisy, reduce
airflow to the burner (close air shutter)• If burner flame is yellow and does not hold its shape, increase airflow to
the burner (open air shutter).6. Tighten air shutter screw.7. Connect electrical supply.8. Test oven bake burner flame for proper adjustment. If not adjusted
properly, disconnect electrical supply and repeat steps 5, 6 and 7.9. Replace storage drawer.10. When oven is again cool, replace oven bottom.
Adjusting broil burner�s air shutter1. Disconnect electrical supply.2. Open oven door.3. Loosen air shutter lock screw and open or close the air shutter.
• Air shutter should be moved by 1/16" to 1/8" at a time.• If burner flame is blowing or noisy, reduce airflow to the burner.• If burner flame is yellow and does not hold its shape, increase
airflow to the burner.4. Tighten air shutter screw.5. Reconnect electrical supply.6. Test oven broil burner flame for proper adjustment. If not adjusted
properly, disconnect electrical supply and repeat steps 3 and 4.7. Close oven door.
Adjustments must conform to all local, municipal and state buildingcodes, and local utility regulations.
1/2"
1/2"long
Burner
Flame
orifice hood
air shutter
air shutterlock screw
close
open
airshutteropen
close
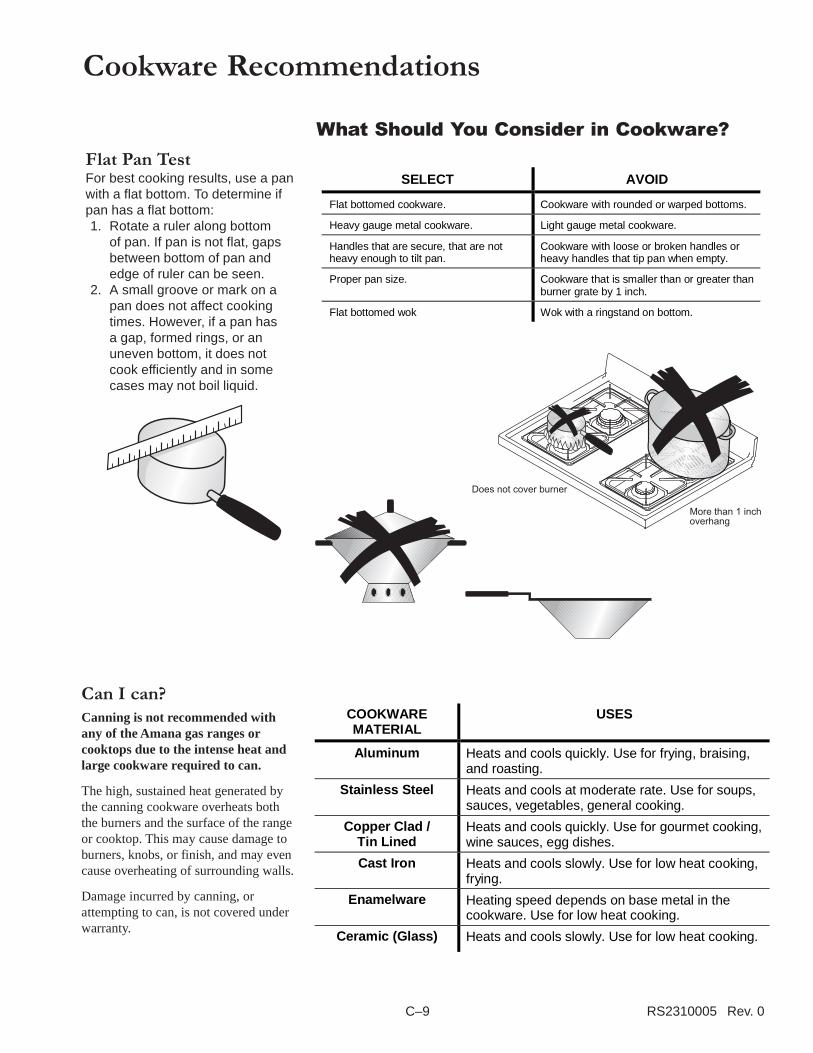
C–9 RS2310005 Rev. 0
Cookware Recommendations
COOKWAREMATERIAL
USES
Aluminum Heats and cools quickly. Use for frying, braising,and roasting.
Stainless Steel Heats and cools at moderate rate. Use for soups,sauces, vegetables, general cooking.
Copper Clad /Tin Lined
Heats and cools quickly. Use for gourmet cooking,wine sauces, egg dishes.
Cast Iron Heats and cools slowly. Use for low heat cooking,frying.
Enamelware Heating speed depends on base metal in thecookware. Use for low heat cooking.
Ceramic (Glass) Heats and cools slowly. Use for low heat cooking.
Flat Pan TestFor best cooking results, use a panwith a flat bottom. To determine ifpan has a flat bottom:1. Rotate a ruler along bottom
of pan. If pan is not flat, gapsbetween bottom of pan andedge of ruler can be seen.
2. A small groove or mark on apan does not affect cookingtimes. However, if a pan hasa gap, formed rings, or anuneven bottom, it does notcook efficiently and in somecases may not boil liquid.
Can I can?Canning is not recommended withany of the Amana gas ranges orcooktops due to the intense heat andlarge cookware required to can.
The high, sustained heat generated bythe canning cookware overheats boththe burners and the surface of the rangeor cooktop. This may cause damage toburners, knobs, or finish, and may evencause overheating of surrounding walls.
Damage incurred by canning, orattempting to can, is not covered underwarranty.
What Should You Consider in Cookware?
SELECT AVOID
Flat bottomed cookware. Cookware with rounded or warped bottoms.
Heavy gauge metal cookware. Light gauge metal cookware.
Handles that are secure, that are notheavy enough to tilt pan.
Cookware with loose or broken handles orheavy handles that tip pan when empty.
Proper pan size. Cookware that is smaller than or greater thanburner grate by 1 inch.
Flat bottomed wok Wok with a ringstand on bottom.
More than 1 inchoverhang
Does not cover burner
RS2310005 Rev. 0 C–10
Using the Range
WARNING!To avoid risk of serious personalinjury, property damage, or fire,do not leave surface burnersunattended while in operation.Grease and spillovers can ignitecausing a fire.
Setting Surface Burner ControlsBurner should ignite within 4 seconds. If burner does not ignite within4 seconds, turn control knob to OFF position and follow directions inPlacing Burner Caps section.
1. Push in and turn knob to LITE.• Burner should ignite within 4 seconds.
2. After gas ignites, turn control to desiredsetting.• Knobs do not have distinct ‘clicks’.• Use HI to bring food to boiling
temperatures. When food is boilingtemperature setting should be reduced.
• After lighting burner do not operate forlong periods of time without cookware ongrate. The finish on the grate can chipwithout cookware to absorb the heat.
• Flame size should match the size of the pan. Do not allow the flameto extend up the sides of the pan. This can cause clothing to ignite,make the handle hot, or cause burns.
3. When finished cooking, turn control to OFF position.
During a Power OutageAlthough the system that lights theburners is electric, surface burners canbe ignited during a power outage. Neverattempt to light bake or broil burners(oven burners) during a power failure.
1. Hold match at base of desiredsurface burner.
2. Push in burner control knob andturn to LITE position.
3. After gas ignites, remove matchfrom burner and turn burner controlknob to desired setting.
Adjusting Burner Flame Size• While turning burner control knob, watch the burner flame.• Flame size should match the size of the pan.• Flames that extend up the sides of the pan can ignite clothing,
making the handle hot, or cause burns.
<G
AS
ON
OFF LO M
ED
HI LITE
If These Controls AreDifferent From YoursThe control descriptions are
intended to show the variety of featuresthat are available in the product line. Ifyour range does not have all the featuresthat are shown, it is not a mistake. Theinformation provided applies to severalof the available models.
SURFACE BURNERCONTROL SETTINGS WHEN TO USE SETTING
LO Use to prepare food at less than boilingtemperatures or to simmer.
MED
Use to maintain boiling of largeramounts of food, low temperature fryingand to maintain correct pressure in apressure cooker.
HI
Use to bring food to boilingtemperatures. When food is boilingtemperature setting should be reducedto LO through MED.
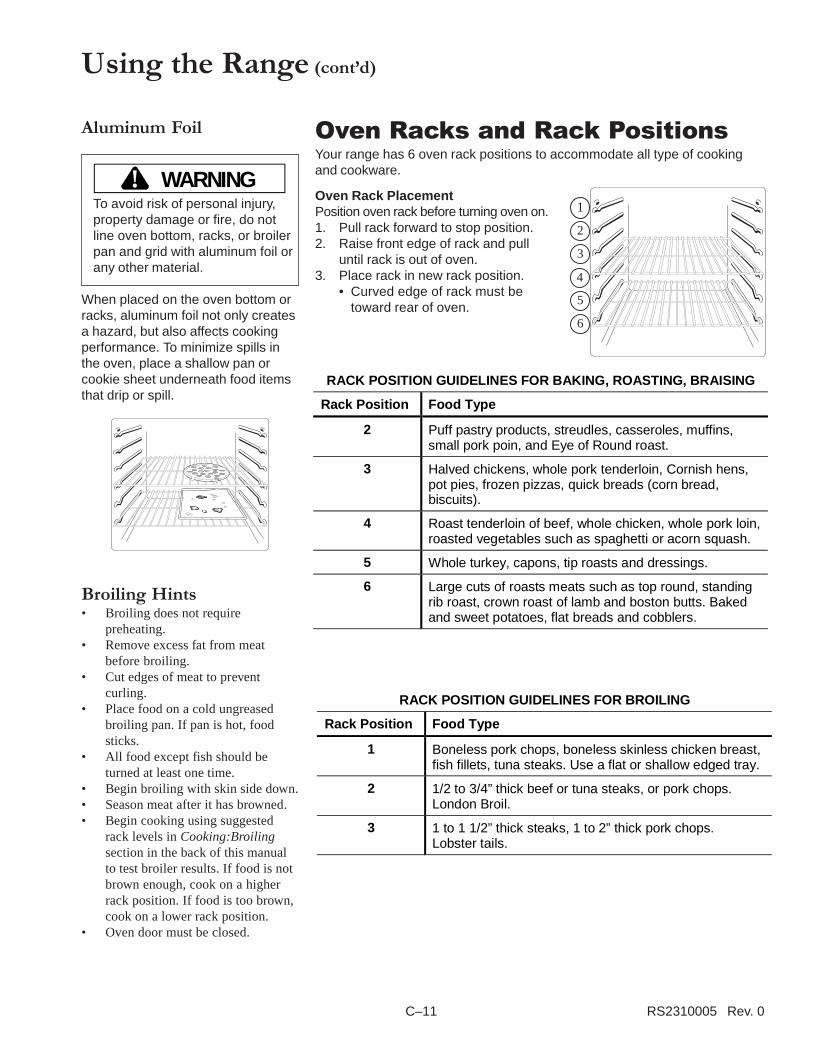
C–11 RS2310005 Rev. 0
Oven Racks and Rack PositionsYour range has 6 oven rack positions to accommodate all type of cookingand cookware.
Oven Rack PlacementPosition oven rack before turning oven on.1. Pull rack forward to stop position.2. Raise front edge of rack and pull
until rack is out of oven.3. Place rack in new rack position.
• Curved edge of rack must betoward rear of oven.
Aluminum Foil
WARNING!To avoid risk of personal injury,property damage or fire, do notline oven bottom, racks, or broilerpan and grid with aluminum foil orany other material.
When placed on the oven bottom orracks, aluminum foil not only createsa hazard, but also affects cookingperformance. To minimize spills inthe oven, place a shallow pan orcookie sheet underneath food itemsthat drip or spill.
Using the Range (cont�d)
1
2
6
3
5
4
Broiling Hints• Broiling does not require
preheating.• Remove excess fat from meat
before broiling.• Cut edges of meat to prevent
curling.• Place food on a cold ungreased
broiling pan. If pan is hot, foodsticks.
• All food except fish should beturned at least one time.
• Begin broiling with skin side down.• Season meat after it has browned.• Begin cooking using suggested
rack levels in Cooking:Broilingsection in the back of this manualto test broiler results. If food is notbrown enough, cook on a higherrack position. If food is too brown,cook on a lower rack position.
• Oven door must be closed.
RACK POSITION GUIDELINES FOR BAKING, ROASTING, BRAISING
Rack Position Food Type
2 Puff pastry products, streudles, casseroles, muffins,small pork poin, and Eye of Round roast.
3 Halved chickens, whole pork tenderloin, Cornish hens,pot pies, frozen pizzas, quick breads (corn bread,biscuits).
4 Roast tenderloin of beef, whole chicken, whole pork loin,roasted vegetables such as spaghetti or acorn squash.
5 Whole turkey, capons, tip roasts and dressings.
6 Large cuts of roasts meats such as top round, standingrib roast, crown roast of lamb and boston butts. Bakedand sweet potatoes, flat breads and cobblers.
RACK POSITION GUIDELINES FOR BROILING
Rack Position Food Type
1 Boneless pork chops, boneless skinless chicken breast,fish fillets, tuna steaks. Use a flat or shallow edged tray.
2 1/2 to 3/4” thick beef or tuna steaks, or pork chops.London Broil.
3 1 to 1 1/2” thick steaks, 1 to 2” thick pork chops.Lobster tails.
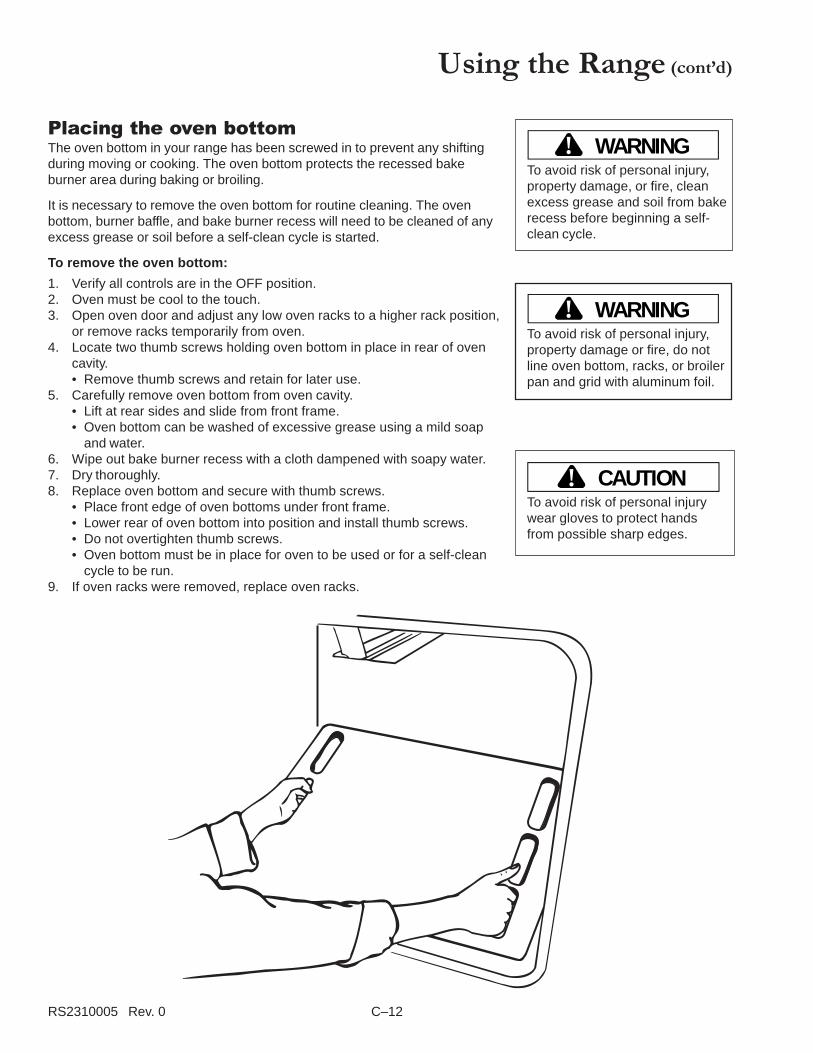
RS2310005 Rev. 0 C–12
Placing the oven bottomThe oven bottom in your range has been screwed in to prevent any shiftingduring moving or cooking. The oven bottom protects the recessed bakeburner area during baking or broiling.
It is necessary to remove the oven bottom for routine cleaning. The ovenbottom, burner baffle, and bake burner recess will need to be cleaned of anyexcess grease or soil before a self-clean cycle is started.
To remove the oven bottom:
1. Verify all controls are in the OFF position.2. Oven must be cool to the touch.3. Open oven door and adjust any low oven racks to a higher rack position,
or remove racks temporarily from oven.4. Locate two thumb screws holding oven bottom in place in rear of oven
cavity.• Remove thumb screws and retain for later use.
5. Carefully remove oven bottom from oven cavity.• Lift at rear sides and slide from front frame.• Oven bottom can be washed of excessive grease using a mild soap
and water.6. Wipe out bake burner recess with a cloth dampened with soapy water.7. Dry thoroughly.8. Replace oven bottom and secure with thumb screws.
• Place front edge of oven bottoms under front frame.• Lower rear of oven bottom into position and install thumb screws.• Do not overtighten thumb screws.• Oven bottom must be in place for oven to be used or for a self-clean
cycle to be run.9. If oven racks were removed, replace oven racks.
WARNING!To avoid risk of personal injury,property damage, or fire, cleanexcess grease and soil from bakerecess before beginning a self-clean cycle.
WARNING!To avoid risk of personal injury,property damage or fire, do notline oven bottom, racks, or broilerpan and grid with aluminum foil.
CAUTION!To avoid risk of personal injurywear gloves to protect handsfrom possible sharp edges.
Using the Range (cont�d)
C–13 RS2310005 Rev. 0
Features
12-hour automatic cancelThis safety feature prevents oven from continuing to operate if it has beenleft on for over 12 hours. If a cooking function continues longer than 12 hourswithout any options on oven control being touched, this feature turns ovenoff. Any time an option is touched, 12-hour automatic cancel is reset.
Oven temperature control adjustmentYour range is calibrated at the factory for proper temperature. Due toindividual variances and preferences, it may be necessary to adjust ovenonce it has been installed.
When first using the oven, follow recipe times and temperatures. Beforeadjusting oven baking temperature, test a recipe by setting oven temperaturehigher or lower than the suggested temperature. The baking results shouldhelp you to decide how much of a temperature adjustment is required.
An accurate digital thermometer is necessary to calibrate the oven. Storepurchased oven thermometers do not accurately measure oven temperature.Oven temperature can be increased or decreased by 35°F. To avoid overadjusting the oven, only adjust the temperature by 5°F each time.
NOTE: Remove aluminum foil from racks and oven bottom as this will alteroven performance. Check for blocked heat vents. If it still appearsoven is not performing as expected, a calibration may be done.
1. Turn oven temperature knob to OFF.2. Press and hold both arrow pads for approximately 5 seconds.3. A double digit will display ranging from -35°F to 35°F.4. Immediately, press either:
• to increase oven temperature by 5°F• to decrease oven temperature by 5°F• When temperature is adjusted to a cooler setting, a minus sign (-) will
display with the offset temperature.5. When desired temperature change is displayed, release control and
change will be automatically saved after a few seconds. Control willreturn to time of day display.• Offset temperature change will be retained through a power failure.
Service codes and tonesElectronic oven control is equipped with a self-diagnostic system.Self-diagnostic system alerts you if there is an error or problem with the unit.If electronic range control sounds a series of short, rapid beeps for over 16seconds and the display shows an F-code, record F-code shown. SomeF-codes can be cleared by disconnecting power to the range forapproximately 3 minutes. If the code continues to reoccur disconnectelectrical supply to range and contact an authorized servicer.
F-code Possible Meaning
F1 Control failure
F2 Oven over temperature
F3 Sensor open or shorted
F9 Door latch circuit failure
DOOR Door has not latched.
¸

RS2310005 Rev. 0 C–14
LIGHTS DESCRIPTION
CLOCK Clock pad light remains on while time of day is set.
TIMER ON/OFF Timer On/Off pad light remains on while the timercounts down.
COOK/CLEAN
TIME
Cook/Clean Time light is turned on when enteringcook or clean time. Light remains on during the cookor clean cycle.
START
COOK/CLEANStart Cook/Clean light turns on when entering thetime a cooking or cleaning cycle is to start.
PREHEATPreheat light turns on and remains on while ovenis heating to selected temperature. Light shuts offwhen oven reaches and maintains temperature.
LOCKEDLocked light turns on and remains on when ovendoor is locked. Locked light flashes when door isautomatically locking or unlocking.
OVEN ONOven On light turns on and remains on whileoven is in use. Oven light does not monitor ovencavity temperature.
OVEN LIGHT Turns on when OVEN LIGHT pad is pressed.
DISPLAY DESCRIPTION
BRL Displays when oven is broiling or set to broil.
CLNDisplays when oven is self cleaning oris set to self clean.
ENDDisplays when oven has reached the end of abaking or cleaning cycle.
Timer SignalWhen time elapses, timer beepsa single, three second tone.
Preheat SignalAfter setting oven to bake and selectinga temperature, oven preheats. Whenoven reaches set temperature, ovensignals a one second beep and thepreheat light shuts off.
End-of-Cycle SignalWhen a timed cooking cycle iscomplete, the oven will beep four tonesapproximately one second apart,followed by a continuous series of onesecond beeps every ten seconds untilthe oven knob is turned to OFF.
Display and Signals
Clock alsodisplays oventemperature.
350
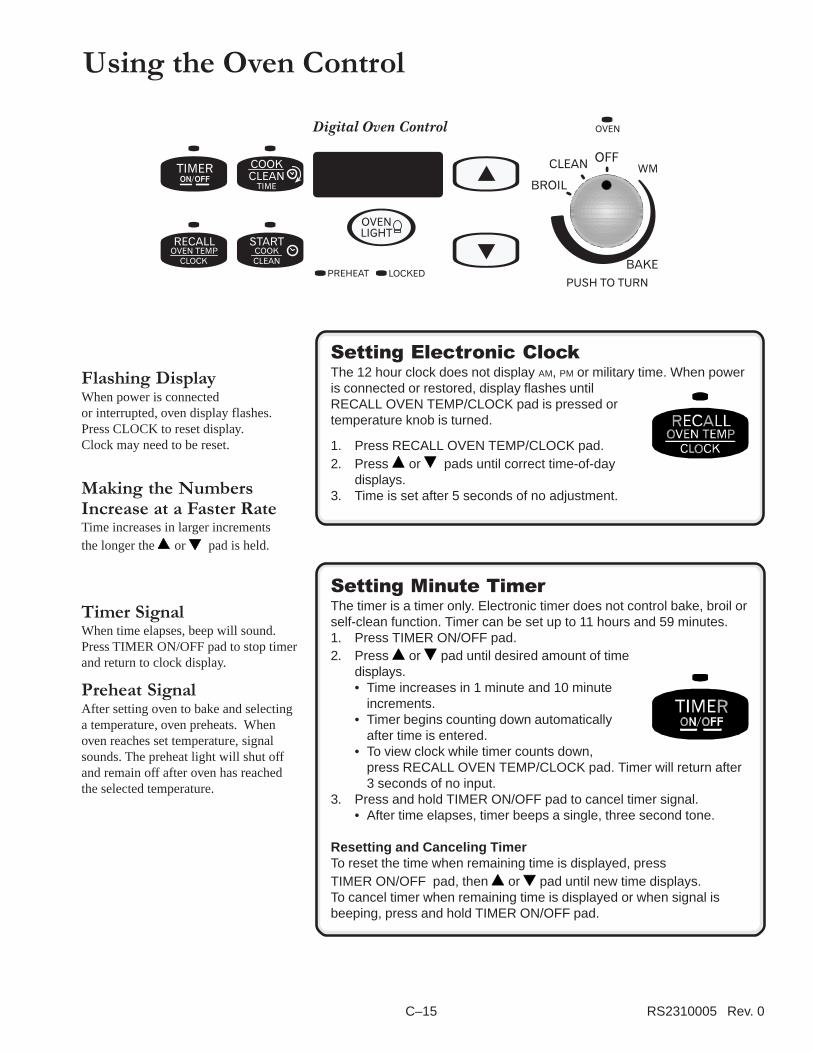
C–15 RS2310005 Rev. 0
Using the Oven Control
Setting Electronic ClockThe 12 hour clock does not display AM, PM or military time. When poweris connected or restored, display flashes untilRECALL OVEN TEMP/CLOCK pad is pressed ortemperature knob is turned.
1. Press RECALL OVEN TEMP/CLOCK pad.2. Press + or pads until correct time-of-day
displays.3. Time is set after 5 seconds of no adjustment.
Setting Minute TimerThe timer is a timer only. Electronic timer does not control bake, broil orself-clean function. Timer can be set up to 11 hours and 59 minutes.1. Press TIMER ON/OFF pad.2. Press + or pad until desired amount of time
displays.• Time increases in 1 minute and 10 minute
increments.• Timer begins counting down automatically
after time is entered.• To view clock while timer counts down,
press RECALL OVEN TEMP/CLOCK pad. Timer will return after3 seconds of no input.
3. Press and hold TIMER ON/OFF pad to cancel timer signal.• After time elapses, timer beeps a single, three second tone.
Resetting and Canceling TimerTo reset the time when remaining time is displayed, pressTIMER ON/OFF pad, then + or pad until new time displays.To cancel timer when remaining time is displayed or when signal isbeeping, press and hold TIMER ON/OFF pad.
Flashing DisplayWhen power is connectedor interrupted, oven display flashes.Press CLOCK to reset display.Clock may need to be reset.
Making the NumbersIncrease at a Faster RateTime increases in larger incrementsthe longer the + or pad is held.
Timer SignalWhen time elapses, beep will sound.Press TIMER ON/OFF pad to stop timerand return to clock display.
Preheat SignalAfter setting oven to bake and selectinga temperature, oven preheats. Whenoven reaches set temperature, signalsounds. The preheat light will shut offand remain off after oven has reachedthe selected temperature.
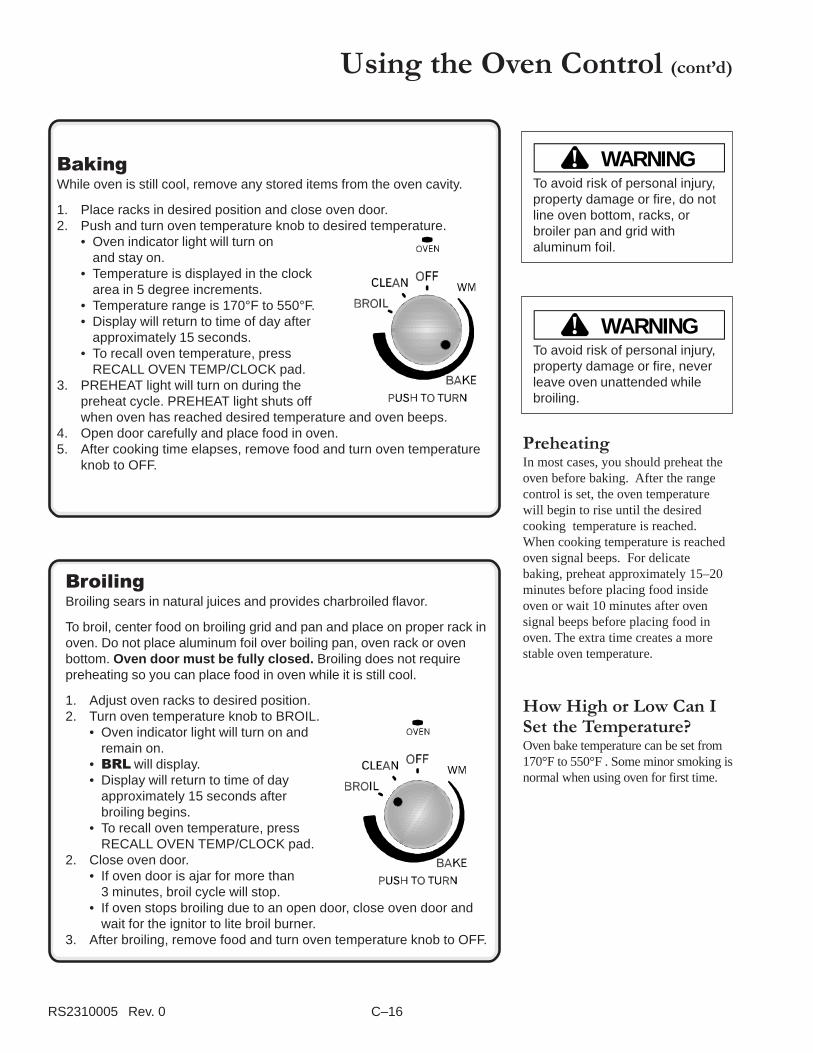
RS2310005 Rev. 0 C–16
Using the Oven Control (cont�d)
PreheatingIn most cases, you should preheat theoven before baking. After the rangecontrol is set, the oven temperaturewill begin to rise until the desiredcooking temperature is reached.When cooking temperature is reachedoven signal beeps. For delicatebaking, preheat approximately 15–20minutes before placing food insideoven or wait 10 minutes after ovensignal beeps before placing food inoven. The extra time creates a morestable oven temperature.
How High or Low Can ISet the Temperature?Oven bake temperature can be set from170°F to 550°F . Some minor smoking isnormal when using oven for first time.
WARNING!To avoid risk of personal injury,property damage or fire, do notline oven bottom, racks, orbroiler pan and grid withaluminum foil.
WARNING!To avoid risk of personal injury,property damage or fire, neverleave oven unattended whilebroiling.
BroilingBroiling sears in natural juices and provides charbroiled flavor.
To broil, center food on broiling grid and pan and place on proper rack inoven. Do not place aluminum foil over boiling pan, oven rack or ovenbottom. Oven door must be fully closed. Broiling does not requirepreheating so you can place food in oven while it is still cool.
1. Adjust oven racks to desired position.2. Turn oven temperature knob to BROIL.
• Oven indicator light will turn on andremain on.
• BRL will display.• Display will return to time of day
approximately 15 seconds afterbroiling begins.
• To recall oven temperature, pressRECALL OVEN TEMP/CLOCK pad.
2. Close oven door.• If oven door is ajar for more than
3 minutes, broil cycle will stop.• If oven stops broiling due to an open door, close oven door and
wait for the ignitor to lite broil burner.3. After broiling, remove food and turn oven temperature knob to OFF.
BakingWhile oven is still cool, remove any stored items from the oven cavity.
1. Place racks in desired position and close oven door.2. Push and turn oven temperature knob to desired temperature.
• Oven indicator light will turn onand stay on.
• Temperature is displayed in the clockarea in 5 degree increments.
• Temperature range is 170°F to 550°F.• Display will return to time of day after
approximately 15 seconds.• To recall oven temperature, press
RECALL OVEN TEMP/CLOCK pad.3. PREHEAT light will turn on during the
preheat cycle. PREHEAT light shuts offwhen oven has reached desired temperature and oven beeps.
4. Open door carefully and place food in oven.5. After cooking time elapses, remove food and turn oven temperature
knob to OFF.
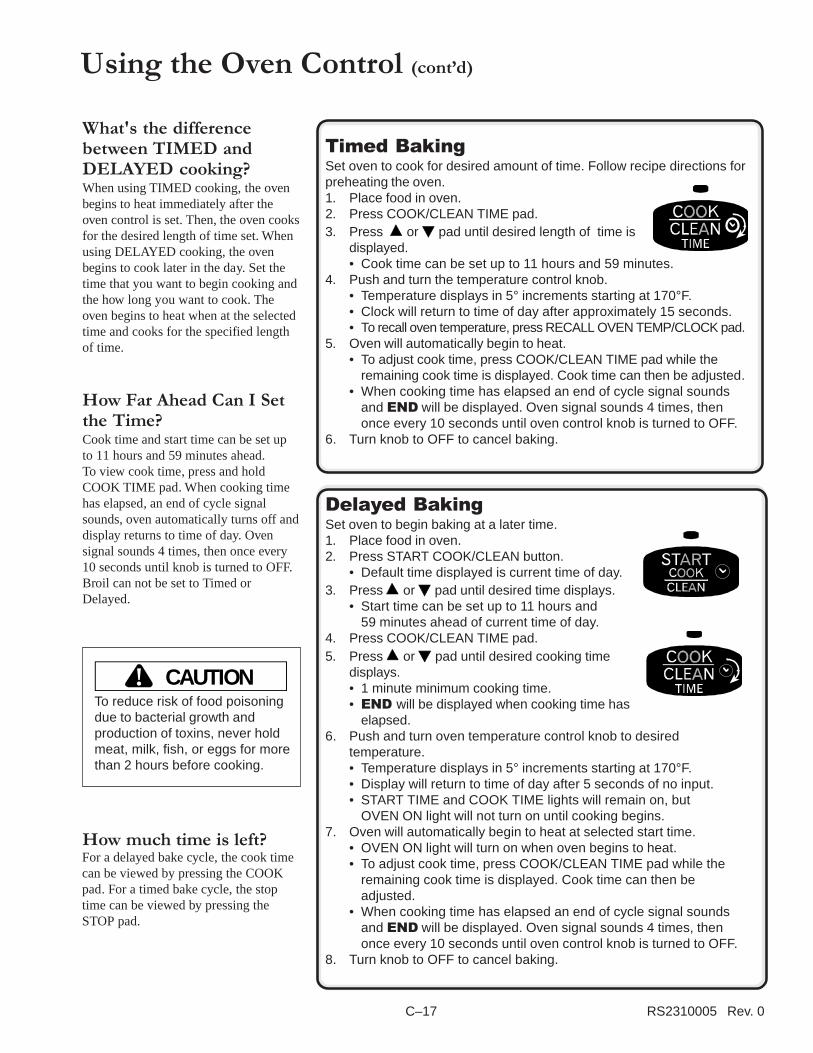
C–17 RS2310005 Rev. 0
Using the Oven Control (cont�d)
CAUTION!To reduce risk of food poisoningdue to bacterial growth andproduction of toxins, never holdmeat, milk, fish, or eggs for morethan 2 hours before cooking.
Timed BakingSet oven to cook for desired amount of time. Follow recipe directions forpreheating the oven.1. Place food in oven.2. Press COOK/CLEAN TIME pad.3. Press or pad until desired length of time is
displayed.• Cook time can be set up to 11 hours and 59 minutes.
4. Push and turn the temperature control knob.• Temperature displays in 5° increments starting at 170°F.• Clock will return to time of day after approximately 15 seconds.• To recall oven temperature, press RECALL OVEN TEMP/CLOCK pad.
5. Oven will automatically begin to heat.• To adjust cook time, press COOK/CLEAN TIME pad while the
remaining cook time is displayed. Cook time can then be adjusted.• When cooking time has elapsed an end of cycle signal sounds
and END will be displayed. Oven signal sounds 4 times, thenonce every 10 seconds until oven control knob is turned to OFF.
6. Turn knob to OFF to cancel baking.
Delayed BakingSet oven to begin baking at a later time.1. Place food in oven.2. Press START COOK/CLEAN button.
• Default time displayed is current time of day.3. Press or pad until desired time displays.
• Start time can be set up to 11 hours and59 minutes ahead of current time of day.
4. Press COOK/CLEAN TIME pad.5. Press or pad until desired cooking time
displays.• 1 minute minimum cooking time.• END will be displayed when cooking time has
elapsed.6. Push and turn oven temperature control knob to desired
temperature.• Temperature displays in 5° increments starting at 170°F.• Display will return to time of day after 5 seconds of no input.• START TIME and COOK TIME lights will remain on, but
OVEN ON light will not turn on until cooking begins.7. Oven will automatically begin to heat at selected start time.
• OVEN ON light will turn on when oven begins to heat.• To adjust cook time, press COOK/CLEAN TIME pad while the
remaining cook time is displayed. Cook time can then beadjusted.
• When cooking time has elapsed an end of cycle signal soundsand END will be displayed. Oven signal sounds 4 times, thenonce every 10 seconds until oven control knob is turned to OFF.
8. Turn knob to OFF to cancel baking.
What's the differencebetween TIMED andDELAYED cooking?When using TIMED cooking, the ovenbegins to heat immediately after theoven control is set. Then, the oven cooksfor the desired length of time set. Whenusing DELAYED cooking, the ovenbegins to cook later in the day. Set thetime that you want to begin cooking andthe how long you want to cook. Theoven begins to heat when at the selectedtime and cooks for the specified lengthof time.
How Far Ahead Can I Setthe Time?Cook time and start time can be set upto 11 hours and 59 minutes ahead.To view cook time, press and holdCOOK TIME pad. When cooking timehas elapsed, an end of cycle signalsounds, oven automatically turns off anddisplay returns to time of day. Ovensignal sounds 4 times, then once every10 seconds until knob is turned to OFF.Broil can not be set to Timed orDelayed.
How much time is left?For a delayed bake cycle, the cook timecan be viewed by pressing the COOKpad. For a timed bake cycle, the stoptime can be viewed by pressing theSTOP pad.
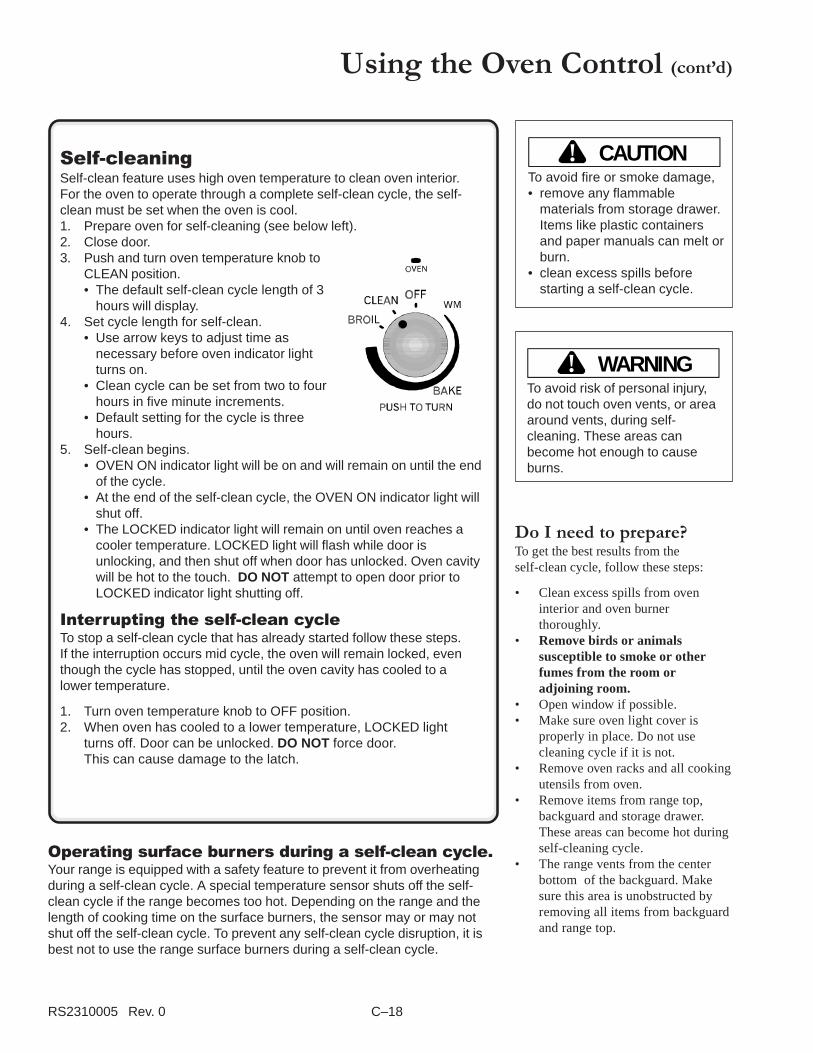
RS2310005 Rev. 0 C–18
Using the Oven Control (cont�d)
WARNING!To avoid risk of personal injury,do not touch oven vents, or areaaround vents, during self-cleaning. These areas canbecome hot enough to causeburns.
CAUTION!To avoid fire or smoke damage,• remove any flammable
materials from storage drawer.Items like plastic containersand paper manuals can melt orburn.
• clean excess spills beforestarting a self-clean cycle.
Do I need to prepare?To get the best results from theself-clean cycle, follow these steps:
• Clean excess spills from oveninterior and oven burnerthoroughly.
• Remove birds or animalssusceptible to smoke or otherfumes from the room oradjoining room.
• Open window if possible.• Make sure oven light cover is
properly in place. Do not usecleaning cycle if it is not.
• Remove oven racks and all cookingutensils from oven.
• Remove items from range top,backguard and storage drawer.These areas can become hot duringself-cleaning cycle.
• The range vents from the centerbottom of the backguard. Makesure this area is unobstructed byremoving all items from backguardand range top.
Self-cleaningSelf-clean feature uses high oven temperature to clean oven interior.For the oven to operate through a complete self-clean cycle, the self-clean must be set when the oven is cool.1. Prepare oven for self-cleaning (see below left).2. Close door.3. Push and turn oven temperature knob to
CLEAN position.• The default self-clean cycle length of 3
hours will display.4. Set cycle length for self-clean.
• Use arrow keys to adjust time asnecessary before oven indicator lightturns on.
• Clean cycle can be set from two to fourhours in five minute increments.
• Default setting for the cycle is threehours.
5. Self-clean begins.• OVEN ON indicator light will be on and will remain on until the end
of the cycle.• At the end of the self-clean cycle, the OVEN ON indicator light will
shut off.• The LOCKED indicator light will remain on until oven reaches a
cooler temperature. LOCKED light will flash while door isunlocking, and then shut off when door has unlocked. Oven cavitywill be hot to the touch. DO NOT attempt to open door prior toLOCKED indicator light shutting off.
Interrupting the self-clean cycleTo stop a self-clean cycle that has already started follow these steps.If the interruption occurs mid cycle, the oven will remain locked, eventhough the cycle has stopped, until the oven cavity has cooled to alower temperature.
1. Turn oven temperature knob to OFF position.2. When oven has cooled to a lower temperature, LOCKED light
turns off. Door can be unlocked. DO NOT force door.This can cause damage to the latch.
Operating surface burners during a self-clean cycle.Your range is equipped with a safety feature to prevent it from overheatingduring a self-clean cycle. A special temperature sensor shuts off the self-clean cycle if the range becomes too hot. Depending on the range and thelength of cooking time on the surface burners, the sensor may or may notshut off the self-clean cycle. To prevent any self-clean cycle disruption, it isbest not to use the range surface burners during a self-clean cycle.
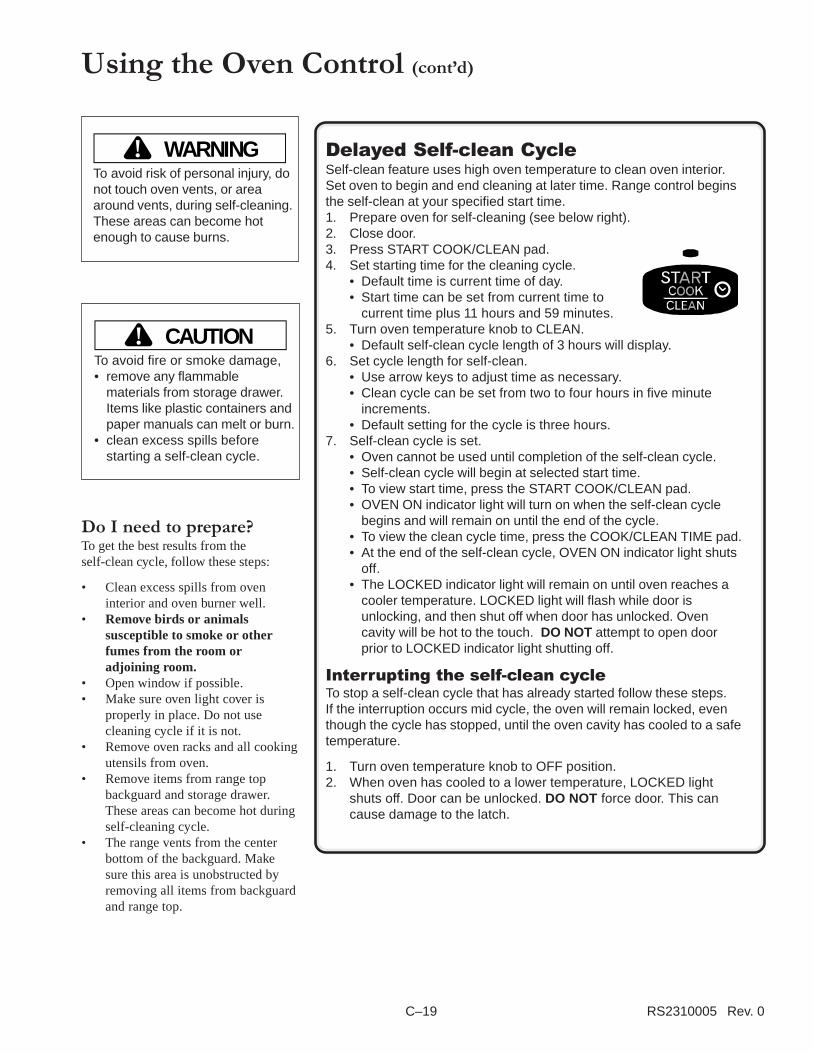
C–19 RS2310005 Rev. 0
Using the Oven Control (cont�d)
Delayed Self-clean CycleSelf-clean feature uses high oven temperature to clean oven interior.Set oven to begin and end cleaning at later time. Range control beginsthe self-clean at your specified start time.1. Prepare oven for self-cleaning (see below right).2. Close door.3. Press START COOK/CLEAN pad.4. Set starting time for the cleaning cycle.
• Default time is current time of day.• Start time can be set from current time to
current time plus 11 hours and 59 minutes.5. Turn oven temperature knob to CLEAN.
• Default self-clean cycle length of 3 hours will display.6. Set cycle length for self-clean.
• Use arrow keys to adjust time as necessary.• Clean cycle can be set from two to four hours in five minute
increments.• Default setting for the cycle is three hours.
7. Self-clean cycle is set.• Oven cannot be used until completion of the self-clean cycle.• Self-clean cycle will begin at selected start time.• To view start time, press the START COOK/CLEAN pad.• OVEN ON indicator light will turn on when the self-clean cycle
begins and will remain on until the end of the cycle.• To view the clean cycle time, press the COOK/CLEAN TIME pad.• At the end of the self-clean cycle, OVEN ON indicator light shuts
off.• The LOCKED indicator light will remain on until oven reaches a
cooler temperature. LOCKED light will flash while door isunlocking, and then shut off when door has unlocked. Ovencavity will be hot to the touch. DO NOT attempt to open doorprior to LOCKED indicator light shutting off.
Interrupting the self-clean cycleTo stop a self-clean cycle that has already started follow these steps.If the interruption occurs mid cycle, the oven will remain locked, eventhough the cycle has stopped, until the oven cavity has cooled to a safetemperature.
1. Turn oven temperature knob to OFF position.2. When oven has cooled to a lower temperature, LOCKED light
shuts off. Door can be unlocked. DO NOT force door. This cancause damage to the latch.
Do I need to prepare?To get the best results from theself-clean cycle, follow these steps:
• Clean excess spills from oveninterior and oven burner well.
• Remove birds or animalssusceptible to smoke or otherfumes from the room oradjoining room.
• Open window if possible.• Make sure oven light cover is
properly in place. Do not usecleaning cycle if it is not.
• Remove oven racks and all cookingutensils from oven.
• Remove items from range topbackguard and storage drawer.These areas can become hot duringself-cleaning cycle.
• The range vents from the centerbottom of the backguard. Makesure this area is unobstructed byremoving all items from backguardand range top.
WARNING!To avoid risk of personal injury, donot touch oven vents, or areaaround vents, during self-cleaning.These areas can become hotenough to cause burns.
CAUTION!To avoid fire or smoke damage,• remove any flammable
materials from storage drawer.Items like plastic containers andpaper manuals can melt or burn.
• clean excess spills beforestarting a self-clean cycle.
RS2310005 Rev. 0 C–20
Bake Pan Placement• Keep pans and baking sheets 2 inches from oven
walls.• Stagger pans placed on different racks so one is
not directly over the other.
Cooking
BAKING TIME GUIDELINES
Cake PanType
Pan size Cups ofbatter
OvenTemp. Minutes
Oval 7 ¾” x 5 ¾” 2 ½ 350°F 25 to 30
13” x 9 ¾” 8 350°F 25 to 30
Round,2” layer
6” 2 350°F 25 to 30
8 “ 3 350°F 30 to 35
14” 10 350°F 50 to 55
Round,3” layer
8” 5 325°F 60 to 65
12” 11 325°F 75 to 80
Half Round,2” layer
18” 9 325°F 60 to 65
Half Round,3” layer
18” 12 325°F 60 to 65
Square 6” 2 350°F 25 to 30
10” 6 350°F 35 to 40
16” 15 1/2 350°F 45 to 50
Baking GuidelinesWhen baking with a new oven, keep in mind temperatures vary from oven to oven. Store-bought thermometers aregenerally not accurate and should not be used to calibrate oven temperatures.
Hints for Cookies,• Shiny, flat cookie sheets should
be used. Avoid cookie pans withhigh sides - this will causeuneven browning on the top.
• Cookie sheet should not touchthe sides of the oven or door.
Cakes,• Follow recipe’s directions for
pan size. Shiny pans work bestfor cakes.
• Cake baked in too large a panwill be thin and dry. Too small apan will be undercooked orunevenly cooked and may spill.
Pies• Pies should be baked in dark or
dull pans to increase browning.• Frozen pies should be heated
on an aluminum cookie sheet.
BAKEWARE GUIDELINES
Dark or dull pans Absorb more heatand result in darkerbrowning.Recommended forpies and breads.
Shiny pans (nosides)
Recommended forcookies.
Shiny pans(sides)
Recommended forcakes
Glass pans Lowerrecommendedoven temperatureby 25°F.
PreheatingIn most cases, you should preheat the oven before baking. After the range control isset, the oven temperature will begin to rise until the desired cooking temperature isreached (approximately 8 to 10 minutes). When cooking temperature is reachedoven signal beeps. For delicate baking (such as puff pastries or souffles),preheat approximately 15–20 minutes before placing food inside oven or wait10 minutes after oven signal beeps before placing food in oven. The extra timecreates a more stable oven temperature.
C–21 RS2310005 Rev. 0
Cooking (cont�d)
Problem Cause
Lopsided cakes(bake unevenly)
Pans touching each other or oven walls.Batter spread unevenly in pan.Uneven heat distribution in oven.Oven is not level.
Cakes, cookies, biscuitstoo brown on bottom or top
Oven not preheated.Pans touching each other or oven walls.Using glass, darkened, warped or dullfinish metal pans.Rack position too high or low.Incorrect use of aluminum foil.Oven temperature too high.
Pies don’t brown Incorrect rack position.Using shiny metal pans.Temperature set too low.
Cakes not done in center Temperature too high.Pan too small.Baking time too short.Pan not centered in oven.
Cakes fall Too much shortening or sugar.Too much or too little liquid.Temperature too low.Old or too little baking powder.Pan too small.Oven door opened frequently (peeking).Insufficient baking.
Excessive shrinkage Too little leavening.Mixing batter too long.Pan too large.Oven temperature too high.Baking time too long.
Cakes high in middleor cracked
Temperature set too high.Overmixing.Too much flour.Pans touching each other or oven walls.
Common Baking Problems If you begin to notice consistent problems refer to the chart below for possible solutions. If results are still poor,contact Amana Consumer Affairs at (800) 843-0304.
Test your cakes for doneness
It may not be the ovenCake problems may be in the mixing ofthe batter. Overbeating can cause cakestructure to break down and excessiveshrinkage of the cake. Underbeatingcan result in lumpy cakes that may notbe cooked thoroughly. All ingredientsshould be at room temperature—notout of the refrigerator. Make sure tofollow the recipes directions for howlong the batter should be mixed.
Cake stuck?Allow cake to cool in cake pan on a rackfor 10 minutes before removing. Largercakes (over 14 inches in diameter) maytake 15 minutes. If the cake has cooledtoo long, reheat in the oven at 250°F fora few minutes.
Better with butterMake sure to follow recipe directionsand use butter or margarine when it islisted. Using a low fat substitute willcause a recipe to fail.
While they are still in the oven. Becauseof variances across individual ovens, itis best to test for the proper consistencyrather than solely relying on time andvisual appearance as an indicator.
RS2310005 Rev. 0 C–22
Cooking (cont�d)
Meat BasicsWhile cooking has always been a talent, it is now becoming a science, also. Amana provides this information as aguide to aid in preparation. For specific questions regarding meat preparation, handling, or storage contactUSDA (United States Department of Agriculture) Meat & Poultry Hotline at (800) 535-4555.
Handling Hints• When shopping, put meat in its
own separate plastic sack tokeep drips off other foods.
• Defrost frozen meats inrefrigerator, not at roomtemperature.
• Keep meat cool and covereduntil it is time to cook.
• Wash hands with warm soapywater before and after handlingmeat or raw egg.
• Thoroughly wash any surface orutensil raw meat or egg touched.
• Do not put cooked meat on thesame plate that held raw meat.
Cooking Tips• Marinate meat in the
refrigerator. Throw out excessmarinade that came into contactwith meat.
• Use an oven-proof meatthermometer.
• Cook meat to internaltemperature recommended byUSDA.
• When reheating foods, heat toan internal temperature of atleast 165 °F.
• While cooking meats, turn overat least once.
Storage Safety• Once carved, refrigerate unused
portion immediately.• Keep hot foods hot and cold
foods cold when serving meals.• Separate cooked foods into
small portions for fast cooling.• Do not store cooked ground
meats or meals containingground meats for longer than3 to 4 days in the refrigerator.
• Do not allow cooked oruncooked meat juices to comeinto contact with ready-to-eatfoods such as fruits orvegetables.
Using a Meat ThermometerWhen using a meat thermometer, remember to insert it at a slight angle, inthe thickest part of the meat, away from fat and bone. The meat should beremoved when 5°F below the desired final temperature. While the meat sitsbefore carving, it will continue to cook internally, raising the last 5°F by itself.
A meat thermometer can• Take the guesswork out of cooking to a desired ‘doneness’.• Help reduce the risk of foodborne illness.
Oven-safe Thermometer• Inserted before the meat is placed in the oven, this thermometer stays
with the meat while it cooks.• The internal temperature will rise slowly as the meat cooks.
Instant-read Thermometer• Not oven safe, these thermometers are placed in the meat when it is
removed from the oven.• While times may vary, an accurate temperature is normally displayed
within one to two minutes.• When using an instant-read, remember to clean the thermometer stem
with warm, soapy water between readings.
TenderizingBraising is only one way to tenderizeless tender cuts. Before cooking, youmay pound, cube, marinate, or usecommercially prepared meattenderizers. You may then use a drymethod to cook the meat.
• Marinades are acidic liquids suchas wine, citrus, or vinegar.Marinades soften meat fibers butonly penetrate about one-fourth ofan inch into the interior of themeat. Do not marinate meat forlonger than 24 hours.
• Pounding with a heavy meat malletbreaks down the connective tissueto tenderize meat.
• Cubing breaks down the structuremore than pounding. Cubing isdone at the meat counter.
• Commercial tenderizers areprimarily enzymes that work on theouter fourth inch on a meat cut.Make sure to follow themanufacturer’s directions.
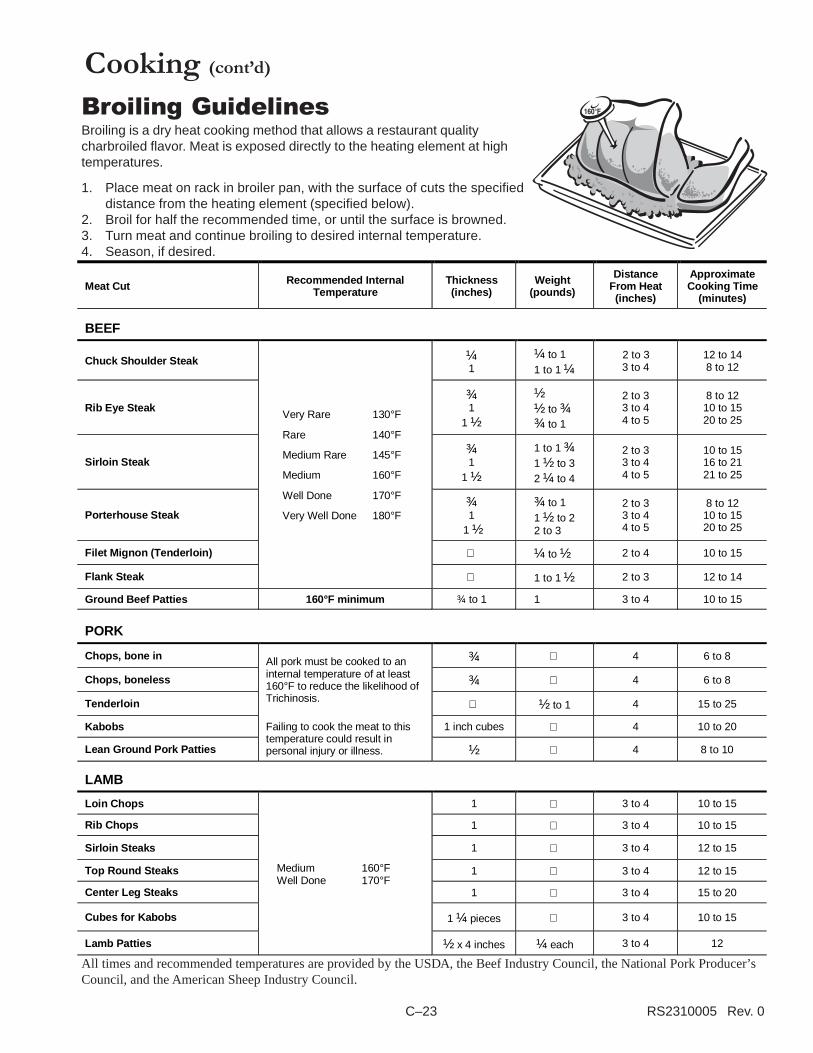
C–23 RS2310005 Rev. 0
Broiling GuidelinesBroiling is a dry heat cooking method that allows a restaurant qualitycharbroiled flavor. Meat is exposed directly to the heating element at hightemperatures.
1. Place meat on rack in broiler pan, with the surface of cuts the specifieddistance from the heating element (specified below).
2. Broil for half the recommended time, or until the surface is browned.3. Turn meat and continue broiling to desired internal temperature.4. Season, if desired.
All times and recommended temperatures are provided by the USDA, the Beef Industry Council, the National Pork Producer’sCouncil, and the American Sheep Industry Council.
Cooking (cont�d)
Meat Cut Recommended InternalTemperature
Thickness(inches)
Weight(pounds)
DistanceFrom Heat(inches)
ApproximateCookin g Time
(minutes)
BEEF
Chuck Shoulder Steak ¼1
¼ to 11 to 1 ¼
2 to 33 to 4
12 to 148 to 12
Rib Eye Steak¾1
1 ½
½½ to ¾¾ to 1
2 to 33 to 44 to 5
8 to 1210 to 1520 to 25
Sirloin Steak¾1
1 ½
1 to 1 ¾1 ½ to 32 ¼ to 4
2 to 33 to 44 to 5
10 to 1516 to 2121 to 25
Porterhouse Steak¾1
1 ½
¾ to 11 ½ to 22 to 3
2 to 33 to 44 to 5
8 to 1210 to 1520 to 25
Filet Mignon (Tenderloin) ¼ to ½ 2 to 4 10 to 15
Flank Steak
Very Rare 130°F
Rare 140°F
Medium Rare 145°F
Medium 160°F
Well Done 170°F
Very Well Done 180°F
1 to 1 ½ 2 to 3 12 to 14
Ground Beef Patties 160°F minimum ¾ to 1 1 3 to 4 10 to 15
PORK
Chops, bone in ¾ 4 6 to 8
Chops, boneless ¾ 4 6 to 8
Tenderloin
All pork must be cooked to aninternal temperature of at least160°F to reduce the likelihood ofTrichinosis. ½ to 1 4 15 to 25
Kabobs 1 inch cubes 4 10 to 20
Lean Ground Pork Patties
Failing to cook the meat to thistemperature could result inpersonal injury or illness. ½ 4 8 to 10
LAMB
Loin Chops 1 3 to 4 10 to 15
Rib Chops 1 3 to 4 10 to 15
Sirloin Steaks 1 3 to 4 12 to 15
Top Round Steaks 1 3 to 4 12 to 15
Center Leg Steaks 1 3 to 4 15 to 20
Cubes for Kabobs 1 ¼ pieces 3 to 4 10 to 15
Lamb Patties
Medium 160°FWell Done 170°F
½ x 4 inches ¼ each 3 to 4 12
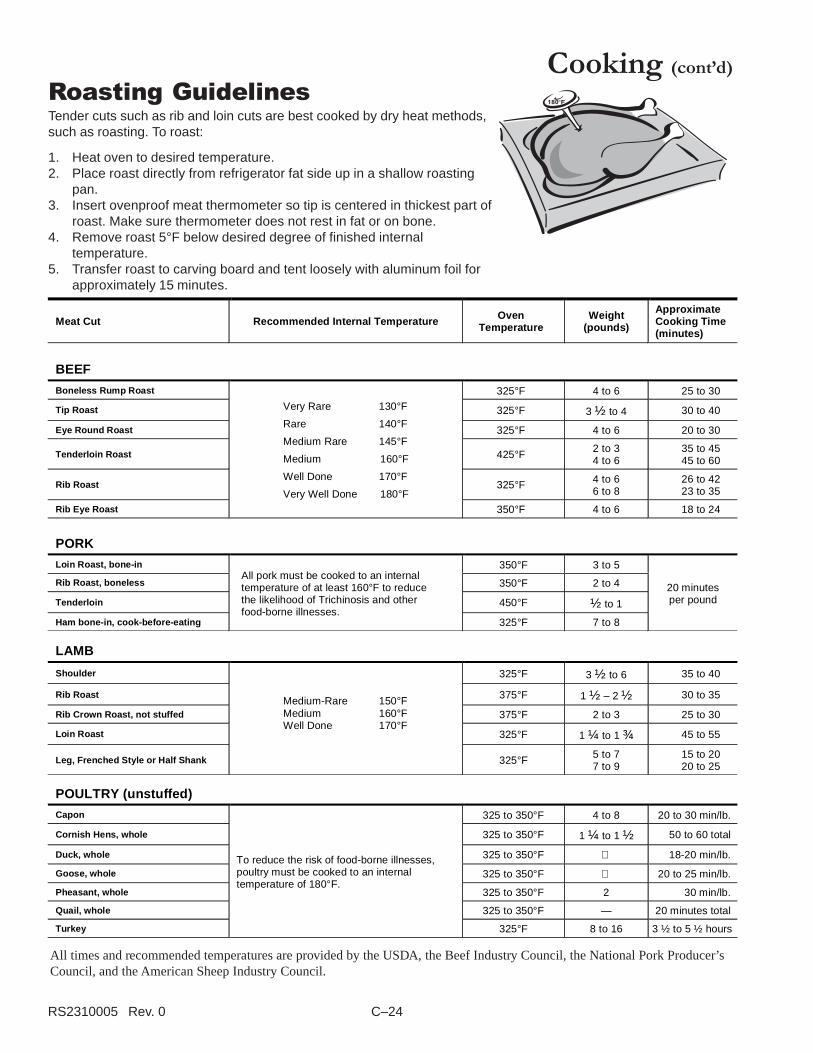
RS2310005 Rev. 0 C–24
Cooking (cont�d)
Roasting GuidelinesTender cuts such as rib and loin cuts are best cooked by dry heat methods,such as roasting. To roast:
1. Heat oven to desired temperature.2. Place roast directly from refrigerator fat side up in a shallow roasting
pan.3. Insert ovenproof meat thermometer so tip is centered in thickest part of
roast. Make sure thermometer does not rest in fat or on bone.4. Remove roast 5°F below desired degree of finished internal
temperature.5. Transfer roast to carving board and tent loosely with aluminum foil for
approximately 15 minutes.
All times and recommended temperatures are provided by the USDA, the Beef Industry Council, the National Pork Producer’sCouncil, and the American Sheep Industry Council.
Meat Cut Recommended Internal Temperature OvenTemperature
Weight(pounds)
ApproximateCooking Time(minutes)
BEEF
Boneless Rump Roast 325°F 4 to 6 25 to 30
Tip Roast 325°F 3 ½ to 4 30 to 40
Eye Round Roast 325°F 4 to 6 20 to 30
Tenderloin Roast 425°F 2 to 34 to 6
35 to 4545 to 60
Rib Roast 325°F 4 to 66 to 8
26 to 4223 to 35
Rib Eye Roast
Very Rare 130°F
Rare 140°F
Medium Rare 145°F
Medium 160°F
Well Done 170°F
Very Well Done 180°F
350°F 4 to 6 18 to 24
PORK
Loin Roast, bone-in 350°F 3 to 5
Rib Roast, boneless 350°F 2 to 4
Tenderloin 450°F ½ to 1
Ham bone-in, cook-before-eating
All pork must be cooked to an internaltemperature of at least 160°F to reducethe likelihood of Trichinosis and otherfood-borne illnesses.
325°F 7 to 8
20 minutesper pound
LAMB
Shoulder 325°F 3 ½ to 6 35 to 40
Rib Roast 375°F 1 ½ – 2 ½ 30 to 35
Rib Crown Roast, not stuffed 375°F 2 to 3 25 to 30
Loin Roast 325°F 1 ¼ to 1 ¾ 45 to 55
Leg, Frenched Style or Half Shank
Medium-Rare 150°FMedium 160°FWell Done 170°F
325°F 5 to 77 to 9
15 to 2020 to 25
POULTRY (unstuffed)
Capon 325 to 350°F 4 to 8 20 to 30 min/lb.
Cornish Hens, whole 325 to 350°F 1 ¼ to 1 ½ 50 to 60 total
Duck, whole 325 to 350°F 18-20 min/lb.
Goose, whole 325 to 350°F 20 to 25 min/lb.
Pheasant, whole 325 to 350°F 2 30 min/lb.
Quail, whole 325 to 350°F — 20 minutes total
Turkey
To reduce the risk of food-borne illnesses,poultry must be cooked to an internaltemperature of 180°F.
325°F 8 to 16 3 ½ to 5 ½ hours
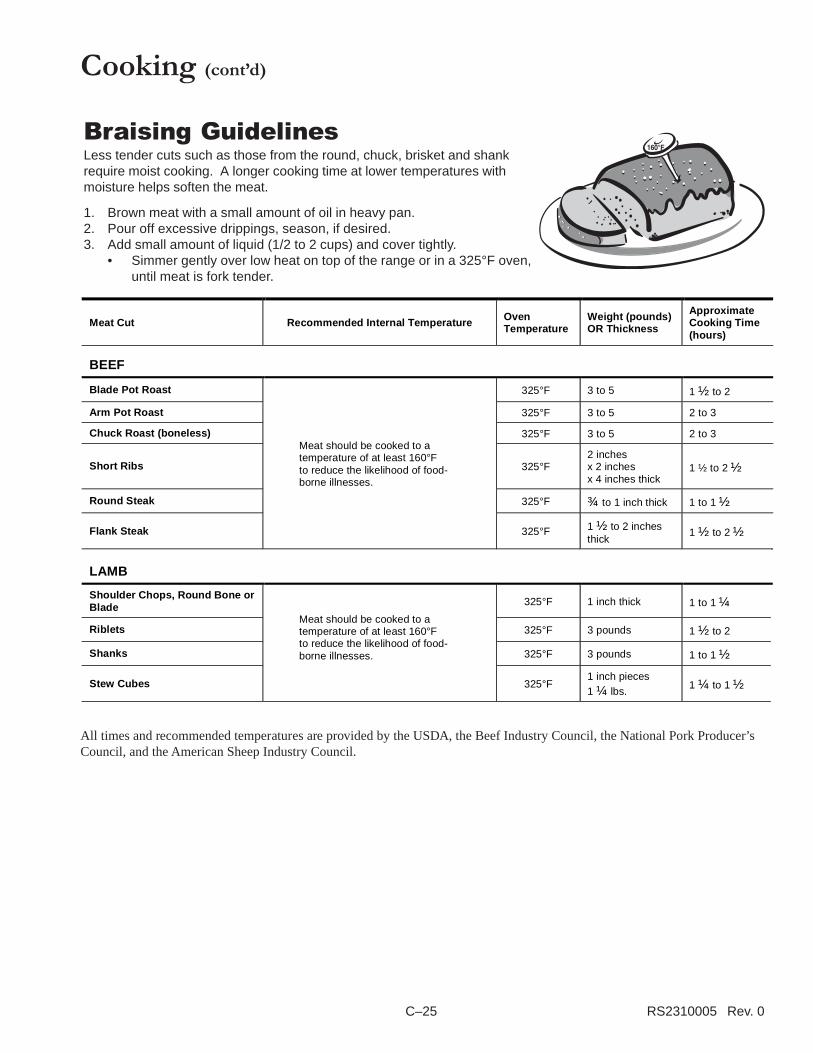
C–25 RS2310005 Rev. 0
Braising GuidelinesLess tender cuts such as those from the round, chuck, brisket and shankrequire moist cooking. A longer cooking time at lower temperatures withmoisture helps soften the meat.
1. Brown meat with a small amount of oil in heavy pan.2. Pour off excessive drippings, season, if desired.3. Add small amount of liquid (1/2 to 2 cups) and cover tightly.
• Simmer gently over low heat on top of the range or in a 325°F oven,until meat is fork tender.
All times and recommended temperatures are provided by the USDA, the Beef Industry Council, the National Pork Producer’sCouncil, and the American Sheep Industry Council.
Cooking (cont�d)
Meat Cut Recommended Internal Temperature OvenTemperature
Weight (pounds)OR Thickness
ApproximateCooking Time(hours)
BEEF
Blade Pot Roast 325°F 3 to 5 1 ½ to 2
Arm Pot Roast 325°F 3 to 5 2 to 3
Chuck Roast (boneless) 325°F 3 to 5 2 to 3
Short Ribs 325°F2 inchesx 2 inchesx 4 inches thick
1 ½ to 2 ½
Round Steak 325°F ¾ to 1 inch thick 1 to 1 ½
Flank Steak
Meat should be cooked to atemperature of at least 160°Fto reduce the likelihood of food-borne illnesses.
325°F 1 ½ to 2 inchesthick
1 ½ to 2 ½
LAMB
Shoulder Chops, Round Bone orBlade 325°F 1 inch thick 1 to 1 ¼
Riblets 325°F 3 pounds 1 ½ to 2
Shanks 325°F 3 pounds 1 to 1 ½
Stew Cubes
Meat should be cooked to atemperature of at least 160°Fto reduce the likelihood of food-borne illnesses.
325°F1 inch pieces1 ¼ lbs.
1 ¼ to 1 ½
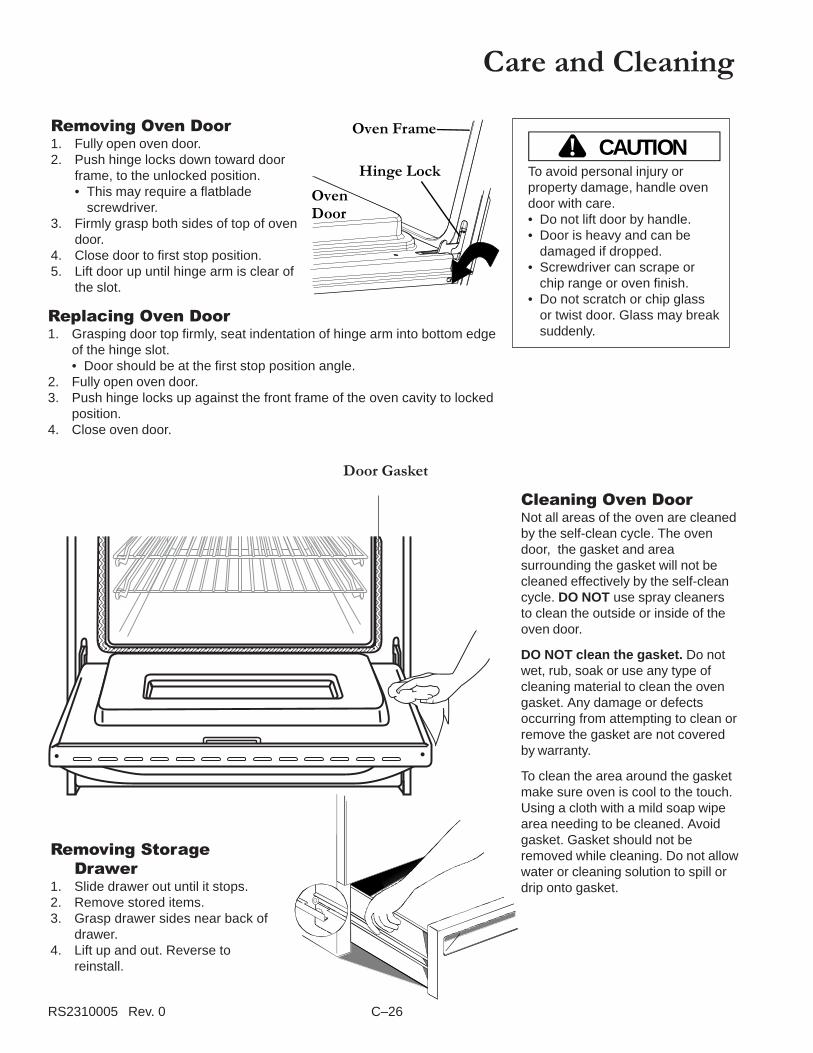
RS2310005 Rev. 0 C–26
Care and Cleaning
Cleaning Oven DoorNot all areas of the oven are cleanedby the self-clean cycle. The ovendoor, the gasket and areasurrounding the gasket will not becleaned effectively by the self-cleancycle. DO NOT use spray cleanersto clean the outside or inside of theoven door.
DO NOT clean the gasket. Do notwet, rub, soak or use any type ofcleaning material to clean the ovengasket. Any damage or defectsoccurring from attempting to clean orremove the gasket are not coveredby warranty.
To clean the area around the gasketmake sure oven is cool to the touch.Using a cloth with a mild soap wipearea needing to be cleaned. Avoidgasket. Gasket should not beremoved while cleaning. Do not allowwater or cleaning solution to spill ordrip onto gasket.
Removing StorageDrawer
1. Slide drawer out until it stops.2. Remove stored items.3. Grasp drawer sides near back of
drawer.4. Lift up and out. Reverse to
reinstall.
Door Gasket
CAUTION!To avoid personal injury orproperty damage, handle ovendoor with care.• Do not lift door by handle.• Door is heavy and can be
damaged if dropped.• Screwdriver can scrape or
chip range or oven finish.• Do not scratch or chip glass
or twist door. Glass may breaksuddenly.
Removing Oven Door1. Fully open oven door.2. Push hinge locks down toward door
frame, to the unlocked position.• This may require a flatblade
screwdriver.3. Firmly grasp both sides of top of oven
door.4. Close door to first stop position.5. Lift door up until hinge arm is clear of
the slot.
Replacing Oven Door1. Grasping door top firmly, seat indentation of hinge arm into bottom edge
of the hinge slot.• Door should be at the first stop position angle.
2. Fully open oven door.3. Push hinge locks up against the front frame of the oven cavity to locked
position.4. Close oven door.
Hinge Lock
OvenDoor
Oven Frame
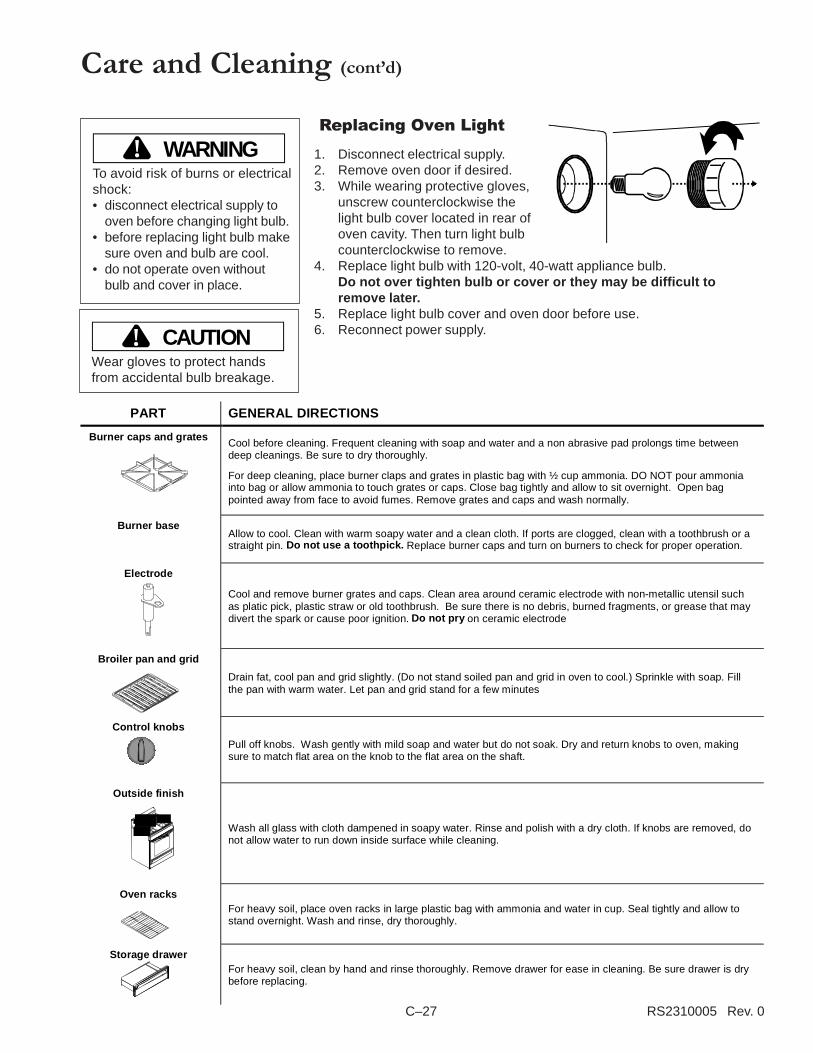
C–27 RS2310005 Rev. 0
Care and Cleaning (cont�d)
CAUTION!Wear gloves to protect handsfrom accidental bulb breakage.
Replacing Oven Light
1. Disconnect electrical supply.2. Remove oven door if desired.3. While wearing protective gloves,
unscrew counterclockwise thelight bulb cover located in rear ofoven cavity. Then turn light bulbcounterclockwise to remove.
4. Replace light bulb with 120-volt, 40-watt appliance bulb.Do not over tighten bulb or cover or they may be difficult toremove later.
5. Replace light bulb cover and oven door before use.6. Reconnect power supply.
WARNING!To avoid risk of burns or electricalshock:• disconnect electrical supply to
oven before changing light bulb.• before replacing light bulb make
sure oven and bulb are cool.• do not operate oven without
bulb and cover in place.
PART GENERAL DIRECTIONS
Burner caps and gratesCool before cleaning. Frequent cleaning with soap and water and a non abrasive pad prolongs time betweendeep cleanings. Be sure to dry thoroughly.
For deep cleaning, place burner claps and grates in plastic bag with ½ cup ammonia. DO NOT pour ammoniainto bag or allow ammonia to touch grates or caps. Close bag tightly and allow to sit overnight. Open bagpointed away from face to avoid fumes. Remove grates and caps and wash normally.
Burner baseAllow to cool. Clean with warm soapy water and a clean cloth. If ports are clogged, clean with a toothbrush or astraight pin. Do not use a toothpick. Replace burner caps and turn on burners to check for proper operation.
Electrode
Cool and remove burner grates and caps. Clean area around ceramic electrode with non-metallic utensil suchas platic pick, plastic straw or old toothbrush. Be sure there is no debris, burned fragments, or grease that maydivert the spark or cause poor ignition. Do not pry on ceramic electrode
Broiler pan and grid
Drain fat, cool pan and grid slightly. (Do not stand soiled pan and grid in oven to cool.) Sprinkle with soap. Fillthe pan with warm water. Let pan and grid stand for a few minutes
Control knobs
Pull off knobs. Wash gently with mild soap and water but do not soak. Dry and return knobs to oven, makingsure to match flat area on the knob to the flat area on the shaft.
Outside finish
Wash all glass with cloth dampened in soapy water. Rinse and polish with a dry cloth. If knobs are removed, donot allow water to run down inside surface while cleaning.
Oven racksFor heavy soil, place oven racks in large plastic bag with ammonia and water in cup. Seal tightly and allow tostand overnight. Wash and rinse, dry thoroughly.
Storage drawerFor heavy soil, clean by hand and rinse thoroughly. Remove drawer for ease in cleaning. Be sure drawer is drybefore replacing.
<GAS
ON
OFF LO ME
D HI LITE
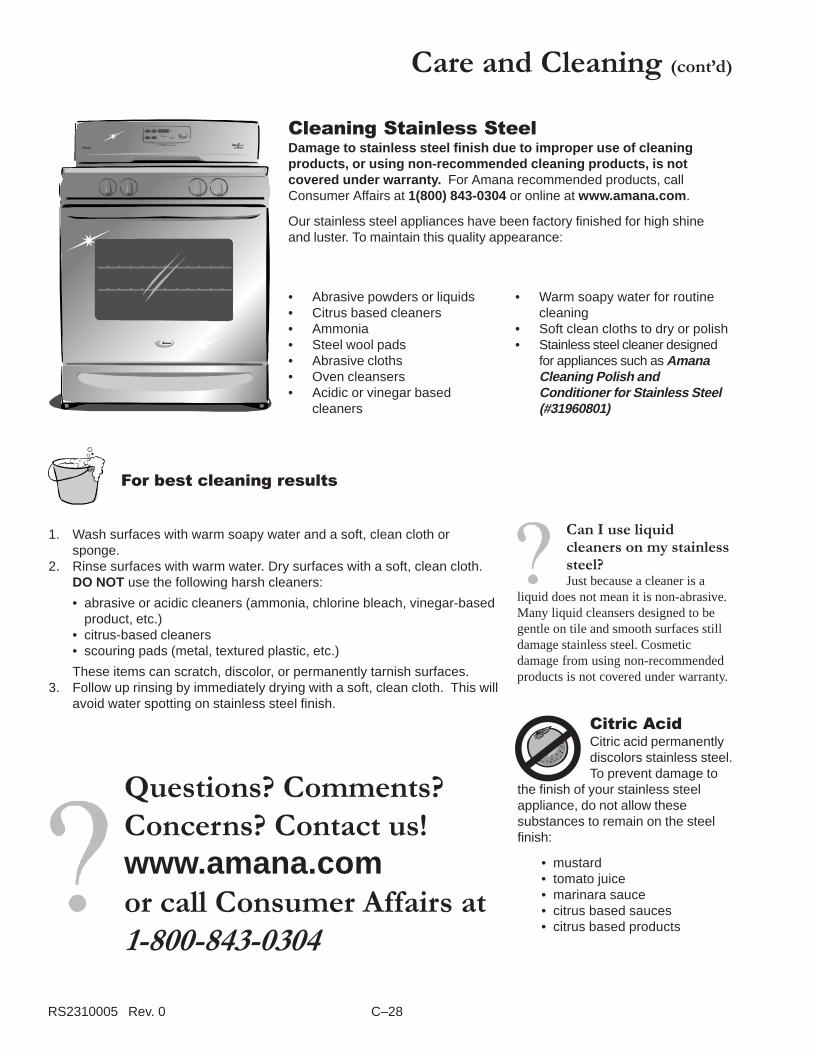
RS2310005 Rev. 0 C–28
Care and Cleaning (cont�d)
Cleaning Stainless SteelDamage to stainless steel finish due to improper use of cleaningproducts, or using non-recommended cleaning products, is notcovered under warranty. For Amana recommended products, callConsumer Affairs at 1(800) 843-0304 or online at www.amana.com .
Our stainless steel appliances have been factory finished for high shineand luster. To maintain this quality appearance:
• Abrasive powders or liquids• Citrus based cleaners• Ammonia• Steel wool pads• Abrasive cloths• Oven cleansers• Acidic or vinegar based
cleaners
• Warm soapy water for routinecleaning
• Soft clean cloths to dry or polish• Stainless steel cleaner designed
for appliances such as AmanaCleaning Polish andConditioner for Stainless Steel(#31960801)
Can I use liquidcleaners on my stainlesssteel?Just because a cleaner is a
liquid does not mean it is non-abrasive.Many liquid cleansers designed to begentle on tile and smooth surfaces stilldamage stainless steel. Cosmeticdamage from using non-recommendedproducts is not covered under warranty.
Citric AcidCitric acid permanentlydiscolors stainless steel.To prevent damage to
the finish of your stainless steelappliance, do not allow thesesubstances to remain on the steelfinish:
• mustard• tomato juice• marinara sauce• citrus based sauces• citrus based products
For best cleaning results
1. Wash surfaces with warm soapy water and a soft, clean cloth orsponge.
2. Rinse surfaces with warm water. Dry surfaces with a soft, clean cloth.DO NOT use the following harsh cleaners:
• abrasive or acidic cleaners (ammonia, chlorine bleach, vinegar-basedproduct, etc.)
• citrus-based cleaners• scouring pads (metal, textured plastic, etc.)
These items can scratch, discolor, or permanently tarnish surfaces.3. Follow up rinsing by immediately drying with a soft, clean cloth. This will
avoid water spotting on stainless steel finish.
Questions? Comments?Concerns? Contact us!www.amana.comor call Consumer Affairs at1-800-843-0304
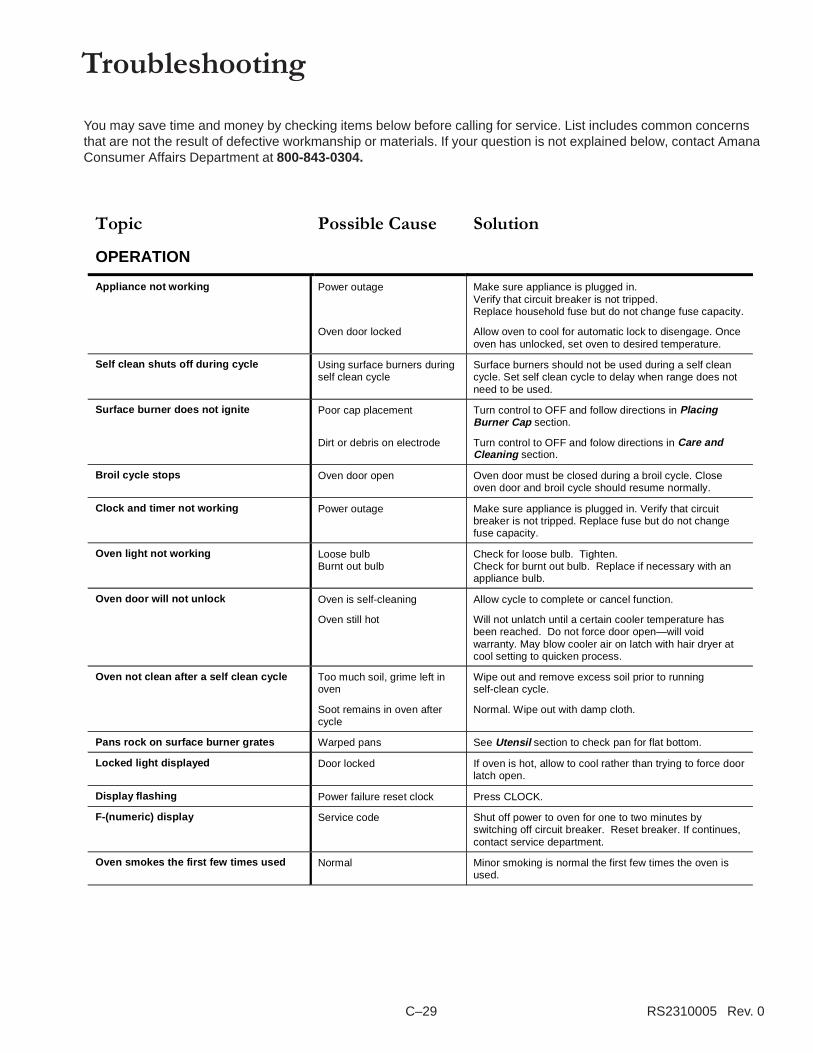
C–29 RS2310005 Rev. 0
Troubleshooting
You may save time and money by checking items below before calling for service. List includes common concernsthat are not the result of defective workmanship or materials. If your question is not explained below, contact AmanaConsumer Affairs Department at 800-843-0304.
Topic Possible Cause Solution
OPERATION
Appliance not working Power outage
Oven door locked
Make sure appliance is plugged in.Verify that circuit breaker is not tripped.Replace household fuse but do not change fuse capacity.
Allow oven to cool for automatic lock to disengage. Onceoven has unlocked, set oven to desired temperature.
Self clean shuts off during cycle Using surface burners duringself clean cycle
Surface burners should not be used during a self cleancycle. Set self clean cycle to delay when range does notneed to be used.
Surface burner does not ignite Poor cap placement
Dirt or debris on electrode
Turn control to OFF and follow directions in PlacingBurner Cap section.
Turn control to OFF and folow directions in Care andCleaning section.
Broil cycle stops Oven door open Oven door must be closed during a broil cycle. Closeoven door and broil cycle should resume normally.
Clock and timer not working Power outage Make sure appliance is plugged in. Verify that circuitbreaker is not tripped. Replace fuse but do not changefuse capacity.
Oven light not working Loose bulbBurnt out bulb
Check for loose bulb. Tighten.Check for burnt out bulb. Replace if necessary with anappliance bulb.
Oven door will not unlock Oven is self-cleaning
Oven still hot
Allow cycle to complete or cancel function.
Will not unlatch until a certain cooler temperature hasbeen reached. Do not force door open—will voidwarranty. May blow cooler air on latch with hair dryer atcool setting to quicken process.
Oven not clean after a self clean cycle Too much soil, grime left inoven
Soot remains in oven aftercycle
Wipe out and remove excess soil prior to runningself-clean cycle.
Normal. Wipe out with damp cloth.
Pans rock on surface burner grates Warped pans See Utensil section to check pan for flat bottom.
Locked light displayed Door locked If oven is hot, allow to cool rather than trying to force doorlatch open.
Display flashing Power failure reset clock Press CLOCK.
F-(numeric) display Service code Shut off power to oven for one to two minutes byswitching off circuit breaker. Reset breaker. If continues,contact service department.
Oven smokes the first few times used Normal Minor smoking is normal the first few times the oven isused.
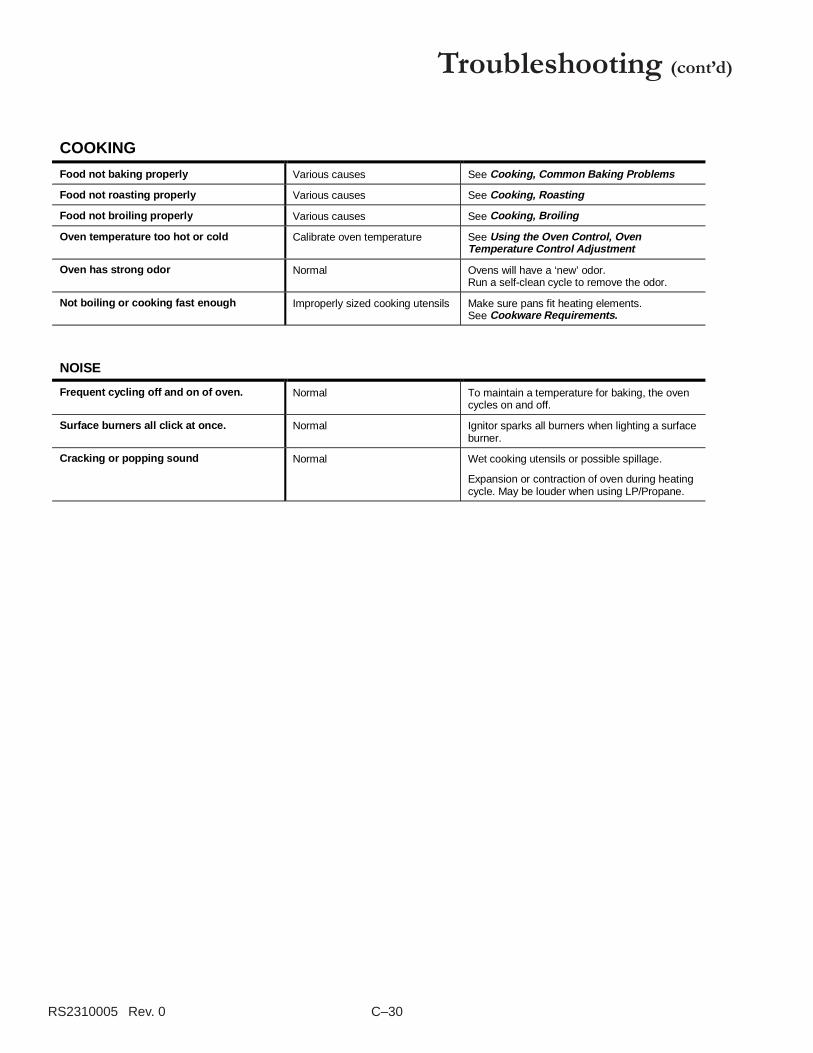
RS2310005 Rev. 0 C–30
Troubleshooting (cont�d)
COOKING
Food not baking properly Various causes See Cooking, Common Baking Problems
Food not roasting properly Various causes See Cooking, Roasting
Food not broiling properly Various causes See Cooking, Broiling
Oven temperature too hot or cold Calibrate oven temperature See Using the Oven Control, OvenTemperature Control Adjustment
Oven has strong odor Normal Ovens will have a ‘new’ odor.Run a self-clean cycle to remove the odor.
Not boiling or cooking fast enough Improperly sized cooking utensils Make sure pans fit heating elements.See Cookware Requirements.
NOISE
Frequent cycling off and on of oven. Normal To maintain a temperature for baking, the ovencycles on and off.
Surface burners all click at once. Normal Ignitor sparks all burners when lighting a surfaceburner.
Cracking or popping sound Normal Wet cooking utensils or possible spillage.
Expansion or contraction of oven during heatingcycle. May be louder when using LP/Propane.

C–31 RS2310005 Rev. 0
2001 Amana AppliancesAmana, Iowa 52204
Part No.36-32038801-0Printed in U.S.A.01/01
Amana Warranty
Full ONE Year WarrantyAmana Appliances will repair or replace, including related labor and travel, any part (f.o.b. Amana Iowa) whichproves defective as to workmanship or materials.
Limited WarrantyAfter one year from the date of original retail purchase, Amana will provide a free part, as listed below, toreplace any part that fails due to a defect in materials or workmanship. The owner will be responsible for payingall other costs including labor, mileage, and transportation.
Second YearAmana will provide replacement part, part only (f.o.b. Amana Iowa), which proves defective as to workmanshipor materials.
Third through Fifth YearAmana will provide replacement glass/ceramic cooktop, part only (f.o.b. Amana Iowa) which proves defectiveas to workmanship or materials. Amana will provide replacement electric surface elements or gas surfaceburners, part only (f.o.b. Amana Iowa) which prove defective as to workmanship or materials.
What is not covered by thesewarranties• Replacement of household fuses, resetting of
circuit breakers, or correction to household wiringor plumbing.
• Normal product maintenance and cleaning,including light bulbs.
• Products with original serial numbers removed,altered, or not readily determined.
• Products purchased for commercial, industrial,rental, or leased use.
• Products located outside of the United Statesor Canada.
• Premium service charges, if the servicer isrequested to perform service in addition to normalservice or outside normal service hours or area.
• Adjustments after the first year.• Repairs resulting from the following:
• Improper installation, exhaust system, ormaintenance.
• Any modification, alteration, or adjustment notauthorized by Amana.
• Accident, misuse, abuse, fire, flood, oracts of nature.
• Connections to improper electrical current,voltage supply, or gas supply.
• Use of improper pans, containers, or accessoriesthat cause damage to the product.
To Receive Warranty ServiceService must be performed by an authorized Amanaservice representative. To schedule service, contactthe Amana dealer where you purchased your applianceor contact Amana Appliances Factory Service.
Amana Appliances Factory Service1-800-628-5782 inside USA
For more information,Amana Appliances Consumer ServicesAmana Appliances2800 220th TrailAmana, Iowa 522041-800-843-0304 inside USA(319) 622-5511 worldwide
When contacting Amana Appliances pleaseinclude the following information:• Your name, address, and telephone number.• Model number and serial number of your appliance
(found on right side of storage drawer opening).• The name and address of your dealer and the date
of purchase.• A clear description of the problem.• Proof of purchase (sales receipt).
Amana Appliances Online • http://www.amana.com
IN NO EVENT SHALL AMANA BE LIABLE FOR INCIDENTAL OR CONSEQUENTIAL DAMAGES.This warranty gives you specific legal rights, and you may have others which vary from state to state. For example, some statesdo not allow the exclusion or limitation of incidental or consequential damages, so this exclusion may not apply to you.