service instruction - allbrit · service instruction sunroof: hollandia 400 ... lower vehicle...
TRANSCRIPT

Service Instruction
Sunroof: Hollandia 400 Doc No.: 1407041A Date: 14-07-2004
Technical Services Webasto Product International © 2003 Webasto Product International
Service on the Hollandia 400 (If not stated otherwise, the pictures in this manual show the Hollandia 400 DeLuxe. - For the Hollandia 400 Classic you will mainly find a different user interface: a switch instead of soft touch operation. However, for the described service procedure there is no difference.)
Removing top cover and headliner
Open folding roof a little to decrease tension on fabric.
Remove edging profile from rear of aperture.
Lower vehicle headlining at rear to gain sufficient access to rear fixings on top cover assembly.
When headliner cover present:
Remove edge protection.
Lower cover at rear side.
Remove nuts and spacers for rear cap (left and right; key no. 13)

Service Instruction
Sunroof: Hollandia 400 Doc No.: 1407041A Date: 14-07-2004
Technical Services Webasto Product International © 2003 Webasto Product International
Fold back rear of top cover.
Remove M4x12 cross-headed screws from end stops on rear corner joints. Push end stops backwards out of slide rails.
max. 10
By operating the interface/switch move top cover backwards and push it carefully out of slide rails.
Warning! Do not bend or push ends of slides!
Remove complete top cover assembly.
Attention! Do not loose elbow levers!
Slide drive cables to end of guide rails.
Use emergency key to open roof manually.
When roof can not be opened further, lift elbow lever with a screwdriver.
Open roof further.
Warning! Do not damage plastic section attached to end of drive cables!

Service Instruction
Sunroof: Hollandia 400 Doc No.: 1407041A Date: 14-07-2004
Technical Services Webasto Product International © 2003 Webasto Product International
Assembling top cover and headliner
Fit elbow levers into drive cable holders at left and right side.
Push front slide into slide rail.
Push elbow lever and “close”-button at the same time until you hear clicking sound.
Move roof further forward slowly. Slide rear slides into slide rail.
Warning! Do not bend or push slides!
Close roof until a 10 cm opening remains.

Service Instruction
Sunroof: Hollandia 400 Doc No.: 1407041A Date: 14-07-2004
Technical Services Webasto Product International © 2003 Webasto Product International
Fix end stops on both sides. Place rear cap and fixing nuts. Adjust canvas tension (see next page).

Service Instruction
Sunroof: Hollandia 400 Doc No.: 1407041A Date: 14-07-2004
Technical Services Webasto Product International © 2003 Webasto Product International
Adjust canvas tension
Slide rear section of top cover evenly rearwards. Tighten top cover fixing nuts.
Close top cover and check tension.
Top cover should close exactly to the right point. The cover should still be straight and there should be no gap at front side.
When top cover is too tight, this will cause wind noises and/or leaks when driving.
Check function of Hollandia 400.
With headliner cover:
Fix cover and edge protection.

Service Instruction
Sunroof: Hollandia 400 Doc No.: 1407041A Date: 14-07-2004
Technical Services Webasto Product International © 2003 Webasto Product International
When headliner covers present:
Install covers.
Service Instruction
Sunroof: Hollandia 400 Doc No.: 1407041A Date: 14-07-2004
Technical Services Webasto Product International © 2003 Webasto Product International
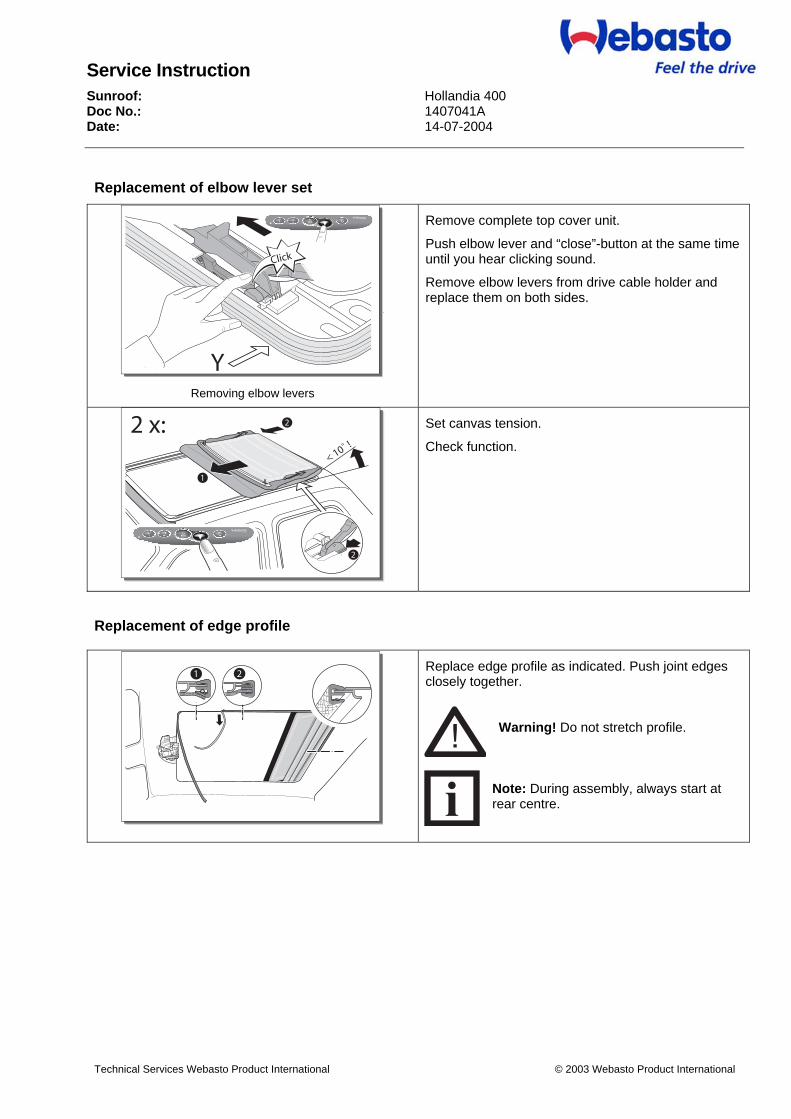
Replacement of elbow lever set
Removing elbow levers
Remove complete top cover unit.
Push elbow lever and “close”-button at the same time until you hear clicking sound.
Remove elbow levers from drive cable holder and replace them on both sides.
Set canvas tension.
Check function.
Replacement of edge profile
Replace edge profile as indicated. Push joint edges closely together.
Warning! Do not stretch profile.
Note: During assembly, always start at rear centre.
Service Instruction
Sunroof: Hollandia 400 Doc No.: 1407041A Date: 14-07-2004
Technical Services Webasto Product International © 2003 Webasto Product International
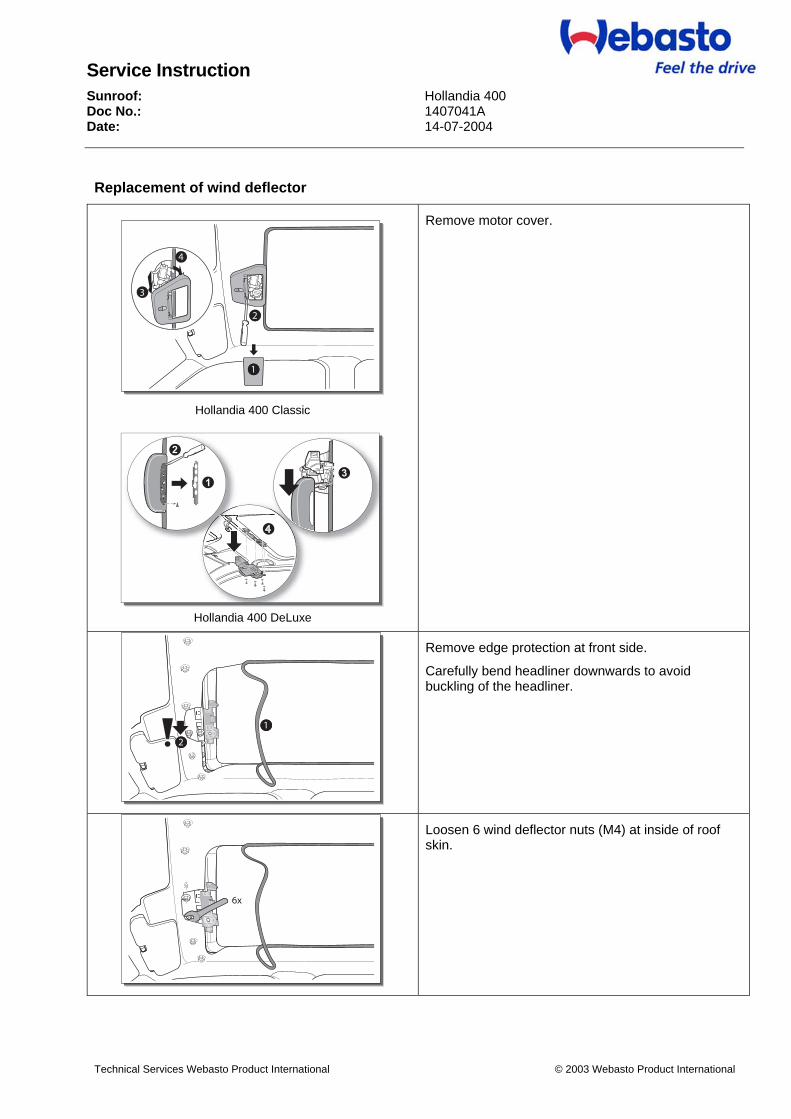
Replacement of wind deflector
Hollandia 400 Classic
Hollandia 400 DeLuxe
Remove motor cover.
Remove edge protection at front side.
Carefully bend headliner downwards to avoid buckling of the headliner.
Loosen 6 wind deflector nuts (M4) at inside of roof skin.

Service Instruction
Sunroof: Hollandia 400 Doc No.: 1407041A Date: 14-07-2004
Technical Services Webasto Product International © 2003 Webasto Product International
Carefully remove wind deflector.
Re-paint damaged roof skin if necessary.
Place new wind deflector and tighten nuts.
Re-install edge protection and motor.

Service Instruction
Sunroof: Hollandia 400 Doc No.: 1407041A Date: 14-07-2004
Technical Services Webasto Product International © 2003 Webasto Product International
Replace cross bar Remove top cover. Pull slides (13) sideways out of roof bows (“cross bars”, 6). Pull cross bar out of top cover and replace.
Reassemble by following sequence in reverse.
Service Instruction
Sunroof: Hollandia 400 Doc No.: 1407041A Date: 14-07-2004
Technical Services Webasto Product International © 2003 Webasto Product International
Disassemble top cover and headliner Remove top cover and headliner. Lift out top cover at endcap wire of headliner (4) and at slide cover straps (13). Loosen headliner (7) at front cover cap (Velcro strip) and remove holding loop left and right. Loosen front cover cap from front slide, left and right (2 cross-head screws M 6 x 10).
Lift out headliner by headliner hook (14) and holding strap of rear cover cap. Pull out two rear slides (13) sideways from cross bars (6). Lift top cover by holding straps out of headliner. Push connecting strip of headliner at rear of top cover to side out of aluminum rail and remove top cover.
Reassemble by following sequence in reverse.
Set canvas tension. Replace headliner
Open top cover halfway. Remove top cover left and right from endcap wire (4) and pull endcap wires off headliners.
Pull headliner sideways out of top cover and replace.
Important: Carefully insert new headliner into frame. Do not damage headliner.
Insert endcap wires onto headliners and secure top cover into endcap wire.
Check function. Replace endcap wire
Open top cover halfway and remove from endcap wire sideways, left and right (4). Pull off endcap wire from headliner and replace. Replace leather top left and right on endcap wire.
Check function.
Replace headliner hook Rear headliner hook: remove top cover from end cap wires (4) and slide cover straps.
Front headliner hook: remove complete leather top unit from folding roof.
Remove headliner from headliner hooks (14).
On top side of slide, push back stop lug of headliner hook and pull down out of slide. Clip in new headliner hook.
Rear headliner hook: insert headliner and leather top.
Check function.
Replace drive cable set
Remove top cover. Remove elbow levers (15) from drive cable holder (16) and replace. Remove motor cover and motor. Pull left and right drive cables out of slide rails. Lightly grease new drive cables with acid-free grease and insert into slide rails.
Important: Before further assembly, drive cables (16) must be adjusted to ensure that folding roof moves parallel:
Push drive cable (16) by hand, left and right evenly forward until stopper is reached. Set up motor and fix. Do not tilt motor when tightening screws. Move drive cables and elbow levers with motor into open position.
Reassemble by following sequence in reverse.

Service Instruction
Sunroof: Hollandia 400 Doc No.: 1407041A Date: 14-07-2004
Technical Services Webasto Product International © 2003 Webasto Product International
Replace inner seal
Remove motor cover and vehicle headliner completely from vehicle. Remove counter frame (11). Separate cable from motor and remove complete folding roof units from vehicle roof upwards.
Note: Lift folding roof frame at rear edge first and then pull out at an angle, backwards, out of roof opening.
Fold back rear section of top cover. Remove inner seal from frame. Clean frame and fit new seal.
Important: On upper side of roof frame seal must be inserted continuously exactly in groove of frame to prevent seal being pushed aside (causing leaks / wind noises).
Reassemble by following sequence in reverse. Replace frame assembly
Remove motor cover and vehicle headliner completely from vehicle. Remove counter frame (11). Separate cable from motor and remove complete folding roof units from vehicle roof upwards.
Note: Lift folding roof frame at rear edge first and then out at an angle, backwards, out of roof opening.
Remove complete leather top unit from roof frame. Remove motor and pull drive cables left and right (16) backwards out of slide rails. Finish new frame in reverse order.
It is important that drive cables are adjusted. Push drive cable (16) forward to stopper on left and right evenly by hand. Set up motor and fix it. Do not tilt motor when tightening screws. Move drive cable into open position.
Reassemble by following sequence in reverse.
Replace slide bar set complete
Remove top cover. Pull slides (13) sideways from endcaps and replace.
Reassemble by following sequence in reverse order.

Service Instruction
Sunroof: Hollandia 400 Doc No.: 1407041A Date: 14-07-2004
Technical Services Webasto Product International © 2003 Webasto Product International
Replace end stop Dismantle folding roof. Removing fixing screws for stopper (M4 x 12) and replace stopper (25). Set canvas tension. Complete folding roof in reverse order.
Replace spacer Dismantle folding roof. Remove spacer (24) from spacer bolt (M8) and mount new spacer. Fix rear cover cap to roof frame. Set canvas tension. Complete folding roof in reverse order.
Replace motor assembly Important: When motor has been removed from folding roof, top cover or headliner must not be moved as this would destroy basic setting (parallel running) (Causing wind noises, leaks!). Remove motor cover. Disconnect motor from wiring harness. Loosen fixing screws (2 M5 x 15, 1 M5 x 35) and remove motor. Set up and fix new motor.
Important: Do not tilt motor when tightening screws.
Re-assemble in reverse order.
22
9
11
1719 12
20
10
24
25