servicenow user guide - stanford uit - university it · pdf fileservicenow user guide ! ......
TRANSCRIPT

Stanford University https://stanford.service-‐now.com/ February 17, 2016
Acorio LLC http://www.acorio.com/ 260 Franklin St., 3rd Floor Boston, MA 02110
ServiceNow User Guide
<CLIENT LOGO HERE>

Page 2 of 31 Acorio, LLC. Confidential and Proprietary.
1. Table of Contents 1. ServiceNow Overview ...................................................................................................................................... 4
1.1 Introduction to ServiceNow ............................................................................................................................. 4 1.2 Supported Browsers .......................................................................................................................................... 4
2. ServiceNow 101 – An Introduction to the Environment ........................................................................ 4 2.1 Login to ServiceNow .......................................................................................................................................... 4 2.2 Navigation Overview ......................................................................................................................................... 5 2.3 Applications and Modules ............................................................................................................................... 5
2.3.1. Using the application filter ....................................................................................................................................... 6 2.4 The Edge .............................................................................................................................................................. 6 2.5 Customizing Instance Appearance .................................................................................................................. 7 2.6 Working with Lists .............................................................................................................................................. 7
2.6.1. Title Menu ...................................................................................................................................................................... 8 2.6.2. Personalize List ............................................................................................................................................................. 9 2.6.3. Go to / Search ............................................................................................................................................................... 9 2.6.4. Breadcrumbs .............................................................................................................................................................. 10 2.6.5. List Position and Navigation .................................................................................................................................. 11 2.6.6. Column Headings ...................................................................................................................................................... 11 2.6.7. Reference Fields ........................................................................................................................................................ 12
3. Service Desk ............................................................................................................................................... 12 3.1 Modules ............................................................................................................................................................. 12 3.2 Creating a call .................................................................................................................................................... 13
4. Incident Management .............................................................................................................................. 14 4.1 Introduction to Incident Management ......................................................................................................... 14 4.2 Incident Form .................................................................................................................................................... 14
4.2.1. Knowledge-‐Centered Support (KCS) .................................................................................................................. 16 4.3 Basic Principles ................................................................................................................................................. 17
4.3.1. SLAs (Service Level Agreements) ......................................................................................................................... 18 4.3.2. Mirrored Incidents to Stanford Health Care .................................................................................................... 19 4.3.3. Email Notifications ................................................................................................................................................... 21 4.3.4. Related Records ........................................................................................................................................................ 21 4.3.5. Resolving an Incident .............................................................................................................................................. 22 4.3.6. Initiating a Request from an Incident ................................................................................................................ 22 4.3.7. Incident – Important Modules ............................................................................................................................. 23 4.3.8. Secure Incidents ........................................................................................................................................................ 24
5. Request Management .............................................................................................................................. 24 5.1 Generating a Request from a Call .................................................................................................................. 24 5.2 Generating a Request from the Service Catalog ......................................................................................... 25 5.3 Email Notifications from Requests .............................................................................................................. 26 5.4 Catalog Task SLAs (Service Level Agreements) ............................................................................................ 27 5.5 Secure Requests ............................................................................................................................................... 28
6. Reporting and Dashboards ...................................................................................................................... 28 6.1 ITIL Homepage .................................................................................................................................................. 28 6.2 Adding Gauges .................................................................................................................................................. 29
Page 3 of 31 Acorio, LLC. Confidential and Proprietary.
6.2.1. Adding Existing Gauges to a Homepage ........................................................................................................... 29 6.2.2. Viewing and Creating Reports .............................................................................................................................. 30 6.2.3. Creating Reports from Lists ..................................................................................................................................... 30
7. Chat .............................................................................................................................................................. 30
8. Visual Task Boards ..................................................................................................................................... 31
9. Publishing Knowledge Articles ................................................................................................................ 31

Page 4 of 31 Acorio, LLC. Confidential and Proprietary.
1. ServiceNow Overview
1.1 Introduction to ServiceNow ServiceNow is a suite of cloud-‐based applications for enterprise IT management. It is built and designed around Information Technology Infrastructure Library (ITIL) principles. Organizations deploy ServiceNow to create a single system of record for enterprise IT, lower operational costs, and enhance efficiency. With a bit of description, some screen shots and a few bullet points to help you quickly find needed hints down the road, we hope to set you up for success as you learn and use this new tool.
1.2 Supported Browsers This document and the screenshots contained in it were captured using a browser supported by ServiceNow. A list of supported browsers can be found here: http://wiki.servicenow.com/index.php?title=Supported_Web_Browsers#Generally_Supported_Web_Browsers
2. ServiceNow 101 – An Introduction to the Environment
2.1 Login to ServiceNow When you navigate to the ServiceNow instance at https://stanford.service-‐now.com/ the first thing you will see is a login prompt as pictured below. Your username and password will be your SUNet id and password.
Once logged in, you will be presented with a homepage initially tailored to your role. You can add content to your homepage by clicking the ‘Add content’ link in the upper left of the content pane. Additionally, if content is not useful or interesting to you, you can remove individual content by hovering over the content box clicking on the ‘x’ ( )that appears in the upper right of the item. This will create a personalized version of this homepage for you.

Page 5 of 31 Acorio, LLC. Confidential and Proprietary.
2.2 Navigation Overview
The primary user interface is divided into four areas:
§ A) The Edge: on the left-‐most side of the page; allows for bookmark-‐keeping and other functions § B) Banner frame: runs across the top of every page and contains a logo and global navigation
controls § C) Application navigator or left-‐navigation bar: provides links to all applications and modules § D) Content frame: displays information, such as lists, forms and homepages
2.3 Applications and Modules In the Application Navigator or ‘Left-‐Nav’ area, you will see gray rectangular boxes with a name. These boxes represent ‘Applications’ within ServiceNow and denote different process areas. The number of Applications available to your view will vary according to your role. Click on the grey rectangular box to expand and collapse the Application area. Upon expanding an Application, you will see a number of links related to that Application. These ‘Modules’ are where work gets started within ServiceNow. Modules can lead to a list of records, a form for capturing data, a report, calendars, overview pages, and other less frequently seen
A
BA
CA
D

Page 6 of 31 Acorio, LLC. Confidential and Proprietary.
data types. Each module has a star icon beside the name. Use these icons to select and view favorite
modules. The star icon for each module can be selected ( ) or deselected ( ). These icons are used to select frequently used modules and then display only the favorites in the application navigator.
2.3.1. Using the application filter
The ‘Filter’ box ( )is a good place to find a needed application or module. Type in a term describing your intended function (e.g., “incident”) to filter the items in the left-‐nav to those containing your search term.
2.4 The Edge The vertical gray bar on the left side of screen is known as “the edge.” The edge allows users to control screen allocation and quickly navigate through the system.
§ Toggle Navigator: Allows the user to hide the navigator when more screen space is required. § List and Form View: view a list and an item from the list (or a new item form) at the same time. Split screen can be especially helpful if you are viewing data in a list. The list can appear in one pane, with selected data being displayed on the other. Once you have engaged split screens, you can resize the individual content panes by clicking and dragging the dividers between screens to the desired size. § Tagged Documents: Tagged documents allows a user to group related records under the same tag. When right clicking a record, a user can select “Assign Tag” allowing for easier access in the future. § Bookmarks: Users can bookmark their most used modules, which fill in the bottom of the edge. Bookmarks are easily added and removed.
Bookmarkable links
§ Modules from the navigator § Breadcrumbs from lists § Links from lists § Reports
To open a bookmark as a flyout window without navigating away from your current pane of work data, hover over the bookmark, select ‘Edit Bookmark’ and check the box titled ‘Flyout.’ Now clicking on the bookmark link will open a flyout of the bookmarked data.

Page 7 of 31 Acorio, LLC. Confidential and Proprietary.
Flyout windows: open informational windows without navigating away from your working panes.
§ Quick Tip: Anywhere in ServiceNow where you see a circled “i” ( ), an informational flyout is available. Hovering over this icon will show the details of the record in the reference field. Clicking on the icon will navigate to the record.
2.5 Customizing Instance Appearance The gear icon in the banner frame (next to the logout button) contains the preferences section. These preferences control the page layout. We will focus on two most commonly used: The Compact View preference determines how large the interface is. When compact view is on, the text and items on the screen will be smaller, and there will be less white space between items, so the user can see more on the screen at the same time. The Tabbed forms preference controls the format of the form page. At the bottom of most forms there are additional forms and items necessary. By default, these forms and items will occur in a vertical view. Tabbed forms will separate each additional item into its own tab, lessening the need for scrolling.
2.6 Working with Lists Lists display information from a data table. Users can search, sort, filter, and edit data in lists. Lists also may be embedded in forms and may be hierarchical (have sub-‐lists). The list interface contains four main elements:
§ Title bar § Breadcrumb navigator § Column headings § Fields In addition, there are four list functions that help navigate and define lists:
§ Title Menu § Go to / Search (to search on different fields) § List Navigation (to scroll to different pages) § Personalize List Gear (to add/remove columns)
We will review these features below.
Page 8 of 31 Acorio, LLC. Confidential and Proprietary.
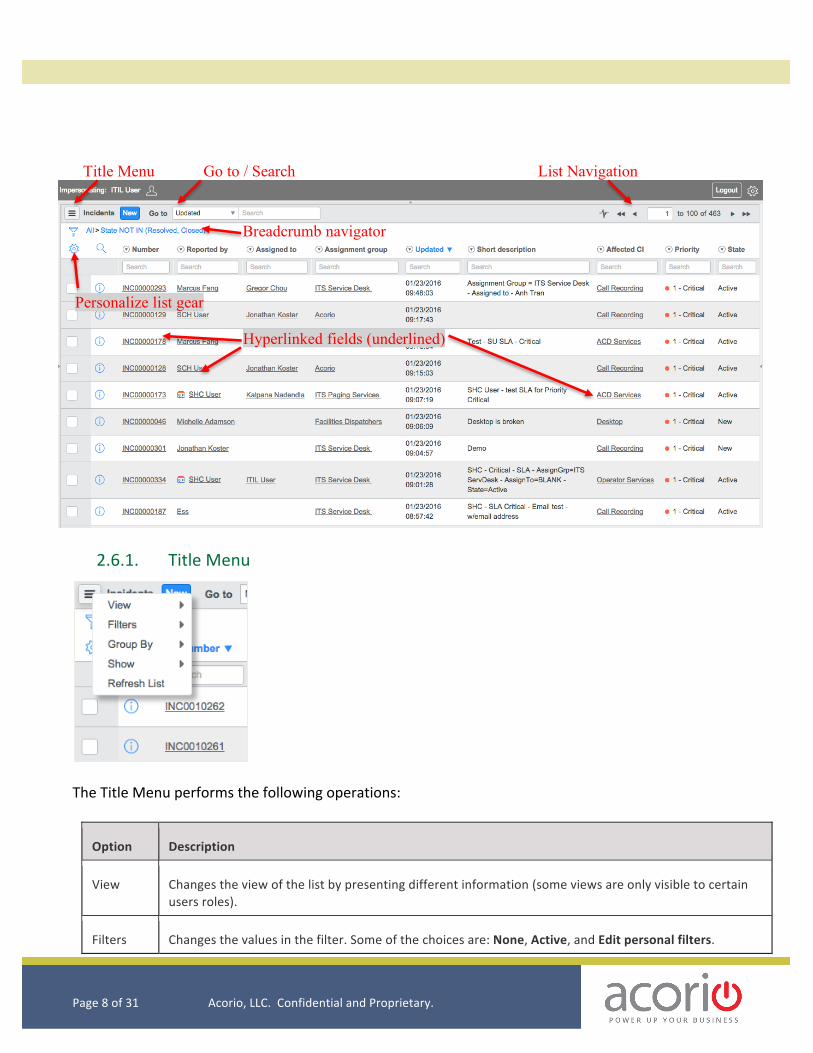
2.6.1. Title Menu
The Title Menu performs the following operations:
Option Description
View Changes the view of the list by presenting different information (some views are only visible to certain users roles).
Filters Changes the values in the filter. Some of the choices are: None, Active, and Edit personal filters.
Go to / Search List Navigation
Breadcrumb navigator
Personalize list gear
Hyperlinked fields (underlined)
Title Menu

Page 9 of 31 Acorio, LLC. Confidential and Proprietary.
2.6.2. Personalize List You can customize the appearance of list data such as incidents or tasks to meet your needs. For example, by right-‐clicking on the header of a list of information, or clicking the ‘gear’ ( ) at the upper left of a list, you can add columns with additional fields.
2.6.3. Go to / Search By default, a list view includes a Go to search option that includes a choice list and a search field. The choice list contains a general text search option in addition to an option for each column name in the list. The column names are actually the field names on the record form. Use the choice list in conjunction with the search field to filter the list of records by the desired field.
To use the Go to search:
1. Navigate to a list of records. 2. If necessary, modify the fields for the
list of records by using the Personalize
Group by Groups records in a list by the values in a selected field from that table. Any field from the table can be used as a group filter, whether or not it appears in the list.
Show Changes the number of rows shown on each page of the list of records.
Refresh List
Refreshes the list to show changes immediately.
Page 10 of 31 Acorio, LLC. Confidential and Proprietary.
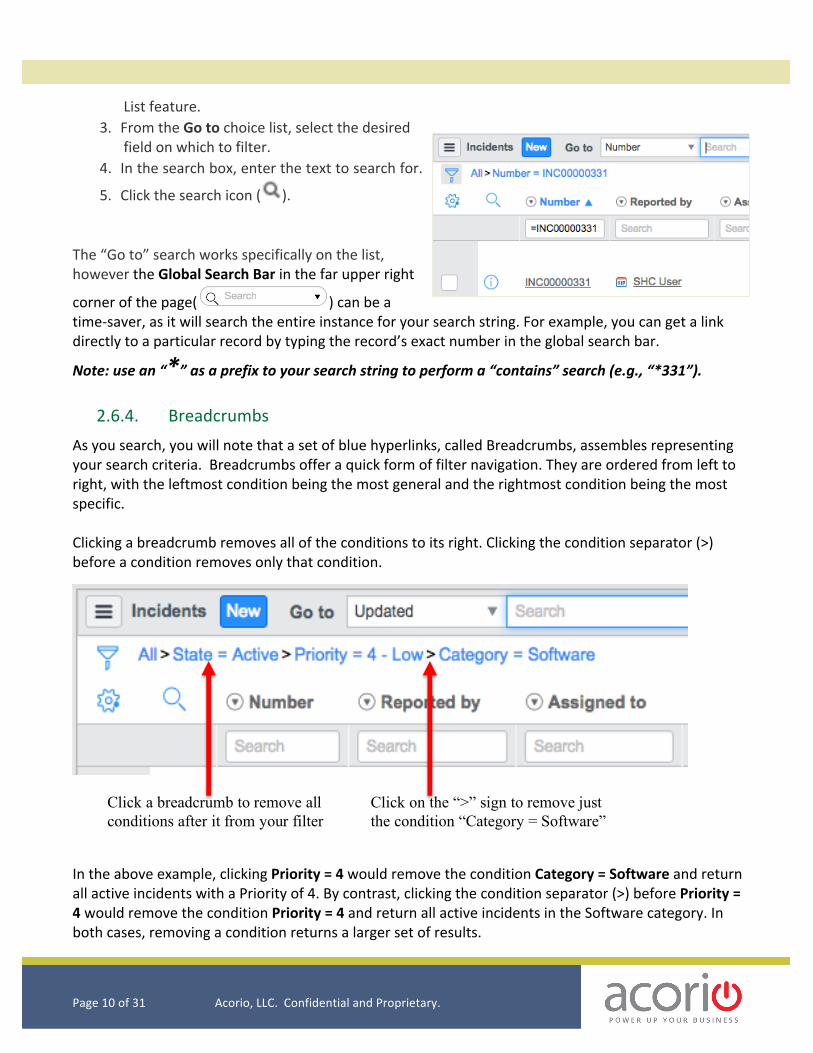
List feature. 3. From the Go to choice list, select the desired
field on which to filter. 4. In the search box, enter the text to search for.
5. Click the search icon ( ).
The “Go to” search works specifically on the list, however the Global Search Bar in the far upper right
corner of the page( ) can be a time-‐saver, as it will search the entire instance for your search string. For example, you can get a link directly to a particular record by typing the record’s exact number in the global search bar.
Note: use an “*” as a prefix to your search string to perform a “contains” search (e.g., “*331”).
2.6.4. Breadcrumbs As you search, you will note that a set of blue hyperlinks, called Breadcrumbs, assembles representing your search criteria. Breadcrumbs offer a quick form of filter navigation. They are ordered from left to right, with the leftmost condition being the most general and the rightmost condition being the most specific. Clicking a breadcrumb removes all of the conditions to its right. Clicking the condition separator (>) before a condition removes only that condition.
In the above example, clicking Priority = 4 would remove the condition Category = Software and return all active incidents with a Priority of 4. By contrast, clicking the condition separator (>) before Priority = 4 would remove the condition Priority = 4 and return all active incidents in the Software category. In both cases, removing a condition returns a larger set of results.
Click a breadcrumb to remove all conditions after it from your filter
Click on the “>” sign to remove just the condition “Category = Software”

Page 11 of 31 Acorio, LLC. Confidential and Proprietary.
Finally, clicking Incidents or All goes to the top of the hierarchy, removing all conditions and returning all incidents in the system.
Alternatively, for a quicker less-‐defined sort, you can right-‐click on a value in the list to filter out records with a matching value (‘Filter Out’), or limit the displayed list to records with an identical value (‘Show Matching’).
2.6.5. List Position and Navigation You can easily move between list pages using the navigation feature pictured here:
In the box with ‘1’ above, you can enter the desired starting record number. For example, in a list displaying 50 records at a time, entering 12 in the box would display records 12 through 50. The single arrows navigate one page at a time backwards or forwards. The double arrows move to the beginning or end of the list. The size of each individual page (i.e., number of records per page) can be adjusted in the Title Menu described above. Once the form is found, best practice is to follow the intended flow of data entry since many fields are populated based on data entered in a previous field. Tabbing between fields can help ensur you enter data in the correct order.
2.6.6. Column Headings Clicking on the column header gives you the following capabilities:
§ Sorting: Left-‐click the column name to sort the list in ascending order. Click again to sort in reverse order.
§ Search: Click the search icon ( ) at the left of the column header to add individual search boxes for each column.
Page 12 of 31 Acorio, LLC. Confidential and Proprietary.
Quick Tip: By default, ServiceNow will search for records that start with the input in the field. Begin the query with a “*” to find all records containing your search string, or begin the query with a “%” to find records that end with the input.
§ Right-‐click menu, also called context menu: right clicking opens these controls: § Sort (a to z) and (z to a): -‐ sort in ascending and descending order. § Group By: aggregates records by a field. § Bar and Pie Chart: create quick bar and pie chart reports based on the filter criteria of
the list. Users can then modify these reports or create gauges (depending on access rights).
§ Export: exports data to Excel, CSV, or PDF.
2.6.7. Reference Fields Within the list, underlined fields represent a reference to a record in another table (e.g., a user record in the user table). Clicking on these fields will take you to that referenced item. While working in the ServiceNow environment there are also several universal settings that can be applied to the interface on an individual basis.
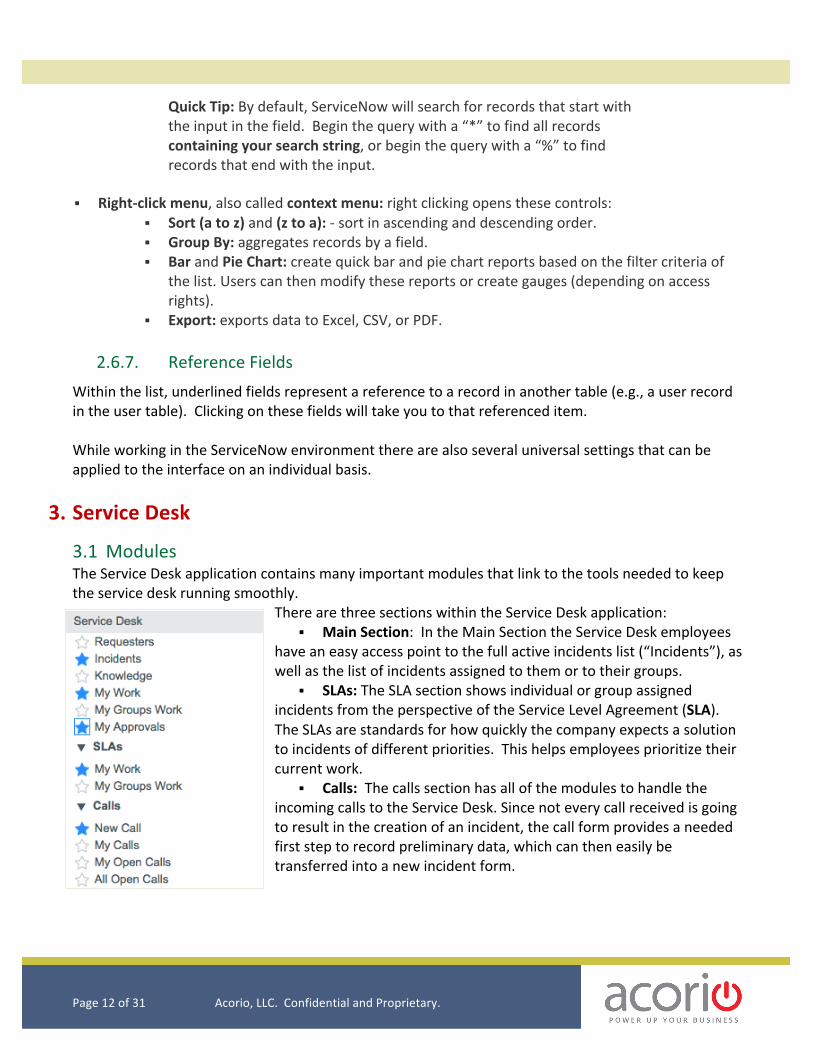
3. Service Desk 3.1 Modules The Service Desk application contains many important modules that link to the tools needed to keep the service desk running smoothly.
There are three sections within the Service Desk application: § Main Section: In the Main Section the Service Desk employees
have an easy access point to the full active incidents list (“Incidents”), as well as the list of incidents assigned to them or to their groups.
§ SLAs: The SLA section shows individual or group assigned incidents from the perspective of the Service Level Agreement (SLA). The SLAs are standards for how quickly the company expects a solution to incidents of different priorities. This helps employees prioritize their current work.
§ Calls: The calls section has all of the modules to handle the incoming calls to the Service Desk. Since not every call received is going to result in the creation of an incident, the call form provides a needed first step to record preliminary data, which can then easily be transferred into a new incident form.

Page 13 of 31 Acorio, LLC. Confidential and Proprietary.
3.2 Creating a call When creating a call, a user will fill out the form with the information provided by the caller. A call form will be filled out for every incoming call into the Service Desk. The call form can range from simply relaying that the wrong number was dialed to collecting data about an incident to be transferred over to an incident report.
You will notice that whenever possible work will be done for you. For example, the Primary Affiliation field will only be displayed after Requested For has been filled in, and it is always read-‐only since the system stores that information automatically in the user’s record. Take care in noting the call type when the purpose of the call has been determined.
The options lead to different actions within the system. Notably for this guide, the incident and request option will lead to the creation of their respective forms.
Note, too, that KCS (Knowledge-‐Centered Support) results will load at the bottom of the call form based on the text in the Short Description Field.

Page 14 of 31 Acorio, LLC. Confidential and Proprietary.
After filling out the call form and clicking on “Save and Go” in the upper right-‐hand corner, you will see that the call has been transferred to an incident and you will be taken to the associated incident form.
4. Incident Management
4.1 Introduction to Incident Management The goal of Incident Management is to restore normal service operation as quickly as possible following an incident, while minimizing impact to business operations and ensuring quality is maintained.
4.2 Incident Form
You will see a row of buttons along the top of the Incident Form. These buttons will change depending upon the State of the Incident and your role within ServiceNow. These buttons have the following functions:

Page 15 of 31 Acorio, LLC. Confidential and Proprietary.
§ Save: Saves your changes to the form and stays on the Incident form. § Save and Exit: Saves your changes and submits the new Incident for work. Submitting will take
you back to a list of all Incidents. § Resolve: Only available on incidents that are not already in a “Resolved” State. Saves your
changes and marks the Incident as resolved, indicating that the Incident has achieved resolution. Resolving will take you back to a list of all Incidents.
Beside these buttons are a few additional smaller icons with the following functions:
§ Attach: Attach is represented by a small paperclip icon. This button will open a dialog allowing you to attach a document related to the Incident.
§ Activity Stream: This button will open a fly-‐out window with a live stream for comments about the incident.
§ Show Live Feed: This button is like activity stream option and goes into the feed for the incident, but it provides a more detailed view. It allows the user to see the members working on the incident and to use hashtags to organize the messages.
§ Personalize Form: Personalize Form is represented by a small gear. This button opens up a fly-‐out window allowing you to check or uncheck the columns you would like to see in the list view.
§ Navigation arrows: these buttons allow for quick movement between incidents. Note: The Incident form should be completed in the order the fields are placed. Completing fields in the proper order can be facilitated by tabbing between fields. Forms were created in a manner that facilitates filling them out in order. In some cases, fields are intended to be auto populated by referencing entered data. This is another reason to proceed in the intended order. Some fields have a small magnifying glass next to them( ) indicating that they are reference fields. Reference fields can be completed by clicking on the magnifying glass and selecting the desired item. Another option is to start typing text in the field, which will leverage type-‐ahead behavior to help you select the desired item. Note that there are many different cues to let a user know the status of a field. The following states appear in the same order pictured in the image here: Read-‐Only: When a field (e.g., Department) cannot be edited by a user the field will appear with a gray background.

Page 16 of 31 Acorio, LLC. Confidential and Proprietary.
Required still needed: When a bright red asterisk appears next to a field (like the Location field above), the user will not be able to submit the form until an accepted value is entered into the field. Required not needed: When the asterisk next to the field is gray (see the Category field), the field is required but the value within is acceptable and already saved. Required but changed: When the asterisk next to a field is a faded red (see the Subcategory field), the field is required and has an acceptable value, but has not yet been saved. Invalid entry: When a field’s background color turns red (as in the Configuration Item field), the field has an invalid value entered and cannot be saved until the value is fixed. Note: If you are entering an Incident for a user that is not in the user table, such as a new employee or contract worker, use the ‘guest’ user record by entering guest in the Reported By/For field.
4.2.1. Knowledge-‐Centered Support (KCS) Like the Call form, the Incident form loads relevant Knowledge articles in the “KCS Results” tab based on the text entered in the short description field. The value of this search increases as more relevant articles are loaded into the instance’s Knowledge Base.
Additionally, ITIL fulfillers can attach knowledge articles to an incident using the “KCS Solution” reference field on the incident form.
After a Knowledge article is selected and the form is saved, the Knowledge article content will be displayed in the Notes tab under Activity.

Page 17 of 31 Acorio, LLC. Confidential and Proprietary.
4.3 Basic Principles Incident Management within Stanford University IT should adhere to the following principles:
• Incidents and their status must be timely and effectively communicated.
• Incidents must be resolved within timeframes acceptable to the business (SLAs).
• Customer satisfaction must be maintained at all times. • Incident processing and handling shouldbe aligned with overall
service levels and objectives. • All incidents should be stored and managed in a single management
system. Status and detailed information on the incident should be recorded and updated on a timely basis in incident records.
• Incident records should be audited on a regular basis to ensure they have been entered and categorized correctly.
• All incident records should utilize a common format and set of information fields wherever possible.
• A common and agreed set of criteria for prioritizing and escalating incidents should be in place wherever possible.
• Requests and problems should not be recorded as incidents. • All service restoration activities should be tracked in an incident record.
Page 18 of 31 Acorio, LLC. Confidential and Proprietary.
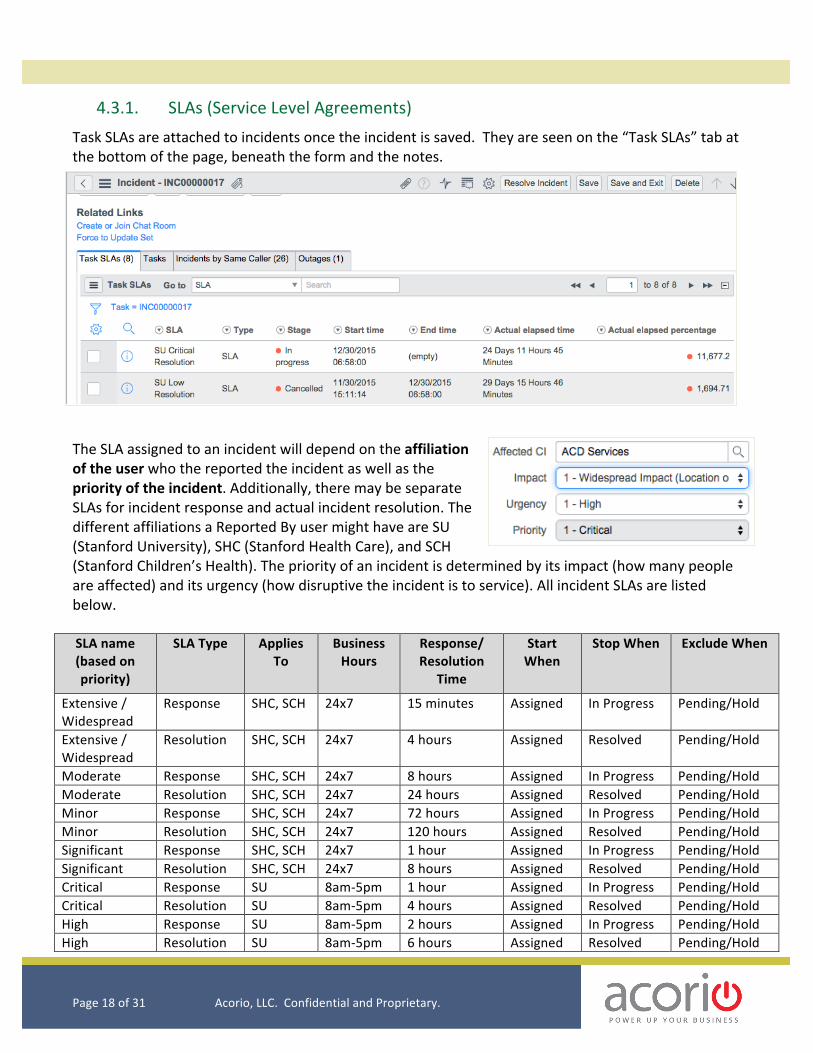
4.3.1. SLAs (Service Level Agreements) Task SLAs are attached to incidents once the incident is saved. They are seen on the “Task SLAs” tab at the bottom of the page, beneath the form and the notes.
The SLA assigned to an incident will depend on the affiliation of the user who the reported the incident as well as the priority of the incident. Additionally, there may be separate SLAs for incident response and actual incident resolution. The different affiliations a Reported By user might have are SU (Stanford University), SHC (Stanford Health Care), and SCH (Stanford Children’s Health). The priority of an incident is determined by its impact (how many people are affected) and its urgency (how disruptive the incident is to service). All incident SLAs are listed below.
SLA name (based on priority)
SLA Type Applies To
Business Hours
Response/ Resolution
Time
Start When
Stop When Exclude When
Extensive / Widespread
Response SHC, SCH 24x7 15 minutes Assigned In Progress Pending/Hold
Extensive / Widespread
Resolution SHC, SCH 24x7 4 hours Assigned Resolved Pending/Hold
Moderate Response SHC, SCH 24x7 8 hours Assigned In Progress Pending/Hold Moderate Resolution SHC, SCH 24x7 24 hours Assigned Resolved Pending/Hold Minor Response SHC, SCH 24x7 72 hours Assigned In Progress Pending/Hold Minor Resolution SHC, SCH 24x7 120 hours Assigned Resolved Pending/Hold Significant Response SHC, SCH 24x7 1 hour Assigned In Progress Pending/Hold Significant Resolution SHC, SCH 24x7 8 hours Assigned Resolved Pending/Hold Critical Response SU 8am-‐5pm 1 hour Assigned In Progress Pending/Hold Critical Resolution SU 8am-‐5pm 4 hours Assigned Resolved Pending/Hold High Response SU 8am-‐5pm 2 hours Assigned In Progress Pending/Hold High Resolution SU 8am-‐5pm 6 hours Assigned Resolved Pending/Hold

Page 19 of 31 Acorio, LLC. Confidential and Proprietary.
Medium Response SU 8am-‐5pm 4 hours Assigned In Progress Pending/Hold Medium Resolution SU 8am-‐5pm 8 hours Assigned Resolved Pending/Hold Low Response SU 8am-‐5pm 6 hours Assigned In Progress Pending/Hold Low Resolution SU 8am-‐5pm 12 hours Assigned Resolved Pending/Hold
4.3.2. Mirrored Incidents to Stanford Health Care Stanford’s University’s (SU) Servicenow Instance is integrated with Stanford University Health Care’s (SHC’s) Instance. This means that some incidents created in the SU environment will be mirrored to the SHC environment and vice versa. Mirroring enables ITIL users from the Hospital system to monitor incidents that are affecting their staff and services even as those incidents are being worked on by SU IT. Though tickets may be created in both instances, they should always be closed in the UIT instance.
From the University to Stanford Health Care: Whenever the “Reported By” user selected on the Incident is a Hospital affiliate (specifically, whenever the user has an SHCID like “S0012345”), the incident will be mirrored to the SHC system. The system notifies you when an incident you created or updated has been mirrored to SHC with a blue message at the top of the incident form. In the case of a new incident, the message will read, “INCXXXXXXXX insert has been mirrored from University to Stanford Health Care.”
From Stanford Health Care to the University: Whenever an assignment group of “University Service Desk” is chosen on the incident form in Stanford Health Care’s instance, a Category of “University” is exposed on the incident form. If the “University” category is chosen, then the incident is mirrored to the University’s instance.
When a mirrored incident is updated in the UIT instance, the system message will read, ““INCXXXXXXXX update has been mirrored from University to Stanford Health Care.”
Updating Incidents in either instance: If the record has been mirrored (e.g., has a Mirror Number), then certain updates on the UIT side will be mirrored to the SHC side and vice versa.

Page 20 of 31 Acorio, LLC. Confidential and Proprietary.
From the UIT instance, updates to the following fields will be mirrored to SHC: Reported By, Guest Name, Reported For, Category, Impact, Urgency, Priority, Assignment Group, Assigned to, Short description, Watch list, Work notes list, Additional comments, Work notes, Close code and Close notes.
From the SHC instance, updates to the following fields will be mirrored to UIT: Reported by, Reported for, Category, Impact, Urgency, Priority, State, Assignment group, Assigned to, Short Description, Watch list, Work notes list, Additional Comments, and Work notes.
Note that attachments on an incident are not mirrored and neither is the encrypted Description field.
Filtering mirrored incidents: From a list view of incidents, you can add a column that shows the Mirror Number of the incident in the other system.
To see only those incidents that have been mirrored, apply the filter “mirror number is not empty” to the list of incident records.
Notifications: The users listed in the Reported by field will receive an email notification when a new incident is created. If the Reported by user is affiliated with the Hospital, the notification will come from the Hospital. If the Reported by user is affiliated with the University, the notification will come from the University. SID users will get their notifications from Hospital only. The University has suppressed all email notifications to users in the Reported by and Reported for fields for mirrored incidents.

Page 21 of 31 Acorio, LLC. Confidential and Proprietary.
4.3.3. Email Notifications Email notifications from the system will provide IT staff and affected users with important updates on incidents without overwhelming them with information that may not be high-‐priority. An example notification is visible below. Email notifications will go out under the following circumstances:
1) When an incident is resolved, a notification is sent to the user in the “Reported By” field. The user who reported the incident can respond to the email with feedback and can choose to reopen the incident if necessary.
2) When an assignment group is chosen for an incident, a notification will go out to the assignment group’s email address if no one is listed in the “Assigned to” field
3) If a new incident is created with an Affected CI that has subscribers, those subscribers will get an email notification.
4) A notification will be sent to the assignee when 75% of an incident’s SLA is reached.
5) A notification will be sent to the assignee and the assignee’s manager when an incident’s SLA reaches 90%.
Currently, emails to the SU IT instance (HelpSU-‐[email protected]) will not create new incidents.
4.3.4. Related Records If an incident was created from a call, the call and incident record will be linked in the system. To find the call record associated with an incident, navigate to the bottom of the incident form and click into the Related Records tab. A Calls related list will appear in the tab.
Subject: Warning Unassigned SLA at 75% for INC00000944
Page 22 of 31 Acorio, LLC. Confidential and Proprietary.
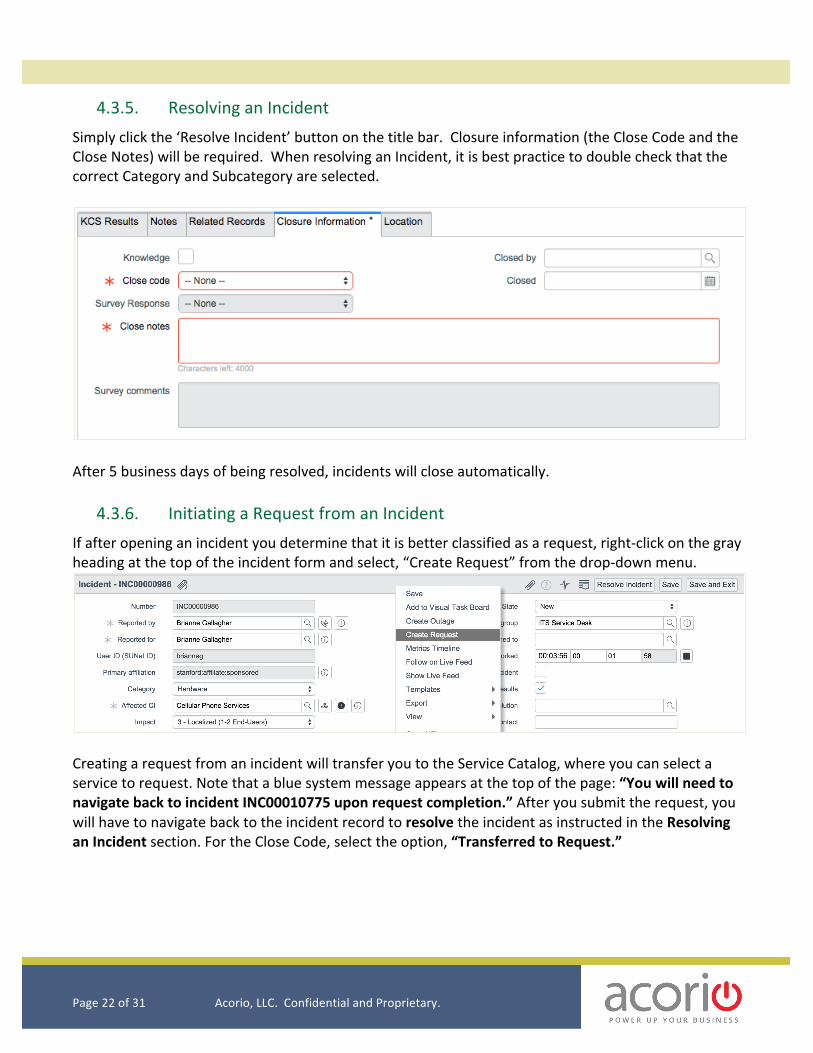
4.3.5. Resolving an Incident Simply click the ‘Resolve Incident’ button on the title bar. Closure information (the Close Code and the Close Notes) will be required. When resolving an Incident, it is best practice to double check that the correct Category and Subcategory are selected.
After 5 business days of being resolved, incidents will close automatically.
4.3.6. Initiating a Request from an Incident If after opening an incident you determine that it is better classified as a request, right-‐click on the gray heading at the top of the incident form and select, “Create Request” from the drop-‐down menu.
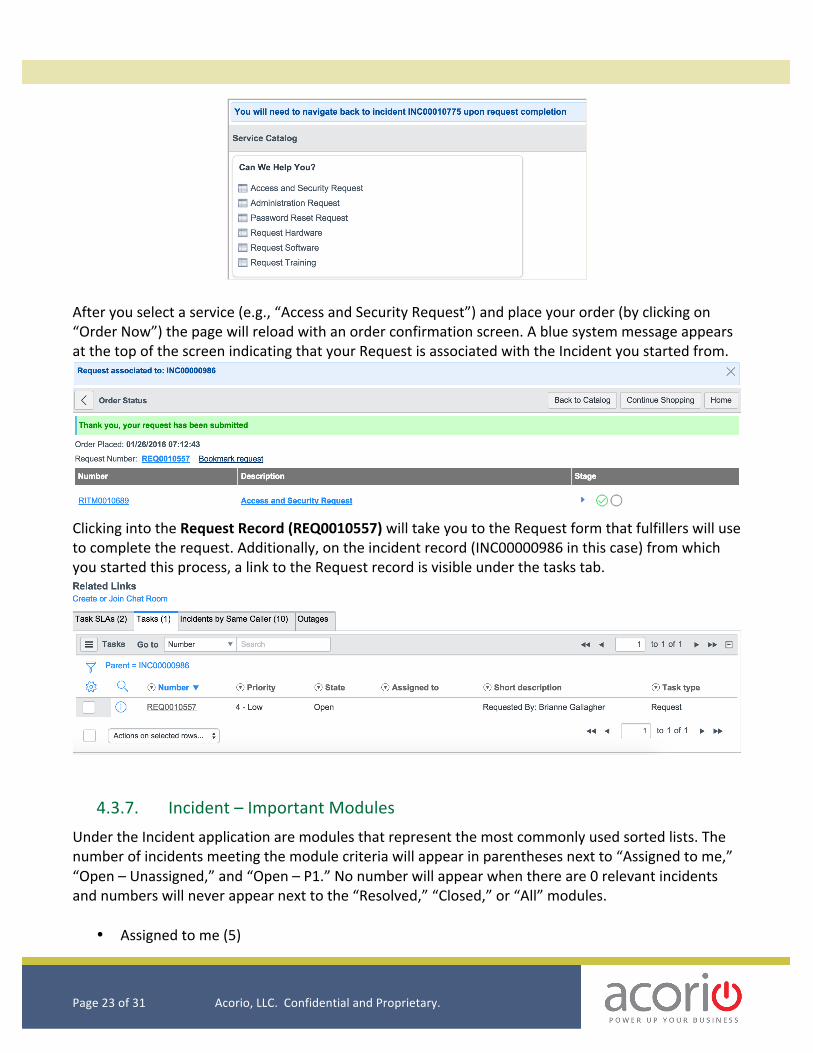
Creating a request from an incident will transfer you to the Service Catalog, where you can select a service to request. Note that a blue system message appears at the top of the page: “You will need to navigate back to incident INC00010775 upon request completion.” After you submit the request, you will have to navigate back to the incident record to resolve the incident as instructed in the Resolving an Incident section. For the Close Code, select the option, “Transferred to Request.”
Page 23 of 31 Acorio, LLC. Confidential and Proprietary.
After you select a service (e.g., “Access and Security Request”) and place your order (by clicking on “Order Now”) the page will reload with an order confirmation screen. A blue system message appears at the top of the screen indicating that your Request is associated with the Incident you started from.
Clicking into the Request Record (REQ0010557) will take you to the Request form that fulfillers will use to complete the request. Additionally, on the incident record (INC00000986 in this case) from which you started this process, a link to the Request record is visible under the tasks tab.
4.3.7. Incident – Important Modules Under the Incident application are modules that represent the most commonly used sorted lists. The number of incidents meeting the module criteria will appear in parentheses next to “Assigned to me,” “Open – Unassigned,” and “Open – P1.” No number will appear when there are 0 relevant incidents and numbers will never appear next to the “Resolved,” “Closed,” or “All” modules.
• Assigned to me (5)

Page 24 of 31 Acorio, LLC. Confidential and Proprietary.
• Open – Unassigned (12) • Open – P1 • Resolved • Closed • All • Overview
4.3.8. Secure Incidents On the incident form, you can check the “Secure Incident” checkbox to make an incident secure. Marking an incident as secure will prevent fulfillers outside of the incident’s Assignment Group from seeing certain fields. Among fulfillers, only the Assigned To and the Assignment Group members can see the Requested for, Description, Additional Comments and Work Notes fields.
The incident in the screenshot shown here is marked as “Secure.” As a result, the full form will only be visible by the Assigned To user and the Assignment Group for the incident. Additionally, people who are not members of the Assignment Group specified will not be able to change the Assignment Group of the Incident or uncheck the incident as secure.
5. Request Management Requests can be generated a number of different ways in the system: (1) from incidents (explained above), (2) from calls, and (3) from the Service Catalog.
5.1 Generating a Request from a Call As was the case with incidents, a request can be generated directly from the call form by selecting “Request” in the Call Type field. If “request” is selected as the Call Type, mandatory Requested Item and Affected CI fields will appear on the form. The Short Description field will be auto-‐generated based on the options you selected for Call type and Request Item.

Page 25 of 31 Acorio, LLC. Confidential and Proprietary.
After you fill in all the Call form fields, click on Save to stay on the form (all call form fields will now be read-‐only) or Save and Go to save your form and be taken to the Request form to which the call is transferred. Data from the call form will be transferred to the new Request Record. The Call and Request record are now linked. To see calls that are associated with a given request, navigate to the bottom of the request form and click on the Calls tab
5.2 Generating a Request from the Service Catalog ITIL fulfillers and end-‐users alike can generate a request from the Service Catalog, which is a module under the Self-‐Service application.

Page 26 of 31 Acorio, LLC. Confidential and Proprietary.
Currently, the Self-‐Service Catalog will contain only IT-‐related requests, such as “Request Software.” Users will fill in the details of their request and then click on the “order now” button to submit the request. Each request generated from the Service Catalog will have an associated RITM (requested item) number/record and TASK number/record. The RITM record contains the details of the item requested by the user, while the TASK record will allow the groups and individuals assigned to fulfill the request to log notes related to its fulfillment. Requests will be assigned based on the Tier 1 Support group for the affected CI selected in the Request.
To view all tasks pending fulfillment, go to the left hand navigator, click on the application Service Catalog and select the Tasks module.
Find the task you want to complete and click the task number to open it. Once the task is open, go the Assigned to field and enter your name (if it is not already there) in the Catalog Task form. You can now do the specific work necessary to complete the request.
Note: The Time Worked field on the Task form will restart at 0 every time you navigate away from the page unless you save/update the Task record prior to leaving it.
When the task is complete, you can close the task by going to the top of the form and selecting Close Task.
Closing the task will bring you back to the list view of all Catalog Tasks. Because you have closed the task, the RITM and Request records associated with the Task will also be updated to a state of “Closed Complete.”
5.3 Email Notifications from Requests Email notifications from the system will provide IT staff and affected users with important updates on Requests without overwhelming them with information that may not be high-‐priority. An example notification is visible to the right. Request email notifications are sent to the following users:
1) The Requested For user when the Request record is opened on their behalf
2) The Requested By user when their request state is changed to Closed – Cancelled
3) The Requested By user when their request state is
Subject: Task TASK0010529 has been assigned to you
Page 27 of 31 Acorio, LLC. Confidential and Proprietary.
changed to Closed (completed) 4) The Assigned to user when a TASK is assigned to them 5) A notification will be sent to the assignee when 75% of a task’s SLA is reached. 6) A notification will be sent to the assignee (and the assignment group’s manager) when a task’s
SLA reaches 90%. Note: Replies to any of these emails will update the Additional Comments field in the Request and Task records to which the original email notification pertained.
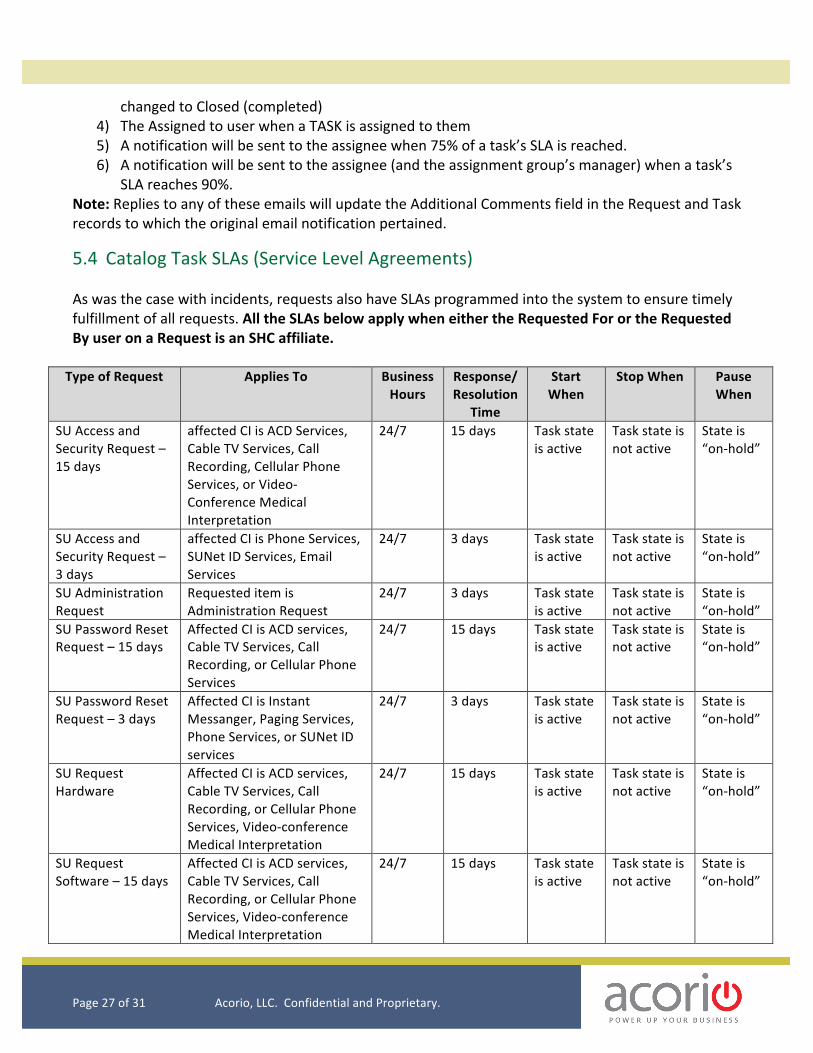
5.4 Catalog Task SLAs (Service Level Agreements) As was the case with incidents, requests also have SLAs programmed into the system to ensure timely fulfillment of all requests. All the SLAs below apply when either the Requested For or the Requested By user on a Request is an SHC affiliate.
Type of Request Applies To Business Hours
Response/ Resolution
Time
Start When
Stop When Pause When
SU Access and Security Request – 15 days
affected CI is ACD Services, Cable TV Services, Call Recording, Cellular Phone Services, or Video-‐Conference Medical Interpretation
24/7 15 days Task state is active
Task state is not active
State is “on-‐hold”
SU Access and Security Request – 3 days
affected CI is Phone Services, SUNet ID Services, Email Services
24/7 3 days Task state is active
Task state is not active
State is “on-‐hold”
SU Administration Request
Requested item is Administration Request
24/7 3 days Task state is active
Task state is not active
State is “on-‐hold”
SU Password Reset Request – 15 days
Affected CI is ACD services, Cable TV Services, Call Recording, or Cellular Phone Services
24/7 15 days Task state is active
Task state is not active
State is “on-‐hold”
SU Password Reset Request – 3 days
Affected CI is Instant Messanger, Paging Services, Phone Services, or SUNet ID services
24/7 3 days Task state is active
Task state is not active
State is “on-‐hold”
SU Request Hardware
Affected CI is ACD services, Cable TV Services, Call Recording, or Cellular Phone Services, Video-‐conference Medical Interpretation
24/7 15 days Task state is active
Task state is not active
State is “on-‐hold”
SU Request Software – 15 days
Affected CI is ACD services, Cable TV Services, Call Recording, or Cellular Phone Services, Video-‐conference Medical Interpretation
24/7 15 days Task state is active
Task state is not active
State is “on-‐hold”

Page 28 of 31 Acorio, LLC. Confidential and Proprietary.
SU Request Software – 3 days
Affected CI is Phone Services or Email Services
24/7 3 days Task state is active
Task state is not active
State is “on-‐hold”
SU Request Training
Affected CI is ACD services, Cable TV Services, Call Recording, or Cellular Phone Services, Video-‐conference Medical Interpretation, Paging Services, Instant Messenger
24/7 15 days Task state is active
Task state is not active
State is “on-‐hold”
SU Request Training/Hardware
If item requested is either training or hardware and the affected CI is phone services
24/7 3 days Task state is active
Task state is not active
State is “on-‐hold”
5.5 Secure Requests On the Request form, you can check the “Secure Request” checkbox to make a request secure. Marking a request as secure will prevent fulfillers outside of the request’s Assignment Group from seeing certain fields. Specifically, only the Assigned To and the Assignment Group members for a secure request can see the Requested for, Requested By, long Description, Short Description, Additional Comments and Work Notes fields.
The request record in the screenshot shown here is marked as “Secure.” As a result, the full form will only be visible by the Assigned To user and the Assignment Group for the request. As was the case with the incident form, people who are not members of the Assignment Group will not be able to change the Assignment Group of the request or uncheck the request as secure.
6. Reporting and Dashboards
6.1 ITIL Homepage The ITIL Homepage provides commonly used reports that give an overview of the processes you are
involved in. Access the ITIL Homepage from the gear icon ( ) in the banner ( top right next to the ‘Logout’ button) by hovering over ‘Home’ and selecting ITIL Homepage from the dropdown menu.

Page 29 of 31 Acorio, LLC. Confidential and Proprietary.
By default, the ITIL Homepage includes these reports:
§ Users by location: a pie chart displaying users divided by location. § Open Items by Escalation: tasks with an open state, grouped by escalation. § My Groups Work: outstanding work for your group. § My Work: your outstanding work. § ITIL Summary Counts: tasks that are critical, overdue, and over a week old.
Because these reports link directly to the appropriate records and tables, you can use the work queues and the reports on critical tasks to manage your work directly from the homepage.
6.2 Adding Gauges
6.2.1. Adding Existing Gauges to a Homepage You can browse the gauges you have available by following these steps from your homepage.
• Navigate to a homepage.
• Click the Add content icon ( ) in the upper left corner of the homepage.
• Select the 'Gauges' choice in the far left column of the Sections pop-‐up box.
• Select the table you want to display a gauge from in the middle column of the Sections pop-‐up box.
• Select the gauge you want to display on the homepage in the far right column of the Sections pop-‐up box.
• Click the button in the desired section to add the gauge to the homepage.
• To add additional gauges, repeat steps the steps listed above.
• Use the mouse to drag the content blocks to different parts of your page. • Click the button in the top right corner of a box to remove a section added to the
homepage.
Page 30 of 31 Acorio, LLC. Confidential and Proprietary.
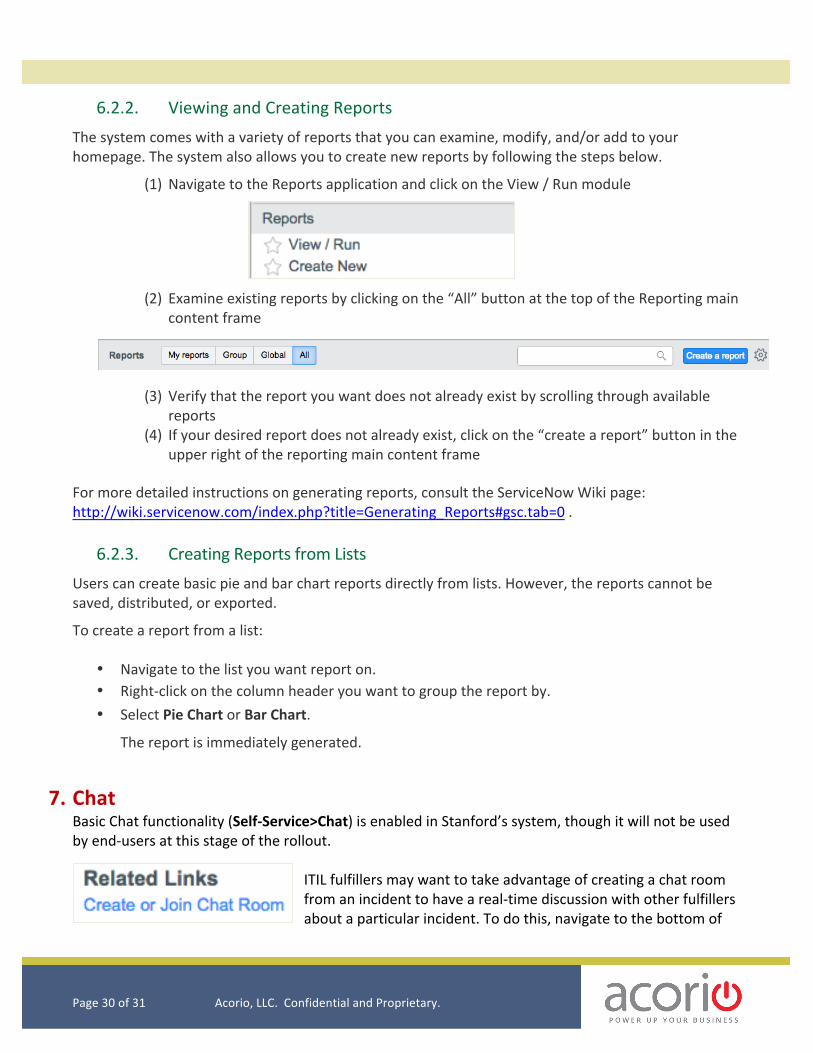
6.2.2. Viewing and Creating Reports The system comes with a variety of reports that you can examine, modify, and/or add to your homepage. The system also allows you to create new reports by following the steps below.
(1) Navigate to the Reports application and click on the View / Run module
(2) Examine existing reports by clicking on the “All” button at the top of the Reporting main content frame
(3) Verify that the report you want does not already exist by scrolling through available reports
(4) If your desired report does not already exist, click on the “create a report” button in the upper right of the reporting main content frame
For more detailed instructions on generating reports, consult the ServiceNow Wiki page: http://wiki.servicenow.com/index.php?title=Generating_Reports#gsc.tab=0 .
6.2.3. Creating Reports from Lists Users can create basic pie and bar chart reports directly from lists. However, the reports cannot be saved, distributed, or exported.
To create a report from a list:
• Navigate to the list you want report on. • Right-‐click on the column header you want to group the report by. • Select Pie Chart or Bar Chart.
The report is immediately generated.
7. Chat Basic Chat functionality (Self-‐Service>Chat) is enabled in Stanford’s system, though it will not be used by end-‐users at this stage of the rollout.
ITIL fulfillers may want to take advantage of creating a chat room from an incident to have a real-‐time discussion with other fulfillers about a particular incident. To do this, navigate to the bottom of

Page 31 of 31 Acorio, LLC. Confidential and Proprietary.
the incident form and click on the “Create or Join Chat Room” link in the Related Links section of the form. After clicking on this link, a pop-‐out window will appear allowing ITIL users to invite other users to the chat room. For example, you can invite other members of your Assignment Group or the people on the incident’s Watch List to the room. For more information on ServiceNow chat functionality, consult the Wiki link: http://wiki.servicenow.com/index.php?title=Chat#gsc.tab=0
8. Visual Task Boards All users may take advantage of ServiceNow’s Visual Task Boards, which provide a graphical way of interacting with records in the system. To get to your Task Boards, navigate to the Self-‐Service Application and the My Task Boards module. For more information on using Visual Task Boards, see the ServiceNow Wiki: http://wiki.servicenow.com/index.php?title=Visual_Task_Boards#gsc.tab=0
9. Publishing Knowledge Articles The Knowledge Base is accessed by navigating to the Knowledge application and Homepage module. The articles contained in the IT Knowledge base are available for adding to Incident and Call records as outlined above. In order to publish new Knowledge Articles to the Knowledge Base, contact _______________, the Knowledge Manager, at ______________.