setting up final cut pro for nikon d3s, d90, and … · by eric maierson march 2, 2012 version 2...
TRANSCRIPT

by Eric MaiersonMarch 2, 2012
version 2
This document can be found online at: http://www.mediastorm.com/train/resources.html
Setting up Final Cut Pro for Nikon D3S, D90, and D300S CamerasNikon D3S, D90, and D300S footage is recorded at 24 progressive frames-per-second using an .AVI codec (AppleOpenDML JPEG) at a size of 1280x720.
The .AVI codec does not work well in Final Cut Pro, requiring constant rendering. You'll need to transcode the footage, i.e., change it's codec. Apple's Compressor application helps with this issue.
Before you begin, copy all of your video into the Video folder in your Final Cut project.
Using Compressor to Transcode Nikon D3S, D90, and D300S Footage Launch Compressor 3 or 4. In the Settings window, open the Apple>Formats>QuickTime folder and select Apple ProRes 422 setting. Duplicate the setting by selecting the the third-to-left duplication button at the top of the Settings window.
The new file Apple ProRes 422 copy will appear in your Custom Settings folder below. Double-click the file to open the Inspector window.
http://mediastorm.com

Rename the file to Nikon_720p24_422 (LT) using Compressor's Inspector window.
Select the Encoder button, second from left at the top of the window. Next, click the Video: Settings... button in the Inspector.
Choose Apple ProRes 422 (LT) from the Compression Type pull-down menu. Make sure your frame rate is set to Current. Click OK.
http://mediastorm.com

Enable the Audio settings.
Click the Audio: Settings... button in the Inspector.
Use the settings in the Sound Settings window above. Click OK.
http://mediastorm.com

In the Geometry tab of the Inspector, make sure your Frame Size is 100% of source.
Click the Save button.
http://mediastorm.com

Create a new Batch Window (command-N). Click Add File from the top of the window. Navigate to your video files. For the best response, shift-select no more than 10-15 files at a time. It might take a moment for Compressor to complete this action. You may see the notorious spinning beach ball. Be patient.
http://mediastorm.com

Logging Files in Compressor Because transcoding is processor intensive, if you're on a deadline you'll need to first review your clips so that you can determine which sections are best. This way, you can convert only your selects. (If you are not working on a deadline you can skip this step and transcode the entirety of each video clip.) Click on one of the files in your batch. Make sure only one clip is highlighted. Open the Preview window (Command-2) and press the space bar to view your clip. Press I to create an IN mark and O to create an OUT marker, exactly the way these keys work in Final Cut Pro.
You can also use the mouse to drag the placement of IN and OUT marks, as well. Mark an IN and OUT around the portion of your clip that you want to use.
http://mediastorm.com

Repeat within each clip in the Batch window. Once you've selected the IN and OUT marks for each clip, select all of your files in the Batch Window using Command-A. Drag the Nikon_720p24_422 setting from the Settings window on to your selected files in the Batch window.
Click Submit...
http://mediastorm.com

If you have set up Qmaster as described in the MediaStorm document, Setting up QMaster for Faster Transcoding and Compression, choose your Qmaster cluster name from the Cluster popup menu. Then, press Submit.
If you are not using Qmaster, select This Computer from the Cluster popup menu.
In the Name field enter the name of your project. In the Cluster menu select the name of your project you entered in the Identify this QuickCluster as window in Qmaster. It should be the name of your project that you entered previously. Finally, set the priority to High. Press Submit. You can monitor your progress in the History window. It may take a moment to begin. Be patient. You can monitor your progress in the History window.
http://mediastorm.com

Depending on the speed of your processor, be prepared to wait an hour or more for each batch.
Upon completion, the transcoded files will appear in the same folder as your original footage. Create two new folders, one labeled video_avi the other video_422. Separate the video according to codec.
Using Final Cut with a 720p24 Sequence Default The Nikon D3S, D90, and D300S cameras all play back at a true 24fps, not the 23.98 standard to 24p. Therefore, it's necessary to change your default sequence time base in Final Cut to better handle these 24fps files. Open Final Cut Pro and create a new project by selecting File > New Project. You'll be presented with the Project Properties window. Select Cancel.
http://mediastorm.com

Open the User Preferences menu by selecting Final Cut Pro > User Preferences. In the General tab, select Prompt for settings on New Project and Prompt forsettings on New Sequence.
Note: If these options were previously selected you will be presented with the Select Sequence Preset window. If this is the case, select Cancel. If these options were not previously selected, you will find a sequence labeled “Sequence 1” in your Final Cut Browser window. Delete it now to avoid confusion. Open the Final Cut Pro > Audio/Video Settings window. Select the Apple ProRes 422 1280x720 24fps 48kHz template. This sequence uses a 23.98 timebase so you'll need to duplicate this template and change the timebase to 24. In the Sequence Presets tab select Apple ProRes 422 1280x720 24p 48kHzand click Duplicate.
The Sequence Preset Editor window will open. Rename the sequence preset as Nikon ProRes 422 1280x720 24fps 48 kHz.
http://mediastorm.com
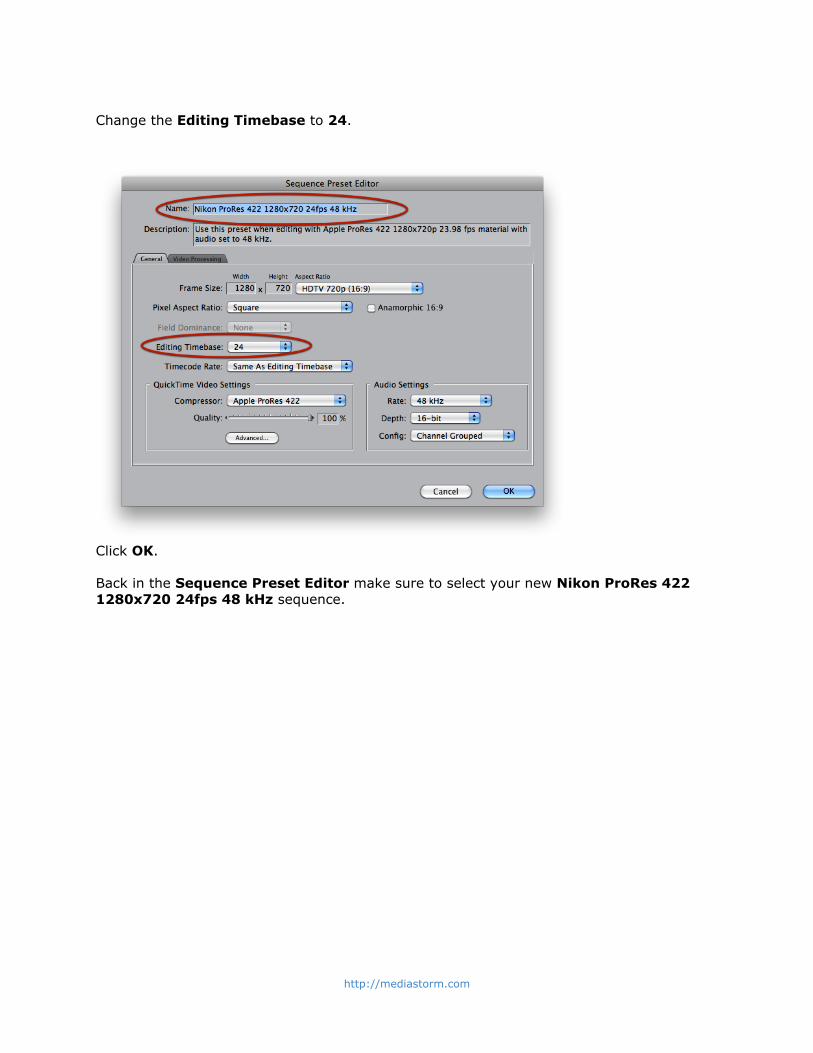
Change the Editing Timebase to 24.
Click OK. Back in the Sequence Preset Editor make sure to select your new Nikon ProRes 422 1280x720 24fps 48 kHz sequence.
http://mediastorm.com

Before you click OK, select the Summary tab in the Audio/Video Settings... window. Your settings should look like the image below.
http://mediastorm.com

Note: You do not need to set Device Control Preset, Video Playback, and Audio Playback if your DSLR is the sole source of video. Now, create a New Sequence.Select File > New > Sequence. In the pop-up menu, Nikon ProRes 422 1280x720 24fps 48 kHz will be your
default. Save your work (command-S).
http://mediastorm.com