setting up synergy dropbox - annville-cleona school … drop box is a folder that a teacher sets up...
TRANSCRIPT

Setting Up Synergy Dropbox and Using Assignments Page SETTING UP SYNERGY DROPBOX 2
ADDING AN ASSIGNMENT PAGE 5
USING ASSIGNMENT CATEGORIES 6 CREATING AN ASSIGNMENT CATEGORY 6 EDITING AN ASSIGNMENT CATEGORY 7 SORTING ASSIGNMENT CATEGORIES 7 WORKING WITH ASSIGNMENTS ON AN ASSIGNMENT PAGE 8 ADDING AN ASSIGNMENT 8 EDITING ASSIGNMENTS 11 COPYING ASSIGNMENTS 11
ACCESSING AN ASSIGNMENT AND USING A DROP BOX AS A STUDENT 12
VIEWING FILES UPDATED BY OTHERS IN SYNERGY 12
REVIEWING/CORRECTING FILES SUBMITTED BY STUDENTS 13

Setting Up Synergy Dropbox Once the setup is complete, students signed into Schoolwires can navigate to an assignment on an Assignment Page and upload their completed assignments directly to the designated Synergy drop box.
Setting up a Drop Box in Synergy
A drop box is a folder that a teacher sets up in Synergy. In order to do this, a teacher must be a Folder Owner in Synergy.
To set up a folder as a drop box:
1. Sign in to Synergy at: http://swapps.acsd.schoolwires.net/ (temporary URL until we go live in July 2013)
2. Click the Synergy button
3. Click New folder.
4. Name the folder, as desired 5. Choose the template for the types of files you’d like to allow to be uploaded
6. Click Save

7. Select the folder by clicking on it in the left menu, then click the dropdown arrow next to the folder name, then click Options
8. Edit the folder options as desired by clicking on the different tabs, then click save.
a. You can:
i. Limit the size of the folder. ii. Allow users to only see the files they own when they are viewing
the folder through Synergy by clicking in the checkbox. (options, sharing settings)
iii. Set up lock settings if you wish students to be locked out of the drop box. (For instance, when the assignment due date has passed. (options, sharing settings)
9. Click the dropdown arrow next to the folder name, then click Sharing
10. Share the folder with the students as individuals or as a group, by using the Assigned Groups Tab and Assigned User Tab, then click the + sign and add the user or groups

11. Edit the permissions to allow the students to add files to the shared folder. If you wish them to be able to view the files in Synergy, include this permission. However, this will not affect what they will see in Schoolwires
a. Click the “Edit Groups/Users Permissions”, then check the “View”, “Add”, “Edit”, or “delete” boxes.

Adding an Assignment Page
Your section may already contain an Assignment Page as well as other pages that were added when the section was created. If it does, you can begin adding assignments to that page immediately. If you do not have an Assignment Page in your section, you will need to add one. You may also want to add additional Assignment Pages . We recommend that each class should have a different assignment page and different calendar. That way assignments and calendar information can be specific to the individual student. Rule of Thumb: Different Kids = Different Assignments
To add an Assignment Page:
1. Access the Section Workspace.
2. Click on the New Page button on the Manage Pages tab as shown in or the New Page task from the Pages drop-down menu on the Main Menu bar.
3. Click on the Assignments link. An Add Assignment Page window will appear
4. Enter a name in the Page Name field
5. Click on the Save button. The Manage Pages tab will return as the active window. The Assignment Page you added will display with an Active status.

Using Assignment Categories
Before you begin adding assignments to the Assignment Page, we recommend that you create assignment categories. These are specific to each Assignment Page and enable users on the end-user website and within Site Manager to filter the assignments on that page by categories.
Creating an Assignment Category
To create a category for an Assignment Page:
1. Access the Section Workspace.
2. Click on the name of the Assignment Page to which you want to add categories.
3. Click on the Categories tab
4. Click on the New Category button.
5. Enter a name for the new category.
6. Click on the Save button. The Assignments Categories window will return as the active window. The category you added will display.

Editing an Assignment Category
To edit an existing category, click on the Edit button to the right of that category on the Assignments Categories window. Editing a category is essentially the same as adding a new category.
Sorting Assignment Categories
To sort the categories for an Assignment Page:
1. Access the Assignment Categories window.
2. Click on the Sort Categories button.
3. Click the Sort Alphabetically radio button. The Sort Categories window will contract.
4. Click the Sort Manually radio button to sort them as desired.
5. Drag and drop each category into the desired location.
6. Click on the Save button. The Assignment Categories window will return as the active window. The sorted categories will appear in the new order. They will also display in the new order in the Categories drop-down list for assignments on that Assignments Page.

Working with Assignments on an Assignment Page
You can add multiple assignments to an Assignment Page. When you add an assignment, you can automatically add it to the section calendar. In addition, you can set up a homework drop box for the assignment in Synergy and link the drop box to the Assignment Page.
Before you begin adding assignments to an Assignment Page, we recommend that you create categories that can be applied to assignments. See “Adding Categories” earlier in this chapter. We also recommend that you set up your drop boxes in Synergy. See “Setting up Drop Boxes in Synergy” earlier in this chapter.
Adding an Assignment
To add an assignment to an Assignment Page:
1. Access the Section Workspace.
2. Click on the page name of the Assignment Page to which you want to add a new assignment.
3. Click on the New Assignment button.
4. Enter a title for the new assignment as you want it to appear on the Assignment Page.
5. Enter directions for the assignment (optional).

6. Select an assignment category from the Assignment Category drop-down menu (optional).
• By default, the assignment category will be Unassigned.
7. The assignment date defaults to the date you are adding the assignment. • You can change it if you wish. It does not affect how
assignments will display on the schoolwires website.
8. Enter a due date for the assignment. • By default, the due date will be the date you add the
assignment. Assignments display on the Schoolwires website according to due dates. They will display as soon as the Assigned Date is reach
9. Click the Add to Calendar checkbox to place the assignment as an event on a calendar. Then choose the desired calendar. If you select this checkbox, the calendar Category field will display. Using the Category drop-down, select a category from the list. When the assignment is placed on the calendar, it will be color-coded to match the calendar category you selected. (These calendar categories are district category colors and cannot be modified or added to by individual users)
Notes: A calendar category is different from an assignment category. A calendar category allows end users to view color-coded calendar events and to apply category filters to their calendar views. An assignment category is a way to group assignments.
If you place an assignment on the section calendar, it will appear on the calendar in Site Manager as a locked event. You will need to navigate to the actual assignment on an Assignment Page to make changes for that calendar event. You will not be able to edit the event on the calendar.

10. Click in “Create an Assignment Dropbox” checkbox to allow users to submit files directly to a Synergy folder. With this checked, the Destination Folder field will display.
11. Click on the Destination Folder drop-down list and select a folder that
will serve as the drop box.
12. Click in the Active checkbox to change the status of this assignment to inactive if desired. With the status set to inactive, the assignment will not appear on your Assignment Page.
13. Click the Save button. The Assignment Page will return as the active window. The assignment you added will display on the page.
Remember that you can add multiple assignments to an Assignment Page and you can have more than one Assignment Page in a section.
Both the assignment and the Assignment Page must be active before an assignment will be accessible from the end-user website.

Editing Assignments
To edit an existing assignment, click on the Edit button to the right of that assignment on the Assignments window. Editing an assignment is essentially the same as adding a new assignment.
Copying Assignments
You can copy an assignment within its Assignments Page. To copy an assignment:
1. Access the Assignment Page that contains the assignment you want to copy.
2. Use the Assignment Category drop-down list to filter the assignments as desired.
3. Click on the More button to the right of the assignment you want to Copy, then click “Copy”. The Assignment Page will refresh. The assignment you copied will display with “Copy of” in front of the title.
Note: The copied assignment will duplicate the original assignment, including its status, whether to add it to the calendar and the selection of a homework drop box. You must edit and save the copied assignment for it to be added to the calendar.
4. Edit and save the copied assignment as required.
Accessing an Assignment and Using a Drop Box as a Student
Once a teacher has set up a Synergy drop box for an assignment in Schoolwires, students will follow these steps to upload their completed assignments.
1. Sign in to Schoolwires.
2. Navigate to the section on the teachers website.
3. Click on the Assignment Page on the left side (i.e., left navigation).
4. Click on an assignment to display assignment details.
6. Click on the Upload Assignment button.
Note: If no drop box has been set up, just the assignment details will display
7. Click the Browse button. A Browsing window will display.
8. Browse to select the file from the computer or network.
9. Click on the Upload button. A progress bar will display, followed by a message that the upload is complete.
10. Close the Upload window. The assignment will return as the active window.
Note: If the student has not signed in to the district website a Sign-in window for Synergy will display.
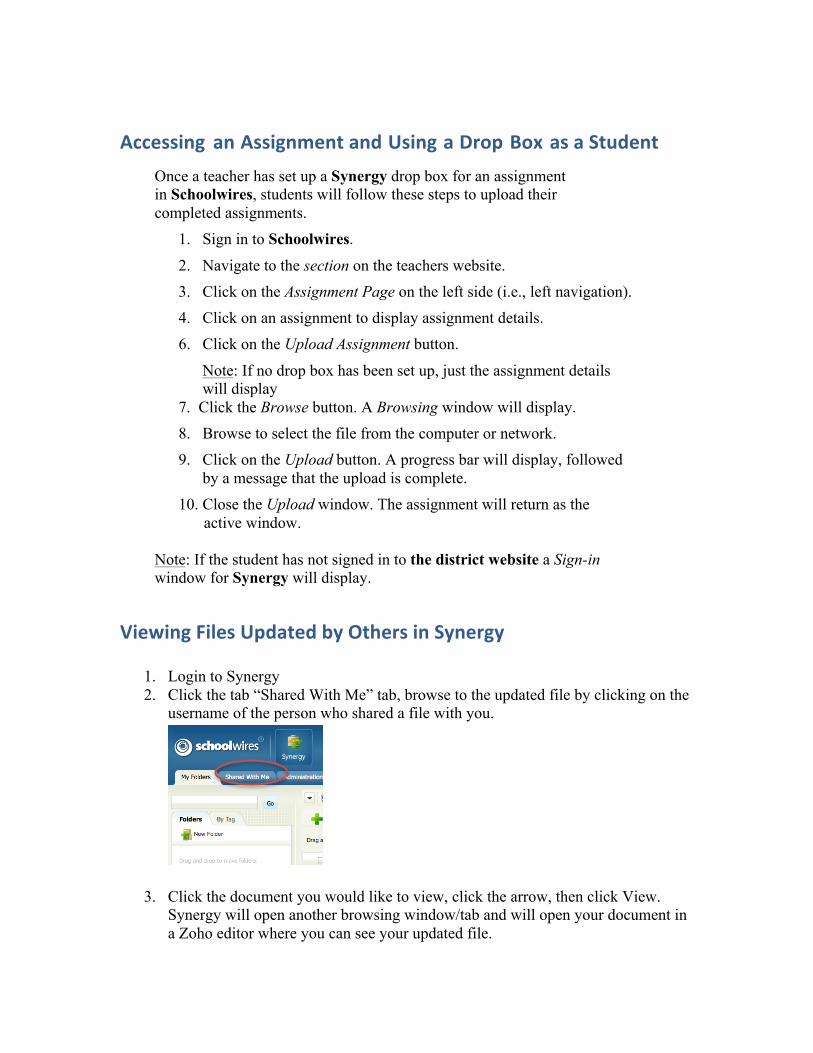
Viewing Files Updated by Others in Synergy
1. Login to Synergy 2. Click the tab “Shared With Me” tab, browse to the updated file by clicking on the
username of the person who shared a file with you.
3. Click the document you would like to view, click the arrow, then click View. Synergy will open another browsing window/tab and will open your document in a Zoho editor where you can see your updated file.

Reviewing/Correcting Files Submitted by Students
1. Login to Synergy 2. Browse to the folder where students submitted assignments, click the title of one
of the documents, then click the arrow to expand the options of the document
3. Click the edit button. This will open another browser window and a Zoho editor. Mark up the document as desired, and use the review tab to enter comments. Then click File Save.
OR
3. Click Download, and open the saved document you downloaded, and use Microsoft’s built in reviewing feature to correct and comment on document (visit: http://www.microsoft.com/mac/how-‐to choose the product, the look for Tracking and Reviewing Changes)
4. Once the document is updated and saved on your computer, browse back to the file the student submitted in Synergy, and click the “update button” then browse and upload the edited file.