setting up virtual machines with kvm - welcome to the ... · setting up virtual machines with kvm...
TRANSCRIPT

Setting Up Virtual Machines with KVMir. Toon Macharis

Setting Up Virtual Machines with KVMir. Toon Macharis

iii
Table of Contents1. Overview ............................................................................................................... 12. Host Setup ............................................................................................................ 23. Network Set Up .................................................................................................... 144. Installing KVM ...................................................................................................... 205. Creating an LVM Partition ..................................................................................... 296. Creating Logical Volumes with LVM ...................................................................... 357. Virtual Machine Manager ...................................................................................... 388. Bridged Networking .............................................................................................. 689. IP Forwarding ...................................................................................................... 90

1
Chapter 1. OverviewThis book will explain how to set up a physical Debian/Ubuntu server and multiple virtualDebian Ubuntu servers using KVM. The explanation will occur mainly through screenshots ofall the steps needed to set up multiple KVM virtual machines on a local Ubuntu desktop. Thewhole process can be emulated on a single PC, so everyone can try it out on his own laptopwithout having to risk doing something wrong on a remote server. Once you are familiar withthe whole procedure, you can apply it on a remote server. Debian is a free operating systemthat can be downloaded from http://www.debian.org. Ubuntu is a free operating system thatcan be downloaded from http://www.ubuntu.com. I would recommend novice users to try outUbuntu as a desktop system, whereas Debian is my prefered server operating system.
This book has 8 chapters:
• Chapter 2, Host Setup: this chapter explains how to disable the root login on a server forsecurity reasons.
• Chapter 3, Network Set Up: this chapter explains how to configure IP addresses for aphysical server.
• Chapter 4, Installing KVM: this chapter explains how to install KVM and bridged networkingfor KVM on a local or remote server.
• Chapter 5, Creating an LVM Partition: this chapter explains how to create an LVM partitionthat will be used to create logical disks for the virtual machine.
• Chapter 6, Creating Logical Volumes with LVM: this chapter explains how to create logicalvolumes with Logical Volume Manager (LVM). These logical volumes can be used as disksfor virtual machines.
• Chapter 7, Virtual Machine Manager: this chapter explains how to install Virtual MachineManager and how to install a virtual server on a remote server.
• Chapter 8, Bridged Networking: this chapter explains how to enable bridged networkingfor a virtual server, how to assign an IP address to a virtual server, how to disable theroot login on the virtual server for security reasons and how to install a SSH server, so thevirtual server can be accessed remotely.
• Chapter 9, IP Forwarding: this chapter explains how IP addresses that are assigned to aphysical server can be assigned to virtual servers running on the physical server.

2
Chapter 2. Host SetupThis chapter explains how to disable the root login on a server for security reasons.
The default installation of Debian has an active root user account. The installation also setsup a regular user account. In the following example, the regular user account name is toon.It is a bad practice to keep the root user account active and to let an SSH server listen tothe default port 22, because the Internet is full of spiders that attempt brute force attacks.The more obvious or powerfull a setting, the more likely they are used in brute force attacks.Most SSH attacks attempt to login at port 22, because this is the default port for SSH andthe user name that is used the most in a log in attempt is root, since this user always existsand if he logs in, he has full control over the machine.
The example assumes no SSH server has been installed and we access the server locally.We will install an SSH server though, so we can access the server remotely. First log in withthe following commands:
debian-root login: rootPassword: password
Install sudo so we can give the regular user account administrative privileges, which will allowus to disable the root account:
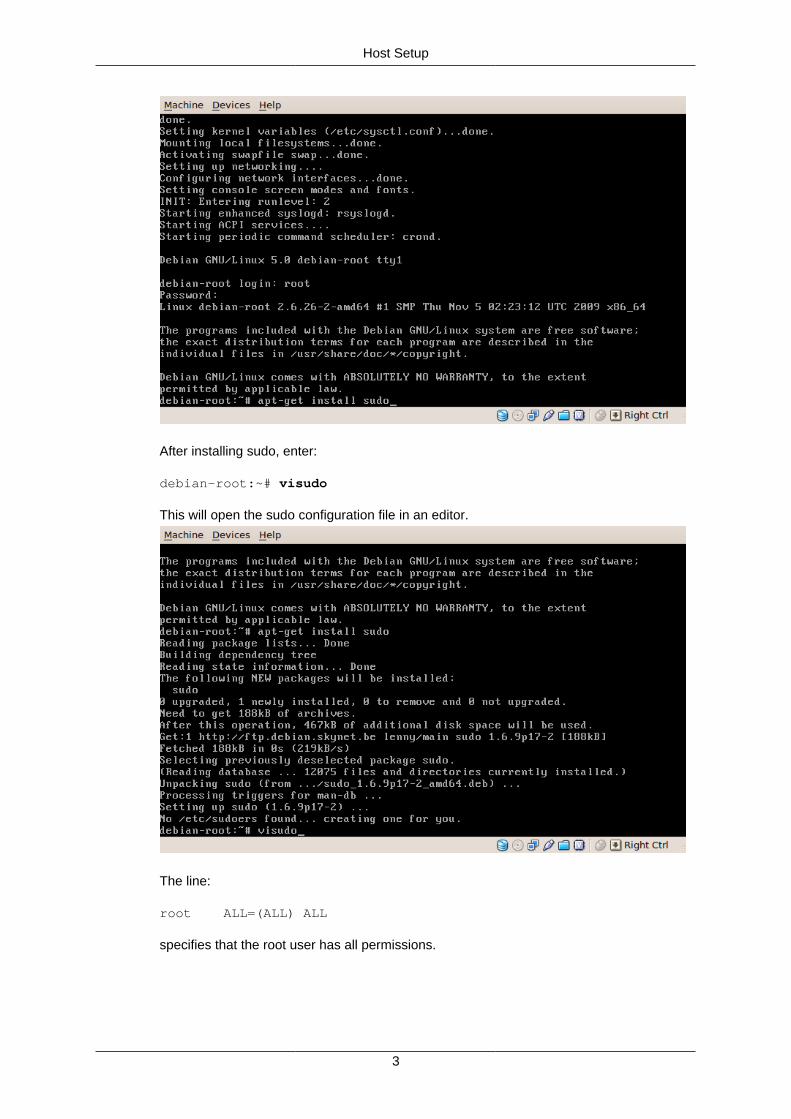
debian-root:~# apt-get install sudo
An alternative and better way to install programs is to use aptitude instead of apt-get as in:
debian-root:~# aptitude install sudo
However, these are older screenshots in which I was still using apt-get, which is older thanaptitude.
Host Setup
3
After installing sudo, enter:
debian-root:~# visudo
This will open the sudo configuration file in an editor.
The line:
root ALL=(ALL) ALL
specifies that the root user has all permissions.

Host Setup
4
Add the following line:
toon ALL=(ALL) ALL
to give all permissions to the user toon also. Press control+X To quit the editor. Press Yto save the changes.
Press enter to confirm the changes:

Host Setup
5
Install an SSH server with the following command:
debian-root:~# apt-get install ssh
When prompted, press Y:

Host Setup
6
After the SSH server has been installed, log out:
debian-root:~# exit
We could now log in remotely to the server and proceed from the remote session. Howeverin this example we just proceed with local access to the server.
Log in with the administrative user:
debian-root login: toon
Password: password

Host Setup
7
Go to the folder that contains the configuration of the SSH server:
toon@debian-root:~$ cd /etc/ssh/
List the files in the directory:
toon@debian-root:/etc/ssh$ ls
Open the SSH configuration file with an editor:
toon@debian-root:/etc/ssh$ sudo nano sshd_config
Note that only an administrator is allowed to modify the file sshd_config. The current user hasbeen made an administrator because we have added the following to the sudo configurationfile before:
toon ALL=(ALL) ALL
Every time a user who is an administrator executes a command, he does not execute thecommand as an administrator by default. If a user wants to execute a command as an ad-ministrator, he has to explicitly type sudo before the command. The very first time a userexecutes a command with sudo he gets the 3 warnings that are shown in the screenshot.The first time a user executes a command with sudo in a session, he has to authenticatewith his password, thus enter:
[sudo] password for toon: password

Host Setup
8
Here we see the configuration for the SSH server. If you have installed a X.Org server onthe physical server and want to be able to tunnel the desktop remotely over SSH, make surethat you set the following setting:
X11Forwarding yes
The default port on which the SSH server is listening is 22:
Port 22

Host Setup
9
Change this to another number between 1024-65535:
Port 2222
By default the root user can log in with SSH:
PermitRootLogin yes

Host Setup
10
Disable the root user logging in with SSH:
PermitRootLogin no
Press control+X To quit the editor. Press Y to save the changes.
Press enter to confirm writing the changes.

Host Setup
11
Go to the /etc/init.d/ directory, which contains start and stop scripts of several Linux services:
toon@debian-root:/etc/ssh$ cd /etc/init.d/
Look for the SSH script:
toon@debian-root:/etc/init.d$ ls s*
Restart the SSH server, so it uses the new SSH configuration:
toon@debian-root:/etc/init.d$ sudo /etc/init.d/ssh restart
Now we will not only prevent the root user from logging in through SSH, we will prevent theroot user from logging in from anywhere. To disable the root user logging in, enter:
toon@debian-root:/etc/init.d$ sudo passwd -l root

Host Setup
12
or alternatively:
toon@debian-root:/etc/init.d$ sudo passwd --lock root
Try logging in as the root user:
toon@debian-root:/etc/init.d$ suPassword password
The authentication fails. Now enable the log in of the root user again:
toon@debian-root:/etc/init.d$ sudo passwd -u root
or alternatively:
toon@debian-root:/etc/init.d$ sudo passwd --unlock root
Verify that the root user can log in again:
toon@debian-root:/etc/init.d$ suPassword password
Log the root user out again:
debian-root:/etc/init.d# exit
Disable the root log in:
toon@debian-root:/etc/init.d$ sudo passwd -l root
Log out, we can access the server remotely over SSH, we do not need to be logged in locally:
toon@debian-root:/etc/init.d$ exit

Host Setup
13
Locally, we see the log in prompt:

14
Chapter 3. Network Set UpThis chapter explains how to configure IP addresses for a physical server.
First we check which network interfaces are up and running. For this, we enter:
toon@ubuntu-toon:~$ sudo ifconfig[sudo] password for toon: password
The network interfaces at my laptop are shown in the following screenshot. To add IP ad-dresses to the eth0 interface, we will modify the /etc/network/interfaces file. For this, enter:
toon@little-ubuntu:~$ sudo nano /etc/network/interfaces

Network Set Up
15
Initially, only the loopback interfaces is defined in /etc/network/interfaces:
We assign the IP address 192.168.0.2 to eth0 by adding the following text (adjust whereneeded):

Network Set Up
16
auto eth0iface eth0 inet static address 192.168.0.2 network 192.168.0.0 netmask 255.255.255.0 broadcast 192.168.0.255 gateway 192.168.0.1 # The DNS information below is copied to /etc/resolv.conf dns-nameservers 8.8.8.8 8.8.4.4 dns-search pacita.org
We assign the IP address 192.168.0.3 to the same eth0 interface by adding the following text:
auto eth0:1iface eth0:1 inet static address 192.168.0.3 netmask 255.255.255.0
We add the IP addresses 192.168.0.4, 192.168.0.5 and 192.168.0.6 to the eth0 interfacewith the following text:
auto eth0:2iface eth0:2 inet static address 192.168.0.4 netmask 255.255.255.0
auto eth0:3iface eth0:3 inet static address 192.168.0.5 netmask 255.255.255.0
auto eth0:4iface eth0:4 inet static address 192.168.0.6 netmask 255.255.255.0

Network Set Up
17
After making the changes to /etc/network/interfaces, press control+X and then Y.
Press enter to confirm the changes:
Now we have made the changes to the networking configuration, we will restart the network-ing for the changes to take effect.
Warning
Be careful before restarting the networking on a remote server. If the configurationis incorrect, you may not be able to access your server remotely anymore!
For the changes to take effect, enter:
toon@ubuntu-toon:~$ sudo /etc/init.d/networking restart

Network Set Up
18
Now enter the following to check that IP addresses have been assigned to the network in-terface eth0:
toon@ubuntu-toon:~$ sudo ifconfig
The IP addresses 192.168.0.2, 192.168.0.3, 192.168.0.4, 192.168.0.5 and 192.168.0.6 havebeen assigned to the network interface eth0:

Network Set Up
19
Test if the IP addresses work by trying to log in to the SSH server at one of the IP addresses.In the previous chapter, we let the SSH server listen at port 2222. Enter:
toon@ubuntu-toon:~$ ssh -p 2222 [email protected]
Are you sure you want to continue connecting (yes/no)? yes
[email protected]'s password: password
We're logged in!

20
Chapter 4. Installing KVMThis chapter explains how to install KVM and bridged networking for KVM on a local orremote server. Much of the information about installing KVM can also be found at https://help.ubuntu.com/community/KVM
Execute the following command:
toon@ubuntu-toon:~$ egrep -c '(vmx|svm)' /proc/cpuinfo
If the console returns a number bigger than 0, all should be fine. 0 means that the CPU doesnot support hardware virtualization, a number bigger than 0 means that the CPU supportshardware virtualization. Execute the following command:
toon@ubuntu-toon:~$ egrep -c ' lm ' /proc/cpuinfo
If the console returns 0, it means the CPU is not 64 bit. If the console returns a number biggerthan 0, it means the CPU is 64 bit. It is recommended, but not required that the CPU is 64bit. Execute the following command:
toon@ubuntu-toon:~$ uname -m
If the console returns x86_64, you are running a 64 bit kernel. If the console returns one ofi386, i486, i586 or i686, you are running a 32 bit kernel. It is recommended, but not requiredto run a 64 bit kernel.
If the settings above are fine, execute the following command to install KVM:
toon@ubuntu-toon:~$ sudo aptitude install qemu-kvm libvirt-binbridge-utils
Press Y when prompted.
Check the groups the user is in by executing the command:
toon@ubuntu-toon:~$ groups

Installing KVM
21
To use KVM, the user has to be in the group libvirtd. This group is created during installationof KVM, however the user is only added to this group after logging out and logging in again.Therefore, execute the command:
toon@ubuntu-toon:~$ logout
Log in again with the following commands:
toon@ubuntu-toon:~$ ssh -p 2222 [email protected]@192.168.0.2's password: password
Now check the user has been added to the libvirtd group:
toon@ubuntu-toon:~$ groups
We will use bridged networking, which would be the most efficient way to emulate physicalethernet cards at the virtual machines. For this, we have to install the libcap2-bin package:
toon@ubuntu-toon:~$ sudo aptitude install libcap2-bin

Installing KVM
22
Execute the following command to give the CAP_NET_ADMIN capability to KVM:
toon@ubuntu-toon:~$ sudo setcap cap_net_admin=ei/usr/bin/qemu-system-*
Execute the following command to modify the users that have the CAP_NET_ADMIN capa-bility:
toon@ubuntu-toon:~$ sudo nano /etc/security/capability.conf
The contents of the file /etc/security/capability.conf look like:

Installing KVM
23
Add the following line to give the user that runs KVM the inheritable CAP_NET_ADMIN ca-pability:
cap_net_admin toon
Note
Give this capability only to the user that runs KVM. It is recommended to create aseparate user, e.g. kvmuser whose only responsibility is to run KVM. In the example,I use my own user account, because I am the only active user at my laptop and itis easy to assign all permissions to myself. However, in a production environmentwith multiple physical users, the user that runs KVM should not be a user that isassociated with a physical person.
If the line has been added, press control+X and then Y to save the changes.

Installing KVM
24
Press enter to confirm the changes:
We will now modify the network configuration to use bridged networking. Execute:
toon@ubuntu-toon:~$ sudo nano /etc/network/interfaces

Installing KVM
25
Below you see the old configuration for the eth0 interface:
Change the configuration for the eth0 interface to:
auto eth0iface eth0 inet manual
Copy the old configuration from the eth0 interface to the bridge network interface br0:
auto br0iface br0 inet static address 192.168.0.2 network 192.168.0.0

Installing KVM
26
netmask 255.255.255.0 broadcast 192.168.0.255 gateway 192.168.0.1 # The DNS information below is copied to /etc/resolv.conf dns-nameservers 8.8.8.8 8.8.4.4 dns-search pacita.org
and add the following lines to the br0 interface:
bridge_ports eth0 bridge_stp off bridge_fd 0 bridge_maxwait 0
Press control+X and then Y to save the changes.
Press enter to confirm the changes:

Installing KVM
27
Restart the networking with the following command:
toon@ubuntu-toon:~$ sudo /etc/init.d/networking restart
Warning
Be careful before restarting the networking on a remote server. If the configurationis incorrect, you may not be able to access your server remotely anymore!
Log out:
toon@ubuntu-toon:~$ exit
Installing KVM
28
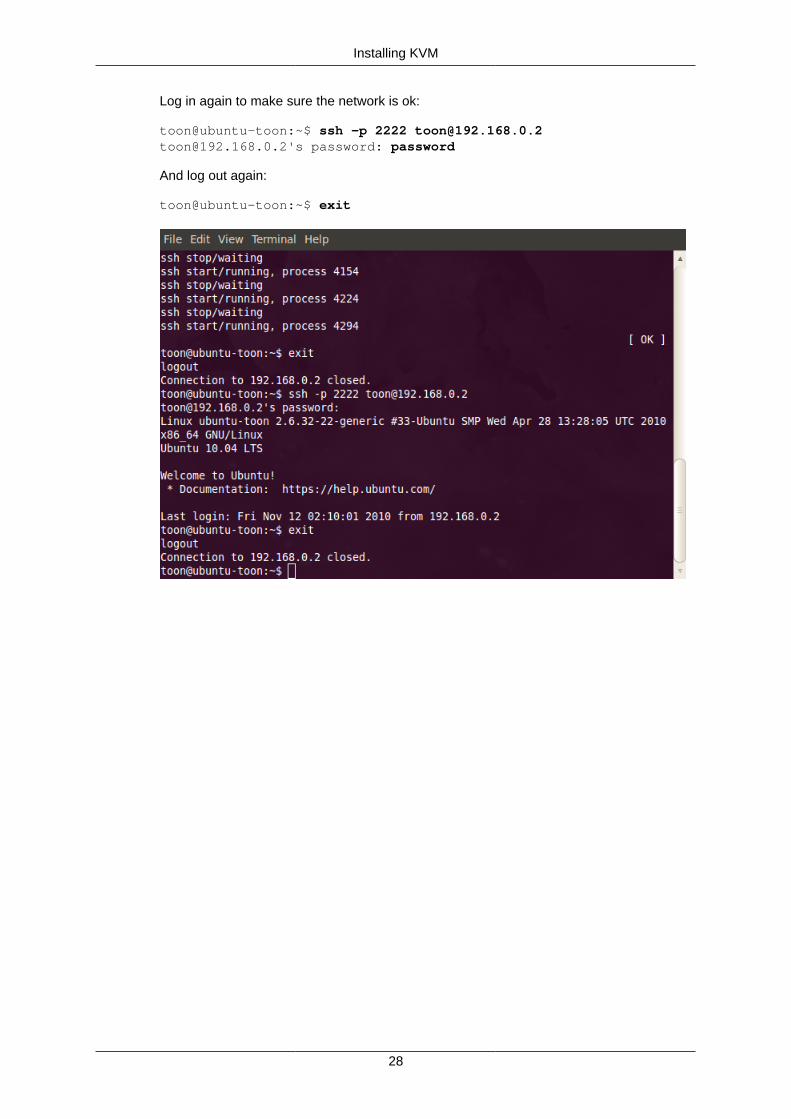
Log in again to make sure the network is ok:
toon@ubuntu-toon:~$ ssh -p 2222 [email protected]@192.168.0.2's password: password
And log out again:
toon@ubuntu-toon:~$ exit

29
Chapter 5. Creating an LVM PartitionThis chapter explains how to create a Logical Volume Manager (LVM) partition that will beused to create logical disks for the virtual machine. There are 4 layers in an LVM partition:
1. The partition of type LVM.
2. A physical volume, which corresponds with an LVM partition.
3. A volume group, which comprises multiple physical volumes and multiple hard drives.
4. A logical volume, which is a part of a volume group and appears to be equivalent to areal hard drive.
The advantages of using LVM over regular partitions are that the volume group can spanover multiple physical disks that can be added or removed on the fly, that the logical volumescan be easily resized and that a live snapshot can be taken of the logical volumes, so theycan be backed up consistently without bringing the server down.
The first thing we do is checking the existing partitions with fdisk. Execute:
toon@ubuntu-toon:~$ sudo fdisk -l[sudo] password for toon: password
The disk /dev/sda has an NTFS partition, an ext3 partition (Linux) and a swap partition andis fully used. The disk /dev/sdb has no partitions and is unused. If you would have no freespace, you could use either GParted (if you install Xorg on your host server, which I don't)or resize2fs (if you do not install Xorg on your host server) to resize partitions and makesome free space. Partitions can only be resized when they are not mounted. We assign newpartitions to /dev/sdb by executing:
toon@ubuntu-toon:~$ sudo fdisk /dev/sdb

Creating an LVM Partition
30
Enter m to see all the available options:
Command (m for help): m
Enter l to see the possible partition types:
Command (m for help): l

Creating an LVM Partition
31
The Linux LVM partition type is identified by 8e. Enter n to create a new partition:
Command (m for help): n
We have to decide whether to create a primary or an extended partition. There can only be 4primary partitions per disk, so if we would create more than 4 partitions at the disk, we wouldhave to use extended partitions. However, I will only create 1 single LVM partition that spansthe whole disk, thus I choose for a primary partition:
Command action

Creating an LVM Partition
32
e extended p primary partition (1-4)p
Since I only create 1 single partition, I can choose which number between 1 and 4 I choose.I choose 1:
Partition number (1-4): 1
The partition starts from the beginning of the disk, thus from cylinder 1:
First cylinder (1-60801, default 1): 1
The partition spans the whole disk until the last cylinder 60801:
Last cylinder, +cylinders or +size{K,M,G}(1-60801, default 60801): 60801
We set the type of the partition with the following command:
Command (m for help): t
We enter 8e, because that is the code for Linux LVM as we have seen before:
Hex code (type L to list codes): 8e
Enter p to print out the changes we have made to the partition table:
Command (m for help): p
Enter w to write the changes:
Command (m for help): w
Execute the following command to check the changes to the partition table have been writtencorrectly:

Creating an LVM Partition
33
toon@ubuntu-toon:~$ sudo fdisk -l
For the disk /dev/sda, we see the same partitions as before. For the disk /dev/sdb, we seethe LVM partition we just created. We can also only list the partitions of disk /dev/sdb withthe following command:
toon@ubuntu-toon:~$ sudo fdisk -l /dev/sdb
We only see the partitions of the disk /dev/sdb:

Creating an LVM Partition
34

35
Chapter 6. Creating Logical Volumeswith LVM
This chapter explains how to create logical volumes with Logical Volume Manager (LVM).These logical volumes can be used as disks for virtual machines. An LVM partition consistsof 4 layers:
1. The partition of type LVM.
2. A physical volume, which corresponds with an LVM partition.
3. A volume group, which comprises multiple physical volumes and multiple hard drives.
4. A logical volume, which is a part of a volume group and appears to be equivalent to areal hard drive.
The previous chapter only explains how to create a partition of type LVM. This chapter ex-plains how to create the other layers. The website http://www.howtoforge.com/linux_lvm ex-plains LVM more in depth.
To create physical volumes, volume groups and logical volumes, we first have to install LVM2:
toon@ubuntu-toon:~$ sudo aptitude install lvm2[sudo] password for toon: password
Next we check the available LVM partitions:
toon@ubuntu-toon:~$ sudo fdisk -l
/dev/sdb1 is the LVM partition we created in the previous chapter. From this partition, wemake a physical volume with the command:
toon@ubuntu-toon:~$ sudo pvcreate /dev/sdb1
We check the existing physical volumes with the command:

Creating LogicalVolumes with LVM
36
toon@ubuntu-toon:~$ sudo pvdisplay
We see that /dev/sdb1 is a physical volume. We create the volume group kvmgroup from thephysical volume /dev/sdb1 with the command:
toon@ubuntu-toon:~$ sudo vgcreate kvmgroup /dev/sdb1
We check the existing volume groups with the command:
toon@ubuntu-toon:~$ sudo vgdisplay
We see that kvmgroup is a volume group. We create the logical volume kvm0 in the volumegroup kvmgroup with the command:

Creating LogicalVolumes with LVM
37
toon@ubuntu-toon:~$ sudo lvcreate --name kvm0 --size 16G kvmgroup
The size of the logical volume is set to 16 GB.
We check the existing logical volumes with the command:
toon@ubuntu-toon:~$ sudo lvdisplay
We created the logical volume /dev/kvmgroup/kvm0 with a size of 16 GB.

38
Chapter 7. Virtual Machine ManagerThis chapter explains how to install Virtual Machine Manager and how to install a virtualserver on a remote server. Virtual Machine Manager is a graphical user interface for KVM.
To install Virtual Machine Manager, execute the command:
toon@ubuntu-toon:~$ sudo aptitude install virt-manager
When prompted, press Y. Virtual Machine Manager has to be installed on your local PC, noton the server that hosts the virtual machines.
After installation, start Virtual Machine Manager from the command line with the command:
toon@ubuntu-toon:~$ virt-manager

Virtual Machine Manager
39
You see the window below: Add a connection to the remote server by selecting from themenu: File > Add Connection...
Select QEMU/KVM as Hypervisor, Remote tunnel over SSH as Connection and enteraaaa@bbbb:cccc as Hostname, in which aaaa is the kvm user at the server, bbbb is the

Virtual Machine Manager
40
server hostname or IP address and cccc is the port at which the SSH server is listening. ClickConnect to connect with the server.
When prompted, enter the password to log in. Once connected, right click on the connection,e.g. right click on 192.168.0.3:2222 (QEMU) and select Details.

Virtual Machine Manager
41
Select the Storage tab and click on the plus image in the bottom left corner.
Enter kvmgroup, the name of the volume group we created in the previous chapter in theName field and select logical: LVM Volume Group for the Type field. Click Forward.

Virtual Machine Manager
42
Set the Target Path to /dev/kvmgroup and leave the other fields blank. Click Finish.
We see the logical volume kvm0 that we created before appearing in the volume group kvm-group. We can also create logical volumes through the GUI. Click New Volume.

Virtual Machine Manager
43
Enter kvm1 in the Name field. Set Max Capacity and Allocation to 16000 MB. Click Finish.
We have now created the logical volume kvm1 with a size of 16000 MB or 15.62 GB.

Virtual Machine Manager
44
Switch back to the console. Check the directory you are currently in with the command:
toon@ubuntu-toon:~$ pwd
Create a subdirectory kvm and go to this subdirectory:
toon@ubuntu-toon:~$ mkdir kvmtoon@ubuntu-toon:~$ cd kvm
Download the latests Debian ISO image (probably different from the one shown in the screen-shot) with wget:
toon@ubuntu-toon:~/kvm$ wget http://cdimage.debian.org/debian-cd/5.0.6/amd64/iso-cd/debian-506-amd64-netinst.iso

Virtual Machine Manager
45
After downloading, check that the ISO image is present:
toon@ubuntu-toon:~/kvm$ ls
Switch back to the window that shows the storage at the server. Click on the plus image inthe bottom left corner.

Virtual Machine Manager
46
Enter downloads in the Name field and dir: Filesystem Directory in the Type field. Click For-ward.
Enter the path to which we downloaded the Debian ISO, /home/toon/kvm in the Target Pathfield. Leave all the other fields blank and click Finish.

Virtual Machine Manager
47
We can now see the Debian ISO image.
Right click on the connection in the first window, e.g. right click on 192.168.0.3:2222 (QEMU)and select New. Enter Debian-Lenny in the Name field. Enter 192 (QEMU/KVM) in the Con-nection field. Select Local install media (ISO image or CDROM) and click Forward.

Virtual Machine Manager
48
Set the OS type to Linux and the Version to Debian Lenny (or whichever that applies). SelectUse ISO image and click Browse....
Virtual Machine Manager
49
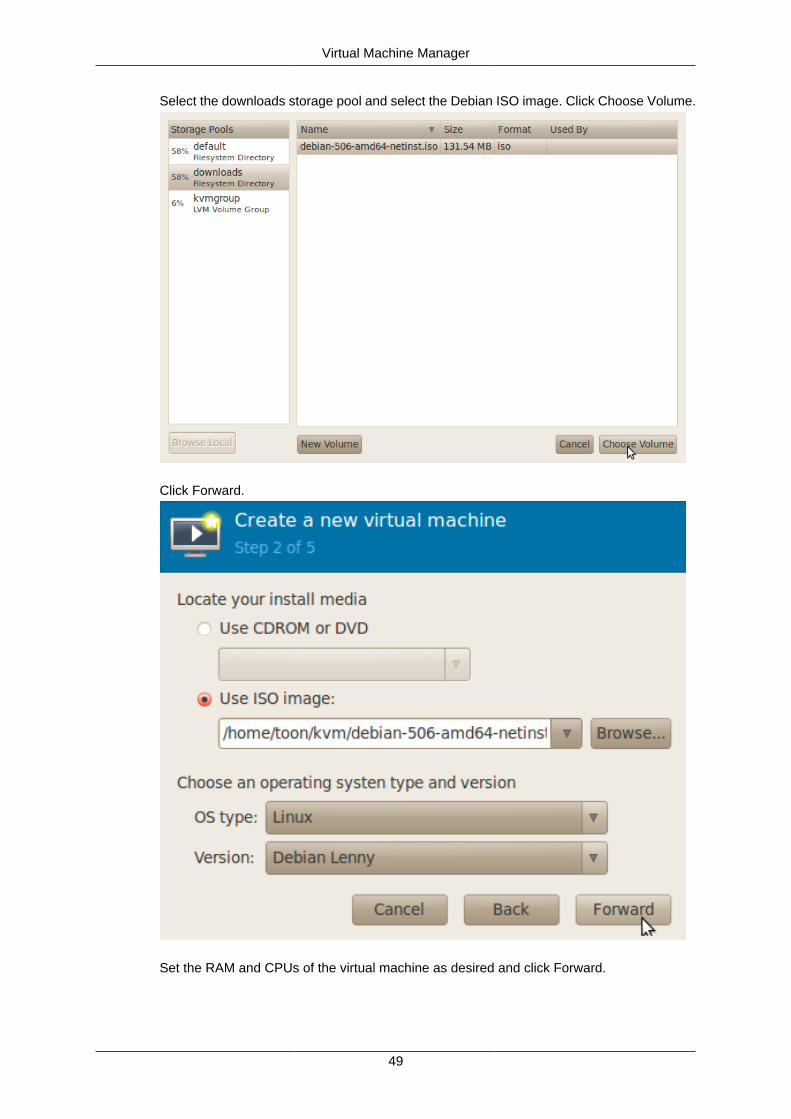
Select the downloads storage pool and select the Debian ISO image. Click Choose Volume.
Click Forward.
Set the RAM and CPUs of the virtual machine as desired and click Forward.

Virtual Machine Manager
50
Select Enable storage for this virtual machine.
Caution
Do not select Create a disk image on the computer's hard drive. If you select thisoption, the file system of the virtual machine will run on top of the file system of thehost, which is not efficient at all. Instead select Select managed or other existingstorage.
Click Browse....

Virtual Machine Manager
51
Select the kvmgroup storage pool and select the logical volume kvm0. Click Choose Volume.
Click Forward.

Virtual Machine Manager
52
Leave the settings as they are and click Finish. The virtual machine will now start and bootfrom the ISO image. Click on the Open image of the first window to see the console of thevirtual machine.

Virtual Machine Manager
53
Select Install and press enter.
Caution
a graphical install is fancier than a regular install, but is also slower on a remoteinstallation!

Virtual Machine Manager
54
Select your language and press enter.
Select your country and press enter.

Virtual Machine Manager
55
Select your region and press enter.
Select your country and press enter.

Virtual Machine Manager
56
Select your keyboard layout and press enter.
Enter a host name for the server, select Continue and press enter.

Virtual Machine Manager
57
Select a domain name for the server, select Continue and press enter.
Select Guided - use entire disk and press enter. (we are already using LVM underneath.)

Virtual Machine Manager
58
Select the virtual disk and press enter.
Select the partitioning scheme you prefer. I prefer to select Separate /home partition, becausethen the user generated data is separated from the operating system files. In case of a backup you might only care about the /home partition, because the rest can be easily restoredwith a clean install. Press enter.

Virtual Machine Manager
59
Select Finish partitioning and write changes to disk and press enter.
Select Yes and press enter.

Virtual Machine Manager
60
Enter a root password (not password, except for demonstration purposes), select Continueand press enter.
Enter the same password, select Continue and press enter.

Virtual Machine Manager
61
Enter your name (not mine), select Continue and press enter.
Enter a user name with which you will log in to the server, select Continue and press enter.

Virtual Machine Manager
62
Enter a password (not password, except for demonstration purposes) for the user name youjust entered, select Continue and press enter.
Enter the same password, select Continue and press enter.

Virtual Machine Manager
63
Select the country from which you want to use the Debian mirror and press enter.
Select one of the available mirrors and press enter.

Virtual Machine Manager
64
Fill in the proxy information, select Continue and press enter. The proxy information is to beleft blank, unless you are behind a proxy.
Select whether you want to participate in the package usage survey and press enter.

Virtual Machine Manager
65
Deselect all options, select Continue and press enter. I prefer to install as little as possibleto my server and only add things when I need them. This would make a server more stableand safe, because programs that are not needed are not running and thus cannot be usedto break into the server (if they would be listening to some ports).
Select Yes and press enter.

Virtual Machine Manager
66
Select Continue and press enter.
After the server has been shut down, go to the info screen of the virtual machine, go to theCDROM and click Disconnect.

Virtual Machine Manager
67
Make sure that the Debian ISO image is not connected to the CDROM of the virtual machineanymore, so next time you start the virtual machine, you do not boot from the Debian ISOimage (to reinstall Debian), but instead you boot from the virtual hard drive of the virtualmachine.

68
Chapter 8. Bridged NetworkingThis chapter explains how to enable bridged networking for a virtual server, how to assign anIP address to a virtual server, how to disable the root login on the virtual server for securityreasons and how to install a SSH server, so the virtual server can be accessed remotely.
The Virtual Machine Manager graphical user interface allows to modify most of the virtualmachine settings. However, it appears not to be possible to set up a network card that usesbridged networking on a remote host. Therefore, we will have to set up the network card bymanually editing the XML configuration file of the virtual machine. Make sure that the bridgenetwork interface br0 has been set up as explained in Chapter 4, Installing KVM. We log into the remote host from the command line with the following commands:
toon@ubuntu-toon:~$ ssh -p 2222 [email protected]@192.168.0.3's password: password
We go to the configuration directory of KVM with the following command:
toon@ubuntu-toon:~$ cd /etc/libvirt/qemu/
and see the configuration files of the virtual machines with:
toon@ubuntu-toon:/etc/libvirt/qemu$ ls
We edit the configuration file of the Debian-Lenny virtual machine with the following com-mands:
toon@ubuntu-toon:/etc/libvirt/qemu$ sudo nano Debian-Lenny.xml[sudo] password for toon: password
Before editing the configuration file, make sure that the virtual machine has been turned off.
We see the original hardware that is attached to the virtual machine represented by XMLelements. Network interfaces are defined by interface elements. The interface element thatis already there represents the default network interface that uses NAT to access the internetthrough the host.

Bridged Networking
69
We add a network interface by adding the following text to the configuration:
<interface type='network'> <mac address='52:54:00:1d:c2:2a'/> <source bridge='br0'/> <model type='virtio'/> </interface>
In this, the MAC address is unique and thus always different! You could add a network card tothe virtual machine through Virtual Machine Manager. Only you don't click Finish, but Cancelin the end, so the network card isn't added. Yet, the UI generated a valid MAC address youcould use while you were configuring the network card. The value for the bridge attribute isthe name of the bridge network interface as set up in Chapter 4, Installing KVM. The valuefor the type attribute should be virtio (which has near native network performance). Once youadded the new network interface, press control+X and then Y to save the changes:

Bridged Networking
70
Press enter to confirm the changes:
Reload the libvirt-bin service:
toon@ubuntu-toon:/etc/libvirt/qemu$ sudo service libvirt-bin reload
Close the command line prompt:
toon@ubuntu-toon:/etc/libvirt/qemu$ exittoon@ubuntu-toon:~$ exit

Bridged Networking
71
Start a new command line prompt and start Virtual Machine Manager:
toon@ubuntu-toon:~$ virt-manager
Connect to the remote host. Enter your password when prompted. Select the Debian-Lennyvirtual machine. Either double click on Debian-Lenny or on Open to open the window of theDebian-Lenny virtual machine:

Bridged Networking
72
Click on the play button to start the virtual machine:

Bridged Networking
73
Click the console button in the window of the Debian-Lenny virtual machine to see the consoleof the virtual machine. Once the login prompt appears, log in with the root user account (wecontinue the fresh Debian installation from Chapter 7, Virtual Machine Manager).
Lenny login: rootPassword: password
Once logged in, we execute the command:
Lenny:~# ifconfig -a
This shows us all the network interfaces connected to the virtual machine, also the onesthat are not configured and up yet. The network interface eth1 is not configured and up yet.We ran this command to find out the name of the network interface we manually added tothe virtual machine by changing Debian-Lenny.xml above. This name is eth1, but it could aswell have been eth2, eth3 or eth4. We need to know the name of the network interface toconfigure it in /etc/network/interfaces:
Lenny:~# nano /etc/network/interfaces

Bridged Networking
74
This is the original network configuration, only eth0 and the loopback interface lo are con-figured:
We assign the IP address 192.168.0.10 to the new network interface by adding the followingtext:
auto eth1

Bridged Networking
75
iface eth1 inet static address 192.168.0.10 netmask 255.255.255.0
Press control+X and then Y to save the changes:
Press enter to confirm the changes:

Bridged Networking
76
Restart networking with the following command:
Lenny:~# /etc/init.d/networking restart
Caution
The networking of the virtual machine could be down if you did not configure it cor-rectly!
Check all the network interfaces that are up and running with the following command:
Lenny:~# ifconfig
We see that the eth1 network interface is up with the IP address that we assigned to it.However, the eth0 network interface appears to be down. The eth0 provided access to theInternet through the host. Currently we have no access to the Internet anymore. However,the eth0 as well as the eth1 network interface will be restored if we restart the server:
Lenny:~# reboot

Bridged Networking
77
After restarting the server, at the log in prompt, we enter again:
Lenny login: rootPassword: password
We check again all network interfaces that are up and running:

Bridged Networking
78
Lenny:~# ifconfig
After restarting the server, both the eth0 and eth1 network interface are up and running. Theeth0 interface provides access to the Internet (through the host by using NAT). The eth1interface allows the host to access the virtual machine at the IP address 192.168.0.10. Wewill now install sudo, so we can give administrative privileges to a regular user account, sowe can desactivate the root user for security reasons:
Lenny:~# aptitude install sudo

Bridged Networking
79
After installation, we configure sudo with the visudo command:
Lenny:~# visudo
Except for the root user, no one has administrative privileges by default:

Bridged Networking
80
We add the following line to give administrative rights to the user toon:
toon ALL=(ALL) ALL
Instead of giving individual users administrative rights, it may be better to give these rightsto a group and add users that need to have these rights to the group. Add the following lineinstead to give administrative rights to the group admin:
%admin ALL=(ALL) ALL
Press control+X and then Y to save the changes:

Bridged Networking
81
Press enter to confirm the changes:
Now log out the root user:
Lenny:~# exit
Log in with a regular user that has been given administrative privileges:

Bridged Networking
82
Lenny login: toonPassword: password
Disable the root login as soon as possible:
toon@Lenny:~$ sudo passwd -l root
The first time you execute sudo, you get the advice:
#1) Respect the privacy of others. #2) Think before you type. #3) With great power comes great responsibility.
Enter your password:
[sudo] password for toon: password
and install an SSH server:
toon@Lenny:~$ sudo aptitude install ssh

Bridged Networking
83
When prompted, press Y and confirm with enter:
Configure the SSH server with:
toon@Lenny:~$ sudo nano /etc/ssh/sshd_config

Bridged Networking
84
First look for the following line:
Port 22
This line defines on which port the SSH server is listening.
Change the port on which the SSH server is listening to a number between 1024 - 65535,e.g. 2234:

Bridged Networking
85
Port 2234
You should not let the SSH server listen to port 22, the internet is full of spiders that attemptbrute force attacks mainly on this port.
Find the line that allows root login:
PermitRootLogin yes

Bridged Networking
86
Change the line to:
PermitRootLogin no
You do not want a brute force attack succeeding in getting root access to your server. Presscontrol+X and then Y to save the changes:
Press enter to confirm the changes:

Bridged Networking
87
Restart the SSH server with the following command:
toon@Lenny:~$ sudo /etc/init.d/ssh restart
Exit the console:
toon@Lenny:~$ exit
You will now be able to log in from the host with SSH.
From a console window, log in to the host:
toon@ubuntu-toon:~$ ssh -p 2222 [email protected]@192.168.0.3's password: password
From the host, log in to the virtual machine guest:
toon@ubuntu-toon:~$ ssh -p 2234 [email protected]
When prompted, enter yes and confirm with enter. Enter the password for the virtual ma-chine:
[email protected]'s password: password

Bridged Networking
88
By mistake, I entered twice the password of the host, before entering the password of theguest, so I needed 3 attempts to log in. Check the hostname once you are logged in:
toon@Lenny:~$ hostname
The hostname is Lenny, which means that we are logged in on the virtual machine. Log outfrom the virtual machine:
toon@Lenny:~$ exit
Log out from the remote host:
toon@ubuntu-toon:~$ exit
And quit the command line:
toon@ubuntu-toon:~$ exit

Bridged Networking
89

90
Chapter 9. IP ForwardingThis chapter explains how IP addresses that are assigned to a physical server can be as-signed to virtual servers running on the physical server.
To reroute Internet traffic that enters on an IP address of the host machine, to a private IPaddress of a virtual machine, one can use iptables. For this a rule has to be added to thePREROUTING chain of the nat table that has a DNAT target. I found a good explanationabout the chains that are traversed by iptables at this website: http://www.faqs.org/docs/iptables/traversingoftables.html The traversal of the chains is also illustrated by the followingimage:

IP Forwarding
91
IP Forwarding
92
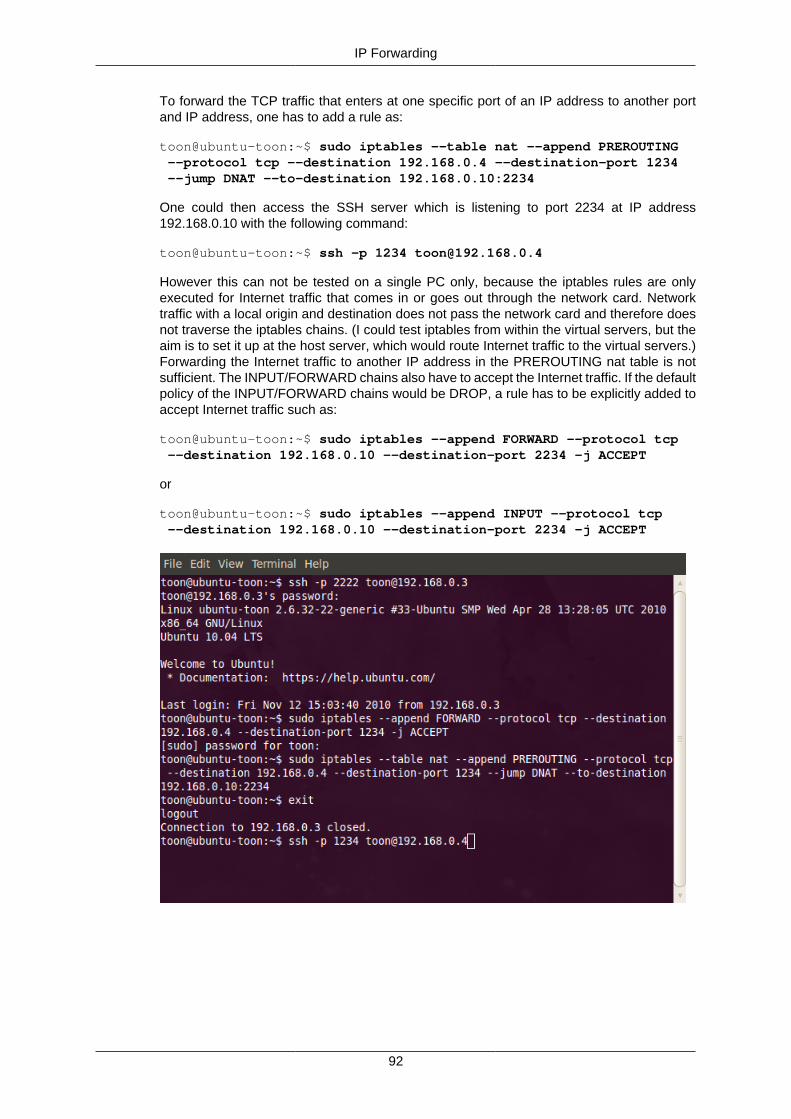
To forward the TCP traffic that enters at one specific port of an IP address to another portand IP address, one has to add a rule as:
toon@ubuntu-toon:~$ sudo iptables --table nat --append PREROUTING --protocol tcp --destination 192.168.0.4 --destination-port 1234 --jump DNAT --to-destination 192.168.0.10:2234
One could then access the SSH server which is listening to port 2234 at IP address192.168.0.10 with the following command:
toon@ubuntu-toon:~$ ssh -p 1234 [email protected]
However this can not be tested on a single PC only, because the iptables rules are onlyexecuted for Internet traffic that comes in or goes out through the network card. Networktraffic with a local origin and destination does not pass the network card and therefore doesnot traverse the iptables chains. (I could test iptables from within the virtual servers, but theaim is to set it up at the host server, which would route Internet traffic to the virtual servers.)Forwarding the Internet traffic to another IP address in the PREROUTING nat table is notsufficient. The INPUT/FORWARD chains also have to accept the Internet traffic. If the defaultpolicy of the INPUT/FORWARD chains would be DROP, a rule has to be explicitly added toaccept Internet traffic such as:
toon@ubuntu-toon:~$ sudo iptables --append FORWARD --protocol tcp --destination 192.168.0.10 --destination-port 2234 -j ACCEPT
or
toon@ubuntu-toon:~$ sudo iptables --append INPUT --protocol tcp --destination 192.168.0.10 --destination-port 2234 -j ACCEPT