sew4home - how to make a box pleat or inverted box pleat - 2012-11-17
DESCRIPTION
how to make a box pleatTRANSCRIPT

Published on Sew4Home (http://www.sew4home.com)
Home > How To Make A Box Pleat Or Inverted Box Pleat
How To Make A Box Pleat Or Inverted Box Pleat Editor: Liz JohnsonTuesday, 15 May 2012 9:00
Pleats are the origami of the sewing world. And although you don't usually need to fold one into the shape of a swan, there area wide variety of pretty pleats that add distinct visual and textural embellishments for both home décor as well as garmentsewing. Each type provides a different look based on how it's formed. You can make: knife pleats, knife pleats in twodirections, box pleats, inverted box pleats, inverted box pleats with a separate underlay, accordion pleats, sunray pleats, andwave pleats. In this tutorial, we're focusing on a box pleat and its identical yet opposite cousin, the inverted box pleat. We'lladdress knife pleats later this week and some of the more specialized pleats in the near future.
A box pleat is one of the most common types of pleats. It's formed when two equal folds of fabric are folded away from eachother in opposite directions on the front of a length of fabric. The folds traditionally meet evenly at the center back, but they don'thave to meet at the center. You can create a single box pleat or a grouping of box pleats, depending on the overall visualdesign. In addition, you can topstitch or edgestitch a pleat to help maintain its form.
An inverted box pleat is formed by two equal folds of fabric folded toward one another so they meet at the center of the pleat onthe front of the fabric. Or, more easily stated, an inverted box pleat is what a box pleat looks like from behind.
The key to sewing any pleat is precise marking of the fold lines and placement lines. You'll want to test your marking tools onyour selected fabric to make sure they are appropriate. The big question is whether to mark your lines on the right side orwrong side of the fabric, or both! You'll determine this by the type of pleat, project, and/or fabric. Another important detail toremember: it's always recommended that you do any necessary hemming prior to pressing the pleats. Which reminds us!Pressing is certainly another important component in making pleats. We will explain all of these details below.
For starters, lets get a visual on what a box pleat looks like. Below is a single box pleat.
1

Here's a group of three small, closely spaced box pleats
And, here's a group of wider box pleats spaced farther apart
2

If we look at one of these examples from the back, we have inverted box pleats!
As you can see, box pleats and inverted box pleats can take on a different look depending on how many you use, their size,and their spacing.
Where we see or use pleatsYou've probably owned a pleated garment or two over the years, most likely a skirt. In fact, this may be where you're mostfamiliar with seeing pleats. However, they're just as effective in other types of sewing! Box pleats look fantastic on a valance ordrape, pillows, bags... in truth, they're a beautiful (and often very functional) accent just about anywhere.
Below are a few examples of projects we've done with box pleats.
There is a single box pleat at the bottom of each pocket on our Nine-Pocket Door Caddy. This is a good example of a box pleatfolded evenly to the center back.
3

We used single box pleats at the bottom of the pockets in our popular Quick Trip Diaper Bag. The pleats are what allow thepocket to expand to hold more stuff. If the pockets were flat, you wouldn't be able to use them for much.
In our cute Mother's Day Travel Pouch, we created single box pleats with edgestitching on either side. This shows how a boxpleat can add dimension to an otherwise plain bag.
And, we incorporated inverted box pleats into our Storybook Bedroom Window Valance.
Pleats and fabric typesPleats are created by folding the fabric at selected intervals (or measured widths). The folds are either pressed in place fromtop to bottom, or only formed at the fabric edge and left to hang as soft folds.
Depending on the fabric you use, you'll see a difference in the crispness of your pleats. Natural fabrics, such as wool or cotton,hold a crisp pressed edge much better than synthetic fabrics. This does not mean you can only use a natural fiber fabric forpleated projects. It simply means you'll have to take extra precautions when marking and pressing pleats in synthetics. As arule of thumb, natural fabrics are traditionally better for full length pleats, and synthetic fabrics are best for soft fold pleats.
In addition to the type of fabric you select, the weight of your fabric will affect the pleat's overall appearance. It's best to usewider pleats on heavier fabrics to eliminate ending up with too much bulk at the fabric edge.
One more detail to consider is yardage. If you're not using a pattern that indicates the yardage needed, you'll have to calculatehow much additional fabric you'll need. You have to add the widths of the folds and the distance between them to your overallcut measurement to make sure you have enough fabric to pleat.
Marking pleatsA box pleat or inverted box pleat consists of two fold lines and a placement line. These must be marked accurately on yourselected fabric.
On commercial patterns, you will most likely see the fold lines indicated by a dotted line and the placement line for these foldsindicated by a solid line. If you are incorporating pleats into a non-patterned project, it's best to use this same dotted and solidline method.
Usually, when folding your fabric to create the individual pleats, you work from the right side of fabric. Therefore, the fold andplacement lines are marked on the right side.
As we often recommend, if you are just learning, it makes sense to first try your technique on scraps before getting started onyour actual project.
The most common method of marking (and the way most professionals suggest) is to mark the lines on the wrong side of thefabric, then thread baste the lines so you can see them on the right side. Once you fold the pleat, press it, and sew it in place,you simply remove the basting stitches.
If you prefer, you can also use a fabric marking pen or pencil that will vanish or wipe away, and just mark the right side of thefabric. It really depends on the fabric type and/or project and/or your "pleating comfort level."
NOTE: Regardless of the method you select to mark your fabric, it may help to use two colors: one for the fold lines and asecond for the placement line. If you have a number of pleats on something, it's easy to forget which line is which.
Below, we demonstrate how to mark using both basting and pen-only methods. The most important thing to remember is to beaccurate. It's usually best to pleat the fabric before you cut it to its final size. However, if you're using a commercial pattern, thepleating has already been figured into the pattern drafting, so you cut the pieces out then create your pleats. Here at S4H, if weare design a project with pleats, we will also give you the appropriate cut size prior to pleating.
Thread basting to mark pleats
1. Place your fabric WRONG side up on a flat surface large enough for your entire fabric piece.2. Working on the wrong side, use a fabric marking pen, pencil, or chalk along with a ruler, mark the fold lines with dotted
lines and the placement line (where the folds meet) with a solid line. Here again, you can use two different color pencils4

to help differentiate between the two.
NOTE: If you're using a commercial pattern, you'll need to take added steps to mark your fabric because that tissuepattern is between you and the fabric. There are a variety of methods that can be used, including a tracing wheel andtransfer paper, pin markings, and/or clipping at the fabric edge. The key is not to move the pattern piece too much so asnot to skew the placement of the pleats. You can refer to our tutorial on How To Make A Dart . The marking process issimilar.
3. Using a hand needle and thread, run a long basting stitch through the marked lines. Again, you can use two differentthread colors. We find this to be very helpful.
4. Turn the fabric over to the RIGHT side and begin to fold the fabric at the fold lines. Match the dotted fold line (or bluethread in our sample) to the solid placement line (or pink thread in our sample). You are pinching the fabric up in order tomatch the lines.
5

5. Then, you are folding it over on itself away from the placement line. Pin, pin ,pin to hold in place.
6. Continue working across the fabric in this same method pinning the folds in place.
7. Move to your ironing board for pressing.
Fabric pen or pencil to mark pleats
6
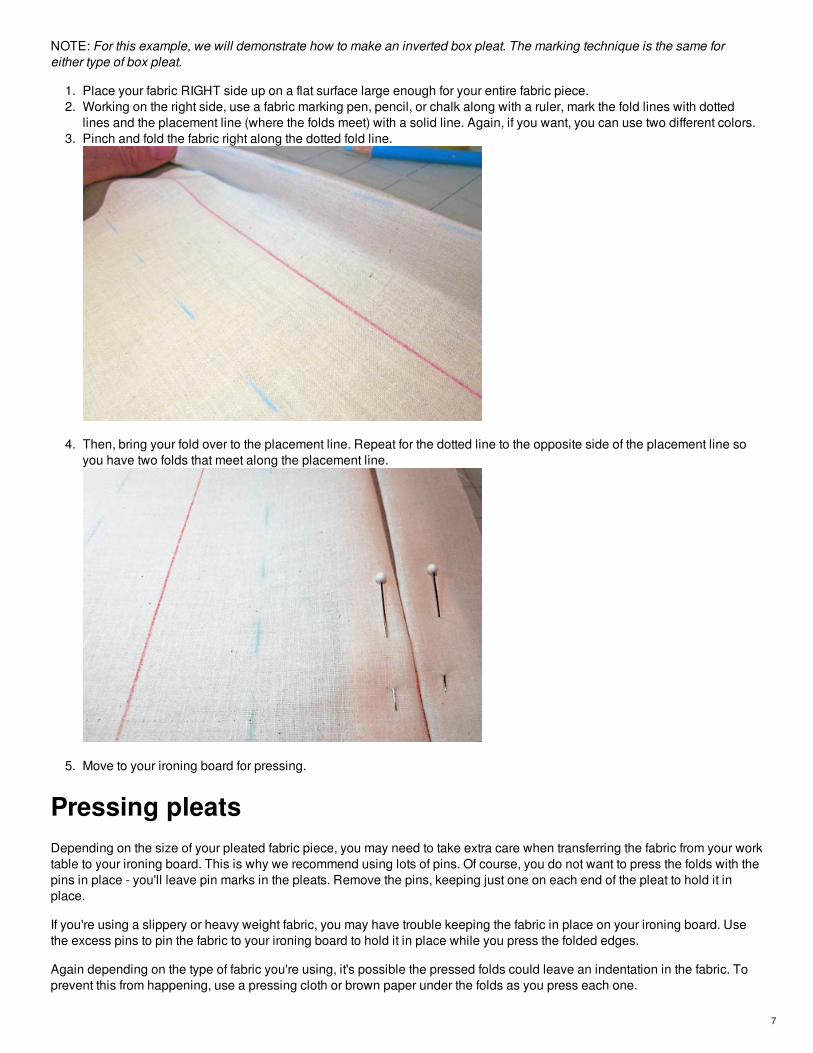
NOTE: For this example, we will demonstrate how to make an inverted box pleat. The marking technique is the same foreither type of box pleat.
1. Place your fabric RIGHT side up on a flat surface large enough for your entire fabric piece.2. Working on the right side, use a fabric marking pen, pencil, or chalk along with a ruler, mark the fold lines with dotted
lines and the placement line (where the folds meet) with a solid line. Again, if you want, you can use two different colors.3. Pinch and fold the fabric right along the dotted fold line.
4. Then, bring your fold over to the placement line. Repeat for the dotted line to the opposite side of the placement line soyou have two folds that meet along the placement line.
5. Move to your ironing board for pressing.
Pressing pleatsDepending on the size of your pleated fabric piece, you may need to take extra care when transferring the fabric from your worktable to your ironing board. This is why we recommend using lots of pins. Of course, you do not want to press the folds with thepins in place - you'll leave pin marks in the pleats. Remove the pins, keeping just one on each end of the pleat to hold it inplace.
If you're using a slippery or heavy weight fabric, you may have trouble keeping the fabric in place on your ironing board. Usethe excess pins to pin the fabric to your ironing board to hold it in place while you press the folded edges.
Again depending on the type of fabric you're using, it's possible the pressed folds could leave an indentation in the fabric. Toprevent this from happening, use a pressing cloth or brown paper under the folds as you press each one.
7

NOTE: Remember to remove your basting stitches.
Basting pleats in placeOnce you've completed pressing each fold, you again have to transfer your pleated fabric from the ironing board to yourmachine.
If your pressing was done well, this should help keep the pleats in place, however, you should still keep a few pins at the rawedge.
At your machine, use a long straight stitch or basting stitch to hold the pleats in place.
Your stitching should be within the seam allowance of your project. When you sew across the pleats in the final sewingprocess, they will be secured in place.
8

NOTE: As we mentioned above, if your project is a garment, such as a pleated skirt, you would have hemmed your fabricprior to creating the pleats.
In some projects, like our inverted box pleat pillow examples below, you may need to sew across both ends of the pleat to holdit in place.
The option to topstitch or edgestitchOnce your pleats are formed and pressed in place, you can sew the folds of the pleats with a topstitch or an edgestitch.
You will often see topstitching used on garments. For example, pleated skirts are normally topstitched from the waist to the hip.Topstitching is also typical when pleating heavier fabrics, like wool.
If you're using a synthetic fabric, an edgestitch on the fold of the pleat will help to hold keep the crease sharp. It also adds avery interesting detail. And, don't underestimate the appeal of using a contrasting thread!
NOTE: You can topstitch if you've already basted across the pleats, but for an edgestitch, you have to do this step beforebasting.
Edgestitching
1. After your pleats are formed, pinned in place, and pressed, transfer your pleated fabric to the sewing machine.2. Using an average length straight stitch, place one fold of a pleat under the foot beginning at one raw edge. In order to
sew just the fold of the fabric, keep the fabric folded onto itself.
9

3. Sew along the fold to the opposite raw edge.4. Repeat for the remaining folds.
Topstitching
1. After your pleats are formed, pinned in place, and pressed; transfer your pleated fabric to the sewing machine.2. Using an average length straight stitch, place one fold of a pleat under the foot beginning at one raw edge. Keep the
fabric flat and sew through all the layers.
3. Sew along the fold to the opposite raw edge.4. Repeat for the remaining folds.
Inverted box pleats with an underlayNow that you understand how to make a box pleat and an inverted box pleat, you can try this fun option. It's one of our favoritesbecause the underlay fabric creates a love kick of color inside the pleat.
10

We used this technique on our Organic Box Pleat Pillows as well as their R&R Version, and it makes an appearance on ourCitron-Gray Nursery Crib Skirt and our Tiger Eye Silk Color Block Pillow.
In order to create an inverted box pleat with an underlay, you have to sew a strip of fabric in between where the folds will meet.As with the other pleats we've already discussed, accuracy is key!
If you're using a pattern or following a tutorial (hopefully ours!), you will be provided with the correct size to cut your fabric strips.If not, you will need to take a few moments to think about the width of your pleats and the size underlay you would need in themiddle.
In the examples we've been showing you, most of our pleats are ½", which means there's 1" in the middle under where thefolds meet. You have to account for the width of the pleat plus the seam allowance on both sides of the strip. Using our pleatexample, and assuming a ½" seam allowance, we need 1" under the folds plus ½" on each side for our seam allowances or atotal of 2" in width for our underlay strip. The length should simply match the length of your main fabric piece.
Do this same math for each pleat, and then remember to include the spacing between pleats if you have more than one. Werecommend drawing it out on paper for the best results, and even making a little prototype out of scrap fabrics to test your math.
1. Using a straight stitch and ½" seam allowance, sew the underlay in between two pieces of your main fabric (this is thefabric that will carry the pleat).
2. Using the seam line as your guide, pinch and fold ½" of fabric and bring the fold over to the middle of the underlay strip.Pin in place.
11

3. Fold in the opposite side to match and pin in place
4. Transfer to your ironing board to press in place. Then, transfer to your sewing machine to baste the raw edges.
NOTE: Again as we've mentioned, had this been an actual project rather than just a how-to sample, we would havehemmed first and then pleated.
Contributors
12

Sample Creation and Instructional Outline: Jodi Kelly
Section:
Sewing Tips & Tricks
Related Articles
Comments (22)
Copyright ©2009-2013 Sew4Home LLC. All Rights Reserved.
Source URL: http://www.sew4home.com/tips-resources/sewing-tips-tricks/how-make-box-pleat-or-inverted-box-pleat
210
13