sewing for beginners - videa | engaging communities on...
TRANSCRIPT

Sewing for Beginners eBook
Find thousands of free crafts, decorating ideas, handmade gifts and more at www.FaveCrafts.com. 2
Sewing for Beginners: Learn to Sew with Free Sewing Patterns
Copyright 2009 by Prime Publishing LLC
All rights reserved. No part of this book may be reproduced or transmitted in any form or by any means, electronic or mechanical, including photocopying, recording, or by any information storage or retrieval system, without written permission from the publisher, except in the case of brief quotations embodied
in critical articles and reviews.
Trademarks are property of their respective holders. When used, trademarks are for the benefit of the trademark owner only.
Published by Prime Publishing LLC, 3400 Dundee Road, Northbrook, IL 60062 – www.primecp.com
Sewing for Beginners eBook
Find thousands of free crafts, decorating ideas, handmade gifts and more at www.FaveCrafts.com. 3
Letter from the Editors
Dear Reader,
To celebrate National Sewing Month in September, we put together this great sewing resource for anyone learning to sew, anyone interested in learning how to sew and even those you who have been sewing for years. In Sewing for Beginners, you will find the essential materials needed for sewing, a guide to sewing needles and handy tips for caring for fabric. While our beginner’s guide does not have quite the depth of our sewing dictionary, we think it’s a good start.
Free sewing patterns are a great resource for those learning how to sew, especially easy patterns with uncomplicated stitches and minimal measuring. This sewing eBook includes 20 different sewing projects from super‐simple to intermediate, including pillows, clothing and bags. Because every sewer needs a pincushion or two, we start off this collection with three unique pincushion crafts. Pincushions are a great way to use up scrap fabric and add a little color to your sewing room.
Happy sewing!
You can find more free knitting patterns, craft projects and extensive decorating ideas at www.FaveCrafts.com.
Our eBooks, like all our craft projects, are absolutely FREE to members of our crafting community. Please feel free to share with family and friends and ask them to sign up at our website for our free e‐mail newsletter.
Sincerely,
The Editors of FaveCrafts
www.FaveCrafts.com
www.FaveCraftsBlog.com
Sewing for Beginners eBook
Find thousands of free crafts, decorating ideas, handmade gifts and more at www.FaveCrafts.com. 4
Sewing Table of Contents
Essential Materials to Begin Sewing ....... 5
Guide to Sewing Needles .......................... 6
Caring for Fabric ...................................... 7
Pincushions ................................................ 8
Canning Jar Pin Cushion or Treasure Jar ........ 8
Felt Donut Pin Cushion ................................. 10
Egg Cup Pincushion ...................................... 11
Pillows ...................................................... 13
Heating Pillow with Buckwheat ................... 13
Recycled Sweater Throw Pillows ................. 15
Easy Pillow Sewing Project ........................... 16
Bags .......................................................... 17
Bow Bag Sewing Tutorial.............................. 17
Ribbon Stripes Bag ....................................... 21
Camping or Sleep Over Bag ......................... 23
Floral Garden Tote Bag ................................ 28
Jewelry Pouch or Sachet .............................. 33
Place Mat Purse ........................................... 35
Clothing .................................................... 36
Sweet Collar Sewing Tutorial ....................... 36
Reversible Scrap Fabric Apron ..................... 38
Fiber Embellished Shirt ................................ 42
Sewn "Crochet" Edge ................................... 46
Woven Edge Cardigan .................................. 48
Home Décor ............................................. 52
Guest Project: Framed Monogram .............. 52
Embellished Thread Bowl ............................ 54
Phone Book or Album Cover ........................ 55
Sewing for Beginners eBook
Find thousands of free crafts, decorating ideas, handmade gifts and more at www.FaveCrafts.com. 5
Essential Materials to Begin Sewing
1. Pins‐ safety pins, straight pins and a pin cushion
2. Needle and thread (of course)
3. Fabric
4. Any patterns you like
5. Sharp fabric shears
6. Paper scissors
7. Small, trimming scissors
8. Iron and ironing board
9. Seam ripper
10. Measuring tape
11. Six‐inch seam gauge
12. Ruler
Sewing for Beginners eBook
Find thousands of free crafts, decorating ideas, handmade gifts and more at www.FaveCrafts.com. 6
Guide to Sewing Needles
By: Maria Nerius
Needles really do come in all shapes and sizes. There are a few general rules to help you pick the right needle for the job. Sharps are used to cut through fabric without tearing or ripping the fabric. Blunts are used with loose or wide weaves or canvas so that you will not snag the needle on this type of material.
Sewing Needles
• Sharps are medium‐length needles with small, rounded eyes. The larger the number, the finer the needle. Considered a general all‐purpose hand‐sewing needle.
• Betweens are short needles with small round eyes for fine quilting and detailed handwork. The larger the number, the finer the needle and of course, the finer the stitch.
• Chenille is for heavy embroidery on tightly woven fabrics, because they have a long, large eye and a thick shaft. The needle to use for silk ribbon embroidery.
• Tapestry needles are easily identified by their blunt tip and long eyes. They are used for cross‐stitch, needlepoint and are ideal for teaching young kids to sew.
• Embroidery/Crewel: For all types of embroidery and crewelwork, these needles with their long, oval eyes accommodate yarn or several strands of embroidery floss.
• Large Eye is a needle that is actually two thin flat wires bonded at both tip ends of this sharp needle. You open the two flat wires to thread any thickness of thread making it foolproof (and so easy!) to thread.
• Beading needles are for picking up several beads or seed pearls at a time before attaching to project. They are long and fine with small, round eyes so they can pick up the smallest of the seed beads
• Long Darners have large eyes and long shaft make the stitches line up perfectly. The shaft is perfectly straight until the point, so all your stitches will stay even.
• Leather has a three‐sided chisel point to easily pierce through leather and suede.
• Doll needles are very long, thin, sharp needle from to 7‐15” long. A lei needle falls into this category and can be up to 25” long.
• Silk Ribbon needles have large eyes and sharp tips for stitching into fabric so can be used with cardstock as well as lighter weight papers.
Sewing for Beginners eBook
Find thousands of free crafts, decorating ideas, handmade gifts and more at www.FaveCrafts.com. 7
Caring for Fabric
• Before prewashing any fabric, a quick zigzag stitch or serge will keep the edges from fraying.
• If you get fabric from a craft or fabric store without care and content labels, make your own labels to sew into finished garments. Make a fabric care label with fabric sheets made for your computer printer and sew into the garment.
• Don’t store your fabric in direct sunlight. Sunlight can fade the showing fabric and leave you with multi‐tonal fabric.
• To protect fabric from dust or smoke, store neatly folded stacks in plastic bins or bags.
• Preshrink fabric before you store it.
• To test how a special fabric reacts to different pre‐treatments (such as silk), create several small swatches and treat them differently. For example, press one with a press cloth and one without a press cloth.
• If you are covering outdoor cushions or pillows with new fabric, use inexpensive plastic shower curtain liners to first cover the cushions with a waterproof layer before covering with the new fabric. You can also do this with purchased newly purchased items. This will reduce mildew.

Sewing for Beginners eBook
Pincushions
Canning Jar Pin Cushion or Treasure Jar By: Suzanne of Crazy for Collars
Ball recently released the Wide Mouth Contemporary Styled Glass Preserving Jars. Using the new little Half Pint size, make a super sweet and easy pincushion or “treasure jar” for Mom.
Find thousands of free crafts, decorating ideas, handmade gifts and more at www.FaveCrafts.com. 8
Materials:
• Fabric Scrap of your choice • Jar with lid and band • Cotton balls or fiberfill • Card Stock • Glue gun, not pictured
Steps:
1. Using the lid of the jar, cut out a circle of the same size from the card stock.
2. Using the lid of the jar, trace around it on the wrong side of your fabric. Increase that circle’s radius about 1” and cut out the larger circle.
3. Layer the fabric, cotton balls, and lid then place the “sandwich” inside the band.

Sewing for Beginners eBook
Find thousands of free crafts, decorating ideas, handmade gifts and more at www.FaveCrafts.com. 9
4. Press the lid down so that the cotton balls and fabric form the pincushion on the opposite side of the band. Check to see if you need to move the fabric to avoid creases. Make any necessary adjustments and then fold in the fabric and hot glue it to the underside of the lid.
5. Trim away any excess fabric and hot glue the cardstock over the fabric edges.
6. Line the band with a small bead of glue and insert the pincushion into it, pressing firmly. Add the lid to the jar and YOU HAVE A NEW PINCUSHION!
Other ideas and suggestions: Monogram the top and use it as a “treasure jar”. Add ribbon, paint, and other embellishments to the band to give it even more personality.
This project comes to us compliments of Suzanne of Crazy for Collars, who specializes in hand‐sewn pet items. Suzanne also operates Joyful Finds shop and Suzanne's Perfect Treasures.

Sewing for Beginners eBook
Find thousands of free crafts, decorating ideas, handmade gifts and more at www.FaveCrafts.com. 10
Felt Donut Pin Cushion
By: Stacy Schlyer of Stacy Sews
Celebrate your sweet‐tooth with this sewing project for a cute donut pincushion. Stacy Schlyer of Stacy Sews added sugar cookie fragrance to the stuffing for an added bonus while sewing!
Materials:
• 2 large felt squares in brown or other color for donut
• 1 felt square in pink or other frosting color
• Sprinkle Beads • Craft Stuffing • Optional: Scent, Sweet‐topped pins
Instructions:
1. Place two felt squares together, draw a large circle and a smaller circle (inside of the larger one) on one (wrong) side of felt.
2. Sew the large circle, right sides together. Cut small circle out, leaving a 1/4 seam allowance.
3. Turn right side out.
4. Stuff the donut. Insert fragrance now if you like.
5. Sew small circle shut (you'll have to hand stitch this once closed, tucking the raw edges inside).
6. Cut pink (or other 'frosting' color) felt the same size as donut.
7. Decorate with beads, etc. for sprinkles and sew onto stuffed donut.

Sewing for Beginners eBook
Find thousands of free crafts, decorating ideas, handmade gifts and more at www.FaveCrafts.com. 11
gg Cup Pincushion
The talented Christina Lane of The Sometimes
E
Crafter shares this free sewing pattern for creating an adorable egg cup pincushion. Thare perfect for Easter, but fun anytime you want a little color in your surroundings. Usefabric scraps left over from a project to creatseveral.
ese
e
Materials:
• Egg cup rap (approx. 5” square)
Thread
Directions:
. Draw a 4” circle on the back of your fabric scrap. I used the bottom of a small dish to trace
• Fabric sc• Polyfill • Needle • Glue gun glue
1
around. Cut out around the circle, approx. ¼” from your drawn line.
2. Baste stitch around your drawn line, leaving ng tails at the start and finish. lo
3. Pull your long ends on one side (I pulle on e back side of the fabric) to gather into a
dthpouch.
4. Stuff the pouch with Polyfill, keeping thread ulled tight. p

Sewing for Beginners eBook
Find thousands of free crafts, decorating ideas, handmade gifts and more at www.FaveCrafts.com. 12
5. Knot your threads, keeping the opening on the pouch as small as possible. Stuff with a little more Polyfill if you need to. The firmer you stuff it, the more rounded your cushion.
6. With your needle and thread stitch the opening all the way closed. I worked from one side to the opposite for a few stitches, and then did the opposite direction a few times.
You should now have a closed cushion as shown.
7. Take a nice sized wad of Polyfill and roll it around in your hands to mat it together a little. Stuff inside your egg cup. You want it to fill the cup about ¾ of the way when compressed slightly.
8. Run a line of hot glue around the top edge of your egg cup
9. Press your stuffed cushion inside of the egg cup and hold for a few seconds, allowing for the glue to dry. That’s it! You’re done. You now have an egg cup pincushion. Now go make some more!
Sewing for Beginners eBook
Find thousands of free crafts, decorating ideas, handmade gifts and more at www.FaveCrafts.com. 13
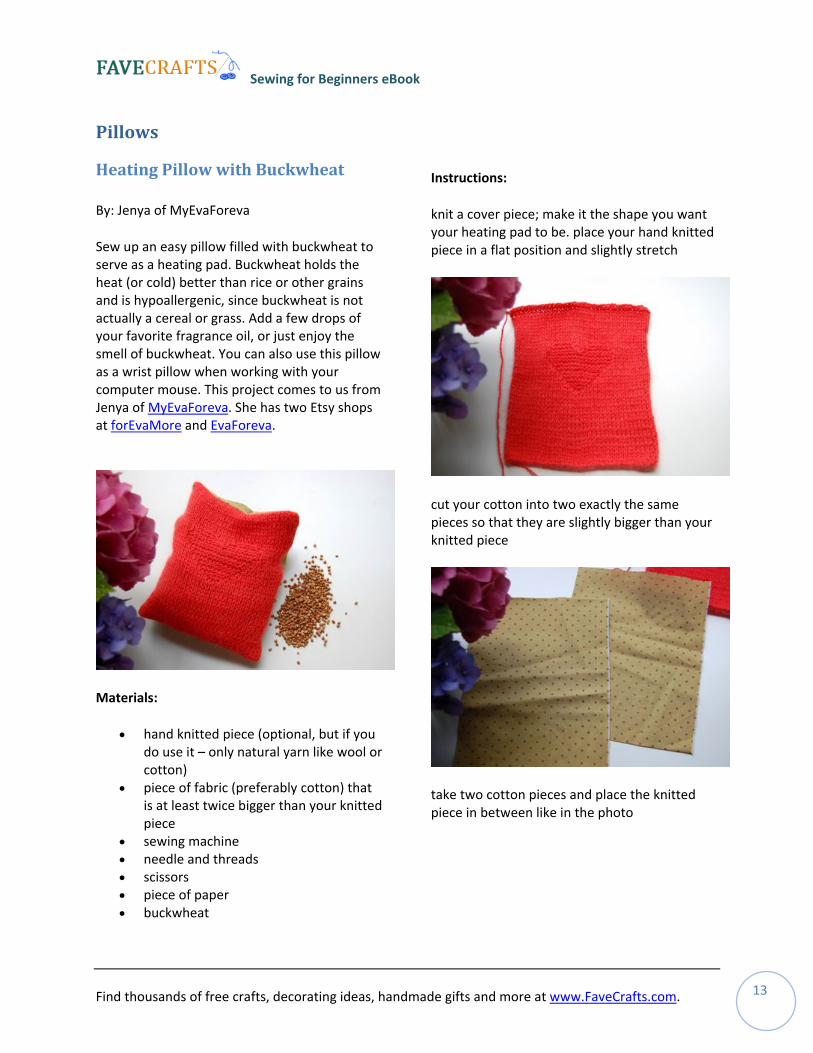
Pillows
Heating Pillow with Buckwheat
By: Jenya of MyEvaForeva
Sew up an easy pillow filled with buckwheat to serve as a heating pad. Buckwheat holds the heat (or cold) better than rice or other grains and is hypoallergenic, since buckwheat is not actually a cereal or grass. Add a few drops of your favorite fragrance oil, or just enjoy the smell of buckwheat. You can also use this pillow as a wrist pillow when working with your computer mouse. This project comes to us from Jenya of MyEvaForeva. She has two Etsy shops at forEvaMore and EvaForeva.
Materials:
• hand knitted piece (optional, but if you do use it – only natural yarn like wool or cotton)
• piece of fabric (preferably cotton) that is at least twice bigger than your knitted piece
• sewing machine • needle and threads • scissors • piece of paper • buckwheat
Instructions:
knit a cover piece; make it the shape you want your heating pad to be. place your hand knitted piece in a flat position and slightly stretch
cut your cotton into two exactly the same pieces so that they are slightly bigger than your knitted piece
take two cotton pieces and place the knitted piece in between like in the photo

Sewing for Beginners eBook
Find thousands of free crafts, decorating ideas, handmade gifts and more at www.FaveCrafts.com. 14
sew around the edges making sure you get all three layers. leave an opening about 2” long
turn it inside out
make a little fennel out of paper and use it to fill up the sack with your precious buckwheat about half way so the sack is rather loose – this way it will take a shape of whatever you want to warm up easier
use blind stitch to close it up. you are done! now go put it in the microwave and heat it up for 1 minute, take it out and shake it up. then put it back in for another minute. don’t you love it?
Sewing for Beginners eBook
Find thousands of free crafts, decorating ideas, handmade gifts and more at www.FaveCrafts.com. 15
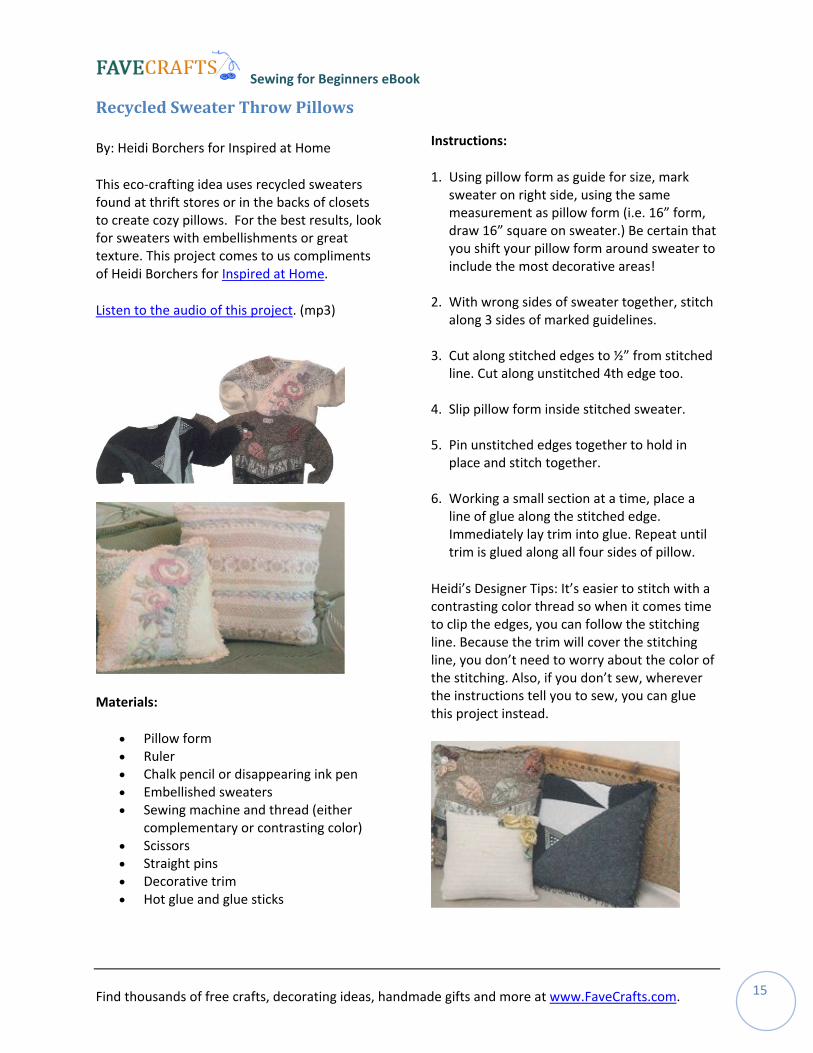
ecycled Sweater Throw Pillows
By: Heidi Borchers for Inspired at Home
This eco‐crafting idea uses recycled sweaters
ts
R
found at thrift stores or in the backs of closetsto create cozy pillows. For the best results, lookfor sweaters with embellishments or great texture. This project comes to us complimenof Heidi Borchers for Inspired at Home.
Listen to the audio of this project. (mp3)
Materials:
• Pillow form
ncil or disappearing ink pen
read (either )
ns m
sticks
• Ruler • Chalk pe• Embellished sweaters • Sewing machine and th
complementary or contrasting color• Scissors • Straight pi• Decorative tri• Hot glue and glue
Instructions:
1. Using pillow form as guide for size, mark sweater on right side, using the same measurement as pillow form (i.e. 16” form, draw 16” square on sweater.) Be certain that you shift your pillow form around sweater to include the most decorative areas!
2. With wrong sides of sweater together, stitch along 3 sides of marked guidelines.
3. Cut along stitched edges to ½” from stitched line. Cut along unstitched 4th edge too.
4. Slip pillow form inside stitched sweater.
5. Pin unstitched edges together to hold in place and stitch together.
6. Working a small section at a time, place a line of glue along the stitched edge. Immediately lay trim into glue. Repeat until trim is glued along all four sides of pillow.
Heidi’s Designer Tips: It’s easier to stitch with a contrasting color thread so when it comes time to clip the edges, you can follow the stitching line. Because the trim will cover the stitching line, you don’t need to worry about the color of the stitching. Also, if you don’t sew, wherever the instructions tell you to sew, you can glue this project instead.

Sewing for Beginners eBook
Find thousands of free crafts, decorating ideas, handmade gifts and more at www.FaveCrafts.com. 16
asy Pillow Sewing Project
By: Janis Bullis for Prym Consumer
Use felt squares to stitch easy pillows with at
E
flowers or personalized initials. This is a greeasy sewing project for beginners.
Project Time: Less than two hours
aterials:
• 1 Skein of Embroidery Floss – for e of
of Embroidery Floss – for s
for
aLong
g Basket Embroidery Needle, size
Basket 5½" Superior Fabric
® 6" x 12" Ruler ing Ink
Instructions:
d cut two 9" felt squares for pillow.
ur initial or daisy shape on ontrasting colors of felt, using the
illow square. se a Running Stitch to attach felt shapes.
ont and back together. Stitch utside edges together using a Blanket
ing closed and omplete stitching. TIP: Disappearing ink
ours, or
M
Blanket Stitch around outside edgpillow
• 1 SkeinRunning Stitch for attaching shape
• 2 Felt Squares, 9" x 12" for pillow • Contrasting Felt Squares (1 square
initial or 2 squares of different colors for daisy)
• Polyester Fiberfill• Sewing Basket Extr• Dressmaker • Pins • Sewin
3 or 5 • Sewing• Scissors • Omnigrid• Quilting Basket Disappear• Marking Pen
1. Measure an
2. Draw yo
cdisappearing fabric marking pen.
3. Cut out shapes on marked line.
4. Pin felt shape to center of one pU(Figure A) Stitch about 1/8” from cut edge of felt shape.
5. Pin pillow froStitch. (Figure B) Leave 5" unstitched at bottom for stuffing.
6. Stuff pillow. Pin opencmarks will disappear within 24 – 72 hyou can remove them with a damp cloth.
Sewing for Beginners eBook
Find thousands of free crafts, decorating ideas, handmade gifts and more at www.FaveCrafts.com. 17
Bags
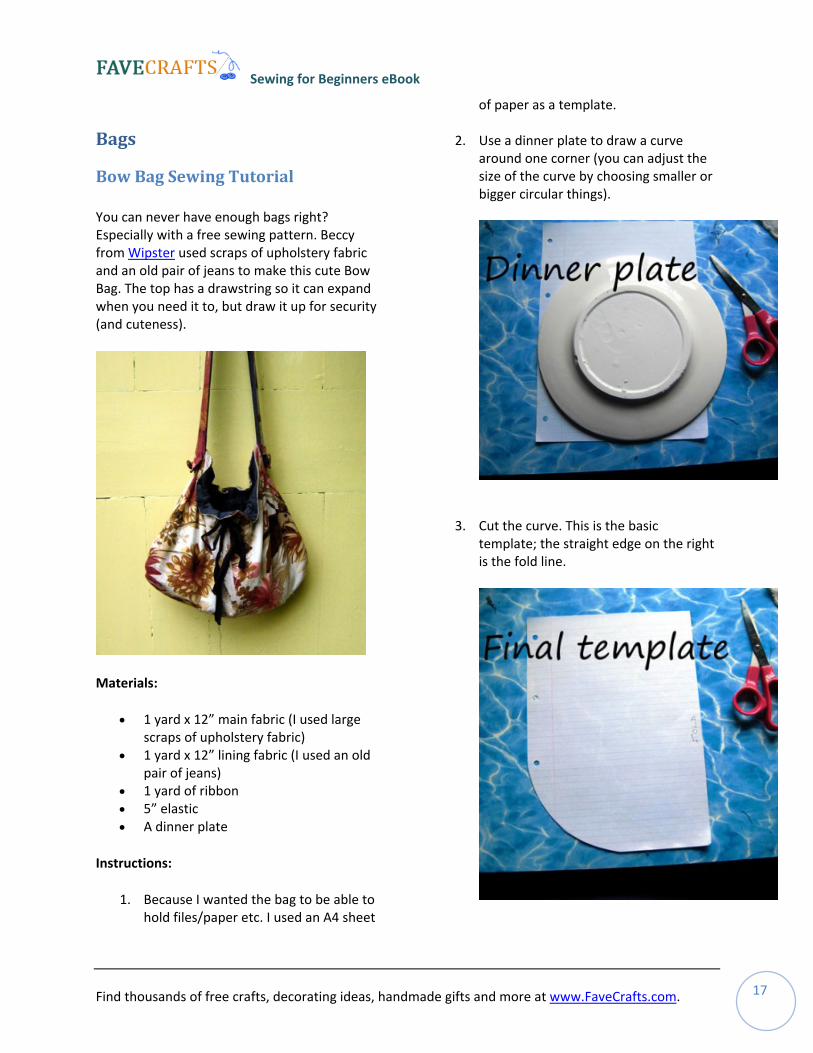
Bow Bag Sewing Tutorial
You can never have enough bags right? Especially with a free sewing pattern. Beccy from Wipster used scraps of upholstery fabric and an old pair of jeans to make this cute Bow Bag. The top has a drawstring so it can expand when you need it to, but draw it up for security (and cuteness).
Materials:
• 1 yard x 12” main fabric (I used large scraps of upholstery fabric)
• 1 yard x 12” lining fabric (I used an old pair of jeans)
• 1 yard of ribbon • 5” elastic • A dinner plate
Instructions:
1. Because I wanted the bag to be able to hold files/paper etc. I used an A4 sheet
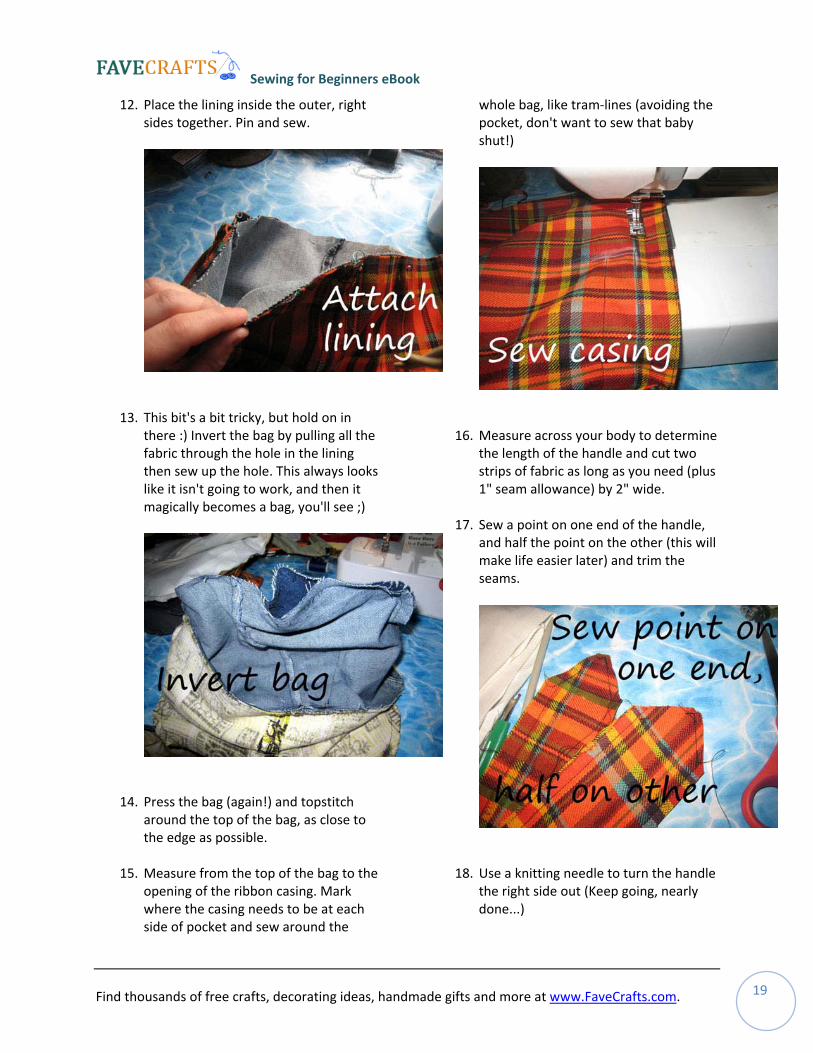
of paper as a template.
2. Use a dinner plate to draw a curve around one corner (you can adjust the size of the curve by choosing smaller or bigger circular things).
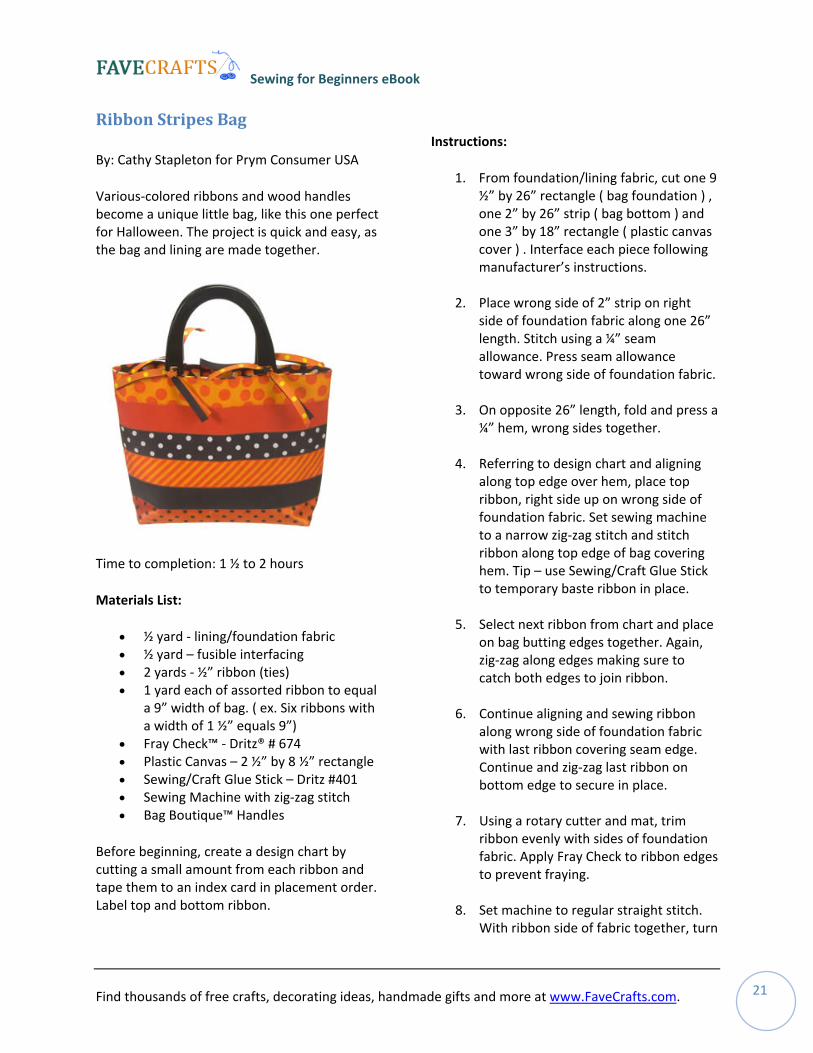
3. Cut the curve. This is the basic template; the straight edge on the right is the fold line.

Sewing for Beginners eBook
Find thousands of free crafts, decorating ideas, handmade gifts and more at www.FaveCrafts.com. 18
4. Cut 1 (back) piece on the fold and two half (front) pieces. Add extra seam allowance to these two pieces. Cut two pieces on the fold for the lining (I recycled a pair of jeans).
5. Pin the two half front pieces face together and place a mark 2 inches from the top, then another 1 inch below that. This will be the opening for the drawstring casing. Sew up front pieces, leaving the 1 inch marked area open.
6. Open out the front piece and press the seam. Topstitch the front seam open.
7. Cut a piece for the pocket approximately 6x6 inches.
8. Fold and press the edges. Press the top edge deep enough to encase the elastic and sew this edge.
9. Thread elastic through casing using a safety pin, gather and secure at both ends.
10. Sew the pocket to one of the lining pieces, approx 3" from the top.
11. Sew the two lining pieces together, leaving a 3" opening in the base.
Sewing for Beginners eBook
Find thousands of free crafts, decorating ideas, handmade gifts and more at www.FaveCrafts.com. 19
12. Place the lining inside the outer, right sides together. Pin and sew.
13. This bit's a bit tricky, but hold on in there :) Invert the bag by pulling all the fabric through the hole in the lining then sew up the hole. This always looks like it isn't going to work, and then it magically becomes a bag, you'll see ;)
14. Press the bag (again!) and topstitch around the top of the bag, as close to the edge as possible.
15. Measure from the top of the bag to the opening of the ribbon casing. Mark where the casing needs to be at each side of pocket and sew around the
whole bag, like tram‐lines (avoiding the pocket, don't want to sew that baby shut!)
16. Measure across your body to determine the length of the handle and cut two strips of fabric as long as you need (plus 1" seam allowance) by 2" wide.
17. Sew a point on one end of the handle, and half the point on the other (this will make life easier later) and trim the seams.
18. Use a knitting needle to turn the handle the right side out (Keep going, nearly done...)

Sewing for Beginners eBook
19. Press the handle flat.
Find thousands of free crafts, decorating ideas, handmade gifts and more at www.FaveCrafts.com. 20
20. This is where you'll be glad you half sewed the second point! Push the excess fabric inside to form the second point and press.
21. Topstitch the handle as close to the edge as possible.
22. Line up the handle with the outer side seam of the bag and stitch across, following the topstitching on the bag. The handle should overlap the edge of the bag an inch or so, for decorative effect.
23. Sew a decorative vintage button to the pointed bit.
24. Tie your ribbon to a crochet hook and thread through casing.
25. Gather the top of the bag slightly and tie a bow and you’re done!
Sewing for Beginners eBook
Find thousands of free crafts, decorating ideas, handmade gifts and more at www.FaveCrafts.com. 21
Ribbon Stripes Bag By: Cathy Stapleton for Prym Consumer USA
Various‐colored ribbons and wood handles become a unique little bag, like this one perfect for Halloween. The project is quick and easy, as the bag and lining are made together.
Time to completion: 1 ½ to 2 hours
Materials List:
• ½ yard ‐ lining/foundation fabric • ½ yard – fusible interfacing • 2 yards ‐ ½” ribbon (ties) • 1 yard each of assorted ribbon to equal
a 9” width of bag. ( ex. Six ribbons with a width of 1 ½” equals 9”)
• Fray Check™ ‐ Dritz® # 674 • Plastic Canvas – 2 ½” by 8 ½” rectangle • Sewing/Craft Glue Stick – Dritz #401 • Sewing Machine with zig‐zag stitch • Bag Boutique™ Handles
Before beginning, create a design chart by cutting a small amount from each ribbon and tape them to an index card in placement order. Label top and bottom ribbon.
Instructions:
1. From foundation/lining fabric, cut one 9 ½” by 26” rectangle ( bag foundation ) , one 2” by 26” strip ( bag bottom ) and one 3” by 18” rectangle ( plastic canvas cover ) . Interface each piece following manufacturer’s instructions.
2. Place wrong side of 2” strip on right side of foundation fabric along one 26” length. Stitch using a ¼” seam allowance. Press seam allowance toward wrong side of foundation fabric.
3. On opposite 26” length, fold and press a ¼” hem, wrong sides together.
4. Referring to design chart and aligning along top edge over hem, place top ribbon, right side up on wrong side of foundation fabric. Set sewing machine to a narrow zig‐zag stitch and stitch ribbon along top edge of bag covering hem. Tip – use Sewing/Craft Glue Stick to temporary baste ribbon in place.
5. Select next ribbon from chart and place on bag butting edges together. Again, zig‐zag along edges making sure to catch both edges to join ribbon.
6. Continue aligning and sewing ribbon along wrong side of foundation fabric with last ribbon covering seam edge. Continue and zig‐zag last ribbon on bottom edge to secure in place.
7. Using a rotary cutter and mat, trim ribbon evenly with sides of foundation fabric. Apply Fray Check to ribbon edges to prevent fraying.
8. Set machine to regular straight stitch. With ribbon side of fabric together, turn
Sewing for Beginners eBook
Find thousands of free crafts, decorating ideas, handmade gifts and more at www.FaveCrafts.com. 22
and stitch sides using ½” seam allowance. Press seam open.
9. Returning to zig‐zag stitch, secure edges of seam by stitching down each seam allowance, creating center back seam of finished bag.
10. Continue with right sides together, and create the bag bottom by stitching remaining bottom fabric together using a ¼” seam allowance. Press seam open.
11. To create a bottom gusset, fold bag with right sides together so bottom seam is centered and facing up, forming triangles on each end. Stitch across bottom of triangle using last zig‐zag
seam as guide. Turn bag right side out.
12. Center bag handles on each side of bag and mark placement for ties.
13. Cut ½” ribbon to eight 9” lengths. Using two 9” pieces together, fold in half and mark center. Attach to bag by stitching on the right side of bag, across center mark of ribbon at handle placements. Tie ribbon to handles to attach.
14. With right sides together, fold 3” by 18” fabric piece in half to create a 3” by 9” piece. Stitch each 9” side together using ¼” seam allowance. Turn and insert plastic canvas. Fold opening and hand or machine stitch in place. Place in bottom of bag for stability.
Sewing for Beginners eBook
Find thousands of free crafts, decorating ideas, handmade gifts and more at www.FaveCrafts.com. 23
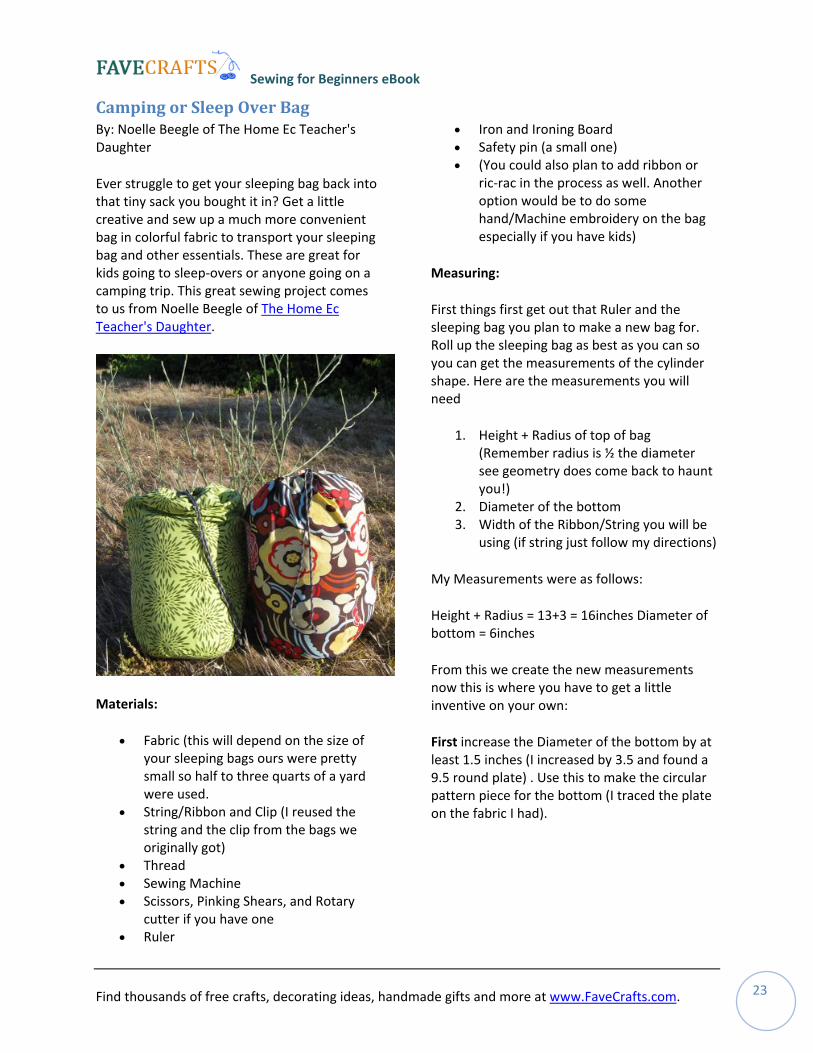
amping or Sleep Over Bag
cher's
Ever struggle to get your sleeping bag back into
nt
CBy: Noelle Beegle of The Home Ec TeaDaughter
that tiny sack you bought it in? Get a little creative and sew up a much more conveniebag in colorful fabric to transport your sleepingbag and other essentials. These are great for kids going to sleep‐overs or anyone going on acamping trip. This great sewing project comes to us from Noelle Beegle of The Home Ec Teacher's Daughter.
Materials:
• Fabric (this will depend on the size of
n and Clip (I reused the
chine ears, and Rotary
cutter if you have one • Ruler
• Iron and Ironing Board
add ribbon or in the process as well. Another
me ry on the bag
nd the sleeping bag you plan to make a new bag for.
eeping bag as best as you can so you can get the measurements of the cylinder
see geometry does come back to haunt you!)
s:
bottom = 6inches
From this we create the new measurements
at a
is to make the circular pattern piece for the bottom (I traced the plate
your sleeping bags ours were pretty small so half to three quarts of a yardwere used.
• String/Ribbostring and the clip from the bags we originally got)
• Thread • Sewing Ma• Scissors, Pinking Sh
• Safety pin (a small one) • (You could also plan to
ric‐racoption would be to do sohand/Machine embroideespecially if you have kids)
Measuring:
First things first get out that Ruler a
Roll up the sl
shape. Here are the measurements you willneed
1. Height + Radius of top of bag (Remember radius is ½ the diameter
2. Diameter of the bottom 3. Width of the Ribbon/String you will be
using (if string just follow my directions)
My Measurements were as follow
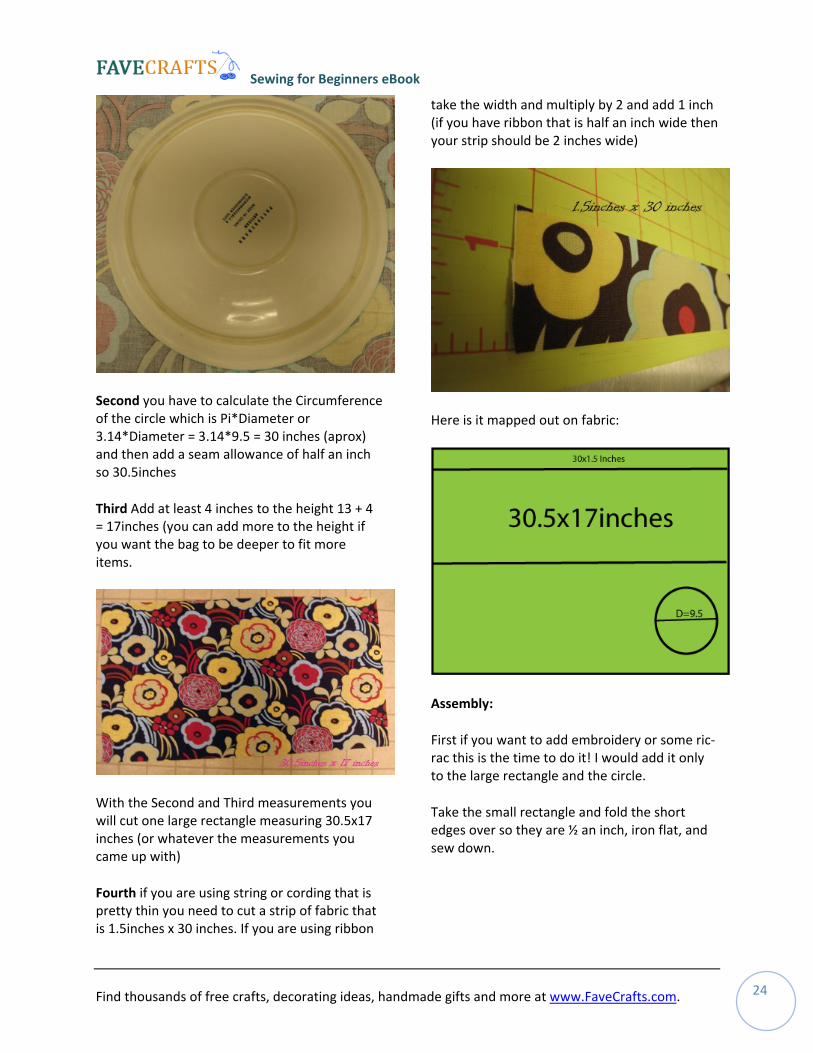
Height + Radius = 13+3 = 16inches Diameter of
now this is where you have to get a little inventive on your own:
First increase the Diameter of the bottom by least 1.5 inches (I increased by 3.5 and found9.5 round plate) . Use th
on the fabric I had).
Sewing for Beginners eBook
Find thousands of free crafts, decorating ideas, handmade gifts and more at www.FaveCrafts.com. 24
Second you have to calculate the Circumference of the circle which is Pi*Diameter or 3.14*Diameter = 3.14*9.5 = 30 inches (aprox) and then add a seam allowance of half an inch so 30.5inches
Third Add at least 4 inches to the height 13 + 4 = 17inches (you can add more to the height if you want the bag to be deeper to fit more items.
With the Second and Third measurements you will cut one large rectangle measuring 30.5x17 inches (or whatever the measurements you came up with)
Fourth if you are using string or cording that is pretty thin you need to cut a strip of fabric that is 1.5inches x 30 inches. If you are using ribbon
take the width and multiply by 2 and add 1 inch (if you have ribbon that is half an inch wide then your strip should be 2 inches wide)
Here is it mapped out on fabric:
Assembly:
First if you want to add embroidery or some ric‐rac this is the time to do it! I would add it only to the large rectangle and the circle.
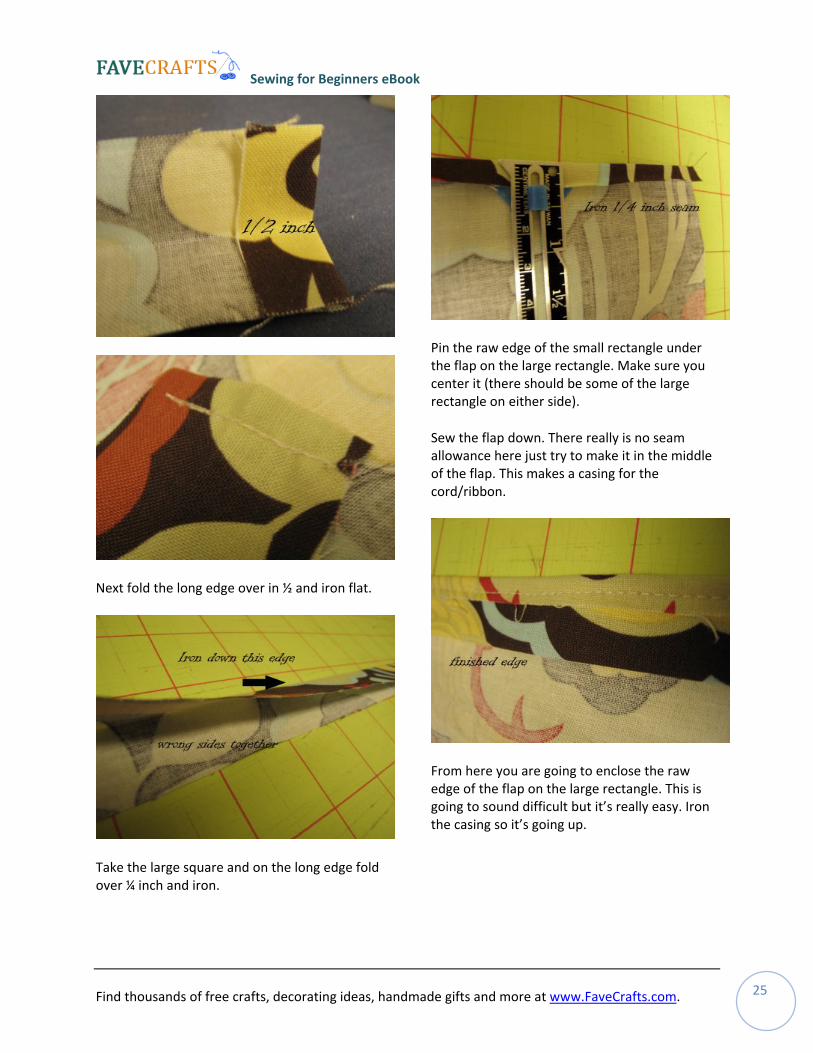
Take the small rectangle and fold the short edges over so they are ½ an inch, iron flat, and sew down.
Sewing for Beginners eBook
Find thousands of free crafts, decorating ideas, handmade gifts and more at www.FaveCrafts.com. 25
Next fold the long edge over in ½ and iron flat.
Take the large square and on the long edge fold over ¼ inch and iron.
Pin the raw edge of the small rectangle under the flap on the large rectangle. Make sure you center it (there should be some of the large rectangle on either side).
Sew the flap down. There really is no seam allowance here just try to make it in the middle of the flap. This makes a casing for the cord/ribbon.
From here you are going to enclose the raw edge of the flap on the large rectangle. This is going to sound difficult but it’s really easy. Iron the casing so it’s going up.

Sewing for Beginners eBook
Find thousands of free crafts, decorating ideas, handmade gifts and more at www.FaveCrafts.com. 26
Next Flip over the fabric so you are looking at the right side of all the fabrics and iron the seam you just made up over the raw edge. This will enclose the raw edge of the flap.
You can either pin this down or hold it down as you sew. When you sew it down you want to sew close to the first seam you made (you can do it on top of the first seam if you like. This will completely enclose all the raw edges on the top of the bag.
Now for the French Seams: Fold your bag in half so the short edges meet up with the wrong sides of the fabric together. Sew a quarter inch seam on the edge of the fabric (you will be sewing on the right side of the fabric). Next take pinking shears to the seam you just made cutting it down a bit. Turn fabric so the wrong side of the fabric is on the outside and the right sides of the fabric are together. Iron the seam and sew down with a quarter inch seam. Turn so the right side is out and notice the seam is enclosed. Easy Peasy right?

Sewing for Beginners eBook
Find thousands of free crafts, decorating ideas, handmade gifts and more at www.FaveCrafts.com. 27
Now you’re ready to attach the circle to the bottom. Turn the tube you just made so the wrong side of the fabric is on the outside. Pin the circle to the edges of the bottom of the tube (where the raw edge is). Use lots and lots of pins!!! It should look like this
(You may need to make some adjustments to the tube if its too big. I just add a new seam that make the tube smaller at the bottom and then angle off to the old seam)
Next sew the circle to the tube using a 3/8 seam. Add a zig zag stitch to finish the edge and using pinking shears to finish edges as well.
You’re almost there now take the safety pin and ribbon and thread through the casing you made add your clip or tie a bow and you’re done.
This project can be modified to make a dirty clothes bag, gift bags, makeup bags, ect the options are limitless!
Sewing for Beginners eBook
Find thousands of free crafts, decorating ideas, handmade gifts and more at www.FaveCrafts.com. 28
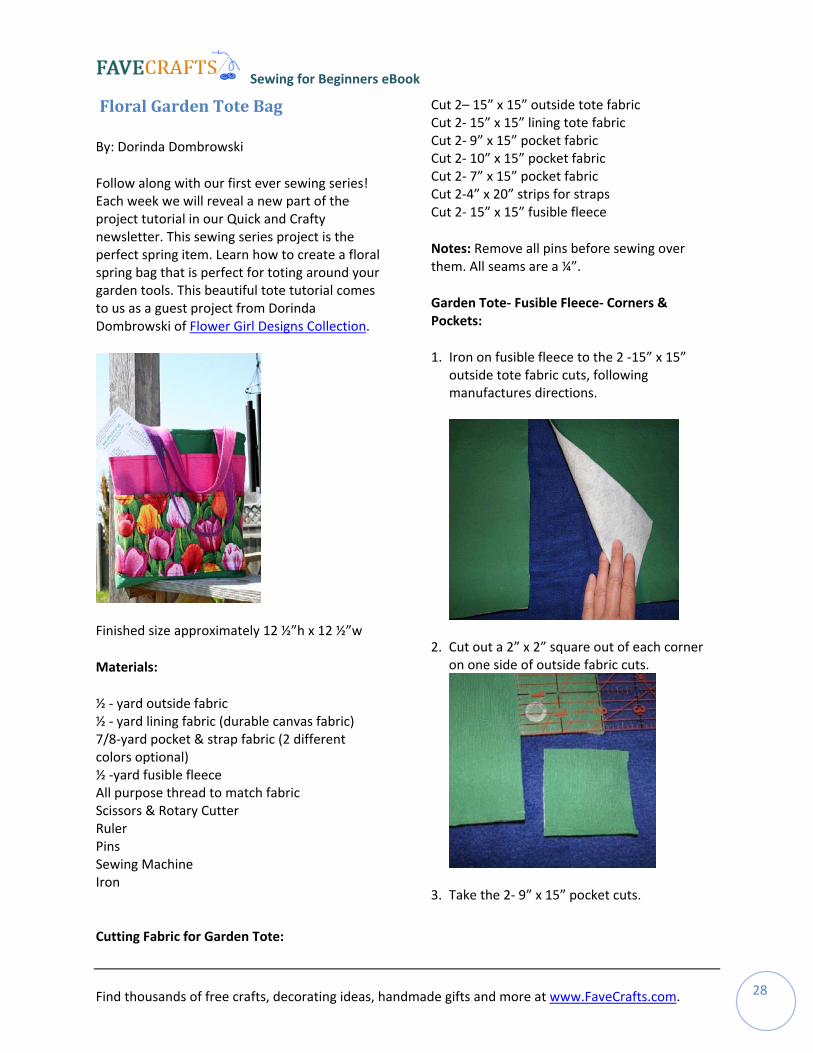
Floral Garden Tote Bag
By: Dorinda Dombrowski
Follow along with our first ever sewing series! Each week we will reveal a new part of the project tutorial in our Quick and Crafty newsletter. This sewing series project is the perfect spring item. Learn how to create a floral spring bag that is perfect for toting around your garden tools. This beautiful tote tutorial comes to us as a guest project from Dorinda Dombrowski of Flower Girl Designs Collection.
Finished size approximately 12 ½”h x 12 ½”w
Materials:
½ ‐ yard outside fabric ½ ‐ yard lining fabric (durable canvas fabric) 7/8‐yard pocket & strap fabric (2 different colors optional) ½ ‐yard fusible fleece All purpose thread to match fabric Scissors & Rotary Cutter Ruler Pins Sewing Machine Iron
Cutting Fabric for Garden Tote:
Cut 2– 15” x 15” outside tote fabric Cut 2‐ 15” x 15” lining tote fabric Cut 2‐ 9” x 15” pocket fabric Cut 2‐ 10” x 15” pocket fabric Cut 2‐ 7” x 15” pocket fabric Cut 2‐4” x 20” strips for straps Cut 2‐ 15” x 15” fusible fleece
Notes: Remove all pins before sewing over them. All seams are a ¼”.
Garden Tote‐ Fusible Fleece‐ Corners & Pockets:
1. Iron on fusible fleece to the 2 ‐15” x 15” outside tote fabric cuts, following manufactures directions.
2. Cut out a 2” x 2” square out of each corner on one side of outside fabric cuts.
3. Take the 2‐ 9” x 15” pocket cuts.
Sewing for Beginners eBook
Find thousands of free crafts, decorating ideas, handmade gifts and more at www.FaveCrafts.com. 29
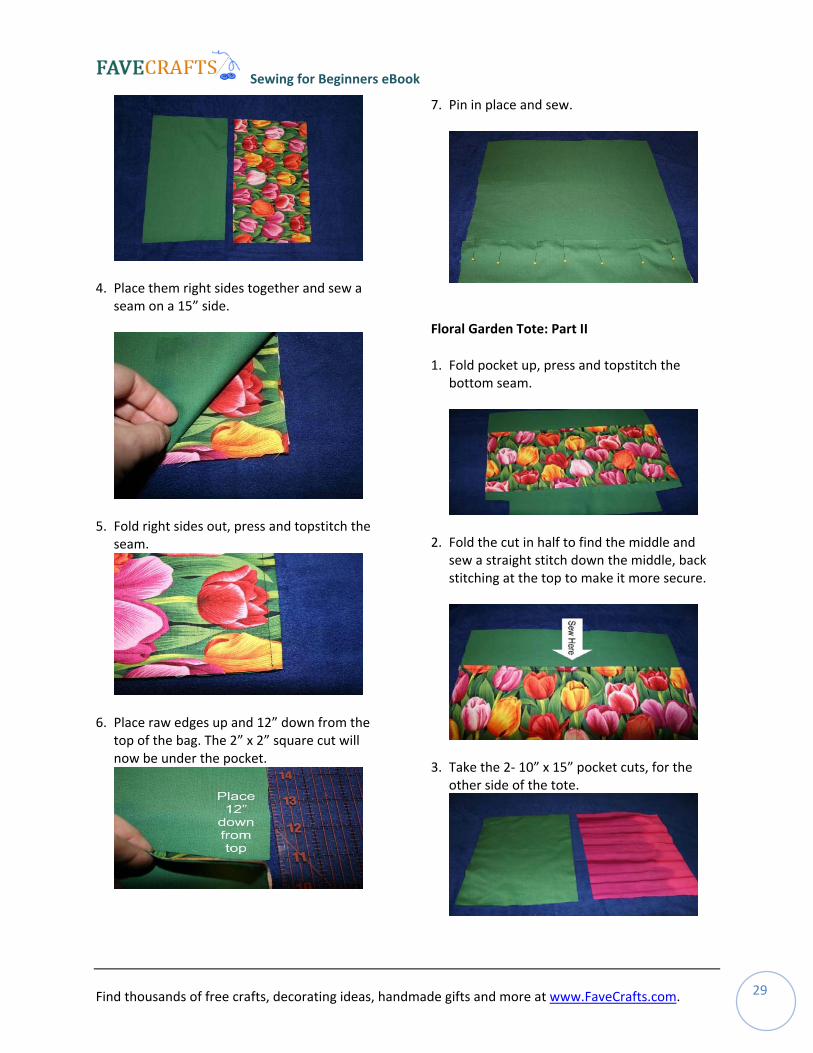
4. Place them right sides together and sew a seam on a 15” side.
5. Fold right sides out, press and topstitch the seam.
6. Place raw edges up and 12” down from the top of the bag. The 2” x 2” square cut will now be under the pocket.
7. Pin in place and sew.
Floral Garden Tote: Part II
1. Fold pocket up, press and topstitch the bottom seam.
2. Fold the cut in half to find the middle and sew a straight stitch down the middle, back stitching at the top to make it more secure.
3. Take the 2‐ 10” x 15” pocket cuts, for the other side of the tote.
Sewing for Beginners eBook
Find thousands of free crafts, decorating ideas, handmade gifts and more at www.FaveCrafts.com. 30
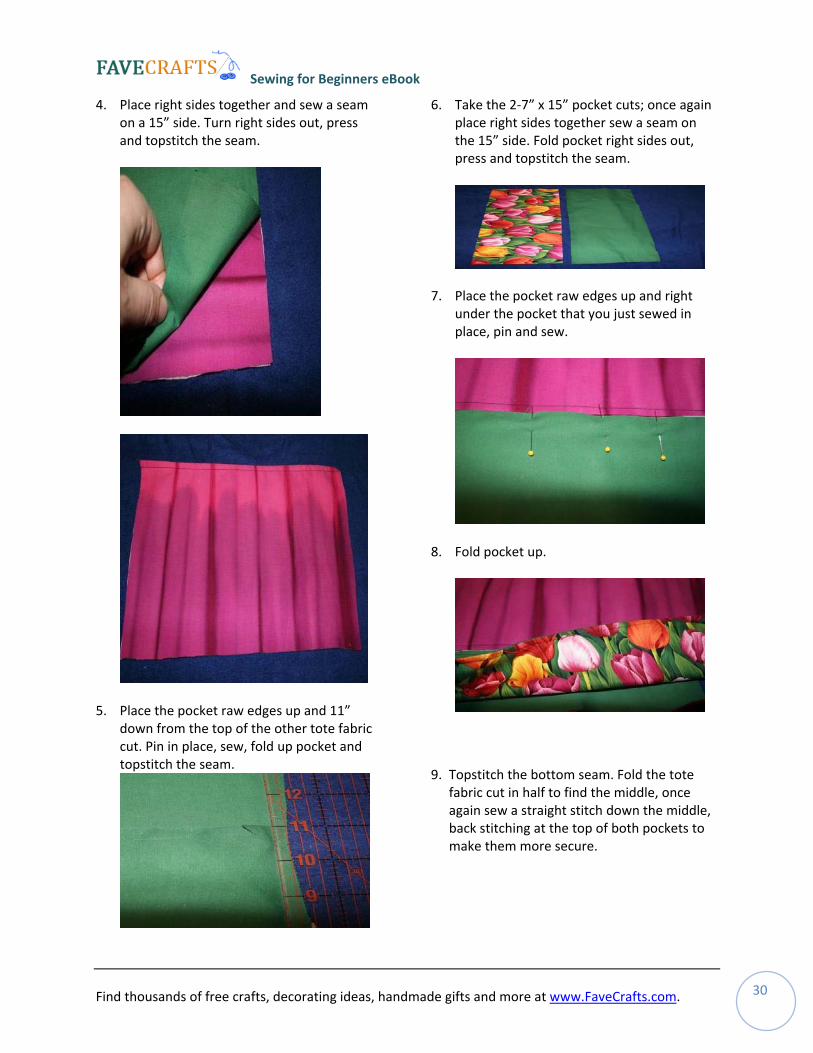
4. Place right sides together and sew a seam on a 15” side. Turn right sides out, press and topstitch the seam.
5. Place the pocket raw edges up and 11” down from the top of the other tote fabric cut. Pin in place, sew, fold up pocket and topstitch the seam.
6. Take the 2‐7” x 15” pocket cuts; once again place right sides together sew a seam on the 15” side. Fold pocket right sides out, press and topstitch the seam.
7. Place the pocket raw edges up and right under the pocket that you just sewed in place, pin and sew.
8. Fold pocket up.
9. Topstitch the bottom seam. Fold the tote fabric cut in half to find the middle, once again sew a straight stitch down the middle, back stitching at the top of both pockets to make them more secure.
Sewing for Beginners eBook
Find thousands of free crafts, decorating ideas, handmade gifts and more at www.FaveCrafts.com. 31
Floral Garden Tote Part III: Sewing Together the Outside of Tote
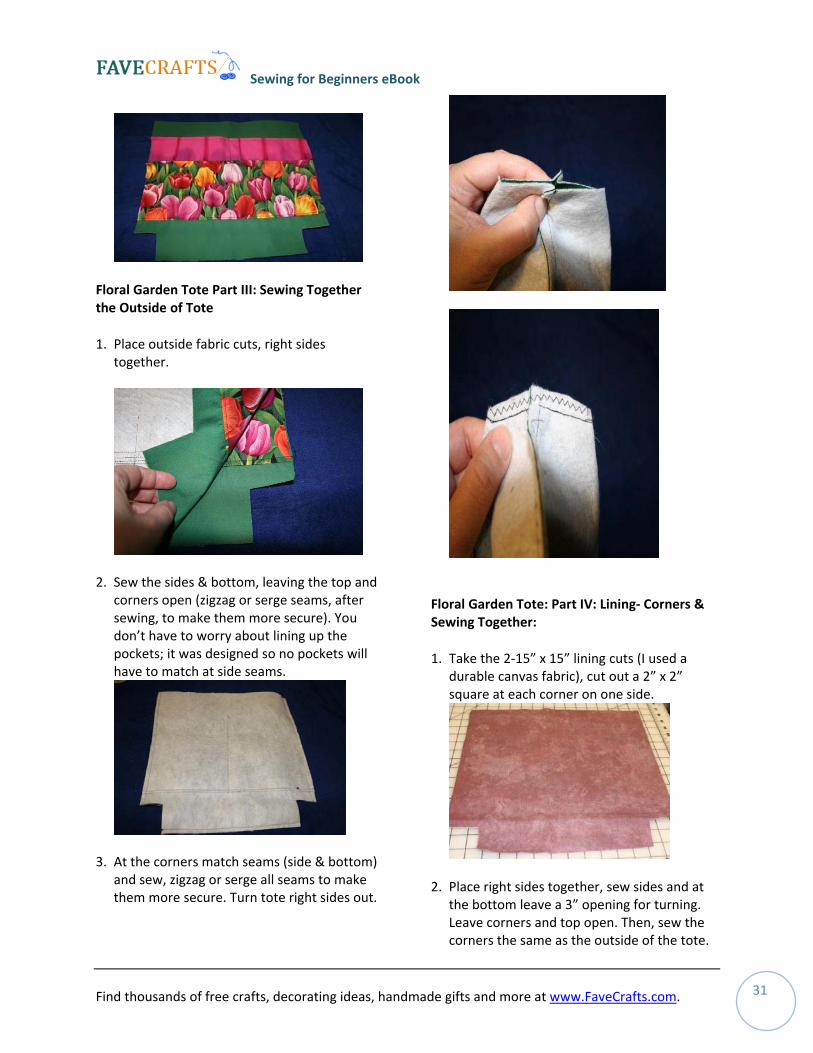
1. Place outside fabric cuts, right sides together.
2. Sew the sides & bottom, leaving the top and corners open (zigzag or serge seams, after sewing, to make them more secure). You don’t have to worry about lining up the pockets; it was designed so no pockets will have to match at side seams.
3. At the corners match seams (side & bottom) and sew, zigzag or serge all seams to make them more secure. Turn tote right sides out.
Floral Garden Tote: Part IV: Lining‐ Corners & Sewing Together:
1. Take the 2‐15” x 15” lining cuts (I used a durable canvas fabric), cut out a 2” x 2” square at each corner on one side.
2. Place right sides together, sew sides and at the bottom leave a 3” opening for turning. Leave corners and top open. Then, sew the corners the same as the outside of the tote.
Sewing for Beginners eBook
Find thousands of free crafts, decorating ideas, handmade gifts and more at www.FaveCrafts.com. 32
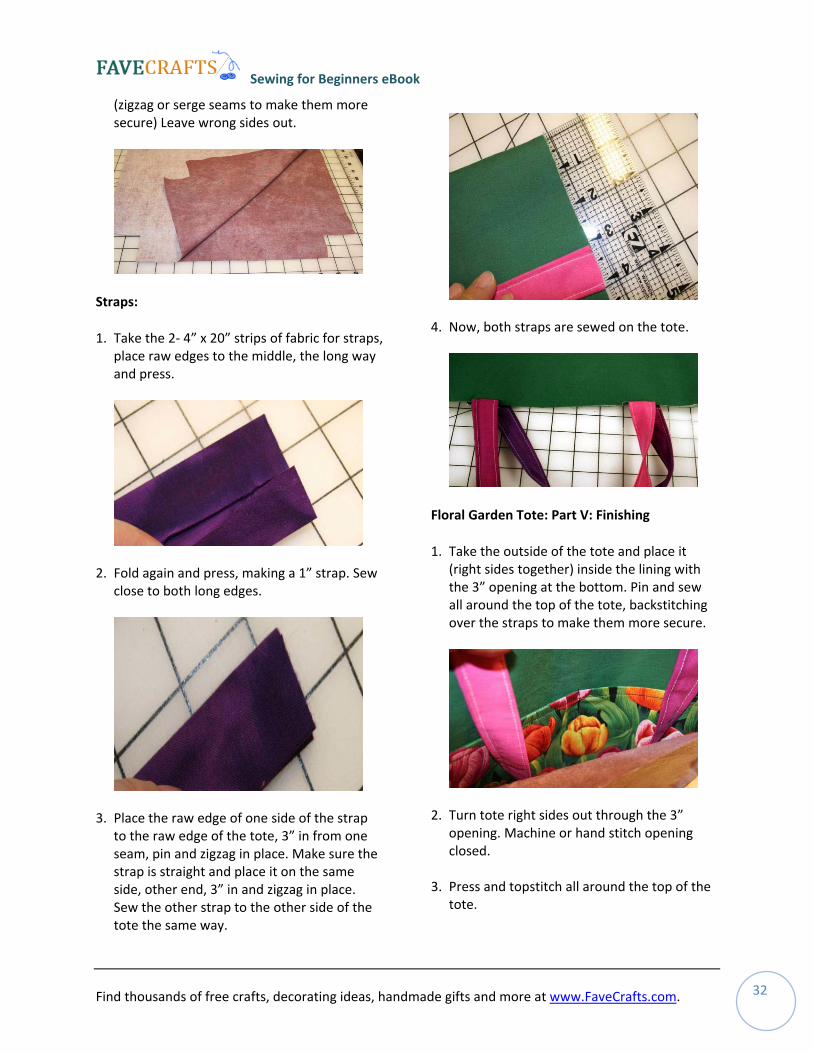
(zigzag or serge seams to make them more secure) Leave wrong sides out.
Straps:
1. Take the 2‐ 4” x 20” strips of fabric for straps, place raw edges to the middle, the long way and press.
2. Fold again and press, making a 1” strap. Sew close to both long edges.
3. Place the raw edge of one side of the strap to the raw edge of the tote, 3” in from one seam, pin and zigzag in place. Make sure the strap is straight and place it on the same side, other end, 3” in and zigzag in place. Sew the other strap to the other side of the tote the same way.
4. Now, both straps are sewed on the tote.
Floral Garden Tote: Part V: Finishing
1. Take the outside of the tote and place it (right sides together) inside the lining with the 3” opening at the bottom. Pin and sew all around the top of the tote, backstitching over the straps to make them more secure.
2. Turn tote right sides out through the 3” opening. Machine or hand stitch opening closed.
3. Press and topstitch all around the top of the tote.
Sewing for Beginners eBook
Find thousands of free crafts, decorating ideas, handmade gifts and more at www.FaveCrafts.com. 33
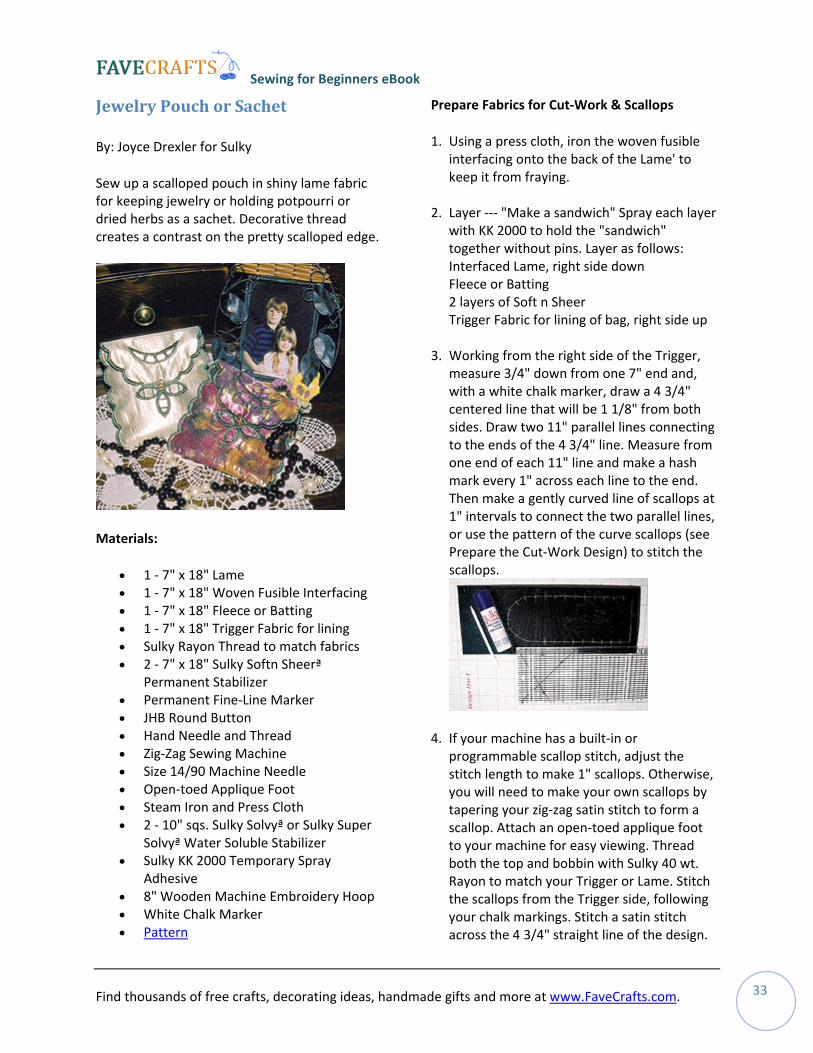
Jewelry Pouch or Sachet
By: Joyce Drexler for Sulky
Sew up a scalloped pouch in shiny lame fabric for keeping jewelry or holding potpourri or dried herbs as a sachet. Decorative thread creates a contrast on the pretty scalloped edge.
Materials:
• 1 ‐ 7" x 18" Lame • 1 ‐ 7" x 18" Woven Fusible Interfacing • 1 ‐ 7" x 18" Fleece or Batting • 1 ‐ 7" x 18" Trigger Fabric for lining • Sulky Rayon Thread to match fabrics • 2 ‐ 7" x 18" Sulky Softn Sheerª
Permanent Stabilizer • Permanent Fine‐Line Marker • JHB Round Button • Hand Needle and Thread • Zig‐Zag Sewing Machine • Size 14/90 Machine Needle • Open‐toed Applique Foot • Steam Iron and Press Cloth • 2 ‐ 10" sqs. Sulky Solvyª or Sulky Super
Solvyª Water Soluble Stabilizer • Sulky KK 2000 Temporary Spray
Adhesive • 8" Wooden Machine Embroidery Hoop • White Chalk Marker • Pattern
Prepare Fabrics for Cut‐Work & Scallops
1. Using a press cloth, iron the woven fusible interfacing onto the back of the Lame' to keep it from fraying.
2. Layer ‐‐‐ "Make a sandwich" Spray each layer with KK 2000 to hold the "sandwich" together without pins. Layer as follows: Interfaced Lame, right side down Fleece or Batting 2 layers of Soft n Sheer Trigger Fabric for lining of bag, right side up
3. Working from the right side of the Trigger, measure 3/4" down from one 7" end and, with a white chalk marker, draw a 4 3/4" centered line that will be 1 1/8" from both sides. Draw two 11" parallel lines connecting to the ends of the 4 3/4" line. Measure from one end of each 11" line and make a hash mark every 1" across each line to the end. Then make a gently curved line of scallops at 1" intervals to connect the two parallel lines, or use the pattern of the curve scallops (see Prepare the Cut‐Work Design) to stitch the scallops.
4. If your machine has a built‐in or programmable scallop stitch, adjust the stitch length to make 1" scallops. Otherwise, you will need to make your own scallops by tapering your zig‐zag satin stitch to form a scallop. Attach an open‐toed applique foot to your machine for easy viewing. Thread both the top and bobbin with Sulky 40 wt. Rayon to match your Trigger or Lame. Stitch the scallops from the Trigger side, following your chalk markings. Stitch a satin stitch across the 4 3/4" straight line of the design.

Sewing for Beginners eBook
Find thousands of free crafts, decorating ideas, handmade gifts and more at www.FaveCrafts.com. 34
Flip to Lame side.
Prepare the Cut‐Work Design
1. Lightly spray KK 2000 onto the cut‐work design pattern. Smooth one of the 10" squares of Sulky Solvy or Super Solvy over it and trace the design onto the Solvy using a fine‐line, permanent‐ ink marker. Carefully peel off the traced Solvy from the pattern.
2. Spray KK 2000 onto both sides of the curved end of the "sandwich". Smooth the Solvy Pattern in place over the Lame layer of the "sandwich". Smooth another layer of Solvy under the "sandwich". Secure all in an 8" wooden machine embroidery hoop.
3. Continue using the Sulky Rayon Thread in the needle and bobbin as you straight stitch 3 times (laying one row of stitching right next to another) over the cut‐work lines on the Solvy. Stitching can be done "free‐motion" with feed‐teeth down using a darning foot, or with the feed‐teeth up along with an open‐toed applique foot.
4. Use small, sharp‐pointed scissors to carefully cut away all layers, except the bottom Solvy layer, up to the straight stitching. Or, you can cut through all layers, spray another 10" square of Solvy, and smooth it under the "sandwich". Rehoop all.
5. Stitch free‐motion Richelieu Bars across crescent shaped cut‐work area by straight stitching three times almost on top of each other, being sure to anchor ends in previous straight stitching.
Finish the Bag
1. Cut away the excess fabric from scallops; remove all Solvy. To finish edges, use a slightly larger width setting than original stitching and make a tapered satin stitch over the scallops and cut‐work areas; do not use a built‐in scallop stitch since its almost impossible to match previous stitching.
2. Fold the bag, matching 5 scallops together. Stitch in the ditch of the scallops or satin stitching to sew the sides together. Sew the button on. The bottom loop of the cut‐work becomes the buttonhole closure.
Sewing for Beginners eBook
Find thousands of free crafts, decorating ideas, handmade gifts and more at www.FaveCrafts.com. 35
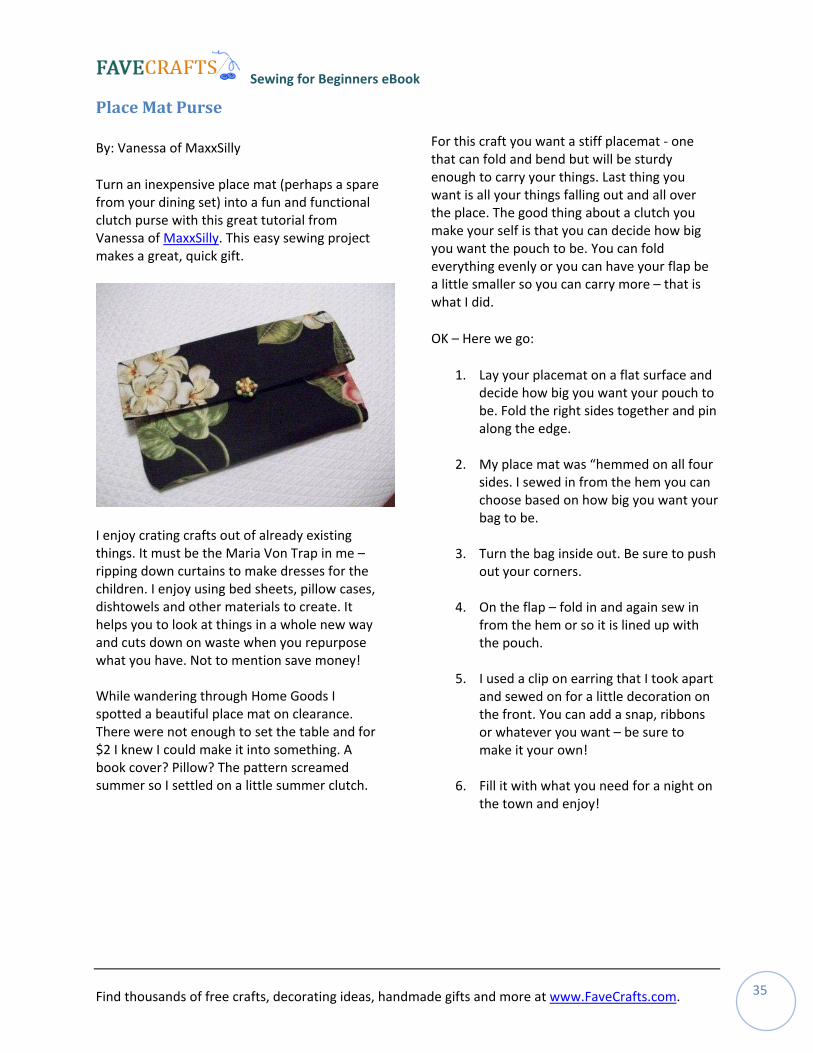
lace Mat Purse
By: Vanessa of MaxxSilly
Turn an inexpensive place mat (perhaps a spare
P
from your dining set) into a fun and functional clutch purse with this great tutorial from Vanessa of MaxxSilly. This easy sewing promakes a great, quick gift.
ject
I enjoy crating crafts out of already existing
ay
hile wandering through Home Goods I e.
for
things. It must be the Maria Von Trap in me –ripping down curtains to make dresses for the children. I enjoy using bed sheets, pillow cases,dishtowels and other materials to create. It helps you to look at things in a whole new wand cuts down on waste when you repurpose what you have. Not to mention save money! Wspotted a beautiful place mat on clearancThere were not enough to set the table and $2 I knew I could make it into something. A book cover? Pillow? The pattern screamed summer so I settled on a little summer clutch.
For this craft you want a stiff placemat ‐ one that can fold and bend but will be sturdy enough to carry your things. Last thing you want is all your things falling out and all over the place. The good thing about a clutch you make your self is that you can decide how big you want the pouch to be. You can fold everything evenly or you can have your flap be a little smaller so you can carry more – that is what I did.
OK – Here we go:
1. Lay your placemat on a flat surface and decide how big you want your pouch to be. Fold the right sides together and pin along the edge.
2. My place mat was “hemmed on all four sides. I sewed in from the hem you can choose based on how big you want your bag to be.
3. Turn the bag inside out. Be sure to push out your corners.
4. On the flap – fold in and again sew in from the hem or so it is lined up with the pouch.
5. I used a clip on earring that I took apart and sewed on for a little decoration on the front. You can add a snap, ribbons or whatever you want – be sure to make it your own!
6. Fill it with what you need for a night on the town and enjoy!

Sewing for Beginners eBook
Find thousands of free crafts, decorating ideas, handmade gifts and more at www.FaveCrafts.com. 36
Clothing
Sweet Collar Sewing Tutorial
By: Jenya of MyEvaForeva
Create a fun and pretty collar to wear over any outfit with this easy sewing tutorial. Anyone can make this tie‐on collar in the fabric of your choice.
This project comes to us from Jenya of MyEvaForeva. She has two Etsy shops at forEvaMore and EvaForeva, where this kind of applique is typical.
Make a mock out of another fabric. When you do it, just make sure you measure your neck circumference and incorporate it in your template.
\
Cut out four pieces (two of each color) giving about quarter of an inch around it.
Sew the pieces that are the same color together in the middle.
Now it the fun part – embellish it, attach your label, draw on it, whatever…
Fold two pieces together the right side in.
Sewing for Beginners eBook
Find thousands of free crafts, decorating ideas, handmade gifts and more at www.FaveCrafts.com. 37
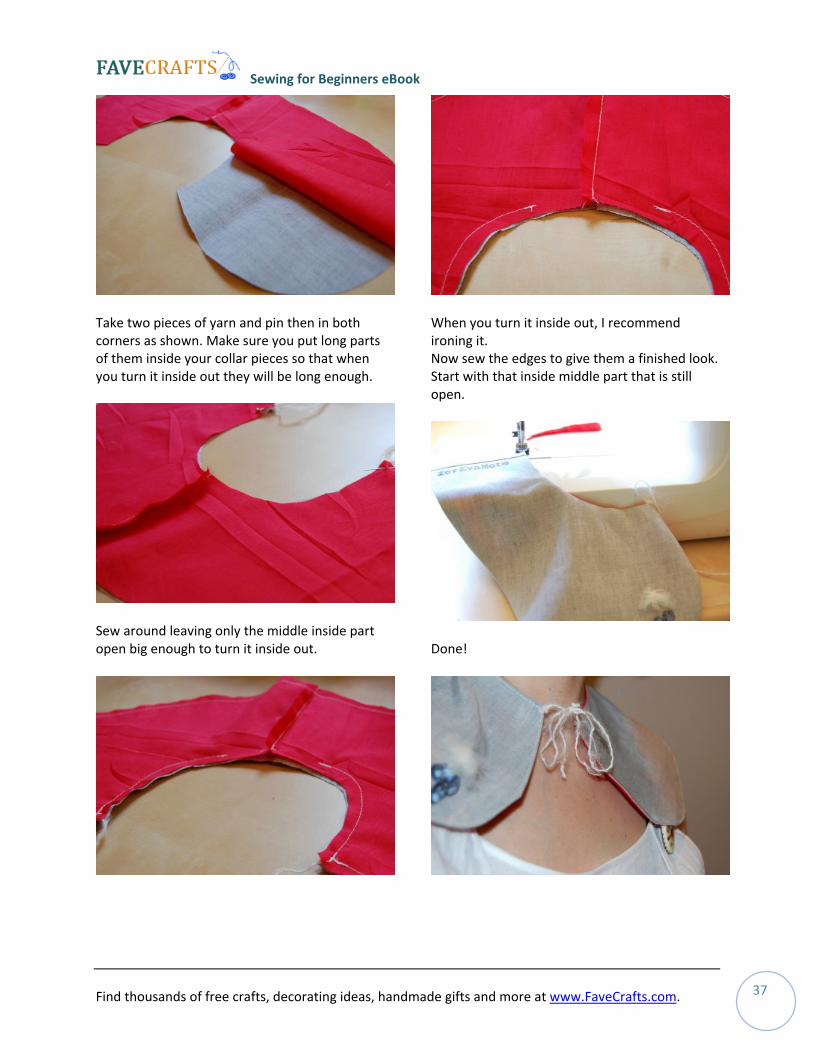
Take two pieces of yarn and pin then in both corners as shown. Make sure you put long parts of them inside your collar pieces so that when you turn it inside out they will be long enough.
Sew around leaving only the middle inside part open big enough to turn it inside out.
When you turn it inside out, I recommend ironing it. Now sew the edges to give them a finished look. Start with that inside middle part that is still open.
Done!

Sewing for Beginners eBook
Find thousands of free crafts, decorating ideas, handmade gifts and more at www.FaveCrafts.com. 38
Reversible Scrap Fabric Apron
By: Jennifer Juniper of Hope Studios
Hey, you FaveCrafters, it’s Juniper here! I popped out of my own little bloggy universe to meet up with you over here and toss out a tutorial. Ready? Let’s make us some Reversible Fabric Scrap Aprons, baby! Let’s see if we can complete this project using what we have around the house.
Materials:
• Fabric Scraps • Various Trims • Sewing machine • Iron • Needle and Thread • Scissors
I worked out this project with my girlfriends, and we decided to pool our scraps of fabric and trim, to mix it up a little. I think most people can make this apron with the extra fabric and trim they have on hand. If you need something, consider getting some fat quarters in the quilting section of your local fabric store.
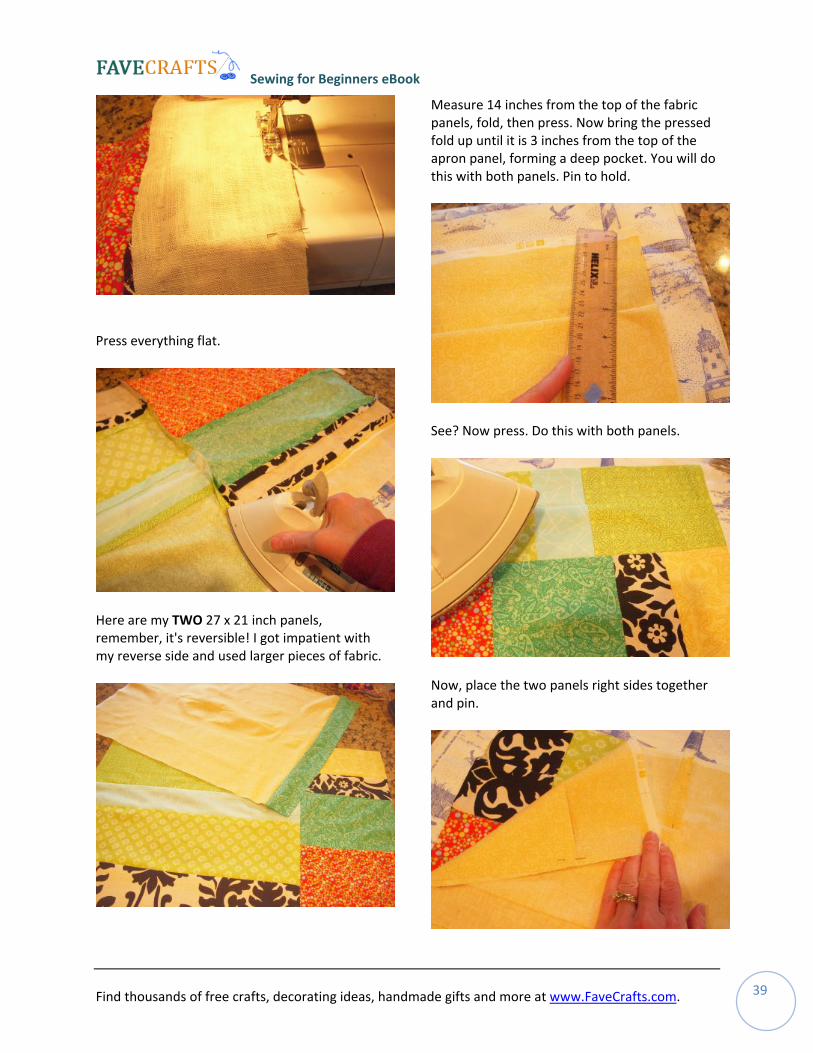
Cut your fabric into strips and squares of various widths and press. Don’t stress, you can’t mess this up. Just make sure your scraps have straight edges.
Sew, right sides together, to form a patchwork from all your strips and squares. The dimensions should be 27 inches x 21 inches for your panel. You can measure and cut to size after you piece your scraps together.
Sewing for Beginners eBook
Find thousands of free crafts, decorating ideas, handmade gifts and more at www.FaveCrafts.com. 39
Press everything flat.
Here are my TWO 27 x 21 inch panels, remember, it's reversible! I got impatient with my reverse side and used larger pieces of fabric.
Measure 14 inches from the top of the fabric panels, fold, then press. Now bring the pressed fold up until it is 3 inches from the top of the apron panel, forming a deep pocket. You will do this with both panels. Pin to hold.
See? Now press. Do this with both panels.
Now, place the two panels right sides together and pin.
Sewing for Beginners eBook
Find thousands of free crafts, decorating ideas, handmade gifts and more at www.FaveCrafts.com. 40
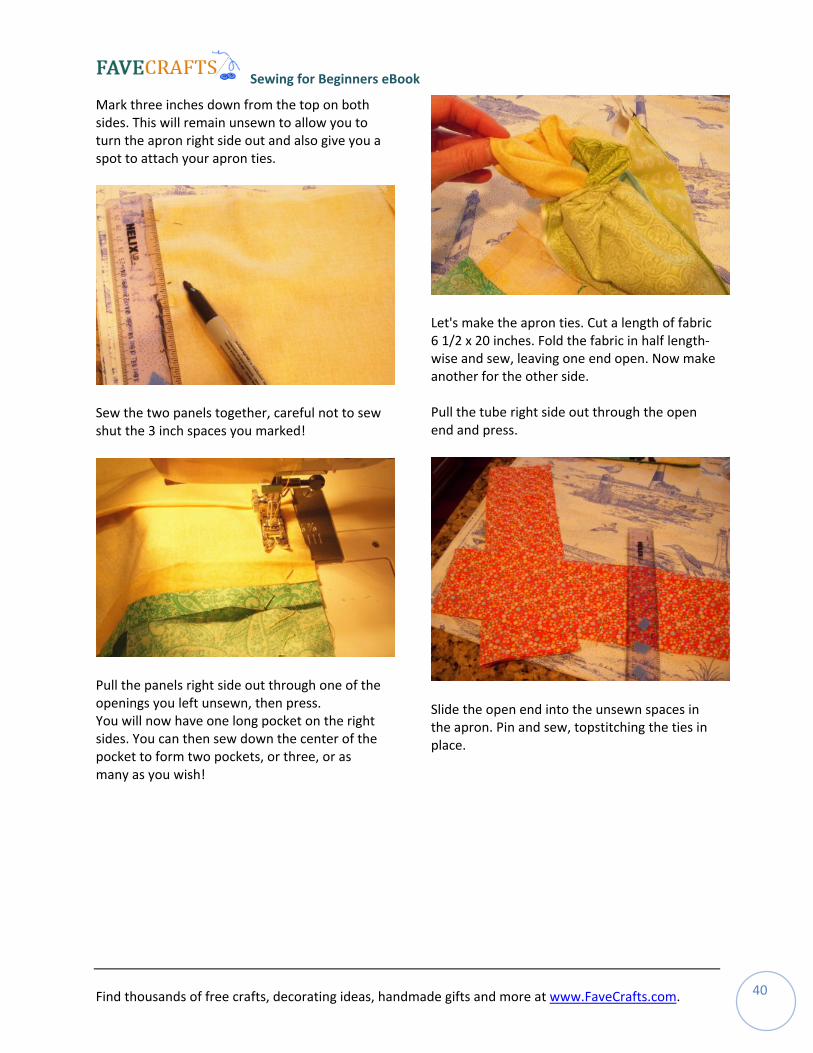
Mark three inches down from the top on both sides. This will remain unsewn to allow you to turn the apron right side out and also give you a spot to attach your apron ties.
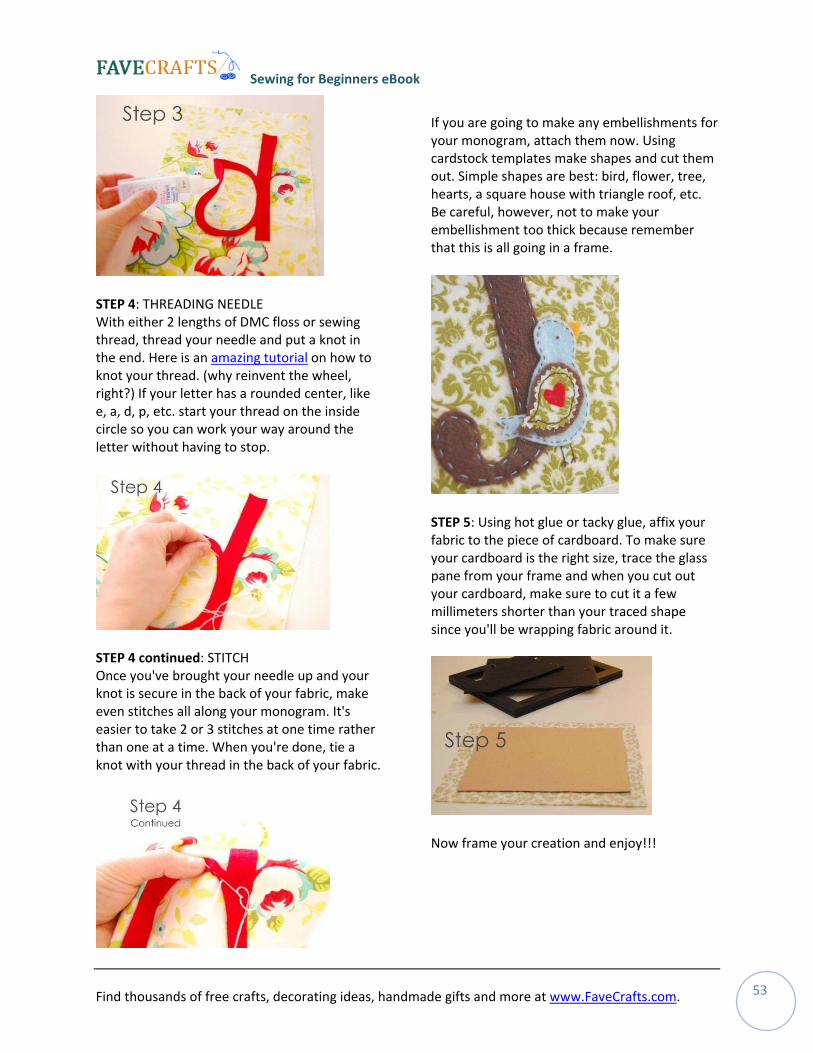
Sew the two panels together, careful not to sew shut the 3 inch spaces you marked!
Pull the panels right side out through one of the openings you left unsewn, then press. You will now have one long pocket on the right sides. You can then sew down the center of the pocket to form two pockets, or three, or as many as you wish!
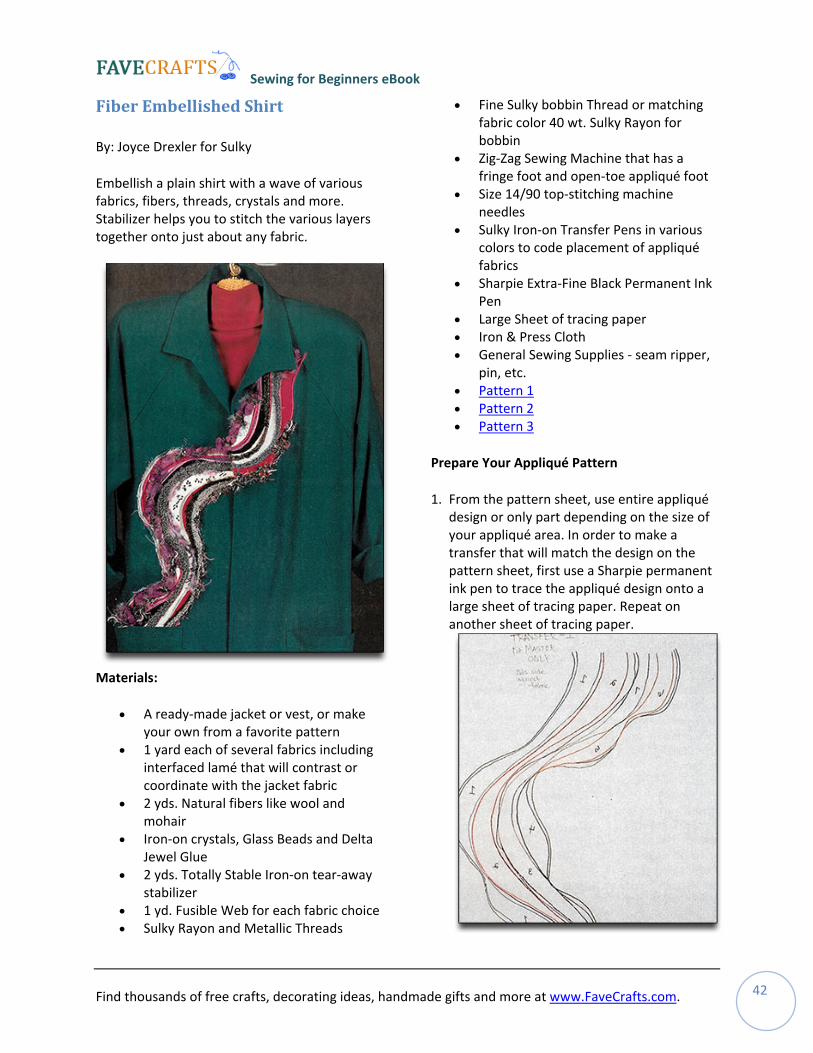
Let's make the apron ties. Cut a length of fabric 6 1/2 x 20 inches. Fold the fabric in half length‐wise and sew, leaving one end open. Now make another for the other side. Pull the tube right side out through the open end and press.
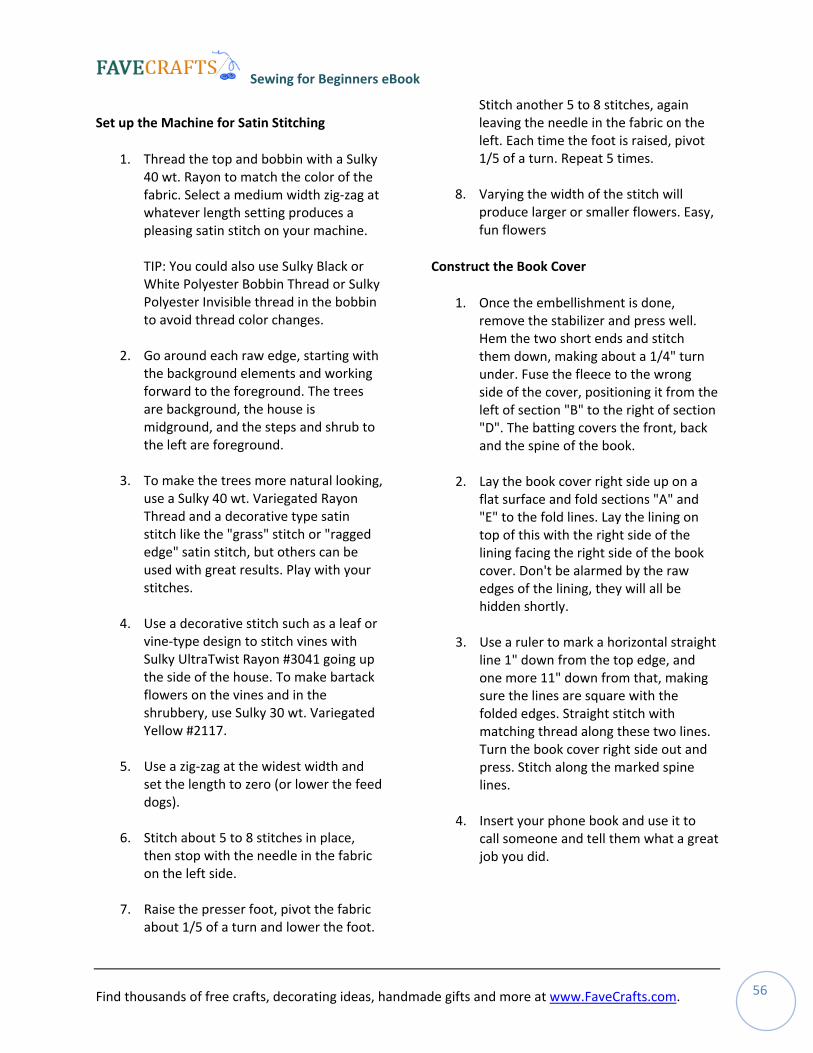
Slide the open end into the unsewn spaces in the apron. Pin and sew, topstitching the ties in place.

Sewing for Beginners eBook
Find thousands of free crafts, decorating ideas, handmade gifts and more at www.FaveCrafts.com. 41
Here is one side of the apron. Let's embellish it with the trims. I have a friend that calls me "the queen of random", I do random well. Mix it up with unexpected combos of fabric and trim. Don't be too matchy matchy.
Hand stitch your trims...
Now, put on your apron, a string of pearls, and some pumps and meet your husband at the door…tell him to take you out for dinner tonight. Girl, you don’t want to mess up your cute apron just yet!
Feel free to pop into my blog at www.HopeStudios.blogspot.com for Tutorial Tuesday for more crafty goodness. See you soon!
Sewing for Beginners eBook
Find thousands of free crafts, decorating ideas, handmade gifts and more at www.FaveCrafts.com. 42
Fiber Embellished Shirt
By: Joyce Drexler for Sulky
Embellish a plain shirt with a wave of various fabrics, fibers, threads, crystals and more. Stabilizer helps you to stitch the various layers together onto just about any fabric.
Materials:
• A ready‐made jacket or vest, or make your own from a favorite pattern
• 1 yard each of several fabrics including interfaced lamé that will contrast or coordinate with the jacket fabric
• 2 yds. Natural fibers like wool and mohair
• Iron‐on crystals, Glass Beads and Delta Jewel Glue
• 2 yds. Totally Stable Iron‐on tear‐away stabilizer
• 1 yd. Fusible Web for each fabric choice • Sulky Rayon and Metallic Threads
• Fine Sulky bobbin Thread or matching fabric color 40 wt. Sulky Rayon for bobbin
• Zig‐Zag Sewing Machine that has a fringe foot and open‐toe appliqué foot
• Size 14/90 top‐stitching machine needles
• Sulky Iron‐on Transfer Pens in various colors to code placement of appliqué fabrics
• Sharpie Extra‐Fine Black Permanent Ink Pen
• Large Sheet of tracing paper • Iron & Press Cloth • General Sewing Supplies ‐ seam ripper,
pin, etc. • Pattern 1 • Pattern 2 • Pattern 3
Prepare Your Appliqué Pattern
1. From the pattern sheet, use entire appliqué design or only part depending on the size of your appliqué area. In order to make a transfer that will match the design on the pattern sheet, first use a Sharpie permanent ink pen to trace the appliqué design onto a large sheet of tracing paper. Repeat on another sheet of tracing paper.

Sewing for Beginners eBook
Find thousands of free crafts, decorating ideas, handmade gifts and more at www.FaveCrafts.com. 43
2. For Transfer #1, turn your tracing over and ink the pattern from this side with the Sulky Iron‐on Heat Transfer Pen. (Using different color pens for different sections will help you with placement later.) When this transfer is placed on fabric to transfer the design, the design will transfer in the same direction as the original drawing on the pattern sheet. Use a Sharpie Marker to label this transfer "Transfer #1 for Master Only." You will use it to transfer a master to your garment or base fabric in order to build the appliqué. For Transfer #2, ink directly over the Sharpie Marker lines with the Sulky Heat Transfer Pen. This transfer will be used on all your appliqué fabrics.
Prepare Your Appliqué Fabrics
1. Cut Fabric choices into rectangles that measure a lttle larger than the appliqué design area.
2. Fuse Fusible Web onto the wrong side of all
the fabric rectangles.
Transfer Your Appliqué Pieces
1. Since the Sulky Transfer Pen can produce multiple transfers from one inking, we will use the traced Transfer Design #2 for all of our appliqué fabrics. I prefer to have choices when designing, so I transfer the entire design to a series of fabrics I wish to have in the finished appliqué; that way I have the option of placing colors at will in an area of the design. Be sure to label each piece so you won't become confused later as to where it should be placed.
2. Once the transfers are make, carefully
cut along the transfer lines, keeping the release sheet paper on each appliqué piece until you are ready to place it on the Master.
Place Chosen Appliqué Design Pieces In Place Over The Master
1. Transfer the #1 Master Design directly onto your garment, or onto a base fabric on which an appliqué will be first assembled and stitched, then placed on a garment.

Sewing for Beginners eBook
Find thousands of free crafts, decorating ideas, handmade gifts and more at www.FaveCrafts.com. 44
2. Now arrange the appliqué pieces until you obtain the best color placement. Keep in mind that some areas could be filled in with natural fibers, fringe or beads. Once you have made your final choices, remove the release sheet from the back of those pieces and iron them in place; put a blank sheet of paper between the iron and the transfer paper to prevent the Master Transfer from transferring back onto your iron.
First ‐ Satin Stitch
1. Iron 1 to 2 layers of totally Stable Iron‐on Tearaway to the under side of fabric in appliqué area. If applying appliqué directly onto your jacket, extend the stabilizer off the jacket front edge so it can be turned back when finished.
2. Thread top of machine with Sulky Decorative Thread and, in the bobbin, use matching 40 wt. Sulky or Sulky Bobbin Thread. Place an open‐toe appliqué foot on the machine. On a practice piece of fabric which is set up like our Master Appliqué, run some satin stitches in various widths to see which one produces the desired effect. Adjust the width while sewing to see the effect. Once satisfied, satin stitch appliqué edges of the Master Appliqué. Taper to finish off the pattern section ends.
Second ‐ Add Rows of Sulky Fringe To Fill In Areas
Thread top with one or two Sulky Threads through the same needle (16/100 Needle for two threads). Use all Sulky Rayon or all Sulky Metallic, or combine the two. Loosen top tension to almost zero, attach fringe foot, set width so needle just clears the raised metal divider on the foot, set switch length for a satin stitch, and run a test row on your practice piece. Choose a place to put a row on your master appliqué, then pack additional rows close to this row. To taper fringe, gradually shorten the length of each row.
Third ‐ Couch Natural Fibers For Added Dimension
Sew with a Sulky Rayon or Sulky Metallic that best contrasts or blends with the yarn you wish to couch. Use a cording foot, if available, or set the machine for free‐motion and use a darning foot. Try twisting a few strands of Sulky Metallic with a dyed wool or nubby decorative yarn. If the fiber is too large to couch, simply glue it in

Sewing for Beginners eBook
Find thousands of free crafts, decorating ideas, handmade gifts and more at www.FaveCrafts.com. 45
place using a fabric glue. Gently remove stabilizer backing from outside edge of overall appliqué. Leave the inside, stitched‐over stabilizer in place.
Fourth ‐ Iron‐on Crystals Or Glue On Beads, Sequins, Etc.
Place iron‐on crystals where you desire them. Place a press cloth over the crystals, then press with an iron for 15‐20 seconds or until stones adhere. You can add beads and/or sequins by sewing them, or glue them in place with Delta's Jewel Glue. Make an interesting pattern that flows with the design, not necessarily just a solid group of beads or rhinestones. You can add as many or as few crystals, beads and sequins to the make the appliqué suit you.

Sewing for Beginners eBook
Find thousands of free crafts, decorating ideas, handmade gifts and more at www.FaveCrafts.com. 46
Sewn "Crochet" Edge
By: Sue Hausmann for Sulky
Follow this technique to sew an edge with the appearance of crochet onto collars, necklace, cuffs and more. This technique is quicker than crochet and creates an heirloom quality garment.
Materials:
• Sulky Heat‐Away Stabilizer • Sulky 30 wt. Rayon Threads • Topstitching Needle • Edge/Joining Presser Foot • Open Toe Presser Foot • Construct It
Instructions:
1. To make the heavier, crochet‐look trim, thread the top of your sewing machine with two strands of the same color of Sulky 30 wt. Rayon thread through the eye of a topstitching neeedle. also treat the two threads as one to wind a bobbin with two
strands of the same Sulky 30 wt. thread.
2. Rotary cut strips of Heat‐Away Stabilizer 3 inches wide. Snap on the edge/joining foot and baste the Heat‐Away strips onto the fabric along the edge with 2 inches extending outside the fabric edge to be finished with "crochet".
3. Select a stitch that sews a seam/overcast‐type stitch. On a Husqvarna Viking #1+, use stitch A21, stitch length 3.0, stitch width 6.0, side‐to‐side mirror image, and an open‐toe foot.

Sewing for Beginners eBook
Find thousands of free crafts, decorating ideas, handmade gifts and more at www.FaveCrafts.com. 47
4. Stitch along the edge of the collar so the side stitch catches the edge, and the rest of the stitch is on the Heat‐Away. To finish the ends select a left needle (or right needle depending on which end) and straight stitch on the Heat‐Away to the next row. Mirror the stitch side‐to‐side, turn the work around, and stitch back along the stitching. Line up the stitch with the side stitches of the first row. The stitches should look like you are laying brick. Continue to add rows as desired. The collar in the sample project has three rows.
5. Trim away the excess Heat‐Away outside the stitching.
6. Place a towel or press cloth on an ironing surface and press with a DRY iron to disintegrate the Heat‐Away.
7. Place the collar in a plastic bag and rub
the stitching gently to "flake" the Heat‐Away off.

Sewing for Beginners eBook
Find thousands of free crafts, decorating ideas, handmade gifts and more at www.FaveCrafts.com. 48
Woven Edge Cardigan
By: Patti Lee for Sulky
Turn a boring crew‐neck sweatshirt into a fashionable cardigan with woven edge and matching cuffs. Colorful strips of fabric are woven with metallic threads and various yarns for the cardigan edge.
Materials:
• 1 1/4 yds. of Sulky Tear‐Easy Stabilizer • Sulky Decorative Sliver Metallic Threads
that coordinate or contrast with fabric • Sulky Polyester Bobbin Thread • Premier Sulky Clear Invisible Thread • June Tailor Pin‐Weaving Express Board • I yd. Tricot Knit Iron‐on Interfacing • A crew‐neck Sweatshirt • 50 yards of yarn for Warp • 1 yd. fabric for lining • 1/4 yd. each of miscellaneous fabric to
embellish for weavers • Assorted Yarns of various weights
• Rotary Cutter, Mat and Quilter's Ruler • Scissors • White Chalk Marker • Quilter's Straight Pins • Spinster ‐ Twisting Tool for combining
and twisting yarns and threads • Serger ‐ Optional • Pin‐Weaving Shuttle ‐ Optional
Getting Started
1. Cut 2 pieces of fusible interfacing 13 1/2" x 26". If you do not have a pin‐ weaving board, you can make one by taping or gluing 1/4" graph paper onto core board (used in framing).
2. Pin the first interfacing piece, FUSIBLE SIDE UP, in the center of your pin weaving board. Pin interfacing at the same 1/2" intervals across the top and bottom. Because you will have to press over these pins as well as the Warp yarn, angle the pins away from the interfacing while catching the edge of the interfacing.
Warp and Weft
1. First, place the Warp yarns on the pin‐weaving board. There are many possible variations of Warp placement. For more ideas, see Donna Rhodes' and Kathy Stachowitz's book, THE FINE ART OF PIN WEAVING ‐‐‐ CREATIVE VARIATIONS. To start end, make a loop with the Warp and wrap it over an extra pin or two.
2. Cut 25 to 30 (depending on the size of the sweatshirt) fabric strips 1" x 45". Cut the same number of Sulky Tear‐Easy Stabilizer 1 1/2" x 45" strips with the grain so it will tear away in long strips instead of little pieces.

Sewing for Beginners eBook
Find thousands of free crafts, decorating ideas, handmade gifts and more at www.FaveCrafts.com. 49
3. Choose satin type decorative stitches. With Sliver Thread in the needle and Sulky Bobbin or Invisible Thread in the bobbin, lower the top tension until no bobbin thread is brought to the top of the fabric. Place Tear‐Easy under the strips and stitch down the center. Remove stabilizer and press, if necessary.
4. Spin some custom yarns by spinning Sulky Sliver in with color groups of different textured yarns or leftovers from a favorite knitting or crochet project. You can spin any length of yarn using the "Spinster" ™. Knot together yarn and a couple of lengths of Sliver and put it over anything like a chair knob, vertical spool pin on your machine, third‐hand, etc.
5. Twist the yarns and Sulky Sliver until they are wound very tight. Take the end off the Spinster and bring that end back to the other end while still holding the yarn tight. Allow the two to twist together. Run yarn through your hand to smooth it until it is relaxed. Knot cut ends together. Prepare a variety of these twisted yarns. If you don't have a Spinster, tie the yarns onto a machine bobbin so the yarns come out of the top and let the bobbin winder twist them.
6. Patti wove two different methods for strikingly different results on the finished sweatshirts. The weave shown here was done so the Warp yarns show alternately. In this piece, the yarn and the fabric strip (Weft) were both woven as one unit through the same Warp yarns. Pin the Weft ends as you weave.
7. In the second sample, the Warp seems to show in continuous rows, not alternating. This is because the fabric and yarn strips were woven independently. When weaving, keep the strips as level as possible. You can leave fabric strips smooth or you can scrunch them up. By leaving them smooth, more of the embellishing stitches will show and you will use less materials.
8. It is important to completely cover the fusible interfacing. You can weave from the top down or from the bottom of the

Sewing for Beginners eBook
Find thousands of free crafts, decorating ideas, handmade gifts and more at www.FaveCrafts.com. 50
piece up, whichever is more comfortable for you. After weaving is completed, press the weaving to fuse it to the interfacing while it is still pinned to the board. If you are concerned about melting some fibers, use a damp press cloth. Starting in the center, steam heavily with only a pressing motion (do not slide iron); take pins out as you fuse edges. Turn project over and steam it well again from the wrong side.
9. Because this is a heavy, densely woven piece, stitch around all four edges about 1/4" in from the edge to hold all Warp and Weft securely in place.
10. Measure the width of the piece and mark it into thirds. Stay stitch on each side of the marked lines, making the two lines in each set of stitching 1/4" apart. Cut between the 1/4" stitching lines. With a 1/4" seam allowance, sew these three long pieces together lengthwise to make one long piece (approximately 75" long). The length required will be determined by the size and length of your sweatshirt. Our sweatshirts were Large and X‐Large.
11. Cut and seam lining piece into the length of the long panel and 1/2" wider. With right sides together, sew the lining to the woven piece along one long side using a 1/4" seam allowance. Understitch seam allowance and lining only.
Sweatshirt Preparation
1. Mark center front. Cut up the center front of sweatshirt through the neckline and bottom band.
2. Cut away 1" to 2" from one side of sweatshirt, around the neck, and down the other side. (Cutting away a lesser amount gives you a stand‐up collar.)
3. Trim away corners (a triangle about 1" wide at upper center front).
4. With right sides together, sew the pin‐woven panel to the sweatshirt, leaving 1/4" extending at each bottom center front edge. Do not attach lining. With pin‐woven panel and lining right sides together, sew across bottom sides even

Sewing for Beginners eBook
Find thousands of free crafts, decorating ideas, handmade gifts and more at www.FaveCrafts.com. 51
with sweatshirt. Turn and press.
5. Understitch seam allowance to lining to reduce bulk and keep lapel flat. Press inside seam allowance toward center front.
6. On the inside, fold lining seam allowance in and handstitch it to the sweatshirt.
Sleeves
1. Cut off sweatshirt sleeves to desired length (approximately 11" to 14" for a rolled‐up sleeve look).
2. Open up sleeve seam about 6" from the cut end.
3. Measure sleeve opening.
4. Cut two pieces of the pin‐woven panel to accomodate sleeve opening (approximately 18" by 5"). Be sure to include a seam allowance at each end.
5. Cut a piece of lining fabric the size of the pin‐woven sleeve pieces, but add 1" to the width, making it approximately 18" x 6".
6. With right sides together, sew the pin‐woven fabric to the lining fabric along one long edge.
7. Understitch the seam allowance to the lining. Press well.
8. With right sides together, stitch the pin‐woven panel to the sleeve seam, leaving the lining free. Fold and press 1/2" of each long edge.
9. Sew sleeve seam closed from opening to edge of lining.
10. Turn the lining to the inside, fold the seam allowance under and hand stitch it; or adjust the seam allowance to be slightly longer than the woven piece and, from the right side, stitch in the ditch with Sulky Invisible Thread on the top and in the bobbin.

Sewing for Beginners eBook
Find thousands of free crafts, decorating ideas, handmade gifts and more at www.FaveCrafts.com. 52
Home Décor
Guest Project: Framed Monogram
Abby Welker of A Feathered Nest shows us how to create a beautiful, framed monogram with felt and fabric. A bird embellishment tops of a simple sewn creation for truly creative decor. Make one for every member of the family!
Materials:
• Picture Frame • Cardstock • Fabric the size of your frame • One sheet of matching felt • Additional felt for embellishments • DMC Floss or thread in contrasting color • Hand‐sewing needle (needs a sharp tip,
not a blunt tip) • Fabric glue • Thin piece of cardboard the size of your
frame. (I cut up a cereal box)
STEP 1: Letter Stencils Find a font you like, print your monogram letter on cardstock and carefully cut out the monogram. Since you'll be tracing with a felt‐tip
marker, turn your letter face‐down so it's reversed. Trace with a felt‐tip marker, cut out your monogram, and since you traced in reverse, you won't see any of the markings.
STEP 2: POSITIONING Position your monogram on your fabric and press it down firmly with your hand. The felt should stick to the fabric a little.
STEP 3: GLUE In order to secure the mogram so you can hand‐stitch without it slipping, we're going to glue it down. Without lifting the monogram off of the fabric, because you've already positioned it, carefully lift parts of the monogram and apply a tiny bit of glue down the center of the letter. Remember that you'll be stitching along the outer edges so you'll want to keep them clear of glue. Press everything down neatly and let the glue set for a few minutes.
Sewing for Beginners eBook
STEP 4: THREADING NEEDLE With either 2 lengths of DMC floss or sewing thread, thread your needle and put a knot in the end. Here is an amazing tutorial on how to knot your thread. (why reinvent the wheel, right?) If your letter has a rounded center, like e, a, d, p, etc. start your thread on the inside circle so you can work your way around the letter without having to stop.
STEP 4 continued: STITCH Once you've brought your needle up and your knot is secure in the back of your fabric, make even stitches all along your monogram. It's easier to take 2 or 3 stitches at one time rather than one at a time. When you're done, tie a knot with your thread in the back of your fabric.
If you are going to make any embellishments for your monogram, attach them now. Using cardstock templates make shapes and cut them out. Simple shapes are best: bird, flower, tree, hearts, a square house with triangle roof, etc. Be careful, however, not to make your embellishment too thick because remember that this is all going in a frame.
STEP 5: Using hot glue or tacky glue, affix your fabric to the piece of cardboard. To make sure your cardboard is the right size, trace the glass pane from your frame and when you cut out your cardboard, make sure to cut it a few millimeters shorter than your traced shape since you'll be wrapping fabric around it.
Now frame your creation and enjoy!!!
Find thousands of free crafts, decorating ideas, handmade gifts and more at www.FaveCrafts.com 53 .

Sewing for Beginners eBook
Find thousands of free crafts, decorating ideas, handmade gifts and more at www.FaveCrafts.com. 54
Embellished Thread Bowl
By: Lynn Koolish for C T Publishing
Using water‐soluble stabilizer, you can create beautiful, translucent thread bowls and vases.
Materials:
• water‐soluble stabilizer • Perle cotton thread from Valdani
thread‐ size 12 • large glass bowl • UV resistant clear acrylic coating
Instructions:
1. I found the largest glass bowl I had and measured across the outside of the bowl.
2. I used that measurement to draw a circle on heavyweight water‐soluble stabilizer.
3. Using regular weight thread, I first free‐motioned stitched a grid, then I went back and free‐motioned fairly densely all over.
4. I drew the design that I wanted to use on another piece of water‐soluble stabilizer and pinned it to the stitched stabilizer.
5. I stitched out my design in size 12 Perle cotton, washed out most of the stabilizer, and draped it over my glass bowl to dry.
6. After the bowl was dry, I took it off the glass bowl and sprayed the thread bowl with a few coats of UV resistant clear Acrylic coating.
Done! Fast, Fun, and Easy!
This bowl, embellished with Perle cotton thread, is inspired by Wendy Hill's Fast, Fun & Easy (R) Incredible Thread‐a‐Bowls. For more information about C&T Publishing, visit their blog.

Sewing for Beginners eBook
Find thousands of free crafts, decorating ideas, handmade gifts and more at www.FaveCrafts.com. 55
Phone Book or Album Cover
By: Beverly Johnson for Sulky
Sew a cute cover for a phone book or photo album featuring a house scene. This cover makes a great house‐warming gift or accent for your own home. The batting or fusible fleece adds depth and hides the color of the phone book.
Materials:
• Zig‐Zag Sewing Machine • Open‐toe Appliqué Foot • Cut one rectangle of main fabric; 13"
high by 34" wide • Cut one piece of lining, which could be
the same fabric: 13" by 20" • Cut one piece of batting or fusible
fleece 13" x 20‐3/8" • Small pieces of an assortment of fabrics
for appliqué • Paper‐Backed Fusible Web
• Sulky Tear‐Easy, Totally Stable or Stiffy Stabilizer
• Sulky Decorative Threads of your choice • Chalk Marker • Fine‐line, Permanent‐Ink Marker • Pattern from below • General Sewing Supplies • Pattern
Preparing the Fabric
1. Following the pattern on the pattern sheet, mark the lines on your 13" x 34" main fabric with a chalk marker as indicated. Seam allowances are included in these measurements. The dotted lines at the top and bottom are 1" from the cut edges and should be 11" apart.
Note: The section marked "D" is the area for embellishment (the front of the book cover). The actual size of the finished cove is 9" x 11'.
Preparing the Appliqués
1. Use a fine‐line, permanent‐ink marker to trace the house and shrub shapes from the pattern sheet onto the paper side of the fusible web. (The pattern is already reversed.)
2. Fuse the web to the back of the desired fabrics. Cut out the shapes and fuse them in position onto Section "D". Make sure things are level.
3. Place either Sulky Tear‐Easy, Totally Stable or Stiffy Stabilizer behind the fabric in section "D". Only do the appliqué work in this area, remembering that the actual size of the finished cover is 9" x 11"; the rest of the fabric is seam allowance. Avoid these edges or your decorative stitching will disappear into the seams.
Sewing for Beginners eBook
Find thousands of free crafts, decorating ideas, handmade gifts and more at www.FaveCrafts.com. 56
Set up the Machine for Satin Stitching
1. Thread the top and bobbin with a Sulky 40 wt. Rayon to match the color of the fabric. Select a medium width zig‐zag at whatever length setting produces a pleasing satin stitch on your machine. TIP: You could also use Sulky Black or White Polyester Bobbin Thread or Sulky Polyester Invisible thread in the bobbin to avoid thread color changes.
2. Go around each raw edge, starting with the background elements and working forward to the foreground. The trees are background, the house is midground, and the steps and shrub to the left are foreground.
3. To make the trees more natural looking, use a Sulky 40 wt. Variegated Rayon Thread and a decorative type satin stitch like the "grass" stitch or "ragged edge" satin stitch, but others can be used with great results. Play with your stitches.
4. Use a decorative stitch such as a leaf or vine‐type design to stitch vines with Sulky UltraTwist Rayon #3041 going up the side of the house. To make bartack flowers on the vines and in the shrubbery, use Sulky 30 wt. Variegated Yellow #2117.
5. Use a zig‐zag at the widest width and set the length to zero (or lower the feed dogs).
6. Stitch about 5 to 8 stitches in place, then stop with the needle in the fabric on the left side.
7. Raise the presser foot, pivot the fabric about 1/5 of a turn and lower the foot.
Stitch another 5 to 8 stitches, again leaving the needle in the fabric on the left. Each time the foot is raised, pivot 1/5 of a turn. Repeat 5 times.
8. Varying the width of the stitch will produce larger or smaller flowers. Easy, fun flowers
Construct the Book Cover
1. Once the embellishment is done, remove the stabilizer and press well. Hem the two short ends and stitch them down, making about a 1/4" turn under. Fuse the fleece to the wrong side of the cover, positioning it from the left of section "B" to the right of section "D". The batting covers the front, back and the spine of the book.
2. Lay the book cover right side up on a flat surface and fold sections "A" and "E" to the fold lines. Lay the lining on top of this with the right side of the lining facing the right side of the book cover. Don't be alarmed by the raw edges of the lining, they will all be hidden shortly.
3. Use a ruler to mark a horizontal straight line 1" down from the top edge, and one more 11" down from that, making sure the lines are square with the folded edges. Straight stitch with matching thread along these two lines. Turn the book cover right side out and press. Stitch along the marked spine lines.
4. Insert your phone book and use it to call someone and tell them what a great job you did.
Sewing for Beginners eBook
Find thousands of free crafts, decorating ideas, handmade gifts and more at www.FaveCrafts.com. 57
Sewing for Beginners: Learn to Sew with Free Sewing Patterns
eBook from www.FaveCrafts.com
Included in this eBook:
• Bag Sewing Patterns
o Ribbon Stripe Bag, pg.21
• Pillow Sewing Patterns
o Easy Felt Pillows, pg. 16
• Clothing Sewing Patterns
o Woven Edge Cardigan, pg. 48
• Home Décor Sewing Patterns
o Phone Book Cover, pg. 55
Sign up for our free crafting newsletter and receive more low‐cost collections, free craft projects, quick tips, home décor ideas and more right in your inbox every week.