sewing pattern by · this tote features an inseam pocket on the front for stashing away extra bits...
TRANSCRIPT

hidden pocket totea sewing pattern by

2 sew desu ne?| www.cholyknight.com |
hidden pocket totesewing tutorial
hidden pocket tote
difficulty:
before you begin:
makes:
materials & tools• ½ydoffusiblefleeceinterfacing
(optional)• Matchingsewingthread• Basicsewingtools(sewingmachine,
scissors,iron,needles,pins,fabricmarker,seamripper)
• ½yd.ofmediumtoheavyweightfabricformaintote(canvasordenimwouldbeperfect–Iusedinterfacedfauxsuede)
• 1/8yd.ofnon-directionalor½yd.ofdirectionalmediumtoheavyweightfabricforcontraststrips(canvasordenimwouldbeperfect–Iusedinterfacedlinen)
• ¼yd.ofnon-directionalor½yd.ofdirectionalmediumtoheavyweightfabricforcentercontrastpanel(canvasordenimwouldbeperfect–Iusedtwill)
• 2/3yd.oflightweightfabricforlining(Iusedquiltingcotton)
one tote that is 18” wide and 10½” tall
This tote is super simple and uses all straight lines, though the pocket portion might throw you a bit if you’re a newbie.
This tote features an inseam pocket on the front for stashing away extra bits and bobs, which is ideal because the size of the tote happens to be the size of most laptops. It works for other items as well, but it’s a plus nonetheless!
4. Mark the fabric pieces with the guide-lines from the pattern
1. Print out the project pattern, pages 9-14
2. Assemble the printed pattern pieces3. Lay out the pattern pieces on your
fabric/interfacing and cut them out

3 sew desu ne?| www.cholyknight.com |
hidden pocket totesewing tutorial
Once we get past the pocket part it’s all gravy from there :D So the
first step to creating the pocket is to take one of your
side panels from your contrast fabric and one of your center panels from your lining fabric, then match up the edges with the single notches. Sew the two pieces together along this edge, then press the seam open.
Next we’re essentially doing the same thing but with your center panel main
fabric and the remaining center panel lining piece.
Once again, match up the single notches and sew down that one edge. Press the seam open when you finish.
2
1
4
hidden pocket totesewing tutorial
sew desu ne?| www.cholyknight.com |
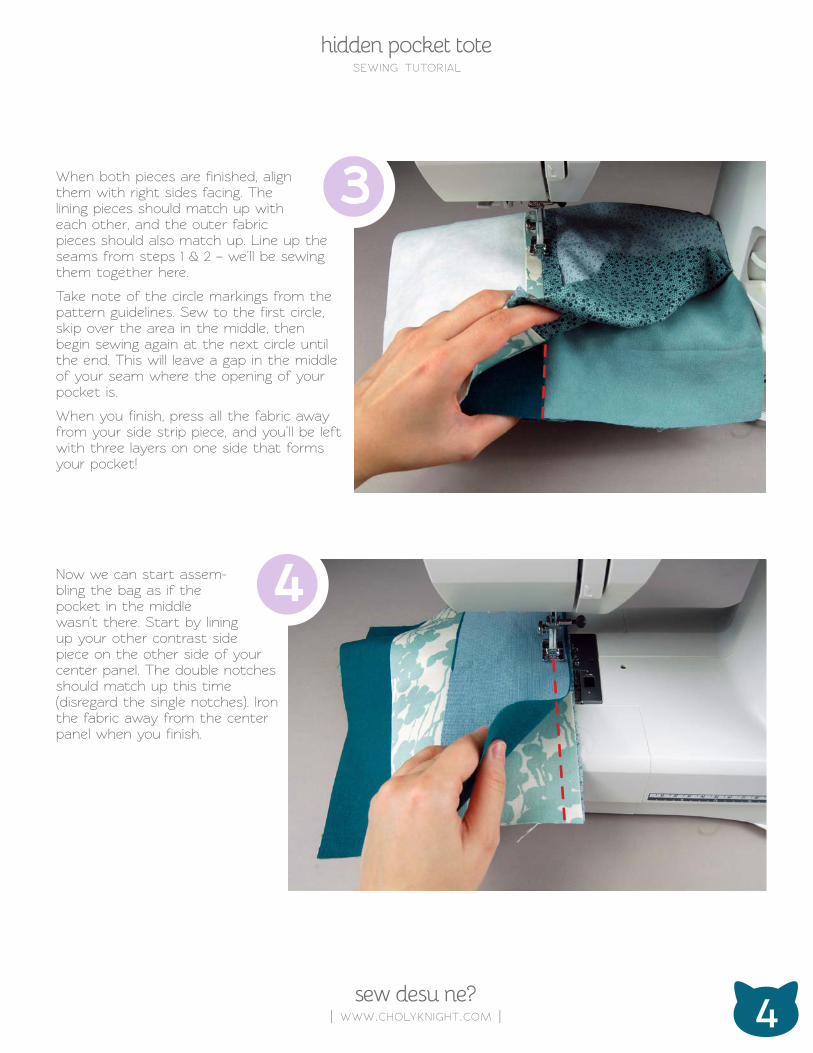
When both pieces are finished, align them with right sides facing. The lining pieces should match up with each other, and the outer fabric pieces should also match up. Line up the seams from steps 1 & 2 – we’ll be sewing them together here.
Take note of the circle markings from the pattern guidelines. Sew to the first circle, skip over the area in the middle, then begin sewing again at the next circle until the end. This will leave a gap in the middle of your seam where the opening of your pocket is.
When you finish, press all the fabric away from your side strip piece, and you’ll be left with three layers on one side that forms your pocket!
Now we can start assem-bling the bag as if the pocket in the middle wasn’t there. Start by lining up your other contrast side piece on the other side of your center panel. The double notches should match up this time (disregard the single notches). Iron the fabric away from the center panel when you finish.
4
3

5 sew desu ne?| www.cholyknight.com |
hidden pocket totesewing tutorial
All that’s left to complete the front of your bag is to sew the main side panels
to each side of your working piece now. Match up the long
edges and sew the panel from your main fabric in place. Repeat this with the other side of your center section as well and that completes the front of your bag!
This is completely optional, but since I made mine into a laptop bag I fused some
fleece padding to the wrong side of my bag front and back.
This will make your front pocket look extra crisp and neat, so I would recommend it for that reason as well.
6
5

6
hidden pocket totesewing tutorial
sew desu ne?| www.cholyknight.com |
With the front and back of your tote complete, you can now sew them together. Simply line them up and match the raw edges, then sew the bag together along the sides and bottom. Leave the top free to turn it right side out.
Now you’ll want to trim your seam allowances, turn the bag right side out, and press it flat.
At this time you’ll want to go back and repeat this step 7 with your corresponding lining pieces, but be sure to leave an opening in the bottom for turning the bag right side out later.
Next is the straps. Simply fold under 5/8” of each long edge of your strap pieces, then fold the whole strap in half with wrong sides together. Edge stitch down the folded edge and you have a crisp and neat-looking strap!
8
7

7 sew desu ne?| www.cholyknight.com |
hidden pocket totesewing tutorial
Now baste your straps in place in preparation for the next step. Take one raw
end of your strap and line up the raw edges with the top
edge of your tote. The placement should be just outside of your center panel. Once you basted one end, you can baste the other end on the other side of the panel.
Repeat this same thing with the back of your tote; line up the front and back top edge and use your fabric marker to copy where the straps ended up on the front to the back of your tote. Then use those markings to baste the straps in place on the back.
Now we can finally attach the lining! Nestle your main tote into your lining and
match up the top edges. Be sure that the straps stay
tucked inside the bag, then sew all the way around the top edge of the tote.
Now you’ll want to turn the bag right side out from the opening in your lining. Tuck the lining back into your tote, then press the top seam nice and crisp.
10
9

8
hidden pocket totesewing tutorial
sew desu ne?| www.cholyknight.com |
To keep the top edge looking crisp, you’ll want to edge stitch around the top edge of your tote. Be sure to push the straps away from your tote to keep them out of the way as you sew. Now tuck your laptop inside, because YOU’RE DONE!
11

open
ing for tu
rnin
g (linin
g only)
B1B2
A1 A2
C1 C2
E1 E2
B3B4
D1D
2
D3
D4
Pg. 1/6 Pg. 2/6
Pg. 3/6 Pg. 4/6
Pg. 5/6 Pg. 6/6

Hidden Pocket ToteP
AT
TE
RN
www.cho
lyknight.com
STRAPS
Cut 2 from
main
fabric
5/8” seam allow
ance
strap
placem
ent
B1B2
A1 A2
C1 C2
E1 E2
B3B4
D1D
2
D3
D4
Pg. 1/6 Pg. 2/6
Pg. 3/6 Pg. 4/6
Pg. 5/6 Pg. 6/6

Hidden Pocket ToteP
AT
TE
RN
www.cho
lyknight.com
TOTE B
ACK &
LIN
ING
Cut 1 from
main
fabric
Cut 2 of lin
ing fab
ricCut 2 of b
atting
5/8” seam allow
ance
Hidd
en P
ocke
t Tot
eP
AT
TE
RN
www.cho
lykn
ight
.com
CENTER F
RO
NT P
ANEL
Cut
1 fro
m c
ontr
ast
fabric
Cut
2 o
f lin
ing
fabric
5/8”
sea
m a
llow
ance
B1B2
A1 A2
C1 C2
E1 E2
B3B4
D1D
2
D3
D4
Pg. 1/6 Pg. 2/6
Pg. 3/6 Pg. 4/6
Pg. 5/6 Pg. 6/6

strap
placem
ent
B1B2
A1 A2
C1 C2
E1 E2
B3B4
D1D
2
D3
D4
Pg. 1/6 Pg. 2/6
Pg. 3/6 Pg. 4/6
Pg. 5/6 Pg. 6/6

Hidd
en P
ocke
t Tot
eP
AT
TE
RN
www.cho
lykn
ight
.com
CENTER F
RO
NT P
ANEL
Cut
1 fro
m c
ontr
ast
fabric
Cut
2 o
f lin
ing
fabric
5/8”
sea
m a
llow
ance
Hidden Pocket ToteP A T T E R N
www.cholyknight.com
SIDE PANELSCut 2 from pain fabric
Cut 2 of 2nd contrast fabric5/8” seam allowance
opening for pocket
opening for pocket
B1B2
A1 A2
C1 C2
E1 E2
B3B4
D1D
2
D3
D4
Pg. 1/6 Pg. 2/6
Pg. 3/6 Pg. 4/6
Pg. 5/6 Pg. 6/6

Hidden Pocket ToteP A T T E R N
www.cholyknight.com
SIDE PANELSCut 2 from pain fabric
Cut 2 of 2nd contrast fabric5/8” seam allowance
B1B2
A1 A2
C1 C2
E1 E2
B3B4
D1D
2
D3
D4
Pg. 1/6 Pg. 2/6
Pg. 3/6 Pg. 4/6
Pg. 5/6 Pg. 6/6