sf-7100sy sf-7200sy - casio official website -...
TRANSCRIPT

SF-7100SYSF-7200SY
User’s Guide
E

GUIDELINES LAID DOWN BY FCC RULES FOR USE OF THIS UNIT IN THE U.S.A.(not applicable to other areas).
NOTICEThis equipment has been tested and found to comply with the limits for a Class B digitaldevice, pursuant to Part 15 of the FCC Rules. These limits are designed to providereasonable protection against harmful interference in a residential installation. Thisequipment generates, uses and can radiate radio frequency energy and, if not installedand used in accordance with the instructions, may cause harmful interference to radiocommunications. However, there is no guarantee that interference will not occur in aparticular installation. If this equipment does cause harmful interference to radio or televisionreception, which can be determined by turning the equipment off and on, the user isencouraged to try to correct the interference by one or more of the following measures:
• Reorient or relocate the receiving antenna.• Increase the separation between the equipment and receiver.• Connect the equipment into an outlet on a circuit different from that to which the
receiver is connected.• Consult the dealer or an experienced radio/TV technician for help.
FCC WARNINGChanges or modifications not expressly approved by the party responsible forcompliance could void the user’s authority to operate the equipment.Proper connectors must be used for connection to host computer and/or peripheralsin order to meet FCC emission limits.
Connector SB-63 ........ SF-7100SY/7200SY to SF-5590SY/5790SY/5990SY/6500SY/6700SY/6900SY/7100SY/7200SY
Connector FA-128 ...... SF-7100SY/7200SY to PC
Declaration of ConformityModel Number: SF-7100SY/7200SYTrade Name: CASIO COMPUTER CO., LTD.Responsible party: CASIO, INC.Address: 570 MT. PLEASANT AVENUE, DOVER, NEW JERSEY 07801Telephone number: 973-361-5400
This device complies with Part 15 of the FCC Rules, Operation is subject to thefollowing two conditions: (1) This device may not cause harmful interference, and (2)this device must accept any interference received, including interference that maycause undesired operation.
• CASIO COMPUTER CO., LTD. assumes no responsibility for any damage or lossresulting from the use of this manual.
• CASIO COMPUTER CO., LTD. assumes no responsibility for any loss or claims bythird parties which may arise through the use of the Digital Diary.
• CASIO COMPUTER CO., LTD. assumes no responsibility for any damage or losscaused by deletion of data as a result of malfunction, repairs, or battery replacement.Be sure to back up all important data on other media to protect against its loss.

– 1 –
Before using the Digital Diary for the first time...
Use the following procedure to load batteries before using it for the first time.1. Slide the battery switch on the back of the Digital Diary to the REPLACE
BATTERIES position.
RESET
NORMAL OPERATION REPLACE BATTERIES
2. Pressing down at the points marked (A) in the illustration, slide the batterycompartment cover in the direction (B) to remove it.
(A)
(B)
3. Load two new batteries, making sure that their positive (+) and negative (–) endsare facing correctly.
RESET
NORMAL OPERATION REPLACE BATTERIES
4. Close the battery compartment cover.5. Slide the battery switch back to the NORMAL OPERATION position.
Battery switch
– 2 –
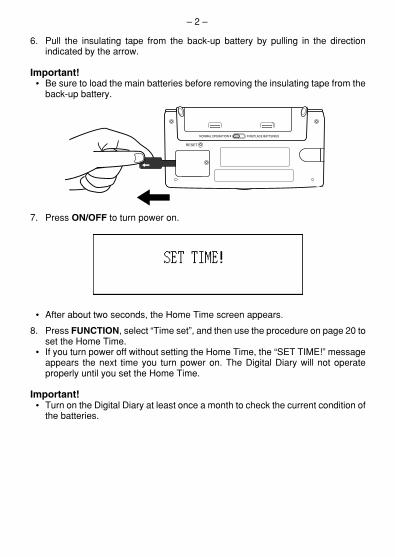
6. Pull the insulating tape from the back-up battery by pulling in the directionindicated by the arrow.
Important!• Be sure to load the main batteries before removing the insulating tape from the
back-up battery.
RESET
NORMAL OPERATION REPLACE BATTERIES
7. Press ON/OFF to turn power on.
• After about two seconds, the Home Time screen appears.
8. Press FUNCTION, select “Time set”, and then use the procedure on page 20 toset the Home Time.
• If you turn power off without setting the Home Time, the “SET TIME!” messageappears the next time you turn power on. The Digital Diary will not operateproperly until you set the Home Time.
Important!• Turn on the Digital Diary at least once a month to check the current condition of
the batteries.

– 3 –
� Turning Power On and OffPress ON/OFF to turn power on and off.
Important!• If nothing appears on the display after you load batteries for the first time, press
the RESET button.• If nothing appears after you press the RESET button, it means that no power is
being supplied from the main batteries. Replace the main batteries with new ones(page 15).
� About the EL backlight• This unit is equipped with an EL backlight that allows easy viewing of display
contents in a theater, or anywhere else where lighting is dim.• Note, however, that frequent or extended use of the EL backlight shortens
battery life.
The following shows how backlight use affects battery life under controlled testconditions*.
* Test Conditions• “Battery Life” is the number of hours before battery failure when the unit is left on
with 5 minutes of a processing operation and 55 minutes of continuous displayonly (no processing operation) per hour, plus the backlight operation describedbelow.
• “Backlight Operation” is the number of minutes the backlight is turned on per hourduring the display only (no processing operation) period.
Backlight Operation Battery Life
3 minutes per hour Approximately 120 hours
15 minutes per hour Approximately 80 hours

Contents
Before using the Digital Diary for the first time... ............... 1Turning Power On and Off ...........................................................3
About the EL backlight ................................................................ 3
Before using the Digital Diary... ............................................ 8Introduction ...................................................................................8
Write down important data somewhere! .................................... 8
Important Precautions .................................................................8
Getting Started ....................................................................... 9General Guide ...............................................................................9
Display .........................................................................................10
All-Reset ...................................................................................... 11
Power Supply ..............................................................................13
Turning Power On and Off ......................................................... 17
Function Menus ..........................................................................17
System Language .......................................................................17
Display Contrast ......................................................................... 18
Key Input Sound ......................................................................... 18
Destructive Backspace .............................................................. 18
Memory Management .................................................................19
Home Time Mode ................................................................. 20Using the Daily Alarm .................................................................21
World Time Mode ................................................................. 23Zone Information Screen ...........................................................24

– 5 –
Data Bank Operations.......................................................... 26Inputting Text ..............................................................................26
Inputting Dates and Times ......................................................... 27
Display Formats ..........................................................................28
Telephone Directory Mode .................................................. 29Record Summary ........................................................................30
Memo Mode .......................................................................... 31Record Summary ........................................................................31
Calendar Mode ..................................................................... 32Maneuvering Around Calendars ............................................... 32
Appointment Markers .................................................................33
Highlighting Calendar Dates ..................................................... 34
Working Day Count .................................................................... 35
Weekly Schedule Screen ...........................................................35
Schedule Keeper .................................................................. 36Maneuvering Around Schedule Keeper Dates ......................... 36
Schedule Alarms ......................................................................... 38
How Schedule Keeper Data is Sorted ....................................... 38
Schedule Type Labels and Icons ..............................................39
Daily Schedule Screen ...............................................................40
Reminder Mode .................................................................... 41Reminder Alarms ........................................................................42
To Do Mode ........................................................................... 43Record Summary ........................................................................44
How To Do Data is Sorted .......................................................... 45
Priority Icons ...............................................................................45

– 6 –
Expense Manager Mode ...................................................... 46Expense Type Labels and Icons ................................................47
Payment Type Labels .................................................................48
Exchange Rate ............................................................................48
Periodic Expense Report ...........................................................49
Record Summary ........................................................................49
Searching for Data ............................................................... 50Scroll Search ...............................................................................50
Initial Character Search .............................................................50
Wild Card Search ........................................................................51
Date Search .................................................................................51
Editing Data .......................................................................... 52
Deleting Data ........................................................................ 53Deleting a Single Data Item........................................................ 53
Deleting All Data Items In a Mode ............................................. 53
Deleting Marked Data Items Only ..............................................54
Deleting All Data Items In Specific Modes ............................... 55
Secret Function .................................................................... 56
Conversion Modes ............................................................... 58Metric Conversions .................................................................... 59
Currency Conversions ...............................................................59
Game Modes ......................................................................... 61Poker Game .................................................................................61
Blackjack Game ..........................................................................63
– 7 –
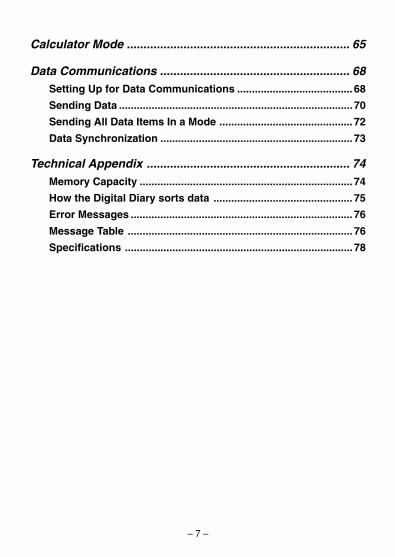
Calculator Mode ................................................................... 65
Data Communications ......................................................... 68Setting Up for Data Communications ....................................... 68
Sending Data ...............................................................................70
Sending All Data Items In a Mode ............................................. 72
Data Synchronization .................................................................73
Technical Appendix ............................................................. 74Memory Capacity ........................................................................74
How the Digital Diary sorts data ............................................... 75
Error Messages ........................................................................... 76
Message Table ............................................................................76
Specifications .............................................................................78

Before using the Digital Diary...
IntroductionCongratulations on your selection of CASIO’s new SF-7100SY/SF-7200SY(referred to as Digital Diary in this manual). Please keep this User’s Guide and allinformation handy for future reference.
Write down important data somewhere!The memory of your Digital Diary holds information only while power is supplied bythe batteries. Always write down important data somewhere.
Important Precautions• Never expose the Digital Diary to fire.• Avoid temperature extremes. Do not locate the Digital Diary in direct sunlight,
near a window, near a heater, etc.• In very low temperatures display response may slow down or fail entirely. This
condition is temporary and operation should resume under normal temperatures.• Avoid areas subject to excessive moisture, dirt, and dust.• Avoid dropping the Digital Diary and otherwise subjecting it to strong impact.• Never bend or twist the Digital Diary.• Never try to take the Digital Diary apart.• Do not use a pen, pencil, or other sharp object to press keys.• To clean the exterior of the Digital Diary, wipe it with a soft cloth dampened in a
weak solution of a mild neutral detergent and water. Be sure to wring out anyexcess moisture from the cloth before wiping off the Digital Diary. Never usebenzene, thinner, or any other volatile agent to clean the unit. Doing so canremove the figures printed on the case or otherwise damage the case finish.
• The contents of this manual are subject to change without notice.• CASIO COMPUTER CO., LTD. assumes no responsibility for any loss or claims
by third parties that may arise from the use of this product.• Note that pressing SHIFT and then LIGHT causes the backlight to light and stay
lit as long as you continue to operate the Digital Diary, or until you press LIGHTagain to turn it off manually.Leaving the backlight on for long periods greatly reduces battery life!
• Be sure to use alkaline batteries only to power this Digital Diary.
– 9 –
Getting Started
Make sure you read this part of the manual.
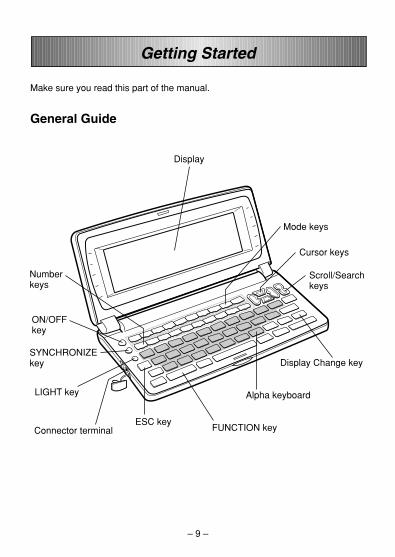
General Guide
Numberkeys
SYNCHRONIZEkey
Display
LIGHT key
Connector terminal FUNCTION key
ON/OFFkey
Alpha keyboard
Display Change key
Scroll/Searchkeys
Cursor keys
Mode keys
ESC key

– 10 –
� DisplayWhen lighting is dim, you can turn on an EL (electro-luminescent) backlight for easierviewing.
To turn on the EL backlightThere are two ways to turn on the backlight of the display.Pressing LIGHT causes the backlight to turn on for about 15 seconds, and then turnoff automatically.Pressing SHIFT and then LIGHT also turns on the backlight, but in this case thebacklight stays on as long as you keep performing key operations on the Digital Diary.The backlight turns off automatically if you do not perform any key operation for about15 seconds.Leaving the backlight on for long periods greatly reduces battery life!You can manually turn the backlight off by pressing LIGHT again.Failure of the backlight to turn on indicates low battery power. Replace batteries assoon as possible.
Display Indicators
C
DATA
SNOOZE
INDEXNEW/EDIT
CODECAPSSHIFT
DAILY
KEY
K
L
~r
f
4321 5 6 7 8 9 0 q w e
1 Low battery warning2 Memory locked3 Telephone Directory Mode4 Memo Mode5 To Do Mode6 Reminder Mode7 Schedule Keeper Mode8 Calendar Mode9 Expense Manager Mode0 Home Time/World Time Modeq Calculator Modew Conversion Modes
e Game Modesr Indicates data abovet SHIFT key operationy Upper-case inputu CODE key operationi NEW/EDIT screeno Index displayp Data displaya Snooze feature activateds Daily alarm ond Key sound onf Indicates data below

– 11 –
� All-ResetUse the following procedure to reset the unit to its initial settings.
Important!• Do not use a very sharp pencil or other object to press the RESET button.• Perform the reset operation only after main batteries and back-up battery are
correctly installed.
To start the all-reset operation1. Turn power off.2. Press the RESET button on the back of the Digital Diary with a thin, pointed
object.
3. Now you should press Y for “yes” or N for “no” in accordance with the conditionsdescribed below.
When to press Y for “yes”• When you want to reset the unit and clear all data and settings.• When you are resetting the unit after a data error (page 76).
1. Press Y in response to the message that appears on the display when you startthe all-reset operation.

– 12 –
2. Press ENTER to reset the Digital Diary or ESC to abort.• After pressing ENTER, the message shown below appears to indicate that
RESET is being performed. RESET takes about 10 seconds to complete.
• After the reset procedure is complete, the message “SET TIME!” appears.• After about two seconds, the Home Time screen appears.
3. Press FUNCTION, select “Time set”, and then use the procedure on page 20 toset the Home Time.
• If you turn power off without setting the Home Time, the “SET TIME!” messageappears the next time you turn power on. The Digital Diary will not operateproperly until you set the Home Time.
When to press N for “no”• When you are not resetting the unit to clear all data and settings.• When you are not resetting the unit after a data error (page 76).
1. Press N in response to the message that appears on the display when you startthe all-reset operation.
• At this time, the message “CHECKING DATA, PLEASE WAIT.” appears. Afterthe data check procedure is complete, the message “SET TIME!” appears.
• After about two seconds, the Home Time screen appears.
2. Press FUNCTION, select “Time set”, and then use the procedure on page 20 toset the Home Time.
• If you turn power off without setting the Home Time, the “SET TIME!” messageappears the next time you turn power on. The Digital Diary will not operateproperly until you set the Home Time.
• Following are the initial settings of the unit after you perform the all-reset operation.
Home Time: New YorkJAN 1, 2000 (SAT)12:00 AM12-hour format
World Time: LondonDaily Alarm: 12:00 AMSound: Daily alarm — OFF
Key — ONMessages: EnglishCharacter input: CAPS — ON

– 13 –
� Power SupplyYour Digital Diary is powered by two AA-size alkaline batteries, and its memory isprotected by a single CR2032 lithium battery.
Low Battery WarningFailure of anything to appear on the display after you turn on power or appearanceof the low battery message, “MAIN BATTERIES WEAK! REPLACE THEM! UNITWILL NOT TURN ON AGAIN!” (followed by the display turning off in about 10seconds) normally indicates that main battery power is low.Note, however, that pressing the RESET button on the back of the unit and thenperforming steps 1 and 2 of the procedure under “When to press N for “no”” abovecan sometimes restore normal operation. When the low battery message appearson the display even if you perform these steps, it means you should replace the mainbatteries as soon as possible.
Note• Take care that you do not make a mistake and delete memory contents at this
time.
Important!• Replace batteries only when low battery power is indicated by failure of the Digital
Diary to turn on when you press the ON key. Do not replace batteries as long asthe Digital Diary turns on normally when you press the ON key.
• There is not low battery warning for the back-up battery. Be sure to replace theback-up battery once every 5 years.
• Be sure you keep a separate copy of all important data that you store in the DigitalDiary.
Battery PrecautionsIncorrectly using batteries can cause them to burst or leak, possibly damaging theinterior of the Digital Diary. Note the following precautions.
• Be sure to use alkaline batteries only to power this Digital Diary.
• Be sure that the positive (+) side of each battery is facing in the correct directions.
• Never mix batteries of different types.
• Never mix old batteries and new ones.
• Do not expose batteries to direct heat, let them become shorted, or try to takethem apart.
• Never leave dead batteries in the battery compartment.
• Remove batteries if you do not play to use the unit for a long time.

– 14 –
• Replace batteries at least once every year, no matter how much you use the unitduring that period.
• Never try to recharge the batteries that come with the unit.
• Should a battery leak, clean out the battery compartment of the unit immediately,taking care to avoid letting battery fluid come into direct contact with your skin.
Keep batteries out of the reach of small children. If swallowed, consult with aphysician immediately.
The batteries that come with this unit discharge slightly during shipment andstorage. Because of this, they may require replacement sooner than the normalexpected battery life.
Restructuring FilesData files in memory must be restructured whenever both the main batteries andback-up battery go dead. The message shown below appears on the display afteryou load new main and back-up batteries on and turn on the unit.
• This message indicates that data files are being restructured. The restructuringtakes a few minutes. Do not try to operate the unit or subject it to impact duringthat time.
• Data file restructuring also returns Home Time, World Time, System Language,and other settings to their initial factory defaults, which are shown below.
Home Time: New YorkJAN 1, 2000 (SAT)12:00 AM12-hour format
World Time: LondonDaily Alarm: 12:00 AMSound: Daily alarm — OFF
Key — ONMessages: EnglishCharacter input: CAPS — ON

– 15 –
To replace the main batteries
Important!• Do not remove the main batteries from the Digital Diary while the back-up battery
is removed.• Be sure to replace both batteries with two new ones. Do not mix an old battery
with a new one.
1. Press OFF to turn power off.2. Slide the battery switch on the back of the Digital Diary to the REPLACE
BATTERIES position.
RESET
NORMAL OPERATION REPLACE BATTERIES
3. Pressing down at the points marked (A) in the illustration, slide the batterycompartment cover in the direction (B) to remove it.
(A)(B)
4. Remove both old batteries and replace them with new ones.• Make sure that the positive (+) and negative (–) ends are facing correctly.
5. Close the battery compartment cover.6. Slide the battery switch back to the NORMAL OPERATION position.7. Press ON to turn power on.
• This causes the message “SET TIME!” to appear. Be sure to set the time againat this time. The Digital Diary suspends its clock operation while replacingbatteries.
8. Press FUNCTION, select “Time set” and then use the procedure on page 20 toset the time.
Battery switch

– 16 –
To replace the back-up battery
Important!• Do not remove the back-up battery from the Digital Diary while the main batteries
are removed or the low battery message appears on the display.• Be sure to replace the back-up battery at least once every 5 years. Otherwise,
you run the risk of losing data stored in memory.
1. Press OFF to turn power off.2. Remove the screw that holds the back-up battery compartment cover in place
and open the cover.
RESET
NORMAL OPERATION REPLACE BATTERIES
3. Insert a thin, pointed object into (A) and remove the old battery.
RESET
4. Load a new battery into the compartment, making sure that its positive side isfacing up (so you can see it).
5. Replace the battery compartment cover and secure it with its screw.• Take care that you do not overtighten the screw.
(A)

– 17 –
� Turning Power On and OffPress ON/OFF to turn power on and off.
Important!• If nothing appears on the display when you turn on power, it means that the main
batteries are low. Replace the batteries (page 13).
Auto Power Off FunctionThe unit automatically turns power off if you do not press any key for about threeminutes. Any alarms you set still sound, even if power is turned off.
� Function Menus• Pressing FUNCTION displays a function menu, whose contents differs depend-
ing on the mode.• Pressing SHIFT FUNCTION displays a function menu of general system
settings (system function menu).• Input the number of the left of the function you want to use to select it.• To exit from a function menu, press ESC.
� System LanguageYour Digital Diary is capable of producing messages in any one of five languages(English, German, Spanish, French, Italian).
To select the system language1. Press SHIFT FUNCTION and then select “Language”.2. Press the number key that corresponds to the language that you want to use.
• To select “English”, you would press 1.• The system language automatically changes to English whenever you perform
the RESET operation (page 11) or after data files are restructured (page 14).
Note• In this manual, all display messages are shown in English.

– 18 –
� Display ContrastUse the following procedure to make the figures on the display darker or lighter.
To adjust display contrast1. Press SHIFT FUNCTION and then select “Display contrast”.2. Use H and J to make display images darker or lighter.3. Press ENTER to quit.
� Key Input SoundWhen the key input sound is turned on, your Digital Diary emits a beep each timeyou press one of its keys.
To turn key input sound on and off1. Press SHIFT FUNCTION and then select “General setting”.
2. Use H and J to turn the key input sound on and off.• The KEY indicator is on the display while the key input sound is on.
3. Press ENTER to quit.
� Destructive BackspaceWhen destructive backspace is turned on, the character at the cursor position isdeleted when you press the BS key.
To turn destructive backspace on and off1. Press SHIFT FUNCTION and then select “General setting”.
Currently selected setting

– 19 –
2. Use L to move the pointer to “Destructive”.3. Use H and J to turn destructive backspace on and off.4. Press ENTER to quit.
� Memory ManagementThe memory of your Digital Diary is designed to make your normal data input andrecall operations as quick and efficient as possible. After repeated storage anddeletion of data, however, you may find that you are unable to store new data, evenafter you have deleted some data from memory. When this happens, you need toperform the following “memory management” procedure, which cleans up andrearranges unused memory to make it available for storage of more data. Note thata memory management operation does not affect all the data in memory. It affectsonly part of the data.
NoteWhen you need to perform memory management depends entirely on how often youdelete data from memory and store new data. The more you delete and store, thesooner you will need to perform the memory management procedure.
To perform memory management1. Press SHIFT FUNCTION and then select “Memory management”.
2. Press Y to start memory management or N to abort.• Memory management takes up to three minutes to complete. Do not operate the
unit during that time.

Home Time Mode
The time kept in the Home Time Mode is used for control of various time basedfunctions.
To enter the Home Time ModePress the HOME/WORLD key once.
To set your Home Time zone1. In the Home Time Mode, press FUNCTION and then select “Time zone change”.2. Use K and L to scroll through the city names.
• See page 25 for a complete list of time zones.
3. When the city you want is displayed, press ENTER.• You can change your Home Time zone later if you like. When you do, only the
zone changes, without affecting the time or date setting.
To set the time and date1. In the Home Time Mode, press FUNCTION and then select “Time set”.
• The hour setting flashes on the display.• Use H and J to move the flashing selection around the display.
2. Input numbers for the year, month, day, hour, and minutes.• Input the year as four digits in the range of 1901 through 2099.• Use 12-hour or 24-hour format depending on the Home Time format (page 21).• All illegal input is ignored.
3. With 12-hour time format, press A for AM or P for PM.4. Press ENTER to quit.
• Pressing ENTER resets the seconds count to “00”.

– 21 –
To switch between standard time and daylight saving timeIn the Home Time Mode, press FUNCTION and then select “Daylight savings”.
• This toggles to the opposite setting and returns to the Home Time Mode screen. indicates daylight saving time.
To switch between 12-hour and 24-hour timekeepingIn the Home Time Mode, press FUNCTION and then select “12/24 hours”.
• This toggles to the opposite setting and returns to the Home Time Mode screen.The AM/PM indicator indicates 12-hour timekeeping.
• The time format you select is applied for all modes.
To select the date format1. In the Home Time Mode, press FUNCTION and then select “Date format”.2. Select the date format that you want to use.
• The following shows and example of each format
[1] Month/Date/Year: JAN 1, 2000 (SAT)[2] Date/Month/Year: 1 JAN, 2000 (SAT)[3] Year/Month/Date: 2000/1/1 (SAT)
• The date format you select is applied in all modes.
� Using the Daily AlarmThe Daily Alarm, it sounds at the same time every day for 20 seconds and the DailyAlarm screen appears.
To change the Daily Alarm time1. In the Home Time Mode, press FUNCTION and then select “Daily alarm set”.
• The hour setting flashes on the display.• Use H and J to move the flashing.
2. Input numbers for the hour and minutes.• All illegal input is ignored.
3. For 12-hour time format, press A for AM or P for PM.4. Press ENTER to quit.
• Pressing ENTER automatically turns on the alarm.
To turn the Daily Alarm on and off1. In the Home Time Mode, press FUNCTION and then select “Daily alarm sound”.2. Use H and Jto turn the Daily Alarm on and off.3. Press ENTER.

– 22 –
How the Daily Alarm worksThe daily alarm sounds at the alarm time you set. A snooze feature sounds the alarmmore than once, helping to make sure you don’t oversleep or miss an appointment.
About the snooze featureThe snooze feature activates (and the SNOOZE indicator appears on the display) ifyou do not press any key or if you press the SPACE key after the Daily Alarm startsto sound.
• If you do not press any key, the alarm stops after 20 seconds, and sounds twomore times every 10 minutes. In this case (you do not press any key), the alarmsounds a total of three times and then stops.
• Pressing the SPACE key while an alarm is sounding stops the alarm and resetsthe snooze feature for three more alarm operations spaced at 10-minuteintervals.
• Pressing any key besides the SPACE key while an alarm is sounding stops thealarm and cancels the snooze feature, so the alarm does not sound again untilan alarm time is reached.
NoteNote the following important points when you are using the Daily Alarm.
• If the alarm time is reached during data communications, the alarm does notsound until you complete the communications procedure.
• The alarm may fail to sound if battery power is too low.

– 23 –
World Time Mode
With World Time you can view the current time in time zones around the world.
To enter the World Time ModePress the HOME/WORLD key twice. From the Home Time Mode, press HOME/WORLD only once.
• Every time you press HOME/WORLD, the Digital Diary switches between theHome Time Mode and World Time Mode.
To scroll through World Time Mode zonesIn the World Time Mode, use K and L to scroll from zone-to-zone.
• Hold down either button to scroll at high speed.
To change a World Time zone’s settings1. In the World Time Mode, display the zone you want.2. Press FUNCTION.3. Switch between 12/24 hour (page 21), switch between standard and daylight
saving time (page 21), and set the date format (page 21).• Timekeeping format and date format settings are applied to all World Time zones
and to the Home Time Mode.• The standard/daylight saving time setting is applied to the currently selected time
zone only.• See page 24 for details on using the Zone Change function menu item.
Hours different from Home Time zone
Current World Time setting
– 24 –
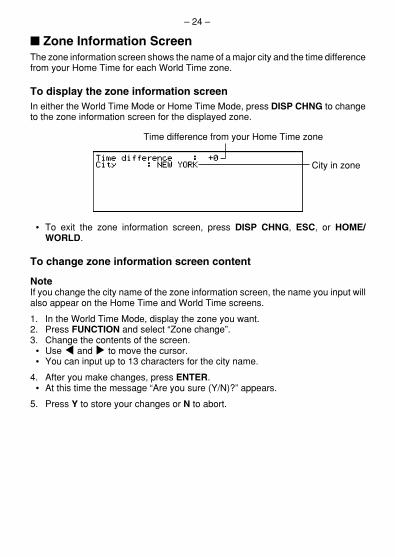
� Zone Information ScreenThe zone information screen shows the name of a major city and the time differencefrom your Home Time for each World Time zone.
To display the zone information screenIn either the World Time Mode or Home Time Mode, press DISP CHNG to changeto the zone information screen for the displayed zone.
• To exit the zone information screen, press DISP CHNG, ESC, or HOME/WORLD.
To change zone information screen content
NoteIf you change the city name of the zone information screen, the name you input willalso appear on the Home Time and World Time screens.
1. In the World Time Mode, display the zone you want.2. Press FUNCTION and select “Zone change”.3. Change the contents of the screen.
• Use H and J to move the cursor.• You can input up to 13 characters for the city name.
4. After you make changes, press ENTER.• At this time the message “Are you sure (Y/N)?” appears.
5. Press Y to store your changes or N to abort.
Time difference from your Home Time zone
City in zone

– 25 –
City List
Time Differ-ence
City Name Other Cities in Zone
MidwayHonoluluAnchorageLos AngelesDenverChicagoNew YorkSantiagoR. de JaneiroF. de NoronhaAzoresLondonRomeJerusalemMoscowAbu DhabiKarachiDhakaBangkokHong KongTokyoSydneyNoumeaAuckland
– 06– 05– 04– 03– 02– 01+ 00+ 01+ 02+ 03+ 04+ 05+ 06+ 07+ 08+ 09+ 10+ 11+ 12+ 13+ 14+ 15+ 16+ 17
San Francisco, Seattle, Las VegasEl PasoDallas, Mexico City, HoustonWashington D.C., Boston, MontrealCaracasSao Paulo, Buenos Aires
Greenwich Mean TimeParis, Madrid, Amsterdam, BerlinCairo, Athens, Helsinki, BeirutJeddah, Kuwait, NairobiDubai
Jakarta, HanoiBeijing, Taipei, Singapore, ManilaSeoul, PyongyangGuamPort VilaWellington
• The time difference values in the above table are what would appear whenNew York is set as the home time.

Data Bank Operations
This part of the manual tells you how to input and edit text, and how to protect yourpersonal data with a password.
� Inputting TextInput or correction is performed at the current cursor location.
About “data items” and “entries”
The above shows a typical Telephone Directory data item, which is made up of anumber of entries. When you are inputting data, prompts appear on the display to tellyou what entry needs text input.
To move the cursor around the screenUse K, L, H, and J.
Note• The maximum number of characters you can input for each data item is 511,
including newline symbols and separator marks (page 27).
To input letters and numbersPress the key that is marked with the letter or number.
To input upper-case lettersPress CAPS to switch between upper-case and lower-case letters. The “CAPS”indicator shows the keyboard is shift-locked for upper-case letters.
Data item

– 27 –
To shift the keyboardPress SHIFT to temporarily shift the keyboard. The indicator “SHIFT” on the screenshows that the keyboard is shifted.If the keyboard is set for upper-case letters (by the CAPS key), pressing SHIFTchanges to lower-case. As soon as you input one character, the keyboard unshifts.
To input punctuation marks and other symbolsPress CODE and then any key marked with the punctuation or symbol you want toinput. The “CODE” indicator shows that the CODE key was pressed.
To input accented charactersExample: To input É
CODE W E
Newline symbols and separator marksEach press of B inputs a newline symbol ( ).Don’t confuse the newline symbol with the separator mark ( ), which is automati-cally added at the end of data that you are inputting when you press ENTER toadvance to the next entry.Separator marks are not shown when you recall data.
To change one character to another1. Move the cursor to the character you want to change.2. Input the character you want to change to.
To delete a character1. Move the cursor to the character you want to delete.2. Press DEL.
To insert characters1. Move the cursor to the location of the insertion.2. Press INS.
• Each press of INS opens up a space at the cursor location.
3. Input the characters you want in the space.
� Inputting Dates and Times
General• Use the cursor keys to move the cursor.

– 28 –
Times• Use the 12-hour/24-hour format setting of the Home Time.• With 12-hour format, press A for AM or P for PM.
Dates• Use the preset date format (page 21).• The year input range is 1901 through 2099.
� Display FormatsTwo display formats (data display format and index display format) are used.Press DISP CHNG to switch between the index and data display formats.
Data Display Format (Telephone Directory)
• The data display format shows all the entries.• Use K and L to scroll line-by-line.
Index Display Format (Telephone Directory)
• The index display format shows a list of one or two entries only.• The item that is in the top line is the one that is currently selected.• Use K and L to scroll up and down.
Currentlyselected item
Main entry

– 29 –
Telephone Directory Mode
Telephone Directory data is automatically sorted according to name entries.
To enter the Telephone Directory Mode1. Press TEL to display the initial Telephone Directory Mode screen.
2. Press TEL again to change to another telephone file.• Each press of TEL changes the file in the following sequence.
TEL-1 TEL-2 TEL-3
To input Telephone Directory data1. Use TEL to display the initial screen of a Telephone Directory file.2. Input the name last name first and press ENTER.3. Input any telephone numbers, company name, address, e-mail address, and
note or title, pressing ENTER after each one.• Prompts appear on the display telling you what to input.• After the last entry, pressing ENTER stores the data and returns to the index
display (page 28).• Data is automatically sorted alphabetically according to the name entry.
Note• You must input a name. After that, you can skip any entry by pressing ENTER
without inputting anything.
To change a file title1. Use TEL to display the initial screen of a Telephone Directory file.2. Press FUNCTION and then select “File title”.
Number of records stored in area
Initial prompt
Memoryusage
File title

– 30 –
3. Input up to 13 characters for the title.• See page 26 for details on how to input characters.
4. Press ENTER to quit.
To specify Telephone Directory Mode index display contents1. Press TEL to display the initial Telephone Directory Mode screen, and then press
K, L, “, or ‘ to change to the index display.2. Press FUNCTION and then select “List type”.
3. Press the number key that corresponds to the entry you want to appear on theindex display.
• The unit changes back to the index display showing the data you specified.
� Record SummaryThe record summary provides an overview of each Telephone Directory file.
To display the record summaryIn the Telephone Directory Mode, press FUNCTION and then select “Recordsummary”.Press ESC to return to the original Telephone Directory Mode display.
Current filetitle
Cursor
File title Number ofrecordsstored

– 31 –
Memo Mode
Memo data is stored in the sequence it is input, without sorting.
To enter the Memo Mode1. Press MEMO to display the initial Memo Mode screen.
2. Press MEMO again to change to another Memo Mode file.• Each press of MEMO changes the file in the following sequence.
MEMO-1 MEMO-2 MEMO-3
To input Memo Mode data1. Use MEMO to display the initial screen of a Memo Mode file.2. Input the first line and press B.
• A newline symbol is inserted and the cursor goes down to the next line.
3. Input the rest of your memo.4. Press ENTER to quit and return to the index display (page 28).
To change a file titleUse the same procedure as that described for changing a Telephone Directory filetitle on page 29.
� Record SummaryThe record summary provides an overview of each Memo Mode file.
To display the record summaryIn the Memo Mode, press FUNCTION and then select “Record summary”.Press ESC to return to your original Memo Mode display.
Number of records stored in area
Memoryusage
File title
Initial prompt

Highlighteddate
Week/Day/Remaining days
Calendar Mode
The Calendar displays calendars from January 1901 through December 2099.• Pressing SCHEDULE in the Calendar Mode enters the Schedule Keeper Mode
for the date selected on the Calendar Mode Screen.• If the date cursor is located at a date that includes Reminder Mode data, pressing
REMINDER enters the Reminder Mode for that date.
To enter the Calendar ModePress CALENDAR.
• The current date (according to the Home Time setting) is selected by the datecursor.
� Maneuvering Around CalendarsThe following describes the basic operations for maneuvering around the calendars.
• Use K, L, H and J to move the date cursor. Holding down any of these keysmoves the date cursor at high speed.
• Press “ to move the date cursor to the first of the previous month, and ‘ to moveto the first of the following month.
To jump to a specific date1. In the Calendar Mode, press FUNCTION and then select “Date search”.
Afternoon appointment
Morning appointment Current date (flashing)

– 33 –
2. Input the month, day and year and then press ENTER.
To jump a specific number of days1. In the Calendar Mode, move the date cursor to the start date.2. Press ! (forward) or @ (backward).
3. Input the number of days you want to jump and then press ENTER.• You can input a value in the range of 0 to 999.
4. Press Y to include holidays or N to exclude holidays.• A holiday is any highlighted date.
About the “active” calendarThe calendar in the center of the display is the “active” calendar. All Calendar Modeoperations are performed on the active calendar.
� Appointment MarkersAppointment markers appear next to each date that contains data in the ScheduleKeeper Mode or Reminder Mode.
Morning Schedule Keeper appointment data
Reminderdata
Afternoon Schedule Keeper appointment data

– 34 –
� Highlighting Calendar DatesYou can highlight calendar dates to indicate holidays or other special events toremember.
To highlight and unhighlight individual dates1. Move the date cursor to the date.2. Press SPACE to highlight or unhighlight the date.
To highlight days of the week for multiple weeksExample: To highlight all Sundays from July 2000 to December 2001.1. In the Calendar Mode, press FUNCTION and then select “Weekly holiday set”.
2. Input the start month (7) and year (2000), and the end month (12) and year(2001).
3. Press ENTER.• SUN is flashing because it is selected.
4. Use H and J to move the flashing. Press SPACE to highlight or unhighlight aday of the week.
• You can specify (highlight) as many days of the weeks as you like.
5. After selecting the days you want, press ENTER.• You can unhighlight any date by selecting it with the date cursor and pressing
SPACE.
To clear days of the week for multiple weeks1. In the Calendar Mode, press FUNCTION and then select “Weekly holiday clear”.2. Input the start month and year, and the end month and year, and then press
ENTER.• At this time the message “Are you sure (Y/N)?” appears.
3. Press Y to unhighlight, or N to abort.
Starting month
Ending month

– 35 –
� Working Day CountUse the following procedures to count the number of working days.
To count working days1. Move the date cursor to the start day.2. Press FUNCTION and then select “Working day count”.
3. Use the K, L, H and J to move the date cursor.• The count changes whenever you move the date cursor.• The date cursor does not stop at highlighted dates, and highlighted dates are
never counted.• If you move the date cursor to a date before the starting date, the working day
count is negative.
� Weekly Schedule ScreenA weekly schedule screen that lets you see everything for an entire week at a glance.
To display the weekly schedule screen1. In the Calendar Mode, move the date cursor to the week you want to view.2. Press DISP CHNG.
• Use H and Jto move the date cursor day-by-day, K and L to jump week-by-week, or “ and ‘ to jump month-by-month.
3. Press ESC to return to the calendar screen.
Starting date
Currently selected dateCount
Part of a multiple-day schedule
Other Schedule Keeper or Reminder events
Selected day (flashing) Appointment scheduled during this time

Schedule Keeper
The Schedule Keeper lets you input the time and a description of your appointmentand set Schedule Alarms.
• Pressing REMINDER in the Schedule Keeper Mode enters the Reminder Modefor the date that is currently selected in the Schedule Keeper Mode. PressingCALENDAR displays the month with the date cursor located at the ScheduleKeeper date.
To enter the Schedule Keeper ModePress SCHEDULE to display the initial Schedule Keeper Mode screen.
• Pressing SCHEDULE in the Calendar Mode displays the Schedule Keeper forthe date where the date cursor is located inside the calendar or weekly schedulescreen.
� Maneuvering Around Schedule Keeper DatesThe following describes the basic operations for selecting a date to input ScheduleKeeper data.
• Use K, L, H and J to move the date cursor. Holding down any of these keysmoves the date cursor at high speed.
• Press “ to move the date cursor to the first of the previous month, and ‘ to moveto the first of the following month.
Memoryusage
Mode
Initial prompt
Number of records stored in modeDate cursor (flashing)

– 37 –
To jump to a specific date1. In the initial Schedule Keeper Mode screen, move the date cursor to the date to
which you want to jump.2. Press ENTER.
• You can also go to a specific date selecting “Date search” (page 51) in theFunction Menu which you can enter by pressing FUNCTION.
To scroll from one date to anotherWhile the Schedule Keeper screen for a date is already displayed, press K or “ toscroll back to the previous date. Pressing L or ‘ scrolls to the following date.
• If the date that is displayed contains more than one Schedule Keeper data entry,the above keys scroll through the data one-by-one. The above key operationschange the date only when the first (top) or last (bottom) data item is on thedisplay.
To input Schedule Keeper data1. Display the Schedule Keeper screen for the date where you want to input data.2. Input the description of the appointment.
• Even if there is already schedule data on the display, simply start inputting thedescription and the previous data will disappear.
3. Press K and the schedule type specification starts to flash.• Do not press “ or ‘. Doing so will start a search using the text you input (page
50).
4. Press H or J to display the schedule type selection menu.
• If you do not want to change the default setting of Schedule Type 1, press Kagain without pressing H or J.
5. Input a value from 1 to 8 to specify a schedule type and return to the ScheduleKeeper display.
6. Press K and the starting time specification starts to flash.7. Input the start time and end time of the appointment.
• Use the 12-hour/24-hour format of the Home Time (page 21).• If you want to input only a start time, don’t input anything for the end time (leave
it the same as the start time). Note, however, that you cannot add a start time andend time once you save the Schedule Keeper item without them.

– 38 –
8. After you finish inputting the start and end time, press J to move to the alarmtime. Use K and L to select the alarm time type and input an alarm time, ifnecessary.
• While the alarm time is selected, pressing K and L selects one of three alarmtypes.Same-day alarm: This type of alarm is indicated when the first alarm time thatappears is the same as the appointment start time input by you in step 7. This isthe only type of alarm that allows you to set a time.Previous-day alarm: This type of alarm is indicated when the first alarm time thatappears is “-24:00”. This type of alarm sounds 24 hours before the start time ofthe appointment start time input by you in step 7.No alarm: When there is no time shown for the alarm time, it means that no alarmis set.
9. After making the alarm time settings you want, press ENTER to move back to theschedule type.
10. While the cursor is in the description text, press ENTER to store all the data.
Note• You must input a description. After that, you can skip any input by pressing
ENTER without inputting anything.
� Schedule AlarmsAn alarm sounds for 20 seconds and the corresponding Schedule Keeper dataappears on the display. Note the following important points when you are using aSchedule Alarm.
• The snooze feature is applied to the same-day alarm also just like the DailyAlarm. See “About the snooze feature” on page 22 for details.
• The alarm indicator and time are automatically cleared after the alarm time isreached.
• If the alarm time is reached during data communications, the alarm does notsound until you complete the communications procedure.
• The alarm may fail to sound if battery power is too low.
� How Schedule Keeper Data is SortedThe following shows how Schedule Keeper data is sorted within each date.1. By date2. By time within the same date(data without time comes first)

– 39 –
� Schedule Type Labels and IconsSchedule Keeper Mode data includes an icon and a schedule type label. Initially,schedule types are labelled “SCH TYPE 1” through “SCH TYPE 8”, and the initialdefault schedule type icon is .
To change schedule type labels and icons1. Press SCHEDULE to display the initial Schedule Keeper Mode screen.2. Press FUNCTION and then select “Define type”.3. Use K and L to move the pointer to the schedule type you want to change.4. Input up to 13 characters for the new label you want to use.
• Skip this step if you don’t want to change the label or if you want to wait until afteryou change the schedule type icon.
5. Press DISP CHNG to display the menu of schedule type icons.• If you do not want to change the icon assigned to this schedule type, skip steps
5 through 7.
6. Use K, L, H and J to move the cursor to the icon you want to use. Use “and ‘ to move between menu screens.
7. When the icon you want is selected, press ENTER to register it and return to theschedule type menu.
8. Press ENTER to store all your changes and return to the initial Schedule KeeperMode display.
• You could change the schedule type label before pressing ENTER in step 8 if youhave not already done so.
To specify Schedule Keeper Mode index display contents1. Display the Schedule Keeper screen for a date, and then press ESC to change
to the index display.2. Press FUNCTION and then select “List type”.
3. Use K and L to move the pointer next to the schedule type you want to change,and then use H and J to change the setting.
• Schedule types set to “Yes” appear in the index display, while those set to “No”do not.
4. Press ENTER to quit and return to the index display.
Pointer (selected type)Marker(current setting)

– 40 –
� Daily Schedule ScreenThe daily schedule screen provides a quick overview of appointments scheduled forthe day.
You should use the daily schedule screen to input multiple-day appointments.
To display the daily schedule screen1. In the Schedule Keeper Mode, display the screen for the date whose schedule
you want to view.2. Press DISP CHNG to change to the daily schedule screen.
• Use H and J to move the date cursor day-by-day, K and L to jump week-by-week, or “ and ‘ to jump month-by-month.
3. Press DISP CHNG to return to the Schedule Keeper data screen.
To input multiple-day schedule data1. Display the Schedule Keeper Mode daily schedule screen.2. Press FUNCTION and then select “Set multi day schedule”.
3. Input the starting date and the ending date, and then press ENTER.4. Input the description of the appointment and specify the schedule type (page 37).
• Note that you cannot specify start time, end time, or alarm time for multiple-dayschedule data.
Normal appointment (includes time and description)
Appointment without time
Date cursorMultiple-day appointment

– 41 –
Reminder Mode
The Reminder Mode helps you keep track of anniversaries, birthdays, and otherimportant events.
To enter the Reminder ModePress REMINDER to display the initial Reminder Mode screen.
• Pressing REMINDER in the Calendar Mode or Schedule Keeper Mode entersthe Reminder Mode for the date selected in the Calendar Mode or ScheduleKeeper Mode.
To input Reminder data1. Press REMINDER to display the initial Reminder Mode screen.2. After moving the date cursor to the date which you want, press any letter key or
ENTER to change to the data input screen.3. Use K and L to select the alarm time type and input an alarm time, if necessary.
• The alarm types are the same as those for the Schedule Keeper Mode. See page38 for details.
• If you select a previous-day alarm (alarm setting of -24:00), the alarm sounds atnoon the day before date you specified for the Reminder Mode data item.
4. After setting the alarm, press ENTER to advance to icon input.• At this time the icon in the upper right of the display starts to flash.
5. Press H or J to display the icon menu.• If you do not want to change the icon, skip steps 6 and 7.
6. Use K, L, H and J to move the flashing cursor to the icon you want to use.7. When the icon you want is selected, press ENTER to register it and return to the
Reminder input screen.8. Input a description of the Reminder.9. While the cursor is in the description area, press ENTER to store all the data.
Memoryusage
Date cursor (flashing)ModeNumber of recordsstored in mode
Initial prompt

– 42 –
Note• You must input a description. After that, you can skip any input by pressing
ENTER without inputting anything.
� Reminder AlarmsWhen a Reminder Alarm time is reached, an alarm sounds for 20 seconds and thecorresponding Reminder data appears on the display. Press any key to stop thealarm and return to the screen that was shown before the alarm began to sound. Notethe following important points when you are using a Reminder Alarm.
• The snooze feature is applied to the same-day alarm also just like the DailyAlarm. See “About the snooze feature” on page 22 for details.
• If the alarm time is reached during data communications, the alarm does notsound until you complete the communications procedure.
• The alarm may fail to sound if battery power is too low.

– 43 –
To Do Mode
You can classify items according to priority, and even input a To Do message andicon.
To enter the To Do Mode1. Press TO DO to display the initial To Do Mode screen.
2. Press TO DO again to change to another To Do file.• Each press of TO DO changes the file in the following sequence.
TO DO-1 TO DO-2 TO DO-3
To input To Do data1. Use TO DO to display the initial screen of a To Do file.2. Press any alphanumeric key to change to the data input screen.3. Input the date for the item and then press ENTER to move to the priority.4. Press Hor J to display a menu of priority levels.5. Input a number from 1 to 8 to assign a priority.6. Press ENTER to advance to the description and then input text.7. While the cursor is in the description area, press ENTER to store all the data.
Note• You must input a description. You can skip any input by pressing ENTER without
inputting anything.
Initial prompt
Memoryusage
File titleNumber of recordsstored in area

– 44 –
To change a file title1. Use TO DO to display the initial screen of the To Do Mode file whose title you want
to change.2. Press FUNCTION and then select “File title”.
3. Input up to 13 characters for the title.4. After you finish, press ENTER.
To specify To Do Mode index display contents1. Press TO DO to display the initial To Do Mode screen, and then press K, L,
“ or ‘ to change to the index display.2. Press FUNCTION and then select “List type”.
3. Use K and L to move the pointer next to the priority you want to change, andthen use H and J to change the setting.
• To Do Mode entries of a priority set to “Yes” appear in the index display, whilethose with priorities set to “No” do not.
4. Press ENTER to quit and return to the index display.
� Record SummaryThe record summary provides a quick view of how many data items are stored in eachTo Do Mode file.
Cursor Current file title
Pointer (selected type)
Marker (current setting)

– 45 –
To display the record summaryIn the To Do Mode, press FUNCTION and then select “Record summary”.Press ESC to return to your original To Do Mode display.
� How To Do Data is SortedTo Do data is sorted into chronological order when it is stored in memory.
� Priority IconsTo Do Mode priorities are assigned icons that appear on the screen whenever youassign a priority.
To priority icons1. Press TO DO to display the initial To Do Mode screen.2. Press FUNCTION and then select “Define type”.
3. Use K and L to move the pointer to the priority whose icon you want to change.4. Press DISP CHNG to display the menu of priority icons.5. Use K, L, H and J to move the cursor to the icon you want to use.6. When the icon you want is selected press ENTER to register it and return to the
priority menu.7. Press ENTER to return to the initial To Do Mode display.
To check and uncheck a To Do item1. Display the initial To Do Mode screen and press “ or ‘ to display the index
display.2. Move the item you want to check or uncheck in the top line of the display.3. Press ENTER to check or uncheck the item.
• You can also perform the above operation using the data display. Display thedata display of the item you want to check or uncheck, and then press ENTER.
• You can delete all checked items by performing the procedure under “To deleteall marked data items” (page 55) while in the To Do Mode.
Pointer

Expense Manager Mode
With the Expense Manager you can store expense data and produce a report thatshows totals for any specific period.
To enter the Expense Manager Mode
1. Press EXPENSE to display the initial Expense Manager Mode screen.
2. Press EXPENSE again to change to another Expense Manager file.• Each press of EXPENSE changes the file in the following sequence.
EXPENSE-1 EXPENSE-2 EXPENSE-3
To input Expense Manager data1. Use EXPENSE to display the initial screen of an Expense Manager file.2. Press any alphanumeric key to change to the data input screen.3. Input the date of the expense and press ENTER to advance to the expense type.
• You can also start data input while the Expense Manager index display or datadisplay is on the screen by pressing FUNCTION and then selecting “Dailyexpense”.
4. Press H or J to display a menu of expense types.5. Select an expense type and then press ENTER to advance to the amount.
• The icon assigned to the expense type you select appears on the screen.
6. Input the amount of the expense and press ENTER to advance to the paymenttype.
7. Press H or J to display a menu of payment types.8. Select the payment type and then press ENTER to advance to the receipt
indication.
Initial prompt
Memoryusage
File titleNumber of recordsstored in area

– 47 –
9. Press H or J to toggle between “Yes” and “No”, and then press ENTER toadvance to the note area.
10. Input any text you want as a memo.11. While the cursor is in the note area, press ENTER to store all of the data.
To change a file title1. Use EXPENSE to display the initial screen of an Expense Manager file.2. Press FUNCTION and then select “File title”.
3. Input up to 13 characters for the title.4. Press ENTER to quit.
� Expense Type Labels and IconsExpense type data includes an icon and a label.
To change expense type labels and icons1. Press EXPENSE to display the initial Expense Manager Mode screen.2. Press FUNCTION and then select “Expense types”.
3. Use K and L to move the pointer to the expense type you want.4. Input up to 13 characters for the label.
• Skip this step if you don’t want to change the expense type label or if you wantto wait until after you change the expense icon.
5. Press DISP CHNG to display the menu of expense icons.• If you do not want to change the icon assigned to this expense type, skip steps
5 through 7.
Cursor Current file title
Pointer

– 48 –
6. Use K, L, H and J to move the flashing cursor to the icon you want to use.7. When the icon you want is selected press ENTER to register it and return to the
expense type menu.8. Press ENTER to store all your changes and return to the initial Expense Manager
Mode display.• You could change the expense type label before pressing ENTER in step 8 if you
have not already done so.
To specify Expense Manager Mode index display contents1. Press EXPENSE to display the initial Expense Manager screen, and then press
K, L, “, or ‘ to change to the index display.2. Press FUNCTION and then select “List expense type”.
3. Use K and L to move the pointer to the expense type you want to change, andthen use H and J to change the setting.
• Expense types set to “Yes” appear in the index display, while those set to “No”do not.
4. After you are finished, press ENTER to return to the index display.
� Payment Type LabelsPayment type data includes a label that appears on the screen whenever you displaythe expense data.To change these labels, use the procedure under “To change expense type labelsand icons” on page 45. The only difference is that you select “Payment types” in step2, and you skip steps 5 through 7 (because there are not payment type icons).
� Exchange RateThe expense total in the periodic report is multiplied by the exchange rate value toproduce the “Converted” item amount.
Pointer (selected type)
Marker (current setting)
– 49 –
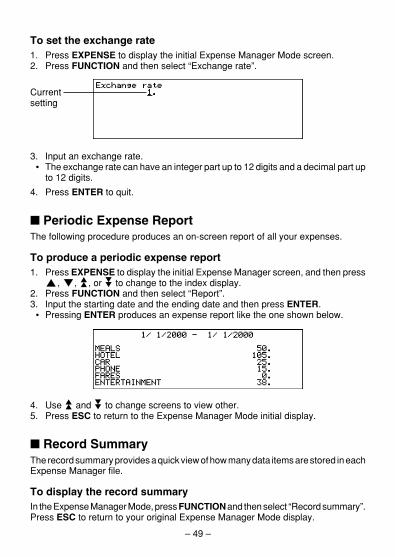
To set the exchange rate1. Press EXPENSE to display the initial Expense Manager Mode screen.2. Press FUNCTION and then select “Exchange rate”.
3. Input an exchange rate.• The exchange rate can have an integer part up to 12 digits and a decimal part up
to 12 digits.
4. Press ENTER to quit.
� Periodic Expense ReportThe following procedure produces an on-screen report of all your expenses.
To produce a periodic expense report1. Press EXPENSE to display the initial Expense Manager screen, and then press
K, L, “, or ‘ to change to the index display.2. Press FUNCTION and then select “Report”.3. Input the starting date and the ending date and then press ENTER.
• Pressing ENTER produces an expense report like the one shown below.
4. Use “ and ‘ to change screens to view other.5. Press ESC to return to the Expense Manager Mode initial display.
� Record SummaryThe record summary provides a quick view of how many data items are stored in eachExpense Manager file.
To display the record summaryIn the Expense Manager Mode, press FUNCTION and then select “Record summary”.Press ESC to return to your original Expense Manager Mode display.
Currentsetting

Searching for Data
This section explains everything you need to know about searching for and recallingdata.
� Scroll SearchScroll search can be used in the Telephone Directory, Memo, Schedule Keeper,To Do, and Expense Manager modes.
To recall data using scroll search1. Display the initial screen of the mode where you want to search.2. Press “ or ‘ to change to the index display (page 28).
• If you are in the Schedule Keeper, press ENTER and then ESC.
3. Use K and L to scroll line-by-line. Use “ and ‘ to scroll screen-by-screen.4. When the item you want is located in the top line of the index display, press
DISP CHNG to change to the data display (page 28).5. Use K, L, “, and ‘ to scroll through the data on the display.
� Initial Character SearchInitial character search can be used in the Telephone Directory, Memo, ScheduleKeeper, Reminder, Expense Manager and To Do modes.
To recall data using initial character search1. Enter the mode where you want to search for data.
• Initial character search can be started from the initial screen, the index display,or the data display.
2. Input the first few characters of the text entry you want to find and press “ or ‘.• When you press “ or ‘, the Digital Diary displays a data display of the first data
item in which the initial characters of the text entry (name, description, etc.) matchyour input characters. If you input “J” in the Telephone Directory Mode, forexample, you will recall such names as Jones, Jackson, Johnson, etc.
3. Use “ and ‘ to scroll between matching data items when there is more than onematch.

– 51 –
� Wild Card SearchWild card search can be used in the Telephone Directory, Memo, Schedule Keeper,Reminder, and To Do modes.
To recall data using wild card search1. Enter the mode where you want to search for data.
• Wild card search can be started from the initial screen, the index display, or thedata display.
2. Press FUNCTION and then select “Wild card search”.3. Input some characters and press ENTER.
• When you press ENTER, the Digital Diary displays a data display of the first dataitem that has a match of your characters anywhere. If you input “E” in theTelephone Directory Mode, for example, you would recall such names asEVENS, EMILY, PETE, SYLVESTER, etc.
4. Use “ and ‘ to scroll between matching data items when there is more than onematch.
� Date SearchDate search can be used in the Schedule Keeper and Reminder modes.
To recall data using date search1. Enter the mode where you want to search for data.
• Date search can be started from the initial screen, the index display, or the datadisplay.
2. Press FUNCTION to display the function menu, and then select “Date search”.3. Input the date and press ENTER.
• When you press ENTER, the Digital Diary displays the date you specified.• In the Reminder Mode, the date is displayed only if it contains data. If the date
you specified does not contain any data, the message “NOT FOUND! PRESSESC TO QUIT.” appears on the display.
• In the Schedule Keeper Mode, the screen for the date you specify appears,regardless of whether or not it contains data.

Editing Data
The procedures described here can be used in the Telephone Directory, Memo,Schedule Keeper, Reminder, To Do, and Expense Manager modes.
To edit data1. Enter the mode that contains the data you want to edit, and recall the data (page
50).2. Change to the data display.3. Press FUNCTION and then select “Edit record”.4. Make any changes in the data that you want.5. Press ENTER to quit.
Notes• With Schedule Keeper data, you cannot use the above procedure to add start,
end, and alarm times to existing data items. You can, however, change existingstart, end, and alarm times.
• With the Reminder data, you can use the above procedure to add an alarm time.

– 53 –
Deleting Data
Use these procedures to delete data.
� Deleting a Single Data ItemThis procedure can be used in the Telephone Directory, Memo, Schedule Keeper,Reminder, To Do, and Expense Manager modes.
To delete a single data item1. Enter the mode that contains the data you want to delete, and recall the data
(page 50).• If you are using the index display (page 28), move the data item into the first line
of the index display.• If you are using the data display (page 28), simply display the item.
2. Press DEL and the message “DELETE RECORD (Y/N)?” appears on thescreen.
• Instead of pressing DEL, you could press FUNCTION and then input the correctnumber of select “Delete record” (“Delete selected record” in the Expense ManagerMode).
3. Press Y to delete, or N to abort.
� Deleting All Data Items In a ModeThe procedure you should use depends on whether the mode whose data items youare deleting has multiple files (Telephone Directory, Memo, To Do, ExpenseManager) or not (Schedule Keeper, Reminder).
To delete all data items from a multiple file mode (TelephoneDirectory, Memo, To Do, Expense Manager)1. Display the initial screen of the mode that contains the data you want to delete.
• You can display the initial screen for any file.
2. Press FUNCTION and then select “Delete all files”.
Marker (current setting)Pointer (selected file)

– 54 –
3. Use K and L to move the pointer to the file whose setting you want to change,and then use H and J to change the setting.
• Files set to “Yes” will be deleted, while those set to “No” will not.
4. Press ENTER.• At this time the message “Are you sure (Y/N)?” appears.
5. Press Y to delete or N to abort.
To delete all data items from a single file mode (Schedule Keeper,Reminder)1. Display the initial screen of the mode that contains the data you want to delete.2. Press FUNCTION and then select “Delete all records”.
• At this time the message “ARE YOU SURE (Y/N)?” appears.
3. Press Y to delete or N to abort.
To delete all listed records (Schedule Keeper)1. Specify the schedule types that you want to appear on the Schedule Keeper
Mode index display.• See “To specify Schedule Keeper Mode index display contents” on page 39.
2. While the Schedule Keeper Mode index display is on the screen, pressFUNCTION and then select “Delete listed records”.
• At this time the message “DELETE LISTED RECORDS (Y/N)?” appears.
3. Press Y to delete or N to abort.• Pressing Y deletes only the records whose schedule types you have specified in
step 1 for display in the index display.
Important!• Be sure to specify the contents of the Schedule Keeper Mode index display in
step 1 first. Otherwise, the above operation deletes all Schedule Keeper Modecontents.
� Deleting Marked Data Items OnlyThe To Do and Expense Manager modes let you mark specific data items fordeletion.
To mark data items for deletion1. Display the initial To Do or Expense Manager Mode screen and press “ or ‘ to
display the index display.2. Move the item you want to mark in the top line of the display.3. Press ENTER to mark or unmark the item.
• You can also perform the above operation using the data display. Display thedata display of the item you want to mark or unmark, and then press ENTER.

– 55 –
To delete all marked data items1. While the index display of the To Do or Expense Manager Mode is on the screen,
press FUNCTION and then select “Delete marked records”.• At this time the message “DELETE MARKED RECORDS (Y/N)?” appears.
2. Press Y to delete or N to abort.
� Deleting All Data Items In Specific ModesUse this procedure to delete all data items in selected modes.
To delete all data items in specific modes1. From any screen, press SHIFT FUNCTION and then select “Delete all”.
2. Use K and L to move the pointer next to the mode whose setting you want tochange, and then use H and J to change the setting.
• The files in modes set to “Yes” will be deleted, while those set to “No” will not.• If all modes are set to “Yes”, this procedure deletes all data in all modes.
3. After you are finished making the settings you want, press ENTER.• At this time the message “Are you sure (Y/N)?” appears.
4. Press Y to delete or N to abort.
Marker (current setting)
Pointer (selected type)

Secret Function
Your Digital Diary lets you protect data you store in the Telephone Directory, Memo,Schedule Keeper, Reminder, To Do, and Expense Manager modes (protectedmodes) with a password.
To register a password1. Press SHIFT FUNCTION and then select “Password”.
• At this time, “ENTER PASSWORD” appears on the display.
2. Input the password and press ENTER to register it.• A password can be up to 6 characters long. You can use any alphabetic characters
or numerals, commas, periods, or spaces inside a password. (A password cannotconsist of spaces only.) You cannot use characters produced with the CODE key.
• After you register a password, the password input screen clears and you returnto the screen you started from in step 1. The next time you turn the Digital Diaryon and try to enter a protected mode, the password input screen will appear andyou will have to input the registered password before you can access thesemodes.
To access protected modes1. Turn on Digital Diary power.2. Press the mode key for one of the protected modes.
• “INPUT PASSWORD” appears on the display.• If you were in a protected mode the last time you turned power off, “INPUT
PASSWORD” appears as soon as you turn on the Digital Diary.
3. Input the correct password and press ENTER.• If you input the wrong password, the password input screen remains on the
display.• Once you input your password, you will not have to input it again, even if you exit
a protected mode and then re-enter it later. Your password input remains validuntil you turn the Digital Diary off or until you manually lock memory (page 57).
To change the password1. Turn on the Digital Diary.
• “INPUT PASSWORD” appears on the display.
2. Input the correct password and press ENTER.

– 57 –
3. Press SHIFT FUNCTION and then select “Password”.
4. Select “Modify password”, which causes the currently registered password toappear.
5. Make any changes to the password you want, and then press ENTER to storethe new password.
To delete the password1. Turn on the Digital Diary.
• “INPUT PASSWORD” appears on the display.
2. Input the correct password and press ENTER.3. Press SHIFT FUNCTION and then select “Password”.4. Select “Delete password”, which causes a confirmation message to appear
asking if you really want to delete your password.5. Press Y to delete or N to abort.
• After you delete the password data, protected modes can be viewed by anyone.
To lock memory without turning power off1. While using the Digital Diary after you have input your password, press SHIFT
FUNCTION and then select “Password”.2. Select “Lock system”.
• Now when you try to enter another protected mode, the password input screenappears and you will have to input your password again.

Conversion Modes
Your Digital Diary actually gives you two conversion modes, one for metric conver-sion and one for currency conversion.
To enter the Conversion Modes1. Press CONV/GAME to display the initial Unit Conversion Mode screen.
2. Press CONV/GAME again to change to the Currency Conversion Mode (page59) and display the initial Currency Conversion Mode screen.
Equivalent(1 inch = 2.54cm)
Input/result area
Unit
Currency Conversion direction
Equivalent
Input/result area
Conversion direction

– 59 –
� Metric ConversionsAll conversion values in this mode are preset and cannot be changed.
inches — centimeters yards — metersmiles — kilometers feet — yardsknots — kilometers/h UK tons — kilogramsUS tons — kilograms pounds — kilogramsounces — grams carats — gramsUK gallons — liters US gallons — literscalories — joules horsepower — kilowattsCelsius — Fahrenheit
To perform a metric conversion1. Enter the Unit Conversion Mode.2. Use K and L to find the one you want to use.3. Use H and J to change the direction of the conversion.4. Input the value you want to convert from and press ENTER to display the
conversion result.5. If you want to view your original input value, press ENTER again.
� Currency ConversionsUse the Currency Conversion Mode to convert between various currencies. Thefollowing are the default currency names that the unit uses. You can change thedefault currency names to other currency names if you want.
USD — U.S. Dollar DM — Deutsche MarkGBP — British Pound ITL — Italian LiraFFR — French Franc YEN — Japanese Yen
Important!• Make sure you input the conversion rates you want to use before trying to perform
a currency conversion. The Digital Diary will not convert from one currency toanother until you do.
To change currency labels and rates1. Enter the Currency Conversion Mode.2. Use K and L to find the conversion pair you want to change.

– 60 –
3. Press FUNCTION to change to the editing screen.
4. Input up to five characters for the name of the first currency, and press ENTER.5. Input up to five characters for the name of the second currency, and press
ENTER.6. Input up to 12 digits for the integer and 12 digits for the decimal part for the rate
of the first currency, and press ENTER.7. Input up to 12 digits for the integer and 12 digits for the decimal part for the rate
of the second currency, and press ENTER to complete the procedure.• Note that one of the currency rates is normally set to 1. To set up a conversion
pair where 1 unit of Currency A equals 100 units of Currency B, you could useeither of the following.Currency A rate = 1 / Currency B rate = 100Currency A rate = 0.01 / Currency B rate = 1
• To leave either currency name or rate unchanged in the above procedure, simplypress ENTER without inputting anything.
To perform a currency conversion1. Enter the Currency Conversion Mode.2. Use K and L to find the one you want to use.3. Use H and J to change the direction of the conversion.4. Input the value you want to convert from and press ENTER to display the
conversion result.5. If you want to view your original input value, press ENTER again.
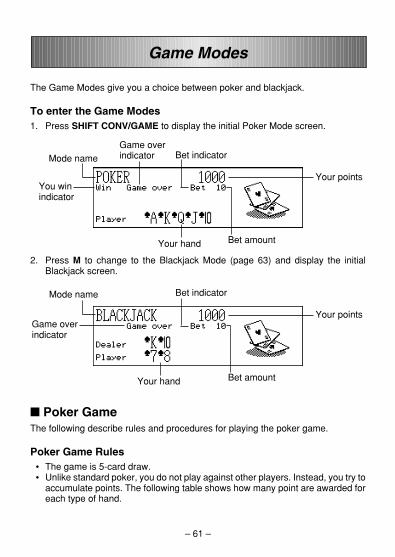
– 61 –
Game Modes
The Game Modes give you a choice between poker and blackjack.
To enter the Game Modes1. Press SHIFT CONV/GAME to display the initial Poker Mode screen.
2. Press M to change to the Blackjack Mode (page 63) and display the initialBlackjack screen.
� Poker GameThe following describe rules and procedures for playing the poker game.
Poker Game Rules• The game is 5-card draw.• Unlike standard poker, you do not play against other players. Instead, you try to
accumulate points. The following table shows how many point are awarded foreach type of hand.
You winindicator
Game overindicator Bet indicator
Your points
Your hand Bet amount
Mode name
Mode name
Game overindicator
Bet indicator
Your points
Bet amountYour hand

– 62 –
Note that no points are awarded for anything less than a pair of Jacks.• The relative value of the cards is meaningless. Two pair always scores the same
number of points, regardless of what cards make up the two pair.• Before cards are dealt to start each hand, you can change the bet amount to 10,
20, 30, 40, 50. The bet amount cannot be changed once a hand is dealt. The betamount is automatically deducted from your point total when each hand is dealt.
• You start with 1,000 points, and the maximum number of points you canaccumulate is 999,999. The game ends when your points reach zero or 999,999.
To play the poker game1. Enter the Poker Mode.2. Use B to declare the bet amount if you want.3. Press H to start the game.
• The first five cards are dealt.
4. Use number keys 1 through 5 to select which cards you want to keep (1 through5 from left to right).
• Pressing a number key causes the letter “H” (for “Hold”) to appear above thecorresponding card. To deselect a card, press its number button again so the “H”disappears.
• You can mark anywhere from no cards to all your cards.
5. After you select which cards you want to hold, press H.• The unmarked cards disappear and are replaced by new cards, and the hand
ends.
Type of Hand Bet 10 Bet 20 Bet 30 Bet 40 Bet 50
Royal Flush 2500 5000 7500 10000 12500
Straight Flush 500 1000 1500 2000 2500
Four of a Kind 250 500 750 1000 1250
Full House 80 160 240 320 400
Flush 50 100 150 200 250
Straight 40 80 120 160 200
Three of a Kind 30 60 90 120 150
Two Pair 20 40 60 80 100
One Pair (Jacks or better) 10 20 30 40 50

– 63 –
• If you win, the “Win” indicator appears and the number of points based on yourhand and the amount you bet are added to your point total (see the table).
• If you lose, the “Win” indicator does not appear and your point total remainsunchanged.
6. To play the next hand, continue from step 2, above.• Repeat the above procedure until you run out of points or until you score 999,999
points.
� Blackjack GameThe following describe rules and procedures for playing the blackjack game.
Blackjack Game Rules• The game is standard blackjack where you play against the dealer’s cards. The
Digital Diary is always the dealer.• Before cards are dealt to start each hand, you can change the bet amount to 10,
20, 30, 40, 50. The bet amount cannot be changed once a hand is dealt. The betamount is automatically deducted from your point total when each hand is dealt.
• You start with 1,000 points, and the maximum number of points you canaccumulate is 999,999. The game ends when your points reach zero or 999,999.
• You are offered the opportunity to insure (by the message “Insure” appearing onthe display) whenever the dealer’s first card is an ace. Press I to insure whenoffered. Insuring costs you one half of your original bet. If the dealer ends upgetting a blackjack, your insurance bet wins and your original bet loses (a push).If the dealer does not get blackjack, the insurance bet loses and you continue toplay your hand.
• You are offered the opportunity to double down (by the message “Double”appearing on the display) whenever your first two cards total 10 or 11. Press Dto double down when offered. Doubling down doubles your bet, and causes youto stand automatically after receiving one more card.
• You can surrender your hand by pressing Q at any time before you receive anycards after your original two. Surrendering immediately ends the hand and youforfeit half of the amount you bet.
• You can continue to draw more cards as long as the total of the cards you alreadyhave is less than 21.
• The dealer will always take a card when the dealer’s cards total less than 17,unless you are already busted (over 21). The dealer always stands when you arebusted.
• At the end of a hand, the player with the higher points without going over 21 wins.• The following table shows the number of points you can win with each type of
hand.

– 64 –
To play the blackjack game1. Enter the Blackjack Mode.2. Use B to declare the bet amount if you want.3. Press H to start the game.
• Two cards are dealt to the player and one to the dealer.• The “Hit”, “Stand”, and “Fold” indicators flash on the display, waiting for the
player’s response. In certain cases, the messages “Insure” or “Double” may alsoappear.
4. Press the letter key that corresponds to the operation you want to perform.• H : hit
S : standI : insureD : double downQ: fold (surrender)
5. If you draw a card and the total of your cards is still less than 21, repeat step 3.6. When you don’t want any more cards, press S to tell the dealer you want to stand.
• At this time the dealer’s hand is completed and the winner is determined.• If you win, the “Win” indicator appears and the number of points based on your
hand and the amount you bet are added to your point total (see the table).• If you lose, the “Win” indicator does not appear and your point total remains
unchanged.
7. To play the next hand, continue from step 2, above.• Repeat the above procedure until you run out of points or until you score 999,999
points.
Type of Hand Bet 10 Bet 20 Bet 30 Bet 40 Bet 50
Double Down 40 80 120 160 200
Blackjack 25 50 75 100 125
Win 20 40 60 80 100
Insurance 15 30 45 60 75
Surrender (Fold) 5 10 15 20 25

– 65 –
Calculator Mode
The Calculator Mode provides you with all the tools you need to perform a variety ofcalculations throughout the day. It also includes a calculation editing feature that letsyou recall the steps of a calculation and make changes.
1 2 3 4 5 6 7 8 9 0
• C/AC — clears the last value input. Press twice to clear a calculation on thescreen and start a new calculation.
• Use the number keys ( 0 through 9 ) to enter values. Press • to input a decimalpoint.
• Use !, @, # and $ to specify the arithmetic operation that is marked oneach key.
• = — executes a calculation and displays its result.• Use MRC, M@, and M+ for calculator memory operations.
MRC — recalls the content of the memory, and clears it when pressed twicesuccessively.
M@ — subtracts the currently displayed value from the current memorycontents.
M+ — adds the currently displayed value to the current memory contents.• Use % for percentage calculations.• Use ^ for square root calculations.• !/@ — switches the sign of a value between positive and negative.
Numberkeys
Cursorkeys
Memory keys, operator keys
Calculator Mode key

– 66 –
To correct errors in calculationsIf you enter a wrong value, press C/AC once and then enter the correct value.If you press the wrong arithmetic operator key ( !, @, #, $), simply press the correctkey before entering anything else.
About calculation errors...Whenever an error occurs, the indicator “ERROR” appears on the display.
• When the number of digits in the mantissa of an intermediate or a final resultexceeds 12 digits
• When the number of digits in the mantissa of a value stored in memory exceeds12 digits. In this case, the Digital Diary automatically retains the last value storedthat did not exceed 12 digits.
• Division by zero• Attempting to calculate the square root of a negative value
To clear errorsPress C/AC once to continue with the same calculation. If you want to clear thecalculation and start again, press C/AC twice.
To enter the Calculator ModePress } to display the initial Calculator Mode screen.
Example 1: 21 + 3 = 24Example 2: 11 + 10% = 12.1

– 67 –
To use the calculation edit feature1. After inputting a calculation, press DISP CHNG to change to the calculation edit
screen.• You can also display the calculation edit screen by pressing FUNCTION and then
selecting “Edit calculation”.
2. Use K and L to scroll through the steps of the calculation.• The Digital Diary stores up to 99 lines of a calculation for editing.
3. When any step you want to edit is on the screen, make the changes you want.4. After you finish editing the calculation, press = or ENTER to recalculate.
To clear a calculationPress DEL twice to clear a calculation. You can also clear a calculation by pressingFUNCTION and then selecting “Clear all steps”.
Calculation Examples
0.53 + 123 − 63 = 53q123w63u 113.963 × (23 − 56) = 23w56e963u − 31779.(56 × 3 − 89) ÷ 5.2 + 63 = 56e3w89r5.2q63u 78.1923076923123456 × 741852 = 123456e741852u 91586080512.3 × 5 = 3ye5u 8.66025403784
12% of 1500 1500e12tu 180.
Percentage of 660 660r880tu 75.against 880
80e9u| – M – 720.50e6u} – M – 300.20e3u| – M – 60.
– M – 480.
80 × 9 = 720−) 50 × 6 = 300
20 × 3 = 60480

Data Communications
You can transfer data between two CASIO SF-7100SY, SF-7200SY units, orbetween your Digital Diary and a personal computer. You can also transfer databetween your Digital Diary and the following CASIO Digital Diary Models:SF-5590SY, SF-5790SY, SF-5990SY, SF-5590SYE, SF-5790SYE, SF-5990SYE,SF-6500SY, SF-6700SY, SF-6900SY units.
• Note that SF-5590SY, SF-5790SY, SF-5990SY, SF-5590SYE, SF-5790SYE, andSF-5990SYE units can receive only 240 characters for each item. Because of this,any data past the 240th character is automatically discarded by these units.
• Your Digital Diary can send up to 511 characters per item.
Data communications can be performed while in the Telephone Directory, Memo,Schedule Keeper, Calendar, To Do, Reminder, or Expense Manager Mode.Data synchronizing helps you to make sure that the data in your PC and your DigitalDiary are always up to date.
� Setting Up for Data CommunicationsThe following describes what you would do to set up for data communicationsbetween two Digital Diary units or between a Digital Diary unit and a personalcomputer.
To connect to another Digital Diary unit1. Make sure that the power of both units is turned off.2. Open the covers of the data communications jacks of the two Digital Diary units.3. Connect the two units using the SB-63 cable.
Important!• Be sure to close the connector covers of the Digital Diary units when you are not
performing data communications.

– 69 –
Performing data communications between a Digital Diary unit anda personal computer running Windows 98 or Windows 95/3.1See the manual that comes with FA-128 Version1.2 for details on connecting to acomputer and setting up for communication.
Note• The CASIO Data Communication Package may not be included with certain
Digital Diary models. If your unit does not come with the Data CommunicationPackage, contact your dealer about purchasing one. Please note that there area number of different CASIO Data Communication Packages to suit variouscomputers and Digital Diary types. Because of this, you should note the followingimportant points when purchasing a Data Communication Package. If you haveany question about which package you need, consult with your dealer.
• Make sure the Data Communication Package is designed for you with yourparticular model of personal computer.
• If the proper Data Communication Package is not yet available in your area,consult with your dealer to find out when it is scheduled to go on sale.
• For information on how to connect the Digital Diary to a personal computer, seethe user’s manual that comes with the Data Communication Package.
To set up the Digital Diary to receive data1. While any screen is displayed, press FUNCTION (or SHIFT FUNCTION) and
then select “Receive data”.• You can perform the above operation in the Telephone Directory, Memo,
Schedule Keeper, Calendar, To Do, Reminder, or Expense Manager Mode.
2. Press Y.

– 70 –
• This message indicates that the unit is standing by to receive data.• To abort the receive operation, press ESC.• This procedure is the same regardless of whether data is being received from
another Digital Diary unit or from a personal computer.
� Sending DataThis section tells you how to operate the Digital Diary to send data to another unit orto a personal computer.
About data transfer types...There are a number of ways you can transfer data.
All Data ItemsWith this method, you can send all data items stored in the Telephone Directory,Memo, Schedule Keeper, Calendar, To Do, Reminder, or Expense Manager Mode.
Mode Data ItemsWith this method, you can send all data items stored in specific modes (TelephoneDirectory, Memo, Schedule Keeper, Calendar, To Do, Reminder, Expense Man-ager).In the Schedule Keeper Mode, you can send items that appear on the index display(which you specified using the function menu’s List type item described on page 39).
One Data ItemWith this method, you can send one data item stored in the Telephone Directory,Memo, Schedule Keeper, To Do, Reminder, or Expense Manager Mode.
Note• For Calendar Mode data, you can send highlight data.• If an alarm (Daily Alarm, Schedule Alarm, or Reminder Alarm) is reached while
data is being sent, the alarm does not sound until the data send operation iscomplete.

– 71 –
To send one data item1. Display the data display (page 28) of the item you want to send.2. Press FUNCTION and then select “Send record”.
3. Input a number 1 or 2 to select the model to which you want to send the data.• A message appears asking if you are ready to send.
4. Press Y to start the send operation, or N to abort.• To interrupt the send operation at any time, press ESC.• After the send operation is complete, the display returns to the screen that was
on the display before you started the send operation. Then you can repeat theabove procedure to send another item.
To send all data items in specific modes1. Press SHIFT FUNCTION and then select “Send all”.
2. Use Kand Lto move the pointer to the mode whose data items you want tosend, and then use Hand Jto change the setting.
• Data in modes set to “Yes” will be sent, while data in modes set to “No” will not.
3. Press ENTER.4. Input a number 1 or 2 to select the model to which you want to send the data.
• A message appears asking if you are ready to send.
5. Press Y to start the send operation, or N to abort.• To interrupt the send operation at any time, press ESC.• After the send operation is complete, the display returns to the screen that was
on the display before you started the send operation.
Pointer (selected file)
Marker (current setting)

– 72 –
To send Calendar data (highlights)1. In the Calendar Mode, press FUNCTION and then select “Send (Holidays)”.2. Input a number 1 or 2 to select the model to which you want to send the data.
• A message appears asking if you are ready to send.
3. Press Y to start the send operation, or N to abort.• To interrupt the send operation at any time, press ESC.• After the send operation is complete, the display returns to the screen that was
on the display before you started the send operation. Then you can repeat theabove procedure to send another item.
� Sending All Data Items In a ModeThe procedure you should use depends on whether the file whose data items you aresending has multiple files (Telephone Directory, Memo, To Do, Expense Manager)or not (Schedule Keeper, Reminder).
To send all data items from a multiple file mode (TelephoneDirectory, Memo, To Do, Expense Manager)1. Display the initial screen of the mode that contains the data you want to send.
• You can display the initial screen for any file.
2. Press FUNCTION and then select “Send all files”.
3. Use K and L to move the pointer to the file whose data you want to send, andthen use H and J to change the setting.
• Files set to “Yes” will be sent, while those set to “No” will not.
4. Press ENTER.5. Input a number 1 or 2 to select the model to which you want to send the data.
• At this time the message “READY TO SEND (Y/N)?” appears.
6. Press Y to send or N to abort.• In the Telephone Directory, Memo, and To Do Modes you can also use another
method to send all data items. While the index display or data display is on thescreen, press FUNCTION and then select “Send all records”.

– 73 –
To send all data items from a single file mode (Schedule Keeper,Reminder)1. Display the initial screen of the mode that contains the data you want to send.2. Press FUNCTION and then select “Send all records”.3. Input a number 1 or 2 to select the model to which you want to send the data.
• At this time the message “READY TO SEND (Y/N)?” appears.
4. Press Y to send or N to abort.
To send listed records in the Schedule Keeper Mode1. Enter the Schedule Keeper Mode and specify the items you want to send in the
index display contents.• See “To specify Schedule Keeper Mode index display contents” on page 39.
2. While the Schedule Keeper Mode index display is on the screen, pressFUNCTION and then select “Send listed records”.
3. Input a number 1 or 2 to select the model to which you want to send the data.• At this time the message “READY TO SEND (Y/N)?” appears.
4. Press Y to send or N to abort.
� Data SynchronizationUse the following procedure to synchronize data entries between your Digital Diaryand a personal computer.
• Data synchronization can be performed for the following modes: TelephoneDirectory, Memo, Schedule Keeper, To Do, Reminder, Expense Manager.
To synchronize data for a single mode1. Press the Digital Diary’s SYNCHRONIZE key.2. Press the mode key for the mode whose data you want to synchronize (TEL,
MEMO, SCHEDULE, TO DO, REMINDER, EXPENSE) to start.• You can press ESC to abort the above procedure.• The Home Time screen appears when the synchronization operation finishes.
To synchronize data for all modes
Important!• All-mode synchronization takes a long time to complete.
Press SHIFT SYNCHRONIZE to start synchronization of all modes.• The Home Time screen appears when the synchronization operation finishes.
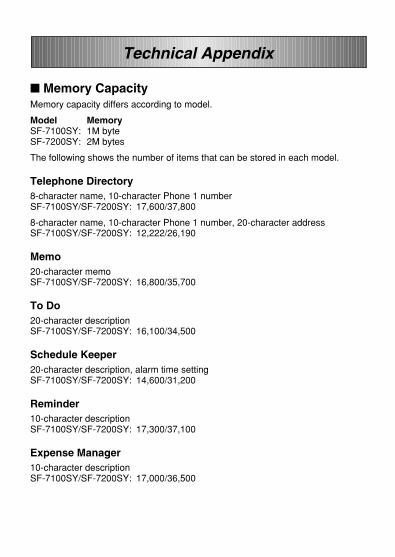
Technical Appendix
� Memory CapacityMemory capacity differs according to model.
Model MemorySF-7100SY: 1M byteSF-7200SY: 2M bytes
The following shows the number of items that can be stored in each model.
Telephone Directory8-character name, 10-character Phone 1 numberSF-7100SY/SF-7200SY: 17,600/37,800
8-character name, 10-character Phone 1 number, 20-character addressSF-7100SY/SF-7200SY: 12,222/26,190
Memo20-character memoSF-7100SY/SF-7200SY: 16,800/35,700
To Do20-character descriptionSF-7100SY/SF-7200SY: 16,100/34,500
Schedule Keeper20-character description, alarm time settingSF-7100SY/SF-7200SY: 14,600/31,200
Reminder10-character descriptionSF-7100SY/SF-7200SY: 17,300/37,100
Expense Manager10-character descriptionSF-7100SY/SF-7200SY: 17,000/36,500

– 75 –
123456789
101112131415161718192021222324252627282930
(space)
!”#$%&’()
*+,–./0123456789:;<=
>?@ABCDEFGHIJKLMNOPQRSTUVWXYZa
bcdefghijkl
mnopqrstuvwxyz~Çüéâ
äàåçêëèïîìÄÅÉæÆôöòûùÖÜ¢£áíóúñÑ
#
$
±`
ÁÍÓÚÀÈÌÒÙËÏÂÊÎÔÛÃãÕõµg
m
q
zß
616263646566676869707172737475767778798081828384858687888990
919293949596979899
100101102103104105106107108109110111112113114115116117118119120
121122123124125126127128129130131132133134135136137138139140141142143144145146147148149150
313233343536373839404142434445464748495051525354555657585960
´
� How the Digital Diary sorts data
Sorting SequenceThe following table shows the sequence used for sorting data in the TelephoneDirectory Mode.

– 76 –
� Error Messages
Data Error MessageThe data error message appears whenever the Digital Diary’s internal checkdiscovers a problem with data stored in memory.
Appearance of the data error message indicates that you must perform the all-resetprocedure to correct the problem. Start out with the procedure under “To start the all-reset operation” on page 11, and continue with the procedure under “When to pressY for “yes”” on page 11.
If you still have trouble after trying the RESET operation, you may have a hardwareproblem. If so, consult with your nearest CASIO dealer.
� Message Table
NOT FOUND!PRESS ESC TO QUIT.
MEMORY FULL.PRESS ANY KEY.MEMORY MANAGE-MENT CAN INCREASEMEMORY FOR NEWSTORAGE.
ALARM TIME COINCI-DENT!
ALARM TIME ALREADYPASSED!
Change specificationor cancel search.
Try performingmemory manage-ment to make moredata available. PressSHIFT FUNCTIONand then select“Memory manage-ment.” See page 19.
Set a different alarmtime or change theexisting alarm time.
Set a different alarmtime.
Message Meaning Action
Data specified in searchoperation does not exist inmemory.
No more room in memoryfor storage of data. You canincrease the amount ofmemory available forstorage using MemoryManagement.
Attempt to set an alarm thatis already used for anotherentry.
Attempt to set an alarm for atime or date that is alreadypassed.
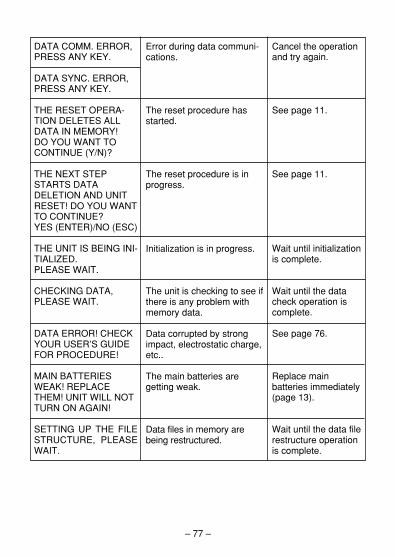
– 77 –
Cancel the operationand try again.
See page 11.
See page 11.
Wait until initializationis complete.
Wait until the datacheck operation iscomplete.
See page 76.
Replace mainbatteries immediately(page 13).
Wait until the data filerestructure operationis complete.
Error during data communi-cations.
The reset procedure hasstarted.
The reset procedure is inprogress.
Initialization is in progress.
The unit is checking to see ifthere is any problem withmemory data.
Data corrupted by strongimpact, electrostatic charge,etc..
The main batteries aregetting weak.
Data files in memory arebeing restructured.
DATA COMM. ERROR,PRESS ANY KEY.
DATA SYNC. ERROR,PRESS ANY KEY.
THE RESET OPERA-TION DELETES ALLDATA IN MEMORY!DO YOU WANT TOCONTINUE (Y/N)?
THE NEXT STEPSTARTS DATADELETION AND UNITRESET! DO YOU WANTTO CONTINUE?YES (ENTER)/NO (ESC)
THE UNIT IS BEING INI-TIALIZED.PLEASE WAIT.
CHECKING DATA,PLEASE WAIT.
DATA ERROR! CHECKYOUR USER’S GUIDEFOR PROCEDURE!
MAIN BATTERIESWEAK! REPLACETHEM! UNIT WILL NOTTURN ON AGAIN!
SETTING UP THE FILESTRUCTURE, PLEASEWAIT.
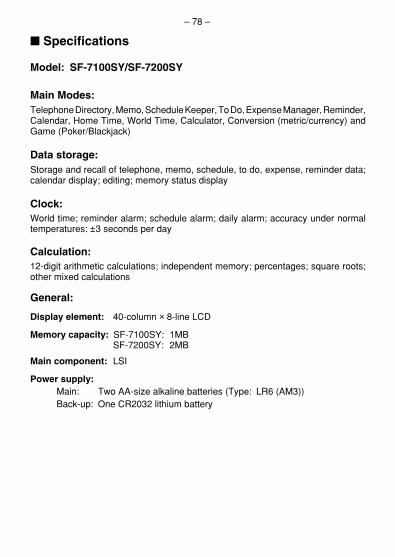
– 78 –
� Specifications
Model: SF-7100SY/SF-7200SY
Main Modes:Telephone Directory, Memo, Schedule Keeper, To Do, Expense Manager, Reminder,Calendar, Home Time, World Time, Calculator, Conversion (metric/currency) andGame (Poker/Blackjack)
Data storage:Storage and recall of telephone, memo, schedule, to do, expense, reminder data;calendar display; editing; memory status display
Clock:World time; reminder alarm; schedule alarm; daily alarm; accuracy under normaltemperatures: ±3 seconds per day
Calculation:12-digit arithmetic calculations; independent memory; percentages; square roots;other mixed calculations
General:
Display element: 40-column × 8-line LCD
Memory capacity: SF-7100SY: 1MBSF-7200SY: 2MB
Main component: LSI
Power supply:Main: Two AA-size alkaline batteries (Type: LR6 (AM3))Back-up: One CR2032 lithium battery

– 79 –
Battery life:Main: • Approximately 240 hours of continuous display only in Telephone
Directory Mode.• Approximately 140 hours with 55 minutes of continuous display
only and 5 minutes of processing operation per hour.• Approximately 120 hours with 55 minutes of continuous display
only and 5 minutes of processing operation per hour, plus 3minutes of backlight operation per hour during continuous displayonly period.
Back-up: Approximately 5 years if main batteries are replaced as soon asthey become weak.
Power consumption: 0.4W
Auto power off: Approximately 3 minutes after last key operation
Operating temperature: 0°C ~ 40°C (32°F ~ 104°F)
Dimensions:Unfolded: 9.6H × 162W × 158.5D mm (3/8"H × 63/8"W × 61/4"D)Folded: 21.4H × 162W × 85D mm (7/8"H × 63/8"W × 33/8"D)
Weight: Approximately 261g (9.2 oz) including batteries

CASIO ELECTRONICS CO., LTD.Unit 6, 1000 North Circular RoadLondon NW2 7JD, U.K.

CASIO COMPUTER CO., LTD.6-2, Hon-machi 1-chome
Shibuya-ku, Tokyo 151-8543, Japan
MO9905-A Printed in China