sfml game development by example - sample chapter
TRANSCRIPT
C o m m u n i t y E x p e r i e n c e D i s t i l l e d
Create and develop exciting games from start to fi nish using SFML
SFML Game Development By Example
Raim
ondas Pupius
SFML Game Development By Example
The Simple and Fast Multimedia Library is a user-friendly interface for developing cross-platform media applications. It has fi ve modules, suitable for a number of different tasks: system, window, graphics, audio, and network. Using the SFML library allows you to craft games quickly and easily, without having to worry about lower-level details that come with a learning curve.
This book starts with building a clone of the classical snake game, where you will learn how to open a window, render basic shapes, implement the design of the game, and detect collisions by using AABB bounding boxes. The next game is a simple platformer with enemies and a few different stages, where you will create states that provide custom application fl ow, as well as apply common design patterns used in games. Last but defi nitely not least, you will create a small RPG game that utilizes multiple GUI elements, advanced graphical features, sounds, and music features. We will also implement networking features that will allow other players to join and play together.
By the end of the book, you will be an expert in using SFML library to its full potential.
Who this book is written forThis book is intended for game development enthusiasts having knowledge of the C++ programming language and an optional background in game design.
$ 49.99 US£ 31.99 UK
Prices do not include local sales tax or VAT where applicable
Raimondas Pupius
What you will learn from this book
Create and open a window using SFML
Manage and apply all of the features and properties of SFML
Employ some basic game development techniques to make your game tick
Build your own code base to make your game more robust and fl exible
Apply common game development and programming patterns to solve design problems
Handle your visual and auditory resources properly
Construct a robust system for user input and interfacing
Develop and provide networking capabilities for your game
SFML G
ame D
evelopment
By Exam
pleP U B L I S H I N GP U B L I S H I N G
community experience dist i l led
Visit www.PacktPub.com for books, eBooks, code, downloads, and PacktLib.
Free Sample

In this package, you will find: The author biography
A preview chapter from the book, Chapter 1 'It's Alive! It's Alive! – Setup
and First Program'
A synopsis of the book’s content
More information on SFML Game Development By Example

About the Author
Raimondas Pupius is a game development enthusiast from Lithuania. He is currently working towards getting a degree in software engineering as well as working on a few projects of his own. Starting his unoffi cial education in this fi eld at the age of 9, and having been introduced to video games even prior to that, helped narrow down his decision regarding a career choice. His ultimate dream is, of course, starting his own company and creating professional games for a living. "It beats my previous choice of being a plumber when I was four years old!" he says jokingly.
His other interests include web development, which was his primary interest before game development, music, and linguistics.

Preface
PrefaceGame development is one of the most interesting career choices to date. Apart from the many other fi elds that are incorporated in this process, it's also a realm where pure imagination comes to life. Even during the times when one may think that there's nothing new under the sun, ground-breaking ideas are still cemented in this medium, both as revolutionary milestones and exciting adventures that will make us feel child-like excitement yet again.
Getting started with game programming is easier now than ever before! Documentation and tutorials aside, there even exist enthusiasts out there who actually put together libraries of code that can be used to eliminate the redundant or diffi cult parts of building different types of applications. As it so happens, one of these libraries is titled "Simple and Fast Multimedia Library", and it is the focal point of this publication.
Throughout the course of this book, three projects are built from scratch, with each one having increased complexity compared to its preceding project. We will start with a basic clone of the classical arcade game—Snake, which introduces the basics of SFML and some of the framework that is going to persist until the very end. As diffi cult subjects are addressed, we will begin to cobble the second project together, turning it into a side-scrolling platformer. The remaining chapters of this book focus on building and polishing an online RPG-style game that can be played with your friends! No detail of any of these projects will remain undiscussed, as you will be guided through the entire process of planning and implementing every single aspect of these projects.
If the vast array of features that need to be worked on hasn't scared you away yet, congratulations! You are about to embark on a journey of tremendous proportions. So don't let the odds intimidate you. We hope to see you at the fi nish line!
Preface
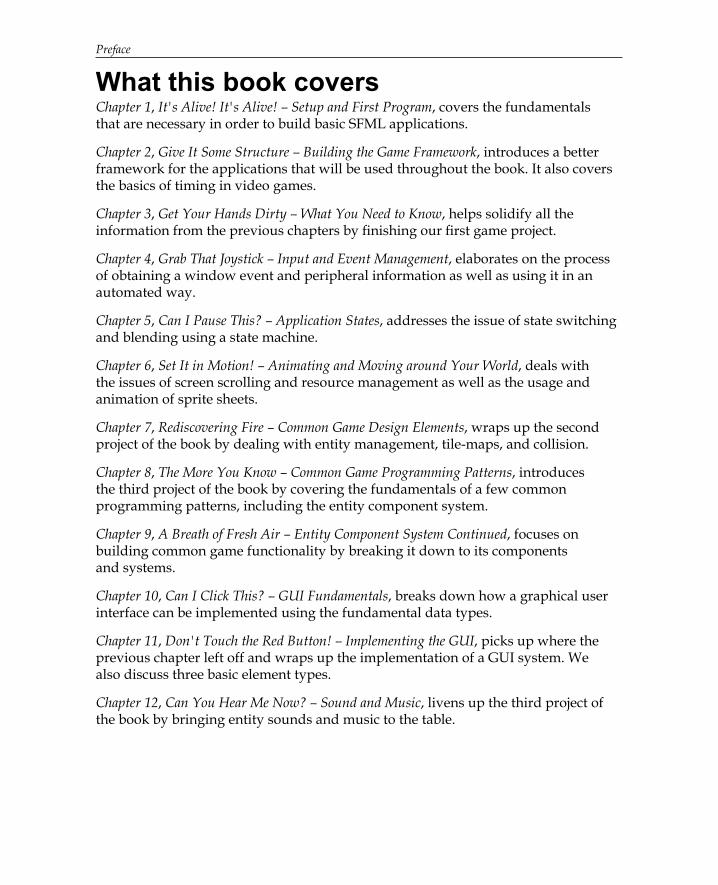
What this book coversChapter 1, It's Alive! It's Alive! – Setup and First Program, covers the fundamentals that are necessary in order to build basic SFML applications.
Chapter 2, Give It Some Structure – Building the Game Framework, introduces a better framework for the applications that will be used throughout the book. It also covers the basics of timing in video games.
Chapter 3, Get Your Hands Dirty – What You Need to Know, helps solidify all the information from the previous chapters by fi nishing our fi rst game project.
Chapter 4, Grab That Joystick – Input and Event Management, elaborates on the process of obtaining a window event and peripheral information as well as using it in an automated way.
Chapter 5, Can I Pause This? – Application States, addresses the issue of state switching and blending using a state machine.
Chapter 6, Set It in Motion! – Animating and Moving around Your World, deals with the issues of screen scrolling and resource management as well as the usage and animation of sprite sheets.
Chapter 7, Rediscovering Fire – Common Game Design Elements, wraps up the second project of the book by dealing with entity management, tile-maps, and collision.
Chapter 8, The More You Know – Common Game Programming Patterns, introduces the third project of the book by covering the fundamentals of a few common programming patterns, including the entity component system.
Chapter 9, A Breath of Fresh Air – Entity Component System Continued, focuses on building common game functionality by breaking it down to its components and systems.
Chapter 10, Can I Click This? – GUI Fundamentals, breaks down how a graphical user interface can be implemented using the fundamental data types.
Chapter 11, Don't Touch the Red Button! – Implementing the GUI, picks up where the previous chapter left off and wraps up the implementation of a GUI system. We also discuss three basic element types.
Chapter 12, Can You Hear Me Now? – Sound and Music, livens up the third project of the book by bringing entity sounds and music to the table.

Preface
Chapter 13, We Have Contact! – Networking Basics, covers all the basics that are required in order to implement networking in our fi nal project.
Chapter 14, Come Play with Us! – Multiplayer Subtleties, transforms the fi nal project of the book into a multiplayer RPG-style death match with the application of a client-server network model as well as a combat system.

[ 1 ]
It's Alive! It's Alive! – Setup and First Program
The proud feeling of building something is a powerful one. Coupled with the thrill of exploration, it hardly makes it diffi cult to narrow down why most of our fellow game developers do what they do. Although creation is a major force in this process, failure governs it, much like any other subject. Sooner or later, all of us will be placed in a situation where a brick wall not only derails the development of a given project, but maybe even kills the motivation to work on it. Having a good resource to fall back on is crucial during those times, especially for new developers who are just now getting their hands dirty, and that's where we come in. Our goal is to pass on the experience in the most hands-on approach by developing real projects during the course of this book.
In this chapter, we're going to be covering:
• Setting up SFML on your machine and IDE• Flow of an average SFML application• Opening and managing windows• Basics of rendering
The purpose of this chapter is to ease you into the process of developing games using Simple and Fast Multimedia Library (SFML). Let's get started by fi rst tackling the setup process!

It’s Alive! It’s Alive! – Setup and First Program
[ 2 ]
What is SFML?Before we start throwing terms and code your way, it's only fair we talk a little bit about the choice library for this book. As its title clearly states, SFML is a library, which speeds up and eases the process of developing applications that rely on extensive use of media content, such as video, text, still images, audio, and animation for interactivity, and we will be focusing on a specifi c category of those applications, that is, video games. It provides an easy to use application programming interface (API), compiles and runs out of the box on Windows, Linux, and Mac OS X, and is supported by multiple languages, such as C, .NET, C++, Java, Ruby, Python, and Go, just to name a few. Unoffi cial ports for certain mobile devices do exist out there, however offi cial releases for mobile platforms are still in the works. It's also open source, so one can always go and look at the source code if one is so inclined. In this book, we will be focusing solely on development for the Windows platform using C++11.
For convenience, SFML is split into fi ve modules, which are independent of one another and can be included on a need-to-use basis:
• System: A core module, which defines most basic data structures, provides access to threads, clocks, user data streams, and other essentials.
• Window: This module provides a means of creating and managing a window, gathering user input and events, as well as using SFML alongside OpenGL.
• Graphics: Everything left to be desired graphically after fully utilizing the window module falls back on the graphics module. It deals with everything concerning two-dimensional rendering.
• Audio: Anything to do with playing music, sounds, audio streams, or recording audio is handled by this module.
• Network: The last but definitely not the least interesting module that covers sending data to other computers as well as working with a few networking protocols.
Each one of these modules is compiled in a separate library (.lib) with specifi c postfi xes that signify whether the library is being linked statically or dynamically, as well as if it's being built in debug or release mode. Linking a library statically simply means that it gets included in the executable, as opposed to dynamic linking, where .dll fi les are required to be present in order for the application to run. The latter situation reduces the overall size of the application by relying on the library being present on the machine that runs it. It also means that the library can be upgraded without the need to alter the application, which can be useful when fi xing bugs. Static linking, on the other hand, allows your code to be executed in environments that are more limited.

Chapter 1
[ 3 ]
It's also important to make sure that your application is being built in a mode that's suitable for the situation. Debug mode applications are bloated with additional information that is useful when you're hunting down fl aws in your programs. This makes the application run considerably slower and shouldn't be used for any other purposes than testing. When building your project in release mode, tons of different optimizations are also turned on, which not only provides a smaller executable footprint, but also a much faster running speed. This should be the mode an application is compiled in, if it is to be released for any kind of use other than debugging.
Each module is named according to the format sfml-module[-s][-d].lib. For example, the fi le name of a graphics library that is being linked statically and compiled in debug mode would look like this: sfml-graphics-s-d.lib. When linking dynamically or compiling in release mode, the postfi xes need to be omitted. SFML also requires the SFML_STATIC macro to be defi ned when linking statically, which we will cover shortly when setting up our fi rst project.
An important thing to keep in mind about the separate libraries is that they still have dependencies. Window, graphics, audio, and network libraries are dependent on the system library, which has to be linked to for any SFML application to compile and run. The graphics library is also dependent on the window library, so all three have to be linked to if an application does any drawing. The audio and networking libraries only depend on the system library.
Since version 2.2, when linking SFML statically, its dependencies must also be linked to the project. These dependencies vary between major versions 2.2 and 2.3, so we're going to stick with the newest version, that is, 2.3. The graphics library requires opengl32.lib, freetype.lib, and jpeg.lib libraries. The window library depends on opengl32.lib, winmm.lib, and gdi32.lib. Linking to the system library only requires the winmm.lib library, while sfml-network-s.lib relies on ws2_32.lib in order to work. Lastly, the sound library depends on openal32.lib, flac.lib, vorbisenc.lib, vorbisfile.lib, vorbis.lib, and ogg.lib.
Each one of these fi ve modules has a corresponding header that must be included to utilize its functionality. For example, including the graphics header would look like this:
#include <SFML/Graphics.hpp>
It is also possible to avoid including the entire module header by specifying the actual header that is desired within a module:
#include <SFML/Graphics/Color.hpp>

It’s Alive! It’s Alive! – Setup and First Program
[ 4 ]
This gives you a chance to include only the parts that are absolutely necessary.
It's best practice to use forward slashes when including libraries. Different operating systems do not recognize paths that have a backslash in them.
SFML licensingWhenever you're utilizing a library of any sorts for your project, it's important to know what you can and cannot use it for. SFML is licensed under the zlib/libpng license, which is far from being restrictive. It allows anyone to use SFML for any purposes, even commercial applications, as well as alter and re-distribute it, given that the credit for writing the original software is left unchanged and the product is marked as an altered source. Giving credit for using the original software isn't required, but it would be appreciated. For more information, visit: http://opensource.org/licenses/Zlib.
Resources and installationYou can download the latest stable pre-built version of the library at: http://www.sfml-dev.org/download.php. It is also possible for you to get the latest Git revision and compile it yourself from here: https://github.com/LaurentGomila/SFML. The former option is easier and recommended for beginners. You have to wait for major versions to be released, however they're more stable. To build SFML yourself, you will need to use CMake, which is a tool used to generate solutions or g++ Makefi les, depending on the software that will be used to compile it. The offi cial SFML website provides tutorials on building it yourself at: http://www.sfml-dev.org/tutorials.
After either obtaining the pre-built version of SFML or compiling it yourself, it's a good idea to move it somewhere more permanent, hopefully with a short path. It's not unusual to dedicate a directory somewhere on your local drive that will hold SFML and potentially other libraries, which can be linked to quickly and at all times. This becomes useful when dealing with several versions of the same library as well. For the rest of this book, we will assume the location of our SFML library and header directories to be at C:\libs\SFML-2.3, consequently being C:\libs\SFML-2.3\lib and C:\libs\SFML-2.3\include. These directories have to be set up correctly in your compiler of choice for the project to build. We will be using Microsoft Visual Studio 2013 throughout the course of this book, however instructions on setting up projects for Code::Blocks can be found in the tutorials section of the SFML website.

Chapter 1
[ 5 ]
Setting up a Microsoft Visual Studio projectCreate a new solution in your IDE. It can be a Win32 application or a console application, which is not really relevant, although a nice console window is often useful for debug purposes. I always go with the Empty Project option to avoid any auto-generated code. After that's done, let's prepare our project to use SFML:
1. Navigate to the VC++ Directories underneath Confi guration Properties by right clicking on our project and selecting Properties.
2. Only two fi elds are of any concern to us, the Include Directories and Library Directories. Make sure the paths to the SFML library and include directories are provided for both Debug and Release confi gurations.
3. When linking SFML statically, the Preprocessor section underneath C/C++ is where you need to defi ne the SFML_STATIC macro.
4. Next is the Additional Library Directories in General underneath Linker. Make sure that it also points to the SFML library directory in both debug and release confi gurations.
5. Lastly, we need to set up the project dependencies by editing the Additional Dependencies fi eld in the Input section underneath Linker. It would look something like this for the debug confi guration when using statically linked libraries: sfml-graphics-s-d.lib; sfml-window-s-d.lib; sfml-system-s-d.lib; opengl32.lib; freetype.lib; jpeg.lib; winmm.lib; gdi32.lib;
Remember that we need to include the system library because of library dependencies. Also note the use of -s and -d postfixes. Make sure both debug and release configurations are set up and that the release configuration omits the -d postfix.
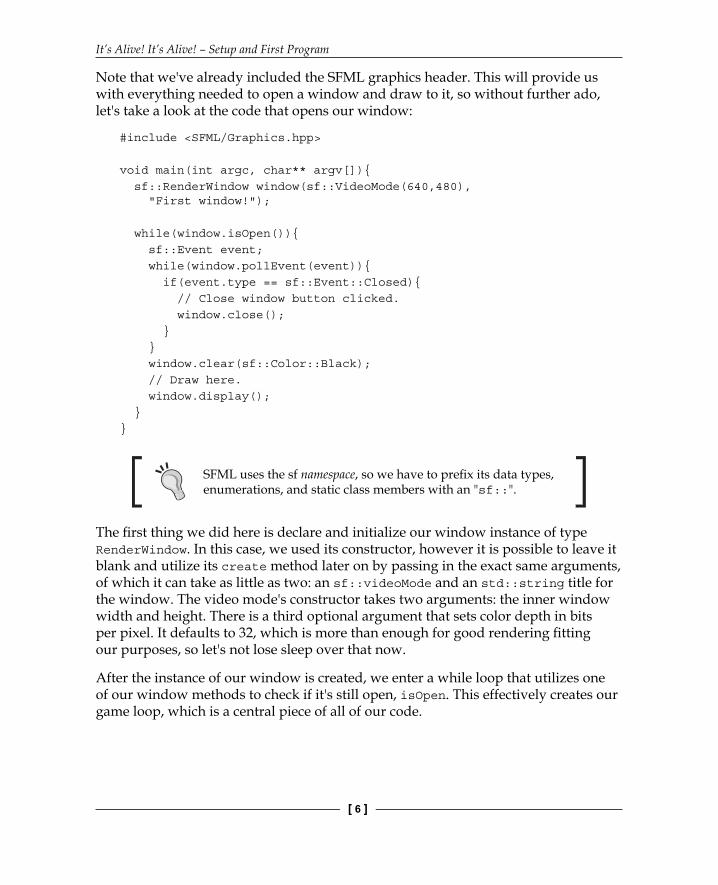
Opening a windowAs you probably know, drawing something on screen requires a window to be present. Luckily, SFML allows us to easily open and manage our very own window! Let's start out as usual by adding a fi le to our project, named Main.cpp. This will be the entry point to our application. The bare bones of a basic application look like this:
#include <SFML/Graphics.hpp>
void main(int argc, char** argv[]){ }
It’s Alive! It’s Alive! – Setup and First Program
[ 6 ]
Note that we've already included the SFML graphics header. This will provide us with everything needed to open a window and draw to it, so without further ado, let's take a look at the code that opens our window:
#include <SFML/Graphics.hpp>
void main(int argc, char** argv[]){ sf::RenderWindow window(sf::VideoMode(640,480), "First window!");
while(window.isOpen()){ sf::Event event; while(window.pollEvent(event)){ if(event.type == sf::Event::Closed){ // Close window button clicked. window.close(); } } window.clear(sf::Color::Black); // Draw here. window.display(); }}
SFML uses the sf namespace, so we have to prefi x its data types, enumerations, and static class members with an "sf::".
The fi rst thing we did here is declare and initialize our window instance of type RenderWindow. In this case, we used its constructor, however it is possible to leave it blank and utilize its create method later on by passing in the exact same arguments, of which it can take as little as two: an sf::videoMode and an std::string title for the window. The video mode's constructor takes two arguments: the inner window width and height. There is a third optional argument that sets color depth in bits per pixel. It defaults to 32, which is more than enough for good rendering fi tting our purposes, so let's not lose sleep over that now.
After the instance of our window is created, we enter a while loop that utilizes one of our window methods to check if it's still open, isOpen. This effectively creates our game loop, which is a central piece of all of our code.

Chapter 1
[ 7 ]
Let's take a look at a diagram of a typical game:
The purpose of a game loop is to check for events and input, update our game world between frames, which means moving the player, enemies, checking for changes, and so on, and fi nally draw everything on the screen. This process needs to be repeated many times a second until the window is closed. The amount of times varies from application to application, sometimes going as high as thousands of iterations per second. Chapter 2, Give It Some Structure - Building the Game Framework will cover managing and capping the frame rate of our applications as well as making the game run at constant speeds.
Most applications need to have a way to check if a window has been closed, resized, or moved. That's where event processing comes in. SFML provides an event class that we can use to store our event information. During each iteration of our game loop, we need to check for the events that took place by utilizing the pollEvent method of our window instance and process them. In this case, we're only interested in the event that gets dispatched when a mouse clicks on the close window button. We can check if the public member type of class Event matches the proper enumeration member, in this case it's sf::Event::Closed. If it does, we can call the close method of our window instance and our program will terminate.

It’s Alive! It’s Alive! – Setup and First Program
[ 8 ]
Events must be processed in all SFML applications. Without the event loop polling events, the window will become unresponsive, since it not only provides the event information to the user, but also gives the window itself a way to handle its internal events as well, which is a necessity for it to react to being moved or resized.
After all of that is done, it's necessary to clear the window from the previous iteration. Failing to do so would result in everything we draw on it stacking and creating a mess. Imagine the screen is a whiteboard and you want to draw something new on it after someone else already scribbled all over it. Instead of grabbing the eraser, however, we need to call the clear method of our window instance, which takes a sf::Color data type as an argument and defaults to the color black if an argument isn't provided. The screen can be cleared to any of its enumerated colors that the sf::Color class provides as static members or we can pass an instance of sf::Color, which has a constructor that takes unsigned integer values for individual color channels: red, green, blue, and optionally alpha. The latter gives us a way to explicitly specify the color of our desired range, like so:
window.clear(sf::Color(0,0,0,255));
Finally, we call the window.display() method to show everything that was drawn. This utilizes a technique known as double buffering, which is standard in games nowadays. Basically, anything that is drawn isn't drawn on the screen instantly, but instead to a hidden buffer which then gets copied to our window once display is called. Double buffering is used to prevent graphical artifacts, such as tearing, which occurs due to video card drivers pulling from the frame buffer while it's still being written to, resulting in a partially drawn image being displayed. Calling the display method is mandatory and cannot be avoided, otherwise the window will show up as a static square with no changes taking place.
Remember to include SFML library .dll fi les in the same directory as your executable relies, provided the application has been dynamically linked.
Upon compilation and execution of the code, we will fi nd ourselves with a blank console window and a black 640x480 px window sitting over it, fewer than 20 lines of code, and an open window. Not very exciting, but it's still better than E.T. for Atari 2600. Let's draw something on the screen!
Chapter 1
[ 9 ]
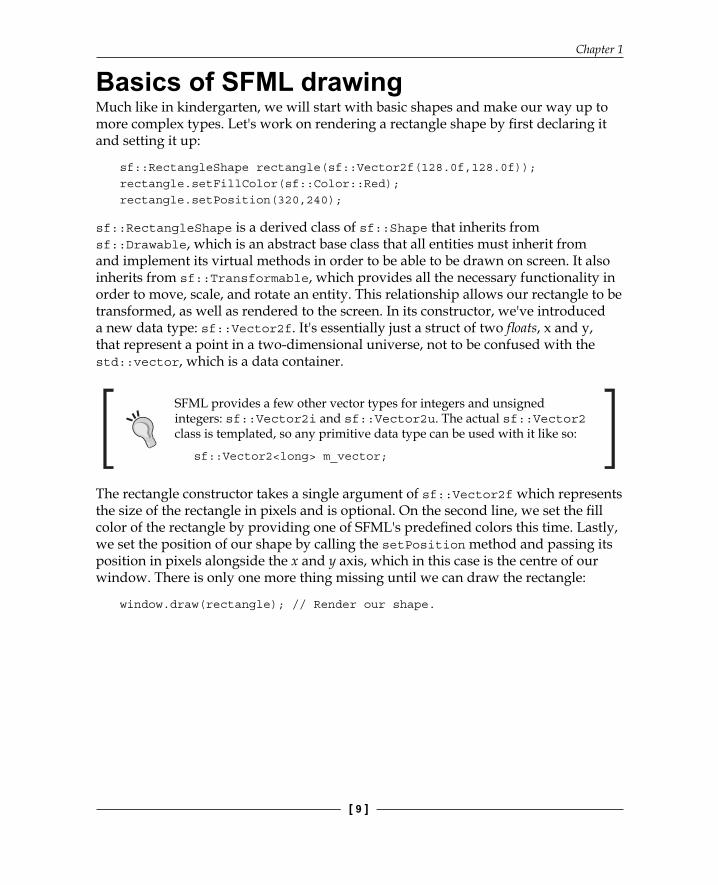
Basics of SFML drawingMuch like in kindergarten, we will start with basic shapes and make our way up to more complex types. Let's work on rendering a rectangle shape by fi rst declaring it and setting it up:
sf::RectangleShape rectangle(sf::Vector2f(128.0f,128.0f));rectangle.setFillColor(sf::Color::Red);rectangle.setPosition(320,240);
sf::RectangleShape is a derived class of sf::Shape that inherits from sf::Drawable, which is an abstract base class that all entities must inherit from and implement its virtual methods in order to be able to be drawn on screen. It also inherits from sf::Transformable, which provides all the necessary functionality in order to move, scale, and rotate an entity. This relationship allows our rectangle to be transformed, as well as rendered to the screen. In its constructor, we've introduced a new data type: sf::Vector2f. It's essentially just a struct of two fl oats, x and y, that represent a point in a two-dimensional universe, not to be confused with the std::vector, which is a data container.
SFML provides a few other vector types for integers and unsigned integers: sf::Vector2i and sf::Vector2u. The actual sf::Vector2 class is templated, so any primitive data type can be used with it like so:
sf::Vector2<long> m_vector;
The rectangle constructor takes a single argument of sf::Vector2f which represents the size of the rectangle in pixels and is optional. On the second line, we set the fi ll color of the rectangle by providing one of SFML's predefi ned colors this time. Lastly, we set the position of our shape by calling the setPosition method and passing its position in pixels alongside the x and y axis, which in this case is the centre of our window. There is only one more thing missing until we can draw the rectangle:
window.draw(rectangle); // Render our shape.

It’s Alive! It’s Alive! – Setup and First Program
[ 10 ]
This line goes right before we call window.display(); and is responsible for bringing our shape to the screen. Let's run our revised application and take a look at the result:
Now we have a red square drawn on the screen, but it's not quite centered. This is because the default origin of any sf::Transformable, which is just a 2D point that represents the global position of the object, is at the local coordinates (0,0), which is the top left corner. In this case, it means that the top left corner of this rectangle is set to the position of the screen centre. That can easily be resolved by calling the setOrigin method and passing in the desired local coordinates of our shape that will represent the new origin, which we want to be right in the middle:
rectangle.setOrigin(64.0f,64.0f);
If the size of a shape is unknown for whatever reason, the rectangle class provides a nice method getSize, which returns a fl oat vector containing the size:
rectangle.setOrigin(rectangle.getSize().x / 2, rectangle.getSize().y / 2);

Chapter 1
[ 11 ]
Now our shape is sitting happily in the very middle of the black screen. The entire segment of code that makes this possible looks a little something like this:
#include <SFML/Graphics.hpp>
void main(int argc, char** argv[]){ sf::RenderWindow window(sf::VideoMode(640,480), "Rendering the rectangle.");
// Creating our shape. sf::RectangleShape rectangle(sf::Vector2f(128.0f,128.0f)); rectangle.setFillColor(sf::Color::Red); rectangle.setPosition(320,240); rectangle.setOrigin(rectangle.getSize().x / 2, rectangle.getSize().y / 2);
while(window.isOpen()){ sf::Event event; while(window.pollEvent(event)){ if(event.type == sf::Event::Closed){ // Close window button clicked. window.close(); } } window.clear(sf::Color::Black); window.draw(rectangle); // Drawing our shape. window.display(); }}
Drawing images in SFMLIn order to draw an image on screen, we need to become familiar with two classes: sf::Texture and sf::Sprite. A texture is essentially just an image that lives on the graphics card for the purpose of making it fast to draw. Any given picture on your hard drive can be turned into a texture by loading it:
sf::Texture texture;if(!texture.loadFromFile("filename.png"){ // Handle an error.}

It’s Alive! It’s Alive! – Setup and First Program
[ 12 ]
The loadFromFile method returns a Boolean value, which serves as a simple way of handling loading errors, such as the fi le not being found. If you have a console window open along with your SFML window, you will notice some information being printed out in case the texture loading did fail:
Failed to load image "fi lename.png". Reason : Unable to open fi le
Unless a full path is specifi ed in the loadFromFile method, it will be interpreted as relative to the working directory. It's important to note that while the working directory is usually the same as the executable's when launching it by itself, compiling and running your application in an IDE (Microsoft Visual Studio in our case) will often set it to the project directory instead of the debug or release folders. Make sure to put the resources you're trying to load in the same directory where your .vcxproj project fi le is located if you've provided a relative path.
It's also possible to load your textures from memory, custom input streams, or sf::Image utility classes, which help store and manipulate image data as raw pixels, which will be covered more broadly in later chapters.
What is a sprite?A sprite, much like the sf::Shape derivatives we've worked with so far, is a sf::Drawable object, which in this case represents a sf::Texture and also supports a list of transformations, both physical and graphical. Think of it as a simple rectangle with a texture applied to it:
sf::Sprite provides the means of rendering a texture, or a part of it, on screen, as well as means of transforming it, which makes the sprite dependent on the use of textures. Since sf::Texture isn't a lightweight object, sf::Sprite comes in for performance reasons to use the pixel data of a texture it's bound to, which means that as long as a sprite is using the texture it's bound to, the texture has to be alive in memory and can only be de-allocated once it's no longer being used. After we have our texture set up, it's really easy to set up the sprite and draw it:
sf::Sprite sprite(texture);...window.draw(sprite);

Chapter 1
[ 13 ]
It's optional to pass the texture by reference to the sprite constructor. The texture it's bound to can be changed at any time by using the setTexture method:
sprite.setTexture(texture);
Since sf::Sprite, just like sf::Shape, inherits from sf::Transformable, we have access to the same methods of manipulating and obtaining origin, position, scale, and rotation.
It's time to apply all the knowledge we've gained so far and write a basic application that utilizes it:
void main(int argc, char** argv[]){ sf::RenderWindow window(sf::VideoMode(640,480), "Bouncing mushroom.");
sf::Texture mushroomTexture; mushroomTexture.loadFromFile("Mushroom.png"); sf::Sprite mushroom(mushroomTexture); sf::Vector2u size = mushroomTexture.getSize(); mushroom.setOrigin(size.x / 2, size.y / 2); sf::Vector2f increment(0.4f, 0.4f);
while(window.isOpen()){ sf::Event event; while(window.pollEvent(event)){ if(event.type == sf::Event::Closed){ window.close(); } }
if((mushroom.getPosition().x + (size.x / 2) > window.getSize().x && increment.x > 0) || (mushroom.getPosition().x - (size.x / 2) < 0 && increment.x < 0)) { // Reverse the direction on X axis. increment.x = -increment.x; }
if((mushroom.getPosition().y + (size.y / 2) > window.getSize().y && increment.y > 0) || (mushroom.getPosition().y - (size.y / 2) < 0 && increment.y < 0)) {

It’s Alive! It’s Alive! – Setup and First Program
[ 14 ]
// Reverse the direction on Y axis. increment.y = -increment.y; }
mushroom.setPosition(mushroom.getPosition() + increment);
window.clear(sf::Color(16,16,16,255)); // Dark gray. window.draw(mushroom); // Drawing our sprite. window.display(); }}
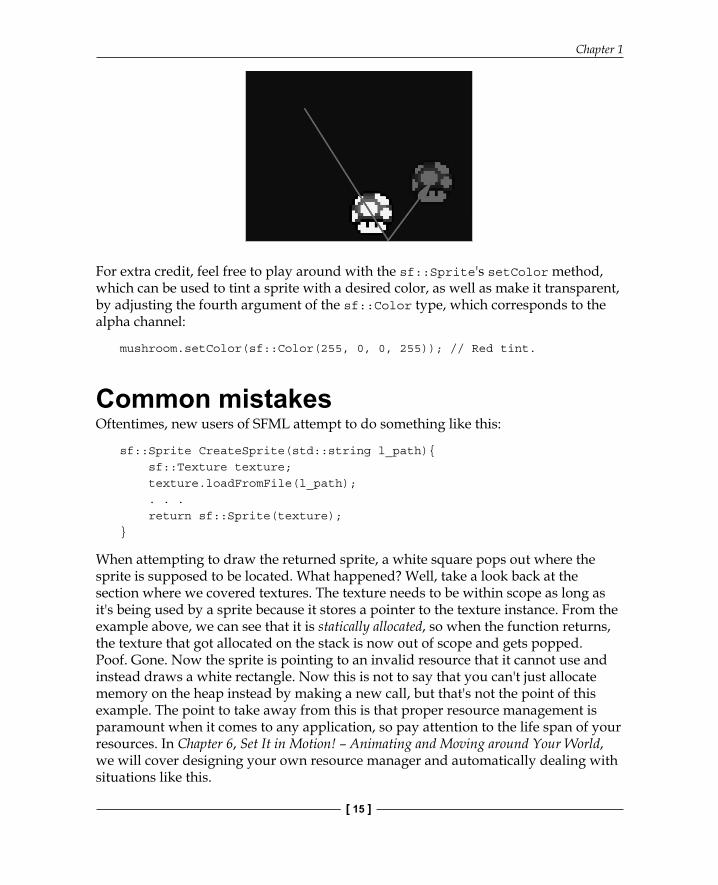
The code above will produce a sprite bouncing around the window, reversing in direction every time it hits the window boundaries. Error checking for loading the texture is omitted in this case in order to keep the code shorter. The two if statements after the event handling portion in the main loop are responsible for checking the current position of our sprite and updating the direction of the increment value represented by a plus or minus sign, since you can only go towards the positive or negative end on a single axis. Remember that the origin of a shape by default is its top-left corner, as shown here:
Because of this, we must either compensate for the entire width and height of a shape when checking if it's out-of-bounds on the bottom or the right side, or make sure its origin is in the middle. In this case, we do the latter and either add or subtract half of the texture's size from the mushroom's position to check if it is still within our desired space. If it's not, simply invert the sign of the increment fl oat vector on the axis that is outside the screen and voila! We have bouncing!
Chapter 1
[ 15 ]
For extra credit, feel free to play around with the sf::Sprite's setColor method, which can be used to tint a sprite with a desired color, as well as make it transparent, by adjusting the fourth argument of the sf::Color type, which corresponds to the alpha channel:
mushroom.setColor(sf::Color(255, 0, 0, 255)); // Red tint.
Common mist akesOftentimes , new users of SFML attempt to do something like this:
sf::Sprite CreateSprite(std::string l_path){ sf::Texture texture; texture.loadFromFile(l_path); . . . return sf::Sprite(texture);}
When attempting to draw the returned sprite, a white square pops out where the sprite is supposed to be located. What happened? Well, take a look back at the section where we covered textures. The texture needs to be within scope as long as it's being used by a sprite because it stores a pointer to the texture instance. From the example above, we can see that it is statically allocated, so when the function returns, the texture that got allocated on the stack is now out of scope and gets popped. Poof. Gone. Now the sprite is pointing to an invalid resource that it cannot use and instead draws a white rectangle. Now this is not to say that you can't just allocate memory on the heap instead by making a new call, but that's not the point of this example. The point to take away from this is that proper resource management is paramount when it comes to any application, so pay attention to the life span of your resources. In Chapter 6, Set It in Motion! – Animating and Moving around Your World, we will cover designing your own resource manager and automatically dealing with situations like this.

It’s Alive! It’s Alive! – Setup and First Program
[ 16 ]
Another common mistake is keeping too many texture instances around. A single texture can be used by as many sprites as one's heart desires. sf::Texture is not a lightweight object at all, where it's possible to keep tons of sf::Sprite instances using the same texture and still achieve great performance. Reloading textures is also expensive for the graphics card, so keeping as few textures as possible is one of the things you really need to remember if you want your application to run fast. That's the idea behind using tile sheets, which are just large textures with small images packed within them. This grants better performance, since instead of keeping around hundreds of texture instances and loading fi les one by one, we get to simply load a single texture and access any desired tile by specifying the area to read from. That will also receive more attention in later chapters.
Using unsupported image formats or format options is another fairly common issue. It's always best to consult the offi cial website for the most up to date information on fi le format support. A short list can be found here: http://www.sfml-dev.org/documentation/2.2/classsf_1_1Image.php#a9e4f2aa8e36d0cabde5ed5a4ef80290b
Finally, the LNK2019 errors deserve a mention. It doesn't matter how many times a guide, tutorial, or book mentions how to properly set up and link your project to any given library. Nothing is perfect in this world, especially not a human being. Your IDE output may get fl ooded by messages that look something like this when trying to compile your project:
error LNK2019: unresolved external symbol. . .
Do not panic, and please, don't make a new forum post somewhere posting hundreds of lines of code. You simply forgot to include all the required additional dependencies in the linker input. Revisit the part where we covered setting up the project for use with SFML and make sure that everything is correct there. Also, remember that you need to include libraries that other libraries are dependent on. For example, the system library always has to be included, the window library has to be included if the graphics module is being used, and so on. Statically linked libraries require their dependencies to be linked as well.

Chapter 1
[ 17 ]
SummaryA lot of ground has been covered in this chapter. Some of it may be a little bit diffi cult to grasp at fi rst if you're just starting, but don't be discouraged just yet. Applying this knowledge practically is the key to understanding it better. It's important that you are competent with everything that has been introduced so far before proceeding onto the next chapter.
If you can truly look throughout this chapter and say with utmost confi dence that you're ready to move forward, we would like to congratulate you on taking your fi rst major step towards becoming a successful SFML game developer! Why stop there? In the next chapter, we will be covering a better way to structure code for our fi rst game project. On top of that, time management will be introduced and we'll practically apply everything covered so far by building a major chunk of your fi rst, fully functional game. There's a lot of work ahead of us, so get the lead out! Your software isn't going to write itself.

Where to buy this book You can buy SFML Game Development By Example from the Packt Publishing website.
Alternatively, you can buy the book from Amazon, BN.com, Computer Manuals and most internet
book retailers.
Click here for ordering and shipping details.
www.PacktPub.com
Stay Connected:
Get more information SFML Game Development By Example