sharedband bonded broadbandsharedband.com/wp-content/uploads/2014/12/tp-link-td-w8968... ·...
TRANSCRIPT

September 2014 http://www.sharedband.com 1 of 12
Sharedband Bonded Broadband TP Link TD-W8968 Configuration Guide
Introduction This document is to instruct you how to configure the Sharedband software on the TP Link TD-W8968
router. It also walks you through setting up your LAN and WAN/Internet connections.
Note: This guide assumes that the router is not configured.
Preparation Make sure you have the Sharedband user Details for the Community you wish to setup.
Configuring Sharedband Step 1: Logon to the Web interface of the router (default address http://192.168.3.17). The default login is
'admin' and password 'Bonding123'.
Step 2: Click 'Configuration' under 'Sharedband' (by default clicking on 'Sharedband' should also take
you to the Sharedband configuration page).
September 2014 http://www.sharedband.com 2 of 12
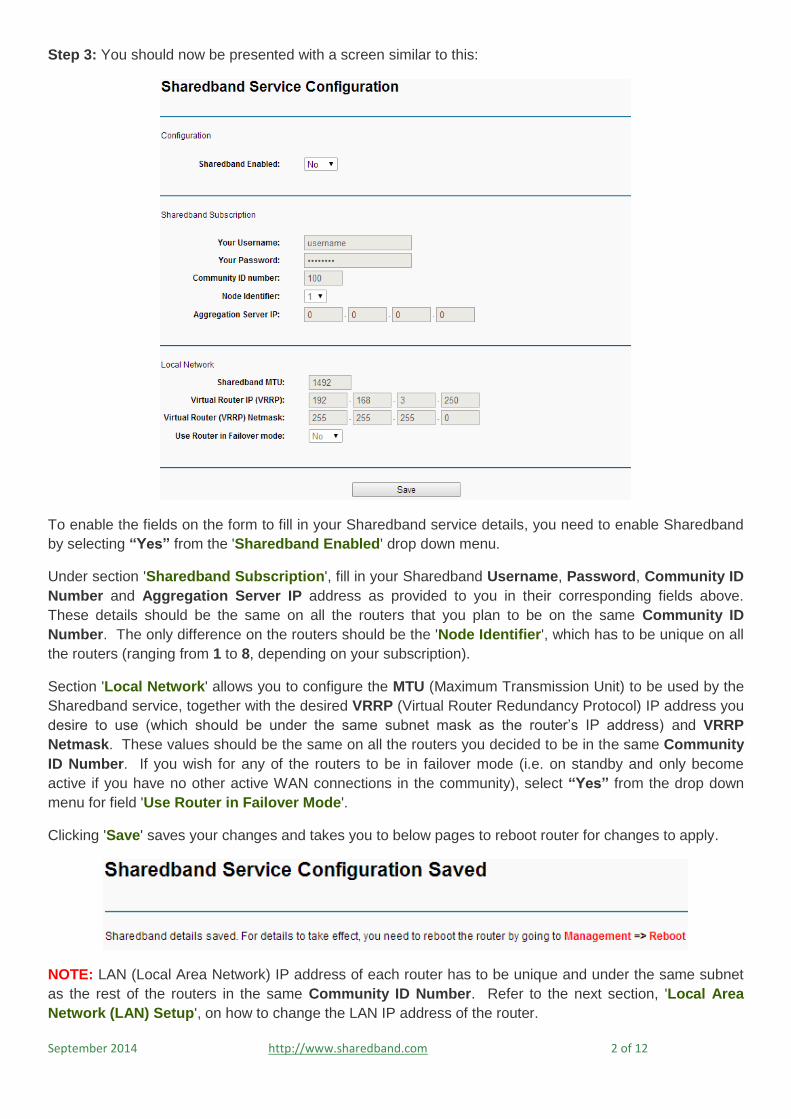
Step 3: You should now be presented with a screen similar to this:
To enable the fields on the form to fill in your Sharedband service details, you need to enable Sharedband
by selecting “Yes” from the 'Sharedband Enabled' drop down menu.
Under section 'Sharedband Subscription', fill in your Sharedband Username, Password, Community ID
Number and Aggregation Server IP address as provided to you in their corresponding fields above.
These details should be the same on all the routers that you plan to be on the same Community ID
Number. The only difference on the routers should be the 'Node Identifier', which has to be unique on all
the routers (ranging from 1 to 8, depending on your subscription).
Section 'Local Network' allows you to configure the MTU (Maximum Transmission Unit) to be used by the
Sharedband service, together with the desired VRRP (Virtual Router Redundancy Protocol) IP address you
desire to use (which should be under the same subnet mask as the router’s IP address) and VRRP
Netmask. These values should be the same on all the routers you decided to be in the same Community
ID Number. If you wish for any of the routers to be in failover mode (i.e. on standby and only become
active if you have no other active WAN connections in the community), select “Yes” from the drop down
menu for field 'Use Router in Failover Mode'.
Clicking 'Save' saves your changes and takes you to below pages to reboot router for changes to apply.
NOTE: LAN (Local Area Network) IP address of each router has to be unique and under the same subnet
as the rest of the routers in the same Community ID Number. Refer to the next section, 'Local Area
Network (LAN) Setup', on how to change the LAN IP address of the router.

September 2014 http://www.sharedband.com 3 of 12
Local Area Network (LAN) Setup Each router on the network is required to have a unique IP address. You also need to make sure that
routers in the same Community ID Number are under the same net mask (X.X.X.<node number>). The
LAN IP address is normally set to 192.168.3.X (X being the node number). To set the LAN IP, selecting
'Advanced Setup' 'LAN' 'IPv4 LAN Config' from the main menu will take you to below screen
Change the IP address in field 'IP Address' from 192.168.3.17 as needed. On doing so and moving focus
to another field on the form, a warning message in red, circled in the diagram above will appear. When you
click on the 'Save and Reboot' button, you will be present with the below dialog box.
September 2014 http://www.sharedband.com 4 of 12
(NOTE: If you wish to change the LAN Subnet Mask or DHCP Server Start and/or End IP address range,
this can be done by changing the values of the 'Subnet Mask', 'Start IP Address' and/or 'End IP Address'
fields respectively. If the LAN IP address of the router was not changed, you will not see the above
mentioned dialog box and the router will be rebooted. IF YOU CHANGE THE LAN SUBNET MASK OR
DHCP RANGE, MAKE SURE THAT YOU ALSO APPLY THE SAME CHANGES TO ALL THE OTHER
ROUTERS IN THE SAME COMMUNITY ID NUMBER.
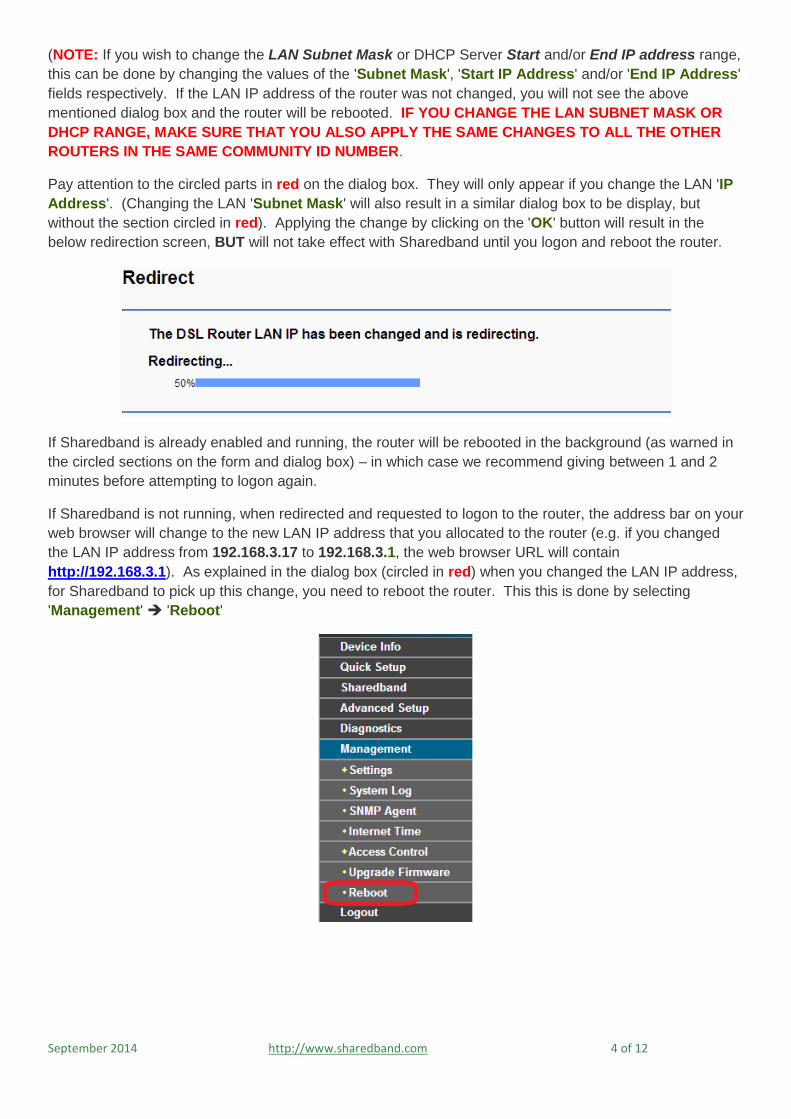
Pay attention to the circled parts in red on the dialog box. They will only appear if you change the LAN 'IP
Address'. (Changing the LAN 'Subnet Mask' will also result in a similar dialog box to be display, but
without the section circled in red). Applying the change by clicking on the 'OK' button will result in the
below redirection screen, BUT will not take effect with Sharedband until you logon and reboot the router.
If Sharedband is already enabled and running, the router will be rebooted in the background (as warned in
the circled sections on the form and dialog box) – in which case we recommend giving between 1 and 2
minutes before attempting to logon again.
If Sharedband is not running, when redirected and requested to logon to the router, the address bar on your
web browser will change to the new LAN IP address that you allocated to the router (e.g. if you changed
the LAN IP address from 192.168.3.17 to 192.168.3.1, the web browser URL will contain
http://192.168.3.1). As explained in the dialog box (circled in red) when you changed the LAN IP address,
for Sharedband to pick up this change, you need to reboot the router. This this is done by selecting
'Management' 'Reboot'

September 2014 http://www.sharedband.com 5 of 12
which will take you to the reboot page below. Click on the 'Reboot' button
and confirm you want to reboot the router by clicking on the 'OK' button on the dialog box similar to below.
This will take you to the restart progress screen similar to below
On completion, you will be taken back to the logon screen as shown below

September 2014 http://www.sharedband.com 6 of 12
WAN (Wide Area Network)/Internet Connection This section walks you through how to configure your Internet connection. At present, the TP Link TD-
W8968 router only supports PPPoA (Point-to-Point over ATM) WAN link type. Please make sure to contact
your Internet Service Provider (ISP) for your PPP username & password, together with connection settings
for VPI (Virtual Path Identifier), VCI (Virtual Channel Identifier) and encapsulation mode.
To configure your Internet connection, click on the 'Quick Setup' link when you logon to the web GUI.
This will lead you to the below page to fill in your connection details obtained from your ISP.
If your ISP is available in the drop down for field 'ISP' and is selected, make sure that the values in the
'VPI/VCI' and 'Encapsulation Mode' matches that from your ISP. If it is different, select “Other” from the
'ISP' field, which will enable these fields to be editable, for you to enter the correct values.
Enter your login details from your ISP in the 'PPP Username' and 'PPP Password' fields. If you wish, you
may change the MTU value used by the router to communicate with your ISP – which is usually 1492. (As
mentioned in section 'Configuring Sharedband', this MTU value is different to that configured for
Sharedband communication).
At this point, clicking on the 'Cancel' button will ignore any changes and return you to the router’s 'Device
Info' page. To proceed with your changes, click the 'Next' button, which will ask you to confirm your
changes as shown on the next page.

September 2014 http://www.sharedband.com 7 of 12
If you do not wish to proceed with the changes, click the 'Cancel' button, which will take you to the router’s
'Device Info' page. To make amendments to the connection settings, select the 'Back' button. If you are
happy with the new settings, click the 'Confirm' button, which will save and apply the changes, then take
you to the router’s 'Device Info' page similar to below.

September 2014 http://www.sharedband.com 8 of 12
The 'Device Info' page is automatically refreshed every 30 seconds. Once you have a successful
connection to your ISP, the 'Internet Info' section will update with the connection details, similar to below.
September 2014 http://www.sharedband.com 9 of 12
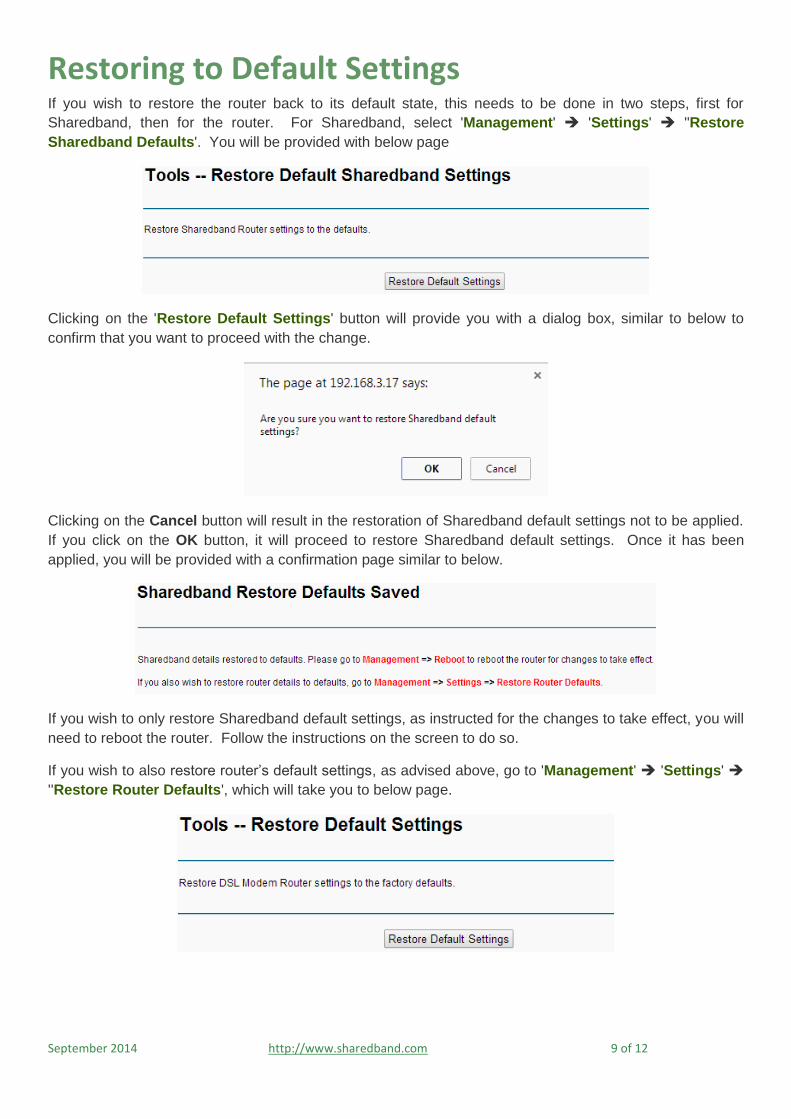
Restoring to Default Settings If you wish to restore the router back to its default state, this needs to be done in two steps, first for
Sharedband, then for the router. For Sharedband, select 'Management' 'Settings' ''Restore
Sharedband Defaults'. You will be provided with below page
Clicking on the 'Restore Default Settings' button will provide you with a dialog box, similar to below to
confirm that you want to proceed with the change.
Clicking on the Cancel button will result in the restoration of Sharedband default settings not to be applied.
If you click on the OK button, it will proceed to restore Sharedband default settings. Once it has been
applied, you will be provided with a confirmation page similar to below.
If you wish to only restore Sharedband default settings, as instructed for the changes to take effect, you will
need to reboot the router. Follow the instructions on the screen to do so.
If you wish to also restore router’s default settings, as advised above, go to 'Management' 'Settings'
''Restore Router Defaults', which will take you to below page.

September 2014 http://www.sharedband.com 10 of 12
You will be prompted if you wish to proceed with the change as shown below. Click the Cancel button if
you do not wish to restore default settings.
To proceed with the change, click the OK button, which will take you to a progress page similar to below.
Once you restore the router back to its default setting, the LAN IP address of the router will return to
192.168.3.17 (if you changed it from this originally) and you will be directed to the web login page
(http://192.168.3.17).

September 2014 http://www.sharedband.com 11 of 12
Sharedband Connection Status Once you have completed configuring Sharedband and your Internet connection, you can check
Sharedband’s status by clicking the 'Sharedband' 'Status' link. If Sharedband has not been enabled,
(remember, for any change to the status of Sharedband to take effect, a reboot of the router is required),
you will see the below message
Sorry, the Sharedband software hasn't been started. Please reboot your router after activating it
If Sharedband is active but unable to successfully connect to the Sharedband Aggregation Server. Check
that you entered the correct details for your configuration.
If everything was configured correctly for Sharedband and your Internet connection, you will have a page
similar to below
If the router is linked to at least one or more Sharedband router on your LAN in the same community, field
'Number of live Sharedband routers' under section 'Community Information' will state the total number
of routers this router can see, including itself. Field 'Number of accessible connections' will tell you how
many of these routers are connected directly to Sharedband.

September 2014 http://www.sharedband.com 12 of 12
Clicking on the [diagnostics] link next to the value of field 'Number of live Sharedband routers' will take
you to a diagnostics page similar to below.
The * next to the 2 under column 'Index' indicates that the router configured with this Sharedband node ID
(in this case this router) is the one controlling the VRRP interface. If the router can see at least one more
Sharedband router in the same community, you will have a display similar to below.