sharepoint server 2019 installation and configuration ... · supported sql server versions: •...
TRANSCRIPT
SharePoint Server 2019 Installation and Configuration Guide
Manoj V Karunarathne | [email protected] | @manojviduranga
Microsoft
SharePoint
Server 2019
Installation and
Configuration Guide for
Public Preview Version
Manoj V Karunarathne
SharePoint Server 2019 Installation and Configuration Guide
Manoj V Karunarathne | [email protected] | @manojviduranga
Preface
This book intends to provide technical guidance for administrators/ITPros on
Installing, Configuring and managing Microsoft SharePoint Server 2019 in a
corporate environment.
SharePoint has become crucial in corporate environments, especially after the
release of the latest cutting-edge functionalities in the SharePoint online. Using
this simple and easy to follow guidance, you will be able to get SharePoint 2019
server installed and configured in a physical or virtual environment. I have used
Microsoft Azure VMs for my farm in this setup as it’s easy to provision and scale
out. Azure is the most flexible way for dev/test environments and even for
production for those who can’t invest massively on hardware.
This book is composed by myself and it is not verified by Microsoft or any other
party. Steps given in this guide is completely based on my industry experience
and studies of the product for the past few years since I deployed it in client sites
and personal usage. Use cases given in this book may vary from other
environments. Product logos, web addresses, some pictures are subjected to
Microsoft copyrights terms.
Who should read this book
This book is for those who are installing, configuring and administering Microsoft
SharePoint server 2019 in a corporate or test/dev environment.

SharePoint Server 2019 Installation and Configuration Guide
Manoj V Karunarathne | [email protected] | @manojviduranga
Notes
This guide is based on the public preview version of SharePoint Server 2019. Some
of the features and functionalities may change in the final product, however,
fundamentals such as Minrole shall not be changed. Amended guide will be
published up on the release of product updates. Further, some deprecated
features may not present in the public preview (e.g. InfoPath Form Services).
Public preview of any Microsoft product is not intended for production use at any
condition and SharePoint is not an exception. SharePoint Server 2019 public
preview is not convertible to an RTM version hence, your data and configurations
would be in a risk if you have placed such content in a preview environment and
planning to take it straight to production.
Contents
▪ Removed and Deprecated Features of SharePoint Server 2019
▪ System Requirements for SharePoint 2019
▪ Service Accounts Requirements
▪ Deployment Phases
▪ Installing a Single Server Farm
▪ Configuring Multi-Server SharePoint Farm
▪ Configuring Search in a Multi-Server SharePoint Environment
▪ Converting a SharePoint Server Role
▪ Creation of a Team Site in SharePoint 2019
SharePoint Server 2019 Installation and Configuration Guide
Manoj V Karunarathne | [email protected] | @manojviduranga
Removed and Deprecated Features of
SharePoint Server 2019
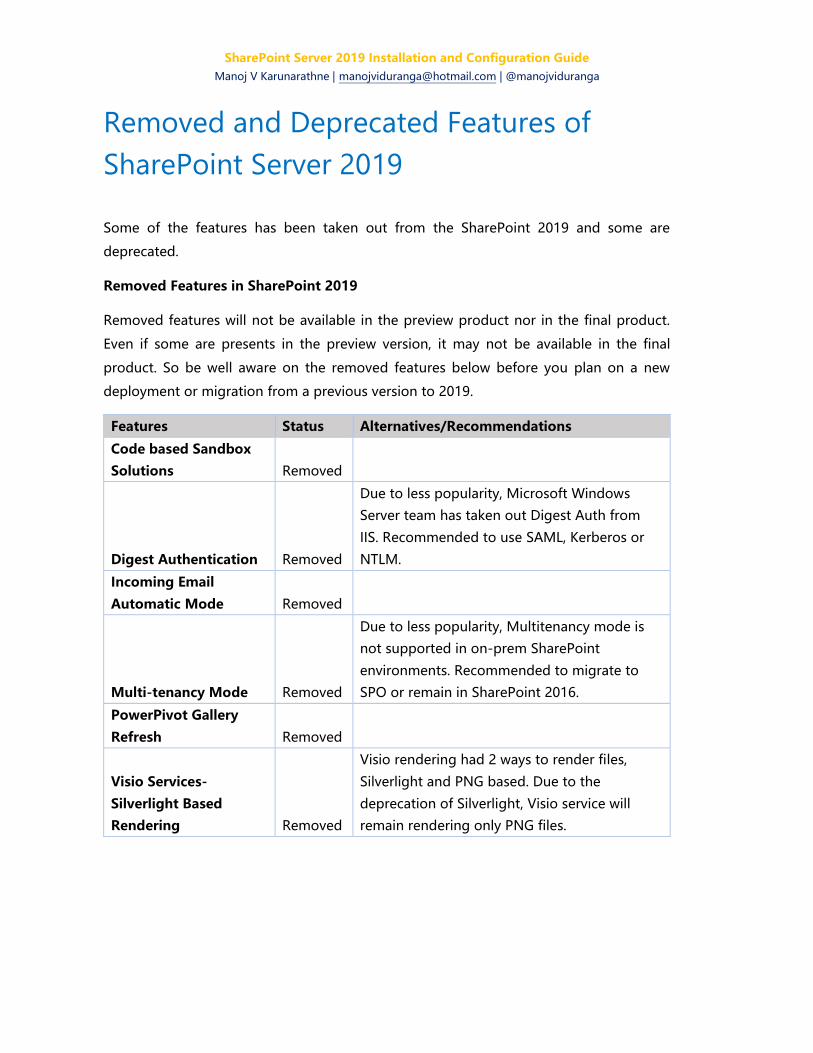
Some of the features has been taken out from the SharePoint 2019 and some are
deprecated.
Removed Features in SharePoint 2019
Removed features will not be available in the preview product nor in the final product.
Even if some are presents in the preview version, it may not be available in the final
product. So be well aware on the removed features below before you plan on a new
deployment or migration from a previous version to 2019.
Features Status Alternatives/Recommendations
Code based Sandbox
Solutions Removed
Digest Authentication Removed
Due to less popularity, Microsoft Windows
Server team has taken out Digest Auth from
IIS. Recommended to use SAML, Kerberos or
NTLM.
Incoming Email
Automatic Mode Removed
Multi-tenancy Mode Removed
Due to less popularity, Multitenancy mode is
not supported in on-prem SharePoint
environments. Recommended to migrate to
SPO or remain in SharePoint 2016.
PowerPivot Gallery
Refresh Removed
Visio Services-
Silverlight Based
Rendering Removed
Visio rendering had 2 ways to render files,
Silverlight and PNG based. Due to the
deprecation of Silverlight, Visio service will
remain rendering only PNG files.

SharePoint Server 2019 Installation and Configuration Guide
Manoj V Karunarathne | [email protected] | @manojviduranga
Deprecated Features in SharePoint 2019
Deprecated features are usually available in the product but not encouraged to use or
depend on them by Microsoft. These features are taken out from the further investments
which means, there will be no effort put on them by Microsoft. Deprecated features would
still be up and running in your environment, however, the bottom line is, they aren’t the
future nor there is guarantee to be available in the next version of the product. The
recommended approach is to use futuristic alternatives over these features.
Features Status Alternatives/Recommendations
Access Services
2010 Deprecated Look in to PowerApps and Flow
Access Services
2013 Deprecated Look in to PowerApps and Flow
Custom Help Deprecated
No more locally installed help engine. New
SharePoint help is rendered in the cloud to
ensure the reliability and relevancy.
Aggregated News
Feed Deprecated
Team News, Communication Sites, Teams or
Yammer encouraged to use
Groove Sync Client
(Or known as
OneDrive for
Business exe) Deprecated
New OneDrive Sync Client (a.k.a Next
Generation Sync Client) is now supported
across all scenarios (Public, Office365,
SharePoint 2019 on-premise)
InfoPath Services Deprecated
Advised to explore alternatives. No new client
shipped but the old 2013 client remains
supported
List Web Services Deprecated
Two list web services are deprecated. These
had dependency for Groove sync client and
since now Groove exe is deprecated, these web
services are deprecated too.
Lists.GetListItemChangesWithKnowledge
Lists.UpdateListItemsWithKnowledge
Machine
Translations (And
Variations) Deprecated Supported but deprecated for SharePoint 2019

SharePoint Server 2019 Installation and Configuration Guide
Manoj V Karunarathne | [email protected] | @manojviduranga
PerformancePoint
Services Deprecated
PerformancePoint service has a tight
dependency on Silverlight rendering. As
Silverlight is not supported after 2021,
PerformancePoint will also be a deprecated
feature but yet supported. Advised to explore
alternatives such as Microsoft PowerBI
SharePoint
Designer Deprecated
No new SharePoint designer. Microsoft
ensured to support SPD2013 on SharePoint
2019 but not beyond 2026. Advised to use
other advance and comprehensive tools.
Site Mailbox Deprecated
Site Mailboxes are not supported in SharePoint
online and now deprecated in on-premise.
Advised to explore Shared Mailboxes as an
alternative.
Site Manager Deprecated
Modern file move feature delivers this
capability in better ways. Hence, deprecated.
SharePoint Server 2019 Installation and Configuration Guide
Manoj V Karunarathne | [email protected] | @manojviduranga
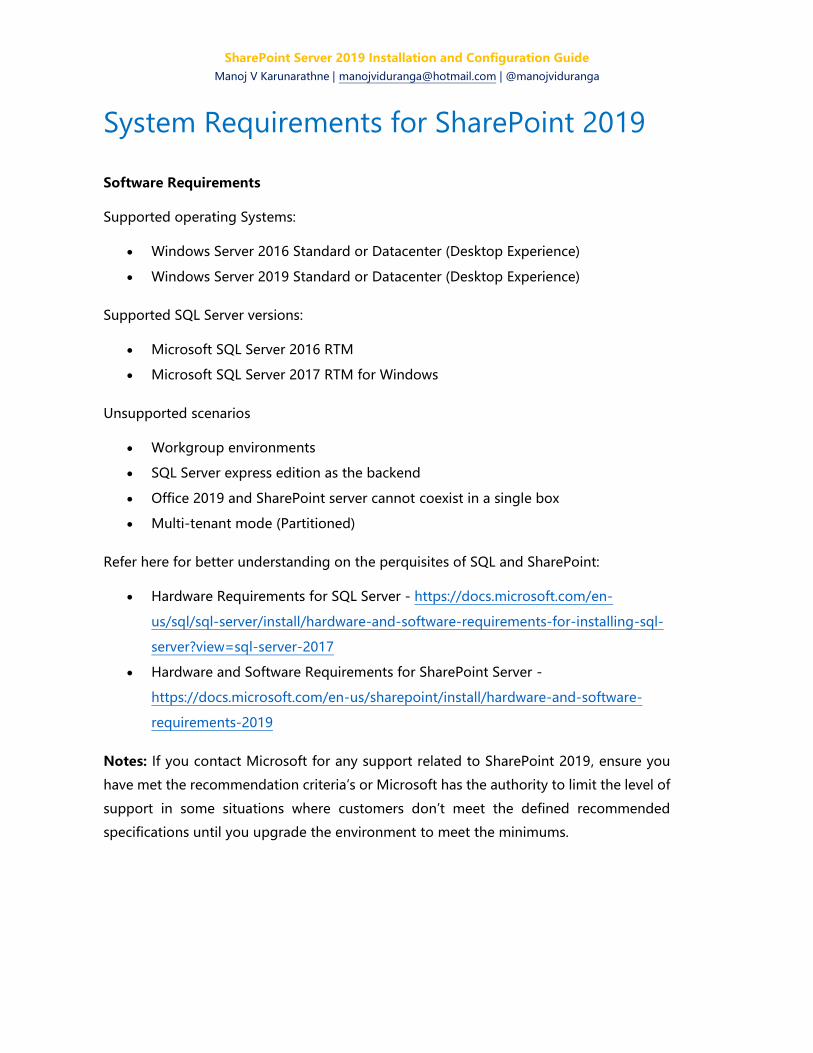
System Requirements for SharePoint 2019
Software Requirements
Supported operating Systems:
• Windows Server 2016 Standard or Datacenter (Desktop Experience)
• Windows Server 2019 Standard or Datacenter (Desktop Experience)
Supported SQL Server versions:
• Microsoft SQL Server 2016 RTM
• Microsoft SQL Server 2017 RTM for Windows
Unsupported scenarios
• Workgroup environments
• SQL Server express edition as the backend
• Office 2019 and SharePoint server cannot coexist in a single box
• Multi-tenant mode (Partitioned)
Refer here for better understanding on the perquisites of SQL and SharePoint:
• Hardware Requirements for SQL Server - https://docs.microsoft.com/en-
us/sql/sql-server/install/hardware-and-software-requirements-for-installing-sql-
server?view=sql-server-2017
• Hardware and Software Requirements for SharePoint Server -
https://docs.microsoft.com/en-us/sharepoint/install/hardware-and-software-
requirements-2019
Notes: If you contact Microsoft for any support related to SharePoint 2019, ensure you
have met the recommendation criteria’s or Microsoft has the authority to limit the level of
support in some situations where customers don’t meet the defined recommended
specifications until you upgrade the environment to meet the minimums.

SharePoint Server 2019 Installation and Configuration Guide
Manoj V Karunarathne | [email protected] | @manojviduranga
Service Accounts Requirements
Having dedicated service accounts benefits in avoiding interdependency of services. In
case if one SharePoint service account's password expires or goes locked out, other
services will remain unimpacted.
On the other hand, it’s a little more complicated and requires additional effort to maintain
multiple accounts. However, complying to at least Medium Secure level will save you from
security loop holes.
Same goes for SQL. MSSQLSERVER and SQLSERVERAGENT can be run with a single
account but recommended to have two separate accounts.
Notes: All service accounts must be domain user accounts as SharePoint does not support
local accounts.
Security
Level Account/Details
SQL Server Service Accounts
Low
Create a single service account for SQL service and Agent. (e.g.
SQL_SVC would be meaningful)
You need to provide local admin rights for this above account in SQL
node/s and the account must be a domain account, not local.
Medium
Have a dedicated account as SQL_Admin which can be used for
installing SQL server setup. This account needs to have local admin
rights for the SQL server/s
Create a sperate account as SQL_SVC which can be used for running
MSSQLSERVER and SQLSERVERAGENT services
In this case, only the SQL_Admin account would be the member of
the local administrator group. Both accounts need to be domain
users, not the local.
High
Dedicated account created for the installation of the SQL instance
(SQL_Admin). This account has to be a local administrator
Another dedicated account as SQL_SVC for running the SQL database
engine services. This account doesn’t have to be a local admin but
simply a domain user.
SharePoint Server 2019 Installation and Configuration Guide
Manoj V Karunarathne | [email protected] | @manojviduranga
3rd account is for SQLSERVERAGENT service. This can be SQL_Agent
and this also doesn’t have to be a local admin but simply a domain
user.
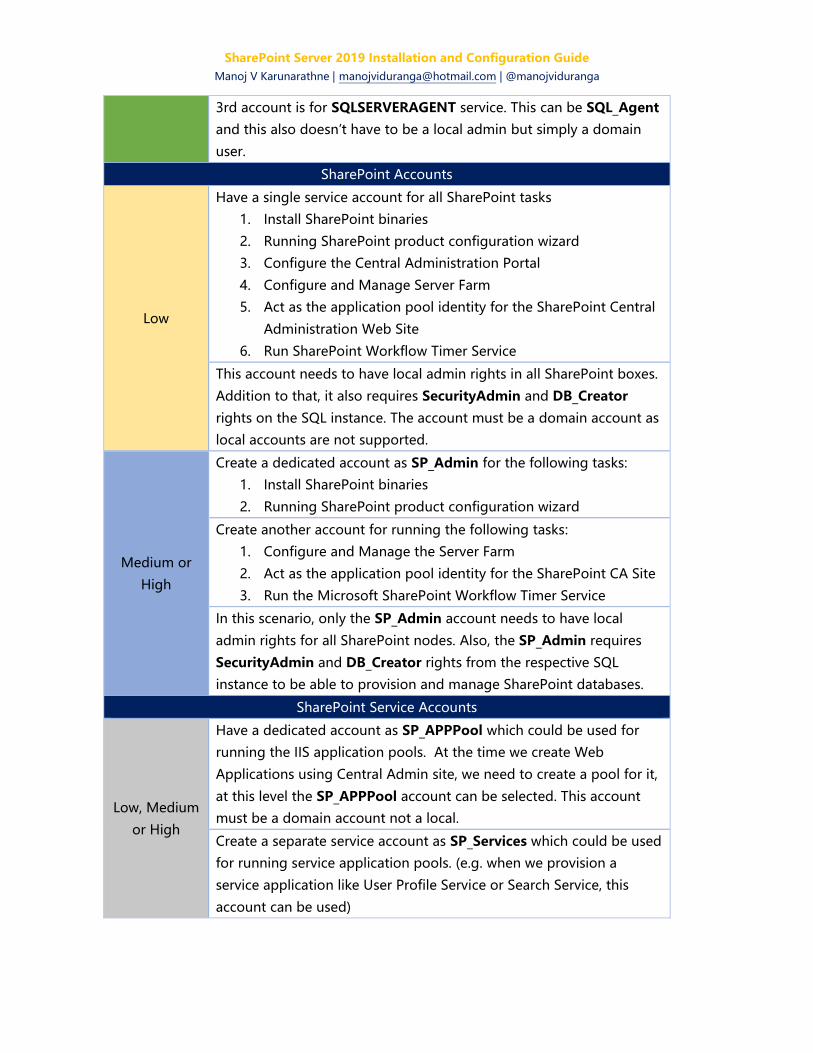
SharePoint Accounts
Low
Have a single service account for all SharePoint tasks
1. Install SharePoint binaries
2. Running SharePoint product configuration wizard
3. Configure the Central Administration Portal
4. Configure and Manage Server Farm
5. Act as the application pool identity for the SharePoint Central
Administration Web Site
6. Run SharePoint Workflow Timer Service
This account needs to have local admin rights in all SharePoint boxes.
Addition to that, it also requires SecurityAdmin and DB_Creator
rights on the SQL instance. The account must be a domain account as
local accounts are not supported.
Medium or
High
Create a dedicated account as SP_Admin for the following tasks:
1. Install SharePoint binaries
2. Running SharePoint product configuration wizard
Create another account for running the following tasks:
1. Configure and Manage the Server Farm
2. Act as the application pool identity for the SharePoint CA Site
3. Run the Microsoft SharePoint Workflow Timer Service
In this scenario, only the SP_Admin account needs to have local
admin rights for all SharePoint nodes. Also, the SP_Admin requires
SecurityAdmin and DB_Creator rights from the respective SQL
instance to be able to provision and manage SharePoint databases. SharePoint Service Accounts
Low, Medium
or High
Have a dedicated account as SP_APPPool which could be used for
running the IIS application pools. At the time we create Web
Applications using Central Admin site, we need to create a pool for it,
at this level the SP_APPPool account can be selected. This account
must be a domain account not a local.
Create a separate service account as SP_Services which could be used
for running service application pools. (e.g. when we provision a
service application like User Profile Service or Search Service, this
account can be used)

SharePoint Server 2019 Installation and Configuration Guide
Manoj V Karunarathne | [email protected] | @manojviduranga
Create a dedicated service account as SP_Crawl which could be used
for search service application to crawl the content. In a low secure
setup, this service also could run SharePoint search Windows service.
Have a dedicated user account for SharePoint search service as
SP_Search. This service will be running in every search server in the
farm as a Windows service.
Create a dedicated service account as SP_UPS which could be used
for running User Profile Service to sync identities with Active
Directory. Ensure this account has Replicate Directory Changes rights
on the Active Directory for syncing activities.
Create a dedicated account as SP_MySitesPool which could be used
for the Web Application pool of SharePoint My Sites.
Addition to this, you will need more accounts to configure other
services such as Workflow Manager, Access Services, Excel Service
and so on. Having a dedicated account for each service would be
more secure and avoids single point of failure however, it requires
additional efforts in configuring and maintaining.
SharePoint Server 2019 Installation and Configuration Guide
Manoj V Karunarathne | [email protected] | @manojviduranga
Deployment Phases
Having a systematic approach in a SharePoint deployment project can only have benefits.
Dividing tasks into phases and carry out in an ordered manner will help greatly to identify
issues early and avoid confusions and unexpected outcomes. Microsoft highly recommend
that you follow these stages in the given order to achieve the optimum result out of your
SharePoint deployment project. These phases would remain same despite the version of
SharePoint.
1. Planning
2. Development
3. Proof of concept
4. Pilot
5. User acceptance test (Both End User and administrator experience is tested and
signed before launching to production)
6. Production (The setup is exposed to end users after all the testing and
verifications)
SharePoint Server 2019 Installation and Configuration Guide
Manoj V Karunarathne | [email protected] | @manojviduranga
Installing a Single Server Farm
Following steps will take you through the settings and configuration of a single Server
SharePoint Server 2019 farm. A single server farm is ideal for testing and developmental
purposes but not for enterprise use. You can try out the full potential of the product using
a single server (except Database and Active Directory) farm but it is not meant to be used
in live environments unless you analyze, plan and design the appropriate farm architecture
to meet the workloads and the demand. SharePoint Server heavily depends on local
hardware such as Memory, IOPs, Processor and network performance. Failing to provide
recommended specification could result bad performance and user experience. Hence,
ensure you go through the recommended hardware specifications defined by Microsoft
for each architecture.
Preparing servers
SharePoint 2019 can only be configured in a domain environment. You must have an
Active Directory setup in order to install SharePoint as Microsoft does not support
workgroup environments for SharePoint anymore. Ensure the following criteria are ready
before installing the product.
Active Directory and DNS servers up and running (a Test AD environment is ideal if you
can afford). In my setup, I have provisioned a brand-new AD/DNS server in Azure as it is
the easiest and cost-effective way. A single server for both AD/DNS roles is used in this
setup.
Ensure the following preliminary steps are followed. The guide will not go through these
steps as these are beyond the SharePoint setup.
1. Install and configure AD and DNS server
2. Create SharePoint and SQL service accounts
3. Provision two virtual machines for SharePoint and SQL nodes
4. Configure static IPs on SharePoint and SQL Nodes and define meaningful names
for each (e.g. SPAPP1, SPDB1)
5. Join the SQL and SharePoint server to the domain and restart the servers.
6. Add necessary service accounts (SQL and SharePoint setup accounts) as local
admins of each server (SharePoint setup account needs to be a local

SharePoint Server 2019 Installation and Configuration Guide
Manoj V Karunarathne | [email protected] | @manojviduranga
administrator for all SharePoint servers and SQL nodes must have SQL setup
account as the local admin)
7. Download SharePoint and SQL sever binaries from official Microsoft site.

SharePoint Server 2019 Installation and Configuration Guide
Manoj V Karunarathne | [email protected] | @manojviduranga
Download binaries
Download SharePoint and SQL setups and place them in respective nodes. SharePoint
2019 Preview can be downloaded here: https://www.microsoft.com/en-
us/download/details.aspx?id=57169
Preview version product key: M692G-8N2JP-GG8B2-2W2P7-YY7J6
Install SharePoint Server prerequisites
There are two ways to install prerequisites for SharePoint as usual, Manual and
prerequisites installer.
Following are the set of prerequisites are installed
1. Web Server (IIS) role
2. Application Server role
3. Microsoft .NET Framework version 4.7.2
4. Microsoft SQL Server 2012 Service Pack 4 Native Client
5. Microsoft WCF Data Services 5.6
6. Microsoft Identity Extensions
7. Microsoft Information Protection and Control Client (MSIPC)
8. Microsoft Sync Framework Runtime v1.0 SP1 (x64)
9. Windows Server AppFabric 1.1
10. Cumulative Update Package 7 for Microsoft AppFabric 1.1 for Windows Server (KB
3092423)
11. Visual C++ Redistributable Package for Visual Studio 2012
12. Visual C++ Redistributable Package for Visual Studio 2017
Note: The Microsoft SharePoint Products Preparation Tool might not be able to install
Microsoft .NET Framework version 3.5 automatically. In this case you need to manually
install the .NET Framework 3.5 Feature Windows Feature as a prerequisite using the
Windows Server install media.
Install prerequisites using prerequisites installer tool (Recommended)
Once you have the media downloaded, explore the file and copy it to a new folder in the
local storage. This is because, media mapping could cause problems sometimes when the

SharePoint Server 2019 Installation and Configuration Guide
Manoj V Karunarathne | [email protected] | @manojviduranga
machine is restarted during the installation. Having the ISO content copied to a folder and
running the tool from there can easily prevent issues.
Now login to SharePoint box using the SharePoint setup account (SP_Admin) and open
the above location. Right click on the “PrerequisitesInstaller” exe and run it as
administrator. If your server has UAC enabled, this prompt might pop up. Simply click
“Yes” here to proceed.

SharePoint Server 2019 Installation and Configuration Guide
Manoj V Karunarathne | [email protected] | @manojviduranga
Click “Next” to begin
And give it a moment. Depends on your internet connectivity strength, files will be
downloaded and installed within few minutes time. Do not attempt any other activities
during this time in the server.
SharePoint Server 2019 Installation and Configuration Guide
Manoj V Karunarathne | [email protected] | @manojviduranga
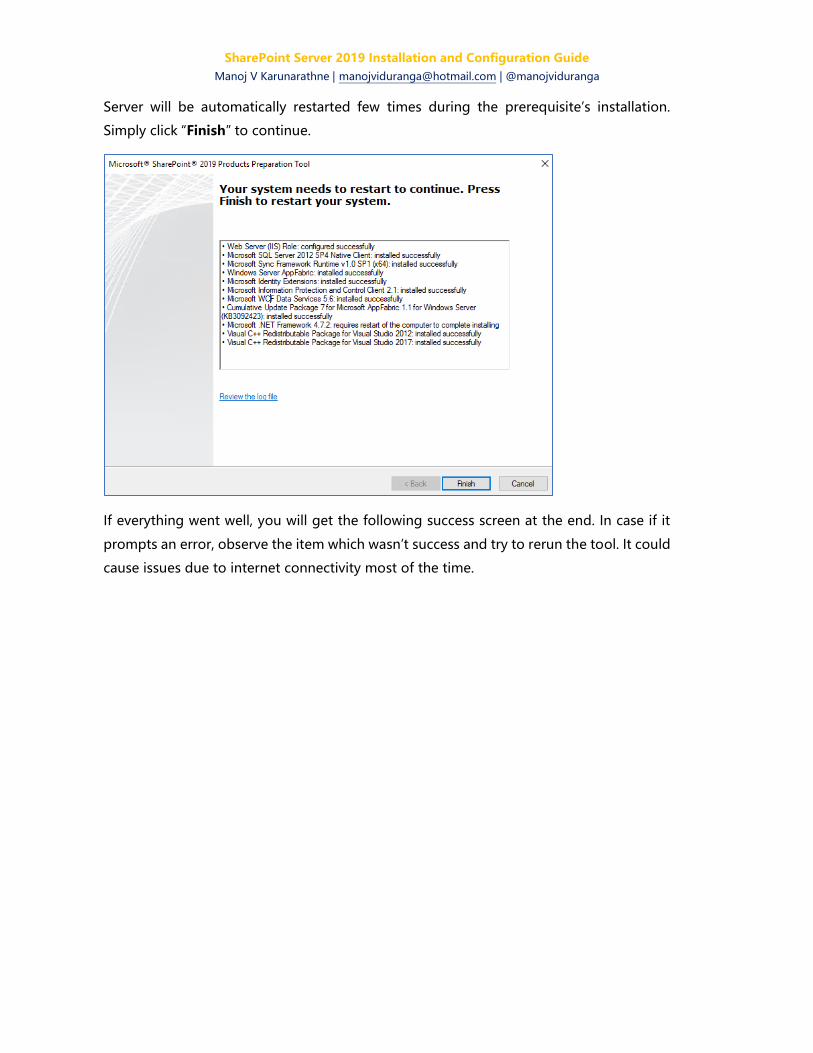
Server will be automatically restarted few times during the prerequisite’s installation.
Simply click “Finish” to continue.
If everything went well, you will get the following success screen at the end. In case if it
prompts an error, observe the item which wasn’t success and try to rerun the tool. It could
cause issues due to internet connectivity most of the time.

SharePoint Server 2019 Installation and Configuration Guide
Manoj V Karunarathne | [email protected] | @manojviduranga
Install all prerequisites manually (Suitable for servers without internet connectivity)
Incase if your servers have no internet connectivity, you can install prerequisites manually.
Simply download the following from another machine which has internet and copy it to
SharePoint server.
Download the prerequisites files:
1. Microsoft .NET Framework version 4.7.2
2. Microsoft WCF Data Services 5.6
3. Microsoft Information Protection and Control Client (MSIPC)
4. Microsoft SQL Server 2012 Service Pack 4 (SP4) Native Client (installs with
Microsoft SQL Server 2012 Feature Pack)
5. Microsoft Sync Framework Runtime v1.0 SP1 (x64)
6. Windows Server AppFabric 1.1
7. Cumulative Update Package 7 for AppFabric 1.1 for Windows Server
8. Visual C++ Redistributable Package for Visual Studio 2012

SharePoint Server 2019 Installation and Configuration Guide
Manoj V Karunarathne | [email protected] | @manojviduranga
9. Visual C++ Redistributable Package for Visual Studio 2017
10. Exchange Web Services Managed API, version 1.2
11. Microsoft Identity Extensions
Do not install the above list yet. Just run the following from an elevated PowerShell first
and let it install the Windows components in your SharePoint server. After completion of
this, you can install the above list in order.
Install-WindowsFeature NET-HTTP-Activation,NET-Non-HTTP-Activ,NET-WCF-Pipe-
Activation45,NET-WCF-HTTP-Activation45,Web-Server,Web-WebServer,Web-Common-
Http,Web-Static-Content,Web-Default-Doc,Web-Dir-Browsing,Web-Http-Errors,Web-
App-Dev,Web-Asp-Net,Web-Asp-Net45,Web-Net-Ext,Web-Net-Ext45,Web-ISAPI-
Ext,Web-ISAPI-Filter,Web-Health,Web-Http-Logging,Web-Log-Libraries,Web-Request-
Monitor,Web-Http-Tracing,Web-Security,Web-Basic-Auth,Web-Windows-Auth,Web-
Filtering,Web-Performance,Web-Stat-Compression,Web-Dyn-Compression,Web-Mgmt-
Tools,Web-Mgmt-Console,WAS,WAS-Process-Model,WAS-NET-Environment,WAS-
Config-APIs,Windows-Identity-Foundation,Xps-Viewer -IncludeManagementTools -
Verbose
Note: Some of the Windows features being installed during this setup are “Features on
Demand (FOD)”, which are downloaded from Windows Update. If your server doesn’t have
access to Windows Update due to connectivity issues, you can specify local installation
files by adding the Source parameter and pointing to the \sources\sxs folder on the
Windows Server installation media (e.g. source D:\sources\sxs). Ensure you have the
Windows server media inserted in the D drive for this.
Installing SharePoint Product using product installation wizard
Now that you have prepared the server with prerequisites, you can go ahead and install
the product. Prerequisites installer tool is the recommended and hassle-free way to get
this done as it simply downloads everything in the backend and installs automatically for
you without having to involve manually at any point.
Login to SharePoint server as the installer account (SharePoint setup account) and run the
setup.exe in elevated mode.

SharePoint Server 2019 Installation and Configuration Guide
Manoj V Karunarathne | [email protected] | @manojviduranga
First screen is to insert the license key. You can use the beta key displayed here. Note:
SharePoint Server public previews cannot be upgraded/converted to RTM version.
There is no option to avoid the license terms. You must accept this one!

SharePoint Server 2019 Installation and Configuration Guide
Manoj V Karunarathne | [email protected] | @manojviduranga
Let the file location be C: drive. Ensure you have enough space in C Drive to host
SharePoint binaries. You can move out the logs in to a different drive for better
performance later. Simply click “Install now” to begin.

SharePoint Server 2019 Installation and Configuration Guide
Manoj V Karunarathne | [email protected] | @manojviduranga
Depends on the server performance, this usually take 5-10 minutes to complete. Do not
attempt to do any changes in the server during this task. Just leave it alone for few
minutes.
If all went well, you will see the success message as shown below. Untick the check box
for running “Configuration Wizard up on Closing” and close the wizard.

SharePoint Server 2019 Installation and Configuration Guide
Manoj V Karunarathne | [email protected] | @manojviduranga
Configuring SharePoint Product
Once the product installation is done, it’s time for you to configure the product through
the SharePoint product configuration wizard.
Sign in to the SharePoint server as the SP_Admin (Setup) account, or as SP_Farm if you
only have a single account for everything (Not recommended).
And, just type “SharePoint” in the start screen to find the SharePoint 2019 Product
Configuration tool. Simply run it from there.

SharePoint Server 2019 Installation and Configuration Guide
Manoj V Karunarathne | [email protected] | @manojviduranga
In the first screen, choose the 2nd option as we are deploying a new farm. To connect a
secondary server to an existing farm you can use the first option.
Defined the following parameters as per your environment. Leave the SharePoint
Configuration Database name as default. Ensure your setup account has the rights in SQL
instance in order to provision the farm databases during the product configuration and
simply hit “Next” to continue.

SharePoint Server 2019 Installation and Configuration Guide
Manoj V Karunarathne | [email protected] | @manojviduranga
Next is to define the farm passphrase. Farm passphrase could be anything but ensure
you define something strong and you can remember. It should also align with
organizational security and compliance standards.

SharePoint Server 2019 Installation and Configuration Guide
Manoj V Karunarathne | [email protected] | @manojviduranga
Here is where Minrole comes in to the picture. Server role can now be selected from the
wizard itself and in this scenario it just a single server farm (Except to the DB server).

SharePoint Server 2019 Installation and Configuration Guide
Manoj V Karunarathne | [email protected] | @manojviduranga
You can specify a custom port number for SharePoint Central Administration Web site
here. A custom port number is the recommended approach.
Under security settings, choose NTLM unless you have a specific need to go for Kerberos.

SharePoint Server 2019 Installation and Configuration Guide
Manoj V Karunarathne | [email protected] | @manojviduranga
A summary of your configuration inputs will be prompted next. Go through the details
and hit “Next” when you think you are ready to start the provisioning. Central
Administration portal will be provisioned in the first server that you deploy in a farm
however, you can change this later using the same wizard. As you deploy more servers,
you can decide on which server you want CA to be hosted. As central admin portal also
hosted in IIS as a Web Site, it is ideal to host in Web Server/s so the application server can
be dedicated for services and applications workloads. You can easily switch the CA site
across different servers using “Product Configuration Wizard”. However, in a production
setup, make sure you complete this task before going live.
SharePoint Server 2019 Installation and Configuration Guide
Manoj V Karunarathne | [email protected] | @manojviduranga
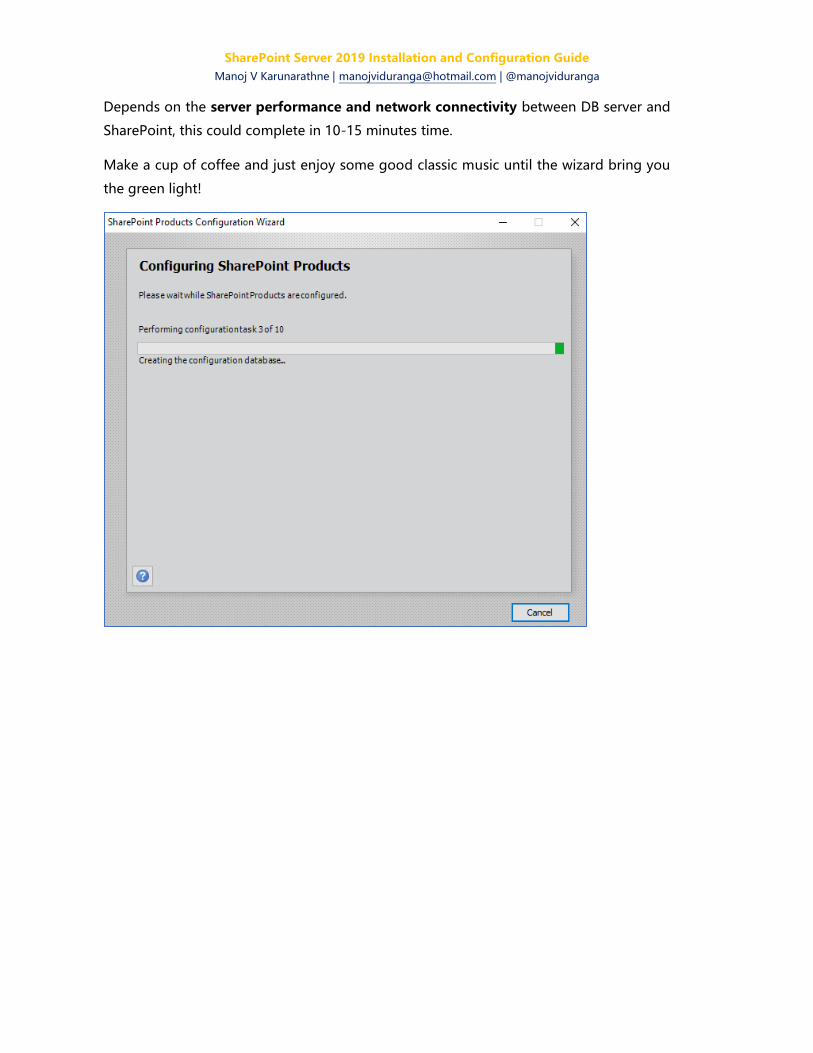
Depends on the server performance and network connectivity between DB server and
SharePoint, this could complete in 10-15 minutes time.
Make a cup of coffee and just enjoy some good classic music until the wizard bring you
the green light!

SharePoint Server 2019 Installation and Configuration Guide
Manoj V Karunarathne | [email protected] | @manojviduranga
If all went well, you will get the green light as below. you can hit “Finish” to complete the
setup.
Setup has now completed successfully and the Central administration site is deployed for
us to explore.
In case if the SharePoint Products Configuration Wizard fails, check the PSDiagnostics log
files, which are located on the drive on which SharePoint 2013 is installed, in the
%COMMONPROGRAMFILES%\Microsoft Shared\Web Server Extensions\17\LOGS
folder.
On the Configuration Successful page, click Finish. When the wizard closes, setup opens
the web browser and connects to Central Administration.
If you are prompted for your user name and password, you might have to add the
SharePoint Central Administration web site to the list of trusted sites and configure user
authentication settings in Internet Explorer. You might also want to disable the Internet
Explorer Enhanced Security settings. If you see a proxy server error message, you might
have to configure proxy server settings so that local addresses bypass the proxy server.

SharePoint Server 2019 Installation and Configuration Guide
Manoj V Karunarathne | [email protected] | @manojviduranga
Running SharePoint Farm Configuration
As we have completed the product configuration, it’s time to run the farm configuration
wizard.
Farm configuration wizard does the following in the system.
• Provisioning service applications
• Starting services
You can use central administration portal to run the farm configuration but it has the
following limitations
Databases names are automatically defined by the wizard. Names are including unique
IDs in the end of the name to maintain the uniqueness.
Post-installation tasks
Once the installation and configurations are done, your browser will automatically open
up a new session with Central administration web site. You can go ahead and add content
or share with others but, it is recommended to perform the fundamental farm level
configurations first.
• Configure user profile service
• Configure usage and health data collection
• Configure diagnostic logging
• Configure search service
• Configure outgoing email
• Configuring distributed cache service
• Configure Workflow Manager Farm

SharePoint Server 2019 Installation and Configuration Guide
Manoj V Karunarathne | [email protected] | @manojviduranga
Configure User Profile Service Application
Launch Central Admin portal and direct to Applications Management. From the
applications page, click on the User Profile Application as shown below.
Once you are inside the application, click on “Configure Synchronization Connections”
Fill out the connection details as shown below. Name could be any meaningful input and
the FQDN should match your corporate domain. Ensure the user account used in this has
the appropriate rights in the domain to sync identities. You will have to use SSL (443) if
your AD uses LDAPS. If it is LDAP, just leave it for 389.
SharePoint Server 2019 Installation and Configuration Guide
Manoj V Karunarathne | [email protected] | @manojviduranga
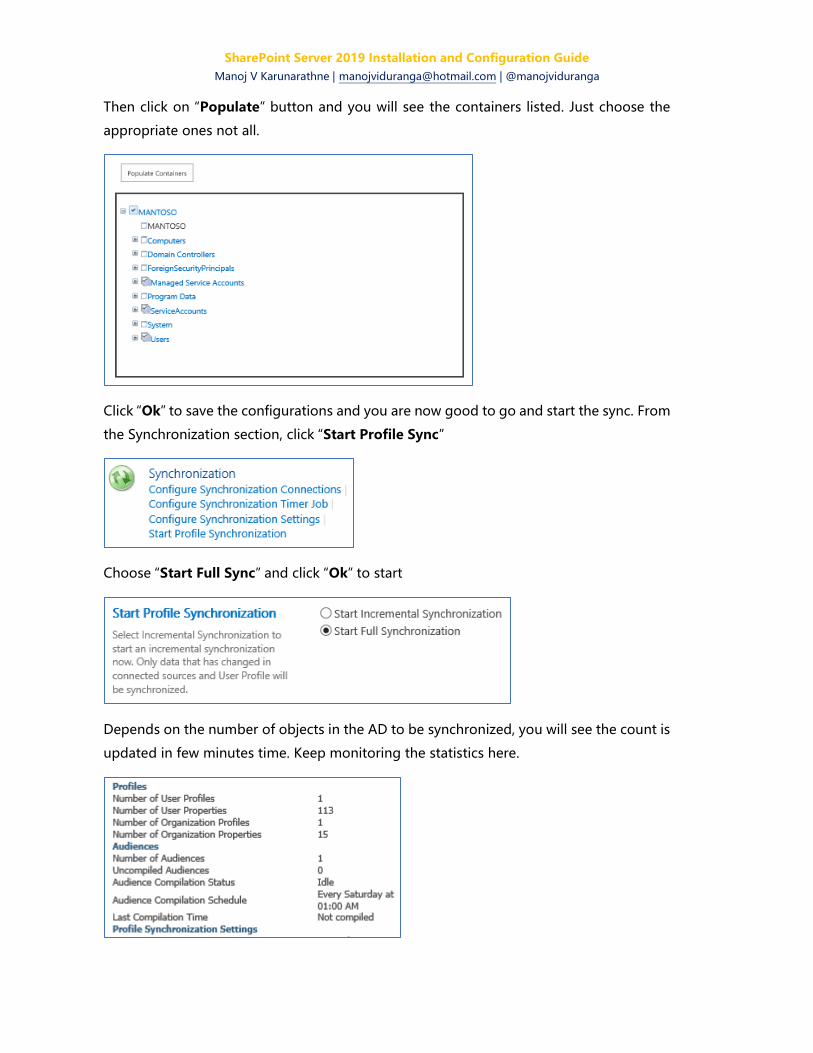
Then click on “Populate” button and you will see the containers listed. Just choose the
appropriate ones not all.
Click “Ok” to save the configurations and you are now good to go and start the sync. From
the Synchronization section, click “Start Profile Sync”
Choose “Start Full Sync” and click “Ok” to start
Depends on the number of objects in the AD to be synchronized, you will see the count is
updated in few minutes time. Keep monitoring the statistics here.

SharePoint Server 2019 Installation and Configuration Guide
Manoj V Karunarathne | [email protected] | @manojviduranga
Ensuring services availability
In a single server farm, you should be able to see the following set of services up and
running. Some services such as distributed cache must be manually configured. Having
distributed cache service in the same box as other services in a single server environment
is not recommended.

SharePoint Server 2019 Installation and Configuration Guide
Manoj V Karunarathne | [email protected] | @manojviduranga
Configuring Distributed Cache Service
The SharePoint distributed cache service provide additional caching support beyond the
traditional options we had such as BLOB cache, Object Cache, Page Output Cache etc...
Most objects that are arrives in the Distributed Cache are computationally expensive or
time intensive to fetch or a combination of both. Storing this kind of objects and data in
a chunk of memory that is spread across multiple servers allows SharePoint to execute
multiple different varieties of requests and operations much faster.
Unlike in SharePoint 2019, Distributed Case is not running by default in SharePoint 2019.
We need to manually configure the service.
SharePoint 2019 uses the AppFabric Cache, AppFabric Cache stores serialized managed
objects in a ‘cache cluster’. The cache cluster consists of one or more machines (Cache
Hosts) that pool their available physical memory. This pooled memory is presented and
used by SharePoint as a single source of caching memory.
The Distributed Cache service is actually built on top of the Windows Server AppFabric
Cache. SharePoint 2019’s prerequisites installer takes care of installing the Windows Server
AppFabric and configuring it for cache operations.
Distributed cache service is a crucial component in new SharePoint. Failing to provide the
recommended resources or mistakes that you make during configuration could lead to
unpleasantness’s such as:
• Newsfeed feature on user’s personal sites can report errors
• Server might unexpectedly stop responding
• In a worst case, you might even have to rebuild a farm as distributed cache might
have taken the farm with it while goes down.
Log in to your target server and head on to windows services via “Start Menu” and type
“Services” and find the AppFabric Caching Service there. This service won’t be running
unless you configure distributed cache.

SharePoint Server 2019 Installation and Configuration Guide
Manoj V Karunarathne | [email protected] | @manojviduranga
Open up a SharePoint Shell in elevated mode (right click and run as admin) and type “Add-
SPDistributedCacheServiceInstance” and hit enter. This will start the “Distributed Cache
Service Instance” in your server which you ran the command.
Now head back to services and ensure if the AppFabric Caching service is up and running.
Note:
I have used SharePoint farm account to start the service. In production scenarios, it is
recommended that you have a dedicated service account for this (perhaps use
sp_services). Please refer to the accounts and permission section in this guide to
understand the service identities requirements and recommendations.
For more detailed information on deploying or demoting distributed cache service, refer
to this Microsoft official article: https://docs.microsoft.com/en-
us/sharepoint/administration/manage-the-distributed-cache-service
Run “Add-SPDistributedCacheServiceInstance”
Then run the following commands in order
$instanceName =”SPDistributedCacheService Name=AppFabricCachingService”
$serviceInstance = Get-SPServiceInstance | ? {($_.service.tostring()) -eq
$instanceName -and ($_.server.name) -eq
$serviceInstance.Provision()

SharePoint Server 2019 Installation and Configuration Guide
Manoj V Karunarathne | [email protected] | @manojviduranga
If all went well, you should be able to see the Distributed Cache service is now up and
running in this server.

SharePoint Server 2019 Installation and Configuration Guide
Manoj V Karunarathne | [email protected] | @manojviduranga
Configuring outgoing email
Outgoing email settings can be configured globally to reflect across all web applications.
In some cases, you might need some web applications to have specific settings (e.g. – a
dedicated mail server for Intranet web application) so that it could be separated from
other web applications mail server settings. This can be done from web application
settings.
Firstly, to configure outgoing email alerts globally to all web applications, open up
“Central Administration” portal and head on to “System Settings” and click on
“Outgoing Email Settings” under the “Email and text Messages” section.
SharePoint Server 2019 Installation and Configuration Guide
Manoj V Karunarathne | [email protected] | @manojviduranga
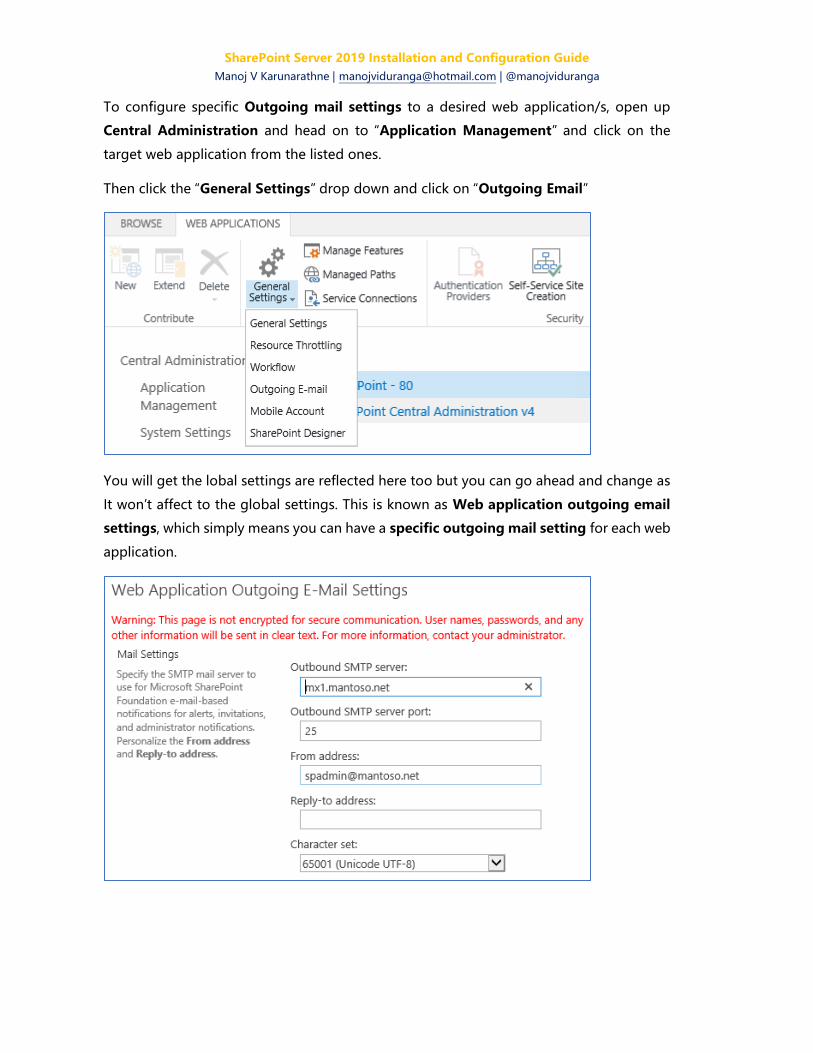
To configure specific Outgoing mail settings to a desired web application/s, open up
Central Administration and head on to “Application Management” and click on the
target web application from the listed ones.
Then click the “General Settings” drop down and click on “Outgoing Email”
You will get the lobal settings are reflected here too but you can go ahead and change as
It won’t affect to the global settings. This is known as Web application outgoing email
settings, which simply means you can have a specific outgoing mail setting for each web
application.

SharePoint Server 2019 Installation and Configuration Guide
Manoj V Karunarathne | [email protected] | @manojviduranga
Configure Search Service Application
If you haven’t run the farm configuration wizard and wish to manually create a search
application, Launch the Central Administration Portal and head on to “Applications
Management” section.
From there, click on “New” and create a search service application.
Launch the Central Administration Portal and head on to “Applications Management”
from there, find the search service application (only if you have run the farm configuration
wizard, or you will have to manually create a search application.

SharePoint Server 2019 Installation and Configuration Guide
Manoj V Karunarathne | [email protected] | @manojviduranga
Head on to Content Sources to setup the sites which are should be crawled.
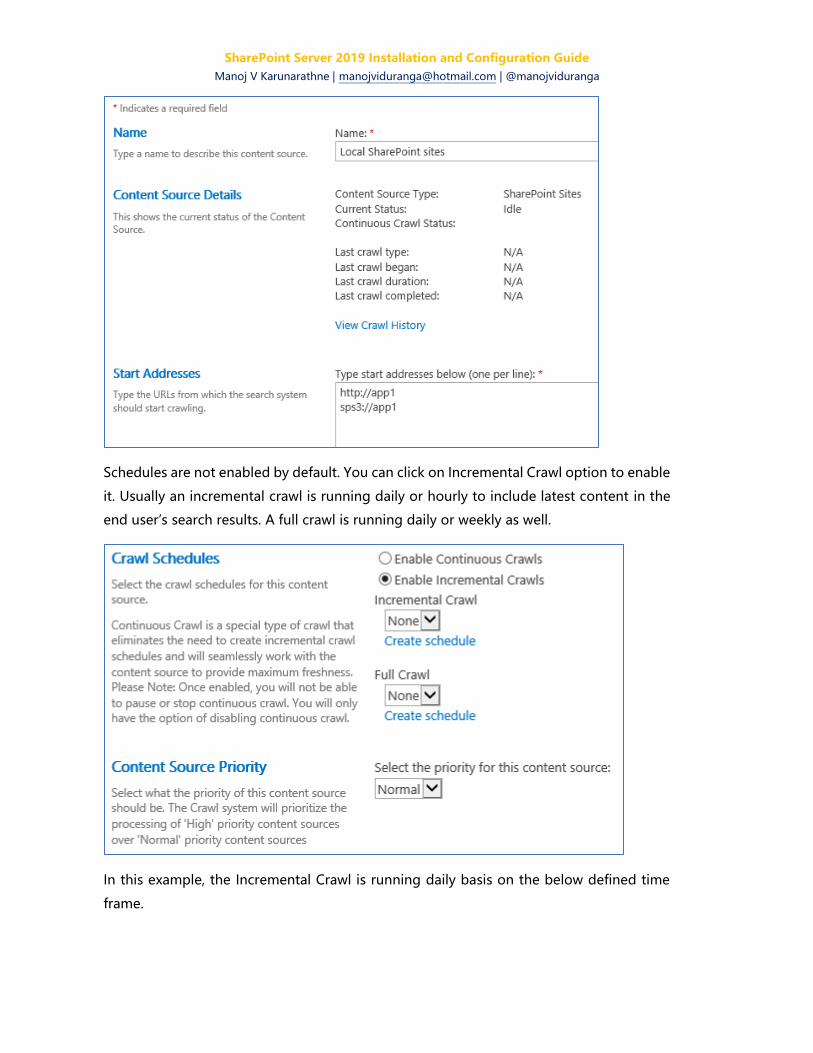
Edit the default entry or create a new and add your site URL which needs to be included
in the crawling as shown below.
SharePoint Server 2019 Installation and Configuration Guide
Manoj V Karunarathne | [email protected] | @manojviduranga
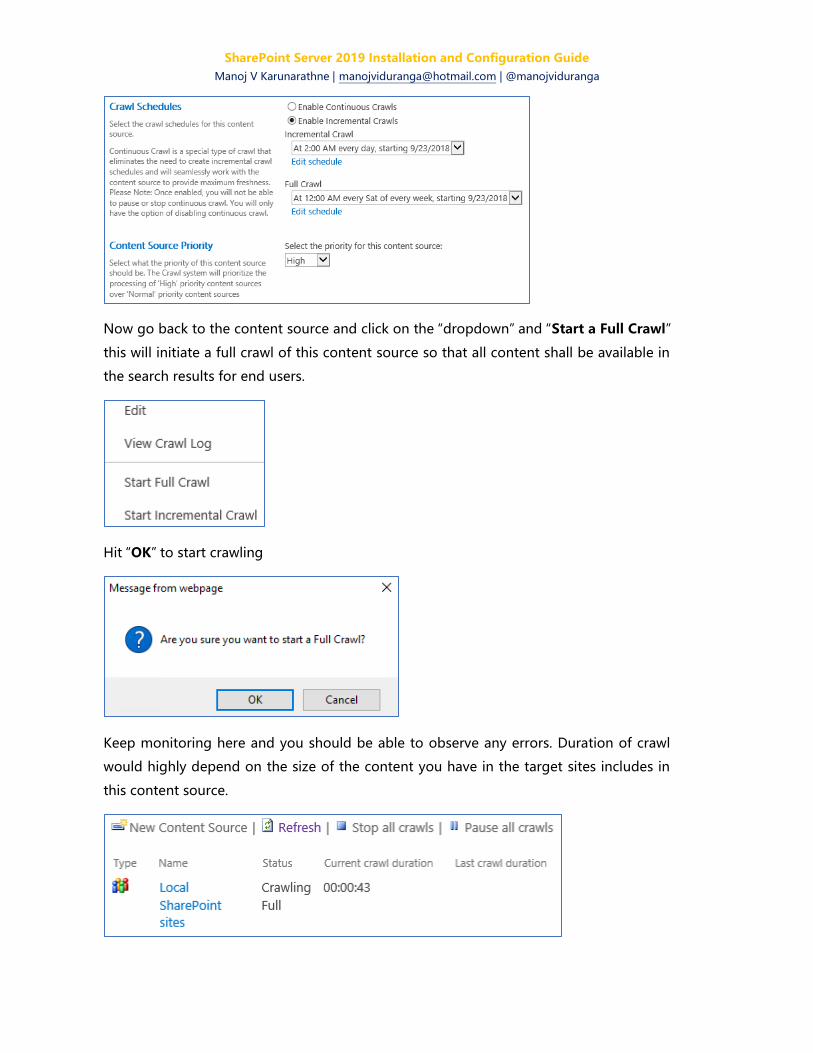
Schedules are not enabled by default. You can click on Incremental Crawl option to enable
it. Usually an incremental crawl is running daily or hourly to include latest content in the
end user’s search results. A full crawl is running daily or weekly as well.
In this example, the Incremental Crawl is running daily basis on the below defined time
frame.

SharePoint Server 2019 Installation and Configuration Guide
Manoj V Karunarathne | [email protected] | @manojviduranga
A full crawl is scheduled weekly (Every Saturday) in the mid night. Search crawls are better
to be scheduled for off-peak time as they are heavy and time-consuming processes.
Once you configured schedules, it should look like this. Don’t forget to set the priority for
this content source as “High” and save the changes.
SharePoint Server 2019 Installation and Configuration Guide
Manoj V Karunarathne | [email protected] | @manojviduranga
Now go back to the content source and click on the “dropdown” and “Start a Full Crawl”
this will initiate a full crawl of this content source so that all content shall be available in
the search results for end users.
Hit “OK” to start crawling
Keep monitoring here and you should be able to observe any errors. Duration of crawl
would highly depend on the size of the content you have in the target sites includes in
this content source.

SharePoint Server 2019 Installation and Configuration Guide
Manoj V Karunarathne | [email protected] | @manojviduranga
Configuring Multi-Server SharePoint Farm
Once you have all the prerequisites installed in the target box, you can use either
PowerShell or SharePoint Product Configuration Wizard to join a new server to a farm.
Login to target SharePoint server using the “setup account” (SP_Admin) and run the
following lines from PowerShell after inputting your environment details.
psconfig.exe -cmd configdb -connect -server <SqlServerName> -database
<ConfigDbName> -user <DOMAIN\FarmServiceAccount> -password
<FarmServiceAccountPassword> -passphrase <FarmPassphrase> -
admincontentdatabase <AdminContentDbName> -localserverrole <ServerRole> -
cmd helpcollections -installall -cmd secureresources -cmd services -install -cmd
installfeatures -cmd adminvs -provision -port <PortNumber> -
windowsauthprovider onlyusentlm -cmd applicationcontent -install
Or start the “SharePoint Product Configuration Wizard”.
On the “Welcome to SharePoint Products” page, click Next.

SharePoint Server 2019 Installation and Configuration Guide
Manoj V Karunarathne | [email protected] | @manojviduranga
On the “Connect to a server farm page”, click “Connect to an existing server farm”. Click
Next.
On the “Specify Configuration Database settings” page, type the name of the instance
of SQL Server in the Database server box, and then click “Retrieve” Database Names.
Select the name of the configuration database in the Database name list, and then click
Next.
SharePoint Server 2019 Installation and Configuration Guide
Manoj V Karunarathne | [email protected] | @manojviduranga
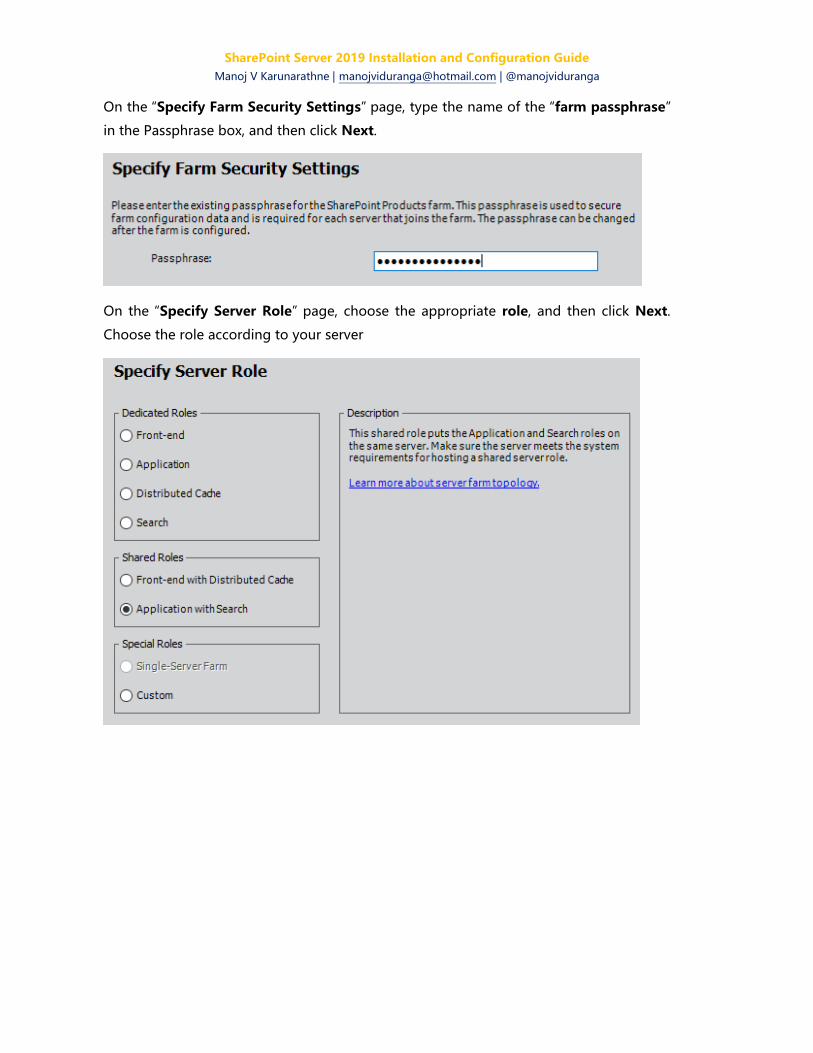
On the “Specify Farm Security Settings” page, type the name of the “farm passphrase”
in the Passphrase box, and then click Next.
On the “Specify Server Role” page, choose the appropriate role, and then click Next.
Choose the role according to your server

SharePoint Server 2019 Installation and Configuration Guide
Manoj V Karunarathne | [email protected] | @manojviduranga
This is the last step before we start the joining process. Click on “Advanced Settings” if
you would like to move the Central Admin web site in to this server. It’s a good idea to
host CA in Web Server rather than having it in the Application servers.
Once you are in Advanced Settings, choose the second option to change the hosting
location of the CA from a different server to this server.
Once done “Click Next” to start the joining. Give it a 5-7 minutes and enjoy a quick
coffee till you see the success screen.

SharePoint Server 2019 Installation and Configuration Guide
Manoj V Karunarathne | [email protected] | @manojviduranga
If everything went well, you will see the success screen as below. simply hit “Finish” to
complete the wizard.
You can use the same steps we have taken to join the other servers to the farm. Once you
added all the planed servers, ensure the appropriate services are running healthy. To do
that, go to “Central Admin” and head on to “System Settings” and click on “Services on
Server"

SharePoint Server 2019 Installation and Configuration Guide
Manoj V Karunarathne | [email protected] | @manojviduranga
Configuring Search Service in a Multi-
Server SharePoint Environment
Single server SharePoint deployment is possible but clearly not the optimum solution for
production usage. It is obvious that a single server can be easily overloaded in processing
large number of requests. Having multiple servers in a systematically architected farm is
the ideal way for production to serve a corporate business audience.
Log on to your target SharePoint server and start PowerShell ISE as an administrator and
run the following commands respectively. You have to modify the server naming to match
your environment.
In the following command, specify the new servers that you want to add search
components. In this example I have used my test environment’s servers. I have just two
servers to run all services. The intention is to run all search components in high availability
mode, so in case if one server goes down, the remaining server shall serve the demand.
There are few commands to get this done and it is not possible to do in the UI so the only
way is PowerShell.
##Get Search Instance and start the service $hostA = Get-SPEnterpriseSearchServiceInstance -Identity "APP1.MANTOSO.NET" $hostB = Get-SPEnterpriseSearchServiceInstance -Identity "APP2.MANTOSO.NET" Start-SPEnterpriseSearchServiceInstance -Identity $hostA Start-SPEnterpriseSearchServiceInstance -Identity $hostB
Wait till the search instance status become “online” in all servers. The following command
can be used to check the status. Just run it few times and wait till it return online status. ##Check Service Instance Status Get-SPEnterpriseSearchServiceInstance -Identity $hostA Get-SPEnterpriseSearchServiceInstance -Identity $hostB
Create the new search topology. Nothing to change in this command. ##Create a new topology $ssa = Get-SPEnterpriseSearchServiceApplication $newTopology = New-SPEnterpriseSearchTopology -SearchApplication $ssa
Now to add components to the new search topology. This is where we define which
servers to act which search role and how it should behave across multiple nodes. In this
scenario, I have duplicated each component in both application servers to achieve high
availability. In a production scenario, please follow the recommended architecture which
would isolate components in to separate servers and duplicate them across secondary
servers this achieve fault tolerance.

SharePoint Server 2019 Installation and Configuration Guide
Manoj V Karunarathne | [email protected] | @manojviduranga
##Define the components of server A New-SPEnterpriseSearchAdminComponent -SearchTopology $newTopology -SearchServiceInstance $hostA New-SPEnterpriseSearchCrawlComponent -SearchTopology $newTopology -SearchServiceInstance $hostA New-SPEnterpriseSearchContentProcessingComponent -SearchTopology $newTopology -SearchServiceInstance $hostA New-SPEnterpriseSearchAnalyticsProcessingComponent -SearchTopology $newTopology -SearchServiceInstance $hostA New-SPEnterpriseSearchQueryProcessingComponent -SearchTopology $newTopology -SearchServiceInstance $hostA New-SPEnterpriseSearchIndexComponent -SearchTopology $newTopology -SearchServiceInstance $hostA -IndexPartition 0 ##Define the components of server B New-SPEnterpriseSearchAdminComponent -SearchTopology $newTopology -SearchServiceInstance $hostB New-SPEnterpriseSearchCrawlComponent -SearchTopology $newTopology -SearchServiceInstance $hostB New-SPEnterpriseSearchContentProcessingComponent -SearchTopology $newTopology -SearchServiceInstance $hostB New-SPEnterpriseSearchAnalyticsProcessingComponent -SearchTopology $newTopology -SearchServiceInstance $hostB New-SPEnterpriseSearchQueryProcessingComponent -SearchTopology $newTopology -SearchServiceInstance $hostB New-SPEnterpriseSearchIndexComponent -SearchTopology $newTopology -SearchServiceInstance $hostB -IndexPartition 0
And then we can simply activate our new topology.
##Activate new search topology Set-SPEnterpriseSearchTopology -Identity $newTopology
Using this command, you can check if the topology is activated
##Check if the topology is active Get-SPEnterpriseSearchTopology -SearchApplication $ssa
From the above command, you should be able to see result similar to following. The
previous topology will be shown as inactive and the new topology has been activated.
This is because a search application can only have one search topology active.
TopologyId : fce8507d-61c6-4498-8038-4fd2d0a62c6e CreationDate : 1/30/2016 2:52:00 AM State : Inactive ComponentCount : 6 TopologyId : b63d48b2-df5c-41be-a7f4-9abaee483611 CreationDate : 1/30/2016 4:30:00 AM State : Active ComponentCount : 12
And then check the service status using this command
##check the service status Get-SPEnterpriseSearchStatus -SearchApplication $ssa -Text

SharePoint Server 2019 Installation and Configuration Guide
Manoj V Karunarathne | [email protected] | @manojviduranga
Example scenario:
In this setup, I’m using two servers which are in redundant mode. Which means, if in case
a one server or a component in one of the servers goes down, the other server will serve
the demand. Host A (Server 1) | Host B (Server 2)

SharePoint Server 2019 Installation and Configuration Guide
Manoj V Karunarathne | [email protected] | @manojviduranga
If everything went well, you will see the components are duplicated across both servers
and started. If you see some components are displaying warnings or errors, give it a little
while and check again. Usually it takes few minutes to start all components and
synchronize with the search service application

SharePoint Server 2019 Installation and Configuration Guide
Manoj V Karunarathne | [email protected] | @manojviduranga
Converting a SharePoint Server Role
With the Minrole capabilities, you can now switch a server from one role to another in
simple one click. Even a single server deployment can now be converted to a SharePoint
server farm deployment. However, there are a few things you need to take care of before
converting a server. SharePoint servers can be converted to a different server role without
having to disconnect them from your farm and then rejoining them using the different
server role. Servers can be converted to dedicated roles, shared roles, the Custom server
role, or the Single-Server Farm server role. You can either use Central Administration Site
or PowerShell to convert.
You can only convert a server to the Single-Server Farm server role if it is the only
SharePoint server in the farm.
SharePoint runs a validation check before a server is converted to a different role. If the
pre-validation check fails, it simply means the server isn’t ready for the conversion hence
it is blocked. Reasons behind the blocking will be displayed via a message along with the
instructions to resolve the issues. Once the issue is resolved, you can rerun the conversion.
Here’s a good example of failing the conversion. In this case it’s because of the Distributed
Cache which exists in the single server farm and unable to convert to an Application server.
To change a server role by using the Central Administration Web site:
Verify that the user account that is performing this procedure is a member of the local
Administrators group.
On the Central Administration web site, click System Settings.

SharePoint Server 2019 Installation and Configuration Guide
Manoj V Karunarathne | [email protected] | @manojviduranga
On the System Settings page, click Convert server role in this farm.
On the Role Conversion page, in the New Role area, click the drop-down box to select
the new server role for each server to change. Click Apply.
To change a server role using PowerShell:
Login to your target server using the farm account and run SharePoint shell as
administrator.
Type Set-SPServer -Identity <server name> -Role <server role> and hit enter
e.g. - Set-SPServer -Identity app1 -Role ApplicationWithSearch
Following are the new roles you can convert in to
• WebFrontEnd
• Application
• DistributedCache
• Search
• WebFrontEndWithDistributedCache
• ApplicationWithSearch
• SingleServerFarm
• or Custom

SharePoint Server 2019 Installation and Configuration Guide
Manoj V Karunarathne | [email protected] | @manojviduranga
Creation of a Team Site in SharePoint 2019
There has to be at least one site collection and a root site for you to be able to use
SharePoint as an end user.
Switch to “Application Management” section and then “Manage Web Applications” and
find out if there is a web application other than the Central Admin.
If you didn’t run the farm configuration wizard, you may not see a content web application
here except Central Admin. In that case you have to go ahead and create a new web
application.
Hit on “New” and insert the required information on the “New Web Application” Screen.
You can create multiple web applications under port 80 only if you are using host header
method (e.g. the URL goes as http://samplesite.contoso.com)
Ensure you have a DNS record for the host header before you provision the web
application. This has to be created from the DNS server.
Ask your DNS admin to provision a new Host A record as shown below. The name you
will have to decide and that IP has to be the WFE server or the load balancer IP if you
have multiple WFE servers in the front end.

SharePoint Server 2019 Installation and Configuration Guide
Manoj V Karunarathne | [email protected] | @manojviduranga
If the record is ready, you should be able to ping it from the SharePoint WFE server. So,
ensure that before you start provisioning the Web Application.
From the New Web Application screen, insert the information below. Web Site name could
be anything meaningful. You will see this in IIS site list hence it better be meaningful and
easy to remember. Port has to be 80 and the host header as per your DNS host record.

SharePoint Server 2019 Installation and Configuration Guide
Manoj V Karunarathne | [email protected] | @manojviduranga
Security configuration can be left with defaults unless you have specific requirements such
as having HTTPS on the target web application.
Sign in URL and Public URL can be left with defaults, too. URL has to match the DNS record
you have defined.

SharePoint Server 2019 Installation and Configuration Guide
Manoj V Karunarathne | [email protected] | @manojviduranga
Define a meaningful name under the pool name along with the security account for the
new app pool. Its recommended to have a dedicated app pool for each web application
and a dedicated service account for running app pools.
You can leave here with the default service applications allocation of choose specific ones
if needed (e.g. Intranet Web App doesn’t need to have Search Service Application
allocated).

SharePoint Server 2019 Installation and Configuration Guide
Manoj V Karunarathne | [email protected] | @manojviduranga
Click “Ok” to start creation. Based on the SQL and SharePoint Server performance, network
connectivity, this will be completed in a few minutes.
Now Let’s create a site collection for this web application. A top-level site collection is a
must have element in a content web application. Without a top-level site collection there
can’t be any sites or sub sites an that’s how the site hierarchy works in SharePoint.
Simply click on the “Create Site Collection” link to get started.

SharePoint Server 2019 Installation and Configuration Guide
Manoj V Karunarathne | [email protected] | @manojviduranga
Fill out the details as below. The title could be a simple name for the site. You can choose
the template but “Team Site” is the most commonly used default template which comes
with common features and functionalities and it gives you a nice first UI impression as you
open it up for the first time.
Primary and secondary site collection administrators can be modified later on but you can
define them here if you know who are they would be.

SharePoint Server 2019 Installation and Configuration Guide
Manoj V Karunarathne | [email protected] | @manojviduranga
And hit “OK” to provision. And you will see the following success message after few
minutes of time if all went well.
Now try to open up the URL and add it to the local intranet zone of your browser. Flat
and yet nice looking, content oriented, all new SharePoint 2019 site UI is here for your
exploration!
You will easily spot that SharePoint online UX has now been shipped for SharePoint 2019.
It’s great to see that Microsoft has put lot of effort on enhancing SharePoint on-premise
in the same way they have done it in SharePoint online.

SharePoint Server 2019 Installation and Configuration Guide
Manoj V Karunarathne | [email protected] | @manojviduranga
About Author
Manoj is a passionate IT Professional who has over 10 years of hands-on experience in
Microsoft technology stack mainly in SharePoint, Windows Server and office 365. He has
experienced 4 generations of SharePoint and have actively engaged in volunteer speaking
events in Srilanka, Brunei, Singapore, USA, Europe, Malaysia and continue to contribute to
the IT Industry across the globe.
Manoj Viduranga Karunarathne | MVP | MCT | MCSE | MCSA | PRINCE2 | ITIL
Consultant - Technology | Microsoft Most Valuable Professional -Reconnect
Web: https://manojviduranga.wordpress.com/
Email: [email protected]