sharpening lathe tools student handout
TRANSCRIPT

Mt. Diablo Adult Education, Wood Turning Center
Keeping Your Tools Sharp Course number 95510001
James Rodgers 11/1/2013

Keeping Your Lathe Tools Sharp
Keeping Your Lathe Tools Sharp. Page 1
Keeping Your Lathe Tools Sharp
Objectives
• Learn to sharpen the five basic tools. • Develop skill at hand sharpening. • Select the grinds and bevel angles for your tools.
Discussion Purpose of sharpening Wood is abrasive, some more than others. As we work tools get less capable, we work harder, and the results show it. How can we tell when to sharpen our tools?
• We are working harder, pushing harder and getting poorer results. • The finished surface becomes rougher, more ragged, and more torn grain shows up. • Vibration increases as the tool “bounces” over the wood fibers and cuts less. • Tools get warmer as they try to cut (partially due to us pushing harder). • As we become more familiar with the sound of the cutting process, we find that the
sound changes as the tools get dull. • Assume that most new tools from the store are really a “kit ready for assembly” and
will require some reshaping and sharpening. Sharpening Station There are several ways to maintain the cutting edge on your tools. Generally, a slow speed (1750 RPM) grinder equipped with aluminum oxide (Al2O3) wheels is preferred. The aluminum oxide wheels cut high-speed steel (HSS) cleanly, their surfaces are friable (they chip off ) leaving sharp cutting edges. Most commonly used are two wheels: one wheel with 80 grit for scrapers and spindle roughing gouges, and one wheel with 120 grit for gouges and skews. Several grinders come with a grey carborundum wheel, which will not cut the tool steel and should be immediately replaced. The aluminum oxide wheel colors are codes to the wheel composition:
• White stones are aluminum oxide (Al2O3) most common with a friable surface which stays sharp.
• Blue stones are similar but with cobalt added for a harder surface and used where a lot of grinding is done.
• Pink stones are the hardest wheels with chromium oxide added for additional hardness. They require more pressure to use and load most easily.
Keeping Your Lathe Tools Sharp. Page 2
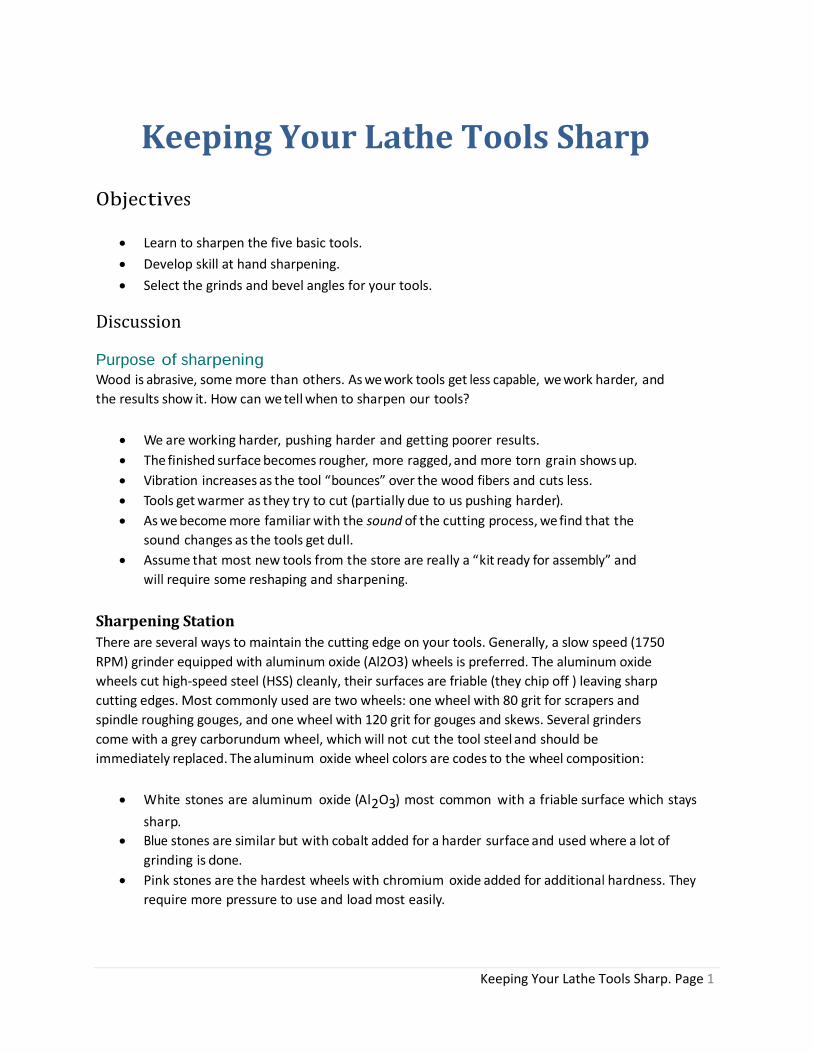
You will need a sharpening jig to allow you to accurately sharpen complex shapes such as the fingernail profile on gouges and a sturdy platform that can be easily adjusted to allow hand sharpening. An inexpensive industrial diamond wheel dresser will help you keep the sharpening wheels free of clogging metal waste and cutting more coolly (Photo 1). Also a mono-crystalline diamond impregnated credit card sharpening card for touching up edges (generally 600-grit) is handy. Don’t forget safety issues here also. Always wear your safety glasses and a dust mask when dressing the wheels and sharpening your tools. Safely Setting Up a New Grinder and Replacing a Wheel
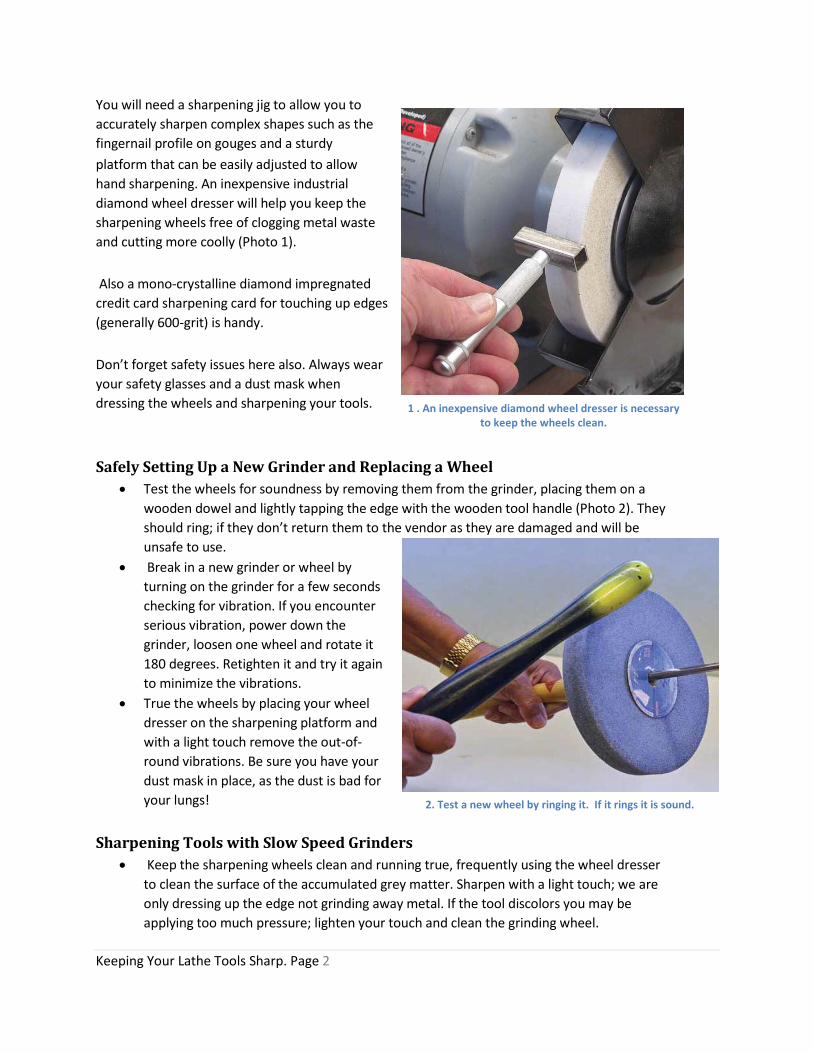
• Test the wheels for soundness by removing them from the grinder, placing them on a wooden dowel and lightly tapping the edge with the wooden tool handle (Photo 2). They should ring; if they don’t return them to the vendor as they are damaged and will be unsafe to use.
• Break in a new grinder or wheel by turning on the grinder for a few seconds checking for vibration. If you encounter serious vibration, power down the grinder, loosen one wheel and rotate it 180 degrees. Retighten it and try it again to minimize the vibrations.
• True the wheels by placing your wheel dresser on the sharpening platform and with a light touch remove the out-of-round vibrations. Be sure you have your dust mask in place, as the dust is bad for your lungs!
Sharpening Tools with Slow Speed Grinders
• Keep the sharpening wheels clean and running true, frequently using the wheel dresser to clean the surface of the accumulated grey matter. Sharpen with a light touch; we are only dressing up the edge not grinding away metal. If the tool discolors you may be applying too much pressure; lighten your touch and clean the grinding wheel.
1 . An inexpensive diamond wheel dresser is necessary to keep the wheels clean.
2. Test a new wheel by ringing it. If it rings it is sound.
Keeping Your Lathe Tools Sharp. Page 3
• Mount your grinder near your lathe so you will be willing to go to it more frequently. It should be at about the same height as your lathe and equipped with a good light source.
When Is the Tool Sharp?
• As you sharpen a tool look for sparks to start coming over the top of the cutting edge. This indicates that the final edge is near.
• When you are close, hold the tool to the bright light and see if you can see an edge. “If you can see the edge, there is no edge.” because there is a small flat area that is reflecting the light. When the edge is achieved there will be no glint reflected.
• Learn the feel of a sharp edge; it will catch in the folds of your fingerprint and cut paper easily.
• Keep the tool cool. If your tools are high speed steel (most newer tools are) the coloring will not damage the temper of the tool but will indicate that you are using too much pressure or you have not cleaned the grinding wheel recently.
• Sharpen carbon steel tools very carefully. As soon as the tool colors you have lost the temper and the edge will not hold. Sharpen once lightly, dunk the tool in a glass of water, and then repeat the process until your edge is achieved.
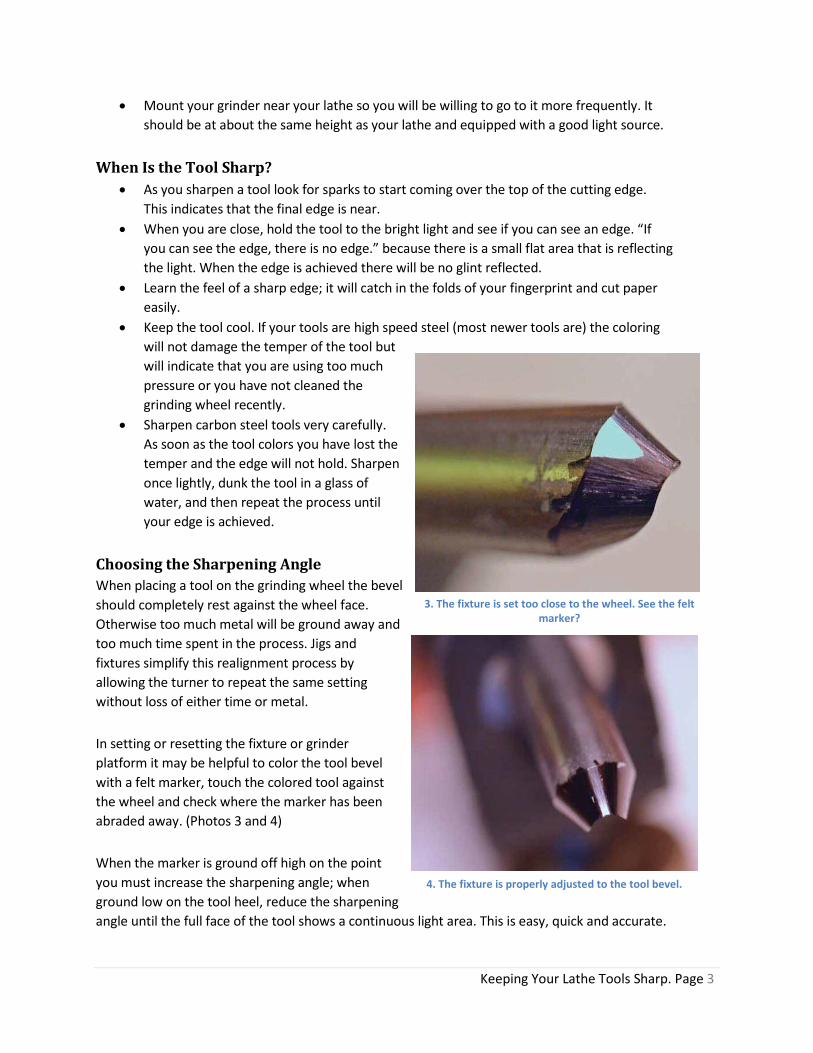
Choosing the Sharpening Angle When placing a tool on the grinding wheel the bevel should completely rest against the wheel face. Otherwise too much metal will be ground away and too much time spent in the process. Jigs and fixtures simplify this realignment process by allowing the turner to repeat the same setting without loss of either time or metal. In setting or resetting the fixture or grinder platform it may be helpful to color the tool bevel with a felt marker, touch the colored tool against the wheel and check where the marker has been abraded away. (Photos 3 and 4) When the marker is ground off high on the point you must increase the sharpening angle; when ground low on the tool heel, reduce the sharpening angle until the full face of the tool shows a continuous light area. This is easy, quick and accurate.
3. The fixture is set too close to the wheel. See the felt marker?
4. The fixture is properly adjusted to the tool bevel.

Keeping Your Lathe Tools Sharp. Page 4
When sharpening the tool the goal is to quickly repeat the selected angle and return the tool to use. The specific angle for tools is debated with some turners suggesting a specific “best” angle. I believe that the one that works for you is the “best” angle. As a general guideline I have included a table as a starting point; however you choose what is best for you.
Spindle roughing gouge 45° ● Corners of gouges should be kept square and not rounded over.
● Square the tool to the grinder, resting it on the sharpening platform. ● Rotate the tool in only one direction to not over-sharpen the center.
Shallow fluted (spindle) gouge
30–40° ● Angle may be lower for beginners for better control. ● A straight across grind works well for beginners. ● Swept back grind (fingernail profile) adds versatility but increases the learning curve. ● Traditional grind gouge is ground straight across.
● Generally use a fixture to maintain a repeatable angle. ● Sharpen left, sharpen right, and then blend across the full tool face. ● Sharpen like a spindle roughing gouge to maintain the square face.
Deep fluted (bowl) gouge
35–40° 50–55° 60–65°
● For normal bowl turning. ● For deeper bowls. ● For bottoms of really deep bowls.
● Use a fixture to maintain a repeatable angle. Sharpen left, sharpen right, and then blend across the full tool face.
Skew chisel 12° <20°
● For softwoods. ● For hard woods. ● The skew angle should be ~ 70°. ● Generally the bevel is 1½ times the thickness of the tool. ● Round over the short point (the heel) of the tool.
● Rectangular skews may be sharpened by adjusting the platform to the correct angle. ● Radiused skews require rotating the tools to follow the curvature. ● Skews also benefit from honing after grinding.
Parting tool 30–50° ● Keep the edge straight and 90° to the tool shaft. ● If the tool is diamond shaped, keep the cutting edge exactly in the center of the tool.
● Sharpen by sliding the tool left and right without turning the tool handle to keep a square edge.
Bowl scrapers 70–80° ● De-burr the tool before sharpening with a diamond plate by stroking the top face against a belt sander (motor off).
● Grinding raises a burr, which aids in cutting. ● Burrs can be replaced by de-burring and burnishing the edge at 5° with a hardened rod.
Keeping Your Lathe Tools Sharp. Page 5
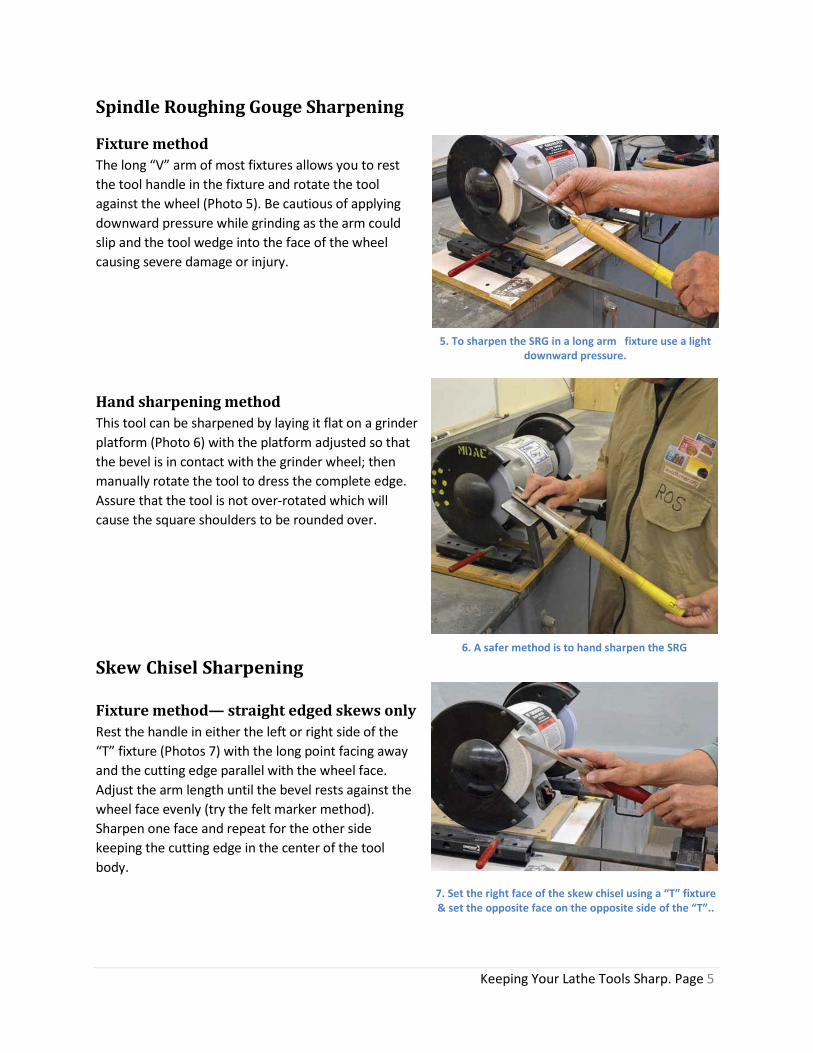
7. Set the right face of the skew chisel using a “T” fixture & set the opposite face on the opposite side of the “T”..
Spindle Roughing Gouge Sharpening
Fixture method The long “V” arm of most fixtures allows you to rest the tool handle in the fixture and rotate the tool against the wheel (Photo 5). Be cautious of applying downward pressure while grinding as the arm could slip and the tool wedge into the face of the wheel causing severe damage or injury. Hand sharpening method This tool can be sharpened by laying it flat on a grinder platform (Photo 6) with the platform adjusted so that the bevel is in contact with the grinder wheel; then manually rotate the tool to dress the complete edge. Assure that the tool is not over-rotated which will cause the square shoulders to be rounded over.
Skew Chisel Sharpening
Fixture method— straight edged skews only Rest the handle in either the left or right side of the “T” fixture (Photos 7) with the long point facing away and the cutting edge parallel with the wheel face. Adjust the arm length until the bevel rests against the wheel face evenly (try the felt marker method). Sharpen one face and repeat for the other side keeping the cutting edge in the center of the tool body.
5. To sharpen the SRG in a long arm fixture use a light downward pressure.
6. A safer method is to hand sharpen the SRG
Keeping Your Lathe Tools Sharp. Page 6
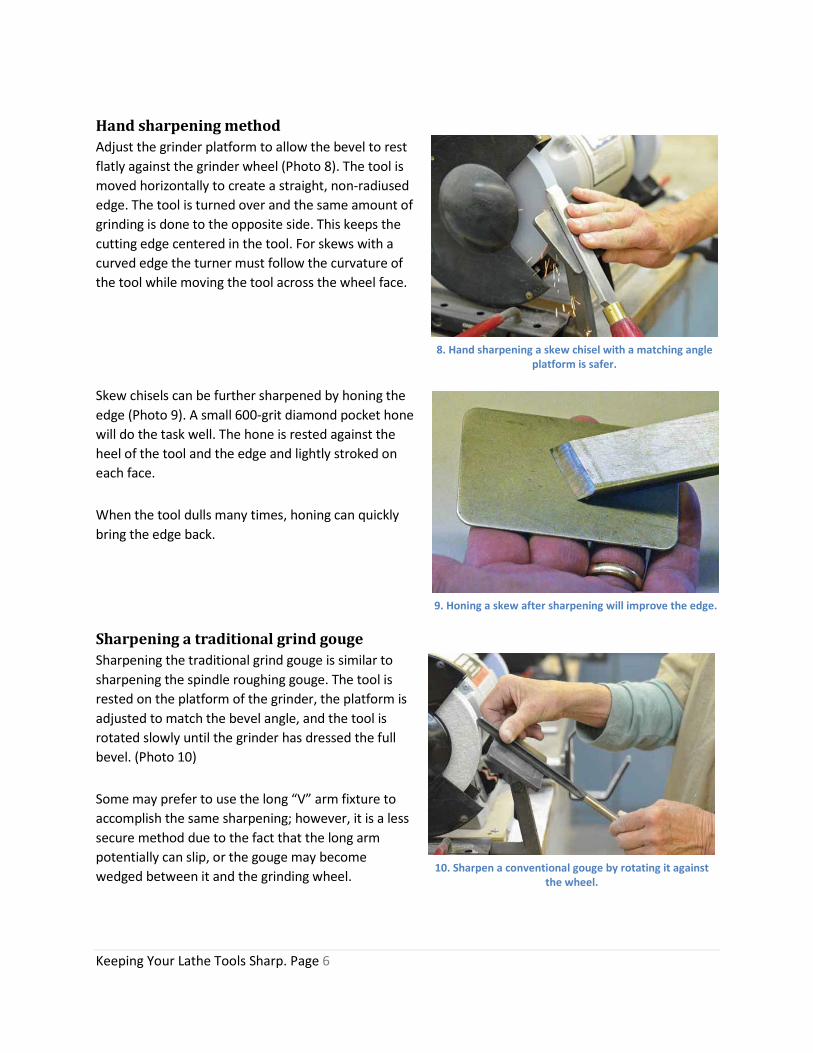
Hand sharpening method Adjust the grinder platform to allow the bevel to rest flatly against the grinder wheel (Photo 8). The tool is moved horizontally to create a straight, non-radiused edge. The tool is turned over and the same amount of grinding is done to the opposite side. This keeps the cutting edge centered in the tool. For skews with a curved edge the turner must follow the curvature of the tool while moving the tool across the wheel face. Skew chisels can be further sharpened by honing the edge (Photo 9). A small 600-grit diamond pocket hone will do the task well. The hone is rested against the heel of the tool and the edge and lightly stroked on each face. When the tool dulls many times, honing can quickly bring the edge back.
Sharpening a traditional grind gouge Sharpening the traditional grind gouge is similar to sharpening the spindle roughing gouge. The tool is rested on the platform of the grinder, the platform is adjusted to match the bevel angle, and the tool is rotated slowly until the grinder has dressed the full bevel. (Photo 10) Some may prefer to use the long “V” arm fixture to accomplish the same sharpening; however, it is a less secure method due to the fact that the long arm potentially can slip, or the gouge may become wedged between it and the grinding wheel.
8. Hand sharpening a skew chisel with a matching angle platform is safer.
9. Honing a skew after sharpening will improve the edge.
10. Sharpen a conventional gouge by rotating it against the wheel.
Keeping Your Lathe Tools Sharp. Page 7
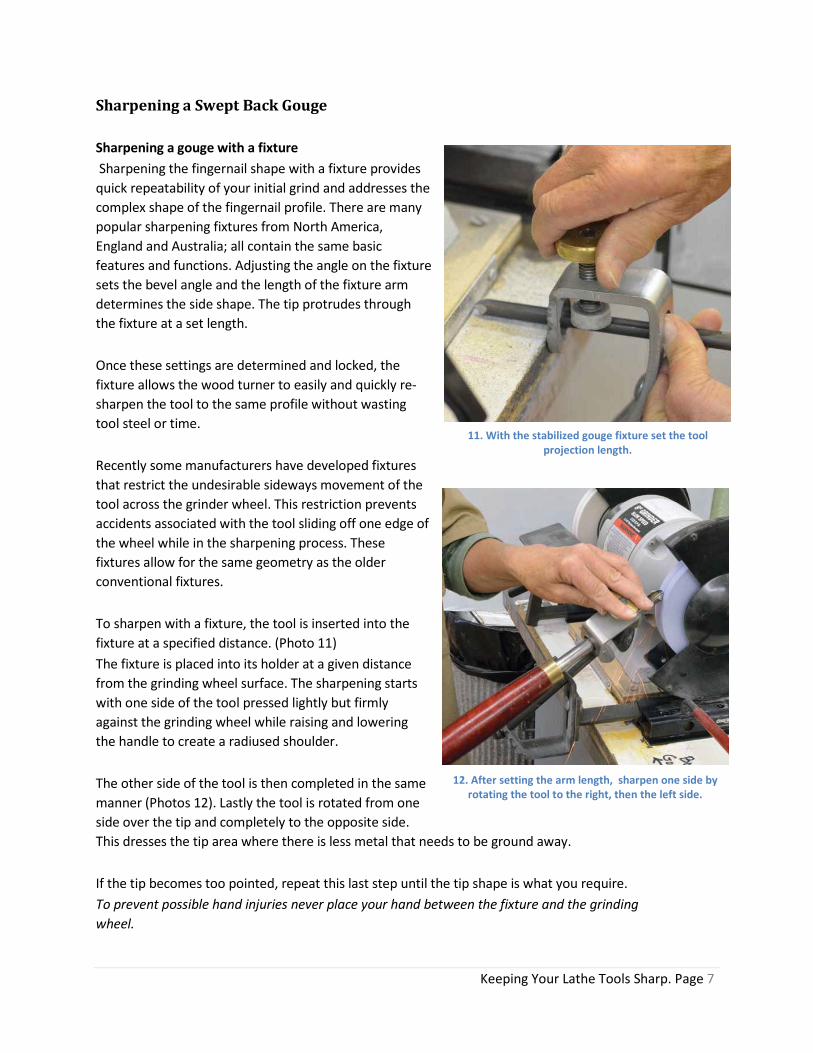
Sharpening a Swept Back Gouge Sharpening a gouge with a fixture Sharpening the fingernail shape with a fixture provides quick repeatability of your initial grind and addresses the complex shape of the fingernail profile. There are many popular sharpening fixtures from North America, England and Australia; all contain the same basic features and functions. Adjusting the angle on the fixture sets the bevel angle and the length of the fixture arm determines the side shape. The tip protrudes through the fixture at a set length. Once these settings are determined and locked, the fixture allows the wood turner to easily and quickly re-sharpen the tool to the same profile without wasting tool steel or time. Recently some manufacturers have developed fixtures that restrict the undesirable sideways movement of the tool across the grinder wheel. This restriction prevents accidents associated with the tool sliding off one edge of the wheel while in the sharpening process. These fixtures allow for the same geometry as the older conventional fixtures. To sharpen with a fixture, the tool is inserted into the fixture at a specified distance. (Photo 11) The fixture is placed into its holder at a given distance from the grinding wheel surface. The sharpening starts with one side of the tool pressed lightly but firmly against the grinding wheel while raising and lowering the handle to create a radiused shoulder. The other side of the tool is then completed in the same manner (Photos 12). Lastly the tool is rotated from one side over the tip and completely to the opposite side. This dresses the tip area where there is less metal that needs to be ground away. If the tip becomes too pointed, repeat this last step until the tip shape is what you require. To prevent possible hand injuries never place your hand between the fixture and the grinding wheel.
11. With the stabilized gouge fixture set the tool projection length.
12. After setting the arm length, sharpen one side by rotating the tool to the right, then the left side.
Keeping Your Lathe Tools Sharp. Page 8
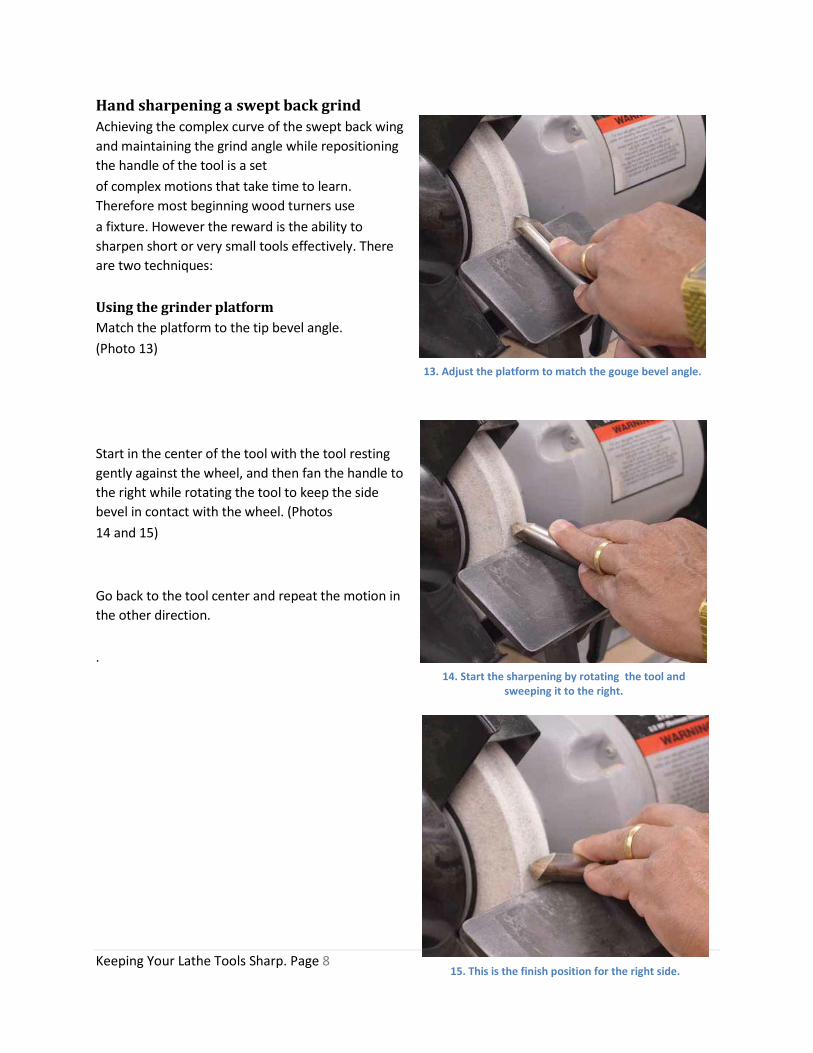
Hand sharpening a swept back grind Achieving the complex curve of the swept back wing and maintaining the grind angle while repositioning the handle of the tool is a set of complex motions that take time to learn. Therefore most beginning wood turners use a fixture. However the reward is the ability to sharpen short or very small tools effectively. There are two techniques: Using the grinder platform Match the platform to the tip bevel angle. (Photo 13) Start in the center of the tool with the tool resting gently against the wheel, and then fan the handle to the right while rotating the tool to keep the side bevel in contact with the wheel. (Photos 14 and 15) Go back to the tool center and repeat the motion in the other direction. .
13. Adjust the platform to match the gouge bevel angle.
14. Start the sharpening by rotating the tool and sweeping it to the right.
15. This is the finish position for the right side.
Keeping Your Lathe Tools Sharp. Page 9
Free hand grinding method The tool is held gently in the hand with the hand resting on the grinder platform and the bevel touching the grinding wheel face. The tool is rotated left or right while being gently pushed up the face of the grinding wheel (Photo 16). The rotation is than repeated in the opposite direction. This technique works especially well with very small tools that cannot easily rest on the platform or that require a very gentle touch.
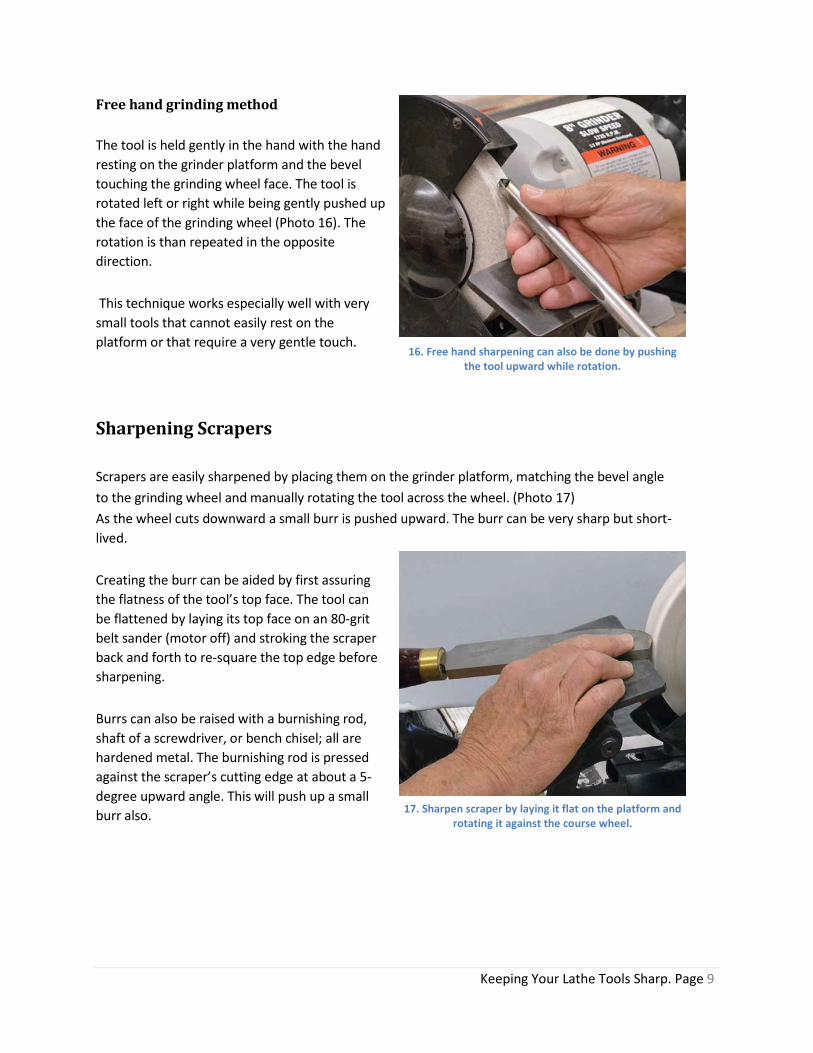
Sharpening Scrapers Scrapers are easily sharpened by placing them on the grinder platform, matching the bevel angle to the grinding wheel and manually rotating the tool across the wheel. (Photo 17) As the wheel cuts downward a small burr is pushed upward. The burr can be very sharp but short-lived. Creating the burr can be aided by first assuring the flatness of the tool’s top face. The tool can be flattened by laying its top face on an 80-grit belt sander (motor off) and stroking the scraper back and forth to re-square the top edge before sharpening. Burrs can also be raised with a burnishing rod, shaft of a screwdriver, or bench chisel; all are hardened metal. The burnishing rod is pressed against the scraper’s cutting edge at about a 5-degree upward angle. This will push up a small burr also.
16. Free hand sharpening can also be done by pushing the tool upward while rotation.
17. Sharpen scraper by laying it flat on the platform and rotating it against the course wheel.
Keeping Your Lathe Tools Sharp. Page 1 0
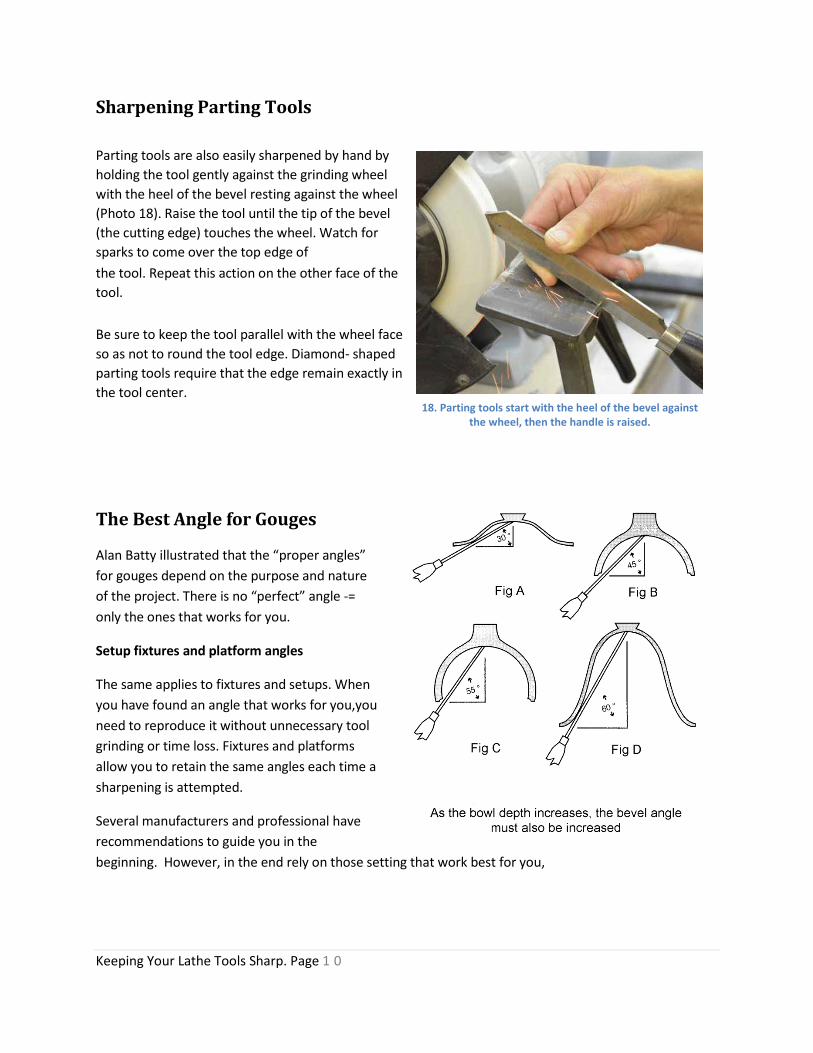
Sharpening Parting Tools Parting tools are also easily sharpened by hand by holding the tool gently against the grinding wheel with the heel of the bevel resting against the wheel (Photo 18). Raise the tool until the tip of the bevel (the cutting edge) touches the wheel. Watch for sparks to come over the top edge of the tool. Repeat this action on the other face of the tool. Be sure to keep the tool parallel with the wheel face so as not to round the tool edge. Diamond- shaped parting tools require that the edge remain exactly in the tool center. The Best Angle for Gouges
Alan Batty illustrated that the “proper angles” for gouges depend on the purpose and nature of the project. There is no “perfect” angle -= only the ones that works for you.
Setup fixtures and platform angles
The same applies to fixtures and setups. When you have found an angle that works for you,you need to reproduce it without unnecessary tool grinding or time loss. Fixtures and platforms allow you to retain the same angles each time a sharpening is attempted.
Several manufacturers and professional have recommendations to guide you in the beginning. However, in the end rely on those setting that work best for you,
18. Parting tools start with the heel of the bevel against the wheel, then the handle is raised.