shcm hr reference guide for bba and ssi€¦ · shcm hr reference guide for bba and ssi ......
TRANSCRIPT

Andy Anderson
BBA Aviation Shared Services, Inc.
Date: 04/15/2013
SHCM HR Reference Guide For
BBA and SSI

/IT/Business Analyst Team folder/Active Projects/SHCM For BBA and SSI /Training/SHCM for BBA and SSI .doc 4/15/2013
2
Revision History
Date Version Description Author
1/15/2011 1 Original document Andy Anderson
9/15/2012 2 Update based for Ontic Andy Anderson
4/15/2013 3 Update based on new version for AIR and SSI Andy Anderson
NOTE:
This document is for use by HR personnel only. It should be used as a reference manual. Do not distribute to
employees. The screen shots are for illustration purposes only and may not accurately show your configuration.
Some of the menu name may have changes since this document was written.

/IT/Business Analyst Team folder/Active Projects/SHCM For BBA and SSI /Training/SHCM for BBA and SSI .doc 4/15/2013
3
Table Of Contents
INFINIUM SELF SERVICE ..................................................................................................................................................................... 4
Introduction ........................................................................................................................................................................................ 4 System Functions ............................................................................................................................................................................... 4 System Access ................................................................................................................................................................................... 5 Employee Basic Data Setup ............................................................................................................................................................... 6 Region Definition............................................................................................................................................................................... 7 Location Region Assignment ............................................................................................................................................................. 7 Security Roles and Groups ................................................................................................................................................................. 7 Employee Position Data Configuration ............................................................................................................................................. 8 Workflows ......................................................................................................................................................................................... 8 Document Routing ............................................................................................................................................................................. 9 Screen Layout and Navigation ........................................................................................................................................................... 9 Employee Menu ............................................................................................................................................................................... 10 Signoff ............................................................................................................................................................................................. 10 Password Change ............................................................................................................................................................................. 11 Personal ............................................................................................................................................................................................ 11 Payroll .............................................................................................................................................................................................. 17 Benefit .............................................................................................................................................................................................. 19 Inbox ................................................................................................................................................................................................ 20 Company .......................................................................................................................................................................................... 23 Contact ............................................................................................................................................................................................. 23 Help .................................................................................................................................................................................................. 24 Manager ........................................................................................................................................................................................... 24 Submitting Requests ........................................................................................................................................................................ 32 Request Approval............................................................................................................................................................................. 33
APPENDIX A: PASSWORD MANAGEMENT .................................................................................................................................... 34

/IT/Business Analyst Team folder/Active Projects/SHCM For BBA and SSI /Training/SHCM for BBA and SSI .doc 4/15/2013
4
Infinium Self Service
Introduction The Infinium Self Service Human Capital Management (SHCM) is an application that
provides employees with a web base front end to the iSeries Infinium system. SHCM helps
reduce HR administrative workload, labor and costs by providing on-demand, 24/7
electronic access to Human Resources, Benefits and Payroll information for managers and
employees. The benefits go beyond saved time and cost, as HR will be able to provide more
face-to-face attention to issues that are more personal than personnel.
System Functions The application provides three basic functions:
Management Self Service
Benefit Enrollment
Employee Self Service
Management Self Service
Rather than filling out a multi-page Personnel Action Form and waiting for
approvals to circulate via inter office mail for a simple status change request,
managers will have the ability to enter in their request online in seconds. SHCM
has been designed to streamline manager’s work by giving them the opportunity to
make their Personnel Action request for all their employees on one screen, all at
one – imagine that! No more forms. No more paper. No more inter office mail
floating around with confidential information.
The following are some of the main HR related functions that manager can perform
via the SHCM portal:
Salary Change
Promotion
Transfer
Status Change
Leave of Absence
Termination
Demotion
New Hire
Rehire
They can also:
View employee’s electronic HR profile
View and update employee time-off information and the approval status
of the employee time-off requests.
View Employee Time Off Calendar in a graphical format

/IT/Business Analyst Team folder/Active Projects/SHCM For BBA and SSI /Training/SHCM for BBA and SSI .doc 4/15/2013
5
Employee Self Service
SHCM enables employees to reduce costs associated with typically resource and
paper-intensive processes within HR. Employees can view their electronic HR file
on-demand and request changes before things happen, rather than as an
afterthought bridging the business to employee gap. SHCM move the organization
closer to a paperless company.
The following are some key employee functions:
Sign-on Preferences
Change password
View HR Personal information
View and Update address information
View and Update emergency contact information (primary and additional)
Review the current time-off information (Vacation, Sick, Floating
Holiday, etc.)
Create a request for time off
View direct deposit information
Change direct deposit information
View pay check earning statements
View previous year check history in a summary view
View benefit summary
Benefit Self Service
This option is not be used at this time
System Access
The application is available from our intranet and from any computer on the internet. This means that
employees can access it from their home computers. The URL to access the application from the internet is
https://eservice.bbaaviation.com. The menu on the intranet is “Employee/Manager Self Service Portal.
Existing employees are added to the system using a mass conversion process. New employees are added to
the system at the time when they are hired. There is no need for any CARS request for getting access to the
application.
Employee User Name
All employees will receive a SHCM ID. This ID allows them to access the SHCM system. It does
not give them access to the iSeries. Employees that need access to the iSeries will need a different
ID and password to access that system.
User IDs are automatically created when an employee is added to the system. The ID is made up
as follows:
First letter of the first name
First five letter of the last name (if a last name is less than 5 characters then all the
characters of the last name is use)
The employee birth month (two characters)
o The employee birth day (two characters)
For example: Tom Jonhston born on May 20th, 1960 ID would be TJONHS0520

/IT/Business Analyst Team folder/Active Projects/SHCM For BBA and SSI /Training/SHCM for BBA and SSI .doc 4/15/2013
6
Note: If two employees have the same name and birthday, then one employee will get the letter
“A” at the end of the ID. Any special character or space in an employee last name will be omitted
from the ID.
Note the following about SHCM password:
Password follows the standard system format
The initial password is set to the employee social security number. They are force to
change it when they first logon
Employees are locked out after 6 bad attempts
The application has a built in password management system that allows employees to
reset their password. In order to reset their password employees must setup their profile
with the answers to three questions (See Appendix A of this manual for steps on how to
use the password management option)
SHCM has its own built-in authentication. It does not interface with our network or with the
iSeries authentication.
Employee Basic
Data Setup
Each employee Infinium basic data must be updated with the following…
Their immediate supervisor name
The region where they work
The supervisor is use for routing and the region define where to rout documents

/IT/Business Analyst Team folder/Active Projects/SHCM For BBA and SSI /Training/SHCM for BBA and SSI .doc 4/15/2013
7
Region Definition
Location Region
Assignment
Security Roles and
Groups
In order to control the routing of document, SHCM is configured with region codes that
identify specific locations/plant.
Note the following about the region definition…
Regions are define as specific group of location that are control by particular group
of HR personnel
Regions does not have to follow geographical path
Each location must be assign to a region
HR personnel are assign to one region
Employees are assign to a region based on where their job is located
The following are the APPH region:
Region Name Description HR Assignment
BBA and SSI APPH Wichita Amy Mason
_________________________________________________________________________
BBA HR is responsible for adding the assign region to the location.
______________________________________________________________________
Employees are classified as either a “Manager” or an “Employee.” An employee with a
“manager” classification is capable of performing management functions for employees that
reports to him or her. An employee that is classified as an “employee” can perform action on
his or her own data.
Please note that a “manager” also has the “employee” classification.
In order to control the functions that managers and employees can perform, special SHCM
groups are created and assign to each employee.
Below are the SHCM groups…
Group Name
Description/Assign Classification Type
SSIVP Vice President M
SSIHR Human Resource managers M

/IT/Business Analyst Team folder/Active Projects/SHCM For BBA and SSI /Training/SHCM for BBA and SSI .doc 4/15/2013
8
SSIMG Managers (Not GM or HR) M
SSISU Supervisor M
PY Payroll personnel M
SSIEE Employees that do not fall in any management position
E
________________________________________________________________________
Employee Position
Data Configuration
Workflows
Employees are automatically assign to a group based on the position they hold. This means
that each position must be assign to a group. BBA HR is responsible for assigning position to
the correct group.
__________________________________________________________________________
Whenever an action is taken in SHCM, the process will follow a predefine workflow.
Depending on how the workflow is setup, the action could flow through several groups until it
get to the final approver.
As each step of the workflow is completed, notifications are sent to the appropriate person.
SHCM has a built-in tool where employees can view their notification. If an employee has a
company email or a private email, it can be added to the SHCM system. If the employee email
is added to SHCM, then they will also receive notification via their email.
Every employee in the system must be assigned a supervisor. This is use as part of the approval
process for certain request.
All action in self service is control by a workflow. The workflow outlines the steps that are followed for a
specific process. Each process is defined as a document type. For example the rehire process is one
workflow and the document type for that process is the “Rehire” document.
The documents are classified as either Management (M) or Employee (E). This determines which group of
employee can process the document.
In the self-service application each document type is define by a specific code. The codes are listed
below…

/IT/Business Analyst Team folder/Active Projects/SHCM For BBA and SSI /Training/SHCM for BBA and SSI .doc 4/15/2013
9
Documentation Code
Type Definition Notes
RH M Rehire
CA E Address Change
NH M New Hire
RE M Performance Review
TR M Transfer
TE M Termination
SC M Salary Change
ST M Status Change Ex. Full time, SEAS
DM M Demotion
PR M Promotion
LV M Leave of Absence
PC M Personal Change Ex. Name change
PT E Plan Time Off
DD E Direct deposit
Document Routing
Documents are routed to individuals based on their role as an employee’s managers/supervisor. Document
routing groups are created to allow routing to specific personnel. One personnel is assign to each routing
group.
Below is the routing groups and their assignment.
Group Name Assignee Description SSIHR Laurie Drachenberg SSI and BBA HR
SSIHR Amy Anthony BBA HR for all organization executives
Screen Layout and
Navigation
The main menus are on the top of the page. Click on a menu to see the submenu. As you click on a menu
item it will display in the main area. You can open several menu item which will be displayed in a tabular
option in the main area. Only one item is visible/active in the main area but once you have an item open
you can click on it to display in the main area. You can close an item by clicking on the “X” in its tab label
Below the main menu is an action box area of icons. The icons that are displayed in the action box area are
dependent on the functions that can be done on the active window. Use the icons to navigate through the
screens and to perform action on any given screen. Each icon has a tooltip that will show you its function.

/IT/Business Analyst Team folder/Active Projects/SHCM For BBA and SSI /Training/SHCM for BBA and SSI .doc 4/15/2013
10
Below is a brief description of the icons that will appear in the action box area...
Left and right arrows use for navigating from one page to another
Submit button is user to submit a request
Delete button is the “X”
Change icon is a “Pencil”
Add icon is the “+” sign
The “?” is the help icon
The “Printer” icon allows you to print the content of the page you are viewing
Below are samples of the icons
back/cancel, change, help, print
add, change, delete, help, print
forward/continue, help, print
back/cancel, save/submit, help, print
The buttons below only appear on the approval screen. They are display at the bottom of the screen. Their
names indicates their function
Employee Menu
Signoff
All employees are assigned the following menu group. Some of the menus has several
submenu. Each menu and submenu are describe on the next few pages of this document.
Signoff
Password Changes
Personal
Payroll
Benefits
In Box
Company
Contact
Help
_________________________________________________________________________
This is use for exiting the application and takes you back to the logon page. There is no
submenu in this option
_________________________________________________________________________

/IT/Business Analyst Team folder/Active Projects/SHCM For BBA and SSI /Training/SHCM for BBA and SSI .doc 4/15/2013
11
Password Change
Personal
Use to change your password or to define answers to security questions for use if you forget
your password, if you need to set a new password, or if your password is disabled.
To change your sign-on preferences, complete these steps:
1. From the Password Changes menu, click Password Changes to display the
Preferences page.
o To change your password, type your current password in the Old
Password field. Type your new password in the New Password field,
and then type it again for confirmation in the Confirm field.
o To define answers for the password reset questions, enter an answer
for each question. If a question line displays a list box with a series of
questions, select one question from the list and enter an answer for
that question. Note that answers are case-sensitive.
If you make a mistake, you can click Clear and start over.
2. Click Submit to process the change. The change to your password takes effect
immediately.
3. Select another menu option or click Sign-off to close your session.
________________________________________________________________________
The personal menu option has the following submenus…
Annual Calendar
Monthly Calendar
Change of Address
Emergency Contact
Personal/Pay Stub Printing
Property
Vac/Sick/Timeoff req
Exception punch
/IT/Business Analyst Team folder/Active Projects/SHCM For BBA and SSI /Training/SHCM for BBA and SSI .doc 4/15/2013
12
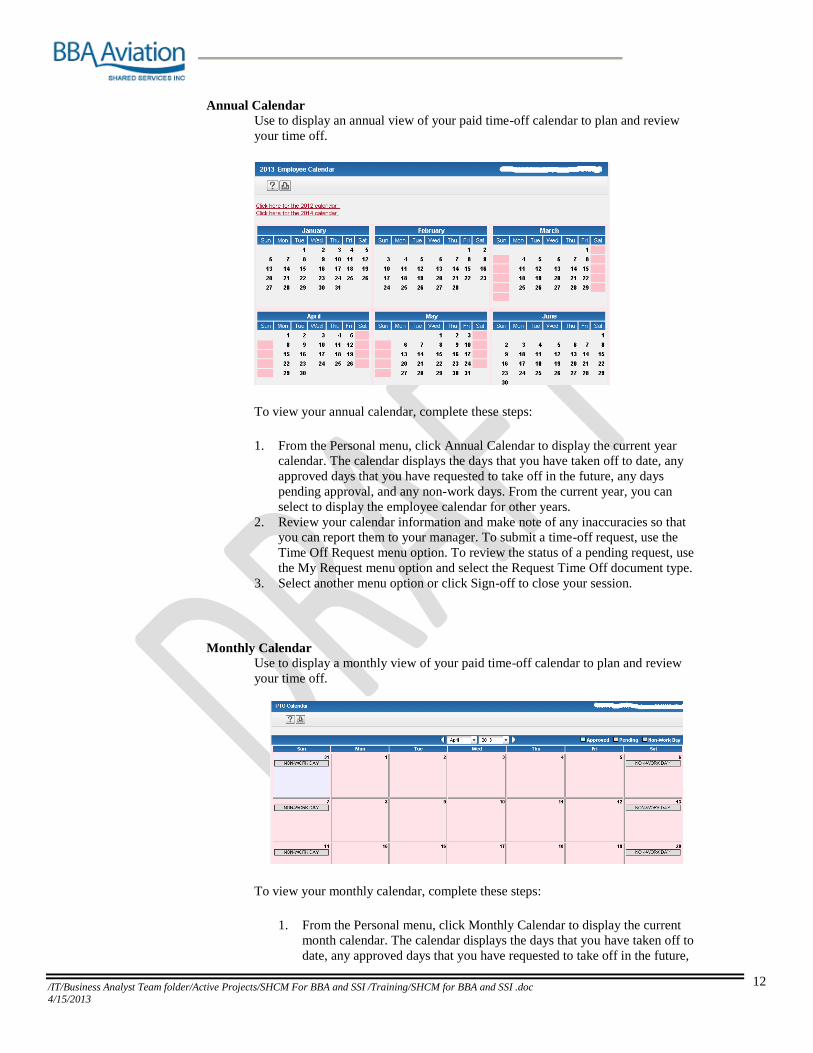
Annual Calendar
Use to display an annual view of your paid time-off calendar to plan and review
your time off.
To view your annual calendar, complete these steps:
1. From the Personal menu, click Annual Calendar to display the current year
calendar. The calendar displays the days that you have taken off to date, any
approved days that you have requested to take off in the future, any days
pending approval, and any non-work days. From the current year, you can
select to display the employee calendar for other years.
2. Review your calendar information and make note of any inaccuracies so that
you can report them to your manager. To submit a time-off request, use the
Time Off Request menu option. To review the status of a pending request, use
the My Request menu option and select the Request Time Off document type.
3. Select another menu option or click Sign-off to close your session.
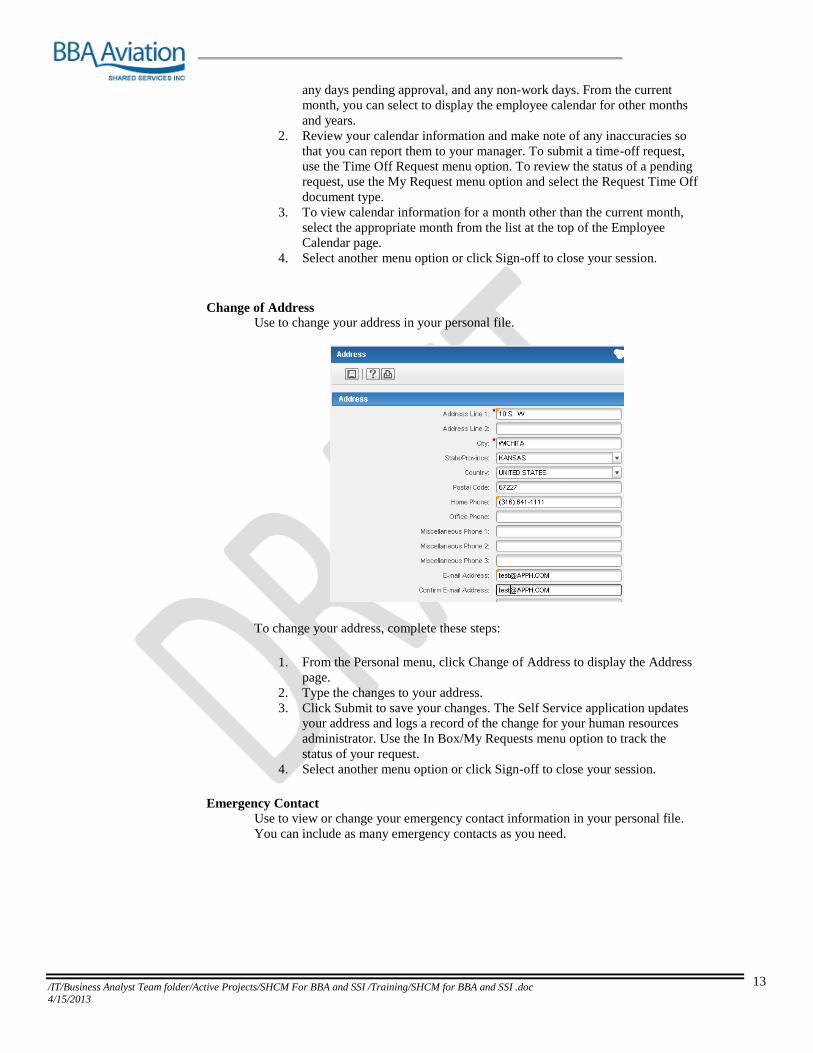
Monthly Calendar
Use to display a monthly view of your paid time-off calendar to plan and review
your time off.
To view your monthly calendar, complete these steps:
1. From the Personal menu, click Monthly Calendar to display the current
month calendar. The calendar displays the days that you have taken off to
date, any approved days that you have requested to take off in the future,
/IT/Business Analyst Team folder/Active Projects/SHCM For BBA and SSI /Training/SHCM for BBA and SSI .doc 4/15/2013
13
any days pending approval, and any non-work days. From the current
month, you can select to display the employee calendar for other months
and years.
2. Review your calendar information and make note of any inaccuracies so
that you can report them to your manager. To submit a time-off request,
use the Time Off Request menu option. To review the status of a pending
request, use the My Request menu option and select the Request Time Off
document type.
3. To view calendar information for a month other than the current month,
select the appropriate month from the list at the top of the Employee
Calendar page.
4. Select another menu option or click Sign-off to close your session.
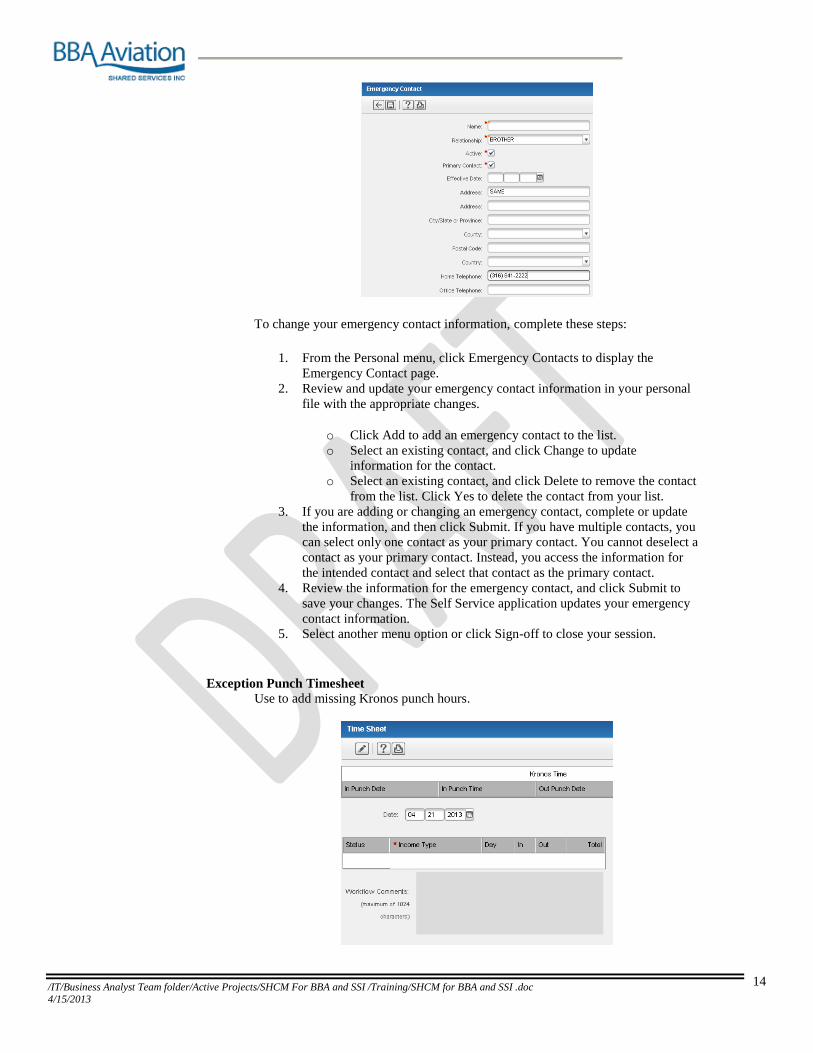
Change of Address
Use to change your address in your personal file.
To change your address, complete these steps:
1. From the Personal menu, click Change of Address to display the Address
page.
2. Type the changes to your address.
3. Click Submit to save your changes. The Self Service application updates
your address and logs a record of the change for your human resources
administrator. Use the In Box/My Requests menu option to track the
status of your request.
4. Select another menu option or click Sign-off to close your session.
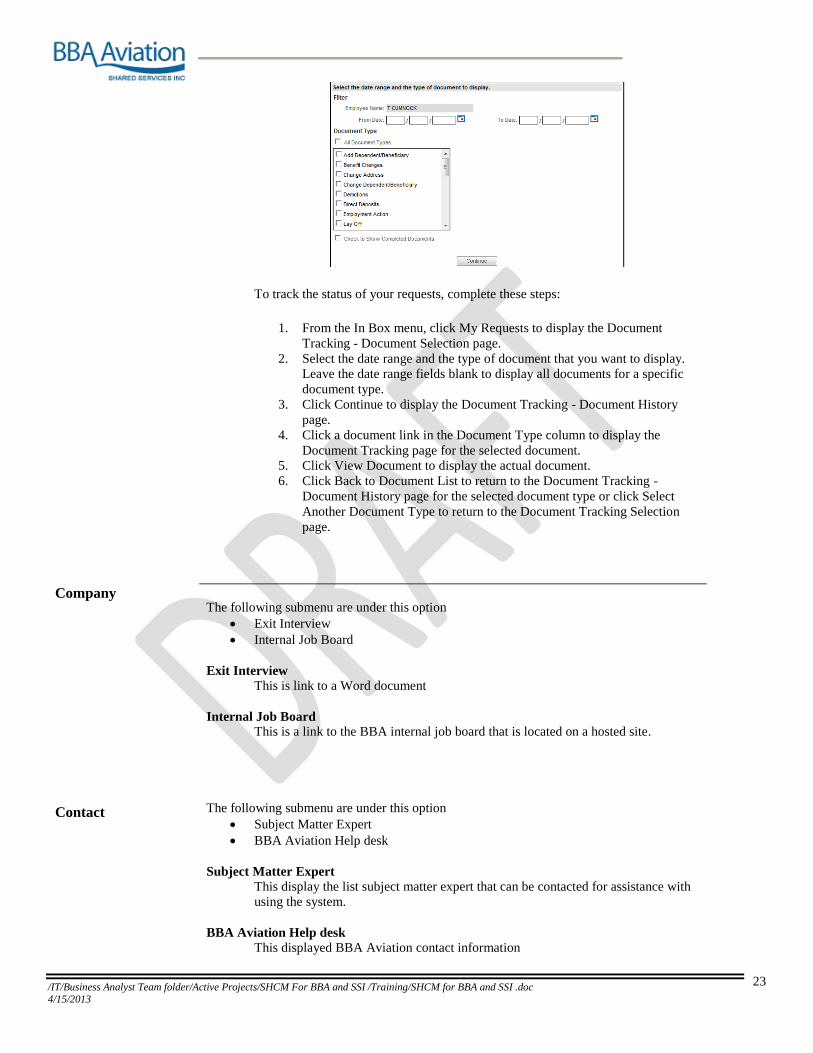
Emergency Contact
Use to view or change your emergency contact information in your personal file.
You can include as many emergency contacts as you need.
/IT/Business Analyst Team folder/Active Projects/SHCM For BBA and SSI /Training/SHCM for BBA and SSI .doc 4/15/2013
14
To change your emergency contact information, complete these steps:
1. From the Personal menu, click Emergency Contacts to display the
Emergency Contact page.
2. Review and update your emergency contact information in your personal
file with the appropriate changes.
o Click Add to add an emergency contact to the list.
o Select an existing contact, and click Change to update
information for the contact.
o Select an existing contact, and click Delete to remove the contact
from the list. Click Yes to delete the contact from your list.
3. If you are adding or changing an emergency contact, complete or update
the information, and then click Submit. If you have multiple contacts, you
can select only one contact as your primary contact. You cannot deselect a
contact as your primary contact. Instead, you access the information for
the intended contact and select that contact as the primary contact.
4. Review the information for the emergency contact, and click Submit to
save your changes. The Self Service application updates your emergency
contact information.
5. Select another menu option or click Sign-off to close your session.
Exception Punch Timesheet
Use to add missing Kronos punch hours.

/IT/Business Analyst Team folder/Active Projects/SHCM For BBA and SSI /Training/SHCM for BBA and SSI .doc 4/15/2013
15
To add a punch, complete these steps:
1. From the Personal menu, click Exception Punch menu.
2. Verify that the punch you are about to enter is not in the list that is shown
3. Select or enter the date of the missing punch then click the Edit icon
4. From the input screen enter the Income Type and the missing punch (use
24 hour clock option). Click Submit after completing the entries
5. The request is routed to your supervisor
6. Select another menu option or click Sign-off to close your session.
Personal/Pay Stub Print
Use to view information in your personal file and to select the option to receive a
pay stub.
To view personal information, complete these steps:
1. From the Personal menu, click Personal to display the Personal page.
2. Review the current information in your personal file. Use the Address
menu option to update your address. Consult your human resources
administrator if other information is not accurate.
3. In the Miscellaneous Information section you can select if you want to get
a pay stub
4. Click Submit to save any change
5. Select another menu option or click Sign-off to close your session.
Property
Use to view your current company property information in your personal file,
maintained by your human resources administrator.

/IT/Business Analyst Team folder/Active Projects/SHCM For BBA and SSI /Training/SHCM for BBA and SSI .doc 4/15/2013
16
To view your company property information, complete these steps:
1. From the Personal menu, click Property to display the Property page.
2. Review your company property information and make note of any
inaccuracies so that you can report them to your human resources
administrator.
3. Select another menu option or click Sign-off to close your session.
Vac/Sick/Timeoff Req
Use to view your current time-off information in your personal file and to submit a
time-off request. You can also submit a request to cancel a previously submitted
paid time-off request.
To view your time-off information and to submit a time-off request, complete these
steps:
1. From the Personal menu, click Vac/Sick/Time Off Req to display the first
Time Off Request page.
2. Review your time-off information and make note of any inaccuracies so
that you can report them to your manager. You can also click View
Calendar to access your calendar.
3. If you want to submit a time-off request, click Create Request to display
the second Request Time Off page.
4. Enter the date range, the number of hours per day, the appropriate absence
code, and any comments for the days that you are requesting. If you are
canceling a previously submitted request, you must enter the number of
hours per day as a negative (-) number.
5. Click Calculate to calculate the total number of requested days off for the
selected date range.
6. Click Submit to forward the request to your manager for approval. Use the
In Box/My Requests menu option and select the Request Time Off
document type to track the status of your request. If you are canceling a
request, you must select the Check to Show Completed Documents check
box to display the canceled request.
7. Select another menu option or click Sign-off to close your session.
__________________________________________________________________________

/IT/Business Analyst Team folder/Active Projects/SHCM For BBA and SSI /Training/SHCM for BBA and SSI .doc 4/15/2013
17
Payroll The Payroll menu has the following sub menus
Direct Deposit Info
Direct Deposit Changes
Pay History
Prior Year Pay
W-2 Information
W-4 Form
State Withholding Forms
Direct Deposit Info
Use to review the current direct deposit disbursements that you have chosen for
your paychecks.
To view your direct deposit disbursement information, complete these steps:
1. From the Payroll menu, click Direct Deposit Info to display the Direct
Deposit Information page.
2. Review your direct deposit disbursement information. To request a
change to your disbursements, use the Direct Deposit Change menu
option or consult your payroll administrator.
3. Select another menu option or click Sign-off to close your session.
Direct Deposit Change
Use to change the direct deposit disbursements that you have chosen for your
paychecks and to submit a request to change your disbursements.
To change your direct deposit disbursement information, complete these steps:
1. From the Payroll menu, click Direct Deposit Change to display the Direct
Deposit Change page.
2. Review your direct deposit disbursement information.
3. To change your disbursements, click Change Direct Deposit Info. to
display the Direct Deposit Change Request page.
4. Complete the information for each direct deposit account that you want to
use. To delete an existing account, check Delete Selected next to the
account.
5. Click Submit to process your request. Use the In Box/My Requests menu
option to track the status of your request.

/IT/Business Analyst Team folder/Active Projects/SHCM For BBA and SSI /Training/SHCM for BBA and SSI .doc 4/15/2013
18
6. Select another menu option or click Sign-off to close your session.
Pay History
Use to review your pay history for the current year.
To view your current year pay history, complete these steps:
1. From the Payroll menu, click Pay History to display the Pay History page.
2. Review the summary information for your paychecks on this page.
3. You can use the date range to filter how much data you see
4. To review detailed information, click the Select column next to the check
whose detailed information you want to view and click Continue.
5. Review the detailed information for the selected paycheck or pay slip.
6. Click Display Another Check or Display Another Pay slip to return to the
Pay History page.
7. Repeat steps 3 through 5 to review detailed information for additional
paychecks or pay slips.
8. You can click the View Paid Time Off Accruals link to see your accrual
balances
9. Select another menu option or click Sign-off to close your session.
Prior Year Pay
Use to review your pay history for a prior year.

/IT/Business Analyst Team folder/Active Projects/SHCM For BBA and SSI /Training/SHCM for BBA and SSI .doc 4/15/2013
19
To view your prior year pay history, complete these steps:
1. From the Payroll menu, click Prior Year Pay to display the Prior Year Pay
page.
2. Review the prior year summary information on this page.
3. To review detailed information, click the Select column next to the year
whose detailed information you want to view and click Continue.
4. Review the detailed information for the selected year.
5. Click Return to Summary to return to the Prior Year Pay page.
6. Repeat steps 3 through 5 to review detailed information for additional
years.
7. Select another menu option or click Sign-off to close your session.
W- 2 Information
Use to access your W-2 information hosted by an external company. You will
require to setup an account to access the site
W- 4 Forms
Use to access information about employee W-4
State Withholding Forms
Use to access state tax withholding forms which are located at an external site
Benefit
The following submenus are under this option. These are links to external system
Wells Fargo 401k
My Benefit Statement
Benefit Enrollment
My Cigna
Well Fargo 401k
This is a link to the Wells Fargo 401K web site
My Benefit Statement
Use to view the benefit plans in which you are enrolled for the current plan year.
To view your current benefit plan elections, complete these steps:

/IT/Business Analyst Team folder/Active Projects/SHCM For BBA and SSI /Training/SHCM for BBA and SSI .doc 4/15/2013
20
1. From the Benefits menu, click My Benefits Statement to display the My Benefits
page.
2. Review your benefit plan elections.
To make a change to your plans, consult your benefits administrator for details.
Otherwise, you must use the Open Enrollment menu option to change a plan. The
timing for this type of change is restricted to an open enrollment period. Consult
your benefits administrator for details.
3. Select another menu option or click Sign-off to close your session.
Inbox
The following submenu are under this option
Alternate Approver (only appear if you are a manager)
For My Approval (Only appears if you are a manager)
My Messages
My requests
Alternate Approval
Use to maintain a list of alternate approvers for the Self Service document types
that you are responsible for approving.
You can select one or more alternate approvers for the period when you are
unavailable to approve workflow documents. If you select more than one alternate
approver for a specified period, you cannot assign the approvers to the same
document types.
To maintain alternate approvers, complete these steps:
1. From the In Box menu, click Alternate Approvers to display the Alternate
Approvers page.
2. Review your alternate approvers and complete the action below to add,
change or delete an alternate approver.
o To add an approver, click Add to display the Alternate Approver
Detail page and continue with the steps below.
o To change information for an approver, click the check box next
to the approver's start date and click Change to display the
Alternate Approver Detail page. Continue with the steps below.
o To delete an approver, click the check box next to the approver's
start date and click Delete.

/IT/Business Analyst Team folder/Active Projects/SHCM For BBA and SSI /Training/SHCM for BBA and SSI .doc 4/15/2013
21
3. Select the start and end dates for the period when you are unavailable to
approve workflow documents.
4. Select one alternate approver for all documents types within the period, or
select multiple approvers. Approvers must be responsible for different
document types if you assign the approvers to the same periods or
overlapping periods.
5. Specify yes in Skip Me if you do not plan to use an alternate approver but
you do not want to delay the workflow process. Self Service routes the
selected document types to the next scheduled approver.
6. Click Submit to save your information and return to the Alternate
Approvers page.
7. Select another menu option or click Sign-off to close your session
For My Approval
Use to view a list of documents that are pending your approval. From the list you
can access the documents and take action to approve or reject a document or, if you
have authorization, you can direct it to a new approver.
To view and work with documents pending your approval, complete these steps:
1. From the In Box menu, click For My Approval to display the For My
Approval page.
2. Review a list of document pending your approval and complete the action
below to approve, reject or redirect a pending document.
o To approve a document, click the check box next to a document
entry in the Subject column and click Approve. To approve all
listed documents, click Select All and then click Approve.
o To reject a document, click the check box next to a document
entry in the Subject column and click Reject. To reject all listed
documents, click Select All and then click Reject.
o If you have authority to redirect a document to another approver,
click the check box next to a document entry in the Subject
column and click Redirect to display the Approval Redirection
List page. To redirect all listed documents, click Select All and
then click Redirect. Specify a new approver for the selected
document. Click Submit to return to the For My Approval page.
You can also click an entry in the Subject column on the For My
Approvals page to view the document details. From the detailed view, you
can approve or reject the document or, if you have authorization, redirect
the document to a new approver.

/IT/Business Analyst Team folder/Active Projects/SHCM For BBA and SSI /Training/SHCM for BBA and SSI .doc 4/15/2013
22
3. Select another menu option or click Sign-off to close your session.
My Messages
Use to work with your messages from other Self Service users, create and send
messages or delete messages. Recipients must be users of your company's Self
Service product. The My Messages menu option does not generate external e-
mails.
To work with messages, complete these steps:
1. From the In Box menu, click My Messages to display the Messages page.
2. If you have a message in your in box, click it to open it.
3. To create a message, click Compose New Message on the Messages page,
complete the information on the Message Composer page and click Send.
4. To delete a message, click the check box next to the message you want to
delete from the Messages page. Click Delete Selected Items.
You can delete only those notifications and messages created with
Compose New Message. You cannot delete messages that require your
approval or rejection.
5. Select another menu option or click Sign-off to close your session.
My Requests
Use to track the status of the requests that you initiated from the following Self
Service menu options:
Address Change
Contacts
Time Off Request
Direct Deposit Change
/IT/Business Analyst Team folder/Active Projects/SHCM For BBA and SSI /Training/SHCM for BBA and SSI .doc 4/15/2013
23
To track the status of your requests, complete these steps:
1. From the In Box menu, click My Requests to display the Document
Tracking - Document Selection page.
2. Select the date range and the type of document that you want to display.
Leave the date range fields blank to display all documents for a specific
document type.
3. Click Continue to display the Document Tracking - Document History
page.
4. Click a document link in the Document Type column to display the
Document Tracking page for the selected document.
5. Click View Document to display the actual document.
6. Click Back to Document List to return to the Document Tracking -
Document History page for the selected document type or click Select
Another Document Type to return to the Document Tracking Selection
page.
Company
The following submenu are under this option
Exit Interview
Internal Job Board
Exit Interview
This is link to a Word document
Internal Job Board
This is a link to the BBA internal job board that is located on a hosted site.
Contact
The following submenu are under this option
Subject Matter Expert
BBA Aviation Help desk
Subject Matter Expert
This display the list subject matter expert that can be contacted for assistance with
using the system.
BBA Aviation Help desk
This displayed BBA Aviation contact information

/IT/Business Analyst Team folder/Active Projects/SHCM For BBA and SSI /Training/SHCM for BBA and SSI .doc 4/15/2013
24
Help
This is a link to generic help information.
__________________________________________________________________________
Manager
The manager menu option is only available to employees that are part of the “manager”
group. The following submenus are under this option.
Documents Routing
Employee Changes
Employee Compensation (Only for HR)
Employee Contacts
Employee History
Employee Information
Employee Time off
New Employee (Only for HR managers)
Performance Review
Rehire Employee (Only for HR managers)
Salary Planning (Only for specific groups)
Links to CARS
Document Routing
Use to track the status of documents that you have initiated or for which you are
responsible in the Self Service workflow process.
To track the status of documents routed through the Self Service workflow process,
complete these steps:
1. From the Manager menu, click Document Tracking to display the
Document Tracking - Document Selection page.
2. Select the date range and the type of document that you want to display.
Leave the date range fields blank to display all documents for a specific
document type.
3. Click Continue to display the Document Tracking - Document History
page.
4. Click a document link in the Document Type column to display the
Document Tracking page for the selected document.
5. Click View Document to display the actual document.
6. Click Back to Document List to return to the Document Tracking -
Document History page for the selected document type or click Select
Another Document Type to return to the Document Tracking Selection
page.

/IT/Business Analyst Team folder/Active Projects/SHCM For BBA and SSI /Training/SHCM for BBA and SSI .doc 4/15/2013
25
Employee Changes
Use to initiate a request for the following employee personnel changes and route the
request through a designated approval process:
Performance Review
Salary Change
Promotion
Transfer (Only for HR managers)
Status Change
Leave of Absence
Termination (Only for HR managers)
Demotion
Personal Change (Only for HR managers)
To process employee changes, complete these steps:
1. From the Manager menu, click Employee Changes to display the Employee
Changes - Employee List Options page.
2. Use Filter to limit the list to employees whose names contain the selected text.
The time to generate your employee list is dependent on the number of
employees. Use Filter to reduce the time required to generate the list.
3. Select from the available options to specify how to retrieve a list of employees
who are your direct or indirect reports.
4. Select from the available values to specify the depth of the reporting level for
the employees. To select direct reports only, select level 1.
5. Click Continue to display the Employee Changes - Employee Selection page.
6. Click one or more transactions for one or more employees. You may select
multiple transactions for one employee or for multiple employees.
7. Click Continue to display the selected transaction.
8. Complete the information on the page for the specific transaction.
9. Click Submit/Next Employee to return to the Employee Changes - Employee
Selection page and initiate the approval process.
If you select multiple transactions for one employee or multiple employees, you
advance to the next selected transaction when you click Submit/Next Employee.
You can also click Cancel/Next Employee to skip a transaction and advance to the
next selected transaction, or you can click Employee Selection to skip all
remaining selected transactions and return to the Employee Changes - Employee
Selection page.
Use the Manager/Document Tracking menu option to track the status of your
transactions.

/IT/Business Analyst Team folder/Active Projects/SHCM For BBA and SSI /Training/SHCM for BBA and SSI .doc 4/15/2013
26
Employee Compensation
Use to view employee compensations
To view an employee current benefit plan elections, complete these steps:
1. From the Manager menu, click Benefits Statement
2. Select the employee from your list of authorization to display their Benefits page.
3. Review the benefit plan elections.
4. Select another menu option or click Sign-off to close your session.
Employee Contacts
Use to view emergency contacts on file for your direct and indirect reports.
To view employee contacts, complete the following steps:
1. From the Manager menu, click Employee Contacts to display the
Employee Contacts - Employee List Options page.
2. Use Filter to limit the list to employees whose names contain the selected
text. The time to generate your employee list is dependent on the number
of employees. Use Filter to reduce the time required to generate the list.
3. Select from the available options to specify how to retrieve a list of
employees who are your direct or indirect reports.
4. Select from the available values to specify the depth of the reporting level
for the employees. To select direct reports only, select level 1.
5. Click Continue to display the Employee Contacts - Employee Selection
page.
6. Select the employee whose emergency contacts you want to display.
/IT/Business Analyst Team folder/Active Projects/SHCM For BBA and SSI /Training/SHCM for BBA and SSI .doc 4/15/2013
27
7. Click Continue to display the Emergency Contacts page.
8. Select the emergency contact whose information you want to display.
9. Click Continue to display detailed information for the selected contact.
10. Click Cancel to return to the selected employee's Emergency Contacts
page.
11. Select another contact or, click Return to Employee List to return to the
Employee Contacts - Employee Selection page where you can select to
view contact information for another employee.
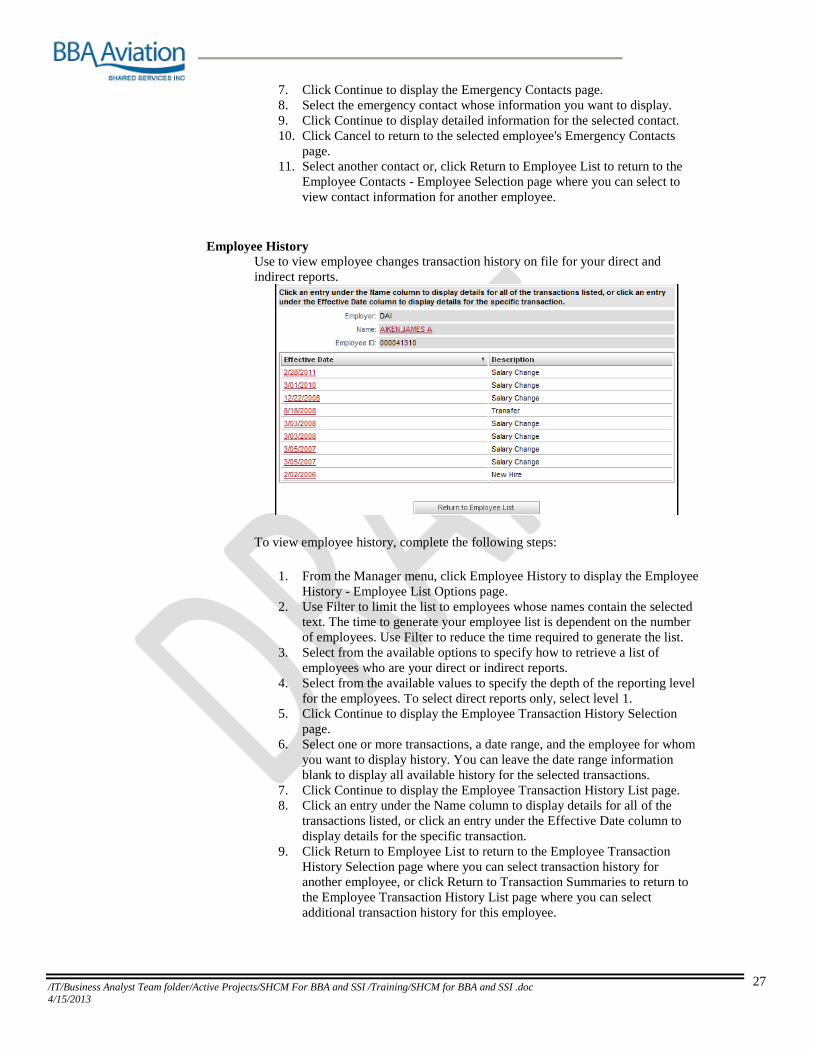
Employee History
Use to view employee changes transaction history on file for your direct and
indirect reports.
To view employee history, complete the following steps:
1. From the Manager menu, click Employee History to display the Employee
History - Employee List Options page.
2. Use Filter to limit the list to employees whose names contain the selected
text. The time to generate your employee list is dependent on the number
of employees. Use Filter to reduce the time required to generate the list.
3. Select from the available options to specify how to retrieve a list of
employees who are your direct or indirect reports.
4. Select from the available values to specify the depth of the reporting level
for the employees. To select direct reports only, select level 1.
5. Click Continue to display the Employee Transaction History Selection
page.
6. Select one or more transactions, a date range, and the employee for whom
you want to display history. You can leave the date range information
blank to display all available history for the selected transactions.
7. Click Continue to display the Employee Transaction History List page.
8. Click an entry under the Name column to display details for all of the
transactions listed, or click an entry under the Effective Date column to
display details for the specific transaction.
9. Click Return to Employee List to return to the Employee Transaction
History Selection page where you can select transaction history for
another employee, or click Return to Transaction Summaries to return to
the Employee Transaction History List page where you can select
additional transaction history for this employee.

/IT/Business Analyst Team folder/Active Projects/SHCM For BBA and SSI /Training/SHCM for BBA and SSI .doc 4/15/2013
28
Employee Information
Use to view information on file for your direct and indirect reports.
To use employee information, complete these steps:
1. From the Manager menu, click Employee Information to display the
Employee Information - Employee List Options page.
2. Use Filter to limit the list to employees whose names contain the selected
text. The time to generate your employee list is dependent on the number
of employees. Use Filter to reduce the time required to generate the list.
3. Select from the available options to specify how to retrieve a list of
employees who are your direct or indirect reports.
4. Select from the available values to specify the depth of the reporting level
for the employees. To select direct reports only, select level 1.
5. Click Continue to display the Employee Information page.
6. Click the category of information that you want to display for a specific
employee. You can select from the categories listed below.
o Personal
o Contacts
o Licenses
o Property
7. Click Close to return to the Employee Information page.
Employee Time Off
Use to view time-off information on file for your direct and indirect reports.
To view employee time-off information, complete these steps:
1. From the Manager menu, click Employee Time Off to display the
Employee Time Off - Employee List Options page.
2. Use Filter to limit the list to employees whose names contain the selected
text. The time to generate your employee list is dependent on the number
of employees. Use Filter to reduce the time required to generate the list.
3. Select from the available options to specify how to retrieve a list of
employees who are your direct or indirect reports.
4. Select from the available values to specify the depth of the reporting level
for the employees. To select direct reports only, select level 1.
5. Click Continue to display the Employee Time Off page.
6. Click the check box in the Select column next to one or more employees
whose time-off information you want to view. To select all employees in
the list, click Select All. You can click Expand All to display detailed
time-off information for the employees in the list, or you can click the
/IT/Business Analyst Team folder/Active Projects/SHCM For BBA and SSI /Training/SHCM for BBA and SSI .doc 4/15/2013
29
Expand arrow to the left of each employee who has detailed time-off
information.
7. Click Continue to display the current month of the calendar for the
selected employees. From the current month, you can select to display the
employee calendar for other months and years.
8. Click Return to Employee List to return to the Employee Time Off page.
New Employee
Use to enter information to request the hiring of a job applicant and to route the
request through a designated approval process.
To process a new hire request, complete these steps:
1. From the Manager menu, click New Employee to display the first New
Employee page.
2. Specify the date of employment, position, and, if applicable, the employer
of the new employee's supervisor for the new employee. If applicable,
select the new employee from the Applicant Name list.
3. Click Continue to display the second New Employee page.
4. Enter the information for the employee you are hiring. Consult your
human resources and payroll administrators if you have questions on how
to use these fields.
5. Click Submit to initiate the approval process.
Use the Manager/Document Tracking menu option to track the status of your
transactions.

/IT/Business Analyst Team folder/Active Projects/SHCM For BBA and SSI /Training/SHCM for BBA and SSI .doc 4/15/2013
30
Performance Review
Use to view the date and status of your employees' upcoming performance reviews.
To view performance review information, complete these steps:
1. From the Manager menu, click Performance Reviews to display the
Performance Reviews - Employee List Options page.
2. Use Filter to limit the list to employees whose names contain the selected
text. The time to generate your employee list is dependent on the number
of employees. Use Filter to reduce the time required to generate the list.
3. Select from the available options to specify how to retrieve a list of
employees who are your direct or indirect reports.
4. Select from the available values to specify the depth of the reporting level
for the employees. To select direct reports only, select level 1.
5. Click Continue to display the Performance Reviews page.
6. Review a list that shows the status of the performance reviews for which
you are responsible. Use the Manager/Employee Changes menu option to
initiate a performance review
Rehire Employee
Use to enter information to request the rehiring of a terminated employee and to
route the request through a designated approval process. The rehire candidate must
be a former employee whose information still resides in Infinium HR. This
function should be performed by HR personnel.
Access to this menu option is dependent on the country in which your company is
located.
To process a rehire request, complete these steps:
1. From the Manager menu, click Rehire Employee to display the first
Rehire Employee - Former Employee Selection page.
2. Use Filter to limit the list to names that contain the selected text. The time
required to generate the list is dependent on the number of records. Use
Filter to reduce the time required to generate the list.
/IT/Business Analyst Team folder/Active Projects/SHCM For BBA and SSI /Training/SHCM for BBA and SSI .doc 4/15/2013
31
3. Select from the available options to specify how to retrieve a list of
terminated employees who were your direct or indirect reports.
4. Select from the available values to specify the depth of the reporting level
for the terminated employees. To select direct reports only, select level 1.
5. Click Continue to display the second Rehire Employee - Former
Employee Selection page.
6. Select the employee that you are rehiring.
7. Click Continue to display the Rehire Employee - Position Selection page.
8. Type the date of employment, and specify the rehire reason, the new
position for the employee you are rehiring, and the employer of the
rehired employee's supervisor.
9. Click Continue to display the Rehire Employee page.
10. Enter or update the information for the employee you are rehiring. Consult
your human resources and payroll administrators if you have questions on
how to use these fields.
11. Click Submit to initiate the approval process.
Use the Manager/Document Tracking menu option to track the status of your
transactions.
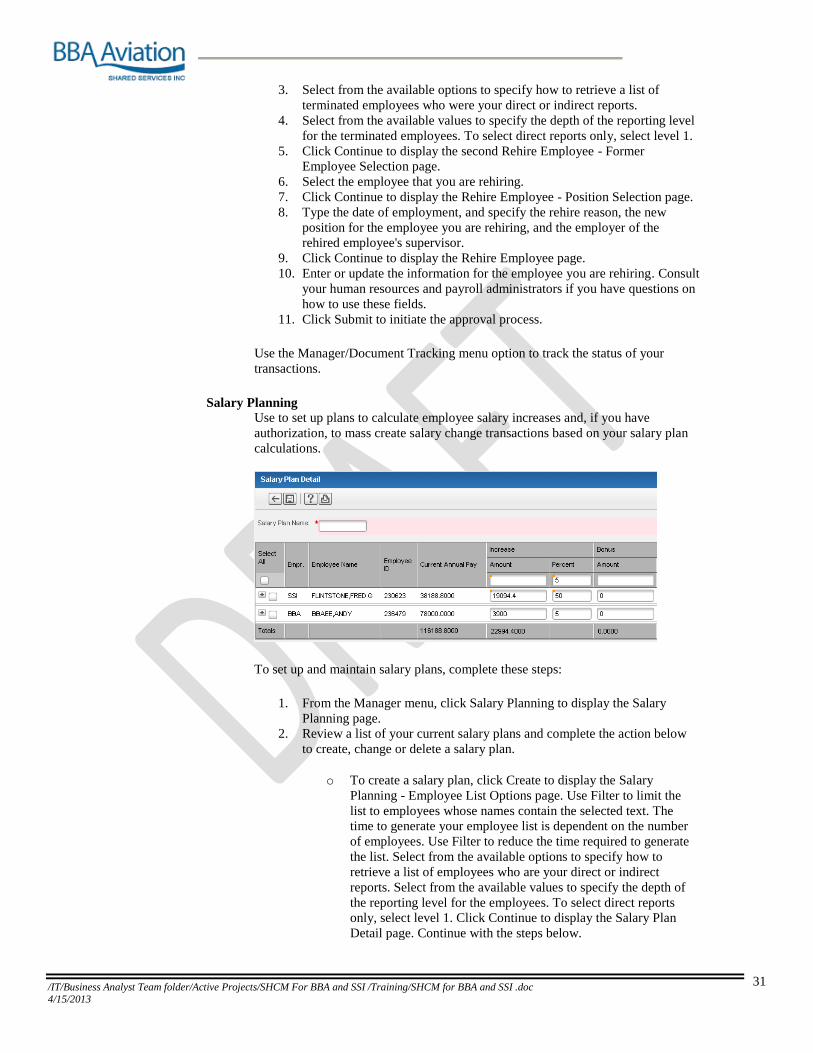
Salary Planning
Use to set up plans to calculate employee salary increases and, if you have
authorization, to mass create salary change transactions based on your salary plan
calculations.
To set up and maintain salary plans, complete these steps:
1. From the Manager menu, click Salary Planning to display the Salary
Planning page.
2. Review a list of your current salary plans and complete the action below
to create, change or delete a salary plan.
o To create a salary plan, click Create to display the Salary
Planning - Employee List Options page. Use Filter to limit the
list to employees whose names contain the selected text. The
time to generate your employee list is dependent on the number
of employees. Use Filter to reduce the time required to generate
the list. Select from the available options to specify how to
retrieve a list of employees who are your direct or indirect
reports. Select from the available values to specify the depth of
the reporting level for the employees. To select direct reports
only, select level 1. Click Continue to display the Salary Plan
Detail page. Continue with the steps below.

/IT/Business Analyst Team folder/Active Projects/SHCM For BBA and SSI /Training/SHCM for BBA and SSI .doc 4/15/2013
32
o To change a salary plan, click an entry in the Salary Plan column
to display the Salary Plan Detail page. Continue with the steps
below.
o To delete one or more salary plans, click the check box next to
each plan to delete and then click Delete Selected Items.
3. To create a plan, type the name of the salary plan, and then select one or
more employees to participate in the plan. Type an amount or percentage
increase in the appropriate category for each employee.
To change a plan, change the amount or percentage in the appropriate
category for each participant.
You can select all employees and type an amount or percentage increase
to apply to all employees. You can also click the arrow to the left of the
box to display more salary information for an employee.
4. Click Save to save the salary plan details and return to the Salary Planning
page.
5. If you have authority to mass create salary change transactions, click the
salary plan entry in the Salary Plan column to return to the Salary Plan
Detail page.
6. Click the check box next to each employee to include in the mass change.
7. Click Create Mass Salary Changes to display the Salary Planning - Mass
Salary Change page.
8. Enter the date and reason for the salary changes for the selected
employees.
9. Click Submit to submit the salary change transactions for processing.
Use the Manager/Document Tracking menu option to track the status of your
transactions.
Link to CARS
This is a link to the CARS system so that managers can submit system access
request
Submitting Requests
You use Self Service Workflow to route your personal information change requests through
a predefined approval or routing process for the topics listed below.
Address changes
Emergency contact changes
Time-off requests
Direct deposit changes
Missing Kronos punch
On many Self Service forms, you can use a Comments field to direct comments and
questions to the employees designated to review and approve your requests.

/IT/Business Analyst Team folder/Active Projects/SHCM For BBA and SSI /Training/SHCM for BBA and SSI .doc 4/15/2013
33
You use the In Box/My Messages menu option to access messages from reviewers and
approvers and to track the status of your requests. The in-box messages contain links that
you can click to access your original requests.
You use the In Box/My Requests menu option to track the status of your requests.
Consult your Self Service administrator if you have questions about Self Service Workflow.
Request Approval
If you are a designated approver or recipient of Self Service documents and notifications,
you use Self Service Workflow to review, approve and reject the documents. If you have
authorization, you can also redirect documents to new approvers.
On Self Service forms, you can use a Workflow Comments field to add comments and
questions to the originator of a request or transaction or to another approver in the
predefined approval or routing process.
You use the In Box/For My Approval menu option to access documents that are pending
your review and approval.
If you are a manager, you can also use the Manager/Document Tracking menu option to
access employee personnel action documents that are pending your review and approval.
Self Service Workflow setup is an administrative function. If you are unable to access Self
Service documents necessary to complete your work, consult your Self Service
administrator to provide you with the proper access.

/IT/Business Analyst Team folder/Active Projects/SHCM For BBA and SSI /Training/SHCM for BBA and SSI .doc 4/15/2013
34
Appendix A: Password Management
Have the employee follow the steps below to reset or retrieve their password. If an employee did not enter
their email or answer their questions then they will not be able to use this option
STEP ACTION
1 From the application logon window enter their SHCM ID then click on the
“click here” button
2 When the following window is displayed, do one of the following:
Click on the “Email Password” button to have the system send the
password to the email that is in the system.
Enter the answers to the three security questions then click the
Submit button. The employee will then be allowed to access the
application.
Note: Employees can also use this screen to reset their password but they
must correctly answer the security questions.