shiffman - 0123736021 - programming
TRANSCRIPT

Lesson TwoEverything You Need to Know
4 Variables5 Conditionals6 Loops

This page intentionally left blank

Variables 45
4 Variables “ All of the books in the world contain no more information than is broadcast as video in a single large American city in a single year. Not all bits have equal value. ” —Carl Sagan
“ Believing oneself to be perfect is often the sign of a delusional mind. ” —Lieutenant Commander Data In this chapter: – Variables: What are they? – Declaring and initializing variables. – Common uses for variables. – Variables you get “ for free ” in Processing (AKA “ built-in ” variables). – Using random values for variables.
4.1 What is a Variable? I admit it. When I teach programming, I launch into a diatribe of analogies in an attempt to explain the concept of a variable in an intuitive manner. On any given day, I might say “ A variable is like a bucket. ” You put something in the bucket, carry it around with you, and retrieve it whenever you feel inspired. “ A variable is like a storage locker. ” Deposit some information in the locker where it can live safely, readily available at a moment’s notice. “ A variable is a lovely, yellow post-it note, on which is written the message: I am a variable. Write your information on me. ”
6
Variablebucket
Variablelocker
Variablepost-it
9 3
fi g. 4.1
I could go on. But I won’t. I think you get the idea. And I am not entirely sure we really need an analogy since the concept itself is rather simple. Here’s the deal. ! e computer has memory. Why do we call it memory? Because it is what the computer uses to remember stuff it needs. Technically speaking, a variable is a named pointer to a location in the computer’s memory ( “ memory address ” ) where data is stored. Since computers only process information one instruction at a time, a variable allows a programmer to save information from one point in the program and refer back to it at a later time. For a Processing programmer, this is incredibly useful; variables can keep track of information related to shapes: color, size, location. Variables are exactly what you need to make a triangle change from blue to purple, a circle fl y across the screen, and a rectangle shrink into oblivion.

46 Learning Processing
Out of all the available analogies, I tend to prefer the piece of paper approach: graph paper .
Imagine that the computer’s memory is a sheet of graph paper and each cell on the graph paper has an address. With pixels, we learned how to refer to those cells by column and row numbers. Wouldn’t it be nice if we could name those cells? With variables, we can.
Let’s name one “ Billy’s Score ” (we will see why we are calling it that in the next section) and give it the value 100. ! at way, whenever we want to use Billy’s score in a program, we do not have to remember the value 100. It is there in memory and we can ask for it by name. See Figure 4.2 .
Billy’s score
100
fi g 4.2
Jane’s Score
5
30
53
65
87
101
10
25
47
68
91
98
Billy’s Score
fi g. 4.3
! e power of a variable does not simply rest with the ability to remember a value. ! e whole point of a variable is that those values vary , and more interesting situations arise as we periodically alter that value.
Consider a game of Scrabble between Billy and Jane. To keep track of the score, Jane takes out paper and pencil, and scrawls down two column names: “ Billy’s Score ” and “ Jane’s Score. ” As the two play, a running tally is kept of each player’s points below the headings. If we imagine this game to be virtual Scrabble programmed on a computer, we suddenly can see the concept of a variable that varies emerge. ! at piece of paper is the computer’s memory and on that paper, information is written— “ Billy’s Score ” and “ Jane’s Score ” are variables, locations in memory where each player’s total points are stored and that change over time. See Figure 4.3 .
In our Scrabble example, the variable has two elements—a name (e.g., “ Jane’s Score ” ) and a value (e.g., 101). In Processing , variables can hold diff erent kinds of values and we are required to explicitly defi ne the type of value before we can use a given variable.

Variables 47
In Figure 4.4 , we have a variable named “ count ” of type “ int, ” which stands for integer. Other possible data types are listed below.
4.2 Variable Declaration and Initialization Variables can hold primitive values or references to objects and arrays . For now, we are just going to worry about primitives—we will get to objects and arrays in a later chapter. Primitive values are the building blocks of data on the computer and typically involve a singular piece of information, like a number or character.
Variables are declared by fi rst stating the type, followed by the name. Variable names must be one word (no spaces) and must start with a letter (they can include numbers, but cannot start with a number). ! ey cannot include any punctuation or special characters, with the exception of the underscore: “ _ ” .
A type is the kind of data stored in that variable. ! is could be a whole number, a decimal number, or a character. Here are data types you will commonly use:
• Whole numbers, such as 0, 1, 2, 3, ! 1, ! 2, and so on are stored as “ integers ” and the type keyword for integer is “ int ” .
• Decimal numbers, such as 3.14159, 2.5, and –9.95 are typically stored as “ floating point values ” and the type keyword for floating point is “ float ” .
• Characters, such as the letters ‘ a ’ , ‘ b ’ , ‘ c ’ , and so on are stored in variables of type “ char ” and are declared as a letter enclosed in single quotes, that is, ‘ a ’ . Characters are useful when determining what letter on the keyboard has been pressed, and for other uses involving Strings of text (see Chapter 17) .
int count
nametype
;
fi g. 4.4
Exercise 4-1: Consider the game Pong. What variables would you need to program the game? (If you are not familiar with Pong, see http://en.wikipedia.org/wiki/Pong ).

48 Learning Processing
Don’t Forget
• Variables must have a type. Why? ! is is how the computer knows exactly how much memory should be allocated to store that variable’s data.
• Variables must have a name.
All Primitive Types
• boolean : true or false • char : a character, ‘ a ’ ,‘b ’ ,‘c ’ , etc. • byte : a small number, –128 to 127 • short : a larger number, –32768 to 32767 • int : a big number, –2147483648 to 2147483647 • long : a really huge number • fl oat : a decimal number , such as 3.14159 • double : a decimal number with a lot more decimal places (only necessary for advanced programs
requiring mathematical precision).
What’s in a name?
Tips for choosing good variable names • Avoid using words that appear elsewhere in the Processing language. In other words, do not call
your variable mouseX , there already is one! • Use names that mean something. ! is may seem obvious, but it is an important point. For
example, if you are using a variable to keep track of score, call it “ score ” and not, say, “ cat. ” • Start your variable with a lowercase letter and join together words with capitals. Words that start
with capitals are reserved for classes (Chapter 8). For example: “ frogColor ” is good, “ Frogcolor ” is not. this canTake some gettingUsedTo but it will comeNaturally soonEnough.
Once a variable is declared, we can then assign it a value by setting it equal to something. In most cases, if we forget to initialize a variable, Processing will give it a default value, such as 0 for integers, 0.0 for fl oating points, and so on. However, it is good to get into the habit of always initializing variables in order to avoid confusion.
int count;
count = 50;
To be more concise, we can combine the above two statements into one.
int count = 50; Declare and initialize a variable in one lines of code.
Declare and initialize a variable in two lines of code.

Variables 49
A variable can also be initialized by another variable ( x equals y ), or by evaluating a mathematical expression ( x equals y plus z , etc.). Here are some examples:
Example 4-1: Variable declaration and initialization examples
int count = 0; // Declare an int named count, assigned the value 0 char letter = ' a'; // Declare a char named letter, assigned the value 'a' double d = 132.32; // Declare a double named d, assigned the value 132.32 boolean happy = false; // Declare a boolean named happy, assigned the value false float x = 4.0; // Declare a float named x, assigned the value 4.0 float y; // Declare a float named y (no assignment) y = x + 5.2; // Assign the value of x plus 5.2 to the previously declared y float z = x *y + 15.0; // Declare a variable named z, assign it the value which // is x times y plus 15.0.
____________________________________________________________ ____________________________________________________________ ____________________________________________________________ ____________________________________________________________ ____________________________________________________________ ____________________________________________________________
Exercise 4-2: Write out variable declaration and initialization for the game Pong.
4.3 Using a Variable ! ough it may initially seem more complicated to have words standing in for numbers, variables make our lives easier and more interesting. Let’s take a simple example of a program that draws a circle onscreen.
void setup() { size(200,200); }
void draw() { background(255); stroke(0); fill(175); ellipse(100,100,50,50); }
In a moment, we’ll add variables at the top here.

50 Learning Processing
Rule of ! umb: When to Use a Variable
! ere are no hard and fast rules in terms of when to use a variable. However, if you fi nd yourself hard-coding in a bunch of numbers as you program, take a few minutes, review your code, and change these values to variables. Some programmers say that if a number appears three or more times, it should be a variable. Personally, I would say if a number appears once, use a variable. Always use variables!
Example 4-2: Using variables
int circleX = 100; int circleY = 100;
void setup() { size(200,200); }
void draw() { background(100); stroke(255); fill(0); ellipse(circleX,circleY,50,50); }
Running this code, we achieve the same result as in the fi rst example: a circle appears in the middle of the screen. Nevertheless, we should open our hearts and remind ourselves that a variable is not simply a placeholder for one constant value. We call it a variable because it varies . To change its value, we write an assignment operation , which assigns a new value. Up until now, every single line of code we wrote called a function: line( ), ellipse( ) , stroke( ) , etc . Variables introduce assignment operations to the mix. Here is what one looks like (it is the same as how we initialize a variable, only the variable does not need to be declared).
variable name " expression
Declare and initialize two integer variables at the top of the code.
Use the variables to specify the location of an ellipse.
In Chapter 3, we learned how to take this simple example one step further, changing the location of a shape to mouseX, mouseY in order to assign its location according to the mouse. ellipse(mouse X ,mouse Y ,50,50);
Can you see where this is going? mouseX and mouseY are named references to the horizonal and vertical location of the mouse. ! ey are variables! However, because they are built into the Processing environment (note how they are colored red when you type them in your code), they can be used without being declared. Built-in variables (AKA “ System ” variables) are discussed further in the next section. What we want to do now is create our own variables by following the syntax for declaring and initializing outlined above, placing the variables at the top of our code. You can declare variables elsewhere in your code and we will get into this later. For now to avoid any confusion, all variables should be at the top.

Variables 51
x = 5; x = a + b; x = y - 10 * 20; x = x * 5;
A common example is incrementation. In the above code, circle X starts with a value of 100. If we want to increment circleX by one, we say circleX equals itself plus one. In code, this amounts to “ circle X " circle X # 1; ” .
Let’s try adding that to our program (and let’s start circleX with the value of 0).
Example 4-3: Varying variables
int circle X = 0; int circleY = 100;
void setup() { size(200,200); }
void draw() { background(255); stroke(0); fill(175); ellipse(circleX,circleY,50,50);
circleX = circleX + 1; }
What happens? If you run Example 4-3 in Processing , you will notice that the circle moves from left to right. Remember, draw( ) loops over and over again, all the while retaining the value of circleX in memory. Let’s pretend we are the computer for a moment. (! is may seem overly simple and obvious, but it is key to our understanding of the principles of programming motion.)
An assignment operation that increments the value of circleX by 1.
fi g. 4.5
1. Remember circlecircleX " 0 and circlecircleY " 1002. Run setup()setup(). Open a window 200 $ 2003. Run draw().draw(). • Draw circle at (circle(circleX, circlecircleY ) → (0,100) • Add one to circlecircleX circlecircleX " 0 # 1 " 14. Run draw()draw() • Draw circle at (circle(circleX, circlecircleY ) → (1,100) • Add one to circlecircleX circlecircleX " 1 # 1 " 25. Run draw(draw() • Draw circle at (circle(circleX, circlecircleY ) → (2,100) • Add one to circlecircleX circlecircleX " 2 # 1 " 36. And so on and so forth!
Examples of assigning a new value to a variables.
Practicing how to follow the code step-by-step will lead you to the questions you need to ask before writing your own sketches. Be one with the computer.

52 Learning Processing
4.4 Many Variables Let’s take the example one step further and use variables for every piece of information we can think of. We will also use fl oating point values to demonstrate greater precision in adjusting variable values.
Example 4-4: Many variables
float circleX = 0; float circleY = 0; float circleW = 50; float circleH = 100; float circleStroke = 255; float circleFill = 0; float backgroundColor = 255; float change = 0.5;
// Your basic setup void setup() { size(200,200); smooth(); }
Exercise 4-3: Change Example 4-3 so that instead of the circle moving from left to right, the circle grows in size. What would you change to have the circle follow the mouse as it grows? How could you vary the speed at which the circle grows?
int circleSize = 0;
int circleX = 100;
int circleY = 100;
void setup() {
size(200,200);
}
void draw() {
background(0);
stroke(255);
fill(175);
_____________________________________
_____________________________________
}
We’ve got eight variables now!All of type fl oat.
• What data do you and the computer need to remember for your sketch? • How do you and the computer use that data to draw shapes on the screen? • How do you and the computer alter that data to make your sketch interactive and animated?
fi g. 4.6

Variables 53
void draw() { // Draw the background and the ellipse background(backgroundColor); stroke(circleStroke); fill(circleFill); ellipse(circleX,circleY,circleW,circleH);
// Change the values of all variables circleX = circleX + change; circleY = circleY + change; circleW = circleW + change; circleH = circleH - change; circleStroke = circleStroke - change; circleFill = circleFill + change; }
Variables are used for everything: background, stroke, fi ll, location, and size.
The variable change is used to increment and decrement the other variables.
Step 1 : Write code that draws the following screenshots with hard-coded values. (Feel free to use colors instead of grayscale.)
Step 2 : Replace all of the hard-coded numbers with variables. Step 3 : Write assignment operations in draw( ) that change the value of the variables.
For example, “ variable1 " variable1 # 2; ” . Try diff erent expressions and see what happens!
Exercise 4-4
4.5 System Variables As we saw with mouseX and mouseY , Processing has a set of convenient system variables freely available. ! ese are commonly needed pieces of data associated with all sketches (such as the width of the window, the key pressed on the keyboard, etc.). When naming your own variables, it is best to avoid system variable names, however, if you inadvertently use one, your variable will become primary and override the system one. Here is a list of commonly used system variables (there are more, which you can fi nd in the Processing reference).
• width —Width (in pixels) of sketch window. • height —Height (in pixels) of sketch window. • frameCount —Number of frames processed.

54 Learning Processing
• frameRate —Rate that frames are processed (per second). • screen.width —Width (in pixels) of entire screen. • screen.height —Height (in pixels) of entire screen. • key —Most recent key pressed on the keyboard. • keyCode —Numeric code for key pressed on keyboard. • keyPressed —True or false? Is a key pressed? • mousePressed —True or false? Is the mouse pressed? • mouseButton —Which button is pressed? Left, right, or center?
Following is an example that makes use of some of the above variables; we are not ready to use them all yet, as we will need some more advanced concepts to make use of many features.
Example 4-5: Using system variables
void setup() { size(200,200); frameRate(30); }
void draw() { background(100); stroke(255); fill(frameCount/2); rectMode(CENTER); rect(width/2,height/2,mouseX + 10,mouseY + 10); }
void keyPressed() { println(key); }
The rectangle will always be in the middle of the window if it is located at (width/2, height/2).
Exercise 4-5: Using width and height, recreate the following screenshot. Here’s the catch: the shapes must resize themselves relative to the window size. (In other words, no matter what you specify for size( ) , the result should look identical.)
frameCount is used to color a rectangle.

Variables 55
4.6 Random: Variety is the spice of life. So, you may have noticed that the examples in this book so far are a bit, say, humdrum. A circle here. A square here. A grayish color. Another grayish color.
! ere is a method to the madness (or lack of madness in this case). It all goes back to the driving principle behind this book: incremental development . It is much easier to learn the fundamentals by looking at the individual pieces, programs that do one and only one thing. We can then begin to add functionality on top, step by step.
Nevertheless, we have waited patiently through four chapters and we have arrived at the time where we can begin to have a bit of fun. And this fun will be demonstrated via the use of the function random( ) . Consider, for a moment, Example 4-6, whose output is shown in Figure 4.7 .
Example 4-6: Ellipse with variables
float r = 100; float g = 150; float b = 200; float a = 200;
float diam = 20; float x = 100; float y = 100; void setup() { size(200,200); background(255); smooth(); }
void draw() { // Use those variables to draw an ellipse stroke(0); fill(r,g,b,a); ellipse(x,y,diam,diam); }
! ere it is, our dreary circle. Sure, we can adjust variable values and move the circle, grow its size, change its color, and so on. However, what if every time through draw( ) , we could make a new circle, one with a random size, color, and position? ! e random( ) function allows us to do exactly that.
random( ) is a special kind of function, it is a function that returns a value. We have encountered this before. In Exercise 3-7 we used the function abs( ) to calculate the absolute value of a number. ! e idea of a function that calculates a value and returns it will be explored fully in Chapter 7, but we are going to take some time to introduce the idea now and let it sink in a bit.
Unlike most of the functions we are comfortable with (e.g., line( ), ellipse( ), and rect( ) ), random( ) does not draw or color a shape on the screen. Instead, random( ) answers a question; it returns that answer to us. Here is a bit of dialogue. Feel free to rehearse it with your friends.
fi g. 4.7
Declare and initialize your variables
Use those variables! (Remember, the fourth argument for a color is transparency).

56 Learning Processing
Me : Hey random, what’s going on? Hope you’re well. Listen, I was wondering, could you give me a random number between 1 and 100? Random : Like, no problem. How about the number 63? Me : ! at’s awesome, really great, thank you. OK, I’m off . Gotta draw a rectangle 63 pixels wide, OK?
Now, how would this sequence look in our slightly more formal, Processing environment? ! e code below the part of “ me ” is played by the variable “ w ” .
float w = random(1,100); rect(100,100,w,50);
! e random( ) function requires two arguments and returns a random fl oating point number ranging from the fi rst argument to the second. ! e second argument must be larger than the fi rst for it to work properly. ! e function random( ) also works with one argument by assuming a range between zero and that argument.
In addition, random( ) only returns fl oating point numbers. ! is is why we declared “ w ” above as a fl oat. However, if you want a random integer, you can convert the result of the random function to an int .
int w = int(random(1,100)); rect(100,100,w,50);
Notice the use of nested parentheses. ! is is a nice concept to get used to as it will be quite convenient to call functions inside of functions as we go. ! e random( ) function returns a fl oat, which is then passed to the int( ) function that converts it to an integer. If we wanted to go nuts nesting functions, we could even condense the above code into one line:
rect(100,100,int(random(1,100)),50);
Incidentally, the process of converting one data type to another is referred to as “ casting. ” In Java (which Processing is based on) casting a fl oat to an integer can also be written this way:
int w = (int) random(1,100);
OK, we are now ready to experiment with random( ) . Example 4-7 shows what happens if we take every variable associated with drawing the ellipse (fi ll, location, size) and assign it to a random number each cycle through draw( ) . ! e output is shown in Figure 4.8 .
A random fl oat between 1 and 100.
A random integer between 1 and 100.
The result of random (1,100) is a fl oat. It can be converted to an integer by “casting.”

Variables 57
Example 4-7: Filling variables with random values
float r; float g; float b; float a;
float diam; float x; float y;
void setup() { size(200,200); background(0); smooth(); }
void draw() { // Fill all variables with random values r = random(255); g = random(255); b = random(255); a = random(255); diam = random(20); x = random(width); y = random(height);
// Use values to draw an ellipse noStroke(); fill(r,g,b,a); ellipse(x,y,diam,diam); }
4.7 Variable Zoog We are now ready to revisit Zoog, our alien friend, who was happily following the mouse around the screen when we last checked in. Here, we will add two pieces of functionality to Zoog.
• New feature #1 —Zoog will rise from below the screen and fly off into space (above the screen). • New feature #2 —Zoog’s eyes will be colored randomly as Zoog moves.
Feature #1 is solved by simply taking the previous program that used mouseX and mouseY and substituting our own variables in their place. Feature #2 is implemented by creating three additional variables eyeRed, eyeGreen, and eyeBlue that will be used for the fi ll( ) function before displaying the eye ellipses.
Example 4-8: Variable Zoog
float zoogX; float zoogY;
float eyeR; float eyeG; float eyeB;
void setup() { size(200,200);
fi g. 4.8
Each time through draw(), new random numbers are picked for a new ellipse.
fi g. 4.9
Declaring variables. zoogX and zoogY are for feature #1. eyeR, eyeG, eyeB are for feature #2.

58 Learning Processing
zoogX = width/2; // Zoog always starts in the middle zoogY = height + 100; // Zoog starts below the screen smooth(); }
void draw() {
background(255);
// Set ellipses and rects to CENTER mode ellipseMode(CENTER); rectMode(CENTER);
// Draw Zoog's body stroke(0); fill(150); rect(zoogX,zoogY,20,100);
// Draw Zoog's head stroke(0); fill(255); ellipse(zoogX,zoogY - 30,60,60);
// Draw Zoog's eyes eyeR = random(255); eyeG = random(255); eyeB = random(255); fill(eyeR,eyeG,eyeB);
ellipse(zoogX - 19,zoogY - 30,16,32); ellipse(zoogX + 19,zoogY - 30,16,32); // Draw Zoog's legs stroke(150); line(zoogX - 10,zoogY + 50,zoogX - 10,height); line(zoogX + 10,zoogY + 50,zoogX + 10,height);
// Zoog moves up zoogY = zoogY - 1;
}
Exercise 4-7: Using variables and the random( ) function, revise your design from the Lesson One Project to move around the screen, change color, size, location, and so on.
Feature #1. zoogX and zoogY are initialized based on the size of the window. Note we cannot initialize these variables before the size () function is called since we are using the built-in variables width and height.
Feature #1. zoogX and zoogY areused for the shape locations.
Feature #2. eyeR, eyeG, and eye B are given random values and used in the fi ll() function.
Feature #1. zoogY is decreased by one so that zoog moves upward on the screen.
Exercise 4-6: Revise Example 4-8 so that Zoog shakes left and right as Zoog moves upward. Hint: this requires the use of random( ) in combination with zoogX.
zoogX = _____________________________;
Conditionals 59
5 Conditionals “ " at language is an instrument of human reason, and not merely a medium for the expression of thought, is a truth generally admitted. ” —George Boole
“ " e way I feel about music is that there is no right and wrong. Only true and false. ” —Fiona Apple
In this chapter: – Boolean expressions. – Conditional statements: How a program produces different results based on varying circumstances. – If, Else If, Else .
5.1 Boolean Expressions What’s your favorite kind of test? Essay format? Multiple choice? In the world of computer programming, we only take one kind of test: a boolean test—true or false. A boolean expression (named for mathematician George Boole) is an expression that evaluates to either true or false. Let’s look at some common language examples:
• I am hungry. → true • I am afraid of computer programming. → false • This book is a hilarious read. → false
In the formal logic of computer science, we test relationships between numbers. • 15 is greater than 20 → false • 5 equals 5 → true • 32 is less than or equal to 33 → true
In this chapter, we will learn how to use a variable in a boolean expression, allowing our sketch to take diff erent paths depending on the current value stored in the variable.
• x % 20 → depends on current value of x • y " " 5 → depends on current value of y • z & " 33 → depends on current value of z
! e following operators can be used in a boolean expression.
Relational Operators
% greater than & " less than or equal to & less than " " equality % " greater than or equal to ! " inequality

60 Learning Processing
5.2 Conditionals: If, Else, Else If Boolean expressions (often referred to as “ conditionals ” ) operate within the sketch as questions. Is 15 greater than 20? If the answer is yes (i.e., true), we can choose to execute certain instructions (such as draw a rectangle); if the answer is no (i.e., false), those instructions are ignored. ! is introduces the idea of branching; depending on various conditions, the program can follow diff erent paths.
In the physical world, this might amount to instructions like so:
If I am hungry then eat some food, otherwise if I am thirsty, drink some water, otherwise, take a nap .
In Processing , we might have something more like:
If the mouse is on the left side of the screen, draw a rectangle on the left side of the screen .
Or, more formally, with the output shown in Figure 5.1 , if (mouseX < width/2) { fill(255); rect(0,0,width/2,height); }
! e boolean expression and resulting instructions in the above source code is contained within a block of code with the following syntax and structure:
if (boolean expression) { // code to execute if boolean expression is true }
! e structure can be expanded with the keyword else to include code that is executed if the boolean expression is false. ! is is the equivalent of “ otherwise, do such and such. ”
if (boolean expression) { // code to execute if boolean expression is true } else { // code to execute if boolean expression is false }
For example, we could say the following, with the output shown in Figure 5.2 .
If the mouse is on the left side of the screen, draw a white background, otherwise draw a black background . if (mouseX < width/2) { background(255); } else { background(0); }
fi g. 5.1
fi g. 5.2

Conditionals 61
Finally, for testing multiple conditions, we can employ an “ else if. ” When an else if is used, the conditional statements are evaluated in the order presented. As soon as one boolean expression is found to be true, the corresponding code is executed and the remaining boolean expressions are ignored. See Figure 5.3 .
if (boolean expression #1) { // code to execute if boolean expression #1 is true } else if (boolean expression #2) { // code to execute if boolean expression #2 is true } else if (boolean expression #n) { // code to execute if boolean expression #n is true } else { // code to execute if none of the above // boolean expressions are true }
Taking our simple mouse example a step further, we could say the following, with results shown in Figure 5.4 .
If the mouse is on the left third of the window, draw a white background, if it is in the middle third, draw a gray background, otherwise, draw a black background. if (mouseX < width/3) { background(255);
} else if (mouseX < 2*width/3) { background(127);
} else { background(0);
}
if (A is true)
else if (B is true)
Do this.And this.
else if (C is true)
else
Do this.And this.
Now on to something else....
No Yes
Do this.And this.
No Yes
Do this.And this.
No Yes
fi g. 5.3
fi g. 5.4
float grade = random(0,100);
if (_______) {
println( "Assign letter grade A. ");
} else if (________) {
println (________);
Exercise 5-1: Consider a grading system where numbers are turned into letters. Fill in the blanks in the following code to complete the boolean expression.
In one conditional statement, you can only ever have one if and one else . However, you can have as many else if ’s as you like!

62 Pixels, Patterns, and Processing
} else if (________) {
println(________);
} else if (________) {
println(________);
} else {
println(________);
}
Exercise 5-2: Examine the following code samples and determine what will appear in the message window. Write down your answer and then execute the code in Processing to compare.
Problem #1: Determine if a number is between 0 and 25, 26 and 50, or greater than 50.
int x = 75;
if (x > 50) {
println(x + " is greater than
50! " );
} else if (x > 25) {
println(x + " is greater than
25! " );
} else {
println(x + " is 25 or
less! " );
}
int x = 75;
if(x > 25) {
println(x + " is greater
than 25! " );
} else if (x > 50) {
println(x + " is greater
than 50! " );
} else {
println(x + " is 25 or
less! " );
}
OUTPUT:____________________ OUTPUT:____________________
Although the syntax is correct, what is problematic about the code in column two above?

Conditionals 63
It is worth pointing out that in Exercise 5-2 when we test for equality we must use two equal signs. ! is is because, when programming, asking if something is equal is diff erent from assigning a value to a variable.
if (x = = y) {
x = y;
5.3 Conditionals in a Sketch Let’s look at a very simple example of a program that performs diff erent tasks based on the result of certain conditions. Our pseudocode is below.
Step 1. Create variables to hold on to red, green, and blue color components. Call them r , g , and b . Step 2. Continuously draw the background based on those colors. Step 3. If the mouse is on the right-hand side of the screen, increment the value of r , if it is on the
left-hand side decrement the value of r . Step 4. Constrain the value r to be within 0 and 255.
! is pseudocode is implemented in Processing in Example 5-1.
Problem #2: If a number is 5, change it to 6. If a number is 6, change it to fi ve.
int x = 5;
println("x is now: " + x);
if (x = = 5) {
x = 6;
}
if (x = = 6) {
x = 5;
}
println( "x is now: " + x );
int x = 5;
println("x is now: " + x);
if (x = = 5) {
x = 6;
} else if (x = = 6) {
x = 5;
}
println( "x is now: " + x);
OUTPUT:____________________ OUTPUT:____________________
Although the syntax is correct, what is problematic about the code in column one above?
“Is x equal to y?” Use double equals!
“Set x equal to y .” Use single equals!
64 Learning Processing
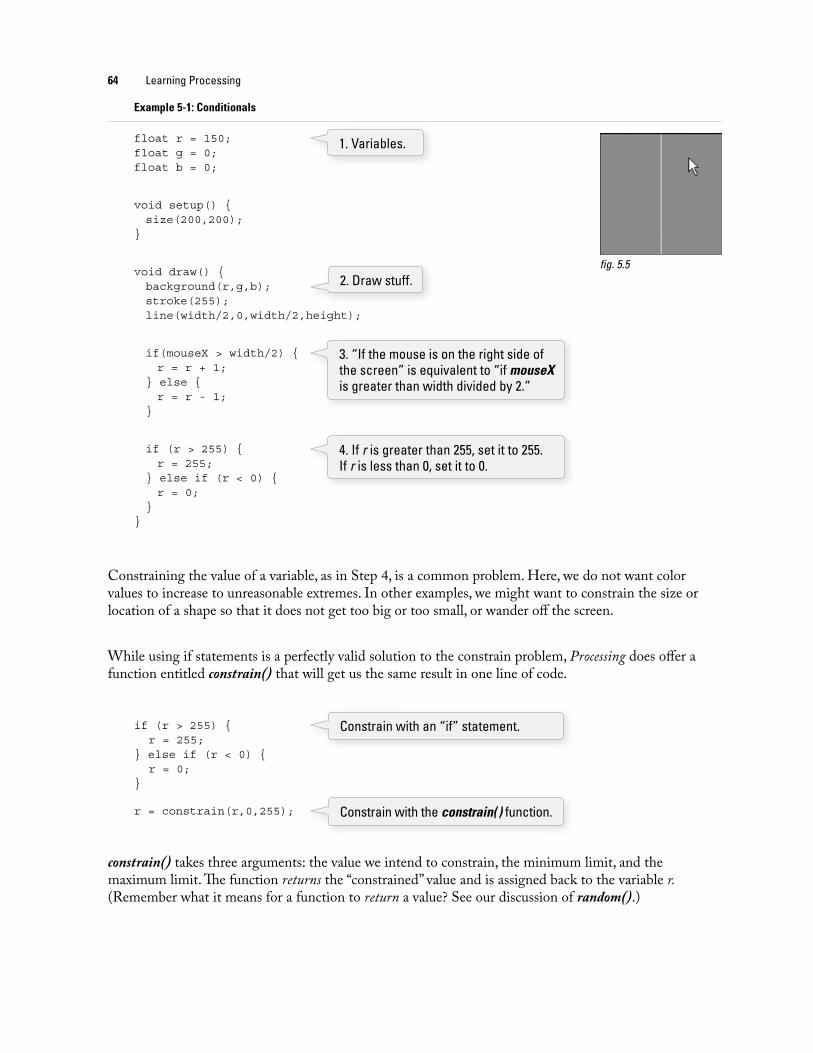
Example 5-1: Conditionals
float r = 150; float g = 0; float b = 0;
void setup() { size(200,200); }
void draw() { background(r,g,b); stroke(255); line(width/2,0,width/2,height);
if(mouseX > width/2) { r = r + 1; } else { r = r - 1; }
if (r > 255) { r = 255; } else if (r < 0) { r = 0; } }
Constraining the value of a variable, as in Step 4, is a common problem. Here, we do not want color values to increase to unreasonable extremes. In other examples, we might want to constrain the size or location of a shape so that it does not get too big or too small, or wander off the screen.
While using if statements is a perfectly valid solution to the constrain problem, Processing does off er a function entitled constrain( ) that will get us the same result in one line of code.
if (r > 255) { r = 255;
} else if (r < 0) { r = 0;
}
r = constrain(r,0,255);
constrain( ) takes three arguments: the value we intend to constrain, the minimum limit, and the maximum limit. ! e function returns the “ constrained ” value and is assigned back to the variable r. (Remember what it means for a function to return a value? See our discussion of random( ) . )
fi g. 5.5
3. “If the mouse is on the right side of the screen” is equivalent to “if mouseXis greater than width divided by 2.”
4. If r is greater than 255, set it to 255. If r is less than 0, set it to 0.
1. Variables.
Constrain with the constrain( ) function.
Constrain with an “if” statement.
2. Draw stuff.

Conditionals 65
Getting into the habit of constraining values is a great way to avoid errors; no matter how sure you are that your variables will stay within a given range, there are no guarantees other than constrain( ) itself. And someday, as you work on larger software projects with multiple programmers, functions such as constrain( ) can ensure that sections of code work well together. Handling errors before they happen in code is emblematic of good style.
Let’s make our fi rst example a bit more advanced and change all three color components according to the mouse location and click state. Note the use of constrain( ) for all three variables. ! e system variable mousePressed is true or false depending on whether the user is holding down the mouse button.
Example 5-2: More conditionals
float r = 0; float b = 0; float g = 0;
void setup() { size(200,200); }
void draw() { background(r,g,b); stroke(0);
line(width/2,0,width/2,height); line(0,height/2,width,height/2);
if(mouseX > width/2) { r = r + 1; } else { r = r - 1; }
if (mouseY > height/2) { b = b + 1; } else { b = b - 1; }
if (mousePressed) { g = g + 1; } else { g = g - 1; }
r = constrain(r,0,255); g = constrain(g,0,255); b = constrain(b,0,255); }
fi g. 5.6
Three variables for the background color.
Color the background and draw lines to divide the window into quadrants.
If the mouse is on the right-hand side of the window, increase red. Otherwise, it is on the left-hand side and decrease red.
If the mouse is on the bottom of the window, increase blue. Otherwise, it is on the top and decrease blue.
If the mouse is pressed (using the system variable mousePressed) increase green.
Constrain all color values to between 0 and 255.

66 Learning Processing
Exercise 5-3: Move a rectangle across a window by incrementing a variable. Start the shape at x coordinate 0 and use an if statement to have it stop at coordinate 100. Rewrite the sketch to use constrain( ) instead of the if statement. Fill in the missing code.
// Rectangle starts at location x
float x = 0;
void setup() {
size(200,200);
}
void draw() {
background(255);
// Display object
fill(0);
rect(x,100,20,20);
// Increment x
x = x + 1;
______________________________________________
______________________________________________
______________________________________________
}
5.4 Logical Operators We have conquered the simple if statement:
If my temperature is greater than 98.6, then take me to see the doctor .
Sometimes, however, simply performing a task based on one condition is not enough. For example:
If my temperature is greater than 98.6 OR I have a rash on my arm, take me to see the doctor .
If I am stung by a bee AND I am allergic to bees, take me to see the doctor .
We will commonly want to do the same thing in programming from time to time.
If the mouse is on the right side of the screen AND the mouse is on the bottom of the screen, draw a rectangle in the bottom right corner .

Conditionals 67
Our fi rst instinct might be to write the above code using a nested if statement, like so:
if (mouseX > width/2) { if (mouseY > height/2) {
fill(255); rect(width/2,height/2,width/2,height/2);
} }
In other words, we would have to bypass two if statements before we can reach the code we want to execute. ! is works, yes, but can be accomplished in a simpler way using what we will call a “ logical and, ” written as two ampersands ( “ & & ” ). A single ampersand ( “ & ” ) means something else 1 in Processing so make sure you include two!
1 “ & ” or “ | ” are reserved for bitwise operations in Processing. A bitwise operation compares each bit (0 or 1) of the binary representations of two numbers. It is used in rare circumstances where you require low-level access to bits.
|| (logical OR) & & (logical AND) ! (logical NOT)
A “ logical or ” is two vertical bars (AKA two “ pipes ” ) “ || ” . If you can’t fi nd the pipe, it is typically on the keyboard as shift-backslash.
if (mouseX > width/2 & & mouseY > height/2) { fill(255); rect(width/2,height/2,width/2,height/2);
}
In addition to & & and ||, we also have access to the logical operator “ not, ” written as an exclamation point: !
If my temperature is NOT greater than 98.6, I won’t call in sick to work. If I am stung by a bee AND I am NOT allergic to bees, do not worry!
A Processing example is:
If the mouse is NOT pressed, draw a circle, otherwise draw a square . if (!mousePressed) { ellipse(width/2,height/2,100,100);
} else { rect(width/2,height/2,100,100);
}
Notice this example could also be written omitting the not , saying:
If the mouse is pressed, draw a square, otherwise draw a circle .
! means not. “mousePressed” is a booleanvariable that acts as its own boolean expression. Its value is either true or false (depending on whether or not the mouse is currently pressed). Boolean variables will be explored in greater detail in Section 5.6.
If the mouse is on the right side and on the bottom.

68 Learning Processing
Exercise 5-4: Are the following boolean expressions true or false? Assume variables x " 5 and y " 6.
!(x > 6) _______ ______________________________
(x = = 6 & & x = = 5)_____________________________________
(x = = 6 || x = = 5)_____________________________________
(x > -1 & & y < 10)_______ _______________________________
Although the syntax is correct, what is fl awed about the following boolean expression?
(x > 10 & & x < 5) ________________________________
Exercise 5-5: Write a program that implements a simple rollover. In other words, if the mouse is over a rectangle, the rectangle changes color. Here is some code to get you started.
int x = 50;
int y = 50;
int w = 100;
int h = 75;
void setup() {
size(200,200);
}
void draw() {
background(0);
stroke(255);
if (_______ & & _______ & & _______ & & _______) {
_______
} _______ {
_______
}
rect(x,y,w,h);
}

Conditionals 69
5.5 Multiple Rollovers Let’s solve a simple problem together, a slightly more advanced version of Exercise 5-5. Consider the four screenshots shown in Figure 5.7 from one single sketch. A white square is displayed in one of four quadrants, according to the mouse location.
fi g. 5.7
Let’s fi rst write the logic of our program in pseudocode (i.e., English).
Setup: 1. Set up a window of 200 $ 200 pixels .
Draw: 1. Draw a white background. 2. Draw horizontal and vertical lines to divide the window in four quadrants . 3. If the mouse is in the top left corner, draw a black rectangle in the top left corner. 4. If the mouse is in the top right corner, draw a black rectangle in the top right corner. 5. If the mouse is in the bottom left corner, draw a black rectangle in the bottom left corner. 6. If the mouse is in the bottom right corner, draw a black rectangle in the bottom right corner.
For instructions 3 through 6, we have to ask ourselves the question: “ How do we know if the mouse is in a given corner? ” To accomplish this, we need to develop a more specifi c if statement. For example, we would say: “ If the mouse X location is greater than 100 pixels and the mouse Y location is greater than 100 pixels, draw a black rectangle in the bottom right corner. As an exercise, you may want to try writing this program yourself based on the above pseudocode. ! e answer, for your reference, is given in Example 5-3.
Example 5-3: Rollovers
void setup() { size(200,200); }
void draw() { background(255); stroke(0); line(100,0,100,200); line(0,100,200,100);

70 Learning Processing
// Fill a black color noStroke(); fill(0);
if (mouseX < 100 & & mouseY < 100) { rect(0,0,100,100); } else if (mouseX > 100 & & mouseY < 100) { rect(100,0,100,100); } else if (mouseX < 100 & & mouseY > 100) { rect(0,100,100,100); } else if (mouseX > 100 & & mouseY > 100) { rect(100,100,100,100); } }
Depending on the mouse location, a different rectangle is displayed.
5.6 Boolean Variables ! e natural next step up from programming a rollover is a button. After all, a button is just a rollover that responds when clicked. Now, it may feel ever so slightly disappointing to be programming rollovers and buttons. Perhaps you are thinking: “ Can’t I just select ‘ Add Button ’ from the menu or something? ” For us, right now, the answer is no. Yes, we are going to eventually learn how to use code from a library (and you might use a library to make buttons in your sketches more easily), but there is a lot of value in learning how to program GUI (graphical user interface) elements from scratch.
For one, practicing programming buttons, rollovers, and sliders is an excellent way to learn the basics of variables and conditionals. And two, using the same old buttons and rollovers that every program has is not terribly exciting. If you care about and are interested in developing new interfaces, understanding how to build an interface from scratch is a skill you will need.
OK, with that out of the way, we are going to look at how we use a boolean variable to program a button. A boolean variable (or a variable of type boolean) is a variable that can only be true or false. ! ink of it as a switch. It is either on or off . Press the button, turn the switch on. Press the button again, turn it off . We just used a boolean variable in Example 5-2: the built-in variable mousePressed . mousePressed is true when the mouse is pressed and false when the mouse is not.
And so our button example will include one boolean variable with a starting value of false (the assumption being that the button starts in the off state).
boolean button = false;
In the case of a rollover, any time the mouse hovered over the rectangle, it turned white. Our sketch will turn the background white when the button is pressed and black when it is not.
if (button) { background(255);
} else { background(0);
}
Exercise 5-6: Rewrite Example 5-3 so that the squares fade from white to black when the mouse leaves their area. Hint: you need four variables, one for each rectangle’s color.
A boolean variables is either true of false.
If the value of button is true, the background is white. If it is false, black.

Conditionals 71
We can then check to see if the mouse location is inside the rectangle and if the mouse is pressed, setting the value of button to true or false accordingly. Here is the full example:
Example 5-4: Hold down the button
boolean button = false;
int x = 50; int y = 50; int w = 100; int h = 75;
void setup() { size(200,200); }
void draw() { if (mouseX > x & & mouseX < x + w & & mouseY > y & & mouseY < y + h & & mousePressed) { button = true; } else { button = false; }
if (button) { background(255); stroke(0); } else { background(0); stroke(255); }
fill(175); rect(x,y,w,h); }
! is example simulates a button connected to a light that is only on when the button is pressed. As soon as you let go, the light goes off . While this might be a perfectly appropriate form of interaction for some instances, it is not what we are really going for in this section. What we want is a button that operates like a switch; when you fl ip the switch (press the button), if the light is off , it turns on. If it is on, it turns off .
For this to work properly, we must check to see if the mouse is located inside the rectangle inside mousePressed( ) rather than as above in draw( ) . By defi nition, when the user clicks the mouse, the code inside mousePressed( ) is executed once and only once (see Section 3.4). When the mouse is clicked, we want the switch to turn on or off (once and only once).
We now need to write some code that “ toggles ” the switch, changes its state from on to off , or off to on. ! is code will go inside mousePressed( ) .
If the variable “ button ” equals true, we should set it to false. If it is false, we should set it to true.
The button is pressed if (mouseX, mouseY) is inside the rectangle and mousePressed is true.

72 Learning Processing
if (button) { button = false;
} else { button = true;
}
! ere is a simpler way to go which is the following:
button = !button;
Here, the value of button is set to “ not ” itself. In other words, if the button is true then we set set it to not true (false). If it is false then we set it to not false (true). Armed with this odd but eff ective line of code, we are ready to look at the button in action in Example 5-5.
Example 5-5: Button as switch
boolean button = false;
int x = 50; int y = 50; int w = 100; int h = 75;
void setup() { size(200,200); }
void draw() { if (button) { background(255); stroke(0); } else { background(0); stroke(255); }
fill(175); rect(x,y,w,h); }
void mousePressed() { if (mouseX > x & & mouseX < x + w & & mouseY > y & & mouseY < y + h){ button = !button; } }
The explicit way to toggle a boolean variable. If the value of button is true, set it equal to false. Otherwise, it must be false, so set it equal to true.
Not true is false. Not false is true!
fi g. 5.8
When the mouse is pressed, the state of the button is toggled. Try moving this code to draw( ) like in the rollover example. (See Exercise 5–7.)
if (mouseX > x && mouseX < x+w && mouseY > y && mouseY < y+h &&
mousePressed){
button = !button;
}
Exercise 5-7: Why doesn’t the following code work properly when it is moved to draw( )?

Conditionals 73
Exercise 5-8: Example 4-3 in the previous chapter moved a circle across the window. Change the sketch so that the circle only starts moving once the mouse has been pressed. Use a boolean variable.
boolean __________ = _________;
int circleX = 0;
int circleY = 100;
void setup() {
size(200,200);
}
void draw() {
background(100);
stroke(255);
fill(0);
ellipse(circleX,circleY,50,50);
____________________________________
____________________________________
____________________________________
}
void mousePressed() {
____________________________________
}
5.7 A Bouncing Ball It is time again to return to our friend Zoog. Let’s review what we have done so far. First, we learned to draw Zoog with shape functions available from the Processing reference. Afterward, we realized we could use variables instead of hard-coded values. Having these variables allowed us move Zoog. If Zoog’s location is X , draw it at X , then at X # 1, then at X # 2, and so on. It was an exciting, yet sad moment. ! e pleasure we experienced from discovering the motion was quickly replaced by the lonely feeling of watching Zoog leave the screen. Fortunately, conditional statements are here to save the day, allowing us to ask the question: Has Zoog reached the edge of the screen? If so, turn Zoog around! To simplify things, let’s start with a simple circle instead of Zoog’s entire pattern.
Write a program where Zoog (a simple circle) moves across the screen horizontally from left to right. When it reaches the right edge it reverses direction.

74 Learning Processing
From the previous chapter on variables, we know we need global variables to keep track of Zoog’s location.
int x = 0;
Is this enough? No. In our previous example Zoog always moved one pixel. x = x + 1;
! is tells Zoog to move to the right. But what if we want it to move to the left? Easy, right? x = x - 1;
In other words, sometimes Zoog moves with a speed of “ # 1 ” and sometimes “ ! 1. ” ! e speed of Zoog varies . Yes, bells are ringing. In order to switch the direction of Zoog’s speed, we need another variable : speed.
int x = 0; int speed = l;
Now that we have our variables, we can move on to the rest of the code. Assuming setup( ) sets the size of the window, we can go directly to examining the steps required inside of draw( ) . We can also refer to Zoog as a ball in this instance since we are just going to draw a circle.
background(0); stroke(255); fill(100); ellipse(x,100,32,32);
Elementary stuff . Now, in order for the ball to move, the value of its x location should change each cycle through draw( ) .
x = x + speed;
If we ran the program now, the circle would start on the left side of the window, move toward the right, and continue off the edge of the screen—this is the result we achieved in Chapter 4. In order for it to turn around, we need a conditional statement.
If the ball goes off the edge, turn the ball around .
Or more formally . . .
If x is greater than width, reverse speed.
if (x > width) { speed = speed * -1;
}
A variable for Zoog’s speed. When speed is positive Zoog moves to the right, when speed is negative Zoog moves to the left.
For simplicity, Zoog is just a circle.
Multiplying by !1 reverses the speed.

Conditionals 75
Running the sketch, we now have a circle that turns around when it reaches the right-most edge, but runs off the left-most edge of the screen. We’ll need to revise the conditional slightly.
If the ball goes off either the right or left edge, turn the ball around. Or more formally . . .
If x is greater than width or if x is less than zero, reverse speed . if ((x > width) || (x < 0)) { speed = speed * -1;
}
Example 5-6 puts it all together.
Example 5-6: Bouncing ball
int x = 0; int speed = 1;
void setup() { size(200,200); smooth(); }
void draw() { background(255);
x = x + speed;
if ((x > width) || (x < 0)) { speed = speed * -1; }
// Display circle at x location stroke(0); fill(175); ellipse(x,100,32,32); }
Reversing the Polarity of a Number
When we want to reverse the polarity of a number, we mean that we want a positive number to become negative and a negative number to become positive. ! is is achieved by multiplying by –1. Remind yourself of the following:
• -5 * -1 = 5 • -5 * -1 = -5 • -1 * 1 = -1 • -1 * -1 = 1
Remember, ! means “or”.
Add the current speed to the x location.
If the object reaches either edge, multiply speed by !1 to turn it around.

76 Learning Processing
Exercise 5-9: Rewrite Example 5-6 so that the ball not only moves horizontally, but vertically as well. Can you implement additional features, such as changing the size or color of the ball based on certain conditions? Can you make the ball speed up or slow down in addition to changing direction?
! e “ bouncing ball ” logic of incrementing and decrementing a variable can be applied in many ways beyond the motion of shapes onscreen. For example, just as a square moves from left to right, a color can go from less red to more red. Example 5-7 takes the same bouncing ball algorithm and applies it to changing color .
Example 5-7: “ Bouncing ” color
float c1 = 0; float c2 = 255;
float c1dir = 0.1; float c2dir = -0.1;
void setup() { size(200,200); }
void draw() { noStroke();
// Draw rectangle on left fill(c1,0,c2); rect(0,0,100,200);
// Draw rectangle on right fill(c2,0,c1); rect(100,0,100,200);
// Adjust color values c1 = c1 + c1dir; c2 = c2 + c2dir;
// Reverse direction of color change if (c1 < 0 || c1 > 255) { c1dir * = -1; }
if (c2 < 0 || c2 > 255) { c2dir * = -1; } }
Having the conditional statement in our collection of programming tools allows for more complex motion. For example, consider a rectangle that follows the edges of a window.
fi g. 5.9
Two variables for color.
Start by incrementing c1. Start by decrementing c2.
Instead of reaching the edge of a window, these variables reach the “edge” of color: 0 for no color and 255 for full color. When this happens, just like with the bouncing ball, the direction is reversed.
Conditionals 77
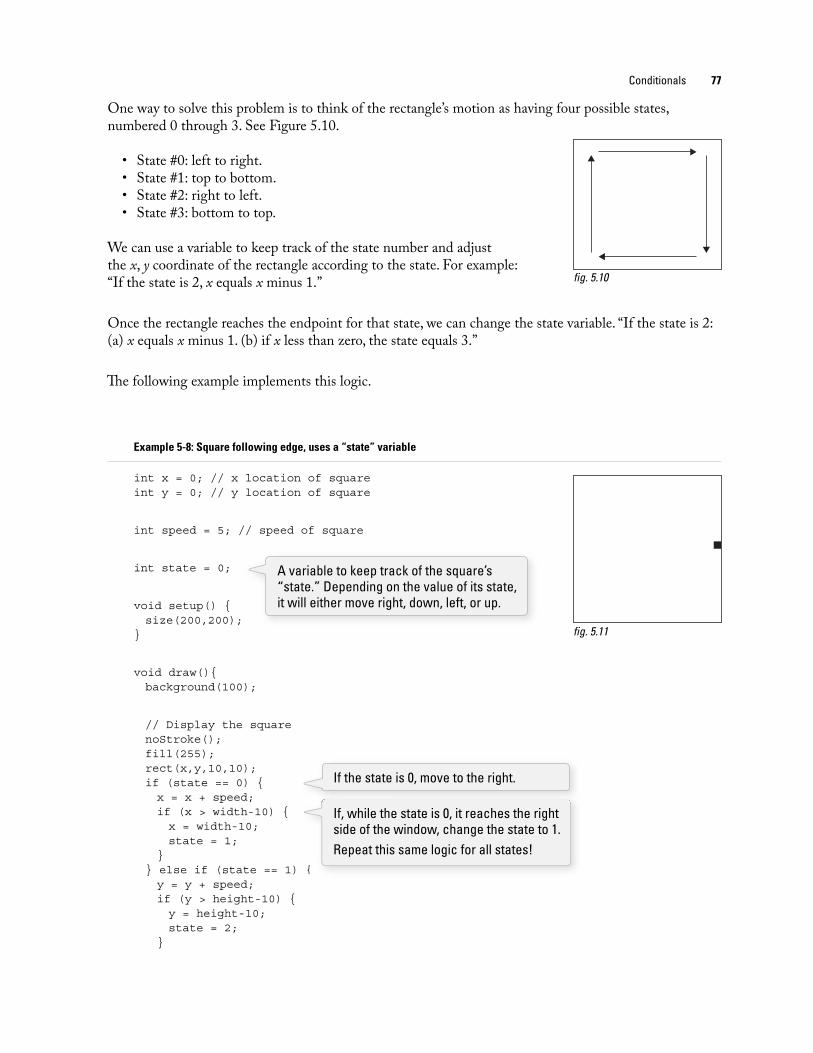
One way to solve this problem is to think of the rectangle’s motion as having four possible states, numbered 0 through 3. See Figure 5.10 .
• State #0: left to right. • State #1: top to bottom. • State #2: right to left. • State #3: bottom to top.
We can use a variable to keep track of the state number and adjust the x , y coordinate of the rectangle according to the state. For example: “ If the state is 2, x equals x minus 1. ”
Once the rectangle reaches the endpoint for that state, we can change the state variable. “ If the state is 2: (a) x equals x minus 1. (b) if x less than zero, the state equals 3. ”
! e following example implements this logic .
Example 5-8: Square following edge, uses a “ state ” variable
int x = 0; // x location of square int y = 0; // y location of square
int speed = 5; // speed of square
int state = 0;
void setup() { size(200,200); }
void draw() { background(100);
// Display the square noStroke(); fill(255); rect(x,y,10,10); if (state = = 0) { x = x + speed; if (x > width-10) { x = width-10; state = 1; } } else if (state = = 1) { y = y + speed; if (y > height-10) { y = height-10; state = 2; }
fi g. 5.11
fi g. 5.10
A variable to keep track of the square’s “state.” Depending on the value of its state, it will either move right, down, left, or up.
If, while the state is 0, it reaches the right side of the window, change the state to 1. Repeat this same logic for all states!
If the state is 0, move to the right.

} else if (state = = 2) { x = x - speed; if (x < 0) { x = 0; state = 3; } } else if (state = = 3) { y = y - speed; if (y < 0) { y = 0; state = 0; } } }
5.8 Physics 101 For me, one of the happiest moments of my programming life was the moment I realized I could code gravity. And in fact, armed with variables and conditionals, you are now ready for this moment.
! e bouncing ball sketch taught us that an object moves by altering its location according to speed.
location " location # speed
Gravity is a force of attraction between all masses. When you drop a pen, the force of gravity from the earth (which is overwhelmingly larger than the pen) causes the pen to accelerate toward the ground. What we must add to our bouncing ball is the concept of “ acceleration ” (which is caused by gravity, but could be caused by any number of forces). Acceleration increases (or decreases) speed. In other words, acceleration is the rate of change of speed. And speed is the rate of change of location. So we just need another line of code:
speed " speed # acceleration
And now we have a simple gravity simulation.
Example 5-9: Simple gravity
float x = 100; // x location of square float y = 0; // y location of square
float speed = 0; // speed of square float gravity = 0.1;
void setup() { size(200,200);
}
void draw() { background(255);
fi g. 5.12
A new variable, for gravity (i.e., acceleration). We use a relatively small number (0.1) because this acceleration accumulates over time, increasing the speed. Try changing this number to 2.0 and see what happens.
78 Learning Processing

Conditionals 79
// Display the square fill(0); noStroke(); rectMode(CENTER); rect(x,y,10 , 10);
y = y + speed;
speed = speed + gravity;
// If square reaches the bottom // Reverse speed if (y > height) { speed = speed * -0.95; } }
Exercise 5-10: Continue with your design and add some of the functionality demonstrated in this chapter. Some options:
• Make parts of your design rollovers that change color when the mouse is over certain areas.
• Move it around the screen. Can you make it bounce off all edges of the window? • Fade colors in and out.
Add gravity to speed.
Here is a simple version with Zoog.
Example 5-10: Zoog and conditionals
float x = 100; float y = 100; float w = 60; float h = 60; float eyeSize = 16;
float xspeed = 3; float yspeed = 1;
void setup() { size(200,200); smooth(); }
void draw() { // Change the location of Zoog by speed x = x + xspeed; y = y + yspeed;
Multiplying by !0.95 instead of !1 slows the square down each time it bounces (by decreasing speed). This is known as a “dampening” effect and is a more realistic simulation of the real world (without it, a ball would bounce forever).
Zoog has variables for speed in the horizontal and vertical direction.
Add speed to location.

if ((x > width) ! (x < 0)) { xspeed = xspeed * -1;
}
if ((y > height) ! (y < 0)) { yspeed = yspeed * -1; }
background(0); ellipseMode(CENTER); rectMode(CENTER); noStroke();
// Draw Zoog's body fill(150); rect(x,y,w/6,h*2);
// Draw Zoog's head fill(255); ellipse(x,y-h/2,w,h);
// Draw Zoog's eyes fill(0); ellipse(x-w/3,y-h/2,eyeSize,eyeSize*2); ellipse(x + w/3,y-h/2,eyeSize,eyeSize*2);
// Draw Zoog's legs stroke(150); line(x-w/12,y + h,x-w/4,y + h + 10); line(x + w/12,y + h,x + w/4,y + h + 10);
}
An IF statements with a logical OR determines if Zoog has reached either the right or left edges of the screen. When this is true, we multiply the speed by !1, reversing Zoog’s direction!
Identical logic is applied to the y direction as well.
80 Learning Processing

Loops 81
6 Loops “ Repetition is the reality and the seriousness of life. ” —Soren Kierkegaard
“ What’s the key to comedy? Repetition. What’s the key to comedy? Repetition. ” —Anonymous
In this chapter: – The concept of iteration. – Two types of loops: “ while, ” and “ for. ” When do we use them? – Iteration in the context of computer graphics.
6.1 What is iteration? I mean, what is iteration? Seriously, what is iteration? Iteration is the generative process of repeating a set of rules or steps over and over again. It is a fundamental concept in computer programming and we will soon come to discover that it makes our lives as coders quite delightful. Let’s begin.
For the moment, think about legs. Lots and lots of legs on our little Zoog. If we had only read Chapter 1 of this book, we would probably write some code as in Example 6-1 .
Example 6-1: Many lines
size(200,200); background(255);
// Legs stroke(0); line(50,60,50,80); line(60,60,60,80); line(70,60,70,80); line(80,60,80,80); line(90,60,90,80); line(100,60,100,80); line(110,60,110,80); line(120,60,120,80); line(130,60,130,80); line(140,60,140,80); line(150,60,150,80);
In the above example, legs are drawn from x = 50 pixels all the way to x " 150 pixels, with one leg every 10 pixels. Sure, the code accomplishes this, however, having learned variables in Chapter 4, we can make some substantial improvements and eliminate the hard-coded values. First, we set up variables for each parameter of our system: the legs ’ x , y locations, length, and the spacing between the legs. Note that for each leg drawn, only the x value changes. All other variables stay the same (but they could change if we wanted them to!).
fi g. 6.1

82 Learning processing
Example 6-2: Many lines with variables
size(200,200); background(0);
// Legs stroke(255);
int y = 80; // Vertical location of each line int x = 50; // Initial horizontal location for first line int spacing = 10; // How far apart is each line int len = 20; // Length of each line
line(x,y,x,y + len);
x = x + spacing; line(x,y,x,y + len);
x = x + spacing; line(x,y,x,y + len);
x = x + spacing; line(x,y,x,y + len);
x = x + spacing; line(x,y,x,y + len);
x = x + spacing; line(x,y,x,y + len);
x = x + spacing; line(x,y,x,y + len);
x = x + spacing; line(x,y,x,y + len);
x = x + spacing; line(x,y,x,y + len);
x = x + spacing; line(x,y,x,y + len);
x = x + spacing; line(x,y,x,y + len);
Not too bad, I suppose. Strangely enough, although this is technically more effi cient (we could adjust the spacing variable, for example, by changing only one line of code), we have taken a step backward, having produced twice as much code! And what if we wanted to draw 100 legs? For every leg, we need two lines of code. ! at’s 200 lines of code for 100 legs! To avoid this dire, carpal-tunnel inducing problem, we want to be able to say something like:
Draw one line one hundred times. Aha, only one line of code! Obviously, we are not the fi rst programmers to reach this dilemma and it is easily solved with the very commonly used control structure —the loop . A loop structure is similar in syntax to a conditional
Draw the fi rst leg.
Add spacing so the next leg appears 10 pixels to the right.
Continue this process for each leg, repeating it over and over.

Loops 83
(see Chapter 5). However, instead of asking a yes or no question to determine whether a block of code should be executed one time, our code will ask a yes or no question to determine how many times the block of code should be repeated . ! is is known as iteration.
6.2 “ WHILE ” Loop, the Only Loop You Really Need ! ere are three types of loops, the while loop, the do-while loop, and the for loop. To get started, we are going to focus on the while loop for a little while (sorry, couldn’t resist). For one thing, the only loop you really need is while . ! e for loop, as we will see, is simply a convenient alternative, a great shorthand for simple counting operations. Do-while , however, is rarely used (not one example in this book requires it) and so we will ignore it.
Just as with conditional ( if / else ) structures, a while loop employs a boolean test condition. If the test evaluates to true, the instructions enclosed in curly brackets are executed; if it is false, we continue on to the next line of code. ! e diff erence here is that the instructions inside the while block continue to be executed over and over again until the test condition becomes false. See Figure 6.2 .
Let’s take the code from the legs problem. Assuming the following variables . . .
int y = 80; // Vertical location of each line int x = 50; // Initial horizontal location for first line int spacing = 10; // How far apart is each line int len = 20; // Length of each line
… we had to manually repeat the following code:
stroke(255); line(x,y,x,y + len); // Draw the first leg
x = x + spacing; // Add "spacing " to x line(x,y,x,y + len); // The next leg is 10 pixels to the right
x = x + spacing; // Add "spacing" to x line(x,y,x,y + len); // The next leg is 10 pixels to the right
x = x + spacing; // Add ''spacing” to x line(x,y,x,y + len); // The next leg is 10 pixels to the right
// etc. etc. repeating with new legs
WHILE (BOOLEAN TEST)
A. DO THISB. DO THIS
IS FALSEIS TRUE
REPEAT
fi g. 6.2
84 Learning processing
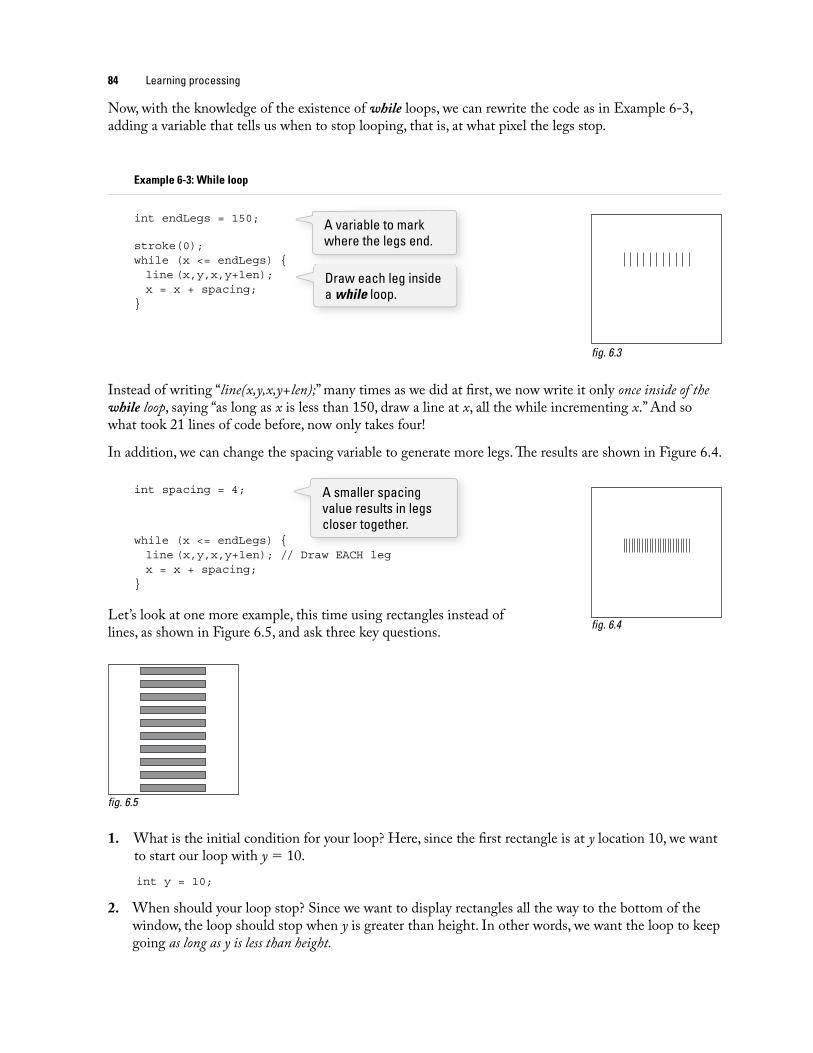
Now, with the knowledge of the existence of while loops, we can rewrite the code as in Example 6-3, adding a variable that tells us when to stop looping, that is, at what pixel the legs stop.
Example 6-3: While loop
int endLegs = 150;
stroke(0); while (x < = endLegs) { line (x,y,x,y + len); x = x + spacing; }
Instead of writing “ line(x,y,x,y + len); ” many times as we did at fi rst, we now write it only once inside of the while loop , saying “ as long as x is less than 150, draw a line at x , all the while incrementing x . ” And so what took 21 lines of code before, now only takes four! In addition, we can change the spacing variable to generate more legs. ! e results are shown in Figure 6.4 .
int spacing = 4;
while (x < = endLegs) { line (x,y,x,y + len); // Draw EACH leg x = x + spacing; }
Let’s look at one more example, this time using rectangles instead of lines, as shown in Figure 6.5 , and ask three key questions.
1. What is the initial condition for your loop? Here, since the fi rst rectangle is at y location 10, we want to start our loop with y " 10. int y = 10;
2. When should your loop stop? Since we want to display rectangles all the way to the bottom of the window, the loop should stop when y is greater than height. In other words, we want the loop to keep going as long as y is less than height.
fi g. 6.3
fi g. 6.4
fi g. 6.5
Draw each leg inside a while loop.
A variable to mark where the legs end.
A smaller spacing value results in legs closer together.

Loops 85
while (y < 100) { // Loop! }
3. What is your loop operation? In this case, each time through the loop, we want to draw a new rectangle below the previous one. We can accomplish this by calling the rect( ) function and incrementing y by 20. rect(100,y,100,10); y = y + 20;
Putting it all together:
int y = 10;
while (y < height) { rect(100,y,100,10);
y = y + 20; }
Initial condition.
The loop continues while the boolean expression is true. Therefore, the loop stops when the boolean expression is false.
We increment y each time through the loop, drawing rectangle after rectangle until y is no longer less than height.
size(200,200);
background(255);
int y = 0;
while (________) {
stroke(0);
line(_______,_______,_______,_______);
y = ________ ;
}
size(200,200);
background(255);
float w = ________ ;
while (________) {
stroke(0);
fill(________);
ellipse(_______,_______,_______,_______);
__________20;
}
Exercise 6-1: Fill in the blanks in the code to recreate the following screenshots.
86 Learning processing
Examining the “ legs ” in Example 6-3, we can see that as soon as x is greater than 150, the loop stops. And this always happens because x increments by “ spacing ” , which is always a positive number. ! is is not an accident; whenever we embark on programming with a loop structure, we must make sure that the exit condition for the loop will eventually be met! Processing will not give you an error should your exit condition never occur. ! e result is Sisyphean, as your loop rolls the boulder up the hill over and over and over again to infi nity.
Example 6-4: Infi nite loop. Don’t do this!
int x = 0; while (x < 10) { println(x); x = x – 1; }
For kicks, try running the above code (make sure you have saved all your work and are not running some other mission-critical software on your computer). You will quickly see that Processing hangs. ! e only way out of this predicament is probably to force-quit Processing . Infi nite loops are not often as obvious as in Example 6-4. Here is another fl awed program that will sometimes result in an infi nite loop crash.
Example 6-5: Another infi nite loop. Don’t do this!
int y = 80; // Vertical location of each line int x = 0; // Horizontal location of first line int spacing = 10; // How far apart is each line int len = 20; // Length of each line int endLegs = 150; // Where should the lines stop?
void setup() { size(200,200); }
void draw() { background(0); stroke(255);
x = 0; spacing = mouseX / 2;
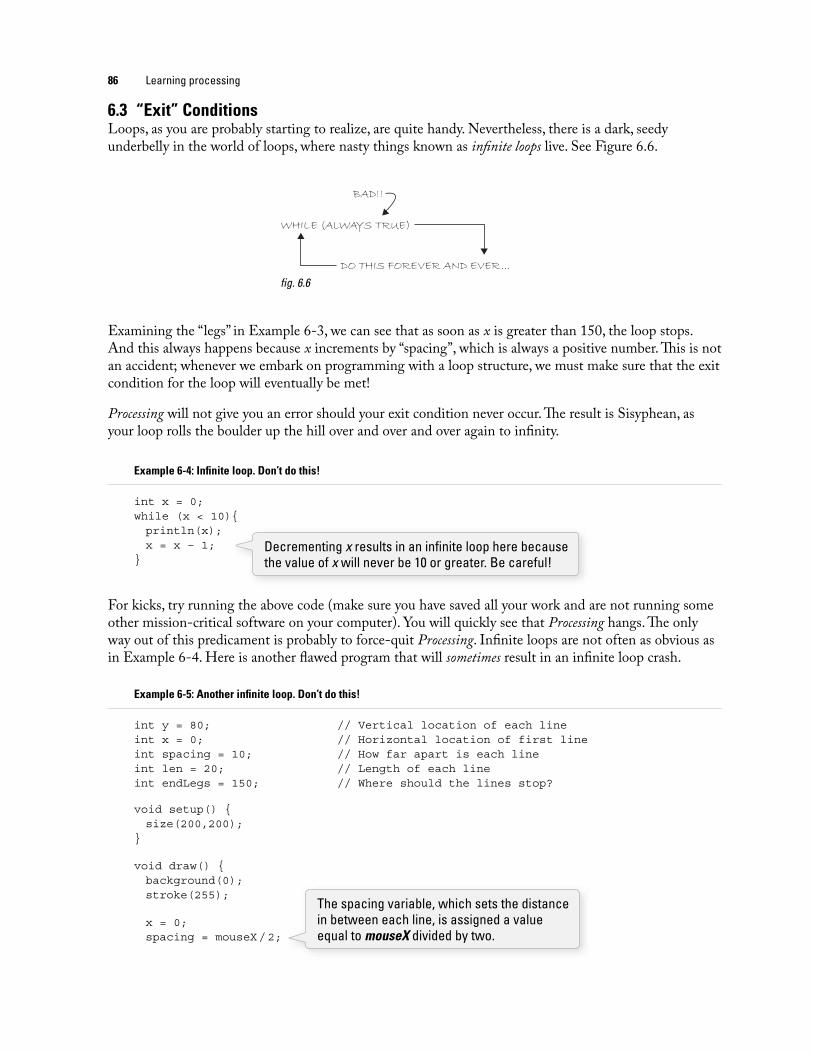
6.3 “ Exit ” Conditions Loops, as you are probably starting to realize, are quite handy. Nevertheless, there is a dark, seedy underbelly in the world of loops, where nasty things known as infi nite loops live. See Figure 6.6 .
WHILE (ALWAYS TRUE)
BAD!!
DO THIS FOREVER AND EVER... fi g. 6.6
The spacing variable, which sets the distance in between each line, is assigned a value equal to mouseX divided by two.
Decrementing x results in an infi nite loop here becausethe value of x will never be 10 or greater. Be careful!

Loops 87
while (x < = endLegs) { line(x,y,x,y + len);
x = x + spacing; } }
Will an infi nite loop occur? We know we will be stuck looping forever if x never is greater than 150. And since x increments by spacing, if spacing is zero (or a negative number) x will always remain the same value (or go down in value.)
Recalling the constrain( ) function described in Chapter 4, we can guarantee no infi nite loop by constraining the value of spacing to a positive range of numbers:
int spacing = constrain(mouseX/2, 1, 100);
Since spacing is directly linked with the necessary exit condition, we enforce a specifi c range of values to make sure no infi nite loop is ever reached. In other words, in pseudocode we are saying: “ Draw a series of lines spaced out by N pixels where N can never be less than 1! ”
! is is also a useful example because it reveals an interesting fact about mouseX . You might be tempted to try putting mouseX directly in the incrementation expression as follows:
while (x < = endLegs) { line(x,y,x,y + len); x = x + mouseX /2; }
Wouldn’t this solve the problem, since even if the loop gets stuck as soon as the user moves the mouse to a horizontal location greater than zero, the exit condition would be met? It is a nice thought, but one that is sadly quite fl awed. mouseX and mouseY are updated with new values at the beginning of each cycle through draw( ) . So even if the user moves the mouse to X location 50 from location 0, mouseX will never know this new value because it will be stuck in its infi nite loop and not able to get to the next cycle through draw( ) .
6.4 “ FOR ” Loop A certain style of while loop where one value is incremented repeatedly (demonstrated in Section 6.2) is particularly common. ! is will become even more evident once we look at arrays in Chapter 9. ! e for loop is a nifty shortcut for commonly occurring while loops. Before we get into the details, let’s talk through some common loops you might write in Processing and how they are written as a for loop.
Start at 0 and count up to 9. for (int i = 0; i < 10; i = i + 1)
Start at 0 and count up to 100 by 10. for (int i = 0; i < 101; i = i + 10)
Start at 100 and count down to 0 by 5. for (int i = 100; i > = 0; i = i – 5)
Exit Condition — when x is greater than endlegs.
Incrementation of x. x always increases by the value of spacing. What is the range of possible value for spacing?
Using constrain() to ensure the exit condition is met.
Placing mouseX inside the loop is not a solution to the infi nite loop problem.

88 Learning processing
Looking at the above examples, we can see that a for loop consists of three parts:
• Initialization —Here, a variable is declared and initialized for use within the body of the loop. This variable is most often used inside the loop as a counter.
• Boolean Test —This is exactly the same as the boolean tests found in conditional statements and while loops. It can be any expression that evaluates to true or false.
• Iteration Expression —The last element is an instruction that you want to happen with each loop cycle. Note that the instruction is executed at the end of each cycle through the loop. (You can have multiple iteration expressions, as well as variable initializations, but for the sake of simplicity we will not worry about this now.)
STARTWITH THIS
RUN THE CODE
DO THIS
RETURN TO #2
for (int i = 0; i < 10; i++) {
#4 & #5 ARE “INVISIBLE”
}
TEST THISIF FALSE EXIT1
3
4
5
2
fi g. 6.7
Increment/Decrement Operators ! e shortcut for adding or subtracting one from a variable is as follows: x ++; is equivalent to: x " x # 1; meaning: “ increment x by 1 ” or “ add 1 to the current value of x ” x ! ! ; is equivalent to: x " x ! 1; We also have: x # " 2; same as x " x # 2; x * " 3; same as x " x * 3; and so on.
In English, the above code means: repeat this code 10 times. Or to put it even more simply: count from zero to nine!
To the machine, it means the following: • Declare a variable i,
and set its initial value to 0. • While i is less than 10, repeat this code. • At the end of each iteration, add one to i .
A for loop can have its own variable just for the purpose of counting. A variable not declared at the top of the code is called a local variable. We will explain and defi ne it shortly.

Loops 89
! e same exact loop can be programmed with the while format: int i = 0; while (i < 10) { i + + ; //lines of code to execute here }
Rewriting the leg drawing code to use a for statement looks like this: Example 6-6: Legs with a for loop
int y = 80; // Vertical location of each line int spacing = 10; // How far apart is each line int len = 20; // Length of each line
for (int x = 50; x < = 150; x + = spacing) { line(x,y,x,y + len); }
Translation of the legs whileloop to a for loop.
Exercise 6-2: Rewrite Exercise 6-1 using a for loop.
size(200,200);
background(255);
for (int y =________;________;________) {
stroke(0);
line(________,________,________,________);
}
size(200,200);
background(255);
for (________;________;________– " 20) {
stroke(0);
fill(________);
ellipse(________,________,________,
________);
ellipse(________,________,________,
________);
}
This is the translation of the for loop, using a while loop.
90 Learning processing
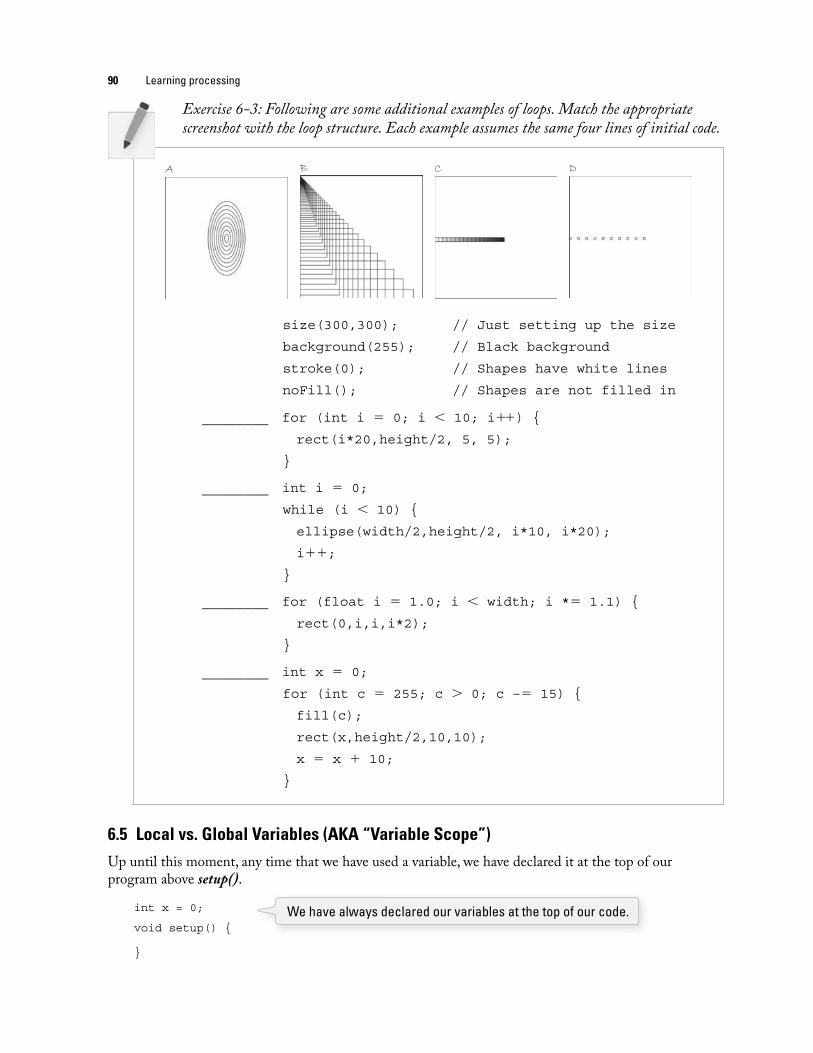
Exercise 6-3: Following are some additional examples of loops. Match the appropriate screenshot with the loop structure. Each example assumes the same four lines of initial code.
A B C D
size(300,300); // Just setting up the size
background(255); // Black background
stroke(0); // Shapes have white lines
noFill(); // Shapes are not filled in
________ for (int i " 0; i & 10; i##) {
rect(i*20,height/2, 5, 5);
}
________ int i " 0;
while (i & 10) {
ellipse(width/2,height/2, i*10, i*20);
i##;
}
________ for (float i " 1.0; i & width; i *" 1.1) {
rect(0,i,i,i*2);
}
________ int x " 0;
for (int c " 255; c % 0; c –" 15) {
fill(c);
rect(x,height/2,10,10);
x " x # 10;
}
6.5 Local vs. Global Variables (AKA “ Variable Scope ” ) Up until this moment, any time that we have used a variable, we have declared it at the top of our program above setup( ) .
int x = 0;
void setup() {
}
We have always declared our variables at the top of our code.

Loops 91
! is was a nice simplifi cation and allowed us to focus on the fundamentals of declaring, initializing, and using variables. Variables, however, can be declared anywhere within a program and we will now look at what it means to declare a variable somewhere other than the top and how we might go about choosing the right location for declaring a variable. Imagine, for a moment, that a computer program is running your life. And in this life, variables are pieces of data written on post-its that you need to remember. One post-it might have the address of a restaurant for lunch. You write it down in the morning and throw it away after enjoying a nice turkey burger. But another post-it might contain crucial information (such as a bank account number), and you save it in a safe place for years on end. ! is is the concept of scope . Some variables exist (i.e., are accessible) throughout the entire course of a program’s life— global variables —and some live temporarily, only for the brief moment when their value is required for an instruction or calculation— local variables . In Processing , global variables are declared at the top of the program, outside of both setup( ) and draw( ) . ! ese variables can be used in any line of code anywhere in the program. ! is is the easiest way to use a variable since you do not have to remember when you can and cannot use that variable. You can always use that variable (and this is why we started with global variables only). Local variables are variables declared within a block of code. So far, we have seen many diff erent examples of blocks of code: setup( ) , draw( ) , mousePressed( ) , and keyPressed( ) , if statements, and while and for loops. A local variable declared within a block of code is only available for use inside that specifi c block of code where it was declared. If you try to access a local variable outside of the block where it was declared, you will get this error:
“ No accessible fi eld named “ variableName ” was found” ! is is the same exact error you would get if you did not bother to declare the variable “ variableName ” at all. Processing does not know what it is because no variable with that name exists within the block of code you happen to be in. Here is an example where a local variable is used inside of draw( ) for the purpose of executing a while loop.
Example 6-7: Local variable
void setup() { size(200,200); } void draw() { background(0);
int x = 0; while (x < width) { stroke(255); line(x,0,x,height); x + = 5; } }
X is not available! It is local to the draw() blockof code.
void mousePressed() { println( "The mouse was pressed! "); }
X is not available! It is local to the draw( ) blockof code.
X is available! Since it is declared within the draw() block of code, it is available here. Notice, however, that it is not available inside draw() above where it is declared. Also, it is available inside the while block of code because while is inside of draw ().

92 Learning processing
//SKETCH #1: Global //SKETCH #2: Local
" count " " count "
int count = 0; void setup() {
size(200,200);
void setup() { }
size(200,200);
} void draw() {
int count " 0;
void draw() { count " count " 1;
count = count + 1; background(count);
background(count); }
}
________ ________
C
Why bother? Couldn’t we just have declared x as a global variable? While this is true, since we are only using x within the draw( ) function, it is wasteful to have it as a global variable. It is more effi cient and ultimately less confusing when programming to declare variables only within the scope of where they are necessary. Certainly, many variables need to be global, but this is not the case here. A for loop off ers up a spot for a local variable within the “ initialization ” part:
for (int i = 0; i < 100; i + = 10) { stroke(255); fill(i); rect(i,0,10,height);
}
It is not required to use a local variable in the for loop, however, it is usually convenient to do so. It is theoretically possible to declare a local variable with the same name as a global variable. In this case, the program will use the local variable within the current scope and the global variable outside of that scope. As a general rule, it is better to never declare multiple variables with the same name in order to avoid this type of confusion.
i is only available inside the for loop.
Exercise 6-4: Predict the results of the following two programs. Test your theory by running them.
A B

Loops 93
6.6 Loop Inside the Main Loop ! e distinction between local and global variables moves us one step further toward successfully integrating a loop structure into Zoog. Before we fi nish this chapter, I want to take a look at one of the most common points of confusion that comes with writing your fi rst loop in the context of a “ dynamic ” Processing sketch.
Consider the following loop (which happens to be the answer to Exercise 6-2) . ! e outcome of the loop is shown in Figure 6.8 .
for (int y = 0; y < height; y + = 10) { stroke(0); line(0,y,width,y); }
Let’s say we want to take the above loop and display each line one at a time so that we see the lines appear animated from top to bottom. Our fi rst thought might be to take the above loop and bring it into a dynamicProcessing sketch with setup( ) and draw( ) .
void setup() { size(200,200); }
void draw() { background(255); for (int y = 0; y < height; y + = 10) { stroke(0); line(0,y,width,y); } }
If we read the code, it seems to make sense that we would see each line appear one at a time. “ Set up a window of size 200 by 200 pixels. Draw a black background. Draw a line at y equals 0. Draw a line at y equals 10. Draw a line at y equals 20. ”
Referring back to Chapter 2, however, we recall that Processing does not actually update the display window until the end of draw( ) is reached. ! is is crucial to remember when using while and for loops. ! ese loops serve the purpose of repeating something in the context of one cycle through draw( ) . ! ey are a loop inside of the sketch’s main loop, draw( ) .
Displaying the lines one at a time is something we can do with a global variable in combination with the very looping nature of draw( ) itself
Example 6-8: Lines one at a time
int y = 0 ;
void setup() { size(200,200); background(0); frameRate(5); }
fi g. 6.8
No for loop here. Instead, a global variable.
Slowing down the frame rate so we can easily see the effect.

94 Learning processing
void draw() { // Draw a line stroke(255); line(0,y,width,y); // Increment y y + = 10; }
! e logic of this sketch is identical to Example 4 - 3 , our fi rst motion sketch with variables. Instead of moving a circle across the window horizontally, we are moving a line vertically (but not clearing the background for each frame).
Only one line is drawn each time through draw( ).
Using a loop inside draw( ) also opens up the possibility of interactivity. Example 6-9 displays a series of rectangles (from left to right), each one colored with a brightness according to its distance from the mouse.
Example 6-9: Simple while loop with interactivity
void setup() { size(255,255); background(0); }
void draw() { background(0); // Start with i as 0 int i = 0; // While i is less than the width of the window while (i < width) { noStroke();
fi g. 6.9
int endY;
void setup() {
size(200,200);
frameRate(5);
endY = ________;
}
void draw() {
background(0);
for (int y = ________; ________; ________) {
stroke(255);
line(0,y,width,y);
}
________;
}
Exercise 6-5: It is possible to achieve the eff ect of rendering one line at a time using a for loop. See if you can fi gure out how this is done. Part of the code is below.

Loops 95
float distance = abs(mouseX – i);
fill(distance); rect(i,0,10,height);
// Increase i by 10 i + = 10; } }
Exercise 6-6: Rewrite Example 6-9 using a for loop.
6.7 Zoog grows arms. We last left Zoog bouncing back and forth in our Processing window. ! is new version of Zoog comes with one small change. Example 6-10 uses a for loop to add a series of lines to Zoog’s body, resembling arms.
Example 6-10: Zoog with arms
int x = 100; int y = 100; int w = 60; int h = 60; int eyeSize = 16; int speed = 1;
void setup() {
size(200,200); smooth(); }
void draw() {
// Change the x location of Zoog by speed x = x + speed;
// If we've reached an edge, reverse speed (i.e. multiply it by –1) //(Note if speed is a + number, square moves to the right,– to the left) if ((x % width)!(x < 0)) { speed = speed * –1; }
background(255); // Draw a white background
// Set ellipses and rects to CENTER mode ellipseMode(CENTER); rectMode(CENTER);
// Draw Zoog's arms with a for loop for (int i = y + 5; i < y + h; i + = 10) { stroke(0); line(x–w/3,i,x + w/3,i); }
That distance is used to fi ll the color of a rectangle at horizontal location i.
fi g. 6.10
Arms are incorporated into Zoog’s design with a for loop drawing a series if lines.
The distance between the current rectangle and the mouse is equal to the absolute value of the difference between i and mouseX.

96 Learning processing
// Draw Zoog's body stroke(0); fill(175); rect(x,y,w/6,h*2);
// Draw Zoog's head fill(255); ellipse(x,y–h/2,w,h);
// Draw Zoog's eyes fill(0); ellipse(x–w/3,y–h/2,eyeSize,eyeSize*2); ellipse(x + w/3,y–h/2,eyeSize,eyeSize*2);
// Draw Zoog's legs stroke(0); line(x–w/12,y + h,x–w/4,y + h + 10); line(x + w/12,y + h,x + w/4,y + h + 10); }
We can also use a loop to draw multiple instances of Zoog by placing the code for Zoog’s body inside of a for loop. See Example 6–11 .
Example 6-11: Multiple Zoogs
int w = 60; int h = 60; int eyeSize = 16;
void setup() { size(400,200); smooth(); }
void draw() { background(255); ellipseMode(CENTER); rectMode(CENTER);
int y = height/2;
// Multiple versions of Zoog for (int x = 80; x < width; x + = 80) { // Draw Zoog's body stroke(0); fill(175); rect(x,y,w/6,h*2);
// Draw Zoog's head fill(255); ellipse(x,y–h/2,w,h);
// Draw Zoog's eyes fill(0); ellipse(x–w/3,y–h/2,eyeSize,eyeSize*2); ellipse(x + w/3,y–h/2,eyeSize,eyeSize*2);
fi g. 6.11
The variable x is now included in a for loop, in order to iterate and display multiple Zoogs!

Loops 97
// Draw Zoog's legs stroke(0); line(x–w/12,y + h,x–w/4,y + h +10); line(x + w/12,y + h,x + w/4,y + h +10); } }
Exercise 6-7: Add something to your design using a for or while loop. Is there anything you already have which could be made more effi cient with a loop?
Exercise 6-8: Create a grid of squares (each colored randomly) using a for loop. (Hint: You will need two for loops!) Recode the same pattern using a “ while ” loop instead of “ for. ”

98 Learning processing
Lesson Two Project Step 1. Take your Lesson One design and rewrite it with variables instead of
hard-coded values. Consider using a for loop in the creation of your design.
Step 2. Write a series of assignment operations that alter the values of those variables and make the design dynamic. You might also use system variables, such as width , height, mouseX , and mouseY .
Step 3. Using conditional statements, alter the behavior of your design based on certain conditions. What happens if it touches the edge of the screen, or if it grows to a certain size? What happens if you move the mouse over elements in your design?
Use the space provided below to sketch designs, notes, and pseudocode for your project.