shirt plackets
TRANSCRIPT

Shirt & Blouse Plackets − TailoredCompiled by Lynn Cook
Shirts and blouses are back in vogue, but many of you have never put in a placket as it has been years since they were a fashion item. These give the finishing touch to a shirt that sets it apart from just a buttoned cuff with a slit turned back on itself and stitched in place or a continuous lapped placket. Tailored plackets are always found on men’s shirts and can be a bit tricky to make if you are not alert. Making just one placket is usually fine but when
you have to make two and one has to be a mirror image of the other, it is fraught with danger. Get them correct or you will end up with one placket going the wrong way. Now we have shown this method before, many, many years ago, but as
we now have so many new readers it is certainly worth updating this fantastic article, which is one of the best we have ever done.
To help you get this in the correct sequence, our step-by-step photos have been mirror-imaged to provide you with instructions for both right and left sleeves, simultaneously. The larger photo is for the left sleeve. This placket may be applied to any cuffed sleeve where there is a placket line marked on the pattern. The secret to the success of these plackets is to make sure you press all the relevant creases on the placket before you commence sewing.
TIP: To tell the difference between the right and wrong side of your fabric, consider marking the wrong side with chalk or a small pin before moving the pattern piece and always work both plackets simultaneously. Work each step on a flat surface to be sure all layers are flat.
Placket patternSome commercial patterns have a very short point or ‘tower’. If you make the tower pointed, rather than square, it is simpler to achieve and produces a much better-looking placket. Be sure the ‘tower’ is four centimetres long. We have provided a full-sized placket pattern so you can use with any sleeve pattern where a placket line is marked. See diagram 1.
This article was originally published in Australian Stitches magazine Vol 17 No 6.Permission for inclusion on this website has been granted by Express Publications Pty Ltd.
31
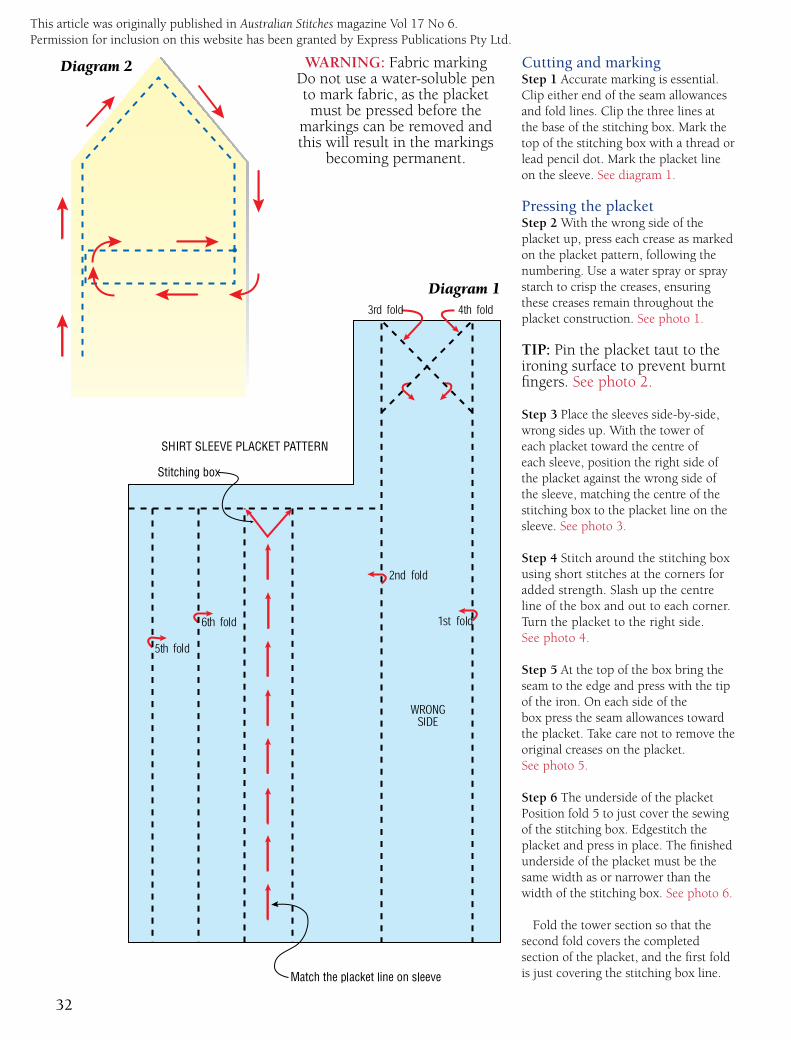
Cutting and markingStep 1 Accurate marking is essential. Clip either end of the seam allowances and fold lines. Clip the three lines at the base of the stitching box. Mark the top of the stitching box with a thread or lead pencil dot. Mark the placket line on the sleeve. See diagram 1.
Pressing the placketStep 2 With the wrong side of the placket up, press each crease as marked on the placket pattern, following the numbering. Use a water spray or spray starch to crisp the creases, ensuring these creases remain throughout the placket construction. See photo 1.
TIP: Pin the placket taut to the ironing surface to prevent burnt fingers. See photo 2.
Step 3 Place the sleeves side-by-side, wrong sides up. With the tower of each placket toward the centre of each sleeve, position the right side of the placket against the wrong side of the sleeve, matching the centre of the stitching box to the placket line on the sleeve. See photo 3.
Step 4 Stitch around the stitching box using short stitches at the corners for added strength. Slash up the centre line of the box and out to each corner. Turn the placket to the right side. See photo 4.
Step 5 At the top of the box bring the seam to the edge and press with the tip of the iron. On each side of the box press the seam allowances toward the placket. Take care not to remove the original creases on the placket. See photo 5.
Step 6 The underside of the placketPosition fold 5 to just cover the sewing of the stitching box. Edgestitch the placket and press in place. The finished underside of the placket must be the same width as or narrower than the width of the stitching box. See photo 6.
Fold the tower section so that the second fold covers the completed section of the placket, and the first fold is just covering the stitching box line.
WARNING: Fabric markingDo not use a water-soluble pen to mark fabric, as the placket must be pressed before the
markings can be removed and this will result in the markings
becoming permanent.
Diagram 1
Diagram 2
This article was originally published in Australian Stitches magazine Vol 17 No 6.Permission for inclusion on this website has been granted by Express Publications Pty Ltd.
32
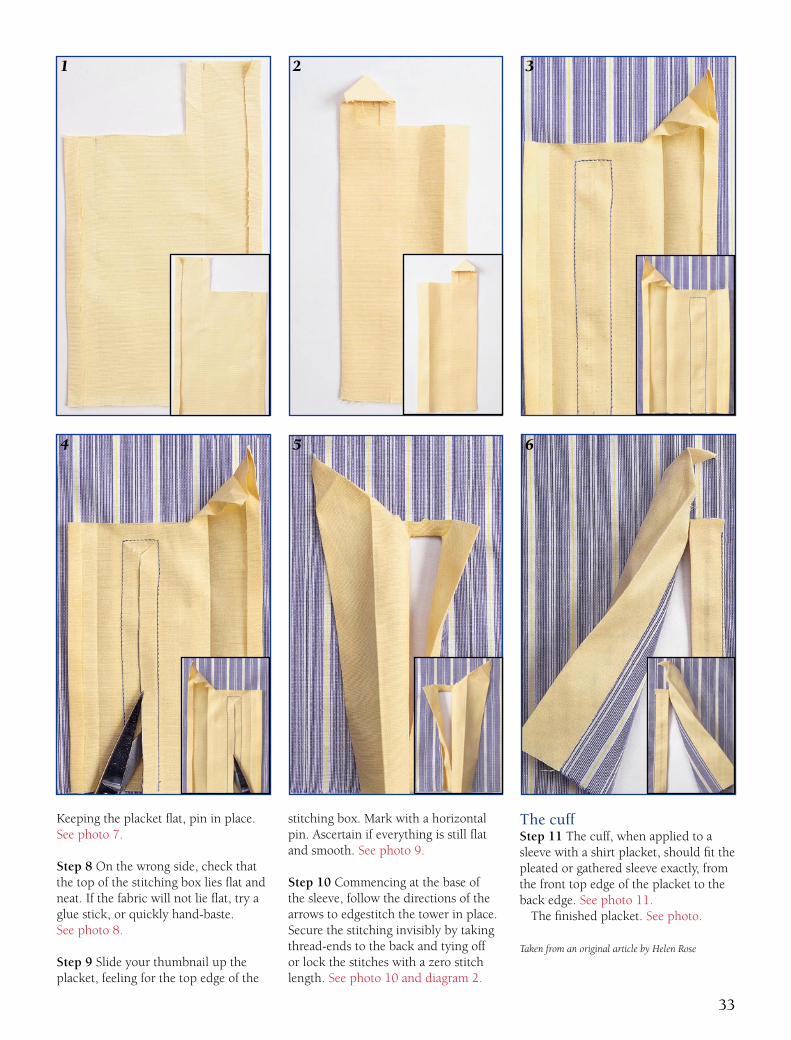
Keeping the placket flat, pin in place. See photo 7.
Step 8 On the wrong side, check that the top of the stitching box lies flat and neat. If the fabric will not lie flat, try a glue stick, or quickly hand-baste. See photo 8.
Step 9 Slide your thumbnail up the placket, feeling for the top edge of the
stitching box. Mark with a horizontal pin. Ascertain if everything is still flat and smooth. See photo 9.
Step 10 Commencing at the base of the sleeve, follow the directions of the arrows to edgestitch the tower in place. Secure the stitching invisibly by taking thread-ends to the back and tying off or lock the stitches with a zero stitch length. See photo 10 and diagram 2.
The cuff Step 11 The cuff, when applied to a sleeve with a shirt placket, should fit the pleated or gathered sleeve exactly, from the front top edge of the placket to the back edge. See photo 11.
The finished placket. See photo.
Taken from an original article by Helen Rose
1
654
32
33
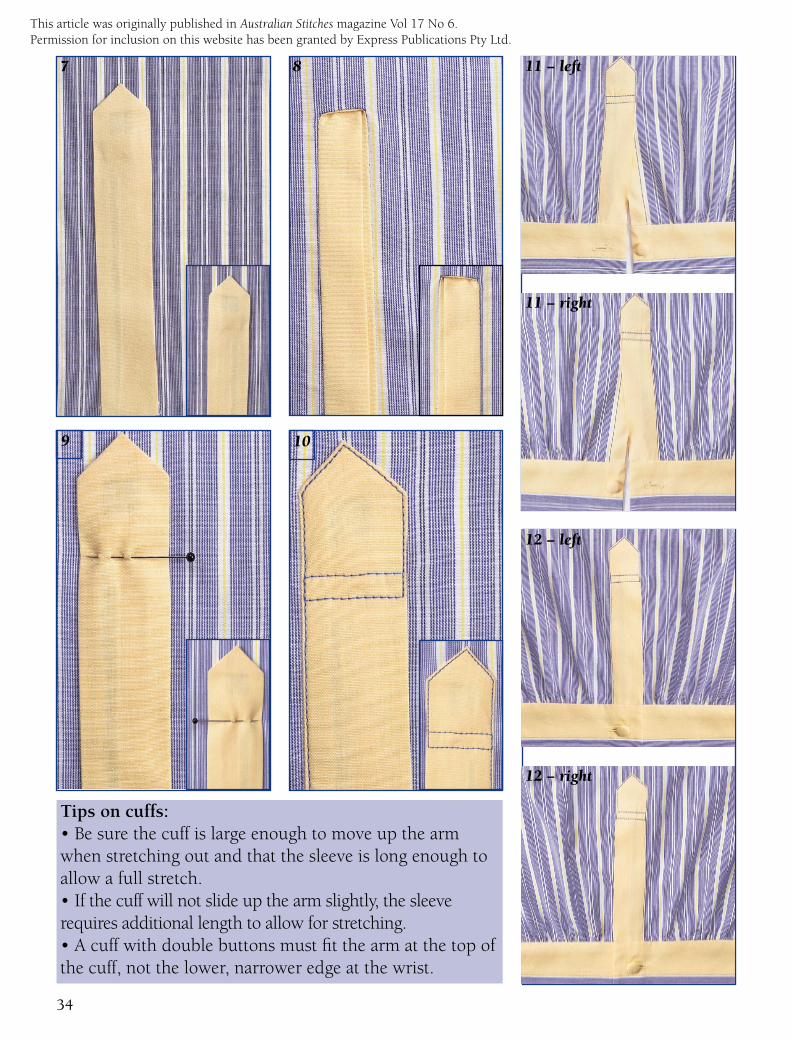
Tips on cuffs: • Be sure the cuff is large enough to move up the arm when stretching out and that the sleeve is long enough to allow a full stretch. • If the cuff will not slide up the arm slightly, the sleeve requires additional length to allow for stretching. • A cuff with double buttons must fit the arm at the top of the cuff, not the lower, narrower edge at the wrist.
12 − left
109
87
12 − right
11 − right
11 − left
34
This article was originally published in Australian Stitches magazine Vol 17 No 6.Permission for inclusion on this website has been granted by Express Publications Pty Ltd.