shopify spre ad s h e e t b u lk pro d u c t m an age r do c ... from woocommerce / wp-ecommerce /...
TRANSCRIPT

Shopify Spreadsheet Bulk Product Manager
Documentation
Table Of Contents
1. ABOUT 3
2. FEATURES 3
3. GUI / USER INTERFACE 4
RESIZING COLUMNS 4
MOVING COLUMNS 5
ALTERNATIVE METHOD OF MOVING/RESIZING COLUMNS 5
HIDDING COLUMNS 5
DRAG-SET 7
SHORTCUT KEYS 8
EXPAND/COLLAPSE VARIANTS 8
FILTERS 8
ACTIVE DATA/ SIMULTANEOUS USE 10
3. WORK SET SCOPE / LOAD SCOPE 11
4. ON-LINE EDITING 12
5. ADDING PRODUCTS 15
6. ADDING VARIANTS 15
7. DELETE PRODUCTS 15
8. DELETE VARIANTS 16
9. METAFIELDS 16
11. DISPLAYING METAFILEDS ON FRONT-END 18
USING APP FRONT-END META HELPER 18
MANUALLY 19
12. MASS UPDATE PRICE 21
13. EXPORTING PRODUCTS/VARIANTS 22
14. IMPORTING PRODUCTS 23
15. IMPORTING FROM WOOCOMMERCE / WP-ECOMMERCE / VIRTUEMART 25


1. ABOUT
Shopify Spreadsheet Bulk Product Manager is Shopify app that lets the user manage their product in a different
manner using Excel-like interface. This type of data entry is fast and gives clear data view to user.
All data altering means are concentrated on single screen.
All changes are submitted in background and are front-end effective after few seconds.
Product data is fully loaded on start. Searching, filtering and then ultra fast. You can locate any product/variant in
fraction of second.
Operations like adding product to collection or editing metafields are significantly easier using this type of data entry.
Shopify Spreadsheet Bulk Product Manager is Shopify APP that gives best interface for editing metafields. Metafields
are important for shops that sell products that have more than 3 properties like mobile phones. In this type of interface
you can edit multiple product properties fast having clear view of property data.
Shopify Spreadsheet Bulk Product Manager offers filtering by any product parameter. Filtered products can be mass
processed : prices updated by % or fixed value or deleted.
Import and export from.to CSV or XLSX (Excel) formats options are also available.
2. FEATURES ON-LINE EDITING
- Editing product properties, metafields and collections - Editing varinat properties, metafields - Adding products - Adding variants - Filtering - Search data - Creting column for any metafiled - Displaying metafields on frontend - Working with sets of data (load products scope by collection, create time, vendor ...) - Save and load view layout states - Active data / Simultaneous users (all changes like edit/delete made by other users working in same
time on other PC or Shopify becked will show actively in data-grid in max 15s without need of reloading page)
EXPORT
- Choose columns for export - Export all or only filtered data - Rename headers for output file - Replace export values - Choose CSV or XLSX output format - Choose vertical (app native) or horizontal (Shopify native) format

- Multiple ways of metafileds exporting - Multiple ways of images exporting - Multiple ways of option exproting - Save and load named export configurations
IMPORT
- Choose all or some columns from input file for import - Map input columns to product properties / metafileds / options / collections - Flexible smart import rutine can accept variety of data formats in input file - It can accept CSV or XLSX file formats of input file - Multiple ways of importing images - Multiple ways of importing metafields - Multiple ways of importing options - Import preview (you can be sure what will happen and that your input file is ok) - Save and load named import configurations
3. GUI / USER INTERFACE
Shopify Spreadsheet Bulk Product Manager spreadsheet interface offers:
- Column resizing
- Column reorder
- Column hiding
- Frozen columns
- Bulk actions
- Drag-set
- Shortcut keys
- Expand/collapse variants
- Choose only needed filters
- Active updates
RESIZING COLUMNS
You can resize any column by using mouse drag on right edge of column header cell.

MOVING COLUMNS
You can move any column by using mouse drag on left edge of column header cell.
ALTERNATIVE METHOD OF MOVING/RESIZING COLUMNS
If you prefer you can use build-in grid column setup for mobile devices to reorder or resize columns.
HIDDING COLUMNS

You can hide columns in Config -> Settings by specifying hidden columns.
Column order and widths are stored in your browser are will remain same as you left them next time you load app.
This stands if you are using same browser on same computer until you clear browser data.
Number of frozen columns you can specify in Config -> Settings. Frozen columns always come from left side. You can
place any columns you need there you moving them.
Number of frozen columns and hidden columns will remain same until you change settings.
Some columns have bulk actions options. You will see handle in right side of column header.

Set types like tags, collections … usualy have option to add/remove some value.
Text types lime metafileds have text replace option.
DRAG-SET
You can select one or few cells horizontally in a same row and drag from bottom-right selection handle up or down to
copy cell values to rows up or down.
If column contians uniqe values like id or handle drag set will skip them.
This can be useful when you want to repeat same values to all variants or what to set same value to some set of
filtered products. You can collapse variants to have only product rows in sequence.
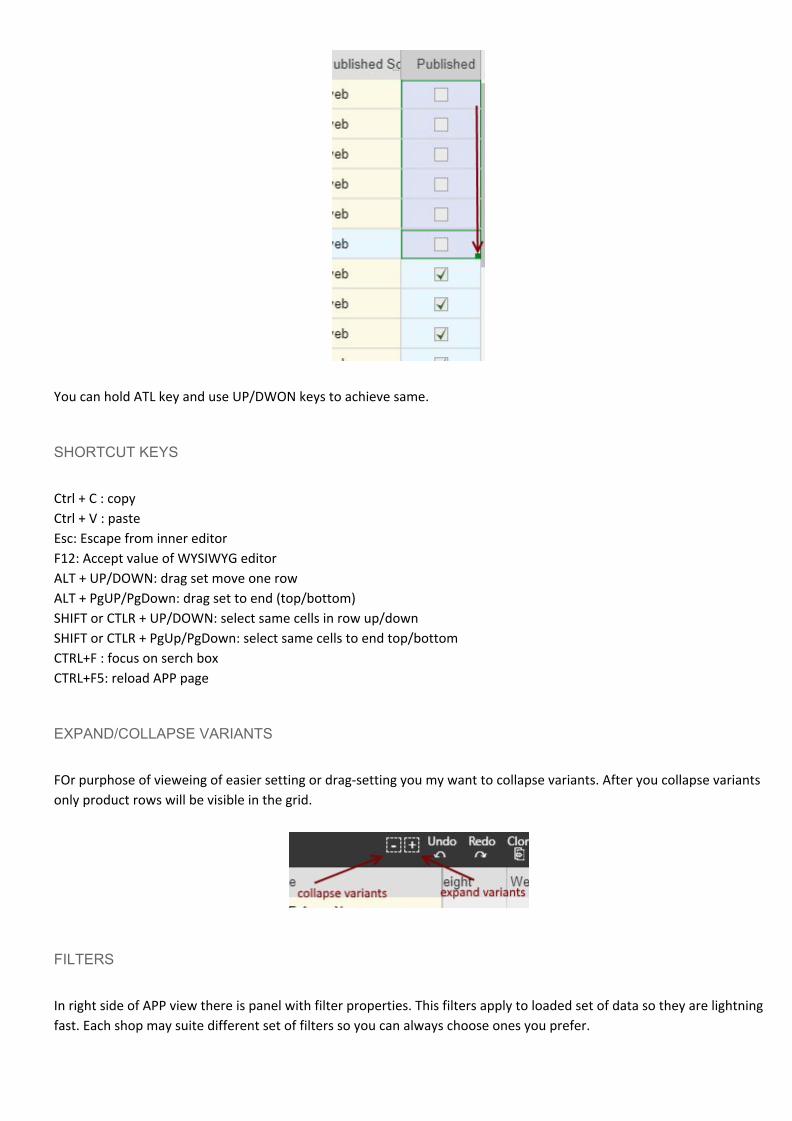
You can hold ATL key and use UP/DWON keys to achieve same.
SHORTCUT KEYS
Ctrl + C : copy
Ctrl + V : paste
Esc: Escape from inner editor
F12: Accept value of WYSIWYG editor
ALT + UP/DOWN: drag set move one row
ALT + PgUP/PgDown: drag set to end (top/bottom)
SHIFT or CTLR + UP/DOWN: select same cells in row up/down
SHIFT or CTLR + PgUp/PgDown: select same cells to end top/bottom
CTRL+F : focus on serch box
CTRL+F5: reload APP page
EXPAND/COLLAPSE VARIANTS
FOr purphose of vieweing of easier setting or drag-setting you my want to collapse variants. After you collapse variants
only product rows will be visible in the grid.
FILTERS
In right side of APP view there is panel with filter properties. This filters apply to loaded set of data so they are lightning
fast. Each shop may suite different set of filters so you can always choose ones you prefer.

To change fiters you use click on “Choose filters” in top-right part of filter panel.
If you have small screen and need space for view you can hide filter panel by clicking very left vertical bar of filter panel
(one with vertical caption “Filters”).

There are few types of filtering fields. Some are simple text, some are drop-downs and ones corresponding to a
numeric properties will have an option of using comparison operators.
For example you can type > 100 to display variants with price greater than 100 , or for id you can type > 8456512441 to
list you only newer products.
In id filter you can type >= 8456512441 || <= 9456512441 to filter products with id between 8456512441 and
9456512441.
In collection filter you can type Car||Bike to filter product belonging to collections that have “car” or “bike” char
sequences in their names.
Simple text filters use “LIKE” notation. For example if you type “iphone” for title product with tile IPhone 7 , IPhone 6,
iPhone 6S charger will be matched.
After you specify filter values you need to click on “Filter” button to apply filtering.
Some other options work in conjunction with filtering. There is option to delete all filtered products, there is option to
mass update process on all filtered products and mose important there is option to export filtered products.
To filter products with empty property you can use null keyword.
ACTIVE DATA/ SIMULTANEOUS USE
If multiple users work with app or default Shopify backend all changes will be automaily visible in APP view inmax 15
seconds after change occured.
So user A may change prices or delete products. This changes will automatically reflect to APP view of user B or vice
versa.
For example if order is made and stock status updated stok will automatically decrease in view without need o
reloading APP page.

3. WORK SET SCOPE / LOAD SCOPE If you have large number of product you may prefer to work with only one subset of them at the time. Besides fact that
it will load faster product set you want to change it may be more convenient to focus on certain group of products.
If you activate scope loading each time you enter app you will be asked to choose work set of product before any
loading starts.
You can specify collections, create time of product , part of title or vendor as criteria to use when loading .

This option will be automatically active of you have more than 2500 products (not considering variants count).
If you want to disable it or enable it you can do it form Config->Settings.
4. ON-LINE EDITING
After each change to spreadsheet changes automatically get auto-saved and will be effective on front-end.
To prevent user from making mistakes rows that are not logically editable are read only and you can not edit them.
There are several types of cell editors:
- simple text
for simple textual entry like SKU, barcode, price, stock, simple metafields...

- drop-down list with fixed options
for selecting value from set of strictly defined options. Like for Out of stock action there are two possibilities.
You can allow order or forbid
- drop-down list with option to add value to existing set of options
used in cases when there is some set of previously defined values that are applicable and also gives the option
to add new value. Like for Options. You will get list of previous values but you can type whatever you want. If
that option is not previously defined it will be offered to you to select it as new value (it will get green
background).
- check-box
used for yes/no values like “Taxable” which can be Yes or No
- image editor
used for editing of product/variation images. It has two modes of behavior depending on what you are editing
product or variation.
For products you use it to add all product images. You can re-order them by mouse dragging. To make image
main image, drag it so it would be first in list.

For variations you pick one of images from list to be associated to that variation. You can also add image if
needed while editing variation image. Images can be picked from your hard drive or picked from URL.
You can add images from your PC by using “Upload” option or you can add images from url using “Add from
url...” option. Both support adding multiple items at the same time.
- - wysiwyg editor
HTML product desctiption or metafields you set to use WYSIWYG editor use HTML editor. This is light
embedded summernote editor similar to one used in Shopify backend. When inserting Images they are
automatically uploaded to your shop assets catalog.

5. ADDING PRODUCTS
To add new product edit title cell of very last spreadsheet row. You will not that only this cell is editable (it has light
yellow color). So you can not make mistake. After you enter title other cells will then unlock and default variant will
show below.
6. ADDING VARIANTS
Each product has main row then rows for its variants after and at end last row for adding new variant To add new
variant for product edits its Option 1 property (and if needed to be unique Option 2 and Option 3).
If option combination is outstanding options cells will turn red until you set applicable values. Once you set that variant
will be created and other fields will get unlocked for editing.
7. DELETE PRODUCTS To delete product make sure select any cell in its product row and click “Delete” button in top bar. You don’t have to
select variants are it is logical to delete all variants along with product.
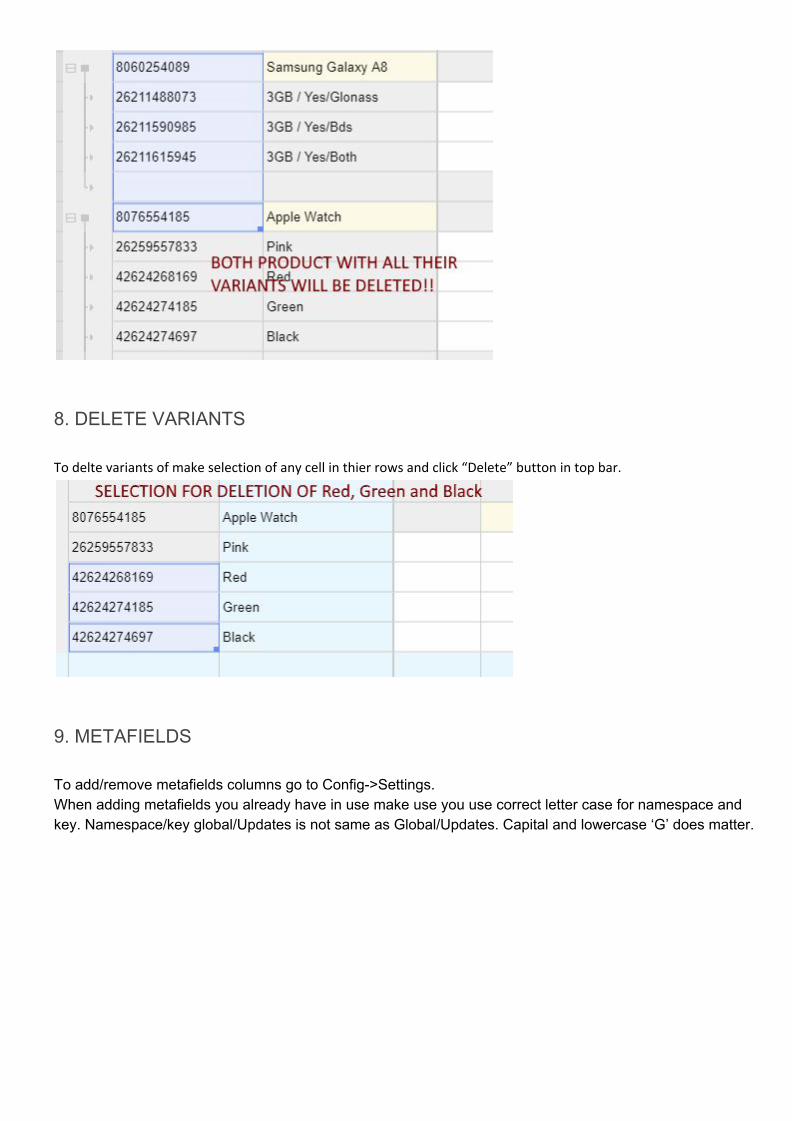
8. DELETE VARIANTS
To delte variants of make selection of any cell in thier rows and click “Delete” button in top bar.
9. METAFIELDS To add/remove metafields columns go to Config->Settings. When adding metafields you already have in use make use you use correct letter case for namespace and key. Namespace/key global/Updates is not same as Global/Updates. Capital and lowercase ‘G’ does matter.

In this cases we recommend you use “Hook to existing meta-field” option. This option searches loaded products to find all existing metafields namespace/key pars.
For each metafield you can choose cell type it will use. They can be simple or HTML. If you choose html you will have WYSIWYG editor when editing their values. Columns for metafields will appear in grid right after you save settings. You will also get option to add this metafields af filter panel. Setting value to empty or hittin DEL cause metafiled to be deleted. NOTE: metafields are properties of your prodcuts stored on Shopify servers. They do not depend on our APP. App is just a tool to edit them.

If you want to display metafields on front-end automatically you need to check checkbox in “Display on product page” column. For this to work you need to add script tag to your theme as instructed after you check this checkbox. After you add this script reference you can also mark elements to be filed with values instead of using auto-table app provides. Checkbox marks those you want to be put into table. You you will use mark by attribute none needs to be checked, it is just important to add script tag.
11. DISPLAYING METAFILEDS ON FRONT-END
USING APP FRONT-END META HELPER After you check “Display on product page” in settings page for any metafield you will get instructions as this:
If you want to use our meta helper plese proceed with applying instructions.

You can add script tag and uncheck all “Display on product page” checkboxes. In this case you can mark HTML element to be filed with values by adding attributes to them. Examples: <div productmf=”spec/Desc” >this div will be filled with value of product spec/Desc metafield</div> <div variantmf=”spec/Desc” >this div will be filled with value of selected variant spec/Desc metafield</div> <input type=”text” variantmf=”spec/Battery” value=”” name=”selected_battery” />
MANUALLY
1. From your shop admin dashboard go to: “Online Store”-> “Themes”
2. Click on “Customize theme” button
3. In top menu click on “Theme options”, then “Edit HTML/CSS”
4. In side file list locate product.liquid or desired liquid file and click on it
5. If you are absolute beggined with shopify find this line:
<form action="/cart/add" method="post" enctype="multipart/form-data" id="AddToCartForm">
Above it we will place our code. If you know what you do you can pick place you prefer more to place meta-field
output.
Code displaying metafileds of product would be like this:
<div>
<h4>Specifications</h4>
<table class="spec-table">
{% for field in product.metafields["Spec"] %}
<tr>
<td class="mkey">{{field | first}}</td>
<td class="mval">{{field | last}}</td>
</tr>
{% endfor %}
</table>
</div>

Code displaying metafileds of current variant would be like this:
<div>
<h4>Specifications</h4>
<table class="spec-table">
{% for field in variant.metafields["Spec"] %}
<tr>
<td class="mkey">{{field | first}}</td>
<td class="mval">{{field | last}}</td>
</tr>
{% endfor %}
</table>
</div>
Note: when user chooses different variant all actions regarding changes on almost all themes happen form javascript.
So unlike this simple examples you wil have to handel that properly. Our META HELPER can detect this changes and it
updates fields regularly. But if you prefer to use your code you need to handle this yourself.
One easy approach on product page would be to output them for all variants then show ones belonging to current one.
Example of showing all metafileds of namespace Spec for all product variants:
{% for variant in product.variants %}
<div id=”var_spec_{{ variant.id }}”>
<h4>Specifications for {{ variant.title }}</h4>
<table class="spec-table">
{% for field in variant.metafields["Spec"] %}
<tr>
<td class="mkey">{{field | first}}</td>
<td class="mval">{{field | last}}</td>
</tr>
{% endfor %}
</table>
<div>
{% endfor %}
This code will create table with two columns. For key name and value and will output all metafields you have set under
“Spec” namespace for product.
If you need to display exact key for product on some place for example Namespace: “Spec” , Key: “Camera” you would
use:
{{ product.metafields["namespace"]["key"] }}
in example:
{{ product.metafields["Spec"]["Camera"] }}
or if meatfiled if set on variant:
{{ variant.metafields["namespace"]["key"] }}

in example:
{{ variant.metafields["Spec"]["Camera"] }}
12. MASS UPDATE PRICE
You can filter some set of product or leave filters empty to view all and then apply mass price update to that set of
products. Go to Options -> Mass update. there you can specify Price and Compare at price updating value. Value can be
% or amount.
For % you can type expression as +10% or -10%.
For amount you just input number.
Mass update discount will combine settings of those two .

13. EXPORTING PRODUCTS/VARIANTS
Export function exports filtered products to CSV of XSLX format. Flow is like this:
- Filter desired set of products
- Open Options->Export
- Select vertical or horizontal format
- Check columns to be exported
- Rename headers if needed
- Set value replacments if you want
- Choose output format CSV or XSLX
- Click on “Export” button to download file
id and parent columns will always be present as they are not omit-able.
Images for products are exported as comma separated list or image URLs. Variant image is exported as its URL.
Collections are exported as comma separated list of collection titles.
Images are exported as comma separated url-s.
You can also check to export images in separate columns.
For horizontal format for metafields you can specify if value of product or variant should be taken (since this format
does not have separate row for product only).
Column headers are given default values by following app notation but you can change them all.
If you will use same export multiple times you can save configuration so you would not have to set it all up again:

14. IMPORTING PRODUCTS
Import procedure imports what it finds in input file. It is not required to have all products or variants in import file.
Import tries to match existing products by id, parent, handle, sku, barcode, options. You can have only sku or barcode
as identifier column. id is strongest identifier.
If not uniquely matched and there are multiple choices APP will ask you to map data to correct product. If nothing is
matched APP will consider that input records as to be used to add new products/variants.

Import option allows you to update existing products or add new from .CSV or .XLSX file. Import can detect various
types of ways you have that data in files but you have to confirm to few rules:
- You can freely re-map columns to properties. APP will try to offer best matching configuration but you can
change it completely.
- You can choose to to import some columns.
- Product variants should come exactly after product row
- When adding new product set id column empty
- When adding new variant set id column empty and in parent column type letter “v”
- Product images are list of comma separated image URLs
- Product images URLs must be accessible from web. If they are on your localhost or local network APP and
Shopify will not be able to get them.
- Variant image can be image URLs or it can be id of image or it can be index (zero based) in parent image list
- If id column is not present for product in import file during import existing product will be searched by title
- If id column is not present for variant in import file during import existing variant will be searched by sku
- If existing product/variant is found then data UPDATE is done otherwise product/variant is added
- Non existent collections will be created
- You need to have metafields defined in Option->Settings to be able to import them
- Column order is not important
Following format will be accepted:
Title,SKU,Price,Stock…

When nothing existing is matched product will one variant will be added. Found properties will be distributed between
product and variation accordingly.
Then existing product/variant is matched it corresponding properties will be updated.
Common need is to adopt prices and stock from business logic application of your company. In that case you can use:
SKU,Price,Stock...
15. IMPORTING FROM WOOCOMMERCE / WP-ECOMMERCE / VIRTUEMART
Holest Engineering has versions of this application for other e-commerce platforms. You can export data from other
platform using corresponding component version them import it to Shopify. You need to adopt data. Some common
things are:
- Pick columns that will be translated to 3 Shopify options. This will usually be attributes that were variated by
on that platforms.
- For rest of attributes you can use metafields
- For product row option value you set name of option
- For variant row option value you leave value.
- Categories will most likely be your collections although you can also use type. This depends on you theme.