short instruction for leica geo office tools (lgo-tools) · select additional tools on the...
TRANSCRIPT

- 1 -
Short Instruction for Leica Geo Office Tools
(LGO-Tools)
Author: Christian Schäfer Version 1.0 Date: 06.10.2004

- 2 -
Table of Contents Chapter Page Table of Contents 2 Installation & Start 3 General 3 Set Instrument Type 4 Codelists 5 Data Exchange Manager 6 Software Upload 6 Format Manager 6 Configuration Manager 7 Coordinate Editor 7

- 3 -
This instruction describes briefly the main tools funtions of Leica Geo Office Tools. To get more information about each issue, we recommend to read the Online Help. Installation & Start
1. Install LGO-Tools on your PC. à For this, please follow the instructions of the installation CD.
2. Start LGO Tools à Double-click on the desktop icon or from the menu.
General:
After starting the program, the following menus are available: Management
Projects à Enables you to manage Projects. à See Online Help
Codelists
à Enables you to create and manage codelists for uploading. Tools
Raw Data import à Enables you to import GSI-coordinates data into a project. à See Online Help
ASCII Data Import à Enables you to import ASCII-coordinates data into a project. à See Online Help ASCII Data Export
à Enables you to export coordinate data from a project. à See Online Help Data Exchange Manager
à Enables you to up- and download data. Software Upload
à Enables you to upload new firmware to the instrument
Format Manager à Enables you to create formats for data download from Instrument Additional Tools
Configuration Manager à Enables you to configure your instrument settings.
à For DNA à For TPS1000 à For TPS1100, TPS1000 à For TPS1100, TPS1000 Coordinate Editor: à Enables you to create coordinate lists for uploading.

- 4 -
Set Instrument Type 1. Select TOOLS on the left-sidebar 2. Press on the “Data Exchange Manager” icon
3. Move the mouse into the left window, and make a right mouse click 4. Click on the window SETTINGS 5. Select the instrument type and change parameters if required.

- 5 -
Codelists Note: The Codelist Management can manage several Codelists. 1. Select MANAGEMENT on the left-sidebar & click on the Codelist icon 1. Create a new Codelist, enter Codes and Attributes
1. Click the right mouse button, when you are on the Codelist symbol (shown below) 2. Select “New Codelist” by clicking on it. 3. Type in the requested Information, like Codelist Name (e.g. Buch), Instrument Class. In the field
LOCATION you can type in where the codelist should be stored. For frequent users we recommend to select the “Advanced” option under TYPE and proceed with OK
4. To enter a code, press the right mouse button when you are on the new codelist and select “New
Code” 5. Type in the Codename (e.g. Tree) and a Discription 6. To enter a attribute, press the right mouse button and select “New Attribute”. 7. Type in the attribute name and select the type and default value, if required. à To create more attributes repeat steps 6 & 7 or mark the attribute and make CTRL+C and CTRL+V and change the properties by right mouse click. 8. For uploading the codelist, please refer to the chapter “Up- & Download of Data”
2.Open a existing codelist, made in Leica Survey Office 1. Click the right mouse button, when you are on the Codelist symbol (shown above) 2. Select “Register” by clicking on it. 3. Use the browser to locate your “old” codelist. If the folder contains several codelists, select the code-
list by using the pull-down menu of the subject “Name”
- 6 -
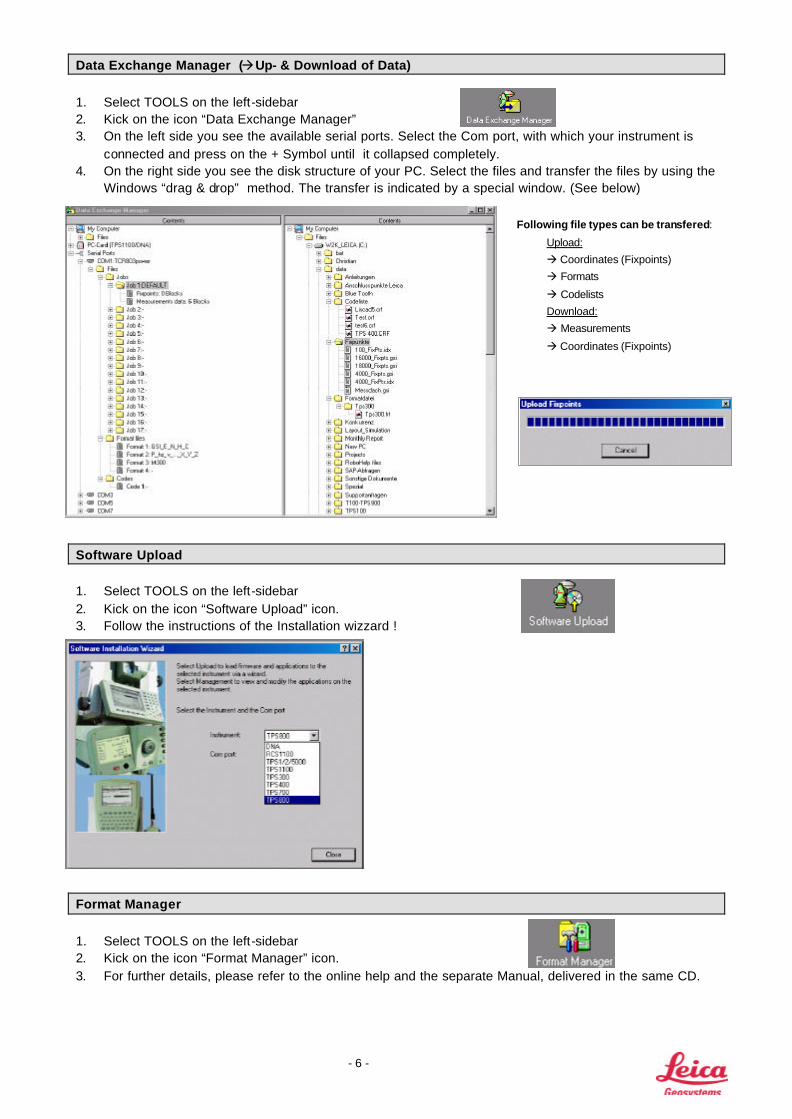
Data Exchange Manager (àUp- & Download of Data) 1. Select TOOLS on the left-sidebar 2. Kick on the icon “Data Exchange Manager” 3. On the left side you see the available serial ports. Select the Com port, with which your instrument is
connected and press on the + Symbol until it collapsed completely. 4. On the right side you see the disk structure of your PC. Select the files and transfer the files by using the
Windows “drag & drop” method. The transfer is indicated by a special window. (See below) Following file types can be transfered:
Upload:
à Coordinates (Fixpoints)
à Formats
à Codelists
Download:
à Measurements
à Coordinates (Fixpoints)
Software Upload 1. Select TOOLS on the left-sidebar 2. Kick on the icon “Software Upload” icon. 3. Follow the instructions of the Installation wizzard ! Format Manager
1. Select TOOLS on the left-sidebar 2. Kick on the icon “Format Manager” icon. 3. For further details, please refer to the online help and the separate Manual, delivered in the same CD.
- 7 -
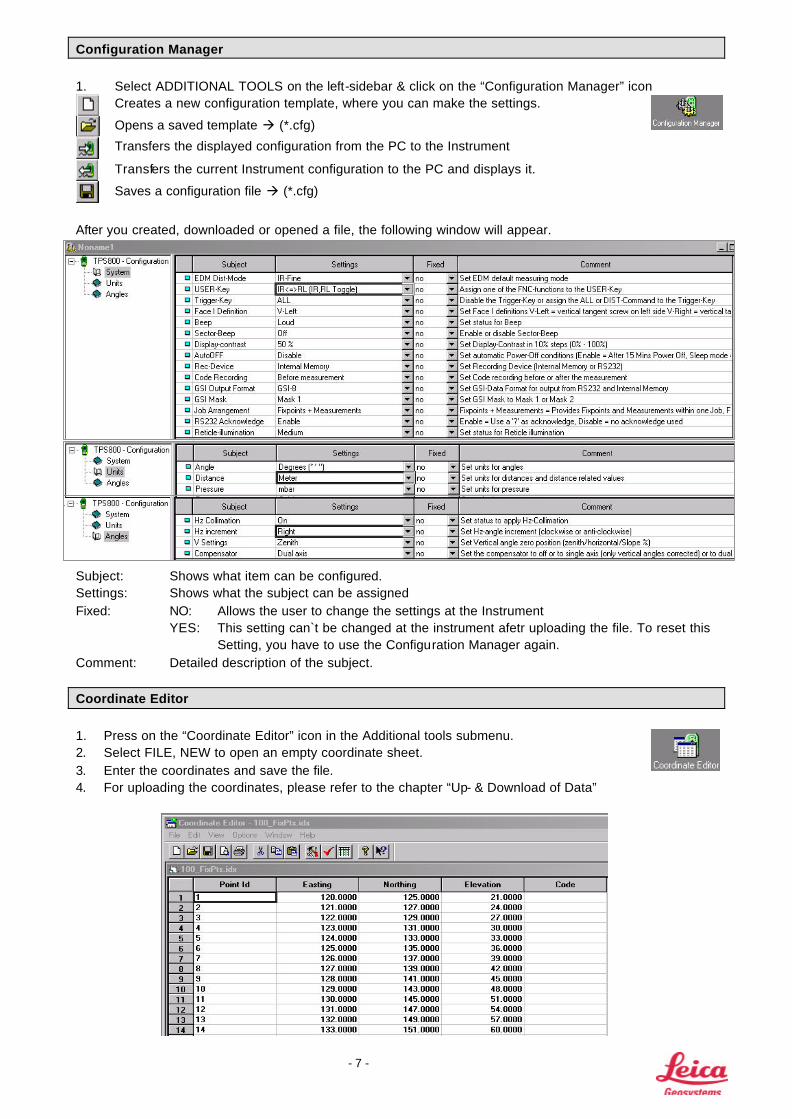
Configuration Manager 1. Select ADDITIONAL TOOLS on the left-sidebar & click on the “Configuration Manager” icon
Creates a new configuration template, where you can make the settings.
Opens a saved template à (*.cfg)
Transfers the displayed configuration from the PC to the Instrument
Transfers the current Instrument configuration to the PC and displays it.
Saves a configuration file à (*.cfg)
After you created, downloaded or opened a file, the following window will appear. Subject: Shows what item can be configured. Settings: Shows what the subject can be assigned Fixed: NO: Allows the user to change the settings at the Instrument YES: This setting can`t be changed at the instrument afetr uploading the file. To reset this Setting, you have to use the Configuration Manager again. Comment: Detailed description of the subject.
Coordinate Editor
1. Press on the “Coordinate Editor” icon in the Additional tools submenu. 2. Select FILE, NEW to open an empty coordinate sheet. 3. Enter the coordinates and save the file. 4. For uploading the coordinates, please refer to the chapter “Up- & Download of Data”